Tag Archives for " mold "

How to equip your college student with better air quality

How to equip your college student with better air quality

If you’re a parent with a son or daughter in college, of course you want to see them succeed!  It can get costly, though.  From helping with tuition, room and board and everything else, it seems like “clean, fresh air” should be a free part of the package. Unfortunately, that may not be the case.  Many colleges and universities are housed in old buildings that did not give thorough consideration to air quality when they were designed, built, or renovated.  In many cases, you are paying for the privilege of  studying there, with living as only an afterthought!  

The problem with poor air quality in the university setting is that it affects the very thing young adults go there to do: learn.  Contaminants in the air work against their body in the following ways.

High CO2 due to inadequate fresh-air ventilation decreases the ability of the brain to metabolize oxygen.  In other words, the brain becomes oxygen deprived!  This can affect learning in terrible ways.  In a Havard study in 2015, 24 participants spent 6 days in simulated offices to control for CO2 and VOCs.  Days were designated by the research team, but blinded to the participants and analysts, to be one “High CO2” day of 1400 ppm CO2, two “Conventional” days representing the average office building conditions of about 940 ppm CO2, one “Green” day representing better ventilation with conditions of approximately 740-750 ppm CO2, and two “Green +” days representing 100% outdoor ventilation (approximately 550 ppm CO2). Cognitive scores were 61% higher on the Green building day and 101% higher on the two Green+ building days than on the Conventional building day. On average, a 400-ppm increase in CO2 was associated with a 21% decrease in a typical participant’s cognitive scores across all domains after adjusting for participant (data not shown), and a 20-cfm increase in outdoor air per person was associated with an 18% increase in these scores.  This shows that for lack of fresh air in their dorm room or classroom, your student could be missing out on their chance to absorb all the material presented, with lower test scores as a result!  Here are some ways to “open the windows”, so to speak:

  • Add a Window Ventilation Filter to their dorm room.  It’s easy to install and remove, and filters out pollution, pollen and dust. 

  • For more info on how to measure CO2 in your dorm or classroom, check out our post.  If the classroom or lecture halls turn out to be high in CO2, advise students to check with their student advisor on advocating for more ventilation.  

VOCs: Most dorm rooms come equipped strictly with the basics -- a bed, desk, chair, light and garbage can, plus a small amount of storage space in the form of a dresser and/or closet. (howstuffworks.com) Therefore, moving into a new dorm room usually means getting new bedding and new accessories like rugs, wall hangings, and more storage like dressers or bookshelves.  When these things are purchased new, VOCs from off gassing can increase dramatically if the doors and windows are kept closed for most of the day.  In the study discussed previously,  a 500-μg/m3 increase in TVOCs was associated with a 13% decrease in the cognitive scores.  Once again, fresh air ventilation is really important to keep VOC levels in check. 

  • Use a portable VOC sensor to check for levels in the dorm room or wherever it’s suspected that VOCs may be high (like a newly renovated area).  

  • Install a  Window Ventilation Filter in the dorm room to get fresh air dilution. 

  • The Air Angel neutralizes VOCs with the catalytic molecules emitted by its AHPCO cell. Being portable and requiring very little maintenance, it can travel anywhere they go: on weekend sports events, home, and on vacation.

  • The Germ Defender/Mold Guard's optional carbon filter adsorbs VOCs emitted by newer items as they off-gas.

Indoor humidity plays a major role in our health: when it’s too low, disease transmissions are more likely, and when it’s too high, mold growth occurs and different mold-related conditions spike.  We can think of many reasons to keep humidity in the recommended range of 40-60% so that your loved one’s health is not at risk!  Sadly, sometimes it takes severe illness and even death to prompt renovation of problem buildings (see this article about the University of Maryland).  Here’s how to equip your student against high humidity and the risk of bacteria, viruses, and mold-related illness.

  • It’s super inexpensive to put a portable humidity sensor in their suitcase or next care package.  Ask them to message you with a photo of the sensor when you’re talking with them in the dorm room, or whenever else it seems to be high.  

  • If the humidity remains high, you can speak to the dorm manager, but also equip your student with a dehumidifier.  Amazon and big box stores can even deliver one from an online purchase.  Since the average dorm room is only about 228 square feet, and larger dehumidifiers come with complaints of extra noise and heat, you’ll want to keep it small.  This economical one by Eva-Dry only covers about 150 square feet (1200 cubic feet), but two of them plugged into different areas will help keep moisture under control.  Here is a review of other models that work great for dorm rooms. 

  • The Germ Defender/Mold Guard is perfect for small, humid spaces, and does triple-duty in a dorm room: 1) Even though the bathroom is typically always humid, mold doesn’t have to grow there… I can testify that one Mold Guard stopped mold growth when I couldn’t get a leaky shower valve repaired right away.  2) This unit also deactivates viruses and bacteria in the air and on surfaces across the room with polarized ions. 3)  Finally, it has an option for a carbon filter to adsorb stinky odors like running shoes and sweaty clothing!

  • Use an Air Angel to prevent transmission of germs and mold growth. This unit is portable and requires very little maintenance, in fact only a replacement AHPCO cell once a year.

Finally, if your college student has not adopted good cleaning habits by now, we can’t help you! (just kidding, but we can supply you with the right goods, read on!)  Statistics on bacteria in dorm rooms are pretty gross: the average women’s dorm rooms had over 1.5 million colony-forming units (CFU)/sq. in. of bacteria, while men’s dorm rooms had an average of over 6 million CFU/sq. in. (collegestats.org).  The same article breaks down the types of bacteria and where they are most concentrated, and while not all of them were bad, most of them were.  It’s time to clean up, because it’s hard to know which is worse: being sick in college or having a sick roommate who will soon infect you.  For those who do clean, equip them: 

  • Once again, Germ Defenders and Air Angels are passive sanitizers that help in activate germs between active cleaning.

  • A bottle of TotalClean goes a long way!  Since dorm rooms are small, heavy-scented chemical cleaners can be super-irritating and not always welcome to their roommates’ sense of smell.  TotalClean is unscented, non-toxic and very effective against dust, dirt, and germs on many different surfaces, even windows and mirrors. 

  • Small pump bottles of non-toxic hand sanitizer and sanitizing wipes stationed around the room and on desks help between hand-washings. 

Of course, similar to sending them off to grade school, you can’t be there 24/7 to help your college student make smart choices, but at least by this point you can give them tools to monitor and correct their own air quality for the healthiest and most productive school year.  Viva la college!

How to have clear sinuses

How to have clear sinuses

Going through yet another round of stuffy nose and headaches, I decided to research all the ways that I or my environment is sabotaging my sinuses.  

First of all, it could be sinusitis (also called rhinosinusitis): an inflammation of the paranasal sinuses, the cavities within the bones that surround the nose (Harvard Health).  Inflammation blocks the ostia, which are the narrow channels that drain into the nasal cavity, so that drainage becomes blocked.  Sinusitis can be caused by a cold, allergies, or a deformity such as deviated septum or nasal polyps.  Here are the different lengths of sinusitis (healthline.com)

  • Acute sinusitis can be caused by a cold, but then a secondary infection can happen once the sinuses get inflamed and blocked.  Technically acute sinusitis lasts less than 4 weeks.

  • Subacute sinusitis lasts from 4-12 weeks.

  • Recurrent acute sinusitis occurs when you have the same symptoms 4 or more times per year, but it lasts over 7 days each time.

  • Chronic sinusitis symptoms last over 12 weeks.

Well what is causing it?  

Normal sinuses are lined with a thin layer of mucus that traps dust, germs and other particles in the air. Tiny hair-like projections in the sinuses sweep the mucus (and whatever is trapped in it) towards openings that lead to the back of the throat. From there, it slides down to the stomach. This continual process is a normal body function.(American College of Allergy, Asthma, and Immunology) Here are some of the common irritants that can interrupt this process:

  • Dust:  A dose of good old dust, whether it’s from a woodshop, mowing the grass on a very dry day, or bringing out boxes from an attic, can overload the sinuses. The problem is that dust is a very complex mixture of irritants.  It can contain dustmites and their feces, chemicals, 

  • Pollen:  Plants have to reproduce, and sadly the weeds seem to be the worst offenders to our noses.  In addition, you’re not just imagining it: pollen really is becoming worse every year!  Check out our post on allergies here

  • Mold:  Mold is dangerous in that unlike other allergens, it can colonize and actually grow inside your sinuses, since they are warm, moist and dark.  Then, the rest of your body is susceptible to other colonizations as you breathe the mold spores and swallow them with mucous.   

  • VOCs:  VOCs can cause inflammation that leads to sinusitis.  A 2001 study showed that patients with chronic rhinosinusitis were exposed to higher levels of volatile organic compounds than healthy subjects.

We at HypoAir are not medical professionals, so we can’t recommend the techniques and drugs that doctors use for prevention and relief of sinusitis.  However, natural techniques are generally milder, and many of our clients are very sensitive to medications anyway, so we are glad to report that sinusitis can often be prevented or treated easily!  Here are some of the ways to do it:

  • I have to say that mask-wearing definitely cut down on my nasal issues when I was required/bothered to wear one.  Why?   Masks filter out many of the airborne contaminants listed above that can trigger sinusitis, as well as germs like bacteria and viruses.  Two+ years into the coronavirus pandemic, the stigma of wearing a mask is virtually nil, and there are a plethora of masks you can use to protect yourself against pollutants and germs alike (see our post on masks). 

  • Nasal irrigation is the number one defense against sinusitis according to Harvard Health (steps included in the article).  Whether you choose to use a bulb, small pitcher or neti pot, the homemade rinse works great to flush away the irritants that can block drainage and start a nasty infection.   It’s recommended to do this daily if you can!

  • Hydrate–your body as well as your nose!  Drink plenty of water during the day, and use a plain nasal saline spray several times a day if you are in a dry environment.  Adding a drop of food-grade tea tree oil or oregano oil (oregano oil is a bit harsher) to the saline spray adds a layer of antimicrobial protection to your spray. 

  • Avoid being unprotected in moldy and dusty places.  If you have to go down into a moldy basement or into a dusty attic, make sure to wear an N95 or respirator mask that seals well, and don’t take it off until you are safely in a clean place. 

  • Keep pollen, dust and pollution out while letting fresh air into your home, by installing some Window Ventilation Filters in your open windows.  They are easy to install and can be vacuumed a number of times before replacement.

  • Neutralize pollutants by adding a bipolar device by HypoAir to your home.  Positive and negative ions neutralize mold and germs by damaging their outer layers, and they cause small nanoparticles to stick together and drop out of the air in order to avoid breathing them in.

  • Be very vigilant about humidity levels in your home, so that mold does not gain a foothold.  You can monitor humidity easily using our inexpensive Humidity Sensors to maintain humidity between 40-60%.  If you see any water intrusion into your home, make sure to deal with it promptly to prevent mold growth! 

  • Use a MERV 13 filter (if possible) in your furnace/HVAC and change it regularly!

  • Use a standalone HEPA filter in areas where you spend a lot of time (living room, bedroom)

  • Clean as often as you can using a non-toxic, unscented cleaner: TotalClean fits the bill perfectly!  Safe to use around food, people and pets, TotalClean is the solution to replace all of the VOC-producing cleaners that can irritate and inflame sinus pathways. 

Think about the agony of sinusitis or a sinus infection and the time you lose while you battle it:  isn’t an ounce of prevention totally worth a pound of cure?  We think so!

How to increase indoor air quality in mobile and manufactured homes

How to increase indoor air quality in mobile and manufactured homes

No matter where you go in the US, there are mobile and manufactured homes.  The homes we’ll discuss here can fall into 2 categories: homes that were moved from a tractor trailer, placed on pilings and realistically will never move again, and then there are recreational vehicles (RVs) that can travel the country (but many sit at home or in storage for most of the year).  There’s also vastly different reasons to live in one or the other–from financial to lifestyle choices to temporary housing.  Whatever your reason to stay in a mobile or manufactured home, we want to help you make it a healthy place. 

Mobile homes with a pier foundation are actually supposed to be called “manufactured homes” according to the industry representative, The Manufactured Housing Institute.  Mobile homes and manufactured homes are two words for the same thing: a home built in a factory on a steel frame with wheels for transport to a homesite, where the wheels are removed after it is set on a foundation.  Manufacturers and HUD prefer that they be called manufactured homes, but most people still refer to them as mobile homes.  You can have single-wide, double-wide, triple and even quadruple-wide “mobile” homes, where the extra “boxes” can be configured side by side or even on top for a second story.  Mobile homes don’t have a great reputation for quality or lifespan, but that doesn’t mean they don’t start out that way or can’t be upgraded to make them better.  Let’s discuss the ways in which mobile homes can be improved for healthier indoor air quality.  The main objective is to keep water out, seal air leaks and provide good ventilation. (source: howtolookatahouse.com)

Starting from the top down…The roof: generally speaking, less-expensive manufactured homes have flatter roofs.  This is because the higher the “pitch” or angle of the roof, more material is necessary to frame and cover it.  The problem with low pitch roofs is that rain and debris spends more time on the roof–rain doesn’t run off as quickly and debris like tree branches and pine needles don’t roll off as easily.  Roofs in general need inspection and maintenance, and low-pitched roofs need regular inspection to keep water from getting backed up and leaking through.  Many owners decide to “double-roof” their homes and this can make a huge difference in indoor temperature and longevity of the home.  I’m not talking about 

Roof overhangs tend to be short in manufactured homes, so that water coming off the roof runs right down the wall.  This is a recipe for water intrusion and mold, not to mention undermining the footings of the piers.  If the home does not have gutters, you can install gutters and downspouts to channel the water away from walls, doors, windows, decks and the foundation.

Siding is the protection for walls against wind and rain, and siding can be metal (very old homes), fiberboard (80’s and 90’s homes) or vinyl, engineered wood or hardyboard (modern homes).  Fiberboard must be continually maintained, or water ingress will cause it to degrade quickly.  Vinyl, engineered wood and cement board sidings provide longer-lasting protection, but they also need to be inspected for damage or improper installation.  The weakest points in siding are the corners, window and door casings, because the irregular joints are typically spots for water ingress.  

For many years, windows in manufactured homes were single pane with an aluminum frame.    The transport of the home to its new foundation may cause the frame to warp or the casing around the window to become unsealed, exposing the sheathing underneath to water.  If you are able to, you can upgrade the windows to double-pane for more insulation against outside weather, and make sure the new windows are installed with good flashing, casing, and caulk techniques.  Likewise, if the front door is of a thinner, lightweight quality, an upgrade to a steel door is also an opportunity to make sure it is installed correctly with flashing, casing and caulk to minimize water ingress.

Foundation: On manufactured homes that have a “skirt” or foundation, a vapor barrier must be installed on the ground (2008 HUD law).  If the home is resting on a concrete pad, then the vapor barrier is not needed because the concrete will act as a vapor barrier.  Unfortunately, the “underbelly” of the home often falls into disrepair because no one wants to go under the house to inspect it!  Directly under the home, another vapor barrier of plastic or black “belly board” will protect the insulation and subfloor from moisture and pests, but this is often damaged and missing in older homes.  Manufactured homes on piers are really sitting over a “crawl space”, so it’s important to inspect the underside of the manufactured home to see how sealing up the ground vapor barrier, belly barrier and insulation can really make a difference in comfort and humidity!  Here’s an article that goes step by step through this repair. 

Inside: the manufactured home industry has certainly had a bad reputation for formaldehyde emissions inside homes.  Formaldehyde has never been banned from the manufacture of homes, but lower limits have been set on the use of components such as plywood and particleboard by HUD and the EPA.  The problem is that there are no HUD standards for the maximum allowable level of formaldehyde gas inside a home, meaning that all the new components like flooring, cabinets, walls, furniture and drapery can have low individual levels of emissions, but a high overall level.  For this reason, it’s best to avoid purchasing or staying in new manufactured homes,  If this is not an option, you can choose to furnish it with only solid wood furniture or composite wood furniture with sealed surfaces. If you have any newer composite wood furniture that is still emitting formaldehyde gas, remove it from your home. Because the formaldehyde off-gassing diminishes over time, storing the pieces outside of your living area for a while (under cover of course) may solve the problem. (howtolookatahouse.com)  You can also ventilate as much as possible (leaving windows open in mild climates, and using a fresh-air ventilation system in more extreme climates.  And of course, increase ventilation of your home while doing any interior painting or use low VOC paint.

Some of the most important mold protection also happens on the inside of the home, because leaking pipes, sinks, showers, toilets, washing machines, etc. all need immediate attention in order not to cause mold and damage that can be very costly to repair.  The abundance of fiberboard in manufactured homes will wick up water much more quickly than hardwood, and even ambient humidity is important to control.  

Recreational Vehicles (RV’s or campers) truly are supposed to be mobile, so that you can take your home with you, and enjoy new scenery wherever it’s parked!  Like manufactured homes, there are a variety of pricepoints and features in two classes, motorized and towable.  There are 3 types of motorized RV’s, ranging from the largest, luxury bus-type (Class A), the smallest conversion van (Class B) to the in-between (Class C).  Towable RVs can be as simple as a small “Pop-up” to large “travel-trailers” and “fifth wheels”.  “Tiny homes” can look like miniature versions of homes on wheels.  Here is a more in-depth look at the differences between these classes. 

RVs have similar challenges to manufactured homes when considering water intrusion from above and vapor from below.  It’s a sad truth that RVs are going to leak, but with a lot of inspection and maintenance, you can prevent this.  Most RV’s rely on sealant and caulking, and inspection and repairs should occur every 90 days (see this video for how to inspect it).  Again, let’s take a look from the top down:

Roofs: Most RV roofs are either rubberized (a thin membrane stretched over wooden frame) or fiberglass (molded).  Considering that these materials are more fragile than the asphalt shingles or metal roofs found on manufactured homes, they need a bit more care and upkeep!  Keeping them clean and conditioned helps so that leaves and branches slide right off instead of piling up, and aftermarket coatings can extend life against the sun’s UV damage.  RV roofs can last from 10-20 years or more, depending on the care and maintenance given them.  Here is an article detailing cleaning and repair tips for each type of roof.  Ideally, RVs should be parked under a permanent roof when they are not being used in order to minimize water and sun damage, and a minimal conditioning system (like a dehumidifier) should be left running to keep the air dry inside.

Since RVs are mobile, they are more prone to separation at the roof and wall joint, as well as openings like skylights, windows and doors.  One website says that driving an RV at highway speeds is “ the equivalent of driving your house through a hurricane during an earthquake.” (!)  Any separation needs to receive prompt attention by removing old sealant, cleaning the surface, and applying new sealant.  Here is a great article on how to achieve a professional look and long-lasting finish when resealing seams.   If your RV has a slide-out, special attention needs to be paid to protecting this area, and awnings are a great way to shelter the slide-out roof and joint area by keeping leaf and branch debris, animal droppings and nests off of it, as well as rain and snow. They’re not too hard to install (instructions here) and are a great investment for your RV. 

Each penetration in the side of the RV (like vents, ports for electricity and drainage, and storage compartments) needs attention, because sealants fail over time and with sun damage.  They should have a bead of sealant at least on the top and corners of the penetration to prevent water from coming in (the best would be all around the penetration).

The underbelly (underside) of the RV also needs regular inspection and repair.  Some RV’s have fiberglass, others have wood or metal sheets, and all are susceptible to road damage or more frequently, water damage from the inside like a leaking pipe.  Here is an article with photos on how to assess and repair underbelly damage.  You can even upgrade the type of underbelly protection fairly easily, but it may take more than one person to wrangle the material into place.

Inside the RV, again, motion from road travel is constantly working to pull apart connections and seams.  Keep an eye on all sources of water leaks such as pipes, sinks, showers, toilets, etc., so that water will not damage your home on wheels and initiate mold!  Also, since many RVs have propane powered appliances such as stoves, furnaces, water heaters, etc, a propane leak can be very dangerous to your health. You can use your nose (the old “rotten eggs” smell is a clue, or detectors such as a Gassaf propane leak detector, or a propane dial manometer (to detect pressure drops in the propane system).  (rvlife.com has a great video on how to inspect your propane system).  A pressure drop-down test is recommended once a year so that you can tell if your system is leaking at all.  If you do have a leak, you can use a simple spray bottle with water and liquid dish detergent, to check all joints for leaks (the soap will cause bubbles around the joint if it’s leaking).  

Like manufactured homes, RVs tend to have an abundance of particleboard, fabric and flooring that should have formaldehyde limits individually, but corporately may give off a lot of formaldehyde when they are new from the factory.  These levels go down dramatically as an RV ages, but RV age also increases chances of other problems, like water or structural damage.  In general, less-expensive units have more adhesive-based components (which generate formaldehyde off-gassing) and could create some irritation for more sensitive RV owners. (rvtravel.com).  When checking out RVs to purchase, you can even bring a portable sensor with you to measure the levels of VOCs and formaldehyde inside them (check out our article on sensors for recommendations).  Air purifiers with activated charcoal filters, like the Germ Defender with carbon filters, absorb VOCs and formaldehyde, and fans are helpful to keep air circulating.  1-2 Germ Defenders can cover the average RV (remember that they don’t cover spaces separated by closed doors) so that your RV can be comfortable even new off the factory floor. 

Manufactured and mobile homes can be as healthy as a permanent home inside with a lot of diligence and the decision to choose your neighbors wisely!   If you are in close proximity to smokers, barbeque grills, auto exhaust or other toxins, this can seep into your home.  If possible, try to live or camp on a large lot and use HEPA filters to capture particulates inside.  In a small or large home, it’s best put your health first and live in the best place you can afford.

Photo by Jon Hieb on Unsplash

Getting the Basement Dried Out

Getting the Basement Dried Out

In our post on how the basement affects our whole home’s air quality, we discussed how mold and mildew form and are sustained in the basement.  Active water leaks (flowing down the walls and pooled on the floor) are not required to make the basement a musty place.  Here are some sources of moisture coming into the basement:

  • Concrete is not a moisture barrier on its own!  Water will permeate concrete walls and floors and simply evaporate, increasing humidity.  
  • Open or broken windows allow moist air from the outside to come in and upon encountering cool walls and surfaces in the basement, condensation will form or just increase relative humidity in the air.  
  • Air leaks around windows, entry doors, unsealed wall penetrations and penetrations into the first floor above allow air to come in, in an uncontrolled way. 

Ideally the basement is inside your building envelope, whether you decide to finish it or not.  This is because it can be a suitable place for mechanical systems like HVAC air handlers and furnaces, hot water heaters, and also for storage.  To house these systems, however, the basement needs to be dry, with good air quality.  We argue that the basement air quality needs to be as good as any other floor in the home, because it will mingle with the atmosphere of the rest of your home!  There will be small leaks in the basement ceiling that make it permeable to the rest of your home.

The way to control humidity is to control:

  • Water flow into the space,
  • Airflow into the space, and
  • Air circulation within the space.

Let’s tackle each problem individually.

Water flow into the basement

Water flowing down walls in streams and puddling on the floor is a major problem– in this case, it is like living above a lake!  It will be difficult to “dehumidify” the air when open water is present, because the water will be continually vaporizing into the air as fast as a dehumidifier can take it out.  Although many basements exist like this, walls and storage of home goods in such environments can accumulate mildew rapidly.  Painting on a “waterproofing coating” will usually just act as a band-aid, because the pressure behind the wall, forcing it into your basement (called hydrostatic pressure) will eventually break through the paint and even degrade the foundation if it’s not drained away properly using interior and/or exterior drains. (basement waterproofing)  It’s best to contract several reputable basement remediation contractors in order to get their recommendations and quotes on stopping the inflow of water.  

If the water is only causing dampness on the walls but not visible condensation, then it’s possible to allow the walls to continually “dry” to the inside by doing the following:

  • Cracks and damage to the walls need to be repaired first.
  • Install rigid foam board with a “perm” rating of 1 or greater.  This allows the moisture to move through the foam and dry out, but still insulate the basement for greater thermal comfort and avoid condensation on the cold wall. Keep the foam insulation up about an inch from the floor to allow any condensation to drain.  If desired, the walls can be framed with treated wood to hang drywall inside.  An excellent cutaway diagram of the installation can be found here (page 24). Below is a picture of rigid foam board insulation from the same document (page 32).
  • An alternative to applying rigid foam board is to paint concrete walls with a waterproofer such as UGL’s Extreme Latex Masonry Waterproofer.  This product has a perm rating of less than 1 (according to this manufacturer’s video), so it is vapor semi-impermeable, but it does not have any insulating properties, like the foam board, so the walls will still be cold to the touch and allow condensation if the air inside is too warm and humid.  
  • Use dehumidification to dry things out.  
  • Decrease relative humidity by increasing the temperature slightly (the dehumidifier may raise the temperature a few degrees, but if not, you can add a small heater).
  • Increase circulation with fans so that air is evenly dehumidified.

Some notes on Vapor Permeability: A material’s permeability is measured in units called perms, which assess how much moisture can pass through a barrier in a 24-hour period according to standardized industry tests. Materials are separated into four general classes based on their permeance:

  • Vapor impermeable: 0.1 perms or less

  • Vapor semi-impermeable: 1.0 perms or less and greater than 0.1 perm

  • Vapor semi-permeable: 10 perms or less and greater than 1.0 perm

  • Vapor permeable: greater than 10 perms

Materials with lower perm ratings are better at stopping the movement of water vapor. If the perm rating is low enough, the material is a vapor retarder. If it’s really low, it is a vapor barrier. (Barricade Building Products)


Air flow into the basement

Sometimes it’s difficult to know what to do: open the windows or not?  Many reputable websites advocate “airing out the basement” (such as thisoldhouse.com), and we at HypoAir always advocate for ventilation to dilute stale air, but here’s the problem: when you don’t know the dewpoint of the air coming in or leaking in, it can cause major mold problems in the basement!  Dewpoint is the controlling factor of whether fresh-air ventilation alone can prevent mold.  As we wrote in another post

The best way to explain this (per this great article) is to find out the dewpoints of the indoor and outdoor conditions.  If the outdoor dewpoint is lower, you can ventilate with fresh air and still dry out your house!  For example on July 26, 2002, here are the conditions inside and outside my house (a relatively “dry” hot day outside!):

Inside: 76 deg F, 67% humidity = 63 deg F dewpoint (check out this easy calculator on dpcalc.org)

Outside: 91 deg F, 54% humidity = 72 deg F dewpoint (dpcalc.org)

See, in this case even though the relative humidity outdoors is lower, if I open my windows, that hot air coming inside would be cooled and relative humidity would increase, working against my humidity goals.

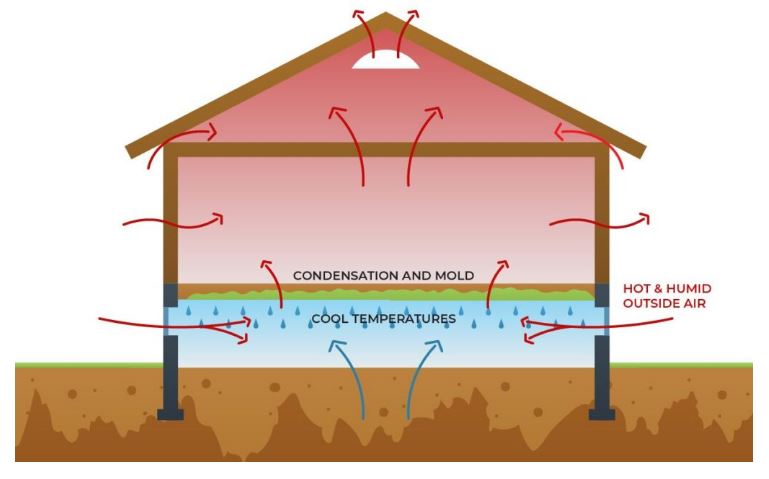
In the case of the basement, the air temperature could easily be lower, like 68 deg F.  If you cool 91 deg air with 54% relative humidity down to 68 degrees, water vapor in the air is going to condense, making your humidity problem worse!   Therefore we want to control all sources of air inflow and only let in drier air for ventilation.  Here is a diagram showing the problem of leaving windows open, and how to solve it:

source: bayareaunderpinning.com

  1. Close windows, block off vents, and seal the window frames with caulk, spray foam or adhesive tape made for the purpose.  Make sure exterior doors have weatherstripping. 

  2. Check for unsealed penetrations in the walls.  If you have to use a flashlight and look behind appliances such as water heaters or furnaces, be prepared with gloves and pest spray to get it done!  The best sealant for wall penetrations in the basement would be sprayfoam, because it conforms to the shape of the hole.  You may want to shove in a wad of steel wool first, because it deters animals from chewing through the foam and re-opening the hole.

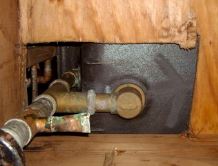
  3. Look up–check the ceiling.  If there is a false ceiling in the basement, you may need to remove ceiling tiles and/or insulation in order to see the underside of the subfloor, but this is where big problems can hide!  The photo below shows the underside of a tub.  Plumbers often cut BIG holes to make their jobs easier, but this can really hurt air quality when these holes let lots of moldy air up (if there’s a negative pressure generated in the space above, this is easily done with a bathroom vent fan), or warm air down (if you are using any type of air extractor in the basement).  It’s best to seal big holes like this one by framing in a box to the surrounding joists, and using spray foam to seal the resulting cracks and holes.  It’s not recommended to insulate the ceiling of the basement (see this definitive guide, page 25) to try to separate it from the rest of the building, as this will only cause more mold problems in the basement.

Source: energyvanguard.com

Where does fresh-air ventilation come from if you’ve sealed outside access off?  According to energyvanguard.com, there are 6 ways to supply fresh air to your home in a humid climate, and for the purpose of a basement that is outside the building envelope, only one makes sense since you’re probably already using a dehumidifier: a fresh air fan that purposely pulls in outside air.  Here are some options to make it happen: 

  • Air King’s QUFresh, 120 cfm, $413 at ecomfort.com
  • Broan’s FreshIn, 180 cfm, $239 at sylvane.com
  • ACInfinity’s AIRTITAN T3 6-In Ventilation Fan, 120 cfm, $69.99, sylvane.com

The AirTitan is a good option where windows are available, because it can be retrofitted to fit in an open window more easily than the other ducted models.  Each of these models have temperature and humidity settings you can adjust so that the fan will only operate when it meets those specifications.  These may need to be set higher in hot and humid climates, but the dehumidifier should be able to handle moderate inflows of fresh air.  When you control the airflow into the basement, you can control the humidity.

And finally, Air Circulation Within the Space

Your basement may be one wide-open area, or several rooms separated by walls and doors, but in each case, good air quality requires that air is moving constantly.  Here are some tips to get the best circulation:

  • Leave doors within the basement open as much as possible
  • Leave dedicated fans running all the time.  Floor fans work great for this purpose, as you can move them around/adjust direction and speeds until you find the optimum circulation.
  • Move boxes and furnishings away from walls and up from floors so that air will circulate to dry them.  Don’t stack boxes to the ceiling.  Separate boxes by several inches to get air moving between them. 
  • Remember, the less absorbent material stored in a non-conditioned space, the better (less cardboard, less fabric, and less wood).

I hope these suggestions help you to dry out your basement so that your whole-house air quality improves, from the ground up!

If you are skeptical about the effects of mold in homes, please stop and read this.

If you are skeptical about the effects of mold in homes, please stop and read this.

Mold is a fungus that has thousands of species and grows outdoors and indoors, year-round; every building has some level of mold in it. (Molds in the Environment, Johns Hopkins Medicine)  It spreads by microscopic spores which are carried in the air, on clothing, shoes and pets to lodge and potentially multiply indoors. (Basic Facts about Mold and Dampness, CDC) Since the spores are too small to see, many people doubt that mold in the home or workplace can actually cause illness.  Is all mold really bad, or are only some molds bad?  Why do some people become ill while staying a short time in a space while others seem to be unaffected?  What levels of mold should cause concern and what tests are best?   These are very common questions and we would like to highlight some scientific research about mold to understand the answers to these questions.  

Because edible mushrooms and molds growing on basement walls are all classified as fungus, with more adverse reactions arising from handling some than others, there are obviously harmless and harmful species in the family.  It’s overgrowth of the harmful types that can lead to problems in buildings. In the right environment they quickly grow from microscopic spores to visible mycelium (colonies), to sending out more spores into the air and starting other colonies.. 

In general, molds need the following to grow (What You Need to Know About Mold):

  • Moisture: even moisture from the air, when it is above 80% humidity, can be enough to sustain mold.
  • Warmer temperatures: most molds cannot grow below 40 deg F, which is why refrigerators are kept at 39 deg F and below. 40 -100 deg F sustains mold.
  • Organic (carbon-based) materials to digest.  Mold can even grow on glass, metal and other inhospitable environments, if it has dirt or synthetic material to feed on.
  • Protection (shade) from UV rays: ultraviolet light kills most mold, so you won’t see it growing in direct sunlight!
  • Oxygen: mold needs very little oxygen to survive, so it’s difficult to control mold by depriving it of oxygen.

Therefore, warm, moist areas with natural materials like wood, paper or fabric are great at growing mold, and mold can take root in these areas in as little as 48 hours.  Eliminating the most important material (water) quickly will stop mold in its tracks and not allow it to proliferate.

Molds can emit several types of toxins: mycotoxins and microbial volatile organic compounds (mVOCs). Mycotoxins are solid or liquid.  Of the several hundred mycotoxins identified so far, about a dozen have gained the most attention due to their severe effects on human health and their occurrences in food. (Mycotoxins, WHO). Mycotoxins have also been frequently detected in house-dust over the past decades, and they can be carried through the air on dust, spores or other fragments of mold.  (Detection of Mycotoxins in Highly Matrix-Loaded House-Dust Samples)  By contrast, MVOCs are gaseous, so they are already airborne.  Both mycotoxins and mVOCs can be emitted when the mold colony is disturbed or threatened, by humans, animals or by other microbes.

Ancient plagues and epidemics among animals and humans were likely the result of mycotoxins in foods. Here are some examples: 

  • In 1960, about 100,000 young turkeys died in the UK, and scientists discovered that aflatoxins produced by the common molds Aspergillus flavus and A. parasiticus in their feed led to the deaths.  (Mycotoxin: Its Impact on Gut Health and Microbiota)  
  • Aflatoxin can also cause liver cancer in humans.  
  • Ingestion of ergot, which is a fungal disease of rye and other grains in which black elongated fruiting bodies grow in the ears of the head of grain, can result in ergotism, a painful and often deadly disease.  Ergotism has even been implicated in premeditated poisonings and witch trials, due to its psychoactive effects and disturbances. (Ergot: from witchcraft to biotechnology)
  • Sadly, since the isolation of T-2 mycotoxin (a member of the trichothecene mycotoxins, which is emitted from several types of mold including Stachybotrys chartarum), T-2 mycotoxin has been allegedly used as a bioweapon during the military conflicts in Laos (1975-81), Kampuchea (1979-81), and Afghanistan (1979-81) to produce lethal and nonlethal casualties. (CBRNE - T-2 Mycotoxins)  

Illness by ingestion of mycotoxins from a food source occurs more frequently than by inhalation of mycotoxins (for example in dust from mold growing on or behind walls); so with the exception of bioweapons, inhalation of mycotoxins is of a lower concentration so that respiratory irritation is the usual effect.  

MVOCs, being gaseous, are highly inhalable, and their effects can range from annoyance (of the musty smell) to coughing, wheezing, fatigue, headaches, dyspnea, allergies, eczema, as well as serious respiratory issues (Sick Building Syndrome, Mølhave, L. "Encyclopedia of Environmental Health." 663-669.)

So why does mold affect some individuals more than others?  For a long time, individuals who became ill upon entering or spending time in a building were deemed to have more psychological issues than actual physical issues, because testing of the building often revealed no measurable toxins.  There are several reasons for this: 

  • First, methods of testing for toxins were not sensitive or specific enough to find the cause.  Dr. Ritchie Shoemaker, a well-known researcher and doctor in the area of mold, Chronic Inflammatory Response Syndrome (CIRS) and Water-Damaged Buildings (WDB), addressed this problem when discussing testing methods in his 2021 paper.  Air sampling methods are not adequate to pick up smaller spores, they may also miss spores outside the air flow boundary and duration of the test, and some spores (like Stachybotrys, commonly called Black Mold even though many other molds are black in appearance) are heavy and don’t become airborne in large numbers, especially if the mold colony is hidden inside a wall. 
  • Some bacteria and molds in WDB produce mVOCs, which are toxins not detected by spore air tests.  Only tests that capture mVOCs would be able to detect these. 
  • Some people are more sensitive to mold spores, mycotoxins, mVOCs and endotoxins than the general population.  They may be missing genes that allow their bodies to process the toxins, or their immune system may have been chronically overstimulated in a previous chemical or toxin exposure.  These predispositions make them much more sensitive to low levels of toxins from mold and bacteria.

Therefore, mold toxins are sometimes difficult to detect, and they don’t produce similar responses per concentration in everyone due to individual sensitivities. This phenomenon is addressed in a guidance paper to clinicians (doctors and other health practitioners) by the University of Connecticut Health Center.  The paper discusses 5 case studies of patients who were observed to have sick building syndrome due to mold issues in WDB. 

There are several reactions to exposure to mold discussed in the paper:

  1. Fungal infections: Infection usually requires direct contact with fungus, and only immuno- compromised or highly sensitive people are at-risk for fungal infections.
  2. Allergic and Hypersensitivity reactions: It is well established that fungi can cause allergic reactions in humans, and molds are typically included in the skin test panels used clinically by immunologists to screen for environmental triggers in atopic patients (those who are predisposed to immune responses). Many atopic patients experience allergic symptoms related to molds commonly encountered outdoors. The presence of mold spores in the indoor environment is not in itself a problem when the source is the normal interchange of outside air and the amount and types of spores inside are the same or less than outside. However, mold actively growing on an indoor substrate may affect the quality of the environment by degrading the surrounding materials (weakening the structure) and, more important, by potentially adding unhealthy chemicals and bioaerosols to the indoor air. Higher levels of mold spores inside than outside or the presence of different species inside than outside reflect this “amplification” of mold.  Antigens are toxins that produce antibodies, and in the case of mold, antigens could be spores or spore fragments, mycotoxins, or mVOCs.  “Individuals’ immune responses to these antigenic molecules are determined by their genetic makeup and environmental factors. Important among these factors are the frequency of exposure to the antigens and the intensity of the exposures…Development of sensitization to antigens generally requires repeat exposures, often to high ambient concentrations of the sensitizing material. Once sensitization to an antigen has developed, it requires a much lower concentration upon re-exposure to elicit the reactive phase that we recognize as the clinical manifestation of disease.  In general, the higher the exposure and the degree to which one has been sensitized, the more severe the allergic or immune-mediated response.”  

This is the pathway by which mold “allergies” progress to severe illness, and even death. All five of the cases discussed in the aforementioned paper necessitated the patients to be removed from the buildings (school, office, and home) to recover from their symptoms.  Unfortunately the death of a two-year-old boy in the UK in 2020 was the result of a severe respiratory condition due to prolonged exposure to mold (the family had reported mold in the apartment repeatedly up to three years prior, however, the housing authority did nothing to repair or mitigate it).  This highlights the need for parents to be knowledgeable about the effects of mold as advocates for their children. 

When should a house be tested for mold? We concur with this experienced mold inspector’s methodology:

  1. If you have no visible mold but high humidity, it’s probable that mold is starting to grow in the area.  Humidity is easy to feel even without sensors but to be sure, you can get 2 humidity sensors here for only $10.
  2. If you find visible mold growth, but don’t know the extent of the damage
  3. If you or someone in your family suffers from health symptoms related to mold exposure, then testing of the home would be appropriate.
  4. If you smell a musty odor, this is an indication that you have actively growing mold.  These odors are mVOCs.
  5. If you’ve already had remediation and need proof that it was performed effectively in order to move back in safely, hopefully a “before” or baseline test was performed for comparison.

What kind of tests are appropriate? 

DIY mold tests are abundant, however, in most cases you get what you pay for.  Petri dishes, while economical, do not provide the quantitative information (how much mold is in the air) and except in the case of sending the dishes in for lab analysis, do not give qualitative information about the types of species. 

If you have only a moderate budget and don’t know where the mold may be coming from, we believe non-viable air sampling can give a lot of information about the spaces in your home.  GotMold? Is an easy way to take these samples in different rooms and get them analyzed by an accredited laboratory. They include an outside sample cassette so that your inside rooms can be referenced against it.  The lowest level of indoor spores should be comparable to an outdoor sample, because mold is in the air everywhere.

If you do have an idea of where the mold is originating, adding a tape-lift, swab or bulk (air filter) sample to your tests can help confirm if a moldy-looking area is indeed mold.  

If, however, an area of your home recently flooded, or you’re experiencing new or worsening health problems, we would recommend requesting a visit from a professional, experienced mold inspector who will not only take samples: they should first of all look at the moisture problems in the home which could generate the mold.  They will also be able to distinguish which type of test is appropriate, and if mold is discovered, whether it’s active mold growth that could be causing illness or inactive mold that’s been dried out and contained behind walls for years.   There is a big difference in renovation scope and cost for active mold and inactive mold!   We understand the health impacts of critically-contaminated spaces on one end of the spectrum, but since many leaks and humidity problems can be corrected in a local, economical way, it’s often not necessary to “gut” a home to remediate it well.  

Beware if the inspector only wants to do ERMI testing.  ERMI stands for Environmental Relative Moldiness Index and was developed by the EPA for research purposes only.  Despite its popularity among many mold inspectors and a number of mail-order labs such as EnviroBiomics and Mycometrics, ERMI has a number of drawbacks that can cause it to miss major mold problems, or overstate minor ones.  

In the end, just as a leak in your outdoor shed can make a stinky, decaying mess, mold can do the same indoors–and it may or may not affect your family’s health, depending on their genetic makeup and previous experiences with mold, chemicals and toxins.   However, we do hope that you will take any water intrusion or humidity problem seriously, because it has the potential to do serious harm.  

Photo by Pawel Czerwinski on Unsplash

Is there mold hiding in your clothes?

Is there mold hiding in your clothes?

It has been one heck of a summer in the US!  More heat = more sweat, more sweat = more stinky wet clothes in the laundry hamper, and more wet clothes in the laundry hamper = more mold!   This is especially a problem with workout clothing or “outdoor work” clothing that get positively soaked with sweat.  My previous schedule of washing one time per week is not cutting it, because now I’m noticing that even after washing, my clothes are not smelling clean (I don’t use perfumed detergent).  Why can’t I get the mold out with just washing?

Mold is persistent.  Because we’ve been trained to save energy and that modern detergents and washing machines work well with cold water, I’ve basically gone to using cold water for all of my washing.  Cold water and detergent typically don’t remove mold, so after several cycles of letting them sit in my hamper, washing with cold water and drying, the smell intensified.  Something had to change!  This excellent article gives many non-toxic ways of getting rid of mold from clothing:

  1. First of all, the habit of leaving wet clothes in the hamper is not good.  If I can’t wash them right away, I need to hang them up to let the moisture dry out.
  2. If I can’t wash them right away, pretreating with a tea tree oil spray not only helps them smell better, but also kills the mold because tea tree oil is a fungicide!  Oregano Oil or Clove Oil will also work, depending on your fragrance preference.  Be sure to purchase pure oil without additives.  Here is how to make it: 
    1. Add one teaspoon of teatree oil to one cup of hot water; pour it into a spray bottle.  Shake the mixture.
    2. Spray the garment thoroughly, inside and out. 
    3. Let the mixture soak in for 10 minutes before washing.
    4. Pour the rest of the mixture into the washing machine or handwash basin.
  3. If you don’t like the smell of the essential oils (the smell does dissipate within a few hours), you can use hydrogen peroxide in a spray bottle (3% dilution works well) in the same way as the essential oils. 
  4. Borax has been around a long time for good reason– it is a good disinfectant and low toxicity (just don’t ingest it, inhale the dust or get it into your eyes). (ThoughtCo.com)  When mixed with hot water, it turns water into hydrogen peroxide. 
    1. Mix ½ cup of Borax with hot water in a large basin, stirring slowly until its fully dissolved.
    2. Soak the clothes in the mixture for at least 20 minutes.
    3. Pour the clothes into the washing machine with the mixture and wash for 2 cycles. 
  5. Vinegar and baking soda:  You’ve probably used this powerful combination before and know that it makes a foamy cleaning agent, except this time use it in separate wash cycles.
    1. 1st cycle: add 1 cup white vinegar to the detergent dispenser, with no other detergent.
    2. 2nd cycle: add ½ cup baking soda to the detergent dispenser and finish washing.
    3. Don’t ever combine vinegar and bleach!  This combination generates toxic fumes.
  6. Closets can be perfect for growing mold, because lack of air circulation can allow moisture to accumulate in the clothes, making them the perfect food source!  We posted an article “Can I avoid mold with JUST ventilation?” and the answer turned out to be oftentimes, you can.  Here are some ways to prevent mold from taking root in the nice clean clothes in your closet:
    1. Leave the closet door open.  If you are keeping your home below 60% humidity, usually this step alone can keep the closet from smelling musty–that first telltale sign of mold.
    2. Try not to pack clothing or boxes tightly together, again because air circulation around items is necessary to keep the humidity down in the clothes. 
    3. If you cannot keep the door open, try adding small dehumidifiers:
      1. DampRid is a brand name that makes a number of desiccant products that you can hang or set on a shelf or on the floor, but there are many comparable products.  Remember that water will need to be poured off, and the chemical absorbing the water will replaced, every so often.  This chemical is usually calcium chloride, which comes prepackaged in the replaceable refills.  Alternatively, you can make your own desiccant dehumidifier by purchasing silica gel or calcium chloride at the hardware store and placing it in small plastic bowls with the tops pierced (just don’t knock them over or the liquid may spill on the floor!)
      2. Small dehumidifiers can make a big difference in closets.  You can get a model to hang on a wall, or place on a shelf (just make sure there is sufficient space above and around it for air circulation).  The condensate container in these will also need to be emptied periodically (although the unit should shut off when full) so put a little reminder on your calendar to do that.  Here are some models that won’t break the bank:
        1. Eva-Dry ($22) makes several “wireless” models, which use silica gel desiccant which must be replaced every 20-30 days. This is a good option for smaller closets (up to 333 cubic feet) without a power outlet, and larger versions are available too.
        2. Eva-Dry also makes electric dehumidifiers; this model ($27) will need to be emptied every 3-4 days but it’s ultra quiet. 
      3. Many customers know that even higher humidity areas like bathrooms and closets can be kept mold free with the Mold Guard/Germ Defender.  It’s a powerful unit that emits a dense blanket of ions that can break apart/deactivate mold spores at the cellular level.  Perfect for spaces of 100 ft2 or under, this unit requires very little maintenance and can be purchased with optional charcoal filters.

The next time you put on clothing from the clean laundry and it doesn’t smell so fresh, it’s probably not you (or your deodorant), it may be mold.  Arm yourself with some natural anti-fungals like vinegar, baking soda, teatree oil, hydrogen peroxide or borax, and banish the mold from your wardrobe!

How to keep MILDEW out of your CLOSET

How to keep MILDEW out of your CLOSET

Closet doors are meant to keep closed, right?  Unless you are Martha Stewart, it’s likely your closet doors don’t stay open very long–if they close to begin with!  The problem comes when humidity and closed doors combine for a stinky problem: mildew and mold.

We sometimes think that mildew is a less toxic form of mold, but it is still mold nonetheless.  Mildew is a subclass of mold that exhibits a white or gray, flat, powdery growth, while the rest of the molds can get more fuzzy and colorful.  Both release spores, but unlike other molds, mildew doesn’t penetrate surfaces and grow into the materials it lands on (though it can still cause cosmetic damage). Instead, it grows on top of flat surfaces and often collects in places like cardboard boxes or your vintage leather jacket in the closet.  Not good!  (What is Mildew, Really? The Difference Between Mold and Mildew)

Since we know that mildew is a form of mold, we know that it needs several things to grow: a food source (ie. leather, clothing, and dust in general), moisture (even excess humidity) and air (although stagnant air is best because lack of circulation keeps humidity at surfaces high).  So, the best ways to keep mildew at bay in closets is to:

  • Clean out the dust and seal off any sources of dust

  • Keep the humidity down and ventilate

  • Store items for longevity and air circulation 

How the heck does dust get in the closet when the door’s closed?

Incredibly, some closets are like dust magnets.  If your closet is part of a tiled or vinyl floor area, dust bunnies can usually slide right under the door due to the slick surface.  If you have any penetrations in the ceiling (like a light bulb), then your closet may be part of a hidden circulation system where the framing in your walls conducts air currents throughout your home.  For example, closets near bathrooms may unknowingly supply air to the bathroom exhaust fan, if the fan’s ductwork is not sealed well in the attic or the lightbulb box is not sealed to the ceiling.  Then there are the closets that double as storage areas and HVAC equipment rooms.  If the HVAC unit is not sealed well, it just pulls air from the surrounding home into your closet.

  1. Seal

The way to keep out the dust is to seal these small air passages: at the ceiling, remove the light fixture and either use a caulk gun (less messy) or a spray foam can with a straw (very messy, be sure to cover everything!)  to seal the electrical box to the drywall.  If the closet is an upper story, you may be able to do it from above in the attic with less mess, and sealing all the ceiling penetrations may help with dust house-wide.  If you notice a lot of dust forming on the floor, it may be worth caulking the baseboards to the floor (if it’s tile or solid-surface) to seal that up as well.

  1. Clean 

Next, removing the dust should be part of a larger goal to store items properly so that cleaning will be easier and mildew will be less likely to form.  You’ll need a HEPA vacuum with brush attachments, and various storage containers.  If possible, empty the closet.  This will allow you to see all the walls and floor to see if there are any water leaks coming in that could be causing the mildew.  If not, use the vacuum to clean ALL the surfaces so you can get a fresh clean start!

It’s a great time to wash clothing and purge any items that you don’t use anymore by donating them.  Clean clothing is less likely to smell and deteriorate from body sweat and dust mites as well.

Stop right there!  If you had mildew in your closet before, you need to make ventilation changes to stop it from recurring.

  1. Ventilate/dehumidify

Mildew sometimes forms in closets because of lack of ventilation.  The great thing about moving air is that it lowers the moisture content of surfaces that come in contact with it.  If the air is not moving, the moisture content of surfaces tends to equalize with the stagnant air, and over time, mold is able to grow.  Also, if your closet is located on the corner or north side of a building, the insulation in the wall may not be sufficient to prevent warm house air from causing condensation on the cold wall.   Here are some tips:

  1. Refill the closet

Ok, you can start restocking the closet but remember this important point: maintain space between items so that air can freely circulate!  Don’t overstuff or compact items against the wall, either.  Wire shelving is great for maintaining circulation from top to bottom, too.

Storage containers matter, too–if possible, don’t use cardboard boxes because cardboard holds moisture, and it’s a favorite food for all kinds of pests: mold, roaches and silverfish like to eat it, and mice like to use it for bedding!  If you’ve cleaned and dried your clothing and excess bedding, packing them in clear storage bins is ideal so that you can easily see what’s in each.  For wool and moth-prone items, you can add cedar blocks to the bin to keep pests out.  These garment bags are great to keep dust off hanging clothes.

After mildew remediation, it’s important to check on your closet at least every few weeks until you’re sure that the changes are producing their intended effect: the ability to close the closet door without mildew taking root!

Photo by Annie Spratt on Unsplash

What’s the difference between EMMA and ERMI?

What’s the difference between EMMA and ERMI?

Maybe EMMA and ERMI sound like children’s story characters, but no, we’re talking about mold testing!   RealTime Laboratories was founded in Texas in 2005 by two doctors who had been researching and collaborating since their meeting in medical school.  Dr. Bolton is a board-certified anesthesiologist and was a doctor with the U.S. Navy for 12 years, as well as practicing privately and with the U.S. Department of Veterans’ Affairs.  He investigated the circumstances of his friend’s mother’s sudden death, whose heart stopped although she was in relatively good health.  The woman’s house was full of mold.  Dr. Bolton’s wife also suffered from sinus and ear problems, most likely from the gym where she worked out (nadallas.com) At RealTime Laboratories, Dr. Bolton and Dr. Hooper developed proprietary testing for the 16 most common, dangerous mycotoxins in patients’ bodies, homes and pets, so that they could recover their homes and lives from these poisons.  EMMA (Environmental Mold and Mycotoxin Assessment) is one of these tests, and it tests for 10 of the most toxigenic molds (including “Black Mold” or Stachybotrys) as well as the presence of 16 of the most dangerous mycotoxins produced by those 10 molds, using provided swab and gauze or a sample of your HVAC filter. (realtimelab.com)

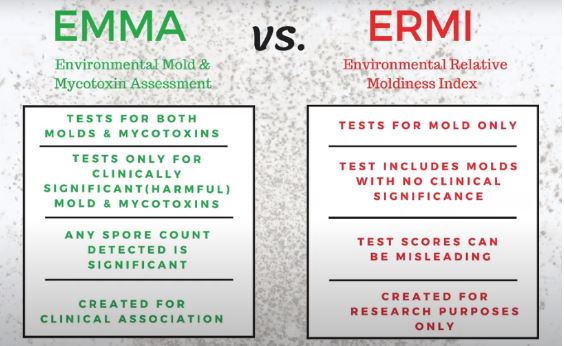
In contrast, ERMI (Environmental Readiness Moldiness Test) was developed by the EPA as a research tool, to investigate the relative moldiness of a home.  ERMI uses the analysis of settled dust in homes and buildings to determine the concentrations of the DNA of the different species of molds.  (survivingmold.com)  In other words, ERMI gives a sense of the concentration of various molds, but does not test for the poisonous mycotoxins they emit. ERMI was developed as a research tool only, and although ERMI testing is widely available by independent labs, it has not been validated for routine public use in homes, schools or other buildings.  It was criticized by the EPA’s own Office of Inpector General in a report titled, “Public May Be Making Indoor Mold Cleanup Decisions Based on EPA Tool Developed Only for Research Applications.”  Some of the shortfalls of ERMI collection practices and analysis are listed in this report

Here is a summary of the differences between EMMA and ERMI (source: presentation by Dr. Matt Pratt-Hyatt):

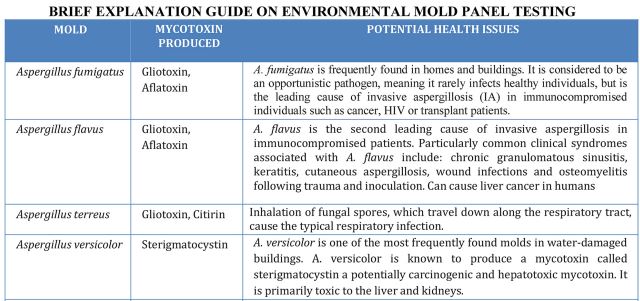
Realtime Laboratories is certified under Clinical Laboratory Improvement Amendments of 1988 (CLIA) and College of American Pathologists (CAP) to perform EMMA testing, which most importantly focuses on the molds AND the mycotoxins they produce.  The company has produced a table of which mycotoxins are associated with which mold, and the symptoms and illnesses caused by them.  Here is a portion of the table:

Mycotoxin testing in the body is what may be foremost to patients.  This lab offers urine sample testing of those same 16 mycotoxins using ELISA-based testing, which stands for enzyme-linked immunoassay. It is a commonly used laboratory test to detect antibodies in the blood. (medlineplus.gov).  (Inclusive in the mycotoxin test, RealTime Labs was granted a patent for its macrocyclic trichothecene test (tricothecenes can be produced by the molds Fusarium, Stachybotrys, Tricothecium and Myrothecium)).  Also, RealTime Labs offers a MycoDART-PCR test of the blood (must be ordered by a doctor) to determine if the patient has been colonized by mold.  According to Dr. Matt Pratt-Hyatt, 1 in 3 mold illness patients is colonized with mold.   If detectable levels of mycotoxins are found:

  • In the body: the patient can choose to start treatment with a doctor in their area (list on the website).  Treatment and monitoring continues until mycotoxins are below detectable limits in the tests.  

  • In the home: the patient can contact environmental remediation services to pinpoint the source (the test does not pinpoint the source) and remove mold from their home.  

Recovery from mold exposure and mold illness really needs to have this dual approach, because if the patient is treated without remediation of the home, then continued exposure will not allow recovery!  Remediation of the home is great, but it could take much longer for the patient to recover if their natural defenses, like glutathione, remain depleted.  Want to know whether you or your home have been “sickened” by mold?  Get tested! 

Photo by Sandy Millar on Unsplash

Actinobacteria: Another danger lurking in Water Damaged Buildings

Actinobacteria: Another danger lurking in Water Damaged Buildings

Avoiding mold and mycotoxins has taken a major share of the spotlight in healthy home discussions, and for good reason, because they can elicit major allergic responses in many people and disabling immune responses in very sensitive people.  However, there is another organism that grows right along with mold in moist environments, and it’s often overlooked even though it can produce the same types of reactions.  Some types of bacteria are unique enough to be in a class of their own, called actinobacteria.  

Here’s a short refresher from an article about bacteria, endotoxins and exotoxins:  bacteria can be classed into two different groups: “Gram-negative” or “Gram-positive”.  These classes are based on a test developed by scientist Christian Gram in 1884, which differentiates the bacteria using a purple stain.   According to webmd.com, bacteria either have a hard, outer shell, or a thick, mesh-like membrane called peptidoglycan.  The hard outer shell will resist the purple stain, and show up as a red color.  These are called “gram negative” because the purple stain did not show.  Bacteria with the peptidoglycan absorb the purple stain much more easily and are called “gram positive”.  The stain also tells many more characteristics about the bacteria and the way it interacts with treatment. 

Going back to actinobacteria (also called actinomycetes), they are a diverse group of gram-positive bacteria, meaning they have that mesh-like membrane called peptidoglycan. However, they resemble molds (fungi) because they are adapted to life on solid surfaces and they can produce mycelium (branching structures) and dry spores like most fungi. Actinomycete spores are known to be important air contaminants in occupational environments, such as agriculture and waste composting facilities, and have recently gained special attention as indicators of mold problems in buildings. They do not belong to the normal microbial flora in indoor air but have been found in buildings suffering from moisture and mold problems. (Characteristics of Airborne Actinomycete Spores)  One class of actinobacteria, called mycobacteria, include the types of bacteria responsible for tuberculosis and leprosy.   These actinobacteria require iron for growth, and in the human body, will destroy red blood cells in order to acquire the iron it needs.

Actinobacteria, which occur in both terrestrial and aquatic habitats, are among the most common groups of gram-positive microorganisms in nature.  Living in soil, actinobacteria decompose organic matter and display antagonism against other bacteria and fungi, with which they compete for nutrients. Actinobacteria have incredible abilities to survive under extreme conditions in their natural environment and have been found in strongly saline soils, soils with a high content of exchangeable sodium and/or magnesium ions, and heavy clay soil which is submerged by water.  (Discovery of Actinomycetes from Extreme Environments with Potential to Produce Novel Antibiotics).  If they can live in these extreme environments, it’s not too much of a stretch to find them indoors in water-damaged buildings (WDB) and indeed, they thrive there too.  In a 2017 study of an office building in the northeast US which had a history of water incursions via roofs, walls, and pipes, actinobacteria were detected in 74% of dust samples, and thermophilic actinomycetes (unique high-temperature aerobic bacteria) were most predominant (81%) among the three types.   In analysis of building occupants who participated (105 participants out of 136 occupants), the increasing thermophilic actinomycetes levels in floor dust were significantly associated with decreased pulmonary function and increased odds of having symptoms reflecting possible granulomatous disease, particularly shortness of breath on exertion, flu-like achiness, and fever and chills.  Prevalences of the three granulomatous disease-like symptoms among the occupants were similar to those reported in another study of a large office building with eight hypersensitivity pneumonitis and six sarcoidosis cases, a long history of moisture incursions, and high fungal and bacterial contamination.   

Dr. Ritchie Shoemaker, an expert on mold illness and CIRS, published the paper Exposure to Actinobacteria resident in water-damaged buildings and resultant immune injury in Chronic Inflammatory Response Syndrome in 2021.  In it, he details some of the interesting facts about actinobacteria that many people do not know:

  • Geosmin is a VOC that accounts for the characteristic musty smell found in many WDB, and many actinobacteria also produce this VOC, creating the logical fallacy that the smell found in WDB buildings is only due to mold growth.  
  • Certain species of actinobacteria live on humans: on our skin and in mucous membranes and genitourinary tracts.  He denoted these HH actinobacteria (for human habitat), as opposed to SH actinobacteria (for soil habitat).   The interior of WDB are usually colonized by HH actinobacteria much more than SH actinobacteria; this is not the same for fungi, because WDB are easily colonized by outdoor (SH) fungi.  (Airborne Bacterial Communities in Residences: Similarities and Differences with Fungi)  
  • Dr. Shoemaker developed indices for exposure to actinobacteria showing differences in subsequent immunoreactivity in Chronic Immune Response Syndrome (CIRS) patients for actinobacteria from human skin carriage, HH, as opposed to SH actinobacteria.  
  • He theorized that the “toxin” that causes the immunoreactivity is not exotoxins, like normal gram-positive bacteria, but extracellular vesicles of 20-150 nanometer size that carry potentially inflammatory molecular signaling compounds from inside the cell wall to the outside. Vesicles are known to contain a variety of charges including nucleic acids, lipoproteins, enzymes, and toxins.  

“Better Health Guy” Scott Forsgren, Functional Diagnostic Nutrition Practitioner interviewed Dr. Larry Schwartz, an indoor air expert with a specialty area is assessing, testing, and creating solutions to make homes and workplaces environmentally safe for patients with inflammatory illnesses, about actinobacteria.  According to Dr. Schwartz, one can get treated for symptoms of CIRS (of which there are 37), but not necessarily get to the root cause.  However, if their blood is tested by GENIE (Genomic expression: Inflammation Explained), root causes for CIRS can be discovered.  “We found over 2,000 patients that have taken the GENIE test. About 42% of them are being triggered by Actinomycetes. The next largest percentage was endotoxins. The least percentage was the mycotoxin.”   (podcast: Episode #171: Actinomycetes with Larry Schwartz, BSME, MBA, CIEC)  Some background on GENIE:  this test was developed by Dr. Shoemaker and Dr. James Ryan, a molecular biologist, who have collaborated on genetic testing since 2011. GENIE is a gene expression assay composed of 188 genes that is performed on a single blood specimen. It reveals gene expression abnormalities found most often in patients facing CIRS illnesses. Typically it's done repeatedly, once before treatment for CIRS, after the first eleven steps of the treatment protocol, during or after VIP treatment. (vasoactive intestinal polypeptide). VIP is a naturally occurring human neuropeptide which affects multiple pathways in the brain and throughout the body, and it’s given as a low-dose nasal spray to benefit patients with severe CIRS.  GENIE results will show if the patient's metabolism is improving as their treatment progresses.

Dr. Schwartz’ research exposed that the major “factory” of actinobacteria (he calls them “actinos” for short) is the bedroom, because of the time we spend under covers (warm temperature) and the amount of skin cells that are deposited in the bed.  He also characterizes showers, crawlspaces and basements and drains as places where actinobacteria tend to multiply because of constant moisture.  He has a bedding protocol for cleaning bedsheets, and drain “protocol” on how to clean drains on a regular basis so that actinobacteria will not continue to proliferate in them.  (check out minute 59:17 of the podcast for these protocols).  Dr. Schwartz also advocates for use of HEPA filters, PCO devices (like the Air Angel Mobile) and bipolar devices (like the Mold Guard).  We would also add that the use of bathroom exhaust fans and humidity control are paramount for lowering relative humidity.  

Dr. Schwartz acknowledged that similar to the way pathogenic mold makes mycotoxins,  many pathogenic species of actinos often create a chemical called mycolic acid, which may be the allergy trigger for CIRS patients.  Dr. Ritchie Shoemaker also found that mycolic acids played a role in inducing T-cell responses (Exposure to Actinobacteria resident in water-damaged buildings and resultant immune injury in Chronic Inflammatory Response Syndrome)  According to the physicians with which Dr. Schwartz consults, although actinos can trigger inflammation and CIRS, they are not necessarily triggering histamines, and mast cell activation, because mast cell activation is primarily a histamine-driven effect. 

As for testing, EnviroBiomics is the only lab known by Dr. Schwartz that does next generation sequencing (NGS) to determine levels of actinos in home samples. Using special lab equipment called NGS processors, they give the in-depth degree of data on the speciation of actinos and their concentrations.  Dr. Schwartz can analyze the results of these test reports, in conjunction with at-home or virtual visits, to determine what may be exacerbating CIRS symptoms.  In one case, a client who lived in a farmhouse on 3 acres had CIRS, but the cause was not in his home.  It turned out that a neighboring property had a dilapidated barn with rotting hay in it (“farmer’s lung” disease comes from the actinobacteria in rotting hay), and correction of the ventilation in his home significantly improved his symptoms.  

Now for the good: despite its ability to cause illness, scientists and researchers have discovered how to harness actinomycetes for healing purposes.  Antibiotics are a class of molecules used for the treatment and prevention of bacterial infections.  These bioactive compounds are produced naturally from different species of fungi and bacteria, but the most attractive class of microorganisms that are able to produce these secondary metabolites are actinobacteria, in particular, actinomycetes. The importance of this order is due to their abilities to produce different classes of antibiotics in terms of chemical structure and mechanisms of action. Moreover, different genera and species of actinomycetes are able to produce the same class of antibiotics and, in few cases, the same chemical compound.  Thanks to antibiotics and the research developed in this field, many infections are now treatable, and life-quality/life expectancy are better than in the past.  (Actinomycetes: A Never-Ending Source of Bioactive Compounds—An Overview on Antibiotics Production)  

In short, actinobacteria can be confused with mold because of many similarities: how they grow, the environmental conditions they prefer, what they smell like, and what symptoms they cause in humans.  The good thing is that regular cleaning of areas like the bedroom, bathroom and drains to remove dust and allergens also removes food for actinobacteria.  In addition, a whole-home approach also examines the ways that toxins from actinobacteria inside walls and even outside can enter the home via leaks and negative air pressure.  When cleaning protocols are introduced and these air pathways are addressed, actinobacteria numbers start to dwindle and the homeowner’s health increases.  Sometimes it takes a trained eye to discover where they are flourishing, but by knowing their preferred habitat and via testing, they are not completely “in the dark” anymore! 

Photo by Ozgu Ozden on Unsplash

Why, when and how do I clean my mini-split unit?

Why, when and how do I clean my mini-split unit?

Mini-splits are the elegant cousins of window AC units (even though some window AC units are pretty darn good-looking nowadays with lower profiles that don’t block your view).   Mini-splits and window AC units have some of the same internal parts, so even though mini-splits are usually less visible tucked up high on walls, they need the same attention as window AC units to perform efficiently and avoid harboring dust and mold.   (If you have a window AC unit, check out our article for deep-cleaning it here).  Dust and condensation (moisture) are the perfect breeding ground in a mini-split for mold, and it’s being blown directly into your indoor air. What we’re looking at today is cleaning the “indoor” part of the mini-split, which is in the top part of the diagram below.  The parts that can get very dirty are: 

  • the dust filter: it’s easy to take this filter(s) out and vacuum or wash it clean with mild soap and water every month

  • the cold coil (also known as the evaporator coil): deep clean at least once a year

  • Fan: deep clean at least once a year

  • the louvered cover (not labeled): deep clean at least once a year. 

Image source: What are Ductless Air Conditioning Systems?

When deep-cleaning the indoor unit, since it can’t be removed from the wall without releasing refrigerant (unlike the way you can lift the whole window AC out of the window and take it outside), cleaning the coils inside will require some good waterproofing to avoid getting water, cleaning fluid and dirt on your wall and floor.

The other inconvenient part about cleaning the indoor part of a mini-split is the location: since most of them are high on a wall, you will need a very sturdy ladder and perhaps someone to help by handing equipment to you as you need it. 

I like this video for a good method of a professional cleaning the indoor part of a mini-split unit.  It shows the preparation and equipment professionals use.   BUT you don’t have to be a professional–you can buy the “bib” cover online and use a simple garden sprayer to approximate the same cleaning power!  Here is a good video of a DIY guy doing an even more thorough job (he removed the blower wheel for cleaning outside) with a bit more detail on how to take off the louvers and cover.   The only things we cannot recommend is:

  • His choice of cleaners, which do contain toxic chemicals, some of which will be released inside.  

  • Also, make sure to wear safety goggles or preferably a full face mask!  You don’t want any moldy dirt to fly into your eyes or mouth while cleaning.

  • You can use a vacuum inside to remove big clumps of dust, however DON’T use a shop vac inside, unless it has a HEPA filter.  If your wet/dry vac doesn’t have a HEPA filter, then use any other vacuum that has a HEPA filter on the dry dust only.

For cleaning the inside unit, you can use:

  • Sturdy ladder

  • Goggles or face mask, (gloves–optional)

  • Flat and phillips screwdrivers (a power screwdriver is optional)

  • (1-2) 5-gallon buckets (at least one for inside, another one if you want to see what comes out of the evaporator drain)

  • Garden or pump sprayer

  • Bib for covering the unit for a cleaner job, $26: if you plan on doing your own maintenance, it’s worth investing in the cover to use every year!

  • Old towels

  • Coil cleaner (see below)

  • HEPA vacuum for any inside vacuuming

Regarding the coil cleaner, most aerosol coil cleaners have a “propellant” that assists with moving the liquid out of the spray can.  These propellants are usually hydrocarbons with VOCs.  You don’t need to buy spray coil cleaner and release this in your home!  Our choice of a non-toxic coil cleaner is Viper Evap+ from Refrigeration Technologies.  According to the Technical Data Sheet, it is the industry’s only non-rinsing evaporator coil cleaner utilizing slow-release enzymes in a synthetic detergent base, which is safe for all metals.  If it is not rinsed off, the enzymes remain on the coils for 72 hours, starving any microbes of oxygen.  The solution is gradually rinsed off by condensate production, which is drained via the condensate line.  It has no VOCs, TAC (toxic air contaminants) or HAP (hazardous air pollutants).  It is to be used full-strength via a pump sprayer (the garden sprayer we mentioned above works just fine). 

There are two natural cleaners we can recommend that are non-toxic.  The best part about these are the light citrus fragrance Please note that you should check the manufacturer literature on your mini-split unit to find out the recommended maximum acidity or alkalinity of any evaporator coil cleaning solutions, because strong acids or bases can eat metal and damage your unit!  Whichever you choose, you can check the acidity with a pH test strip after dilution to make sure it’s in a safe range for your unit.

  • For an acidic cleaner:  Nutribiotic is a grapefruit seed extract (GSE) which is highly acidic and microbial at full concentration (be very careful mixing and using it!) but can be diluted to use as a coil cleaner.  According to the manufacturer, The GSE Liquid Concentrate has a pH of about 2.75 and the Maximum GSE Liquid Concentrate has a pH of about 2.2, which are both very acidic.  In the article we found for using it to clean your car’s air conditioning evaporator coil, it’s recommended to use it at 2x manufacturer’s recommended dilution.  (Recommended is 10 drops per 5 oz water, so 2x strength is 20 drops per 5 oz water).  

  • For a basic (alkaline) cleaner: EarthClean by Earthpaint is a citric acid cleaner that is super-effective on greasy countertops, and when used at the manufacturer’s dilution, degreases safely on stone countertops with no damage.   Alkaline cleaners can remove greasy dust more easily, so if your mini-split is near your kitchen and your unit can tolerate an alkaline cleaner, this might be the best choice.

Mini-splits look great on the wall, but their performance is only as good as their cleanliness.  If you keep up with cleaning the air filter regularly (at least once a month), the unit will work better through the cooling and heating seasons, and won’t be nearly as gross or hard to clean during the yearly deep-cleaning.  You can save money by doing this yourself, but hiring a reputable technician is fine for those who have too many other things going on.  The most important thing is prioritizing good air quality in your home by performing or scheduling this type of cleaning regularly.