Tag Archives for " mold "

Which is a healthier home habitat: the forest or the desert?

Which is a healthier home habitat: the forest or the desert?

Is it more healthy to live in or near a forest or a desert?  Spoiler alert: we’re not going to call that decision.  Each habitat has its advantages and disadvantages, so we’ll explore them to see which one is best for you.

You might think that these two climes are extremely opposite, but they do have (at least) one thing in common: trees!  Granted, there are many more trees in forests, but trees in the desert can accomplish many of the same purposes.  In a 2020 study, one particular type of tree found in Qatar (desert region), Acacia tortilis, was found to be the most efficient tree species for reducing air pollution, having good capacity to intercept storm water runoff, reducing energy consumption and reducing air pollution levels through dry deposition, avoiding further pollution formation and CO2 removal.  Mature trees (with diameter greater than 45 inches) were much more efficient at accomplishing these goals than younger trees (diameter 10 inches). 

According to the US Department of Agriculture (USDA), trees provide many benefits, including the ability to clean our atmospheric environment both directly underneath their canopies, and at a larger, regional scale. Because leaves transpire large amounts of moisture, trees have a cooling effect on the surrounding environment—like air conditioning. By cooling and cleansing the atmosphere, trees help to make air safer for breathing by plants, animals, and humans and have positive benefits on habitat. In fact, air quality underneath a closed tree canopy is often significantly better than above that tree canopy, especially for ozone—a common air pollutant that forms downwind of urban air pollution sources. On a regional scale, forests also scrub ozone and other nitrogen and sulfur-containing air pollutants out of the prevailing winds, protecting more sensitive areas.  Healthy forests with large, widely-spaced trees also protect from wildfire smoke because pines and other fire-adapted trees with their thick, fire retardant bark better resist fire in all but the most extremely hot, dry, and windy conditions.

Interestingly, some trees contribute to ozone production, while others reduce it.  This is because species like black locust, European oak and poplar intensively emit isoprene, which results in higher ozone and PM10 concentrations, while tree species emitting primarily monoterpenes such as beech, magnolia and wayfaring trees yield less of both.  (Impact of vegetative emissions on urban ozone and biogenic secondary organic aerosol: Box model study for Berlin, Germany)

Another common denominator between forests and deserts is animals–whether they are domesticated or wild, contact with animals is more frequent in remote areas than in urban areas.  There is also much research that shows how exposure to animals benefits us.  In one study, the researchers recruited 2 groups of young men:  20 young men who were raised for the first 15 years of life on farms with farm animals, and a second group of 20 young men who were raised for the first 15 years of life in a city of over 100,000 people, without daily exposure to pets. Both groups were then given Trier Social Stress Test (TSST), a model of acute psychosocial stress in humans. The results revealed that those who grew up in cities without daily exposure to pets, and thus lacked exposure to diverse microbial environments during childhood, responded to psychosocial stress with exaggerated inflammation markers,  (Less immune activation following social stress in rural vs. urban participants raised with regular or no animal contact, respectively)

Now, let’s talk about some specifics of each habitat.

Deserts

Although the stereotypical desert is hot, dry and sandy, only one of these words accurately describes every desert (dry).  Most experts agree that a desert is an area of land that receives no more than 25 centimeters (10 inches) of precipitation a year. The amount of evaporation in a desert often greatly exceeds the annual rainfall. Surprisingly, areas near water can actually be deserts, because humidity in the air doesn’t predict or cause rainfall.  The Atacama Desert, on the Pacific shores of Chile, is a coastal desert. Some areas of the Atacama are often covered by fog. But the region can go decades without rainfall. In fact, the Atacama Desert is the driest place on Earth, and some weather stations in the Atacama have never recorded a drop of rain.  (Desert)

Low humidity is obviously a benefit to keeping mold from growing on outdoor or indoor surfaces, if air conditioning is not needed.  Dryness would lead some to believe that mold could not be a problem in the desert.  However, mold spores are present everywhere, and lack of home maintenance can allow even a small amount of rainfall to turn into a mold disaster.  Mold can start growing undetected in attics, crawlspaces and walls during one of the infrequent rains, and can turn into a big problem whenever it is disturbed, such as during renovation or further deterioration.  If air conditioning is used, it can generate mold problems when moist air (like from cooking or showering) hits cold air, or around the surfaces where cold condensate is produced.   

Low humidity also means little to no mosquitoes and many other biting insects.  Low pollution (when the wind is not kicking up dust) and warm weather can also be a positive for those who suffer from breathing problems like asthma.  

One problem of low humidity is its effects on the human body (see our article).  Dehydration can become evident in dry skin, hair and nails, respiratory system and through your whole body, affecting every major system.  In addition, static electricity builds up in your clothing and furniture, which can hurt and damage electronics.  Finally, dry air allows pathogens to stay afloat in the air for longer periods of time.  

Most deserts have very little cloud cover and thus a lot of sunshine.  This, for sure has its benefits and drawbacks; it can be the cure for Seasonal Affective Disorder (SAD) but also present higher risk for skin and eye damage and cancer.  Exposure to UV sunlight was associated with lower systolic blood pressure (the first number in a blood pressure reading) regardless of the temperature. (Could sunshine lower blood pressure? Study offers enlightenment)  In addition, sunlight assists your body in making vitamin D, which strengthens bones, and sunlight promotes collagen production in your connective tissue, which helps you move quickly. (7 Health Benefits of Living in the Desert)

The purifying power of sunlight should not be underestimated.  Those who live in or near the desert can use the UV rays of sunlight to purify water, their laundry, and anything else they can bring outside for a good “freshening”. 

One important disadvantage to desert life is dust.  In fact, you don’t have to live in the desert to suffer from the effect of desert dust, because dust from deserts can be transported on the wind and even injected into the troposphere, allowing it to travel great distances (such as across the Atlantic Ocean in the case of Saharan dust).  Dust clouds at surface levels bring particulate matter, coarse and fine, worsening air quality and posing respiratory or even cardiovascular risks.(What is desert dust and how does it change atmosphere and the air we breathe?)  The danger of dust presents in two different ways: size of the particles and content of the particles.  Particles that are approximately between 2.5 to 10 microns (PM10) are inhalable, but can be trapped and cleared from the upper respiratory tract.  Particles less than 2.5 microns (PM2.5) can lung alveoli, entering the blood stream where they cause systemic harm to other organs in the human body. (A Retrospective Cohort Study of Military Deployment and Postdeployment Medical Encounters for Respiratory Conditions)  Especially concerning is the class of particles less than 1.0microns (PM1.0), which are sure to enter directly into the bloodstream and may also cross the blood-brain barrier.  The toxic content of dust can be pathogens such as bacteria, including some that carry respiratory diseases (Characterization of Bacteria on Aerosols From Dust Events in Dakar, Senegal, West Africa), and most importantly, a fungus Coccidioides which causes Valley Fever.  It can also be bioreactive metals such as copper, chromium, nickel, lead and zinc, as well as pesticides, herbicides, radioactive particulates and aerosolized sewage (yuck!!). (Desert dust storms carry human-made toxic pollutants, and the health risk extends indoors)

Increased heat and low humidity also tends to decrease the number of negative ions in the air.  Elevated negative air ion levels are widely reported to have beneficial effects on humans including enhanced feeling of relaxation, and reduced tiredness, stress levels, irritability, depression, and tenseness. Depleted ion levels and enhanced positive ion levels are reported to have no effect, or deleterious effects. (Air Ion Effects

The study of how gasses in the earth’s atmosphere react with each other is very complex.  For example, it’s been shown that desert soil releases nitrogen species gasses into the air.  The release of NOx from desert soil and subsequent effective oxidation in the atmosphere indicates that the desert ecosystem is an important area for ozone production. This has been manifested by higher ozone in the desert air than the regional background from many observations (Güsten et al., 1996; Hoffer et al., 1982).  (Active Nitrogen Cycle Driven by Solar Radiation in Clean Desert Air)  Thus, higher levels of ozone in the desert could make it unhealthy for sensitive individuals.  These could become particularly high after rains, when microbes in the soil emit N2O (nitrous oxide, also known as laughing gas).  (Following rain, desert microbes exhale potent greenhouse gas)  In addition, it’s been shown that “stratospheric intrusions” (ozone-rich air descending from the stratosphere during spring storms) can also capture ozone created by pollution from Asia as they descend and transport it to desert areas of the southwest.  Particularly in the area of Las Vegas, these can create short episodes of high ozone that exceed federal air quality standards without factoring in local pollution.  (Background ozone burdens Las Vegas’ air quality in spring)

The other side of the coin is that in some areas of the world (like Atacama and Sechura deserts in Chile and Peru), dust from deserts can contain significant iodine, which actually destroys ozone.  (Iodine in Desert Dust Destroys Ozone)  Therefore, the mineral makeup of the soil in deserts is very important in characterizing what’s in the air. 

Living in/near the Forest

Forest bathing” is a Japanese term that emerged during the 1980’s as an antidote to tech burnout: it’s being calm and quiet amongst the trees, observing nature around you whilst breathing deeply can help both adults and children de-stress and boost health and wellbeing in a natural way. (How to start forest bathing)  If you regularly spend quiet time in the outdoors, perhaps you are already aware of its benefits: lower blood pressure, heart rate, and levels of harmful hormones like cortisol.  (Forest bathing: What it is and why you should try it)

What is in the air of forests?

Phytoncides are aromatic compounds from plants which can increase your number and activity of natural killer cells, a type of white blood cell that supports the immune system and is linked with a lower risk of cancer. These cells are also believed to be important in fighting infections and inflammation, a common marker of disease.  In one study, researchers found that people who took a long walk through a forest for two days in a row increased their natural killer cells by 50% and the activity of these cells by 56%. Those activity levels also remained 23% higher than usual for the month following those walks. (Why Spring Is the Perfect Time to Take Your Workout Outdoors)

Hinoki cypress, cedar, oak, pine and spruce are just some of the trees to release phytoncides (aromatic compounds), which include alpha-pinene and d-limonene.  Although these are actually VOCs, they are termed biogenic VOCs (BVOCs) because they are naturally made, unlike chemical VOCs that are manufactured.  Pinene and limonene are monoterpenes, which global annual emissions amount to 330–480 million tons. When visiting a forest, monoterpene VOCs such as limonene and pinene are mainly absorbed through inhalation, their blood levels rapidly rise after exposure, and they are mostly eliminated unchanged both in exhaled air and in the urine.  The tree composition can markedly influence the concentration of specific VOCs in the forest air.  Although essential oils do contain BVOCs, not all BVOCs are present in essential oils, and some molecules included in essential oils are not part of the BVOC molecular suite but are rather artifacts of distillation. (Forest Volatile Organic Compounds and Their Effects on Human Health: A State-of-the-Art Review)

Some other benefits of forest living are:

  • Humidity: in moderate amounts, humidity is good for the skin and respiratory system, 

  • Cooling effect: trees cool air through evapotranspiration. As trees transpire, they release water into the atmosphere through their leaves. As the water changes state from liquid to vapor, the surrounding air is cooled, similar to how we sweat.

  • Particulate matter capture: Forests can improve public health greatly by catching dust, ash, pollen and smoke on their leaves, keeping it out of our lungs.

  • Trees are sinks for other harmful pollutants, such as nitrogen oxides, ammonia and ozone, which can all cause respiratory problems from repeated exposure. (The Important Relationship between Forests and Air)

  • Healthy forest air includes bacteria, fungal spores, plant and animal particles and pollen, which may have good and bad effects.  Good effects of exposure to these include desensitization to allergies (exposure therapy), and certain bacteria, like Mycobacterium vaccae (a bacteria strain that lives in soil), which can stimulate serotonin production, and can make you feel relaxed and happier, as well as reduce inflammatory responses to stress. According to Dr. Christopher Lowry, “Surprisingly, when adults engage in soil-mixing activities for ten minutes with soil that is ‘spiked’ with M. vaccae ATCC 15483, there is a rapid alteration in brain activity within the occipital cortex and alteration in the plasma metabolome, relative to soil that is not spiked with M. vaccae ATCC 15483 [35]; this suggests that exposures to mycobacteria not only have long-term immunoregulatory effects but also alter physiology and neurophysiology within minutes. Perhaps we all really should spend more time playing in the dirt.” 

  • Ions: That “fresh air” feeling in the forest also comes from higher than normal presence of ions.  Negative air ions (NAIs) are an important indicator of air quality, and are significant for the evaluation of air conditions. In a 2020 study of a scenic area in China, negative air ions were present in forested areas  approximately 3.2-3.4 times over the numbers in open areas or the lake.  (For more information on the cleansing power of ions, read our post here!)

And the cons of forest living: 

  • Humidity: many forests are high in humidity, which can promote mold growth.  Without dehumidification in a home, it would be difficult to live in many forested areas because of mold growth. 

  • Radon: Trees are sources, sinks, and conduits for gas exchange between the atmosphere and soil, so radon, a product of uranium decay in the soil, is naturally expired by trees along with other gasses.  Although radon accumulation in homes through their foundation (the rocks and soil below the foundation) is most concerning, emission of radon by trees will cause a forest to have a higher level of radon than unforested areas, because radon is approximately 7.5 times heavier than air, so that living in or near the forest may increase the ambient level of radon outside the home depending on winds.  There are two units of measurement for radon, picocuries per liter, and becquerels per cubic meter.  According to a 2015 study in Brazil, radon concentrations as high as 40 kBq/m3 (40,000 Bq/m3) were found in a national forest.  The EPA recommends that homeowners take action to lower radon levels in their homes if there is a level above 2 pCi/L.  Since one pCi/L is equivalent to 37 Bq/m3, the measurement in the Brazilian forest showed 1,081 pCi/L, or 250 times the upper limit of radon recommended by the EPA!  Thus, the study rightly inferred that “the results indicated considerable radon hazard for human occupation in the neighborhood.”

Overall, the desert and the forest are two vastly different climates, yet each have potential for healthy lifestyles for those who can live further away from urban areas.   From forest bathing to hiking to biking, there are plenty of ways that each environment offers us to connect with nature and take in its natural health benefits. 

Indoor Mold Summary White Paper

Indoor Mold Summary White Paper

What is indoor Mold and how does it affect us? 

Overgrowth of mold in the home can produce high levels of mycotoxins and microbial volatile organic compounds (mVOCs), causing illness.  

While there is much more for the scientific community to explore, thankfully there is a growing focus on mold in our environment with a significant amount of new research being conducted on these topics.  

What are mold, mycotoxins and mVOCs?

Mold includes various types of fungus that grow on damp or decaying organic matter.  Mold can grow outdoors or indoors; it only needs moisture and a carbon source. 1  Outdoors, moisture from the ground and decaying leaves or wood provide the perfect habitat for mold.  Indoors, moisture from the air (excess humidity) or from a leaking pipe or roof will saturate a substrate such as wood, cardboard or even dust, and provide the moisture and carbon food for mold to grow. It produces particulate pollution (physical spores that replicate and spread) as well as various chemical byproducts. 

Mycotoxins are secondary metabolites, which are organic compounds that are produced by various organisms that are not directly involved in the growth, development, or reproduction of the organism but are essential in the ecological and other activities (contrasted with primary metabolites, which are directly involved with these activities).2  These are chemicals that are specifically toxic to humans, which scientists believe the mold produces to cause plant disease, defend the mold from other microbes, or simply when the mold is stressed. 

Mold can cause two broad types of disease, mycoses and mycotoxicoses.

(1) Human mycoses3:

  • Are caused by growth of the fungi on or in our bodies, which can be treated with antifungals.  (Mycotoxins produced while the mold is in the body cause a secondary reaction).

  • are mainly caused by opportunistic fungi, which produce illness by taking advantage of debilitated or immunocompromised hosts 

  • are frequently acquired via inhalation of mold spores from an environmental reservoir or by unusual growth of a commensal species that is normally resident on human skin or the gastrointestinal tract

  • portal of entry can be through the pulmonary tract or direct contact with the skin

  • are largely diseases of the developed world, usually occurring in patients whose immune systems have been compromised by advanced medical treatment.

(2) In contrast, mycotoxicoses: 

  • Are caused by dietary, respiratory, dermal, and other exposures to the mycotoxins, causing “poisoning by natural means” similar to the pathologies caused by exposure to pesticides or heavy metal residues.3

  • Can be successfully treated by regimens of mycotoxin antigens, sauna, oxygen therapy, and nutrient..4

  • Are common in underdeveloped nations due lack of resources to harvest and store foods properly.3 However, it is hypothesized that mycotoxicoses in the Western World are mainly due to inhalation of mycotoxins from mold growing in indoor environments (our inference from mold experts). 

As a company focused mainly on air quality, HypoAir has focused on mycotoxins that cause illness due to inhalation (which are mainly mycotoxicoses), as a result of mold growing indoors and releasing conidia (entire spores or fragments of mold or its spores) that contain mycotoxins.  In samples collected from water-damaged indoor environments in Sweden in 20075, here are the main mycotoxins found:

  • Trichodermol and Verrucarol are trichothecenes. Trichothecenes are a very large family of chemically related mycotoxins produced by various species of Fusarium, Myrothecium, Trichoderma, Trichothecium, Cephalosporium, Verticimonosporium, and Stachybotrys molds. Trichothecenes inhibit protein synthesis in human and animal cells. 6,7

  • Sterigmatocystin is also generated by Aspergillus molds.  It is structurally and biologically related to aflatoxins and is regarded as a precursor of aflatoxin B1 (see below). Therefore, the acute toxicity and carcinogenic properties of this mycotoxin are similar to those presented by aflatoxins, although less potent, and Sterigmatocystin has been recognized as a group 2B carcinogen.8

  • Satratoxins G and H are produced by the black mold Stachybotrys chartarum.  Neurotoxicity and inflammation within the nose and brain are potential adverse health effects of exposure to satratoxins and Stachybotrys in the indoor air of water-damaged buildings.9

  • Gliotoxin is produced by the common indoor mold genus Aspergillus and is immunosuppressive (it can dampen the body's ability to ward off disease and infection). To do this it impairs the activation of T-cells and induces cell death in monocytes, a type of white blood cell.10

  • Aflatoxin B1 (AFB1) is one of the most potent carcinogens in foods, and it was postulated to account for the prevalence of hepatocellular carcinoma (HCC) in high exposure areas. 11

Volatile Organic Compounds (VOCs)

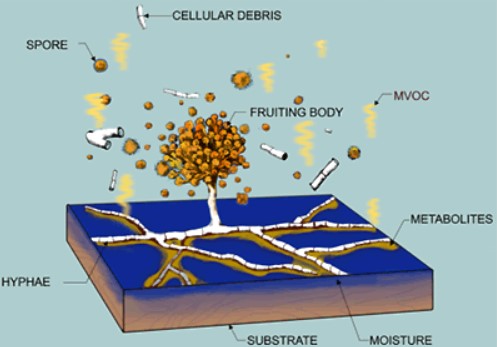
VOCs are gasses and can be anthropogenic (produced by human activity) or biogenic (produced by living organisms, but more specifically plants and animals).   A subclass of biogenic VOCs is microbial VOCs (mVOCs), which are gasses produced by bacteria or fungi.  Indoors, mVOCs diffuse through and sometimes accumulate in the air.  Some mVOCs are responsible for that “musty” odor that is the telltale sign of mold growth (such as geosmin and 1-octen-3-ol), but others can be odorless. Compounds with eight carbon atoms, such as 1-octen-3-ol, 3-octanol and 3-octanone are among the most common fungal VOCs, and among fifteen of the most prevalent mVOCs in water-damaged buildings (thse are 2-methyl-1-propanol, 3-methyl-1-butanol, 3-methyl-2-butanol, 2-pentanol, 3-octanol, 1-octen-3-ol, 2-octen-3-ol , 3-methylfuran, 2-hexanone, 2-heptanone, 3-octanone, 2-methylisoborneol, 2-isopropyl-3-methoxy-pyrazine, geosmin, and dimethyl disulphide).12  Although these mVOCs have not been tested for carcinogenicity, DNA damage was detected for all fifteen of the common mVOCs. 13  Low concentrations of the vapor form of several C-8 compounds including 1-octen-3-ol are toxic to larvae and adult fruit flies.  Moreover, 1-octen-3-ol (octenol for short and also called mushroom alcohol) selectively affects dopaminergic neurons in adult Drosophila (fruit fly) brain and induces Parkinson’s-like behavioral alterations in a fly model for this disease.14,15  Volatile phase 1-octen-3-ol was 80 times more toxic than the volatile phase of toluene in stem cells studies.16  Unfortunately, due to studies mostly conducted on the liquid phase of octenol, the FDA has approved it for use in foods and perfumes, and the EPA has approved it for use in insect lures. The problem with the vapor phase octenol is, like other VOCs, concentrations can build up in enclosed spaces like basements, attics, and even whole homes if they are not ventilated.

Image source: (17) 

How do mycotoxins and mVOCs overlap?

Mycotoxins are only found in solid or liquid form, while mVOCs are gaseous.  However, mycotoxins and many mVOCs are both toxic products of mold.  Therefore, overlap exists in the toxic category, but the science community doesn’t think that mVOCs should be called mycotoxins.   Why?

  1. The condition of secondary metabolites: mycotoxins are all secondary metabolites, encoded by clustered genes that are easy to detect in genomic data. Only some fungal volatiles (e.g., the terpenoids) are secondary metabolites. 18 

  2. There already are other classes of toxic metabolites made by fungi that are not called mycotoxins. Terms like “antibiotic,” (compounds toxic to bacteria), “mushroom poison” (compounds made by mushrooms) and “phytotoxin” (compounds toxic to plants, or confusingly, made by plants19) are used to label certain other categories of fungal products with toxigenic properties. 18 

  3. Since many of the VOCs that have been studied are breakdown products of fatty acids, mediated by lipoxygenases, or are made by simple biotransformation steps from amino acids, we are not certain whether the VOCs we detect in profiles from growing fungi are the direct products of fungal metabolism or are merely incidental breakdown products.18

For these reasons, one article proposes the name “volatoxin” for those mycotoxins which are volatiles.18  Whatever they are officially named, mVOCs have the potential to be harmful to humans, especially if they are allowed to accumulate in a closed space.

Mold Naturally found outside vs trapped indoors

Mycotoxins and mVOCs found outside are normally diluted due to the abundant circulation of fresh air around and through them.  It is entirely different indoors.  Just as CO2 can build up from exhalation of inhabitants in a closed space, mVOCs from mold can also become concentrated in closed atmospheres, and mycotoxins become airborne whenever mold is disturbed, even from the airflow created when a window or door is opened.  

Where are these high concentrations found?  Spaces like the following are ripe for “biohazard” conditions concerning mVOCs and mycotoxins: 

  • Damp basements

  • Enclosed crawl spaces

  • Attics with leaky roofs or otherwise high ambient humidity

  • Backyard sheds

  • Non-climatized storage units

  • Vacation homes that are closed up without air conditioning or ventilation

  • Homes damaged by natural disasters or neglect, that are abandoned

  • Commercial buildings that have not been occupied or climatized in some time

The combination of lack of ventilation (for dilution) and excess humidity and darkness makes these spaces the perfect environment to grow mold and all of the toxins it emits.

How does Polar Ionization affect mycotoxins and mVOCs?

Our Polar Ionization uses Carbon Brush style Needlepoint Ionization to split the normal water vapor (H2O) in the air into millions of positive Hydrogen ions and negative Oxygen ions, without the production of ozone.  These natural ions are in proper balance and are stable enough that they can last a minute or longer as they travel in the airflows of an HVAC system or room giving them sufficient time to interact with air and surface contaminants in large buildings. Ions are any molecule or atom where the number of electrons does not equal the number of protons. These ions are very effective against a wide range of particulate, biological and chemical contaminants.  

Due to their type and stability they:

  • can provide purification for large areas with reasonable upfront costs and no ongoing replacement parts 

  • can react with both airborne and surface based contaminants opening up many new applications for safe active sanitization of occupied spaces.

  • Remove static electricity, and as such are able to travel much further than negative ions.  

  • Due to their balanced nature, they do not create unwanted ozone unlike devices that produce negative only ionization

Ability of Polar Ionization to protect against Mycotoxins and Mold Related Particulates

Mycotoxins can be transmitted through ingesting contaminated food, or they can become airborne, attached to spores of mold (conidia) or fragments of conidia.  According to a 2005 study 20, mycotoxins from Stachybotrys Chartarum (specifically trichothecene mycotoxins) were found on intact spores, which are larger (about 5 microns in diameter) as well as fragments of mold and other smaller particles (1.2 microns and below). These mycotoxins are known to react primarily with mucous membranes of the upper respiratory tract and eyes, leading to irritating erythema, inflammation, and pain. 20  In an earlier study, Trichothecene mycotoxins were found on Stachybotrys atra conidia of 5 micron diameter on average, indicating that these mycotoxins are easily respirable.21

The term PM2.5 is often used to refer to particulates 2.5 microns and less in diameter. For reference, a human hair is around 50-100 microns (μm) in diameter.  The human body has many natural defenses against large particulates like these.  In general, we consider extremely small PM2.5 contaminants to be far more dangerous and difficult to remove than larger particulates. Even smaller, 0.3 microns are considered the Most Penetrating Particle Size (MPPS) due to their difficulty to capture.  A HEPA filter's efficiency rating is specifically tested at 0.3 microns (not larger or smaller particles) because it is addressing a variant of the filter's minimum efficiency. 

Polar Ionization removes particulates from the air primarily through making them group together making them larger, heavier, and often with a negative or positive charge.   Those same larger, heavier, and charged particles can not stay airborne for long and are relatively easy to trap in a mechanical filter or easily vacuumed up from the ground after they settled.   Polar Ionization can quickly remove well over 95% of airborne particulates (including spores) without any physical mechanical filtration whatsoever (HEPA).  Due to its mode of action, it can also improve the filter rating of any mechanical filter used in the same space by several levels.  The use of mechanical filtration in addition to Polar Ionization is often unnecessary, however it can improve the speed of removal of particulates especially with those with high sensitivities.  At HypoAir we are quick to recommend redundancies in air purification where the needs of the occupants require faster removal of particulates and when finances allow. 

Numerous case studies conducted by independent labs show how mold spore counts (and thus by inference, mycotoxins carried on the mold spores)  were dramatically reduced in the air of closed environments by employing HypoAir’s Polar Ionization without additional filters.22 

Ability of Polar Ionization to break down mVOCs

The Polar Ions are also effective at breaking down VOCs & odors at a molecular level, specifically gasses with electron volt potential below 11. This is by design as the power output is capped at 12.07eV in order to prevent the formation of ozone since oxygen has an electron volt potential of 12. Formaldehyde (CH2O) for example has 10.88 as its electron volt potential and can be dismantled down into harmless carbon dioxide (CO2) and water vapor (H2O).  Similarly Ammonia (NH3) with an electron volt potential of 10.07 is broken down into harmless nitrogen (N2) and water vapor (H2O) (nitrogen naturally makes up about 78% of earth’s atmosphere).   Due to the method of production and stability of the ions, no ozone is produced in this process and the theoretical issue of incomplete oxidation or unintended byproducts is addressed with net VOC reduction.  One example showing proof of these breakdown reactions was obtained by measurement before and after installation of a bi-polar ionization device in the HVAC system of Houston Methodist Hospital, which reduced Total VOCs (TVOCs) to acceptable levels with activation of the device after many months of poor air quality complaints and failure of carbon filters to adequately clean the polluted air intake.23

The following are electron volt potentials of some of the most common mVOCs in water-damaged buildings24:  

Common mVOCs

Electron Volt Potentials

2-methyl-1-propanol

9.7

3-methylfuran

8.39

2-hexanone

9.34

2-heptanone

9.33

3-octanone

9.19

dimethyl disulphide

8.46

Additional efficacy against more complex chemical compounds and high concentrations of odors can be found with our products that combine Polar Ionization with Activated Carbon, AHPCO and/or our TotalClean i2 spray.

Ability of Polar Ionization to Neutralize Biological Contaminants on Surfaces and in the Air

Polar Ionization has been well tested in our products and in other devices that produce the same type of ions to neutralize certain bacteria, mold, and viruses in the air and on surfaces.  Polar Ionization & Mold Spores in particular have been tested many times, including a 99.50% kill rate tested by GCA over a 24 hour period. 25 The Polar Ions are effective at disrupting these biological contaminants by breaking down their surface proteins which results in inactivation or lysis.  The efficacy of Polar ionization on viral (Feline Coronavirus, Coxsackie Virus, Polio Virus, SARS Coronavirus) and other biological threats (TB, MRSA, VRE, C. Diff) has been proven for years by a wide range of independent studies with more information, sources, and studies found on hypoair.com.

For more info about our proprietary products and technologies, please visit www.hypoair.com

References:

  1. Indoor Environmental Quality: What is Mold? (n.d.). Retrieved from https://www.cdc.gov/niosh/topics/indoorenv/whatismold.html

  2. Sapkota, A. (18 January 2022). Primary vs Secondary Metabolites- Definition, 12 Differences, Examples. Retrieved from https://microbenotes.com/primary-vs-secondary-metabolites/

  3. Bennett, J. W., Klich,  M. (2003). Mycotoxins. Clinical Microbiology Reviews, 16(3), 497–516.  https://doi.org/10.1128%2FCMR.16.3.497-516.2003

  4. Rea, W.J. (2018). A Large Case-series of Successful Treatment of Patients Exposed to Mold and Mycotoxin. Clinical Therapeutics, 40(6), 889-893. https://doi.org/10.1016/j.clinthera.2018.05.003

  5. Bloom, E., Nyman, E., Must, A., Pehrson, C., Larsson,  L. (2009).  Mycotoxins produced by molds in water-damaged indoor environments.  Journal of Occupational and Environmental Hygiene, 6(11), 671–678. http://dx.doi.org/10.1080/15459620903252053

  6. Trichodermol (T3D3717). (n.d.). Retrieved from http://www.t3db.ca/toxins/T3D3717

  7. Verrucarol (T3D3723). (n.d.). Retrieved from http://www.t3db.ca/toxins/T3D3723

  8. Vieira, T., Cunha, S., Casal, S. (2015). 25.3.3 Sterigmatocystin. In V.R. Preedy (Ed.), Coffee in Health and Disease Prevention (pp. 225-233). Elsevier Inc.

  9. Islam, Z., Harkema, J.R., Pestka, J.J. (2006). Satratoxin G from the black mold Stachybotrys chartarum evokes olfactory sensory neuron loss and inflammation in the murine nose and brain. Environmental Health Perspectives, 114(7), 1099-1107. https://doi.org/10.1289/ehp.8854

  10. Gliotoxin. (n.d.). Retrieved from https://healthmatters.io/understand-blood-test-results/gliotoxin

  11. Ferk, F., Speer, K., Mišík, M., Nersesyan, A., Knasmüller, S. (2015). Chapter 66 - Protective Effects of Coffee Against Induction of DNA Damage and Cancer by Aflatoxin B1. In V.R. Preedy (Ed.), Coffee in Health and Disease Prevention (pp. 587-596). Elsevier Inc.

  12. Korpi, A., Järnberg, J., Pasanen, A-L. (2009).  Microbial volatile organic compounds.  Critical Reviews in Toxicology, 39(2), 39-193. https://doi.org/10.1080/10408440802291497 

  13. Kreja, L., Seidel,  H-J. (2002). Evaluation of the genotoxic potential of some microbial volatile organic compounds (MVOC) with the comet assay, the micronucleus assay and the HPRT gene mutation assay.  Mutation Research, 513(1-2), pp. 143-150.  https://doi.org/10.1016/s1383-5718(01)00306-0

  14. Inamdar, A.A., Masurekar, P., Bennett, J.W. (2010).  Neurotoxicity of fungal volatile organic compounds in Drosophila melanogaster. Toxicological Sciences, 117, pp. 418–426. https://doi.org/10.1093/toxsci/kfq222

  15. Inamdar, A.A., Hossain, M.M., Bernstein, A.I., Miller, G.W., Richardson, J.R.,  Bennett, J.W. (2013). The fungal derived semiochemical 1-octen-3-ol disrupts dopamine packaging and causes neurodegeneration. Proceedings of the National Academy of Sciences USA, 110, 19561–19566. https://doi.org/10.1073/pnas.1318830110

  16. Inamdar, A.A., Moore, J.C., Cohen, R.I., Bennett, J.W. (2012).  A model to evaluate the cytotoxicity of the fungal volatile organic compound 1-octen-3-o1 in human embryonic stem cells. Mycopathologia, 173, 13–20.  https://doi.org/10.1007/s11046-011-9457-z

  17. Morse, R., Acker, D. (22 February 2017). Indoor Air Quality And Mold Prevention Of The Building Envelope. Retrieved from https://www.wbdg.org/resources/indoor-air-quality-and-mold-prevention-building-envelope

  18.  Bennett, J.W., Inamdar, A.A., (2015). Are Some Fungal Volatile Organic Compounds (VOCs) Mycotoxins? Toxins (Basel), 7(9), 3785–3804. https://doi.org/10.3390%2Ftoxins7093785

  19.  A.Graniti (1972). “The evolution of the toxic concept in plant pathology.” In: Wood R.K., Ballio A., Graniti A., editors. Phytotoxins in Plant Diseases (pp. 1–18). Academic Press.

  20. Brasel, T. L., Douglas, D. R., Wilson, S. C., Straus, D. C. (2005).  Detection of Airborne Stachybotrys chartarum Macrocyclic Trichothecene Mycotoxins on Particulates Smaller than Conidia.  Applied and Environmental Microbiology. 71(1),  114–122.  https://doi.org/10.1128%2FAEM.71.1.114-122.2005

  21. Sorenson, W. G., Frazer, D.G., Jarvis, B.B., Simpson, J., Robinson,  V.A. (1987). Trichothecene Mycotoxins in Aerosolized Conidia of Stachybotrys atra. Applied and Environmental Microbiology, 53(6), 1370-1375. https://doi.org/10.1128%2Faem.53.6.1370-1375.1987

  22. Milburn, D. Case Studies, Mold Focus_Part 1. (n.d.) Retrieved from https://docs.google.com/presentation/d/1RSgZYhSq0M_-fzlPUP1Q8z2btVuDi8so/edit#slide=id.p1

  23. Schurk, D. Houston Methodist Hospital Test Study Results Needle Point Bi-Polar Air Ionization for VOC Remediation. (n.d.). Retrieved from http://www.victordistcontrols.com/wp-content/uploads/2014/03/Methodist_Hospital_VOC_Remediation_Project_Test_Results_2014.pdf

  24. Electron Volt (eV) Potential Chart for Industrial Gases: UNDERSTANDING eV POTENTIAL PAPER. (n.d.). Retrieved from https://egeda.be/wp-content/uploads/2020/11/Electron-Volt-potential-chart.pdf

  25. Waddell, C. GPS Reports on Pathogen Testing,(n.d.) Retrieved from https://gpsair.com/uploads/customer-resources/Service-Logic/White-Paper-GPS-Reports-on-Pathogen-Testing-03-2020.pdf

Photo by Josh Eckstein on Unsplash

Is it ok to walk around barefoot in my home? I’m concerned about my feet absorbing mycotoxins.

Is it ok to walk around barefoot in my home?  I’m concerned about my feet absorbing mycotoxins.

Often we end up researching and writing articles in response to client questions, and this is one such article.  If your floors are warm or carpeted, it often feels good to walk around barefoot in the house.  However, this may or may not be a good idea, depending on what is on your floors.  Can toxins really go into or out of your feet?

“Foot detoxing” pads, baths and creams have been popular for a while.  Usually they show the pad or water turning brown with “toxins” after supposedly releasing them from your body through the feet.  However, there have been very few studies on their effectiveness.  In a small 2012 study, the researchers sampled water from before and after foot baths with the popular IonCleanse device, as well as hair and urine samples.  They found no evidence to suggest that ionic footbaths help promote the elimination of toxic elements from the body through the feet, urine, or hair.   So, it’s unlikely that these methods are able to pull toxins out of the body.

However, some molecules can be absorbed through the skin (particularly the feet) into the bloodstream.   You can even “taste” with your feet; if you apply garlic to the soles of your feet in a plastic bag ala this video, you can taste it in your mouth between 15 minutes to one hour later.  This is because small, light molecules like allicin (the chemical released in freshly-cut garlic) can penetrate the skin and the bloodstream, traveling throughout your body.  Dimethyl sulfoxide (DMSO) is a chemical that has similarities to allicin and is very easily absorbed through the skin.  Part of the DMSO is transformed to the volatile metabolite dimethyl sulfide, which gives a characteristic garlic- or oyster-like smell when excreted through the lungs.  (Adverse reactions of dimethyl sulfoxide in humans: a systematic review)  Therefore, we are susceptible to chemicals that behave in this way.  Scientists and drug-researchers are constantly in search of chemicals that can deliver drugs more easily to the bloodstream, and therefore new “carriers” are of great interest.  

What about mycotoxins that may happen to be on the floors?  Can we get mycotoxin poisoning from walking around barefoot?   Although there’s no direct answer via testing, research on individual mycotoxins shows that they can be absorbed through the skin, so it’s reasonable to assume that they can be absorbed through the skin of the soles of the feet.  Since mycotoxin concentration on surfaces is highly variable, however, it remains to be seen whether concentrations sufficient to cause illness are present on floors. 

We found that a 2014 paper summarizing previous research on the absorption of the most common mycotoxins through skin and their effects, was most helpful.   This research documented mostly animal trials to determine toxicity, but there are also reports of workers who were accidentally exposed to these toxins.   The actual methods of damage incurred by these toxins can be quite complex, so we will spare you the details, but many of them cause oxidative stress that stimulate the immune system, triggering inflammation and cell damage.  Here are some examples:

  • T-2 toxin, a member of the trichothecene mycotoxin family, is produced by various species of Fusarium fungus, which can infect corn, wheat, barley and rice crops in the field or during storage.  It’s infamous for allegedly being used as a bioweapon during the military conflicts in Laos (1975-81), Kampuchea (1979-81), and Afghanistan (1979-81) to produce lethal and nonlethal casualties. (CBRNE - T-2 Mycotoxins) T-2 toxin causes oxidative stress, which releases cytokines (proteins that help control inflammation in the body) that are thought to cause the death of the outer layer of skin cells (keratinocyte apoptosis).   T-2 mycotoxicosis can cause nausea, vomiting, diarrhea, leukopenia, hemorrhaging, skin inflammation, and in severe cases, death. (T-2 Mycotoxicosis)  The reported LD50 (amount which causes death in 50% of exposures) of T-2 toxin is approximately 1 mg/kg of body weight. (Medical Aspects of Chemical and Biological Warfare)
  • Citrinin (CTN) is a product of several fungal species belonging to the genera Penicillium, Aspergillus and Monascus. To summarize, CTN under in vivo conditions has the ability to cause oxidative stress and ROS-mediated DNA damage in mouse skin upon topical exposure, leading to skin death.
  • Patulin (PAT) is a toxic chemical naturally produced by several species of mold, especially within Aspergillus, Penicillium and Byssochlamys.  A single topical application of PAT to mouse skin generates ROS, which causes DNA damage in skin cells.  In small doses it causes death of the cells, but in larger doses it initiates tumor growth.
  • Aflatoxins are products of  several types of Aspergillus molds, with AFB1 known as the  most potent teratogen (causing malformation of embryos), mutagen and hepatocarcinogen (causes liver cancer) of all aflatoxins. Like in the case of PAT, AFB1 may also cause skin tumors in mouse skin after long-term and higher-dose application.
  • Ochratoxin A (OTA) is a fungal metabolite produced by Aspergillus ochraceus and Penicillium verrucosum. OTA is found in a variety of plant food products such as cereals. To summarize, a single topical exposure of OTA at the dose level of 20–80 μg/mouse (20-80 millionths of a gram, with a mouse weight of 40-45 grams, translates to 0.5-2.0 ppm) induces the production of ROS, resulting in the skin cell death. On the other hand, a single topical exposure of OTA at a dose level of 100 nmol/mouse causes significant enhancement of short-term markers of skin tumor promotion in mouse skin.

As you can see, the least effect of these mycotoxins is to cause skin cell death, but the worst effects are whole-body!  They are effectively absorbed through the skin.  However, is it reasonable to assume that they would be found on your floors, in a sufficient quantity to cause illness?  

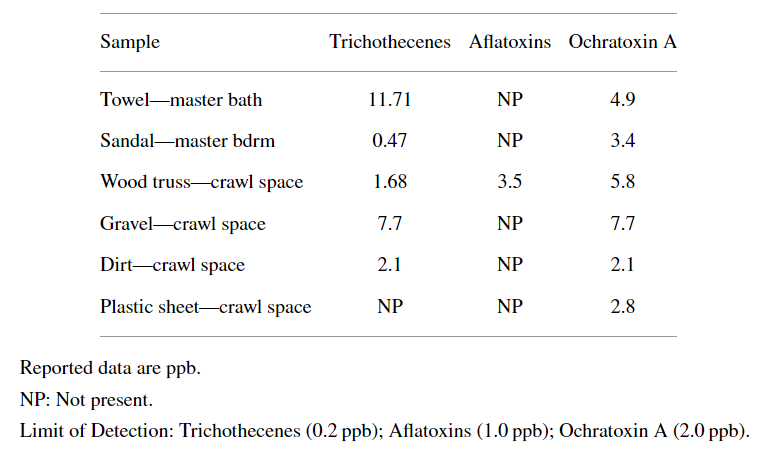
A 2012 study of a family that started to experience illness shortly after moving to a home in Hawaii in 2008 indicates that mycotoxin levels in the low parts-per-billion range on various surfaces in the home (including a sandal and a bath towel), as well as elevated fungal counts, can cause systemic illness.  The father and mother, aged 40 and 39, had an 8 year old daughter, a 5 year old son and a pet dog, living in a 2-story home with a crawlspace that had water intrusion.  According to one of the two inspection companies hired to investigate the home for mold, “A serious moisture/mold problem is observed in the crawlspace directly below the bedrooms. Moisture is penetrating the walls of the foundation. The HVAC system is designed to force air into the crawl space, forcing crawl space air into the bedrooms and other areas above. Moisture intrusion also results from the master shower into the crawl space as well as from sprinklers, damp soil against the foundation, lack of roof gutters, and poor grading.” Similar findings were in the second report, plus: “Smoke testing revealed communication between the crawl space and upper level bedrooms via electrical outlets and electrical ducts and plumbing. The conduit holes were not sealed, permitting observance of light coming through spaces in the floor joists. A musty odor was present in the master bathroom and noted to get stronger when the fan coil was turned on.”  ERMI tests for mold indicated ERMI levels of 2 to 3 throughout the home, which “represent a moderately high index, and further investigation should be conducted to establish if your home has a mold contamination problem”.  (Interpreting ERMI test results) Here are the test results for mycotoxins; mycotoxins can be measured from air or dust samples and in this case the dust was analyzed:

All four of the family members and the dog tested positive for OTA and some for tricothecenes in their urine; they had health problems involving the upper and lower respiratory tract, headaches, neurocognitive deficits, and severe sinusitis. They had chronic sinusitis and nasal inflammation, and the isolation of bacteria (Pseudomonas and Acinetobacter) and molds (Penicillium and Aspergillus) from nasal secretions from the father and daughter is consistent with other cause and effect symptoms of mold exposure.  Even the dog suffered from 72 lesions, an ear mass and lipomas (which were surgically removed), in were found OTA and tricothecenes.  The mother gave birth to a daughter 3 months after moving out of the home, which had skin inflammation and discolorations because of being exposed to mycotoxins in the womb and via breastmilk.  

Therefore, we can conclude from this sad scenario that mold, bacteria and mycotoxins are a real concern in house dust when the home has water intrusion and mold issues.  There’s no way to know how much of the mycotoxins were inhaled versus absorbed through their skin, but of course young children are closer to the floor, often crawling and sitting on it, thus sitting in dust, stirring up dust, and breathing it in.  The dog obviously suffered from laying on the floor!  

According to IndoorScience, a reputable indoor air-quality testing company, 

  • there are no guidelines for “acceptable” amounts of mycotoxins in house dust, 

  • mycotoxin testing is much more expensive than standard mold testing, and 

  • there are only a few labs that perform mycotoxin testing.   

However, if you have water intrusion or mold problems in your home that you suspect are causing health problems, mycotoxins or toxins from actinobacteria (see our article here) could very well be the culprit.  In these cases, solving the water intrusion problem and remediation and thorough cleaning will also remove the mycotoxins and bacterial toxins!  Here are some tips for maintaining a cleaner home from our related article

  • Invest in a HEPA air cleaner to remove dust from the air

  • Clean floors regularly with a HEPA vacuum and mopping (some appliances do both)

  • Filter the air that comes into your home via window filters

  • Change your HVAC filter regularly and even upgrade it if possible

  • Try to remove your outdoor shoes at the door, and wear indoor shoes or slippers only in the home

  • Minimize clutter, upholstery and carpets that can hold dust. 

These are also common recommendations of doctors and practitioners who see mold illness in their patients, because removing them from surfaces is helpful whether the toxins are inhaled or absorbed.  If you suspect water intrusion anywhere in your home (even in places you can’t see, like the crawlspace or attic),  of course you’ll need to address remediation in the moldy area pronto.  However, since you don’t know how air currents may be carrying dust and toxins into the living space, it’s a safe bet to also step up the cleaning and keep your shoes on!

Photo by Jimmy Chang on Unsplash

Glowing under blacklight

Glowing under blacklight

I’ve heard that in the 1960’s, blacklight posters were all the rage.  Glowing things are cool!  How does blacklight actually cause things to glow?  

“Blacklight” is an invisible form of light that operates in the ultraviolet range.  Because light takes on a wave form, the frequency of the peaks and troughs in the wave are known as wavelengths.  In the visible spectrum, reds and oranges have the longest wavelengths, and at the other end of the spectrum, blues and violets have the shortest wavelengths, meaning they have higher frequency.   Ultraviolet light is not visible to us, yet exists beyond the violet shade.  The wavelengths of ultraviolet light are grouped into 3 bands: A, B and C.   

UV-A, with wavelengths ranging from 320-400 nanometers (nm), is the safest form of UV light and often referred to as Longwave UV.  This kind of UV light is generated by Blacklight units (the dark purple fluorescent tubes) as well as UV LED flashlights.  Black lights are considered safe for use in the home as well as theatres and night clubs etc.  Most quality sunglasses will protect eyes against UV-A.  

UV-B, at 280-320nm wavelength, is the one that can cause sunburn when over-exposed. It can also be used in the medical treatment of certain skin conditions.  Most quality sunglasses will protect eyes against UV-B.

UV-C, at 200-280nm wavelength, is totally absorbed by the Earth's atmosphere, but also widely used as a germicidal sterilizer in hospitals. 

Obviously, UV light has had good and bad press.  As you may know, certain types of UV light are known to cause eye and skin damage and cancer.   And certain types of UV light are used to kill microbes, making the air you breathe (or surfaces you touch) safer.  We have a whole article on some of the ways researchers are using UV light to sanitize.  In this article, however, we’re going to look at some of the more useful ways to use blacklight (UV-A) in your life–to literally “see” the invisible!

Blacklight makes some of the invisible, visible, because it illuminates items that fluoresce.  These items contain exposed phosphorus atoms that reflect short wavelength UV light back to our eyes. For instance, paper shines under a blacklight because of the fluorescent chemicals added as a whitener. (Using Blacklights to Find Pet Urine)

Urine glows under UV light because it contains phosphorus. 

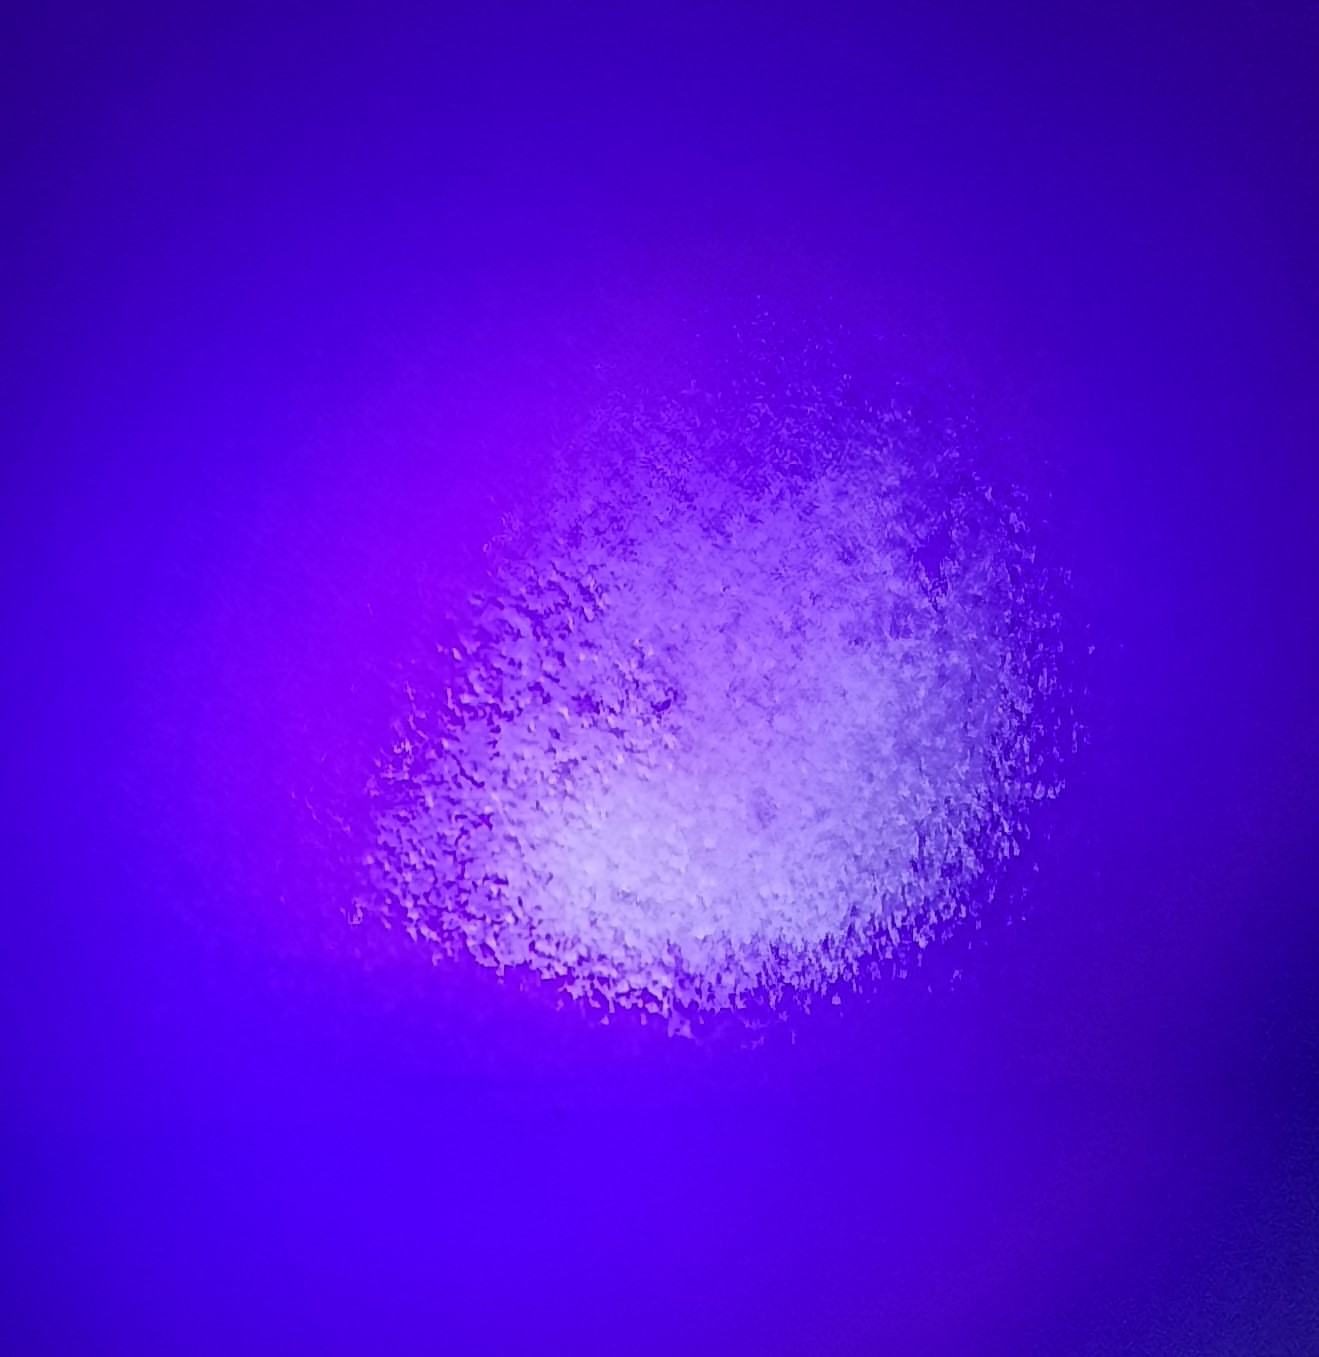
Pet Urine:  Unlike the synthetic fluorescents added to white paper, natural fluorescent substances such as dog and cat urine etc, do not glow brightly under UV. In fact, they are generally quite dim, so do not expect a supernova!  You will be looking for patches a little brighter than their background; you’ll know them when you see them.  Cat urine glows particularly well under a black light, as it contains high levels of phosphorus, but the intensity of the glow can vary depending on the animal’s diet and health.  When examining soft surfaces like carpet and fabrics, remember that liquids can quickly soak down into them, so that not a lot of urine remains on the surface to “glow”. It’s also easier to find it:

  • When fully dried, because liquid or damp urine will not glow.
  • When new–the “glow” slowly fades over time as the urine ages.

If you do find “accidents”, try a cleanser that uses enzymes.   You can read all about enzyme cleansers in our article.  (Stain Detective Pro)

Rodent Urine: Rats and mice are incontinent and will urinate and defecate on the move, up to 80 times a day! This means you will be looking for a trail of urine droplets or streaks leading in the direction of travel. Urine and droppings are deposited where the rodents spend most of their time and where they travel.  Amino acids in rodent urine will fluoresce, or emit light of a different color, when exposed to ultraviolet light. This makes it possible to see rodent, rat, mouse, hamster, guinea-pig or squirrel urine even in dark places. (Rodent Detector Pro)

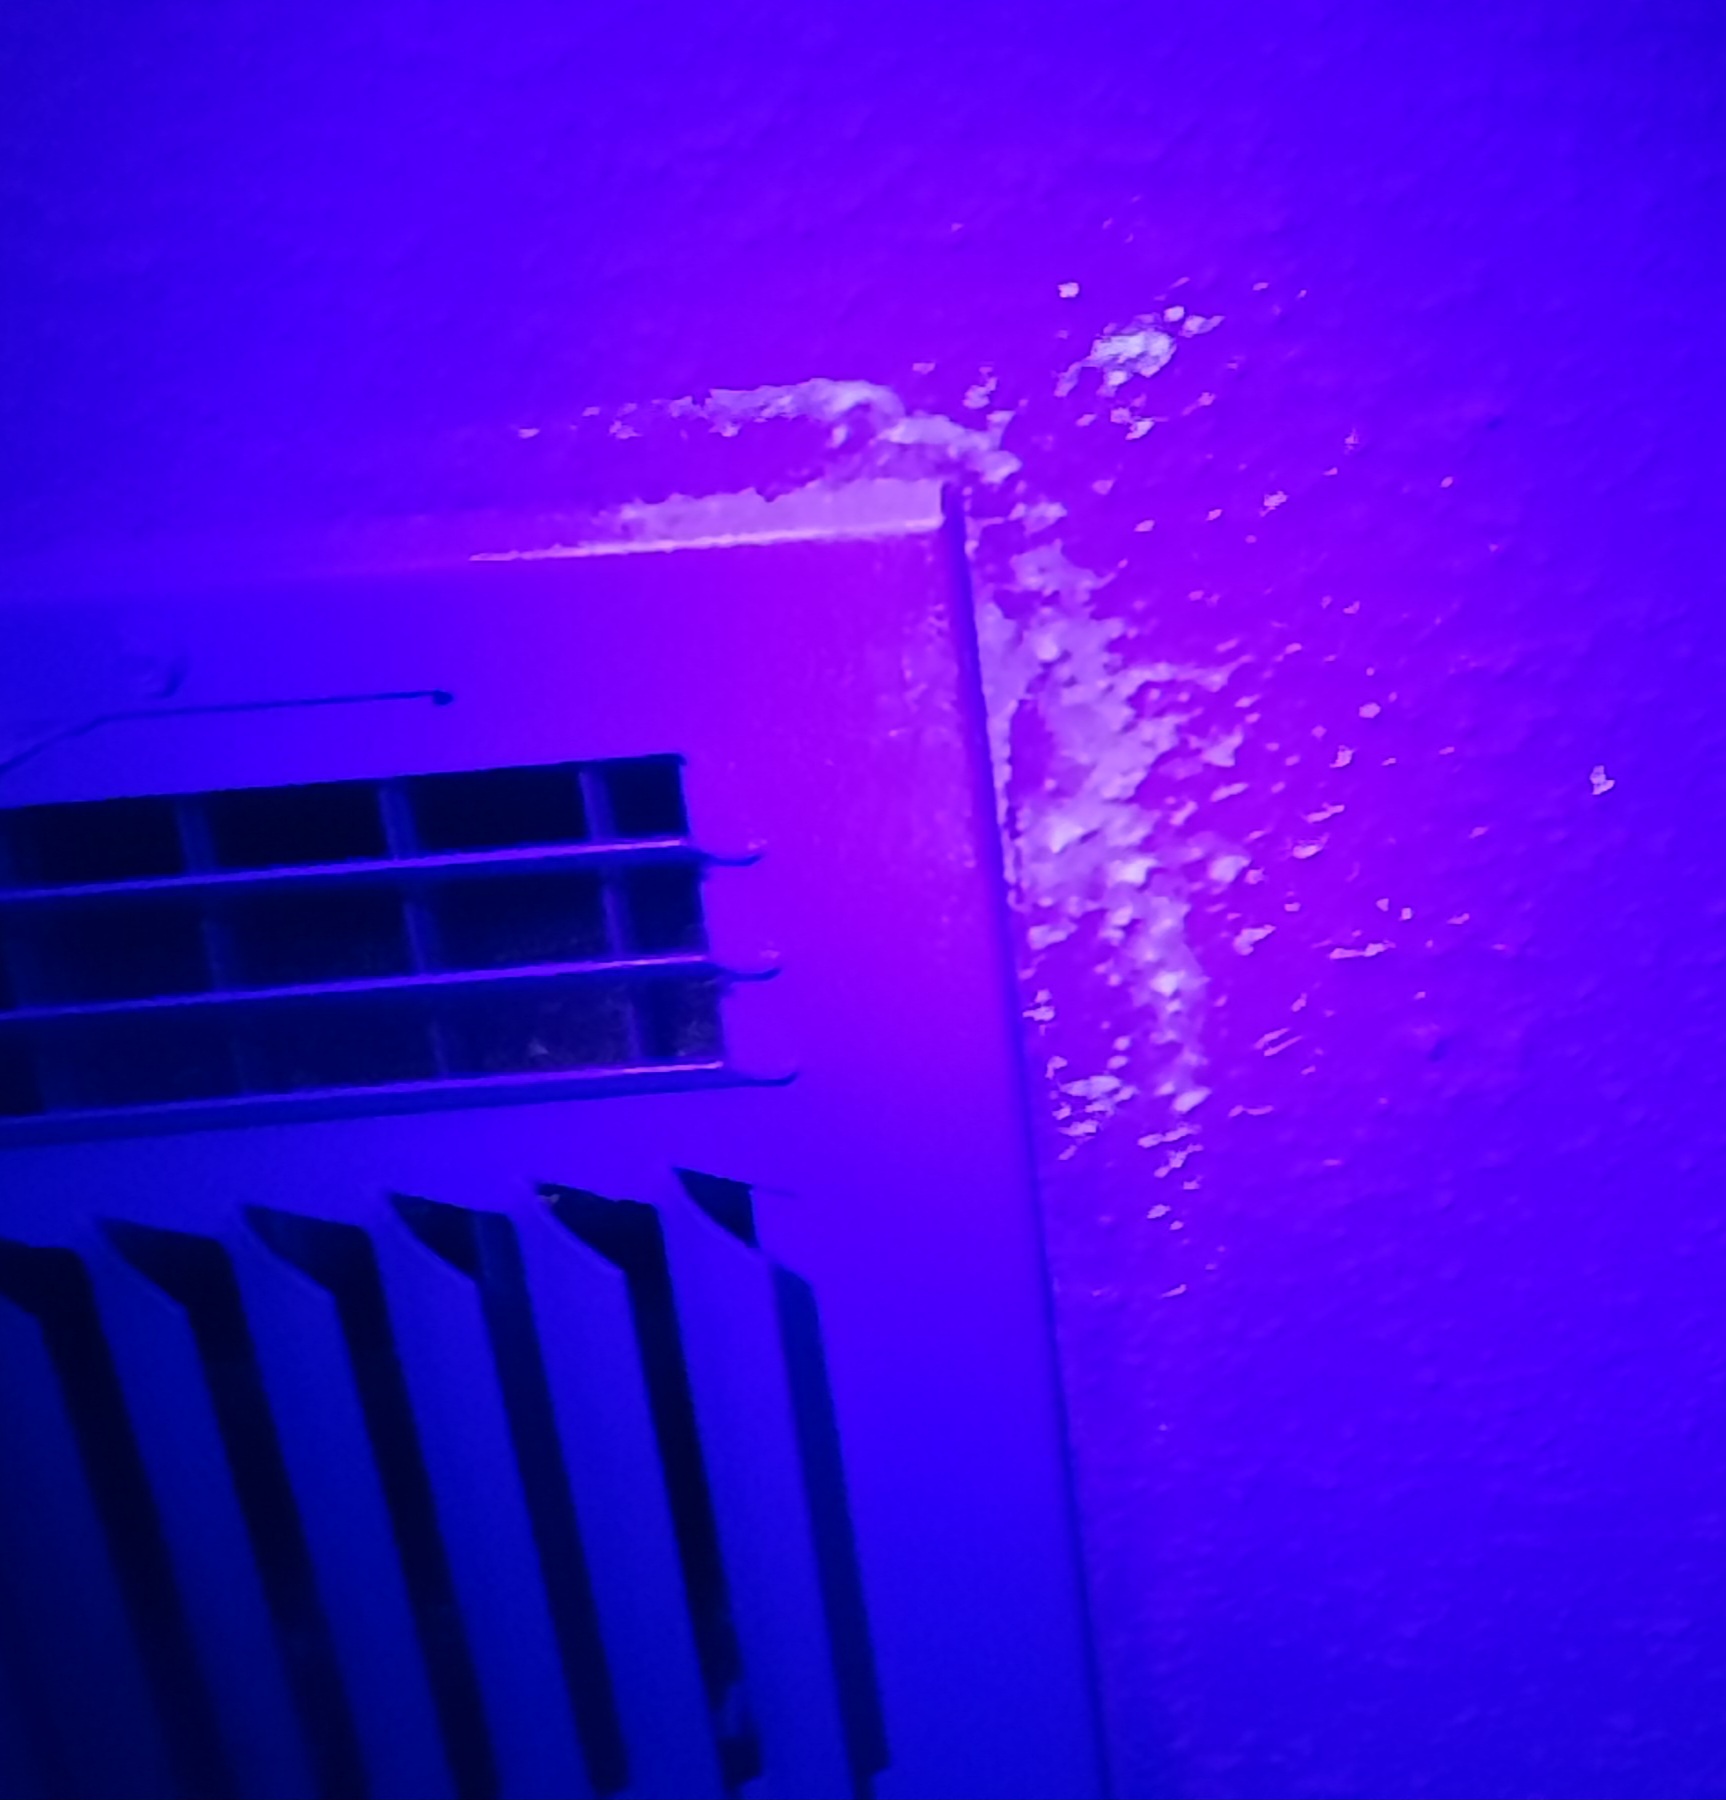
Mold often glows under blacklight.  In this video, mold stains that are not visible in normal light are shown on the ceiling under blacklight.  If you are not seeing stains in an area that has leaked before, or has a high level of humidity, the key may be to shine the light at an angle against the wall.  You should shine the ultraviolet light closely along the sides of the suspected surface or walls. The angle of illumination will show the presence of fungus, however, some cleaning products also leave a glow, so be careful not to mistake cleaning residues for mold. (How To Detect Mold With A Blacklight)

Hand Washing: Blacklights make it possible to see if you are washing your hands effectively and make training on hand-washing easy!  If you apply some UV Germ Grease (which simulates the way germs cover your hands; it’s just a clingy grease with glowing particles), wash according to this video and check them under blacklight to see if any of the grease remains, you’re more likely to get your hands cleaner after this training.

Here are some other interesting items you can get to “glow” in your home: (Got a new UV torch? Here are some things to shine it on

  • Tonic water – the quinine in tonic water glows blue
  • Honey – the aromatic molecules in honey can glow green
  • Turmeric root – the curcumin in turmeric glows yellow
  • Eggs – a compound in eggshells called protoporphyrin IX can glow red
  • Rocks, jewels and gemstones – lots of minerals glow under UV light
  • Cash – banknotes have added photoluminescent details to prevent fraud
  • Cleaning materials – detergents (including laundry detergents) often have photoluminescent molecules to make them easy to see
  • Highlighters and dyes – fluorescence is a type of photoluminescence, so fluorescent markers and dyes will often glow under UV light
  • Vitamins: Vitamin A and the B vitamins thiamine, niacin, and riboflavin are strongly fluorescent. Try crushing a vitamin B-12 tablet and dissolving it in vinegar. The solution will glow bright yellow under a black light. (16 Things That Glow Under Black Light)
  • Antiques that have been repaired or touched up will glow or fluoresce differently in the area where the repair has been made.
  • Insects such as scorpions glow bright green, and Harvestman (Opiliones, also sometimes called Daddy Long Legs) glow blue, as do certain other spiders.

Here are some tips about selecting UV blacklights: 

  • Although many people associate blacklight with a purple light, if you can see the light, it’s not blacklight, and the contribution of visible light diminishes the ability to “see” any hidden markings. 
  • The frequency of UV light emitted determines the quality of results obtained.  There is a sweet-spot for UV which is between 365nm and 385nm.  However, to manufacture LEDs capable of emitting in this frequency range is far more expensive.
  • There are different types of lamps that are used to make UV light:
    • Mercury vapor lamps are used in theaters and large spaces where it’s needed to project UV light over a distance
    • UV fluorescent tubes or bulbs are smaller and more portable, with decent quality
    • UV LED lights: these come in a wide spectrum of quality (wavelengths), but they are very portable and consume little energy.

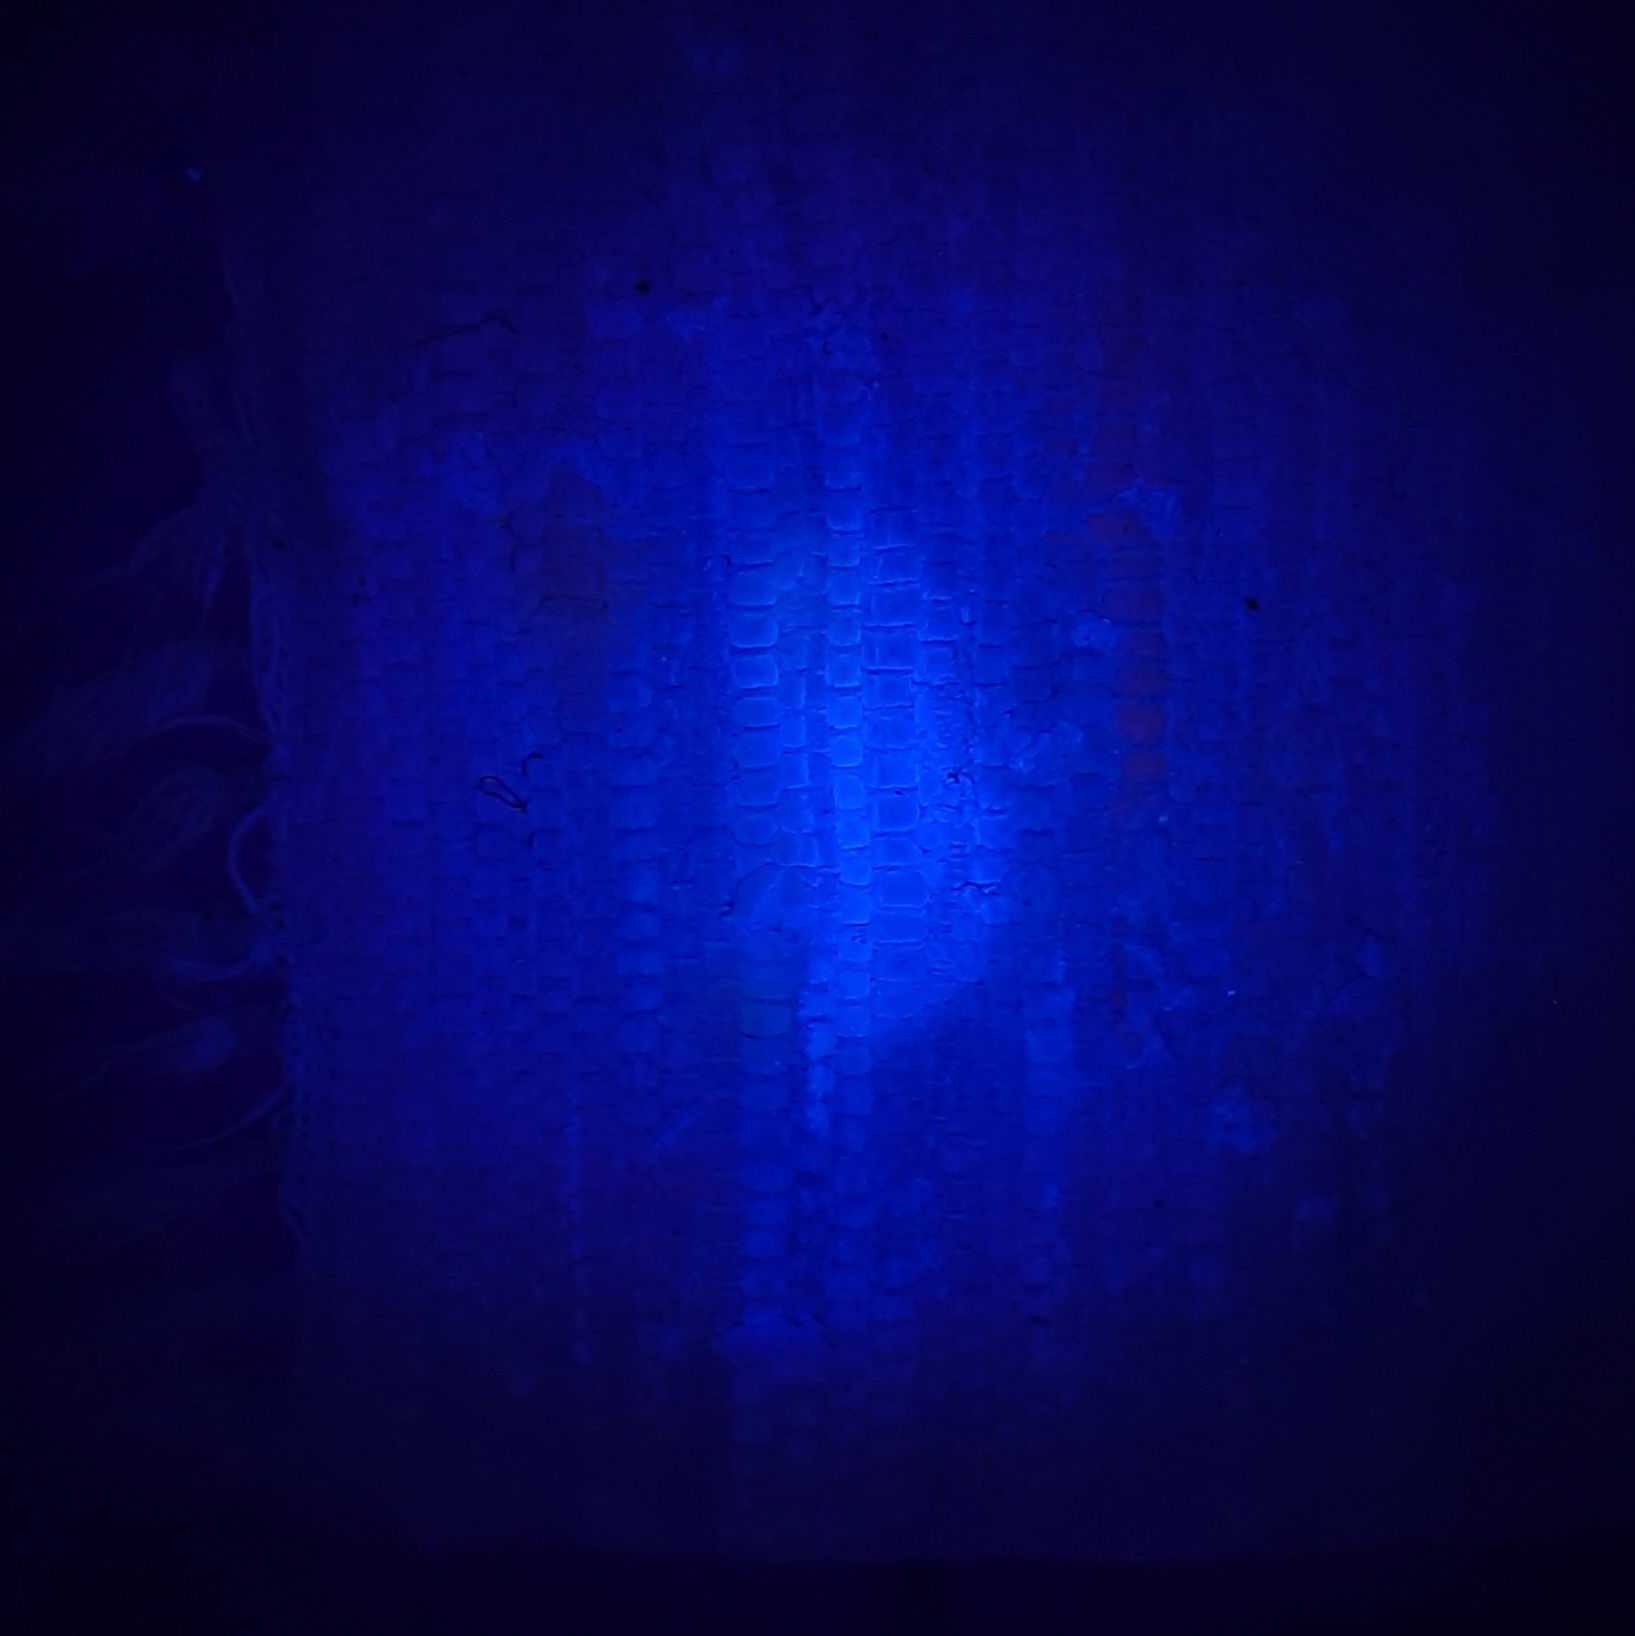
So....I went sleuthing one night with a small, inexpensive blacklight borrowed from a friend, and it works!  First I looked around some registers I knew had sweated when I had an older, less efficient HVAC system, and there they were--old stains and mold that was not even visible in the daylight (I have some popcorn ceilings so shining the light at an angle really accentuates the stain).  Next, I looked and saw a white patch where stains had been "touched up"--proof that not everything was stained or mold.  Then, I found a pet stain in a small rug that had absorbed and was unnoticeable in daylight. 

A small blacklight flashlight could be a cool science project for you and your kids, by not only finding things that glow, but eliminating the yucky animal pee and poo as well with enzyme cleansers.  Remember that the wavelength (365-385nm) is important to get quality black light, and many cheap flashlights don’t fall in that range. Here are some lights that will give the best results for your detective work:

Photo by h heyerlein on Unsplash

Tenant Rights to a Habitable Home: Mold and Smoke Issues

Tenant Rights to a Habitable Home: Mold and Smoke Issues

What can a renter do when their home becomes “inhabitable” due to mold or second-hand smoke?

When tenants sign lease agreements with building owners or landlords, they agree to abide by certain rules while living at the property, which protect both the tenant and the landlord.  In the US, certain tenant rights are protected under federal, state, and local laws.  For the purposes of this article, we are going to examine a tenant’s right to a habitable home.  

The “implied warranty of habitability” is the legal term for a renter’s right to a home that keeps out rain and snow, has sufficient hot water and heat, sturdy walls and floors, free from environmental dangers such as lead, asbestos and mold, and reasonable protection from criminal intrusion.  According to Nolo.com, all states except one (Arkansas) recognize the implied warranty of habitability.  Even if a landlord offers lower rent in exchange for the tenant “waiving” habitability rights, such waivers are typically not upheld in court.  There are differences between habitability problems and “minor repair” problems, though, so that landlords are not legally required to fix every problem that elicits a complaint. 

For purposes of safety and air quality, some habitability problems may be:

-a roof leak or plugged air conditioner drain that results in moldy walls

-improperly vented water heater that causes exhaust gasses to leak into the apartment/home

-neighbors that do things that cause you to be unhealthy, like smoke inside, make a lot of noise during sleeping hours, etc.

If the landlord does not acknowledge or repair the problem, there are ways that tenants can enforce the implied warranty of habitability.  If this applies to you, make sure that you have properly notified the landlord and given them time to respond, and then you may want to notify the local building inspector.  Be prepared, however, to move out if the inspector deems the problem causes your home to be uninhabitable!   “Bigger stick” actions for the renter include, depending on state laws:

  • withholding rent
 (make sure you are completely up-to-date on rent before withholding it for habitability reasons)

  • paying for repairs yourself and deducting the cost from the rent
 (also make sure you are completely up-to-date on rent before doing this)

  • sue the landlord, or 


  • move out without notice (break the lease) and without liability for future rent. 

To check whether your state has a precedent for withholding rent or paying for repairs and deducting them from your rent, you can check this page.  Here is more information about these options. 

Specific problems that constitute inhabitable spaces:

Although mold can be a serious health issue, there are no federal laws regarding permissible exposure limits or building tolerance standards for mold in residential buildings, and only a few states and cities have established guidelines regarding mold in indoor air.  (Nolo.com)  Because of the following, it has been difficult for tenants to get landlords to fix or compensate for mold:

  • Mold causes a plethora of symptoms and health problems that are not exclusive to mold

  • Blood or urine tests are the only way to confirm its presence in the body

  • There is are many types of molds present in most homes and rentals, however, only a few have been implicated in serious health issues (such as Stachybotrus Chartrum or Aspergillus)

  • The term “toxic mold” is not a legal term, but the above mentioned species are “toxigenic”, meaning that they can produce mycotoxins.  

There have been successful lawsuits; in 2021 a Florida jury awarded $48 million in a habitability/mold case. (TysonMendes.com)  This is an exceptional compensation, but the vast majority of tenants living with mold that causes health problems do not get any compensation, sometimes due to weak local and state laws on habitability.  For example, in Washington state there are no explicit protections from mold for tenants, and the law doesn’t hold landlords liable when they don’t provide the “mold addendum”. (whyy.org) Here are what legal experts recommend to make your voice heard (based on advice from a Virginia lawyer in this video):

  • Make sure you notify the landlord or owner of the problem in writing and the way prescribed in your lease, and document all communication with them about the problem.  Describe the condition of the area, photograph it, include any lab results and any health effects that may have come from it.

  • If the landlord does not respond or fix the problem, in Virginia you can file an official document called a Tenant Assertion and Complaint.  Definitely check with legal experts on your rights to withhold rent or move out (which as stated above, vary from state to state; withholding rent is not allowed in Virginia).  

  • If you believe health issues have resulted from the mold, it’s best to contact a specialist or personal injury attorney.  

Second-hand smoke and vapors are a serious problem in multi-family dwellings.  This document from the American Lung Association and Public Health Law Center at Mitchell Hamline School of Law outlines tenant rights to healthy air inside their homes, and guidelines on options available to them in California, including:

  1. Approaching the neighbor who smokes/vapes.  They may be unaware of the impact it’s having on you or your family.

  2. Contacting the landlord, if the smoking/vaping doesn’t stop.  Always document your communication with the neighbor or landlord.  

  3. Reviewing your lease and ask the landlord in writing to enforce the non-smoking clause.

  4. Reviewing local laws, as they may have specific requirements to force landlord action. 

  5. California allows withholding of rent, however this could trigger an eviction response from the landlord.  In this case, uninhabitable conditions is a reasonable defense, and if the landlord does evict, the courts will decide whether rent abatement is appropriate. 

  6. Lawsuits include small-claims court, which is used for claims $10,000 or less, and trial court, which in general is only used when there has been substantial harm from repeated, significant exposure to secondhand smoke.  Appropriate charges against the landlord would include breach of contract, disability claims, nuisance claims, covenant of quiet enjoyment, and constructive eviction (if the tenant is forced to move out because of uninhabitable conditions).  

Unfortunately, rights for tenants vary from state to state, but you must do what is healthy for you in deciding whether to stay in or leave an unhealthy home.  We have written another article with specific suggestions if you can’t afford to move out or really want to stay, and mitigate the problem.

Photo by Al Elmes on Unsplash

Are Tiny Homes built from Sheds a Good Idea?

Are Tiny Homes built from Sheds a Good Idea?

At least every other day, I see an ad for a tiny home or office that companies or individuals built from what used to be backyard “sheds”.  Now, don’t get me wrong, I am all for repurposing buildings and materials, when they are done the right way!  (In fact, I even repurposed a large metal workshop building into a 2 bed/1.5 bath “condo” for my parents.  This one is on a concrete slab and for all intents and purposes, could have been built that way as a home). What are the advantages, and what are the cautions, of making a home from a shed?  (Many great points adapted from Living in a Shed: 9 Things (2023) You Must Know):

The advantages to living in a tiny home are many, for example:

  • Up-front cost is cheaper than a house
  • Smaller utility bill
  • Less square footage to clean
  • Less impact on the environment
  • Privacy
  • Portability
  • Customization
  • Ability to live in nature or “off-grid” more easily

However, “sheds” are only a subset of tiny homes, specifically, tiny homes that started out as prefab backyard buildings.  Let’s take a look at what could go wrong from making one of these into a habitation.

First of all, when considering whether to build out a shed as a home, you should check into local building codes.  If you live within city limits, there are likely laws about what type of buildings can be built or placed on your property to become “habitations”.  Plopping a shed down and running electricity to it for your teenager to live in could be a big problem whenever it’s noticed by the building inspectors!  Moving it to the middle of a few acres in the country doesn’t normally pose these legal issues, but again, it’s best to check with your local building inspector!   If it’s illegal to live in a shed, it may be legal to live in an ADU-an Accessory Dwelling Unit.  For example, ADU’s in California are required to be at least the size of an efficiency unit (at least 150 sq. ft. livable space plus a bathroom), they must contain a kitchen, a bathroom, they must be built on a permanent foundation, and must be able to turn on/off the ADU utilities without entering the primary unit.  (ADU vs Finished Shed Comparison)

Construction: This is the largest area of caution we see.  Within this topic, we need to highlight: 

  • Off-gassing of toxic compounds from interior building materials.  If the building was never meant for habitation (even as a chicken coop!), then it may contain building materials that are rated for “outdoor use only” which may give off dangerous pesticides/weatherization chemicals.
  • Inferior flooring and framing techniques:  We’ve seen them: sheds built to hold push lawnmowers and Christmas decorations may not hold up to daily living over a number of years.  Holes or loose joints that develop inevitably allow pests to come in (they want to be cool/warm/fed too!).  
  • Inferior foundation: Setting a shed on a few cinder blocks is typically not sufficient for daily living and if the floor begins to sag, all kinds of structural issues (including leaks and mold) can ensue. 
  • Poor insulation:  Typically, storage sheds only need to keep the paint from freezing, not keep a person comfortable, so insulation may not be optimal.  This includes roof and floor insulation–yes, if your shed is not mounted to a slab foundation, it needs to be insulated!
  • Improper sealing (which can cause moisture infiltration and mold growth): If siding is applied over the frame without an air or vapor barrier, it’s easy for moisture to condense inside the walls if they are heated for a living space, or similarly cooled during a hot summer.  These steps in normal construction are what inspectors look for, for the safety of the homeowner and longevity of the building.
  • Addition of water and sewage facilities warrants several considerations:
    • Where is your water source and how will you deal with sewage?  Sewage service is probably the biggest hurdle to overcome, as there are 3 options which may or may not be permitted in your locale: connection to the city’s sewer system, installing a septic tank, or installing a composting toilet. 
    • Plumbing in sinks, toilets, showers and drains also is done by code for a reason–leaks can cause serious mold and hygiene issues.  It’s not a good idea to buy that shed if these appliances are added without proper spacing and materials by someone who knows plumbing code.
  • Addition of power to the shed:  Sometimes power service to a shed (50-100 amp service) is not what you would get for a normal home (200 amp service).  Like the plumbing, wiring the shed for power should be done by someone who knows electrical code, so that it’s wired safely!
  • Addition of HVAC to the shed: Sticking a “window unit” AC or space heater in the side of the shed may keep you cool or warm if it’s the right size, but without proper ventilation, you could build up CO2 and mold very quickly.  CO2 is the product of insufficient ventilation, and face it, a shed is just a small, closed room unless proper ventilation is planned and built-in!  The mold can result from simply living in that closed room, because along with CO2, every human exudes water vapor through their lungs and skin.  If there are 2 people living there, the air quality will be even worse.

So far, it may sound like a major “NO” to use sheds as homes, but that’s just not true.  If you’re allowed to use one in your locale, you can safely do so by starting from scratch (buying a bare-bones model) or buying one from a builder that knows good home construction.  Then you can make sure that the construction, outfitting and customization will work for years to come without causing health issues.  Let’s face it, home ownership is expensive, but saving on a tiny home just to live uncomfortably from lack of weatherization or get sick from mold is definitely not worth the savings.  Therefore, planning is essential!

Photo by Andrea Davis on Unsplash

Optimizing Your Window Air Conditioner for Maximum Clean, Cool Air

Optimizing Your Window Air Conditioner for Maximum Clean, Cool Air

Global average temperatures have exceeded recorded highs several times in the last month, and articles on ways to keep cool are proliferating!  In this article, I don’t have any “new” way to keep cool, but if you are among those blessed with a simple window air conditioner, let us help you make it work just as well and as efficiently as the day you bought it!

Window air conditioners are the humble yet hard-working appliances that many households can’t do without.  As one of the oldest cities in the US, New York City has an abundance of window units because about 75 percent of the buildings throughout the five boroughs were constructed before 1960, according to the NYC Department of Buildings.  (Why about a quarter of US households are stuck with ugly and loud window AC units)  The cost of retrofitting these old buildings with central air conditioning is way too high, so window air-conditioning units are the solution, and continue to be for many households across the US.  However, even if your window air conditioner is an older unit, a little time and effort can go a long way in helping it cool better, work less (lower your energy bill), and put out better quality air! 

If you have the option of upgrading your window air conditioner, there are many worthy options out there, including those with inverter motors, which save a lot of energy and control humidity better.  (To understand better what inverter technology is, check out our article here.)  Unfortunately, no one has combined an inverter air conditioner and premium filtration, but you can get premium filtration on a new air conditioner with the Friedrich Kuhl units.  These units cool (and some also heat) rooms by heat pump, with smart controls (wifi enabled and smart home compatible) AND they have MERV 13 filters available (a MERV 13 bracket kit is needed).  Until manufacturers put inverter units and premium filtration together, we have to put premium filtration in priority!

If your existing window air conditioner has a few more years of life, it helps (although not necessary) to know how a window air conditioner works.  In the first part of our article “What kind of air conditioner do you have?” we explain the workings of this type of unit.  A key lesson is knowing that unless you have a ventilation lever on your unit, there is no mixing of indoor and outdoor air.  (Check out this video to find out how to find and operate a ventilation lever.)  Therefore, the air conditioner is not pulling in outside air, it’s only recirculating indoor air.  Whatever dust, pet dander and microbes are floating around your apartment can get lodged in the air conditioner and grow into disgusting science experiments that will negatively affect your air quality!

Therefore, a clean evaporator coil is super-important.  The evaporator coils are what change your hot and humid indoor air into cooler and drier air.  Because most window air conditioners come with a flimsy clean-able filter that would qualify somewhere between MERV 1 through 4, what really ends up filtering the air is the coil–because after a season of running constantly, so much dust and dirt go through the cheap filter and get lodged in the coil!  This is not only disgusting, it’s unhealthy.  Therefore, if you’ve operated your window unit for more than one summer and never cleaned the coil, please start with this step to eliminate the majority of grime that’s lodged there.  (Be sure to have help removing the air conditioner from the window, especially if you live on an upper story!) 

After you’ve cleaned your unit (and the included filter), check that it is blowing cold air well.  It should blow air that is 15-20 degrees colder than the air it takes in.  To measure this, simply use a portable temperature gauge above the unit (out of the stream of cold air) as the intake temperature, and then move the thermometer directly into the cold air coming out, and note the difference (it’s also helpful to note the difference in humidity, to know that it’s actually removing moisture as well!).  Our portable humidity sensors will give both temperature and humidity.  If the difference in inlet and outlet temperatures does not approach 15 degrees F for a clean AC unit, then you can check into getting the refrigerant topped up.  This is best done by a licensed HVAC technician.

Next, it’s not too hard to upgrade your current filtration so that the air coming out of your air conditioner is cleaner than the air that goes in!  Here are some options:

  • Frigidaire now offers MERV 14 filters for some of its models.  Check the link in the overview for compatibility.
  • You can cut a regular HVAC filter to fit as per this video (make sure you use painter’s tape around the edges to prevent air leaking around the filter), or 
  • You can have a custom filter bracket made for your window AC, and change the filter in it often. Since the louvers in front just thwart air flow, you can actually remove the louvered panel and fit the filter inside (if it has a rectangular filter), or you can fit the filter over the louvers and secure it to the front with double-sided tape.  In order to specify the correct size for your window unit, determine which louvers are the “intake” (moving air into the unit), and measure the area covering and slightly outside of them, so that the frame and tape will seal but not cover a lot of the louvered space. 
  • You can make your own frame from 1” aluminum “u-channel” and rivets, and purchase the filter material in bulk or cut to size (these media pads are equivalent to MERV 8 and will filter a lot more dust than the cleanable factory filter!)

Finally, placing a Germ Defender or Mobile Air Angel near the air conditioner will not only help to freshen the room as ions are carried with the fresh air, it will also help to keep the coils cleaner as ions are sucked into the air conditioner by killing microbes and mold spores inside it.

If your space is feeling stuffy from being closed up all the time due to hot weather, chances are CO2 levels are rising.  Fresh air ventilation is important, so go ahead and use that ventilation lever on your window air conditioner, or crack the windows in the morning or evening when temperatures are more tolerable.  If you live in an urban or dusty area, use our window ventilation filters to get fresh air without the particulates.  May our window air conditioning units live long, cool lives!

Keeping Your Vacation Home Fresh

Keeping Your Vacation Home Fresh

It doesn’t matter whether your “vacation home” is a pull-behind trailer, or a luxurious condo, or a humble cabin in the mountains:  when you “get away” to a relaxing place, you don’t want to spend your precious vacation time trying to figure out how to get musty smells out or remove mold from the linens because the climate inside suffered while you were away.  Here are our tips to make it welcoming and low-maintenance!

First of all, humidity is the most important factor you’ll want to control in order to keep out mold, and you’ll want to keep the humidity under 60% all the time.  If the outside climate humidity rises over 60%, that climate will come inside and settle into soft surfaces, making them a perfect habitat for mold growth. You can only control humidity inside effectively by having a tight envelope, which means sealing up passages where outside air can penetrate in.  If no one will be living there while you’re away, you won’t need fresh-air ventilation, so make your get-away home as tight as possible by sealing windows, doors, attic doors, and other penetrations.  

Also, remember that relative humidity and temperature are closely linked.  For example, if you leave an air conditioner set on 82 degrees and the humidity rises to 80%, you may be at risk of mold forming in less than 2 weeks!  (If you’re wondering how that calculation came to be, check out this fun dew point calculator.)  In addition, relative humidity in a space will increase as temperature is lowered.   Air conditioning will naturally take some of the humidity out of the air, but there are a number of factors that can allow humidity to remain high even when your air conditioner is on. 

Here are some options to keep the humidity under control while you’re not there:

  • If you have wi-fi available in your vacation home, now’s the time to take advantage of technology that can pair with existing units like mini-splits, window or portable air conditioners to enable you to monitor climate and control them remotely.  Cielo is a company that has a number of products that can help you maintain the right humidity and temperature remotely. 

  • Alternatively, if you do not have wifi or app-enabled monitoring, you’ll need to choose a temperature for setting your air conditioner.  Although it’s tempting to set the temperature just under the temperature of melting plastic (haha) to conserve energy, don’t do it!  Setting the thermostat as high as 85 degrees can cause short run times and not allow the air conditioner to remove enough humidity from the air, creating an atmosphere for mold growth.  (No, You Shouldn’t Set Your Thermostat to 85F.  Here’s Why.)  For that reason, it’s ok to set it 7-10 degrees above the temperature you normally keep it while you’re staying there IF you also take into account the outdoor temperature and humidity.  There’s no magic formula for determining this ideal energy-saving-yet-mold-preventing temperature setting, but think about it: if your vacation space is in a hot, humid climate like the southeast US, you’ll want to set the maximum indoor temperature lower than the average outdoor temperature to make the air conditioning come on often enough to remove humidity.  

  • Thirdly, if you don’t have a humidity control setting on your air conditioner, or even an air conditioner at all, it’s best to purchase a dehumidifier with a humidistat and set it to 60% maximum humidity.  This will ensure that humidity is being controlled, no matter what temperature the interior rises to!  Think of this dehumidifier as insurance against mold: if your air conditioner was to stop working, the dehumidifier can still keep your space mold-free if it’s suitably sized for your space.  Check out our article on different types and sizes of dehumidifiers, and be sure to set up a portable dehumidifier with a drain into a lower tub or sink that condensate can safely drain all the time.

  • Leave doors to rooms and closets open for best air circulation.  Just like air purifiers, portable dehumidifiers cannot reach behind closed doors.  

  • Use ceiling fans in rooms and portable fans elsewhere to keep air circulating while you’re away, which will reduce the water content in all your furnishings by evaporation.  ““Evaporation increases the humidity of the atmosphere that immediately surrounds the liquid. This humid air takes some time to dissipate into the rest of the atmosphere. The presence of a breeze, a powerful wind, or some other form of air circulation can speed up this process and make the environment of the liquid less humid. Therefore, by decreasing the humidity of the liquid’s surrounding, a powerful breeze or wind can increase the rate at which the liquid evaporates.” (Factors Affecting the Rate of Evaporation)  This is why disaster restoration companies use powerful fans to move air over wet surfaces, increasing evaporation and removal of water.  With less water in your furnishings, the chance of mold growth is reduced.   You can even add air circulation to any space that has a light socket, such as closets and pantries, by removing the light bulb and screwing in a light socket fan (which come in different designs with exposed or enclosed blades).

  • Make sure your air conditioning and dehumidifier drains are clear and a clean air filter is in place before you leave!  Many homeowners have come on vacation to find their air conditioner or dehumidifier drain pan overflowing and dripping onto ceilings, floors, and other inconvenient places–what a mess that can also turn into hazardous mold!  As a homeowner, make sure to check these drains and change the filter several times during the air conditioning season, or arrange for someone to do the same while you’re away. 

  • Window air conditioners need deep-cleaning sometimes.  If a musty smell is coming from the air conditioner when the fan cycles on, then you’ll know that dust has infiltrated the cooling coils, absorbed moisture, and is nourishing mold growth.  Check our article on how to deep clean it and restore the fresh smell.

  • If you can, shut off water at the main valve to avoid any possible leaks, and switch off the breaker to the hot water heater if it’s electric (turn off gas if it’s gas).  This will avoid water leaks under sinks, which can make a nasty moldy mess!  If you don’t do this, at the very least shut off water to the washing machine, because burst water hoses at the washer are the single largest cause of home flooding.  (Leaving the House for 3 Days or 3 Months? 5 Must-Dos Before Your Trip)

  • Bipolar ionization units like our Germ Defenders, Mobile Air Angels and Whole Home Ionizers are a great way to keep mold away too.  At the very least, plugging a Germ Defender into the bathroom will send out ions to kill mold spores in this small space where air circulation can be a challenge.

  • Leaving a portable HEPA filter with activated carbon running is not a bad idea, either.  Activated carbon will help avoid that “musty” smell.  According to firesafeliving.com,  “plug-in” scent devices are not a fire hazard if you leave them plugged in while you’re away, but we at HypoAir don’t recommend them because a) many plug-ins use toxic chemicals like phthalates and formaldehyde, and b) the freshener will dry out before you return anyway, leaving an appliance running on your wall.  What’s better: make your own reed diffusers with your favorite essential oil (or combination of oils) and place them throughout your space for a safe, no-mess fresh scent!

These extra steps may seem to take more time on those days you’re packing up to leave your vacation home, but when you come back to a home that is ready for relaxing as soon as you open the doors and windows, it will be worth it!

Photo by Lavi Perchik on Unsplash

Mold in the Toilet

Mold in the Toilet

The bathroom is a room that’s very susceptible to mold growth, and once you understand what mold needs to grow, it’s easy to understand why. Basically, it just needs moisture (shower=check, sink=check, toilet=check), and food (dust=check, organic matter=check), so the bathroom sometimes becomes a petri dish that’s hard to keep up with.  Fortunately for you, we’re tackling this problem by appliance, so check out our other articles here:

Now, back to mold in the toilet.  Mold can be mistaken for those stubborn mineral toilet rings, until it starts to turn weird colors, like black, brown or pink. 

What type of mold is the black mold in the toilet?

Although you may know that Stachybotrys chartarum is the most commonly termed “black” mold, another mold that appears black is Aspergillus Niger, as shown in Figure 2 of this 2017 study from India.  Aspergillus Niger can be a cause of some forms of pneumonia, so it’s definitely not something you want in your bathroom!  The study identified five types of mold in public toilets, resulting from airborne spread of spores and improper or infrequent cleaning procedures.

Alternaria and Cladosporium are two other types of mold that can produce black growths. (10 Types of Mold Colors Commonly Found in the House)  The most important thing to know is that these molds can produce mycotoxins and mVOCs every time they are disturbed!  Stachybotrys has been demonstrated to produce a number of Macrocyclic Trichothecene mycotoxins.  (Black Mold and Stachybotrys Exposure Guide)  Aspergillus niger can produce Ochratoxin A, Cladosporium produces mVOCs which can be irritating, and Alternaria species produce more than 70 mycotoxins! (Alternaria host-specific (HSTs) toxins: An overview of chemical characterization, target sites, regulation and their toxic effects)

Brown stains in the toilet are another problem–they could be caused by a number of molds, such as Pithomyces chartarum, Aureobasidium pullulans, Stemonitis, Taeoniella, Cladosporium or Mucor.  Arguably the most harmful mold of these is Mucor, which can cause a life-threatening blood infection called mucormycosis. However, it’s not always brownt any point during its life cycle it can be brown, yellow, black, white, or gray.  (10 Types of Mold Colors Commonly Found in the House)

Pink slime in the toilet is actually not mold.  As we mentioned in our article about the shower, that pink slime that can also form around drains and at the bottom of the shower curtain is caused by the bacteria Serratia marcescens, and can cause urinary and respiratory tract infections, which are especially problematic for people with immune problems. 

If you decide to try to find out what type of mold is growing, you can test it with a lab, but in any case it’s wise to treat it as a dangerous air pollutant.  Don’t disturb it unless you spray a cleaner on it first (to immobilize the spores), or are using a mask!

What is the cause of mold in the toilet bowl?

There are several possible causes for mold in the toilet bowl, some of which can be easily resolved and some need more effort!  

  • One of the easiest methods is just flushing the toilet more often. Toilets that are not used every day can allow mold and bacteria to attach to the bowl.  After cleaning the toilet, try to remind yourself to swing by and flush the toilet at least every other day so that these microbes don’t have a chance to proliferate.
  • Next, if the toilet does get used or flushed often, more frequent cleaning is often needed.  However, you need to skip traditional bleach based toilet cleaners, as they are toxic for you!  The following are some non-toxic cleaners that are very effective for bacteria and germs, however note that citric acid is not always effective on mold (read below on citric acid** and get a few more recommendations from Zero-Waste Memoirs):
    • Force of Nature is hypochlorous acid, a safe alternative to bleach that is a hospital-grade, EPA-registered disinfectant that kills 99.9% of germs including Staph, MRSA, Norovirus, Influenza A, Salmonella, and Listeria when used as directed.  You can spray Force of Nature in the toilet as a final disinfectant, but it should not be mixed with essential oils or cleaners that contain essential oils, as this can reduce its disinfecting power. 
    • Fragrance-free powder: Seventh Generation Zero Plastic Toilet Bowl Cleaner ($22) has citric acid as its main cleaning agent.  This non-toxic ingredient is registered with the FDA in products certified to kill feline calicivirus (a testing substitute for norovirus), so we know that it works.  If you or anyone in your household is exhibiting symptoms of this illness or a similar one, we would suggest cleaning toilets full-strength and often with a product like this!   If you like a little lemony fragrance, try the Probiotic Toilet Bowl Cleaner by Etee ($45), which also uses citric acid.  It may seem expensive, but it’s not bad on a per-use basis ($1.50), and some customers find that using less than the prescribed amount (1 TBSP) works just fine.  Added probiotics help to keep your septic system functioning optimally.
    • Dissolving strips:  Nature Clean Natural Toilet Bowl Cleaners Strips ($17) are highly rated too.  They use sodium coco sulfate as the main ingredient, which is a blend of the fatty acids in coconut oil. (Sodium Coco Sulfate: Is It Natural?)  It is a synthetic detergent with one of its ingredients being sodium lauryl sulfate (SLS), however it is less irritating should you immerse your skin in the soapy water (highly unlikely for a toilet bowl cleaner!) Lastly, the essential oils including Australian tea tree oil, provide a pleasant scent and antiseptic properties.
    • Liquid: Mrs. Meyer’s Liquid Toilet Bowl Cleaner, $6, uses citric acid and essential oils like lemon verbena to get a fresh-smelling clean, all in a bottle made from at least 30% post-consumer plastic (recycled).  

Safe descaling of your toilet bowl:  mineral stains and some molds may be removed by simply using the concentrated citric acid** (as you’ve read, a non-toxic ingredient in many toilet bowl cleaners), which comes in a granule or powder form.  Granules are safer to use because they are mostly dust-free (they’ve been formed into little clumps that don’t kick up dust when you handle them).  

The following is adapted from a post on Moral Fibres.  Their method did not work without scrubbing but I learned a few things working on my own toilets:

  • Gather your supplies: a large pitcher for clean water, ½ cup of citric acid powder or granules, latex or plastic gloves, an abrasive scrub sponge that’s safe for porcelain, Bar-Keeper’s Friend Cleanser (optional), several paper towels, small disposable cup, tape for closing the lid (optional), about ¼ cup baking soda. 

  • Turn off/close the water valve on the wall completely.

  • Flush the toilet.  The tank and the bowl won’t refill this time. 

  • Fill a large pitcher full of hot water from your sink and pour it into the toilet bowl. The water should not be boiling hot as it could crack your toilet.  Also, make sure to add it slowly so that the water doesn’t drain completely from the bowl; you’ll want the water at or above the water ring stain.

  • Put on gloves and add about ½ cup of citric acid powder or granules to your toilet bowl. (use a mask if your citric acid comes in powder form)

  • Swish the water in the bowl gently with your toilet brush to dissolve it, but don’t swirl too vigorously because it will cause water to drain from the bowl.  After you add the citric acid to the bowl, don’t add more water, because this will dilute the acid. Add paper towels around the bowl to cover all the stained porcelain, and use the disposable cup to wet them with liquid from the bowl.  The bowl should be lined with paper towels stuck to the inside wherever there are stains.

  • Close the lid and put tape and a sign to prevent people from using it! 

  • Leave the citric acid in the toilet bowl, without flushing, for at least one hour, or preferably before going to bed, so it can soak the scale overnight.

  • After leaving the solution to soak, use the bowl brush or gloved hands to remove the paper towels, and try using your toilet brush to remove scale deposits. If it doesn’t move, use gloved hands, the scrub sponge, and Bar-Keeper’s Friend or another agent safe for porcelain.  Scrub away!

  • Finish by adding the baking soda to neutralize the acid, swish with the bowl brush, open the water valve, wait for the tank to fill, and flush!

  • If your toilet is particularly stained, then it may need a second application to remove stubborn deposits.

Citric acid**: The interesting thing about this chemical is that it is commercially produced by the mold Aspergillus Niger, which may be the same type of mold you’re trying to eliminate.  Manufactured Citric Acid (MCA) is one of the most common food additives in the world, and has received the status of “generally recognized as safe” (GRAS) with the FDA.  However, there have been isolated cases of inflammation due to ingestion of foods with MCA, due to its great tolerance to heat and large potential that byproducts of A. niger remain in the final MCA product. (Potential role of the common food additive manufactured citric acid in eliciting significant inflammatory reactions contributing to serious disease states: A series of four case reports)  Unfortunately, we weren’t able to determine whether MCA actually kills Aspergillus Niger growing in your toilet, but it does a great job with all the other molds 

The atmosphere of the bathroom is also very important in preventing mold.  Here are two ways to keep the air in the bathroom less hospitable to mold: 

  • Bathroom exhaust fans are a must for any bathroom with an actual shower or bath.  If you have a fan but not sure if it’s large enough, check the cubic feet of air per minute rating (cfm) on the fan (you may have to remove the cover) and this article to see if it’s large enough for your bathroom.  In addition, go outside and see if you can see the little flapper lifting to show that air is indeed being exhausted.  If you can't find the exhaust of this fan, it's possible that the moisture is being exhausted in the attic, which needs to be fixed.  If your kids or guests are not switching on the exhaust fan during their showers, get an electrician to tie the fan and light switch together so that the fan MUST come on when the light is on.  Finally, if you don't have an exhaust fan, get a window fan like this one and make sure the kids use it!
  • Bipolar ionization units like our Germ Defenders, Mobile Air Angels and Whole Home Ionizers are a great way to keep mold away too.  At the very least, plugging a Germ Defender into the bathroom will send out ions to kill mold spores in this small space where air circulation can be a challenge.

If the mold keeps coming back despite flushing and cleaning, then there are several possible causes for this:

  • Older toilets commonly have pitting in the ceramic which can harbor mold. This video shows that no matter how hard a toilet is scrubbed with different products, pits in the ceramic are microscopic reservoirs that shelter bits of the mold, allowing it to come back again.  The safest solution in this case is to replace the old toilet with a new one.  The radical (but toxic) solution to keep your old toilet but lose the mold is to use diluted muriatic acid (also known as hydrochloric acid) to clean the pits.  However, the mold will eventually come back and inhabit those pits again unless you take another step to renew the enamel on your toilet bowl (a bit extreme to save an old toilet). 
  • Improper venting.  You may not know it, but all drains in your home require a vent to work properly.  We’re not talking about the air vents in ceilings and walls, but a gas vent for the drain line.  These are hidden in your walls.  According to the uniform plumbing code, vents must be located within six feet of the P-trap (that snake-like part under the sink and the S-curve under the back of the toilet); otherwise, the drain may not work properly and gasses can build up, supporting mold and microbe growth.  If this seems to be the case, it’s best to have a good plumber check out the location and condition of the toilet and sink vents and see if there are other drain problems.   
  • This next one is a difficult truth: there may be a cache of mold hidden in your home that is “seeding” spores into your air, causing mold to grow wherever there’s a water source (sinks, showers, and of course your toilet).  According to a respected mold inspection and remediation company, Mold hotspots include the basement, attic, windowsills and door frames, crawlspaces, appliances, and underneath the sinks. Do you feel worse in some rooms of your home and better after leaving them?  This gives a clue to where the mold contamination may be originating.  If you don’t see anything obvious, you could have a hidden leak somewhere, like in the walls or flooring, that’s allowing mold to grow. There are two things you can do in this case: 
    • Order some spore traps from GotMold or even just a set of EC3 test plates ($36 for 6-pack) by MicroBalance Health Products to check the relative mold level in rooms to narrow it down!
    • If you suspect a problem or are having chronic symptoms, it’s best to hire a qualified mold inspector.

There are many non-toxic ways to clean and keep clean nowadays, and with a little research and effort the toilet can be as clean and healthy as the rest of your bathroom and home!

Photo by Jas Min on Unsplash

How to safely remove old carpet

How to safely remove old carpet

Upon testing my bedroom carpet as part of a series of mold tests in my home, I found this:

I scheduled time to remove the carpet the next week.  Now, how do I do this safely?

Research revealed two extremes:

  1. removing the carpet with no breathing equipment and no dust abatement (although this guy has some great tips, I cringe at the way he’s throwing the carpet around with no dust mask)

  2. removing the carpet with breathing equipment, a zillion garbage bags and gallons of mold eliminator (this method is costly and WET!) 

I had to find a solution in the median.  Here’s what I came up with for my situation (I am moderately sensitive to mold). 

Supply list:

  • Respirator with extra set of filters

  • Heavy gloves

  • Old clothes

  • Knee pads

  • TotalClean concentrate (or several pre-mixed spray bottles)

  • Clean garden sprayer

  • Rags

  • Plastic sheeting and painters tape for taping off vents and covering heavy furniture

  • Old towels to block under door

  • Heavy duty garbage bags (also known as contractor bags)

  • Carpet knife with extra blades or utility knife with extra blades

  • Duct tape

  • Pliers for pulling carpet

  • Nail puller to remove staples in padding

  • Pry bar and hammer to remove tack strips

  • HEPA vacuum with new bag for cleanup

  • Air Angel and/or Germ Defender: helps with dust and mold mitigation

Prep, prep, prep…it’s tedious but so worth it.  

  • Move whatever furniture, clothing and decor you can easily move, into another room. I took the long-overdue opportunity to get a new mattress, so I could escort my old one to the dump!

  • Use dollies on furniture that is too heavy or large to move out of the room.

  • Turn off the HVAC and cover any ceiling, floor or wall registers with plastic sheeting and painter’s tape

  • Measure TotalClean concentrate and water into garden sprayer at 1:7 parts respectively or empty pre-mixed spray bottles into sprayer.

  • Block under door(s) with old towels so that dust doesn’t migrate through the house.

  • Open window and remove screen if you plan to toss the carpet out of the window (also block off the area below)

  • Turn on the Air Angel and/or Germ Defender to help dust particles clump together and fall to the floor; the ions also destroy mold and bacteria on contact

  • Suit up with all protective gear including your respirator!

My strategies for minimizing dust will be to dampen a section of the carpet with the sprayer; cut the carpet into a  manageable section, remove it, and do the same three steps for the carpet pad underneath.  You’ll want to make the least number of cuts, because cutting through the carpet releases a lot of dust and fibers into the air.  I realize that this method will only wet the top of the carpet and not the cut edge or bottom, but short of soaking the carpet and subfloor, I found this is the best solution.  I liked the idea of tossing the carpet out of the window on a good weather day and bagging or binning it outside so that I didn’t drag the bags through the house.  I removed the carpet, padding and staples as I went, because I had a heavy piece of furniture left in the room and did not want to move it around more than necessary.

  1. Starting in one corner, use the sprayer to dampen the carpet in a 2’x8’ section.  Cut just inside that section with the carpet knife.  

  2. Use pliers to grab the carpet in the corner and wrestle it from the tack strips. If you can’t get it out, try cutting the corner out with your knife and pulling out just the corner.

  3. Roll it up gently and dispose of it in a contractor bag (or toss it out a window!)  If bagging it, then you can use the duct tape to keep it rolled tightly.

  4. Spray the carpet pad underneath and cut it.

  5. Dispose of it in the same way.

  6. Remove staples holding the padding to the floor with the nail puller.

  7. Remove tack strips using the pry bar and hammer.  They are super-sharp!  (If you plan on replacing with new carpet and the tack strips are not rusty or damaged, you can leave them in place).  

Repeat steps 1-5 until the whole room is devoid of carpet and padding!  If you can handle more than 2x8’ of damp carpet at a time, you can  Then, use a HEPA vacuum to thoroughly vacuum the floors to remove dust.  You will want to wipe down the walls, window(s) and ceiling fan with TotalClean because dust is now everywhere.  Finally, you can remove the sheeting from your register(s) and change clothes and shower–you earned it!  It’s best to add a bit of EC3 Laundry Additive to your clothing when washing it to avoid spreading mold to any of your clean clothing. 

If you have a new floor already scheduled for installation, good for you! Make sure that the subfloor dries out completely before 48 hours have passed, and definitely before installing new flooring (use of the sprayer makes it unlikely to soak the subfloor).   If you haven’t picked out new flooring yet, you can remove/replace any nails or screws that are sticking out, use a non-toxic floor paint, and/or use an area rug to cover over any rough areas until that day comes.  Try not to wait too long, however, so that excessive wear of the subfloor doesn’t occur.  

Photo by Julie Marsh on Unsplash

The unintended consequences of turning down the thermostat this winter

The unintended consequences of turning down the thermostat this winter

According to the Energy Information Administration and their Winter Fuels Outlook report, it will cost 27 percent to 28 percent more than 2021/2022 to heat your home with oil or gas.  If you heat with electricity, prices may rise by as much as 10 percent, because much of our electricity is generated from oil and gas. (Newsweek.com)

When you have a fixed or unstable budget, the decision to lower or turn off heat during the winter is not easy.  The other components of our budgets–food, housing, transportation and medical care–aren’t as flexible as those extra blankets, mittens and hats, so down the thermostat goes.  This is where what you don’t know might hurt you.

It’s not only the air temperature that changes when the heat source turns off.  Air holds a certain amount of water vapor, also called humidity, and warmer air can hold more water vapor than cooler air.  When the air cools, water vapor in the air will tend to condense on any surface that is lower than the dewpoint temperature.  That’s why you see condensation on windows and around door frames in winter: these are the points that tend to conduct cold temperatures from the outside, and moisture from the air is condensing on them.  Persistent moisture is mold-feeding moisture, and before you know it, there is a mold problem.  Even worse is that mold could be forming in places you can’t readily see, like inside walls, attics and basements, because the air temperature has dropped and cooler air just can’t hold the moisture of warmer air.   Cooler air can easily reach humidity levels of 80% or more, giving that “damp” feeling and over time, exposing the home to mold growth.  

There is a myth that when a room is not being used, it’s best to turn off heat (close registers) and close it off from the rest of the house (close the door) to save money.  If this is done without any ventilation or air circulation, it’s also a recipe for mold, because without air circulation, water vapor in stagnant air will be absorbed by furnishings and allow mold to take root.  If you need to limit heating in your home, try to leave doors to unused rooms at least cracked and leave a fan running in the room, because dynamic airflow limits moisture ingress due to evaporation. For more on finding and fixing areas prone to mold in the winter, check out our article.

If high humidity is not a problem, low humidity might be.  Low humidity can damage all kinds of decor in your house by shrinking and drying, from wood flooring, wallpaper, and furniture to fine instruments like pianos and guitars and artwork.

Then, there’s your body.  Stress due to cold is a real problem for the elderly and those with pre-existing medical conditions like asthma or heart disease.  It also makes people more likely to use alternate heating methods that could be unsafe.  Small room heaters are often known to tip over and cause fires, and electric blankets can actually cause burns.   Falling asleep on a bunched-up blanket is a common cause of burns, according to Bell, a plastic surgeon who treats many burn patients. He explains that when a hot blanket rests on the same body part for an extended period, the skin can burn. “These burn accidents usually happen because someone has fallen asleep on a bunched-up area of the blanket,” he says.  Unfortunately, people with diabetes are more vulnerable to burns from electric blankets because their condition makes them less sensitive to heat. “Electric blankets are also not recommended for infants, young children or anyone who is paralyzed or incapable of understanding how to safely operate them,” says Bell.  People with urinary incontinence also should not use electric blankets because wetness and electricity don't mix. (ul.com)  If you do use an electric blanket, follow all the safety guidelines of UL Solutions (previously Underwriters Laboratories) so that you don’t become one of these statistics!

When home heating costs rise, air quality can also worsen due to particulates in the air.  In Europe, the impacts of inflation and fuel scarcity due to the Russian-Ukrainian war is particularly hard on middle and lower income families, and they turn to alternative sources like burning wood, coal and even garbage in indoor stoves.  These stoves impact indoor and outdoor air quality.  Indoors, reloading a stove that is already burning fills the air with particulates, and combustion gasses can leak out of improperly-sealed doors and exhaust pipe fittings, exposing inhabitants to dangerous levels of carbon monoxide and particulates.   Outdoors, European cities that typically have poor air quality during the winter may have even worse this winter. A recent study from Greece showed that wood burning was responsible for almost half of the cancer-causing air pollution in Athens and a new study from New Zealand has showed an increase in serious respiratory infections when wood smoke built up in an area. (TheGuardian.com)  If you live in one of these areas, it doesn’t matter whether you are the one burning wood–you will still be breathing its effects. 

If you feel financial pressure to lower the thermostat this winter, here are some practical ways to keep the air warmer and less humid in your home (Prof Cath Noakes from the University of Leeds):

  • Move seating away from cold windows
  • Use thick curtains at night, but allow the sun to come in during the day
  • Ensure radiators or ventilation registers are not covered or blocked by furniture
  • Ventilate using high-level windows can reduce cold drafts
  • Ventilating after a shower or when cooking can prevent moisture buildup which can lead to damp and mold.

It’s sometimes harder to detect high humidity in the winter because of the lower temperatures, so don’t take a risk–keep one or more humidity sensors in your home for monitoring it.  Our bipolar ionizers like the Germ Defender, Air Angel or Whole Home Polar Ionizer actually deter mold even if humidity temporarily goes too high, making them great investments for all seasons. 

Finally, if you have a warm home, sharing it with your elderly, disabled or disadvantaged friends for a meal or a few hours could make a huge impact in their lives.  Helping them to purchase safe heating appliances and understand how to keep humidity at manageable levels also will help them to live healthier.  Warmth is not always about containment, but allowing it to radiate to others. 

Photo by Will on Unsplash

Ancient homebuilding 101: How did ancient people prevent mold in their homes?

Ancient homebuilding 101: How did ancient people prevent mold in their homes?

Mold is an ancient problem, the most infamous account of which is in the 14th chapter of the book of Leviticus in the Bible.   Although it’s described as a “plague of leprosy” in the King James translation (verse 34), the references to “ingrained streaks, greenish or reddish, which appear to be deep in the wall” (verse 37 in New King James translation) are hallmarks of mold.  Indeed, some scholars investigating the meaning of the Hebrew word “Tsara’at” that was translated “leprosy” have inferred from ancient skeletal evidence and modern symptoms of mold exposure that a better translation may have been “mold”.  (Mold: “Tsara’at,” Leviticus, and the History of a Confusion).  Going forward with this assumption, the prescription for mold in the ancient Hebrew home was inspection (by the priest), identification (by shutting up the house and seeing if the mold grew), remediation (empty the house of everything valuable, remove the stones and plaster, and replace them with new stones and plaster), reinspection and cleansing, and in the case of last resort, demolition (complete dismantling and removal of the house). 

Has the problem (or plague) of mold gotten worse since ancient times?  Maybe so.  After World War II, a housing boom generated the need for faster and cheaper construction and made gypsum wallboard (drywall) much more popular than plaster as a building material.  Drywall is composed of compressed gypsum between two layers of durable paper. Gypsum readily absorbs water and dries slowly, while paper supports mold growth very readily. Since mold growth can occur within 24-48 hours of a water event, according to the US EPA, this is a perfect recipe for mold growth (just add water!).

The housing boom also caused quality of construction to decrease as volume increased, allowing for water problems to happen more frequently. “Back in the days of plaster, brick and stone construction, we didn’t have mold problems like we do now. This is in part because mold doesn’t grow on those materials very easily, if at all. Drywall, on the other hand, is like a Petri dish. What’s worse is that drywall is an ideal growth medium for Stachybotrys, the black toxic mold referenced above, because of its high cellulose content. Nearly every mold will grow on drywall given the right moisture levels, but Stachybotrys has a field day with it.  The final component of the perfect storm, which has made mold into the problem we now face as a society, here and internationally, is that our buildings are built so tightly, in the name of energy efficiency. Ever since the fuel crisis in the 70’s, there has been a huge push to reduce energy usage and create a more comfortable living environment. We have walls stuffed thick with fluffy insulation. Having a small utility bill is a bragging right at cocktail parties.” (A Brief History of Mold)

We can see that there are three things we need to consider in homebuilding to prevent the dreaded “m” word: design (for natural ventilation), construction technique (to avoid water intrusion and decay) and materials.  Here are two examples of how ancient people incorporated these mold-fighting aspects into their homes, knowingly or unknowingly:  one is from Israel and the other is from Egypt.

Building techniques in first-century Israel:

According to nazarethvillage.com, villagers in Israel often built homes on the bare ground.  They could dig into soft limestone to make caves for water or wine storage, but often just used what the topography offered.  “Building on sloping bedrock requires great care in setting the first course, starting from the lowest part of the foundation and working upwards step by step. The bedrock footing is flattened and slightly stepped, but does not need to be completely level. By fitting stones into the uneven footing, the force of gravity will secure the buildings onto the bedrock. Using the land as the ancients did makes a lot of sense – there is less to dig and less to build.”  (Site Excavation)  The mortar used to hold the stones together was primarily earth, chalk (calcium carbonate), leftover straw (to add strength and reduce cracking) and a small amount of hydrated lime for durability.  The chalk is excellent at absorbing excess moisture from the air (reducing humidity inside), while the lime also inhibits fungal growth (keep reading for more benefits of lime!).  (Mortars for building and plastering in antiquity)

House windows in first-century Galilee were typically placed relatively high in the wall for maximum ventilation and privacy. Ventilation, as we know, can discourage mold by allowing ions in the fresh air to reach interior surfaces. (Windows)  The same principles were used in design of the homes, which featured a central courtyard with rooms added around it; thus fresh air could flow through the rooms whenever doors were opened to the courtyard. 

Preparing the house for plastering inside requires placing “small chinkstones and mortar to fill cracks and create a flat substrate for the interior plaster. Although obscuring the beautiful view of exposed stone masonry, interior plaster was necessary for insulation and to prevent household pests from taking over.  Plasters also improve interior lighting by brightening up the colours of the walls. We discovered that mixing chalk with the earth plaster gives a bright yet warm tonality to the home. The homes of more wealthy residences and public buildings – such as our synagogue – were finished in white lime plaster and occasionally painted.” (Interior Plaster)

Building techniques in ancient Egypt:  The following facts were taken from the article Homes and Mud-Brick Construction in Ancient Egypt, which references the report by Virginia L. Emery, University of Chicago, UCLA Encyclopedia of Egyptology 2011, escholarship.org:

Unfired mud brick houses were common in ancient Egypt, from the simplest abodes to the grandest of palaces.  Mud brick had several advantages over stone:

  • Brick ingredients were available virtually everywhere (sand, clay, and silt combined with chopped straw or dung as temper and binding agent)
  • Mud bricks are quicker to fabricate than quarrying stone, making them more economical in that sense
  • Mud bricks are quicker and easier to build with because they don’t require the trimming or fitting that building with hewn stone demands. 

“Mud-brick walls could be constructed directly on an unprepared ground surface, though more commonly were provided with brick foundations and wall footings laid in trenches upon a bed of sand... Occasionally, particularly along high- traffic routes, the base of the wall at ground level was protected by a footing of stone, in an effort to minimize the undercutting of the wall due to water or wind damage and traffic; stone elements also could be included in the wall proper, being most common at the quoining of building corners.”

The article Mudbricks give clues to understanding the Bible, which referenced the article Mud Bricks and the Process of Construction in the Middle Bronze Age Southern Levant, confirms that unfired mudbricks are susceptible to water damage.  Water can dissolve the bricks as well as weaken them, especially near the base of the walls. Several strategies are used to help minimize water damage. Typically, the construction techniques in the Ancient Near East involved building a stone foundation of 2-3 courses of stone upon which mudbricks were then placed to the desired height. The stone foundation does two things:  it minimizes the capillary action of water and salts seeping into the lower courses of bricks; it also helps reduce the erosive effect of water splashing from the roof back onto the bricks or from water running in the street.  Another aspect of mudbrick preservation was regular plastering and re-plastering the walls, which helped retard the effects of moisture and erosion, as well as the intrusion of plants, insects, and animals. 

How do these natural building methods defeat mold?

Mud-brick, which is also called adobe in areas of Spanish influence, can still be an economical way to build. Many people think that mud-brick invites mold and dampness into your home, however, it actually inhibits mold in several ways.  Ideal conditions for mold or rot are caused when a building material absorbs moisture and is unable to later release it, or when moisture is not absorbed but condensates on a surface. Here are the ways mud-brick and other earth building techniques inhibit mold, according to Earth Building School:

  • Creating thermal mass:  Thermal mass regulates temperature by absorbing heat when it is available, storing it and slowly releasing it when ambient temperatures drop.  Keeping temperatures higher and more constant reduces condensation and dampness, because cold air holds less moisture and so will condensate on windows and walls.Earth is one of the best thermal mass materials available, because of its slow reaction time and because it naturally regulates humidity.  It is easy to retrofit earthen building elements to your existing home: Earthen plaster over drywall, inbuilt cob furniture or mudbrick feature walls - let your imagination run free while creating a beautiful, healthy living space.
  • Clay regulates humidity: You can't beat clay when it comes to balancing indoor humidity at optimum levels of 40-60% RH. A solid wall of earth bricks can absorb up to thirty times the moisture of conventional burnt bricks and a 30mm (1-3/16”) thick surface coating of clay is more than enough for daily buffering.  
  • Naturally anti-fungal: Finally, natural finishes such as clay, lime plasters or Tadelakt (Moroccan plaster) are naturally anti-fungal.  These are good finishes in areas that are often damp, such as kitchens and bathrooms.  Lime is highly alkaline (high pH) and inhibits mold growth. It can be used to fix mold problems in old buildings (once permanent water damage has been remedied) and is a good and very hygienic choice for bathrooms - even in splash areas such as hand basins and showers.  Lime plaster is water resistant and can be applied as Tadelakt, for a totally waterproof result.  Working with lime - especially in situations where waterproofing is required - is a bit more technical, so it is advisable to get a skilled person onto the job. 

Whether the building is constructed with mud-brick or stone, these are the “bones” of the walls; plaster is placed over the brick or stone, and then the final interior and exterior finishes give them the protective “skin” that really preserve the construction from the elements.  Let’s dive into the finishes of Limewash and Tadelakt to find out why they are so good at inhibiting mold.

Limewash:  This ancient paint has so many physical benefits, and topping it off, has a soft and warming aesthetic that is causing a resurgence in its popularity.  Chemically, limewash is calcium hydroxide mixed with water.  Calcium hydroxide, also known as quicklime, is a naturally-occurring mineral that is soft and easy to mine from the ground (nature also “excavates” lime deposits with water, producing caves with fantastic formations inside).   Adding just the right amount of water causes the mixture to heat up (an exothermic reaction) that can be used immediately or left to cool down and thinned out with more water.  Here are some benefits of applying limewash in your interior or exterior finishes:

  • Limewash applied to stone and wood prevents rot and erosion while allowing the structure to “breathe” and release moisture.
  • Limewash is a natural pest repellent: the active ingredient, calcium hydroxide, discourages many types of worms, beetles and even mosquitoes from infesting the structure.
  • Lime is a farmer’s friend because it naturally deodorizes.  Lime provides free calcium ions, which react and form complexes with odorous sulfur species such as hydrogen sulfide and organic mercaptans found in animal and biological waste.  Thus, waste odors are not “covered over” with lime, but actually destroyed.  (Uses of Lime/Environmental/Animal Waste)
  • The high pH of limewash (10-13) makes it anti-fungal, anti-viral and anti-bacterial when it’s wet.  When dry, the pH lowers to neutral; however certain commercial limewashes like Lime Prime by Earthpaint have proprietary resins/polymers that allow the active ingredients to rehydrate and raise the pH again, so that it continually fights mold.
  • Limewash (and the plaster beneath it) are naturally incombustible.  This property was recognized at least as far back as 1212, when the King of England decreed that buildings that survived the terrible London fire must be plastered and limewashed immediately to prevent future fires.
  • Limewash prevents rust on iron surfaces.  This makes it even easier to apply, as masking off hardware is not necessary unless for aesthetic purposes.
  • Limewash is cheap and easy to make on your own.  You’ll just need to purchase calcium oxide (also called burnt lime or quicklime) from a supplier, and be sure to wear the proper clothing and protective gear to guard against chemical burns.  There is plenty of tutorials online, and this article from a long-established UK building conservation company also describes the process.
  • Finally, if you prefer skip the DIY and use commercially prepared limewash, Earthpaint, a company that prides itself in only offering non-toxic paints and wood finishes, has a set of products that can specifically tackle damp areas and mold remediation areas: Lime Prime and Lime Seal.  These are also great on unprimed drywall in any location.

Tadelakt: Sometimes referred to as Moroccan plaster, tadelakt is a traditional plaster indigenous to the Marrakesh region of Morocco that can be used as a stylish wall covering and alternative to tiles. It can be used indoors and on exterior walls.  Tadelakt-plastered walls create a solid, waterproof surface that is seamless, has no grout lines and is resistant to mold, which are some of the reasons why this traditional plaster style has become so popular in contemporary, minimalist homes. (Tadelakt: What you Need to Know About Moroccan Plaster)

Tadelakt is applied in several coats and finished using a special technique. "The final stage of polishing is done by using a plastic trowel, Japanese trowel or a traditional Moroccan application which requires a special polishing stone," explains Ian Kozlowski, Founder of Decor Tadelakt.  It's the final stage of applying tadelakt that makes the resulting surface waterproof.  Valentin Tatanov, manager at Tadelakt London explains: "The olive oil soap that is rubbed into the surface of the product chemically reacts with the lime to form calcium stearate."

This waterproof membrane makes Tadelakt appropriate for use in shower enclosures and wet room ideas (where shower walls are not necessary and the entire room can be wetted and drained).  The seamless application means that details like benches, windowsills and shower niches are easy to create.

Tadelakt is relatively low maintenance;  it can be cleaned simply by rinsing with water because the surface resists dirt and mold. "In the shower, squeegeeing down the walls after each shower is all that is needed to maintain the tadelakt shower walls," explains Decor Tadelakt's Ian Kozlowski.  What's even better from a non-toxic standpoint, you must avoid using commercial bathroom cleaners on tadelakt, especially any containing bleach or harsh solvents, as this may destroy its waterproof quality. 

Just like a wooden countertop or cutting board needs periodic maintenance to keep it looking great, water-resistant and bacteria free, "regular recoating with soap solution ensures that the tadelakt stays in excellent condition for years to come," suggests Valentin. 

Shikkui Plaster:  The Japanese started using this type of thick plaster in the 6th century following the spread of Buddhism from the Korean peninsula.  It is made of slaked lime additives including seaweed extracts, soybean oil, natural plant fibers, and eggshells.  It is also used on interior and exterior surfaces.  According to this article, some versions of the plaster also contain plankton skeletons and special algae only found in Japan, which is hygroscopic and helps control humidity. Due to these ingredients and the plaster’s natural ability to absorb pollutants and VOC gasses, it creates healthy airflow within spaces. It is fire and earthquake resistant, has the ability to naturally control bacteria, fungi, and molds; and is naturally anti-static, which reduces dust accumulation.   This Shikkui plaster manufacturer shows the tools and techniques for applying this plaster to practically any wall surface (even wallpaper!).  It is applied quickly in two thin coats back to back, and has a highly polished finish.

For all of their benefits and non-toxicity, we shouldn't be afraid to experiment with limewash, tadelakt and even Shikkui plaster in our homes as the "new" anti-microbial coatings.  They've stood the test of time!

Photo by Anne Nygård on Unsplash

Breaking down Mycotoxins and mVOCs with Enzymes and Non-Toxic Cleaners

Breaking down Mycotoxins and mVOCs with Enzymes and Non-Toxic Cleaners

If you haven’t read our white paper on mold, mycotoxins and mVOCs, you should!  While discussing the meanings of these scientific terms with our team, we thought it would be even more helpful to break it down to the vernacular.  Mold is like most other living organisms that excrete waste products.  Mycotoxins are not similar to excrement, in that they are not secreted because of normal growth, development or reproduction of the mold (they are secondary, not primary metabolites).  They are chemicals secreted in offense and defense, and in stressful situations.  Thus, mycotoxins are like sweat–the toxic sweat of mold (yuck!).  They can be sent aloft into the air on mold spores (which are also released whenever the mold is stressed or physically agitated), or even smaller fragments of mold and dust, which are all easily breathed in.  

Microbial Volatile Organic Compou0nds (mVOCs) are gasses as a product of growth, development or reproduction (some are primary metabolites), and as a signal to other microbes around them (secondary metabolites).  This means that mold uses mVOCs to communicate and affect the behavior of other molds around it, even as a competitive tool to directly exert antimicrobial activity (suppressing or eliminating potential enemies). (Volatile affairs in microbial interactions)  As such, mVOCs are akin to body odor–the toxic body odor of mold, which it uses to intimidate other mold!   Although they are meant to signal other microbes, even humans can recognize the smell of some mVOCs in that musty, earthy smell that is a tell-tale sign of mold.

It has been shown that the mycotoxins can be eliminated by various physical means such as thermolysis (destruction by intense heat), radiation treatment and low-temperature plasma (bipolar ionization).  They can also be destroyed by chemical methods such as oxidation (removal of electrons), reduction (addition of electrons), hydrolysis (breakdown by reaction with water), alcoholysis (breakdown by reaction with alcohol), absorption and adsorption, and biological methods by using living things like bacteria or other molds. (Enzymes for Detoxification of Various Mycotoxins: Origins and Mechanisms of Catalytic Action)  Only two  of these methods are permitted to mitigate mycotoxins in foods, however, contamination of raw materials with chemicals and/or products of side reactions limit their use.

Alternatively, using enzymes to detoxify mycotoxins mostly avoids these problems.  First of all, what is an enzyme?   Enzymes are proteins produced by living organisms that act as catalysts in chemical reactions.  Enzymes can either build up or break down.  For our purposes, cleaning enzymes facilitate breaking down microbes and their byproducts that cause sickness, stinkiness or stains.  

Scientists have been exploring making artificial enzymes since the 1990’s, and many of these are mimicking enzymes found in nature.  Here are the most common types of natural enzymes (from Simple Science: How in the World do Enzymes Clean?):

  • Proteases break down protein-based soils including blood, urine, food, feces, wine and other beverages.
  • Lipases break down fat molecules like oils and grease.
  • Amylases break down starch molecules like eggs, sugars, sauces, ice cream, gravy.
  • Cellulases are used to soften fabric and restore color to fibers made up of cellulose material. They also remove particulate soil and reduce fabric graying and pilling.

Various enzymes can also be combined to treat the combinations of mycotoxins that are produced by some molds.  For example, cytochromes are enzymes that include a number of compounds consisting of an iron-containing molecule bonded to a protein (cancer.gov).  Cytochromes are usually used within mammals as detoxifying agents of multiple toxic compounds, including mycotoxins.  Cytochromes in the human liver are able to convert aflatoxin B1 (a cancer-causing mycotoxin) into Aflatoxin M1, which is 10 times weaker in carcinogenic potency.  In turn, glutathione s-transferase, another enzyme in our bodies, leads to the excretion of aflatoxins from the body (2016 study).   

Since the enzyme-based approach for degrading mycotoxins in homes is new, there aren’t that many commercial products on the market.  In fact, Green Home Solutions claimed in 2022 that it was the “is the only professional remediation company that combines the ANSI/IICRC standards for mold remediation with a state of the art proprietary disinfectant/ fungicide that not only kills bacteria and molds, but continues to work by breaking down the allergenic protein structures into harmless amino acids.”  It is only available for professional use, but their product description shows that several enzymes are combined for maximum effect on the broad range of mycotoxins that may be found in a home:

  • AMYLASE is an enzyme that digests the mold’s outer membrane or cell wall. It dissolves and causes the insides to leak out.
  • LIPASE is another enzyme in our product formula which attacks and breaks down the fatty lipids inside of and in between the mold membranes.
  • PROTEASE breaks down allergenic proteins at the mold’s core or nucleus, eliminating them from the air you are breathing.

Since we revealed the real nature of mycotoxins and mVOCs (they’re like toxic sweat and body odor), we thought you might like some real solutions you can use to get rid of these toxins in your home!   Elimination of the mold colony is first and foremost, so it’s best to contact an inspector if you can’t find or handle the problem yourself.  Getting rid of the bulk of mold will remove much of the mycotoxins and mVOCs, but mycotoxins can still be present in dust (they are very hardy and indestructible by heat), and mVOCs may be present in absorbent furnishings.  Here are some products and techniques that can rid your home of the remainder of these toxins.

  • EC3 Enzyme Cleaner Concentratie is a non-toxic solution also trusted by many mold remediation companies and mold awareness sites, such as moldfreeliving.com.  It is an enzyme solution with citrus and essential oils that is safe for food-prep surfaces, can also be used in the laundry and many surfaces around the home, even as a degreaser. It was proven effective for mold spores and mycotoxins by a 3rd-party, CAP-accredited lab.   

  • MycotoxinKlear is recommended for all mold and mycotoxin products in use of a fogger or electrostatic sprayer.  

  • The enzyme-based approach for degrading mycotoxins in homes is not common on the commercial scale.  However, some mold remediation companies use them with great results.  The Mold Pros use SurfaceGuard, which was shown in a 2019 study analyzed by RealTime Labs to break down ochratoxin, aflatoxin and gliatoxin to undetectable levels.  Unfortunately SurfaceGuard is only available to commercial remediation companies.

  • Most MVOCs can be mitigated with activated carbon filters, because they are in a gas form and can flow through and be adsorbed by the carbon molecules.  You can try our Germ Defender with carbon filters, or purchase carbon filters for your standalone HEPA unit.  Mycotoxins, however, will not be affected by carbon filters because mycotoxins are attached to spores, fragments of spores, and dust, which are not captured by carbon filters.

If you can’t remove all of the mold, the next best thing may be encapsulation.  Encapsulation is a controversial method in that it does not physically remove the mold but surrounds it with a protective layer that does not allow it to release spores or mycotoxins into the environment anymore.  If encapsulation is done properly, though, it can be a safe method that allows homeowners to save wet drywall and wood that have not dried out completely, by sealing any mold that is present and not allowing more to grow.  As demonstrated by EarthPaints, encapsulation either needs to be applied to completely dry substrates, or with a solution that allows the substrate to completely dry over time.  Their Lime Prime paint is a non flammable mineral shield that saturates wood fiber cells and pozzolanically reacts with concrete and gypsum. Encapsulated Substrates dry out properly and in 30-60 days are ready for follow up after a flood. (earthpaint.net)  The problem with mold encapsulation is that it must completely coat surfaces in a space with a durable non-toxic product, and of course the space must be clean and dehumidified, or the mold will “break through” and continue growing as dust and moisture allow it to propagate.  For more information on whether encapsulation is right for a space in your home, this article by a building biologist is very helpful.

Once again, we also find that bi-polar ionization (used in the Germ Defender, Air Angel and Whole-Home Purifier) should be effective against mycotoxins in the home.  Because bipolar ionization sends out positive and negative ions that cause small particles to clump together and fall out of the air, this reduction in particles means a reduction in mycotoxins, since mycotoxins ride on spores and fragments of mold.  More testing is needed in residential and commercial settings to confirm this, however, our case studies using bipolar ionization to reduce mold spore counts without any additional filters, are quite extraordinary!

Photo by Anne Nygård on Unsplash

Are my windows causing my mold allergy?

Are my windows causing my mold allergy?

If you viewed the results of my home’s mold plate testing, you probably saw the high count of mold colonies in my sunroom–which doesn’t even have air conditioning vents in it.   What the heck?  I was scratching my head until I remembered that I had placed the plate on a table only a few feet away from the exterior wall of windows.  There are 12 exterior windows in that room!

Here are some of the ways that windows can increase mold counts in your home:

  • Direct water leaks:  if the seals or caulking fail on your window(s), they could allow water to run into the wall, where mold can grow.

  • Drafty windows allow air to pass from the outside in, or inside to outside, where the temperature and humidity difference can surpass the dewpoint and cause condensation.  Condensation can occur on the windowsill or anywhere around the window that is not properly sealed.

  • Outdoor mold can grow on the screens, because they retain dust and moisture.  When you open windows, air blowing through the screens will blow mold spores right into the room.

  • Heavy window treatments create a micro-climate between the room and the window.  Although they are great at insulating the room from heat or cold, fabric curtains retain humidity/moisture, and also create a cold pocket of air without air circulation.  With drafty windows, air between long curtains and the wall can allow condensation, and offer the ideal darkness for mold to grow.    

In my case, I believe it was the drafty windows that allowed air to blow around the frames and carry mold into the room.

Here are some ways to get that mold count down:

  • Check for leaks in your windows.  Here are some warning signs that a window is leaking and how to determine where it is leaking (video):

    • Peeling paint on an interior window sill 

    • Peeling paint on an interior wall near a window

    • Rotting wood on the exterior window frame or sill

If you have any of these symptoms, it’s best to remove the outer siding materials and find out where the water is getting in, because cosmetic repairs will not fix the leak. 

  • Decide whether to replace or reseal your windows.  It’s rarely an easy decision because replacing your windows is not likely to save you money, considering the cost of the windows and installation.  However, there are some ways to know that it’s time to replace them:

    • Replacement: If your windows are extremely damaged by water infiltration, then it’s a good case for replacement. (ecohome.net)  There are many options for energy-efficient windows, available in wood, vinyl or composite (fiberglass or a combination of materials).  Like many products, the installation of the windows is just as important as the quality of the windows themselves. Quality installation is critical for an airtight fit and a continuous water barrier to prevent drafts, water damage and condensation.(efficientwindows.org)  To select windows, the National Fenestration Rating Council (nfrc.org) is a non-profit organization that gives consumers energy performance ratings and other useful information about windows, doors, and skylights.  You’ll also want to consider that new exterior windows that meet Energy Star standards fall under “qualified energy efficiency improvements” which can generate tax credits.  For windows purchased in 2022, you can claim the Residential Renewable Energy Tax Credit for 30% of the total cost, up to a maximum of $600 for exterior windows and skylights. (filemytaxesonline.org) In addition, check with your local power supplier to see if they have more incentives for replacing windows. If you do decide to replace, remember that higher-cost wood windows (which are clad in aluminum or vinyl for weather protection) are only as good as the seals and techniques of cladding them; if water penetrates the cladding, the windows can rot in just a few years.  In addition, the vinyl or aluminum skins on these windows do not permit passage of vapor from the interior to the exterior, so that condensation forms on the inside of the skin.  Condensation = rot! (video)

    • Reseal:  If the windows and frames are in good shape, but you have airtightness problems, it’s most cost-effective to apply some sealing around them. Caulk, weatherstripping and caulking cord are all products made for these purposes, and this video shows how to apply them.  In order to know where the air is coming in, you can do the following (houselogic.com):

      • Seal the house by locking all doors, windows, and skylights.

      • Close all dampers and vents.

      • Turn on all kitchen and bath exhaust fans.

      • Pass a burning incense stick along all openings -- windows, doors, fireplaces, outlets -- to pinpoint air rushing in from the outside. Smoke Pencil Pro ($44) is non-toxic smoke pencil for this purpose.

    • Clean your windows and screens!  On windows where screens are installed, a bi-annual cleaning will greatly reduce the amount of mold present.  In general it’s not better to wash the outside or the inside first, as long as both are done!  However, since outsides usually get dirtier than the insides, it may be easier to see inside dirt if you wash the outside first. You can use a bucket of warm water with a few drops of dish detergent on the outside with a long-handled brush and squeegee, and TotalClean or a mixture of one part white vinegar to two parts water in a spray bottle for the inside. 

    • Get your drapes in order!  If drapes are causing condensation to form on or around your windows, this is not a good situation and it will lead to mold if left unchecked.  Here are some suggestions:

      • Open the drapes during the warm part of the day so that temperatures between the room and window can equalize and dry out moisture. 

      • Leave the ceiling fan running in the room to promote circulation. 

      • True thermal curtains are made of 3-4 layers of material, including a vapor retarder that allows vapor to escape through the curtain.   Problems can occur if the curtains block vapor.  

If you still have a high mold count near your windows, it’s best to check with a qualified, reputable mold inspector to find out the source and be able to enjoy the sun and scenery through your windows instead of the mold!

Photo by Rob Wingate on Unsplash

Insulating drafty windows makes a difference in air quality, not just energy savings!

Insulating drafty windows makes a difference in air quality, not just energy savings!

When you’re trying to make a whole house less drafty, you should go for the low-hanging fruit first.  That means big ol’ holes in the walls, floor or ceiling (like this disconnected register) come first.  If you don’t have any big holes, you can start on the smaller ones–and sometimes the smaller ones can add up.  That was the case in my sunroom. 

My sunroom is west-facing, which means in the summertime it gets brutally hot from sunlight, and in the wintertime it’s brutally cold from westerly winds.  On top of that, it’s fairly dusty and showed some of the highest counts of mold colonies in my home.  When I saw another cold front coming later in the week in December, I finally “made” the time to insulate the windows where I felt the drafts coming in.  I saw that the lower windows didn’t seal at the bottom when closed, AND the previous owner had cut the corners on the lift at the bottom for some reason (they rubbed on the trim?).  Due to these leaks, the room stayed quite “fresh”--meaning the CO2 didn’t really budge from outdoor levels unless I lit a fire in the fireplace on the other side of the room.  If you don’t have a CO2 monitor, I highly suggest getting one: here’s a portable version.

Therefore, the cons of my leaky windows easily outweighed this one “pro”: fixing them was a no-brainer!

Pros

Cons

Better ventilation (lower CO2)

More drafts of hot or cold air (higher energy cost)

More dust or pollution

More mold 

Excess humidity in house

Here are the tools I used: 

  • A spray bottle of TotalClean and several rags for cleaning the windowsills
  • Adhesive-backed weatherstripping in a suitable color to match your windows (low-profile like this one, ¼”, is good unless your windows are very misaligned) 
  • Scissors
  • Optional: A CO2 monitor is helpful–to see the effect on the room
  • Optional: Window locks in case the windows don’t lock afterwards (see below)

If you do have a CO2 monitor, leave the windows closed and take a CO2 measurement before doing the insulation work. You might want to do it while there are a number of people in the room, or you have a propane or natural gas stove burning (I know there are a lot of gas stoves out there!).  Extra people and gas appliances do two things–they consume oxygen and they give off CO2.  These should cause the CO2 to be higher than when the room is empty or no gas appliances are lit.

Next, just get down to it: use the TotalClean and rags to clean off the window sill where the lower half of the window seats.  If you have vertical sliding windows, find the best place to attach the insulation in the vertical track and clean that.  When the track is clean and dry, start peeling the adhesive backing off and apply the weatherstripping a little at a time, cutting it when you get to the end of the track. Close and lock the window to make sure it’s placed correctly.

If you find your windows don’t lock because of the extra height of the insulation (this was the case for my windows) there are a number of window locks available that can be easily removed if you have to open the window for ventilation.  I ended up getting a thumb-screw version that can be moved up a few inches if I decide to ventilate, while still keeping the window secure.  

That’s it!  When you have all of the insulation installed, close the window and repeat the CO2 reading, with or without activity (people or gas-burning appliances).  The CO2 levels should go and stay higher because there is less fresh air coming in.  Fresh air ventilation is needed in a home, but it’s best to do it in a controlled way, not just letting the air come in wherever there’s a small gap or crack.   For more ideas on how to air seal leaky windows, check out this video.

If you’ve completed an easy project that resulted in better air quality, let us know about it! 

Photo by Rob Wingate on Unsplash

What’s hiding in that pallet wall?

What’s hiding in that pallet wall?

Another embarrassing but true story:  

Once upon a time in New Orleans, I rehabbed a house that was gutted post-Katrina.  In a neighborhood built in the 1950’s, I took down a few walls and set about making this little 1500 square foot home into my Pinterest dream.  No matter that the sloping floors would make a soup can roll from front door to back with no effort and amazing speed; all of the reclaimed furniture and materials available at that time were more than sufficient to supply the ideas that came into my head.  Some of my favorite places to go were the local “Green Project” or Habitat for Humanity stores.  Green Project had a small lumber yard of reclaimed wood and salvaged architectural pieces.  I don’t know whether I found this particular piece of wood there, or from the side of the road, but it looked perfect. 

My carpenter had framed in split-level bar countertops on either side of the newly opened-up kitchen, and to keep the cost of countertops low, I decided that the top of the bar would be reclaimed wood.  The chunk of wood I found was long enough for both tops, and the color of dark chocolate, a perfect contrast to the cream-colored kitchen.  I cut the pieces, sanded the edges, coated them with a few layers of varnish and set them outside to dry for a week or so.  Time to install!  They looked beautiful.

Throughout processing this wood, I did notice a “smell”.  It didn’t seem too strong, probably because I was doing the cutting, sanding and painting outside.  But soon after I installed it inside, the headaches started.  I had a constant strong headache most days for a week, until I made the connection and removed the wood.  Bingo!  Problem solved.  This was probably a decade before home VOC-testing equipment was available, but my brain and respiratory system was telling me that this wood was poisonous. Looking back, it was probably treated with creosote, which gave it the (beautiful!) dark brown color.  Creosote is derived from the distillation of tar from wood or coal and is used as a wood preservative. Pesticide products containing creosote as the active ingredient are used to protect wood used outdoors (such as railroad ties and utility poles) against termites, fungi, mites and other pests. (epa.gov) The EPA has also determined that coal tar creosote is a probable human carcinogen (over longer exposure periods).  Thankfully, I was the only one in the household who seemed to be affected.  

I’m still a fan of reclaiming wood and other materials, but I’m a little more cautious nowadays.  That’s the major drawback to most reclaimed wood: you just don’t know its history.  Whether it’s been soaked in smelly chemicals like creosote, or sprayed with non-odorous pesticides, or just sitting outside accumulating mold and insect droppings, it has a mysterious history that you may or may not be able to neutralize when you “reclaim” it.  Following are the main dangers of using some (not all) reclaimed wood (cdawood.com) indoors.  

  • Like my experience above, reclaimed wood that has been treated with harsh chemicals, like paints or stains, or contains VOCs (volatile organic compounds), can release toxins into the air.  Unlike my experience, you may not always smell these VOCs or toxins, which is a “silent” risk.

  • Wood is quite a porous material.  Mold and mildew can be hiding in the crevices of the wood, especially reclaimed wood that has a lot of “character” (read: cracks, knots and grains).  Mold and its toxic byproducts, mycotoxins and MVOCs, can make you quite sick and even spread to other parts of your home via dust and spores.  

  • You could bring pests inside.  Anyone who’s lived in the southeastern US would be familiar with termites, possibly carpenter bees, and maybe carpenter ants.  These are all wood-loving pests that can hitch a ride into your home inside of the lovely reclaimed wood.  They generally exit or die when the wood is agitated or dried out.  But have you heard of powder-post beetles?  These tiny pests can spread to other wood furniture and even the framing of your home, reducing the wood to “powder”.  Imagine losing your grandma’s precious antique dresser, or your kitchen floor joists, to these destructive pests because you decided to “reclaim” some wood for a table top: not a good trade-off!

If part of the reason to use reclaimed wood is “saving money” (one of my original reasons for creating those bar tops), are you really saving if one or more of these problems surfaces because of using it?  Here are a few ways to be more cautious with reclaimed wood: (Brunsell.com)

  • Consider the source: Grocery store palettes are likely to have been in close contact with food, so they run a higher risk of having bacteria (from spills), so don’t use them indoors.

  • Check for signs of how the wood has been treated: Know if and how the wood’s been treated. Heat-treated wood, also known as kiln-dried wood, is generally marked with an “HT.” In terms of your health, HT wood is preferable to chemically treated wood. You forgo the chemicals, and the heating kills off bugs. 

  • Consider the end-use of the wood:  If it will be in close contact with children, pets or food, it’s best to use new, untreated wood and opt for non-toxic finishes (like the paints and stains we mention in this article). 

If your gut says, I don’t know about this piece of wood, it might be best to listen to your gut!   Manufacturers have honed in on the reclaimed trend and created vintage looking wood and furniture from new materials.  

  • CdA Wood in Coeur d’Alene, Idaho is one such company that has the slogan “Barn wood but better”.  They take new untreated wood and make it look like old barn wood without paints or stains, using a patented “Xcelerated” process.  In the words of the VP, they “age wood indoors without using paints or stains”.  

  • Another company that values indoor air quality is EarthPaint.net.   All of their coatings are non-toxic, so you can start with new wood and get a fabulous aged finish without VOCs, mold, toxins or pests.   

  • Here’s a slew of ways you can add “character” to new wood with tools and a little elbow grease; just substitute non-toxic finishes for the stains used in the last few slides.

  • Did you know that charred wood naturally resists water, pests and further aging?  Developed by the  Japanese, Shou sugi ban is the art of preserving and finishing wood using fire.  Cedar wood works best for shou sugi ban because of its natural chemical properties, but you can also use shou sugi ban on pine, hemlock, maple, or oak.  This article tells you a little about the history and how to DIY your own burnt wood!  EarthPaint.net also has “Special Linseed Oil” similar to what is used in the article.  I’ve personally used shou sugi ban on some wood supports for my shower curtain, as well as an outdoor table. 

At HypoAir, we aim to bring the best of the outdoors inside.  We’re very selective, though, to make sure that hidden pollutants or pests don’t slip in with the good stuff…and with vigilance you can be too.  It’s time to raise the bar on reclaimed wood, to make it as healthy as it is beautiful!

Start Thinking Like a Home Inspector

Start Thinking Like a Home Inspector

If you own a home, you need to learn to think like a home inspector.  A home is a great investment, but if the outside elements start to penetrate the building envelope, your great investment can start to deteriorate and become toxic!

Sometimes, after an especially hard rain, there is a different smell in my house.  This tells me that rain is probably going where it shouldn't. According to commonsensehome.com, a natural home website, the first spots to check are the roof and attic, especially around any roof penetrations like chimneys and vent lines.  

Recently one morning after such a rain, I went in earnest search of leaks inside to find the source of the musty smell.  Not finding anything in the attic, I went to the room where the smell was the strongest, the laundry room.  I checked areas around the windows because there were shelves in front of them, hiding any potential damp spots.  Uh-oh– a couple of the windowsills were wet, indicating that more of the not-so-old (10 years) windows were leaking.  I checked the corner above which there was a valley in the roof (roof valleys can be a source of leaks in a hard rain if they are improperly installed/sealed).  Thankfully all the walls were dry.

There was a gutter outside this room, and I knew from past experience (rain during the daytime), that the volume of water flowing off the roof seemed to be too fast or too much for this particular gutter, because it would shoot right over the side and pour down next to the wall.  Thinking about it, I went up onto the flat portion of the roof over the laundry room.  There were no big branches or breaks in the flat roof, but a lot of leaves and acorns were up there!  Time to get to work with the broom or leafblower, and I removed a section of the leaf guard over the gutter to clean out the gutter.  I checked to see that the downspouts were clean.

Next, I looked up to see if there were any wet spots behind or below the gutters (this only works after the sun has been out for a bit).  Thankfully, that was not the case.  Looking down the walls, I saw that there were a lot of wet leaves piled up around the foundation.  Wet leaves around the foundation do not just cause a musty smell in the house.  They can allow insects like carpenter ants and termites to come in, using the leaves as a shield to keep their tunnels moist.  I got to work with the leafblower.  

Rain can seep into basements and crawlspaces, so if I had a  basement, I would check the walls for seepage.  Bring a bright light, gloves, and if necessary a respirator (basements can be dusty!) to make sure that you don’t leave any corners/spots hidden from view; try to move any stored boxes to get a peek at every square foot of wall.  It was only after moving some storage shelves in front of the laundry room windows that I discovered the leaking windows. (Crazy, I know, my goal is to build some cabinets so that the windows will not be covered up!)

If you can't find the source of the problem, reach out to a well-reviewed professional home inspector in your area.  Remember, professional home inspection is a service dedicated to helping you find and live in healthy homes--not selling you other products or services.  You can find accredited home inspectors in your state at The International Association of Certified Home Inspectors (nachi.org).

There are a lot of good sites to help you get thinking like a home inspector.  Here are some that we’ve discovered and reference frequently.  Don't be shy about contacting them with questions!  

  • Inspectapedia.com: This website must have THOUSANDS of pages, but the “search” function is great, the website hosts answer questions very promptly (within 48 hours), and there is feedback from many homeowners and experts alike.  Highly recommended!
  • Homeinspectorsecrets.com: Created by a home inspector, this site has a lot of guides about a variety of subjects.
  • Familyhandyman.com: This website contains step by step instructions to correct any problems you may find around your home, and reviews products as well.   
  • Thespruce.com: Although not technically about home inspection, this website contains a wealth of information on a variety of home improvement topics and often contains non-toxic, safer alternatives. Their Home Improvement Review Board is made up of licensed general and specialty contractors, journeyman electricians, and journeyman plumbers, so you know that you’re getting good advice.
  • Energyvanguard.com: This website is written by a building scientist and has an extensive blog, so you can understand the “why’s” of the best building practices.  He also frequently incorporates how he investigates and solves problems at his own home. 

Catch it EARLY

Catch it EARLY

No, I’m not talking about a movie, or even a sale.  I’m talking about water leaks.  After recently dealing with a leaky faucet (what a pain), I figured that there must be something to help me detect the leak in the first couple hours after it starts, instead of days later.  I’ve seen leak detectors that can detect as little as 1/16” of water, but that still requires placing it in the right place and hoping that the leak will puddle there first.  When I opened the doors to the area below my sink, what I sensed first, before seeing any water, was the high humidity.  Even without standing water, high humidity can cause mold to grow in virtually any area that it contacts.  

Here are my requirements for these remote hygrometers (humidity sensors):

  • Use a common, easily accessible battery
  • Place it anywhere in your home
  • Low cost of sensors to enable more monitoring places
  • Wireless alarm through phone app
  • Enabled with history to show trends of rising humidity

Bingo!  There are a few systems that fit this bill and more.

Govee is a brand known for its LED lighting and smart home appliances.  Regarding their WiFi digital thermometer hygrometer, they have great reviews on the ease of setting up the WiFi Gateway, and adding all of the sensors to the app.  The sensors can remain connected up to 230 feet away, and the gateway can connect up to 10 sensors ($119 on sale).  Let’s see, I could use one: under each bathroom sink (2), kitchen sink (1), behind the washing machine(1), next to the water heater (1), next to the HVAC air handler (1), behind the refrigerator (1), under the dishwasher (1) in bedroom closets (2-3).  Other people have used them for greenhouses, humidors, and as room sensors to balance their HVAC systems.   I easily found places for 10+ sensors in my home, and with the discounted price, they are cheaper than buying the smaller 3-sensor pack ($46) and adding more sensors separately. 

The Moen Smart Water Leak Detector ($102 for a set of 3 sensors) monitors moisture levels (through a moisture-sensing cable), humidity and temperature to send alerts to your phone through the Moen FLO app.  It does require a wifi connection, but you also have the option of installing a remotely-operated water shutoff valve ($470) that can operate manually from your smart phone, or automatically in response to a water leak detection signal from one of the monitors.  This valve also performs a nightly check of the system by shutting off the water and sensing pressure drop, to detect leaks as small as one drop per minute behind walls!  

YoLink is another smart appliance manufacturer and their temperature/humidity devices have a few differences.  For one, the wifi connection can be sustained up to ¼ mile, which is over 5 times the distance of Govee.  The YoLink can monitor extreme temperatures, which is useful if you want to place one in your attic or in your freezer (in case of a power outage). It is also compatible with Alexa.  There are  2 sensors and a hub in this pack ($60), and the hub can monitor other YoLink devices such as water leak sensors and door/window sensors. This unit runs on LoRa (Long Range wireless technology), which uses less power and transmits for longer distances than traditional bluetooth technology.

These devices are especially helpful in vacation homes and rental homes, as well as a great monitoring system to assist caretakers for the elderly and handicapped.  The Internet of Things (IoT) is making our lives less prone to worry in more ways than one.  Can it train my dog not to splash water on the floor?  Maybe not, but with sensors in other places maybe I’ll have the “bandwidth” to do it myself!

Photo by Matt Hoffman on Unsplash

What do our holiday traditions really cost?

What do our holiday traditions really cost?

Okay…we all know that visiting the Christmas Tree Lot the day after Thanksgiving can be really expensive, and prices get better the longer you can wait to get one.  That’s not what I’m talking about!   I wanted to know, are some of our traditions costing us in our health?  After my manager shared how his family “mysteriously” gets allergies every December after bringing home a live tree, I had to do some research!

As it turns out, Christmas tree allergies are real.  If you experience any of the following after bringing home a live tree or other live pine decorations, the pine may be an allergen, or it may be carrying allergens (advancedsinusandallergy.com).

  • Runny nose
  • Watery eyes
  • Sneezing
  • Coughing
  • Wheezing
  • Itchy eyes and nose
  • Dark circles under your eyes
  • Skin rash

Now that you may be making some mental connections, here is what scientists have found about homes with live trees:

  • Mold: pine trees can carry 53 different types of mold!  (Researchers at SUNY Upstate Medical University).  Many of these are allergens and especially so for infants and children.  The mold, which is attached to leaves, branches and bark, multiplies in your warm home and spores are released during the agitation of bringing the tree in, setting it up, placing lights and decorations on it and watering it.  A 2007 study found that apartments containing a live Christmas had a 6-fold increase in airborne mold, which did not return to normal until after the tree was removed.  Weed, grass and tree pollens were also found in the air during the time Christmas trees were in the house, because of course, live trees once lived in fields with other weeds and trees.  
  • The beloved pine scent emitted by Christmas trees is actually a family of VOCs called terpenes.  Terpenes are made naturally in the tree sap, and real or artificial terpenes are often used in pine-scented cleaning products and home fragrances.  Terpenes can unfortunately be allergenic to some people. 
  • Dust mites and insect droppings come with live and artificial trees that have been in storage because they naturally accumulate dust. 

Bringing home a live tree is a deeply-ingrained tradition for many American families, so unless your allergies become severe, simply treating your tree appropriately may help you to suffer a lot less this season!

  • Formerly, it was recommended to spray the tree down with water and allow it to dry naturally outside for a day or two, or blow off the water with a leaf blower before bringing it inside (advancedsinusandallergy.com).  However, water is just what mold needs to keep growing and multiplying!  Therefore, we’re going out on a limb here (pun intended) to say that the same EC3 Mold Solution Spray or  Remedy Mold Treatment Spray by CitriSafe that is safe for humans and pets, is a great treatment for live and artificial Christmas trees.  Yes, use that leaf blower on your live or artificial tree to remove dust outside (with a mask of course), and then give it a good misting of EC3 Mold Solution Spray or  Remedy Mold Treatment Spray over every branch (don’t be afraid to use too much).  This should drastically reduce the amount of mold in your home while the tree is up!  Treat live garlands, wreaths and other live decorations in the same way.
  • Dispose of the tree as soon as possible, because any mold that was not touched by the spray will continue to grow.  

If you opt for an artificial tree, you still may suffer from allergies if it’s improperly stored.  Here are some tips:

  • Storing trees and decorations in unconditioned spaces like attics and basements can expose them to mold and dust.  In these situations, don’t use cardboard boxes; change the storage container to a sealed plastic bin or optimally, make a little room in your conditioned space for storage.  
  • Use a mask when retrieving them out of storage.
  • Use a cloth misted with EC3 Mold Solution Spray or use CitriSafe's Remedy Multi-Purpose Mold Treatment Wipes to wipe down ornaments and lights before adding them to the tree. 

Scented candles and sprays may smell nice, but they can seriously irritate your respiratory system and add unwanted VOCs and toxic chemicals to your air.  Instead, we can show you a number of ways to add holiday fragrance without the allergies in this post!  With the vodka air fresheners mentioned,  if you have several spray bottles, you can “decorate” your home with different holiday scents by adding drops from an assortment of essential oils like this one

This holiday season, break the mold (pun intended) by dis-inviting mold and allergens from your decorating party: it will be less costly for your health! 

Check them at the door! (How to bring less contaminants into your house)

Check them at the door! (How to bring less contaminants into your house)

Oh, how I love to walk barefoot or bare-socked around my house!  It’s a pleasure that doesn’t happen often enough. With two (albeit non-shedding) dogs who constantly bring sand and dirt in from the outside, and my own habit of walking straight in from outside with my shoes on, walking barefoot only happens for a few hours after I vacuum and mop.  Vacuuming and mopping takes a minimum of 45 minutes to do, so how often does it get done?  Embarrassingly, not enough!

There are even more benefits to cleaner floors than walking barefoot.  After all, you and your pets are not just bringing in lifeless dirt…there are microorganisms like mold, pollen, bacteria and viruses in every grain of dirt.  These can wreak havoc on those who are more sensitive, and especially those who spend more time on the floor, like babies and young children.  At HypoAir, we’re all about avoiding bringing contaminants indoor whenever possible!

It’s hard to believe what you can’t see, so I was grateful to run across this article.   The hostess of this website became self-educated about mold after she and her family experienced numerous health problems from the homes they lived in, and she has a very informative website that includes interviews with experts!  She performed a test with a white towel laid at the door of her home, to catch dirt and mold particles as they are tracked in. She performed a mold test before and after two days.  Although the “before” mold test revealed some mold from the clean towel being stored in the garage, the “after” test was definitely more prolific and indicated that some colonies could be producing mycotoxins.  Yuck!  Unfortunately I know this is happening at my house in the woods during the very wet summer we’ve had….

This has prompted me to research strategies to avoid bringing that dirt, mold and germs in!  There are some ways that make a big difference.

  1. Leave your shoes at the door.  My main problem with this is time (like when I’m bringing in groceries), and sheer number of shoes.   Patience and dropping off loads at the door will take care of the first problem, but for the second one, If I had a “mudroom” this might be more easy to organize.   I’m not a shoe collector by any means, but I have a number of shoes that I like to wear outdoors!  This has led me to find a used low bookshelf and number of baskets so that I, my sister who lives with me, and any number of guests can feel comfortable storing them at the door.

  2. Find the best doormats for your situation, and use them!  When I went searching for “doormats” online, I was overwhelmed by the sheer number and diversity of them.  Then I refined the search to “best doormats for pets” or “best outdoor doormat”, etc. and read what people wrote about them.  I am even doubling up (one indoor, one outdoor) for more protection.Here are some good ones:

    1. Doormat for pet feet: I like the generous size and decor options for these rugs by PURRUGS, but they are made of polyester.

    2. Outdoor mat for removing dirt: 

      1. According to Spruce.com, coir (pronounced “coy”-er) is the best material for removing dirt: it’s made from coconut husks, so it’s scratchy and natural-looking.  A lot of coir mats are made with a rubber backing, which doesn’t let the dirt fall to the floor, but if you get a woven one with no backing like this one by Kempf ($43), you don’t have to shake it out as often. 

      2. For a modern look, Clean Machine Mats are made of Astroturf, but not all of them have the bright green color!  This one ($29) just takes a simple shake to empty all the sand off your porch.

    3. Indoor mat: Requirements for good indoor mats are that they need to be of a safe material that doesn’t create dangerous VOCs (polyester and PET may have endocrine-disrupting chemicals in them).  A non-slip backing is best, but solid rubber or plastic may harbor mold if moisture gets underneath, so check for mold during wet or humid weather.  Machine-washability is a plus!  

      1. Large and absorbent, these mats by Crate and Barrel ($135) are great for wet and muddy feet.  They can be spot cleaned or taken outside for scrubbing and hosing down.  The rug is made of polypropylene, which is quite durable and has a low off-gas.  The backing is made of rubber (20% recycled), which can give off a smell but doesn’t seem to be a complaint with this rug.

      2. Chenille is very absorbent and soft, which makes these rugs by Gorilla Grip a nice buy at $35-50 depending on the size.  They are machine washable!

      3. I love the idea of recessed mats, which are popular in commercial buildings and apartment buildings.  They “fit” into your floor and are very unlikely to slide around.  Water and dirt will also be more contained in a recessed mat, where you can easily vacuum it up.  You’ll need to create a standard-sized recess that is laid into your floor at the front door.

  3. If you have pets, teach them to stop at the door and wipe their feet! (cue cute video…)  More seriously, you can teach them to at least stop while their human helps them wipe their feet!  You can even hang a towel near the door for that purpose on a simple hook or more elegant towel rack.  You can also use  EC3’s Mold Solution Spray ($28 for 32 oz) for misting their fur to deactivate any mold spores they may carry in.

  4. Use a non-toxic additive or detergent to get rid of mold in the laundry.  EC3 products by Micro Balance are recommended by a number of experts and experienced laymen who know about mold!  This non-toxic, environmentally safe laundry additive ($29) is good for about 11-16 loads at the recommended dosage of 2-3 oz per load.  It’s great for washing those dirty door mats and washable shoes.  (moldfreeliving.com)

  5. For shoes that can’t be washed in the washing machine, spritz them with EC3’s Mold Solution Spray ($28 for 32 oz) before you put them back in your closet.  You can also spritz it on the indoor mat between washings.  (moldfreeliving.com)

  6. Vacuum and mop frequently(1-2x per week) in the entranceways of your home, if not your whole home.  At the beginning of this article, I was lamenting the time it took me to successively vacuum and mop the ground floor of my home (where the most dirt lies).  Well, this is the case IF you don’t have a combo vacuum/mop, which can be a total game changer!  I’m happy that I have all tile with only a few area rugs on this floor, which makes it the perfect candidate for such a machine. I grew up using cumbersome canister vacuums, which seemed to hit every doorjamb as I tugged them through the house.  My mother has already graduated to a Bissell CrossWave, and raves over it.  Here is a great review of the newest upright vac/mop combos, in which I’m sure you’ll find one that’s right for you.  The only problem with using water floor cleaners is that they tend to have chemicals of questionable toxicity in their proprietary cleaning solution (7 of 11 Bissell products earned a “D” grade on ewg.org).  If you use another solution during the warranty period, your warranty may be voided.  If that prospect does not bother you, this article gives some tips on making homemade cleaning solutions for your vacuum/mop machine that have non-toxic ingredients.

How to equip your college student with better air quality

How to equip your college student with better air quality

If you’re a parent with a son or daughter in college, of course you want to see them succeed!  It can get costly, though.  From helping with tuition, room and board and everything else, it seems like “clean, fresh air” should be a free part of the package. Unfortunately, that may not be the case.  Many colleges and universities are housed in old buildings that did not give thorough consideration to air quality when they were designed, built, or renovated.  In many cases, you are paying for the privilege of  studying there, with living as only an afterthought!  

The problem with poor air quality in the university setting is that it affects the very thing young adults go there to do: learn.  Contaminants in the air work against their body in the following ways.

High CO2 due to inadequate fresh-air ventilation decreases the ability of the brain to metabolize oxygen.  In other words, the brain becomes oxygen deprived!  This can affect learning in terrible ways.  In a Havard study in 2015, 24 participants spent 6 days in simulated offices to control for CO2 and VOCs.  Days were designated by the research team, but blinded to the participants and analysts, to be one “High CO2” day of 1400 ppm CO2, two “Conventional” days representing the average office building conditions of about 940 ppm CO2, one “Green” day representing better ventilation with conditions of approximately 740-750 ppm CO2, and two “Green +” days representing 100% outdoor ventilation (approximately 550 ppm CO2). Cognitive scores were 61% higher on the Green building day and 101% higher on the two Green+ building days than on the Conventional building day. On average, a 400-ppm increase in CO2 was associated with a 21% decrease in a typical participant’s cognitive scores across all domains after adjusting for participant (data not shown), and a 20-cfm increase in outdoor air per person was associated with an 18% increase in these scores.  This shows that for lack of fresh air in their dorm room or classroom, your student could be missing out on their chance to absorb all the material presented, with lower test scores as a result!  Here are some ways to “open the windows”, so to speak:

  • Add a Window Ventilation Filter to their dorm room.  It’s easy to install and remove, and filters out pollution, pollen and dust. 

  • For more info on how to measure CO2 in your dorm or classroom, check out our post.  If the classroom or lecture halls turn out to be high in CO2, advise students to check with their student advisor on advocating for more ventilation.  

VOCs: Most dorm rooms come equipped strictly with the basics -- a bed, desk, chair, light and garbage can, plus a small amount of storage space in the form of a dresser and/or closet. (howstuffworks.com) Therefore, moving into a new dorm room usually means getting new bedding and new accessories like rugs, wall hangings, and more storage like dressers or bookshelves.  When these things are purchased new, VOCs from off gassing can increase dramatically if the doors and windows are kept closed for most of the day.  In the study discussed previously,  a 500-μg/m3 increase in TVOCs was associated with a 13% decrease in the cognitive scores.  Once again, fresh air ventilation is really important to keep VOC levels in check. 

  • Use a portable VOC sensor to check for levels in the dorm room or wherever it’s suspected that VOCs may be high (like a newly renovated area).  

  • Install a  Window Ventilation Filter in the dorm room to get fresh air dilution. 

  • The Air Angel neutralizes VOCs with the catalytic molecules emitted by its AHPCO cell. Being portable and requiring very little maintenance, it can travel anywhere they go: on weekend sports events, home, and on vacation.

  • The Germ Defender/Mold Guard's optional carbon filter adsorbs VOCs emitted by newer items as they off-gas.

Indoor humidity plays a major role in our health: when it’s too low, disease transmissions are more likely, and when it’s too high, mold growth occurs and different mold-related conditions spike.  We can think of many reasons to keep humidity in the recommended range of 40-60% so that your loved one’s health is not at risk!  Sadly, sometimes it takes severe illness and even death to prompt renovation of problem buildings (see this article about the University of Maryland).  Here’s how to equip your student against high humidity and the risk of bacteria, viruses, and mold-related illness.

  • It’s super inexpensive to put a portable humidity sensor in their suitcase or next care package.  Ask them to message you with a photo of the sensor when you’re talking with them in the dorm room, or whenever else it seems to be high.  

  • If the humidity remains high, you can speak to the dorm manager, but also equip your student with a dehumidifier.  Amazon and big box stores can even deliver one from an online purchase.  Since the average dorm room is only about 228 square feet, and larger dehumidifiers come with complaints of extra noise and heat, you’ll want to keep it small.  This economical one by Eva-Dry only covers about 150 square feet (1200 cubic feet), but two of them plugged into different areas will help keep moisture under control.  Here is a review of other models that work great for dorm rooms. 

  • The Germ Defender/Mold Guard is perfect for small, humid spaces, and does triple-duty in a dorm room: 1) Even though the bathroom is typically always humid, mold doesn’t have to grow there… I can testify that one Mold Guard stopped mold growth when I couldn’t get a leaky shower valve repaired right away.  2) This unit also deactivates viruses and bacteria in the air and on surfaces across the room with polarized ions. 3)  Finally, it has an option for a carbon filter to adsorb stinky odors like running shoes and sweaty clothing!

  • Use an Air Angel to prevent transmission of germs and mold growth. This unit is portable and requires very little maintenance, in fact only a replacement AHPCO cell once a year.

Finally, if your college student has not adopted good cleaning habits by now, we can’t help you! (just kidding, but we can supply you with the right goods, read on!)  Statistics on bacteria in dorm rooms are pretty gross: the average women’s dorm rooms had over 1.5 million colony-forming units (CFU)/sq. in. of bacteria, while men’s dorm rooms had an average of over 6 million CFU/sq. in. (collegestats.org).  The same article breaks down the types of bacteria and where they are most concentrated, and while not all of them were bad, most of them were.  It’s time to clean up, because it’s hard to know which is worse: being sick in college or having a sick roommate who will soon infect you.  For those who do clean, equip them: 

  • Once again, Germ Defenders and Air Angels are passive sanitizers that help in activate germs between active cleaning.

  • A bottle of TotalClean goes a long way!  Since dorm rooms are small, heavy-scented chemical cleaners can be super-irritating and not always welcome to their roommates’ sense of smell.  TotalClean is unscented, non-toxic and very effective against dust, dirt, and germs on many different surfaces, even windows and mirrors. 

  • Small pump bottles of non-toxic hand sanitizer and sanitizing wipes stationed around the room and on desks help between hand-washings. 

Of course, similar to sending them off to grade school, you can’t be there 24/7 to help your college student make smart choices, but at least by this point you can give them tools to monitor and correct their own air quality for the healthiest and most productive school year.  Viva la college!

How to have clear sinuses

How to have clear sinuses

Going through yet another round of stuffy nose and headaches, I decided to research all the ways that I or my environment is sabotaging my sinuses.  

First of all, it could be sinusitis (also called rhinosinusitis): an inflammation of the paranasal sinuses, the cavities within the bones that surround the nose (Harvard Health).  Inflammation blocks the ostia, which are the narrow channels that drain into the nasal cavity, so that drainage becomes blocked.  Sinusitis can be caused by a cold, allergies, or a deformity such as deviated septum or nasal polyps.  Here are the different lengths of sinusitis (healthline.com)

  • Acute sinusitis can be caused by a cold, but then a secondary infection can happen once the sinuses get inflamed and blocked.  Technically acute sinusitis lasts less than 4 weeks.

  • Subacute sinusitis lasts from 4-12 weeks.

  • Recurrent acute sinusitis occurs when you have the same symptoms 4 or more times per year, but it lasts over 7 days each time.

  • Chronic sinusitis symptoms last over 12 weeks.

Well what is causing it?  

Normal sinuses are lined with a thin layer of mucus that traps dust, germs and other particles in the air. Tiny hair-like projections in the sinuses sweep the mucus (and whatever is trapped in it) towards openings that lead to the back of the throat. From there, it slides down to the stomach. This continual process is a normal body function.(American College of Allergy, Asthma, and Immunology) Here are some of the common irritants that can interrupt this process:

  • Dust:  A dose of good old dust, whether it’s from a woodshop, mowing the grass on a very dry day, or bringing out boxes from an attic, can overload the sinuses. The problem is that dust is a very complex mixture of irritants.  It can contain dustmites and their feces, chemicals, 

  • Pollen:  Plants have to reproduce, and sadly the weeds seem to be the worst offenders to our noses.  In addition, you’re not just imagining it: pollen really is becoming worse every year!  Check out our post on allergies here

  • Mold:  Mold is dangerous in that unlike other allergens, it can colonize and actually grow inside your sinuses, since they are warm, moist and dark.  Then, the rest of your body is susceptible to other colonizations as you breathe the mold spores and swallow them with mucous.   

  • VOCs:  VOCs can cause inflammation that leads to sinusitis.  A 2001 study showed that patients with chronic rhinosinusitis were exposed to higher levels of volatile organic compounds than healthy subjects.

We at HypoAir are not medical professionals, so we can’t recommend the techniques and drugs that doctors use for prevention and relief of sinusitis.  However, natural techniques are generally milder, and many of our clients are very sensitive to medications anyway, so we are glad to report that sinusitis can often be prevented or treated easily!  Here are some of the ways to do it:

  • I have to say that mask-wearing definitely cut down on my nasal issues when I was required/bothered to wear one.  Why?   Masks filter out many of the airborne contaminants listed above that can trigger sinusitis, as well as germs like bacteria and viruses.  Two+ years into the coronavirus pandemic, the stigma of wearing a mask is virtually nil, and there are a plethora of masks you can use to protect yourself against pollutants and germs alike (see our post on masks). 

  • Nasal irrigation is the number one defense against sinusitis according to Harvard Health (steps included in the article).  Whether you choose to use a bulb, small pitcher or neti pot, the homemade rinse works great to flush away the irritants that can block drainage and start a nasty infection.   It’s recommended to do this daily if you can!

  • Hydrate–your body as well as your nose!  Drink plenty of water during the day, and use a plain nasal saline spray several times a day if you are in a dry environment.  Adding a drop of food-grade tea tree oil or oregano oil (oregano oil is a bit harsher) to the saline spray adds a layer of antimicrobial protection to your spray. 

  • Avoid being unprotected in moldy and dusty places.  If you have to go down into a moldy basement or into a dusty attic, make sure to wear an N95 or respirator mask that seals well, and don’t take it off until you are safely in a clean place. 

  • Keep pollen, dust and pollution out while letting fresh air into your home, by installing some Window Ventilation Filters in your open windows.  They are easy to install and can be vacuumed a number of times before replacement.

  • Neutralize pollutants by adding a bipolar device by HypoAir to your home.  Positive and negative ions neutralize mold and germs by damaging their outer layers, and they cause small nanoparticles to stick together and drop out of the air in order to avoid breathing them in.

  • Be very vigilant about humidity levels in your home, so that mold does not gain a foothold.  You can monitor humidity easily using our inexpensive Humidity Sensors to maintain humidity between 40-60%.  If you see any water intrusion into your home, make sure to deal with it promptly to prevent mold growth! 

  • Use a MERV 13 filter (if possible) in your furnace/HVAC and change it regularly!

  • Use a standalone HEPA filter in areas where you spend a lot of time (living room, bedroom)

  • Clean as often as you can using a non-toxic, unscented cleaner: TotalClean fits the bill perfectly!  Safe to use around food, people and pets, TotalClean is the solution to replace all of the VOC-producing cleaners that can irritate and inflame sinus pathways. 

Think about the agony of sinusitis or a sinus infection and the time you lose while you battle it:  isn’t an ounce of prevention totally worth a pound of cure?  We think so!

How to increase indoor air quality in mobile and manufactured homes

How to increase indoor air quality in mobile and manufactured homes

No matter where you go in the US, there are mobile and manufactured homes.  The homes we’ll discuss here can fall into 2 categories: homes that were moved from a tractor trailer, placed on pilings and realistically will never move again, and then there are recreational vehicles (RVs) that can travel the country (but many sit at home or in storage for most of the year).  There’s also vastly different reasons to live in one or the other–from financial to lifestyle choices to temporary housing.  Whatever your reason to stay in a mobile or manufactured home, we want to help you make it a healthy place. 

Mobile homes with a pier foundation are actually supposed to be called “manufactured homes” according to the industry representative, The Manufactured Housing Institute.  Mobile homes and manufactured homes are two words for the same thing: a home built in a factory on a steel frame with wheels for transport to a homesite, where the wheels are removed after it is set on a foundation.  Manufacturers and HUD prefer that they be called manufactured homes, but most people still refer to them as mobile homes.  You can have single-wide, double-wide, triple and even quadruple-wide “mobile” homes, where the extra “boxes” can be configured side by side or even on top for a second story.  Mobile homes don’t have a great reputation for quality or lifespan, but that doesn’t mean they don’t start out that way or can’t be upgraded to make them better.  Let’s discuss the ways in which mobile homes can be improved for healthier indoor air quality.  The main objective is to keep water out, seal air leaks and provide good ventilation. (source: howtolookatahouse.com)

Starting from the top down…The roof: generally speaking, less-expensive manufactured homes have flatter roofs.  This is because the higher the “pitch” or angle of the roof, more material is necessary to frame and cover it.  The problem with low pitch roofs is that rain and debris spends more time on the roof–rain doesn’t run off as quickly and debris like tree branches and pine needles don’t roll off as easily.  Roofs in general need inspection and maintenance, and low-pitched roofs need regular inspection to keep water from getting backed up and leaking through.  Many owners decide to “double-roof” their homes and this can make a huge difference in indoor temperature and longevity of the home.  I’m not talking about 

Roof overhangs tend to be short in manufactured homes, so that water coming off the roof runs right down the wall.  This is a recipe for water intrusion and mold, not to mention undermining the footings of the piers.  If the home does not have gutters, you can install gutters and downspouts to channel the water away from walls, doors, windows, decks and the foundation.

Siding is the protection for walls against wind and rain, and siding can be metal (very old homes), fiberboard (80’s and 90’s homes) or vinyl, engineered wood or hardyboard (modern homes).  Fiberboard must be continually maintained, or water ingress will cause it to degrade quickly.  Vinyl, engineered wood and cement board sidings provide longer-lasting protection, but they also need to be inspected for damage or improper installation.  The weakest points in siding are the corners, window and door casings, because the irregular joints are typically spots for water ingress.  

For many years, windows in manufactured homes were single pane with an aluminum frame.    The transport of the home to its new foundation may cause the frame to warp or the casing around the window to become unsealed, exposing the sheathing underneath to water.  If you are able to, you can upgrade the windows to double-pane for more insulation against outside weather, and make sure the new windows are installed with good flashing, casing, and caulk techniques.  Likewise, if the front door is of a thinner, lightweight quality, an upgrade to a steel door is also an opportunity to make sure it is installed correctly with flashing, casing and caulk to minimize water ingress.

Foundation: On manufactured homes that have a “skirt” or foundation, a vapor barrier must be installed on the ground (2008 HUD law).  If the home is resting on a concrete pad, then the vapor barrier is not needed because the concrete will act as a vapor barrier.  Unfortunately, the “underbelly” of the home often falls into disrepair because no one wants to go under the house to inspect it!  Directly under the home, another vapor barrier of plastic or black “belly board” will protect the insulation and subfloor from moisture and pests, but this is often damaged and missing in older homes.  Manufactured homes on piers are really sitting over a “crawl space”, so it’s important to inspect the underside of the manufactured home to see how sealing up the ground vapor barrier, belly barrier and insulation can really make a difference in comfort and humidity!  Here’s an article that goes step by step through this repair. 

Inside: the manufactured home industry has certainly had a bad reputation for formaldehyde emissions inside homes.  Formaldehyde has never been banned from the manufacture of homes, but lower limits have been set on the use of components such as plywood and particleboard by HUD and the EPA.  The problem is that there are no HUD standards for the maximum allowable level of formaldehyde gas inside a home, meaning that all the new components like flooring, cabinets, walls, furniture and drapery can have low individual levels of emissions, but a high overall level.  For this reason, it’s best to avoid purchasing or staying in new manufactured homes,  If this is not an option, you can choose to furnish it with only solid wood furniture or composite wood furniture with sealed surfaces. If you have any newer composite wood furniture that is still emitting formaldehyde gas, remove it from your home. Because the formaldehyde off-gassing diminishes over time, storing the pieces outside of your living area for a while (under cover of course) may solve the problem. (howtolookatahouse.com)  You can also ventilate as much as possible (leaving windows open in mild climates, and using a fresh-air ventilation system in more extreme climates.  And of course, increase ventilation of your home while doing any interior painting or use low VOC paint.

Some of the most important mold protection also happens on the inside of the home, because leaking pipes, sinks, showers, toilets, washing machines, etc. all need immediate attention in order not to cause mold and damage that can be very costly to repair.  The abundance of fiberboard in manufactured homes will wick up water much more quickly than hardwood, and even ambient humidity is important to control.  

Recreational Vehicles (RV’s or campers) truly are supposed to be mobile, so that you can take your home with you, and enjoy new scenery wherever it’s parked!  Like manufactured homes, there are a variety of pricepoints and features in two classes, motorized and towable.  There are 3 types of motorized RV’s, ranging from the largest, luxury bus-type (Class A), the smallest conversion van (Class B) to the in-between (Class C).  Towable RVs can be as simple as a small “Pop-up” to large “travel-trailers” and “fifth wheels”.  “Tiny homes” can look like miniature versions of homes on wheels.  Here is a more in-depth look at the differences between these classes. 

RVs have similar challenges to manufactured homes when considering water intrusion from above and vapor from below.  It’s a sad truth that RVs are going to leak, but with a lot of inspection and maintenance, you can prevent this.  Most RV’s rely on sealant and caulking, and inspection and repairs should occur every 90 days (see this video for how to inspect it).  Again, let’s take a look from the top down:

Roofs: Most RV roofs are either rubberized (a thin membrane stretched over wooden frame) or fiberglass (molded).  Considering that these materials are more fragile than the asphalt shingles or metal roofs found on manufactured homes, they need a bit more care and upkeep!  Keeping them clean and conditioned helps so that leaves and branches slide right off instead of piling up, and aftermarket coatings can extend life against the sun’s UV damage.  RV roofs can last from 10-20 years or more, depending on the care and maintenance given them.  Here is an article detailing cleaning and repair tips for each type of roof.  Ideally, RVs should be parked under a permanent roof when they are not being used in order to minimize water and sun damage, and a minimal conditioning system (like a dehumidifier) should be left running to keep the air dry inside.

Since RVs are mobile, they are more prone to separation at the roof and wall joint, as well as openings like skylights, windows and doors.  One website says that driving an RV at highway speeds is “ the equivalent of driving your house through a hurricane during an earthquake.” (!)  Any separation needs to receive prompt attention by removing old sealant, cleaning the surface, and applying new sealant.  Here is a great article on how to achieve a professional look and long-lasting finish when resealing seams.   If your RV has a slide-out, special attention needs to be paid to protecting this area, and awnings are a great way to shelter the slide-out roof and joint area by keeping leaf and branch debris, animal droppings and nests off of it, as well as rain and snow. They’re not too hard to install (instructions here) and are a great investment for your RV. 

Each penetration in the side of the RV (like vents, ports for electricity and drainage, and storage compartments) needs attention, because sealants fail over time and with sun damage.  They should have a bead of sealant at least on the top and corners of the penetration to prevent water from coming in (the best would be all around the penetration).

The underbelly (underside) of the RV also needs regular inspection and repair.  Some RV’s have fiberglass, others have wood or metal sheets, and all are susceptible to road damage or more frequently, water damage from the inside like a leaking pipe.  Here is an article with photos on how to assess and repair underbelly damage.  You can even upgrade the type of underbelly protection fairly easily, but it may take more than one person to wrangle the material into place.

Inside the RV, again, motion from road travel is constantly working to pull apart connections and seams.  Keep an eye on all sources of water leaks such as pipes, sinks, showers, toilets, etc., so that water will not damage your home on wheels and initiate mold!  Also, since many RVs have propane powered appliances such as stoves, furnaces, water heaters, etc, a propane leak can be very dangerous to your health. You can use your nose (the old “rotten eggs” smell is a clue, or detectors such as a Gassaf propane leak detector, or a propane dial manometer (to detect pressure drops in the propane system).  (rvlife.com has a great video on how to inspect your propane system).  A pressure drop-down test is recommended once a year so that you can tell if your system is leaking at all.  If you do have a leak, you can use a simple spray bottle with water and liquid dish detergent, to check all joints for leaks (the soap will cause bubbles around the joint if it’s leaking).  

Like manufactured homes, RVs tend to have an abundance of particleboard, fabric and flooring that should have formaldehyde limits individually, but corporately may give off a lot of formaldehyde when they are new from the factory.  These levels go down dramatically as an RV ages, but RV age also increases chances of other problems, like water or structural damage.  In general, less-expensive units have more adhesive-based components (which generate formaldehyde off-gassing) and could create some irritation for more sensitive RV owners. (rvtravel.com).  When checking out RVs to purchase, you can even bring a portable sensor with you to measure the levels of VOCs and formaldehyde inside them (check out our article on sensors for recommendations).  Air purifiers with activated charcoal filters, like the Germ Defender with carbon filters, absorb VOCs and formaldehyde, and fans are helpful to keep air circulating.  1-2 Germ Defenders can cover the average RV (remember that they don’t cover spaces separated by closed doors) so that your RV can be comfortable even new off the factory floor. 

Manufactured and mobile homes can be as healthy as a permanent home inside with a lot of diligence and the decision to choose your neighbors wisely!   If you are in close proximity to smokers, barbeque grills, auto exhaust or other toxins, this can seep into your home.  If possible, try to live or camp on a large lot and use HEPA filters to capture particulates inside.  In a small or large home, it’s best put your health first and live in the best place you can afford.

Photo by Jon Hieb on Unsplash

Getting the Basement Dried Out

Getting the Basement Dried Out

In our post on how the basement affects our whole home’s air quality, we discussed how mold and mildew form and are sustained in the basement.  Active water leaks (flowing down the walls and pooled on the floor) are not required to make the basement a musty place.  Here are some sources of moisture coming into the basement:

  • Concrete is not a moisture barrier on its own!  Water will permeate concrete walls and floors and simply evaporate, increasing humidity.  
  • Open or broken windows allow moist air from the outside to come in and upon encountering cool walls and surfaces in the basement, condensation will form or just increase relative humidity in the air.  
  • Air leaks around windows, entry doors, unsealed wall penetrations and penetrations into the first floor above allow air to come in, in an uncontrolled way. 

Ideally the basement is inside your building envelope, whether you decide to finish it or not.  This is because it can be a suitable place for mechanical systems like HVAC air handlers and furnaces, hot water heaters, and also for storage.  To house these systems, however, the basement needs to be dry, with good air quality.  We argue that the basement air quality needs to be as good as any other floor in the home, because it will mingle with the atmosphere of the rest of your home!  There will be small leaks in the basement ceiling that make it permeable to the rest of your home.

The way to control humidity is to control:

  • Water flow into the space,
  • Airflow into the space, and
  • Air circulation within the space.

Let’s tackle each problem individually.

Water flow into the basement

Water flowing down walls in streams and puddling on the floor is a major problem– in this case, it is like living above a lake!  It will be difficult to “dehumidify” the air when open water is present, because the water will be continually vaporizing into the air as fast as a dehumidifier can take it out.  Although many basements exist like this, walls and storage of home goods in such environments can accumulate mildew rapidly.  Painting on a “waterproofing coating” will usually just act as a band-aid, because the pressure behind the wall, forcing it into your basement (called hydrostatic pressure) will eventually break through the paint and even degrade the foundation if it’s not drained away properly using interior and/or exterior drains. (basement waterproofing)  It’s best to contract several reputable basement remediation contractors in order to get their recommendations and quotes on stopping the inflow of water.  

If the water is only causing dampness on the walls but not visible condensation, then it’s possible to allow the walls to continually “dry” to the inside by doing the following:

  • Cracks and damage to the walls need to be repaired first.
  • Install rigid foam board with a “perm” rating of 1 or greater.  This allows the moisture to move through the foam and dry out, but still insulate the basement for greater thermal comfort and avoid condensation on the cold wall. Keep the foam insulation up about an inch from the floor to allow any condensation to drain.  If desired, the walls can be framed with treated wood to hang drywall inside.  An excellent cutaway diagram of the installation can be found here (page 24). Below is a picture of rigid foam board insulation from the same document (page 32).
  • An alternative to applying rigid foam board is to paint concrete walls with a waterproofer such as UGL’s Extreme Latex Masonry Waterproofer.  This product has a perm rating of less than 1 (according to this manufacturer’s video), so it is vapor semi-impermeable, but it does not have any insulating properties, like the foam board, so the walls will still be cold to the touch and allow condensation if the air inside is too warm and humid.  
  • Use dehumidification to dry things out.  
  • Decrease relative humidity by increasing the temperature slightly (the dehumidifier may raise the temperature a few degrees, but if not, you can add a small heater).
  • Increase circulation with fans so that air is evenly dehumidified.

Some notes on Vapor Permeability: A material’s permeability is measured in units called perms, which assess how much moisture can pass through a barrier in a 24-hour period according to standardized industry tests. Materials are separated into four general classes based on their permeance:

  • Vapor impermeable: 0.1 perms or less

  • Vapor semi-impermeable: 1.0 perms or less and greater than 0.1 perm

  • Vapor semi-permeable: 10 perms or less and greater than 1.0 perm

  • Vapor permeable: greater than 10 perms

Materials with lower perm ratings are better at stopping the movement of water vapor. If the perm rating is low enough, the material is a vapor retarder. If it’s really low, it is a vapor barrier. (Barricade Building Products)


Air flow into the basement

Sometimes it’s difficult to know what to do: open the windows or not?  Many reputable websites advocate “airing out the basement” (such as thisoldhouse.com), and we at HypoAir always advocate for ventilation to dilute stale air, but here’s the problem: when you don’t know the dewpoint of the air coming in or leaking in, it can cause major mold problems in the basement!  Dewpoint is the controlling factor of whether fresh-air ventilation alone can prevent mold.  As we wrote in another post

The best way to explain this (per this great article) is to find out the dewpoints of the indoor and outdoor conditions.  If the outdoor dewpoint is lower, you can ventilate with fresh air and still dry out your house!  For example on July 26, 2002, here are the conditions inside and outside my house (a relatively “dry” hot day outside!):

Inside: 76 deg F, 67% humidity = 63 deg F dewpoint (check out this easy calculator on dpcalc.org)

Outside: 91 deg F, 54% humidity = 72 deg F dewpoint (dpcalc.org)

See, in this case even though the relative humidity outdoors is lower, if I open my windows, that hot air coming inside would be cooled and relative humidity would increase, working against my humidity goals.

In the case of the basement, the air temperature could easily be lower, like 68 deg F.  If you cool 91 deg air with 54% relative humidity down to 68 degrees, water vapor in the air is going to condense, making your humidity problem worse!   Therefore we want to control all sources of air inflow and only let in drier air for ventilation.  Here is a diagram showing the problem of leaving windows open, and how to solve it:

source: bayareaunderpinning.com

  1. Close windows, block off vents, and seal the window frames with caulk, spray foam or adhesive tape made for the purpose.  Make sure exterior doors have weatherstripping. 

  2. Check for unsealed penetrations in the walls.  If you have to use a flashlight and look behind appliances such as water heaters or furnaces, be prepared with gloves and pest spray to get it done!  The best sealant for wall penetrations in the basement would be sprayfoam, because it conforms to the shape of the hole.  You may want to shove in a wad of steel wool first, because it deters animals from chewing through the foam and re-opening the hole.

  3. Look up–check the ceiling.  If there is a false ceiling in the basement, you may need to remove ceiling tiles and/or insulation in order to see the underside of the subfloor, but this is where big problems can hide!  The photo below shows the underside of a tub.  Plumbers often cut BIG holes to make their jobs easier, but this can really hurt air quality when these holes let lots of moldy air up (if there’s a negative pressure generated in the space above, this is easily done with a bathroom vent fan), or warm air down (if you are using any type of air extractor in the basement).  It’s best to seal big holes like this one by framing in a box to the surrounding joists, and using spray foam to seal the resulting cracks and holes.  It’s not recommended to insulate the ceiling of the basement (see this definitive guide, page 25) to try to separate it from the rest of the building, as this will only cause more mold problems in the basement.

Source: energyvanguard.com

Where does fresh-air ventilation come from if you’ve sealed outside access off?  According to energyvanguard.com, there are 6 ways to supply fresh air to your home in a humid climate, and for the purpose of a basement that is outside the building envelope, only one makes sense since you’re probably already using a dehumidifier: a fresh air fan that purposely pulls in outside air.  Here are some options to make it happen: 

  • Air King’s QUFresh, 120 cfm, $413 at ecomfort.com
  • Broan’s FreshIn, 180 cfm, $239 at sylvane.com
  • ACInfinity’s AIRTITAN T3 6-In Ventilation Fan, 120 cfm, $69.99, sylvane.com

The AirTitan is a good option where windows are available, because it can be retrofitted to fit in an open window more easily than the other ducted models.  Each of these models have temperature and humidity settings you can adjust so that the fan will only operate when it meets those specifications.  These may need to be set higher in hot and humid climates, but the dehumidifier should be able to handle moderate inflows of fresh air.  When you control the airflow into the basement, you can control the humidity.

And finally, Air Circulation Within the Space

Your basement may be one wide-open area, or several rooms separated by walls and doors, but in each case, good air quality requires that air is moving constantly.  Here are some tips to get the best circulation:

  • Leave doors within the basement open as much as possible
  • Leave dedicated fans running all the time.  Floor fans work great for this purpose, as you can move them around/adjust direction and speeds until you find the optimum circulation.
  • Move boxes and furnishings away from walls and up from floors so that air will circulate to dry them.  Don’t stack boxes to the ceiling.  Separate boxes by several inches to get air moving between them. 
  • Remember, the less absorbent material stored in a non-conditioned space, the better (less cardboard, less fabric, and less wood).

I hope these suggestions help you to dry out your basement so that your whole-house air quality improves, from the ground up!

If you are skeptical about the effects of mold in homes, please stop and read this.

If you are skeptical about the effects of mold in homes, please stop and read this.

Mold is a fungus that has thousands of species and grows outdoors and indoors, year-round; every building has some level of mold in it. (Molds in the Environment, Johns Hopkins Medicine)  It spreads by microscopic spores which are carried in the air, on clothing, shoes and pets to lodge and potentially multiply indoors. (Basic Facts about Mold and Dampness, CDC) Since the spores are too small to see, many people doubt that mold in the home or workplace can actually cause illness.  Is all mold really bad, or are only some molds bad?  Why do some people become ill while staying a short time in a space while others seem to be unaffected?  What levels of mold should cause concern and what tests are best?   These are very common questions and we would like to highlight some scientific research about mold to understand the answers to these questions.  

Because edible mushrooms and molds growing on basement walls are all classified as fungus, with more adverse reactions arising from handling some than others, there are obviously harmless and harmful species in the family.  It’s overgrowth of the harmful types that can lead to problems in buildings. In the right environment they quickly grow from microscopic spores to visible mycelium (colonies), to sending out more spores into the air and starting other colonies.. 

In general, molds need the following to grow (What You Need to Know About Mold):

  • Moisture: even moisture from the air, when it is above 80% humidity, can be enough to sustain mold.
  • Warmer temperatures: most molds cannot grow below 40 deg F, which is why refrigerators are kept at 39 deg F and below. 40 -100 deg F sustains mold.
  • Organic (carbon-based) materials to digest.  Mold can even grow on glass, metal and other inhospitable environments, if it has dirt or synthetic material to feed on.
  • Protection (shade) from UV rays: ultraviolet light kills most mold, so you won’t see it growing in direct sunlight!
  • Oxygen: mold needs very little oxygen to survive, so it’s difficult to control mold by depriving it of oxygen.

Therefore, warm, moist areas with natural materials like wood, paper or fabric are great at growing mold, and mold can take root in these areas in as little as 48 hours.  Eliminating the most important material (water) quickly will stop mold in its tracks and not allow it to proliferate.

Molds can emit several types of toxins: mycotoxins and microbial volatile organic compounds (mVOCs). Mycotoxins are solid or liquid.  Of the several hundred mycotoxins identified so far, about a dozen have gained the most attention due to their severe effects on human health and their occurrences in food. (Mycotoxins, WHO). Mycotoxins have also been frequently detected in house-dust over the past decades, and they can be carried through the air on dust, spores or other fragments of mold.  (Detection of Mycotoxins in Highly Matrix-Loaded House-Dust Samples)  By contrast, MVOCs are gaseous, so they are already airborne.  Both mycotoxins and mVOCs can be emitted when the mold colony is disturbed or threatened, by humans, animals or by other microbes.

Ancient plagues and epidemics among animals and humans were likely the result of mycotoxins in foods. Here are some examples: 

  • In 1960, about 100,000 young turkeys died in the UK, and scientists discovered that aflatoxins produced by the common molds Aspergillus flavus and A. parasiticus in their feed led to the deaths.  (Mycotoxin: Its Impact on Gut Health and Microbiota)  
  • Aflatoxin can also cause liver cancer in humans.  
  • Ingestion of ergot, which is a fungal disease of rye and other grains in which black elongated fruiting bodies grow in the ears of the head of grain, can result in ergotism, a painful and often deadly disease.  Ergotism has even been implicated in premeditated poisonings and witch trials, due to its psychoactive effects and disturbances. (Ergot: from witchcraft to biotechnology)
  • Sadly, since the isolation of T-2 mycotoxin (a member of the trichothecene mycotoxins, which is emitted from several types of mold including Stachybotrys chartarum), T-2 mycotoxin has been allegedly used as a bioweapon during the military conflicts in Laos (1975-81), Kampuchea (1979-81), and Afghanistan (1979-81) to produce lethal and nonlethal casualties. (CBRNE - T-2 Mycotoxins)  

Illness by ingestion of mycotoxins from a food source occurs more frequently than by inhalation of mycotoxins (for example in dust from mold growing on or behind walls); so with the exception of bioweapons, inhalation of mycotoxins is of a lower concentration so that respiratory irritation is the usual effect.  

MVOCs, being gaseous, are highly inhalable, and their effects can range from annoyance (of the musty smell) to coughing, wheezing, fatigue, headaches, dyspnea, allergies, eczema, as well as serious respiratory issues (Sick Building Syndrome, Mølhave, L. "Encyclopedia of Environmental Health." 663-669.)

So why does mold affect some individuals more than others?  For a long time, individuals who became ill upon entering or spending time in a building were deemed to have more psychological issues than actual physical issues, because testing of the building often revealed no measurable toxins.  There are several reasons for this: 

  • First, methods of testing for toxins were not sensitive or specific enough to find the cause.  Dr. Ritchie Shoemaker, a well-known researcher and doctor in the area of mold, Chronic Inflammatory Response Syndrome (CIRS) and Water-Damaged Buildings (WDB), addressed this problem when discussing testing methods in his 2021 paper.  Air sampling methods are not adequate to pick up smaller spores, they may also miss spores outside the air flow boundary and duration of the test, and some spores (like Stachybotrys, commonly called Black Mold even though many other molds are black in appearance) are heavy and don’t become airborne in large numbers, especially if the mold colony is hidden inside a wall. 
  • Some bacteria and molds in WDB produce mVOCs, which are toxins not detected by spore air tests.  Only tests that capture mVOCs would be able to detect these. 
  • Some people are more sensitive to mold spores, mycotoxins, mVOCs and endotoxins than the general population.  They may be missing genes that allow their bodies to process the toxins, or their immune system may have been chronically overstimulated in a previous chemical or toxin exposure.  These predispositions make them much more sensitive to low levels of toxins from mold and bacteria.

Therefore, mold toxins are sometimes difficult to detect, and they don’t produce similar responses per concentration in everyone due to individual sensitivities. This phenomenon is addressed in a guidance paper to clinicians (doctors and other health practitioners) by the University of Connecticut Health Center.  The paper discusses 5 case studies of patients who were observed to have sick building syndrome due to mold issues in WDB. 

There are several reactions to exposure to mold discussed in the paper:

  1. Fungal infections: Infection usually requires direct contact with fungus, and only immuno- compromised or highly sensitive people are at-risk for fungal infections.
  2. Allergic and Hypersensitivity reactions: It is well established that fungi can cause allergic reactions in humans, and molds are typically included in the skin test panels used clinically by immunologists to screen for environmental triggers in atopic patients (those who are predisposed to immune responses). Many atopic patients experience allergic symptoms related to molds commonly encountered outdoors. The presence of mold spores in the indoor environment is not in itself a problem when the source is the normal interchange of outside air and the amount and types of spores inside are the same or less than outside. However, mold actively growing on an indoor substrate may affect the quality of the environment by degrading the surrounding materials (weakening the structure) and, more important, by potentially adding unhealthy chemicals and bioaerosols to the indoor air. Higher levels of mold spores inside than outside or the presence of different species inside than outside reflect this “amplification” of mold.  Antigens are toxins that produce antibodies, and in the case of mold, antigens could be spores or spore fragments, mycotoxins, or mVOCs.  “Individuals’ immune responses to these antigenic molecules are determined by their genetic makeup and environmental factors. Important among these factors are the frequency of exposure to the antigens and the intensity of the exposures…Development of sensitization to antigens generally requires repeat exposures, often to high ambient concentrations of the sensitizing material. Once sensitization to an antigen has developed, it requires a much lower concentration upon re-exposure to elicit the reactive phase that we recognize as the clinical manifestation of disease.  In general, the higher the exposure and the degree to which one has been sensitized, the more severe the allergic or immune-mediated response.”  

This is the pathway by which mold “allergies” progress to severe illness, and even death. All five of the cases discussed in the aforementioned paper necessitated the patients to be removed from the buildings (school, office, and home) to recover from their symptoms.  Unfortunately the death of a two-year-old boy in the UK in 2020 was the result of a severe respiratory condition due to prolonged exposure to mold (the family had reported mold in the apartment repeatedly up to three years prior, however, the housing authority did nothing to repair or mitigate it).  This highlights the need for parents to be knowledgeable about the effects of mold as advocates for their children. 

When should a house be tested for mold? We concur with this experienced mold inspector’s methodology:

  1. If you have no visible mold but high humidity, it’s probable that mold is starting to grow in the area.  Humidity is easy to feel even without sensors but to be sure, you can get 2 humidity sensors here for only $10.
  2. If you find visible mold growth, but don’t know the extent of the damage
  3. If you or someone in your family suffers from health symptoms related to mold exposure, then testing of the home would be appropriate.
  4. If you smell a musty odor, this is an indication that you have actively growing mold.  These odors are mVOCs.
  5. If you’ve already had remediation and need proof that it was performed effectively in order to move back in safely, hopefully a “before” or baseline test was performed for comparison.

What kind of tests are appropriate? 

DIY mold tests are abundant, however, in most cases you get what you pay for.  Petri dishes, while economical, do not provide the quantitative information (how much mold is in the air) and except in the case of sending the dishes in for lab analysis, do not give qualitative information about the types of species. 

If you have only a moderate budget and don’t know where the mold may be coming from, we believe non-viable air sampling can give a lot of information about the spaces in your home.  GotMold? Is an easy way to take these samples in different rooms and get them analyzed by an accredited laboratory. They include an outside sample cassette so that your inside rooms can be referenced against it.  The lowest level of indoor spores should be comparable to an outdoor sample, because mold is in the air everywhere.

If you do have an idea of where the mold is originating, adding a tape-lift, swab or bulk (air filter) sample to your tests can help confirm if a moldy-looking area is indeed mold.  

If, however, an area of your home recently flooded, or you’re experiencing new or worsening health problems, we would recommend requesting a visit from a professional, experienced mold inspector who will not only take samples: they should first of all look at the moisture problems in the home which could generate the mold.  They will also be able to distinguish which type of test is appropriate, and if mold is discovered, whether it’s active mold growth that could be causing illness or inactive mold that’s been dried out and contained behind walls for years.   There is a big difference in renovation scope and cost for active mold and inactive mold!   We understand the health impacts of critically-contaminated spaces on one end of the spectrum, but since many leaks and humidity problems can be corrected in a local, economical way, it’s often not necessary to “gut” a home to remediate it well.  

Beware if the inspector only wants to do ERMI testing.  ERMI stands for Environmental Relative Moldiness Index and was developed by the EPA for research purposes only.  Despite its popularity among many mold inspectors and a number of mail-order labs such as EnviroBiomics and Mycometrics, ERMI has a number of drawbacks that can cause it to miss major mold problems, or overstate minor ones.  

In the end, just as a leak in your outdoor shed can make a stinky, decaying mess, mold can do the same indoors–and it may or may not affect your family’s health, depending on their genetic makeup and previous experiences with mold, chemicals and toxins.   However, we do hope that you will take any water intrusion or humidity problem seriously, because it has the potential to do serious harm.  

Photo by Pawel Czerwinski on Unsplash

Is there mold hiding in your clothes?

Is there mold hiding in your clothes?

It has been one heck of a summer in the US!  More heat = more sweat, more sweat = more stinky wet clothes in the laundry hamper, and more wet clothes in the laundry hamper = more mold!   This is especially a problem with workout clothing or “outdoor work” clothing that get positively soaked with sweat.  My previous schedule of washing one time per week is not cutting it, because now I’m noticing that even after washing, my clothes are not smelling clean (I don’t use perfumed detergent).  Why can’t I get the mold out with just washing?

Mold is persistent.  Because we’ve been trained to save energy and that modern detergents and washing machines work well with cold water, I’ve basically gone to using cold water for all of my washing.  Cold water and detergent typically don’t remove mold, so after several cycles of letting them sit in my hamper, washing with cold water and drying, the smell intensified.  Something had to change!  This excellent article gives many non-toxic ways of getting rid of mold from clothing:

  1. First of all, the habit of leaving wet clothes in the hamper is not good.  If I can’t wash them right away, I need to hang them up to let the moisture dry out.
  2. If I can’t wash them right away, pretreating with a tea tree oil spray not only helps them smell better, but also kills the mold because tea tree oil is a fungicide!  Oregano Oil or Clove Oil will also work, depending on your fragrance preference.  Be sure to purchase pure oil without additives.  Here is how to make it: 
    1. Add one teaspoon of teatree oil to one cup of hot water; pour it into a spray bottle.  Shake the mixture.
    2. Spray the garment thoroughly, inside and out. 
    3. Let the mixture soak in for 10 minutes before washing.
    4. Pour the rest of the mixture into the washing machine or handwash basin.
  3. If you don’t like the smell of the essential oils (the smell does dissipate within a few hours), you can use hydrogen peroxide in a spray bottle (3% dilution works well) in the same way as the essential oils. 
  4. Borax has been around a long time for good reason– it is a good disinfectant and low toxicity (just don’t ingest it, inhale the dust or get it into your eyes). (ThoughtCo.com)  When mixed with hot water, it turns water into hydrogen peroxide. 
    1. Mix ½ cup of Borax with hot water in a large basin, stirring slowly until its fully dissolved.
    2. Soak the clothes in the mixture for at least 20 minutes.
    3. Pour the clothes into the washing machine with the mixture and wash for 2 cycles. 
  5. Vinegar and baking soda:  You’ve probably used this powerful combination before and know that it makes a foamy cleaning agent, except this time use it in separate wash cycles.
    1. 1st cycle: add 1 cup white vinegar to the detergent dispenser, with no other detergent.
    2. 2nd cycle: add ½ cup baking soda to the detergent dispenser and finish washing.
    3. Don’t ever combine vinegar and bleach!  This combination generates toxic fumes.
  6. Closets can be perfect for growing mold, because lack of air circulation can allow moisture to accumulate in the clothes, making them the perfect food source!  We posted an article “Can I avoid mold with JUST ventilation?” and the answer turned out to be oftentimes, you can.  Here are some ways to prevent mold from taking root in the nice clean clothes in your closet:
    1. Leave the closet door open.  If you are keeping your home below 60% humidity, usually this step alone can keep the closet from smelling musty–that first telltale sign of mold.
    2. Try not to pack clothing or boxes tightly together, again because air circulation around items is necessary to keep the humidity down in the clothes. 
    3. If you cannot keep the door open, try adding small dehumidifiers:
      1. DampRid is a brand name that makes a number of desiccant products that you can hang or set on a shelf or on the floor, but there are many comparable products.  Remember that water will need to be poured off, and the chemical absorbing the water will replaced, every so often.  This chemical is usually calcium chloride, which comes prepackaged in the replaceable refills.  Alternatively, you can make your own desiccant dehumidifier by purchasing silica gel or calcium chloride at the hardware store and placing it in small plastic bowls with the tops pierced (just don’t knock them over or the liquid may spill on the floor!)
      2. Small dehumidifiers can make a big difference in closets.  You can get a model to hang on a wall, or place on a shelf (just make sure there is sufficient space above and around it for air circulation).  The condensate container in these will also need to be emptied periodically (although the unit should shut off when full) so put a little reminder on your calendar to do that.  Here are some models that won’t break the bank:
        1. Eva-Dry ($22) makes several “wireless” models, which use silica gel desiccant which must be replaced every 20-30 days. This is a good option for smaller closets (up to 333 cubic feet) without a power outlet, and larger versions are available too.
        2. Eva-Dry also makes electric dehumidifiers; this model ($27) will need to be emptied every 3-4 days but it’s ultra quiet. 
      3. Many customers know that even higher humidity areas like bathrooms and closets can be kept mold free with the Mold Guard/Germ Defender.  It’s a powerful unit that emits a dense blanket of ions that can break apart/deactivate mold spores at the cellular level.  Perfect for spaces of 100 ft2 or under, this unit requires very little maintenance and can be purchased with optional charcoal filters.

The next time you put on clothing from the clean laundry and it doesn’t smell so fresh, it’s probably not you (or your deodorant), it may be mold.  Arm yourself with some natural anti-fungals like vinegar, baking soda, teatree oil, hydrogen peroxide or borax, and banish the mold from your wardrobe!

How to keep MILDEW out of your CLOSET

How to keep MILDEW out of your CLOSET

Closet doors are meant to keep closed, right?  Unless you are Martha Stewart, it’s likely your closet doors don’t stay open very long–if they close to begin with!  The problem comes when humidity and closed doors combine for a stinky problem: mildew and mold.

We sometimes think that mildew is a less toxic form of mold, but it is still mold nonetheless.  Mildew is a subclass of mold that exhibits a white or gray, flat, powdery growth, while the rest of the molds can get more fuzzy and colorful.  Both release spores, but unlike other molds, mildew doesn’t penetrate surfaces and grow into the materials it lands on (though it can still cause cosmetic damage). Instead, it grows on top of flat surfaces and often collects in places like cardboard boxes or your vintage leather jacket in the closet.  Not good!  (What is Mildew, Really? The Difference Between Mold and Mildew)

Since we know that mildew is a form of mold, we know that it needs several things to grow: a food source (ie. leather, clothing, and dust in general), moisture (even excess humidity) and air (although stagnant air is best because lack of circulation keeps humidity at surfaces high).  So, the best ways to keep mildew at bay in closets is to:

  • Clean out the dust and seal off any sources of dust

  • Keep the humidity down and ventilate

  • Store items for longevity and air circulation 

How the heck does dust get in the closet when the door’s closed?

Incredibly, some closets are like dust magnets.  If your closet is part of a tiled or vinyl floor area, dust bunnies can usually slide right under the door due to the slick surface.  If you have any penetrations in the ceiling (like a light bulb), then your closet may be part of a hidden circulation system where the framing in your walls conducts air currents throughout your home.  For example, closets near bathrooms may unknowingly supply air to the bathroom exhaust fan, if the fan’s ductwork is not sealed well in the attic or the lightbulb box is not sealed to the ceiling.  Then there are the closets that double as storage areas and HVAC equipment rooms.  If the HVAC unit is not sealed well, it just pulls air from the surrounding home into your closet.

  1. Seal

The way to keep out the dust is to seal these small air passages: at the ceiling, remove the light fixture and either use a caulk gun (less messy) or a spray foam can with a straw (very messy, be sure to cover everything!)  to seal the electrical box to the drywall.  If the closet is an upper story, you may be able to do it from above in the attic with less mess, and sealing all the ceiling penetrations may help with dust house-wide.  If you notice a lot of dust forming on the floor, it may be worth caulking the baseboards to the floor (if it’s tile or solid-surface) to seal that up as well.

  1. Clean 

Next, removing the dust should be part of a larger goal to store items properly so that cleaning will be easier and mildew will be less likely to form.  You’ll need a HEPA vacuum with brush attachments, and various storage containers.  If possible, empty the closet.  This will allow you to see all the walls and floor to see if there are any water leaks coming in that could be causing the mildew.  If not, use the vacuum to clean ALL the surfaces so you can get a fresh clean start!

It’s a great time to wash clothing and purge any items that you don’t use anymore by donating them.  Clean clothing is less likely to smell and deteriorate from body sweat and dust mites as well.

Stop right there!  If you had mildew in your closet before, you need to make ventilation changes to stop it from recurring.

  1. Ventilate/dehumidify

Mildew sometimes forms in closets because of lack of ventilation.  The great thing about moving air is that it lowers the moisture content of surfaces that come in contact with it.  If the air is not moving, the moisture content of surfaces tends to equalize with the stagnant air, and over time, mold is able to grow.  Also, if your closet is located on the corner or north side of a building, the insulation in the wall may not be sufficient to prevent warm house air from causing condensation on the cold wall.   Here are some tips:

  1. Refill the closet

Ok, you can start restocking the closet but remember this important point: maintain space between items so that air can freely circulate!  Don’t overstuff or compact items against the wall, either.  Wire shelving is great for maintaining circulation from top to bottom, too.

Storage containers matter, too–if possible, don’t use cardboard boxes because cardboard holds moisture, and it’s a favorite food for all kinds of pests: mold, roaches and silverfish like to eat it, and mice like to use it for bedding!  If you’ve cleaned and dried your clothing and excess bedding, packing them in clear storage bins is ideal so that you can easily see what’s in each.  For wool and moth-prone items, you can add cedar blocks to the bin to keep pests out.  These garment bags are great to keep dust off hanging clothes.

After mildew remediation, it’s important to check on your closet at least every few weeks until you’re sure that the changes are producing their intended effect: the ability to close the closet door without mildew taking root!

Photo by Annie Spratt on Unsplash

What’s the difference between EMMA and ERMI?

What’s the difference between EMMA and ERMI?

Maybe EMMA and ERMI sound like children’s story characters, but no, we’re talking about mold testing!   RealTime Laboratories was founded in Texas in 2005 by two doctors who had been researching and collaborating since their meeting in medical school.  Dr. Bolton is a board-certified anesthesiologist and was a doctor with the U.S. Navy for 12 years, as well as practicing privately and with the U.S. Department of Veterans’ Affairs.  He investigated the circumstances of his friend’s mother’s sudden death, whose heart stopped although she was in relatively good health.  The woman’s house was full of mold.  Dr. Bolton’s wife also suffered from sinus and ear problems, most likely from the gym where she worked out (nadallas.com) At RealTime Laboratories, Dr. Bolton and Dr. Hooper developed proprietary testing for the 16 most common, dangerous mycotoxins in patients’ bodies, homes and pets, so that they could recover their homes and lives from these poisons.  EMMA (Environmental Mold and Mycotoxin Assessment) is one of these tests, and it tests for 10 of the most toxigenic molds (including “Black Mold” or Stachybotrys) as well as the presence of 16 of the most dangerous mycotoxins produced by those 10 molds, using provided swab and gauze or a sample of your HVAC filter. (realtimelab.com)

In contrast, ERMI (Environmental Readiness Moldiness Test) was developed by the EPA as a research tool, to investigate the relative moldiness of a home.  ERMI uses the analysis of settled dust in homes and buildings to determine the concentrations of the DNA of the different species of molds.  (survivingmold.com)  In other words, ERMI gives a sense of the concentration of various molds, but does not test for the poisonous mycotoxins they emit. ERMI was developed as a research tool only, and although ERMI testing is widely available by independent labs, it has not been validated for routine public use in homes, schools or other buildings.  It was criticized by the EPA’s own Office of Inpector General in a report titled, “Public May Be Making Indoor Mold Cleanup Decisions Based on EPA Tool Developed Only for Research Applications.”  Some of the shortfalls of ERMI collection practices and analysis are listed in this report

Here is a summary of the differences between EMMA and ERMI (source: presentation by Dr. Matt Pratt-Hyatt):

Realtime Laboratories is certified under Clinical Laboratory Improvement Amendments of 1988 (CLIA) and College of American Pathologists (CAP) to perform EMMA testing, which most importantly focuses on the molds AND the mycotoxins they produce.  The company has produced a table of which mycotoxins are associated with which mold, and the symptoms and illnesses caused by them.  Here is a portion of the table:

Mycotoxin testing in the body is what may be foremost to patients.  This lab offers urine sample testing of those same 16 mycotoxins using ELISA-based testing, which stands for enzyme-linked immunoassay. It is a commonly used laboratory test to detect antibodies in the blood. (medlineplus.gov).  (Inclusive in the mycotoxin test, RealTime Labs was granted a patent for its macrocyclic trichothecene test (tricothecenes can be produced by the molds Fusarium, Stachybotrys, Tricothecium and Myrothecium)).  Also, RealTime Labs offers a MycoDART-PCR test of the blood (must be ordered by a doctor) to determine if the patient has been colonized by mold.  According to Dr. Matt Pratt-Hyatt, 1 in 3 mold illness patients is colonized with mold.   If detectable levels of mycotoxins are found:

  • In the body: the patient can choose to start treatment with a doctor in their area (list on the website).  Treatment and monitoring continues until mycotoxins are below detectable limits in the tests.  

  • In the home: the patient can contact environmental remediation services to pinpoint the source (the test does not pinpoint the source) and remove mold from their home.  

Recovery from mold exposure and mold illness really needs to have this dual approach, because if the patient is treated without remediation of the home, then continued exposure will not allow recovery!  Remediation of the home is great, but it could take much longer for the patient to recover if their natural defenses, like glutathione, remain depleted.  Want to know whether you or your home have been “sickened” by mold?  Get tested! 

Photo by Sandy Millar on Unsplash

Actinobacteria: Another danger lurking in Water Damaged Buildings

Actinobacteria: Another danger lurking in Water Damaged Buildings

Avoiding mold and mycotoxins has taken a major share of the spotlight in healthy home discussions, and for good reason, because they can elicit major allergic responses in many people and disabling immune responses in very sensitive people.  However, there is another organism that grows right along with mold in moist environments, and it’s often overlooked even though it can produce the same types of reactions.  Some types of bacteria are unique enough to be in a class of their own, called actinobacteria.  

Here’s a short refresher from an article about bacteria, endotoxins and exotoxins:  bacteria can be classed into two different groups: “Gram-negative” or “Gram-positive”.  These classes are based on a test developed by scientist Christian Gram in 1884, which differentiates the bacteria using a purple stain.   According to webmd.com, bacteria either have a hard, outer shell, or a thick, mesh-like membrane called peptidoglycan.  The hard outer shell will resist the purple stain, and show up as a red color.  These are called “gram negative” because the purple stain did not show.  Bacteria with the peptidoglycan absorb the purple stain much more easily and are called “gram positive”.  The stain also tells many more characteristics about the bacteria and the way it interacts with treatment. 

Going back to actinobacteria (also called actinomycetes), they are a diverse group of gram-positive bacteria, meaning they have that mesh-like membrane called peptidoglycan. However, they resemble molds (fungi) because they are adapted to life on solid surfaces and they can produce mycelium (branching structures) and dry spores like most fungi. Actinomycete spores are known to be important air contaminants in occupational environments, such as agriculture and waste composting facilities, and have recently gained special attention as indicators of mold problems in buildings. They do not belong to the normal microbial flora in indoor air but have been found in buildings suffering from moisture and mold problems. (Characteristics of Airborne Actinomycete Spores)  One class of actinobacteria, called mycobacteria, include the types of bacteria responsible for tuberculosis and leprosy.   These actinobacteria require iron for growth, and in the human body, will destroy red blood cells in order to acquire the iron it needs.

Actinobacteria, which occur in both terrestrial and aquatic habitats, are among the most common groups of gram-positive microorganisms in nature.  Living in soil, actinobacteria decompose organic matter and display antagonism against other bacteria and fungi, with which they compete for nutrients. Actinobacteria have incredible abilities to survive under extreme conditions in their natural environment and have been found in strongly saline soils, soils with a high content of exchangeable sodium and/or magnesium ions, and heavy clay soil which is submerged by water.  (Discovery of Actinomycetes from Extreme Environments with Potential to Produce Novel Antibiotics).  If they can live in these extreme environments, it’s not too much of a stretch to find them indoors in water-damaged buildings (WDB) and indeed, they thrive there too.  In a 2017 study of an office building in the northeast US which had a history of water incursions via roofs, walls, and pipes, actinobacteria were detected in 74% of dust samples, and thermophilic actinomycetes (unique high-temperature aerobic bacteria) were most predominant (81%) among the three types.   In analysis of building occupants who participated (105 participants out of 136 occupants), the increasing thermophilic actinomycetes levels in floor dust were significantly associated with decreased pulmonary function and increased odds of having symptoms reflecting possible granulomatous disease, particularly shortness of breath on exertion, flu-like achiness, and fever and chills.  Prevalences of the three granulomatous disease-like symptoms among the occupants were similar to those reported in another study of a large office building with eight hypersensitivity pneumonitis and six sarcoidosis cases, a long history of moisture incursions, and high fungal and bacterial contamination.   

Dr. Ritchie Shoemaker, an expert on mold illness and CIRS, published the paper Exposure to Actinobacteria resident in water-damaged buildings and resultant immune injury in Chronic Inflammatory Response Syndrome in 2021.  In it, he details some of the interesting facts about actinobacteria that many people do not know:

  • Geosmin is a VOC that accounts for the characteristic musty smell found in many WDB, and many actinobacteria also produce this VOC, creating the logical fallacy that the smell found in WDB buildings is only due to mold growth.  
  • Certain species of actinobacteria live on humans: on our skin and in mucous membranes and genitourinary tracts.  He denoted these HH actinobacteria (for human habitat), as opposed to SH actinobacteria (for soil habitat).   The interior of WDB are usually colonized by HH actinobacteria much more than SH actinobacteria; this is not the same for fungi, because WDB are easily colonized by outdoor (SH) fungi.  (Airborne Bacterial Communities in Residences: Similarities and Differences with Fungi)  
  • Dr. Shoemaker developed indices for exposure to actinobacteria showing differences in subsequent immunoreactivity in Chronic Immune Response Syndrome (CIRS) patients for actinobacteria from human skin carriage, HH, as opposed to SH actinobacteria.  
  • He theorized that the “toxin” that causes the immunoreactivity is not exotoxins, like normal gram-positive bacteria, but extracellular vesicles of 20-150 nanometer size that carry potentially inflammatory molecular signaling compounds from inside the cell wall to the outside. Vesicles are known to contain a variety of charges including nucleic acids, lipoproteins, enzymes, and toxins.  

“Better Health Guy” Scott Forsgren, Functional Diagnostic Nutrition Practitioner interviewed Dr. Larry Schwartz, an indoor air expert with a specialty area is assessing, testing, and creating solutions to make homes and workplaces environmentally safe for patients with inflammatory illnesses, about actinobacteria.  According to Dr. Schwartz, one can get treated for symptoms of CIRS (of which there are 37), but not necessarily get to the root cause.  However, if their blood is tested by GENIE (Genomic expression: Inflammation Explained), root causes for CIRS can be discovered.  “We found over 2,000 patients that have taken the GENIE test. About 42% of them are being triggered by Actinomycetes. The next largest percentage was endotoxins. The least percentage was the mycotoxin.”   (podcast: Episode #171: Actinomycetes with Larry Schwartz, BSME, MBA, CIEC)  Some background on GENIE:  this test was developed by Dr. Shoemaker and Dr. James Ryan, a molecular biologist, who have collaborated on genetic testing since 2011. GENIE is a gene expression assay composed of 188 genes that is performed on a single blood specimen. It reveals gene expression abnormalities found most often in patients facing CIRS illnesses. Typically it's done repeatedly, once before treatment for CIRS, after the first eleven steps of the treatment protocol, during or after VIP treatment. (vasoactive intestinal polypeptide). VIP is a naturally occurring human neuropeptide which affects multiple pathways in the brain and throughout the body, and it’s given as a low-dose nasal spray to benefit patients with severe CIRS.  GENIE results will show if the patient's metabolism is improving as their treatment progresses.

Dr. Schwartz’ research exposed that the major “factory” of actinobacteria (he calls them “actinos” for short) is the bedroom, because of the time we spend under covers (warm temperature) and the amount of skin cells that are deposited in the bed.  He also characterizes showers, crawlspaces and basements and drains as places where actinobacteria tend to multiply because of constant moisture.  He has a bedding protocol for cleaning bedsheets, and drain “protocol” on how to clean drains on a regular basis so that actinobacteria will not continue to proliferate in them.  (check out minute 59:17 of the podcast for these protocols).  Dr. Schwartz also advocates for use of HEPA filters, PCO devices (like the Air Angel Mobile) and bipolar devices (like the Mold Guard).  We would also add that the use of bathroom exhaust fans and humidity control are paramount for lowering relative humidity.  

Dr. Schwartz acknowledged that similar to the way pathogenic mold makes mycotoxins,  many pathogenic species of actinos often create a chemical called mycolic acid, which may be the allergy trigger for CIRS patients.  Dr. Ritchie Shoemaker also found that mycolic acids played a role in inducing T-cell responses (Exposure to Actinobacteria resident in water-damaged buildings and resultant immune injury in Chronic Inflammatory Response Syndrome)  According to the physicians with which Dr. Schwartz consults, although actinos can trigger inflammation and CIRS, they are not necessarily triggering histamines, and mast cell activation, because mast cell activation is primarily a histamine-driven effect. 

As for testing, EnviroBiomics is the only lab known by Dr. Schwartz that does next generation sequencing (NGS) to determine levels of actinos in home samples. Using special lab equipment called NGS processors, they give the in-depth degree of data on the speciation of actinos and their concentrations.  Dr. Schwartz can analyze the results of these test reports, in conjunction with at-home or virtual visits, to determine what may be exacerbating CIRS symptoms.  In one case, a client who lived in a farmhouse on 3 acres had CIRS, but the cause was not in his home.  It turned out that a neighboring property had a dilapidated barn with rotting hay in it (“farmer’s lung” disease comes from the actinobacteria in rotting hay), and correction of the ventilation in his home significantly improved his symptoms.  

Now for the good: despite its ability to cause illness, scientists and researchers have discovered how to harness actinomycetes for healing purposes.  Antibiotics are a class of molecules used for the treatment and prevention of bacterial infections.  These bioactive compounds are produced naturally from different species of fungi and bacteria, but the most attractive class of microorganisms that are able to produce these secondary metabolites are actinobacteria, in particular, actinomycetes. The importance of this order is due to their abilities to produce different classes of antibiotics in terms of chemical structure and mechanisms of action. Moreover, different genera and species of actinomycetes are able to produce the same class of antibiotics and, in few cases, the same chemical compound.  Thanks to antibiotics and the research developed in this field, many infections are now treatable, and life-quality/life expectancy are better than in the past.  (Actinomycetes: A Never-Ending Source of Bioactive Compounds—An Overview on Antibiotics Production)  

In short, actinobacteria can be confused with mold because of many similarities: how they grow, the environmental conditions they prefer, what they smell like, and what symptoms they cause in humans.  The good thing is that regular cleaning of areas like the bedroom, bathroom and drains to remove dust and allergens also removes food for actinobacteria.  In addition, a whole-home approach also examines the ways that toxins from actinobacteria inside walls and even outside can enter the home via leaks and negative air pressure.  When cleaning protocols are introduced and these air pathways are addressed, actinobacteria numbers start to dwindle and the homeowner’s health increases.  Sometimes it takes a trained eye to discover where they are flourishing, but by knowing their preferred habitat and via testing, they are not completely “in the dark” anymore! 

Photo by Ozgu Ozden on Unsplash

Why, when and how do I clean my mini-split unit?

Why, when and how do I clean my mini-split unit?

Mini-splits are the elegant cousins of window AC units (even though some window AC units are pretty darn good-looking nowadays with lower profiles that don’t block your view).   Mini-splits and window AC units have some of the same internal parts, so even though mini-splits are usually less visible tucked up high on walls, they need the same attention as window AC units to perform efficiently and avoid harboring dust and mold.   (If you have a window AC unit, check out our article for deep-cleaning it here).  Dust and condensation (moisture) are the perfect breeding ground in a mini-split for mold, and it’s being blown directly into your indoor air. What we’re looking at today is cleaning the “indoor” part of the mini-split, which is in the top part of the diagram below.  The parts that can get very dirty are: 

  • the dust filter: it’s easy to take this filter(s) out and vacuum or wash it clean with mild soap and water every month

  • the cold coil (also known as the evaporator coil): deep clean at least once a year

  • Fan: deep clean at least once a year

  • the louvered cover (not labeled): deep clean at least once a year. 

Image source: What are Ductless Air Conditioning Systems?

When deep-cleaning the indoor unit, since it can’t be removed from the wall without releasing refrigerant (unlike the way you can lift the whole window AC out of the window and take it outside), cleaning the coils inside will require some good waterproofing to avoid getting water, cleaning fluid and dirt on your wall and floor.

The other inconvenient part about cleaning the indoor part of a mini-split is the location: since most of them are high on a wall, you will need a very sturdy ladder and perhaps someone to help by handing equipment to you as you need it. 

I like this video for a good method of a professional cleaning the indoor part of a mini-split unit.  It shows the preparation and equipment professionals use.   BUT you don’t have to be a professional–you can buy the “bib” cover online and use a simple garden sprayer to approximate the same cleaning power!  Here is a good video of a DIY guy doing an even more thorough job (he removed the blower wheel for cleaning outside) with a bit more detail on how to take off the louvers and cover.   The only things we cannot recommend is:

  • His choice of cleaners, which do contain toxic chemicals, some of which will be released inside.  

  • Also, make sure to wear safety goggles or preferably a full face mask!  You don’t want any moldy dirt to fly into your eyes or mouth while cleaning.

  • You can use a vacuum inside to remove big clumps of dust, however DON’T use a shop vac inside, unless it has a HEPA filter.  If your wet/dry vac doesn’t have a HEPA filter, then use any other vacuum that has a HEPA filter on the dry dust only.

For cleaning the inside unit, you can use:

  • Sturdy ladder

  • Goggles or face mask, (gloves–optional)

  • Flat and phillips screwdrivers (a power screwdriver is optional)

  • (1-2) 5-gallon buckets (at least one for inside, another one if you want to see what comes out of the evaporator drain)

  • Garden or pump sprayer

  • Bib for covering the unit for a cleaner job, $26: if you plan on doing your own maintenance, it’s worth investing in the cover to use every year!

  • Old towels

  • Coil cleaner (see below)

  • HEPA vacuum for any inside vacuuming

Regarding the coil cleaner, most aerosol coil cleaners have a “propellant” that assists with moving the liquid out of the spray can.  These propellants are usually hydrocarbons with VOCs.  You don’t need to buy spray coil cleaner and release this in your home!  Our choice of a non-toxic coil cleaner is Viper Evap+ from Refrigeration Technologies.  According to the Technical Data Sheet, it is the industry’s only non-rinsing evaporator coil cleaner utilizing slow-release enzymes in a synthetic detergent base, which is safe for all metals.  If it is not rinsed off, the enzymes remain on the coils for 72 hours, starving any microbes of oxygen.  The solution is gradually rinsed off by condensate production, which is drained via the condensate line.  It has no VOCs, TAC (toxic air contaminants) or HAP (hazardous air pollutants).  It is to be used full-strength via a pump sprayer (the garden sprayer we mentioned above works just fine). 

There are two natural cleaners we can recommend that are non-toxic.  The best part about these are the light citrus fragrance Please note that you should check the manufacturer literature on your mini-split unit to find out the recommended maximum acidity or alkalinity of any evaporator coil cleaning solutions, because strong acids or bases can eat metal and damage your unit!  Whichever you choose, you can check the acidity with a pH test strip after dilution to make sure it’s in a safe range for your unit.

  • For an acidic cleaner:  Nutribiotic is a grapefruit seed extract (GSE) which is highly acidic and microbial at full concentration (be very careful mixing and using it!) but can be diluted to use as a coil cleaner.  According to the manufacturer, The GSE Liquid Concentrate has a pH of about 2.75 and the Maximum GSE Liquid Concentrate has a pH of about 2.2, which are both very acidic.  In the article we found for using it to clean your car’s air conditioning evaporator coil, it’s recommended to use it at 2x manufacturer’s recommended dilution.  (Recommended is 10 drops per 5 oz water, so 2x strength is 20 drops per 5 oz water).  

  • For a basic (alkaline) cleaner: EarthClean by Earthpaint is a citric acid cleaner that is super-effective on greasy countertops, and when used at the manufacturer’s dilution, degreases safely on stone countertops with no damage.   Alkaline cleaners can remove greasy dust more easily, so if your mini-split is near your kitchen and your unit can tolerate an alkaline cleaner, this might be the best choice.

Mini-splits look great on the wall, but their performance is only as good as their cleanliness.  If you keep up with cleaning the air filter regularly (at least once a month), the unit will work better through the cooling and heating seasons, and won’t be nearly as gross or hard to clean during the yearly deep-cleaning.  You can save money by doing this yourself, but hiring a reputable technician is fine for those who have too many other things going on.  The most important thing is prioritizing good air quality in your home by performing or scheduling this type of cleaning regularly.