Monthly Archives: September 2023

Norovirus: one tough virus to avoid

Norovirus: one tough virus to avoid

There’s a lot to be said for cruising on ships.  If you want a pre-planned vacation that offers as much or as little adventure as you desire, cruises top the list.  The economy of cruise ships, though, depends on the number of passengers, and with all those passengers come a number of microbes that your body may not tolerate well.  Although norovirus is a disease that can happen anywhere, health officials track illness more closely on cruise ships, so norovirus outbreaks on cruise ships tend to be more extensively documented and publicized. (Facts About Noroviruses on Cruise Ships)

Norovirus is the illness caused by viruses in the Caliciviridae family. When the virus enters your body, it makes your stomach and intestines swell or become inflamed. This is a condition called gastroenteritis, which leads to symptoms that typically include diarrhea, vomiting, nausea and stomach pain. Mild fever and aches are possible. Although it’s often called the “stomach flu”, norovirus is not the influenza or “flu” virus.  (Norovirus appears to keep spreading as rate of positive tests exceeds last year's peak)    

So how does the norovirus get transferred so quickly?  Infected people “shed” billions of particles of the virus through feces and vomit, and it only takes 1 particle of virus to become infected.  This “viral shedding” happens because viruses make copies of themselves very quickly. Every time a virus infects a cell, the number of viruses increases more and more rapidly. The immune system does its best to neutralize the virus by using antibodies, but it can take the immune system a long time to make enough antibodies to kill all the virus living inside one person. In the meantime, the virus has already spread to other people by taking it in orally.  (Viral Shedding and What It Means for COVID-19)  Sometimes, certain foods, including oysters and other seafood, are naturally contaminated with norovirus, so you can get it from eating contaminated foods too. (Norovirus)   

Although norovirus cases usually peak in the wintertime, places like cruise ships foster the environment that helps it to spread quickly (close contact), so it’s not really surprising that a norovirus outbreak on a cruise ship in June 2023 caused approximately 175 people to fall ill.  Here are some facts you need to know: 

  • After you come into contact with norovirus, it can take 12 to 48 hours before you start to show symptoms. This amount of time before you get sick is called an incubation period. Most people get better within 1-3 days.  After your symptoms stop, you’re still contagious for up to 48 hours.  That means an infected person could be contagious for 2+3+2 days, or a whole week! (Norovirus: Why Cases are on The Rise and How to Avoid It)

  • The virus can thrive in food buffets and cafeterias because many people touch the utensils that are used to serve the food.  According to the CDC, norovirus can stay viable on surfaces for days or weeks!

  • Although alcohol-based sanitizers are effective on many other types of viruses, norovirus is alcohol-resistant, because it lacks a lipid-based envelope.  Therefore, you can’t depend on an alcohol-based hand sanitizer to beat norovirus.  (How Much Effect Does Alcohol Have Against Alcohol-Resistant Norovirus?)  Another popular (but toxic) ingredient in hand sanitizers is Quaternary compounds (Benzalkonium chloride), which is NOT effective against norovirus either.  (Norovirus fact sheet for environmental cleaning)

  • Soap and water are recommended for cleaning hands because they can lubricate your hands enough to loosen the virus particles and wash them down the drain.

  • Noroviruses are relatively resistant to heat also. They can survive temperatures as high as 140°F and quick steaming processes that are often used for cooking shellfish. (Norovirus Illness: Key Facts)

  • There are many types of norovirus and sadly, you can get it more than once.  

Whew, these facts are hard…how can an uninfected person to stay well during an outbreak of norovirus?  Keep in mind that unlike rhinoviruses, which are mainly spread through the air, norovirus is mainly spread by touching infected surfaces and then touching your mouth or eyes. Here are some tips from the CDC:

  1. Wash hands thoroughly with soap and water for at least 20 seconds (humming the happy birthday song twice is about 20 seconds).  You should wash after using the bathroom, before preparing or serving food, and especially after contact with an infected person. 

  2. Wash fruits and veggies and cook seafood thoroughly.

  3. Don’t prepare food for others while you’re sick and for 3 days after you recover.

  4. Clean and disinfect contaminated surfaces like the bathroom and kitchen, doorknobs and railings.

  5. Wash laundry thoroughly.  

One problem is that not everyone who carries the virus is symptomatic, but everyone who carries it sheds virus particles, whether they show symptoms or not!  Therefore, when in close contact with a lot of people, extreme vigilance will help you to ward off illness that could ruin your cruise (or conference, or family reunion…)   

Of course we like to find the most non-toxic ways for you to disinfect all these surfaces!  Chlorine bleach, Glutaraldehyde (0.5%) or Iodine (0.8%) mixed at the manufacturer’s recommendations ARE effective at killing the virus.  Of these, only iodine is safe and effective as a hand sanitizer.  A study showed that antiseptics containing 10% povidone-iodine (equivalent to 1% available iodine) reduced virus at a rate higher than that achieved with any of the alcohol-based sanitizers, non-alcoholic sanitizers or antimicrobial soaps that were tested as well.

Although the same study showed that Glutaraldehyde (0.5%) was effective at killing the virus, like bleach it can irritate nasal passages and eyes, as well as severely burn skin.  A study performed in 1993 showed the virucidal effect of copper, iron and mixtures of these two elements with peroxide, on 5 viruses.   The copper-peroxide mixture performed the best, even better than glutaraldehyde.  The study proposed that a formulation comprising 0.05% copper and 5% peroxide should have a virucidal efficacy comparable to that of glutaraldehyde at 2%, the concentration (used for 2 to 20 min), which was currently recommended for disinfection of a wide variety of medical devices.  

The great news is that our all-purpose, non-toxic cleaner TotalClean combines both copper and iodine, and when they are combined, they produce peroxide!  In simple terms, the peroxide acts as an “oxidizing agent”, destroying the means for bacteria to take in oxygen and suffocating them. 

You can also go to this page on the EPA’s website to find products that are capable of inactivating norovirus, or many other viruses!  Norovirus is a “tier 3” virus, which are small, nonenveloped viruses that are the hardest to inactivate. (For more information on “enveloped” vs. “non-enveloped” viruses, this video is very informative.)  Both their protein capsids and their small size make them less vulnerable to disinfectants compared to other viruses.  Norovirus is not able to be cultivated for testing in human cell cultures, but the closest relatives, Feline or Murine Calicivirus, can be inactivated by the following non-toxic disinfectants: Hypochlorous Acid (a safer chemical related to bleach), hydrogen peroxide, thymol (a natural antiseptic produced from thyme), peracetic acid and citric acid, among others.  The sortable database also gives brand names so you can find these products online or in stores.

The bipolar ionization in Germ Defender, Upgraded Air Angel Mobile and Whole Home Polar Ionizer can kill microbes in the air and on surfaces by creating positive and negative ions that disperse through the air and interact with the microbes to inactivate them.   In order for ions to inactivate the norovirus, they would need to fight the virus on surfaces, also called fomites.   Although this technology has not, to our knowledge, been tested against norovirus or other non-enveloped viruses, in a 2015 study using influenza A and animals, negative ionization caused 2 effects: inactivation of virus particles in the air, and more efficient capture of the particles on a collector plate (because the particles became negatively charged and the plate had a slight positive charge).  

So, if you happen to be in close contact with a lot of people, remember the advice that many mothers give: wash your hands and avoid touching your mouth or eyes.  And we would add: disinfect surfaces using a safe, non-toxic disinfectant approved to do so.  These steps could well spare you a big stomach-ache and pain!  

Photo by Adam Gonzales on Unsplash

More Enzymatic Cleaners to the Rescue!

More Enzymatic Cleaners to the Rescue!

If you read our article “Breaking down Mycotoxins and mVOCs with Enzymes and Non-Toxic Cleaners”, we described that certain enzymes can be used to break down mycotoxins, the toxic products of mold, which can otherwise be very hard to eliminate.  Enzymatic cleaners specifically targeting mold and mycotoxins are few, but we wanted to let you know that all-purpose enzymatic cleaners work on stains, odors, and general cleaning duties all around the house!

First of all: What is an enzyme?   Enzymes are proteins produced by living organisms that act as catalysts in chemical reactions.  Enzymes can either build up or break down.  For our purposes, cleaning enzymes facilitate breaking down microbes and their byproducts that cause sickness, stinkiness or stains.  

Scientists have been exploring making artificial enzymes since the 1990’s, and many of these are mimicking enzymes found in nature.  Here are the most common types of natural enzymes (from Simple Science: How in the World do Enzymes Clean?):

  • Proteases break down protein-based soils including blood, urine, food, feces, wine and other beverages.

  • Lipases break down fat molecules like oils and grease.

  • Amylases break down starch molecules like eggs, sugars, sauces, ice cream, gravy.

  • Cellulases are used to soften fabric and restore color to fibers made up of cellulose material. They also remove particulate soil and reduce fabric graying and pilling.

Enzymes were initially produced by extraction from glands of various animals; however, modern enzyme production is done through fermentation of various fungi and bacteria through the steps of fermentation, recovery, and standardization.   (about Cleaning Products: Enzyme Science

Enzymes and purely enzymatic cleaners are not “alive”.  Bio-enzymatic cleaners, however, do combine enzymes with bacteria, which are “alive”. Examples are drain cleaners and some pet stain removers.  

Enzymatic cleaners are marketed to pet owners (and even more so to cat owners) because cat urine can be especially concentrated (cats make the most of the little water they drink), and so once it’s deposited, the ammonia and hormones in the urine start to smell, and bacteria start breaking it down into urea.  It’s an unmistakable fragrance, and enzymatic cleaners are regularly recommended by veterinarian and pet experts for pet accident cleanup (the ASPCA, mobile vet company The Vets, and professional veterinary site DVM360 are just a few examples).  

Some of the benefits of enzymatic cleaners are:

  • They tend to be more powerful by working on more substrates (surfaces, conditions) in lower concentration than chemical cleaners.  Therefore you use less, resulting in less packaging.

  • They work at moderate pH and temperature, allowing for milder detergents and less energy, like cold-water laundry detergents.

  • Enzymes are not mutagenic (causing changes in DNA) and not clastogenic (causing breaks in chromosomes).  They are not reproductive or developmental toxins and have a low toxicity to aquatic systems.

Some of the cons of enzymatic cleaners are:

  • They can have storage time limitations before the enzymes become less active.

  • They can have storage temperature limitations.

  • They can take longer to work.

  • Some enzymatic cleaners (especially carpet cleaners as in this video) can leave an oily sticky residue if the cleaner is not washed away, which can attract soil/stain even more.

  • They can have inhalation dangers if the cleaner is in powder form, but many formulations are now in dust-free granules that avoid this danger.

  • They can be incompatible with other cleaners like bleach and chemical disinfectants, which can deactivate the enzymes.

So, here are some enzyme cleaners you might like to try:

For pet owners:  Rocco & Roxie Stain & Odor Eliminator for Strong Odor - Enzyme Pet Odor Eliminator for Home has a LOT of fans for the way it quickly and thoroughly eliminates pet odors and stains (just read some of the comments/watch videos).  Although their ingredients are a bit mysterious (Water, advanced biological blend, non-ionic surfactant, odor counteractant), the company says it is safe to use around pets and children, and certified safe for all carpets from the Carpet and Rug Institute (CRI).  They also offer a 100% money-back guarantee if you’re not satisfied.

For anyone who cleans: TweetMint Enzyme Cleaner contains no volatile organic compounds (VOC) or synthetic chemicals. It's completely free of artificial colors & fragrances, preservatives, animal products or by-products and has not been tested on animals.  Since it’s concentrated, a little (just ½ oz) will make ½ gallon of medium-strength concentrate, and the website publishes a whole list of jobs like cleaning windows and floors, degreasing, stain removal, odor elimination, and even pest control (garden and home).  The active ingredients are purified water, anionic/nonionic surfactant blend, glycerin, enzymes, peppermint oil, sodium borate. Sodium borate is a naturally-occurring compound made of boron, oxygen, hydrogen, and sodium, and in 2020 the Cosmetic Ingredient Review (CIR) Expert Panel evaluated data and concluded that sodium borate is safe as a cosmetic ingredients in concentrations less than or equal to 5%.. (Sodium Borate: Is it Safe?)

For anyone who showers or washes clothes:  Zerotaboos (ok, just put a space in there to easily say it: zero taboos!) is a woman-owned company which uses prebiotics (simple sugars, which are food for beneficial bacteria) and postbiotics (Lactobacilli ferment filtrate) in their products to encourage growth of good bacteria so that you don’t need harsh chemicals and fragrances to smell better.  Their Laundry Enzymes contain 10% nuclease enzymes, the strongest concentration available and the best for breaking down body odor.  It doesn’t replace your regular laundry detergent, but does a good job of removing troublesome body odor from clothing so that it actually smells fresh again after washing!  This owner knows her stuff and cares about her customers (see video on why she stopped offering refill packaging). For sure, bacteria and their byproducts have fed odors and fears long enough…it’s time to turn the tables by putting good bacteria and enzymes to work for us!

Photo by Daiga Ellaby on Unsplash

Our Top Articles for Reference by Topic

Our Top Articles for Reference by Topic

We have published a lot of information for you on our website, so we understand it can be a lot to digest!  Here’s a shortlist of our top articles 

Mold and Mycotoxins

Mold Prevention

Mold Testing

Cleaning

Air Filtration

Humidity

New Home Search

Ventilation

Home Projects for Better Air Quality

HVAC

Disaster/Emergency Preparation

How to safely remove old carpet

How to safely remove old carpet

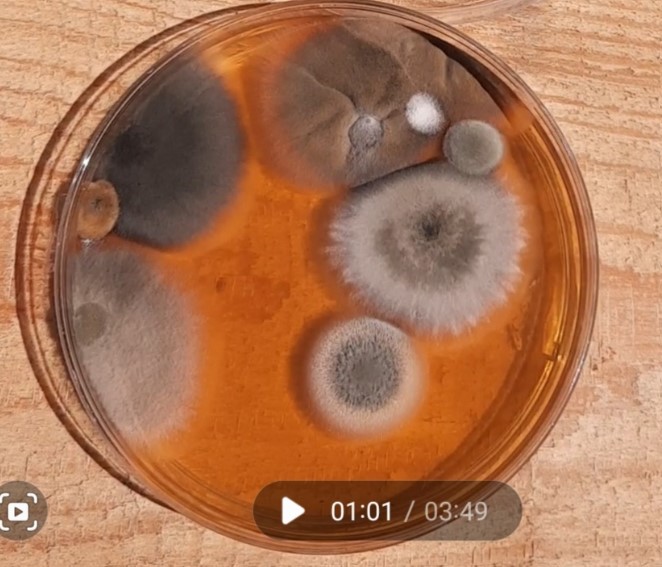
Upon testing my bedroom carpet as part of a series of mold tests in my home, I found this:

I scheduled time to remove the carpet the next week.  Now, how do I do this safely?

Research revealed two extremes:

  1. removing the carpet with no breathing equipment and no dust abatement (although this guy has some great tips, I cringe at the way he’s throwing the carpet around with no dust mask)

  2. removing the carpet with breathing equipment, a zillion garbage bags and gallons of mold eliminator (this method is costly and WET!) 

I had to find a solution in the median.  Here’s what I came up with for my situation (I am moderately sensitive to mold). 

Supply list:

  • Respirator with extra set of filters

  • Heavy gloves

  • Old clothes

  • Knee pads

  • TotalClean concentrate (or several pre-mixed spray bottles)

  • Clean garden sprayer

  • Rags

  • Plastic sheeting and painters tape for taping off vents and covering heavy furniture

  • Old towels to block under door

  • Heavy duty garbage bags (also known as contractor bags)

  • Carpet knife with extra blades or utility knife with extra blades

  • Duct tape

  • Pliers for pulling carpet

  • Nail puller to remove staples in padding

  • Pry bar and hammer to remove tack strips

  • HEPA vacuum with new bag for cleanup

  • Air Angel and/or Germ Defender: helps with dust and mold mitigation

Prep, prep, prep…it’s tedious but so worth it.  

  • Move whatever furniture, clothing and decor you can easily move, into another room. I took the long-overdue opportunity to get a new mattress, so I could escort my old one to the dump!

  • Use dollies on furniture that is too heavy or large to move out of the room.

  • Turn off the HVAC and cover any ceiling, floor or wall registers with plastic sheeting and painter’s tape

  • Measure TotalClean concentrate and water into garden sprayer at 1:7 parts respectively or empty pre-mixed spray bottles into sprayer.

  • Block under door(s) with old towels so that dust doesn’t migrate through the house.

  • Open window and remove screen if you plan to toss the carpet out of the window (also block off the area below)

  • Turn on the Air Angel and/or Germ Defender to help dust particles clump together and fall to the floor; the ions also destroy mold and bacteria on contact

  • Suit up with all protective gear including your respirator!

My strategies for minimizing dust will be to dampen a section of the carpet with the sprayer; cut the carpet into a  manageable section, remove it, and do the same three steps for the carpet pad underneath.  You’ll want to make the least number of cuts, because cutting through the carpet releases a lot of dust and fibers into the air.  I realize that this method will only wet the top of the carpet and not the cut edge or bottom, but short of soaking the carpet and subfloor, I found this is the best solution.  I liked the idea of tossing the carpet out of the window on a good weather day and bagging or binning it outside so that I didn’t drag the bags through the house.  I removed the carpet, padding and staples as I went, because I had a heavy piece of furniture left in the room and did not want to move it around more than necessary.

  1. Starting in one corner, use the sprayer to dampen the carpet in a 2’x8’ section.  Cut just inside that section with the carpet knife.  

  2. Use pliers to grab the carpet in the corner and wrestle it from the tack strips. If you can’t get it out, try cutting the corner out with your knife and pulling out just the corner.

  3. Roll it up gently and dispose of it in a contractor bag (or toss it out a window!)  If bagging it, then you can use the duct tape to keep it rolled tightly.

  4. Spray the carpet pad underneath and cut it.

  5. Dispose of it in the same way.

  6. Remove staples holding the padding to the floor with the nail puller.

  7. Remove tack strips using the pry bar and hammer.  They are super-sharp!  (If you plan on replacing with new carpet and the tack strips are not rusty or damaged, you can leave them in place).  

Repeat steps 1-5 until the whole room is devoid of carpet and padding!  If you can handle more than 2x8’ of damp carpet at a time, you can  Then, use a HEPA vacuum to thoroughly vacuum the floors to remove dust.  You will want to wipe down the walls, window(s) and ceiling fan with TotalClean because dust is now everywhere.  Finally, you can remove the sheeting from your register(s) and change clothes and shower–you earned it!  It’s best to add a bit of EC3 Laundry Additive to your clothing when washing it to avoid spreading mold to any of your clean clothing. 

If you have a new floor already scheduled for installation, good for you! Make sure that the subfloor dries out completely before 48 hours have passed, and definitely before installing new flooring (use of the sprayer makes it unlikely to soak the subfloor).   If you haven’t picked out new flooring yet, you can remove/replace any nails or screws that are sticking out, use a non-toxic floor paint, and/or use an area rug to cover over any rough areas until that day comes.  Try not to wait too long, however, so that excessive wear of the subfloor doesn’t occur.  

Photo by Julie Marsh on Unsplash

You can’t have too much air circulation!

You can’t have too much air circulation!

When clients ask advice on choosing air purifiers, some of the first questions we ask are about the layout of their home and how air circulation is accomplished.  This topic is covered in our article “Which air purifier should I choose for my home?  Part 1: Airflow”.  Airflow is super-important, and if outdoor conditions like heat, cold, humidity or pollution restrict your ability to open windows for good cross-ventilation, fans are necessary to get air moving.  Moving air helps any kind of air purifier and also your home’s heating and cooling systems to work more efficiently.  We’ve put together a few visuals on how common (and not so common) fans work. 

What about Radiator Fans?  

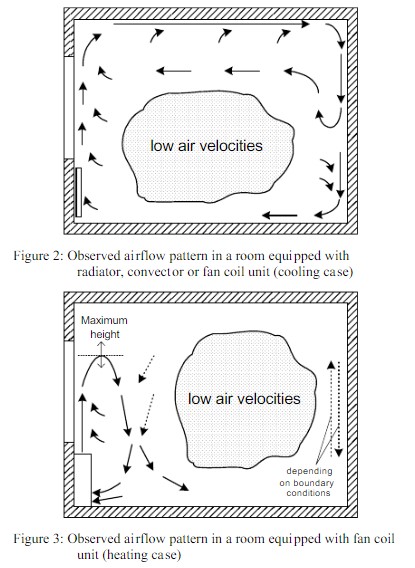
Radiators with fans are common installations in older buildings and to be sure, they are better than not having a fan at all.  However as shown in the below diagrams, there tends to be an area in the middle of the room that doesn’t get much mixing action.

Source: Study “Influence of Sensor Position in Building Thermal Control: Development and Validation of and Adapted Zone Model

“Basket Fans”

Although you may not have heard of this description before, when seeing a basket fan you can easily understand why it’s called that:

Whether sitting on a desk, standing on a floor or hung from the ceiling, these types are generally economical and when placed near where you are sitting, seem to be efficient in moving air.  However, scientific study about their circulation effects show otherwise.  There can be large “void spaces” where virtually no air is moving.

Source: Read this before investing in basket fans for air circulation

Regular Ceiling Fans

Ceiling fans are great tools for getting more air circulation.  Traditional ceiling fans tend to create better air circulation in a room than regular floor-or tabletop- fans (excluding “air circulators”, which we will visit separately in this article).  The image below shows that the fan shoots air with greatest velocity down near its center, and airflow moves along floors until it reaches walls and moves upwards again.  There are entrainment zones around the fan that do not get optimal mixing, however, if the fan is sized correctly for the room (check our article on choosing a ceiling fan), it’s definitely an improvement over not having a fan at all.

Image: Study: Measurement of airflow pattern induced by ceiling fan with quad-view colour sequence particle streak velocimetry

HVLS Fans

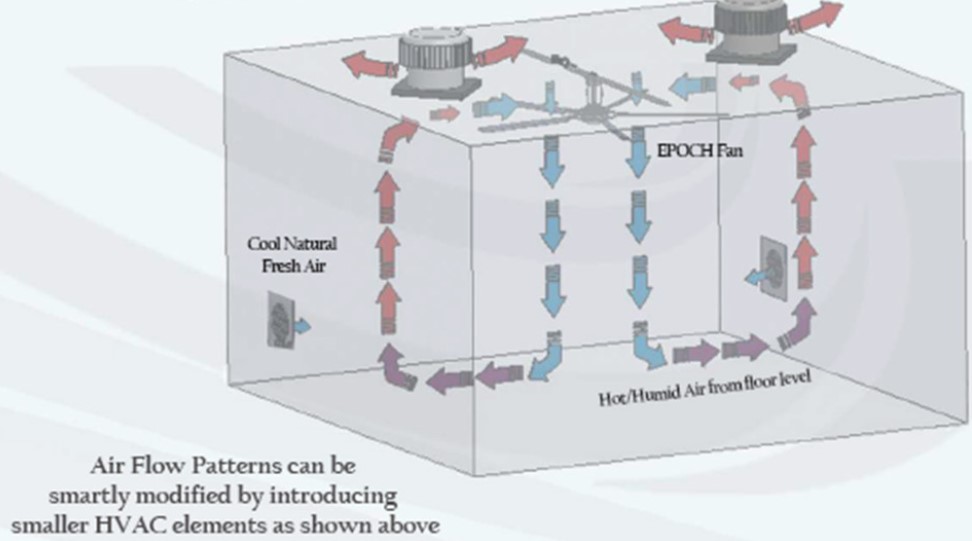
Some big rooms can be serviced by one or more High Volume Low Speed (HVLS) fans, which turn more slowly but generate much bigger cubic foot per minute (cfm) airflows in a space (read more about HVLS fans here).  Because the airflow along the floor is much deeper with HVLS fans than with normal ceiling fans, these currents on the floor are called floor jets.  The image below also shows how such a fan can cool even more effectively when fresh air vents at the bottom of the room, and exhaust vents at the top, are opened.

Source: “Need for Ventilation

Air Circulators/Destratification Fans

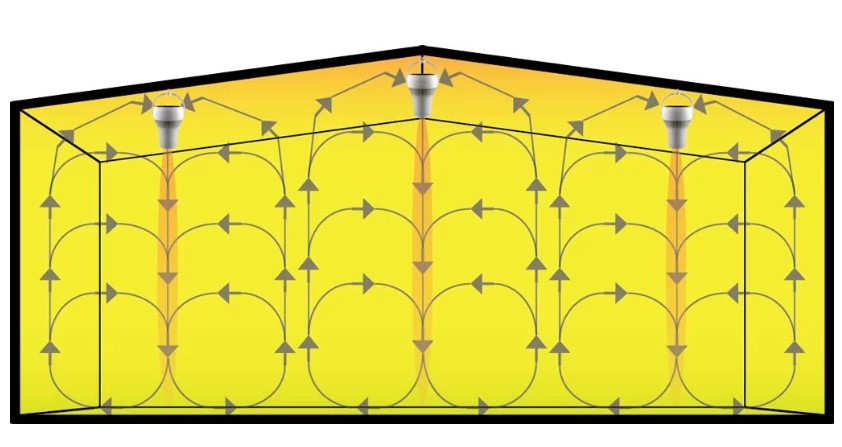
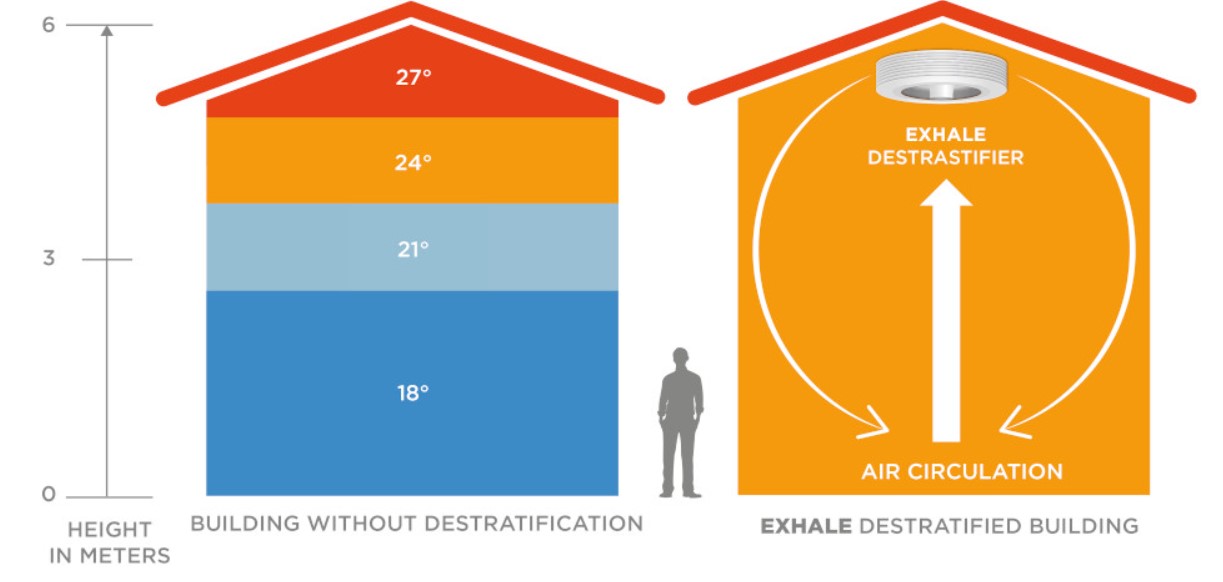
“Destratification” is the gold standard of air circulation in a room, because temperatures in the top, bottom and sides of the room can show that the air is being thoroughly mixed!  Without destratification, thermal “layers” can develop, and air conditioning (including heating) as well as purifiers cannot effectively service the entire volume of air.  There are several different types of fans that can break up these thermal layers.  Airius, an Australian company, makes a different type of high volume fan that is termed “bladeless” because the blades are hidden in the body of the fan but still generate significant airflow.  Their systems are termed “airflow circulation cooling fan and destratification system” and are designed to be mounted close to the ceiling; many applications are found in convention centers, dealerships and indoor stadiums. 

Source: Airius Fans Vs. HVLS Fans

Real “bladeless” fans

For residential or commercial use, true “bladeless” ceiling fans (modeled after Nicola Tesla’s bladeless turbine) offer similar destratification to circulator fans, with less noise.  According to Exhale Fans’ fact page, “The airflow is a vortex: The airflow profile makes the real difference in how you feel while in your space. Air exits the Exhale Fan in all directions 360° horizontally and at a 45° angle. This unique airflow starts a gentle rotation of the air much like a vortex. The vortex airflow profile generated by the Exhale Fan is unmatched in the ceiling fan industry. Air is not simply directed straight down but moves around the room in a pleasant cyclonic flow. What we have created is a destratified environment where floor to ceiling, wall to wall, you have a temperature balanced and comfortable space.”  The video of an Exhale Fan working in water to lift and circulate particles off the floor of the water tank is impressive!

Source: How does it work?

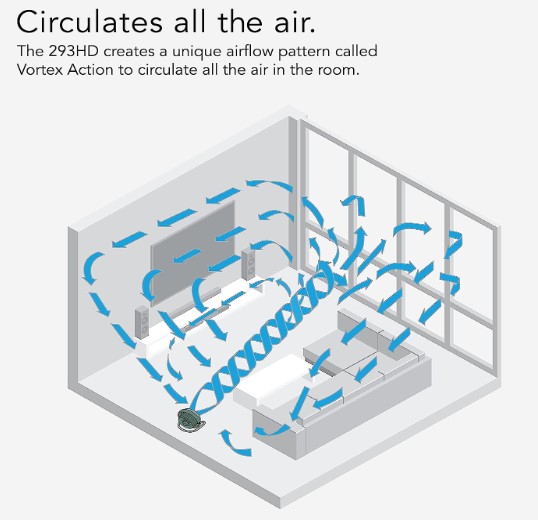
An “air circulator” like the Vornado ($92) is purported to have a similar pattern to ceiling and HVLS fans, however it shoots air across a room.  Here is a video comparing Vornado, Dyson and generic tabletop fan.  The reviewer (Filipino) and commenters mostly prefer the Vornado for power and value.  Another great air circulator option is the Dreo ($99); this video comparing Vornado and Dreo declares Dreo the winner, although it's virtually the same price as the Vornado.  The Dreo uses a brushless DC motor so it has more range of speeds, and uses less power than the Vornado, which uses an AC induction motor.  Dreo is also quieter across the range, even at the highest setting.  There are more economical versions of each brand that incorporate less technology but move the same amount of air.

Source: Vornado 293HD literature

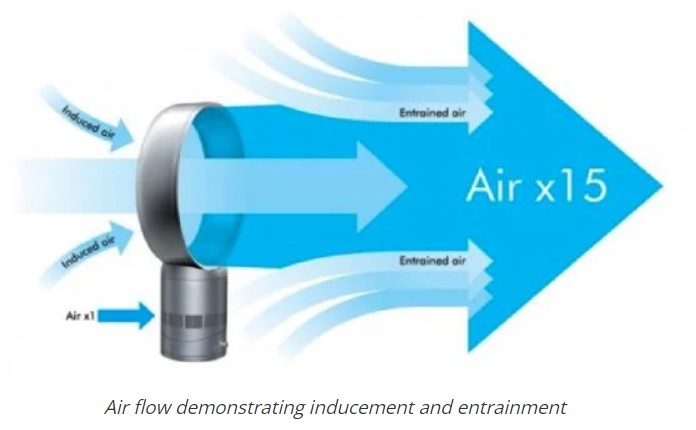
Although the Dyson bladeless fans claim to be “air multipliers” because more air is entrained than is taken in through the pedestal of the fan, they lack the power to destratify and circulate air in a whole room.

Source: How does the Dyson Air Multiplier Work?

Now that you know which types of fans help to truly get all of the air in the room moving, you can decide how and where to use/place them.  Perhaps you’ve never turned on your ceiling fans…now is the time to clean them and get them running!  Considering that the purpose of an air purifier with HEPA is to filter all the air within a room, the fan used in the purifier or a separate fan paired with it is very important to the purification function. It should either have a high Clean Air Delivery Rate (CADR), or be used with a separate fan that is able to destratify the room.  

In this test, a 705 cubic foot space (approximately 9x10 foot room with 8 foot ceiling) was filled with incense smoke and different purifiers were operated to clear all traces of PM1.0ug/m3, PM2.5ug/m3 and PM10.0 ug/m3 particulate matter.  Although the location of the particulate measurement devices were not disclosed (how close to the purifier they were), the purifier with the highest CADR proved to be the fastest to clear the air (BlueAir Pure Fan Auto, in only 27 minutes); the other two purifiers tested took 1 hour 24 minutes and 2 hours 11 minutes!   However, it’s possible to pair a purifier with lower CADR with a ceiling fan or circulator or destratifier fan to improve performance..

In conclusion, the best way to purify air with a HEPA filter is to use a purifier with a high CADR, or to use the purifier in conjunction with a fan that improves whole-room circulation (and thus destratification).  In addition, we’ve always stated that the Germ Defender/Mold Guard and Air Angel units work differently from HEPA, because they send out ions into the room instead of pulling all the air through the device to filter it.  However, their function also improves when coupled with an air circulator, in order to deliver the ions more widely and evenly throughout the space.

Photo by Sidekix Media on Unsplash

How can bacteria possibly grow in/on my soap?

How can bacteria possibly grow in/on my soap?

Well, it seems like a conundrum to me: our use and promotion of antibacterial products which actually have bacteria growing in them.  It’s like finding out your bar soap has bacteria on it (ahh, unfortunately it does).  So what’s the purpose of washing if the soap we are using has bacteria?

There are some heavy duty questions.  We’ll tackle them by splitting them up into parts.

Part 1: The science of soap and its intended purpose

Let’s go back to the purpose and method of washing our hands (or actually any part of the body): to get us clean.  Clean means the removal of dirt and germs, but not the killing of germs.  Our bodies naturally produce oil, and a lot of dirty surfaces have oil in them, making dirt stick to our hands and difficult to remove with water alone.  Why? Because oil and water don’t mix.  Here’s where the chemistry of soap helps.  Soap molecules are elongated and have two ends: one end that loves water (hydrophilic) and one end that repels water (hydrophobic).  When you lather your hands with soap, the end that repels water sticks to the oily dirt, and the end that loves water, well of course sticks to the water, and the soap will help lift away the oily dirt from your skin.  Any germs in the dirt are loosened with it and flushed down the drain when you rinse well with water.  Thus, the purpose of washing with soap is not to kill germs, but to wash them away!  

Part 2: Antibacterial Soaps

Antibacterial hand soaps first came on the scene after 1984, when David Poshi and Peter Divone filed for a patent for “antimicrobial soap”, which used triclosan to kill microbes. (The FDA, Soap, and Superbugs)  After several decades, the safety of triclosan came under scrutiny (it is an endocrine-disrupting chemical that may cause cancer), and in 2013, the FDA called for data proving that triclosan was safe for everyday use and more effective than preventing infections than products that didn’t contain it.  After manufacturers had not provided the necessary proof, in 2016 the FDA ruled companies couldn’t sell triclosan-containing consumer products such as antibacterial soaps anymore and stated that washing with antibacterial hand soap is not any more effective than washing with soap and water. (Triclosan)

These rules from the FDA don’t apply to handsoaps used in healthcare settings, or hand sanitizers or antibacterial wipes.  So in these cases, triclosan is allowed because of the ability to kill germs even when water is not used to flush them away.  

Part 3: The ability of soaps and even antibacterial soaps to harbor bacteria (!)

Hopefully the understanding of how soap works to loosen dirt and germs from our hands will help to override the gross fact that soap, like most other moist substances in the house, can harbor bacteria.  For normal (non-antibacterial) soaps, It all goes back to biofilms.  Biofilms are thin, slimy layers of bacteria that adhere to surfaces and to each other.  (For more on biofilms you can read our article here.)   The slime on your teeth in the morning and the slime in the dog’s water bowl are both examples of biofilms. 

Biofilms are colonies that protect the bacteria from eradication by scrubbing, or drying out, or in the case of antibacterial soap, from agents that can directly kill it.  The slime is a coat of armor to the bacteria living beneath it!  

If bacteria can form a biofilm, it’s set to thrive, because biofilms are particularly hard to eradicate.  We brush our teeth in the morning, and wash out the dogbowl, but guess what–the biofilm is back the next day, if not a few hours later.  So, it’s not surprising that the longer a container is used and has water in or around it, the more likely there’s a biofilm on it!  This goes for our water bottles, contact lens storage cases, and yes, bar soap dishes, handsoap, shampoo and body wash containers.  In fact, a study in 2011 showed that about 25% of soaps sampled from public restrooms in the US were contaminated with more than 106 colony-forming-units (CFUs) per ml (for reference, the maximum amount of contamination for eye cosmetics or baby products is 100 CFUs per gram or ml).  

Refillable containers for many different products are still thought to be the best practice to reduce plastic waste, and they do accomplish that one goal.  However, the way they are refilled is very important and can substantially increase the risk for biofilms to grow and contaminate the soap inside.  In another 2011 study, 14 refillable soap dispensers were sampled in one elementary school, and all 14 had significant bacterial contamination, which resulted in a 26-fold increase of gram-negative bacteria on hands after washing with the contaminated soap!  In a school setting, of course there adults and children, and although hand-washing technique was not dictated, washing with bacteria-contaminated soap increased bacteria on the hands for both.  Bacteria levels dropped drastically after the soap containers were changed out to accept sealed refill packets (bladders of uncontaminated soap).  

What are the lessons here?  

  • Although the FDA’s position on antibacterial soaps is probably true (antibacterial soaps do not provide any measurable benefits over plain soap outside of a healthcare setting), it is made on the premise that the soap or the container is not harboring bacteria!  

  • Refilling your soap container without using sealed soap refills may expose you to increased bacteria.  This is because without extensive cleaning of the dispenser, humid air that fills a nearly-empty dispenser is probably enough to enable a biofilm to take hold, and without thoroughly cleaning your soap dispenser, the new liquid soap poured into it becomes contaminated, too.  This article by GoJo, a soap manufacturer, outlines the risks of refilling your soap dispenser from larger containers of soap and lists these facts about soap dispensers (from article Evaluation and remediation of bulk soap dispensers for biofilm):

    • Once dispensers are contaminated with biofilm, even cleaning and soaking in bleach has been proven ineffective, as biofilms are highly resistant. 

    • It takes only a tiny number of remaining bacteria from the biofilm community to recontaminate the soap and dispenser. Recontamination occurs rapidly – within two weeks.

    • Contaminants can be present even when not obvious or visible (that’s why we call them “microorganisms” – you need a microscope to see them).

    • Biofilms can be found in bulk dispensers made of any materials (plastic, stainless steel, etc.).

Therefore, if you use liquid soap, making the switch to sealed soap refills or single-use dispensers is safer for everyone who uses the soap!   The problem is that there are virtually no “natural” soaps for the home that use sealed soap refills.  There are many “solutions” online for cleaning soap dispensers, but they are more than likely ineffective– this article showing that even industrial chemicals such as sodium hypochlorite, sodium hydroxide and benzalkonium chloride were not able to completely eradicate a biofilm of salmonella after it was allowed to establish for only 7 days.

  • Many people prefer solid bar soap to liquid soap for washing.  However, solid bar soap that sits in water allows a slimy biofilm to form that nurtures bacteria with dead skin cells and water.  If you use solid bar soap, make sure to use a dish that allows water to drain off the soap (so it’s not sitting in a puddle of water) and one that is not porous, like a good ceramic or metal dish.  Wooden grate soap dishes are popular and very “zen”-looking, but think about wet wood and all the microbes that it can sustain!   Don’t be tempted to use that “soap water”, either.  To get rid of bacteria on the surface,  washing the bar soap thoroughly with water drastically diminishes the risk of bacteria surviving on the soap. It is also recommended to wash the container where the bar soap is kept often to keep the goo from developing.  (The Shocking Truth About Bar Soap And Germs)  Check out these soap dishes:

Although it seems like an insult to a frugal, ecologically conscious mind, the most healthy soaps come in liquid single use dispensers or a bar soap situated on a well-drained soap dish.  You might keep these in mind the next time you see a super deal on a liquid soap refill, and even reconsider the merits of old-fashioned bar soap.

Photo by Matthew Tkocz on Unsplash

Can burning a candle really reduce the mold spore count in my home?

Can burning a candle really reduce the mold spore count in my home?

Candles are a super-popular home decor item, and they add to the ambiance of a home through their appearance and smell, making it cozy or sophisticated or elegant with the “snap” of a match or lighter.  Unfortunately, the VOCs and particulates aerosolized by most candles make them more of a health detriment than a plus.  Burning a candle against mold, however, is a new concept, and like so many other products, the benefits all depend on WHICH candle you’re burning!   

Several companies have formulated candles that actually reduce mold spore counts in the air while the candles burn.  Like the Bipolar Ionization technology, where ions are sent out into the air instead of using a “filter” to grab all pollutants, the flame of the candle is not the main part that kills mold spores.  For the EC3 Air Purification Candle by MicroBalance Health Products ($43 for 3), the flame melts the non-toxic soy wax and releases a proprietary natural blend of citrus seed extracts, that includes Grapefruit Seed Extract (GSE). (per the manufacturer’s answer to client question here).  The product is all natural and uses no petrol-chemicals, unlike traditional paraffin candles.  

In studies, GSE has been proven to be incredibly bactericidal even at minute dilutions: at 1:512 parts water to GSE, the extract kills gram negative and gram positive bacteria, yet is non-toxic to human cells. (The effectiveness of processed grapefruit-seed extract as an antibacterial agent: II. Mechanism of action and in vitro toxicity)

However, other studies are not so positive.  In this 1999 study, 6 commercial GSE formulations were tested and 5 of the 6 were very effective against 7 germs, including 1 yeast.  It turns out that these 5 GSEs also had traces of the synthetic antiseptic agent benzethonium chloride (a quat), while the 1 remaining GSE that contained no preservative, did not effectively eliminate the germs.  The study concluded “Thus, it is concluded that the potent as well as nearly universal antimicrobial activity being attributed to grapefruit seed extract is merely due to the synthetic preservative agents contained within. “  The American Botanical Council (proclaiming to be “your source for reliable herbal medicine information”) also confirmed, “A significant amount, and possibly a majority, of ingredients, dietary supplements and/or cosmetics labeled as or containing grapefruit seed extract (GFSE) is adulterated, and any observed antimicrobial activity is due to synthetic additives, not the grapefruit seed extract itself. “

Digging into studies on GSE against fungus found that these were mainly in liquid form.   This one showed it was effective against different types of fungus that affect asparagus plants, when used in conjunction with clove, Dahlia and Chrysanthemum extracts.   This study pitted GSE against candida (yeast) strains that tended to form a biofilm on denture resins, and it did very well.  Another study of GSE showed that it eliminated 3 Candida species that commonly infected patients with dentures.   This is great news for sufferers of oral candidiasis, but does aerosolizing citrus seed oil extracts (including GSE) work the same way?  

Although it’s not clear how citrus seed extract vapors attack mycotoxins, we did find that the EC3 candle was tested by RealTime Labs in 2012, with excellent results.  According to the letter from the lab (copied from this mold expert’s website), “Results showed that within 3 hrs of exposing the EC3 candle to known concentrations of mycotoxins, no mycotoxins were detected, if known levels of any mycotoxins were 250 ppb or below.  Concentrations of 500 to 1000 ppb were decreased by 90% in 3 hours…Given the experimental situation created in our laboratory, the EC3 candle will eliminate aflatoxins, ochratoxins, and trichothecenes at concentrations of 250 ppb or less and will reduce these toxins by 90% in 3 hrs at concentrations of 500 to 1000 ppb.”

Given that mycotoxins are hard to destroy (most are highly resistant to heat and antimicrobials), this is very good news.  MicroBalance Health Products, the maker of these candles, is an established company (founded in 2009) whose products are based on the work of Dr. Donald Dennis, a practicing Ear, Nose and Throat (ENT) surgeon who discovered that mold was the culprit of many of his clients’ health issues.  The citrus extract blends he developed are also used in their body supplements (shown here in their free sinusitis wellness protocol), so it’s probable that the citrus seed extracts used in their products (not just the candle) are of great purity.  

Another company, CitriSafe, also uses citrus extract blends in their Remedy Maintenance Candle ($16 for 1 candle) and mold solution sprays, however I could not find any studies or testing data for them.  The research behind Citrisafe Remedy products and MicroBalance Health Products (as well as BioBalance) was developed by pharmacist Dr. Walter Hayhurst and JW Biava (founder and CEO of Immunolytics, a laboratory that tests for mold and mycotoxins) in the early 2000’s. (podcast with JW Biava), therefore it’s likely that the citrus extract blends in these products are very similar.

Both MicroBalance Health Products and Citrisafe recommend using their candles with a broader treatment plan for mold in your home, but if there’s a space you spend a lot of time but you have less control over, like your office or hotel room (if you travel a lot), the candles may help significantly to clean up the air in that space.  When it comes to mold, every little (non-toxic) bit of help is welcome!

10 Ways to Improve Air Quality in Your Home for $50 or less!

10 Ways to Improve Air Quality in Your Home for $50 or less!

We all like easy, cheap tasks that bring a lot of satisfaction when they’re done.  Why not focus on your air quality the next time you’re in the mood to DIY?  Here’s a list of things that only take a little preparation and a little time, but can make a big impact in the air in your home.  

  1. Are you on an HVAC filter change schedule?  If not, it’s time to change that!  Dirty HVAC filters have a number of negative consequences–from increasing the dust and mold in the evaporator/air handler, to possibly even causing damage to your expensive system.  If you don’t have any filters, just click here and order some from us, and we’ll have them at your door shortly!  If you’re not sure which “MERV” to order, read through the information on the page, and/or contact us to find out.  (Per filter cost is much less than $50).  Then, set a reminder on your calendar to change them regularly.

  2. Clean and adjust your fans for better air circulation: Fans make a BIG difference in quality of air because airflow is critical in this process to 1) get air moving, which reduces pockets of stale air or humidity, and 2) introduce fresh air, which dilutes contaminants and refreshes us!  (for more info check our article here)  Here’s a short list of fans that will need attention: 

    1. Ceiling fans need periodic cleaning and seasonal direction adjustment.  Get yourself an extendable duster that can be used wet or dry (we recommend dry first, then spritz with some TotalClean to get it cleaner).  The fan should also rotate in the correct direction: clockwise in the winter and counterclockwise in the summer (there should be a switch on the remote OR on the fan motor to control rotation direction).  

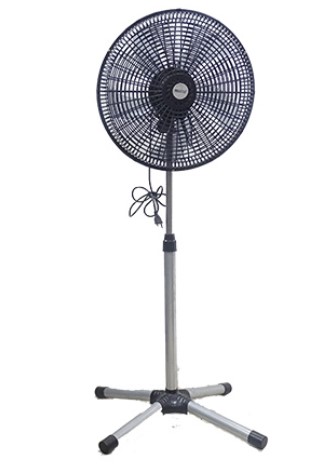
    2. Portable fans are important for spot cooling and can get pretty dusty!  Some are easy to remove the grill cover, the fan blades and dump them in a sink with soapy water.  For others, use a brush attachment on your HEPA vacuum to clean all accessible surfaces.  

    3. As long as you have your HEPA vacuum with brush attachment out, just scoot on over to the refrigerator and use it on the front grille at the bottom (and/or the back of the fridge–some models have a grille there also).

    4. Bathroom vent fans can also get pretty dusty.  Turn off the power at the wall and if you can, get on a ladder to remove the grille and dust out the inside of the unit, wash the grille and replace it.

    5. Kitchen exhaust fans probably top the list in the grime category!  We have a short article on how to clean them, and even use activated carbon media to make the kitchen smell better!

  3. Fall is the perfect time to get more fresh air into your home, but sometimes more filtration is needed.  Our Nanofiber PureAir Window Screens catch more fine particles than regular insect screens, so you can have fresh air without the dust and pollutants that normally come with it.   If you have window screens in your home, replacing them with this material is very easy, even for beginners, and we recommend several methods to do it on the product page. 

  4. You know that accomplished feeling when you’ve just cleaned the inside of your car?  Well, here’s a shortcut…order and replace your car’s Cabin Air Filter with a new one that has activated carbon in it.  True, the coffee cup behind your seat won’t disappear, but your car will smell much better, and it will filter out more pollution from other vehicles on the road. (and it might even inspire you to clean the whole inside of your car!)

  5. It may sound like a paradox, but cleaning the dishwasher every few months is really necessary!  As you can see in this video on how to easily remove and clean the filter, the hidden parts can get nasty and slimy!  If you don’t have time to properly take apart and clean your dishwasher, you can try using a highly-rated but non-toxic dishwasher cleaner, which uses citric acid as its active ingredient.  You can use TotalClean or a DIY cleaner to wipe down the door seals and any other parts that can’t be removed.

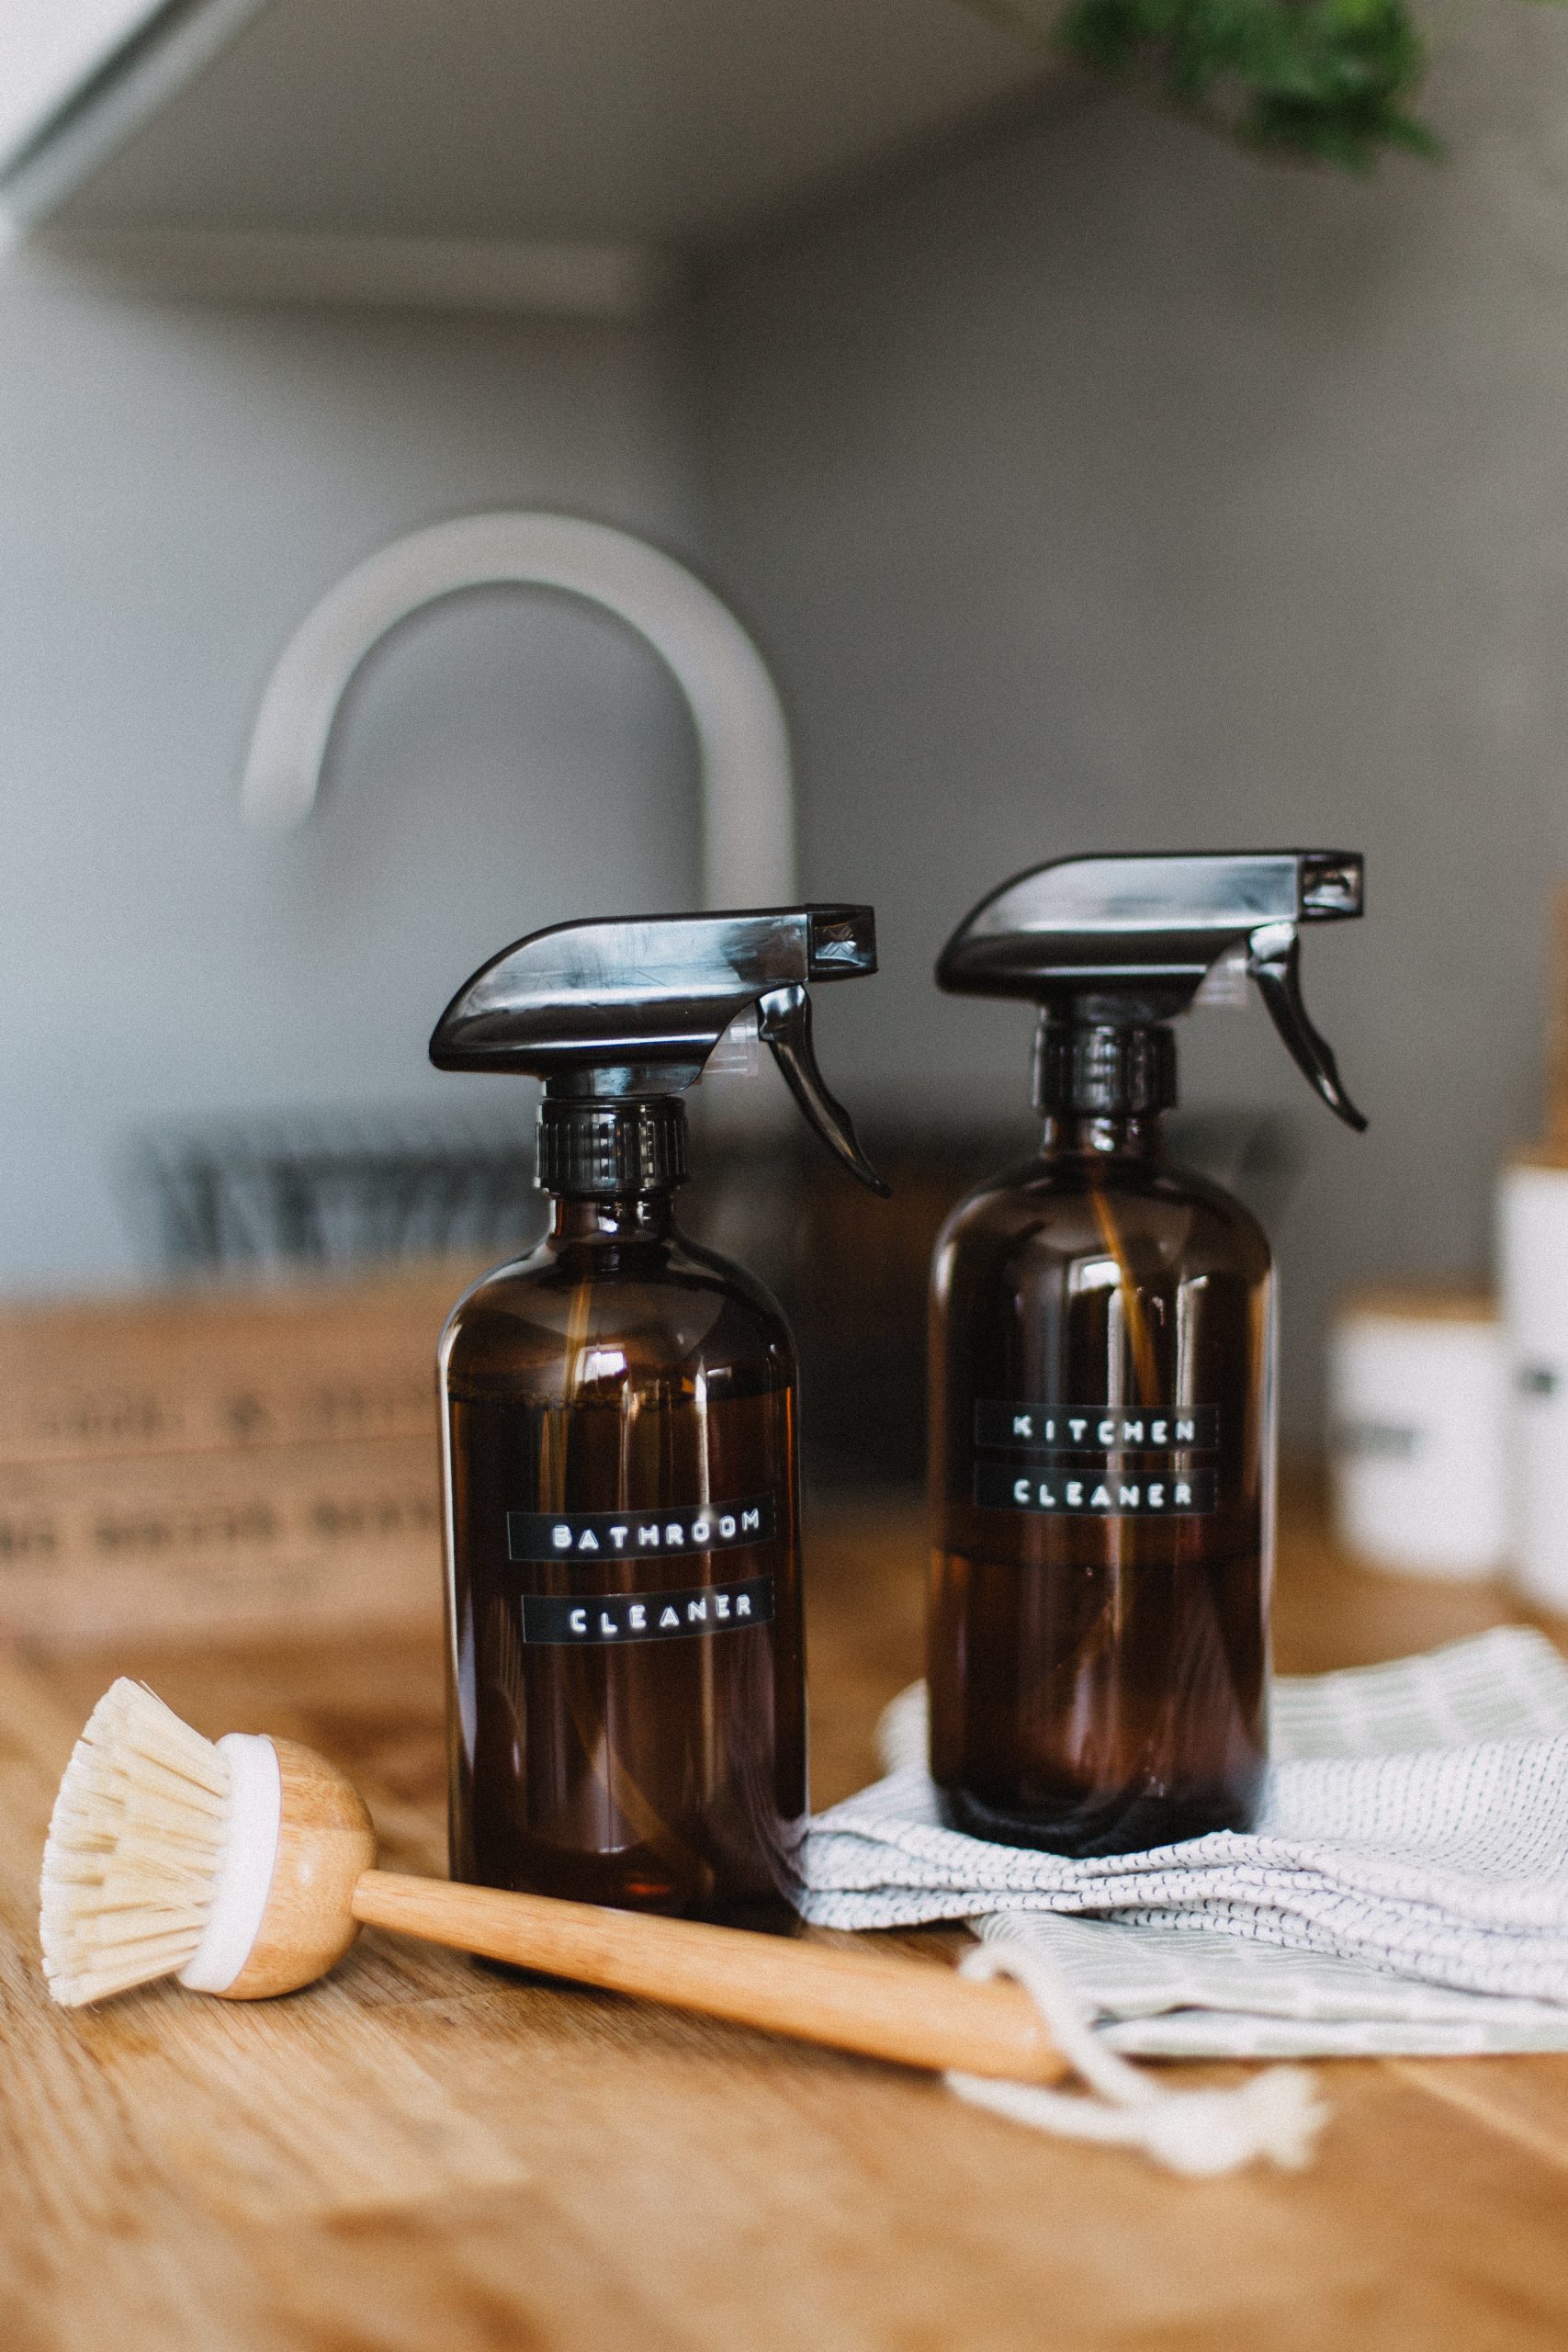
  6. Set yourself up for cleaning success!  Chances are, if you don’t have the right tools in the right place(s), cleaning will not spontaneously happen!  Case in point: I used to keep 1 spray bottle of TotalClean under the kitchen sink, and paper towels on my kitchen counter.  After researching and writing about the “toilet plume”, however, I knew I had to increase frequency of cleaning the toilet and other surfaces to at least every other day.  Here’s what to do:

    1. Keep a non-toxic spray cleaner and disposable wipes (like paper towels) in the bathroom so that you can easily clean surfaces every few days.

    2. Keep a stash of hand towels and bath towels in a closed bathroom cabinet to change them out several times a week.

    3. If you use a floor cleaning machine like my highly-rated CrossWave, make up a non-toxic cleaning solution and place it in a labeled jar so that you can break out your machine and get going at any time!  Here’s the recipe I like to use. 

    4. Keep a cleaner where you charge your phone.  (Yes, we’re not supposed to, but many of us keep our phones beside our bed at night.)  In that case, dampen a few paper towels with TotalClean and place in an airtight container so that you can sanitize your phone easily and quickly.  

  7. If you or any of your family are susceptible to toenail fungus or athlete’s foot, here is an uncomfortable fact:  fungus can live in your shoes for up to 20 months, and it can even persist in socks for several washings.  To get rid of fungus from washable shoes and socks, (and towels and sweaty clothing in separate loads), add 2 oz of EC3 Laundry Additive to the rinse cycle reservoir of your washing machine.  Not only will it eliminate mold spores from your shoes and clothing, it will also help to clean the washing machine, which can also harbor mold.  (Mold is a type of fungus).

  8. I cannot overstate the positive effects of adding mattress and pillow encasements, and ripping out old carpet in my bedroom.   My breathing and sleep quality have improved drastically by eliminating these materials where dust mites live and multiply.  Here’s what to do; it even works on old mattresses!

    1. Order a real mattress encasement and pillow covers for the bed(s) you want to protect.  Mattress encasements like these by Hospitology have tight-weave microfiber (which do tend to make you sleep warmer til you get used to it) and zipper ends that have velcro coverings so that no dust mites can get in or out!  This is death to dust mites; check out more encasement recommendations here

    2. When you decide to install your encasements, wash all your sheets and and blankets in hot water and your detergent of choice, so that any dust mites will die in the washer.

    3. Install your encasements (it may take another person because it fully encloses the mattress like an envelope that’s only zippered on one side), making sure that all toppers and thick mattress covers go inside the encasement.  You don’t want to leave anything that cannot be easily washed outside.  Now, any bugs living in your mattress and pillows will starve and be contained within the encasement (kind of gross but wayyy cheaper than buying new mattress and pillows). 

    4. Make your bed with fresh clean sheets and blankets and have a great night’s rest!

  9. The second part of the last recommendation is getting rid of old carpet in your bedroom (or any room you spend a lot of time in!).  Dust mites can also live in the carpet around your bed, especially if pets are allowed in your bedroom.  So, even if you don’t have an alternative flooring plan or budget at the moment, removing the carpet and fixing up the subfloor can still be a big improvement.   Warning: once you rip carpet out in one room, you’ll want to do it in other rooms, too!   Here’s what to do:

    1. Read our article on how to safely remove old carpet, and gather your materials/tools.  Make sure to find out how your local garbage or waste company requires you to dispose of it (bagged vs. unbagged, where and when).  Then, budget at least a few hours to get ‘er done!

    2. Fixing up the subfloor can be as simple as checking for splinters and sharp nails or screws, to sealing it with a non-toxic paint or sealer.  Check out a really helpful article here and a few companies that specialize in these types of paints:

      1. Ecos Interior Floor Paint

      2. AFM Safecoat Concrete Floor Paint

  10. Sealing Air Channels in your attic:  You’ll want to wait until cooler weather for this chore, but the idea is to tighten up your “building envelope” so that your expensive “conditioned air” (hot or cold) is not leaking out or unconditioned air leaking in!  All it really takes is some spray foam in cans, maybe some scrap wood or styrofoam sheet (to block off bigger gaps), the right personal protective gear, and time!  This is really worthwhile to do if you plan on adding insulation (must be done before adding insulation, check with your insulation company to see if they will do it).  

Okay, the last two projects take more time and effort than changing an air filter, but they do make a difference in your air quality.  In the case of #10, it should also reduce your home heating and cooling bill and stop pests and insects too.   In these cases, showing your home a bit of love will return the favor!

Photo by Heather Ford on Unsplash