Category Archives for "Air Quality"

A Clean-Air Kitchen Checklist

A Clean-Air Kitchen Checklist

It’s clear from the amount of money and size of kitchens nowadays that the kitchen is where people spend a lot of time.  Big islands, comfortable chairs and features like coffee bars and wine coolers make it easy to stay and chat while the host cooks up a delicious meal.  The problem is that some things get overlooked in kitchen design and maintenance, so that hidden appliances may be making your air dirtier than your guests would expect! 

Kitchen exhaust vent

We’ve previously posted about how cooking and baking can raise fine particulates and VOCs in your kitchen to levels of a polluted city.  The best defense against spreading them to the rest of the home and breathing them in is to use your kitchen exhaust vent.  The problem is that the exhaust vent filter is often overlooked, and a clogged filter strains the vent motor and can throw particles right back into your kitchen.  Here’s where it’s important to a) check whether your vent is recirculating or exhausting to the outside, and b) clean the filter!

When I first learned about combination microwave/vent hoods, I thought, these are space-saving genius.  Being a moderately tall person, I could easily lift items in and out of the microwave, the unit was not taking up any counter space, and it doubled as a stove vent hood.  However, the more I used the one in my current home, the more disappointed I was with it.  Here are the problems with most microwave/vent hood combos:

  • The ventilation can exhaust directly back into the kitchen.  That’s right, those little grilles above the microwave door are the exit point of the exhaust fumes, which don’t get a lot of filtering before they come straight back into the kitchen.  The other option is to exhaust outside, which is far better.
  • Microwave/vent hood combos typically do not provide the cubic feet per minute (cfm) ventilation that a standard size kitchen requires, and what little you get can be further reduced if there is more than one turn in the ductwork above the unit to the outdoors.  
  • Although it’s a common situation, placing the microwave on a countertop is not a great installation either, because cooking gasses generated in the microwave are vented directly into the kitchen with no filter. 

Here’s what we recommend to get the cleanest air while you cook:

  1. If you have a combination microwave/vent hood, check two things:
    1. Does the vent hood provide the correct cfm for your kitchen?  Here is an article to help you calculate whether it’s sufficient for your kitchen.  If you don’t know the cfm of your unit, type the model number into an internet search.  If your unit does not have the necessary throughput, consider placing the microwave elsewhere and getting a more powerful standalone vent hood.  In this case proceed to #2.
    2. If the cfm is sufficient, does the microwave/vent hood exhaust back into the kitchen?  Place a microwaveable container in the microwave with some water and start to heat it.  Place your hand over the grille above the door and see if you can feel a stream of air moving into the room.  
      1. If so, then the exhaust is probably set to exhaust into the kitchen.  If you own your home and you want to change it to exhaust outside, it’s possible to take the microwave down from the wall and change the exhaust configuration.  Here’s a short video on how to rotate the blower fan of the microwave, which will change the exhaust port configuration.  This change necessitates installing a duct above the microwave and vent port outside, however.  For the venting, check this video
      2. If you are renting or otherwise can’t change the configuration of your microwave/vent hood exhaust to outside, then do your best to clean the filter on a regular basis so that cooking particulates can be trapped before they’re blown back into the room.
  2. Congratulations if you are upgrading to a standalone vent hood (our choice for the best kitchen atmosphere)!  Here are some tips to split up the microwave and vent hood and make each perform well.
    1. If budget is not a constraint, vent hoods now come in a “balanced” option, which means they not only suck fumes from your kitchen, but these are replaced with fresh air from outside.  Check out this smoke test on such a unit. 
    2. For normal budgets, good kitchen vent hoods can be purchased between $200-500 (here is a great review on the newest models, but be sure to pick one that vents externally!)  In addition to capacity, it’s also wise to get the quietest fan you can afford so that you won’t be annoyed with the sound.
    3. Now, where shall we place the microwave?  Most kitchen design professionals are happy to place it anywhere in the kitchen except the countertop, but then venting it back into the room is still polluting your indoor air.  Besides the moisture emitted from cooking steamy foods like rice or potatoes, some foods emit a lot of ultra-fine particles (UFPs).  Popcorn is one of these; in this study it was discovered that UFPs and PM2.5 generated by microwaving popcorn were 150-560 and 350-800 times higher than the emissions from microwaving water, respectively. About 90% of the total particles emitted were in the ultrafine size range.  To avoid releasing these harmful particles into your kitchen, here are the best scenarios for venting the microwave.
      1. Install it in cabinetry with a dedicated vent to the outdoors.  No questions about getting the vapors out in this case!
      2. Install it in a lower cabinet space next to the stove.  That way, steam and UFPs exhausting from the top of the unit can be drawn up and out by the range hood. “Drawer” microwaves are becoming more popular now (see photo below). 
      3. (Least effective, but still possible) Set the microwave on the counter next to the range hood but 2 feet away from it, for heat safety concerns. 

The last two options require manually turning on the range hood every time you use the microwave, but if you have a nice quiet vent hood, this shouldn’t be a problem.  

Microwave Drawer installed next to the oven/stove (source: Home Depot)

Refrigerator coils

It’s pretty obvious when the refrigerator needs cleaning: food spills inside and dirty fingerprints outside get the most attention.  However, the most important part (the working “guts” of the fridge) is easy to overlook, except for some dust gathering on the toe kick grill.  On most newer models, the cooling coils are hidden under the fridge, and all kinds of dust (especially if you have a shedding pet) will gather there and clog up the vital cooling parts. The coils should be cleaned every six months to one year to keep the fridge working properly, and keep the accumulated dust out of your air. Here’s how to clean it without a lot of hassle (realtor.com):

  • If the coils are not exposed at the back of the unit, then remove the toe kick panel in the bottom front to expose them.
  • Use a vacuum cleaner with HEPA filter (you don’t want to blow that dust back into the air) to vacuum off as much dust as you can reach.
  • Use a coil cleaning brush to get between the rows of coils, keeping your running vacuum nearby to suck up dislodged dust. 
  • Clean off the front grille with the vacuum and soap and water if necessary, and reinstall it.

The Dishwasher

Ahh, the dishwasher–what a super-convenient place to hide dirty dishes.  My cousin (an engineer) always joked that in his new house, he’s going to install 2-3 dishwashers and no cabinets.  Why?  Dishwashers are way cheaper than cabinets and no one likes to unload the dishwasher.  When you can have 1 “clean” and 1 “dirty” dishwasher at all times, you can take clean dishes from the clean one, use them and place them in the dirty one, and theoretically no cabinets are needed!  Somehow, I think his wife will have a problem with no cabinets…

Back on topic, dishwashers are appliances that use steaming hot water and caustic detergent, but are not vented to the outside.  Where does all that steam and vaporized detergent go?  Into your kitchen air, of course!  Hayward Score is a company which identifies the major issues in your home that can impact your health and gives you free personalized actionable recommendations to fix them.  They performed a study on how bad dishwashers are for your indoor air quality, and found out that it was really the “heat and dry” cycles, not the soap, that caused air quality problems.  They placed an air quality monitor in the room adjacent to the kitchen and ran the dishwasher three times:

  • Dishwasher run with standard soap, heat and dry cycle on = Air Quality: RED ZONE (bad)
  • Dishwasher run with no soap, heat and dry cycle on = Air Quality: RED ZONE (bad)
  • Dishwasher run with standard soap, heat and dry cycle off = Air Quality: BLUE ZONE (good)

Based on these results, the soap was not causing elevated levels of VOCs but high temperature combined with chlorinated water was.

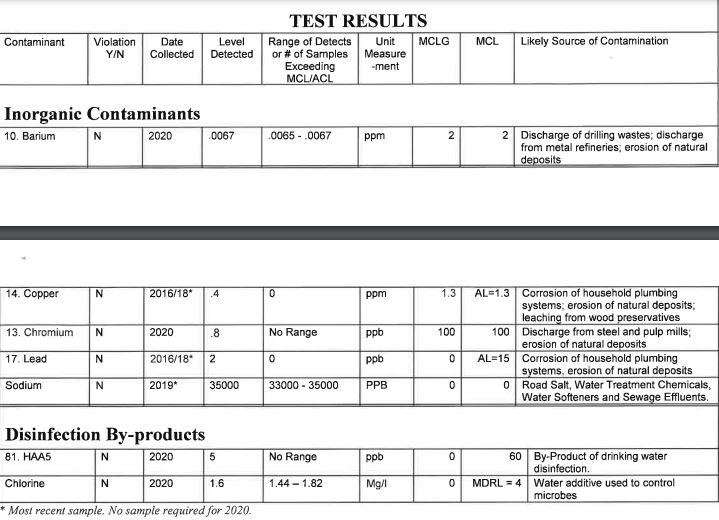
When your home is supplied by city or community water, these systems typically use a lot of chlorine to keep bacteria out.  I mean, A LOT–often you can turn on the tap and it will smell like a swimming pool coming out of your faucet.  Heat and dry cycles can reach temperatures of 160 deg F or more, which when contacting chlorinated water, produces chloroform.  The chloroform can drift through your home farther than the steam does, hence the bad air quality readings taken in the next room. 

The solution to good air quality while running your dishwasher?  If your tap water is sufficiently hot to sterilize (above 120 deg F), then don’t use the heat and dry cycle settings.  Also, run your kitchen exhaust vent during and 30 minutes after the dishwasher cycle, to move steam and any other gasses outdoors.  If your tap water is below 120 deg F, then it’s a good idea to use the heat cycles to make sure everything is sanitized, but make sure to run the kitchen exhaust vent simultaneously.

Toasters, Crock Pots, Air-Fryers, Electric Skillets and all their cousins

We have a lot of miscellaneous appliances hidden in the cabinets or sitting on the countertops, which can put a lot of fine particulates and VOCs into the air when using them.  Toasters are one of the worst offenders, and start emitting toxic fumes from the moment you turn them on (University of Texas at Austin study), because they are heating up the leftover bits from previous foods, including oils.  Toasting two slices of bread caused twice as much air pollution as is seen in London for 15 to 20 minutes – meaning three times the World Health Organization’s safety limit. (dailymail.co.uk)  The solution?  Set them as close as possible to your range (2 feet away is safe if you are using the range also) and fire up that kitchen exhaust fan.  Heck, chopping your onions next to the kitchen exhaust fan can even whisk away the chemical irritant that they release to make you cry (syn-Propanethial-S-oxide).

With a good exhaust fan and little cleaning you can spend as much time as you like in your kitchen without worrying about what’s floating around in the air! 

Photo by Jimmy Dean on Unsplash

The Not-So-Silent Killer: Roads and Highways

The Not-So-Silent Killer: Roads and Highways

Even with the shift towards the ability to work from home, some jobs require proximity to cities, which cause people to live in places adverse to their health.  In a recently published study from the University of Leicester in the UK, researchers identified that road noise, such as the rumble of engines, honking and braking, causes hypertension (increase in blood pressure).  The study reviewed the status of 240,000 people over 8 years and looked at the correlation between the noise of where they lived (using addresses and computer modeling tools) and their blood pressure.  It also adjusted for air pollution, because we know that fine particulates and nitrogen dioxide can also have effects on blood pressure.  It turns out that plain old traffic noise was enough to cause an increase in hypertension, even though those who are also exposed to more air pollution had the highest risk.  

Ok, so what do you do if your housing choices put you squarely in traffic central?  

Consider where the noise comes in the most, and try one or more solutions for that area, which may be enough to dampen most of the sound coming in.

Windows on an outside wall facing a busy street will certainly be the source of most of the noise, and there are several ways to block out most of it.  Single pane windows are very noise-transmissive, and double pane are a bit better, but each of them can be improved significantly with custom window inserts like those offered by Indow.  If you are a renter or don’t own your house, replacement windows are likely out of the picture, and more expensive than these inserts.  The company can provide a laser measuring system if you’re unsure about the squareness of your windows (for older homes), and once fabricated, Indows can easily be installed by one person (or two people for a large window).  The compression fit keeps them snugly in place to block sound.  

If you are not inclined to pay for window inserts, you can make your own foam board inserts to sleep soundly at night when the window’s not needed!  Just pick up a large sheet of foam board and measure and cut it carefully to the exact measurements of your window casing, attaching handles/pulls to the top and bottom of the inserts to help you install or remove them.  They can be stored in a closet, or behind long drapes during the day when they are not needed.

If you don’t want the expense of window inserts, acoustic caulk may help.  You’ll want to remove the existing caulk and replace it with the acoustic caulk.  It’s not a quick job, but if your windows are older and haven’t been caulked in a while, it will also provide needed thermal sealing too.

Thick, heavy curtains like these are much easier to install than caulk, come in a variety of colors, and are specifically made to block noise.  

Plants need light, so placing them near a window will benefit them and you–they can also absorb noise!  Plants with thick foliage and fleshy leaves are the best at absorbing and deflecting it.  This article lists a  number of plants in different styles and heights that can be placed on the floor, on stands or hung from the ceiling to deaden sound.  As a plus, some plants also absorb VOCs that can seep in around the windows from the vehicles outside.  Areca palms, rubber plants, Dracaena (Janet Craig variety), ferns and  peace lilies are common to both of these lists!

A few more Tips for Dealing with Noise from the Street can help for walls that face the street:

  • Bookcases with lots of books

  • Portable closets like armoires

  • Hang a thick tapestry or quilt as a statement piece on the wall

  • Hang large or small art canvases with the backs filled with foam board

And finally, all the other places that sound can enter and bounce around your space:

  • Add thick, cushy rugs (if you have the ability to keep them clean, of course!)

  • Install door sweeps/seals (many are easy to install with adhesive or slip-on type)

  • Add a thick curtain with retractable rod if you have an entrance hall that emits noise

  • If you like music or audio books, try listening to them with sound-canceling headphones to have a studio-feel while relaxing, working out, cleaning or just walking around.

For tips to get a more restful night’s sleep, check out our post on Maximizing Your Sleep.   We want you to have the healthiest home possible, so whatever you can do to reduce outside noise in your space will be worth it, for your heart and for your mind!

Photo by Josh Eckstein on Unsplash

Truly Natural Air Purifiers

Truly Natural Air Purifiers

As homeowners realize the extent of air pollution inside the home, they value making or buying air purifiers all the more.  Many purifiers require expensive manufactured filters to be purchased and changed out on a regular basis.  They can certainly do the job but our ears always perk up when something using natural materials comes along!  It’s fun to research how outdoor air is purified by plants and microbes and natural materials.   Here are some of these “new” products that use ancient natural processes.

FIrst, we’ll talk about ones you can actually buy.  

Unless you live with open windows next to a pond with a lot of green stuff on the top, you’d never experience the benefits of using algae as an air purifier.  Or, you could buy an Algae Air Purifier, which cultivates the algae in a low-maintenance tube anywhere in your home.  Algae naturally feed on pollutant particles and gasses like CO2, CO, NO2, VOC`s, PM 10 and 2.5 and transform them into oxygen, turning a problem into a solution. Their ability to absorb and remove the carbon dioxide in the air is 10 times higher than large trees as their whole bodies are photosynthetic. (Can Algae Purify Air?)  AlgenAir looks like a cool modern lava lamp, which has a light, bubbles and soothing white noise.  Algae does have a life cycle of 4-8 weeks, which at the end does not have to be dumped out on the ground.  Since it’s a natural fertilizer, the algae can be poured onto your other houseplants to be used as food.  The Aerium 3.0 comes with the container, one spirulina starter kit and sterile hydrophobic filter.  The subscription plan will reship spirulina every 30, 45 or 60 days for $24.75 for each refill.  

We wrote about the power of moss to purify air previously, but Briiv is a new product that brings it indoors.  It’s a compact filter about the size of a hot water kettle, that looks like a little terrarium on your counter.  How could this green filter possibly last for a whole year?  Yet, it does.  The company claims that it’s as powerful at 3,043 medium-size houseplants, and on its maximum fan setting it delivers 53 cubic feet per minute of purified air. This equates to a CADR of 90 cubic meters per hour.  Reviewers felt more refreshed after sleeping with the Briiv running in their closed bedroom, and enjoyed the fresh outdoor scent.  Since reindeer moss grows at high latitudes and altitudes, it is certainly an uncommon houseplant!  The price of $356 sets you up with one filter which lasts one year, and multiple filters are needed for larger spaces/more rooms.  The replacement filters (moss, coconut and nano matrix) are $38 for one set.  It’s a luxury filter that imparts the scent and look of the outdoors anywhere you place it.

“Biofiltration” could describe the way the algae and moss clean the air, and in a new adaptation,  is also the method of passing air through a thin film containing immobilized bacteria and fungi.  Researchers in Chile focused on reducing volatile organic compounds (VOCs) from building materials and paint, and polycyclic aromatic hydrocarbons (PAHs) from wood-burning.  Current air purifiers typically use activated charcoal to adsorb these pollutants, but the capacity of the charcoal will get “used up” and require disposal at some point. Instead, they found that by using the fungus Fusarium solani and the bacterium Rhodococcus erythropolis, the pollutants could be completely degraded, and the  “filter” did not degrade in performance even after eight months of continuous use. Furthermore, other microbes were captured from the air, demonstrating the potential of the prototype for retaining airborne bacteria and fungi.  (Fresh research for fresh air: Harnessing microbes for removing indoor pollutants)

It is a bit costly to use these “natural” filters in your home; we’re hoping the last one using bacteria and fungi retails for less when it’s finally commercialized!  However, by harnessing the power of 25-3000 houseplants in 1 filter, they are definitely easier than maintaining a forest of indoor plants.  I like the idea of smelling fresh outdoor scents, so I think the Briiv would be my choice.  The compostable filter elements in each device are particularly attractive, and on a replacement-filter basis really are not so expensive after all when compared to many air purifiers which cannot remove VOCs or CO2.  Bravo for the natural versions, we definitely want to see more of these!

Photo by Kent Pilcher on Unsplash

How to reduce annoying Static Electricity (and distinguish it from real electricity)

How to reduce annoying Static Electricity (and distinguish it from real electricity)

Static electricity is just plain rude!  Although it can seem like someone has electrified your doorknob to play a trick on you, most likely your own body is just ridding itself of built-up static electricity.

Why and how does one accumulate that much electricity, anyway?

This topic warrants a small science lesson, so bear with us! As you walk around your house, friction will cause electrons to transfer between surfaces.  Friction on floors (especially carpet), friction between your clothing, and friction between your clothing and body will all cause transfer of electrons, usually resulting in you becoming positively charged (we tend to lose electrons).  Any kind of imbalance in electrons between two objects is basically voltage potential, so the potential continues to build until you touch something that is grounded (a metal appliance, doorknob, or another person) and BAM!  The potential dissipates immediately in the form of a spark or shock.  This means that the missing electrons are suddenly transferred back to you in a moment’s time.  Static electricity shocks are on the average 3000 volts–but very little “amps”, so although they don’t feel good, they usually do not harm you.

You may notice that static shocks in the wintertime occur more frequently or with more power.  What’s up with that?  It’s due to dry winter air.  Warmer air has more capacity to hold water vapor, which when it touches our skin can transfer electrons painlessly so voltage potential never builds up.  However, cold air has less capacity to hold water vapor, so it tends to be dry and more insulating.  That is not good for our sinuses and skin, as well as the nasty static shocks.  

If you’re concerned that it’s not actually static that is causing the shock, there are ways to tell the difference between static and real electricity.  First of all, does the object that shocked you do so every time you touch it?  Static is not constant, meaning that once the shock occurs, it takes some friction to build up the voltage potential again.  Touching the same doorknob a few seconds after a shock usually does not elicit another shock, indicating that it’s static.  Electricity, on the other hand, will cause your hand to “tingle” again every time you touch it (so don’t do this repeatedly until you can find the power source and shut it off!)  The “tingle” is actually the alternating current that powers all the appliances in the house, and it feels different from static.  You can also use a voltmeter to measure the potential between the "ground" of an electrical socket (the little round hole at the bottom of each outlet) and the doorknob. If it's real electricity, you should see about 120 volts (using the 200VAC setting) constantly (although an intermittent ground may flicker up and down). It’s not possible to measure static electricity using an ordinary voltmeter.Here are some weird and dangerous ways that real electricity can make its way to your doorknob or other metal:

  • One person found that the extension cord running under his door (which is a no-no anyway) had gotten a nick in the insulation from the door rubbing on it.  He unplugged it and there were no further shocks.
  • When doors are installed, normally there's at least one longer screw in each hinge in order to get more holding power into the door frame.  There's a chance the screw could have run into a wire, either behind the trim or in the wall (sometimes people hide wires behind trim instead of properly routing them inside the wall)
  • If there's a moisture problem in the wall, any fault in the wiring can be transmitted a longer distance to the doorknob.

Faulty wiring in the wall of a house is a serious safety issue, and even more so faulty wiring or ground problems in an RV or travel trailer.  Because these homes on wheels are insulated by rubber tires, the major way of grounding them is through the ground prong of the electrical cable.  If there is a break in the ground system and hot wires touch the frame, the potential of electrocution is very real.  In a word, if you suspect your RV has faulty wiring or ground problems, disconnect it from power and ask a knowledgeable person or electrician to examine it as soon as possible!

So, getting back to our static problem, how can you reduce the frequency and severity of these shocks?  Here are the easiest ways:

  • Check the humidity in your home and if it’s less than 50%, try adding a humidifier.  Even a kettle of water on an electric hotplate set on low (make sure to check frequently that it has plenty of water and turn it off when you leave the room) can help to alleviate static, as well as sooth your respiratory system and skin.  Adding a cinnamon stick or a few fresh herbs can add a light, pleasant scent, too!
  • Using bipolar ionizers like the Germ Defender, Upgraded Air Angel Mobile or Whole Home Polar Ionizer in your home eliminates static buildup.  Did you know that these use the same type of technology used in electronics cleanrooms to eliminate static charge?  The ions float throughout rooms in your home and help to equalize the charge wherever they touch a solid surface.  
  • Wear more natural fibers (but not silk or wool), as fibers like cotton and linen tend to build up less static charge than synthetic fibers like nylon or polyester.  Silk and wool, while they are natural, do build up static charge because they tend to insulate better than they conduct electricity.
  • Go barefoot when you can.  The practice of grounding or earthing not only avoids static shocks but also provides evidence of other health benefits.  
  • Synthetic hairbrush bristles may generate more friction and static than natural bristles such as boar’s bristles, so you may opt to change your brush.
  • Moisturize your skin and hair with lotions or conditioners to help “conduct” charges into the air.
  • Touch metal surfaces such as doorknobs with another metal first, like a key, so that the charge is not sent directly into your fingers. 

Winter doesn’t have to be so SHOCKING…now that you know where all this extra energy comes from!

Photo by Ilona Panych on Unsplash

How PCM works to keep your home cooler–and warmer

How PCM works to keep your home cooler–and warmer

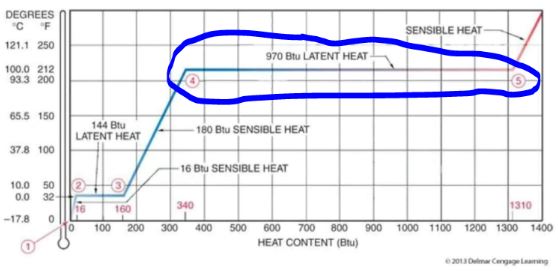
We are always eager to hear about advances in technology that the average homeowner can use to live healthier lives with less expense or energy.  Lots of new materials are being engineered that use the ambient air or temperature to reduce heating or air conditioning costs.  Phase Change Materials (PCM) are not new, in fact water is one of them!  PCM describes the way that the material absorbs or gives off heat while changing phase (from ice to water or vice-versa) but does not change temperature during the phase change.  Water doesn’t give much advantage in home insulation, however, because the phase change happens at 32 degrees F or 212 degrees F, which are outside of our comfort zone in the home!  However, there are other materials being used that fall in the perfect range for keeping our homes cool or warm.

Phase change material is like a heat battery.  In warmer climates, solar heat starts to warm the roof and wall areas early in the day, but with PCM installed, the heat is absorbed in the material while the material temperature remains constant.  It continues to “melt” inside the pouches as heat is applied, and only increases in temperature after absorbing a lot of heat.  In the evening, PCM gives off the heat back into the attic or wall space, which radiates toward the outside.  In cooler climates, PCM forms a barrier to keep heat from escaping your warm home in the same way.  This is different from traditional insulation such as fiberglass, rockwool or sprayfoam, which all “resist” passage of heat over time, meaning they constantly allow some heat to pass through by conduction, convection, and radiation.  PCM insulation is not meant to replace traditional insulation, but it is a great supplement to it.

There are several companies that manufacture PCM insulation using a soybean/palm oil blends. QE Platinum is a Dallas, Texas-based company, and Phase Change Solutions is based in North Carolina.  The oils are contained in pouched sheets that are flexible.  They can be installed behind drywall (vertically, horizontally or at any angle), above ceiling tiles, or simply laid over existing batt or blown-in insulation in the attic.  The great benefits about this type of insulation are that it is 

  • Non-toxic 

  • Green, sustainable material

  • Moisture, humidity and mold-resistant

  • Self-healing (any punctures cause the material to harden and seal in remaining material

  • Long-lasting (30-year warranty) and guaranteed energy reduction

  • Class A fire rating

  • QE Platinum is also a radiant barrier

  • Has the same thermal mass as a 12” concrete wall!  QE Platinum absorbs and stores up to 100 BTUs per square foot.

  • The company can tailor the melting/solidification range of the PCM to your climate (customized!)

There are two great videos reviewing it.  This reviewer is based in San Diego; he is renovating his older home to get to net zero and is planning to install it in walls and attic.  This reviewer is based in Texas.  Both videos go into the science of PCM and why this product is a game-changer for homeowners and business owners wanting to make their spaces more energy-efficient and comfortable.  We love that it’s non-toxic and easy to install–even for DIYers.  At $2.50-3.50 per square foot, it’s expensive but not ridiculous, and the companies may be able to reduce the cost even more as production increases.  

As great as this material sounds, however, it’s not for every home.  In order for it to be cost-effective, you need to live in an area that has significant daily temperature swings, like 20 to 30 degrees between daily and nightly temperatures.  This allows the PCM to full change phase and be ready for the next day’s cycle.

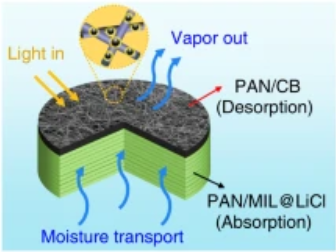
Another PCM has incredible capacity, but it’s not quite ready for the residential market.  Fraunhofer’s zeolite are small pellets that can be heated, which extracts all their moisture and in the process creates and stores heat.  They can then store that heat for indefinite periods of time.  The amazing things about this zeolite is that due to the huge internal surface area, the pellets store more than 4 times the heat of water (which is has one of the highest heat capacities of any substance), the heat storage is indefinite until water is added, heat losses are very minimal over time, and the zeolite does not change temperature, making it a true PCM.  In the energetic state, zeolites are therefore completely dry; conversely, when water vapor is passed through the pellets, heat is released. The advantage of this is that the energy is not stored in the form of increased heat but in the form of a chemical state. This means that heat is not lost during long-term storage. There is one drawback: Zeolites have poor thermal conductivity, which makes transferring the heat from the heat exchanger to the material and back difficult.  The engineers have finally solved the heat transfer problem by coating the pellets with aluminum.  Amazingly, the aluminum did not impact the ability to adsorb/desorb water, but it enhanced heat transfer. (Thermal Storage for the Energy Transition)  Can you imagine, instead of receiving a heating oil delivery, receiving a delivery of pellets that are already charged with energy, but not hot?  Or using the summer heat in your attic to recharge a bank of pellets for use in the cold winter heating system?  This is incredible technology!

So, homeowners, keep dreaming and scheming to keep energy costs down and comfort levels up.  Science can sometimes satisfy our wish-lists, and when it does, do your research and ask lots of questions to make sure it’s effective and non-toxic.  PCM insulation seems to be a good fit for many smart, green buildings, with no internet connection required.

Photo by Erik Mclean on Unsplash

What to do when you find yourself in an air quality emergency

What to do when you find yourself in an air quality emergency

We’ve all been on the other side of the highway when an accident snarls traffic for miles behind it, and our lanes of traffic slow down but continue to move.  Whew, glad I wasn’t on that side, we think…but sadly sometimes we may find ourselves stuck in an air quality emergency that requires calm, decisive action to quickly get to safe air.  

On Wednesday, November 8, 2023, a fire at a small chemical plant north of Houston sent plumes of black smoke into the air.   According to the Reuters report on November 9, Sound Resource Solutions blends, packages and distributes oilfield and other industrial chemicals including sulfuric acid, acetone and petrochemicals like xylene and toluene, according to the company's website.  These are chemicals that are acutely toxic with the potential to cause serious eye, skin and organ damage, as well as carcinogenic. 

A news article from a Houston news station released the list of chemicals that had been stored on the site during the last 2 years, which confirmed they are quite toxic.  

However, despite the smoke and shelter-in-place orders (which have been lifted), it seems that officials are downplaying the possible effects.

  • According to a Houston news channel video the day after the fire was extinguished (Nov. 9), the Texas Commision on Environmental Quality was monitoring the air and “did not detect any levels of concern from the samples”.  

  • In the same video, an official from the University of Houston said that rain would wash any chemicals out of the air, dilute them out and they eventually go into the ocean.  

Here are the problems we see with these assessments: black smoke was seen moving north toward Livingston, Texas.  Such smoke carries a lot of particulates, which will deposit on businesses and residents’ homes, vehicles and farms (food sources), as well as drinking water facilities.  Also, by our estimates, Shepherd, Texas is 50-60 miles from Trinity Bay, which is open to the Gulf of Mexico.  In order to get to the ocean (Gulf of Mexico), the particulates and chemicals will pass through many drinking water sources!  Once again, it’s probable that authorities are not releasing timely information about hazardous levels of chemicals in the air (and no water reports were discussed).

If you find yourself in an emergency area like Shepherd, Texas, it’s best to do one of two things: stay inside and implement air quality containment measures, or drive out of the area as soon as possible.  Here are our recommendations:

If you choose to stay inside:

  • Close all windows and turn off air conditioning and heating systems if possible.

  • Although most HVAC systems don’t have fresh air intakes, you should close these intakes if they do.  

  • Don’t use exhaust fans like the kitchen or bathroom exhaust fans.  Don’t use clothes dryers, either!  Each of these pull air out of the house, which consequently draws air into the home through cracks in windows and other penetrations.

  • If you have air purifiers, run them continuously.  If you have only one purifier, run it in one small room where you can shelter for most of your time.  If you don’t have an air purifier, here's how to make one using a box fan and a MERV-rated filter.

  • Don’t cook if possible; try eating canned food or food that doesn’t require cooking or heating.  The reason is that cooking and heating food releases even more VOCs into the air, and you shouldn’t vent these with the exhaust fan.

  • Monitor AirNow.gov for local air quality updates, because the air quality outside your home will eventually be the air quality in your home.  If air quality outside deteriorates, you may want to gather supplies and necessities and evacuate via car.

  • Use bottled (preferable) or home-filtered water until you are sure that tap water has not been contaminated (which may be weeks or months).

If you evacuate:

  • Make sure that the HVAC in your home is turned off and all windows/doors are closed before you leave.  You can leave air purifiers running in your home, however.

  • Make sure you use the best masks you have until you get out of the area.  Exchange your mask for a new one if you start to have trouble breathing. 

  • Spend as little time outside as possible. 

  • When driving, keep your air conditioner set to “recirculation” mode until you get out of the danger area.

  • Bring/buy bottled water. 

  • Monitor AirNow.gov for local air quality updates and check updates by local news authorities. 

  • Upon returning home, clean carefully and thoroughly!  We have recommendations in our article here.

Note that smoke particles, which can contain toxic chemicals, will deposit on the ground, making it easy for people and pets to bring them into the house, so you may want to be vigilant about removing shoes and cleaning pets’ paws when you can.

Many people live or drive within range of being affected by toxic spills, fires and environmental disasters, so your best bet is being prepared (and have a healthy skepticism of all-clear reports until you can research the situation).

Photo by irfan hakim on Unsplash

Air quality in the Operating Room

Air quality in the Operating Room

If you are in the position to have elective surgery, you probably assume that the hospital does its best to mitigate infections by maintaining a sterile environment and using sterile procedures.  The Operating Room (OR) is where patients are at their most vulnerable because hospital-acquired infections (HAIs) can easily happen when the skin barrier is broken, resulting in a Surgical Site Infection (SSI).  Therefore, air quality is very important for patients’ protection, and there are a number of factors that govern the quality of the air.  In the U.S., OR air quality is regulated by three organizations: the American National Standards Institute (ANSI); the American Society of Heating, Refrigerating and Air-Conditioning Engineers (ASHRAE); and the American Society for Healthcare Engineering (AHSE). Operating rooms require positive pressure, a minimum of 20 air changes per hour (ACH), with a minimum of four outdoor changes per hour. The standard specifies a minimum effective reporting value for air filter efficiency (MERV 16) but does not recommend a type of air delivery system. (Operating Room Sterilization: A Complete Guide to Air Quality)  Here are some details about these requirements:

  • Positive or negative pressure: Traditionally, hospitals make operating rooms positive pressure in order to keep contaminants from the rest of the hospital from infecting the patient on the operating table.  According to ASHRAE 170, operating rooms require positive pressurization of at least +0.01 in.w.g.  However, as operations are sometimes necessary on patients who may have contagious diseases like MERS or SARS CoV-2, hospitals are beginning to rethink whether they want to put the rest of the ward at risk of spreading a microbe from a positive pressure OR room. Discussions are underway regarding alternatives such as a positively pressured OR with negatively pressured ante/setup rooms. Another possibility is to have a negatively pressured OR with positively pressured ante/setup rooms.  (Rethinking air pressure in operating rooms could save lives)

  • The air change rate is a key factor influencing the concentration of microbe-carrying particles (MCPs). The higher exposure risks of surgical incision in the surgical microenvironment may be mitigated with increasing air changes per hour (ACH). (The impact of air change rate on the air quality of surgical microenvironment in an operating room with mixing ventilation)  

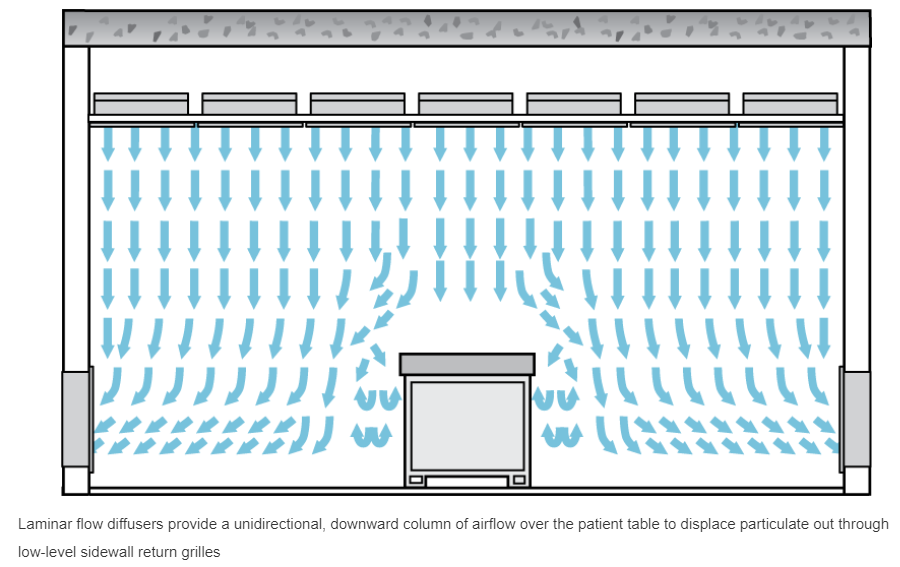
  • A key design requirement within ASHRAE 170 for operating rooms is the primary supply diffuser array. The airflow in the primary diffuser array should be unidirectional and downward, with an average velocity of 25 to 35 cfm per sq. ft.  This is recommended with the sole intent of creating a large sterile zone around the patient and medical staff. The standard dictates that the coverage area of the primary supply diffuser array should include the surgical table and extend a minimum of 12 in. beyond the footprint of the surgical table on each side and that no more than 30% of this area may be used for nondiffuser uses (like lighting, surgical gasses, electrical outlets, televisions, etc). This recommendation ensures that enough clean, filtered air is dispensed above the patient while accommodating the complex medical equipment present in today’s modern operating rooms. (How is ASHRAE Standard 170 Applied to Hospital Operating Rooms?)

Although not it’s not mandated, it’s also a good idea to have restricted access to the OR during surgical procedures.  The number of door openings are related to the number of colony-forming units (CFU) in the OR.  According to this study, increased number of door openings and surgery duration increased CFU counts in the OR, but the relationship between these variables was only observed outside the Laminar Air Flow.(LAF). Within LAF conditions, only the number of staff was associated with higher CFU. 

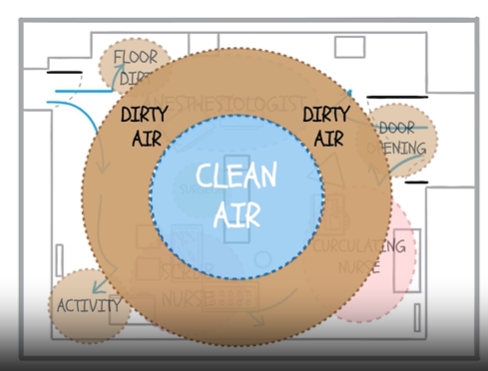
There have been several key developments in systems that promote ultra-clean operating rooms.  Laminar Air Flow (LAF) systems were developed by Sir John Charnley in the 1960s for use during joint replacement implantations.  They are useful for maintaining sterile conditions in the center of the operating room (under the diffusers) because they produce a continuous flow of microorganism-free air, which improves air quality by reducing infectious microbes. However, a 2023 meta-analysis agreed with multiple studies that have found it ineffective for reducing SSIs, and even possibly increasing the likelihood of SSIs, during orthopedic procedures.  (Laminar airflow ventilation systems in orthopaedic operating room do not prevent surgical site infections: a systematic review and meta-analysis)  In addition, air outside of the sterile field (that which is supplied by the LAF system) is often called the “dirty donut” because it is not effectively sterilized by the LAF; air in the dirty donut can be up to 100 times more contaminated than the center.  There are several solutions to improving the air in the dirty donut; Aerobiotix has developed a mobile unit called Illuvia that can reduce the contaminants.  

Source: Cleaning up the Dirty Donut

There is no standard for LAF design in the US.  In addition to the filters employed, different sterilization devices can be employed within or outside the LAF cabinet to increase deactivation of pathogens.  According to Steris, a major design/manufacture/installation firm for OR suites, the following technologies are improving LAF cabinets: 

  • UV light: Use of mobile and ceiling mounted UV light systems is restricted to when patients and staff use full personal protective equipment.  This type of light is also limited to line-of-sight, meaning that disinfection is obstructed by ceiling mounted fixtures and other equipment.  UV light may also embrittle certain materials and fixtures.  Therefore, in-duct UV sterilizers are preferred.

  • In-duct hydroxyl generator systems ultraviolet energy to produce reactive oxygen species known as hydroxyls. Airborne hydroxyls are ideal sanitizing agents which reduce pathogens and neutralize volatile organic compounds (VOC) and a broad range of chemicals. Atmospheric hydroxyls are natural-occurring molecules produced by the action of the sun’s ultraviolet energy on oxygen and water in our atmosphere. The hydroxyls are a natural oxidant and safe for patients and staff to be present during treatment without additional PPE. The system can run continuously and year-round, providing the potential for maximum surgical uptime. An added benefit is that hydroxyls help mitigate odors caused by surgical smoke and cauterized tissues.

According to this 2018 paper, it may be wise to adopt some standards of cleanrooms in ORs.  One such principle is maximizing the use of ceiling space to make the ceiling one large diffuser.  The reason for this is that every gap in airflow delivery (for instance, around a light connection) causes a low pressure area into which airflow is directed, producing turbulence.  Therefore, the operating room would look more like this: 

Source: How is ASHRAE Standard 170 Applied to Hospital Operating Rooms?

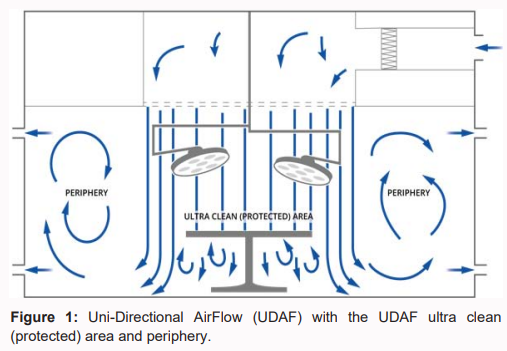
LAF is also described as Uni-Directional Air Flow (UDAF), but UDAF may not always be laminar.   Here’s the difference: UDAF describes the direction of flow, however the velocity must be below 90 feet per minute in order to be described as laminar (non-turbulent).  It’s easy to see that the periphery (outside the Ultra Clean Ventilation area in the center) has a lot of turbulent air flow.  Although the large lights over the operating table do produce some turbulence, it is not visualized here.

Source: Air Quality in the Periphery of Operating Rooms during Surgery

Previous LAF systems utilized fans to force air down.  A new type of LAF system called Opragon was developed by the Swedish firm AvidCare, and the system uses Temperature-controlled AirFlow (TcAF).  The technology behind TcAF is based on the ventilation system pumping out slightly cooled air into a zone around the operating table. By taking advantage of the fundamental laws of nature, TcAF breaks the convection currents in an effective and energy-efficient manner. Since cool air is denser than the surrounding warmer air, it drops towards the floor. The air speed is dictated by the temperature difference in the room.  a temperature difference (ΔT value) of -1.5 to -3°C is required between the ultra-clean air and the ambient room air at the operating table to guarantee a fall speed of about 0.25 m/s at the level of the operating table. The technology continually checks to ensure that the ultra-clean air maintains a constant under-temperature of 1.5–3°C regardless of the temperature of the ambient room air. (Temperature-controlled AirFlow)

Air curtain systems like Mediclean emit an air curtain around the perimeter of the sterile area.  The Mediclean system uses Continuous Particle Monitoring (CPM) to measure airborne particles in real-time and uses simple visual alarms. When particles are detected, Mediclean® CPM systems automatically increase the airflow from the UCV to quickly flush the contamination away from the safety-critical area, protecting both patients and surgical staff.

Other innovations include:

  • Surgicube, which is positioned just above the operating table, emits sterile air for minor surgeries.

  • Surgibox, a portable sterile surgical field with self-supporting battery and filter system

  • Air Barrier System, which is a portable diffuser to bathe the surgical site in ultra-clean air 

  • A novel upward-flow design to ventilate using natural stack effect, which is less complex requiring fewer scarce components, lower maintenance commitments, lower energy requirements and operating costs.

And, it’s likely that even more innovations are in the pipeline.  We thought it would be helpful to let you know that even the air in operating rooms is important for the operation’s success and your healing, so you might want to check into it if you need to have surgery!

Specific help for asthma and allergy sufferers

Specific help for asthma and allergy sufferers

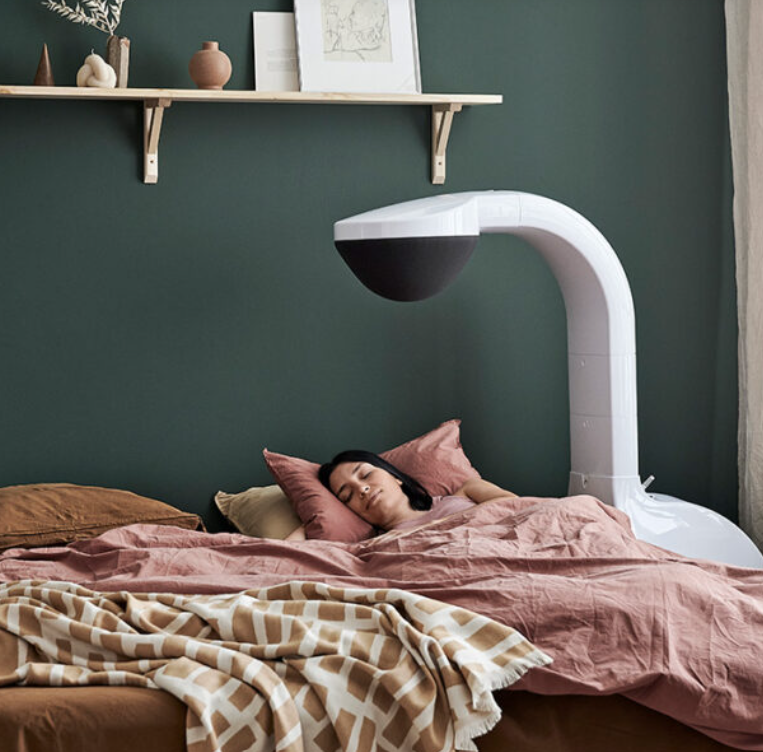
In our article “Air Quality in the Operating Room”, we described a new technology to produce laminar air flow called Opragon.  Opragon by Avidicare creates a clean air flow from the ceiling to the floor by creating a 3 degree temperature difference, which causes clean, filtered air to flow downwards, enveloping the entire operating room in clean air.  Now, the sister company AirSonett has produced a device which can drastically improve the lives of asthma and atopic dermatitis sufferers using the same technology.   Airsonett Air4 uses the unique and patented technology Temperature-controlled Laminar Airflow (TLA) to control a flow of lightly cooled, filtered clean air towards the breathing zone. The filtered air sinks with the help of gravity and pushes away the particle- and allergen-rich air from the breathing zone. In this way, at least 99.5% of all particles larger than 0.5 μm are blocked from reaching your breathing zone when you sleep.(Airsonett Air4)

Asthma can often be exacerbated by the allergens in bedclothes and bedding, which are skin dander and dustmites.  Movement in bed and a person’s body heat stir up these allergens, bringing them into their breathing zone.  Many people think that adding an air purifier to the room will help, but in fact air cleaners try to do too much–they attempt to purify the whole room, when all that’s needed is to purify the air in the breathing zone.  According to clinical trials, TLA has proven to be one hundred times more effective compared to air purifiers. (Airsonett Air4)

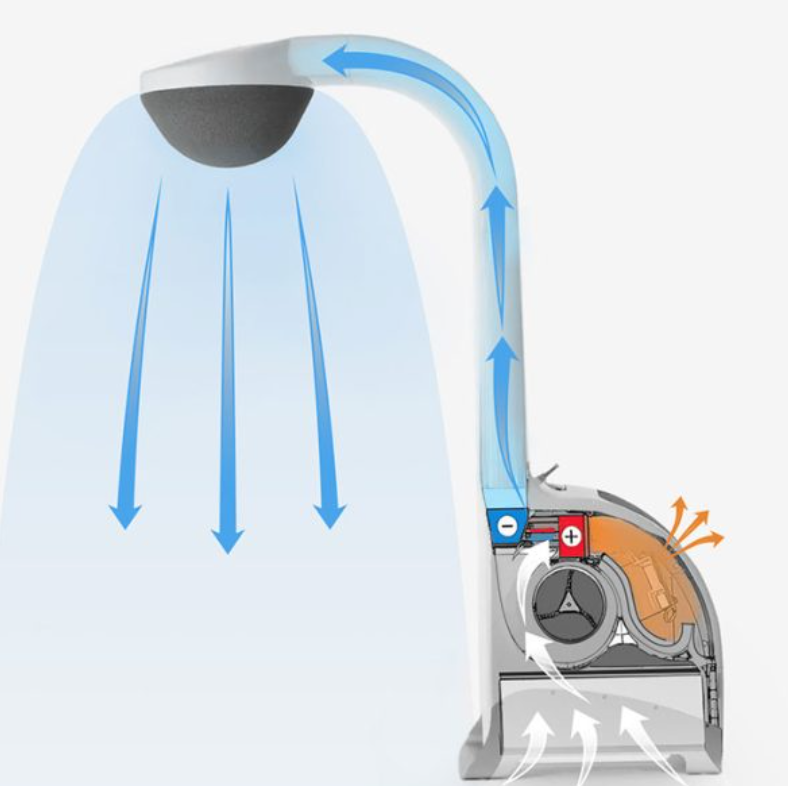
The machine works by drawing in air from the room under its base through a large HEPA filter.  The air passes through the fan and is then separated into cool and warm air streams.  The warm air stream is discharged through the back of the unit, while the slightly cooler air is moved up through the neck of the machine to the port above the sleeping person, to deliver cool air that drifts down over their breathing zone.  Since the required temperature difference to cause downdraft is small (about 3 degrees F), the unit can employ a Peltier module to cool the air, which is quiet and efficient.  Peltier modules work by passing a DC current through them, causing one side of the unit to heat up, and the other to cool down below room temperature.  Peltier modules are well suited for small cooling or heating loads, and in places where circulating liquids are not desirable (like computers).  The power consumption of the whole unit (fan, cooling and electronics) is 60W. 

Source: Airsonett Air4

This device is pricey (one medical equipment company quotes it at $88 per month for a 5 year lease), but the ease of use, efficacy, and improvement of condition may be worth it for certain individuals.  In these cases, insurance may go a long way to being able to use one in your home. For sure, there are no encumbrances like masks or tubes to deliver clean air, can be operated 24/7, and it can be situated in different areas of the home (over the bed for sleeping, or over a chair or desk for working) because the height is adjustable from 46-55 inches.  Airsonett Air4 is normally prescribed through a pediatrician, allergist, pulmonologist or dermatologist, as it is important that you are diagnosed and receive correct treatment. However, it is also possible to rent or buy Airsonett Air4 directly through the company.

Source: Airsonett Air4

Why is my house so DUSTY? Assessing the air currents gives a clue

Why is my house so DUSTY? Assessing the air currents gives a clue

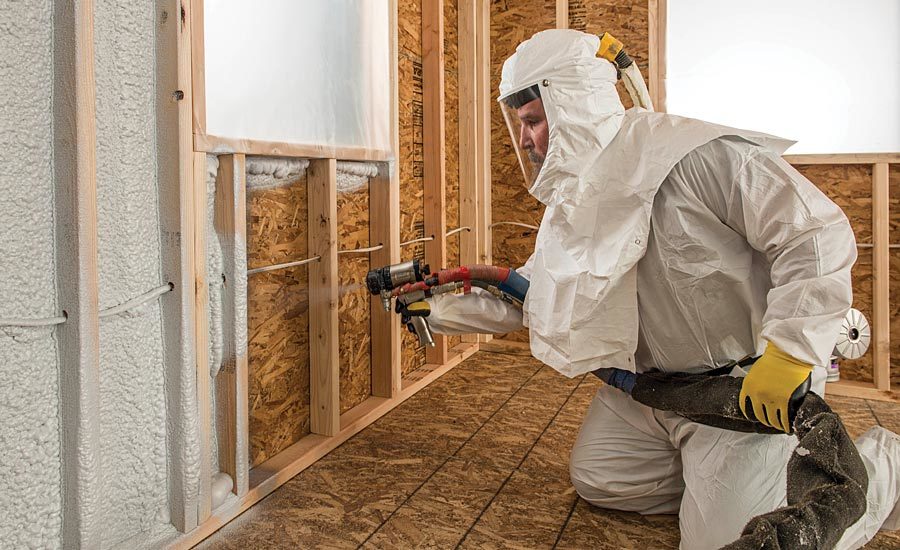
This article was written in response to an actual problem.  My elderly parents moved into a “barndominium” which was converted from a 35x35’ metal workshop, in 2020.  The walls were insulated with fiberglass batts, and the attic above their 10’ ceilings was insulated with blown-in insulation.  I listened to my mom’s complaints about dust in the house. This is a real problem because the dust seemed to settle very quickly after cleaning, and my father has COPD.  Since the dust seemed to be a whitish colored dust, together we decided it must be coming from the attic, which had extra (white) insulation blown in after renovations were complete. We increased the HEPA filtration of the HVAC, with no results.  I checked for openings in the flexible ducts of the HVAC which could entrain insulation, with no results.  I tried several different times to seal the attic penetrations, which in actuality should have been done by a conscientious insulation company BEFORE the extra insulation was blown in.  I sprayed foam:

  • Around the HVAC vents
  • Around the bathroom exhaust fans
  • Around the LED puck lights (must check with the lighting manufacturer before doing this as some lighting is incompatible with direct-contact insulation.  The light needs to be “IC rated” in order to safely come into contact with the insulation.)
  • Around ceiling fan boxes
  • Around hanging shelf penetrations through the drywall of a floor-to-ceiling closet

It took multiple trips to the attic (with a good dust mask, of course) and quite a few cans of spray foam to get the job done, but sealing these areas, and one other (big) thing really helped cut the dust down.  It wasn’t until I really analyzed what was propelling the dust from the attic into the living space, that I figured out what was going on.

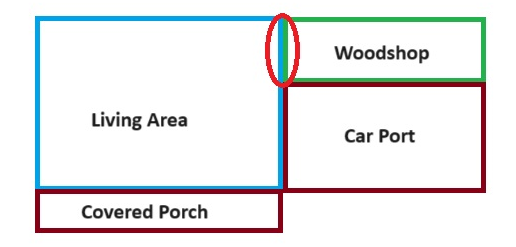
We’ve written several articles about negative pressure in your home and its negative effects. (This one has an eye-opening video linked).  I suspected that the dust was coming from the attic because negative pressure was somehow being generated in the house by the HVAC system.  However, I didn’t look at the big picture.  The living space is adjacent to a woodshop where my father carves (his hobby) and he uses a powerful dust collector to whisk the dust out of the workshop to a drum container.  The motor on this dust collector is rated for 240V so you can imagine that it’s a heavy-duty machine and being situated in the carport, can be heard from some distance from the house.  This thing SUCKS, and most of the time he’s using it with the door and window closed, so where is the makeup air coming from?  The workshop shares a common wall with a small bedroom in the living area (see red circle in diagram below).  It’s not too big of a leap to think that the dust collector may be pulling air from the house, as well, which in turn draws air from the attic when the ceiling penetrations were not sealed. 

To seal the wall between the woodshop and living area, I caulked the baseboard to the floor, as well as sealed the electrical boxes by taking off the switchplate and sprayfoaming around them as much as the little foam straw would allow (extra large switch plates help if you have to cut out the drywall a little).  The drywall took care of the rest of the wall.

Sometimes it takes a bit of thought to figure out the air currents in your home, but they are well-worth investigating!  Recently I found (by accident) that some carpenters had terminated a whole-house vacuum system in the ceiling of their house instead of routing it outside.  Even though the system used a filter, the space above the tiled ceiling was thick with a fine dust. We only discovered it when a  leak forced replacement of part of the roof above it.  We extended the PVC vacuum exhaust pipe just a few more feet and ran it out through the soffit.  It just goes to show that a little investigation (and a lot of spray foam) can go a long way to maintaining less dust in the house! 

Photo by Kent Pilcher on Unsplash

Why it’s important to get a proper kitchen exhaust fan and USE IT

Why it’s important to get a proper kitchen exhaust fan and USE IT

Recently (in the last few years) gas stoves have come under fire as a source of air pollution in homes.  While we used to think that the “blue flames” were clean-burning, it turns out that natural gas stoves (the kind of gas used in cities that is piped and metered to homes) can emit a range of pollutants from carbon monoxide, formaldehyde and other harmful pollutants into the air, which can be toxic to people and pets. (Indoor Air Pollution from Cooking)  Thirty-five percent of American homes cook with it, not to mention countless restaurants and commercial kitchens.  The problem is not using gas stoves in the home, however, it is using them with inadequate ventilation.  

Many older homes don’t have a kitchen exhaust vent, or if they do, it is not close enough to the stove or powerful enough to evacuate all the toxic fumes.  Nitrogen dioxide (NO2) is another common pollutant emitted by gas stoves, which the Environmental Protection Agency says is a toxic gas that even in low concentrations can trigger breathing problems for people with asthma or chronic obstructive pulmonary disease.  According to research, including this 1992 study, children who live in a home with a gas stove have about a 20% increased risk of developing respiratory illness.  NO2 concentrations can quickly spike when using as little as the oven and 1 burner without an exhaust fan, to more than double the EPA 1-hour standard of 100 parts per billion (ppb).  (We need to talk about your gas stove, your health and climate change)

Plus, we’re not even counting the burnt food bits that emit VOCs and fine particulates.  Our article about the air pollution cost of cooking–a favorite pastime of many–tells about a test kitchen where the Thanksgiving food items generated particulates levels exceeding that of Delhi, one of the cities with the world’s worst air quality!  You may be thinking about the time(s) a smoke detector may have been set off in your own home.  In my home, cooking during Thanksgiving set off my air quality monitor several times, from cooking bacon in the morning to toasting bread for the stuffing.  And I was using a kitchen exhaust vent, and, the monitor was a good 20 feet away, meaning that levels were even higher at the stove.  Yikes.

It’s just time to cook healthier, and I’m not talking about the type of cooking oil or how much butter you use.  It’s all about the exhaust vent.

If you live in a home with an existing exhaust vent, like a small combination microwave-vent, the first thing to do is check its rated throughput.  Most fans will have a brand and model number somewhere accessible, and the internet is a great resource for looking up this information.  

In our article here, I walk you through calculating how many cubic feet per minute (CFM) of air the hood must move in order to vent properly (it depends on the size of the stove and the size of your kitchen).  Many small vents and microwave combo units are just not powerful enough for the width of stove they are supposed to cover!  That’s exactly why the air quality alarm went off in my home even while the exhaust fan was at the highest setting.

If your vent falls short in the CFM department, or you don’t have a vent, it’s time to upgrade it or supplement. Here are some things to consider if you upgrade:

  • Noise: get the quietest fan you can afford.  Really.  A noisy fan is a big deterrent to actually using it, and the kitchen is a gathering place, so you’ll want to have a fan that makes it easy to enjoy cooking and holding a conversation.  Most of them will operate between 6 and 10 sones, or around 53 to 61 decibels. A normal conversation comes in at around 6 sones, so finding a range hood that operates in that range or below will make it much easier for you to enjoy carrying on conversations in the kitchen. (How loud should a range hood be?)  Another quiet (more installation-oriented) option is to get a model that has a remote fan, which can be installed away from the kitchen in the exhaust line.

  • Direct-Current (DC) Motors: More and more appliances are using DC motors and the advantages are several: they are slim and compact, they are more energy-efficient than their AC counterparts and speed control is easier.  In addition, it may have a longer life and quieter operation.

  • Other features such as LED lighting, optional filtration and pressure--balanced models are available.

  • Make sure to vent outdoors whenever possible.  If you cannot vent outdoors due to where the stove is located or if you’re renting (see below), look for fans with carbon filters that are easy to replace.  Activated carbon removes NO2, as well as VOCs, as long as the fan is powerful enough (see CFM discussion above) and you change the filters on a regular basis.

Here are some good values:

If you don’t have room to exhaust outside above your stove, consider adding a wall fan with outdoor shutter closure:

We also realize that many people rent or live in an apartment where it’s impossible to access the outdoors, or just don’t have any say about installing permanent equipment where they live.  We get that.  Thankfully, there are several portable inventions nowadays that can help get the purifying power you need.

  • CIARRA Portable Range Hood, Desktop Range Hood with 2 Speed Exhaust Fan, $170, would work well for college dorms with a hotplate, micro apartments, or small campers.  It’s not for use with open flame cooking, only electric griddles or hot pots.  It moves about 100 cfm, which is sufficient for this type of cooking, and comes with carbon filter and an optional HEPA filter (although this may clog up quickly if you’re cooking greasy food!)

  • AirHood ($157-$197) is another small portable kitchen exhaust fan, and comes in wired or wireless models. The downside is that this model is 70 dB, which may be loud for some people.  It does not specify CFM but can be used with open flame cooking with adequate distance between the flame and the unit.

  • Air King 9155 Window Fan, 16 inch, White: $147, is a powerful fan that would work well if you have a window in or near your kitchen, preferably close to the stove!  Of course, it could get a bit greasy when drawing cooking fumes, but the fan can be taken apart and cleaned.  It also allows you to close the window behind it during stormy weather without removing the fan.

With so many options out there, there’s hardly any reasons NOT to get proper ventilation for your stove/oven.  The important thing is to USE IT…make your family members or roommates aware of the dangers of NO2 and particulates.  Even toasting bread releases a lot of particulates from the bread as well as all the crumbs left from previous toastings.  So, it’s best to turn your exhaust fan on while cooking anything in the oven, range, toaster or microwave, and leave it on for up to an additional 15 to 30 minutes after you're done to evacuate all those gasses and particulates (and smells).  The plus is that with carbon filters, you don’t have to put up with cooking smells lingering for the rest of the day (well, cleaning the cooking pans is required too).  Here’s to fresh air and easier breathing with the right kitchen exhaust fan!

Photo by Erik Mclean on Unsplash
Non-toxic ways to deal with Hard Water

Non-toxic ways to deal with Hard Water

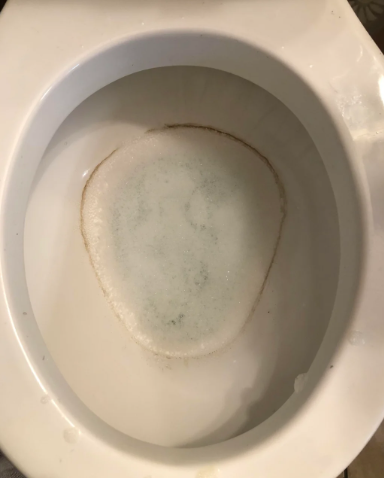
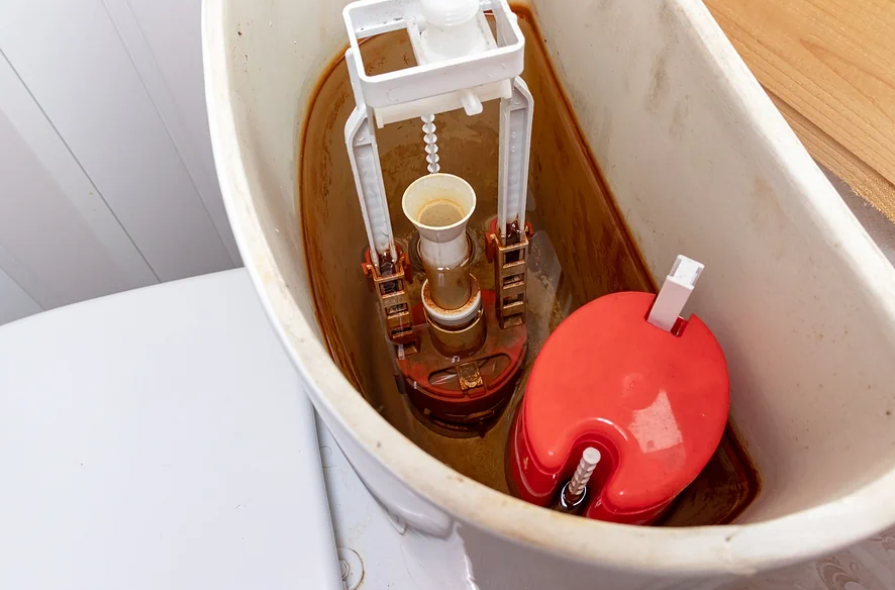
Many of us live in areas with very “hard” water.  How can water be hard?  It’s a way of saying there are a significant amount of minerals in the water, which can leave spots on your appliances, clog your pipes or leave a filmy residue on your hair or skin after showering.  If, despite frequent cleaning, your toilet looks like the following, you probably have hard water! 

Hard water is not necessarily bad for you; after all, many “mineral waters” for consumption capitalize on these very minerals that we are not fond of looking at on our appliances. 

According to the science, “hard” water can be categorized into alkaline (e.g., calcium carbonate CaCO3), non-alkaline (e.g., CaSO4), and silica based, with alkaline being the most common.  This water chemistry will of course affect the ability to prevent scale.  

Since CaCO3 is the most common type of mineral, most findings are delivered as a number that reports the concentration of calcium carbonate or calcium carbonate equivalents for a given unit of water. This result may be expressed in grains per gallon (gpg), parts per million (ppm), or milligrams per liter (mg/L). According to the Water Quality Association, the hardness scale, measured in gpg of calcium carbonate, can be represented as follows:

Less than 1 gpg is considered soft

Between 1 and 3.5 gpg is considered slightly hard

Between 3.5 and 7 gpg is considered moderately hard

Between 7 and 10.5 gpg is considered hard

More than 10.5 gpg is considered very hard

(Source: How is water hardness measured?)

If you want to “soften” your water, there are many solutions ranging from a few dollars to thousands of dollars, and from chemical-free to lots of chemicals.  Obviously, the best would be chemical-free and cheap…but most preferably chemical-free.  Here are 3 proposed solutions to keeping minerals from adhering to the surfaces your water comes in contact with (shower doors, bathtubs, toilets, sinks, etc.).  You can:

  1. Add a true water “softener” into your water source to remove the minerals
  2. Add a slick “film” or coating to the appliances so that the minerals don’t stick.
  3. Change the chemistry of the water so that the minerals don’t stick (EMF, MWT, AMT)

Let’s dig into these to find out which is best for you.  Our first recommendation is to test your water.  There are a lot of water testing kits on the market, some of which have 16-20 functions (a lot of tiny colors on the strip!)  While these are good for getting an overall picture of water quality, if you are interested in hardness, a specific test for hardness has better clarity.  This one by Varify retails for $12 on Amazon.  If your water comes in more on the green side (low minerals), you may need to do more research on the nature of your water “stains” because that result shows it’s actually low in minerals.

If your water shows as moderately to very hard (above 3 grains per gallon), then you might want to do something about it.  Moving on to our 3 proposed solutions:

Water Softeners

Softener systems actually remove minerals such as calcium and magnesium from your water by using an “ion exchange” process. The softener passes incoming water through a bed of resin beads, where minerals are attracted to the beads and softened water flows out of the tank.  Once in a while, the beads must be regenerated by flushing it with a strong solution of sodium chloride (salt) or potassium chloride, causing the minerals to release from the beads.  Then the system is ready to soften water again.   Softeners come in different sizes, for “whole-home” or smaller “appliance” use.  Although the upfront cost is more, the per-gallon cost is typically lower on whole-home systems.  In addition, appliances all over your home, from your coffee maker to your washing machine perform better with softer water.  However, there are disadvantages to using whole-home softeners: they can corrode pipes (it’s not recommended to soften water on very new pipes; you’ll want to wait several weeks to months so that an internal mineral film will develop), it does add a small amount of sodium to your drinking water, and regular testing of the water and maintenance of the softener is necessary to make sure the softener is working properly. (Home Water Softening Frequently Asked Questions)   Since there are many whole home systems available, we chose to review a few systems that soften specific appliances where people see the most impact.

Water softeners also lower the surface tension of water, making it feel “wetter” or “more slippery”.  On a porous surface, having a lower surface tension allows water to penetrate deeper allowing for better cleaning.  The addition of soap or the use of hot water will both lower the surface tension of water… Water softeners function through the process of ion exchange, i.e. exchange calcium and magnesium ions for sodium ions.  The conclusion can be drawn that sodium lowers the surface tension of water while calcium and magnesium ions increase the surface tension…There are other factors that influence the "wetness" or "slippery" feel of soft water including pH and alkalinity.  Typically the higher the alkalinity and pH, the greater the impact of this phenomenon.  This may help to explain why naturally soft water or reverse osmosis water do not have the same "wetness" or "slippery" feel. (The Kinetics and Aesthetics of Soft Water)

Softeners are measured by the number of “grains” they remove before regeneration is needed.  Here’s where you need to know how hard your water is (hence testing is needed!).  For example, if your water is 10 gpg, there are 3 people in your household and since the average person in the US uses about 75 gallons of water per day, that means 10 x 3 x 75 = 2,250 grains per day.  A water softener is usually sized to regenerate about one time per week, so that means a softener of 15,750 grains would work (16,000 grains like this one is ideal for an RV or live-aboard boat).   This article has very good information about the salt efficiency of different softeners, as using a lot of salt to regenerate is not only costly, it’s not good for the environment 

Washing dishes and clothes in hard water doesn’t yield great results.  Just like the inside of the sink or toilet, minerals can build up on your washed clothing over time, making them feel stiff and look dingy. In the dishwasher, minerals deposit on dishes causing spots and incomplete rinses.  “Water softening tablets” are available for use in the laundry or dishwasher and here are some non-toxic brands that work well with hard water:

  • Calgon 4 in 1 Water Softening Tablets, $51, for 75 tablets for laundry washing machine: add 1 tablet with each load of laundry (and use your own detergent).  Mainly composed of polycarboxylates, these tablets prevent minerals from depositing on surfaces and are generally deemed safe for human contact (after rinsing) and the environment.  Therefore, although these are “chemicals”, you can safely add softeners to your dishwasher or laundry:
  • BioKleen Free & Clear Natural Laundry Detergent, $35 for 150 loads, is very low cost for a natural detergent and is said to work well for moderately hard water.  Like many non-toxic detergents, it dissolves and works better in warm water rather than cold.
  • Planet Automatic Free & Clear Dishwasher Pacs, $6 for 20 pacs, is among the lowest cost per load, has transparent ingredients, and is good for hard water according to reviews. 
  • Blueland Dishwasher Detergent Tablet Starter Set, $30 for 60 tablets, do not have wrappers at all and are good for hard water according to reviews.

Shower “filters” are a great idea to prevent the harsh chemicals that municipal water treatment companies employ to keep drinking water safe.  Mostly we’re talking about chlorine and its by-products (see our article about the nasty effects of using too much chlorine).  But most shower filters don’t address hard water (which causes all those spots on your glass shower doors), or iron or sulfur in the water.  However, there are some shower filters that do; you must read the product description carefully to see what is removed.  The first product below is primarily a water softener to remove hard water minerals; the next 2 products are filters with some water softening capabilities.

  • ShowerStick Shower Water Softener, $260: This company has done its homework on water softening and actually allows the customer to do so as well, by providing a water testing kit with their kit. Using the water test weekly will show you when to “regenerate” the resin beads inside, which accomplish the softening.  Depending on how often you use the shower, regeneration may need to be done on a weekly basis.  The company also offers a KDF water filter to remove 95-99% of chlorine and controls the buildup of microorganisms such as bacteria, algae, fungi and mold.
  • PureAction Water Softener Shower Head Filter for Hard Water, $40, is a shower head meant to replace your existing shower head.  It comes with 2 extra filters that are replaceable (the filter cartridge is what removes the minerals and chlorine).  According to reviews, customers with sensitive skin have had good results with this showerhead. 
  • AquaEarth 15 Stage Shower Filter, $30, is an in-line water filter that allows you to add your own shower head.  It lasts approximately 6 months and replacements run about $7.50 each ($30 for a pack of 4).

Coatings that inhibit scale formation

There are a lot of anti-scale coatings available for commercial equipment, but not so many for residential use.  The application of a coating is sometimes not so difficult when a fixture is new (like a new toilet), but doing the necessary cleaning and application in an older fixture can be a lot of work.  In addition, the chemicals that make surfaces slick enough to inhibit scale are often not disclosed.  For example, Spotless Toilet Coating contains 84-94% isopropyl alcohol (for quick drying) and 0.5-1% of a proprietary acid, leaving 5-10% undisclosed ingredients. (MSDS)

Salt-free Water Conditioners

There are a number of water “conditioners” that do not use salt, electricity, or other energy to keep minerals from depositing in your appliances.  Here is a rundown of these technologies:

  • Template-Assisted Crystallization (TAC) uses surface-treated resin beads to convert (not remove) dissolved hardness ions to microscopic scale-resistant crystals. The polymeric beads are fluidized, creating agitation that releases the microscopic crystals and allows for further formation of crystals. Once these crystals are formed and released from the beads, they are insoluble particles that do not form scale on surfaces. In some cases, a fine dust may form on dishes but it can be wiped away. Template-assisted crystallization systems typically require relatively clean water as the input, and may require pretreatment if the water contains high iron and manganese concentrations or other sediment..(Drinking Water Treatment Salt-Free Water “Softener” Options)  Brand names include Aquasana, AO Smith and Pentair-Pelican.
  • Ultrafiltration and Nanofiltration: These processes use very fine filters to remove bacteria, viruses, and some salts from water.  This article by the Safe Drinking Water Foundation shows the different substances these processes can remove. 
  • Reverse Osmosis: These systems work by pushing water through a microscopically small filter material.  This semi-permeable membrane has a pore size of around 0.0001 microns, effectively only allowing the small water molecules through and catching any larger molecules of contaminants, organic materials or even salt. Originally designed to desalinate seawater and reduce high chemical contaminant material such as heavy metals, reverse osmosis is now in use in many government, commercial, military and even residential applications.  It does produce ultra-pure water, but also wastes a lot of water due to back-flushing requirements, and is relatively expensive. (Learn The Pros And Cons Of Reverse Osmosis Water Filtration Systems)

Magnetic Water Treatment, Anti-Scale Magnetic Treatment, Electromagnetic Fields

There’s been a fair amount of studies on AMT (anti-scale magnetic treatment) or MWT (magnetic water treatment) or EMF (Electromagnetic Fields).  Wikipedia states that it is “unproven and unscientific.”  However, EMF has seen a lot of study since 2010, and one meta-study concluded that although different results were reported regarding the influence of EMF in minerals precipitation, the results support the same hypothesis that EMF induce bulk precipitation of crystals rather than adhesion to the surface of reactors, pipes and vessels or to membrane surfaces. If we consider the bulk precipitation enhancement as effective EMF treatment, the percentage of effective EMF cases can reach 95% for the discussed 48 studies, 5% of the studies observed negligible improvement with EMF treatment, none of them has negative results.  This is not “unproven and unscientific.”  

There are two configurations of an EMF device used in water systems: permanent magnet and solenoid coil (uses alternating or direct current).    The efficiency of EMF depends on the properties of the field, including intensity, waveform, and frequency (the field strength varies with the number of coils or the thickness of the wire used), the material of pipe or surface, pH of the water, temperature of the water, residence time (how long the water is exposed to the EMF), and suspended particles (in some cases the presence of suspended particles such as silica is necessary for EMF water treatment to be effective, which can adsorb metal ions and increase bulk precipitation). (EMF meta-study)

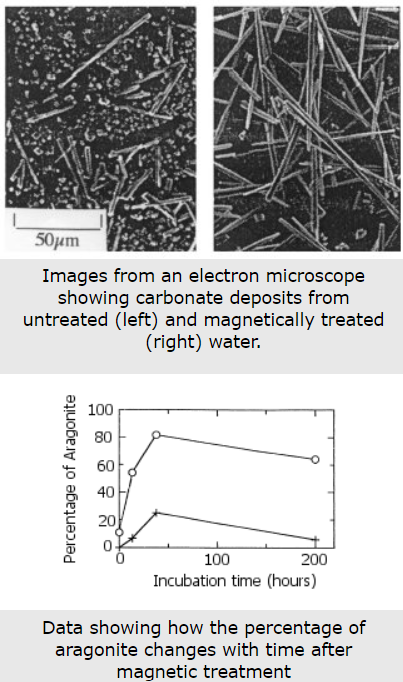
Under ordinary circumstances, the scale forms through heterogeneous nucleation of CaCO3 (calcium carbonate) on the substrate surface. By contrast, when magnetically treated is used, nucleation (formation of crystals at a molecular level) takes place homogeneously in the body of the water, and small disc-shaped crystallites (about 50 #m in diameter and 1 #m thick) are formed.  Initially suspended, these crystallites gradually settle as a sediment at the bottom of the container.  (Magnetic Treatment of Water: A Theoretical Quantum Model)

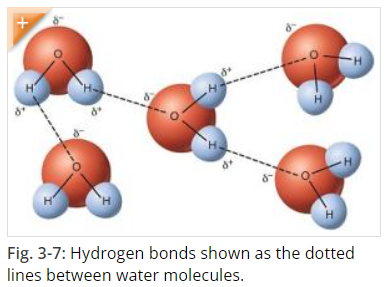
When magnetic water treatment was first patented in 1945 by a Belgian company, there was not a complete understanding of how magnetic fields inhibited scale formation.  Today, however, one theory is presented here:  “Through the efforts of universities and their extensive laboratories, the performance of the magnetic water treatment for scale prevention has moved from being a phenomenon to understanding that the magnetic field creates a hardness crystal called Aragonite. It forms this because a tiny percentage of water is always dissociating – hydrogen (proton) leaving and forming H3O or hydronium – and the energy imparted to the water by the magnet causes the percentage of hydronium to increase dramatically. Water missing the hydrogen reacts differently with calcium bicarbonate (calcium hardness) than does water with full hydrogen in the size, shape, and texture of calcium carbonate crystals formed as evidenced in electron microscope photos. All crystals are void of charge so they won’t adhere to metals, however, the aragonite form is softer and is easily flushed through plumbing. No magic and no mystery. The performance relative to scale prevention is directly proportional to magnetic field strength and speed of water through alternating magnetic fields.” (Magnetic water treatment for scale prevention)

This is similar to the explanation given in a paper from 2000: MWT changes the form of calcium in water. The researchers tested MWT by passing water through a magnetic field of 1000 Gauss (0.1 Tesla).  The samples were then heated in open beakers, forming scale when the water evaporated.  The scale was inspected by X-ray diffraction (which can reveal what it’s made of) and an electron microscope (to view the structure).

The results confirm earlier claims that there are two different types of calcium deposits made: calcite and aragonite.  They are both made of the same stuff (calcium), but form in different structures.  The small beads of calcite tend to make hard scale that clings well to surfaces.  Aragonite forms in longer shapes which are less prone to form hard scale, and keep moving along with the water.  The data they collected also confirms that the effect can last over a period of time, as much as 200 hours.

Source: Magnetic Water Treatment, K&J Magnets, Inc.

In conclusion, if you have calcium carbonate in your water, then MWT may work in preventing some scale buildup.  Since it’s likely that many small magnet systems are not strong enough for the amount of water flow, it’s best to purchase from a company that knows its science (and offers different size magnets/appliances for different size pipes).:

  1. Magnation: this company employs several technologies, not just magnets, into their products.  They have a questionnaire enabling you to find the right product.
  2. ESF scale preventer uses permanent magnets, but you need to install them in-line with the water pipe, which may require a plumber. (contact company for price)
  3. Build your own: Using K&J’s equations, they have calculated the strength of the magnets necessary to do the work, and they sell them!  Basically you just have to measure the diameter of the inlet pipe where you are going to place the magnets, and build a system to place them opposed over the pipe so they don’t fall off or slam into each other.  They offer magnets in strong, stronger and strongest energy.

One more product was tested by one of our team members.  Krazy Klean is a magnet-based product that is placed in the toilet tank to reduce scaling in the toilet bowl, leading to less cleaning and use of chemicals.  In the toilet we tested, it definitely worked.  Old deposits were not removed, but once the bowl was cleaned (see our article here for non-toxic methods), it stayed clean for a month test period (from waste and minerals) with the Krazy Klean device in the tank, whereas it was previously cleaned about 2x per week yet still had waste and mineral residues building up.  The manufacturer advertises "Just drop it in your tank and eliminate scrubbing for an entire decade", however, we promote cleaning your toilet bowl regularly with non-toxic cleaners to reduce germs.  The company provides a report of its scientific testing on its website if you'd like to check out how it works.

Photo by Andres Siimon on Unsplash

How to eliminate many of your cleaning solutions

How to eliminate many of your cleaning solutions

Well, that is a pretty attractive headline, right?   Since the average American family of four can expect to pay at least $680 a year for cleaning products, this is a substantial sum of money.  (Cleaning Supplies Costs: How to Save Money While Keeping Your Home Clean)  How in the world can you get something clean without using a cleaning solution?  Water alone can’t clean a surface, right?

If the water is deionized, it can actually clean without any added solutions.  If it sounds crazy, you just have to check what’s actually in your water to understand.  Normal tap water has minerals such as calcium carbonate (CaCO3) which are left behind when the water evaporates from a surface, leaving water “spots”.  The spots are actually the dissolved solids in the water, which can also be ionic..  Ions are atoms or groups of atoms that have a positive or negative charge.  For the calcium carbonate example, calcium Ca has a positive charge (2+) while the carbonate CO3 (carbon and oxygen atoms) has a negative charge of 2-.  The easiest way to avoid this deposit on your surface (windows, car, etc.) is to remove the minerals from the water. 

Here’s where it may help to understand some water chemistry.

Water, as we know it H2O, is formed of hydrogen and oxygen atoms that “stick” to each other by covalent bonds.  Covalent bonds form when two or more nonmetals combine. For example, both hydrogen and oxygen are nonmetals, and when they combine to make water, they do so by forming covalent bonds. (Covalent Compounds - Formulas and Names)  Hydrogen bonding is responsible for how individual water molecules “stick” to other water molecules, because the hydrogen end of the molecule is attracted to the oxygen of other molecules.  However, because hydrogen bonds are weaker than covalent bonds, in liquid water they form, break, and reform easily.  (Hydrogen Bonds Make Water Sticky)  

Source: Hydrogen Bonds Make Water Sticky

Calcium carbonate, CaCO3, is one of the most common dissolved substances in water.  Calcium has a +2 charge, and is considered a metal, and Carbonate (CO3) has a -2 charge and is a non-metal, and the bond between metals and non-metals is called ionic.  This is a pretty strong bond, and is one of the reasons CaCO3 doesn’t actually dissolve in water.  Because  water molecules act like magnets with positive and negative ends, and both the calcium and carbonate ions have electric charges, there is some electric attraction going on between water and CaCO3.  The calcium ions hang out with the oxygen part of the water, and the carbonate ions cozy up to the hydrogen part.   However, the ionic bond within CaCO3 is stronger than the electric charges between the water and CaCO3 molecules, so the water never really breaks up or “dissolves” the CaCO3. (Is Calcium Carbonate Soluble in Water:Answer and Explanation of Reasons)  It precipitates easily, and can be removed from the water solution by several means: reverse osmosis, which is passing the water through very small filters, or by passing the water through positive and negative beds of resin that attract the CaCO3. When the impurities are removed from water, the electric charges that exist on the “ends” of the pure water molecules are freed up again, and water becomes more “sticky”, enabling it to pick up more dirt than water with CaCO3 or other impurities in it.  This is why deionized water cleans better than water with impurities in it.

The main enemy of water-based cleaning is Total Dissolved Solids, which are those impurities that get left behind when water evaporates, regardless of whether they were truly “dissolved” in the water to begin with. Car enthusiasts, window washers and solar panel cleaners are big fans of DI water.  Why?  It has no dissolved solids, so it leaves no spots or impurities behind when it dries.  Spots are unsightly, and when left to bake onto a car’s finish in the sun, can actually “etch” the clear coat of the car.. Now, many car detailers will wash their cars with normal car-washing liquids and water, but save the DI water for the final rinse.  This conserves DI water, which can be pricey because of the filtration process.  Many professional window cleaners and solar-panel cleaners, however, use it exclusively (no chemicals) with soft brushes, so that the cleaning process from start to finish relies on DI water.  Remember, windows and solar panels are big areas that are continually baked in the sun, so washing them with normal soap and water and then rinsing with DI water can cause the soap to bake on before you even get to the rinse step!  They are also very-high visibility surfaces, and spots on solar panels can translate into big efficiency losses, which are a large reason they are installed to begin with.  

True deionizatIon systems can cost a lot.  For the average person wanting to clean their home with less chemicals however, using deionized water is not out of reach.  It all depends on how you get it and how you use it!

Before we get into home deionization systems, however, you’ll want to understand the difference between distilled water and DI water.  Water distillation is a physical process where the water is boiled and the steam condensed for purification.  Although distilled water has less total dissolved solids than tap water, it’s still not free of impurities like DI water. That said, both deionized water and distilled water are safe for human consumption as long as there are no germs (viruses, bacteria, cysts), which may pass through the deionization process because these are generally not charged (ionized) particles. DI water is also not the same as “softened” water: softened water still has TDS in it and water softeners also do not remove bacteria and viruses.

That said, there are some home systems (like ZeroWater) that can produce deionized water that is safe for consumption and better for cleaning.  Because municipal water systems already employ disinfection systems like chlorination to kill bacteria and viruses, using ZeroWater filters with city water is sanitary AND free from TDS, because the ZeroWater filter removes TDS.  ZeroWater filters are 5-stage filters.  One of the stages is a mixed bed (cation & anion resins) of small sized polymeric beads. Ion exchange is a reversible chemical reaction where dissolved ions are removed from solution and replaced with other ions of the same or similar electrical charge. The cation beads contains hydrogen ions (positive charge). The anion beads contain hydroxide ions (negative charge). The resin works by exchanging contaminant ions in the water with the hydrogen and hydroxide ions.The contaminants attach to the beads while the hydrogen and hydroxide are released into the water. These two ions combine together to produce H2O.  (How does Ion Exchange Technology Work?)

Reverse Osmosis (RO) is another type of system that deionizes water.  There are many different manufacturers of RO systems, and if you have one, you’re probably very satisfied with the quality of water.  RO removes sediment and chlorine from water with a prefilter before it forces water through a semipermeable membrane to remove dissolved solids. After water exits the RO membrane, it passes through a postfilter to polish the drinking water before it enters a dedicated faucet.  RO does not remove some types of bacteria and viruses from the water, though, so this is why it should be used with municipal water or another disinfection mode, like UV light. (What Is a Reverse Osmosis System and How Does It Work?)

Therefore, if you have ZeroWater or RO water, you can test the water for TDS (many come with an included TDS meter) and use it as deionized water for cleaning.  Since filters do have a cost, however, you’ll want to maximize the use of your deionized water.  For example, a 4-pack of ZeroWater filters is $55, which is about 92 cents per gallon of water, whether you use it for drinking or cleaning. Here are our suggestions:

  • Use DI water for spray-bottle applications where you mix your own cleaner (like TotalClean)

  • Use DI water for vacuum mops/steamers so floors get cleaner and look better

  • Use DI water as a “rinse” for areas where water spots are most visible

  • Use DI water for “descaling” modes of small appliances if water is called for (like coffee machines, baby-bottle sterilizers, steam irons and other heated appliances)

Unfortunately, larger-scale DI systems used for washing cars, windows and solar panels can incur substantial cost not only in equipment but in maintenance, as they require replacement of the resin beads periodically as they become fouled with minerals.  Beware of cheap In-line water deionizers like this one, reviewed in this video, however, because they don’t work well in areas of water with high TDS. 

  • CR-Spotless Water Systems - DIC-20, $438, has 2 mixed-bed resin beads, a moveable cart, and a battery-operated TDS meter.  The reservoir should produce 300 gallons of deionized water, so theoretically the 2 replacement cartridges for $139 should give DI water at a cost of 47 cents per gallon.

  • According to this car detailing video, this On The Go dual-bed system, $600, is the best budget system if you plan on using at least 1200 gallons per year.  Now, this is a lot of DI water, but if you like to wash cars, boats, windows, showers, solar panels, etc., this could be realistic for you at about 25 cents per gallon for the refills.

Well…is deionized water a draw for you?  Maybe not, if you don’t have an abundance of cars, boats, etc, but the ZeroWater filter is a nice all-purpose drinking water filter that also provides deionized water for a small amount of spot-free cleaning.  If you have basic home cleaning needs, there are other ways to remove minerals and contaminants from your water.  Check out our article Non-Toxic Ways to Deal with Hard Water for more of them!

Photo by Andres Siimon on Unsplash
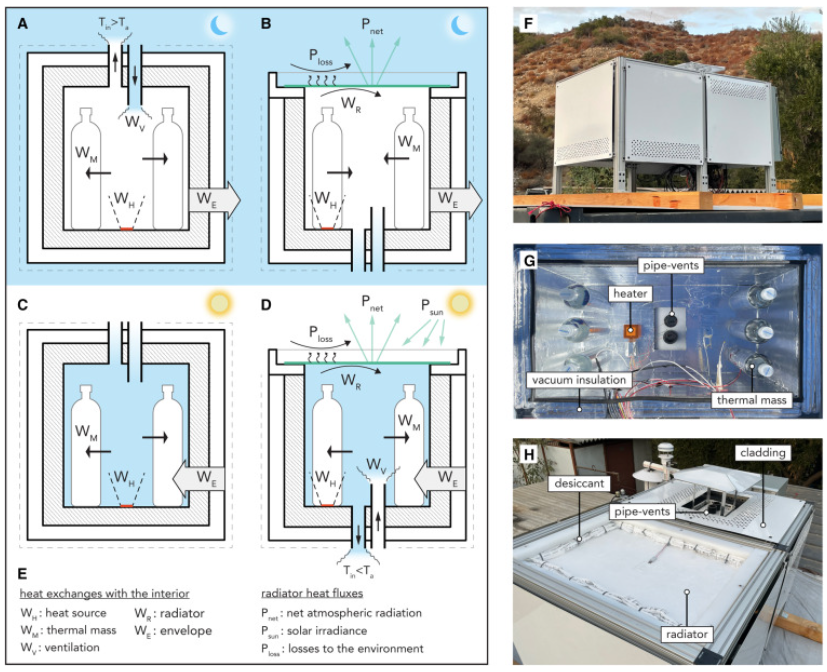
How do water-based vacuums work and are they better than traditional vacuum cleaners?

How do water-based vacuums work and are they better than traditional vacuum cleaners?

Do you like how fresh the air seems after a rainstorm?  Well, that is the effect of the rain “washing” dust and microbes out of the air.  Sure, on a hot summer’s day it’s not long until these contaminants return, but it’s a welcome respite.  It’s nature’s air purifier!

This brings us to the topic of water-based vacuum cleaners.  Mechanically, the suction part of the vacuum (with or without a rotary brush to dislodge dirt) is the same as traditional vacuum cleaners.  However, using water to “filter” dust out of the air stream is the main difference. 

Let’s talk about how filtration using water as a filter is different from filtration using other mechanical means, such as a cyclonic separator or filter.  When a stream of dirty air is filtered by water, the dirt or dust in the air gets wet and heavy, and thus becomes entrained in the water, leaving the air “clean” on exit.  However, most water-based vacuums also use HEPA filters, in order to prevent any remaining dust or dust in water droplets from leaving the machine.   These HEPA filters are designed to get wet, whereas non-water-based vacuums do not have filters that can get wet.  

In traditional vacuums, the incoming dirty air stream usually first passes through a vacuum bag or cyclone, which filters out larger particles of dirt and hair.   In bagless systems, the cyclone uses centrifugal force to “spin” out these large particles so that the user only has to empty a cup of dirt, not replace the bag.  Single-stage or multi-stage cyclones can be employed, where a multi-stage cyclone allows the vacuum to operate longer without losing suction.  After the bag or cyclone, a final filter (this is where the HEPA filter is found if the vacuum has one) filters out any remaining dust in the air stream before exhaust.

The attraction and “wow” factor of water-based vacuums usually lies in the dirty water that you empty from the vacuum after cleaning.  If the floor is cleaned with a traditional vacuum and then with a water-based vacuum, being able to “see” the dirt that’s left behind drives enthusiasm for the water-based vacuum.  No one cuts open the bag from their traditional vacuum after cleaning, so the satisfaction of seeing that dirty water makes one think that water-based vacuums provide superior cleaning power. 

Although we haven’t tested them, we thought we’d share some insight on the most common water-based vacuum brands and what their customers like and dislike about them. 

Rainbow Vacuum Cleaners

You may have heard of or viewed a Rainbow Vacuum Cleaner, the first vacuum to remove dust from its vacuum stream using water.  The manufacturer, RexAir, was formed in the 1920’s and has been improving the Rainbow ever since it was introduced in the 1950’s. (The Original Water-Based Cleaning System)  It relies on a rotating brush to dislodge dirt, and the suction power of the vacuum motor to bring it into the machine, where the filters purify the air before exhaust.  According to product literature, its unique water filtration system captures typical household dirt, while remaining microscopic particles are caught by the HEPA Neutralizer Filtration System. This two-stage filtration combination removes nearly 100% of dirt and contaminants.  The company uses a network of Independent Authorized Rainbow Distributors which demonstrate the product in homes and businesses, so it’s not sold online.  Purchase prices for these units are not published either, however, customers seem to verify that these vacuums are the most expensive on the market.  Devoted Rainbow customers seem to keep their vacuums for 15-20 years, so the price per vacuum may be a very good value.  The units weigh in at about 20 pounds and rely on smooth casters to roll through your home.  Rainbow is “Certified Asthma & Allergy Friendly” and AHAM Certified: The Association of Home Appliance Manufacturers (AHAM) certifies that the Rainbow is a proven air cleaner designed to reduce air pollutants that contribute to poor indoor air quality.  The weight of the E2 model is approximately 40 lbs and comes with an 8 year warranty.

Sirena vacuums ($600-990) are designed and made in Canada.  They can pick up wet or dry messes, and come with an assortment of tools to get into nearly every crevice.  The motor is quite powerful, providing ample suction, and the water reservoir hold 3.5 liters of water maximum, which is quite a lot of water in which to filter out dust and dirt.  It weighs 40 lbs and comes with a 10 year warranty.

Quantum X ($439) is an upright vacuum, meaning you don’t have to drag a canister around with you while you clean.  The power head can extend up to 18”, making it a good competitor to most canister vacuums, and it has a hose for smaller cleaning attachments.  The upright style affords less room for the water compartment, but this also allows it to be more portable.  It weighs 27.1 lbs. 

Kalorik Water Filtration Canister Vacuum Cleaner ($120) is a good budget cleaner made by a Belgian company that has been in business since 1930. Termed the “poor man’s Rainbow” by one reviewer, it’s a great option for those with pets and/or allergies, and it’s a lot lighter at 14.3 lbs.  The suction head does not have a rotating brush, but it has a high/low adjustment, very powerful suction, and picks up wet and dry messes. Without the rotating brush, it’s best suited for hard floors and not carpets.  It has a 1 year warranty.  

These four vacuums all use water as a filter, but are different from cleaners that vacuum and mop at the same time.  I use the CrossWave floor and area rug cleaner by Bissell ($257), which uses water to clean AND filter out dust.  For homes that have no wall-to-wall carpet or a lot of area rugs, these types of upright vacuums are convenient and ideal because they perform two functions at one time–vacuuming and mopping, with good efficiency (check out our article on using these types of vacuums to tackle dust in your home).

In all, many customers (including myself) prefer water-based vacuums over traditional ones because:

  1. You can see the dirt they pull off your floors very readily when you empty the vacuum, which is both satisfying and disgusting.  Whether this is more than the dirt that is captured by traditional vacuums is not measured.

  2. There’s no bag to retain smelly dirt (especially pet hair).  With traditional vacuums, this smelly dirt stays in your home until you replace the bag, and it also expels smelly air every time you vacuum until you replace the bag.  (As a pet owner, I appreciate this!)

  3. There are no bags to purchase and replace! 

  4. They are very good at retaining suction (most work until the suction compartment is completely clogged with debris or pet hair), and restoring suction is very easy to do–empty the compartment!

  5. Many of these models remove wet or dry messes (traditional vacuums can only handle dry dirt). 

  6. Many of these models allow addition of essential oils to the filter water or cleaning water for a fresh scent of your choice, and some, like the Rainbow and Sirena, double as air purifiers.

The “cons” of water-based vacuums are that: 

  1. Of course, water is heavy and more quality construction can make the unit VERY heavy and bulky, to the point of not being mobile enough to clean separate floors in a home if you are physically challenged.  Most water-based models are “cannister” type instead of “upright” in order to more easily and stably move the water around.

  2. Water-based vacuums can be more costly than traditional vacuums.

  3. Some water-based vacuums (like the Bissell CrossWave) require a detergent to enhance cleaning of the floors.  This detergent is an added operating cost and can have toxic ingredients in it (unless you make your own, check out our recipe here). 

  4. If your vacuum uses water to “scrub” and then suck up dirt and debris, water that stays on your floor can temporarily increase humidity in your home, albeit less than regular mopping.  If water is used to clean carpeting, you must be careful that it’s thoroughly dried, and quickly, so that mold doesn’t have a chance to take root.

Do you prefer another type of vacuum that we haven’t discussed?  Let us know!

Photo by No Revisions on Unsplash
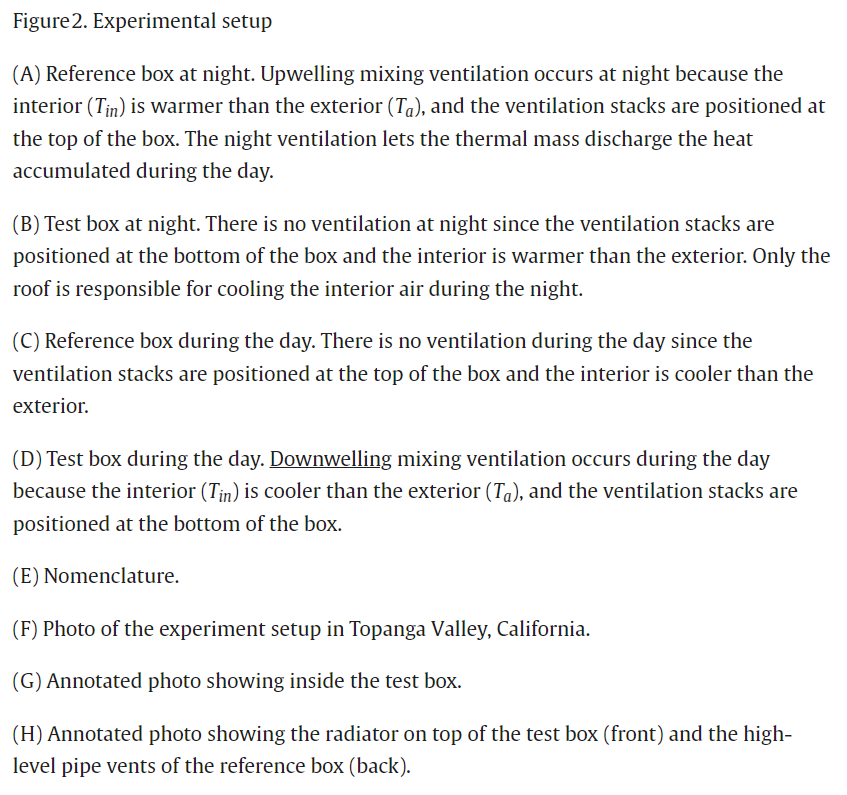
Hidden benefits in the scents of the holidays

Hidden benefits in the scents of the holidays

In the US, you know that winter holidays are coming when pine-scented, cinnamon, clove and peppermint candles and essential oils come out.  Besides giving a fresh, yet cozy scent to your home, each of these have hidden benefits in their chemistry.

Pine oil (which emits a concentrated fragrance due to the terpenes it contains) has many health benefits.  Primarily, the terpenes (which are biogenic volatile organic compounds or BVOCs) are phytoncides. Phytoncides are aromatic compounds from plants which can increase your number and activity of natural killer cells, a type of white blood cell that supports the immune system and is linked with a lower risk of cancer (see our article about why it’s good to take walks in the forest!).  These BVOCS produced by the pine tree include  α-pinene and α-phellandrene, both have which have shown to have anti-inflammatory properties and anti-cancer properties when inhaled and d-limonene and p-cymene phytoncides, which have shown to specifically act against allergic lung inflammation too.  (How Pine Can Benefit Your Respiratory Health)

Hinoki cypress, cedar, oak, pine and spruce are just some of the trees to release phytoncides.  Camphene is a common monoterpene and phytoncide found typically above 10% in many essential oils including white fir, black spruce, hemlock and Engelman spruce. Camphene is noted for its antioxidant and mucolytic properties. It’s similar to camphor; both have a well-known smell that is invigorating and refreshing. (3 Essential Oils High in Terpenes)

Cinnamon scents are synonymous with holiday baking, but did you know that it is also useful in combating mold in your home?  The cinnamon sticks you may be familiar with are actually the inner bark of several types of trees, which are rolled into “quills” and dried.  Cinnamon powder is made by grinding it and cinnamon oil can also be extracted from the bark.  You can use cinnamon essential oil diluted in water to clean small patches of mold and mildew from surfaces, or place it in a diffuser to combat airborne mold spores.  Cinnamon powder can be sprinkled or mopped onto floors to fight mold, or used as a paste to clean surfaces (beware that it can stain however).  Boiling cinnamon sticks in water gives a double benefit; besides making your home smell lovely, the water will become more concentrated with cinnamon liquid, which can be added to your cleaning solutions as well.  Check out this helpful article for more tips on using cinnamon.  Scientists are also exploring use of the leaves; there were 16 compounds found in the active fraction of cinnamon leaf extracts and 3 dominant compounds that are anti-fungal compounds. (Antifungal Activities Of Cinnamon Leaf Extracts Against Sigatoka Fungus (Pseudocercospora Fijiensis))

Growing up, my family used to stick cloves into oranges to make pretty scented holiday decorations. These little sticks actually come from the flower buds of the clove tree, which primarily grows in Indonesia.   Clove oil has so many uses!  It has a strong, earthy smell, which are the BVOCs.  It is antibacterial, antiviral and antifungal, and can be used in throat sprays and oral hygiene, as an analgesic to relieve nerve pain, infused into syrups, honey or vinegar or in a diffuser to reduce airborne mold and microbes.  (5 Health Benefits Of Clove Oil You Need To Know)  It’s also a dermatological fungus-buster: both clove essential oil and its volatile vapor strongly inhibit spore germination and mycelial growth of dermatophytic fungi (fungi that require keratin, a protein in hair, skin and nails, for growth). The volatile vapor of clove essential oil showed fungistatic activity whereas direct application of clove essential oil showed fungicidal activity.  (Antifungal Activity of Clove Essential Oil and its Volatile Vapour Against Dermatophytic Fungi)

Menthol is the monoterpenoid in peppermint that gives that fresh smell and taste. The high menthol content in Peppermint make this essential oil excellent for diffusion and inhalation to reduce congestion and clear the airways. It is one of the best essential oils for colds, flu, bronchitis and asthma, with studies showing that Peppermint oil is rich in compounds that are anti-microbial, antiviral and antibacterial.  It can also help with seasonal allergies, helping to unclog the sinuses and clear pollen out of the nasal passages.  (Peppermint Benefits) Peppermint oil is a key ingredient in many natural pesticides and pest deterrents, because insects hate the smell!  Spray peppermint oil around your home to repel ants, spiders, mosquitoes, roaches, ticks, and even mice.

You can also apply peppermint oil directly on the skin as a natural bug repellant (if you have sensitive skin, you can use a carrier oil).  Peppermint oil is a natural antifungal, antimicrobial, and antiviral. Spray it over countertops, especially in bathrooms, and kitchens. (20 Uses For Peppermint Essential Oil)  Check out this natural floor and surface cleaner using essential oil–my favorite is peppermint oil to give a fresh scent to all surfaces!

  • 1-¾  cups TotalClean Concentrate

  • ⅛ cup rubbing alcohol

  • ⅛ tsp dish soap

  • 5-10 drops essential oil (optional)

These are only some of the hidden benefits of the scents we associate with winter and holidays…you might want to research your other favorites to find new uses for them in your health regime and home!

Hydrogen Peroxide as an Air Cleaner

Hydrogen Peroxide as an Air Cleaner

Hydrogen peroxide has been around for a long time.  The brown bottle you may keep in your bathroom as an antiseptic for treating wounds has many, many more uses!  It was discovered in 1818 by scientist Louis Jacques Thénard as he reacted barium peroxide with nitric acid.  Today, it’s still used medically, as well as in many diverse applications such as launching rockets and satellites into space, or as a more environmentally-friendly alternative to chlorine-based bleaching products in the manufacture of paper.   (Peroxide Power)

Hydrogen peroxide is chemically written as H2O2, meaning it has 2 hydrogen atoms and 2 oxygen atoms.  It is an oxidizing agent, releasing an oxygen atom when it decomposes.  Decomposition happens quickly in the presence of organic matter like microbes or reactive compounds (hence the bubbling fizzing action on wounds or with baking soda), but it will also decompose slowly in storage, which is why it’s sold in those brown bottles to protect it from light and the ambient air.  

Hydrogen peroxide can be used as a disinfectant in appropriate dilutions on surfaces, in laundry, and in the air.   In the air, hydrogen peroxide is safe in concentrations up to 1ppm according to the Occupational Safety and Health Administration (OSHA). Because it’s chemically very similar to water, it can be produced from water and decomposes into water.  Yet as common and beneficial of a substance as it is, bulk hydrogen peroxide is surprisingly hard to produce and transport.  Currently, large quantities of hydrogen peroxide are made through what’s known as the “anthraquinone process.” This method is energy-intense, requires large-scale production, and produces large quantities of carbon dioxide (CO2) as a byproduct. While directly reacting hydrogen and oxygen to make hydrogen peroxide would be ideal, thermodynamics prefers to form the more stable water (H2O) over hydrogen peroxide.  (Producing hydrogen peroxide when, and where, it’s needed)  However, since only a minimal amount of hydrogen peroxide is needed and proven safe to kill microbes in the air, purifiers are now using different technologies to produce “dry” hydrogen peroxide and distribute it for air cleaning.  Here are some examples:

  • Photohydroionization (PHI) is a technology developed by RGF Environmental Group that uses a broad-spectrum, high intensity UV light targeted on a hydrated quad-metallic catalyst. The UV light in conjunction with the catalyst promotes the conversion of naturally occurring water vapor into airborne molecules of hydrogen peroxide (H2O2). These airborne H2O2 molecules revert to oxygen and hydrogen once they have come in contact with a pollutant. (PHI) This company produces standalone and in-duct products.
  • The TADIRAN AIROW technology fractures Oxygen (O2) into two separate “O” molecules by using a discharge current. These “free O” atoms combine with the H2O molecules in the airflow, transforming into hydrogen peroxide (H2O2). The H2O2 is then distributed through the indoor unit of the air conditioner into the conditioned living space. The amount of hydrogen peroxide that Tadiran’s new TADIRAN AIROW releases into the conditioned space is below the safety requirement as determined by OSHA of 1ppm. TADIRAN AIROW has been proven to release less than 7ppb of hydrogen peroxide. (HYDROGEN PEROXIDE TECHNOLOGY FOR INDOOR AIR PURIFICATION)
  • AirROS purifiers utilize and create 7 species of ROS (Reactive Oxygen Species).  The first stage, which occurs inside the device, includes 5 of these ROS (atomic oxygen, singlet oxygen, hydroxyl radicals, superoxide and peroxynitrite), and 2 species (gas-phased H2O2- dry hydrogen peroxide and low concentration levels of O3-ozone) leave the reactor and move into the room for further disinfection.  According to AirROS, “...Dry Hydrogen Peroxide purifiers technology can only provide short-distance surface treatment within the air purifier because of the short life of hydrogen peroxide. If you have a surface not close to the purifier, it will be untreated and left vulnerable to contamination.  AirROS commercial air and surface purifiers offer long-distance surface treatment because of the Trioxidane that forms from O3 and H2O2 combined, which means you can treat any surface, no matter how far away it is from the purifier. As a result, it provides an added layer of protection against surface contamination and eliminates odor effectively.  Trioxidane decomposes very quickly in water but has a half-life of 16 minutes in normal ambient conditions, making it one of the longest lasting hydroxyl radicals. It’s theorized that the human body also produces trioxidane as a powerful oxidant against invading bacteria because the body also produces singlet oxygen and has lots of water, the two ingredients for making trioxidane.  (Trioxidane)
  • AsepticSure Oxidation by Medizone International (UK company) is a system that uses hydrogen peroxide and ozone to clean unmanned rooms. According to EPA registration, personnel must be trained, the room must be sealed, and the ozone generated can have severe effects on certain materials, such as natural rubber and nylon.  The time to disinfect, personnel required to operate the system and limitations (not to be used with contraindicative materials or with life-saving equipment or with personnel in the room), all seem to be quite restrictive, yet the system has been sold to and installed at many medical facilities.
  • A hydrogen peroxide generator composed of a TiO2 catalyst that is activated with UV light was studied in 2022.  The photocatalyst becomes activated by light given off by a nearby UV-A bulb which excites electrons across the bandgap of TiO2, converting water vapor in the air stream passing through the catalyst into H2O2.  The researchers were aware that it is theoretically possible that H2O2, OH radicals, and hydroperoxide radicals can enter an air stream that passes through an operating photocatalytic TiO2 structure. From an indoor air space standpoint, however, only H2O2 will survive long enough to be detected at distances greater than about 1 cm from the photocatalyst. Over time, the H2O2 that has entered the room will either react with organic species within the indoor space or decay naturally into the benign products, water and oxygen. Hydrogen peroxide can last up to 30 minutes, depending on temperature, humidity, and reactive contents in the room.

Limitations of dry hydrogen peroxide include:

  • Position of the unit: position is very important, because dry hydrogen peroxide has relatively high reactivity, which can diminish its effective lifetime. For instance, H2O2 is known to react with metal surfaces such as those provided by the metal ductwork in the bypass duct. As the pathlength between the device and the room becomes longer, the H2O2  concentration could possibly become diminished (due to reactions with the metal ducting) to a point where MS2 inactivation is minimal or no longer even occurs (2022 study Evaluation of a Gaseous Hydrogen Peroxide Generating Device). 
  • Sensitivity: The other product, trioxidane, is a product of ozone and hydrogen peroxide.  Although devices are restricted in ozone output in the US, those who have asthma or other respiratory issues may want to use them with caution. 

Photo by Bill Jelen on Unsplash
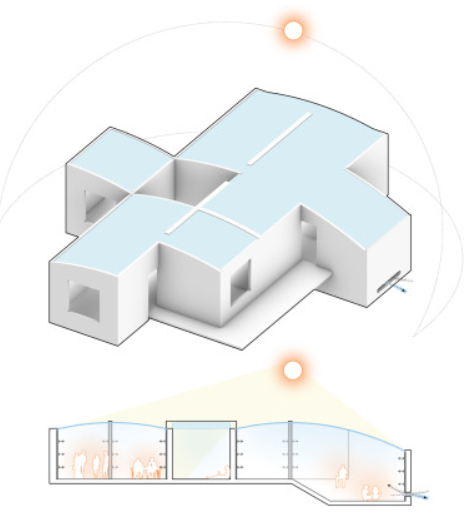
A Clean Way to Update Your Popcorn Ceiling

A Clean Way to Update Your Popcorn Ceiling

Do you have an old ceiling that needs updating?  “Popcorn”, acoustic tile and other types of textured ceilings can become brittle and contribute to bad air quality because they can hold dust and mold spores, as well as fall off in big or small chunks whenever they’re disturbed (think small flying toys, changing light fixtures, cleaning cobwebs or any type of paint touch-up!).  Worst of all, some ceilings installed before/through the 1980s may have asbestos in them (here is a helpful article if you suspect your ceilings may have asbestos).  Refinishing or replacing such a ceiling is a major undertaking that involves removing or covering all the furniture, blocking off the HVAC and doorways, and using personal protective gear to avoid inhaling the dust.  It’s daunting and expensive even for seasoned DIYer’s, and not a realistic option for renters.  

It’s important that homeowners or renters with older popcorn ceilings be aware that ceilings installed before the early 1980s may have asbestos in them. Asbestos is a mineral fiber that occurs in rock and soil (Learn About Asbestos). According to the EPA, most uses of asbestos are not banned; however, it was banned from spray-applied surfacing materials (such as ceiling textures) in 1978. (EPA Actions to Protect the Public from Exposure to Asbestos).  So, it’s unlikely for any ceilings constructed/finished in the late 1980s to have asbestos.  Although professional removal of asbestos-containing materials is best, encapsulation of the ceiling by professional stretch ceiling installers is a (likely less-expensive) alternative. 

Stretch ceilings are a design idea that’s new to the US, but has been more popular in Europe and the Middle East for some time now.  Far from being relegated to the renovation industry, architects even specify them in some designs, and they are ideal for athletic and commercial spaces. 

There are two types of stretch ceilings: fabric or PVC.  Unfortunately, PVC must be heated during installation (usually with propane heat cannons) and it will start to off-gas and continue to off-gas throughout its life (up to 20 years).  (Two Kinds of Stretch Ceilings)  Therefore, in this article we will focus on fabric ceilings, which still have plenty of design choices, colors and aesthetics.  Fabric ceilings from Popcorn Ceiling Solutions are made from 100% knit polyester strands, infused with a water-based polyurethane (PU) coating, which makes them hydrophobic and mildew resistant.  They are VOC-tested and CE-certificated. 

According to stretch ceiling websites, there are many advantages to these installations.  Here are a few:

  • Lighting can be installed under or over stretch fabric ceilings.  Underneath, led lighting installations can be configured as spotlights or tracks in any design, with individual and dimmer controls available.  Traditional flush and pendant lights can be installed through the ceiling so that traditional design aesthetics can be maintained.  

  • Acoustic insulation can be hidden above a stretch ceiling, which is an obvious benefit for schools and athletic buildings to dampen noise.  You can also add it to your apartment or bedroom to get more privacy and peace.

  • Moisture and mildew resistance is a plus for humid environments like bathrooms, athletic facilities and indoor swimming pools. 

  • Many city apartment or condo buildings have concrete ceilings, which have limited lighting and design options.  A stretch ceiling adds many more possibilities.

  • Renters can upgrade their stained, dated ceilings by asking them (or asking permission) to install stretch ceilings. 

  • Stretch ceilings only lower ceilings by inches: the typical installation requires a minimum of 1” clearance, so substantial ceiling height is not compromised.

  • Cleaning with a mild soap and water are all that’s needed if the ceiling becomes soiled.  

  • Most installation companies give warranties that the ceiling will not sag or drop during the warranty period.

  • The fabric may be fire-rated.  According to Popcorn Ceiling Solutions, their fabric has the highest fire rating for building materials and a Class A. Fire and Smoke certificate is available upon request. (Frequently Asked Questions)

  • Multiple designs and colors are available; it’s even possible to paint your own ceiling (however it may void the manufacturer’s warranty). 

  • Stretch ceilings appear even smoother than skim-coated drywall and are completely level.

So, if you have a flaky or unsightly ceiling that may be contributing to bad air quality at home, check into fabric stretch ceiling installers in your area.  Then the ceiling will be one less source of dust and allergies in your home!

Are there any new mold detectors on the market?

Are there any new "mold detectors" on the market?

If you have had a brush with illness-causing mold or suspect that there may be toxic mold growing somewhere in your home, we understand the desire for speedy detection and remediation!  Often, the solution also has to lie within a modest budget.  Traditionally, that demanded a trade-off between Do-It-Yourself (DIY) mold detection versus calling in professionals.  We’ve written about DIY mold test kits and how they work, but what else is available when the mold can’t be seen?  Ian Cull of the Indoor Air Quality Association made a three-part video on how to detect mold in walls, but we tend to advise homeowners NOT to do some of the things he mentions:

  1. We recommend that you DON’T cut a large hole in your drywall with a saw to peek inside.  This presents a number of problems: patching the hole if you don’t find mold, potentially cutting electrical wires or plumbing in the process, and disturbing mold that will be released throughout the home!

  2. We recommend that you DON’T “sniff” around electrical or cable outlets for microbial volatile organic compounds (mVOCs): these are the musty, earthy smells that mold produces when it’s growing. The drawbacks are that there may not be an outlet where there’s mold, and of course, you’re inhaling mVOCs and potentially mold spores and mycotoxins, very deeply into your lungs!  Instead, check out the VOCs and Mold Test option below.

  3. Use a borescope (also called an endoscope or snake camera)–it’s a very small camera that can fit through a very small hole!  Some have mirror attachments that can look at the back side of the drywall.  They used to only be used by professionals, but now are available for under $100.

  4. Looking for moisture: Since mold needs moisture to grow, a moisture meter is a cheap way to see if that moisture is present in the wall.  A more expensive piece of equipment is an infrared camera, which sometimes requires experience to understand what you are seeing.  However, these only find active moisture and mold problems (not if the area has dried out).

  5. Lab-based methods: taking samples of the air in the room. This may cause elevated counts in that room, but it will not pinpoint the source of the mold.  It may also not pick up mold in the wall.

  6. Lab-based methods: taking samples of air within the wall.  This is more specific to the area, however there’s not a threshold and this type of test may give false positives or false negatives.

Besides these (sometimes) destructive methods, we’ve written about blacklights that can show mold or water staining.  Also, using an N-95 mask or equivalent, you could:

  • Carefully remove a baseboard to see if any mold is present at the bottom of the drywall or on the plate (wood stud sitting on top of the floor).  You can also make a hole just above the plate but still under the top of the baseboard, if you want to do any testing in the wall cavity.

  • If you have pocket doors, you can peer into the cavity of the door to check the backside of the drywall. 

  • If there’s carpet in the room, use a pair of pliers to pull the carpet away in a corner to see if there’s mold under the carpet or baseboard.

  • If you have access to the wall from the attic or the crawlspace, you can use a drill to drill through the top or bottom plate and use a borescope to see “into” the wall.  Be sure to use a mask and plug up the hole afterward!

These are fairly standard ways to look for mold in a wall, but here are some new ones that have popped up recently.

VOCs and Mold Test: Because “black mold” like Stachybotrys does not always release a significant amount of spores unless it is disturbed, detecting mold that is enclosed in a wall can be difficult.  However, microbial VOCs (mVOCs) are the gasses given off by mold, they can be more easily detected, and are exactly what this test specializes in.  The sample pump and test tubes are shipped to you with instructions, which are also available in video form on the website.  After sampling, the equipment and tubes are mailed back for analysis. The only difficult part of this test may be complying with keeping the outside doors closed for 24 hours before the test.  It doesn’t detect mycotoxins, but where there’s mVOCs, there also may be mycotoxins.  The real-time version of this type of testing is called zNose, and it’s used in airports and building security, food manufacturing, and many other industries to detect VOCs from trace explosives, chemicals and microbes.

The Healthful Home 5-Minute Mold Test is unique.  The company has a patented way to check for Stachybotrys Chartarum and Penicillium/Aspergillus species using a swab test, which are just two of the most common toxic molds.  The test seems similar to an at-home pregnancy test: use liquid from a swab sample to fill the reservoir on the mold detecting devices, and wait five minutes for the “positive” lines to appear.  The test was reviewed by an actual mold inspector in this video and he found the results concurred with lab testing of the same sample.  However, readings can sometimes be misleading on the at-home test.  It’s a good start…we would like to see more tests like this.

Hire a rescue dog: According to this video, specifically trained dogs are 95% accurate.  They point out the location, and are accurate and faster than other testing.  Dogs that are specifically trained to be mold detectives are used in Canine Mold Detective.  Buddy was the first dog trained in this way, initially trained for a thousand hours in three months, and he continues his training daily with his owner Lacey.

We at HypoAir have not physically reviewed this device, but the BioMatrix Mold Monitor is a unique in that it scans temperature, relative humidity, dew point, absolute humidity, and equilibrium moisture content (EMC), and feeds these into a mold algorithm to determine if the area around it is at a high risk for mold.  The device is activated when the moisture meets one of 3 specialized sensors on the back of the unit, triggering an alarm that will alert you to potential problems. The product is powered by one 9-volt battery, which should last for 3 years (battery not included).  It also comes with a Free Virtual Mold Inspection Service by a team supervised by Industrial Hygienists experienced with mold inspection and remediation. They can perform a virtual walkthrough of the environment by video call and a structural history review to identify the potential mold exposure risks associated with each incident. Once identified, they will be available to answer any questions, provide a suggested course of action, and offer helpful resources. 

Sometime in the future, Unmanned Aerial Vehicles (UAVs or more commonly, drones) could be employed to detect indoor pollution sources.  According to this study, people have begun to try using UAVs to locate indoor gas sources, and it actually could save money: one drone could replace an extensive sensor network.  

For more advanced warning devices for mold, check out our article on leak detectors.  Overgrowth of mold in your home is just too costly in terms of your health and money to repair damages, so it’s worth looking into detectors and safeguards to detect it or its precursor, moisture. 

Photo by Ali Hajian on Unsplash

Increasing Filter Surface Area for Better HVAC Filtration

Increasing Filter Surface Area for Better HVAC Filtration

Lots of customers are jumping on the idea to use their central HVAC as a whole-house air cleaner.  Why not?  It’s a very expensive piece of equipment, it has a fan and an air filter, and it circulates air throughout the house.  The only thing is that you can’t snatch out your 1” MERV 2 filter and throw in a MERV 12 one.  At the least, the unit will protest by whistling, or delayed starts and stops, and at the worst you could cause damage it or cause a fire.  Whoa!  Let’s make the conversion to a whole-house air cleaner SAFELY.

We’ve written another article on how to increase filtration with your HVAC and why it’s dangerous to increase MERV without increasing filter surface area.  Doing this increases the pressure drop, throwing a restriction into the airflow of the system.  Basically, HVAC systems are not designed to have more than 0.25 inches water gage pressure drop over the filter (manufacturers recommend on average a 0.1 inch water gage over the filter), and adding a high MERV filter in the same slot as a low MERV filter will drastically increase the pressure drop.  

Now, you can train that dog to hunt–just put in some extra equipment!  What we’re talking about is more filter surface area.  Here’s a great rule of thumb to keep in mind: when the filter surface area in a system is doubled, the pressure drop over the filters will typically reduce by more than 50 percent. (Duct Dynasty: Confronting Restrictive Air Filters)  Another rule of thumb is to keep the filter face velocity between 200-250 feet per minute.  This allows the air enough time to interact with the filter and effectively remove even fine particles. Here’s a great video explaining the concept; even though the instructor is using an app that HVAC techs use (measureQuick), he explains the filter face velocity concept beautifully.  The difference between his velocity range (250-500 feet per minute) and ours (200-250 feet per minute) is that he’s working with commercial systems, so according to residential IAQ gurus, you’ll want to keep it between 200-250 feet per minute..  

Ok, so I need to add more surface area to my filters–what options do I have?  

  1. Adding another return grille: You can examine the layout of your current HVAC return duct and air handler to see if there is room to add another return grille, where you can place another filter.  This may be the least expensive initial cost, however, over time thicker filters (see next option) may cost less.  In order to calculate the required surface area of the additional filter, start with the cfm of your unit (see our article to determine, and divide it by 1) 200 ft/min and then 2) 250 ft/min.  This will give your max and min surface area in feet squared.  To convert these numbers to square inches, divide by 144.  Then, subtract your current filter’s square inches to get the max and min square inches of the additional filter, and look at common filter sizes to fall in this range.
  2. A thicker filter: although the cross-sectional area of the face of the filter may remain the same, increasing from a 1” to a 4” filter adds a lot more surface area with those deep pleats! They are also called media filters. These thicker filters usually also require less frequent filter replacements. You will want to check the rated cfm and clean filter pressure drop for each model you consider.  Here are some systems that fall into this category:
    1. If you have a 1” filter return filter grille on a wall somewhere, and there is enough room behind it (it doesn’t immediately narrow down), you can substitute a 4-5” thick filter for the 1” filter very easily using this type. See how the lip of the filter is designed to fit in the 1” grille, but you have a lot deeper filter behind it?  Genius!
    2. Again, if you have deep space behind your 1” return grille, you can consider an Electronic Air Cleaner, which can increase MERV with the same surface area.  For example, the Clean Comfort® brand AE14-G Series Electronic Air Cleaner, $600, claims "At rated airflow, the electronic air cleaner achieves a MERV 14 rating. With the fan running on low speed, the air cleaner increases efficiency up to a rating of MERV 16.  The static pressure drop of the electronic air cleaner is as low as 0.16” compared to 0.22" or higher for a typical 1" MERV 8 furnace filter.”
  3. Install a cabinet air filter:
    1. Honeywell F100 Air Cleaners:  At 6.25 inches wide, the cabinet is not super-wide, and it comes in 7 dimensions.  For the 20x25” filter, the cabinet and filter are $168, and replacement filters are $40 each (when buying a 2-pack of MERV 11 filters).  It’s recommended to replace the filter at least every 6 months, so $80 a year for filter changes is not bad!  The clean filter pressure drop is 0.25 inches water gage for 2000 cfm.
    2. Aprilaire also makes a media filter.  Their model 1210 is 20x25” and costs $120.  MERV 11 filters for this unit cost $50 per filter (with a 2-pack).   The clean filter pressure drop is 0.22 inches water gage for 2000 cfm.
    3. IQAir PerfectPro 2025 is a thick filter with nanofibers arranged for “hyperHEPA” filtration. It can drastically reduce the PM2.5 and PM10 in your home, as this test/review found, but the pressure drop at 2000 cfm (5 tons) is 0.32 inches water gage, which is very high!  The price tag is also quite steep at  $1,995.  
    4. Trane CleanEffects Air Cleaner is an electrostatic filter.  It uses ions to charge the incoming air to make particles more “sticky” on the filter.  There are 3 parts to the air cleaner: a prefilter which should be vacuumed every 1-3 months, a field charger (with metal pins that generate ions) that should be cleaned by a technician, and a set of “reusable collection cells” which also get vacuumed by the homeowner.  The pros: CleanEffects has the highest efficiency of particle removal with the lowest pressure drop, it has no filters to “replace”, and it’s Asthma & Allergy Friendly™ certified by the Asthma and Allergy Foundation of America. However, the cost for this device is about $2000 installed, and maintenance (cleaning) is key because its efficiency drops when it gets dirty.  These units are only sold and installed by licensed HVAC technicians.
  4. A “V-Bank” of filters: Instead of placing one filter perpendicular to the air flow, you can get more surface area by adding 2 (or more) filters in the shape of a V.  This device would usually be installed in an HVAC room (it’s not a filter grille for a wall). The only problem with this arrangement is that filter loading is not always even; air (like any fluid) will always seek the lowest pressure/resistance, and at the pointy ends where air becomes compressed, the filter load is lighter.  There are several manufacturers that sell this type of filter arrangement.
    1. IQAir also makes a double-v-bank filter, meaning that it technically has up to 4x the filter surface area of a typical single, perpendicular filter installation (see picture below).  This enables the device to exceed MERV 16, according to independent testing. The PerfectPro X 25x30 is compatible with a 5-ton HVAC system, the price tag is quite steep at  $3,395, but you do get 3 years out of the filters. The pressure drop is similar to other systems at 0.22 in H2O at 2000 cfm. 
    2. For a more economical V-bank filter system, AirScape SFB-V Series are MERV-13 V-Bank inline filter boxes.  However, their largest unit is slightly undersized for our 2000 cfm system above. The SFB-V-16x25 costs about $374 and has a min-max airflow of 1667-2778 cfm, corresponding to 300-500 feet per minute face velocity and 0.12-0.29 pressure drop.  Therefore, we would recommend you stay on the lower side and use this unit only in a 4 ton system (1600 cfm) to keep the face velocity down.

Source: IQAir Whole House Air Purifiers

If you want cleaner air with less filter changes, there are many options out there (we didn't include cabinets by Koch, GeneralAire and others simply because pressure drop information was not available).  You’ll want to take into consideration ease of obtaining (purchasing) the filters, and also placement of the cabinet for ease of changing/cleaning them.  Keeping up with filter changes is a worthwhile, minor chore if it means less dust in the house, less cleaning, and less allergens to potentially infect or annoy your family.  

Photo by frank mckenna on Unsplash

How to get free ventilation without sacrificing heat (or cool)

How to get free ventilation without sacrificing heat (or cool)

Something has piqued my interest for some time: the transfer of heat to make something cooler or warmer than the ambient air without mechanical means.  Living in the hot and humid southeast US, I’m keenly aware that air conditioning is key to my comfort during the summer.  Ventilation is necessary, but ventilation will make my house hot like the outside…or will it?   

I’m going to draw on a 2023 study that showed how to ventilate a building by natural means (no fans) but still cause it to be 7 degrees cooler than the outside, even with an internal heat source.  Whoa!  This is noteworthy.

I’ll give you the simplified version. The study involved placing 2 insulated boxes on the top of a shipping container in a warm, dry climate (Topanga Valley, CA).  The “reference” box had insulation on all 6 sides.  The “test” box had insulation on the four vertical sides and bottom, but for the top had an aluminum plate on which a radiant material was glued.  The only ventilation in each box was 2 PVC pipes.  On the reference box, the ventilation pipes were in the top of the box, while on the test box, they were in the bottom of the box.  Each box contained (4 to 6) 1-liter water bottles for thermal mass, as well as a small heater to simulate lighting, fans and other electrical loads that would be operating in a home.

What happened in these boxes?  The differences of a) removing the insulation from the roof and replacing it with conductive and radiative materials, as well as b) placement of the ventilation pipes, caused a substantial difference in the way the boxes ventilated and their interior temperatures.  Here’s a schematic of the boxes:

In a nutshell, this type of natural ventilation is driven by differences in temperature.  During the day, the reference box did not ventilate because the interior stayed cooler than the exterior.  It only ventilated at night, because with cool desert temperatures at night, the interior was relatively warmer than the exterior.  However, the test box actively ventilated during the day because the cool air in the box sank out through the ventilation pipe on the bottom, and was replaced with warmer air.  However, it stayed cooler than the reference box because the conductive material on the roof (aluminum) drew heat from the inside and the radiative material reflected 93% of solar heat back into space.  Here’s a summary of the benefits of the test box setup:

  • There was a net loss of heat during the day and the night, even with an internal heat source. 

  • Ventilation during the day occurred 7 times per hour (7 ACH).  

Here’s an architectural concept of what a real house could look like:

Other details:

  • The reference box only ventilated at night and the test box only ventilated during the day.  In a real building, however, both ventilation approaches can be combined to produce continuous ventilation, switching between downwelling and upwelling by activating different vents as necessary.
  • The thermal mass inside the boxes had the purpose of modulating heat fluctuations.
  • The insulation used on the boxes was vacuum panels, which are a very effective insulation, albeit an expensive one for residential housing!  
  • Convection shields of metal with a radiative coating were placed over the sides of the boxes to prevent them from absorbing solar heat.  
  • The boxes had no penetrations except for the ventilation pipes, which is not a realistic residential scenario with no windows or doors. 
  • The boxes were tested in a warm dry climate, without humidity/mold concerns.  In a more humid climate, dehumidification would probably be necessary.  
  • Ventilation pipe size and thermal mass would need to be fine-tuned for each home and its occupants. 
  • Removing the roof insulation from a modern home is quite unusual; in fact, a previous version of movable roof panel insulation and radiant covering was key in Harold Hays’ Skytherm innovation. 

Wow, this is really quite fascinating.  Imagine having copious ventilation AND keeping your home cool in the summer.  Windows don’t have to be heat loss/gain devices, either: with new insulation materials coming into existence all the time (there’s a new aerogel made from cellulose that’s even more transparent than glass), or the Parans solar lighting system that captures sunlight and sends it indoors via fiber-optic cables, a super-insulated, light-filled home is possible (with the right budget).  The idea of thermal mass is certainly not new, either; that’s the reason stone and earth have been used in warm-climate homes for millenia!  We also wrote about a new insulation material that uses phase-change to absorb heat without transmitting it into your home.  With the invention of new radiant systems like the SkyCool system, buildings are actively rejecting solar heat and removing heat from inside the building, saving from 15-40% of cooling costs.

Even without the high-tech materials, the main takeaway of this concept is to seal up your home and ventilate naturally: to do this in warm climates it’s best to have the ventilation intakes lower in the house, on the “cool” side.  Also, look into a radiant barrier for your attic space; we give some tips in this article.   Finally, always monitor humidity, no matter the temperature.  No one can live in an ice-box and turn a blind eye to humidity and mold!

Photo by frank mckenna on Unsplash

Why you need a moisture meter (and how to use it!)

Why you need a moisture meter (and how to use it!)

Moisture meters are like thermometers.  When you think, I feel warm…do I have a fever?  You might ask someone else to put their hand on your forehead for a reference check, but if they’re not sure, what you really need is a thermometer to verify your body temperature.  Likewise, sometimes in my own home I see a dark spot on a wall or windowsill that I hadn’t noticed before, and think, is that a water stain or actively leaking water?  I place my fingers or hand on the spot to see if I feel moisture, but if it’s not sopping wet, it’s sometimes hard to tell if there’s any difference with the surrounding material.  What I need is a moisture meter.

Moisture meters work to sense moisture by electrical conductivity.  Since water is more conductive than drywall, wood and many materials (other than metal),it uses this property of water to “detect” the relative moisture.  For this reason, some types of moisture meters are made for gardeners and farmers, to tell when the soil is too dry and plants need to be watered (this type doesn’t even need a battery).  Moisture meters for home inspections, however, come in “pin” and “pinless” varieties.  The “pin” type have sharp pins for actually sticking into the material, while pinless meters–you guessed it–don’t have pins.  This type detects moisture using conductance by either radio frequency or capacitance of a material.  (Evaluating Pinless Moisture Meters Vs. Pin Moisture Meters)  Both have their place in a professional home inspector’s toolbox for different reasons.

Here are some considerations to decide which moisture meter to use:

Accessibility and Damage: Obviously, you can’t insert a pin moisture meter into materials like concrete and tile without damage, so pinless would be the way to go.  Also, if the material is highly visible and/or valuable, you might not want to insert pins into it (even though the holes are small).

Speed: Pinless meters are much faster because you don’t have to stop and insert pins into the material.

Accuracy: Both types of meters can be accurate, but pin meters are preferred by home inspectors (when possible to use them) because pins have the ability to sense deeper into the material, and their readings are very repeatable when inserted into the same holes.  

Adaptability: Pin meters may come with a variety of accessories (types of pins) for different surfaces.  There are hammer electrodes (you guessed it-for hammering them in!), deep wall probes, extension probes and baseboard probes.  

Now that you know the difference, how do you use them?

For those that like videos, here’s a good short one by This Old House.  Here are the takeaways:

  • Thermal cameras can also be used to spot moisture in a wall because of temperature differences, but unless you’re an expert, you should confirm that’s it not simply missing insulation with a moisture meter.
  • When using a moisture meter, good dry material should show between 6-9% moisture.
  • 15% or more indicates a definite water intrusion problem.   You’ll need to consider replacing the material if it’s drywall, or if it’s wood, at least removing it to assess damage, expose the backside and dry it thoroughly.
  • Some meters are “combination” meters that have pins and pinless technologies.

It’s important to know some quirks about using moisture meters.  You can watch a very interesting video (up to about minute 5:50) from a reputable home inspector showing these points, or read them here: 

  • Metal also has low resistance to electricity (high conductivity), so if there’s metal in the surface, like a metal cornerbead in drywall or metal lath behind tile or nails or screws, you can get a reading that looks like moisture when in fact it’s dry; the metal gives a false positive.
  • Moisture meters are not very accurate on tile.  The minerals in the masonry/concrete can give a false positive.  Also, there can be metal flashing under tile, especially behind shower surrounds.  You must use intuition/other tools to find real water intrusion and remediate.
  • Dry dog and especially cat urine will give false positives because the minerals in the urine will permanently alter the composition of the material (drywall, carpet, etc.), causing it to be more conductive and appear "wet" to the meter.
  • Moisture meters only read water, not mold.  Although mold needs moisture to grow, it takes a few days to take root (typically 48 hours for very wet surfaces), so if you catch the moisture soon enough and dry it out quickly, you may not have a mold issue.
  • Moisture meters may give a normal reading (false negative) even though you have mold!  This can happen when the mold is caused by humidity.  A moisture meter will typically not pick up excessive moisture when the mold is caused by condensation.  The condensation occurs only on a very thin layer of the material.  While this is sufficient to cause mold growth, it typically will produce a normal reading on a moisture meter. (Humidity and Mold in Home)

Moisture meters can be used in other situations, too!  It’s nice to know:

  • Is the firewood dry enough to burn well:  It's important to burn only wood with moisture content below 20%. Burning wood with higher moisture content creates more smoke, which contains harmful chemicals and particulates and forms creosote on your chimney. It also gives you less heat, because it takes energy to boil off the excess water. (Storing and Drying Firewood)
  • How dry does a wood surface need to be in order to paint it?  According to an Amazon Technical Bulletin, most outdoor wood, concrete, stucco and plaster surfaces must be at or below 12%, otherwise the paint may not adhere properly, or risks failing early.  Indoor wood and cabinetry should be closer to 6%. 
  • Are your hard wood floors ready to install?  Wood flooring installers typically want the moisture content of hardwood floorboards to be between 6% and 9% (based on an indoor temperature of 60–80° F and 30–50% relative humidity).  (How to Measure Moisture in Hardwood Floors)

Finally, like many other products, the more functions a moisture meter has, the more expensive it’s going to be.  Here are some functions:

  • Ability to “calibrate”: although most cheaper meters do not have a “calibration” function, some have a button to return the device to a factory preset.
  • Ability to choose a very specific material (like concrete, drywall, softwood, hardwood, etc.) Here is a video showing the differences between using a cheap moisture meter and a more expensive one for woodworking.
  • Sensitivity: Instead of soft or hardwoods, some testers allow to select based on a table of listed woods, like this one (more specific for woodworking). 

Here are some devices to consider:

Pinless meters: 

  • Wood Moisture Meter (Pinless-colors), $37, has an LED display screen that looks like an analog meter, with green to red color codes that align with the moisture content.  The pinless moisture meter is penetrates up to 0.75inches deep.  Despite the warning that it’s not recommended for drywall, many customers report using it with success in finding leaks behind drywall before they became too serious.
  • Klein Tools ET140 Pinless Moisture Meter, $42: This rugged meter seems to be very easy to use in selecting the material and verifying the moisture content.

Pin meters:

“Combo” meters:

Reading the reviews on these devices, we’ve seen many homeowners and renters who are able to make quick, informed decisions to call in professional help and get repairs going before serious water damage and mold took root in their homes.  We think it’s an important tool to have in your toolbox whether or not you think you need it right now, because water damage can escalate quickly in hours and days, and the time spent looking or ordering one could be very precious!

Gutters and downspouts: the necessary accessories that move water away from your home

Gutters and downspouts: the necessary accessories that move water away from your home

Gutters just can’t compete with kitchens.  When you save up for those long-awaited home renovations, or even as a part of a new home, gutters usually take a backseat to countertops and appliances.  We get it–spending so much time inside makes you want to beautify the things you see most.  But right now we’re going to bat for those hard-working gutters, because it turns out you’ll probably use them way more than a pot-filler behind your stove.

Unless you live in a desert (and even deserts can have pretty intense flash floods), gutters are the second line of defense (after your roof) against water intrusion.  In conjunction with downspouts, they move water away from your home so it’s less likely to cause damage and rot.   Without them, water falls directly off the roof and lands on the ground next to your home, splashing up and causing the siding to discolor at the very least from erosion, mud and vegetation that gets thrown up, or deteriorate because the water splash is coming from the opposite direction (the ground) than the siding is designed to handle.  In addition, excess water around your home’s foundation can intrude into the basement or crawlspace, causing mold problems that contaminate the home’s air quality.  One family who moved into a home in Hawaii in 2008 became very ill because of mold and myctoxins, and one of the inspection reports of the home revealed the water intrusion problem. “The crawl space had water intrusion, musty mold odor, and visible mold on floor joists. The yard sprinklers were directed towards the house and the eaves did not have rain gutters, permitting the pooling of water. Water entered the crawl space through cement walls and followed piping present in the crawl space. Smoke testing revealed communication between the crawl space and upper level bedrooms via electrical outlets and electrical ducts and plumbing. The conduit holes were not sealed, permitting observance of light coming through spaces in the floor joists. A musty odor was present in the master bathroom and noted to get stronger when the fan coil was turned on.”  The couple, their 2 young children, the family dog, and even a baby born 3 months after moving out of the house, all suffered from the mold growing in the home.  (A Water-Damaged Home and Health of Occupants: A Case Study)  
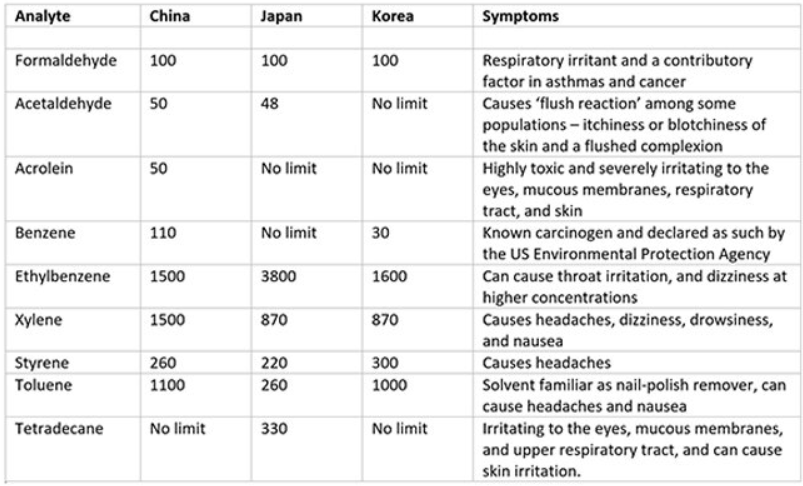
If you’ve got them, clean them regularly!  We’ve all seen gutters that sag or break because a clog in one area or the downspout makes the water back up through the rest of the gutter.  If you don’t remember from science class, water weighs about 8.3 pounds per gallon.   Let’s do a little math here.  If you have 5” K-style gutters (5” is the width), they can hold 1.2 gallons of water per foot.  (The Definitive Guide to Gutter Sizing)  If you have a gutter run on one side of your house of only 20 feet, almost 200 pounds of water (8.3x1.2x20) could be hanging out in your gutters if it becomes clogged!   Chances are, while the water is stopped up there for days or weeks, it’s dripping from seams or holes into the ground, or into the fascia board if the water line is close to the top.  Then, another rainstorm sends water pouring over the side of them, splashing on the side of your home and making it look like you didn’t have gutters at all.  

If your home doesn’t have gutters, you should investigate why.   “We took them down because they were falling down” or “they weren’t there when we moved in” is not an acceptable answer!   You need to examine the reason for their absence, and understand where rainwater is going in their absence.  That said, there are acceptable reasons and alternatives to gutters, and here are some:

Reasons not to have gutters on your home (Are Gutters Necessary?):

  1. Your home is surrounded by concrete that slopes away from the house.  In this case, the falling water still may splash on the siding, but it’s not running back toward the foundation. 

  2. If your home is on a hill that slopes in all directions away from the home, gutters may not be necessary (but splashing will still occur).

  3. Large roof overhangs (the article says 6-10 inches but that’s really not sufficient if the ground doesn’t slope away sufficiently) may preclude gutter installation.

  4. If you live in a very dry area, you may not need gutters.

  5. If you have a flat roof, gutters are not necessary, but certainly you’ll have to make sure the drains from the roof stay clean and well-maintained.

  6. Some historical societies are very strict about gutters, as they weren't commonly installed on residential homes until the mid-1900s.  In this case “built-in” or box gutters conceal the device, and “Yankee gutters” also blend in with the roof so that architectural features like rafter tails are not concealed (check out this article for more information and photos about historic gutters).

Wait, are there alternatives to gutters?  Yes, there are!  Without a gutter up high, some options allow you to bring the maintenance down to ground level. (6 Best Gutter Alternatives for Your Home (2024)):  

  1. Drip paths: Without a gutter, the water runs straight off your roof over the edge.  Without attention to the landscaping, the water hitting the ground will eventually erode the ground, also splashing on the home’s siding.  Drip paths are shallow trenches that run along the base of the home, filled with rocks, bricks, or other materials to help divert excess water away from the foundation, preventing dirt splashback, reducing erosion, and limiting soil saturation.  They are labor-intensive to install (you’ll have to dig down for the trench and bring in the stone or materials to line it) and don’t protect the siding, but they do help to prevent erosion and limit soil saturation.

  2. French drains are similar to drip paths but look better, recycle water, and can expand to the entire yard. They resemble a trench filled with gravel. Underneath the trench is a perforated pipe that funnels water into a designated area.  They often require the assistance of a landscaping company to install because of the labor, getting the slope and destination of the pipe correct, and materials required.  

  3. Yard grading: Many times the turf around Contracting a reputable landscaper will be needed to adjust the slope of your yard to drain water away from the home and its foundation. Yard grading helps with other landscaping problems, such as soggy lawns, puddles, root rot, and uneven turf.  You may have to replant grass and other plants where it’s graded (unless the landscaper can save them), but if you have a large area to grade, their equipment (and expertise) is invaluable.   For a small grading project, check out this video.  

  4. “Underground roof”: An underground roof is a deflecting surface just below grade that slopes away from the building and directs all that roof water away from the foundation. Any impervious sheet material (heavy-duty polyethylene, rubber membrane, rigid insulation) at least 3 feet wide is placed along the foundation about 8 to 12 inches below grade and sloped away from the foundation. (In a cold climate, using rigid foam insulation has the additional benefit of warming the soil, even if just a bit, beneath the insulation and next to the foundation.) Well-draining soil is placed over the sheet material up to grade and covered with a large-diameter topping material, such as pea stone or wood mulch, to break up the falling water and reduce splashback to the building.  A combination French drain/underground roof system is shown here

  5. Rainhandlers: This system is like a louvre that directs water away from your home.  It doesn’t require downspouts, which are unattractive to many homeowners.  They are not supposed to clog with debris.  In gentle rains, the water droplets will fall straight down.  In harder rains, the water is “kicked” out from the rainhandler about 3 feet.  With very intense rains, however, water could pool around your foundation if you don’t have a drain in the ground.  This renovation company prefers gutters over Rainhandlers for this reason. 

  6. Some sources state that a drip edge is an alternative to gutters.  A drip edge is part of a roof, and only keeps the water from going back up under the shingles and rotting wood or forming ice dams.  It’s not really an alternative to gutters, because it doesn’t do anything to keep water away from the foundation. 

  7. Rain chains: These decorative chains are really meant to replace downspouts, as they work with gutters to focus the runoff to one vertical place.  In downpours, they can be overwhelmed and allow erosion of the ground below, if it’s not protected by stone or a large water container.   They also make noise (from the water splashing on the metal), and can become airborne in high winds if they are not of heavy construction. 

If you are installing or replacing gutters, here are some considerations :

  • Just like buying a new heating or cooling system, gutters come in various sizes that relate to your home’s size and roof.  It’s worth doing your own gutter sizing calculations to double-check what the gutter company is offering.  After all, if your new gutters turn out to be under-sized, the foundation, siding and landscaping are all at risk for damage.

  • One reason that gutters are best installed by a professional, is that they need to be adequately sloped.  The slope should be one-half inch for every 10 feet of gutter.

  • Investigate what fasteners will be used.  Fasteners are what supports the gutters on the side of the fascia, and they are very important.  Many experts prefer gutter hangers (they clip inside the gutter and have a long screw that is angled down that is screwed into the end of the rafters) over spikes, which are basically long nails that are driven through the gutters into the fascia.  These screws will not come loose on their own, as spikes tend to do.  (Hangers vs. Spikes: How to Choose the Best Gutter Fastener)  Also, gutter hangers should be installed at least every three feet apart, or closer if you live in an area that receives a lot of snow, because snow and ice, even though snow is less dense, can pile up for feet above your gutter and roof.

  • According to the Building America Solutions Center, downspouts should be placed every 20 feet but not more than 50 feet apart.   After the downspout, you should continue the water channel in lateral pipe, ending at least 5 feet from the house. 

  • Gutter guards, or leaf guards, are perforated pieces of metal, plastic or foam that fit over your gutters to minimize clogging with leaves and debris.  They come in all designs and costs, from a roll of plastic netting (too flimsy in my experience) to plastic coated metal strips that snap into place (much better) to custom-made and installed guards.  LeafFilter and LeafGuard are among the most popular brands.  If you live in a wooded area, these can really extend gutter-cleaning intervals by keeping leaves or needles out of the gutters.  

  • From personal experience:  If you can, get the fascia boards wrapped in metal before installing gutters:  When I supervised the buildout of my parents’ “barndominium” in 2020, I balked at this one.  The porch had already taken longer to construct than I anticipated, and this step seemed unnecessary.  “Just let me prime and paint it”, I argued with the carpenter.  But I relented when he said it would only take 1 day longer and lead to much longer life of the roof.  Four years later, I have to agree.  I’ve been up there cleaning out the gutters several times a year, and despite debris that piles up sometimes, there is no sign of rot on the fascia.  It’s a good decision. 

  • Finally, aesthetics matter!  The style and color of the gutters are important to the looks of your home.  You should definitely read this article before choosing a gutter style and color, it’s packed with photos of good and bad choices.

Investing in gutters or their upkeep is not top-priority to many homeowners, but it should be just as important as making sure you get the right vitamins, because they really are preventing damage to your home and your family’s health!

Photo by Rūta Celma on Unsplash

Keep Air Quality in Mind When Exercising Outdoors

Keep Air Quality in Mind When Exercising Outdoors

When the weather is nice, many people want to shift their exercise from indoors to outdoors.  There are a lot of benefits to it, such as varied surroundings and surfaces, mood-elevating sunshine, and even a greater incentive to stick with it and go farther, whether you’re walking, running or doing more stationary exercises.  However, should a bad air quality report keep you inside?  The answer is: it depends!  The ability to exercise outside depends on a number of factors such as location, timing, and equipment.  A free and easy way to check air quality and receive updates is from airnow.gov. Using an Air Quality Index (AQI) as a measuring tool ranging from 0-500, your local forecast and larger maps can be color coded to show whether an area is good (green), moderate (yellow), unhealthy for sensitive groups (orange), unhealthy (red), very unhealthy (purple), and hazardous (maroon).  You’ll definitely want to keep AQI between 0-50 if you are more sensitive, but healthy and active athletes can keep going in conditions up to 100 with the right equipment (masks–see below).

First of all, here’s what science says.  Sixteen studies completed between 2000 and 2020 on the short-term health effects from exposure to air pollution during outdoor exercise were chosen for review.  Nine of the 16 papers reviewed demonstrated that exercising outdoors in air pollution results in short-term (temporary) health effects, with lung function impairments being the most observed. The seven other papers, which looked at different health effects, such as inflammation and blood pressure, found no effects.   Besides being nearly evenly split, there was another unexpected result: healthy people who did moderate to high intensity exercise outdoors in low or high levels of air pollution experienced less health effects than when doing low-intensity exercise.  Experts had expected to find the opposite: that low-level exercise afforded less adverse health effects.  This seems to show that deep breathing of semi-polluted air does not seem to negate the good effects of exercise.

While exercising is a good thing, those who are older or are unusually sensitive to air pollution should avoid prolonged and intensive exercise or physical activity when the air quality is moderate or higher.   (Should You Exercise Outside in Air Pollution?)  For everyone else, here are some tips to getting your workouts outdoors with the least air pollution.

Location, location, location

When setting goals to exercise outside, it’s important to have location options and check the air quality in each of them.  If you can find a green area like a large park, chances are that it’s going to have better air quality than a track next to the highway.  Coastal routes near water and marshes also are good filters for air pollution.  This is where an AQI map of your area comes in handy, because you can head to the green areas right away!

Timing, timing, timing

Like the weather, air quality changes constantly in many locations.  That run route you wanted to do during rush hour in the morning might be clearer at noon or 2pm, so don’t lose hope!  When you can be flexible, there’s a greater chance of making your favorite routine work.

Duration

If you decide to exercise outside but the air quality is closer to 100 than to 0, consider exercising at a lower intensity or shorter duration.  

Equipment

City- and valley-dwellers admittedly have a harder time finding clean air for exercising outside.  However, masks have evolved and certain kinds are much more comfortable and adaptable for exercise use.  They must fit properly, however, and make a tight seal in order to do their job.  Here are some masks that have good reviews for exercising:

  • Cambridge Mask Company, $33, make masks that are very well-suited for more polluted areas because they have a 3-layer microfilter for particulates, plus a layer of activated carbon, which not only removes smells but also some VOCs and NOx that are troublesome in high-traffic or smoky areas.  The valved mask styles are recommended for high-intensity exercise.  They are washable and reusable for up to 340 hours, which is around 3-6 months’ average wear.

  • Airweave masks by AUSAIR, $30, are very light and have a copper filter that protects from bacteria, viruses, air pollution down to PM0.1, smog, cigarette smoke, bushfire smoke, and pollen.  The copper filters last 20 days each and come in a 3-pack for $18.

  • FuturePPE Mesh Sports Mask with 5-Layer Carbon Activated Filter, $19, blocks airborne particles, dust, and pollution.  It fits snugly and a 12-pack of replacement filters are on sale at $15. 

  • N95 and P100 masks are also sufficient to filter the particles of air pollution, but they don’t actively remove gasses like VOCs and NOx as a mask with activated carbon in it.

  • Particles can also stick to your clothing, so it’s best to launder them every time you come inside after exercising.

When one or more of these conditions don’t align to let you go outside, remember that without active filtering, air pollution eventually also makes its way inside.  Therefore, use that mask indoors or try to find a gym or studio that uses air purifiers.  You may be in the minority wearing a mask indoors, but your lungs, heart and stamina will shine when you can power through a workout without “choking”.  

Photo by Chander R on Unsplash
So you’re in the market for a new car? With or without New Car Smell?

So you’re in the market for a new car?  With or without New Car Smell?

If the idea of driving a new car is appealing, you may need to educate your nose to accept that the new car smell is not a good thing.  Thankfully, many automakers are becoming conscious of the dangers of volatile organic compounds (VOCs) that compose most new car smells, and are taking steps to reduce them.  Not a small driver for this is the new car market of China.  Over 11% of buyers in China complained about the odors they found in their new cars, according to the 2019 JD Power China Initial Quality Study. (The Self-Poisoning Car)  Apparently, Chinese prefer for their new cars to have no smell at all, which makes sense due to their genetics.  Many Asians possess a less functional acetaldehyde dehydrogenase enzyme, which is responsible for breaking this VOC down, therefore they may be especially susceptible to its allergenic effects. 

When you know about what is in the “new car smell”, you might not be too disappointed when it fades away!  Most of the smells are due to VOCs, some toxic ones at worst.   The sources are varied:

  • Residual compounds from the manufacturing process and material treatment of different interior components and textiles.   These include flame retardants (FRs), of which tris(1-chloro-isopropyl) phosphate (TCIPP) had a 99% detection frequency in a 2024 study.  TCIPP was the dominant FR detected in the vehicle seat foam, and air concentrations of this chemical increased with increasing temperature.     
  • Adhesives and carrier solvents that will de-gas – as much as 2kg of adhesive can be found in a modern car, much higher than in the past where mechanical riveting and bolting was more common]
  • Degradation of cabin materials over the longer term as a result of oxidation, ultra-violet light and heat. 

There are no worldwide standards for interior VOCs on new cars, but Asian countries seem to have some of the most well-defined guidelines.  Here are some of them:

Source: The Self-Poisoning Car

Testing VOCs with professional equipment can yield surprising results.  Even in a 1-year old gasoline Hyundai i10 (an economy car produced in India but not sold in the US because it was deemed too lightweight), methanol and acetone rose dramatically as the car stood in the sun for 5 hours, only reaching 68 degrees F.  After the five hour test without the engine on, the car was started, windows rolled up and AC on max with recirculation mode.  This yielded another surprise: some VOCs such as acetaldehyde rose steeply during the fourth to sixth minutes. During this phase acetaldehyde concentrations rose from an initial base of approximately 50 to 550 μg/m3, more than ten times the regulated limit in China and Japan. It was suspected that the air conditioner acted as a “sink” for some VOCs, which was flushing them out during this time.  (The Self-Poisoning Car)

VOCs in cars have even led to a new condition: Sick Car Syndrome (SCS), a phenomenon in which drivers and passengers experience short-term health problems owing to the accumulation of volatile organic compounds (VOCs) in vehicle cabins [1], [2] and is particularly prominent in new rarely used cars. The symptoms of SCS include irritation of the eyes, nose, and throat, headaches, and dizziness, among other symptoms, with potential long-term health consequences.  (Elevated volatile organic compound emissions from coated thermoplastic polyester elastomer in automotive interior parts: Importance of plastic swelling)

Some solutions from automotive material suppliers include: 

  • UK company Aqdot has introduced the product Aqfresh, which is a powder composed of barrel-shaped molecules with a hollow hydrophobic cavity and polar portals, enabling them to tightly bind a wide spectrum of unwanted molecules.  Aqfresh can be applied to textiles via dry impregnation, as well as by spraying and padding during the finishing process.  It can also be incorporated via compounding or polymer masterbatch into rigid plastic parts such as dashboards and other trim pieces.  


  • 3M has developed low VOC adhesive tapes and a water-based spray-on adhesive (no VOCs) that meet the Japanese Automobile Manufacturers Association (JAMA) standards for nine substances with defined limits for vehicle indoor air quality (VIAQ).  
  • POM is an acronym for the chemical name polyoxymethylene. It is generally referred to as polyacetal or acetal resin.  POM has a number of applications in cars where it replaces metal such as door locks, fuel system parts, door rollers, and clips to hold trim in place.  It has properties of durability, oil and chemical resistance, and self-lubrication.  However, traditionally POM was a source of formaldehyde.  Polyplastics has developed a number of grades of POM that are low-VOC in its DURACON® POM LV Series

Although there are some brands that historically have higher customer ratings for interior air quality (like Honda), the last comprehensive survey of new car VOCs was in 2012, and recent reports by individual automakers regarding interior VOCs are very hard to find.  You can definitely call individual manufacturers and inquire about VOCs while shopping, but when it comes down to deciding,it’s best to see/test cars in person:  What you see in a “floor model” may not be what you get in your delivered car, either, since a 2007 study showed that interior VOC emissions varied greatly between makes, models and trims and even within the same make/model/trim.

You can do a lot to rid your car’s interior of most of its VOCs. Here are some tips to do it (How to Get Rid of That New Car Smell (Step by Step))

  • Heat, ventilation, and time are certainly the main ways to offgas a vehicle. You can heat it by putting it in the sun, by running the heating system, or even with space heaters (very carefully in a small space).  When you are heating materials you are releasing the VOCs and also creating new VOCs (this study explains), so make sure when you are heating up the new vehicle you are airing it out substantially at the same time so that the gasses have somewhere to go.  Windows should be open while you are heating the vehicle. Windows can also be left open anytime it’s safe to do so.
  • Deep clean the vehicle with non-toxic products:
    • You can use AFM Carpet Shampoo to deep clean carpets and upholstery; just make sure not to soak these surfaces in order to extract all the water and prevent mold growth.
    • Vacuum frequently with a HEPA vacuum.
    • Wipe down hard surfaces with disposable cleaning cloths so that you can throw them away after picking up dust, which is what many chemicals from the plastic bind to.  TotalClean is a non-toxic cleaner that’s safe for cleaning soft or hard surfaces in the car (again beware of soaking soft surfaces, however, because of the danger of mold and water rings when the material dries.)
    • Use an adsorbent like activated charcoal.  You can cut and place this filter media wherever you want in the car, and even use large pieces of it to cover seats when you’re not using them.  
    • Use an Air Angel all the time; the AHPCO cell is especially good at removing VOCs, and you can use it from your car’s power plugs while driving, or plug it into a wall receptacle via extension cord in your garage.
    • Unfortunately, flame retardants used in the foam parts may continue to off-gas for the life of the parts, so use fresh-air ventilation whenever you are driving and the outside air pollution permits you do so.

If VOCs are not reduced through the heat, ventilation and time method, you can block them using sealants. This really is the last resort, because sealing prevents further offgassing.  AFM makes a number of non-toxic products for this purpose and questions about their best application can be answered by The Green Design Center.

  • Fabric seats and carpet: AFM Lock-Out is sprayed on.
  • Vinyl: AFM Hard Seal is applied in thin coats using a sponge
  • Other Plastic Surfaces: AFM Acrilaq is best applied with a pad applicator in 3 light coats, sanding lightly between coats. .


If you’re used to the good old-fashioned “smells” of just fresh air and sunshine, ditching the new car smell should not be hard for you…hopefully it’s the same for whoever else will be driving your new car.  A final option would be to look for a lightly used car from someone with non-toxic habits–just like the price, the VOCs should also be reduced considerably, and even if it was “professionally cleaned” by a dealership, those cleaning chemicals can be removed using the same steps above.  Goodbye, little air freshener trees, hello fresh air!

Photo by Sarah Brown on Unsplash

Which is a healthier home habitat: the forest or the desert?

Which is a healthier home habitat: the forest or the desert?

Is it more healthy to live in or near a forest or a desert?  Spoiler alert: we’re not going to call that decision.  Each habitat has its advantages and disadvantages, so we’ll explore them to see which one is best for you.

You might think that these two climes are extremely opposite, but they do have (at least) one thing in common: trees!  Granted, there are many more trees in forests, but trees in the desert can accomplish many of the same purposes.  In a 2020 study, one particular type of tree found in Qatar (desert region), Acacia tortilis, was found to be the most efficient tree species for reducing air pollution, having good capacity to intercept storm water runoff, reducing energy consumption and reducing air pollution levels through dry deposition, avoiding further pollution formation and CO2 removal.  Mature trees (with diameter greater than 45 inches) were much more efficient at accomplishing these goals than younger trees (diameter 10 inches). 

According to the US Department of Agriculture (USDA), trees provide many benefits, including the ability to clean our atmospheric environment both directly underneath their canopies, and at a larger, regional scale. Because leaves transpire large amounts of moisture, trees have a cooling effect on the surrounding environment—like air conditioning. By cooling and cleansing the atmosphere, trees help to make air safer for breathing by plants, animals, and humans and have positive benefits on habitat. In fact, air quality underneath a closed tree canopy is often significantly better than above that tree canopy, especially for ozone—a common air pollutant that forms downwind of urban air pollution sources. On a regional scale, forests also scrub ozone and other nitrogen and sulfur-containing air pollutants out of the prevailing winds, protecting more sensitive areas.  Healthy forests with large, widely-spaced trees also protect from wildfire smoke because pines and other fire-adapted trees with their thick, fire retardant bark better resist fire in all but the most extremely hot, dry, and windy conditions.

Interestingly, some trees contribute to ozone production, while others reduce it.  This is because species like black locust, European oak and poplar intensively emit isoprene, which results in higher ozone and PM10 concentrations, while tree species emitting primarily monoterpenes such as beech, magnolia and wayfaring trees yield less of both.  (Impact of vegetative emissions on urban ozone and biogenic secondary organic aerosol: Box model study for Berlin, Germany)

Another common denominator between forests and deserts is animals–whether they are domesticated or wild, contact with animals is more frequent in remote areas than in urban areas.  There is also much research that shows how exposure to animals benefits us.  In one study, the researchers recruited 2 groups of young men:  20 young men who were raised for the first 15 years of life on farms with farm animals, and a second group of 20 young men who were raised for the first 15 years of life in a city of over 100,000 people, without daily exposure to pets. Both groups were then given Trier Social Stress Test (TSST), a model of acute psychosocial stress in humans. The results revealed that those who grew up in cities without daily exposure to pets, and thus lacked exposure to diverse microbial environments during childhood, responded to psychosocial stress with exaggerated inflammation markers,  (Less immune activation following social stress in rural vs. urban participants raised with regular or no animal contact, respectively)

Now, let’s talk about some specifics of each habitat.

Deserts

Although the stereotypical desert is hot, dry and sandy, only one of these words accurately describes every desert (dry).  Most experts agree that a desert is an area of land that receives no more than 25 centimeters (10 inches) of precipitation a year. The amount of evaporation in a desert often greatly exceeds the annual rainfall. Surprisingly, areas near water can actually be deserts, because humidity in the air doesn’t predict or cause rainfall.  The Atacama Desert, on the Pacific shores of Chile, is a coastal desert. Some areas of the Atacama are often covered by fog. But the region can go decades without rainfall. In fact, the Atacama Desert is the driest place on Earth, and some weather stations in the Atacama have never recorded a drop of rain.  (Desert)

Low humidity is obviously a benefit to keeping mold from growing on outdoor or indoor surfaces, if air conditioning is not needed.  Dryness would lead some to believe that mold could not be a problem in the desert.  However, mold spores are present everywhere, and lack of home maintenance can allow even a small amount of rainfall to turn into a mold disaster.  Mold can start growing undetected in attics, crawlspaces and walls during one of the infrequent rains, and can turn into a big problem whenever it is disturbed, such as during renovation or further deterioration.  If air conditioning is used, it can generate mold problems when moist air (like from cooking or showering) hits cold air, or around the surfaces where cold condensate is produced.   

Low humidity also means little to no mosquitoes and many other biting insects.  Low pollution (when the wind is not kicking up dust) and warm weather can also be a positive for those who suffer from breathing problems like asthma.  

One problem of low humidity is its effects on the human body (see our article).  Dehydration can become evident in dry skin, hair and nails, respiratory system and through your whole body, affecting every major system.  In addition, static electricity builds up in your clothing and furniture, which can hurt and damage electronics.  Finally, dry air allows pathogens to stay afloat in the air for longer periods of time.  

Most deserts have very little cloud cover and thus a lot of sunshine.  This, for sure has its benefits and drawbacks; it can be the cure for Seasonal Affective Disorder (SAD) but also present higher risk for skin and eye damage and cancer.  Exposure to UV sunlight was associated with lower systolic blood pressure (the first number in a blood pressure reading) regardless of the temperature. (Could sunshine lower blood pressure? Study offers enlightenment)  In addition, sunlight assists your body in making vitamin D, which strengthens bones, and sunlight promotes collagen production in your connective tissue, which helps you move quickly. (7 Health Benefits of Living in the Desert)

The purifying power of sunlight should not be underestimated.  Those who live in or near the desert can use the UV rays of sunlight to purify water, their laundry, and anything else they can bring outside for a good “freshening”. 

One important disadvantage to desert life is dust.  In fact, you don’t have to live in the desert to suffer from the effect of desert dust, because dust from deserts can be transported on the wind and even injected into the troposphere, allowing it to travel great distances (such as across the Atlantic Ocean in the case of Saharan dust).  Dust clouds at surface levels bring particulate matter, coarse and fine, worsening air quality and posing respiratory or even cardiovascular risks.(What is desert dust and how does it change atmosphere and the air we breathe?)  The danger of dust presents in two different ways: size of the particles and content of the particles.  Particles that are approximately between 2.5 to 10 microns (PM10) are inhalable, but can be trapped and cleared from the upper respiratory tract.  Particles less than 2.5 microns (PM2.5) can lung alveoli, entering the blood stream where they cause systemic harm to other organs in the human body. (A Retrospective Cohort Study of Military Deployment and Postdeployment Medical Encounters for Respiratory Conditions)  Especially concerning is the class of particles less than 1.0microns (PM1.0), which are sure to enter directly into the bloodstream and may also cross the blood-brain barrier.  The toxic content of dust can be pathogens such as bacteria, including some that carry respiratory diseases (Characterization of Bacteria on Aerosols From Dust Events in Dakar, Senegal, West Africa), and most importantly, a fungus Coccidioides which causes Valley Fever.  It can also be bioreactive metals such as copper, chromium, nickel, lead and zinc, as well as pesticides, herbicides, radioactive particulates and aerosolized sewage (yuck!!). (Desert dust storms carry human-made toxic pollutants, and the health risk extends indoors)

Increased heat and low humidity also tends to decrease the number of negative ions in the air.  Elevated negative air ion levels are widely reported to have beneficial effects on humans including enhanced feeling of relaxation, and reduced tiredness, stress levels, irritability, depression, and tenseness. Depleted ion levels and enhanced positive ion levels are reported to have no effect, or deleterious effects. (Air Ion Effects

The study of how gasses in the earth’s atmosphere react with each other is very complex.  For example, it’s been shown that desert soil releases nitrogen species gasses into the air.  The release of NOx from desert soil and subsequent effective oxidation in the atmosphere indicates that the desert ecosystem is an important area for ozone production. This has been manifested by higher ozone in the desert air than the regional background from many observations (Güsten et al., 1996; Hoffer et al., 1982).  (Active Nitrogen Cycle Driven by Solar Radiation in Clean Desert Air)  Thus, higher levels of ozone in the desert could make it unhealthy for sensitive individuals.  These could become particularly high after rains, when microbes in the soil emit N2O (nitrous oxide, also known as laughing gas).  (Following rain, desert microbes exhale potent greenhouse gas)  In addition, it’s been shown that “stratospheric intrusions” (ozone-rich air descending from the stratosphere during spring storms) can also capture ozone created by pollution from Asia as they descend and transport it to desert areas of the southwest.  Particularly in the area of Las Vegas, these can create short episodes of high ozone that exceed federal air quality standards without factoring in local pollution.  (Background ozone burdens Las Vegas’ air quality in spring)

The other side of the coin is that in some areas of the world (like Atacama and Sechura deserts in Chile and Peru), dust from deserts can contain significant iodine, which actually destroys ozone.  (Iodine in Desert Dust Destroys Ozone)  Therefore, the mineral makeup of the soil in deserts is very important in characterizing what’s in the air. 

Living in/near the Forest

Forest bathing” is a Japanese term that emerged during the 1980’s as an antidote to tech burnout: it’s being calm and quiet amongst the trees, observing nature around you whilst breathing deeply can help both adults and children de-stress and boost health and wellbeing in a natural way. (How to start forest bathing)  If you regularly spend quiet time in the outdoors, perhaps you are already aware of its benefits: lower blood pressure, heart rate, and levels of harmful hormones like cortisol.  (Forest bathing: What it is and why you should try it)

What is in the air of forests?

Phytoncides are aromatic compounds from plants which can increase your number and activity of natural killer cells, a type of white blood cell that supports the immune system and is linked with a lower risk of cancer. These cells are also believed to be important in fighting infections and inflammation, a common marker of disease.  In one study, researchers found that people who took a long walk through a forest for two days in a row increased their natural killer cells by 50% and the activity of these cells by 56%. Those activity levels also remained 23% higher than usual for the month following those walks. (Why Spring Is the Perfect Time to Take Your Workout Outdoors)

Hinoki cypress, cedar, oak, pine and spruce are just some of the trees to release phytoncides (aromatic compounds), which include alpha-pinene and d-limonene.  Although these are actually VOCs, they are termed biogenic VOCs (BVOCs) because they are naturally made, unlike chemical VOCs that are manufactured.  Pinene and limonene are monoterpenes, which global annual emissions amount to 330–480 million tons. When visiting a forest, monoterpene VOCs such as limonene and pinene are mainly absorbed through inhalation, their blood levels rapidly rise after exposure, and they are mostly eliminated unchanged both in exhaled air and in the urine.  The tree composition can markedly influence the concentration of specific VOCs in the forest air.  Although essential oils do contain BVOCs, not all BVOCs are present in essential oils, and some molecules included in essential oils are not part of the BVOC molecular suite but are rather artifacts of distillation. (Forest Volatile Organic Compounds and Their Effects on Human Health: A State-of-the-Art Review)

Some other benefits of forest living are:

  • Humidity: in moderate amounts, humidity is good for the skin and respiratory system, 

  • Cooling effect: trees cool air through evapotranspiration. As trees transpire, they release water into the atmosphere through their leaves. As the water changes state from liquid to vapor, the surrounding air is cooled, similar to how we sweat.

  • Particulate matter capture: Forests can improve public health greatly by catching dust, ash, pollen and smoke on their leaves, keeping it out of our lungs.

  • Trees are sinks for other harmful pollutants, such as nitrogen oxides, ammonia and ozone, which can all cause respiratory problems from repeated exposure. (The Important Relationship between Forests and Air)

  • Healthy forest air includes bacteria, fungal spores, plant and animal particles and pollen, which may have good and bad effects.  Good effects of exposure to these include desensitization to allergies (exposure therapy), and certain bacteria, like Mycobacterium vaccae (a bacteria strain that lives in soil), which can stimulate serotonin production, and can make you feel relaxed and happier, as well as reduce inflammatory responses to stress. According to Dr. Christopher Lowry, “Surprisingly, when adults engage in soil-mixing activities for ten minutes with soil that is ‘spiked’ with M. vaccae ATCC 15483, there is a rapid alteration in brain activity within the occipital cortex and alteration in the plasma metabolome, relative to soil that is not spiked with M. vaccae ATCC 15483 [35]; this suggests that exposures to mycobacteria not only have long-term immunoregulatory effects but also alter physiology and neurophysiology within minutes. Perhaps we all really should spend more time playing in the dirt.” 

  • Ions: That “fresh air” feeling in the forest also comes from higher than normal presence of ions.  Negative air ions (NAIs) are an important indicator of air quality, and are significant for the evaluation of air conditions. In a 2020 study of a scenic area in China, negative air ions were present in forested areas  approximately 3.2-3.4 times over the numbers in open areas or the lake.  (For more information on the cleansing power of ions, read our post here!)

And the cons of forest living: 

  • Humidity: many forests are high in humidity, which can promote mold growth.  Without dehumidification in a home, it would be difficult to live in many forested areas because of mold growth. 

  • Radon: Trees are sources, sinks, and conduits for gas exchange between the atmosphere and soil, so radon, a product of uranium decay in the soil, is naturally expired by trees along with other gasses.  Although radon accumulation in homes through their foundation (the rocks and soil below the foundation) is most concerning, emission of radon by trees will cause a forest to have a higher level of radon than unforested areas, because radon is approximately 7.5 times heavier than air, so that living in or near the forest may increase the ambient level of radon outside the home depending on winds.  There are two units of measurement for radon, picocuries per liter, and becquerels per cubic meter.  According to a 2015 study in Brazil, radon concentrations as high as 40 kBq/m3 (40,000 Bq/m3) were found in a national forest.  The EPA recommends that homeowners take action to lower radon levels in their homes if there is a level above 2 pCi/L.  Since one pCi/L is equivalent to 37 Bq/m3, the measurement in the Brazilian forest showed 1,081 pCi/L, or 250 times the upper limit of radon recommended by the EPA!  Thus, the study rightly inferred that “the results indicated considerable radon hazard for human occupation in the neighborhood.”

Overall, the desert and the forest are two vastly different climates, yet each have potential for healthy lifestyles for those who can live further away from urban areas.   From forest bathing to hiking to biking, there are plenty of ways that each environment offers us to connect with nature and take in its natural health benefits. 

Enjoy Your Favorite Scents and (Effortlessly) Reap the Benefits!

Enjoy Your Favorite Scents and (Effortlessly) Reap the Benefits!

You might have said this of different tasks in your life, that you can “do it while sleeping”, meaning that you don’t have to use much conscious thought to do them.   Well, here’s a literally simple way to boost cognitive capacity and avoid dementia-related diseases: plug in an essential oil diffuser before you go to sleep!  

Previously, a 2009 study showed that olfactory enrichment (the daily exposure to multiple odorants) could improve both memory and neurogenesis (the formation of new neurons) in the mouse brain. In addition, novelty was the critical element in this kind of stimulation, as exposure to odorant mixtures did not produce these changes, while exposure to multiple odorants individually did.  

When some COVID-19 patients began to lose sense of smell, researchers tested subjects and found that MRI scans from individuals both pre-infection and post-infection have revealed neural deterioration that resembles a decade of aging in brain regions that receive olfactory-system projections.  Because olfactory loss precedes or accompanies cognitive decline in dementia-related diseases like Alzheimer’s and Parkinson’s diseases, researchers hypothesized that easy and affordable intervention to prevent cognitive decline could be using scents.

In a study, 20 participants (the Enriched Group) between ages 60 to 85 were given a diffuser and 7 essential oil odorants (rose, orange, eucalyptus, lemon, peppermint, rosemary, and lavender) in identical glass vials that each fit into the diffuser. They were asked to turn on the diffuser when they went to bed, and the odorant was released into the air during the night for 2 h when they first went to sleep. They rotated through the different odorants each night, continuing at home for 6 months. Twenty-three individuals in the control group also were provided with an odorant diffuser, and they followed the same regimen as the olfactory enrichment participants, however they were provided with bottles that contained distilled water with an undetectable amount of odorant added. 

The results showed a 226% difference between enriched and control older adults in performance on the Rey Auditory Verbal Learning Test (RAVLT). This test evaluates verbal learning and memory, including proactive interference, retroactive interference, delayed recall, retention, and recognition memory.  (Overnight olfactory enrichment using an odorant diffuser improves memory and modifies the uncinate fasciculus in older adults)

Before and after MRIs also showed that parts of the brain that receive input from the olfactory system, specifically the uncinate fasciculus, are modified by olfactory enrichment.  The researchers found a moderate increase in the mean diffusivity (MD) of the left uncinate fasciculus in the enriched group compared to controls, which correlates to increased integrity of that specific brain pathway.

What does this mean for the average senior?  Olfactory stimulation (smelling different scents) can be an important way to avoid dementia-causing diseases, and the cost of a programmable essential oil diffuser and a variety of different oils is not prohibitively expensive.  Here are a few options:

Best of all, this method is not hard to do; basically, with a little preparation, you can “do it while sleeping”! 

Photo by Kelly Sikkema on Unsplash

Keeping safe when using supplemental heat

Keeping safe when using supplemental heat

When the weather turns chilly, sometimes your main heat source doesn’t heat quickly or completely, or it’s expensive to run, and you may turn to supplemental heaters for a quick way to warm up.  Supplemental heating sources like radiators, space heaters, and fireplaces are alternative options to simply turning up the heat in your home or installing a new, main heating system.  However, they have limitations and safety considerations you should note!

Portable space heaters

Type

Pros

Cons

Ceramic

  • Heats whole space, not limited to line-of-sight

  • Lightweight

  • Because it’s convection heat, it usually requires a fan to direct the heat

  • Can dry out the air excessively

  • Lose heat due to convection (heating air instead of objects)

  • May take longer to heat 

Infrared/ Quartz

  • Great for small, open spaces

  • Cost depends on which power source it uses: electric or gas (natural or propane).

  • Quickly heats due to direct transfer of radiant heat

  • More efficient than ceramic heaters (over 90% efficiency)

  • Must be in line-of-sight of the heater to feel warmth

  • Not good for large spaces

Oil-filled Radiator (electric)

  • Quiet!  Fans are not necessary in these models.  

  • Modern versions have features like programmable timers and adjustable thermostats. 

  • Radiant heat is very comfortable and continues even after the heater is turned off.

  • Surfaces become hot and may endanger children and pets.

  • These type of heaters may take longer to heat up a room initially.

  • They are heavy but most are equipped with casters for portability.

Kerosene

  • Kerosene stores well for long periods so it can be a good emergency heater for power outages.

  • Inexpensive

  • Quiet because no fans are needed

  • Can heat larger spaces like garages

  • Because it burns fuel liquid inside your home, you must take abundant safety precautions around flammable furnishings, children and pets.

  • Combustion byproducts mean that carbon monoxide monitors must ALWAYS be used, and room should be ventilated adequately (possibly losing heat).

  • They’re illegal to use indoors in MA and possibly other states

  • They produce water vapor, which can cause excess humidity

  • Kerosene can emit significant particulate pollutants, especially if burners/wicks are not kept clean

Sometimes the permanent heating system in your home is undersized and it can’t heat the whole home adequately.  In other cases, if you have a gas furnace, propane or natural gas can become relatively expensive!  In these cases, permanent supplemental heating (the installation of a heater in one part of the home) can help. 

Permanent Supplemental Heating

Type

Pros

Cons

Electric Radiators or wall-mounted heaters

  • Provides steady heat with minimal safety issues

  • Unobtrusive because they are located on or near a wall

  • Can consume a lot of electricity during prolonged cold spells

Electric Heat Pump Mini-Split

  • Heat pumps are more efficient for larger spaces than portable electric heaters

  • Heater can be sized to the space very easily

  • Air handler portion is mounted on a wall, out of the way

  • Can be regulated with a programmable thermostat

  • Units typically heat and cool, making them very versatile

  • Long life

  • May also include an electric coil for emergency backup heating

  • More expensive initial investment than portable heaters

  • Requires exterior space for the heat pump

Wood heating systems

  • Wood burning fireplaces are attractive

  • Very economical if you have the ability to cut and haul wood

  • Fireplaces do not require power

  • Wood pellet stoves produce very little ash, burn cleanly and easy to operate

  • Long-lasting

  • Sealed fireplace inserts increase heat efficiency while decreasing emissions

  • Professional installation is recommended

  • Wood pellet stoves require electricity to operate the fan and feeder motor

  • Flues must be cleaned at least annually to prevent fire risk

  • Carbon monoxide monitors must ALWAYS be used and it’s a good idea to monitor for CO2 and NOx

  • Unsealed fireplaces always have risks of dangerous smoke and embers coming out of the firebox into your living space

Vented

Gas Fireplace or heater

  • Gas fireplaces are attractive and vented models are readily available

  • Can work when the power is off but are more efficient when using the fan to disperse heat

  • Environmentally friendly

  • Professional installation is recommended for any permanent combustion heater

  • Requires a nearby gas line

  • Carbon monoxide monitors must ALWAYS be used and it’s a good idea to monitor for CO2 and NOx

Unvented

Propane or Natural Gas Heater

  • Very efficient and inexpensive

  • Available with safety features such as oxygen depletion sensor (ODS) that immediately shuts down the blue flame heater if carbon monoxide or lack of oxygen is detected

  • Can work when power is off but are more efficient when using the fan to disperse heat

  • Broad choice of unvented models; however read the precautions below

  • Professional installation is recommended for any permanent combustion heater

  • Requires a nearby gas line

  • Lack of venting required does not mean lack of air pollution.  NO2 and CO2 levels can become relatively high if ventilation is not used.

  • Combustion byproducts mean that carbon monoxide monitors must ALWAYS be used, and room should be ventilated adequately (possibly losing heat)

  • Should not be left burning when the room is unattended

We want you to be knowledgeable about and avoid air quality poisons that are created just by heating your home with a combustion unit!  According to a Japanese study of propane, kerosene and electric space heaters used in a non-ventilated, 215 ft2 room:

  • concentrations of NO2 and CO2 from all the heaters except the electric heater exceeded the 1-hr Environmental Quality Standards (NO2: 0.04-0.06 ppm) and the Building Sanitation Management Standards (BSMS, CO2: 1,000 ppm).  

  • The CO concentration emitted from reflection kerosene and natural gas heaters slightly exceeded the BSMS (10 ppm). 

  • The concentrations of suspended particulate matter and polynuclear aromatic hydrocarbons showed an increasing tendency during the use of kerosene-fueled heaters. 

In a study of kerosene heaters, NOx, CO2 and CO are the main gaseous pollutants emitted by kerosene space heaters. In addition, carbonyl compounds (formaldehyde, acetaldehyde, acetone) were identified, as well as ∼50 other VOCs, six of which presenting a risk for human health (1,3-butadiene, benzene, ethylene, propene, isobutene and acetylene). There is an accumulation of soot on wick heaters after a few hours of operation, which causes incomplete combustion that increases CO emissions, (CO poisonings are frequent with kerosene heater use). Therefore, the recommendation with any combustion gas heater is to ventilate profusely, or go with a vented heater model.  This article on BuildingGreen.com concurs that we should avoid unvented gas heaters. 

Photo by Jessica Johnston on Unsplash

“Sleeper” bacteria spores are like mold spores

“Sleeper” bacteria spores are like mold spores

One of the unsavory facts about mold is its ability to lie dormant when food and moisture sources dry up, until conditions allow it to “bloom” again.  Scientists are finding out that there are other microbes that exhibit this same behavior, necessitating finding new ways to detect their presence.  

One of these is Acinetobacter Baumannii.  This superbug is usually present in wet environments, such as soil and mud, ponds, wetlands, wastewater, fish farms and seawater.  Healthy people can also carry the Acinetobacter bacteria on their skin, particularly if they work in a healthcare setting. It can survive for a long time on dry surfaces, making it difficult to eliminate. (Acinetobacter: What to know)  

Scientists have recently discovered a new state of “life” of this bacteria.  When living conditions become too stressful, many bacteria enter a dormant state that is almost death-like, showing no metabolic activity. These are known as spores. 

Acinetobacter baumannii can alternatively form special cells which are in a kind of deep sleep. Although these cells still show signs of life and breathe, it is no longer possible to cultivate them on culture media in Petri dishes. "We know this state from cholera bacteria, for example; it is referred to as the viable but non-culturable (VBNC) state," explains Professor Volker Müller of Goethe University Frankfurt.  (The deep slumber of a hospital pathogen: Why infections with Acinetobacter baumannii can flare up again and again)

As of the study date (September 2023), scientists have kept the acinetobacter in VBNC state for 11 months, and are still able to “wake them up” after 2 days of “rehab” with special nutrients and oxygen.  No end is in sight for the length of time these bacteria can hibernate.  

The danger is that courses of normal antibiotics and culture procedures (on a plate) can yield negative culture results, which would indicate that a patient is clear of such dangerous microbes.  However, VBNC cells can be hiding in nooks and crannies of the body, waiting to resurge when stress or antibiotics are removed  Tests like PCR (Polymerase Chain Reaction) can be used to detect VBNC cells because they identify specific genes that cause virulence and predict antibiotic resistance, but it’s probable that these are not used in smaller hospitals currently.

Acinetobacter Baumannii is not the only bacteria with “sleeper” capabilities; dormancy or persistence is just a “state” that many bacteria can occupy.  Mycobacterium smegmatis, which is related to the bacteria that causes pneumonia, was studied in 2013 and discovered that “persister” bacteria continued to divide and die even during antibiotic treatment so that the total number of bacteria stayed approximately the same.  The fact that the cells weren’t classically “dormant” but still continued to divide, makes them technically “dynamically resistant” to antibiotics, while other microbes use other techniques to evade death and can be labeled “tolerant, latent, indifferent, dormant and non-multiplying”.  (Sleeper cells – the secret lives of invincible bacteria) However, it all comes back to their ability to survive antibiotics, which is dangerous for us!

Here is some recent literature on other “sleeper cells”

Since persistent bacteria are difficult to kill with traditional antibiotics, scientists are pursuing several strategies to take them out.  One is to find ways to wake all of them up, so that they are easy to kill with accessible drugs.  The second is to discover what genes or proteins allow them to stay alive in sleep mode.  Some of these “upregulate” cell functions (like scavenging for iron), and some of them downregulate cell functions (like digestive functions).  A third tactic would be to look for drugs that kill the sleeper cells, not just active ones.  

To the layman, all this sounds like poking into a hibernating bear’s den with different sticks until you find one of the right length poking in the right place, and having the best gun or trap ready for when he wakes up!  The sad fact is that people regularly suffer from hosting these persistent bacteria in their bodies and we sincerely hope that scientists can find the right triggers in labs to find the combination of methods to help patients who need it.

Bacteria, mold and other microbes also populate our homes in the form of spores, persisting for years until the right moisture AND nutrients come along.  Although there is no “silver bullet” like an antibiotic to remove them completely, we can use the same principles to keep the population under control so that our bodies don’t suffer!

  • Clean regularly with non-toxic ingredients.  The less dust and dirt we allow to accumulate in our homes, the less microbe spores are lying around.  Check out our article on Tackling Dust in Your Home.

  • The FDA states that over-the-counter antibacterial hand soaps don’t protect us from disease any better than regular soap and water.  The cleansing action happens in the thorough agitation of soap and water over hands, and a good rinse with water.  Many “antibacterial” soaps also contain ingredients, like triclosan, which can be harmful to us over time.  

  • Since you can’t easily scrub and rinse items like your countertop or toilet seat with soap and water, however, different solutions need to be employed there.  Sure, you can get antibacterial cleaning sprays, but the same concerns apply: are they safe long-term?  Instead, opt for cleaners that are non-toxic and are less likely to create antibiotic resistance.  We’ve recommended the following cleaners for these reasons:

    • Our all-purpose, non-toxic cleaner TotalClean combines both copper and iodine, and when they are combined, they produce peroxide!  In simple terms, the peroxide acts as an “oxidizing agent”, destroying the means for bacteria to take in oxygen and suffocating them.  

    • The Honest Company Disinfecting Spray also uses hydrogen peroxide to clean, disinfect, and deodorize while meeting EPA’s criteria for products effective against SARS-CoV-2 and a laundry list of other germs.

    • Because hypochlorous acid is an oxidant, it leaves nothing behind for bacteria and viruses to create resistance to and therefore does not contribute to the superbug (multidrug-resistant organisms) dilemma.(The Role of Hypochlorous Acid in Managing Wounds: Reduction in Antibiotic Usage)   Hypochlorous is not bleach; in fact, it’s superior to bleach.  Some hypochlorous cleaners include Force of Nature and Clean Republic’s All Purpose Cleaner.

  • Of course, change your HVAC filter regularly so that spores do not find their way to your air handler’s evaporator coil, where moisture can allow them to reactivate.  We’ve got some great filters with activated carbon and MERV 10-14 ratings (for more on MERV, check out our article HVAC filter changes are vital to your indoor air quality

  • The technology in our bipolar ionizers like our Germ Defender, Upgraded Air Angel Mobile and Whole Home Polar Ionizer has been tested against bacteria such as E. coli, MRSA and C. diff (see test results here), so why not add them to your non-toxic cleaning arsenal as a passive way to keep the spores under control? 

There’s a lot about the microscopic world of bacteria and mold that we don’t know, and obsessing over it doesn’t help much!  Thankfully, there are quite a few ways to keep safe using non-toxic products and methods that are tried and true. 

Photo by CDC on Unsplash

Mold Spores, Endospores and Exospores…what are the differences?

Mold Spores, Endospores and Exospores…what are the differences?

I think most of us are familiar with spores that mold produces, which act similarly to dandelion seeds that can be carried off by air currents to relocate and start growing new “plants” elsewhere.  However, there are similar terms using the word “spore” in the bacteria world that don’t always mean the same thing!   Here’s some explanation to clear things up.  

First of all, it’s good to get refreshed regarding the two major classes of bacteria,  “Gram-negative” and “Gram-positive”.  These classes are based on a test developed by scientist Christian Gram in 1884, which differentiates the bacteria using a purple stain.   According to webmd.com, bacteria either have a hard, outer shell, or a thick, mesh-like membrane called peptidoglycan.  The hard outer shell will resist the purple stain, and show up as a red color.  These are called “gram negative” because the purple stain did not show.  Bacteria with the peptidoglycan absorb the purple stain much more easily and are called “gram positive”.  Here is a diagram showing the differences in the cell walls between these two types:

Source: Difference Between Gram-Positive and Gram-Negative Bacteria

These differences in cell structure cause gram-positive bacteria to release toxins that are different from gram-negative bacteria, as we explained in our article What are Endotoxins and Exotoxins and where do they come from?

Here is a diagram from that article that’s helpful:

Source: Differences Between Exotoxins and Endotoxins

Here’s where it gets confusing, however, because the “Exo-” prefix associated with gram-positive bacteria, and “Endo-” with gram-negative bacteria only applies to their toxins.  Moving on to spores, bacterial “spores” usually refers to endospores, endospores are usually associated with gram-positive bacteria, and endospores aren’t formed the same way that mold spores are.  Let’s look at endospores first…  

Endospores are not tiny little “seeds” released by a gram-positive bacteria.  Instead, they are a hardened shell that forms inside a bacterial cell when it starts to sense that resources (food and water) are drying up.  This little endospore with its essential life-code inside is then left when the original bacterial cell dies, and the endospore is tough-as-nails while waiting for a better environment  to allow it to flourish and multiply again.  One author describes them as being harder than Bruce Willis to kill (in the movie Die Hard, of course)!   (Endotoxins or Endospores?)  Endospores exhibit no signs of life, however when the environment returns to a favorable state for bacterial growth the bacterial endospore will germinate and return to a normal state.  (What are Bacterial Endospores?)  So, unlike mold spores of which one mold cell can make thousands of spores, if not millions, only one gram-positive bacteria makes one endospore.  The tough outer layer of an endospore is actually called an exosporium, which makes it a little bit more confusing.

Exospores are more similar to mold spores and they are a form of bacterial reproduction.  Exospores are produced by the members of the phylum Actinobacteria (Actinomyces, Streptomyces, etc).  They form outside the bacterial wall and are released by “budding” when they separate from the bacterial wall.  Exospores are also resistant to destruction and do not show signs of life until their environments have sufficient water and nutrients for them to grow.  Here is a diagram showing the difference between endospores and exospores:

Source: Difference Between Endospore and Exospore

Here are some similarities between Endospores and Exospores:

  • Endospore and Exospore both spores are produced under unfavorable environmental conditions.

  • Endospore and Exospore both are unicellular and have a resistant structure.

  • The process of making spores in both types of known as sporulation.

  • Endospores and Exospores both are reproductive cells.

Now that we know WHAT they are, what is the danger of spore-forming bacteria?  Bacterial spores may be in the quiescent state for dozens or hundreds of years but after they appear in the favorable conditions of a human or animal organism, they turn into vegetative forms causing an infectious process. We wrote about these in our article “‘Sleeper’ bacteria spores are like mold spores”.  The greatest threat among the pathogenic spore-forming bacteria is posed by the bacterial agents of anthrax (B. anthracis), food toxicoinfection (B. cereus), pseudomembranous colitis (C. difficile), botulism (C. botulinum), and gas gangrene (C. perfringens). (Learning from Nature: Bacterial Spores as a Target for Current Technologies in Medicine (Review)

Endospores literally work inside our immune system to accomplish their deadly mission.  In the example of illness caused by anthrax, when these endospores are inhaled by a human or animal host, they are engulfed by macrophages and dendrite cells, which are immune cells that circulate in the lymphatic system.  Spores transition from endospores to active bacteria inside the phagocytes and dendrite cells, multiply, and produce toxins. In the lymph nodes, immune cell death takes place with subsequent bacterial invasion to the blood flow, active proliferation, and toxin production which mediates clinical manifestations of the infection, resulting in lethal outcome.  (Learning from Nature: Bacterial Spores as a Target for Current Technologies in Medicine (Review))  Sadly, animals like cows and sheep are also susceptible to anthrax, especially when grazing land is dry and the soil can be inhaled as dust, because these endospores are found naturally in the soil.  This was the case in Australia in February 2024 when 10 beef cattle died of anthrax poisoning and a similar number of sheep died from anthrax poisoning in 2023.

How do you get rid of Endospores and Exospores?

Endospores are one of the most resistant specialized dormant cells, being able to resist high temperature (up to 100 °C), ionizing radiation, chemical solvents and detergents.   Mature exospores produced by Streptomyces are more resistant to desiccation, low temperature and osmotic changes (changes in permeability) than vegetative (living) cells. However, they are less resistant to heat and desiccation than endospores.  (Multiple roads lead to Rome: unique morphology and chemistry of endospores, exospores, myxospores, cysts and akinetes in bacteria)  Killing endospores, then, represents the most difficult task.  Autoclaves for cleaning medical equipment are set to run at the proper time, pressure and temperature. Using an exposure time of at least 15 minutes and 15 PSI at 121 celsius usually kills endospores on durable medical equipment.  For entire rooms, however, sporicides are used at preset times (like biweekly or monthly).  (Endotoxins or Endospores?) Sporicides can be composed of toxic chemicals like phenol (a mutagen, which is a potential cancer risk); this is the chemical used in the popular Sporicidin Disinfectant Solution.  However, less harmful chemicals like Hydrogen Peroxide and Acetic Acid are also used.  The combination of those two compounds is Peroxyacetic Acid (PAA). Acetic acid is also known as vinegar and has that acidic smell; PAA also has a vinegar smell so that personal protective equipment like masks, goggles and gloves may be required to use them.  The majority of sporicides on the EPA’s Registered Antimicrobial Products Effective Against C. diff Spores [List K] are sodium hypochlorite (bleach).  Bleach is definitely something you want to avoid bringing into your home.    

There is a very non-toxic product on this endospore-killing list, however: hypochlorous acid.  Even though it sounds toxic and it’s related to bleach (which is sodium hypochlorite), hypochlorous acid is much safer as well as being a far superior disinfectant to bleach.  One of the most fundamental reasons for this is its pH. Hypochlorous acid exists at a near-neutral pH (5-7). Bleach resides at a highly-alkaline pH (8-13). The germ-killing properties of bleach are derived from the presence of hypochlorous acid. However, because of its high pH, the majority of the hypochlorous acid present in bleach ends up getting converted to hypochlorite, which is a less effective disinfectant.  (Hypochlorous acid versus bleach: What's the difference?)

Other strategies to killing endospores are mentioned in this paper according to the part of the endospore they target; here are some interesting ones:

  • “Germinate to eradicate” involves tricking the endospore into reviving and then killing the vegetative cells, because the vegetative cells are easier to kill.  Triggers for spore germination include temperatures close to 37°C (98.6°F, sound familiar?), making water available to “rehydrate” the cell through its bacterial cell walls, and the availability of nutrients.  (Why Are Bacterial Spores Hard To Sterilize?)   However, warm water and gloppy nutrients are not at all suitable for your home’s surfaces!

  • Alcohols and aldehydes like ethanol and gluteraldehyde can work against the inner membrane of the endospore, but glutaraldehyde (0.5%) can irritate nasal passages and eyes, as well as severely burn skin. 

  • Enzymes like proteases can degrade the “coat” of the endospore and even induce germination, so that it is easier to kill. (Enzyme-driven bacillus spore coat degradation leading to spore killing)

  • Dodecylamine, a yellow liquid with an ammonia like odor, kills spores of all species that have been tested, including Bacillus species and C. diff.; however, it’s toxic to humans and animals. 

The most important thing about killing spores is to make sure they are dead, or if they are not, to make sure they are damaged beyond being able to reproduce!   Unfortunately, only a lab can determine whether endospores are present (PCR test, by re-animating them, or using a special green staining technique), so don’t “guess” whether a DIY solution has taken care of them.  Using a non-toxic product from the EPA’s list K (like hypochlorous acid) and making sure you give it ample “residence time” (ie. read the usage instructions and don’t mop it up right away) will ensure that you don’t suffer from those tough endospores re-animating in your home or body.    Here are some additional tips:

  • Clean regularly with non-toxic ingredients.  The less dust and dirt we allow to accumulate in our homes, the less microbe spores are lying around.  Check out our article on Tackling Dust in Your Home.

  • The FDA states that over-the-counter antibacterial hand soaps don’t protect us from disease any better than regular soap and water.  The cleansing action happens in the thorough agitation of soap and water over hands, and a good rinse with water.  Many “antibacterial” soaps also contain ingredients, like triclosan, which can be harmful to us over time.  

  • Since you can’t easily scrub and rinse items like your countertop or toilet seat with soap and water, however, different solutions need to be employed there.  Sure, you can get antibacterial cleaning sprays, but the same concerns apply: are they safe long-term?  Instead, opt for cleaners that are non-toxic and are less likely to create antibiotic resistance.  We’ve recommended the following cleaners for these reasons:

    • Because hypochlorous acid is an oxidant, it leaves nothing behind for bacteria and viruses to create resistance to and therefore does not contribute to the superbug (multidrug-resistant organisms) dilemma.(The Role of Hypochlorous Acid in Managing Wounds: Reduction in Antibiotic Usage)   Hypochlorous is not bleach; in fact, it’s superior to bleach.  Some hypochlorous cleaners include Force of Nature and CleanSmart Daily Surface Cleaner

      • Our all-purpose, non-toxic cleaner TotalClean combines both copper and iodine, and when they are combined, they produce peroxide!  In simple terms, the peroxide acts as an “oxidizing agent”, destroying the means for bacteria to take in oxygen and suffocating them.  

  • Of course, change your HVAC filter regularly so that spores do not find their way to your air handler’s evaporator coil, where moisture can allow them to reactivate.  We’ve got some great filters with activated carbon and MERV 10-14 ratings (for more on MERV, check out our article HVAC filter changes are vital to your indoor air quality

  • The technology in our bipolar ionizers like our Germ Defender, Upgraded Air Angel Mobile and Whole Home Polar Ionizer has been tested against bacteria such as E. coli, MRSA and C. diff (see test results here), so why not add them to your non-toxic cleaning arsenal as a passive way to keep the spores under control? 

Photo by CDC on Unsplash

Enter your text here...

How do emergency shelters get fresh air?

How do emergency shelters get fresh air?

If you must go into an emergency shelter, then you can bet that conditions outside are not good, whether it’s a natural disaster, war or safety from criminal activity. You can store many supplies such as food and water for staying in a shelter, but without clean air, survival will only be minutes instead of days, weeks or months!  There are a number of things that air and ventilation systems need to accomplish for shelters:

  1. Providing a positive pressure at all times so that contaminated air from leaks or outside sources does not enter the shelter.

  2. Filtering out contaminants such as nuclear, biological, chemical (NBC) or smoke toxins. 

  3. When the shelter must be completely closed up due to bad air quality outside, two things must happen: 

    1. Removing carbon dioxide (CO2) byproducts of the people residing in the shelter.

    2. Providing supplemental oxygen to replace the oxygen depleted by residents

Let’s go through these in order.  When the shelter is not being used or only tested during good external conditions, then its ventilation system can operate like your home system: bring in outside air, send it through filter(s) to remove dust and normal microbes like mold and bacteria, and keep a slight “overpressure” of 0.3 inches of water so that leaks in the shelter’s walls and doors will only cause air to move out, never in.  The exhaust “vents” are really one-way valves that only let air go out, so that air coming in is controlled.  They also protect residents of the shelter from any explosive “blast” of pressure and debris.  For this reason, they are called overpressure blast valves.   

The flow of fresh air should be similar to what is required at home: according to US standards, that is 0.35 air changes per hour (ACH) or 5 cubic feet per minute per person, whichever is greater (5 cfm is the specified minimum required by the US military, whereas 15 cfm is the recommended supply for ventilation in residential and commercial buildings).  That said, 5 cfm is usually the design criteria to remove the moisture and carbon dioxide (CO2) that shelter residents exhale, and make them feel comfortable.  The air intake must be protected from water and animal intrusion and sufficiently distant from the exhaust (overpressure blast valve) so that used air is not recycled through the shelter.  Routing airflow through the shelter ensures that the exhaust is in the airlock (the chamber where residents enter and exit) so that any outdoor contamination is flushed out with the positive air pressure.

NBC filtration (or as the military defines it CBRN: Chemical, Biological, Radiological, and Nuclear) requires unique filter material.  Pre-filters are used to keep dust and particulates out of the airstream, and then activated carbon impregnated with specific minerals is used to adsorb gasses that may be emitted during disasters or wars.  For example, the activated carbon may be mixed or “doped” with potassium permanganate, potassium iodide, or magnesium dioxide or copper dioxide (see our article on what these materials remove from air). These are not typical systems used in home ventilation, as the activated carbon must be in sufficient purity and quantity to allow filtration for a number of days until outside air clears.

In the event that outside air is heavily contaminated, the ventilation system will need to be completely sealed off and the shelter will operate more like a submarine, where supplemental oxygen is added and CO2 is removed.  The atmosphere needs to be maintained close to ambient outdoor air, at 19.5% oxygen and less than 0.2% (2000 ppb) CO2, and that’s a complex task when humans are using oxygen and expelling CO2 every minute!  It’s good in this case to use the same two principals we introduced in our article on submarines: use good instruments to measure the air quality and have redundant systems to ensure that each function is maintained in case of system failure.  In well-planned shelters, it’s common to have the following instruments: thermometer, humidity meter, differential pressure gauge (to maintain 0.3” water overpressure), smoke alarm, low oxygen detector, carbon monoxide alarm, carbon dioxide alarm, and a radon meter. (NBC Air Filtration Systems)

Although NBC filtration systems can be expensive, systems for adding oxygen and removing CO2 are even more expensive and complex.  Here are some ways that military and professional systems do it (Air Supply Principles in Isolated Shelters & Chambers):

Supplemental Oxygen is available in three different methods:  

  1. Oxygen can be stored in a gas form under pressure or as liquid oxygen in cylinders, and released from these tanks when needed.

  2. Oxygen generators can separate oxygen from compressed air stored in the tanks, or even generate oxygen from electrolysis of water (passing an electric current through it).

  3. Oxygen “candles”, also called chlorate candles, are a very hot-burning cylindrical candle that actually puts out oxygen instead of consuming it.  

Removal of CO2 requires even more chemistry. On average, each person produces 1 kg of CO2 per day, and buildup of CO2 in the air is lethal (see our article on CO2 levels).  Therefore one or more of the following systems is needed:

  1. CO2 scrubbers use a soda lime or lithium hydroxide material to remove CO2 from the airstream, but they produce a lot of moisture and heat and require space for storage of filters and material, which could be prohibitive for smaller bunkers.

  2. Regenerative carbon-dioxide removal systems use a solid amine material and are advantageous in terms of space required, but have a high energy consumption and are costly to install.  

Since air supply is one of, if not the most, critical aspects of a shelter, these systems are best designed and installed by professionals who have experience.  In the survival shelter industry, NBC filter systems made by Israeli and European (Finnish and Swiss) companies differ significantly from those made in the US and UK.  The former systems are more robust, with significantly better materials, engineering and more generous carbon supply than others.  (NBC Air Filtration Systems)

Due to threats of war, disease and scarcity, many people are becoming interested in emergency shelters, but an improperly designed or constructed shelter can be more life-threatening than life-saving!  If you are interested in building or buying an emergency shelter, we recommend you check out this article and research first.  Having a place to retreat in emergency requires a lot of forethought and planning to truly make it "safe"!

Photo by Billy Freeman on Unsplash
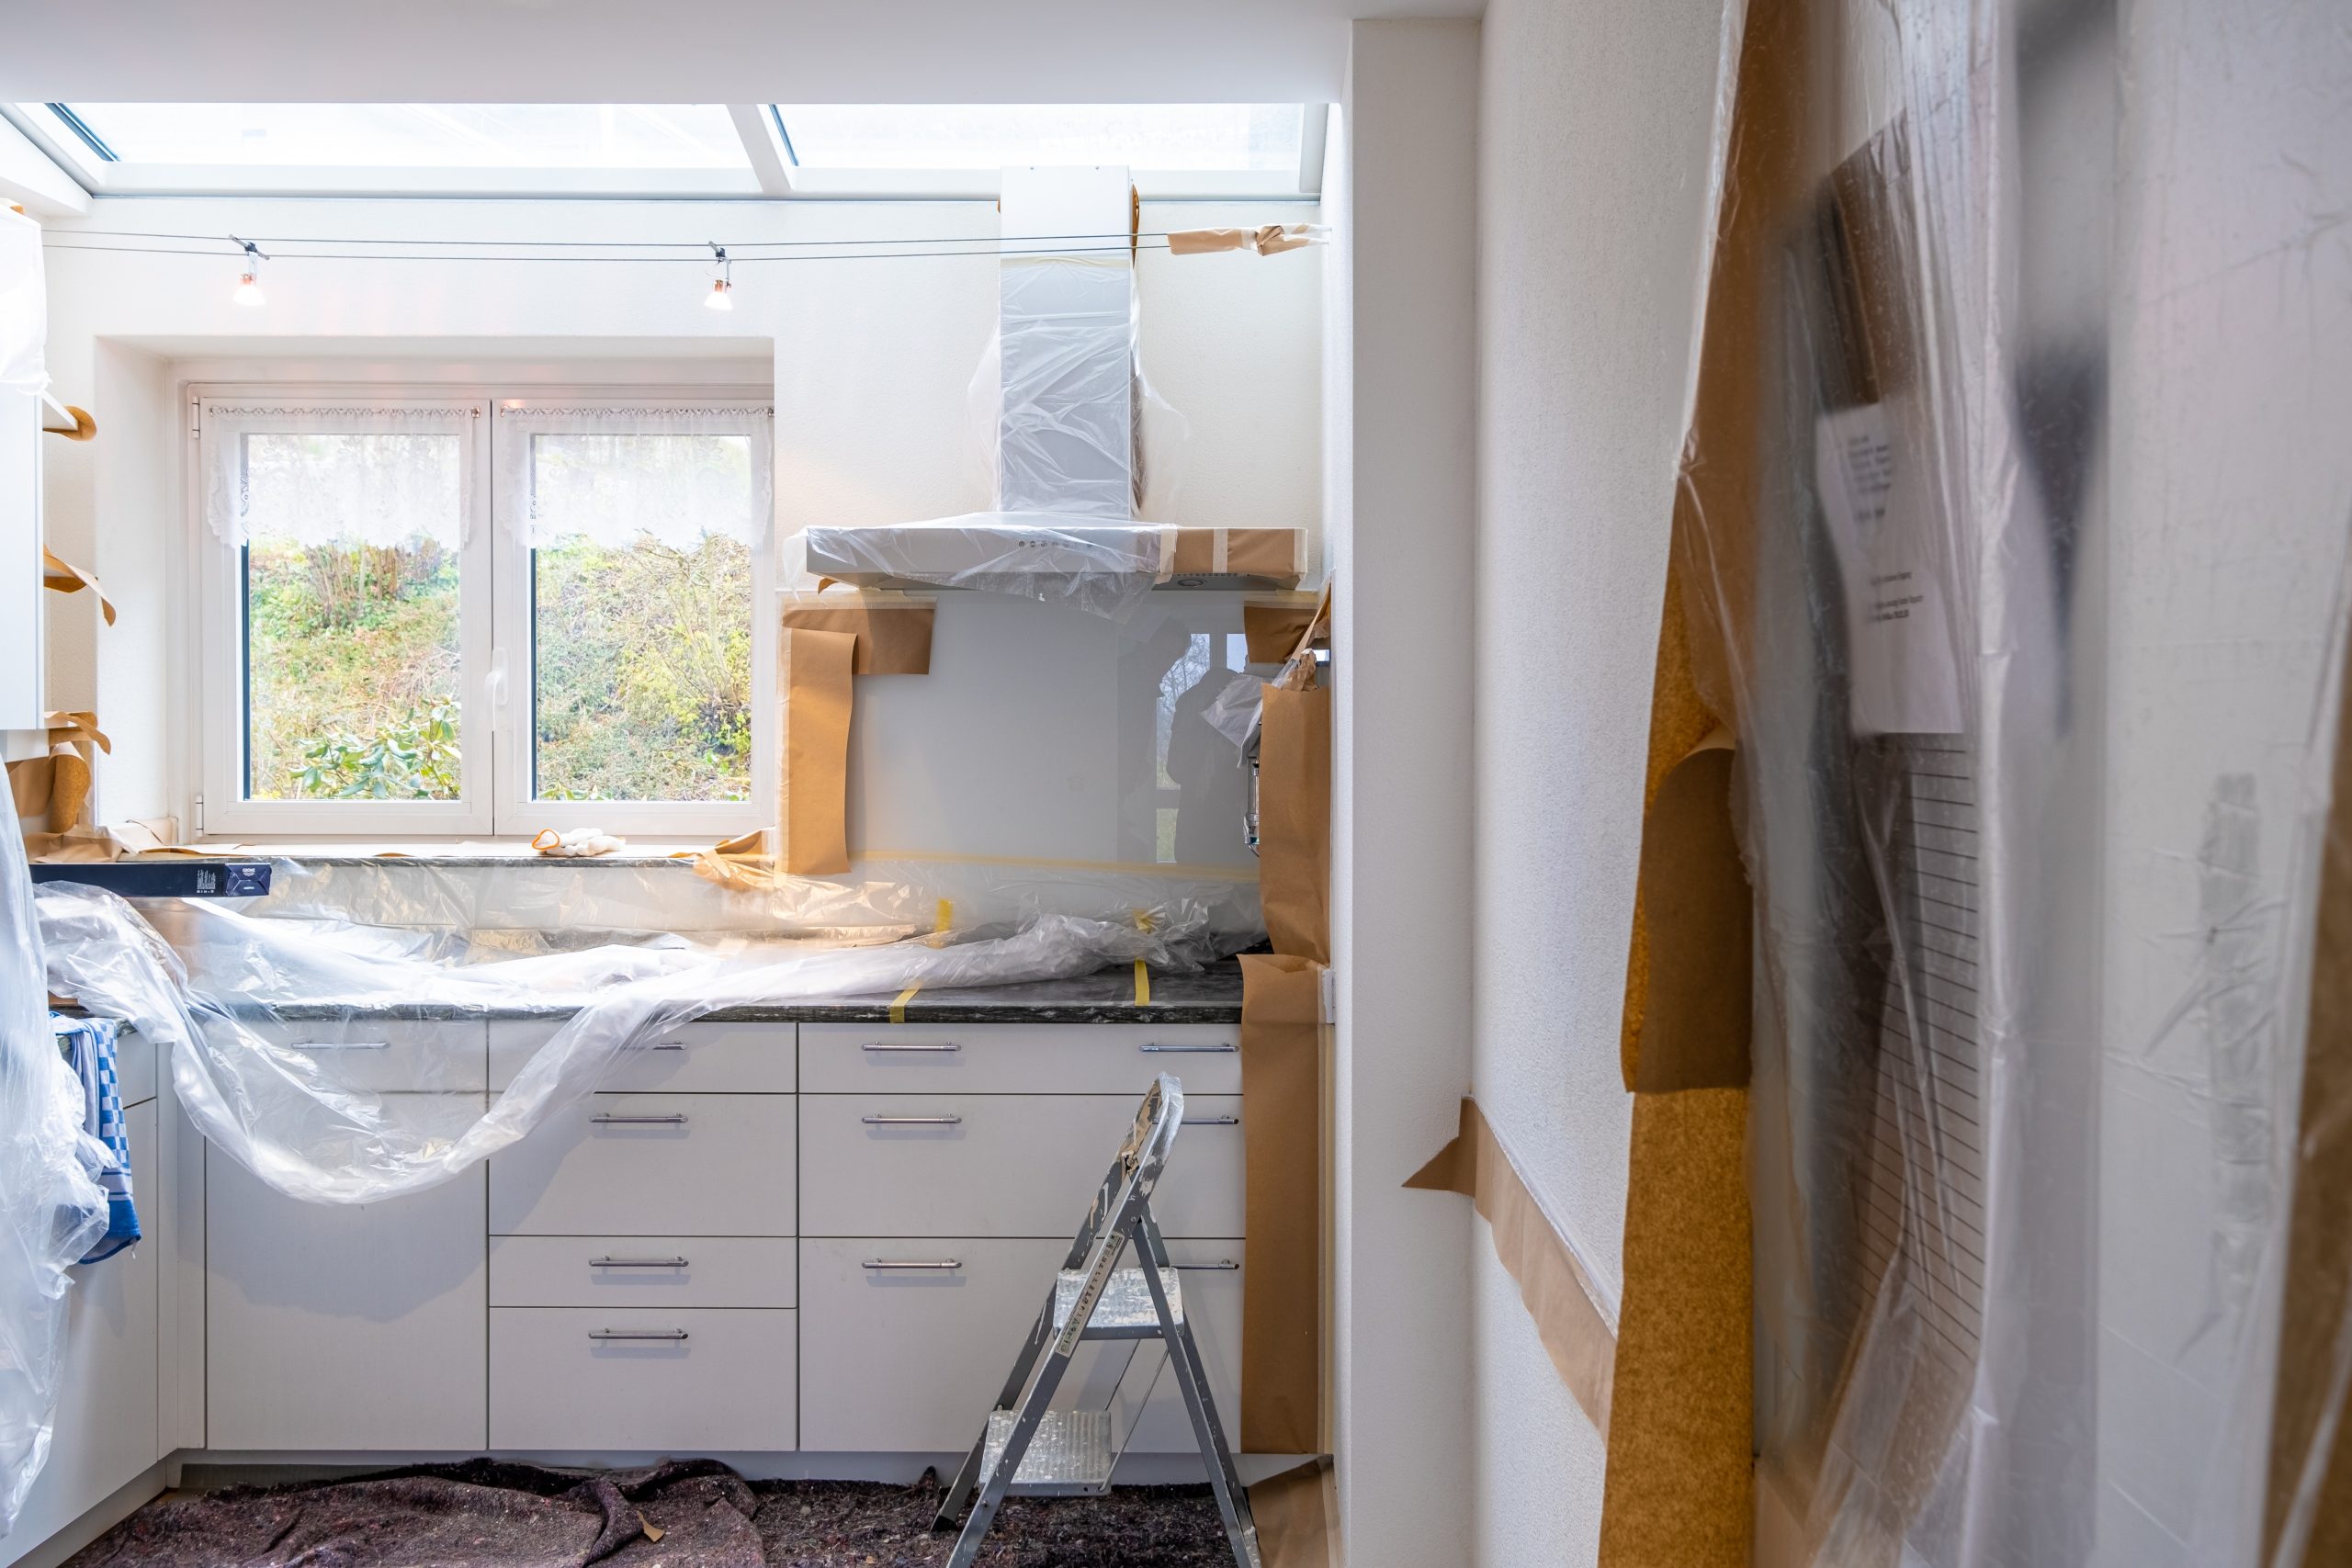
Indoor Mold Summary White Paper

Indoor Mold Summary White Paper

What is indoor Mold and how does it affect us? 

Overgrowth of mold in the home can produce high levels of mycotoxins and microbial volatile organic compounds (mVOCs), causing illness.  

While there is much more for the scientific community to explore, thankfully there is a growing focus on mold in our environment with a significant amount of new research being conducted on these topics.  

What are mold, mycotoxins and mVOCs?

Mold includes various types of fungus that grow on damp or decaying organic matter.  Mold can grow outdoors or indoors; it only needs moisture and a carbon source. 1  Outdoors, moisture from the ground and decaying leaves or wood provide the perfect habitat for mold.  Indoors, moisture from the air (excess humidity) or from a leaking pipe or roof will saturate a substrate such as wood, cardboard or even dust, and provide the moisture and carbon food for mold to grow. It produces particulate pollution (physical spores that replicate and spread) as well as various chemical byproducts. 

Mycotoxins are secondary metabolites, which are organic compounds that are produced by various organisms that are not directly involved in the growth, development, or reproduction of the organism but are essential in the ecological and other activities (contrasted with primary metabolites, which are directly involved with these activities).2  These are chemicals that are specifically toxic to humans, which scientists believe the mold produces to cause plant disease, defend the mold from other microbes, or simply when the mold is stressed. 

Mold can cause two broad types of disease, mycoses and mycotoxicoses.

(1) Human mycoses3:

  • Are caused by growth of the fungi on or in our bodies, which can be treated with antifungals.  (Mycotoxins produced while the mold is in the body cause a secondary reaction).

  • are mainly caused by opportunistic fungi, which produce illness by taking advantage of debilitated or immunocompromised hosts 

  • are frequently acquired via inhalation of mold spores from an environmental reservoir or by unusual growth of a commensal species that is normally resident on human skin or the gastrointestinal tract

  • portal of entry can be through the pulmonary tract or direct contact with the skin

  • are largely diseases of the developed world, usually occurring in patients whose immune systems have been compromised by advanced medical treatment.

(2) In contrast, mycotoxicoses: 

  • Are caused by dietary, respiratory, dermal, and other exposures to the mycotoxins, causing “poisoning by natural means” similar to the pathologies caused by exposure to pesticides or heavy metal residues.3

  • Can be successfully treated by regimens of mycotoxin antigens, sauna, oxygen therapy, and nutrient..4

  • Are common in underdeveloped nations due lack of resources to harvest and store foods properly.3 However, it is hypothesized that mycotoxicoses in the Western World are mainly due to inhalation of mycotoxins from mold growing in indoor environments (our inference from mold experts). 

As a company focused mainly on air quality, HypoAir has focused on mycotoxins that cause illness due to inhalation (which are mainly mycotoxicoses), as a result of mold growing indoors and releasing conidia (entire spores or fragments of mold or its spores) that contain mycotoxins.  In samples collected from water-damaged indoor environments in Sweden in 20075, here are the main mycotoxins found:

  • Trichodermol and Verrucarol are trichothecenes. Trichothecenes are a very large family of chemically related mycotoxins produced by various species of Fusarium, Myrothecium, Trichoderma, Trichothecium, Cephalosporium, Verticimonosporium, and Stachybotrys molds. Trichothecenes inhibit protein synthesis in human and animal cells. 6,7

  • Sterigmatocystin is also generated by Aspergillus molds.  It is structurally and biologically related to aflatoxins and is regarded as a precursor of aflatoxin B1 (see below). Therefore, the acute toxicity and carcinogenic properties of this mycotoxin are similar to those presented by aflatoxins, although less potent, and Sterigmatocystin has been recognized as a group 2B carcinogen.8

  • Satratoxins G and H are produced by the black mold Stachybotrys chartarum.  Neurotoxicity and inflammation within the nose and brain are potential adverse health effects of exposure to satratoxins and Stachybotrys in the indoor air of water-damaged buildings.9

  • Gliotoxin is produced by the common indoor mold genus Aspergillus and is immunosuppressive (it can dampen the body's ability to ward off disease and infection). To do this it impairs the activation of T-cells and induces cell death in monocytes, a type of white blood cell.10

  • Aflatoxin B1 (AFB1) is one of the most potent carcinogens in foods, and it was postulated to account for the prevalence of hepatocellular carcinoma (HCC) in high exposure areas. 11

Volatile Organic Compounds (VOCs)

VOCs are gasses and can be anthropogenic (produced by human activity) or biogenic (produced by living organisms, but more specifically plants and animals).   A subclass of biogenic VOCs is microbial VOCs (mVOCs), which are gasses produced by bacteria or fungi.  Indoors, mVOCs diffuse through and sometimes accumulate in the air.  Some mVOCs are responsible for that “musty” odor that is the telltale sign of mold growth (such as geosmin and 1-octen-3-ol), but others can be odorless. Compounds with eight carbon atoms, such as 1-octen-3-ol, 3-octanol and 3-octanone are among the most common fungal VOCs, and among fifteen of the most prevalent mVOCs in water-damaged buildings (thse are 2-methyl-1-propanol, 3-methyl-1-butanol, 3-methyl-2-butanol, 2-pentanol, 3-octanol, 1-octen-3-ol, 2-octen-3-ol , 3-methylfuran, 2-hexanone, 2-heptanone, 3-octanone, 2-methylisoborneol, 2-isopropyl-3-methoxy-pyrazine, geosmin, and dimethyl disulphide).12  Although these mVOCs have not been tested for carcinogenicity, DNA damage was detected for all fifteen of the common mVOCs. 13  Low concentrations of the vapor form of several C-8 compounds including 1-octen-3-ol are toxic to larvae and adult fruit flies.  Moreover, 1-octen-3-ol (octenol for short and also called mushroom alcohol) selectively affects dopaminergic neurons in adult Drosophila (fruit fly) brain and induces Parkinson’s-like behavioral alterations in a fly model for this disease.14,15  Volatile phase 1-octen-3-ol was 80 times more toxic than the volatile phase of toluene in stem cells studies.16  Unfortunately, due to studies mostly conducted on the liquid phase of octenol, the FDA has approved it for use in foods and perfumes, and the EPA has approved it for use in insect lures. The problem with the vapor phase octenol is, like other VOCs, concentrations can build up in enclosed spaces like basements, attics, and even whole homes if they are not ventilated.

Image source: (17) 

How do mycotoxins and mVOCs overlap?

Mycotoxins are only found in solid or liquid form, while mVOCs are gaseous.  However, mycotoxins and many mVOCs are both toxic products of mold.  Therefore, overlap exists in the toxic category, but the science community doesn’t think that mVOCs should be called mycotoxins.   Why?

  1. The condition of secondary metabolites: mycotoxins are all secondary metabolites, encoded by clustered genes that are easy to detect in genomic data. Only some fungal volatiles (e.g., the terpenoids) are secondary metabolites. 18 

  2. There already are other classes of toxic metabolites made by fungi that are not called mycotoxins. Terms like “antibiotic,” (compounds toxic to bacteria), “mushroom poison” (compounds made by mushrooms) and “phytotoxin” (compounds toxic to plants, or confusingly, made by plants19) are used to label certain other categories of fungal products with toxigenic properties. 18 

  3. Since many of the VOCs that have been studied are breakdown products of fatty acids, mediated by lipoxygenases, or are made by simple biotransformation steps from amino acids, we are not certain whether the VOCs we detect in profiles from growing fungi are the direct products of fungal metabolism or are merely incidental breakdown products.18

For these reasons, one article proposes the name “volatoxin” for those mycotoxins which are volatiles.18  Whatever they are officially named, mVOCs have the potential to be harmful to humans, especially if they are allowed to accumulate in a closed space.

Mold Naturally found outside vs trapped indoors

Mycotoxins and mVOCs found outside are normally diluted due to the abundant circulation of fresh air around and through them.  It is entirely different indoors.  Just as CO2 can build up from exhalation of inhabitants in a closed space, mVOCs from mold can also become concentrated in closed atmospheres, and mycotoxins become airborne whenever mold is disturbed, even from the airflow created when a window or door is opened.  

Where are these high concentrations found?  Spaces like the following are ripe for “biohazard” conditions concerning mVOCs and mycotoxins: 

  • Damp basements

  • Enclosed crawl spaces

  • Attics with leaky roofs or otherwise high ambient humidity

  • Backyard sheds

  • Non-climatized storage units

  • Vacation homes that are closed up without air conditioning or ventilation

  • Homes damaged by natural disasters or neglect, that are abandoned

  • Commercial buildings that have not been occupied or climatized in some time

The combination of lack of ventilation (for dilution) and excess humidity and darkness makes these spaces the perfect environment to grow mold and all of the toxins it emits.

How does Polar Ionization affect mycotoxins and mVOCs?

Our Polar Ionization uses Carbon Brush style Needlepoint Ionization to split the normal water vapor (H2O) in the air into millions of positive Hydrogen ions and negative Oxygen ions, without the production of ozone.  These natural ions are in proper balance and are stable enough that they can last a minute or longer as they travel in the airflows of an HVAC system or room giving them sufficient time to interact with air and surface contaminants in large buildings. Ions are any molecule or atom where the number of electrons does not equal the number of protons. These ions are very effective against a wide range of particulate, biological and chemical contaminants.  

Due to their type and stability they:

  • can provide purification for large areas with reasonable upfront costs and no ongoing replacement parts 

  • can react with both airborne and surface based contaminants opening up many new applications for safe active sanitization of occupied spaces.

  • Remove static electricity, and as such are able to travel much further than negative ions.  

  • Due to their balanced nature, they do not create unwanted ozone unlike devices that produce negative only ionization

Ability of Polar Ionization to protect against Mycotoxins and Mold Related Particulates

Mycotoxins can be transmitted through ingesting contaminated food, or they can become airborne, attached to spores of mold (conidia) or fragments of conidia.  According to a 2005 study 20, mycotoxins from Stachybotrys Chartarum (specifically trichothecene mycotoxins) were found on intact spores, which are larger (about 5 microns in diameter) as well as fragments of mold and other smaller particles (1.2 microns and below). These mycotoxins are known to react primarily with mucous membranes of the upper respiratory tract and eyes, leading to irritating erythema, inflammation, and pain. 20  In an earlier study, Trichothecene mycotoxins were found on Stachybotrys atra conidia of 5 micron diameter on average, indicating that these mycotoxins are easily respirable.21

The term PM2.5 is often used to refer to particulates 2.5 microns and less in diameter. For reference, a human hair is around 50-100 microns (μm) in diameter.  The human body has many natural defenses against large particulates like these.  In general, we consider extremely small PM2.5 contaminants to be far more dangerous and difficult to remove than larger particulates. Even smaller, 0.3 microns are considered the Most Penetrating Particle Size (MPPS) due to their difficulty to capture.  A HEPA filter's efficiency rating is specifically tested at 0.3 microns (not larger or smaller particles) because it is addressing a variant of the filter's minimum efficiency. 

Polar Ionization removes particulates from the air primarily through making them group together making them larger, heavier, and often with a negative or positive charge.   Those same larger, heavier, and charged particles can not stay airborne for long and are relatively easy to trap in a mechanical filter or easily vacuumed up from the ground after they settled.   Polar Ionization can quickly remove well over 95% of airborne particulates (including spores) without any physical mechanical filtration whatsoever (HEPA).  Due to its mode of action, it can also improve the filter rating of any mechanical filter used in the same space by several levels.  The use of mechanical filtration in addition to Polar Ionization is often unnecessary, however it can improve the speed of removal of particulates especially with those with high sensitivities.  At HypoAir we are quick to recommend redundancies in air purification where the needs of the occupants require faster removal of particulates and when finances allow. 

Numerous case studies conducted by independent labs show how mold spore counts (and thus by inference, mycotoxins carried on the mold spores)  were dramatically reduced in the air of closed environments by employing HypoAir’s Polar Ionization without additional filters.22 

Ability of Polar Ionization to break down mVOCs

The Polar Ions are also effective at breaking down VOCs & odors at a molecular level, specifically gasses with electron volt potential below 11. This is by design as the power output is capped at 12.07eV in order to prevent the formation of ozone since oxygen has an electron volt potential of 12. Formaldehyde (CH2O) for example has 10.88 as its electron volt potential and can be dismantled down into harmless carbon dioxide (CO2) and water vapor (H2O).  Similarly Ammonia (NH3) with an electron volt potential of 10.07 is broken down into harmless nitrogen (N2) and water vapor (H2O) (nitrogen naturally makes up about 78% of earth’s atmosphere).   Due to the method of production and stability of the ions, no ozone is produced in this process and the theoretical issue of incomplete oxidation or unintended byproducts is addressed with net VOC reduction.  One example showing proof of these breakdown reactions was obtained by measurement before and after installation of a bi-polar ionization device in the HVAC system of Houston Methodist Hospital, which reduced Total VOCs (TVOCs) to acceptable levels with activation of the device after many months of poor air quality complaints and failure of carbon filters to adequately clean the polluted air intake.23

The following are electron volt potentials of some of the most common mVOCs in water-damaged buildings24:  

Common mVOCs

Electron Volt Potentials

2-methyl-1-propanol

9.7

3-methylfuran

8.39

2-hexanone

9.34

2-heptanone

9.33

3-octanone

9.19

dimethyl disulphide

8.46

Additional efficacy against more complex chemical compounds and high concentrations of odors can be found with our products that combine Polar Ionization with Activated Carbon, AHPCO and/or our TotalClean i2 spray.

Ability of Polar Ionization to Neutralize Biological Contaminants on Surfaces and in the Air

Polar Ionization has been well tested in our products and in other devices that produce the same type of ions to neutralize certain bacteria, mold, and viruses in the air and on surfaces.  Polar Ionization & Mold Spores in particular have been tested many times, including a 99.50% kill rate tested by GCA over a 24 hour period. 25 The Polar Ions are effective at disrupting these biological contaminants by breaking down their surface proteins which results in inactivation or lysis.  The efficacy of Polar ionization on viral (Feline Coronavirus, Coxsackie Virus, Polio Virus, SARS Coronavirus) and other biological threats (TB, MRSA, VRE, C. Diff) has been proven for years by a wide range of independent studies with more information, sources, and studies found on hypoair.com.

For more info about our proprietary products and technologies, please visit www.hypoair.com

References:

  1. Indoor Environmental Quality: What is Mold? (n.d.). Retrieved from https://www.cdc.gov/niosh/topics/indoorenv/whatismold.html

  2. Sapkota, A. (18 January 2022). Primary vs Secondary Metabolites- Definition, 12 Differences, Examples. Retrieved from https://microbenotes.com/primary-vs-secondary-metabolites/

  3. Bennett, J. W., Klich,  M. (2003). Mycotoxins. Clinical Microbiology Reviews, 16(3), 497–516.  https://doi.org/10.1128%2FCMR.16.3.497-516.2003

  4. Rea, W.J. (2018). A Large Case-series of Successful Treatment of Patients Exposed to Mold and Mycotoxin. Clinical Therapeutics, 40(6), 889-893. https://doi.org/10.1016/j.clinthera.2018.05.003

  5. Bloom, E., Nyman, E., Must, A., Pehrson, C., Larsson,  L. (2009).  Mycotoxins produced by molds in water-damaged indoor environments.  Journal of Occupational and Environmental Hygiene, 6(11), 671–678. http://dx.doi.org/10.1080/15459620903252053

  6. Trichodermol (T3D3717). (n.d.). Retrieved from http://www.t3db.ca/toxins/T3D3717

  7. Verrucarol (T3D3723). (n.d.). Retrieved from http://www.t3db.ca/toxins/T3D3723

  8. Vieira, T., Cunha, S., Casal, S. (2015). 25.3.3 Sterigmatocystin. In V.R. Preedy (Ed.), Coffee in Health and Disease Prevention (pp. 225-233). Elsevier Inc.

  9. Islam, Z., Harkema, J.R., Pestka, J.J. (2006). Satratoxin G from the black mold Stachybotrys chartarum evokes olfactory sensory neuron loss and inflammation in the murine nose and brain. Environmental Health Perspectives, 114(7), 1099-1107. https://doi.org/10.1289/ehp.8854

  10. Gliotoxin. (n.d.). Retrieved from https://healthmatters.io/understand-blood-test-results/gliotoxin

  11. Ferk, F., Speer, K., Mišík, M., Nersesyan, A., Knasmüller, S. (2015). Chapter 66 - Protective Effects of Coffee Against Induction of DNA Damage and Cancer by Aflatoxin B1. In V.R. Preedy (Ed.), Coffee in Health and Disease Prevention (pp. 587-596). Elsevier Inc.

  12. Korpi, A., Järnberg, J., Pasanen, A-L. (2009).  Microbial volatile organic compounds.  Critical Reviews in Toxicology, 39(2), 39-193. https://doi.org/10.1080/10408440802291497 

  13. Kreja, L., Seidel,  H-J. (2002). Evaluation of the genotoxic potential of some microbial volatile organic compounds (MVOC) with the comet assay, the micronucleus assay and the HPRT gene mutation assay.  Mutation Research, 513(1-2), pp. 143-150.  https://doi.org/10.1016/s1383-5718(01)00306-0

  14. Inamdar, A.A., Masurekar, P., Bennett, J.W. (2010).  Neurotoxicity of fungal volatile organic compounds in Drosophila melanogaster. Toxicological Sciences, 117, pp. 418–426. https://doi.org/10.1093/toxsci/kfq222

  15. Inamdar, A.A., Hossain, M.M., Bernstein, A.I., Miller, G.W., Richardson, J.R.,  Bennett, J.W. (2013). The fungal derived semiochemical 1-octen-3-ol disrupts dopamine packaging and causes neurodegeneration. Proceedings of the National Academy of Sciences USA, 110, 19561–19566. https://doi.org/10.1073/pnas.1318830110

  16. Inamdar, A.A., Moore, J.C., Cohen, R.I., Bennett, J.W. (2012).  A model to evaluate the cytotoxicity of the fungal volatile organic compound 1-octen-3-o1 in human embryonic stem cells. Mycopathologia, 173, 13–20.  https://doi.org/10.1007/s11046-011-9457-z

  17. Morse, R., Acker, D. (22 February 2017). Indoor Air Quality And Mold Prevention Of The Building Envelope. Retrieved from https://www.wbdg.org/resources/indoor-air-quality-and-mold-prevention-building-envelope

  18.  Bennett, J.W., Inamdar, A.A., (2015). Are Some Fungal Volatile Organic Compounds (VOCs) Mycotoxins? Toxins (Basel), 7(9), 3785–3804. https://doi.org/10.3390%2Ftoxins7093785

  19.  A.Graniti (1972). “The evolution of the toxic concept in plant pathology.” In: Wood R.K., Ballio A., Graniti A., editors. Phytotoxins in Plant Diseases (pp. 1–18). Academic Press.

  20. Brasel, T. L., Douglas, D. R., Wilson, S. C., Straus, D. C. (2005).  Detection of Airborne Stachybotrys chartarum Macrocyclic Trichothecene Mycotoxins on Particulates Smaller than Conidia.  Applied and Environmental Microbiology. 71(1),  114–122.  https://doi.org/10.1128%2FAEM.71.1.114-122.2005

  21. Sorenson, W. G., Frazer, D.G., Jarvis, B.B., Simpson, J., Robinson,  V.A. (1987). Trichothecene Mycotoxins in Aerosolized Conidia of Stachybotrys atra. Applied and Environmental Microbiology, 53(6), 1370-1375. https://doi.org/10.1128%2Faem.53.6.1370-1375.1987

  22. Milburn, D. Case Studies, Mold Focus_Part 1. (n.d.) Retrieved from https://docs.google.com/presentation/d/1RSgZYhSq0M_-fzlPUP1Q8z2btVuDi8so/edit#slide=id.p1

  23. Schurk, D. Houston Methodist Hospital Test Study Results Needle Point Bi-Polar Air Ionization for VOC Remediation. (n.d.). Retrieved from http://www.victordistcontrols.com/wp-content/uploads/2014/03/Methodist_Hospital_VOC_Remediation_Project_Test_Results_2014.pdf

  24. Electron Volt (eV) Potential Chart for Industrial Gases: UNDERSTANDING eV POTENTIAL PAPER. (n.d.). Retrieved from https://egeda.be/wp-content/uploads/2020/11/Electron-Volt-potential-chart.pdf

  25. Waddell, C. GPS Reports on Pathogen Testing,(n.d.) Retrieved from https://gpsair.com/uploads/customer-resources/Service-Logic/White-Paper-GPS-Reports-on-Pathogen-Testing-03-2020.pdf

Photo by Josh Eckstein on Unsplash
Sealing your Attached Garage

Sealing your Attached Garage

For many people an “attached garage” is an asset in a home: the convenience of parking and walking inside under cover is very attractive when there’s extreme weather outside!  However, from an air quality perspective, attached garages are actually a liability, unless the garage has been air-sealed from your house!

In our articles about negative air pressure here and here, we talked about how contaminants can enter your home from the garage.  The garage not only has car exhaust fumes, it can also have paint or chemical fumes from your hobby, VOCs from pesticides and insecticides stored there, and possibly even exhaust gases from your gas water heater, furnace or clothes dryer.  Need we  mention the mold and mildew spores when humidity and cardboard boxes create the perfect environment for mold?  It’s almost like having an unsanitary neighbor in the apartment next to you…now, does an attached garage still seem like an “asset” to your clean, healthy home?

If you are coming around to a healthier way of thinking about your garage, it’s essential to consider installing some boundaries with this unsanitary neighbor!  “Air sealing” is more than just a tight-closing door.  It goes from the ground (foundation), through walls and insulation and even into the attic.  That’s right–if the attic over your garage is not sealed from the attic over your home, you got it–there is shared airspace and the possibility of contaminants crossing over from the air that circulates there due to changing temperatures. 

As with most air-sealing projects, creating this boundary is easiest if it’s done during the building phase.  The easiest way is to build your attached garage as a “separate” building…as in this article.  Jake Bruton of Airow Building in Missouri does it this way: do all the framing for the house, install your air barrier, and only then, frame the garage on the other side of the air barrier.  Finally, any penetrations like electrical and ventilation must be properly sealed. 

Another way to airseal during construction is to hang drywall on the shared wall inside the garage, foam the penetrations like light switches and outlets on that wall, and also run plywood sheathing above it to the roofdeck, using sprayfoam to seal the entire barrier in the attic as in this video.  Sprayfoam really is the only way to effectively seal around ceiling joists, which often run straight over the wall from the home into the garage.     

This is all great...for new construction.  What if you are buying an existing home, or just now want to upgrade your home?  First of all, examine that shared wall from the garage side, from floor to ceiling. 

  • If the drywall is finished, that’s good.  Finished drywall can be an air barrier.  However, you’ll want to remove any trim like baseboards or trim around doors, faceplates like electrical plates, and uncover any penetrations.  Get some spray foam in a can and seal all of these cracks with spray foam.   You’ll want to cover the space from the sill plate to the drywall, the spaces around electrical boxes, and around any pipes sticking through the wall like gas pipes or hot water pipes if you have a hot water heater in the garage.  Make sure to seal around the door frame if there’s dead space there. 

  • If the drywall is not finished (no tape and mud or just insulation), that’s even better!  Consider removing the existing drywall on the garage side (you can install it again later if screws were used), as well as any fiberglass or rolled insulation, and sprayfoaming the entire wall.  Spray foam can be an excellent air barrier if it’s done by a pro.  Before you schedule the job, however, go to the next point and prep the attic space so that they can foam there as well.

  • If the attic space between the garage and home are shared, you’ll need to build a partition wall between them.  Of course this is not a fun job, because attics are typically low, cramped and have extreme temperatures, but it’s critical if you’re going to do a thorough job.  Then, the wall can be sprayfoamed on the attic or house side, or at least foamed around the roof, rafters and joists and taped where plywood sheets come together.  

  • Ventilation (air conditioning and heating) is something that should never be shared between a house and garage, because that is a sure way to pull those contaminants right in and distribute them around your home!  If you do have a shared system, consult with an HVAC company about terminating the vents to the garage and installing a dedicated mini-split.  For small garages, a window air conditioner and portable heater will do the trick!  

  • If flexible ventilation ducts go over the garage with no vents, it’s really hard to get an air seal around flex ducts.  If you can’t/don’t want to switch to metal ductwork, install a collar in the attic wall that separates the garage and house (the one you build as in bullet #3 above), and attach the ends of the flex duct to it, so the wall can still be adequately airsealed.  

  • The door between the house and garage, of course, is an area that needs to seal tightly.  Adjust the door so that no daylight shows around the perimeter (I know, this is easier said than done!) and use weatherstripping around the sides so that it seals when closed.  If necessary, install a “sweep” on the bottom or replace the rubber seal in the threshold so the bottom seals as well. 

Here are some product recommendations for air sealing the garage:  

  • Air-sealing tapes can be expensive, but don’t scrimp: don’t use duct-tape, vapor-barrier tape or anything less than a product that is for air-sealing.  ZIP System is a great brand and be sure to buy more than you think you will need, because there always seems to be another seam to seal!  Use this tape to seal plywood edges together, seal the door frame to the drywall (if you can’t foam it), etc. 

  • Spray foam cans come in lots of formulations: small cracks (less than ¼”), larger gaps and cracks ( ), pest block formula (who knows what kind of chemicals are in there), but just be sure to buy a good number of the small and large gap formulations before you start the job.  Wear gloves, safety goggles and old clothing (long hair safely tucked away) because this stuff is super sticky!  Also, if you use a can quickly, you can reuse the same straw on the next can, and save the extra straw in case one gets plugged or lost.  Unless you buy the “smart dispenser” version, the straws and remainder in the can cannot be reused after about 30-40 minutes, so be sure to have several spray areas ready when you start spraying!  After it hardens, you can use a utility knife or hacksaw blade to cut away excess foam.  Consider these different products:

    • Great Stuff Window and Door gently expands so that frames will not warp under pressure.

    • Great Stuff Gap and Cracks (use in gaps up to 1”)

    • Loctite Tite Foam, pack of 2 for $19

    • Great Stuff Pro (large cans, $14 each–a great tool for a large job because it’s easier to dispense and can be reused for up to 30 days); however it requires a special gun.  Users report that a can goes a LONG way (3-6 cans on a large home) but if you have more air-sealing to do, it’s worth having several more on hand.

    • And more…

Not only will your house smell better and stay cleaner after these airsealing improvements, you’ll probably notice less cold drafts in winter and hot air in summer, since most attached garages are not conditioned.  Finally, complete your sealed garage upgrade with a funny sign reminding everyone to “close the door”...after all, airsealing can only go so far when the door is open!!

Photo by Kevin Wolf on Unsplash

What happens behind closed doors…

What happens behind closed doors…

What happens behind closed doors…is STAGNATION!  When you close the door to a room in your home, air is trapped in the room, resulting in the following:

  • If there is no fan operating, air will not circulate, and any humidity present in the air will saturate soft furnishings, increasing the likelihood that mold will grow (see our article on ventilation and one of our favorite tools, dpcalc.org).

  • If central air conditioning or heating is pushing air into the room, the closed door prevents proper cycling of air out of the room, causing the system to a create a negative pressure zone near the return grille and placing stress on the system’s mechanical parts like blower motors.

  • Again, central air conditioning or heating with closed doors causes imbalances in the temperature of the home, because conditioned air is prevented from mixing, which in turn affects the thermostat and causes the system to run longer to reach the temperature set point.

Keeping doors closed, in other words, is just not good for proper ventilation in your home!  This makes sense to us…until the question of privacy is brought up.  Of course, not everyone wants their door to be open at all times, even if it’s just cracked open.  Don’t worry, there are ways to get good ventilation even with closed doors!

The best solutions are brought in during the design phase of the home, before construction begins.  This is where our first idea is best incorporated.  Transfer grilles offset high/low in a wall cavity use the cavity to muffle sound, so that this design affords  the maximum privacy.  However, in order to avoid entraining dust and other building toxins from surrounding spaces, the cavity needs to be sealed by gluing the drywall to the studs and plates…meaning that this solution needs to be built in during construction.

Source: Building America Solution Center

If you’re realizing you need better air circulation after construction, then there are still more solutions to consider.  You can use a back-to-back grille over a door (or any high space on a shared wall), which have sheet metal baffles to block sound and light while still allowing the passage of air through the wall.  Here are some diagrams to show back-to-back grilles:

Source: Building America Solution Center

Thirdly, if wall space is an issue and you have attic space above the rooms, you could install a jump duct using flexible duct, two ceiling grilles, and foam sealant (to make sure air from the attic does not leak into your home).  Theoretically, a jump duct could also be placed through/under the floor to bridge two spaces, but in either place, take care to make sure the flexible duct is not crimped, and do not cut any structural beams like rafters or joists to install it.

Source: Building America Solution Center

Lastly, there’s a solution which I consider to be the easiest of all of these.  In-Door Return Air Pathways by Tamarack Technology are easily installed in the bottom of your hollow-core or solid wood interior doors (door must be 1-3/8” thick to fit).  Simply remove the door from the frame (I find that tapping the hinge pins out is easiest), lay it down, trace the provided template on the bottom of the door, cut it with a jigsaw, install the grille with two screws (provided) and re-install the door.  They do provide less privacy than the previous two options, but are quick to install (less than 30 minutes in my experience) and can be left white or spray painted to match any door color with paint suitable for plastic. 

In-Door Return Air Pathway installed in a solid wood door.

When you have the door closed with any of these three solutions, air is free to mix with the rest of the home, rooms do not become positively or negatively pressured, and you definitely have an advantage in keeping mold from forming in that room.  Additionally, the continuous use of the following in the closed room costs very little energy, but boosts your mold protection even more: 

Sure, we get it…everyone needs their privacy, but for health’s sake, make sure the air is flowing freely!  

Photo by Storiès on Unsplash

Better bedroom ventilation = better sleep quality

Better bedroom ventilation = better sleep quality

Have you ever wondered why you’re not sleeping well?  We have quite a few suggestions for better sleep, but there’s one more (invisible) thing that can negate the others: CO2.  Sleeping in a stuffy bedroom does not enable quality sleep!  It turns out that you need “fresh air” even when you’re not conscious of it.  A new study shows that CO2 concentrations in the bedroom above 750 ppm affect your sleep and as a consequence, your cognitive performance is lower the next day.

In the 18-month study, 36 healthy college-age men and women volunteered to sleep for a week each in furnished bedrooms where their sleep was analyzed.  The levels of CO2 varied during the week: the first night was not included in the study (for adaptation), but then two nights each of three ventilation conditions were used to approximate CO2 levels of 750 ppm, 1,000 ppm and 1,300 ppm.  Sleep quality was monitored with wristband sleep trackers.  Salivary cortisol concentrations were measured upon waking also, as elevated cortisol levels correspond with decreasing sleep quality.  Overall, the researchers found that compared with ventilation causing an average CO2 concentration of 750 ppm (fresh air scenario), sleep quality was significantly reduced at the ventilation rates causing CO2 concentrations of 1,000 ppm and 1,300 ppm.  Sleep efficiency was reduced by 1.3 % and 1.8 % and time awake increased by 5.0 min and 7.8 min, respectively. Deep sleep duration decreased at the ventilation rate causing CO2 concentration of 1,300 ppm as compared to 750 ppm along with a significant increase in salivary cortisol after waking, which suggests increased stress and sympathetic activity. 

The takeaway from this study is to try and ventilate your bedroom with fresh air at night to simulate outdoor CO2 levels (450-500 outdoors is normal, up to 750ppm).  Obviously the best way to get fresh air is to open one or more windows, and windows don’t actually need to be fully open to achieve it.  By using a CO2 monitor near your bed, you can experiment to see how wide open 2the windows need to be.  If you live in a quiet suburb or country setting, it’s not too hard to install insect screens and do this.  However, there are lots of areas and circumstances that aren’t so simple!  We want to suggest some products and ways to help.

What if it’s too hot or humid or rainy outside to open my windows?  

  • In this case, the best solution is to install a window air conditioning unit that has a fresh air intake (not all of them do).  If you’re buying a new air conditioner, you may also want to look for one with inverter technology (it dehumidifies the air better and operates more efficiently) and upgraded air filter.  
  • If you have an existing window unit with no fresh air intake, you modify the weatherization around the unit (on the sides or bottom) to allow fresh air to “leak” into the room.  
  • If you have central air conditioning already, you should only need to open the windows about 1” to get enough fresh air to lower CO2 levels below 1000 ppm.
  • If you live in a quiet but rainy area, using a product like the Invisible Awning Rain Guard, $35-40, allows you to open your windows and ventilate, even during a storm.
  • If rain is the problem, here are two window fans that will help:

What if I live in an area with a lot of air pollution, like in a city or near busy roads?

While CO2 is not good for sleep, other types of air pollution like NOx (nitrous oxides) and particulates may be just as bad or worse, so we understand the need for outside air to be filtered.  Depending on the severity of your area, we have two products that can help:

  • The Window Ventilation Filter, $40-50, has an 11” height and reduces dust, dirt and was tested to remove 94% of ragweed pollen.  It also keeps out rain, snow and mild wind.
  • Nanofiber PureAir Window Screens, $40, cover approximately 3-4 average window screen panels.  They are transparent (so your view is not blocked) and use electrostatic adsorption to block particulates.
  • Medify has a great selection of HEPA air purifiers which can be sized according to your room.  All units are equipped with a pre-filter, True HEPA H13 or H14, and active carbon filter.  The active carbon filter is what will remove the VOCs in traffic and industrial pollution.

What if I live in an area where it’s not safe to keep the windows open? 

Security, of course, trumps fresh air…but you can have both if you secure a small window opening with a latch or lock.  It can also prevent children from opening the window too far and falling out.  One thing you’ll need to keep in mind, however, is fire safety; if the window is your safety exit in the case of a fire, you’ll need to make sure the key remains nearby if you lock it.

  • MiniLatches, $69, are pricey but well-made.  They are sized to allow fresh air in but prevent any indoor cats from going out.
  • Stainless Steel Window Chain Locks, $19, are very sturdy
  • Window Security Bars, $50 for a pack of 4, are easily adjustable and installed, and can be used on vertical or horizontal sliding windows and doors.

What if I don’t have a window in my bedroom?

“Fresh air” doesn’t always have to come from windows.  If your bedroom is an interior room, you’ll need to either use the central air conditioning system or create ventilation pathways to bring in fresh air from the rest of the house.

  • If your house is tightly built, it’s a great idea to add a fresh air intake.  Heat recovery ventilators (HRVs) and energy recovery ventilators (ERVs) minimize the heat and humidity losses of bringing in fresh air and exhausting stale air (ERV’s are recommended for more humid climates).  That way, fresh air comes into all parts of the home and having a window to open is not necessary.  For more on HRVs and ERVs, check out our article here.
  • If your room doesn’t have central air conditioning, you can have privacy and better ventilation by adding grilles in the wall or door.  We discuss four options to do it in this article.
  • If you can’t modify the walls or door, you can still have some security by using a Door Chain Lock ($7 for 2-pack) that will allow your door to open slightly and let more air flow in.  

Here’s a pictorial summary of the ventilation recommendations:

Source: Ventilation causing an average CO2 concentration of 1000 ppm negatively affects sleep: a field-lab study on healthy young people

The bottom line is…a lot of our comfort and well-being depends on how well we sleep.  Measure your bedroom CO2 in the morning before exiting (with the door closed) and if it’s above 1000 ppm, research your options for better ventilation.  Ventilate your bedroom tonight for a better day tomorrow!

Photo by Storiès on Unsplash

Materials to Exclude from a Healthy Home

Materials to Exclude from a Healthy Home

Everyone has at least one  “young and dumb” story where they are thankful not to have had more serious consequences from doing something un-wise, to put it mildly.  One of mine is repurposing a chunk of mystery wood for bar-tops in my 1950’s home.  It had a beautiful rustic espresso color and texture; a couple nail-holes here and there, and seemed very hard.  I cut it to length outside, put several coats of clear polyurethane on it and fitted it in place.  Then the headaches began.  For several weeks I could not shake the headaches…and since I was in the middle of finishing the house, I didn’t immediately recognize the culprit.  Suddenly, the “aroma” of creosote came back to me from cutting the pieces of wood.  It’s a potent preservative used for telephone poles and railroad ties, but definitely not meant for interior residential use.  I yanked out those bar-tops and, not one to throw anything out if I could help it, added them to my landscaping in the far corner of the yard.  No more headaches: I learned that creosote is a no-tolerance VOC for me!

The point of this story is that people can become very sensitive to chemicals and VOCs, often by accident, so education is probably our best defense!  Multiple Chemical Sensitivity (MCS) is a condition for anyone that has a reaction to formaldehyde, fragrance, VOCs, etc. and can be self-diagnosed.  One in four Americans suffer when exposed to certain chemicals (25%), and half of those are medically diagnosed with MCS. (One in four Americans suffer when exposed to common chemicals)  

For those of you who are fascinated by the right way to build (and building disaster stories), a  fun podcast to watch/listen to is BS* and Beer, which BS of course stands for Building Science.  I was intrigued by the headline of what NOT to include in my home, and also because the guest speaker is Corinne Segura, author of mychemicalfreehouse.net.  Her website and facebook page are a wealth of information for building a healthy home.  Corinne survived extreme chemical sensitivities in her first tiny home and she has consulted for approximately eight years on building techniques and products, notably for many highly chemically-sensitive people.  Mold tends to underlie these sensitivities, and in Corrine’s experience with this community, MCS has strong links to depression.  Here is her list of materials to avoid:

  1. Two-part spray foam tops the list. It offgasses more than expected (1-3 years), and contains flame retardants (FR).  When substitutions are made with soy and castor oil, these components do not change the offgassing.  VOCs are a major concern.
  2. Vinyl sheet flooring (used frequently in mobile homes) off gases at high rates, it uses plasticizers and may contain phthalates, which continually leach out. Linoleum (which is a natural product) is not vinyl sheet flooring.
  3. Rubber flooring, used for gym floors and especially made from recycled rubber tires, has high off gassing.  Many of us may know this when we get a new spare tire, if it’s stored inside the vehicle or in a trunk that’s not sealed from the cabin.  Phew!
  4. Some carpet: nylon carpet has high off gas levels.  Glues used for glue-down and padding also offgas.  Flame retardants and stain-proofing, which contain PFAS, can also be included.  However good carpet is zero-VOC.  There are very good wool, polyester and a nylon brands available.
  5. Some caulking and sealants: liquid asphalt and hot-mopping (for roofs), butyl caulks and sealants, and polyurethane caulks and sealants are high off gas.  The best types are made of silicone and polyether (however you will need to check warranties for the intended use area), and acrylic caulk has the next lowest offgas..
  6. PFAS (per- and polyfluoroalkyl substances) are used as stain guard substances, stone sealers, floor sealers and artificial turf.  They are highly persistent in the environment and have health concerns.  If you are chemically sensitive, you’ll particularly need to consider the type of stone you want, because there is not a lot of choice in stone sealers without PFAS (particularly for white stones)!
  7. Oil paints: solvent-based oil paints and primers are high VOC and slow to off-gas!  Water-based alkyd paints are a much better choice.
  8. Solvent-based stains for wood: same as #7.  Unfortunately water-based stains are finicky and the contractor needs to have experience with them.  However, there are natural oil-based stains which are not as harsh (such as tung oil, which can be applied with citrus solvent).  Rubio Monocoat is a plant-based, hardwax oil wood finish that is 0% VOC, durable, matte and keeps the natural look and feel of the wood.
  9. Fiberboards and particle boards are called medium density fiberboard (MDF) and high-density fiberboard (HDF), and are typically high in formaldehyde.  Alternatively, plywood is quicker to offgas. 
  10. Tiles with lead: some tiles test as much as 3x higher than leaded paint!  Cutting and working with these tiles is very concerning, as cutting tile releases more dust than demolishing it. 

Corinne had more advice to offer during the Q&A session. Here are some points:

  • Water-based is not always great because it may have other chemicals in it; it’s best to determine this from the MSDS or use brands that are known for non-toxicity (EarthPaint and AFM Safecoat are two that come to my mind).
  • UV-cured painted surfaces are good because this process is completed in the factory and has limited off-gassing by the time it arrives in the home.
  • Some people adversely react to natural VOCs like alpha-pinene, so natural materials are not always better in terms of VOCs.  You can actually reach a VOC level over CARB in a log house where everything’s made of wood!
  • Canned spray foam is actually way better than 2-part spray foam because it’s 1 part, it’s thinner, way smaller amounts.  
  • What makes a vinyl plank “luxury” (also called multi-layer rigid planks), besides marketing?  It has several parts to it: an SPC core (limestone-vinyl plasticizers in the core) with vinyl on top and cheap foam underlayment.  They are mainly zero-VOC and not on the “unhealthy” list. 
  • Some “antique” products like pressed-wood kitchen cabinets from the 1960’s have usually finished off gassing, but 40-60 year old vinyl flooring may still leach phthalates chemicals (forever). 
  • In her estimation, ventilation is way more helpful than air purifiers and Corinne would spend her money on ventilation strategies (ERV, HRV) before air purifiers.  These ventilation strategies, according to one of the hosts of the podcasts, work well even with “leaky” houses.
  • Furniture foam is a different substance than 2 part spray foam.  It contains polyurethane, which has plasticizers but not flame retardants (phased out).  Only natural latex is a good substitute for polyurethane foam, but it’s not that much of a difference to chemically sensitive people because both have some off-gassing.
  • Epoxy coatings are similar to the concept of 2 part spray foam if they are not mixed properly; they can offgas for some time and may have BPA.  

Corinne advises that if you are chemically sensitive, you should compile a list of your sensitivities and use a consultant who is able to specify materials for these needs, instead of just telling them “I have MCS, I need a chemical-free house”.   Since she was not currently consulting at the time of the podcast (early 2024) , she advises that Andrew Pace, Paula Baker-Laporte and Caroline Blazovsky are three that are expert consultants in this area.  She does, however, answer every question sent to her website.  Ask away and avoid, shall we say, “uninformed” mistakes!

Photo by Storiès on Unsplash
PSA: How to quickly shut off water to your home, and systems that can do it automatically

PSA: How to quickly shut off water to your home, and systems that can do it automatically

Think quick: do you know where your home’s water shut-off valve(s) are?   Imagine for a moment that you hear the sound of water gushing in the kitchen, and walk in to find it pouring out from under the kitchen sink.  If it’s not the dishwasher or kitchen faucet, then the leak may be in the wall–what do you do?  

Emergency water leaks are a realistic scenario, and every year, 1 in 12 homes experience a leak.  That’s more often than burglary or fires!  (Plumbing Leak Facts)  Therefore, it should be top priority to find your home’s water shut-off valve right away, and show it to other family members/housemates so that they know what to do, too.  It’s a good idea to practice gently closing and opening these valves every so often so that you know they work.  We use the term “gently” because old plastic valves and old plastic lines can break if they are manipulated with too much force!  If they are in bad repair, it’s time to replace them (or call a plumber to replace them) asap.

There could be multiple main water shut-off valves.  They are typically: (Two methods to turn off your homes water supply)

  1. In the main riser– this is where the water pipe comes out of the ground outside, and enters the home through the side.  If you live in a cold climate, there may not be an exposed valve outside to avoid freezing!
  2. In the garage or basement.  Normally it’s in the wall next to the garage door. 
  3. At the water meter box, you can use a meter key (special long-handled wrench) to shut off the water to the whole home.
  4. If you live in an apartment, there is one valve that serves the whole apartment.  It’s usually near your hot water heater or in a utility closet.

If you know where the water is coming from and you can shut it off at a specific appliance, go for it!  Here are the locations of specific water supply valves throughout a home: (How to shut off water supply in an apartment)

  • Toilets: Below and behind the toilet at the wall.  These can be ¼ turn valves or fully opening and closing valves.
  • Refrigerator: You’ll need to pull out the refrigerator to access the valve that supplies the icemaker; it’s usually recessed in the wall.  These are usually ¼ turn valves.
  • Dishwasher: look underneath the sink for a supply line that goes toward the dishwasher. 
  • Kitchen and bathroom sinks: under the sink, there are usually two for hot and cold. 
  • Washing machine: the valves should be about 2-3 feet off the floor behind or next to the machine in the wall. 
  • Water heater:  first, shut off the gas or electricity to the water heater.  Then, shut off the water supply by closing the valve(s) on the lines coming into the water heater at the top.  Then, relieve pressure to the lines by opening a sink faucet.  You can also help the water heater to drain to an appropriate place (like outside) by connecting a garden hose to the drain valve on the side, and opening the valve.  (How To Turn Off a Leaking Water Heater)
  • Showers and baths: if there is not an access panel in the opposite side of the wall where the shower/bath valves are located, go and shut off water at one of the main supply valves mentioned above.

Here’s a trick if the main shut-off valve(s) is not closing all the way, and water is continuing to come in at a reduced rate.  You can open the other faucets with drains in the home, like bathtub, sinks, etc., to relieve pressure at the leak until the plumber can get there.

Now that you know where your water supply valves are, you might want to consider automatic water shut-off options.  There are many systems that can shut off your whole home’s water supply, but they fall into 2 categories: moisture detection and flow sensing.  Basically, the water valve is shut off if the system senses water on the floor (via water detectors scattered around the home) or if the water flow in the main supply exceeds a pre-set user amount (water runs for too long).  Here are some pros and cons for these systems:

System

Leak Detector System

Flow-Sensing System

Pros

  • May detect smaller leaks if water falls on/near sensors
  • Will determine exact location of leak
  • May shut off water faster than a flow-sensing system if leak detector is placed in right location
  • Some qualify for home insurance discount
  • If wi-fi goes out, it can still shut off water in case of leaks 
  • Can catch very small leaks if loss of pressure is detected

Cons

  • Detector could get kicked out of place
  • If moisture sensors require batteries, they could fail if not changed regularly
  • If wi-fi goes out, individual leak detector may not communicate with shutoff valve
  • Doesn’t detect leaks behind walls, floors, etc. 
  • Most systems require wi-fi
  • No way to tell where leak is located
  • Water flow must exceed pre-set limits to shut off water, so small leaks could go undetected in some systems

Here are some systems for each:

Leak Detection: We spoke about individual leak detectors in this article, but the systems below can also shut off water:

  • Phyn ($50-579) offers leak detection via moisture-detecting “pucks” you can place around your home under sinks and other water appliances, but it also has a “smart water assistant” that can notify you of leaks via pressure waves in the system in both your hot and cold water lines.  It also has a “plumbing check” function to detect pinhole-size leaks.  The Phyn Plus will shut off your water in case leak parameters are exceeded. 
  • YoLink has a variety of water leak sensors that connect to their hub and thus can be programmed to activate an automatic water shutoff valve that is connected to the same app.

Flow-sensing: 

  • Water Hero ($900-1250): This is a whole-home system that is installed on the main water line just inside or outside (only in non-freezing climates) your home.  The motorized valve is installed by your plumber, and then it can be activated when you connect the unit to wi-fi and set up the water usage parameters for your home online.  If the water usage exceeds the parameters you set (for example, for 20 minutes continuously), the valve shuts, limiting water leakage in the home.
  • FloLogic ($2000-2900): This is also a whole-home system that is installed on the water main line, indoors or outdoors (outdoors with precipitation protection).  It has a more sophisticated flow sensor; FloLogic’s EverWatch™ leak sensing technology can see leaks in real time starting a ½ ounces per-minute (about a tablespoon).  Normal water use happens in intervals. Leaks are constant. Once flow begins, FloLogic measures the time duration. If the flow time exceeds the allowance, a leak is suspected and the water is shut off automatically.   The system can have a local control panel or app-based control.
  • Moen Flo Smart Water Monitor and Automatic Shutoff Sensor ($500) is an app-based product that “learns” your home appliances’ water usages and can shut off flow when leaks are detected through their FloSense technology.  The app is free with the product and the system is compatible with Amazon Alexa, Google Assistant, and Control4. 
  • YoLink FlowSmart Control: Meter & Valve Controller, $40-1180, is an AC or battery-powered device (4 AA batteries) that monitors water usage and will shut-off water if flow exceeds pre-determined limits you set on the app.  This device requires a YoLink “hub” as it doesn’t connect directly to the app or your wi-fi.  

There are additional considerations as well.  Most of these valves are recommended to be installed by a licensed plumber.  You’ll also need to check what kind of battery backup they have so that in case of a power outage, you’re still protected from leaks.  If you don’t want wi-fi control, only one system (FloLogic) seems to have a local panel option instead of the app.  Despite these details, the time and money you spend on selecting such a system could be “a drop in the bucket” compared to costly renovations from water damage if you didn’t have this protection.  Busy lives and unattended homes need help to keep the water where it should be–in the pipes and drains!

Photo by Jimmy Chang on Unsplash

Do HypoAir products kill the “good” bacteria as well as “bad” bacteria?

Do HypoAir products kill the “good” bacteria as well as “bad” bacteria?

Short answer: yes, some good bacteria are killed, but let us explain a little about the nature of bacteria, and how this technology affects them!

Since HypoAir’s bipolar ionization is made for the home, we are talking about “good” bacteria for humans, found on exposed home surfaces, the skin, and upper respiratory tract, because this type of ionization does not penetrate to interior surfaces.

So the answer is: yes, bipolar ionization does kill some “good” bacteria, but the type of bacteria, on which surfaces, at what humidity, at what concentration of ions, and so on, are highly variable!   We find that the biological and air quality contaminants found in homes are typically in high unhealthy concentrations, which are typically not found in the outside air.   We want to reintroduce natural counterbalances to suppress the spread and growth of these biologicals indoors, to make them more similar to what's found in nature.  However, our technologies are not going to sterilize the environment; they're just designed to cut concentrations and reduce illness in families.  In 20-30 years, technologies like ours could become very cost effective and installed throughout a home to have a nearly sterilizing effect in our indoor environments.  We don't want that!  At that point, the intentional reintroduction of a positive biome would be advisable.  If you are concerned that the use of bipolar kills too many good bacteria, you may want to investigate probiotics for the air to replace those good bacteria on surfaces, and use gentle cleansers and soap for your skin, dispensed from containers that don’t promote the growth of bacteria.  And, consider the fact that pets (and dogs especially) vary the nature of your home’s microbiota a lot too!  

Getting back to bacteria, here’s a short refresher from an article about bacteria, endotoxins and exotoxins:  bacteria can be classed into two different groups: “Gram-negative” or “Gram-positive”.  These classes are based on a test developed by scientist Christian Gram in 1884, which differentiates the bacteria using a purple stain.   According to webmd.com, bacteria either have a hard, outer shell, or a thick, mesh-like membrane called peptidoglycan.  The hard outer shell will resist the purple stain, and show up as a red color.  These are called “gram negative” because the purple stain did not show.  Bacteria with the peptidoglycan absorb the purple stain much more easily and are called “gram positive”.  The stain also tells many more characteristics about the bacteria and the way it interacts with bipolar ions.

Bipolar technology is also called cold atmospheric-pressure plasma (CAP), or non-thermal plasma (NTP).  In a study which analyzed how plasma affected bacteria in soil, it turned out that the non-treated soil consisted of both gram-positive and gram-negative bacteria from different phyla (a level of classification).  After treatment with plasma, however, the gram-negative bacteria were mainly eradicated, and only the major phyla of Firmicutes (gram-positive) were left.  Presumably this has to do with the structure of the bacteria.

The authors cited two previous studies on treatment of E. Coli (gram-negative) and S. Aureus (gram-positive) with cold plasma.  In the first study, the treated Gram-positive bacteria was mainly inactivated by intracellular damage, while the Gram-negative bacteria expired mainly by cell leakage.  The second study showed that plasma treatment led to damage of the bacterial cell wall of both E. coli and S. aureus and a decrease in the total concentrations of nucleic acid and cellular protein. However, S. aureus (gram positive) was less susceptible to plasma exposure in comparison to E. coli (gram-negative).

The sum of these three studies seem to indicate that gram-positive and gram-negative bacteria are affected by plasma differently, and chances of survival of bacteria after treatment with cold plasma is higher if a bacteria is gram-positive, having more of the mesh-like membrane (peptidoglycan).  One can see from the diagrams below that these peptidoglycan layers are relatively thick on the gram-positive type, which may account for its resistance to plasma.  Depending on the relative humidity of the air, plasma can form varying quantities of reactive oxygen species such as hydroxide ions (OH-), hydroxyl radicals (•OH), atomic oxygen (O), hydrogen peroxide (H2O2), and singlet oxygen (1O2).   Ozone (O3) is another ROS formed by plasma generators, however we’ve excluded it from HypoAir ionizers by limiting the input energy.  These ROS are reported to damage the bacterial structure and functions.  In addition, the multiple reactive nitrogen species (RNS), including nitric oxide (NO), peroxinitrites (ONOO−), nitrites (NO2−), and nitrates (NO3−), can play a major role in the plasma’s biocidal process by altering the cell wall components, the functions and the structure of the phospholipid bilayer, the structure of nucleic acids and cellular proteins, gene expressions, and protein synthesis. (Effects of Atmospheric Plasma Corona Discharges on Soil Bacteria Viability)

Image source: Difference between gram-positive and gram-negative cell wall

However, there are factors other than gram-type that affect bacterial eradication via plasma technology, such as pH, humidity, and the surface on which the bacteria were placed during plasma exposure.  Specifically, 

  • Lower pH can translate to higher kill rates.  A reduction of 4.9 log was observed when Bacillus cereus was treated at pH 5, while a reduction of only 2.1 log was observed at pH 7.  Interestingly, the same study showed that “No appreciable differences between gram-positive and gram-negative pathogens were observed, although the spore-forming B. cereus was more resistant to plasma than non-spore-formers.” (Spores in bacteria are not the same as mold spores; only one bacteria makes one spore). 
  • Humidity was also reported as an important parameter; increasing the relative humidity was correlated to efficiency in plasma inactivation of Aspergillus niger, which was explained by the generation of more hydroxyl radicals. However, the same study showed that “In contrast, B. subtilis showed slightly poorer inactivation at high gas humidity.”
  • Regarding the surface on which the bacteria were placed during plasma treatment, higher eradication was observed when microorganisms were loaded on a filter compared to a fruit surface, because the microbes could “migrate” to the interior of the fruit.  Therefore, if the bacteria could migrate into a moist surface, it was more likely to survive. (Cold Atmospheric Plasma Disinfection of Cut Fruit Surfaces Contaminated with Migrating Microorganisms)  Wow, bacteria can migrate! 

Now that we know that there are a lot of variables in your home that affect the mortality of bacteria, how likely is it that “good” bacteria on skin, your upper respiratory system, and home surfaces will be killed?

First of all, let’s look at what types of bacteria these are.  Staphylococcus epidermidis (phylum Firmicutes, gram-positive)  is a part of the skin microbiota (aka skin flora) and another type of good bacteria is Roseomonas mucosa (phylum pseudomona dota, gram-negative), which is naturally present on the skin and contributes to an overall healthy skin microbiome. (Dermatologists Break Down the Difference Between Good and Bad Bacteria)  In addition, the optimal pH value of skin on most of our face and body lies between 4.7 and 5.75, which is mildly acidic. (Understanding skin – Skin’s pH)  According to the studies above, it’s not known whether good bacteria on healthy skin survive plasma treatment, because although healthy skin is normally mildly acidic (which promotes their death by ions), moist skin favors preservation of good bacteria. Therefore, no matter what relative humidity is in your home, it’s a good idea to keep your skin hydrated!  

Concerning the upper-respiratory tract, potential keystone microbiota are Dolosigranulum and Corynebacterium species (both gram-positive), as they have been strongly associated with respiratory health and the exclusion of potential pathogens, most notably Streptococcus pneumoniae, in several epidemiological and mechanistic studies. (The microbiota of the respiratory tract: gatekeeper to respiratory health)  Regarding pH, airway surface liquid pH in normal airways ranges in vivo between 5.6 and 6.7 in the nasal mucosa, and is around 7.0 in bronchia.  (Airway Surface Liquid pH Regulation in Airway Epithelium Current Understandings and Gaps in Knowledge) Therefore it’s mildly acidic in the upper regions, and tending toward neutral pH in the lower regions.  Being gram-positive favors survival, as does being in mucous, but being on a mildly acidic surface favors eradication of these good bacteria.  Again, keeping your mucous membranes moist via water intake and plain saline sprays is a good idea!

Finally, most of the ions that are emitted by bipolar devices will contact surfaces in our homes.  What kind of good bacteria live on surfaces?  Forty homes in North Carolina were sampled for a study in August 2011.  Standard places like cutting boards, kitchen counters, door handles, toilet seats and pillowcases were sampled.  The bacterial families with the highest relative abundances across all of the collected samples were the Streptococcaceae (8.9%) (gram-positive), Corynebacteriaceae (5.6%) (gram-positive), and Lactobacillaceae (5.1%) (gram-positive).  Since these are all gram-positive, their survival would also depend upon the acidity and nature of the surface.  Keeping the humidity in the home in the sweet range of 40-60% will favor the production of more bacteria-killing hydroxyl radicals, and cleaning regularly is important.  Wet, dusty or cluttered surfaces will actually promote good bacteria survival, but they also promote bad bacteria survival too, so to play it safe, it’s best to keep surfaces clean!  

Is it ok to walk around barefoot in my home? I’m concerned about my feet absorbing mycotoxins.

Is it ok to walk around barefoot in my home?  I’m concerned about my feet absorbing mycotoxins.

Often we end up researching and writing articles in response to client questions, and this is one such article.  If your floors are warm or carpeted, it often feels good to walk around barefoot in the house.  However, this may or may not be a good idea, depending on what is on your floors.  Can toxins really go into or out of your feet?

“Foot detoxing” pads, baths and creams have been popular for a while.  Usually they show the pad or water turning brown with “toxins” after supposedly releasing them from your body through the feet.  However, there have been very few studies on their effectiveness.  In a small 2012 study, the researchers sampled water from before and after foot baths with the popular IonCleanse device, as well as hair and urine samples.  They found no evidence to suggest that ionic footbaths help promote the elimination of toxic elements from the body through the feet, urine, or hair.   So, it’s unlikely that these methods are able to pull toxins out of the body.

However, some molecules can be absorbed through the skin (particularly the feet) into the bloodstream.   You can even “taste” with your feet; if you apply garlic to the soles of your feet in a plastic bag ala this video, you can taste it in your mouth between 15 minutes to one hour later.  This is because small, light molecules like allicin (the chemical released in freshly-cut garlic) can penetrate the skin and the bloodstream, traveling throughout your body.  Dimethyl sulfoxide (DMSO) is a chemical that has similarities to allicin and is very easily absorbed through the skin.  Part of the DMSO is transformed to the volatile metabolite dimethyl sulfide, which gives a characteristic garlic- or oyster-like smell when excreted through the lungs.  (Adverse reactions of dimethyl sulfoxide in humans: a systematic review)  Therefore, we are susceptible to chemicals that behave in this way.  Scientists and drug-researchers are constantly in search of chemicals that can deliver drugs more easily to the bloodstream, and therefore new “carriers” are of great interest.  

What about mycotoxins that may happen to be on the floors?  Can we get mycotoxin poisoning from walking around barefoot?   Although there’s no direct answer via testing, research on individual mycotoxins shows that they can be absorbed through the skin, so it’s reasonable to assume that they can be absorbed through the skin of the soles of the feet.  Since mycotoxin concentration on surfaces is highly variable, however, it remains to be seen whether concentrations sufficient to cause illness are present on floors. 

We found that a 2014 paper summarizing previous research on the absorption of the most common mycotoxins through skin and their effects, was most helpful.   This research documented mostly animal trials to determine toxicity, but there are also reports of workers who were accidentally exposed to these toxins.   The actual methods of damage incurred by these toxins can be quite complex, so we will spare you the details, but many of them cause oxidative stress that stimulate the immune system, triggering inflammation and cell damage.  Here are some examples:

  • T-2 toxin, a member of the trichothecene mycotoxin family, is produced by various species of Fusarium fungus, which can infect corn, wheat, barley and rice crops in the field or during storage.  It’s infamous for allegedly being used as a bioweapon during the military conflicts in Laos (1975-81), Kampuchea (1979-81), and Afghanistan (1979-81) to produce lethal and nonlethal casualties. (CBRNE - T-2 Mycotoxins) T-2 toxin causes oxidative stress, which releases cytokines (proteins that help control inflammation in the body) that are thought to cause the death of the outer layer of skin cells (keratinocyte apoptosis).   T-2 mycotoxicosis can cause nausea, vomiting, diarrhea, leukopenia, hemorrhaging, skin inflammation, and in severe cases, death. (T-2 Mycotoxicosis)  The reported LD50 (amount which causes death in 50% of exposures) of T-2 toxin is approximately 1 mg/kg of body weight. (Medical Aspects of Chemical and Biological Warfare)
  • Citrinin (CTN) is a product of several fungal species belonging to the genera Penicillium, Aspergillus and Monascus. To summarize, CTN under in vivo conditions has the ability to cause oxidative stress and ROS-mediated DNA damage in mouse skin upon topical exposure, leading to skin death.
  • Patulin (PAT) is a toxic chemical naturally produced by several species of mold, especially within Aspergillus, Penicillium and Byssochlamys.  A single topical application of PAT to mouse skin generates ROS, which causes DNA damage in skin cells.  In small doses it causes death of the cells, but in larger doses it initiates tumor growth.
  • Aflatoxins are products of  several types of Aspergillus molds, with AFB1 known as the  most potent teratogen (causing malformation of embryos), mutagen and hepatocarcinogen (causes liver cancer) of all aflatoxins. Like in the case of PAT, AFB1 may also cause skin tumors in mouse skin after long-term and higher-dose application.
  • Ochratoxin A (OTA) is a fungal metabolite produced by Aspergillus ochraceus and Penicillium verrucosum. OTA is found in a variety of plant food products such as cereals. To summarize, a single topical exposure of OTA at the dose level of 20–80 μg/mouse (20-80 millionths of a gram, with a mouse weight of 40-45 grams, translates to 0.5-2.0 ppm) induces the production of ROS, resulting in the skin cell death. On the other hand, a single topical exposure of OTA at a dose level of 100 nmol/mouse causes significant enhancement of short-term markers of skin tumor promotion in mouse skin.

As you can see, the least effect of these mycotoxins is to cause skin cell death, but the worst effects are whole-body!  They are effectively absorbed through the skin.  However, is it reasonable to assume that they would be found on your floors, in a sufficient quantity to cause illness?  

A 2012 study of a family that started to experience illness shortly after moving to a home in Hawaii in 2008 indicates that mycotoxin levels in the low parts-per-billion range on various surfaces in the home (including a sandal and a bath towel), as well as elevated fungal counts, can cause systemic illness.  The father and mother, aged 40 and 39, had an 8 year old daughter, a 5 year old son and a pet dog, living in a 2-story home with a crawlspace that had water intrusion.  According to one of the two inspection companies hired to investigate the home for mold, “A serious moisture/mold problem is observed in the crawlspace directly below the bedrooms. Moisture is penetrating the walls of the foundation. The HVAC system is designed to force air into the crawl space, forcing crawl space air into the bedrooms and other areas above. Moisture intrusion also results from the master shower into the crawl space as well as from sprinklers, damp soil against the foundation, lack of roof gutters, and poor grading.” Similar findings were in the second report, plus: “Smoke testing revealed communication between the crawl space and upper level bedrooms via electrical outlets and electrical ducts and plumbing. The conduit holes were not sealed, permitting observance of light coming through spaces in the floor joists. A musty odor was present in the master bathroom and noted to get stronger when the fan coil was turned on.”  ERMI tests for mold indicated ERMI levels of 2 to 3 throughout the home, which “represent a moderately high index, and further investigation should be conducted to establish if your home has a mold contamination problem”.  (Interpreting ERMI test results) Here are the test results for mycotoxins; mycotoxins can be measured from air or dust samples and in this case the dust was analyzed:

All four of the family members and the dog tested positive for OTA and some for tricothecenes in their urine; they had health problems involving the upper and lower respiratory tract, headaches, neurocognitive deficits, and severe sinusitis. They had chronic sinusitis and nasal inflammation, and the isolation of bacteria (Pseudomonas and Acinetobacter) and molds (Penicillium and Aspergillus) from nasal secretions from the father and daughter is consistent with other cause and effect symptoms of mold exposure.  Even the dog suffered from 72 lesions, an ear mass and lipomas (which were surgically removed), in were found OTA and tricothecenes.  The mother gave birth to a daughter 3 months after moving out of the home, which had skin inflammation and discolorations because of being exposed to mycotoxins in the womb and via breastmilk.  

Therefore, we can conclude from this sad scenario that mold, bacteria and mycotoxins are a real concern in house dust when the home has water intrusion and mold issues.  There’s no way to know how much of the mycotoxins were inhaled versus absorbed through their skin, but of course young children are closer to the floor, often crawling and sitting on it, thus sitting in dust, stirring up dust, and breathing it in.  The dog obviously suffered from laying on the floor!  

According to IndoorScience, a reputable indoor air-quality testing company, 

  • there are no guidelines for “acceptable” amounts of mycotoxins in house dust, 

  • mycotoxin testing is much more expensive than standard mold testing, and 

  • there are only a few labs that perform mycotoxin testing.   

However, if you have water intrusion or mold problems in your home that you suspect are causing health problems, mycotoxins or toxins from actinobacteria (see our article here) could very well be the culprit.  In these cases, solving the water intrusion problem and remediation and thorough cleaning will also remove the mycotoxins and bacterial toxins!  Here are some tips for maintaining a cleaner home from our related article

  • Invest in a HEPA air cleaner to remove dust from the air

  • Clean floors regularly with a HEPA vacuum and mopping (some appliances do both)

  • Filter the air that comes into your home via window filters

  • Change your HVAC filter regularly and even upgrade it if possible

  • Try to remove your outdoor shoes at the door, and wear indoor shoes or slippers only in the home

  • Minimize clutter, upholstery and carpets that can hold dust. 

These are also common recommendations of doctors and practitioners who see mold illness in their patients, because removing them from surfaces is helpful whether the toxins are inhaled or absorbed.  If you suspect water intrusion anywhere in your home (even in places you can’t see, like the crawlspace or attic),  of course you’ll need to address remediation in the moldy area pronto.  However, since you don’t know how air currents may be carrying dust and toxins into the living space, it’s a safe bet to also step up the cleaning and keep your shoes on!

Photo by Jimmy Chang on Unsplash

Excuse me but your fireplace is open!

Excuse me but your window fireplace is open!

Heading into the winter heating season, many of us are thinking of cozy nights snuggled inside our homes, not the cold drafts that spoil the atmosphere in more ways than one–ahem, even our heating bills!  Drafts are invisible sucks on our budget, like “phantom” power leeches that use electricity.  The drafts coming from the fireplace are comparable to leaving a window cracked open.  In our article about how to keep the fireplace from polluting the house, we noted that the average household can save 14% on their heating bill by weatherstripping the fireplace.   It’s time to prepare for maximum coziness!

Working fireplaces have dampers, and these should work well.   Dampers are like “valves” that should be closed when the fireplace is not in use, to prevent outside air (and smoke particles from the flue) from coming back into our homes when we’re not using the fireplace.  However, dampers are not air-tight; they just don’t have the ability to block drafts.  Here are several other places to really air-seal your fireplace:

1) At the chimney cap: this requires you to get up on the roof or hire someone to do that.

2) Inside the flue with a balloon: the balloon, however, can shrink as temperatures get colder, or get punctured on a rough surface and leak.

3) At the hearth (bottom): this is the most physically convenient place, and can be easily removable for those times you want to use your fireplace.

Although the first two can accomplish air sealing well with the right products, #3 is actually the healthiest because the chimney and firebox (with smoke particles on their surfaces) stays separated from your house air.  

Here are some ways we’ve found to seal out those drafts all year long: 

If your fireplace is a bare opening in the bricks, like mine, this is the most difficult to seal but worth the effort.  Here is are two ways to do it:

Method 1: You’ll need: 

  • 4 pieces of wood (at least 1” square, larger is better) or metal tubing cut to fit the length and width of the opening (see diagram below)
  • Foam insulation tape to go around the frame in the opening
  • Glue gun and glue if adhesive on insulation doesn’t work well
  • Magnetic tape or velcro tape
  • Optional: 1-2  tension rods will help stabilize the frame if the wood doesn’t fit snugly.
  • An insulated blanket or piece of plywood cut fit over the frame.

You’ll want to thoroughly plan out how the frame will fit together before cutting your wood or metal to length!  Here’s how I cut mine:

Then, add insulation to the perimeter of the pieces using the adhesive on them, or a glue gun, and fit the wood snugly back into the opening–you may need to re-cut the pieces to accommodate the increased thickness due to the insulation.  

You can add 1-2 adjustable tension rods across the opening or up and down for added stability.

Next, add magnetic tape or velcro to the front of the wood pieces in order to attach the insulation.  You can use all kinds of materials to cover the opening and get creative!  Just remember that there will be a temperature differential in winter or summer, so adding some insulation to the back of the material makes it even more energy efficient.

  • Foam board or cardboard (if cut to fit snugly, no tape is needed to secure it in the opening)

  • Bed blanket with extra insulation glued or stitched to back or inside

  • Old electric blanket with wire removed and extra insulation added inside (stitched in place)

  • Plywood

  • Drywall

Of course, if you decide to use the fireplace, remove ALL of these materials and store them away for re-installing later. 

Method 2 involves taking a baby or pet gate and setting it to firmly span the opening, then cutting a foam board or cardboard to fit exactly over it (you can cover the foam board with wallpaper or fabric).  While this method can be sturdier and quicker to do, it does involve finding an unused gate and cutting the foam very carefully so that it seals the opening. Alternatively, you could cut a used foam mattress topper slightly larger than the opening, and squeeze it into place to cover the gate (again, covering the foam with any decorative material). 

Here’s how my fireplace draft blocker turned out with a fleece blanket, 2 sheets of cardboard glued together, and a staple gun (admittedly I could have stretched the fleece a bit more or made a border for more visual interest):


Voila!  Just sticking my head into my fireplace one time during this project and smelling the lingering smoke smell made me think, why didn’t I do this sooner?  Drafts and smoke be gone all year long!

Norovirus: one tough virus to avoid

Norovirus: one tough virus to avoid

There’s a lot to be said for cruising on ships.  If you want a pre-planned vacation that offers as much or as little adventure as you desire, cruises top the list.  The economy of cruise ships, though, depends on the number of passengers, and with all those passengers come a number of microbes that your body may not tolerate well.  Although norovirus is a disease that can happen anywhere, health officials track illness more closely on cruise ships, so norovirus outbreaks on cruise ships tend to be more extensively documented and publicized. (Facts About Noroviruses on Cruise Ships)

Norovirus is the illness caused by viruses in the Caliciviridae family. When the virus enters your body, it makes your stomach and intestines swell or become inflamed. This is a condition called gastroenteritis, which leads to symptoms that typically include diarrhea, vomiting, nausea and stomach pain. Mild fever and aches are possible. Although it’s often called the “stomach flu”, norovirus is not the influenza or “flu” virus.  (Norovirus appears to keep spreading as rate of positive tests exceeds last year's peak)    

So how does the norovirus get transferred so quickly?  Infected people “shed” billions of particles of the virus through feces and vomit, and it only takes 1 particle of virus to become infected.  This “viral shedding” happens because viruses make copies of themselves very quickly. Every time a virus infects a cell, the number of viruses increases more and more rapidly. The immune system does its best to neutralize the virus by using antibodies, but it can take the immune system a long time to make enough antibodies to kill all the virus living inside one person. In the meantime, the virus has already spread to other people by taking it in orally.  (Viral Shedding and What It Means for COVID-19)  Sometimes, certain foods, including oysters and other seafood, are naturally contaminated with norovirus, so you can get it from eating contaminated foods too. (Norovirus)   

Although norovirus cases usually peak in the wintertime, places like cruise ships foster the environment that helps it to spread quickly (close contact), so it’s not really surprising that a norovirus outbreak on a cruise ship in June 2023 caused approximately 175 people to fall ill.  Here are some facts you need to know: 

  • After you come into contact with norovirus, it can take 12 to 48 hours before you start to show symptoms. This amount of time before you get sick is called an incubation period. Most people get better within 1-3 days.  After your symptoms stop, you’re still contagious for up to 48 hours.  That means an infected person could be contagious for 2+3+2 days, or a whole week! (Norovirus: Why Cases are on The Rise and How to Avoid It)

  • The virus can thrive in food buffets and cafeterias because many people touch the utensils that are used to serve the food.  According to the CDC, norovirus can stay viable on surfaces for days or weeks!

  • Although alcohol-based sanitizers are effective on many other types of viruses, norovirus is alcohol-resistant, because it lacks a lipid-based envelope.  Therefore, you can’t depend on an alcohol-based hand sanitizer to beat norovirus.  (How Much Effect Does Alcohol Have Against Alcohol-Resistant Norovirus?)  Another popular (but toxic) ingredient in hand sanitizers is Quaternary compounds (Benzalkonium chloride), which is NOT effective against norovirus either.  (Norovirus fact sheet for environmental cleaning)

  • Soap and water are recommended for cleaning hands because they can lubricate your hands enough to loosen the virus particles and wash them down the drain.

  • Noroviruses are relatively resistant to heat also. They can survive temperatures as high as 140°F and quick steaming processes that are often used for cooking shellfish. (Norovirus Illness: Key Facts)

  • There are many types of norovirus and sadly, you can get it more than once.  

Whew, these facts are hard…how can an uninfected person to stay well during an outbreak of norovirus?  Keep in mind that unlike rhinoviruses, which are mainly spread through the air, norovirus is mainly spread by touching infected surfaces and then touching your mouth or eyes. Here are some tips from the CDC:

  1. Wash hands thoroughly with soap and water for at least 20 seconds (humming the happy birthday song twice is about 20 seconds).  You should wash after using the bathroom, before preparing or serving food, and especially after contact with an infected person. 

  2. Wash fruits and veggies and cook seafood thoroughly.

  3. Don’t prepare food for others while you’re sick and for 3 days after you recover.

  4. Clean and disinfect contaminated surfaces like the bathroom and kitchen, doorknobs and railings.

  5. Wash laundry thoroughly.  

One problem is that not everyone who carries the virus is symptomatic, but everyone who carries it sheds virus particles, whether they show symptoms or not!  Therefore, when in close contact with a lot of people, extreme vigilance will help you to ward off illness that could ruin your cruise (or conference, or family reunion…)   

Of course we like to find the most non-toxic ways for you to disinfect all these surfaces!  Chlorine bleach, Glutaraldehyde (0.5%) or Iodine (0.8%) mixed at the manufacturer’s recommendations ARE effective at killing the virus.  Of these, only iodine is safe and effective as a hand sanitizer.  A study showed that antiseptics containing 10% povidone-iodine (equivalent to 1% available iodine) reduced virus at a rate higher than that achieved with any of the alcohol-based sanitizers, non-alcoholic sanitizers or antimicrobial soaps that were tested as well.

Although the same study showed that Glutaraldehyde (0.5%) was effective at killing the virus, like bleach it can irritate nasal passages and eyes, as well as severely burn skin.  A study performed in 1993 showed the virucidal effect of copper, iron and mixtures of these two elements with peroxide, on 5 viruses.   The copper-peroxide mixture performed the best, even better than glutaraldehyde.  The study proposed that a formulation comprising 0.05% copper and 5% peroxide should have a virucidal efficacy comparable to that of glutaraldehyde at 2%, the concentration (used for 2 to 20 min), which was currently recommended for disinfection of a wide variety of medical devices.  

The great news is that our all-purpose, non-toxic cleaner TotalClean combines both copper and iodine, and when they are combined, they produce peroxide!  In simple terms, the peroxide acts as an “oxidizing agent”, destroying the means for bacteria to take in oxygen and suffocating them. 

You can also go to this page on the EPA’s website to find products that are capable of inactivating norovirus, or many other viruses!  Norovirus is a “tier 3” virus, which are small, nonenveloped viruses that are the hardest to inactivate. (For more information on “enveloped” vs. “non-enveloped” viruses, this video is very informative.)  Both their protein capsids and their small size make them less vulnerable to disinfectants compared to other viruses.  Norovirus is not able to be cultivated for testing in human cell cultures, but the closest relatives, Feline or Murine Calicivirus, can be inactivated by the following non-toxic disinfectants: Hypochlorous Acid (a safer chemical related to bleach), hydrogen peroxide, thymol (a natural antiseptic produced from thyme), peracetic acid and citric acid, among others.  The sortable database also gives brand names so you can find these products online or in stores.

The bipolar ionization in Germ Defender, Upgraded Air Angel Mobile and Whole Home Polar Ionizer can kill microbes in the air and on surfaces by creating positive and negative ions that disperse through the air and interact with the microbes to inactivate them.   In order for ions to inactivate the norovirus, they would need to fight the virus on surfaces, also called fomites.   Although this technology has not, to our knowledge, been tested against norovirus or other non-enveloped viruses, in a 2015 study using influenza A and animals, negative ionization caused 2 effects: inactivation of virus particles in the air, and more efficient capture of the particles on a collector plate (because the particles became negatively charged and the plate had a slight positive charge).  

So, if you happen to be in close contact with a lot of people, remember the advice that many mothers give: wash your hands and avoid touching your mouth or eyes.  And we would add: disinfect surfaces using a safe, non-toxic disinfectant approved to do so.  These steps could well spare you a big stomach-ache and pain!  

Photo by Adam Gonzales on Unsplash

More Enzymatic Cleaners to the Rescue!

More Enzymatic Cleaners to the Rescue!

If you read our article “Breaking down Mycotoxins and mVOCs with Enzymes and Non-Toxic Cleaners”, we described that certain enzymes can be used to break down mycotoxins, the toxic products of mold, which can otherwise be very hard to eliminate.  Enzymatic cleaners specifically targeting mold and mycotoxins are few, but we wanted to let you know that all-purpose enzymatic cleaners work on stains, odors, and general cleaning duties all around the house!

First of all: What is an enzyme?   Enzymes are proteins produced by living organisms that act as catalysts in chemical reactions.  Enzymes can either build up or break down.  For our purposes, cleaning enzymes facilitate breaking down microbes and their byproducts that cause sickness, stinkiness or stains.  

Scientists have been exploring making artificial enzymes since the 1990’s, and many of these are mimicking enzymes found in nature.  Here are the most common types of natural enzymes (from Simple Science: How in the World do Enzymes Clean?):

  • Proteases break down protein-based soils including blood, urine, food, feces, wine and other beverages.

  • Lipases break down fat molecules like oils and grease.

  • Amylases break down starch molecules like eggs, sugars, sauces, ice cream, gravy.

  • Cellulases are used to soften fabric and restore color to fibers made up of cellulose material. They also remove particulate soil and reduce fabric graying and pilling.

Enzymes were initially produced by extraction from glands of various animals; however, modern enzyme production is done through fermentation of various fungi and bacteria through the steps of fermentation, recovery, and standardization.   (about Cleaning Products: Enzyme Science

Enzymes and purely enzymatic cleaners are not “alive”.  Bio-enzymatic cleaners, however, do combine enzymes with bacteria, which are “alive”. Examples are drain cleaners and some pet stain removers.  

Enzymatic cleaners are marketed to pet owners (and even more so to cat owners) because cat urine can be especially concentrated (cats make the most of the little water they drink), and so once it’s deposited, the ammonia and hormones in the urine start to smell, and bacteria start breaking it down into urea.  It’s an unmistakable fragrance, and enzymatic cleaners are regularly recommended by veterinarian and pet experts for pet accident cleanup (the ASPCA, mobile vet company The Vets, and professional veterinary site DVM360 are just a few examples).  

Some of the benefits of enzymatic cleaners are:

  • They tend to be more powerful by working on more substrates (surfaces, conditions) in lower concentration than chemical cleaners.  Therefore you use less, resulting in less packaging.

  • They work at moderate pH and temperature, allowing for milder detergents and less energy, like cold-water laundry detergents.

  • Enzymes are not mutagenic (causing changes in DNA) and not clastogenic (causing breaks in chromosomes).  They are not reproductive or developmental toxins and have a low toxicity to aquatic systems.

Some of the cons of enzymatic cleaners are:

  • They can have storage time limitations before the enzymes become less active.

  • They can have storage temperature limitations.

  • They can take longer to work.

  • Some enzymatic cleaners (especially carpet cleaners as in this video) can leave an oily sticky residue if the cleaner is not washed away, which can attract soil/stain even more.

  • They can have inhalation dangers if the cleaner is in powder form, but many formulations are now in dust-free granules that avoid this danger.

  • They can be incompatible with other cleaners like bleach and chemical disinfectants, which can deactivate the enzymes.

So, here are some enzyme cleaners you might like to try:

For pet owners:  Rocco & Roxie Stain & Odor Eliminator for Strong Odor - Enzyme Pet Odor Eliminator for Home has a LOT of fans for the way it quickly and thoroughly eliminates pet odors and stains (just read some of the comments/watch videos).  Although their ingredients are a bit mysterious (Water, advanced biological blend, non-ionic surfactant, odor counteractant), the company says it is safe to use around pets and children, and certified safe for all carpets from the Carpet and Rug Institute (CRI).  They also offer a 100% money-back guarantee if you’re not satisfied.

For anyone who cleans: TweetMint Enzyme Cleaner contains no volatile organic compounds (VOC) or synthetic chemicals. It's completely free of artificial colors & fragrances, preservatives, animal products or by-products and has not been tested on animals.  Since it’s concentrated, a little (just ½ oz) will make ½ gallon of medium-strength concentrate, and the website publishes a whole list of jobs like cleaning windows and floors, degreasing, stain removal, odor elimination, and even pest control (garden and home).  The active ingredients are purified water, anionic/nonionic surfactant blend, glycerin, enzymes, peppermint oil, sodium borate. Sodium borate is a naturally-occurring compound made of boron, oxygen, hydrogen, and sodium, and in 2020 the Cosmetic Ingredient Review (CIR) Expert Panel evaluated data and concluded that sodium borate is safe as a cosmetic ingredients in concentrations less than or equal to 5%.. (Sodium Borate: Is it Safe?)

For anyone who showers or washes clothes:  Zerotaboos (ok, just put a space in there to easily say it: zero taboos!) is a woman-owned company which uses prebiotics (simple sugars, which are food for beneficial bacteria) and postbiotics (Lactobacilli ferment filtrate) in their products to encourage growth of good bacteria so that you don’t need harsh chemicals and fragrances to smell better.  Their Laundry Enzymes contain 10% nuclease enzymes, the strongest concentration available and the best for breaking down body odor.  It doesn’t replace your regular laundry detergent, but does a good job of removing troublesome body odor from clothing so that it actually smells fresh again after washing!  This owner knows her stuff and cares about her customers (see video on why she stopped offering refill packaging). For sure, bacteria and their byproducts have fed odors and fears long enough…it’s time to turn the tables by putting good bacteria and enzymes to work for us!

Photo by Daiga Ellaby on Unsplash
Glowing under blacklight

Glowing under blacklight

I’ve heard that in the 1960’s, blacklight posters were all the rage.  Glowing things are cool!  How does blacklight actually cause things to glow?  

“Blacklight” is an invisible form of light that operates in the ultraviolet range.  Because light takes on a wave form, the frequency of the peaks and troughs in the wave are known as wavelengths.  In the visible spectrum, reds and oranges have the longest wavelengths, and at the other end of the spectrum, blues and violets have the shortest wavelengths, meaning they have higher frequency.   Ultraviolet light is not visible to us, yet exists beyond the violet shade.  The wavelengths of ultraviolet light are grouped into 3 bands: A, B and C.   

UV-A, with wavelengths ranging from 320-400 nanometers (nm), is the safest form of UV light and often referred to as Longwave UV.  This kind of UV light is generated by Blacklight units (the dark purple fluorescent tubes) as well as UV LED flashlights.  Black lights are considered safe for use in the home as well as theatres and night clubs etc.  Most quality sunglasses will protect eyes against UV-A.  

UV-B, at 280-320nm wavelength, is the one that can cause sunburn when over-exposed. It can also be used in the medical treatment of certain skin conditions.  Most quality sunglasses will protect eyes against UV-B.

UV-C, at 200-280nm wavelength, is totally absorbed by the Earth's atmosphere, but also widely used as a germicidal sterilizer in hospitals. 

Obviously, UV light has had good and bad press.  As you may know, certain types of UV light are known to cause eye and skin damage and cancer.   And certain types of UV light are used to kill microbes, making the air you breathe (or surfaces you touch) safer.  We have a whole article on some of the ways researchers are using UV light to sanitize.  In this article, however, we’re going to look at some of the more useful ways to use blacklight (UV-A) in your life–to literally “see” the invisible!

Blacklight makes some of the invisible, visible, because it illuminates items that fluoresce.  These items contain exposed phosphorus atoms that reflect short wavelength UV light back to our eyes. For instance, paper shines under a blacklight because of the fluorescent chemicals added as a whitener. (Using Blacklights to Find Pet Urine)

Urine glows under UV light because it contains phosphorus. 

Pet Urine:  Unlike the synthetic fluorescents added to white paper, natural fluorescent substances such as dog and cat urine etc, do not glow brightly under UV. In fact, they are generally quite dim, so do not expect a supernova!  You will be looking for patches a little brighter than their background; you’ll know them when you see them.  Cat urine glows particularly well under a black light, as it contains high levels of phosphorus, but the intensity of the glow can vary depending on the animal’s diet and health.  When examining soft surfaces like carpet and fabrics, remember that liquids can quickly soak down into them, so that not a lot of urine remains on the surface to “glow”. It’s also easier to find it:

  • When fully dried, because liquid or damp urine will not glow.
  • When new–the “glow” slowly fades over time as the urine ages.

If you do find “accidents”, try a cleanser that uses enzymes.   You can read all about enzyme cleansers in our article.  (Stain Detective Pro)

Rodent Urine: Rats and mice are incontinent and will urinate and defecate on the move, up to 80 times a day! This means you will be looking for a trail of urine droplets or streaks leading in the direction of travel. Urine and droppings are deposited where the rodents spend most of their time and where they travel.  Amino acids in rodent urine will fluoresce, or emit light of a different color, when exposed to ultraviolet light. This makes it possible to see rodent, rat, mouse, hamster, guinea-pig or squirrel urine even in dark places. (Rodent Detector Pro)

Mold often glows under blacklight.  In this video, mold stains that are not visible in normal light are shown on the ceiling under blacklight.  If you are not seeing stains in an area that has leaked before, or has a high level of humidity, the key may be to shine the light at an angle against the wall.  You should shine the ultraviolet light closely along the sides of the suspected surface or walls. The angle of illumination will show the presence of fungus, however, some cleaning products also leave a glow, so be careful not to mistake cleaning residues for mold. (How To Detect Mold With A Blacklight)

Hand Washing: Blacklights make it possible to see if you are washing your hands effectively and make training on hand-washing easy!  If you apply some UV Germ Grease (which simulates the way germs cover your hands; it’s just a clingy grease with glowing particles), wash according to this video and check them under blacklight to see if any of the grease remains, you’re more likely to get your hands cleaner after this training.

Here are some other interesting items you can get to “glow” in your home: (Got a new UV torch? Here are some things to shine it on

  • Tonic water – the quinine in tonic water glows blue
  • Honey – the aromatic molecules in honey can glow green
  • Turmeric root – the curcumin in turmeric glows yellow
  • Eggs – a compound in eggshells called protoporphyrin IX can glow red
  • Rocks, jewels and gemstones – lots of minerals glow under UV light
  • Cash – banknotes have added photoluminescent details to prevent fraud
  • Cleaning materials – detergents (including laundry detergents) often have photoluminescent molecules to make them easy to see
  • Highlighters and dyes – fluorescence is a type of photoluminescence, so fluorescent markers and dyes will often glow under UV light
  • Vitamins: Vitamin A and the B vitamins thiamine, niacin, and riboflavin are strongly fluorescent. Try crushing a vitamin B-12 tablet and dissolving it in vinegar. The solution will glow bright yellow under a black light. (16 Things That Glow Under Black Light)
  • Antiques that have been repaired or touched up will glow or fluoresce differently in the area where the repair has been made.
  • Insects such as scorpions glow bright green, and Harvestman (Opiliones, also sometimes called Daddy Long Legs) glow blue, as do certain other spiders.

Here are some tips about selecting UV blacklights: 

  • Although many people associate blacklight with a purple light, if you can see the light, it’s not blacklight, and the contribution of visible light diminishes the ability to “see” any hidden markings. 
  • The frequency of UV light emitted determines the quality of results obtained.  There is a sweet-spot for UV which is between 365nm and 385nm.  However, to manufacture LEDs capable of emitting in this frequency range is far more expensive.
  • There are different types of lamps that are used to make UV light:
    • Mercury vapor lamps are used in theaters and large spaces where it’s needed to project UV light over a distance
    • UV fluorescent tubes or bulbs are smaller and more portable, with decent quality
    • UV LED lights: these come in a wide spectrum of quality (wavelengths), but they are very portable and consume little energy.

So....I went sleuthing one night with a small, inexpensive blacklight borrowed from a friend, and it works!  First I looked around some registers I knew had sweated when I had an older, less efficient HVAC system, and there they were--old stains and mold that was not even visible in the daylight (I have some popcorn ceilings so shining the light at an angle really accentuates the stain).  Next, I looked and saw a white patch where stains had been "touched up"--proof that not everything was stained or mold.  Then, I found a pet stain in a small rug that had absorbed and was unnoticeable in daylight. 

A small blacklight flashlight could be a cool science project for you and your kids, by not only finding things that glow, but eliminating the yucky animal pee and poo as well with enzyme cleansers.  Remember that the wavelength (365-385nm) is important to get quality black light, and many cheap flashlights don’t fall in that range. Here are some lights that will give the best results for your detective work:

Photo by h heyerlein on Unsplash
What are xenobiotics and POPs and how do our bodies deal with them?

What are xenobiotics and POPs and how do our bodies deal with them?

Xenobiotics surround us everyday!  If you have an illness that you can pinpoint to a chemical or environmental exposure, then you know what a xenobiotic is and how it can seriously affect your health.     

  • Xenobiotics have been defined as chemicals to which an organism is exposed that are extrinsic to the normal metabolism of that organism. (Progress in Molecular Biology and Translational Science).  Since mold produces mycotoxins that are not made in our own bodies, these mycotoxins are xenobiotics to us, as are many man-made chemicals like POPs. (Alcohol is also a xenobiotic).

  • Persistent Organic Pollutants (POPs) are chemicals of global concern due to their potential for long-range transport, persistence in the environment, ability to bio-magnify and bio-accumulate in ecosystems, as well as their significant negative effects on human health and the environment. The most commonly encountered POPs are organochlorine pesticides, such as DDT, industrial chemicals, polychlorinated biphenyls (PCB) as well as unintentional by-products of many industrial processes, especially polychlorinated dibenzo-p-dioxins (PCDD) and dibenzofurans (PCDF), commonly known as dioxins. (Food safety: Persistent organic pollutants (POPs))  POPs are fat-soluable, and tend to accumulate in our fat tissues. POPs are xenobiotics, but not all xenobiotics are POPs. Exposure to POPs has been associated with diabetes, cardiovascular diseases and many other chronic diseases. (Glutathione!)  

Most of these xenobiotics are transformed by enzymes in the liver, and are then eliminated by excretion.  First of all: What is an enzyme?   Enzymes are complex proteins produced by living organisms that act as catalysts in chemical reactions.  Enzymes can either build up or break down.  Enzymes themselves are not consumed.

This is where our genes come in.  “GST” genes are important for detoxification of the body, in that they manufacture those enzymes that facilitate the detoxification reaction.  One of the most important GST enzymes is GSTP1.  

The GST pi gene encodes (provides instructions for building) the enzyme Glutathione S‑transferase Pi (GSTP1), which plays an important regulatory role in detoxification, anti‑oxidative damage, and the occurrence of various diseases.  The detoxification reaction is called “glutathione conjugation”.  (GSTP1 and cancer: Expression, methylation, polymorphisms and signaling (Review))  Following is an example of glutathione conjugation; note that the “SH” site on glutathione (sulfur) is the binding site for the xenobiotic:

Source: The role of glutathione-S-transferase in anti-cancer drug resistance

GSTP1 has a wide range of physiological functions: It is involved in metabolism, detoxification and elimination of potentially genotoxic foreign complexes, metabolizes a variety of carcinogenic compounds, and protects cells against DNA damage and canceration.  However, while GST mediates detoxification from accidental xenobiotics, like exposures to pesticide for example, GSTs have also been implicated in the development of resistance toward chemotherapy agents, especially platinum-based chemotherapy drugs. (GSTP1 and cancer: Expression, methylation, polymorphisms and signaling (Review))

Here are several more genetic terms that will help to understand how GST and GSTP1 work: 

  • Gene expression is how GST directs the manufacture of GSTP1 (for more on how gene expression works, check out this article)

  • Methylation is a chemical modification of DNA and other molecules that may be retained as cells divide to make more cells. When found in DNA, methylation can alter gene expression. In this process, chemical tags called methyl groups attach to a particular location within DNA where they turn a gene on or off, thereby regulating the production of proteins that the gene encodes. (National Human Genome Research Institute)

  • Polymorphism, as related to genomics, refers to the presence of two or more variant forms of a specific DNA sequence that can occur among different individuals or populations. The most common type of polymorphism involves variation at a single nucleotide (also called a single-nucleotide polymorphism, or SNP). Other polymorphisms can be much larger, involving longer stretches of DNA. (National Human Genome Research Institute)

GSTP1 methylation can affect gene expression, inactivating the GST gene.  GSTP1 methylation has been associated with the development or recurrence of prostate cancer (PCa), liver and breast cancers. 

In addition, during detoxification of xenobiotics, GSTP1 may become damaged, causing polymorphism (a variation).  Some polymorphisms are associated with specific cancer types. For example, the genetic polymorphism of GSTP1 may be associated with the detoxification of polycyclic aromatic hydrocarbons (PAHs) in cigarette smoke and exhibits the highest expression in lung tissue.  More polymorphisms of GSTP1 and associated cancer risks are shown in the next table:

Source: (GSTP1 and cancer: Expression, methylation, polymorphisms and signaling (Review)

Therefore, xenobiotics can not only overload the GST detoxification processes, but they can damage GST and the enzymes it encodes, like GSTP1.  Restricting xenobiotics and stress is crucial to keeping this important defense system working optimally!

Here’s a bit more on how these genes detoxify.  Although GST genes do not make glutathione (GSS genes do), they regulate its use.

Glutathione has been described as “the mother of all antioxidants” because it recycles vitamins C and E, which are other antioxidants, and of course it binds and modifies toxins from our environment so that we can get rid of them.  According to Dr. Mark Hyman, “The secret of its (glutathione’s) power is the sulfur (SH) chemical groups it contains. Sulfur is a sticky, smelly molecule. It acts like fly paper and all the bad things in the body stick onto it, including free radicals and toxins like mercury and other heavy metals.” (Glutathione: The Mother of All Antioxidants)

Glutathione (GSH) is a tripeptide molecule consisting of the amino acids glutamate, cysteine, and glycine. It is the most abundant antioxidant in the human body that contains thiol (an organic sulfur compound).  Peptides are chains of 2 to 50 amino acids that are linked together.  For reference, proteins are also chains of amino acids linked together, but these number over 50 and usually more than 100. Here is a visual aid, noting that Glutathione falls under the Peptides category. 

Source: The Difference between Peptides and Proteins

Glutathione exists in two states in cells: reduced (GSH) and oxidized (GSSG).  Oxidized glutathione is actually 2 reduced glutathiones bound together at the sulfur atoms.

Source: Glutathione!

The difference between reduced and oxidized glutathione is that GSH (reduced) is the “recharged” version, while GSSG (oxidized, also called glutathione disulfide) is the “spent” version. GSH is also called “free glutathione” in that it has its sulfur site ready to bind to xenobiotics, while the site on the spent version is not available because it’s stuck to another glutathione molecule. 

The body is constantly recycling glutathione from the oxidized to the reduced version (for more on how this happens, this video is really helpful) .  Healthy cells at rest have a GSH/GSSG ratio >100:1, meaning that there is much more GSH (recharged) available than GSSG (spent).  When cells are exposed to oxidant stress such as xenobiotics, the ratio can drop to 1:10. This is very dangerous, because depletion of GSH and accumulation of GSSG is actually directly toxic to cells, causing their death (apoptosis).  (Glutathione!)  

Glutathione (GSH) production also drops with age and disease. Unfortunately you can’t just “pop a pill” for more GSH (contrary to many medical claims on the internet!). The body, however, can  make its own GSH in the liver with the amino acids cysteine, glutamate, and glycine. The best ways to boost our bodies’ manufacturing of GSH are to eat foods rich in glutathione or its building blocks (amino acids of cysteine, glutamate, and glycine), increasing your intake of vitamin C, and getting enough sleep and exercise.  (10 Natural Ways to Increase Your Glutathione Level)

Here’s a recap about GST, GSTP1, and glutathione:

  • GST is the gene responsible for encoding GSTP1.

  • GSTP1 is the enzyme that regulates the ability of glutathione to bind to xenobiotics.

  • Glutathione is an an enzyme that exists in 2 forms: GSH (reduced) and GSSG (oxidized).

  • GSH is also called “free glutathione” and in healthy cells, exists in a 100:1 ratio with GSSG.

  • Xenobiotics are those chemicals to which we are exposed that come from outside our bodies.  POPs (persistent organic pollutants) are xenobiotics.

  • GSH binds with xenobiotics in the presence of the GSTP1 enzyme.

  • GSSG cannot be used to bind xenobiotics, it first must be converted back to GSH.

  • Stress and xenobiotics are dangerous in that they can cause changes to GST and GSTP1 which affect their ability to detoxify our bodies, making the body prone to cancer.

  • Unchecked stress and xenobiotics also overwhelm free glutathione, causing cell death.

  • We can help restore proper glutathione balance and immune function by limiting stress and xenobiotics, eating the right foods for manufacture of GSH and getting enough sleep and exercise.

Photo by Al Elmes on Unsplash

Cancer may be a case of nature AND nuture: Why it’s time to pay attention to Inflammogens

Cancer may be a case of nature AND nuture: Why it’s time to pay attention to Inflammogens

The New Yorker article “All the Carcinogens We Cannot See” is quite eye-opening.  You’ve probably known people who lived a “bad” life, drinking or smoking or doing drugs, to a ripe old age, and then also a number of “innocent” young victims of cancer.  What’s the rhyme or reason of evading cancer or acquiring it?   This is the question that thousands of scientists engage every day as they test chemicals on bacteria or animals.  In the 1970’s, biochemist Bruce Ames was able to measure that many mutagens are carcinogens: if a chemical or toxin causes a mutation in bacteria, then it’s likely to also be a carcinogen.  Thus, the Ames test for mutagens remains the standard lab technique for screening substances that may cause cancer.  However, there are many chemicals that cause cancer but are not obviously mutagenic, such as diethylstilbestrol (DES), which increases the risk of vaginal, cervical, and breast cancer.  Also, it has been discovered that with or without exposure to mutagens, most people have a small number of mutated genes.  What is the “trigger” that begins cancer growth?

A well-known example is cigarette smoke.  It contains more than 60 mutagens, which are by extension carcinogens. Surprisingly, however, in a 2023 study that examined the characteristic fingerprints of DNA damage caused by cigarette smoke in human lung cancers, ninety-two per cent had the mutations associated with the DNA-damaging substances in smoke. But about eight per cent lacked this kind of mutagenic damage, and clear mechanisms of cancer in between 8-10 percent of smokers is lacking, causing scientists to think that there are missing cancer-causing agents.

Other studies have confirmed that a second agent is necessary to “activate” the mutations into cancerous tumors.  In one study, DMBA, a cancer-linked chemical that was found in coal tar, only caused cancer in a small percentage of the mice that were exposed to it.  However, after adding an inflammatory oil after exposure to DMBA, more than half of the mice developed malignant tumors.  In another study, mice with a powerful cancer-causing gene only developed cancer when they were also plagued with poorly healing wounds, causing chronic inflammation.  It was inflammation that triggered tumors. 

What does this tell us (other than animals do a lot of our dirty work)?  It’s not mutagens alone that cause cancer:  in many cases, malignancies are only activated when another environmental toxin causes chronic irritation that catapults them out of normalcy. “The mutant cells just lie there,” according to Allan Balmain, a cancer geneticist at the University of California, San Francisco.. “It’s the inflammation that awakens them.”

Unfortunately, there are a lot of sources of inflammation.  According to the Cleveland Clinic, the some of the most common reasons for chronic inflammation in the body are autoimmune diseases, exposure to toxins, and untreated acute inflammation, as from an infection or injury.  Then there are lifestyle factors such as drinking alcohol in excess, obesity, chronic stress and smoking. 

Air pollution also featured prominently in The New Yorker article, and it’s a frequent topic in the news today in expected areas (cities and industrial zones) and unexpected areas (wildfires in the wilderness).  In fact, British epidemiologists Richard Doll and Austin Bradford Hill, who are celebrated for determining the primary cause of lung cancer–smoking–also correlated the disease to proximity to major roadways, gasworks, industrial plants, and coal fires, and thus, by extension, exposure to high levels of air pollution.  Since then, it’s been discovered that when lung cancer occurs in people who have never smoked, the malignant cells often carry a mutation in a gene known as EGFR.  Using data from the U.K., South Korea, and Taiwan, researchers found that in each of the three countries, tthe higher the level of air pollution, the higher the incidence of EGFR-mutated lung cancer. This confirms a link between air pollution and nonsmoking-related lung cancer by mutation.  But there is something else in the air pollution besides mutagens, and it is inflammogens.  Again using all mice that were genetically primed to have EGFR mutations, mice who received larger doses of a liquid simulating air pollution (PM2.5) in their lungs, had more tumors.  The PM2.5-treated mice were full of inflammatory cells.  It seems to be the combination of mutation AND inflammation that caused the mutation to develop into cancer.  Looking more closely at the inflammation, macrophages (large cells that eat foreign particles) promoted an immune response by secreting interleukin-1 beta, a potent inflammatory signal,. If the interleukin-1 beta was blocked with an antibody, the effect of air-pollution exposure dissipated.  Accordingly,  immune-deficient mice did not have inflammation and defeated the effects of air pollution.

Whew, that’s a lot of science.  What we can take away is that inflammation could be the invisible criminal accomplice in many cancer cases, as well as in other diseases.  There’s been a big focus on knowing your genetics, and firms like The DNA Company recognize that purposefully changing your lifestyle with better food, exercise, less stress and sometimes specific supplements can mitigate the effects of DNA deficiencies by defeating the accomplice, inflammation.  In this spirit, we hope that whether you get your DNA tested or not, you are aware of the air quality in and outside your home, and do your best to avoid inflammation by ascribing to a healthy lifestyle and less stress.  These include cleaning often with non-toxic cleaners like TotalClean, changing your HVAC filters regularly, using masks and HEPA filters where necessary, and using bi-polar devices  like the Germ Defender, Upgraded Air Angel Mobile or Whole Home Polar Ionizer that can also help purify the air of VOCs and particulates.  (For more information about your immune system at a molecular level and specific ways to build it up, check out our article here).  The answer to disease, like the cause, is two-fold: take the physical steps you can avoid toxins and inflammation, and sort out the mental toxins (stresses) that cause inflammation too.   At HypoAir, we wish you a healthy home and year!

Photo by Al Elmes on Unsplash

Tenant Rights to a Habitable Home: Mold and Smoke Issues

Tenant Rights to a Habitable Home: Mold and Smoke Issues

What can a renter do when their home becomes “inhabitable” due to mold or second-hand smoke?

When tenants sign lease agreements with building owners or landlords, they agree to abide by certain rules while living at the property, which protect both the tenant and the landlord.  In the US, certain tenant rights are protected under federal, state, and local laws.  For the purposes of this article, we are going to examine a tenant’s right to a habitable home.  

The “implied warranty of habitability” is the legal term for a renter’s right to a home that keeps out rain and snow, has sufficient hot water and heat, sturdy walls and floors, free from environmental dangers such as lead, asbestos and mold, and reasonable protection from criminal intrusion.  According to Nolo.com, all states except one (Arkansas) recognize the implied warranty of habitability.  Even if a landlord offers lower rent in exchange for the tenant “waiving” habitability rights, such waivers are typically not upheld in court.  There are differences between habitability problems and “minor repair” problems, though, so that landlords are not legally required to fix every problem that elicits a complaint. 

For purposes of safety and air quality, some habitability problems may be:

-a roof leak or plugged air conditioner drain that results in moldy walls

-improperly vented water heater that causes exhaust gasses to leak into the apartment/home

-neighbors that do things that cause you to be unhealthy, like smoke inside, make a lot of noise during sleeping hours, etc.

If the landlord does not acknowledge or repair the problem, there are ways that tenants can enforce the implied warranty of habitability.  If this applies to you, make sure that you have properly notified the landlord and given them time to respond, and then you may want to notify the local building inspector.  Be prepared, however, to move out if the inspector deems the problem causes your home to be uninhabitable!   “Bigger stick” actions for the renter include, depending on state laws:

  • withholding rent
 (make sure you are completely up-to-date on rent before withholding it for habitability reasons)

  • paying for repairs yourself and deducting the cost from the rent
 (also make sure you are completely up-to-date on rent before doing this)

  • sue the landlord, or 


  • move out without notice (break the lease) and without liability for future rent. 

To check whether your state has a precedent for withholding rent or paying for repairs and deducting them from your rent, you can check this page.  Here is more information about these options. 

Specific problems that constitute inhabitable spaces:

Although mold can be a serious health issue, there are no federal laws regarding permissible exposure limits or building tolerance standards for mold in residential buildings, and only a few states and cities have established guidelines regarding mold in indoor air.  (Nolo.com)  Because of the following, it has been difficult for tenants to get landlords to fix or compensate for mold:

  • Mold causes a plethora of symptoms and health problems that are not exclusive to mold

  • Blood or urine tests are the only way to confirm its presence in the body

  • There is are many types of molds present in most homes and rentals, however, only a few have been implicated in serious health issues (such as Stachybotrus Chartrum or Aspergillus)

  • The term “toxic mold” is not a legal term, but the above mentioned species are “toxigenic”, meaning that they can produce mycotoxins.  

There have been successful lawsuits; in 2021 a Florida jury awarded $48 million in a habitability/mold case. (TysonMendes.com)  This is an exceptional compensation, but the vast majority of tenants living with mold that causes health problems do not get any compensation, sometimes due to weak local and state laws on habitability.  For example, in Washington state there are no explicit protections from mold for tenants, and the law doesn’t hold landlords liable when they don’t provide the “mold addendum”. (whyy.org) Here are what legal experts recommend to make your voice heard (based on advice from a Virginia lawyer in this video):

  • Make sure you notify the landlord or owner of the problem in writing and the way prescribed in your lease, and document all communication with them about the problem.  Describe the condition of the area, photograph it, include any lab results and any health effects that may have come from it.

  • If the landlord does not respond or fix the problem, in Virginia you can file an official document called a Tenant Assertion and Complaint.  Definitely check with legal experts on your rights to withhold rent or move out (which as stated above, vary from state to state; withholding rent is not allowed in Virginia).  

  • If you believe health issues have resulted from the mold, it’s best to contact a specialist or personal injury attorney.  

Second-hand smoke and vapors are a serious problem in multi-family dwellings.  This document from the American Lung Association and Public Health Law Center at Mitchell Hamline School of Law outlines tenant rights to healthy air inside their homes, and guidelines on options available to them in California, including:

  1. Approaching the neighbor who smokes/vapes.  They may be unaware of the impact it’s having on you or your family.

  2. Contacting the landlord, if the smoking/vaping doesn’t stop.  Always document your communication with the neighbor or landlord.  

  3. Reviewing your lease and ask the landlord in writing to enforce the non-smoking clause.

  4. Reviewing local laws, as they may have specific requirements to force landlord action. 

  5. California allows withholding of rent, however this could trigger an eviction response from the landlord.  In this case, uninhabitable conditions is a reasonable defense, and if the landlord does evict, the courts will decide whether rent abatement is appropriate. 

  6. Lawsuits include small-claims court, which is used for claims $10,000 or less, and trial court, which in general is only used when there has been substantial harm from repeated, significant exposure to secondhand smoke.  Appropriate charges against the landlord would include breach of contract, disability claims, nuisance claims, covenant of quiet enjoyment, and constructive eviction (if the tenant is forced to move out because of uninhabitable conditions).  

Unfortunately, rights for tenants vary from state to state, but you must do what is healthy for you in deciding whether to stay in or leave an unhealthy home.  We have written another article with specific suggestions if you can’t afford to move out or really want to stay, and mitigate the problem.

Photo by Al Elmes on Unsplash

Are Tiny Homes built from Sheds a Good Idea?

Are Tiny Homes built from Sheds a Good Idea?

At least every other day, I see an ad for a tiny home or office that companies or individuals built from what used to be backyard “sheds”.  Now, don’t get me wrong, I am all for repurposing buildings and materials, when they are done the right way!  (In fact, I even repurposed a large metal workshop building into a 2 bed/1.5 bath “condo” for my parents.  This one is on a concrete slab and for all intents and purposes, could have been built that way as a home). What are the advantages, and what are the cautions, of making a home from a shed?  (Many great points adapted from Living in a Shed: 9 Things (2023) You Must Know):

The advantages to living in a tiny home are many, for example:

  • Up-front cost is cheaper than a house
  • Smaller utility bill
  • Less square footage to clean
  • Less impact on the environment
  • Privacy
  • Portability
  • Customization
  • Ability to live in nature or “off-grid” more easily

However, “sheds” are only a subset of tiny homes, specifically, tiny homes that started out as prefab backyard buildings.  Let’s take a look at what could go wrong from making one of these into a habitation.

First of all, when considering whether to build out a shed as a home, you should check into local building codes.  If you live within city limits, there are likely laws about what type of buildings can be built or placed on your property to become “habitations”.  Plopping a shed down and running electricity to it for your teenager to live in could be a big problem whenever it’s noticed by the building inspectors!  Moving it to the middle of a few acres in the country doesn’t normally pose these legal issues, but again, it’s best to check with your local building inspector!   If it’s illegal to live in a shed, it may be legal to live in an ADU-an Accessory Dwelling Unit.  For example, ADU’s in California are required to be at least the size of an efficiency unit (at least 150 sq. ft. livable space plus a bathroom), they must contain a kitchen, a bathroom, they must be built on a permanent foundation, and must be able to turn on/off the ADU utilities without entering the primary unit.  (ADU vs Finished Shed Comparison)

Construction: This is the largest area of caution we see.  Within this topic, we need to highlight: 

  • Off-gassing of toxic compounds from interior building materials.  If the building was never meant for habitation (even as a chicken coop!), then it may contain building materials that are rated for “outdoor use only” which may give off dangerous pesticides/weatherization chemicals.
  • Inferior flooring and framing techniques:  We’ve seen them: sheds built to hold push lawnmowers and Christmas decorations may not hold up to daily living over a number of years.  Holes or loose joints that develop inevitably allow pests to come in (they want to be cool/warm/fed too!).  
  • Inferior foundation: Setting a shed on a few cinder blocks is typically not sufficient for daily living and if the floor begins to sag, all kinds of structural issues (including leaks and mold) can ensue. 
  • Poor insulation:  Typically, storage sheds only need to keep the paint from freezing, not keep a person comfortable, so insulation may not be optimal.  This includes roof and floor insulation–yes, if your shed is not mounted to a slab foundation, it needs to be insulated!
  • Improper sealing (which can cause moisture infiltration and mold growth): If siding is applied over the frame without an air or vapor barrier, it’s easy for moisture to condense inside the walls if they are heated for a living space, or similarly cooled during a hot summer.  These steps in normal construction are what inspectors look for, for the safety of the homeowner and longevity of the building.
  • Addition of water and sewage facilities warrants several considerations:
    • Where is your water source and how will you deal with sewage?  Sewage service is probably the biggest hurdle to overcome, as there are 3 options which may or may not be permitted in your locale: connection to the city’s sewer system, installing a septic tank, or installing a composting toilet. 
    • Plumbing in sinks, toilets, showers and drains also is done by code for a reason–leaks can cause serious mold and hygiene issues.  It’s not a good idea to buy that shed if these appliances are added without proper spacing and materials by someone who knows plumbing code.
  • Addition of power to the shed:  Sometimes power service to a shed (50-100 amp service) is not what you would get for a normal home (200 amp service).  Like the plumbing, wiring the shed for power should be done by someone who knows electrical code, so that it’s wired safely!
  • Addition of HVAC to the shed: Sticking a “window unit” AC or space heater in the side of the shed may keep you cool or warm if it’s the right size, but without proper ventilation, you could build up CO2 and mold very quickly.  CO2 is the product of insufficient ventilation, and face it, a shed is just a small, closed room unless proper ventilation is planned and built-in!  The mold can result from simply living in that closed room, because along with CO2, every human exudes water vapor through their lungs and skin.  If there are 2 people living there, the air quality will be even worse.

So far, it may sound like a major “NO” to use sheds as homes, but that’s just not true.  If you’re allowed to use one in your locale, you can safely do so by starting from scratch (buying a bare-bones model) or buying one from a builder that knows good home construction.  Then you can make sure that the construction, outfitting and customization will work for years to come without causing health issues.  Let’s face it, home ownership is expensive, but saving on a tiny home just to live uncomfortably from lack of weatherization or get sick from mold is definitely not worth the savings.  Therefore, planning is essential!

Photo by Andrea Davis on Unsplash

How to Balance Wildfire Smoke and Work

How to Balance Wildfire Smoke and Work

Wildfire smoke from Canada in 2023 has made the northern and eastern states in the US look like a Martian landscape at times.   If your job requires you to commute to the office, whether it’s one day a week or everyday, what should you consider before taking off for work?

First things first:  how is your employer reacting to this problem?  Employers and employees have been pivoting ever since COVID-19: office, home, office, schedules, communication, and air quality.  It’s a juggling act, and this new challenge (ok, maybe new for these areas, not so much for west coasters) is another fire drill.  Hopefully, everyone can continue to work together to get through it, safely.  Does your employer recognize that air quality from smoke is a safety concern just as much as viruses?   According to Thomas Brugato, counsel in the Washington office of Covington & Burling who focuses on environmental matters, as well as civil and administrative litigation, companies need to be asking whether the systems they have in place are “adequate to ensure protection and safe air during very bad air quality events”.  (How wildfire smoke should change the way companies think about return to office)  Generally speaking, companies have a duty to provide a safe work environment under federal Occupational Safety and Health Administration (OSHA) rules. 

How this applies to your commute

Technically, under the “coming and going rule,” employees are typically deemed not engaged in work while commuting, so generally, employers are not liable for wrongs committed during that time.  (Are you responsible for an employees’ commute?)  However, if you are in a job that has already redefined “office” because of air quality, to commute or not commute is now also an air quality decision, and hopefully an informed one!  If your employer is not familiar with the air quality reports at AirNow.gov, you’ll need to find a tactful way to introduce them in order to know what everyone will be facing on their commute. 

Even if you’re in a vehicle with the “recirculation” mode on, the outside atmosphere WILL come inside.  We’ve addressed vehicle air quality in this article, and changing your cabin air filter on a regular basis, especially with one that includes activated carbon, can drastically improve air quality in your car.  (Cabin air filters should be changed every 15,000 to 30,000 miles.)  Wearing a mask inside your car can also help with mild smoke conditions; it will not filter noxious gasses, but will help with particulates.  If you’re using a company car, try to find out when the cabin air filter was changed, and push for doing so if it’s overdue.  You can also ask for your employer to reimburse mask expenses for commuting. 

Research your route!  It may take a bit longer to drive through cleaner air, but it’s certainly worth it for your health.  Free apps like AirNow, BreezeOMeter and google maps (they have a new air quality “layer”) can show where the air quality is acceptable. 

Do you normally walk or bike to work?  In a 2017 review of 39 studies, scientists discovered a few conundrums that are worth considering: 

  • although biking and walking exposes you to less pollutants, the uptake of pollution is higher because you are breathing more frequently and deeply by reason of exercise

  • the years of life expectancy (YLE) gained by walking or biking compared with motorized transport are positive, meaning that cyclists and pedestrians actually gained years in life expectancy despite inhaling more particulates, due to the positive health effects of physical activity.  Cyclists gained more YLE than pedestrians because the average commute for pedestrians took longer.  

However, this study did not take wildfire smoke into account.  Because particulates from smoke are an additional burden, walking or biking on these days is not recommended!  Any other mode of transportation (car, train, bus, subway, etc.) would be advised over walking or biking on low air-quality days due to wildfire smoke.  If you don’t have a car or are close to public transportation, ask your employer or coworkers for help commuting during low air-quality days.

How this applies to your workplace

Although office workspaces usually have a HVAC system with a filter, sometimes they can be overwhelmed by bad air quality outside, especially if people are constantly entering and leaving, or service windows are being opened and closed.  It’s helpful to bring a portable air quality monitor with you and keep it at your workspace, to determine if air inside the building is healthy.  If particulates are high and changing the HVAC filter does not help, here are some ways to improve it:

  • recommend trying a higher MERV filter (MERV 13 should help)

  • recommend getting a standalone HEPA filter, if possible with activated carbon

  • recommend increasing cleaning during this time, as particulates settle into dust which can be disturbed and inhaled

  • If office-wide improvements are not welcomed, add a small air cleaner with HEPA and activated carbon to your space. 

  • Lastly, using a mask during the workday or part of the day is not pleasant but it is better than breathing polluted air!

If you work and are locked into being at a specific workplace, discussing air quality with your employer and coworkers can bring this problem to the forefront, and may also generate some creative solutions!

Photo by Ivan Bogdanov on Unsplash

Optimizing Your Window Air Conditioner for Maximum Clean, Cool Air

Optimizing Your Window Air Conditioner for Maximum Clean, Cool Air

Global average temperatures have exceeded recorded highs several times in the last month, and articles on ways to keep cool are proliferating!  In this article, I don’t have any “new” way to keep cool, but if you are among those blessed with a simple window air conditioner, let us help you make it work just as well and as efficiently as the day you bought it!

Window air conditioners are the humble yet hard-working appliances that many households can’t do without.  As one of the oldest cities in the US, New York City has an abundance of window units because about 75 percent of the buildings throughout the five boroughs were constructed before 1960, according to the NYC Department of Buildings.  (Why about a quarter of US households are stuck with ugly and loud window AC units)  The cost of retrofitting these old buildings with central air conditioning is way too high, so window air-conditioning units are the solution, and continue to be for many households across the US.  However, even if your window air conditioner is an older unit, a little time and effort can go a long way in helping it cool better, work less (lower your energy bill), and put out better quality air! 

If you have the option of upgrading your window air conditioner, there are many worthy options out there, including those with inverter motors, which save a lot of energy and control humidity better.  (To understand better what inverter technology is, check out our article here.)  Unfortunately, no one has combined an inverter air conditioner and premium filtration, but you can get premium filtration on a new air conditioner with the Friedrich Kuhl units.  These units cool (and some also heat) rooms by heat pump, with smart controls (wifi enabled and smart home compatible) AND they have MERV 13 filters available (a MERV 13 bracket kit is needed).  Until manufacturers put inverter units and premium filtration together, we have to put premium filtration in priority!

If your existing window air conditioner has a few more years of life, it helps (although not necessary) to know how a window air conditioner works.  In the first part of our article “What kind of air conditioner do you have?” we explain the workings of this type of unit.  A key lesson is knowing that unless you have a ventilation lever on your unit, there is no mixing of indoor and outdoor air.  (Check out this video to find out how to find and operate a ventilation lever.)  Therefore, the air conditioner is not pulling in outside air, it’s only recirculating indoor air.  Whatever dust, pet dander and microbes are floating around your apartment can get lodged in the air conditioner and grow into disgusting science experiments that will negatively affect your air quality!

Therefore, a clean evaporator coil is super-important.  The evaporator coils are what change your hot and humid indoor air into cooler and drier air.  Because most window air conditioners come with a flimsy clean-able filter that would qualify somewhere between MERV 1 through 4, what really ends up filtering the air is the coil–because after a season of running constantly, so much dust and dirt go through the cheap filter and get lodged in the coil!  This is not only disgusting, it’s unhealthy.  Therefore, if you’ve operated your window unit for more than one summer and never cleaned the coil, please start with this step to eliminate the majority of grime that’s lodged there.  (Be sure to have help removing the air conditioner from the window, especially if you live on an upper story!) 

After you’ve cleaned your unit (and the included filter), check that it is blowing cold air well.  It should blow air that is 15-20 degrees colder than the air it takes in.  To measure this, simply use a portable temperature gauge above the unit (out of the stream of cold air) as the intake temperature, and then move the thermometer directly into the cold air coming out, and note the difference (it’s also helpful to note the difference in humidity, to know that it’s actually removing moisture as well!).  Our portable humidity sensors will give both temperature and humidity.  If the difference in inlet and outlet temperatures does not approach 15 degrees F for a clean AC unit, then you can check into getting the refrigerant topped up.  This is best done by a licensed HVAC technician.

Next, it’s not too hard to upgrade your current filtration so that the air coming out of your air conditioner is cleaner than the air that goes in!  Here are some options:

  • Frigidaire now offers MERV 14 filters for some of its models.  Check the link in the overview for compatibility.
  • You can cut a regular HVAC filter to fit as per this video (make sure you use painter’s tape around the edges to prevent air leaking around the filter), or 
  • You can have a custom filter bracket made for your window AC, and change the filter in it often. Since the louvers in front just thwart air flow, you can actually remove the louvered panel and fit the filter inside (if it has a rectangular filter), or you can fit the filter over the louvers and secure it to the front with double-sided tape.  In order to specify the correct size for your window unit, determine which louvers are the “intake” (moving air into the unit), and measure the area covering and slightly outside of them, so that the frame and tape will seal but not cover a lot of the louvered space. 
  • You can make your own frame from 1” aluminum “u-channel” and rivets, and purchase the filter material in bulk or cut to size (these media pads are equivalent to MERV 8 and will filter a lot more dust than the cleanable factory filter!)

Finally, placing a Germ Defender or Mobile Air Angel near the air conditioner will not only help to freshen the room as ions are carried with the fresh air, it will also help to keep the coils cleaner as ions are sucked into the air conditioner by killing microbes and mold spores inside it.

If your space is feeling stuffy from being closed up all the time due to hot weather, chances are CO2 levels are rising.  Fresh air ventilation is important, so go ahead and use that ventilation lever on your window air conditioner, or crack the windows in the morning or evening when temperatures are more tolerable.  If you live in an urban or dusty area, use our window ventilation filters to get fresh air without the particulates.  May our window air conditioning units live long, cool lives!

Wash your hands AND your wristband!

Wash your hands AND your wristband!

Their popularity never seems to diminish, and where there’s one, there’s usually a stack of them: wristbands.  Silicone is a popular material choice because it is flexible, durable, can be colorful, shaped into wide or small bands, and even hold useful appliances like smart watches and gym passes.  However, depending on the material and the wearer, wristbands can carry harmful germs that don’t get as much attention as they should. 

According to a study by Florida Atlantic University's Charles E. Schmidt College of Science, there is a correlation between the material (plastic, rubber, cloth, leather and metal (gold and silver)) and the prevalence of bacteria.  Plastic and rubber had the highest incidence of bacteria because they tend to hold moisture between it and the wearer’s skin, and foster microbial growth unless some sort of antibacterial coating is incorporated.  Not surprisingly, gold and silver had virtually no bacteria (these are age-old non-toxic anti-microbial materials due to the ions they release).  

The other variable was the activity (hygiene) of the subject at sampling time. (no significant differences between males and females were detected in the occurrence or distribution of the bacteria groups).   This means that more activity (exercise) and specifically going to the gym, increased bacteria counts.  Here are the types of bacteria monitored:

  • Staphylococcus and Pseudomonas, which are common skin residents.  The highest staphylococcal counts were found on wristbands from gym-goers.  Besides the skin, Staphylococcus aureus is a type of bacteria found in the nose, armpit, groin and other areas, and causes a wide variety of diseases. Pseudomonas spp. can cause infections in blood, lungs (pneumonia) or other parts of the body following surgery. 

  • Intestinal organisms of the genera Escherichia, specifically E. coli: these are prevalent in the bathroom and can land anywhere on you after you flush a toilet (don’t fear, we show you how to protect against this here).  However, raw foods in the kitchen are another source for these bacteria.

Thankfully, the study also investigated what types of cleaners were the most effective at reducing bacteria: 

  • Lysol™ Disinfectant Spray and 70 percent ethanol were highly effective regardless of the wristband material with 99.99 percent kill rate within 30 seconds.  While Lysol has been trusted for disinfection for many years, it’s not non-toxic: most of the spray can formulations earned an “F” rating on the Environmental Working Group’s website.  Instead, try hypochlorous acid, like this Force of Nature Starter Kit.  For more about hypochlorous acid, check out our post here

  • Apple cider vinegar, a common “DIY” cleaning ingredient, was not as potent and required a full two-minute exposure to reduce bacterial counts.

Although they weren’t tested in the study, we do have some simple alternatives to help you wear your wristbands with less germs:

  • If it’s flexible enough, turn your wristband inside-out once in a while during the day to expose the underside to light and air.  The UV rays in sunlight, as well as the ions in fresh air, kill germs!

  • Although many wristbands can be worn 24/7, it’s a good idea to take them off after showering to let your skin and the underside of the band dry out.  Leaving them off overnight is even better.

  • Hand sanitizers:  Sanitizers are super convenient when soap and water is not available, so whenever using it on your hands, spread some around the wristband and your wrists. The same goes for washing your hands–just make sure to rinse off the soap.

If you decide to upgrade your rubber silicone wristband, think gold or silver.   In this case, you will get what you pay for–less germs!

Get more fresh air ventilation with Nanofiber Window Screens (Easy DIY Project!)

Get more fresh air ventilation with Nanofiber Window Screens (Easy DIY Project!)

If you’ve never thought about them, it’s time to give your window screens some attention.  If your windows open, you’ll want to have screens that are clean and in good repair to keep out insects and other creepy crawly things (won’t go into what could possibly come through an open window).  It’s even more important in seasons of extreme heat or power outages to have a way to get fresh air.  Keeping your windows closed all day can cause levels of CO2 to build up in your home that cause drowsiness and inability to focus or concentrate (check out our article here), so it’s best to let some fresh air in whenever the outside air temperature, humidity and quality permit.

Window screens have been around for a long time (like the 1800’s!) but even age-old products can get an upgrade, making our lives easier.  This upgrade doesn’t have to involve AI or “smart” anything, requiring the internet and electricity.  In this case, window screens have been upgraded with a new material, nanofiber.

Traditionally, window screening came in several varieties of material and color, such as aluminum and fiberglass, and black, silver, gray or bronze colors.  Standard screens have a mesh size of 18 by 16, meaning there are 18 squares per inch from the top left corner to the top right corner (also referred to as warp) and 16 squares per inch from the top left corner to the bottom left corner (also referred to as fill). (Replacement Window Screen Buying Guide)  These are able to prevent most flying insects from passing through, but they do allow a lot of dust and smaller particles to pass through.   The use of nanofibers (each fiber is less than the width of a human hair) allows the holes to become much smaller, because they are spaced very closely, allowing air but not fine particulates to pass through.  Voila!  Nanofiber window screens offer protection from the next “pest”, dust and allergens.  By just replacing the screens you already have with nanofiber material, you can save yourself some cleaning, coughing and add the ability to open your windows more often because of this protection.   What’s even better is that it doesn’t take a lot of time or special tools (just one cheap one) to replace the screen material with some new nanofiber screening.

Here’s the DIY part: replacing your screens with nanofiber screens is a homeowner project that just takes a few hours and supplies.  If you’re not familiar with how window screens are held in place, they are held into the narrow channel on the screen frame with a rubbery spline, or cord.  

There’s also an ALTERNATIVE INSTALLATION with Magnetic Tape (which is practical if your screen frames are broken or missing).  Scroll down to the bottom of this article for the alternative installation.

Here’s what you’ll need for the traditional installation:

  • The nanofiber window screen (order yours here)

  • Spline (if the spline in your screens is not cracking or falling apart, you can reuse it)

  • Window screen rolling tool, $4

  • Small flat-head screwdriver

  • Sharp utility knife to trim the screen after installation

There are lots of videos online showing how to replace screens, but I like this one for its simplicity (step 1 starts at 1:50).  Here are the basic steps:

  1. Remove old spline and screen

  2. Size and align new screen over the frame (1-2 inches extra on each side)

  3. Push screen into channel on first side (using the convex side of the tool)

  4. Insert spline into grooved screen and channel (using the concave side of tool) (Repeat steps 3 and 4 for other sides)

  5. Push spline into corners using screwdriver, trim excess screen carefully with utility knife

And here are some additional tips:

  • If you have to get new spline, take a small piece of the old stuff to the hardware store in order to select the right diameter.

  • Some people like to hold the frame in place by taping it to the work surface, but this doesn’t allow you to rotate it easily if you can’t access all 4 sides of your work surface.

  • You can use a gallon of water or full can of paint to help hold the screen in place to get started.

  • Some people like to use the spline in one length, bending it at the corners as you go around; some like to cut it at each corner. 

  • Be careful not to press too hard on the spline as you work, in case your tool slips, so that you don’t cut the screen accidentally.

  • Normally you shouldn’t have to “stretch” the screen, just gently smooth it out, while rolling the last two sides, as you don’t want too much tension on the frame when you’re done.

  • If you get too frustrated or find that one of the screen frames is broken, many small hardware stores offer “rescreening” services and repair of the frames; just bring them your nanoscreen with the frame(s).

It may take a little more time to get your first screen replaced, but you’ll get better as you go along and have some new functional “filters” in your windows.  Sit down to enjoy the fresh, clean air and admire the fruits of your hard work!  After a few months, you will notice dust collecting on the outside of your screens as they do their job, but you can easily clean them by removing them and using a gentle spray of water on them from the inside out to wash off the dust.  If necessary, use a mild detergent like liquid dish soap or car wash soap and a soft brush to remove any stubborn dirt or bird poop. 

Nanofiber window screens can help you breathe easier all year long, because let’s face it, there always seems to be an “allergen” in the air.  They can also cut down on the dust going onto your HVAC filter, your TV screens, your rugs and furniture—you name it!  Maybe most importantly, they can help you open windows for fresh air more often and be prepared for a power outage in the summer, when open windows (but not dust!) are a necessity.  

ALTERNATIVE INSTALLATION:  Many times the screen frame is broken or missing altogether, or you’re just not sure about doing the traditional install yourself.  Instead, you can use Magnetic Tape to install the screen.  The kit has everything you need to make a nice, flexibly-framed screen that installs easily over your window frame.  (Note that you’ll need to remove the screen to open or close the window, but that’s easy to do.)  The video on the product page gives step by step instructions.

Navigating Electromagnetic Frequency (EMF) Radiation

Navigating Electromagnetic Frequency (EMF) Radiation

Convenience and technology go hand in hand.  If you want to save money at your store, the store’s “app” gives you the deals straight to your cellphone.  Smart doorbells and smart thermostats keep us safe and comfortable.  Baby monitors and cameras help us to keep an eye on the kids.  What could be better than knowing and doing more than your parents ever could?

The only problem with these perks is the energy they emit while helping you.  It’s called electromagnetic frequency radiation, or EMF for short.  Now, don’t get me wrong.  Anything that uses electricity, even a washing machine motor from the 1960’s, will have an electricmagnetic field associated with it, because that’s what electricity does.  Electrons move inside the electric supply cord, back and forth at the rate of about 60 cycles per second (60 hertz) in the US.  When the motor is energized, the electrons moving through the coils of the motor generate an electric field that spins the drum, and another motor that pumps out the water.  Electricity is right up there with indoor plumbing as something we wouldn’t want to be without!  

There is a big difference, however, between the way an old washing machine and a new cellphone use electricity and emit radiation.  The old washing machine had two modes, on and off, and it used power straight from the wall (110-120 volts alternating current, 60 hertz) with no transformers, inverters or rectifiers involved.   The cellphone, however, could never be plugged into the wall because it uses low voltage (12 volts) and “direct current” (DC).  The charger is plugged into the wall to convert high AC to low DC voltage to feed it to the sensitive electronics of the phone.  The phone, once charged, is essentially a battery with several different modes and the ability to radiate signals in a radius around it (about 30 feet for Bluetooth).  This generates two different problems with it: the way the charger manipulates electricity (taking the AC and converting it to DC and lowering the voltage) and the way both the charger and cellphone emit radiation.

“Dirty electricity” is admittedly not easy to understand.  After all, electricity is promoted to be the world’s cleanest energy, right?  We are enticed to replace everything that emits carbon with newer appliances that are “greener” for the planet with “no” emissions.   Yet, there is no such thing as free.  There are trade-offs for every convenience and savings in the pocket don’t always mean a savings to our peace of mind or health.

Since dirty electricity can’t be seen, smelled or touched, the best way to describe it is in pictures.   The photo below is of an alternating current electrical signal.  (If you don’t understand the difference between alternating and direct current, here is a really good video). The bright green line is clean power, which in alternating current is a smooth rolling sine wave (the peaks and valleys occur 60 times per minute, hence 60 hertz).  The green fuzz is dirty electricity, which is made up of jagged spikes that cause more radiation and can cause damage to equipment.  Where does the green fuzz come from?

Source: What is Dirty Electricity?

The green fuzz, or dirty power, is what is left over when you convert AC into DC or maneuver it in other ways.  Here is a video that visualizes what the little transformer/rectifiers on your cellphone charger and laptop chargers are doing to convert the power from the wall (120 volts AC) into usable power for your device (12 volts DC).  Chopping up the signal and smoothing it out causes some power “noise” and energy wastage.  Have you ever felt the transformer plug of the phone, or of your laptop computer?  Heat is another sign that there is energy being wasted.  

The green fuzz is not just ruining a nice picture of a sine wave.  The spikes and unpredictable energy can cause damage to electronics as well as to our bodies.  Dirty electricity can cause the following health issues (What is Dirty Electricity?) :

  • Headaches
  • Sleep Disturbances
  • Fatigue
  • Tinnitus
  • Cognitive Impairment
  • Heart Arrhythmia
  • Mood Swings
  • Weakening of the nervous, endocrine and immune systems
  • Increased risk of serious chronic illnesses such as cancer

Why does dirty electricity affect us?  Because we, as humans, run on electricity too.  The nervous system that regulates many functions in our bodies is electrical, and its sensitive equipment and signals can be affected by outside electromagnetic radiation.  For example, scientists have known for a while that some types of EMF radiation can actually cause bone to grow, and calcium channel blockers (which are frequently prescribed for heart arrhythmias) block EMF effects because they block electrical activity in the body. (Electromagnetic fields act via activation of voltage-gated calcium channels to produce beneficial or adverse effects)

Many health effects are only manifested when a major change occurs, like the installation of a smart meter on our home, or a newly installed cellphone tower coming online nearby, or moving into an apartment with wi-fi signals surrounding yours.  However, symptoms can also be gradual as well.  Like the effects of mold and mycotoxins, EMF radiation seems to affect those who are most sensitive to them.  When most of the population are not affected outwardly, regulation of new and more profuse radiation is not a priority.  However, quantified effects on our microbiology such as blood, organs and DNA through research should be enough to increase awareness of its dangers.

Although governments and health organizations (including the WHO) have denied that there is any risk to our health from dirty electricity, here is a short list of studies that have shown there is a cause and effect.  Since animals are even more sensitive than humans (termed “canaries”), included are a couple of real-world case studies on how EMF has affected farm animals, with detrimental effects on their behavior, output and reproduction.

The good news is that you can take control in your own home and eliminate some causes of dirty electricity.  Dimmer switches and compact fluorescent bulbs (CFLs) are some of the worst offenders, so try to eliminate these in your home.  Unplug computer and cellphone chargers whenever they are not in use, and when they are in use, keep them as far from you as possible.   Special paints, coverings and cases can help to shield you from harmful EMF--you can check out these types of shields here

Other sources of EMF radiation can be controlled as well: 

  • Smart meters: Smart meters are power meters that broadcast a signal similar to your cellphone, to the electric company so that they can monitor power usage remotely.  Although many utility companies claim that their meters only “broadcast” less than a minute per day, the pulses sent by the meter (typically 3 milliseconds each) can be over 10,000 times per day.  (Frequently Asked Questions about Smart Meters)  If you can, opt out of having a smart meter placed on your building and have it replaced with an analog meter.  If you cannot, there are meter cages available that can significantly block EMF radiation from the meter.  This video shows how high and frequently EMF radiation can be emitted from Smart Meters.
  • Wireless routers: Unplug wireless routers at night and place them away from bedrooms or areas where people spend extended periods of time.  
  • Baby Monitors: Research the baby monitor you use to see whether it is safe, and place it a safe distance from the crib or bed.  
  • Cellphones: Restrict cellphone use by children and for adults, opt to use headsets or  speakerphone as often as possible, carrying the phone in a purse or away from your body.  
  • Solar power inverters:  the process of converting low-voltage direct current into high voltage alternating current produces dirty electricity, which can build up over time to dangerous levels inside your home.

There are two types of devices that can detect EMF radiation: a Graham-Stetzer meter that measures dirty electricity in GS units (I’ll discuss this next), OR simply an AM radio!  AM radios can pick up low-order harmonics.  Tune it down to the lowest amplitude, about 500 kHz, to start, and turn up the volume a bit to hear the static.  Bring it near a possible EMF emitter like a cellphone or its charger plug, and listen for an increase in static or “ticks” to indicate it is emitting EMF radiation.  You can also tune the amplitude up to its highest, to about 1600 kHz, to see what’s going on there.  (This setting is better for “hearing” the EMF from your cellphone, which typically broadcasts on even higher frequencies).  This video shows how to use an AM radio inside your home to detect relative volumes of EMF radiation from different appliances (the dimmer switch really puts out a lot)!  Another video shows you how to detect whether EMF radiation is coming from the line power (from the power company), or from the devices, like lighting and electronics, in your house.  

If you find you have a lot of EMF radiation with the AM radio, then you might want to invest in a more quantitative meter that shows the real levels of radiation.  With a meter designed to detect EMF radiation, you can walk around your home to measure these levels.  The original meter, called a Graham-Stetzer Microsurge meter (after its inventors) measures EMF radiation in units of “GS”.  According to Dave Stetzer, a GS unit is a measure of the energy on electrical wires generated by high frequency transients and harmonics, and is influenced by voltage, amplitude and frequency. (presentation by Dr. Magda Havas, PhD).  According to one electrician, under 200 GS is good and acceptable, but Dr. Havas has noted that those who are more sensitive and already have health issues like diabetics and multiple sclerosis patients, require readings under 40 GS.  In order to reduce EMF, a “Stetzerizer filter” can simply be plugged into any normal electrical outlet.  This video shows how to use a Graham-Stetzer meter and Stetzerizer filters to get rid of dirty electricity.  After removing as many offending appliances as possible like dimmer switches, CFL bulbs and unused electronic charges, the filters are very easy to use–just plug them in! 

If you have unexplained or chronic health issues, it’s worth exploring and measuring EMF radiation in your home.  This type of pollution can’t be seen, smelled or heard but the health effects on many people are debilitating, and intervention can provide significant relief.  We hope you will do your own research on EMF radiation!

Taking precautions: What to do if your home is spared from a fire, but still smells like smoke

Taking precautions: What to do if your home is spared from a fire, but still smells like smoke

We at HypoAir sincerely hope that you and your family have not been forced out of your home by any of the recent wildfires.  Even if your home is spared from fire, if it is in close proximity, danger from lingering smoke particles is a real concern that you should know about and take precautions against.  You may know that smoke is a combination of ultra-fine particles and gasses, both of which can be toxic.  The gasses may be swept away by “airing out” your home or using activated carbon filters, but the particles settle into dust that can be disturbed anytime you clean or even when the HVAC comes on.  

A study was born in the weeks after the Marshall Fire, which occurred in the Boulder area in December 2021.  It spread very quickly and destroyed more than 1,000 homes and buildings.  Those that were near the flames but not burned, like the home of air quality scientist Christine Wiedinmyer, smelled like “the day after a campfire” and had ash on the door and window sills.  (Study finds potentially harmful chemicals lingered in homes affected by Marshall Fire)  Without testing, she did not know whether it was safe for her (or the neighbors who asked) to return to their homes.  So, she became part of a team of expert scientists who tested four homes in the area (including hers) in order to determine what toxins may have been left behind.  

The scientists collected samples of particles of dust in the air and on surfaces in January and February 2022. Elevated concentrations of potentially harmful materials like polycyclic aromatic hydrocarbons (PAHs) were detected in the dust samples.  PAHs are considered carcinogens by the Environmental Protection Agency, and it’s chemicals like these that deserve extra precautions in the way residents return to and clean their homes.  

When the scientists set up their equipment in the homes, they took dust samples from windowsills and used monitors to track particulate matter in the air, minute-by-minute.  The floating particles of ash produced by the fire seemed to settle out of the air in these houses within a day or two, but the dust that Wiedinmyer had seen on her windowsills lingered. In February, the researchers took measurements as a six-person cleaning crew entered one of the homes to vacuum and mop.  The concentrations of particles in the air nearly doubled during that time. Overnight in the same house, the team saw airborne particles spike about once every 20 minutes—likely due to the home's HVAC system switching on and off.  (Study finds potentially harmful chemicals lingered in homes affected by Marshall Fire

For this reason, the scientists recommend wearing a mask when you’re cleaning up fire damage, because human activity like cleaning resuspends the dust in the air, making it easy to breathe in.  Also, be sure to change your HVAC filter more frequently during the first few months after cleanup, and only use true HEPA vacuum cleaners, so exhaust from the vacuum cleaner will not blow dust back into the air.  Wiedinmyer herself “aired out” the home for a week before re-entering to clean.  During this time and going forward, a standalone HEPA filter would be very useful to filter particles that are missed by the HVAC system (if you have one!).  Our Germ Defenders, Mobile Air Angels and Whole Home Ionizers help to ionize and agglomerate dust, making it easier for the filters to trap it.

Another part of the aftermath of wildfires is dealing with contamination to drinking water systems. According to NPR for northern Colorado, The fire damaged six public drinking water systems, and toxic chemicals leaked into pipes from damaged homes and into hydrants where low water pressure created vacuums that pulled the compounds into the distribution system.  Although the personnel in these districts were not all clear on how and where to test, they were eager to do so when experts who had managed similar disaster response teams educated them.  Andrew Whelton, a professor of civil, environmental and ecological engineering at Purdue University, has taken part in several water disaster recoveries, including the 2017 Tubbs Fire and the 2018 Camp Fire in California, the Joint Base Pearl Harbor-Hickam contamination, and a chemical spill in West Virginia.  In a study he co-authored, he said that although the Marshall Fire response was not perfect, major crisis was averted because authorities did not refuse to test.  (Sadly I think many of us can recall other disasters that did not go so well).

There were a couple reasons that contaminants were introduced into these drinking water systems.  First, when a system loses pressure, toxins like wildfire smoke can get sucked into the distribution system.  Second, overheated plastic pipe can leach benzene and other chemicals for months or even years.  According to Whelton’s research, plastic pipes were primed to leach chemicals by temperatures as low as 392 degrees Fahrenheit; wildfires can exceed 1,400 degrees.  Thirdly, flushing out the system quickly with clean water is important to prevent smoke and chemicals from reaching damaged pipe, which can act as a reservoir for such toxins.

If your home survives a fire in the future, remember that unseen dangers like carcinogens may still linger and you need to take caution with your air and your drinking water.  Although it seems that authorities in the Boulder area were for the most part very proactive for public health during the Marshall Fire response, it’s usually up to individual residents in wildfire-prone areas to have stores of masks, filters and clean drinking water.  We hope you don’t have to go through such a catastrophe, but it certainly doesn’t hurt to be prepared.

UPDATE:  Another professor, Delphine Farmer from Colorado State University, wrote a followup article explaining smoke and VOC behavior in a test house during the Chemical Assessment of Surfaces and Air, or CASA, study in 2022.   She found that VOCs that entered a home are adsorbed into surfaces and while they may temporarily clear by opening doors and windows (“airing out”), they quickly built up again after ventilation stops, and the house would slowly release those VOCs back out over the next hours, days or even months, depending on the type of VOC.  They found that air purifiers can remove only some of the VOCs that are in the air – they can’t clean the VOCs on your floors or in your walls. They also work only when they’re running, and even then, air purifiers don’t work particularly well to reduce VOCs.

The good news is that basic household cleaning–vacuuming, dusting and mopping with a commercial, nonbleach solution–removed most of the VOCs.  This means that while you’re cleaning for particles, VOCs are also removed.  Check out our article on Tackling Dust in Your Home for our recommendations on appliances and cleaning products to get ‘er done, but don’t forget to add the personal protective gear mentioned above, as well!

Photo by Egor Vikhrev on Unsplash

Tight homes need ventilation, but what do I do when it’s smokey outside?

Tight homes need ventilation, but what do I do when it’s smokey outside?

If you’re blessed to be living in a “tight” home (one that doesn’t allow much unintentional air leakage), you should know that mechanical ventilation is really helpful, if not necessary, to achieve healthy indoor air.  Humidity, CO2, particulates and VOCs can build up inside your tight home and without intentional ventilation, can lead to major mold and health problems quickly.  In this case, many people opt for an ERV or HRV so that the energy savings on their tight home don’t go “out the window” (literally!) by exhausting indoor air and pulling in outdoor air without some kind of energy exchange.   For more basic information on building tightness, ERVs and HRVs, check out our article here.

If you have an HRV or ERV and live in an area prone to wildfires, you should prepare for them by having the proper filters in place and knowing what to do with your system.  We’ve helped several clients prepare for this scenario recently, and the “smoke” was not all from wildfires!  Sometimes neighbors with bad or even innocent habits like smoking, barbequing, or sittin’-round-the-campfire can all wreak havoc on your air quality.

First of all, be familiar with your HRV/ERV unit!  This means knowing where it is, how to change its filters, and how to operate the different modes.  Hopefully the installer did a good job of allowing room for maintenance, because just like a furnace/air handler, the filters must be changed or cleaned regularly in order for the unit to work well for many years.  

Many units only come with standard MERV 8 filters, but these are not adequate to handle smoke.  Smoke presents 2 problems: particulate matter (PM10 and PM2.5) and volatile organic compounds (VOCs).  According to the US EPA, a HRV or ERV unit filter must have a Minimum Efficiency Reporting Value (MERV) of 13 to provide effective protection against particulate matter in the air we're going to breathe inside a home or office building if it's smokey outside. (How to keep wildfire smoke out of homes with mechanical ventilation systems?)  Therefore, you’ll need to know what grade filters are in your unit now, and if they are below MERV 13, inquire with the manufacturer on which filters to upgrade to. 

Before you buy new filters, however, you should consider the other part of smoke: VOCs.  You can have a MERV 16 in your unit, but it will not capture VOCs and your home will be filled with the smell of smoke if there is smoke outside!  These insidious gasses are most easily removed with activated carbon.  Therefore, a layered filter (with MERV13 or more plus activated carbon) is really the best defense against smoke.  Since not all units/manufacturers offer carbon in their filters, here are some other options to get rid of the particulates AND VOCs: 

  • Check our offerings to see if we have your filter size in a MERV 13 filter plus carbon.
  • If not, you can cut and layer activated carbon media behind/under your manufacturer’s MERV 13 filter.
  • ((Some units use “panel” filters which are basically squares of bulk filter cut to fit the unit.  In this case you can cut your own using laminated MERV 13 and carbon media. ))

The following options are adapted from HRV with Smoke Filtration:

  • Ensure there is positive pressure inside the house during wildfire events (some ERVs like Panasonic ERV can be balanced to deliver more air than is exhausted from home) so that smoke never wants to come in “illegally”.  
  • Add an inline fan/filter to the intake of the ERV.  This would generate additional positive pressure without overloading the ERV fan and also filter the air before it hits the ERV.  This one has a MERV 13.
  • Get a local HVAC shop to fabricate a filter box that uses a regular furnace filter with MERV 13 (or higher) and carbon, sized sufficiently to overcome any static pressure concerns, and install it in the fresh air intake before the HRV, OR you can add a media filter cabinet to the fresh air intake of your HRV/ERV and leave out the HRV/ERV filter on that side.  We can help with calculations on sizing the cabinet if you have the model of HRV/ERV available (basically it comes down to airflow/CFM). 
  • Lastly, you could add one or more air purifiers or Corsi-Rosenthal cubes (CR cubes) with HEPA/carbon) to your home.  However, this is not ideal because the pollutants have already entered your home and you’re relying on these purifiers to clean your air, instead of having a “guard” filter at the entrance.

Now, here’s the part which requires discernment: in which mode to use the HRV/ERV.  

According to this article on how to keep wildfire smoke out of your home, the intake dampers of HVAC systems should be closed during wildfire incidents, and the equipment should be configured to only recirculate indoor air.  Before any smoke event occurs, you should check that the intake dampers have seals on them and they actually close tightly.  In case you think that you would run out of oxygen in a very short time in this scenario, that just isn’t the case.  Consider this calculation for 1 person staying in a completely sealed space of approximately 600 ft2; they would possibly die of carbon dioxide poisoning (at 12 days!) before low oxygen would be an issue.  Here’s where having carbon in your filters is also good, because it can also filter out some CO2 from inside your home while you close the outside vent and recirculate.  We think that a CO2 meter is a great thing to keep on hand whether or not your home is tightly sealed, and especially if you have any combustion appliances (like gas stoves, water heaters, furnaces, dryers, etc.)  

(I wouldn’t even worry about this “12 days” deadline, either, because very-tightly sealed homes are very rare!  A home in Alaska currently holds the record for being the world’s tightest home, and the owner/builder took the ingenious route of building a “box within a box” in order to air-seal and insulate it well enough for the climate.  At 600 ft2, it has a rating of 0.05 air changes per hour at 50 pascals of pressure (ACH50).  This is less than 10% of the very rigorous Passivhaus standard, which is 0.60 ACH50.)  

So, recirculating air instead of bringing in outside smokey air has a few benefits:

  • It saves your filters and uses them only to filter the small amount of smoke that leaks in through unauthorized leaks (or briefly opening a door). 
  • It maintains the air quality of the room above that which you would have if you were bringing in outside smokey air.
  • Depending on where the intake filter is located, it could save you cleaning your HRV by not passing unfiltered smokey air through it.

This last point may not be obvious, but not all HRV/ERV manufacturers consider that wildfire smoke is a real threat to the operation of their units, because some have intake filters on the exhaust side of the heat exchanger:

Source: “How ERVs Work”

Do you see the “Fresh air from outside” on the lower left?  Imagine that this is “smoky air from outside”, passing through the fan and then through the heat exchanger, before passing through the filter on the upper right.  All those particulates just passed through a heat exchanger, and it’s likely that some of them get stuck there until they are manually cleaned out. Particles sticking to a heat exchanger reduce its efficiency and depending on their chemical makeup, may damage the surface of the heat exchanger.  Now, placing the filter on the lower left poses a maintenance issue, but it shouldn’t negatively affect the operation of the fan or heat exchanger.  This is why having a separate filter on the fresh air intake before the HRV/ERV and leaving off that top right filter inside the unit, may be the best option in wildfire areas. 

One last point: although we’re not huge fans of completely “smart” homes due to the EMF they emit, if you travel a lot or have an HRV/ERV system installed in a vacation home, it is worth practicing operating it remotely (via an app).  In real emergencies, roads can be closed quickly and if you are not able to get home right away, it becomes the difference between being able to come “home” to a clean house and one that smell like smoke (because even carbon filters will not be able to adsorb VOCs for an extended or intense event).  

Any smoke (cigarette, wildfire, campfire, barbeque, industrial or traffic accidents, etc.) is very unhealthy, so we need to do our best to keep it out of our homes, even at the cost of not ventilating for the duration of the smoke event.  The particulate matter in smoke is especially dangerous for children and people with respiratory or cardiac conditions, because fine particulates can pass from the lungs to the bloodstream. The best line of defense against particulate matter is an airtight building envelope, which by extension means closing the intake dampers of ventilation systems.  Filters with a MERV 13 rating or higher, and activated carbon if possible, should be used in HRV or ERV systems and central air conditioning units so that these units can remove any smoke that gets in.  One or more portable air cleaners with a HEPA filter and carbon are also a very good addition for use in common rooms or bedrooms at night.  It all comes down to preparation…having the filters on hand (or better yet, already installed) and knowing how your unit works is worth a lot of clean air when the smoke suddenly appears around your home! 

Photo by Egor Vikhrev on Unsplash

Marijuana smoke, just like cigarette smoke, is an air quality problem that affects a lot of people.

Marijuana smoke, just like cigarette smoke, is an air quality problem that affects a lot of people.

According to Gallup Polls, approximately 17% of Americans smoked marijuana in 2023, which is up from 12% in 2017-2021.  By inference, approximately 83% of Americans don’t directly smoke marijuana, for any number of reasons, but a good number of them deal with it as secondhand smoke (as evidenced by the number of inquiries we receive about how to protect against/remove it).  

A misguided perception: According to Beth Cohen, MD, MA,  a primary care doctor and researcher in California, her research showed that in 2017, 26% of people thought that it was safer to smoke a cannabis joint than a cigarette daily. In 2021, over 44% chose cannabis as the safer option. People were similarly more likely to rate secondhand cannabis smoke as being “completely safe” compared with tobacco smoke, even for vulnerable groups such as children and pregnant women. (Many people think cannabis smoke is harmless − a physician explains how that belief can put people at risk)  

Yet despite these increasing opinions that marijuana smoke is less dangerous than traditional cigarette smoke,  “Smoke is smoke. Both tobacco and marijuana smoke impair blood vessel function similarly. People should avoid both, and governments who are protecting people against secondhand smoke exposure should include marijuana in those rules.”  -Matthew Springer, cardiovascular researcher and Associate Professor of Medicine, University of California, San Francisco

If non-smokers are in the majority, why are they having to fight for the right not to breathe it?  We can think of several reasons:

  • Conflicting studies done over the last decade have perpetuated confusion.  For example:
    • This 2012 study found that occasional and low cumulative marijuana use was not associated with adverse effects on pulmonary function, specifically air flow rate and lung capacity.  
    • In 2022, Researchers from Ottawa Hospital General in Canada compared approximately 150 lung scans from marijuana smokers, tobacco-only smokers and nonsmokers. The study found that rates of emphysema, airway inflammation and enlarged breast tissue were higher in marijuana than in tobacco smokers.  The scans showed that 75% of the marijuana smokers had emphysema. Slightly less than 70% of tobacco-only smokers had emphysema, while only 5% of nonsmokers had it. Emphysema, a form of chronic obstructive lung disease (COPD), is the third leading cause of death in the U.S. (Smoking marijuana may be more harmful to lungs than smoking cigarettes, study finds)
  • Tobacco giants Altria and Reynolds American together with convenience store retailer networks have invested billions into the marijuana industry and actively support legalization.  They produce and market products that support both tobacco and marijuana, like e-cigarettes and vape pens.  (Protecting Nonsmokers from Secondhand Marijuana Smoke)
  • Have societal norms flip-flopped?  Less than 20 years ago, cannabis users were advised to be “discreet”, but with widespread legalization, that’s no longer applicable.  Furthermore, you could say that those who don’t smoke are now being pressured to be discreet!.  Included in the 2008 paper “Civic Norms and Etiquettes Regarding Marijuana Use in Public Settings in New York City” is a resource from the Cannabis Action Network’s 2005 “Good Neighbor Guidelines” promoting both marijuana use and etiquettes: “Have fun with cannabis, but in your neighborhood keep a kind, discrete, polite profile. Do not consume your cannabis openly. The fewer people who know you have cannabis around, the smaller your exposure to rip-offs, overeager youths, cops, and mooches. Keep cannabis plants hidden from public view. Avoid actions that would lead to nuisance complaints like ... overly loud music or too many freaky parties.... Do not keep your stash and paraphernalia in plain view of the doors or windows. Take measures to minimize the distinct odors cannabis has when grown, smoked, or just sitting around.”

Whether it comes down to money or public opinion, we’re finding that people who do not want to inhale second-hand marijuana smoke have to fight for that right, despite some disturbing facts (Secondhand Marijuana Smoke Fact Sheet):

  • Particulate levels from secondhand marijuana smoke are even higher than particulate levels from secondhand tobacco smoke. A study comparing indoor particulate matter 2.5 (PM2.5) levels from secondhand marijuana smoke and secondhand tobacco smoke concluded that “the average PM2.5 emission rate of the pre-rolled marijuana joints was found to be 3.5 times the average emission rate of Marlboro tobacco cigarettes, the most popular US cigarette brand. 
  • Significant amounts of mercury, cadmium, nickel, lead, hydrogen cyanide, and chromium, as well as 3 times the amount of ammonia, are found in mainstream marijuana smoke than is in tobacco smoke.  (A comparison of mainstream and sidestream marijuana and tobacco cigarette smoke produced under two machine smoking conditions)
  • One minute of exposure to marijuana SHS (secondhand smoke) substantially impairs endothelial function in rats for at least 90 minutes, considerably longer than comparable impairment by tobacco SHS. (Endothelial function is the way blood nourishes surrounding tissues via the endothelium, the single-layer cells that line our blood vessels). The findings in rats suggest that SHS can exert similar adverse cardiovascular effects regardless of whether it is from tobacco or marijuana. (One Minute of Marijuana Secondhand Smoke Exposure Substantially Impairs Vascular Endothelial Function)
  • And many more…

So how do people who don’t want these health risks overcome them?

People living in multifamily buildings, whether they are apartments or condos, frequently have problems with this issue, because: the units are commonly leaky, landlords are reluctant to impose sanctions on smoking tenants who are otherwise ideal habitants, and in many states, it’s expensive and risky to bring about legal action. Therefore, it’s the burden of the non-smoker to either “prove” the harm or mitigate the problem on their own.  

In response to our own clients’ problems, we’ve done some research and want to try to help “clear the air”. 

Testing: Since marijuana smoke produces even more particulates than tobacco smoke, tenants with neighbors who smoke or vape marijuana could invest in a particulate monitor like the PurpleAir (or similar) in order to establish a history of particulates. A study used a PurpleAir monitor (PurpleAirTM Model PA-II, PurpleAir.com) alongside expensive lab equipment to show that PurpleAir is just as effective to show secondhand PM2.5 exposure to marijuana aerosol from vaping.  The benefit of using such a monitor is that data is uploaded to the internet every 2 minutes, so that a history can be established.

In addition, if the smoke is particularly heavy or your apartment is particularly leaky, test kits can be used to discover THC residue in your space (THC Surface Residue Detection Test by Mistral, $10, THC Surface Residue/Vape Oil (Pouch) Drug Test, $10)  More expensive laboratory test kits could be used if necessary: EMSL has Marijuana Smoke Contamination Test Kit that costs $95 for lab analysis upon return.  A terpenes test kit from LCS Laboratory is $200-300. The marijuana plant contains a high concentration of terpenes that are responsible for the characteristic smell of marijuana products. Terpenes are natural organic compounds that can be found in most plants, industrial solvents (as turpentine), and many cleaning supplies with the floral or citrus smell.

Cleaning: Due to the chemicals left behind by marijuana smoke, personal protective gear should be used depending on the severity of the residue::gloves, eye protectors, respirators and possibly Tyvek suits are all standard for professional cleaning crews..The best non-toxic cleaners seem to be SmokeOut and THC-Ya:

  • SmokeOut Cannabis RTU Spray by EcoClear is safe for people, pets and wildlife as per the company’s policy.  It neutralizes cannabis odor on contact.  $20/32 oz. from this distributor.
  • THC-Ya! By MoMar is an enzymatic cleaner compatible with hard and soft surfaces.  It encapsulates and neutralizes odors on contact while built-in detergents and beneficial bacteria destroy and remove the source of the odors. 100% biodegradable, no dyes, no solvents, and no phosphates. Non-flammable, non-corrosive, and non-toxic.

According to Restoration and Remediation Magazine, there are several other options for deodorizing and deep-cleaning soft surfaces: hydroxyl generators or ozone machines.  Their preference was hydroxyl generators.  However, both hydroxyl generators and ozone machines have drawbacks.  They may cause more harm than good by generating oxidant byproducts. In a 2021 study, hydroxyl radicals generated by a device reacted with volatile organic compounds present in the indoor space. This led to chemical reactions that quickly formed organic acids and secondary organic aerosols that can cause health problems. Secondary organic aerosols are a major component of PM2.5 (particulate matter with a diameter smaller than 2.5 mm), and exposure to PM2.5 has been associated with cardiopulmonary diseases and millions of deaths per year. (Joo et al.)

Regarding ozone machines, ozone reacts with tetrahydrocannabinol (THC) to produce at least three new oxidant products, from concentrations of ozone as low as found in the natural air.  Therefore, using an ozone generator could increase these byproducts. (Science Daily)  Another study by Berkeley Lab’s Indoor Environment Group found that ozone can remove nicotine and polycyclic aromatic hydrocarbons (PAHs) that had adsorbed onto fabrics after smoking, but that people need to wait a few hours after the generator has run and allow the space to be ventilated of new contaminants generated by the ozone, before going back inside. (thirdhandsmoke.org)

Ventilation: Although ventilation with fresh outside air does dilute contaminants,ventilation does not eliminate all the poisonous toxins and chemical components of secondhand smoke.  The Board of Directors for the American Society of Heating, Refrigerating, and Air Conditioning Engineers (ASHRAE), the international standard-setting body for indoor air quality, unanimously adopted an important position statement on secondhand tobacco smoke at its summer 2005 conference.  ASHRAE Standard 62.1 reaffirms:

  • There is no safe level of exposure to secondhand smoke.
  • Ventilation and other air filtration technologies cannot eliminate all the health risks caused by secondhand smoke exposure.
  • Tobacco smoke does not belong in indoor areas.

In 2013, the Standard was amended to state:

  • Marijuana smoke should not be allowed indoors.
  • Emissions from electronic smoking devices should not be allowed indoors.

The “ASHRAE Position Document on Environmental Tobacco Smoke” was again approved.  According to this position statement, “ASHRAE holds the position that the only means of avoiding health effects and eliminating indoor ETS exposure is to ban all smoking activity inside and near buildings.”  (Protecting Nonsmokers from Secondhand Marijuana Smoke)

Air purifiers: Our most effective products against these types of contaminants are the Upgraded Air Angel Mobile and Activated Carbon Filter Media; the Air Angel’s AHPCO cell and the media are most potent against VOCs.  Our Germ Defender and Whole Home Polar Ionizer (installed in central AC) work to reduce particulates by causing them to clump together and fall on surfaces, where they can be more easily cleaned.  If you have a central air conditioning unit, you can also use our Whole Home Filters with Activated Carbon to filter and deodorize, setting the fan to “on” so that it’s always filtering.  We also recommend standalone HEPA filters like Medify Air Purifiers (sized for your space).

We get you and have written on how to walk the fine line of dealing with neighbors’ health hazards.  Just like your rights to a habitable home free from mold, tenants should also have a home free from secondhand smoke.  No-smoke.org has similar good suggestions about communicating with smokers and landlords, as well as a new one: getting a note from your doctor!  You can never have too many allies in this fight for clean air, and we want to help as much as possible.

Photo by Ahmed Zayan on Unsplash

How to make your home less susceptible to flooding

How to make your home less susceptible to flooding

Weather forecasts for rain can strike fear in homeowners.  Different parts of the world are experiencing rainfalls that surpass a year’s average within just a few days, or even a few hours.  What can we do to lessen the chance of having to use mops, pumps, demolition and expensive contractors in the aftermath?  

There’s nothing like firsthand experience.  There is an area in Laval, Montreal that historically never flooded, yet in recent years received two “one-hundred year” floods from the Ottawa river.  Andrew Henry is a homeowner who fought very hard to keep his home from flooding for the 2nd time in April/May 2019.  He described his flood prevention/mitigation steps in a series of videos, categorizing them into three main parts:

  1. Keeping the river out of your house:  Sandbags and plastic sheeting are the primary defense for this, adding reinforcements to the back of the sandbag wall where necessary (sadly, they can fail if the water gets too deep).   You may want to keep plastic sheeting and tape on hand at the minimum if authorities in your area supply sandbags.
  2. High water table: Super-saturated soil around your foundation will seep in any cracks in the walls.  
    • In an emergency, you can dig down outside your foundation and set up sump pumps to act as temporary “french drains”.
    • You can also break the floor inside your lowest level at strategic points to install sump-pumps.   This involves a concrete saw and/or jack hammer in most cases, so preparation is key!  If you live in an area prone to flooding, it’s also wise to have spare sump-pumps on hand, along with tubing/piping for expelling the water away from the house, and plenty of extension cords. 
    • Have an emergency power source (small generator) to keep your sump pumps going even if the power fails!
  3. Drains inside the home: you can sand-bag them closed but ideally have sump pumps at the ready or installed in the drains.  For toilets, the best thing you can do is remove the toilet and install a toilet plug (see minute 1:00 in this video).  Andrew did not say it, but chances are that he immediately removed all carpeting/rugs from the ground floor (if he had rugs) in order to clearly see where any water comes in.

There are a lot of great tips in the videos of what he learns as he goes, and his determination pays off, and one month later he can remove the 8 tons of sandbags.  Other seriously flooded homes survived also!  See this house at minute 3:45

City planners and inspectors sometimes have good advice too.  Here is a helpful video from the City of Toronto that suggests the following:

  • If you have any trees running near your sewer line, it may be worth getting a plumber to scope the sewer line to see if tree roots have infiltrated or broken the line, which can cause backups of sewage into your home, even without flooding.  If you don’t have a sewer cleanout, this is also the time to have a licensed plumber to install one.
  • Foundations need to be maintained.  This kind of work includes:
    • Repairing cracks and gaps promptly.  If you have never used it, hydraulic cement is a great product.  You can use it to patch any visible cracks when the walls are dry, and keep the rest of the tub for emergencies, because it even works to seal water out when wet.  It sets extraordinarily fast (3-5 minutes) so you should only mix and use a small amount at a time. 
    • Regrading the soil around your home so it slopes away, not toward the foundation
    • Get a licensed foundation contractor to upgrade your foundation flood protection (see below)
  • Declutter your gutters:  Gutters are important because they direct water off the roof and through the downspout, away from the home.  If they are blocked by leaves and debris, water will pour over them and down the walls of your house.
  • Make sure that downspouts are directed away from the foundation, and discharge at least 2 meters (about 6 feet) from the foundation.

According to the Natural Resources Defense Council (NRDC), some ways to flood-proof your house involve researching flood plain maps before you buy your home (but with storms that break historic precedents, even that doesn’t always work), buying flood insurance, and considering relocating.  Of course, if you really like where you live or can’t move, they also suggest the following:

  • Install a sewage water backstop:  If your basement floor drain backs up after heavy rains, consider getting help from a licensed plumber to install backflow prevention valve(s) and other devices to keep overtaxed sewer mains from backing up into basements.
  • Changing your landscaping includes the following: 
    • Digging depressions known as swales to channel stormwater runoff away from your foundation.  Swales carry water in a non-erosive way.  They can have river rocks or water-loving plants.  
    • Converting concrete or asphalt driveways to gravel or brick
    • Using absorbent mulch can help manage heavy rain and reduce potential flood damage. 
    • Placing a rain barrel beneath a gutter downspout 

Although rain gardens can be used in dry areas to manage water runoff, they can also be used in flood prone areas to lessen the chance that storm drains will become clogged and overflow, leading to flooded properties.  They are depressions made and planted with water loving plants that can absorb large amounts of water and drain it slowly.  If you are able to motivate your neighbors to do the same, the effects are multiplied and can save thousands of gallons of water from pooling or flooding the neighborhood.  Here is a great video showing where and how to make a rain garden.

If grading your lawn and maintaining the gutters and downspouts is not enough to keep your ground floor or basement dry, you may need to have foundation work done.  This can involve setting french drains inside or outside the basement or ground floor, applying a sealant to the exterior of the basement walls, and/or a last resort, waterproofing the interior of the walls.  The reason we mention this as a last resort is because waterproof paint is not a replacement for good drainage–it simply can’t hold back a large amount of water for a long time (check out our article here).  Also, waterproofing should never be installed on both sides of a wall, because it needs to be able to dry out from one side.  Since foundation work is costly and intrusive, it’s best to get plans and quotes from several reputable companies before proceeding.   

Flood conditions can rise very quickly, so there is no substitute for planning and supplies.  Here’s to hoping that you are able to stem the flood/tide and keep your home dry this spring, and all year long!

Photo by jim gade on Unsplash

Termite Architecture: A Lesson in Biomimicry

Termite Architecture:  A Lesson in Biomimicry

Termites in America are largely unseen, building their unwelcome nests inside walls.  Termites in Africa, on the other hand, are quite noticeable: their earthen nests can extend up to 30 feet off the ground!  (I found out that of the 2,600 species of termites, only about two dozen infest and destroy buildings.  Lucky us.)  Other than size, the amazing thing about these structures is that they stay relatively cool inside compared to the outside environment.  How do termites acclimatize their mounds?  The answer is ventilation.  Although some species make mounds that look completely solid from the outside, these actually have micropores, 99% of which are linked together.  The termites use water, soil and their own saliva to create the wall which allows air and gasses to pass through as a sort of living lung or membrane.  Other species’ mounds have “chimneys” which the termites actively open and plug up as the outside temperature changes in order keep the inside at a constant temperature.  This type of architecture is especially beneficial for the Macrotermitinae termite for keeping the nest at 87 degrees F, in order to successfully farm a certain type of fungus for food.

A year ago I wrote the article Can I avoid mold with JUST ventilation? because for those living in hot, humid climates, maintaining a healthy home almost always requires air conditioning.  I walked through the importance of ventilation and how with adequate ventilation, it’s possible to keep humidity levels low enough to avoid mold in many cases.  After finding out that the Eastgate Center in Harare, Zimbabwe is a huge office and retail building that uses no air conditioning, I had to find out how ventilation alone is sufficient in an urban commercial setting!

Zimbabwe is in the southern hemisphere, where summer temperatures and humidity peak in October through February.  Over the course of the year, the temperature typically varies from 47°F to 82°F and is rarely below 42°F or above 89°F.  (weatherspark.com) Humidity is at or above 60% for 7-8 months of the year, and being approximately 4865 ft (1483m) above sea level, Harare is in a “subtropical highland” category.  

Architect Mick Pearce took on the project, and the prohibition of using air conditioning precipitated some extreme design rules:

They said that no direct sunlight must fall on the external walls at all and the north façade [direction of summer sun] window-to-wall area must not exceed 25%. They asked for a balance between artificial and external light to minimise energy consumption and heat gain. They said all windows must be sealed because of noise pollution and unpredictable wind pressures and temperatures, relying on ducted ventilation. Above all, windows must be light filters, controlling glare, noise and security. (1)

Inspired by a television show, David Attenborough’s BBC Life series showcasing the inside of a termite nest in Nigeria, Mr. Pearce designed a building that looks more traditional than modern, but uses 35% less energy than similarly-sized office buildings nearby.  Because of this, the building can afford a decrease of 20% less rent to tenants.  Building costs were reduced by 10% at the outset by eliminating air conditioning equipment.  The following features are a sample that translate into energy savings:

  • Thick protruding concrete “teeth” expand the surface area on walls, so that heating of the walls is minimized during the day, and cooling is maximized at night. 

  • Windows are recessed to avoid exposure to direct sunlight, and ledges around the windows have vegetation to absorb more heat and beautify it.

  • The Eastgate Centre is more like the chimney mounds, as chimneys at the top of the buildings release hot air from inhabitants inside.  A ventilation space below the habitable floors houses low and high-speed fans to exchange warm, CO2-laden air with fresh, cooler air drawn in near the ground and push it up through the building. 

  • The building stays at a constant 82 degrees F during the day (and 57 degrees at night), daytime temps which would be slightly warm to most Americans, but Zimbabweans are comfortable with it.

Source: Biomimicry & Beyond

Mr. Pearce’s description of the design is fascinating!  He went on to design Council House 2 (also known as CH2) in Melbourne Australia using the same passive cooling design, with a slightly more modern façade.  Biomimicry, the emulation of natural forms and processes for the purpose to solve human design challenges, is not about copying nature–who would want to live in a building that looks like a termite mound?  But emulation of the process uses natural ventilation to save energy while providing the comfort, convenience, and productivity demanded by modern society.  

References:

(1) Atkinson, J., 1995. Emulating the termite. The Zimbabwean Review, 1(3), pp.16-19.

Tree Air Filters are Real!

Tree Air Filters are Real!

Did you know that plants and trees filter PM2.5 and PM10 from the air?

If you’re not familiar with particulates and filtration, let me do a short recap: particulate matter (PM) is a big air pollutant in the form of dust, pollen, and most currently, smoke particles.  PM is measured in microns, or a millionth of a meter, and higher levels of PM floating around in the air are dangerous for our lungs, hearts, and whole bodies, because the smallest particles can pass through your lungs directly into your blood.  PM10 is matter that is 10 microns or smaller in diameter, and PM2.5 is matter that is 2.5 microns or smaller in diameter.  The smaller the particulates, the more dangerous it tends to be for us, because in dry conditions small dust can float in the air for a long time and reach down into the deepest parts of our lungs.

The way trees "filter" dust is one reason why air near trees feels cleaner: they intercept particulate matter, which clings to the surface of the leaves, branches and trunk.  The EPA has recognized this and even created a map of certain cities and their suburbs to show how much particulates are removed by trees per year, in kg or %.  EnviroAtlas is a cool interactive tool which you can use to examine 30 cities in the US and their suburbs, to see where the most (or least) particulates are removed by trees. Other layers available are ozone, nitrogen dioxide, carbon monoxide, and sulfur dioxide.  Other tools available in this map include soil drainage and water supply/runoff/etc.  It’s a huge database at your fingertips!

To use this map, go to this link.  It will offer a tutorial, or you can follow these steps to find PM2.5 and PM10 reduction:

  • Click on the box that says “Selected Communities: Combined Communities”.

  • Select a city you’re interested in and the map will zoom to that area.  Then close the box.

  • Click “Pollutant Reduction: Air” in the left-hand column,  and a sub-menu will appear.  Then select either “Particulate Matter: PM10” and/or “Particulate Matter: PM2.5” and check whether you want to see kg/year or %.  Wait for the map to populate with colors.  

  • Once the area has fully populated in color, you can click on an area of the city and the information about that area will appear in another box.  Use the left or right arrows in the box to scroll through it.  In general, darker blue areas absorb more PM than green or beige areas because they have more trees.

  • That’s it!   You can play around with different “layers” of information and check out some of the other tools, where data exists for the whole US, not just selected cities.

Trees are used in this way to create buffers around reservoirs, to keep dust and leaves from blowing in. (Working Trees for Water Quality)  They also can make up hedgerows around fields to prevent weed seeds from blowing in.  (A Guide to Hedgerows: Plantings That Enhance Biodiversity, Sustainability and Functionality)   They are also used as “shelterbelts” to decrease the speed of wind blowing over dry soil to reduce erosion and even prevent snow drifts.  (Why more 'shelterbelts' could prevent dust storms in the future)

Trees are a well-known asset for cities and residential areas because they help reduce air pollution, absorb excess rainwater, reduce erosion and even remediate soil to an extent.  Check out our articles “From the Outside In: How to cultivate a healthy yard that will benefit your indoor air!” and “Surround yourself with trees, and your heart will thank you for it!” to find out how to benefit most from trees in your community, whether you are looking for a place to live or have the opportunity to plant some.  In addition, https://www.itreetools.org/ has free tools with free online office hours that will help you find the right trees for your yard or community space.

Keeping Your Vacation Home Fresh

Keeping Your Vacation Home Fresh

It doesn’t matter whether your “vacation home” is a pull-behind trailer, or a luxurious condo, or a humble cabin in the mountains:  when you “get away” to a relaxing place, you don’t want to spend your precious vacation time trying to figure out how to get musty smells out or remove mold from the linens because the climate inside suffered while you were away.  Here are our tips to make it welcoming and low-maintenance!

First of all, humidity is the most important factor you’ll want to control in order to keep out mold, and you’ll want to keep the humidity under 60% all the time.  If the outside climate humidity rises over 60%, that climate will come inside and settle into soft surfaces, making them a perfect habitat for mold growth. You can only control humidity inside effectively by having a tight envelope, which means sealing up passages where outside air can penetrate in.  If no one will be living there while you’re away, you won’t need fresh-air ventilation, so make your get-away home as tight as possible by sealing windows, doors, attic doors, and other penetrations.  

Also, remember that relative humidity and temperature are closely linked.  For example, if you leave an air conditioner set on 82 degrees and the humidity rises to 80%, you may be at risk of mold forming in less than 2 weeks!  (If you’re wondering how that calculation came to be, check out this fun dew point calculator.)  In addition, relative humidity in a space will increase as temperature is lowered.   Air conditioning will naturally take some of the humidity out of the air, but there are a number of factors that can allow humidity to remain high even when your air conditioner is on. 

Here are some options to keep the humidity under control while you’re not there:

  • If you have wi-fi available in your vacation home, now’s the time to take advantage of technology that can pair with existing units like mini-splits, window or portable air conditioners to enable you to monitor climate and control them remotely.  Cielo is a company that has a number of products that can help you maintain the right humidity and temperature remotely. 

  • Alternatively, if you do not have wifi or app-enabled monitoring, you’ll need to choose a temperature for setting your air conditioner.  Although it’s tempting to set the temperature just under the temperature of melting plastic (haha) to conserve energy, don’t do it!  Setting the thermostat as high as 85 degrees can cause short run times and not allow the air conditioner to remove enough humidity from the air, creating an atmosphere for mold growth.  (No, You Shouldn’t Set Your Thermostat to 85F.  Here’s Why.)  For that reason, it’s ok to set it 7-10 degrees above the temperature you normally keep it while you’re staying there IF you also take into account the outdoor temperature and humidity.  There’s no magic formula for determining this ideal energy-saving-yet-mold-preventing temperature setting, but think about it: if your vacation space is in a hot, humid climate like the southeast US, you’ll want to set the maximum indoor temperature lower than the average outdoor temperature to make the air conditioning come on often enough to remove humidity.  

  • Thirdly, if you don’t have a humidity control setting on your air conditioner, or even an air conditioner at all, it’s best to purchase a dehumidifier with a humidistat and set it to 60% maximum humidity.  This will ensure that humidity is being controlled, no matter what temperature the interior rises to!  Think of this dehumidifier as insurance against mold: if your air conditioner was to stop working, the dehumidifier can still keep your space mold-free if it’s suitably sized for your space.  Check out our article on different types and sizes of dehumidifiers, and be sure to set up a portable dehumidifier with a drain into a lower tub or sink that condensate can safely drain all the time.

  • Leave doors to rooms and closets open for best air circulation.  Just like air purifiers, portable dehumidifiers cannot reach behind closed doors.  

  • Use ceiling fans in rooms and portable fans elsewhere to keep air circulating while you’re away, which will reduce the water content in all your furnishings by evaporation.  ““Evaporation increases the humidity of the atmosphere that immediately surrounds the liquid. This humid air takes some time to dissipate into the rest of the atmosphere. The presence of a breeze, a powerful wind, or some other form of air circulation can speed up this process and make the environment of the liquid less humid. Therefore, by decreasing the humidity of the liquid’s surrounding, a powerful breeze or wind can increase the rate at which the liquid evaporates.” (Factors Affecting the Rate of Evaporation)  This is why disaster restoration companies use powerful fans to move air over wet surfaces, increasing evaporation and removal of water.  With less water in your furnishings, the chance of mold growth is reduced.   You can even add air circulation to any space that has a light socket, such as closets and pantries, by removing the light bulb and screwing in a light socket fan (which come in different designs with exposed or enclosed blades).

  • Make sure your air conditioning and dehumidifier drains are clear and a clean air filter is in place before you leave!  Many homeowners have come on vacation to find their air conditioner or dehumidifier drain pan overflowing and dripping onto ceilings, floors, and other inconvenient places–what a mess that can also turn into hazardous mold!  As a homeowner, make sure to check these drains and change the filter several times during the air conditioning season, or arrange for someone to do the same while you’re away. 

  • Window air conditioners need deep-cleaning sometimes.  If a musty smell is coming from the air conditioner when the fan cycles on, then you’ll know that dust has infiltrated the cooling coils, absorbed moisture, and is nourishing mold growth.  Check our article on how to deep clean it and restore the fresh smell.

  • If you can, shut off water at the main valve to avoid any possible leaks, and switch off the breaker to the hot water heater if it’s electric (turn off gas if it’s gas).  This will avoid water leaks under sinks, which can make a nasty moldy mess!  If you don’t do this, at the very least shut off water to the washing machine, because burst water hoses at the washer are the single largest cause of home flooding.  (Leaving the House for 3 Days or 3 Months? 5 Must-Dos Before Your Trip)

  • Bipolar ionization units like our Germ Defenders, Mobile Air Angels and Whole Home Ionizers are a great way to keep mold away too.  At the very least, plugging a Germ Defender into the bathroom will send out ions to kill mold spores in this small space where air circulation can be a challenge.

  • Leaving a portable HEPA filter with activated carbon running is not a bad idea, either.  Activated carbon will help avoid that “musty” smell.  According to firesafeliving.com,  “plug-in” scent devices are not a fire hazard if you leave them plugged in while you’re away, but we at HypoAir don’t recommend them because a) many plug-ins use toxic chemicals like phthalates and formaldehyde, and b) the freshener will dry out before you return anyway, leaving an appliance running on your wall.  What’s better: make your own reed diffusers with your favorite essential oil (or combination of oils) and place them throughout your space for a safe, no-mess fresh scent!

These extra steps may seem to take more time on those days you’re packing up to leave your vacation home, but when you come back to a home that is ready for relaxing as soon as you open the doors and windows, it will be worth it!

Photo by Lavi Perchik on Unsplash

Summer Cooling: What are our options?

Summer Cooling: What are our options?

Many places in the US and around the world have broken temperature records this June.  Whether you’re in Minnesota or south Texas, it can be tough to keep your home cool during summer while maintaining a decent air quality.  We’ll go over some of the most popular ways of cooling your home and maybe some you haven’t thought of.  

If you’re not familiar with the different types of air conditioners and how they work, check out this article.  Note that newer air conditioners are also often “heat pumps” that can reverse the flow of refrigerant to provide heating in the winter.   

Central Air:  About 66% of homes in the US have central air conditioning, but this is not spread out evenly over the country.  As one would expect, central A/C is more prevalent in the south (37%), west (22%), and midwest (21%), versus the northeast (17%), and newer homes are more likely to have it.  (How Much Value Does Central Air Add to Your Home?) The best thing about central air conditioning is its distribution system, which allows multiple rooms to receive cooling and filtration from one unit.  With any air conditioning, it’s very important to do the following things:

  • Keep your home closed (a sealed system) so that warm, moist air is not introduced.  Letting in humid air from the outside will quickly increase humidity inside, because air at a lower temperature cannot hold as much moisture as warmer air, and humidity climbs.  This applies to windows, doors, and any significant leaks (like the door to an unconditioned attic or crawlspace).   

  • Change the filter on your unit regularly!   We can’t emphasize this enough: a dirty filter not only puts extra stress on the machinery like fans and compressors, but it increases cooling costs, and when the filter gets dirty enough, air will start to leak around the filter and get your evaporator coil dirty, providing food for mold.  Using the highest MERV possible for your unit will help keep the system clean and your air clean as well.  You can check out our article here to find out how to get more filtration out of your current AC system. 

  • For extra filtration, you can cut filter material to fit your vents, just don’t forget to clean or change these regularly, too. 

  • Get your unit serviced regularly.  Here are some things that the HVAC tech will do for you during a service visit:  inspect the inside coils, clean the outside coils and straighten fins if necessary, check the refrigerant levels and add refrigerant if necessary, and test the thermostat.  An HVAC system is a big investment (average $7000), so you’ll want to take care of it!  

  • Make sure your insulation is up-to-par: check air ducts to make sure they are not crimped and are fully insulated, and make sure there are no “bare spots” in the home’s conditioned-space envelope (ceiling or roof).  You’ve got to keep that cool air where it belongs!

Mini-Splits have most of the same parts as a central system, but they don’t have ducts to distribute cool air.  Instead, you could have one outdoor unit combined with up to eight indoor units, with the outdoor unit distributing refrigerant, not air.  In this way, you’ll have eight separate fans and filters inside, but these are smaller.  Mini-splits also have filters, so you’ll want to clean or change these on a regular basis.  One disadvantage with mini-splits is that the air filters tend to be similar to window air conditioners, which are cleanable, but they don’t provide high filtration, just large dust capture.  You will also want to get your units serviced regularly by an HVAC technician.  To get additional dust filtration, try adding standalone HEPA filters in the rooms that seem to get the most dust. 

Window Air Conditioners have come a long way in efficiency and looks!  They are one of the quickest installations, too: from buying one in your local home improvement store to having cool air in your space, could take as little as 1 hour.  Window air conditioners are a sort of “plug and play” cooling solution, but they also require regular maintenance of cleaning the filter.  Because the filter is equivalent to a very low MERV, like mini-splits, you’ll want to add a standalone HEPA filter to reduce pollen and dust.  In addition, if your window unit is more than several years old, it would benefit from a deep cleaning (see our article for tips on how to do that).   Some window air conditioners also have a feature that mini-splits and basic central systems don’t: a fresh air vent.  When this vent is open, you can get a small stream of fresh air from the outside, to dilute stale indoor air.  The only problem is that this air is usually not filtered or conditioned:  it’s the same as “cracking the window” without a screen.  To find this feature and operate it correctly, sometimes you’ll need to refer to the owner’s manual.   New window units with “inverter” type motors can be extremely efficient and this “saddle” style unit by Soleus even gives you your window view back, because it hangs below the window on each side.  It also has a dehumidifier setting to lower the humidity in your space. 

Portable Air Conditioners have become popular because like the name suggests, they are the most portable.  They can cool spaces without a window, as long as you have a place nearby to send the heat through the exhaust duct (through a sliding door with an adapter kit, for example).  You will also need a drain to collect condensate, or you will need to empty the reservoir every so often.  Portable air conditioners have the minimal filters similar to window air conditioners and mini-splits, so they are not able to filter smaller particulates.  It’s really important to clean these filters on a regular basis to keep your air conditioner working well!  Another downside to portable air conditioners is that they are less efficient than window air conditioners, and they have bulky hoses that aren’t the most attractive.  

Fans are the most common cooling systems we have, and many are cheap, at less than $50.  Fans cause evaporative cooling, where the circulated air carries heat away from our bodies in the form of water vapor.  Fans work well to cool us down if there is some humidity in the air.  (See our article about the detrimental effect of fans in extreme dry heat.)  You can use a combination of ceiling fans and portable fans to move air from cooler to warmer areas of your home.  Dreo Air Circulators are very powerful, efficient, and quiet because of the fan design, and because they use brushless DC motors that have a large range of speed with low energy consumption.  Since most fans don’t have filters, you can add standalone HEPA filters to cut down on dust, or add cloth filters to your tower fans. Filters for box fans (20x20”) are mainly the replaceable type, not cleanable, but $45 for a 4-pack of MERV-13 filters could help your space stay a lot less dusty.

Opening the windows is an option if you live outside of polluted urban areas, wildfire smoke, or excessive heat and humidity.  In these cases, it’s best to leave the windows closed and curtains drawn to preserve coolness as long as possible in the day.  If inside temperatures start to equalize with outdoors, however, you can use regular window screens in pristine areas, and Window Ventilation Filters in more polluted areas.  Although the filters restrict airflow slightly, they provide a good buffer against dust and pollen.  Here again, standalone HEPA filters will also help reduce dust in your home. 

Evaporative coolers, also known as Swamp Coolers, began to be popular in the 1920’s and 30’s when electricity was available, but residential air conditioning was not affordable/accessible. (Window air conditioners were invented in 1931 and central air conditioning was offered in 1931 but many Americans could not purchase them due to the Depression).   Swamp coolers use a fan to blow air over a wet membrane, which, if not cleaned regularly, begins to grow algae and smell like a swamp!  This older type of membrane is definitely not something we would recommend for air quality, but newer models like those made by Big Ass Fans uses a proprietary resin coating on the media that resists the growth of algae and mold to keep your airflow clean and people healthy.  Following the cleaning and maintenance guidelines are very important, too.  Another downside of this type of cooling is the massive airflow that could kick up a lot of dust.  However, if you have a large outdoor or unconditioned space and adding humidity into the air is not a problem, then an evaporative cooler could help you stay cool.  It would even help to cool a porch, from which you can open up air to your home to take in cooler air.

Heat Pump Water Heaters can actually cool your space.  It sounds counterintuitive–til you consider what this machine is actually doing.  Instead of creating heat by an electric coil or gas furnace, this type of water heater pulls heat from the surrounding air–in effect making the room in which it’s installed, cooler!  If you have the water heater installed in the garage or another unconditioned space, you can still reap the benefits by using ducts to bring warm air from your house to the heat pump, and cool air from the heat pump back to your house.  Heat pump water heaters do cost more than the basic electric or gas varieties, but according to the Department of Energy, they can be two to three times more efficient than a regular electric water heater.  However, when you consider you’re getting free cooling during the summer, you can deduct this cost from your cooling bill.  Another consideration is the size of room where it is installed.  It must be installed in a room at least 12’x12’, or have ducting to access larger areas, so it can pull the heat it needs from the ambient air.   If it’s time to replace your water heater, check with your plumber to see if a heat pump water heater would work for you!

There are many ways to move cool air from the basement into your home, but consider the quality of basement air before you make this move.  If it’s musty or moldy smelling, you’ll definitely want to get rid of that mold before trying to move that air upstairs.  For this reason, we can’t recommend circulating basement air in the rest of your home.

Whichever way you decide to cool your home, make sure that air quality doesn’t suffer.  Our Germ Defenders, Mobile Air Angels and Whole Home Ionizers sanitize air using bipolar ionization, killing microbes and agglomerating dust and pollen so it’s easy to filter or clean.   Extreme heat tends to lead to increased air pollution, so be conscious of air quality when you open the windows, or even when they are closed and outdoor air seeps in (as it always does except in the tightest of homes).   Check out our article to find out how to ride out a heat/air pollution wave safely!

Photo by Glen Carrie on Unsplash

Should I move out of my home during mold remediation?

Should I move out of my home during mold remediation?

We get this question a lot from homeowners who have discovered mold in their homes and need professional remediation to remove it.  Should I try to stay while the mold is removed and my house is put back together, or find another temporary home?

There are several considerations in making this decision, and they’re not easy.  Sadly, mold remediation is not “elective” or optional once you find it and discover the extent of mold damage.  The traditional option of renovating “room-by-room” is not available here because if it has mold, it has to be remediated as soon as possible if you want to live in your home!  

Why should I move out during remediation?

First off, If you’re not used to putting yourself first, you need to consider the value of your health.  Staying in your home while mold is removed and materials are replaced simply may not be safe for certain individuals.  The following are just some of the conditions that make it safer to leave:

  • Anyone diagnosed with Chronic Inflammatory Response Syndrome (CIRS) or Mast Cell Syndrome (MCS)

  • A compromised respiratory system or respiratory illness like asthma, COPD, emphysema, cystic fibrosis or any number of similar conditions.  Why?  Small particles and mold released into the air can directly affect your lungs and can be extremely dangerous for immuno-compromised individuals.

  • Heart conditions like arrhythmia, congestive heart failure, unstable angina, and any number of similar conditions.  Why?  Small particles and mold released into the air can directly affect your heart when they pass through your lungs into your bloodstream and can be extremely dangerous for immuno-compromised individuals.

  • Mobility handicapped people and the elderly may find it difficult to perform more cleaning and move around areas under construction

  • Work-from-home employees:  construction noise can be distracting and unproductive

  • Families with young children and/or pets  Even with protective barriers between you and the construction, you may find that your living space has increased dust on all surfaces, danger of children and/or pets getting into construction zones,  and construction noise from 7am on any time during the workday.

Secondly, most remediators will say that moving out is the best option to minimize time and labor.  According to Anna Williams, founder of Your Beautiful Home, there are multiple reasons.  If you live at home during the work, the construction crew will have to take extra care to clean up each evening before leaving, as well as pack up their tools.  This takes at least 30 minutes in the evening, plus time in the morning to unpack tools. (Move out during renovation or live through it? That is the question!)  Also, they may not have the easiest access if you are living there, for instance walking and carting tools to the back door to avoid your living space.  So, making it easier and quicker on the remediators means less time and money spent.

And of course, if the remediation requires extensive gutting to your home, it may be just too inconvenient to try to live there.

If you decide to leave, family and friends usually have the cheapest “rates” of any accommodations, but will your relationship survive the remediation?  If your contractor has a reputation for completing projects on-time, staying with family may be a good option.  Alternatives include:

  • Vacation rentals like Airbnb and VRBO

  • Extended stay suites

  • Sublets

  • Corporate housing/short-term rentals (contact a corporate housing agency)

If you move out, you’ll want to make sure to do the following:

  • Store food items in airtight bins

  • Discuss power requirements and when the power will be cut off (will it affect your freezer/any other climatization?

  • Place plastic dust covers on furniture, clothing and carpets if possible

  • Secure any areas of the home that contractors don’t need to access, take or lock up valuables

  • Notify your home insurance and security company

  • Check the “containment” that the contractor has set up.  Be sure to discuss your HVAC system, which can broadcast mold and dust throughout your home if it’s not secured!  If temporary ventilation is needed during extreme heat or cold, the contractor should be able to provide it.  

  • Plan for extra weeks or months in case the remediation schedule doesn’t proceed as planned.

Why should I stay?

Finding alternate accommodations can be stressful if you have to stay with others, or expensive if you have to pay for a rental for your family.  For these reasons, many decide to stay at home.  Homeowners who decide to try to live in their home during remediation should know about the stresses they may endure!  It’s not easy to have workers coming and going through your personal space.  Here are just a few considerations:

  • Increased dust throughout the home

  • Increased noise during workdays

  • Temporary (or prolonged) power and water disruptions

  • Ventilation during extreme temperatures

  • Child safety

  • Parking issues–will there be many vehicles and/or a dumpster parked in front of your house?

  • Access to your kitchen

  • Access to at least one bathroom and shower or tub

  • Access to laundry facilities

  • Sufficient clean space for your family to sleep

  • Sufficient space to work if working from home

  • Delays to the schedule may make the remediation longer than expected

It’s a lot to consider.  Of course, make sure you have as many options available as possible before deciding, including knowing if your insurance will pick up any of the cost for relocation.  If not, you can check with local, state and federal agencies for assistance.  

Staying at home during a mold remediation carries an extra risk: airborne mold.  For this reason, we recommend purchasing extra HEPA filters to place around your living area and portable air sanitizers like the Air Angel and Germ Defender.  Containment of dust and mold spores has to be top-notch–make sure that the contractor follows all safety standards for containment!

Working with the contractor on setting a budget and timeline should be a top priority.  Many contractors may think that delays are acceptable if the homeowner is living in the home or with family–after all, you won’t be paying rent–but make sure that this is not their mindset by including deadlines in the contract, and penalties or cost reductions if they are not met.

By all means, ask for help whenever you can.  Whether it’s taking a weekend getaway break, taking vacation during the remediation, asking for help with children and pets, or having dinner with friends more often, you’ll need to pace yourself so that your health and your relationships aren’t “gutted” either!  

BALOs: voracious good bacteria

BALOs: voracious good bacteria

Bacteria in general have bad connotations: infection and illness to name a few.  But increasing awareness about the benefits of probiotics and natural gut bacteria have taught us that not all bacteria are bad: there are good bacteria too.  Bdellovibrio is in the good bacteria category and recent discoveries about it are spurring more possible uses.

Bdellovibrio bacteriovorus, which was first discovered in 1962, is a gram-negative, aerobic bacteria, which means it has a hard, outer shell that resists the purple stain used to differentiate strains of bacteria.  (For more information on gram negative and gram positive bacteria, check out our post here.)

Bdellovibrio is also a predator.  It is capable of killing and replicating inside over 100 different types of Gram-negative bacteria, including antibiotic-resistant pathogens, giving it a reputation of being a “living antibiotic”.  These prey bacteria include such well-known pathogens as Escherichia coli, Helicobacter pylori, Klebsiella pneumoniae, Pseudomonas, and Salmonella.  This predation behavior has even spawned a new acronym for this type of bacteria: Bdellovibrio and Like Organisms, or BALOs.

According to the following analysis, Bdellovibrio sounds like a voracious alien by attaching to, penetrating, and killing host bacteria, then using them to incubate its own progeny:  “In the wild, B. bacteriovorus uses chemotaxis and a single polar flagellum to hunt groups of prey bacteria. Once in close proximity, B. bacteriovorus collides with individual prey and attaches through an unknown mechanism. Next, B. bacteriovorus invades the prey periplasm (layers around the cell), likely through use of retractable pili, and secretes hydrolytic enzymes that kill the prey within 10 to 20 min of invasion. The predator subsequently remodels host peptidoglycan to form the spherical bdelloplast, where it degrades intracellular contents to fuel its own filamentous growth (liquidates the insides of the prey to fuel replication). Finally, 3 to 4 h following initial contact, the prey cell is lysed (ruptured), and four to six daughter cells emerge from their protected niche (the bdellovibrio babies emerge). Wow!   

Bdellovibrio is found naturally in soil and water, including rivers, lakes, the open ocean, and sewage and wastewater treatment plants (WWTPs).  They are also found in the gills of certain aquatic animals like crabs and oysters, and some mammal intestines.  

Here are some of the proposed uses of BALOs:

  • It could be used in a probiotic to foster healthy human gut microbiota (Higher Prevalence and Abundance of Bdellovibrio bacteriovorus in the Human Gut of Healthy Subjects)

  • It could be an effective treatment for pneumonia in lungs, as both B. bacteriovorus and M. aeruginosavorus could reduce the burden of K. pneumoniae in rat lungs, and B. bacteriovorus treatment is also effective in Yersinia pestis infection of mouse lungs. However, it was found that B. bacteriovorus and M. aeruginosavorus did not reduce pathogenic colonies in the blood, as it did in the lungs of these animals.  (Predatory Bacteria Attenuate Klebsiella pneumoniae Burden in Rat Lungs, Susceptibility of Virulent Yersinia pestis Bacteria to Predator Bacteria in the Lungs of Mice)

  • It could be an effective treatment for Cystic Fibrosis (CF), in which patients have a defective gene that hampers immune response and causes them to be prone to chronic lung infections with an exaggerated inflammatory response.  In CF patients, instead of a diversity of microbiota, only two pathogenic microbes prevail, namely usually the Gram-negative P. aeruginosa and the Gram-positive S. aureus.  Therefore Bdellovibrio was used in a 2014 study to “challenge” these 2 strains in a lab setting, and it was able to reduce the biofilm of both cultures dramatically, even in “flow” settings.  The scientists were even able to photograph (at 30-50 times magnification) Bdellovibrio preying on S. aureus bacteria (see photo below).

Source: Study: Bdellovibrio bacteriovorus directly attacks Pseudomonas aeruginosa and Staphylococcus aureus Cystic fibrosis isolates

  • Prolong food storage:  This study proposes that Bdellovibrio could be used to prolong the shelf life and reduce additives to packaged meat, because it was tested on chicken slices and canned beef and found to reduce colonies of E.Coli by 4.3 log and 2.1 log respectively.  The Bdellovibrio was able to lyse (rupture) all the strains of E. Coli that were tested.  In a separate investigation of Bdellovibrio and E. Coli, this video shows how an actual Bdellovibrio cell multiplies inside an E.Coli cell and destroys it from the inside out.

  • It’s already been recognized as a mode of controlling bacteria in water supply systems.  In 2020 in Varberg, Sweden, a municipal water supply company decided to replace its chlorination system with ultrafiltration, which is an ultrafine mesh filter that prevents microbes from passing through.  Scientists monitored the results closely following discontinuation of chlorine, and some bacteria grew, but then decreased drastically.  By the third month, Bdellovibrio had flourished and harmful bacteria had diminished.  This showed that chlorine had actually suppressed the natural predatory action of bdellovibrio in the biofilm on the inside of drinking water distribution pipes where the good and bad bacteria live. (Predatory bacteria could be used to purify water in the future, study suggests)

So, what’s keeping us from using BALOS as natural antibiotics?  Of course, scientists want to make sure that there will be no harm to humans.  A number of studies using the two BALOs B. bacteriovorus and M. aeruginosavorus “demonstrate their inability to invade mammalian cells, and no apparent pathological effects or signs of cytotoxicity or reduction in cell viability, supporting the proposition that these two BALOs are inherently non-pathogenic to mammals.” (Biotechnological Potential of Bdellovibrio and Like Organisms and Their Secreted Enzymes)  However, scientists are also concerned that prey bacteria could become resistant to it, if it incompletely eradicates the prey. 

In addition, varying amounts of oxygen are necessary for BALOs to work on their prey.  Finally, in complex microbial environments like in our bodies or even in a wastewater treatment plant, it’s not always easy to predict how introduced BALOs will change the biome or which microbes they will prey on, although some do have preferred prey.  Certain chemicals also reduce their effectiveness.

In conclusion, it’s amazing what goes on all around us in microscopic realms.  BALOs could be harnessed in many different ways to improve our health: just the Swedish experiment of removing chlorine showed that it’s not always necessary to use harmful chemicals to kill bad microbes.  Although a lot more research needs to be done, it’s good to know that there are bacteria out there that are on our side! 

Photo by CDC on Unsplash

How a moth’s wings could make your home quieter

How a moth’s wings could make your home quieter

Noise is an important part of our home environment.  The most beautiful, well-designed home, if situated next to a busy, noisy road, falls in value due to its location, location, location.   Apartments in the city may have beautiful balconies that are never used because of the drone of traffic all around.  What if nature offered an innovative sound-absorbing “cloak” for your home?

Bats use echolocation to find their prey.  Smooth surfaces that lack scales or fur make the echoes louder, allowing the bat to close in quickly.  Animals with fur or scales, however, can elude the bat more often.  Scientists have discovered that a certain type of moth have scales that overlap in unique ways to provide exceptional sound-dampening. 

Diamond Light Source is a synchrotron in the UK (a synchrotron is a circular particle accelerator), which was used to examine the nanosized scales on the wings.  According to Professor Christoph Rau, a scientist at this synchrotron, the sound absorbing properties of thoracic moth scales are capable of absorbing about two thirds of the sound energy emitted by their predator, the bat, and significantly increases the insect's survivability.

A separate study by the University of Bristol's School of Biological Sciences showed that the wings absorb as much as 87% of the incoming sound energy. The effect is also broadband and omnidirectional, covering a wide range of frequencies and sound incident angles.

"What is even more impressive is that the wings are doing this whilst being incredibly thin, with the scale layer being only 1/50th of the thickness of the wavelength of the sound that they are absorbing," explained lead author Dr. Thomas Neil.

What could we do with such incredible sound-absorbing performance?  Certain types of noise, like car horns and screeching tires can be detrimental to our health, as we detailed in this article.  Then, there’s also the noise pollution that comes from neighbors or even your own home, which can affect your sleep or concentration while studying or working from home.    Wallpaper or ultra thin sound absorbing panels would vastly improve interiors or exteriors in cities and other loud locations.  Office walls and places where highly sensitive information is discussed could use it.  Even libraries, children’s nurseries and our own bedrooms could use it.  Can you get too much quiet in a space?  I don’t think so, when the world’s noise is only a few steps away!

Tackling Dust in Your Home

Tackling Dust in Your Home

Dust is one of those things that never completely goes away, like mold, but keeping both at a minimum in your home is key!  There are a lot of weather conditions that increase dust, but in general, heat and low humidity are two of them.  When these occur, you’ll not only see an increase of dust in your home, you’ll be breathing more of it because the less humidity, the longer particles stay afloat.  Yuck!  Getting it under control takes some effort, but we’d like to help!

Invest in the right tools

We see deep discounts all the time on home appliances that look like they make our lives easier–but they end up to be a waste of money.   This is where it pays to research–and only buy what will do the job, not the gadget with the most features.  The tools we’re going to talk about are very important to your family’s health, so we hope that you keep these requirements in mind and buy wisely! 

  1. Air Cleaner

With dust in the air, you can do all the cleaning you want and then–BOOM–the dust continues to fall out of the air after you stop cleaning, not to mention all the dust you are filtering with your nose and lungs!  If you live in a dusty area, an air cleaner that uses HEPA filters is imperative.  

For value and solid performance, Medify Air has a range of air purifiers that is hard to beat.  You can find one for every size room in your home, from small nurseries to “great” rooms, with simple controls and most with filters that can be vacuumed gently once a month on the pre-filter side to extend their life.  They use True HEPA H13 filters, which in general last 3 to 6 months.  

Another great option is the CoWay AirMega Mighty, which has been highly rated for a number of years by the NY Times Wirecutter review for dusty rooms up to 250 square feet.  Their testing has used the same filter for up to a year with good performance (however of course you’ll want to have new filters on hand just in case you are caught in an exceptionally-poor air quality day).  

  1. Dusting, Vacuuming, and Mopping

I wish I could tell you differently, but these chores are a must.  If you invest in the right tool(s), however, you can enjoy your clean surfaces with less work!  Dusting should be done with a dry microfiber cloth (check out this video to learn how to dust properly–yes there are techniques that are more effective with less work!)  Then, get both vacuuming and mopping done at the same time with this ONE TOOL (I’ve touted it in other articles, but here it is again): with the CrossWave floor and area rug cleaner by Bissell ($257).  It leaves your floor cleaner than if you had vacuumed and mopped separately!  It has a rug cleaning function, and it has a HEPA filter included, so no dust is escaping your machine and going back into the air.   For people who have mobility or strength issues, this machine absolutely reduces the straining scrubbing actions that normal mopping requires, and it also comes in a cordless option.  If you check local discount stores, there are many reconditioned models that sell for less than half this price (I got my corded one at Ollie’s).  In addition, of course the manufacturer wants you to use their patented floor cleaner, and states that using any other cleaner will violate the warranty.  Unfortunately, Bissell products mostly rate an “D” grade from the Environmental Working Group for toxicity to humans and the environment, but if you do decide to substitute a non-toxic cleaner, we have just the one for you: a recipe using TotalClean.  TotalClean has no fragrance and no toxicity, you can clean your floors as often as you want without adding more VOCs and chemicals to your home.  Here’s the full recipe for a Bissell-like non-toxic floor cleaner:

Machine Floor Cleaner Concentrate Recipe (this is the concentrated cleaner so you add it in replace of the manufacturer’s cleaner, with the recommended amount of water, adapted from this very informative article):

  • 1-¾  cups TotalClean Concentrate
  • ⅛ cup rubbing alcohol
  • ⅛ tsp dish soap
  • 5-10 drops essential oil (optional)

If you simply must have a separate vacuum and mop, though, make sure the vacuum uses certified true (make sure the label says “true”) HEPA filters with an airtight, sealed filtration system.  You don’t want that dust to be recycled right back into the air!  As for mops, The Maker’s Mop is an ingenious tool for dry and wet-mopping, dusting, and cleaning up after huge spills.  And, being “cordless”, I guess it’s handy to have around in the case of a power outage!  (20 Tips To Prevent And Reduce Dust In Your Home)  

  1. Fresh-air ventilation WITH filtration

If your rooms are stuffy (too much CO2!) and you don’t have central air conditioning, make sure you only open windows with filters in them!  That’s right, screens may prevent mosquitoes and flies from coming in, but they do nothing to filter dust.  Our Window Ventilation Filters are adjustable so that you can still open your windows for fresh air and block out most of the dust. 

If you like to open your windows wide for fresh air often, you should consider replacing the fitted window screens with nanoscreening.  Nanoscreening does cut visibility through the screen somewhat compared to normal insect screens, but many customers like the additional privacy it offers.  AllergyGuard nanoscreen offers a kit that is super-easy to install with double-sided tape.   If you re-screen a few windows with this kit and like how it performs, you can go to their website for a larger roll and video on how to install it with spline, the skinny rubber tubing that is normally used to keep screens in place.  

  1. Change your HVAC filter more frequently.  

If you have a hard time remembering to do this, just enroll in an auto-ship subscription to make it easy to have them available when you need them.  If you’re concerned about changing it too frequently, check out our tips for getting that interval just right.

  1. Don’t carry the dust in with you!

We’ve written a lot about this practice, which ranges from taking your shoes off at the door and using a doormat, to doing your best to clean dusty pets off before they come inside (umm, can we teach them how to brush themselves?)

  1. Minimize.

This says so much in one word.  Minimize the fluffy pillows, fuzzy throws, carpeted flooring (don’t rip out carpet if you’re renting, though, obviously), knick-knacks and tchotchkes, piles of clothing, anything that you can do without, that catches loads of dust (children not included)!   If you want to have area rugs or carpet, consider changing them to wool carpets.  According to a 2015 study, wool carpets significantly improve indoor air quality by rapidly absorbing the common pollutants formaldehyde, sulphur dioxide and nitrogen oxides, known as volatile organic compounds, or VOCs, which are released from many common household items such as cleaners and disinfectants, air fresheners, printers and home furnishings.  A high level of formaldehyde (300 parts per million) was reduced to virtually zero in four hours, and nitrogen oxides from 300 to 5 parts per million in 24 hours, whereas nylon carpets did not perform as well.  The wool carpets retained the formaldehyde and did not remit them into the atmosphere.  When you choose a carpet, low pile heights are favorable so that dust and debris is easier for the vacuum to remove (with your True HEPA vacuum, of course!).    


How can I apply Altitude Simulation to my home?

How can I apply Altitude Simulation to my home?

Visitors and full-time residents in high-altitude locations are susceptible to altitude sickness, also called Mountain Sickness.  This is due to the lower atmospheric pressure and consequently lower oxygen molecules by volume, found in the mountains.  These illnesses include problems sleeping, fatigue, headaches, and even life-threatening pulmonary edema (buildup of fluids in the lungs).  At just 6,000 feet many people experience trouble sleeping, and, according to the Cleveland Clinic, about half of people who ascend to 8,000 feet will experience some form of altitude symptoms, and almost 75 percent of people will have effects at 10,000 feet. (Oxygenation for Mountain Hotels and Resorts)  Even one of the premier experts on altitude sickness, Dr. Peter Hackett, had a close call with pulmonary edema while mountaineering (video). Technically, even people at sea level can get “hypoxia” (the condition of low oxygen content in tissues) if the atmosphere is low in oxygen or their breathing function is impaired.  

Studies have shown that supplementing oxygen during sleeping reduces the effects of altitude sickness or hypoxia, while also improving daytime oxygen saturation and ability to function during the day.

Altitude Control Technologies (ACT) works with ordinary homeowners, as well as the US Air Force, US Navy, universities, professional sports teams, Olympic training facilities, etc. to provide “altitude simulation” for enhanced health and performance.  It’s a unique technology that raises oxygen levels in a room to “simulate” lower altitudes.  In homes, ACT only services bedrooms because with 8 hours of sleep at a simulated lower altitude, people can become better acclimatized to their physical altitude during the rest of the day.  This informative video shows the machines, how they work, where they are installed and how they are controlled.

ACT machines take in air from outside, splits up oxygen and nitrogen, sends the nitrogen out of the house, and the oxygen to the bedroom(s).  For example in Colorado, oxygen levels are increased by about 30% to simulate an altitude closer to sea level.  The control sensors monitor the oxygen saturation, barometric pressure and CO2 in the room constantly.   In this way, too much oxygen (which violates the National Fire Protection Code) is never a problem.  

The oxygen machines installed by ACT use molecular sieves.  They are placed outside the bedroom(s) in the attic, mechanical space or crawlspace so that noise and heat created by the machines does not impact the restful area of the bedroom.  To counter the heat of the machines that could otherwise place an additional burden on the HVAC system, ACT has developed an Alticool™ system uses a combination of fresh mountain air and exhaust fans to cool the machinery space.

Although the machines used by ACT are proprietary, many of the machines used by oxygen medical supply companies use Pressure Swing Adsorption (PSA) systems to separate oxygen from nitrogen.  Two pressure vessels are filled with Carbon Molecular Sieves (CMS).  In the first pressure vessel, clean compressed air is introduced, where the nitrogen and carbon dioxide is attracted to the CMS and oxygen is allowed to pass through.  The second pressure vessel is regenerated to “purge” the nitrogen and carbon dioxide from the CMS by vacuum and a small stream of pure oxygen.  Then, the vessels switch placement in the process and the first vessel is regenerated while the second vessel produces oxygen. (How Oxygen PSA Generators Work)

Because air pressure is lower at higher altitude, simulating a lower altitude in a room involves adding oxygen, which also increases air pressure in the room.  In building science, this is a “positive pressure” scenario, where good air sealing must accompany the installation so that the newly added oxygen doesn’t leak out of the room and cancel the work of the equipment!   For this reason, detailed engineering of the space(s) to be oxygenated precedes any installation.  The engineers take into account the room boundaries including doors, windows, walls and ventilation systems that are shared with other spaces, often specifying dampers that are activated when the system is in use.  New construction and pre-existing structures are candidates for the system, however it’s always less costly and easier to plan for such a system before the home is under construction. 

So you may be saying, how does all this apply to my home at sea level?  Even if you don’t live at or visit high altitudes, you can apply some of the principles of this technology to make your bedroom the optimal place for your body to recharge and repair itself while you sleep.  Let’s recap to understand how this applies to your bedroom:

  • Getting a better sleep at night increases performance and cognitive facilities during the day. 

  • Air-seal the room boundaries from pollutants by using air-sealing techniques at the door(s), window(s), corners, outlets and openings like can lights and ceiling fans.

  • If you want more fresh, clean air, you can consider the following: 

    • Use a window ventilation filter where you can open the window comfortably without excess humidity, heat or cold.

    • If you have central air conditioning, you could switch the bedroom to a dedicated mini-split with its own filter and option to intake fresh air from outside, OR

    • Add a fresh-air intake in your HVAC system and add an inline duct fan and filter to the vents serving your bedroom (here’s an inline duct filter). 

    • Add plants that are low-maintenance and produce the most oxygen while filtering pollutants. 

  • Check with your doctor to see if you suffer from sleep apnea or hypoxia.  Usually these are diagnosed through a sleep study.  If you are a relatively stationary sleeper, you could add oxygen to your sleep routine with a portable oxygen concentrator and mask or cannula.  Continuous positive airway pressure machines (CPAPs) are popularly prescribed but they do not increase the oxygen content of the incoming air;  CPAPs just increase air pressure slightly to keep breathing airways open while you sleep.

  • Consider that outside noise can also reduce your sleep quality, so check out our recommendations to seal out unwanted noise, as well. 

  • Make it a priority to clean surfaces and change your sheets at least once a week.  To help combat dust and allergens between cleanings, add an Air Angel and a standalone HEPA filter.  A dustmite-proof mattress encasement also helps to transform your bed from being a dustmite haven to a clean “nest”!

Consider what and how you are breathing during the most important time of the day–your sleep–and you may find that making small changes can improve your daytime enjoyment immensely!

Photo by Jason Hogan on Unsplash

Which DIY mold test kit should I get?

Which DIY mold test kit should I get?

Every home has some mold, because mold spores practically hitchhike into the home on our clothing, groceries, and even the air.  The difference between acceptable levels of mold and an infestation, however, is whether the moisture and food sources exist to feed an infestation.  There are many reasons to test your home for unacceptable levels of mold, some of which are:

  • Musty smells in an area

  • Recent flooding in or around your home

  • Roof damage

  • Renovations like roof, siding or foundation repair that expose your home to the elements

  • Mysterious health issues in any resident of your home

If you suspect an infestation of mold in your home, there’s no time to waste in testing, stopping the growth and removing the mold!  The health effects of living with a mold infestation are too costly not to do anything! 

Of course, if you have the resources and are able to hire a trained, reputable mold inspection and remediation company, they are often preferable to DIY kits because these inspectors have the training and equipment to make a thorough inspection and testing of your home.  However, working on a budget often means if you spend too much on inspection, there isn’t enough money to make a thorough remediation.  We get it, and so do makers of DIY mold testing kits.  For this reason, we have investigated some DIY kits and even partnered with one. 

There are several types of DIY mold testing you can do in your home.  Here is a description of each, from lowest to highest costs:

  • Gravity plates (also commonly called petri dishes)--an Air Sampling method:  When opening a sealed petri dish to the air in your home, mold spores in the air land on the sugar coating (agar) lining the dish and start to grow.  This method does grow mold!  However, unless you get your samples analyzed by a lab, you will not know for sure what species of mold is present, and even then, only “relative” quantities of mold colonies can be inferred.  If you decide to go this route, we recommend Micro Balance Health Products’ EC3 Mold Screening Test Kit - 6 Pack, which retails for $36.  It has detailed, easy to follow instructions to determine a relative “mold burden” in your home, but does not include the option to have your samples analyzed by a lab.  Because it’s sold by a company that has developed several mold abatement products and  many more highly reviewed health supplement products, you can be sure that they are interested in your best health!

  • Spore traps–an Air Sampling Method: GotMold combines the best of professional technology with DIY convenience.  Although it’s a major step-up in pricing from agar plates (a 3-room kit is $299 including return shipping and analysis), you can use the same sampling procedure that professionals use, and professional lab analysis is included in that package.  Their patented BioVac™ Air Sampler can be reused, so if you decide you’d like to retest after completing renovations to make sure the mold is gone (wise idea), you can get refill “cassettes” to use with your machine (again, postage and analysis is included in the cost of the cassettes).  In the lab report, each area tested will be grouped under the following severity of mold: 

    • GREEN — Not Evident

    • YELLOW — Slightly Evident

    • ORANGE — Moderately Evident

    • RED — Significantly Evident

Then, you’ll get spore counts from 4 common and 14 other types of mold, as well as an indication of whether these molds are usually found with water damage.  It gives “next step” recommendations in the conclusion of the report.

  • Immunolytics’ Kit–Combination Air and Swab sampling method: Since not all types of mold reveal themselves in an air sample, Immunolytics offers a Quickstart Kit ($198) made up of gravity plates and 1 swab or “Build Your Own” kit ($33 per sample) that combines the two methods. Like Micro Balance Health Products’ kit, gravity plates are interpreted by number of colonies formed, and swab samples give a percentage of specific molds found in the sample.  You can also ask for a consultation to determine the next steps for your home. 

  • EMMA–Air or Swab sampling method:  Offered by RealTime Labs, This method is VERY simple in that you use the provided swabs or gauze, or cut out a section of your home’s AC filter.  The separate samples can be combined into 1 sample, or charged as separate samples. This test is ideal for homeowners who are already experiencing mold-related illness symptoms, as their “combo” tests not only test your home for 12 of the most common molds, but also detect 5 of the most common mycotoxins (mycotoxins are responsible for illness).  Knowing the mycotoxins floating around your home may help you develop a treatment plan with your doctor, and the company also offers urine tests, pet tests, and tests for other known toxins.  One disadvantage of this method is that combination of samples will not allow you to learn where the mold is coming from (which room has the highest count).  Check out our article “What’s the Difference between EMMA and ERMI?” to learn more about EMMA.  

  • HERTSMI-2–Dust sampling method:  ERMI was a test developed for research purposes by the US government.  Although it can tell you the presence of specific molds, it is unreliable for determining whether a building is safe to re-enter after remediation.  HERTSMI-2 is a method of interpreting the results of ERMI that is much more reliable (for mold scores less than 10) of whether you will get sick again when returning to a water-damaged building (WDB). HERTSMI-2 analyzes the results for 5 specific molds, also called the “Big 5”, which are most likely to cause relapse of symptoms for patients.  EnvironBiomics offers a very reasonable price ($130) and fast service for HERTSMI-2.  They also offer separate tests for endotoxins (bacterial toxins) and actino microbes (gram-positive bacteria), which are not common to be tested (see our article here about endo-and exotoxins).  If your home was heavily water-damaged or had water damage in multiple areas, you may want to opt for a HERTSMI-2 to make sure it’s safe to inhabit after the remediation.

Since the unconditioned outdoors has its own mold biome, it’s a  helpful baseline to reference.  Most tests do not suggest taking an outdoor sample, but GotMold includes one air cassette specifically for the outdoors in each of their kits.  That way, you can see the types and concentrations of mold directly outside your home, which may be influencing your indoor scores.  We have chosen to partner with this company because of the owner’s passion for helping average homeowners detect mold in an economical way (read his personal story and the company’s philosophy here).  Their air sampler was one of the first affordable machines for DIY air sampling.   

Of course, there are many more test kits out there, but be sure to do your research!  Some have extra fees for lab analysis, postage, or consultation, and each lab report reveals different information.  Companies started by physicians (like Realtime Lab or SurvivingMold.com) are even more helpful because they have taken the time to screen and affiliate with doctors around the US who can physically treat homeowners and their families who have been affected by mold.  Whichever method you choose, don’t stop looking for the source of mold in your home and remediation of the damage until retesting comes back with an acceptable score.  Even then, “acceptable” to one person may cause relapse in someone whose health has been severely impacted by mold.   Mold can be sneaky and hard to find, so if DIY tests don’t reveal the problem, check out our articles on Taking our Homes Back from Mold and article on How to Choose a Mold Remediation Contractor (which also speaks about inspection) to partner with professionals.  We at HypoAir are also available to help with products that can help keep mold at bay while you're remediating or on a maintenance basis. 

Our Top Articles for Reference by Topic

Our Top Articles for Reference by Topic

We have published a lot of information for you on our website, so we understand it can be a lot to digest!  Here’s a shortlist of our top articles 

Mold and Mycotoxins

Mold Prevention

Mold Testing

Cleaning

Air Filtration

Humidity

New Home Search

Ventilation

Home Projects for Better Air Quality

HVAC

Disaster/Emergency Preparation

Mold in the Toilet

Mold in the Toilet

The bathroom is a room that’s very susceptible to mold growth, and once you understand what mold needs to grow, it’s easy to understand why. Basically, it just needs moisture (shower=check, sink=check, toilet=check), and food (dust=check, organic matter=check), so the bathroom sometimes becomes a petri dish that’s hard to keep up with.  Fortunately for you, we’re tackling this problem by appliance, so check out our other articles here:

Now, back to mold in the toilet.  Mold can be mistaken for those stubborn mineral toilet rings, until it starts to turn weird colors, like black, brown or pink. 

What type of mold is the black mold in the toilet?

Although you may know that Stachybotrys chartarum is the most commonly termed “black” mold, another mold that appears black is Aspergillus Niger, as shown in Figure 2 of this 2017 study from India.  Aspergillus Niger can be a cause of some forms of pneumonia, so it’s definitely not something you want in your bathroom!  The study identified five types of mold in public toilets, resulting from airborne spread of spores and improper or infrequent cleaning procedures.

Alternaria and Cladosporium are two other types of mold that can produce black growths. (10 Types of Mold Colors Commonly Found in the House)  The most important thing to know is that these molds can produce mycotoxins and mVOCs every time they are disturbed!  Stachybotrys has been demonstrated to produce a number of Macrocyclic Trichothecene mycotoxins.  (Black Mold and Stachybotrys Exposure Guide)  Aspergillus niger can produce Ochratoxin A, Cladosporium produces mVOCs which can be irritating, and Alternaria species produce more than 70 mycotoxins! (Alternaria host-specific (HSTs) toxins: An overview of chemical characterization, target sites, regulation and their toxic effects)

Brown stains in the toilet are another problem–they could be caused by a number of molds, such as Pithomyces chartarum, Aureobasidium pullulans, Stemonitis, Taeoniella, Cladosporium or Mucor.  Arguably the most harmful mold of these is Mucor, which can cause a life-threatening blood infection called mucormycosis. However, it’s not always brownt any point during its life cycle it can be brown, yellow, black, white, or gray.  (10 Types of Mold Colors Commonly Found in the House)

Pink slime in the toilet is actually not mold.  As we mentioned in our article about the shower, that pink slime that can also form around drains and at the bottom of the shower curtain is caused by the bacteria Serratia marcescens, and can cause urinary and respiratory tract infections, which are especially problematic for people with immune problems. 

If you decide to try to find out what type of mold is growing, you can test it with a lab, but in any case it’s wise to treat it as a dangerous air pollutant.  Don’t disturb it unless you spray a cleaner on it first (to immobilize the spores), or are using a mask!

What is the cause of mold in the toilet bowl?

There are several possible causes for mold in the toilet bowl, some of which can be easily resolved and some need more effort!  

  • One of the easiest methods is just flushing the toilet more often. Toilets that are not used every day can allow mold and bacteria to attach to the bowl.  After cleaning the toilet, try to remind yourself to swing by and flush the toilet at least every other day so that these microbes don’t have a chance to proliferate.
  • Next, if the toilet does get used or flushed often, more frequent cleaning is often needed.  However, you need to skip traditional bleach based toilet cleaners, as they are toxic for you!  The following are some non-toxic cleaners that are very effective for bacteria and germs, however note that citric acid is not always effective on mold (read below on citric acid** and get a few more recommendations from Zero-Waste Memoirs):
    • Force of Nature is hypochlorous acid, a safe alternative to bleach that is a hospital-grade, EPA-registered disinfectant that kills 99.9% of germs including Staph, MRSA, Norovirus, Influenza A, Salmonella, and Listeria when used as directed.  You can spray Force of Nature in the toilet as a final disinfectant, but it should not be mixed with essential oils or cleaners that contain essential oils, as this can reduce its disinfecting power. 
    • Fragrance-free powder: Seventh Generation Zero Plastic Toilet Bowl Cleaner ($22) has citric acid as its main cleaning agent.  This non-toxic ingredient is registered with the FDA in products certified to kill feline calicivirus (a testing substitute for norovirus), so we know that it works.  If you or anyone in your household is exhibiting symptoms of this illness or a similar one, we would suggest cleaning toilets full-strength and often with a product like this!   If you like a little lemony fragrance, try the Probiotic Toilet Bowl Cleaner by Etee ($45), which also uses citric acid.  It may seem expensive, but it’s not bad on a per-use basis ($1.50), and some customers find that using less than the prescribed amount (1 TBSP) works just fine.  Added probiotics help to keep your septic system functioning optimally.
    • Dissolving strips:  Nature Clean Natural Toilet Bowl Cleaners Strips ($17) are highly rated too.  They use sodium coco sulfate as the main ingredient, which is a blend of the fatty acids in coconut oil. (Sodium Coco Sulfate: Is It Natural?)  It is a synthetic detergent with one of its ingredients being sodium lauryl sulfate (SLS), however it is less irritating should you immerse your skin in the soapy water (highly unlikely for a toilet bowl cleaner!) Lastly, the essential oils including Australian tea tree oil, provide a pleasant scent and antiseptic properties.
    • Liquid: Mrs. Meyer’s Liquid Toilet Bowl Cleaner, $6, uses citric acid and essential oils like lemon verbena to get a fresh-smelling clean, all in a bottle made from at least 30% post-consumer plastic (recycled).  

Safe descaling of your toilet bowl:  mineral stains and some molds may be removed by simply using the concentrated citric acid** (as you’ve read, a non-toxic ingredient in many toilet bowl cleaners), which comes in a granule or powder form.  Granules are safer to use because they are mostly dust-free (they’ve been formed into little clumps that don’t kick up dust when you handle them).  

The following is adapted from a post on Moral Fibres.  Their method did not work without scrubbing but I learned a few things working on my own toilets:

  • Gather your supplies: a large pitcher for clean water, ½ cup of citric acid powder or granules, latex or plastic gloves, an abrasive scrub sponge that’s safe for porcelain, Bar-Keeper’s Friend Cleanser (optional), several paper towels, small disposable cup, tape for closing the lid (optional), about ¼ cup baking soda. 

  • Turn off/close the water valve on the wall completely.

  • Flush the toilet.  The tank and the bowl won’t refill this time. 

  • Fill a large pitcher full of hot water from your sink and pour it into the toilet bowl. The water should not be boiling hot as it could crack your toilet.  Also, make sure to add it slowly so that the water doesn’t drain completely from the bowl; you’ll want the water at or above the water ring stain.

  • Put on gloves and add about ½ cup of citric acid powder or granules to your toilet bowl. (use a mask if your citric acid comes in powder form)

  • Swish the water in the bowl gently with your toilet brush to dissolve it, but don’t swirl too vigorously because it will cause water to drain from the bowl.  After you add the citric acid to the bowl, don’t add more water, because this will dilute the acid. Add paper towels around the bowl to cover all the stained porcelain, and use the disposable cup to wet them with liquid from the bowl.  The bowl should be lined with paper towels stuck to the inside wherever there are stains.

  • Close the lid and put tape and a sign to prevent people from using it! 

  • Leave the citric acid in the toilet bowl, without flushing, for at least one hour, or preferably before going to bed, so it can soak the scale overnight.

  • After leaving the solution to soak, use the bowl brush or gloved hands to remove the paper towels, and try using your toilet brush to remove scale deposits. If it doesn’t move, use gloved hands, the scrub sponge, and Bar-Keeper’s Friend or another agent safe for porcelain.  Scrub away!

  • Finish by adding the baking soda to neutralize the acid, swish with the bowl brush, open the water valve, wait for the tank to fill, and flush!

  • If your toilet is particularly stained, then it may need a second application to remove stubborn deposits.

Citric acid**: The interesting thing about this chemical is that it is commercially produced by the mold Aspergillus Niger, which may be the same type of mold you’re trying to eliminate.  Manufactured Citric Acid (MCA) is one of the most common food additives in the world, and has received the status of “generally recognized as safe” (GRAS) with the FDA.  However, there have been isolated cases of inflammation due to ingestion of foods with MCA, due to its great tolerance to heat and large potential that byproducts of A. niger remain in the final MCA product. (Potential role of the common food additive manufactured citric acid in eliciting significant inflammatory reactions contributing to serious disease states: A series of four case reports)  Unfortunately, we weren’t able to determine whether MCA actually kills Aspergillus Niger growing in your toilet, but it does a great job with all the other molds 

The atmosphere of the bathroom is also very important in preventing mold.  Here are two ways to keep the air in the bathroom less hospitable to mold: 

  • Bathroom exhaust fans are a must for any bathroom with an actual shower or bath.  If you have a fan but not sure if it’s large enough, check the cubic feet of air per minute rating (cfm) on the fan (you may have to remove the cover) and this article to see if it’s large enough for your bathroom.  In addition, go outside and see if you can see the little flapper lifting to show that air is indeed being exhausted.  If you can't find the exhaust of this fan, it's possible that the moisture is being exhausted in the attic, which needs to be fixed.  If your kids or guests are not switching on the exhaust fan during their showers, get an electrician to tie the fan and light switch together so that the fan MUST come on when the light is on.  Finally, if you don't have an exhaust fan, get a window fan like this one and make sure the kids use it!
  • Bipolar ionization units like our Germ Defenders, Mobile Air Angels and Whole Home Ionizers are a great way to keep mold away too.  At the very least, plugging a Germ Defender into the bathroom will send out ions to kill mold spores in this small space where air circulation can be a challenge.

If the mold keeps coming back despite flushing and cleaning, then there are several possible causes for this:

  • Older toilets commonly have pitting in the ceramic which can harbor mold. This video shows that no matter how hard a toilet is scrubbed with different products, pits in the ceramic are microscopic reservoirs that shelter bits of the mold, allowing it to come back again.  The safest solution in this case is to replace the old toilet with a new one.  The radical (but toxic) solution to keep your old toilet but lose the mold is to use diluted muriatic acid (also known as hydrochloric acid) to clean the pits.  However, the mold will eventually come back and inhabit those pits again unless you take another step to renew the enamel on your toilet bowl (a bit extreme to save an old toilet). 
  • Improper venting.  You may not know it, but all drains in your home require a vent to work properly.  We’re not talking about the air vents in ceilings and walls, but a gas vent for the drain line.  These are hidden in your walls.  According to the uniform plumbing code, vents must be located within six feet of the P-trap (that snake-like part under the sink and the S-curve under the back of the toilet); otherwise, the drain may not work properly and gasses can build up, supporting mold and microbe growth.  If this seems to be the case, it’s best to have a good plumber check out the location and condition of the toilet and sink vents and see if there are other drain problems.   
  • This next one is a difficult truth: there may be a cache of mold hidden in your home that is “seeding” spores into your air, causing mold to grow wherever there’s a water source (sinks, showers, and of course your toilet).  According to a respected mold inspection and remediation company, Mold hotspots include the basement, attic, windowsills and door frames, crawlspaces, appliances, and underneath the sinks. Do you feel worse in some rooms of your home and better after leaving them?  This gives a clue to where the mold contamination may be originating.  If you don’t see anything obvious, you could have a hidden leak somewhere, like in the walls or flooring, that’s allowing mold to grow. There are two things you can do in this case: 
    • Order some spore traps from GotMold or even just a set of EC3 test plates ($36 for 6-pack) by MicroBalance Health Products to check the relative mold level in rooms to narrow it down!
    • If you suspect a problem or are having chronic symptoms, it’s best to hire a qualified mold inspector.

There are many non-toxic ways to clean and keep clean nowadays, and with a little research and effort the toilet can be as clean and healthy as the rest of your bathroom and home!

Photo by Jas Min on Unsplash

7 Ways Air Quality Impacts Our Skin Health

7 Ways Air Quality Impacts Our Skin Health

Pollution is not only harmful to internal organs: it can also damage the body's surface. Here is the connection between air quality and skin health.

While we often think of air pollution as affecting our respiratory system, its effects go beyond our lungs. It can also be detrimental to other organs.  The skin is the largest organ in our body and serves as a protective barrier against external factors such as pollution, UV radiation, and other environmental stressors. However, when exposed to poor air, the body's ability to protect itself can be compromised, leading to many problems. From dryness and premature aging to acne and eczema — air quality impacts skin health in a big way.  Below, we will analyze the seven most common ways air quality impacts skin health.

1. Dryness: making the skin dry, flaky, and itchy

Poor air quality can have a significant impact on the skin's natural oil, leading to dryness, flakiness, and itchiness. Particulate matter such as PM2.5, can penetrate the layers of the epidermis, causing oxidative stress and inflammation that disrupts natural oil production. Indoor pollutants, like smoke and volatile organic compounds for example, can also contribute to skin dryness and other issues.

It is essential to take protective measures against the detrimental effects of poor air quality on the skin's natural oils. This includes using a gentle cleanser, moisturizing regularly, avoiding heavily polluted areas, and using a humidifier when necessary to add moisture back into the air, so that relative humidity stays between 40-60%.

2. Premature aging: the destruction of collagen and elastin

Exposure to these same pollutants can break down collagen and elastin, proteins that give the epidermis its firmness. When these compounds are destroyed, skin can become saggy, loose, and more prone to wrinkles. Moreover, exposure to ultraviolet radiation, especially in polluted areas, only exacerbates this process.

To safeguard yourself from contaminants and UV rays, you should utilize protective clothing, apply sunscreen, and stay away from places with high levels of air pollution for extended periods.

3. Acne: clogging pores and causing inflammation

Pollution affects the appearance of our skin on the surface and changes it underneath. Inflammatory acne, characterized by red, swollen pimples, is particularly sensitive to air quality. Environmental contaminants, such as tobacco smoke, clog pores and irritate, leading to inflammation and blemishes.

Keeping up with a consistent skincare regimen that involves cleansing, exfoliating, and moisturizing is crucial in countering the harmful impacts of air pollution on the skin.

4. Pigmentation: affecting melanin production

Harmful substances from polluted air can penetrate the skin and stimulate melanin production, the pigment that gives skin its color. Increased melanin can lead to dark spots and blemishes on the body. These pigmentation problems can be more pronounced on skin areas that are frequently exposed, such as the face and hands.

Ultraviolet radiation can contribute to pigmentation issues, the intensity of which decreases depending on air quality.  It can lead to a harmful and uneven tan.

5. Eczema: irritating and exacerbating diseases

Eczema, a chronic inflammatory skin condition, can be particularly sensitive to environmental factors such as air quality. Pollution not only triggers flare-ups but can also worsen existing inflammatory symptoms.

Indoor pollutants such as dust and pet dander can also contribute to eczema flare-ups. The presence of these harmful substances can irritate the skin and prompt the body's immune system to react, resulting in the manifestation of disease symptoms.

To minimize your exposure to eczema, avoid areas with polluted air and wear protective clothing. In cases where disease flare-ups persist, medical treatment may be necessary. A dermatologist may recommend topical creams and ointments to reduce inflammation and soothe irritated skin, as well as oral medications in severe cases.

6. Rosacea: causing skin redness, flushing, and inflammation

Rosacea is also a chronic inflammatory skin condition characterized by redness, visible blood vessels, and small, pus-filled bumps on the face. Although the exact causes of disease are not yet fully understood, environmental factors such as air pollution can trigger its exacerbation.

Exposure to pollutants, along with UV radiation, can cause skin inflammation. It underscores the importance of protecting the skin from both contaminants and UV radiation during condition treatment.

7. Sensitivity: depriving the skin of its natural protective barrier

Air quality can also affect skin sensitivity, especially in people with pre-existing conditions. Exposure to pollutants and irritants can cause inflammation and damage the skin barrier, leading to increased skin sensitivity and the development of new types.

Then again, the composition of the air, such as nitrogen dioxide or particulate matter, can react with UV radiation to produce free radicals that can damage the skin, leading to the development of sensitivity.

Final remarks

Air quality can have a significant impact on the skin, resulting in various problems such as dryness, premature aging, acne, pigmentation, eczema, rosacea, and skin sensitivity. Such habits as smoking, environmental stressors, and UV exposure can exacerbate these issues.

As a countermeasure to the harmful effects of air quality, red light therapy can be a powerful tool since it is effective in treating and preventing several skin disorders, including acne, rosacea, and premature aging. According to the Heliotherapy Institute, this procedure can be more effective, cheaper, and safer than invasive methods.  You can check with a dermatologist to see if they offer powerful in-office red light therapy.

Fortunately, we can do something to protect our skin from harmful irritants in the air. Wearing protective clothing, using air filters, keeping your home at optimal humidity (40-60% relative humidity) and avoiding heavily polluted areas can help keep your skin healthy and vibrant.

Article by Benjamin Allemon

How does the amount of oxygen in the air affect us?

How does the amount of oxygen in the air affect us?

We mostly take air for granted.   It’s a (boring) mixture of 78 percent nitrogen and 20.9 percent oxygen with small amounts of other gasses such as carbon dioxide, neon, and hydrogen.  (10 Interesting Things About Air)  Even though the news headlines seem to revolve around increasing carbon dioxide, let’s look at the gas humans are most in need of: oxygen.

The majority of the world’s oxygen levels are the same: 20.9% if the humidity is 0%.  Water vapor in the air displaces oxygen, and oxygen can go down to 20.1% if the relative humidity is 100%.  This holds true at sea level and high altitude, where the air is said to be “thinner”.  At high altitude, the percentage of oxygen in the air is the same, 20.9%.  However, lower pressure of the atmosphere causes all molecules of air to spread out. That means you get less oxygen in every breath you take, compared to sea level.  (Living in Thin Air)

According to scientists, oxygen levels in the atmosphere in prehistoric times averaged around 30% to 35%, compared to only 21% today – and that the levels are even less in densely populated, polluted city centers and industrial complexes, perhaps only 15 % or lower. (The Oxygen Crisis)  Fifteen percent sounds extreme, first of all because OSHA has defined atmospheric oxygen concentration below 19.5 percent to be unsafe.  We can only take 19.5% as a guideline, because oxygen in our blood is measured in partial pressure, which may vary slightly according to altitude and the CO2 our bodies are attempting to expel.   In general when figuring in humidity, there’s a margin between normal and unsafe of only 1.3%!   And, in populated areas, this margin is getting even smaller.   

A 2021 study showed that oxygen deficiency can happen in large cities due to a number of factors: increased combustion in vehicles and factories consuming oxygen, lack of green space restricting oxygen production or replenishment, and stalling weather patterns that can stop the flow of fresh air into the city.  The study correlated 391 global large cities (with a population of more than 1 million people) using the oxygen index (OI), which is the ratio of oxygen consumption to oxygen production. Results showed that the global urban areas, occupying only 3.8% of the global land surface, accounted for 39% (14.3 ± 1.5 Gt/yr) of the global terrestrial oxygen consumption during 2001−2015. It was estimated that 75% of cities with a population more than 5 million had an OI of greater than 100. Also, cities with larger OI values were correlated with more frequent heatwaves and severe water withdrawals.  In fact, oxygen in large cities has been declining by 4 ppm per year since the 1980’s, and that rate is actually accelerating. 

When the oxygen in air gets too low, as in high altitudes or confined spaces, the body can enter a state of hypoxia, where low levels of oxygen in your body tissues causes symptoms like confusion, restlessness, difficulty breathing, rapid heart rate, and bluish skin.  (Hypoxia)  Unfortunately, many people in mountainous regions around the world suffer from hypoxia and other effects of high-altitude, which are together called Chronic Mountain Sickness (CMS).

To restore proper tissue function, you’ve got to get more oxygen.  Getting more oxygen in your lungs has a long-recognized stimulant effect, allowing you to focus, concentrate and generally perform better mentally.  In your lungs, more oxygen causes the blood vessels in your lungs to dilate, which improves cleansing and tissue repair within them, and helps them exchange gasses more easily.  In the rest of your body, more oxygen lowers blood pressure and heart rate (your heart doesn’t have to pump as much blood to get the correct amount of oxygen), your tissues heal faster, and digestion is improved. (Surprising Health Benefits of Getting Fresh Air)

Whether it’s increasing levels of carbon dioxide (check our article here) or decreasing levels of oxygen, our bodies are not made to live in cities or houses without adequate ventilation!  Ventilation restores oxygen levels to a safe level above 20% and flushes out harmful gasses like carbon dioxide, radon and VOCs.  It’s interesting to note the differences between fresh air and exhaled air:

Fresh Air

Exhaled Air

Nitrogen

78%

78%

Oxygen

21%

17%

Other gases

1%

1%

Carbon dioxide 

0.04%

4%

(The composition of inhaled and exhaled air. What should and shouldn’t contain?)

A note on rescue breathing: although 17% oxygen is less than the OSHA safety minimum of 19.5%, it is more oxygen than unconscious victims who are not breathing are getting (0%), so rescue breathing does help to save lives.  The problem is that anytime we are conscious (breathing on our own), we should be getting oxygen levels at close to fresh air levels (21%)! 

Unless you live in a major city during a heat wave as described above, low oxygen levels in our air at home shouldn’t be a cause for worry.   Why?  Because even if you lived in a sealed room for 12 days, you would die of carbon dioxide poisoning before running out of oxygen.  Thus, carbon dioxide levels are the greater concern, and more so if your home is really well sealed.  Note that furnaces and gas stoves require oxygen to burn their fuel.  If you operate a furnace or gas stove in a space that’s not well-ventilated, you’re going to get high levels of carbon dioxide first, and when the oxygen level drops enough to cause the furnace to have incomplete combustion, carbon monoxide is produced.  There is a simple fix for this: ventilate the space continuously, and install CO and CO2 monitor(s). 

There may be several other scenarios where oxygen concentration in your home suffers, and these are real, life-threatening situations.

  1. If you live in the mountains, you know that although the percentage of oxygen in the air is the same, the same volume that you breathe in contains less oxygen than at sea-level.  Our bodies compensate for the lower oxygen by increasing heart rate and respiration rate in order to cycle more air through our lungs.  Athletes sometimes train at high altitudes to gain “an edge” while competing at sea level.

  2. Fire requires at least 16% oxygen to continue to burn.  This is not a problem for most wildfires; as the air within a wildfire heats up dramatically, fresh air is sucked from surrounding areas.  If you live in an area prone to wildfires, you may experience high winds bringing fresh air–until the wind changes and smoke is the major problem.  In this case, smoke inhalation is deadly because of extreme heat of the smoke, oxygen depletion (hypoxia), and inhalation of noxious gasses carbon monoxide (CO), cyanide or hydrogen cyanide (CN or HCN), phosgene, ammonia, sulfur dioxide, hydrogen sulfide (H2S), formaldehyde, and acrylonitriles.  (Smoke Inhalation Injury: Etiopathogenesis, Diagnosis, and Management)  In this case, the presence of toxic gasses may be more life-threatening than low oxygen.

  3. As we mentioned above, living in a city during extreme heat or even inversion (many times this occurs during the winter), oxygen at ground level becomes depleted and this layer becomes more polluted and less oxygenated.  

Each of these situations can become life-threatening.  If you find yourself living in risk of any of them, the first step would be to monitor oxygen (and other pollutants for situations 2 and 3).  Unfortunately, most web-enabled monitors do not have oxygen sensors.  In fact, the only multi-sensor home monitor I could find that included oxygen is by Airovita, which is made in Europe and not sold in the US.  Don’t let this “hole” in the market stop you from being informed, however; handheld meters like this one ($100) that measure O2, CO, H2S, and explosive gasses are accessible so that you can be aware of how the atmosphere outside is affecting your home’s air.  In the case of high-altitude air, however, be aware that oxygen levels will register as “normal” (20-21%) but because of the low atmospheric pressure, you still may have trouble breathing!  

Unfortunately, making your air more breathable costs money.  The Washington Post notes that during wildfires, wealthier families flee smoky areas, staying in second homes or renting expensive hotels or vacation residences. Not all families can afford air purifiers, which start at about $200 and clean only one room. During frequent power outages that happen during fire season, only wealthier families that can afford expensive backup generators will still be able to run their purifiers.  Nonetheless, here are some solutions for making life safer and more comfortable: 

  • If you desire to add more oxygen to any room in the home (especially the bedroom, where your body repairs itself while you sleep), then companies like ACT (Altitude Control Technology) offer “altitude control”, meaning that with their controllers, ventilation and oxygen generators, you can change the atmosphere of that room to mimic living at a lower altitude.  Athletes can even use the system to change their workout room to a higher “altitude”.  Selecting a lower altitude creates an artificial “pressure” so that your lungs will receive more oxygen with less work.  Their equipment also includes particulate air filters to eliminate dust, viruses, bacteria, and fine particles as small as .3 microns to keep the air pure.  Truly, this system is the gold standard in creating the desired altitude, because of its oxygen machines, control system and custom designs for each room.  Alarms notify the user(s) of any unsafe conditions, and the air separation units are under low pressure.   

  • Since toxic gasses and particulates can be even more likely than low oxygen during a wildfire event, it’s best to start using air quality monitors to plan your days during these events.  When air outside is bad, closing up your home and using air filters can make it better.  As shown in the graphic below, indoor air sensors (left) are better than outdoor air sensors (right). (How much wildfire smoke is infiltrating our homes?)  Also, check out our article on how to prepare for wildfires and keep your air quality safe.

  • Ultra-filtration and oxygen generation technology can be adapted to any shelter, provided you have the budget!  “Bunkers” are not what they used to be.  Nowadays the mega-wealthy have underground swimming pools, gardens, and entertainment to escape whatever is happening above-ground.  Some developers are also acquiring decommissioned military bunkers and missile silos built by the United States or Soviet governments – sites that would cost hundreds of millions of dollars to build today. The fortified structures are designed to withstand a nuclear strike and come equipped with power systems, water purification systems, blast valves, and Nuclear-Biological-Chemical (NBC) air filtration. (Billionaire bunkers: How the 1% are preparing for the apocalypse

So, although oxygen depletion rarely happens at lower altitudes, if you have concern about it, make sure to measure it and then take action.  As John F. Kennedy said, “The time to repair the roof is when the sun is shining,” or in our case, the time to prepare our air is now!  Don’t wait for that extreme event to buy an air filter, learn how to control your home’s ventilation, or search for a getaway spot, because that’s what the majority of people will be doing.  Now’s the time to get ahead of the curve!

Photo by Jason Hogan on Unsplash

Knock out the NOx

Knock out the NOx

This title may sound like an ad for high-octane gasoline, but I’m talking about air pollution here!  In air purification “PM” or particulate matter often steals the show and drives the decisions behind purchasing this filter versus that filter and this purifier over that one.  But what about the gasses in air pollution?  Gasses are not particulates–they are harmful molecules in the air that cannot be filtered out by plain HEPA filters.  So what are they and how can we get rid of them?

NOx is one term for two nitrogen gasses commonly found in urban areas.  It includes nitric oxide (NO), which is a colorless, odorless gas, and nitrogen dioxide (NO2), which is a reddish-brown gas with a pungent odor.  They are produced during combustion: in factories, in transportation vehicles, and even boilers for heating apartments, office buildings, hospitals, universities, etc.  They’re also produced indoors by gas stoves and furnaces when they are not properly vented. 

Nitric oxide in ambient conditions is not harmful, as it dilates (relaxes) blood vessels and improves oxygenation.  However in higher concentrations, it does two things: it will create a burning sensation in your throat and chest as it changes into nitric and nitrous acid, and it goes deep into your lungs to react with blood cells and eventually be excreted by the kidneys.   Nitric oxide in the air that is not breathed in is converted to NO2, the other dangerous nitrogen gas, or precipitated in moisture as acid rain.  (Poison Facts: Low Chemicals: Nitric Oxide)  

According to Clarity.io, a manufacturer of air monitoring sensors, nitrogen dioxide pollution stays mostly concentrated in the area where it is emitted, meaning that areas with high vehicle traffic like urban areas tend to have the highest NO2 levels. (Clean air cities: Innovative approaches to improving air quality in urban settings)  NO2 is a pretty nasty gas: it causes inflammation of the respiratory pathways, worsened cough and wheezing, reduced lung function, increased asthma attacks and is likely to be a cause of asthma in children. (Nitrogen Dioxide)  

If you’ve been reading our articles or have any experience with air pollution or wildfire smoke, you’ll know that outside pollution eventually makes it into our homes, because they’re leaky.  Thus, we don’t have a “safe place” to get away from air pollution unless we leave the city or take steps to make our home air cleaner.  As we already discussed, just buying a plain HEPA filter or making a DIY air filter (Corsi-Rosenthal box) will not take NOx out of your home.  There are ways to get rid of NOx, however: upgrade to a HEPA filter with activated carbon, AND eliminate the sources of NOx inside your home.

A 2014 study conducted in Baltimore, MD found that a two-pronged approach really helped reduce the NO2 in homes:  

  1. Replacement of unvented gas stoves with electric stoves reduced NO2 concentrations by 51% and 42% in the kitchen and bedroom, respectively, indicating that stove replacement impacts NO2 concentrations beyond the kitchen (even when the home also has a gas furnace or drier).

  2. Placement of air purifiers with HEPA and carbon filters in the home results in a nearly 27% decrease in median kitchen NO2 concentrations immediately (1 week after placement), and reductions were maintained at 3 months following intervention. 

Although the study also included the addition of a ventilation hood in some homes, it was unclear whether the hood helped lower NO2 emissions (ventilation does help remove air pollution, but it depends on strict use of the hood during and after cooking).  

Activated carbon adsorbs the NO2 and secures it in the filter, until the filter is changed.  Adsorption of NO2 can be enhanced by 38-55% by adding coatings to the activated carbon, such as potassium hydroxide (KOH).  (Development of an activated carbon filter to remove NO2 and HONO in indoor air)  Even wildfire smoke has NO2 in it; according to this Canadian government environmental webpage, wildfire smoke is a complex mixture of gases, particles and water vapour that contains pollutants such as: sulphur dioxide, nitrogen dioxide, carbon monoxide, volatile organic compounds, fine particulate matter (PM2.5), and ozone.  Activated carbon can handle these gasses and VOCs, while HEPA filtration is used against PM2.5

Therefore, city dwellers, take note!  Whether it’s “business as usual” as pollution from downtown traffic penetrates your home, or wildfires hundreds of miles away turn the skies orange and hazy, a purifier with HEPA and activated carbon is your best bet to knock out the NOx.  Be on the lookout for purifier giveaways, too!   Here are some programs being offered at this time:

  • San Joaquin Valley Air Pollution Control District (California) is giving away air purifiers to keep residents safe from air pollution.  If you live in the area, you can apply for one here

  • The City of Philadelphia is giving air purifiers to early-childhood education centers and schools.  You can learn more and link to an interest form in this article.

  • Project N95, a national non-profit working to protect people and their communities during the COVID-19 pandemic and beyond, has begun a donation pilot program of air purifiers for schools and other organizations.  You can fill out their form here.

Keep your eyes and browser open, as other organizations may spontaneously donate during events like the Canadian wildfires (the University of Connecticut gave away 100 DIY purifiers on June 8, 2023).  During such a time, it’s the neighborly thing to do!

Photo by Jacek Dylag on Unsplash

The purifying power of sunlight

The purifying power of sunlight

“Letting the sunshine in” has several purifying benefits–and sunshine is free!  Ultraviolet (UV) radiation has a higher frequency than visible light (you can’t see it), but it kills microbes.  UV radiation has three wavelength zones: UV-A, UV-B, and UV-C, and it is this last region, the shortwave UV-C, that has germicidal properties for disinfection.  the optimum range for UV energy absorption by nucleic acids is about 240-280 nanometers (nm); at this wavelength the UV breaks bonds in the nucleic acids of microorganisms, killing them.  Artificial UV lamps for germicidal use tend to emit energy around the middle of this range, at 260 nm.  (UV Disinfection)  If you want to know more about the sanitizing power of UV light, check out our first article here.  Here are some ways to put it to good use:

Purify water with sunlight (salt and lime juice optional):  UV radiation is sometimes used in municipal water purification systems (more often in Europe).  It doesn’t affect the taste or smell of the water (unlike chlorine), so this is an advantage over that chemical.  However, turbidity of the water (amount of particles present) will decrease the effectiveness of UV radiation, so it should be pre-filtered first.  Here’s where the salt comes in:  if you have a plastic or glass bottle of water that is slightly turbid, add a pinch of salt, which will help the particles settle to the bottom of the container, allowing the UV radiation to penetrate farther into the bottle.   Leave it out in the sun for 6 hours, and the microbes will be dead!  If you want to speed up the process, add some lime juice.  Lime juice cuts down the amount of time necessary to disinfect a two liter bottle of water from six hours to just half an hour!  Limes contain chemical compounds called psoralens, which have been shown to kill pathogens in blood and, now, also in water.  (To Disinfect Water Cheaply, Just Add Sunlight (and Salt or Lime Juice))  Psoralens are also used together with UV light to treat psoriasis, vitiligo, and skin nodules of cutaneous T-cell lymphoma. (National Cancer Institute Dictionary)  Many fruits and vegetables like parsnips, carrots and celery are high in psoralens too, so they would work, but the juice of a lime is probably the most tasty. Of course, the sunlight doesn’t remove pathogens, so if you have the opportunity, you can run the disinfected water through a post-filter. 

Sanitize sheets, bedding and any upholstered item by laying them out in the sun and flipping over after 1-2 hours to expose the reverse side.  UV light kills dust mites and mold!  The key is cleaning off any dirt first (ie, wash anything that can be washed first), and making sure that it dries COMPLETELY in the sun.  Therefore, obviously sheets, quilts and comforters can go in the washer, but bulky items like rugs, mattresses and upholstered chairs should get a vacuuming and surface cleaning using a non-toxic fabric cleaner.  Be aware that sunlight can fade colors, so avoid leaving colorful or fragile items out for more than several hours in direct sunlight. 

“Bleach” plastic containers by leaving them in the sun:  UV light can also take stains out of plastic.  Spaghetti sauce stains be gone!  (Things You Can Clean With Sunlight)

Mildewed things:  Once again, surface cleaning is the important first step in order to get wooden furniture, books, leather, and anything else looking and smelling better.  Then, let the sun do its work!  

What does living near a farm mean? It’s not all cute baby animals.

What does living near a farm mean?  It’s not all cute baby animals.

I didn’t grow up near a farm, but I spent a lot of time on one.  My mother’s uncle was a farmer who raised soybeans, corn, a few pigs and an extensive home garden.  Although my sister and I had to shell a lot of peas and shuck a lot of corn, we also got to play on the hay bales and jump in the soybean pile when the adults weren’t looking.  Farms through the eyes of a child are wonderful until we really learn what makes the garden grow (and not be eaten up by pests). 

I feel for farmers.  They are at the mercy of the weather (which has been crazy during the past few years) and pests, as well as an economy that expects perfect specimens of fruits, vegetables and meats delivered to their front door (literally) for the cheapest price possible.  Although I’m indebted to farms for providing the food I buy at the supermarket, I wouldn’t want to live near one.  At least not the kind that produces non-organic food for the supermarket, because it takes a lot of pesticides, herbicides and fertilizers in order to get that kind of production to a profitable level.   

Application of pesticides is often done by airplane, and low level pesticide vapors that are present in the air linger for days and sometimes weeks after application on food crops. Some pesticides react with sunlight (in a process known as photolysis) to form new chemicals that are more toxic than the original.  (Living Near Agriculture Increases Health Problems)

Many studies show that adverse effects from pesticides can be seen in people living up to one mile away from where they are sprayed.  In rural areas where farms abound, it can be difficult to stay out of this zone, and for the farmer’s family, it’s a fact of life  Some of the diseases which have higher rates surrounding farms include:

  • Diabetes: 21 studies presented at the 2015 European Association for the Study of Diabetes show pesticides increase the risk of diabetes by 61%. 
  • Birth defects: According to this 2001 study, ifpesticide exposure of pre-born babies occurred between the 3rd and 8th week of pregnancy, there was a 40% increase in major birth defects ending in fetal death.
  • Brain cancer: Researchers from the Boston University School of Public Health compared the home locations of approximately 1000 cancer patients to the home locations of 1000 patients dying of illnesses not related to cancer. Results showed that living within 2600 feet of the cranberry growing area resulted in twice the risk for all brain cancers and nearly a 7-fold increased risk for a type of brain cancer known as astrocytoma.
  • Autism: the study, “Maternal Residence Near Agricultural Pesticide Applications and Autism Spectrum Disorders among Children in the California Central Valley”  showd that the risk of having a child with Autism Spectrum Disorder (ASD) was 7.6 times higher than normal if their homes were located within 500 meters (< 1/3 mile) from pesticide treated fields, crops were treated using the pesticides dicofol and endosulfan, and the pesticides were applied between week 1 and week 8 after conception.  The risk of ASD increased with the pounds of pesticide used and decreased with distance from the treated fields.
  • And many more, including infertility, miscarriage, Parkinson's Disease, immune system damage, leukemia, developmental brain damage in children, higher rates of child cancers, non-Hodgkin's lymphoma, autoimmune disorders, arthritis and lupus.

Many of these diseases can be prevented by our body’s own first line of defense, a liver enzyme known as cytochrome P-450. It breaks down pesticides in the blood into a less toxic form. Some people, however, have only 1/3rd the normal levels of these important enzymes, and therefore, would have higher levels of pesticides in their blood for longer periods of time, thereby resulting in more harm from the chemical.  In addition, Glyphosate residues are found in the main foods of the Western diet, comprised primarily of sugar, corn, soy and wheat. Glyphosate, the active ingredient in Roundup®, is the most popular herbicide used worldwide. Glyphosate's inhibition of cytochrome P450 (CYP) enzymes is an overlooked component of its toxicity to mammals. (Glyphosate’s Suppression of Cytochrome P450 Enzymes and Amino Acid Biosynthesis by the Gut Microbiome: Pathways to Modern Diseases)  

What about livestock farms?  Like other industries, farms tend to survive by merging, and the largest livestock farms are termed “CAFOs” for Concentrated Animal Feeding Operations.  CAFOs are agricultural meat, dairy, or egg facilities where animals are kept and raised in confinement. Instead of grazing or eating in pastures, fields, or on range lands, animals are given food.  The animals, feed, waste, and production operations are all confined to a small area of land.  (Environmental Health: Concentrated Animal Feeding Operations (CAFOs))  CAFOs are not all bad: Potential benefits of CAFOs include an economy of scale that affords more efficient sewage and manure management and, in some cases, improved control of some pathogens. For example, trichinosis from pork has been significantly reduced by the improved rodent control made possible by confined feeding operations. (Exploring Health and Environmental Costs of Food: Workshop Summary.)

According to a 2017 commentary, livestock farms–particularly poultry and swine barns–emit large amounts of dust particles from manure, bedding material, straw, animal feed, feathers, skin flakes, and hair.  The dust may be contaminated with bacteria and viruses that are mostly harmless for humans, although pathogenic organisms such as avian influenza virus (bird flu) or coxiella burnetii, the bacterium causing Q-fever, can under certain circumstances be found in the air near farms.  Farm operations also emit a mixture of gasses such as ammonia, an irritant gas that is formed by enzymes in animal waste.  Ammonia is primarily emitted by cattle farms, and by the application of manure to agricultural land.  Ammonia reacts with combustion-derived gases in the atmosphere (primarily from industrial and traffic emissions) to form secondary inorganic aerosols, which contribute to fine dust air pollution. (Is Living Near a Farm Bad for Your Health?)  

A 2021 study found that US agriculture results in 17,900 deaths (range across models: 15,600 to 20,300) per year via reduced air quality, 

  • Damages are driven by NH3 (ammonia) emissions (12,400 deaths; 69% of total) mainly from livestock waste and fertilizer application.  At many beef, pork and dairy facilities, animal waste is stored in massive “lagoons,” such as the one near Herring’s mother’s home in Duplin County. There, the microbes that break down feces release huge amounts of ammonia. Many facilities spray nitrogen-rich liquid waste on nearby farm fields, another source of contamination. (Air pollution from farms leads to 17,900 U.S. deaths per year, study finds)
  • Primary PM2.5 is also a major contributor (4,800 deaths, 27% of total), largely from dust from tillage, livestock dust, field burning, and fuel combustion in agricultural equipment use. 
  • NOx, SO2, and NMVOCs are minor contributors (collective total: 700 deaths; 4% of total). 
  • Areas causing the greatest damages are spatially concentrated, with the top 10% of the most damaging counties (308 counties) together responsible for 8,400 deaths per year (47% of total deaths). These counties are mainly located in California, Pennsylvania, North Carolina, and along the Upper Midwest Corn Belt.

According to a study performed in the Netherlands with 2500 neighboring residents of livestock farms, ambient ammonia concentrations were associated with worse lung function, and people living closer to poultry and goat farms were at increased risk of pneumonia. The location of the study in the southeast Netherlands is very informative, as it is densely populated and also a region of intensive swine, poultry, cattle and goat farming.  As a result of the research, the Dutch government planned to reduce poultry barn emissions by 50% over the following ten years.  

On the bright side, the same Dutch study found that people who lived within about 1,000 feet of livestock were 27 percent less likely to have allergies than those who lived farther away.  Specifically, people living within about 1,600 feet of a pig farm were 37 percent less likely to have allergies than those who lived more than roughly 1,900 feet away. And living no more than 1,300 feet from a cattle farm was linked with a 32 percent lower risk for allergies, the study found.

According to Dr. Alan Mensch, a pulmonologist at Plainview and Syosset Hospitals on Long Island, N.Y., "elevated levels of components of [potentially protective] gram-negative bacteria were prominent in the atmosphere around farms and downwind in areas in close proximity to farms.” These "helpful" bacteria may bolster the human microbiome -- the collection of trillions of helpful germs living in our bodies. And "the less we are exposed to various microbiomes prevalent on livestock farms, the more likely are we to develop allergic diseases," he theorized. (Even Living Near a Farm Might Help Prevent Allergies)

Water quality is also a concern when living near a farm.  Farms can contaminate groundwater by agricultural runoff from poorly managed animal feeding operations, overgrazing, overworking the land (for example, plowing too often), or poorly managed and ineffective application of pesticides, irrigation water, and fertilizer. (Water Contamination)  Therefore, you should get a water test done of any well water on a property near a farm before purchasing, because chemicals could make the water undrinkable, and microbes such as E.Coli could require purification equipment.  

Farms are necessary, for sure, but their use of large amounts of chemicals and densely-packed animals can make them poor neighbors.  Since we can get dangerous pesticides into our bodies without even living near farms (this article tells how one such chemical is ingested and its use being deregulated), are the additional risks that come with living near a farm worth the “peaceful” atmosphere?  It’s a complex question that is likely split between those who have not had serious health issues, and those who have (similar to those sensitive to mold).  Once again, research and divine guidance are the best ways to answer the question for yourself!

Photo by Dan Meyers on Unsplash

What are Probiotics for the Air?

What are Probiotics for the Air?

Probiotics have been around for a long time, even millenia!  Probiotics are live, active microorganisms ingested to alter the gastrointestinal flora for health benefits. They often are referred to as good bacteria in the gut and compete with bad bacteria to support the body in establishing optimal digestion and aid immune function. (An Introduction to Probiotics)  Now, they didn’t always exist in “capsule” form.  In fact, if you look in  the refrigerated section of the grocery store, probiotics are the cultures found in kefir, kimchi (fermented cabbage), kombucha (a fermented tea), miso (a fermented soybean paste), pickles, sauerkraut, tempeh (another fermented soybean food) and yogurt.  The common thread of all these foods includes fermentation, which is the breaking down of organic substances through the action of enzymes.  Bacteria are the carriers of these enzymes, so as the fermentation occurs, these good bacteria increase.  When we ingest fermented foods, the bacteria populate our intestines for better digestion. (Check out our article on fermentation!)

Now that you know probiotics have been in foods since antiquity, probiotics for the air and surfaces in your home is a relatively new concept.  BetterAir was the first company to use probiotics in an air purifier.  According to BetterAir President Tom Staub, “Allergens, pathogens, germs etc. do not grow in the air, but are born and propagate on surfaces and objects.  Since they are microscopic they are then propelled into the air by minute movements of air such as the wave of a hand across a tabletop or fall off a foot upon stepping onto carpet.”  BetterAir’s proprietary probiotic formula consumes organic allergens often found inside the built environment like pollen, mold spores, pet dander, and dust mite fecal matter. Staub continues, “They also consume the food sources that germs and pathogens need in order to multiply and propagate thereby minimizing their presence. Fewer pathogens on surfaces and objects results in cleaner air, surfaces and objects. “ (BetterAir: The First Air Purification Device To Utilize Probiotics To Clean Your Home’s Air)

Considering that probiotics contain live bacteria, an air purifier that sprays them into the air may be, well, a little scary to some!  Rest assured, however; BetterAir’s proprietary formula’s active ingredient consists of naturally occurring (non-GMO), safe and effective Bacillus strains.  

Bacillus encompasses a large number of bacteria types, and some are harmful, but many are helpful, such as the medically useful antibiotics  produced by B. subtilis (bacitracin). (bacillus bacteria)  In order to produce and market Enviro-Biotics, BetterAir passed all the required tests by EPA standards at EPA-certified GLP (Good Laboratory Practice) labs, became EPA registered (94339-1, August 2021), and the US Food and Drug Administration (FDA) declared Enviro-Biotics as GRAS – Generally Recognized as Safe.  Finally, it has been certified by many government and private healthwatch organizations.  So, the liquid dispersed by BetterAir systems is safe for people, pets and plants.  

The following video screenshot shows how a petri dish treated with drops of Enviro-Biotics (right) forms a barrier that stops black mold from growing, unlike the untreated dish on the left.  This is visual proof of what their technology claims: microscopic sized Environmental Probiotics form a protective layer of microflora on all surfaces and objects, where the probiotics agents deny pathogens (mold and bacteria) access to nutrients (food), therefore obstructing and disabling growth of pathogens on these surfaces and objects.  In addition, and concurrently, Enviro-Biotics consumes harmful organic particles that are the source of allergies and diseases. Since dust and dander will be in every household to some extent, by introducing good bacteria, these allergens are used to feed the good and starve the bad bacteria.

Source: The Power of Enviro-Biotics

If your home is in an exceptionally dusty or polluted area, BetterAir has also combined a probiotic air purifier and a HEPA air purifier

Another way to use probiotics is to clean with them.   HomeBiotic has spray bottles for spritzing the air and surfaces that are smelly, which starves bad bacteria and protects from its regrowth for up to 5 days.  Their cleaning bundle has tablets that dissolve in water to make a non-toxic, powerful cleaning solution that is safe to the homebiotic bacteria they promote, and nano-sponges that clean without spreading germs around your home.  The tablets are made of washing sodas and citric acid, which are completely safe for people and pets. Citric acid in the right dose, for example, is an EPA-approved, non-toxic sanitizer that kills norovirus.  However, citric acid should not be used on natural stone or marble, wood, delicate surfaces or electronic screens because it may damage them.

Although probiotics are not a “silver bullet” for all airborne contaminants, they may help allergy sufferers and may help you to maintain health better when seasons change and new contaminants come into the home.  It’s like your gut: taking probiotic supplements feeds the good bacteria and doesn’t leave a lot of room for the bad to multiply out of control.  Therefore good effects of probiotics in the home depend on consistent use over a period of time, and avoiding chemicals like bleach that kill both good and bad bacteria indiscriminately. With new technology advancing everyday, it probably won’t be long before we can “see” exactly what is colonizing our homes and bodies, and then get tailored solutions to optimize it.  Since probiotics already live outside in the natural world (in soil, wood and other natural surfaces), like ions are present in fresh outdoor air, bringing probiotics indoors could be a good idea for keeping our homes healthy with natural methods and substances!

Are your air purifiers and emergency supplies ready? Bad air quality can come from any direction!

Are your air purifiers and emergency supplies ready?  Bad air quality can come from any direction!

“Wildfire season” historically starts June 1, but the concept of a “fire year” is more accurate when fires in Canada begin in April.  This year’s fires in British Columbia and Alberta started in April, and now nearly all of Canada’s ten provinces have fires burning.  The problem for Americans, especially northern states, is that air currents carry the smoke aloft and bring it to remote places, sometimes thousands of miles away.  Certainly people on the mid-Atlantic coast did not expect to see hazy skies or low air quality, but we now know that distant events can wreak havoc on our air quality.  

Take for instance volcanoes.  According to research published in 2018 by scientists at the Imperial College of London, Napoleon’s defeat at Waterloo in 1816 may have in part been caused by a volcanic eruption in Indonesia two months prior.  This eruption of Mount Tambora was the most destructive explosion on earth in the past 10,000 years, killing over 90.000 people and blasting 12 cubic miles of gasses, dust and rock into the atmosphere and over the island and surrounding area.  (Blast from the Past) The ash spewed into the air was carried even higher than it would be by winds alone, due to electrostatic forces.  Negative charges from volcano plume gave the ash a negative charge, repelling it into the air and even as high as the ionosphere, which is a layer of our atmosphere that extends from 50-400 miles above the earth and is responsible for cloud formation.  Even though the charged ash did not reach Europe, it “short-circuited” the ionosphere, initially stopping clouds from forming.  Later, however, the clouds surged back, inundating places like Waterloo which normally only had 2” of rain for the entire month of June.  On 16-18 of June 1815, however, the area received unseasonably heavy rains that made the earth very soft, slowing down cavalry and artillery movements, and delaying the battle on June 18 so that the Prussian forces arrived in time to support the Allies and defeat Napoleon.   This type of cloud suppression was documented following the eruption of another Indonesian volcano, Krakatau in 1883, and reports of ionosphere disturbance followed the eruption of Mount Pinatubo, Philippines in 1993.  

So now we know that volcanoes can interrupt flight schedules, battle plans, and…global rain clouds.  Less rain equals more drought, and more drought equals more wildfires.  When the clouds come back to a drought-damaged area, lightning can spark many fires. In Quebec, for example, fires were sparked by lightning, but officials in Alberta have said that the cause of fires there is currently unknown.  (How did the Canadian wildfires start?)   This is how volcano eruptions can change world events and weather, halfway around the world!  

So, while interruptions to daily activities in the Northeast are hopefully temporary due to the Canadian wildfires, we have to look further to be prepared for the next blanket of wildfire smoke.  Studies regarding erupting volcanoes have shown that they have different atmospheric consequences depending on which hemisphere they are located.  Here are some of the results:

  • Scientists studied 54 large explosive eruptions during 501–2000 AD including 16 in the Northern Hemisphere (NH), 25 equatorial and 13 in the Southern Hemisphere (SH).  In the first two years following an eruption, NH volcanoes decrease NH monsoon volume, and SH volcanoes decrease SH monsoon volume.  They tend to have the opposite effect on the opposite hemisphere, for example, a volcano in the NH will increase precipitation in the SH the first year, with diminished increase in the second year.  (Global monsoon precipitation responses to large volcanic eruptions)

  • Long-term, however, volcanoes near the equator tend to have greater impacts than the high-latitude eruptions on global climate because their stratospheric aerosol clouds cover a larger surface area and have a longer residence time, and because the aerosols are then transported poleward in both hemispheres and eventually cover the entire globe. (Climate response to large, high-latitude and low-latitude volcanic eruptions in the Community Climate System Model

  • Volcanoes inject a number of things into the atmosphere when they erupt.  Rocks and larger particles are the first to fall out of the atmosphere, ash can linger for several months, H20 , N2, and CO2 are the most abundant, and sulfur aerosols are responsible for reflecting light back into space and generally cooling the atmosphere. For example, the Pinatubo eruption in 1991 injected an estimated 20 metric tons of SO2 into the atmosphere, leading to a temporary (∼2 years) reversal of the late twentieth century global warming trend.  Did you know that volcanoes also inspire art?  The famous 1893 Edvard Munch painting, "The Scream," shows a red volcanic sunset over the Oslo harbor produced by the 1892 Awu eruption, and the 1815 Mount Tambora explosion inspired the novel Frankenstein by Mary Shelley due to the 1816 “year without a summer” which was unseasonably cold and gloomy. (Volcanic Eruptions and Climate)

  • Mount Tonga, an equatorial submarine volcano, released an enormous amount of water vapor high into the atmosphere (mesosphere) when it erupted in February 2022, which caused weather anomalies globally.  Increased rainfall in the southern hemisphere following the jet stream was recorded, and much of the northern hemisphere had drier conditions than average.  (Influence of Volcanic Activity on Weather and Climate Changes)

But non-volcanic activity can be just as dangerous... 

  • Halocarbons, used in foam insulation, refrigeration and other appliances, were released during the 2011 Tohoku earthquake in Japan, amounting to 6600 metric tons.  This is an increase of 21-91% over typical levels of six halocarbons that deplete ozone, which in turn affects weather patterns.  (Deadly Japan Quake and Tsunami Spurred Global Warming, Ozone Loss)  Of course, the major headline after this earthquake was the destruction of the Fukushima-Daiichi nuclear plant when the earthquake disabled the power and cooling to its three reactors.  There were no deaths or cases of radiation sickness from the nuclear accident, but over 100,000 people were evacuated from their homes as a preventative measure.  (Fukushima Daiichi Accident)

  • Other natural disasters have damaged nuclear plants, like a 1998 tornado that knocked out power to the Davis-Besse plant outside Toledo, Ohio, and Hurricane Andrew, which knocked out power to the Turkey Point plant south of Miami site for five days in 1992. In 2008, Hurricane Gustav damaged the River Bend Nuclear Generation Station in St. Francisville, La.  At both Davis-Besse and Turkey Point, the plants' emergency diesel generators kept the equipment running until crews fixed the power lines. (Can U.S. Nuclear Plants Handle a Major Natural Disaster?)

  • The Carrington Event of 1859 was the most intense geomagnetic storm in recorded history.  Earth narrowly missed receiving another series of solar flares in July 2012, which may have exceeded the strength of the Carrington event and prompted widespread power and communications outages. (Carrington-class CME Narrowly Misses Earth

It just goes to show that natural disasters can have global consequences.  For the next weather changes and wildfire risks, we could look far and long, or just be prepared with extra filters, masks, food and water, and a well-sealed home.  This is prudent because unfortunately, it only takes one badly-placed volcanic eruption, solar flare, earthquake, hurricane or tornado to upset a nuclear power plant or spew toxins into the air, sending the world and its weather into chaos.  

Photo by Yosh Ginsu on Unsplash

How can I get more filtration with my current HVAC system? It’s a tug of war!

How can I get more filtration with my current HVAC system?  It’s a tug of war!

At a staff meeting one day, one of our team members related how the HVAC company which installed the central AC system in his new home recommended using the lowest MERV filters available.  I was shocked!  Well, after thinking about it some more, I hypothesized they were waiting for his evaporator coil (the part that transfers absorbs heat from the air by transferring it to the cold refrigerant) to plug up so they could sell him a new system.  In this day and age of availability of every type, face size and thickness of filter, a good HVAC company should be able to work with your existing system to get good filtration.  Period.

If you’ve never heard of MERV, it is an acronym that stands for minimum efficiency reporting value, developed by the American Society of Heating, Refrigerating, and Air Conditioning Engineers (ASHRAE) in 1987.    The range is from 1 to 20, and designates with what efficiency the filter removes small particles between 0.3 and 10 micrometers in diameter. (check out this post for more information on MERV).   Generally you’ll want to get the highest rating possible (more filtration) for your system, without causing too much pressure drop, because in general, increasing the MERV increases pressure drop across the filter, while HVAC equipment manufacturers want you to stay with a low pressure drop of around 0.10 inches of water column (i.w.c.) across the filter.  That’s the tug of war–but why aren’t HVAC installers figuring out how to give consumers, the ones who pay for new or upgraded systems, both?  It’s like selling a delicious drink in a cup with a straw that’s too small to get it out at any satisfying rate (like a coffee stirrer).  Sure, you could take out the straw and lid and risk getting it all over yourself as you drink it.  However, even fast food chains and gas stations figured this out years ago: larger straw and cup= convenient way to drink, more satisfaction, more sales.

In this case, though, the consumer is left to bow to the advice of greedy or ignorant HVAC installers, or do research to figure it out himself.  Yes, there is a way to get both high MERV and low pressure drop!  You just need to install a larger filter.  It sounds simple, right?  Yet, because many installers are trained to recommend standard size, 1” filter frames, you’ll probably have to do the math and specify one yourself.  Don’t get scared yet!  We’re here to help with that calculation.  

Here’s a diagram of the typical HVAC system so you know what we’re talking about/aiming for:


Image source: RemoveandReplace.com

The part we’re talking about is outlined in blue.  The filter can be installed on the side of the HVAC closet door, in a ceiling or a wall.  In the diagram the air is flowing through the filter, up through the air handling unit, through the evaporator coil, and out to various room registers/grilles.  The whole system “sucks” air through that filter, and if it’s too small, it’s like sucking a Big Gulp through a coffee stirrer–the pressure drop or suction pressure is too much!  Making the “face” of the filter larger will allow the velocity of the air through the filter to drop, which makes the pressure drop go down.  

So, what is the magic size of filter that makes the pressure drop go down?  That depends on the size of your HVAC system.  This very helpful article from industry expert Allison Bailes gives the secret requirement:  

Filter Area = 2.0 square feet (or more) for each 400 cfm of air flow

Since most filters are measured in inches, we can convert that formula to:

Filter size (sq. inches) = System Air Flow(cfm) x 288/400    OR  

Filter size (sq. inches) = 0.72 x System Air Flow (cfm)

Like in any interesting math problem, this one has a formula with some knowns and some unknowns.  The unknown is the filter size, and the known is the System Air Flow.  To find the system air flow, you can do several things: 

  • Look at the HVAC air handler information specifications.  If you don’t have the system specs, go to the air handler, take a photo of the sticker with the model number on it, and search for this model’s manual online.   For example, I replaced my air handler recently with a variable-speed unit.  It will shift fan speeds according to the heating or cooling load, with maximum 1200 cfm, 640 cfm intermediate, and 400 cfm minimum.  Since the pressure drop will be maximum at the maximum air flow, I’m going with 1200 cfm.
  • Approximate the air flow using the system tonnage: cooling units are often measured in the US by “tons”.  According to HVACtrainingsolutions.net, 350 to 400 CFM per ton of cooling is required for proper air conditioning system operation. We’ll use 400 cfm to be conservative.  If you know you have a 3 ton system, then 1200 cfm is the maximum airflow.  This lines up with the specifications on my unit.  (This equivalent of 400 cfm per ton can vary because of relative humidity, dry-bulb temperatures, wet-bulb temperatures, air density, mass flow rate, and elevation; if you want to “get technical”, check out this article!)

After you determine the cfm of your system, plug it into the filter size formula above.  In my case, 1200 cfm x 0.72 = 864 square inches of filter.  Yikes!  My own filter (24”x24”) was undersized by a third, and when I measured the pressure drop at maximum fan speed (1200cfm) it was 0.25 inches water gage, which was fairly high for a clean filter. However, if I “upgraded” to a 24x36” filter that size fit my requirements exactly (864 square inches).  The problem is that I don’t have room for such a big filter.

If you find that space or filter availability for bigger filters is a problem, you can solve it in a different way: add another return with another filter.  Many homes have 2 returns, such as one upstairs and one downstairs.  In this way, you’re getting the area and the filtration you need.  Adding a second return lowers the airflow per return, and also changes the air circulation in your home.  At the minimum, high MERV and high airflow will not be a problem!  In my case, the easiest thing to do was look at the return air duct and add another grille in the only place I could: my bedroom.  I ended up adding a 20x20 return air grill there, which lowered the pressure drop to 0.09 inches water gage for a clean filter, which eased the work of the fan unit and gave me more filtration.

This is the dilemma homeowners often face: accept the “expert” opinion of their contractor, or start doing their own research and demand equipment or installations that at least safeguard the equipment they are installing!  Many installers mean well, but by not using standard equipment like manometers (pressure-sensing devices) they have no idea what the pressure drop over the filter is.  They also don’t know what pollutants like dust, human and pet dander, and microbes are allowed  into the new system by specifying low-grade MERV filters.  Their ignorance or bad advice costs homeowners BIG when the air, and consequently the system, stays dirty.  Just like we sometimes must do with our health and doctors, we hope that you take this information to your HVAC company and specify what you need to win the tug-of war and keep you and your family healthy!

New methods to accelerate wound healing

New methods to accelerate wound healing

Although bandages and antibiotic ointment are staples in my house, doctors have need of more advanced treatments for wound healing beyond these simple first aid tools. By researching how our skin heals, they have incorporated pH adjustment, ions and lasers to help those who suffer from large or slow-to-heal wounds.  These are very non-invasive ways to help get patients back to their normal function more quickly and with less pain.

What’s your pH?

In our article on alkaline water, we discussed pH: what it is and that our bodies regulate the pH of our blood and tissues carefully.  Scientists took information on healthy tissue and compared it to wounds.  According to the 2021 book Digital Health: Exploring Use and Integration of Wearables (chapter 6), healthy skin has a pH value of approximately 5.5 (acidic), but for infected wounds, the pH value is in the range of 7-8.5 (neutral to alkaline).  The alkaline nature of pH in the wound is due to the presence of bacterial colonies and enzymes. When a wound is kept in an acidic condition, the fibroblasts proliferate more actively and the wound healing process is stimulated more while an infected wound shows a slightly alkaline pH environment due to certain enzyme activities, bacterial colonization, and formation of protein structures.  Consequently, several research groups have developed dressings which incorporate pH-sensitive materials.

In addition, this theory of how acidic environments prevent or retard infection holds true for other entry points of infection in the body:

Consequently, those tissues that are closer to neutral pH or alkaline, may be more susceptible to infection:

  • The normal pH for the esophagus is close to 7.0. (Johns Hopkins)
  • The eyes: “The normal physiological pH of ocular surface in humans to be 7.11±1.5. They also showed an increase in ocular surface pH early in the morning and a gradual increase in pH to more alkali levels during the day.” (2014 NIH article)
  • According to Healthline.com, “ A normal blood pH level is 7.35 to 7.45 on a scale of 0 to 14, where 0 is the most acidic and 14 is the most basic. This value can vary slightly in either direction.” 

Hence, it’s very important that microbes are stopped at our body’s first lines of defense!  Acidity is one way of preventing infection and speeding healing, but scientists have discovered that ions can also help.  As you may know, there are two varieties of ions: negative and positive.  They work in different ways to assist healing.  

Negative ions can be applied via negative ion misting machines (using sterilized water), corona devices, or bipolar ionization (like HypoAir units).  They produce negative ions by the hundred-thousand or millions, while normal air only has hundreds or thousands of the ions.  Negative ions were found to have antioxidant and anti-inflammatory effects in this 2021 study.  In this 2022 study, it was inferred that increased wound healing was due to a hydrogen peroxide scavenging effect provided by the ions.  

On the other hand, excess positive ions in the air do not promote healing, but positive ions produced by copper and silver are often used in bandages to do so.  These metals produce positive ions when they are placed in contact with the skin or wound, which enhance angiogenesis (formation of new blood vessels), anti-inflammatory power, as well as being anti-microbial to prevent infection during healing. (2014 study)  To increase contact and ions produced, researchers have designed bandages with nanoparticles of silver and/or copper.  

Lasers are another tool in the box for doctors to help their patients heal.  Traditionally low-power lasers and LEDs have been used in phototherapy of large or otherwise slow-healing wounds.  However, high-power unfocused lasers have also recently been used.  The advantage of lasers for wound healing are that they reduce pain, inflammation and exudates (weeping of fluids from the wounds), as well as reduce scar tissue and help the body to granulate tissue in a more organized way.  Laser sessions last only seconds to minutes and are painless for the patient, and in a matter of weeks they can see new skin being formed to close the wound.

Our bodies can normally heal themselves with simple wound care, but infections and  co-morbid conditions like diabetes or circulation problems can severely impact healing.  That’s when harnessing wound pH management, applying positive or negative ions, or laser therapy can help get the healing going.

What do spiderwebs and your home’s air filter have in common? (no spider pictures)

What do spiderwebs and your home’s air filter have in common? (no spider pictures)

Spiderwebs–and the creatures that make them–are not welcome in most homes.  Not only are spiderwebs a “sign” of poor housekeeping (although they often appear overnight), spiders themselves are feared or despised (admittedly I’m in this group).  Even many nature-lovers would rather relocate the spiders and tear down their webs rather than abide with them, but scientists have recently discovered that their webs contain a wonder material that filters air akin to the best air filters. 

It’s obvious that spiders are probably not interested in reducing PM2.5 with their webs: their primary goal is getting dinner.  Face it, though: we all know that spiderwebs do a great job of collecting dust!  Scientists found that the electrostatic properties of the glue that coats spider webs causes them to reach out to grab all charged particles, from pollen and pollutants to flying insects.  A quirk of physics causes webs to move towards all airborne objects, regardless of whether they are positively or negatively charged.  Webs can catch particles as small as aerosols and pesticides, making them perfect environmental monitors if we choose to examine them.  (How electricity helps spider webs snatch prey and pollutants)

It’s the statement that “all charged particles” are attracted to the web that caused us to investigate further.  How does that work?  Typically electrostatic filters work by charging all incoming particles either positively or negatively and then attracting them with an oppositely-charged filter.  Spiderwebs are not exactly the same, because the web has no control of the charge of the particles (insects or dust) flying toward it, yet it actively “springs” out toward them if they are charged (click here to see it happen–no spiders included!)

The fact is that as things fly through the air, whether it’s dust, water droplets, insects or airplanes, they collect a static charge. This is why airplanes have little “antennae” or rods sticking out of the back of the wings: these static dischargers disperse the charge back into the air.  Insects can easily acquire electrostatic charge by walking over charged surfaces or by flying in an airstream of charged particles. (Spiderweb deformation induced by electrostatically charged insects)  Just as humans accumulate static by walking through dry air and carpets during winter, low humidity likely amplifies the static charge of insects, too.  The deflection of the spider’s web depends on the mass of the particle or insect and their charge; small charged dust particles generate less deflection than larger insects.  So, although insects have sensors on the tips of their antennae for detecting electric fields, and the glue spirals can distort Earth's electric field within a few millimeters of the web,  sometime the total charge of the insect or their speed gets them in trouble, allowing the web to “reach out and grab” them!

But how does the spiderweb attract positive and negatively-charged objects?    According to the scientists, this is due to the ion mobility within the miniscule water droplets that the web’s adhesive surface attracts. A combination of the spiders’ naturally compound-rich silk and the droplets (which serve as both glue carriers and electrostatic conductors) imbues the web with these amazing electrostatic properties.  ('Electric' webs are spiders' secret to catching prey)

Orb weaver spiders are the common class of garden spiders.  Their webs are formed roughly in a circular pattern, hence the “orb”.  Their webs are also hygroscopic, meaning that they absorb moisture from the atmosphere, using salts to retain a specific amount of moisture.  

Since there are more positive ions in the air than negative ones during calm weather, most insects gain a slight positive charge as they fly through the air.  The web is usually “neutral” meaning it doesn’t have a charge, but as an insect nears it, moisture on the web allows electrons to migrate to the surface of the web near the insect and cause the silk to stretch out toward it.  

Static induction is the principle that guides this phenomenon, which you've experienced if you've ever rubbed a balloon on your head and stuck it to a wall. Rubbing the balloon causes it to gain a static charge, and then it induces the opposite charge in the wall. Materials that are poor conductors, like rubber or silk, produce the best static induction.

Similarly, static induction occurs between the spider web and an insect. As an insect carrying a positive charge nears the threads of the web, that positive charge attracts electrons in the spider silk, creating a temporary negative charge. That negative charge can then be attracted to the positively charged insect, causing the spider threads to snap out and stick to the insect. (Note to Flies: Avoid Fuzzy Socks)

The drops of water on the web also allow glycoproteins in the web to move around it and coat any insects that become entangled in a sticky glue.  Glycoproteins are proteins that have carbohydrates attached to them, which allows the glue to form a large number of hydrogen bonds.  In these types of bonds, hydrogen forms a positive dipole in one molecule and fluorine, oxygen, or nitrogen form a negative dipole in another molecule. The positive dipole of hydrogen is attracted to the negative dipole on the electronegative atom, creating an attraction between the two molecules. (ChemistryTalk.org)  Although the hydrogen bonds are relatively weak, they are collectively strong enough to keep insects and pollen from escaping the web. (Glue Stays Sticky When Wet)

Spiders depend on the invisibility of their webs to catch insects, so when the webs become “dirty”, many spiders clean and repair them on a daily basis (Spiders and Their Webs).  To replicate the web and this cleaning action, other scientists took on the mission in 2020 of creating artificial webs that attract and release particles in a self-cleaning action (Ionic Spiderwebs)

Instead of repairing them, some spiders ingest the old web and its contaminants, including the water droplets on the web.  Web material is hygroscopic, meaning that after it exits the spiders body, it attracts water from the atmosphere.  (Water harvesting during orb web recycling)  This actually helps the spider by giving it a source of water from the air.  The pollen on the web is a bonus too:  pollen makes up to a quarter of the diet of orb weavers. Unfortunately, a lot of urban spiders end up ingesting microplastics, chemicals and tire components (from road dust).  

Spiders also build their webs with a minimum of material, to reduce waste and avoid having to clean or eat extraneous web.   Because the web material is stretchy, sticky and because of static inductance, webs can be constructed with holes to let wind pass through, at the same time catching much more pollen and insects than any plain non-stretchy, sticky material.  “Avoiding” capture is much harder for any insect or bit of pollen trying to fly “through” the web when its holes can close automatically by static attraction!   Simply put, spider webs are amazing particle capture machines, also known as filters.  It’s no wonder then that scientists are busy replicating them for different purposes.

Spider‐web‐inspired network generator (SWING) air filters, based on a unique electrospraying–netting technique, integrate properties of small pore size (200–300 nm) and innovative self‐charging capacity (3.7 kV surface potential), enabling the synergistic effect of physical sieving and electrostatic adhesion for PM removal.  High efficiency (>99.995%), low pressure drop (<88.5 Pa), high transparency (>82%), robust bioprotective activity, energy‐saving, and long‐term stability for MPPS PM0.3/pathogen removal were achieved.  The filters are made of electrospun nanofibers (PVDF material) and carbon nanotubes, which are uniquely formed by using a droplet spray–deformation–assembly process during electrospinning (Spider‐Web‐Inspired PM0.3 Filters Based on Self‐Sustained Electrostatic Nanostructured Networks)

The silk proteins in spider webs themselves were determined in the early 2000’s (Spider Silk Proteins – Mechanical Property and Gene Sequence).  Spider silk is desirable not only for strength (it is superior to nylon, kevlar, silkworm silk and steel in elongation at break, tensile strength and breaking energy), but it’s also bio-compatible to humans and so can be used in medical applications.  Artificial spider silk has not been easy to develop.  Although the primary proteins were discovered earlier, It took a lot of gene-sequencing work to discover a formula for getting the optimal amount of nanocrystals in the silk.  Once the protein sequence was determined, scientists needed to figure out who or what should be used to make the silk?  Spiders themselves are too aggressive and territorial to be farmed. (Artificial Superstrong Silkworm Silk Is 70% Stronger Than Spider Silk)  For this reason, bacteria, silkworms and goats have been bio-engineered with spider DNA to produce the silk. (Artificial Spider Silk Is Stronger Than the Real Thing, Spider Silk, BioSteel Goat)

Filter production methods: Traditional Needle Electrospinning (ES) requires extensive preparation, time, and post-treatment to produce filter material, as shown in this video.  In this article, Centrifugal Electrospinning (CES) was found to be the most effective method in mimicking the fiber and composition of spider webs, albeit in a random non-woven way.  The suitable spinning conditions for the recombinant spider silk protein eADF4(C16), including protein concentration, process flowrate, electric field strength,and rotational speed were analyzed.  Experimentation with these variables enabled researchers to develop a roll-to-roll production process that is up to 1000 times faster than traditional electrospinning processes that also required no post-treatment.  

So–knowing that spiderwebs are such efficient filters and their silk is now the object of much scientific research and investment, has this information changed your opinion of spiderwebs in your home?  It’s ok, I know that fear of spiders is hard to dispel.  So with you, I say, bring on the artificial spider silk, please! 

To-Do List: Change the Cabin Air Filter in your car and ADD CARBON!

To-Do List: Change the Cabin Air Filter in your car and ADD CARBON!

I know, car maintenance is not everyone’s “thing” and air filters sound super-boring.  However, if you’ve owned your car for a while and never changed the filter, or bought a used car and have no clue when this filter was last changed, you could be horrified at what you would find (and hence are breathing in every time you drive it)!  It’s time to think of this task as a “health upgrade” for you, the driver or passenger!

Cabin air filters in cars (tip: these are different from the engine air filter) are probably even more neglected than household air conditioning or furnace filters, for several reasons:  our car ventilation systems are exposed to even more dust, toxins and critter debris than our homes, and many people are averse or afraid of car maintenance.   However, it’s so easy to order the right filter online with your car’s model and year, and now virtually every maintenance procedure on every model car can now be found on YouTube.  There’s no excuse for rolling up your sleeves and getting to it (or bribing your teenager or neighbor to do it with some food)!   Simple tools like screwdrivers, sockets and a vacuum cleaner are usually the only things needed. 

Before you order the filter, however, check to see if they are available with activated carbon.  If so, definitely get that one.  Not only does carbon help with smells in your vent system and car interior, it can remove NO2 from ventilation air.  Nitrogen Dioxide (NO2) is a by-product of fuel combustion and it irritates our respiratory system, causing flare-ups of asthma, which can trigger a visit to the emergency room if the coughing and difficulty of breathing is not controlled.  Over time, NO2 can actually cause asthma or respiratory infections.  A study in the UK at the University of Birmingham showed how much the activated carbon lowered NO2 levels compared to basic pollen filters.  In heavy traffic, many people close the windows and put the ventilation system on “recirculation mode”, which helps reduce NO2 levels by about 1.6 times compared to open windows.  However, you shouldn’t keep the windows closed and recirc on for extended periods of time because CO2 levels will start to rise; maintaining appropriate ventilation is also important to prevent drowsiness.  Here’s the alternative:  using external ventilation with activated carbon filters fitted.  Even with fresh air coming through the ventilation system, NO2 levels were 6.6 times lower than levels with windows open.  Also, in-vehicle NO2 levels were on average 14.3 times lower with closed windows and recirculated air.  It just makes sense to go with activated carbon if it’s available in a filter for your car. 

With minimal research and $, you can feel a lot better about the air you breathe on every drive.  Then, you can place a reminder on your calendar to do it again next year, and keep up the good habits!

Photo by Ivan Bogdanov on Unsplash

Phytoremediation Cleans Up Soil Naturally

Phytoremediation Cleans Up Soil Naturally

It’s happened to the most careful and graceful of us: a cup of coffee or plate of spaghetti sauce lands on the carpet, upside-down, of course. Out come the carpet cleaners, vacuum cleaner, or if you’re really prepared, the carpet-cleaning machine, and we do our best to treat the area and cordon it off for “drying”.  If the offending stain doesn’t appear again, case closed.

But what if you or someone else spills a toxic chemical on a large area of your lawn?  How do you remove that? There are no “lawn cleaners”...or maybe there are. 

The Environmental Protection Agency (EPA) is the U.S. agency concerned with not only monitoring, but cleaning up those big spills or more unfortunately “dumps” in the U.S.  It mandates how the sites are cleaned up and should hold individuals or corporations liable for the damage.  Unfortunately, as long as there is industry, there will be accidental, and often intentional, spill on land and water.  However, sometimes, the “cleanup” may not look like cleanup at all, if phytoremediation is used.  A toxic waste cleanup site may look like any other green field.

Phytoremediation refers to the different ways plants can be used to “clean up” contaminated soil.  Around  400  species  of  plants are called “hyperaccumulators” because they absorb unusually large amounts of metals in comparison to other plants.   These  plants  have  been found to accumulate metals at a rate 50 - 100 times higher than normal plants.  (Phytoremediation of soil metals)  They do this in a number of ways; the following terms are taken from the EPA’s Phytoremediation Resource Guide:

  • Phytoextraction: some plants take up metal contaminants in the soil by plant roots and move them into the aboveground portions (stems, leaves, fruit). 

  • Rhizofiltration: some plants adsorb contaminants from ground water onto their roots, or in the case of aquatic species, the plants live in contaminated water (like wastewater). Duckweed is a species that has been shown to remove many types of heavy metals from water. (Duckweed: A Model for Phytoremediation Technology)

  • Phytostabilization: some plants are used to immobilize contaminants in the soil and ground water through absorption and accumulation by roots, adsorption onto roots, or precipitation within the root zone. This process reduces the mobility of the contaminant and prevents migration to the ground water or air, and it reduces bioavailability for entry into the food chain.

  • Phytodegradation: some plants take up contaminants and break them down through metabolic processes within the plant, or through the effect of compounds (such as enzymes) produced by the plants. Pollutants are degraded, incorporated into the plant tissues, and used as nutrients.

  • Rhizodegradation:  the breakdown of contaminants in the soil through microbial activity that is enhanced by the presence of the rhizosphere and is a much slower process than phytodegradation. Microorganisms (yeast, fungi, or bacteria) consume and digest organic substances for nutrition and energy.  This is becoming a very popular topic and technology as scientists learn how to modify and genetically engineer microbes for particular purposes.   

  • Phytovolatilization:  some plants are able to take up and transpire (breathe out) contaminants, releasing the contaminant or a modified form of the contaminant to the atmosphere.  It is known that trees with deep roots transpire radon from the ground and groundwater.  

So, once the area is planted with hyperaccumulating plants, what happens next?  Unless the contaminant is phytodegraded, meaning, the plant breaks it down, the plants will still contain the contaminants, so they must be harvested and disposed of properly.  If testing reveals that they indeed have higher-than-acceptable levels of the contaminants (actually, this is a good outcome), they are either composted or dried and incinerated, and the waste remaining is securely buried.  Then the process is repeated until the soil is cleaned to an acceptable level.  The difference between phytoremediation and traditional soil removal is huge:  typically the amount of material to be incinerated from phytoremediation is only 10% of that required by traditional soil removal.   Here is a video of an EPA phytoremediation project in Crozet, VA where arsenic is removed from the site of an old apple orchard by planting and harvesting ferns that were bioengineered for the purpose of extracting arsenic.

What does this mean for the average homeowner?  Unfortunately, many private lands are poisoned with any number of contaminants: lead paint from old buildings, pesticides from farms and aerial contaminants that settle from spraying for insects or crops are all sources of contaminants.   You might not even be aware of old fuel tanks or lines that were buried decades ago, before you purchased the land, and have begun to leak, or maybe a new industry is releasing chemicals upstream of your land.  With any knowledge or suspicion of contamination, consider if you or your family will be exposed to the soil, and decide whether to get the soil tested.  If children or animals are regularly in contact with the soil, or you want to grow edible plants and vegetables on the land, testing is a good idea, so you know what chemicals you’re dealing with and which plants may be able to help you!  Here is a great article on how to gather soil samples and available testing centers. 

If you do find contamination on your land, here are some actual plants that could help clean up the soil: 

  • Grasses: Indian Grass has the ability to detoxify common agrochemical residues such as pesticides and herbicides. Indian Grass is one of nine members of grasses that assist in phytoremediation plants. When planted on farmland, the reduction of pesticides and herbicides is significant. This list also includes Buffalo grass and Western wheatgrass, both capable of absorbing hydrocarbons from the land. (Phytoremediation Plants Used to Clean Contaminated Soil)

  • Sunflower plants were demonstrated to have removed 95 percent of uranium from a contaminated area in a 24-hour period. This highly successful crop is a powerful tool for the environment because of its ability to remove radioactive metals from superficial groundwater, so they were used in cleanup after the Chernobyl nuclear disaster, which left nearby soil and water heavy with the radioactive elements cesium and strontium. The process works because the isotopes “mimic” nutrients that the sunflower would naturally absorb – cesium mimics potassium, which plants need for photosynthesis, and strontium passes for calcium, which provides structural support. Unfortunately, sunflowers did not work so well for Fukushima, Japan, because the isotopes released were very different from Chernobyl. (Why Scientists Plant Sunflowers After Nuclear Disasters).  Sunflowers are also good at absorbing metals such as lead, arsenic, zinc, chromium, copper and manganese. Indian mustard removes lead, selenium, zinc, mercury and copper.  Hydrangeas draw out aluminum from the soil.  (Superplants clean up toxins from contaminated soil)

  • Trees can do their part:  Willows and poplars have been shown to be strong phytoremediators, not to mention being beautiful.  Carbon tetrachloride, a well-known carcinogen, is easily absorbed by poplar tree roots. They can also degrade petroleum hydrocarbons like benzene or paint thinners that have accidentally spilled onto the soil. (Phytoremediation Plants Used to Clean Contaminated Soil)

  • Vegetables:  Of course, if you know that there’s soil contamination and you grow vegetables to remove it, you must take care not to let anyone or any animals eat the vegetables or plants.  Certain vegetables only take contaminants into their root systems, but others draw them up into the leafy greens of the plants.  Cruciferous vegetables like broccoli, kale, collards, mustards and also corn are considered hyperaccumulators.  (Superplants clean up toxins from contaminated soil)

  • Mushrooms: Like phytoremediation, mycoremediation is the use of fungus or microbes to clean the soil.  It’s hard to believe that edible mushrooms are in the same class as toxic mold, but they are both fungus, and can be used to absorb and/or break down pollutants.  As mycelium spreads, it secretes enzymes which can break down pollution.  For example, oyster mushrooms have been used to remove E. Coli from Chicago River water, harmful Polycyclic aromatic hydrocarbons (PAHs) and TNT from water sources contaminated by wildfire ash, and diesel-contaminated fields from 10,000 parts per million (ppm) of PAHs to less than 200 ppm in eight weeks.  Turkey Tail, Shiitake and White-Rot Fungus are three other useful mycoremediators. (Mycoremediation: 8 Ways Mushrooms Can Mitigate Pollution)

The downside of hyperaccumulating plants is when they are grown and consumed without testing/regulation of the contaminants in them.  Unfortunately, brown and white rice (they are the same grain; brown rice is simply the whole grain while white rice has been milled and polished) are hyperaccumulators of cadmium and arsenic.  Arsenic is a more common pollutant; in the US, it gets into rice through pesticides used in old cotton fields that are flooded to farm rice, and through contaminated groundwater that floods fields in Bangladesh, for example.  The rice plant often takes up arsenic in place of silicon; rice plants require large amounts of silicon for optimal growth, and the chemical form of arsenite (AsIII) is very similar to silicon.  (Arsenic Transport in Rice and Biological Solutions to Reduce Arsenic Risk from Rice)  This is a very serious problem in eastern cultures where rice is a main staple of the diet for millions of people, and even those who can’t eat gluten, a protein in wheat that causes severe allergies in some people.

Unless you are reclaiming a swamp, new pristine land is not being created in great quantities, so we’re left with land that has centuries or millennia of human footprints, including toxic chemicals and metals.  Human use of the land in general leaves it in worse condition, but with the right plants, it’s possible to reverse a lot of the contamination.  If you want to make your own land–whether it’s your suburban backyard or acres in the country–cleaner and more habitable, get the soil tested and research which hyperaccumulating plants will make it better.  Once you get past the latin plant classifications, you may find the right plants also bring aesthetic beauty you wouldn’t have imagined. 

Photo by Markus Spiske on Unsplash

Volcanic Ash, Repurposed

Volcanic Ash, Repurposed

Inferring from news headlines, you might think that volcano eruptions are rare–maybe a couple a year.  This is definitely not the case!  As of April 14, 2023, there were 49 volcanoes in eruption, 75% of them along the “Ring of Fire” where the Pacific Ocean meets land masses on the west and east.   To see the names and places of these active volcanoes, check out this page in the Smithsonian’s Global Volcanism Program.

Volcanoes emit several things when they erupt.  Gasses are composed of water vapor, carbon dioxide (CO2), sulphur dioxide (SO2), and hydrogen sulphide (H2S).   In actuality, lava can also contain 6% or more of its mass as gasses.  The gasses come out of solution from the lava when it erupts from the ground, in the form of bubbles or explosions.  (Volcanoes) Lava can flow in many forms above ground, below ground, and underwater.  The chemical composition of the lava causes it to have different viscosities and take different shapes as it cools and solidifies.  This page has a detailed description and fascinating photos of the many different types of lava.  

When gas and solids are emitted at the same time from a volcano–watch out!  Pyroclastic flows are the most dangerous type of eruption, where the hot pressurized gas can carry fragments of rock and ash for long distances.  Boulders can be thrown for miles if the eruption is particularly energetic, but the main danger for nearby residents is lava, fragments of rock called pumice, hot ash and gasses.  It was once thought that the residents of Pompeii perished due to suffocation of ash, but new evidence points to extreme heat.  (The Hazards of Pyroclastic Flows)

Clouds of ash can travel thousands of miles in the atmosphere.  It can disrupt airplane traffic and cause air pollution in distant cities, but when “the dust settles”, volcanic ash can be a good thing, as it’s used for many purposes.

Solid particles emitted from volcanoes are collectively called tephra.  Products made with tephra can be from ash (fragments of rocks, minerals, and volcanic glass ranging in size from sand to clay-like (from 2 mm to less than 0.004 mm in diameter) which is hard and abrasive), or milled/crushed from larger rocks and pumice.  Here are a few examples:

  • Bricks made with 10-20% ash of Mt. Etna, a very active volcano in Italy, were less porous, more compact and less susceptible to decay, with a small loss of strength that was still in acceptable parameters. (Producing Bricks with Volcanic Ash from Mount Etna)
  • Concrete made with 30-50% ash vs. 100% Portland cement is less energy-intensive to make and is stronger. (Cities of the future may be built with locally available volcanic ash)
  • Volcanic ash can make soil incredibly fertile due to the different minerals it contains. 
  • Volcanic rock can be used to purify water.  This use is discussed in the rest of this article.

Zeolites are natural volcanic minerals with unique characteristics. They are aluminosilicates, meaning that they are composed of varying quantities of aluminum, oxygen and silicon.  Zeolites were formed when volcanic ash was deposited in ancient alkaline lakes. The interaction of the volcanic ash with the salts in the lake water altered the ash into various zeolite materials, creating “pores”.  The pores have typical diameters of 0.5 to 0.7 nm, which are slightly larger than the diameter of a water molecule. Positive ions are present in the channels, which can be exchanged for other ions.

This substitution of ions enables zeolites to selectively adsorb certain harmful or unwanted elements from soil, water and air. A good example is the removal of calcium from hard water, also called "softening".  In this case, zeolites exchange sodium ions for calcium ions, which result in soft water. Zeolites also have strong attraction for certain harmful heavy metals such as lead, chromium, nickel and zinc. (Zeolites)

The oldest evidence of use of volcanic rock in water purification exists at Tikal, a Mayan city in northern Guatemala.  The Maya collected zeolite and quartz from a crystalline tuff (a light, porous rock formed by consolidation of volcanic ash.) about 30 km northeast of the city between ~ 200 BC and 1000 A.D. They used these natural volcanic mineral resources to purify large volumes of drinking water in a tropical forest environment, which was complicated by catastrophic cyclones, volcanic events, droughts, and subsurface drainage; this is the oldest known zeolite water purification system. (Zeolite water purification at Tikal, an ancient Maya city in Guatemala)

Zeolites can also be synthesized  from volcanic ash.  In an effort to reduce landfill disposal of the ash surrounding Mt. Etna in Italy, two samples of ash were processed to form a synthetic zeolite that could adsorb cesium (a radioactive element) from polluted water. (Synthesis of zeolite from volcanic ash: Characterization and application for cesium removal)

For those whose interests lie more in beauty products, volcanic material has moved beyond pumice stones used for foot exfoliation and now the ash is having a moment in skin creams, masks and primers.  The minerals in volcanic ash (including sulfur) are antibacterial, anti-inflammatory (when used temporarily and correctly) and some products can be used to exfoliate and dry especially oily skin.  Three dermatologists weigh in on volcanic ash’s skin-clearing properties in this article.

How can you use volcanic ash or zeolite around your home? (Zeolites-applications)

  • For adsorbing odors: in shoes, carpets and kitty litter
  • For absorbing fat runoff in barbeque pits
  • For adsorbing moisture in closets and cabinets
  • As a filter medium for your fishtank (adsorbs ammonia)
  • As a filter medium for an air purifier (removes ammonia, formaldehyde, and other VOCs)
  • As a filter medium for water purifiers and softeners
  • As a garden soil additive for drainage, minerals and for landscaping textural interest

The minerals and rock formations of volcanoes vary endlessly in composition and uses.  Volcanic ash and zeolite are another of the earth’s natural filters and cleaners.   As our air and water become more polluted, we expect these resources to be used in many more ways–another example of taking “waste” and repurposing it for a cleaner environment.

Photo by Yosh Ginsu on Unsplash

What is Salutogenic Design? How can we use it in our homes?

What is Salutogenic Design?  How can we use it in our homes?

Salutogenic design comes from the two Latin words ‘salus’ meaning health and ‘genesis’ meaning origin.  It is the study of the origins of human health.  Aaron Antonovsky was an immigrant to the US in the 1920’s, eventually being drafted into the US Army in World War II and serving in the Pacific.  Much later after obtaining his doctorate in sociology, Aaron studied survivors of concentration camps and wondered, why aren’t more of them in very poor health?  It was his questioning of the means and causes of good health, rather than what causes disease, that set him apart. (The Handbook of Salutogenesis, Chapter 3, Aaron Antonovsky, the Scholar and the Man Behind Salutogenesis

Normally salutogenesis is focused on healthcare settings and providers.  However, we can take the same concepts and apply them to our workspaces and homes. In today’s news, we’re constantly being made aware of environmental and human threats like viruses and toxic spills that threaten our health.  The possible effects,  such as cancer, high blood pressure, and sickness, are always presented to admonish us, avoid this or suffer consequences!  It’s definitely hard to tune out these sources.  However, if we’re able to focus on what makes us feel good, the results could be much greater.  Whether you’re designing a home from the ground up or have some time and budget to make some changes, here are some concepts from salutogenesis to keep your perspective in the right place: your health.

Louisa Grey is a designer living in north London who has embraced salutogenic design.  She prioritizes space, light and air in her projects by identifying the direction of natural light and the optimum layout to encourage airflow.  She admires the design of southern Italy’s trulli (ancient homes made out of limestone with conical roofs) and often incorporates a similar building material–clay–in her modern works, because it is naturally abundant, has acoustic-controlling qualities, is dehumidifying, regulates temperature and can improve air quality.  Clay plaster on walls has a soothing texture and appearance that gives a rustic, hand-crafted look to rooms, which also saves on energy in manufacturing and reduces waste. (Interiors expert Louisa Grey on how to embrace salutogenic design)  

Well-placed windows should allow the right amount of sunlight into your home, such that it doesn’t cause a large cooling load but rather allow a range of filtered or dappled light.  There are a number of companies that also offer faux skylights (thus avoiding any leaks or roof problems!) when natural light is at a premium.  

Open-concept floor plans do have the advantage of seeming more spacious than the same size traditional floor plan, but there is also comfort and peace in having walls and doors define some spaces, like an office or home library.   

Porches, courtyards and the ability to open large windows or doors to the outdoors (in areas with good air quality) are very beneficial because they allow fresh air to fill your home and to warm or cool it.  Plus, they are an ideal place to keep plants that need a little shade or protection and surround your seating areas in green.  Even views of green–from inside the house–lower stress, lower blood pressure, improve cognitive functions (like your ability to learn or focus), increase productivity, reduce anxiety, improve mood … the list is extensive! (How Your Home’s Design Can Improve Your Health)

If you are not building from the ground up, however, there are still ways to apply this type of design in your home.  According to the previous source, one of the most popular methods of salutogenic design is to incorporate biophilic design, which is based on human’s innate connection to nature. To do this, you can incorporate plants into your home, a calming mural, or the actual “architecture” of nature such as a natural stone fireplace, spiral staircase, or live-edge shelving that protrudes at different widths and heights on a wall.  Honeycomb shelving or tiled floors also mimic natural shapes.

Texture and comfort inside the home are very important.  (Although rugs and upholstery can hold dust and dust-mites, the way they “warm up” a room to make it inviting and comforting is important enough to use them when you can.  Also according to Louisa Grey, scents are can also be a healing part of your home: try to use natural oils and purifying mists and flowers that are grown locally. (How to design a healing home – and the power of salutogenic design)

Salutogenic design can even encourage healthy behavior when features like stairs or a swimming pool are included, or workout areas are not tucked away into a back corner or basement (you pass by them on a regular basis).  A beautiful library space, whether it’s an entire room or several bookshelves and a comfortable chair with good light also encourages learning. (Salutogenic Approach to Design is at the Core of Wellbeing)

Salutogenic design follows the principle that “an ounce of prevention is worth a pound of cure”.  Many homeowners make this choice everyday: should we go for small pieces of quality workmanship in our decor, appliances and clothing, or larger but lower-quality items?  It’s true that good design, building and decor may cost more than “builder’s grade” plans and materials, but what you should reap is a lifetime (or at least as long as you can live there) of better air quality, ergonomic ease, increased productivity and creativity, lower stress and overall wellbeing.  Who can put a price on that?

Photo by Andrea Davis on Unsplash

Are you TILTed?

Are you TILTed?

People who have lived with chemical sensitivities for some time become more educated about their bodies and what makes them feel bad.  The upside to knowing your sensitivities is that you can (mostly) avoid products and situations that will worsen your health, but the downside is that these products and situations can become ubiquitous, and dramatically change your social, work and home lives!  For many people, the onset of chemical sensitivities can be related to an over-exposure to one thing, like renovating a moldy bathroom, or staying in a hotel room that was cleaned with overly-noxious chemicals.  However, others do not have a clue about what caused the onset of sensitivities.  For each, navigating their daily life becomes a strategy of finding out and avoiding chemicals that trigger symptoms.  

If you are able to consult a doctor who treats chemical sensitivities, they will likely discuss conditions like “Mast Cell Activation Syndrome” (MCAS), or “Chronic Inflammatory Response Syndrome” (CIRS).  These syndromes present differently in different people and have overlapping symptoms, but there are physical tests and questionnaires that can help the doctor diagnose and treat them.  If you are in the beginning stages of treating sensitivities, it’s certainly helpful to become knowledgeable on your own, and researchers at the University of Texas have made it a little bit easier to zoom in on what makes you feel sick with a couple of free online tools.  In the expensive world of healthcare, we are all for “free”!

In their recent article “5 Types of Household Items to Avoid if You Have a Chemical Intolerance”, researchers introduce the two-stage process called toxicant-induced loss of tolerance, or TILT.  First, there is a major or chronic exposure to environmental agents such as pesticides, solvents or indoor air contaminants. Then, multi-system symptoms are triggered by a series of lower-level exposures to substances you may have previously tolerated like cleaning products, fragrances, foods, drugs or food and drug combinations.   This can explain why, after a major chemical exposure, you may feel sick in the vicinity of things that never affected you before, like certain laundry soaps or refueling your car at the gas station.  (The article above is super-helpful, including several recipes for homemade, non-toxic cleaners that anyone, TILTed or not, should try!)

To broadly test for TILT, they have developed a really quick questionnaire of 3 questions (within the article).  If you answer “yes” to one or more of those questions, they have a more detailed questionnaire of about 10 pages (all online click-through scales, no paper and math involved!) which can help you identify the types of chemicals and the parts of your body they affect the most.  Although I answered “yes” to food allergies, thankfully the more detailed questionnaire suggested I didn’t have TILT.  The organization has a page that describes TILT with a video of a man who grew up on a farm and the over-exposure to various dangerous chemicals that probably contributed to his sensitivities.  You can find more stories of different people with their triggers and symptoms here

This organization is dedicated to educating the public and also traditional healthcare workers like doctors, nurses and hospital staff about TILT.  On their provider resource page is a video describing the current problem: healthcare workers frequently don’t ask questions about chemical exposure when someone presents with symptoms.  

If you do find you have been TILTed, you can share your story or register to help the organization with future studies here.  At the very least, you can take the results of the surveys to your own healthcare provider to make sure they are aware of your sensitivities in planning your treatment.  The complexities of the chemical world we live in are making it more and more difficult to live well, but knowledge goes a long way toward that goal.

Photo by Rex Pickar on Unsplash

What Effects Do HVAC Systems Have on House Theatres and Entertainment Areas?

What Effects Do HVAC Systems Have on House Theatres and Entertainment Areas?

Home theatres and entertainment rooms are designed for family fun and relaxation. These rooms in your house are the most important to you when it comes to socializing, relaxing, and having fun. You and your loved ones can gather in these rooms to enjoy a performance of a film, play, or musical.

The entertainment rooms are a part of the house that should be well cared for. These areas need to be cleaned regularly to keep them in top condition. Many people in the home often use them, so it is always crucial to keep them clean. HVAC systems are another option for keeping these rooms comfortable. A good HVAC system makes watching movies or listening to music more enjoyable.

What are House Theatres and Entertainment Areas?

A theatre room with state-of-the-art projection and sound equipment is specifically designed for watching films. The walls of such spaces are typically covered in movie posters and other film-related memorabilia. In addition, they provide relaxing seating options, so you can kick back and enjoy your favorite program or film.

An entertainment area, often adjacent to the living room or family room, keeps guests entertained during social gatherings such as birthdays and anniversaries. Putting in pool, arcade, or foosball tables will give people something to do while waiting for food or drinks. This will provide them with a fun activity while waiting for their dinner to be served.

What Is an HVAC System?

HVAC stands for heating, ventilation, and air conditioning. In homes, businesses, and even indoor stadiums, air conditioning and heating systems control the air temperature inside the building. HVAC systems come in a wide variety, but they all work similarly. Mechanical ventilation provides fresh outdoor air through the system.

HVAC systems often include air cleaners to prevent the spread of airborne pathogens such as bacteria, fungi, and viruses. A specialist in the field will visit your home to assess its readiness for HVAC installation. Dallas HVAC installation service is one of the experts who will find the best HVAC setup for your home. They can install a new HVAC system for your home or business and also provide the repair service. 

To ensure your new HVAC system is installed correctly, you should hire a professional with a wealth of knowledge and experience. Professional HVAC installers help clients determine which heating and cooling systems are right for them. They can help you determine which size unit suits your space and how big your ducts need to be.

How HVAC Systems Affect Home Theatres and Entertainment Areas

When you plan to install a home theatre or entertainment area, it is crucial to understand how the HVAC system will affect these areas. The most common problems that arise from inadequate HVAC systems include the following:

Temperature 

Most home theatre components are not made to work in extreme heat or cold and may malfunction if exposed to such conditions. If your heating and cooling system is not running correctly, the temperature inside your home could fluctuate wildly. Either of these extreme temperature conditions can destroy sensitive audio and electronic equipment.  The equipment itself produces heat, so that must be accounted for in the “load” of the system.

The quality of the sound delivered to a home theatre will be affected by the temperature of the HVAC system. When the air temperature in a room is too low, the sound quality suffers. If the temperature is too high, you'll hear crackling sounds. The optimal viewing temperature for a home theatre is between 68 and 72 degrees Fahrenheit (20 and 22 degrees Celsius).

In addition, if your home theatre or entertainment area is sized for a number of people that significantly exceeds the people living in the house, you’ll need to consider the “load” that the extra people place on the system, because they will increase the temperature, humidity and CO2 of the room(s).  Too high or low of a temperature will also make it hard to focus on the plot of the movie or TV show you're watching. With reliable HVAC installations, you should be able to keep the temperature comfortable.

Humidity 

Water vapor in the air is what is quantified when discussing humidity. It affects how your home theatre and entertainment areas function.

Home theatre systems are not designed to withstand the high levels of humidity found outdoors. When exposed to humidity, most indoor equipment rusts, corrodes, or otherwise breaks down. HVAC controls ventilation, heating, and air conditioning to maintain a healthy indoor climate.

A high humidity level can make it uncomfortable to spend time indoors. You may feel overheated and wet all the time. Humidity levels in your home theatre could be quite high. Extreme heat and humidity are bad for your hair and skin. When the air in your home is too dry, you may experience a chill, discomfort, and dry skin.

If you have a humidifier in your house, ensure it's set to keep humidity levels at 30-40% during winter. For most house theatres and entertainment areas, this range is ideal. In the summer, that percentage can reach fifty to sixty percent.

An HVAC system that incorporates both a humidifier and a dehumidifier is the most efficient way to control moisture in a home. No matter the season, you can maintain optimal humidity levels in your home theatres and entertainment areas with HVAC installations.

Airflow

Airflow can affect how well you hear the dialogue in movies and TV shows and how you can listen to sound effects. It also affects the clarity of your surrounding system.

The lack of proper airflow is one of the biggest problems facing people who want to set up an effective home theatre system in their homes today. 

Poor airflow can lead to condensation on the walls and windows in your house theatre. This will cause mold growth and damage your furniture or other items within the space. Mold can grow inside the space and damage appliances.

Poor ventilation from the outdoors will allow CO2 levels to rise within the space, making everyone feel drowsy and irritable, the opposite of the environment you’re planning!  Without proper ventilation, microbial contaminants can also increase as people in close proximity exhale, laugh, cough or sniffle.   It’s critical to make sure that adequate ventilation is provided to keep everyone healthy!  Adding an air sanitizer device like the Whole Home Polar Ionizer or Air Angel will work to keep all the air fresh and clean in these spaces. 

HVAC systems can help maintain constant airflow throughout your home, keeping the temperature tolerable for those inside. The HVAC system uses ducts to distribute the conditioned air to different rooms in your home and especially entertainment areas. 

What Makes a Good Home Theatre and Entertainment Area?

Home theatres or entertainment rooms are more than just couches and speakers. It's a place to take a break from the stress of everyday life with your loved ones and friends. To make the area more fun and friendlier for anybody who visits, you'd probably want to improve it a little.

Ensure the room has enough seating for all those watching shows or movies. With a well-functioning heating, ventilation, and air conditioning system (HVAC), your guests can enjoy the show in comfort.

Installing an appropriate HVAC system should be a top priority. It will keep dust off your electronics, extending their life and ensuring they function properly. It will also keep your home at a temperature that will allow you to watch comfortably.  If you already have a central HVAC system, you may want to consider adding an additional unit for these entertainment areas, like a mini-split, to make sure your home theatre HVAC system maintains a consistent temperature, humidity and airflow.

Conclusion

Heating, ventilation, and air conditioning (HVAC) systems for a home theatre have unique design parameters that must be strictly adhered to for the best possible viewing environment for the audience. The system must be efficient and silent for the viewing experience to be satisfying. Creating a comfortable environment for watching movies or TV shows at home requires careful planning of the HVAC installations.  With all these things in mind, choose an HVAC system that keeps your home and entertainment areas safe and comfortable.

Guest post by Daniel Martin

Fire and Smoke Recovery

Fire and Smoke Recovery

Wildfires have been very destructive in the western half of the US in the late 2010's and early 2020’s.  As for the future, a 2022 report by the UN Environment Programme (UNEP) and GRID-Arendal projects an increase in extreme fires by 14% by 2030, 30% by the end of 2050, and 50% by 2100, due to climate change and land-use change. (breezometer.com)  

Fire disasters, like natural disasters, do not just destroy what the fire touches.  They can disrupt major infrastructures like highways and railways, power and water, and most important, air quality.  Because fires may smolder for some time, try to prepare to deal with the effects for weeks. 

If you live in an area prone to wildfires or prevailing winds that may carry smoke, here are some ways to prepare:

  • Seal doors and windows with weatherstripping, caulk and door sweeps.  
  • Find out how to adjust your HVAC system accordingly: you’ll want to close the fresh air intake and change over to recirculation, no matter whether you have central AC, a window air conditioner or portable air conditioner.
  • Purchase extra MERV 13 or higher filters for your HVAC system, to be used on poor air quality days.
  • If you live in an apartment building or condo with little control over the HVAC, consider purchasing vent filter material so you can place them in the vents into your space. Carbon vent filter material will neutralize many VOCs as well.
  • Purchase a HEPA air cleaner (non-ozone producing type) and be sure to have an extra filter or two on hand.    
  • Keep a number of N95 respirator masks on hand.    
  • Keep canned food and bottled water on hand.
  • Stock up on essentials for cleaning smoke odor: baking soda, white vinegar, rags, TotalClean

During:

  • Try not to cook during a wildfire emergency, because cooking indoors increases small particulates and vapors in the air, and you won’t want to turn on your stove exhaust, as that will draw polluted outdoor air into the house.  Try to use just the canned food you have on hand.
  • Monitor the filters in your HVAC system and air purifiers and change them when you start to notice a color change on the front of the filter, or when the output air starts to smell like smoke. 
  • Check your local air quality and receive updates from airnow.gov . Fire and smoke maps are available under the heading fire.airnow.gov.  You can also register for a free 14-day trial of Breezometer’s Air Quality app.  Below is a diagram to understand air quality index values (airnow.gov).
  • Use N95 respirators to evacuate to a safer place if necessary.  

Source: airnow.gov

After:  

  • Don’t open windows and doors until the air quality index is less than 100.  When that happens, you can open windows fully to get more fresh air ventilation. 
  • Set up fans near doors and windows to “push” smoke odor and soot outside.

To remove smoke odor that infiltrated from outside, or if you had a fire in your home:

  • Run air purifier(s) continuously with charcoal filters. 
  • Sprinkle baking soda over carpets and rugs and leave it overnight.  Then using a vacuum with HEPA filter, vacuum out the carpets.  
  • Remove drapes, towels, and any hanging fabric exposed to smoke, and either launder it in your washing machine or send it for professional cleaning.  When washing it yourself, you can add a cup of distilled white vinegar to your regular laundry detergent to remove smoke.  Don’t machine dry the item until the odor has been removed; it may need an additional washing cycle.
  • Wipe down all hard surfaces, including walls, ceilings, floors and windows with TotalClean or a 1:1 mixture of warm water and white vinegar (TotalClean is more gentle than vinegar and can be used on stone, wood, etc.)  Dispose of rags or wash them out with mild detergent and water as you go.  

To clean fabric-upholstered items:

  • Try to remove any cushion covers that are washable.  
  • Clean bare foam cushions by using “air replacement”:  Place the cushion into a large vacuum-seal bag and sprinkle baking soda over it.  Seal the bag and use your HEPA vacuum to remove the air from inside the cushion.  Let the air back into the bag to re-inflate the cushion.   Repeat several times if necessary. 
  • Sprinkle baking soda over the piece and let it set overnight before vacuuming it off.
  • You can also move the piece outside to air it out in the sun.  
  • It’s difficult to remove smoke that’s settled into furniture, however, if it does not dissipate following using an ozone generator, you can contact a restoration company for their services if it’s a valuable piece to you.

Try an Ozone Generator to remove smoke odors:

  • Ozone generators should only be used once all surfaces that can be cleaned are thoroughly cleaned (walls, floors and ceilings too!).  
  • Ozone is not as effective in areas of high humidity, so running the air conditioner or a dehumidifier in the space to get the humidity down (60% or less) is advisable.  Central air conditioning and any exhaust fans must be shut down when using the ozone generator, though, because you’ll want the ozone to stay in the space. 
  • Use fan(s) within the space to circulate the ozone.
  • Ozone generators cannot be used in the presence of people, pets or plants, but once these are removed, they can be quite effective in removing smoke.  Follow all instructions to seal up the space and allow it to work for the full time advised before ventilating.  Contact HypoAir regarding rental of our ozone generators, or local restoration companies may rent ozone generators.    

For large areas with open walls and ceilings such as basements, garages or gutted homes, consider having them soda blasted by professionals to remove soot and smoke odor from the structure in hard-to-reach places.  Baking soda’s legendary cleaning and odor-absorption qualities can produce amazing results when combined with commercial equipment and a skilled contractor.

Don’t: 

  • Spray deodorizers or fresheners to “cover up” the smell of smoke, because they do nothing to remove the contaminants, and many have toxic ingredients in them.
  • Attempt to live in spaces with heavy smoke damage until they are cleaned.  “Third-hand smoke” is the term used for the way carbon and chemicals in the smoke react to the materials in your home, and it can make you very ill.
  • Neglect flood remediation if the smoke damage was part of a fire in your home and fire response crews extinguished it using water.  Building materials must be removed or dried thoroughly within 48 hours in order to prevent mold growth. 

Photo by Daniel Tausis on Unsplash

Flood and Leak Preparation/Remediation Guide

Flood and Leak Preparation/ Remediation Guide

Water damage (including damage from freezing) is one of the most common and most costly types of homeowners insurance claims. Every year, about one in 50 homeowners files a water damage or freezing claim, accounting for 29% of all homeowners insurance claims, according to the Insurance Information Institute. (forbes.com) With the right knowledge and preparation, we hope that you can avoid very costly damage even if you experience a flood event.  That’s the purpose of this guide and kit. 

Before: secure lawn furniture, vehicles, and windows and doors

Flash Floods can happen with no notice, but if you have time, try to do as much of the following as possible to keep water and wind out.

  • Park your vehicle in a garage above street level if possible  

  • If high winds are forecasted, install hurricane shutters or plywood over windows and glass doors if possible. Store lawn furniture and bikes in a garage and roll or move heavy decor like pots to sheltered places.

Before the storm/flood: Take photos of your property inside and out for documentation (which hopefully will not be needed!).  Move valuables like photos and jewelry to a high, safe place in the home.

Before: prepare a basic survival kit for weathering the storm at home, as many times floods cause power outages.  

  • Drinking water (one gallon per person per day for several days, for drinking and sanitation)

  • Food (at least a several-day supply of non-perishable food) 

  • Manual can opener (for food)

  • Battery-powered or hand crank radio and a NOAA Weather Radio with tone alert

  • Flashlight

  • First aid kit

  • Extra batteries

  • Whistle (to signal for help)

  • Dust masks (N-95 if possible) (to help filter contaminated air)

  • Plastic sheeting and duct tape to protect furniture from water

  • Hand sanitizer

  • Moist towelettes, garbage bags and plastic ties (for personal sanitation)

  • Wrench or pliers (to turn off utilities)

  • Local maps

  • Cell phone with chargers and a backup battery

  • Various buckets for leaks

Minimum Tools for Clean-Up:

  • Utility knife with extra blades for cutting drywall

  • Pry bar and hammer

  • Heavy duty gloves

  • Heavier plastic tarp(s) for temporary repairs and drywall disposal

  • Heavy duty “contractor” bags for disposing of wet drywall, carpeting and water-damaged items

  • Flat shovel for removing debris from floor

  • Wet-dry HEPA vacuum

During the storm/flood: 

  • Don’t open windows or doors during the storm, as flying debris can cause serious injury!  Contrary to urban legends, you shouldn’t open them to “equalize pressure” during a tornado situation, either.  

  • Keep your weather radio tuned and cell phone on for local updates and take shelter in an interior room or the basement if advised against tornadoes. 

  • Occasionally tour the house and peek at attic space (if you have one) to check for leaks. Use buckets to contain water and if a steady drip of water starts to come from one area, use a utility knife to cut through the ceiling drywall to let the water run out faster and avoid blowout of the ceiling.  

  • Don’t stand in or walk through water to avoid risk of electrocution

After:  

  • Venture outside only when it’s safe to do so (the storm has passed). 

  • Alert authorities if your power is out or there are downed power lines near your property

  • Don’t drink tap water unless it’s deemed safe to do so

  • Take “after” photos inside and out

  • Be aware of displaced wildlife like snakes, alligators and the like!

  • Make repairs as you are safely able to do so.

  • If you have to leave your home for safety, write the date, your name(s), destination and phone number on a prominent wall as information for rescue teams

The Clean-Up:

When flooded by a hurricane or flash flood, the waters invading your home contain a variety of pathogens such as E. coli, Salmonella, and Shigella; Hepatitis A Virus, agents of typhoid, paratyphoid and tetanus, as well as agricultural or industrial chemicals (OSHA.gov).  This means that contents and surfaces that came in contact with floodwater from outside must be sanitized and completely dried within 48 hours or disposed of; do not let them just “dry out”.  Then after cleaning and drying, mold prevention treatment can be applied. 

Tips for salvaging household items (adapted from haywardscore.com):

Papers and clothing 

  • Move outside and spread out in sun

  • May wash clothing in washer

  • Papers and clothing soaked in contaminated water should be disposed (clothing will contaminate washing machine)

Solid wood furniture

  • Move outside to dry thoroughly

  • Remove drawers

  • Tip back to expose underside

  • Wipe down with clean rags

Area rugs

  • Can be professionally cleaned with extraction method

  • Washing them in your machine may contaminate the machine

  • Rugs with foam backings should be disposed

Wall-to-wall carpeting

  • Since it must be cleaned and thoroughly dried within 48 hours, and this is hard to do in the case of large areas of carpet, disposal is most common.

Padding under wall-to-wall carpet

  • Dispose because it is difficult to completely dry.

Upholstered furniture like couches and recliners

  • Must be cleaned and thoroughly dried within 48 hours.  

  • Move them outside if the weather is dry

  • Tip back so that the underside is exposed

  • Remove cushions and covers if possible to dry faster. 

  • Use a wet-dry shop vac to remove as much water as possible, then use fans to circulate air over them continually.

  • Thoroughly soaked furniture is unlikely to be completely cleaned and dried: disposal is recommended.

Drywall:  If any water pooled on the floor near walls, then it likely contacted the bottom of the drywall and insulation and needs immediate attention to get the walls dry.  The following is adapted from PopularMechanics.com:

  1. Wearing a respirator mask, safety glasses and gloves, remove baseboard with a prybar or hammer claw.

  2. Place a tarp under the area you will start to cut to catch drywall debris.

  3. Mark walls 6-12” above the high water line (use a chalkline or laser if possible) and cut using a utility knife, drywall saw or light circular saw set at ½” depth.

  4. Punch out the drywall under the cut with a hammer and remove it from the studs.

  5. Cut away insulation using a utility knife, making sure that you remove all damp insulation.

  6. Haul out debris on the tarp and repeat until all affected walls are open.  

  7. Use a wet-dry HEPA vacuum throughout the process to keep dust down

  8. Remove electrical plates to promote drying within the wall.

  9. Disinfect floors and cavities with a degreaser/cleaner and pressure washing to clean out all the bacteria from floodwater (not necessary if it was clean water) (moldfreeliving.com)

  10. Use drying equipment (see below) to expedite drying.

If entire ceiling areas and walls are soaked (from roof damage), remove all items you wish to salvage in the room before tearing out drywall and insulation (best done by professionals).  Unfortunately, all wood, tile, and vinyl flooring must be removed eventually because incomplete drying in-between and under the floor will cause mold to grow (also best left to professionals).  

How to use Drying Equipment: Drying out a house is actually an art.  Remediation companies use their equipment to get the right humidity, airflow, and temperature (HAT), the elements necessary for evaporation, during different stages of drying. The following advice is from the article Expediting the Drying Cycle:

  • Low relative humidity (RH) is necessary for drying, as moisture in materials and air seek equilibrium. The lower the RH of the air, the quicker the wet materials will give up their moisture to become equal with the moisture in the air.  Use any dehumidifier available from the first day, in order to get the RH as low as possible and keep it there.  It’s important to use the wet-dry HEPA vacuum as much as possible before switching on fans, as dust can plug filters on the dehumidifiers and reduce their drying capabilities. 

  • Airflow measured in feet per minute (FPM) is more important than cubic feet per minute (CFM).  Airflow speed at the beginning must be aggressive, preferably 600 FPM or more.   This is why professional blowers sit low on the floor to move air directly across flooring surfaces.  Alternate the blower between rooms if you only have one blower. 

  • Heat is needed when rates of evaporation begin to slow down, usually on the second day of drying.  At this time, if you have a room heater, turn it on and slow down fan speeds to 150 FPM.

  • Consistently low RH is the most important goal, because RH drives drying. Toward the end of the drying job, it’s possible that only one airmover is needed in each room (where the drying goal has not been met) with all available dehumidifiers running.

Wait until everything completely dries in the walls (consistently low RH can indicate this) before applying any anti-mold products.  Here are some recommended mold preventatives:

  • For a large area, consider having it soda blasted by professionals to remove remaining debris and mold from the structure in hard-to-reach places. 

  • DIY Fogging to prevent mold growth:  EC3 Mold Solution Concentrate and Fogger, $495

  • Laundry: EC3 Laundry Additive, $23

  • Use the Mold Guard and Air Angels after drying to continue elimination of mold in all areas.

  • Use TotalClean to wipe down surfaces like countertops, windows, cabinets, mirrors

Consider using an Ozone Generator to kill mold and remove odors:

  • Ozone generators should only be used once all surfaces that can be cleaned are thoroughly cleaned (walls, floors and ceilings too!).  

  • Ozone is not as effective in areas of high humidity, so running the air conditioner or a dehumidifier in the space to get the humidity down (60% or less) is advisable.  Central air conditioning and any exhaust fans must be shut down when using the ozone generator, though, because you’ll want the ozone to stay in the space. 

  • Use fan(s) within the space to circulate the ozone.

  • Ozone generators cannot be used in the presence of people, pets or plants, but once these are removed, they can be quite effective in removing smoke.  Follow all instructions to seal up the space and allow it to work for the full time advised before ventilating.  Contact HypoAir regarding rental, or local restoration companies may rent ozone generators.  

How to safely remove old carpet

How to safely remove old carpet

Upon testing my bedroom carpet as part of a series of mold tests in my home, I found this:

I scheduled time to remove the carpet the next week.  Now, how do I do this safely?

Research revealed two extremes:

  1. removing the carpet with no breathing equipment and no dust abatement (although this guy has some great tips, I cringe at the way he’s throwing the carpet around with no dust mask)

  2. removing the carpet with breathing equipment, a zillion garbage bags and gallons of mold eliminator (this method is costly and WET!) 

I had to find a solution in the median.  Here’s what I came up with for my situation (I am moderately sensitive to mold). 

Supply list:

  • Respirator with extra set of filters

  • Heavy gloves

  • Old clothes

  • Knee pads

  • TotalClean concentrate (or several pre-mixed spray bottles)

  • Clean garden sprayer

  • Rags

  • Plastic sheeting and painters tape for taping off vents and covering heavy furniture

  • Old towels to block under door

  • Heavy duty garbage bags (also known as contractor bags)

  • Carpet knife with extra blades or utility knife with extra blades

  • Duct tape

  • Pliers for pulling carpet

  • Nail puller to remove staples in padding

  • Pry bar and hammer to remove tack strips

  • HEPA vacuum with new bag for cleanup

  • Air Angel and/or Germ Defender: helps with dust and mold mitigation

Prep, prep, prep…it’s tedious but so worth it.  

  • Move whatever furniture, clothing and decor you can easily move, into another room. I took the long-overdue opportunity to get a new mattress, so I could escort my old one to the dump!

  • Use dollies on furniture that is too heavy or large to move out of the room.

  • Turn off the HVAC and cover any ceiling, floor or wall registers with plastic sheeting and painter’s tape

  • Measure TotalClean concentrate and water into garden sprayer at 1:7 parts respectively or empty pre-mixed spray bottles into sprayer.

  • Block under door(s) with old towels so that dust doesn’t migrate through the house.

  • Open window and remove screen if you plan to toss the carpet out of the window (also block off the area below)

  • Turn on the Air Angel and/or Germ Defender to help dust particles clump together and fall to the floor; the ions also destroy mold and bacteria on contact

  • Suit up with all protective gear including your respirator!

My strategies for minimizing dust will be to dampen a section of the carpet with the sprayer; cut the carpet into a  manageable section, remove it, and do the same three steps for the carpet pad underneath.  You’ll want to make the least number of cuts, because cutting through the carpet releases a lot of dust and fibers into the air.  I realize that this method will only wet the top of the carpet and not the cut edge or bottom, but short of soaking the carpet and subfloor, I found this is the best solution.  I liked the idea of tossing the carpet out of the window on a good weather day and bagging or binning it outside so that I didn’t drag the bags through the house.  I removed the carpet, padding and staples as I went, because I had a heavy piece of furniture left in the room and did not want to move it around more than necessary.

  1. Starting in one corner, use the sprayer to dampen the carpet in a 2’x8’ section.  Cut just inside that section with the carpet knife.  

  2. Use pliers to grab the carpet in the corner and wrestle it from the tack strips. If you can’t get it out, try cutting the corner out with your knife and pulling out just the corner.

  3. Roll it up gently and dispose of it in a contractor bag (or toss it out a window!)  If bagging it, then you can use the duct tape to keep it rolled tightly.

  4. Spray the carpet pad underneath and cut it.

  5. Dispose of it in the same way.

  6. Remove staples holding the padding to the floor with the nail puller.

  7. Remove tack strips using the pry bar and hammer.  They are super-sharp!  (If you plan on replacing with new carpet and the tack strips are not rusty or damaged, you can leave them in place).  

Repeat steps 1-5 until the whole room is devoid of carpet and padding!  If you can handle more than 2x8’ of damp carpet at a time, you can  Then, use a HEPA vacuum to thoroughly vacuum the floors to remove dust.  You will want to wipe down the walls, window(s) and ceiling fan with TotalClean because dust is now everywhere.  Finally, you can remove the sheeting from your register(s) and change clothes and shower–you earned it!  It’s best to add a bit of EC3 Laundry Additive to your clothing when washing it to avoid spreading mold to any of your clean clothing. 

If you have a new floor already scheduled for installation, good for you! Make sure that the subfloor dries out completely before 48 hours have passed, and definitely before installing new flooring (use of the sprayer makes it unlikely to soak the subfloor).   If you haven’t picked out new flooring yet, you can remove/replace any nails or screws that are sticking out, use a non-toxic floor paint, and/or use an area rug to cover over any rough areas until that day comes.  Try not to wait too long, however, so that excessive wear of the subfloor doesn’t occur.  

Photo by Julie Marsh on Unsplash

Safety concerns after the Norfolk Southern train derailment in Ohio

Safety concerns after the Norfolk Southern train derailment in Ohio

On Friday, February 3, 2023, about 50 freight cars derailed in East Palestine, Ohio. Unfortunately, the freight company Norfolk Southern did not release the full manifest of what was in the derailed cars to the public until about two weeks later.  It was first stated that only ten of these cars contained hazardous materials.  Five of those cars started leaking vinyl chloride, a gas which is used to make PVC (polyvinyl chloride), a hard plastic that composes many consumer products such as lawn chairs and water piping.  Vinyl chloride exposure increases risk of certain cancers, including liver cancer. According to the New Jersey Department of Health, some of the acute health effects of inhaling vinyl chloride are irritation of the nose, throat and lungs causing coughing, wheezing and/or shortness of breath.  It can cause headache, nausea, vomiting, dizziness, fatigue, weakness and confusion. Higher levels can cause lightheadedness and passing out.  With chronic exposure, vinyl chloride is a carcinogen in humans. It has been shown to cause liver, brain, lung, and other types of cancer, as well as reproductive harm.


Other chemicals initially reported were:

  • Butyl acrylate, a liquid at normal atmospheric conditions, but it evaporates quickly.  It’s used to make plastics and paints.  Butyl Acrylate is listed as a “serious” health and flammability hazard by the New Jersey Department of Health.  Inhaling Butyl Acrylate can irritate the nose, throat and lungs causing coughing, wheezing and/or shortness of breath.  Exposure to Butyl Acrylate can cause headache, dizziness, nausea and vomiting.
  • A “small amount of non-hazardous lube oil”.

According to news headlines of February 13, additional chemicals contained in the train cars include:

  • Ethylene glycol monobutyl ether (EGBE) is a colorless liquid with a mild odor, is used as a solvent for paints and enamels, as well as in cleaning products.  It’s a carcinogen and can immediately irritate the nose and throat to cause coughing, wheezing, nausea, vomiting, diahhrea, abdominal pain, headaches, dizziness, confusion and passing out (Hazardous Substance Fact Sheet).
  • Ethyhexyl acrylate is a clear colorless liquid with a pleasant odor, whose vapors are heavier than air.  It’s used in the making of paints and plastics.  It can cause severe skin and eye irritation on contact and respiratory irritation if concentrated vapors are inhaled.
  • Isobutylene is usually transported as a colorless liquid under pressure, which becomes a gas when depressurized.  It’s highly flammable and used in the production of aviation gasoline, paints and coatings, packagings and plastics.  It can cause headache, dizziness, lightheadedness and fatigue when breathed in, as well as irritating the eyes, nose and throat. (Hazardous Substance Fact Sheet)

According to a Washington Post article of February 18, other chemicals include:

  • Polyethylene, a common plastic, is considered to be of low toxicity by the Environmental Working Group.
  • Dipropylene glycol, used in some skin care products, has low toxicity. (Environmental Working Group)
  • Propylene glycol, a food additive and skin care ingredient, has moderate allergenic potential.  (Environmental Working Group)
  • Polyvinyl (PVC), a common plastic, may contain phthalates (an endocrine and reproductive toxin), and can produce dioxin and hydrogen chloride if it's burned.
  • Diethylene glycol (DEG) is a clear, colorless, practically odorless, viscous, hygroscopic liquid with a sweet taste. It’s used in a wide range of industrial products but has also been involved in a number of prominent mass poisonings spanning back to 1937. (scientific review), causing renal (kidney) failure, neurological disorders, and/or death.
  • Benzene, a major ingredient in gasoline, is used to make many other industrial products, detergents, drugs and pesticides.  It’s a known carcinogen that can cause death at high levels of inhalation (10,000-20,000 ppm), and headaches, dizziness and drowsiness with only short-term inhalation.  Inhalation over extended periods or in high concentration can cause organ damage, especially to bone marrow and blood (Virginia Department of Health).

In order to mitigate explosion risk, crews drained and ignited the vinyl chloride on Monday February 6, causing a dark plume of smoke.  Unfortunately, the smoke contains phosgene and hydrogen chloride, which are both irritants that can cause adverse effects at very low concentrations.  Here is what we know about these chemicals:

Phosgene, a product of the burning vinyl chloride, can occasionally poison workers in the plastics and chemical industries.  According to an academic review of 10 cases of phosgene exposure, “Phosgene inhalation may cause initially symptoms of respiratory tract irritation, patients feel fine thereafter, and then die of choking a day later because of build up of fluid in the lungs (delayed onset non-cardiogenic pulmonary edema). Phosgene exposure is associated with significant morbidity and mortality.”  The exposure limits are also very low for this chemical: 0.1 ppm (part per million) averaged over a 10-hour workshift and 0.2 ppm, not to be exceeded during any 15 minute work period, according to the National Institute for Occupational Safety and Health (NIOSH).  (Phosgene Hazardous Substance Fact Sheet)

Hydrogen Chloride, another of the products of burning vinyl chloride, is synonymous with Muriatic Acid and Hydrochloric Acid.  It’s a colorless gas with a very pungent odor, used to make other chemicals, or used in making cleaning products.  Very corrosive, it’s an irritant to the respiratory system and can cause severe burns to the skin, eyes and lungs.  Hydrogen Chloride is corrosive to steel and has an explosive reaction to some other substances. (Hydrogen Chloride Hazardous Substance Fact Sheet)

Since vinyl chloride and some other chemicals are heavier than air at ambient temperatures, officials have been testing areas near the ground and the basements of residents, to be sure that they are safe to return to their homes.  However, until all of the chemicals are removed from the site, there is the possibility of further escape of chemical gasses and liquids into the air, ground and water.  It’s been confirmed that some chemicals reached the Ohio River, so that at least one water supply company had to make provisions to obtain a different source of water from another river.  There have been reports of dead animals in the area such as chickens, dogs, foxes, and fish. 

There is a very real concern about soil and water contamination, because the vinyl chloride was first drained from five of the cars to an excavated trench and then burned.  This was not a lined trench, so the vinyl chloride contaminated the soil, where it can permeate and move into waterways with snow and rain.   According to the EPA’s letter to Norfolk Southern, chemicals were also seen entering storm drains.  The soil of the disposal trench was not excavated for disposal following the burning; in fact the repaired train line was quickly built over part of the trench/burn site.  Because vinyl chloride is a carcinogen, there’s likely to be lasting adverse effects from the quick disposal and cover-over.  

In addition, chemicals released from burning the vinyl chloride are potentially toxic.  Among them, dioxins can cause developmental problems in children, lead to reproductive and infertility problems in adults, result in miscarriages, damage the immune system, and interfere with hormones.  Dioxins can bind to an intracellular protein known as the aryl hydrocarbon receptor (AhR). When that happens, the AhR can alter the expression, or function, of certain genes. The resulting cellular imbalance leads to a disruption in normal cell function and ultimately adverse health effects. (National Institute of Environmental Health Sciences)  Unfortunately, dioxins can persist for decades in soil and contaminate plants and animals, where they are stored in the fat reserves of the animals which graze on or contact the soil.  On Thursday, March 2, the EPA ordered Norfolk Southern to begin testing for dioxins in the area surrounding the derailment.

Many residents returning to their homes have requested air and well water testing, which is being conducted by the EPA.  Detection of these gasses and chemicals in many cases requires specialized testing equipment that has been calibrated to sense their presence, such as this meter. According to this fact sheet from the Illinois Department of Public Health, showering, bathing or cooking with water contaminated with vinyl chloride can release it into the air, where you can breathe it. Drinking contaminated water can also expose you to vinyl chloride; people can taste it starting at about 3400 parts per billion (ppb), however, the EPA recommends avoiding cooking or bathing with water that contains over 2 ppb.  The sheet advises that water can be safely filtered using carbon filters, however with the low safety level (2 ppb) and much higher sensory detection level (3400 ppb), there is no way to know if water has been safely filtered unless it’s tested.  Testing by private labs are one way to be sure that water is safe, but testing water continually, and purchasing bottled water, can come at significant cost to the homeowners.

Photo by Craig Marolf on Unsplash

How to enjoy winter

How to enjoy winter

Whether or not you enjoy winter, there are ways you can enjoy it more.  It calls for identifying some potential drawbacks, and transforming them into advantages.  Some potential cons of the winter are less daylight, more clothing, less time outside, colds and flu, and staying at home when inclement weather hits.  These don’t have to be dampers on the season: here’s how.

Less Daylight.  When the sun goes down at 5pm or earlier, our bodies tend to say, “Yay, it’s time to sleep!”  but there’s still plenty of time left in the day.  Apparently, less sunlight really does affect our circadian rhythm and may cause us to feel groggy or fatigued during the day.  Also, because our bodies use sunlight to manufacture vitamin D, and vitamin D is a hormone, less of this vitamin has a tremendous impact on mood, energy level and immune function. Here are some ways to keep your energy levels high even after the sun goes down:

  • Bright light helps to energize us by telling your brain to stop producing melatonin, a sleep hormone.  If you want to get really technical, blue light does that best, while lights that are amber and reddish don’t provide much “wake-up” at all.  In our previous post, we describe how sunlight actually wakes and puts us to bed with different wavelengths as the light is filtered differently through our atmosphere at different times of day.  You can do this inside (artificial light)with programmable light bulbs in your home like the Wyze Color Bulb ($16) or Light Engines ($289-349) which can help your body track the natural sun or reprogram for travel.  In any case, when you want to stay awake, break out those cool blue light bulbs (also called daylight and cool white), and head toward the warm white bulbs when you’re ready to sleep. 

  • Get tested for your vitamin D levels.  Women are especially susceptible to deficiency in this vitamin, which can lead to lower bone density, fatigue and susceptibility to disease (immune problems).  Your doctor can help you select the right vitamin D supplement to recover.

More clothing:  If you prefer to walk around in shorts, winter could put a cramp in your style, but layers can extend many different styles.  When the weather is blah, brighten up your mood with your wardrobe!  Here are some cases in point:

  • Leggings got you covered whether you wear a summer dress or shorts over them.

  • Socks come uber-stylish in patterns and colors, and showing them off is cool.  Unique socks make great gifts too!

  • Sweater vests add warmth to your core.

  • Try a different kind of hat, in a different color, than what you would normally wear–like a bucket hat, turban or tam.

  • Lighter layers even help you to pack less clothing when you travel, because you can mix and match them compared to more bulky items.  

  • Think about it: insulation in the home is about sandwiching air in cavities.  Several light layers usually cause active people to be more comfortable and sweat less.  They also do a better job to allow movement and coverage–a gap here or there is covered by another layer, or adds “ventilation”.  

Less time outside: says who?  If you’re limiting time outside, it’s only because you haven’t found the right sport or way to dress for it.  There are proven benefits to spending more time outside during the winter: it increases the basal metabolic rate, which helps the body burn more calories. (insidehook.com)  Here are some suggestions:

  • Firepits and outdoor heaters

  • Hot tubs

  • String lights

  • Backyard gatherings with friendly competitions and hot chocolate

  • If you live in snow: snowshoeing, cross-country-skiing

  • Biking

  • Birdwatching

  • Polar bear dips

Repeat after me: colds and flu do not have to be part of my winter!  Contrary to advice during our upbringing, people experiencing cold temperatures are no more likely to get sick than those who are in a warm environment.  The increase in colds and flu at this time of year is most likely because cold, dry conditions are ideal for transmitting these viruses.  The virus is more stable and is able to stay in the air for longer when it’s cold and dry. (signaturemd.com)  

If the indoor air is dry, you can add humidity to it in your own home by using a humidifier.  Dr. Jeffrey Banyas is an ear, nose and throat surgeon in Pennsylvania.  He advises that about 40% relative humidity is ideal to prevent infections, because it reduces the chances of virus remaining airborne, and it helps the body’s natural defenses.  “The nose and sinuses are lined with a mucous membrane that has within it small hairs called cilia,” Banyas explained. “These cilia beat rhythmically to sweep the sinuses clean.” Banyas said when the mucus is thin, the cilia work much more efficiently. However, dryness impedes them.

“When the membranes dry out, not only do the cilia not work as well, but any trapped infectious mucus, pus, or debris is thicker and harder for the cilia to remove.” (Pennsylvania newspaper)

Especially if you are out and about, be sure to drink plenty of water and use a saline nasal spray or gel to keep nasal passages moist.

Cold air is a problem for asthma sufferers because it causes air passageways to constrict when breathing it in.  In this case, it’s best to dress warmly and place a scarf or covering over your mouth to help warm the air before it enters your body.  In the case of those with heart disease, cold temperatures stress the cardiovascular system and cause your blood vessels to constrict, shallow breathing, and a slight thickening of the blood.  (signaturemd.com) Yes, strenuous outdoor activities like shoveling snow can cause heart attacks, so if heart disease is a concern, it’s best to get help with chores outside! 

There is moderate evidence to suggest that vitamin C, D and zinc help with colds.  Vitamin C helps in the formation and function of immune cells, but here’s the thing: they don’t do much if you only start taking them after you get sick.  According to a 2013 Cochrane meta-analysis of human studies, people who take vitamin C regularly can expect shorter colds (by 8% in adults and 14% in children) with slightly less severe symptoms.  Also, athletes who take vitamin C regularly are about half as likely to catch a cold as those who don’t.  The recommended daily dose of vitamin C is 75 milligrams (mg) a day for women and 90 mg a day for men. (mayoclinic.org)

Vitamin D is involved in many cellular processes, including the regulation of immune cells during infections. Deficiences of vitamin D are associated with increased upper respiratory tract (URT) infections. (signaturemd.com).  Because one way of getting vitamin D, through exposure to sunlight on your skin, is limited during the winter months, supplements can help.  You don’t need to take a large dose of vitamin D daily to get its benefits. The recommended daily amount of vitamin D is 400 international units (IU) for children up to age 12 months, 600 IU for people ages 1 to 70 years, and 800 IU for people over 70 years.  (webmd.com)

Zinc keeps the immune system strong, helps heal wounds, and supports normal growth.  Some studies have found that zinc lozenges may reduce the duration of cold, perhaps by a day or so, and may reduce the number of upper respiratory infections.  The recommended dosage of zinc is 8 mg/day for women and 11 mg/day for men (webmd.com)

Knowing that your body reacts differently to cold air and it can harbor harmful viruses, taking care of your body needs to be an everyday routine.  Make sure to get the rest you need, hydrate your body and the air, and take supplements that will support your immune system before you encounter germs, to have your best winter yet!

Photo by freestocks on Unsplash

How to choose the right ceiling fan (other than the color)

How to choose the right ceiling fan (other than the color)

Everyone has a “style” in their home, and glancing at the number of pages of ceiling fan choices in any online hardware or home decor store, there is a ceiling fan for every style!   You’ve got modern, traditional, glam, rustic, minimalist, and everything in-between.  Knowing the characteristics of the best-performing ceiling fans will make your choices easier within the style and color you like, so take a minute to check out these tips.

The object of a ceiling fan is to circulate air, so air flow should be near the top of your list.  Airflow is measured in cubic feet per minute, and although some manufacturers like to give measurements of velocity (feet per second or meters per second), they are not the same.  Airflow is what “mixes up” the air in a room and breaks up stratified air (thermal layers) so that your air conditioning system becomes more efficient.    The most efficient ceiling fans are High Velocity Low Speed (HVLS) types; these are the ginormous fans that you may see in a warehouse store or sports arena.  They typically measure 6 feet in diameter and larger, many topping 20 feet or more.  Surprisingly, they move the most air with the least amount of energy, but you do need a high ceiling so that each fan is between 20-25 feet above the floor.  If you aren’t looking for such an industrial size fan, Aeratron makes the most efficient ceiling fan in normal sizes.  Their fans incorporate several designs that help them to achieve this efficiency:

  • Blade shape: Blades can get super-fancy, but the most efficient are oar-shaped, or in Aeratron’s case, with a “winglet” to reduce drag.

  • Motors: the more powerful the motor, the more efficient the fan.  The most recent developments are “DC” or direct current motors, which can be adjusted to an infinite number of speeds.  These are electronically controlled and are typically quieter, smaller and lighter than AC (alternating current) motors.  

  • Number of blades (Less is More): Did you know that the lower the number of blades, the better the efficiency?  More than two blades just cause more turbulence and do not move more air.  

  • Slower is better:  Operating a ceiling fan at a slow speed continuously is better than higher speeds.

  • Having a downrod (an extension that lowers the body and blades of a fan away from the ceiling) is critical to a fan’s ability to move air.  Even a 3” to 4” downrod increases efficiency by approximately 40% over a flush-mount fan (one that hugs the ceiling).  Check out downrod specifications below. 

So, after giving all this information, there is one number that could guide you to the most efficient fan in your style preference.  It’s called cubic feet per minute per watt (CFM/W).  Basically, it’s analogous to gas mileage for fans–how much air it can move per watt of energy expended.  Although 75 is the minimum to make a fan efficient, the higher the better, and the most efficient fans have a CFM/W over 400.   Here’s a list of the most efficient as compiled by EnergyStar.gov.

So, now that you think you have found the most efficient, stylish fan in your budget, we just wanted to make sure you know the following interesting information:

Ceiling fans don’t actually cool a room.  Say whaaat?  That’s right, ceiling fans don’t cool a room because they can’t remove heat, the way an air conditioner can.  In fact, because ceiling fans expend energy and a portion of that energy produces heat, they actually add heat to a room.  The cooling effect you feel is the wind chill effect, which is the temperature which a person feels with respect to the wind.  (cielowigle.com)  According to Consumer Reports, using a ceiling fan, can make you feel up to 4° F cooler, and you can save 3 to 5 percent on air-conditioning costs for each degree you raise the thermostat, so using ceiling fans and raising the thermostat setpoint can theoretically save you 12-20% in air conditioning costs.  Pretty cool!

Remember the rule above about the less blades, the better?  Well, an improvement on a two-bladed ceiling fan might just be a ceiling fan without blades.  There are actually quite a few products that advertise to be “bladeless”, but in reality, the blades are enclosed in a casing (enclosed fans, by the way, are great choices for kids’ rooms and near bunkbeds, to avoid the chance of getting fingers or toys caught in them).  One of the true “bladeless” fans is the Exhale Fan, which features a stack of spinning discs modeled after Nikola Tesla’s bladeless turbine.  Instead of shooting the air straight downwards like traditional fans, Exhale fans move air at a 45 degree angle, which accomplishes a lot: it creates a vortex and de-stratifies the temperature layers of the room, more effectively mixing the air.  The fans themselves move over 5,000 cfm of air, which is pretty amazing since they have no “blades”!  No blades also means very little noise.  In addition, they are preferably mounted directly to the ceiling, eliminating the use of downrods.

Sizing your fan is very important.  The larger your room, the greater the diameter of the ceiling fan you need to circulate air effectively.  This sizing guide is very simple to use, and when in doubt, it’s best to go one size larger!   The reason for this is that it’s more efficient to operate a large fan on lower speed, than to operate a smaller fan on its highest setting.    

Choosing the correct downrod length is very important.  It’s not common knowledge, but if you have a standard 8’ ceiling, you should have a short downrod on your fan (3”).  When I purchased my home, even though all of the ceilings are 8’ or more, 6 out of 7 ceiling fans were flush-mounted (mounted directly to the ceiling).  Flush-mounting is only recommended for ceilings lower than 8’, and a flush-mounted fan moves approximately 40% less air!   So, before purchasing a ceiling fan, measure your ceiling height and check this handy guide.  If a fan accommodates a downrod, you can always adjust the length by purchasing the right downrod separately.  Basically, you’ll want the fan to be at least 7’ from the floor and 8-9’ for optimal airflow.

LED lights continue the savings.  If you are going for efficiency, it makes sense not to squander savings from the fan by using incandescent light bulbs.  Many high-end fans now have permanent LED bulbs and LEDs that can be adjusted for color in cooler or warmer tones. 

Photo by Sidekix Media on Unsplash

You can’t have too much air circulation!

You can’t have too much air circulation!

When clients ask advice on choosing air purifiers, some of the first questions we ask are about the layout of their home and how air circulation is accomplished.  This topic is covered in our article “Which air purifier should I choose for my home?  Part 1: Airflow”.  Airflow is super-important, and if outdoor conditions like heat, cold, humidity or pollution restrict your ability to open windows for good cross-ventilation, fans are necessary to get air moving.  Moving air helps any kind of air purifier and also your home’s heating and cooling systems to work more efficiently.  We’ve put together a few visuals on how common (and not so common) fans work. 

What about Radiator Fans?  

Radiators with fans are common installations in older buildings and to be sure, they are better than not having a fan at all.  However as shown in the below diagrams, there tends to be an area in the middle of the room that doesn’t get much mixing action.

Source: Study “Influence of Sensor Position in Building Thermal Control: Development and Validation of and Adapted Zone Model

“Basket Fans”

Although you may not have heard of this description before, when seeing a basket fan you can easily understand why it’s called that:

Whether sitting on a desk, standing on a floor or hung from the ceiling, these types are generally economical and when placed near where you are sitting, seem to be efficient in moving air.  However, scientific study about their circulation effects show otherwise.  There can be large “void spaces” where virtually no air is moving.

Source: Read this before investing in basket fans for air circulation

Regular Ceiling Fans

Ceiling fans are great tools for getting more air circulation.  Traditional ceiling fans tend to create better air circulation in a room than regular floor-or tabletop- fans (excluding “air circulators”, which we will visit separately in this article).  The image below shows that the fan shoots air with greatest velocity down near its center, and airflow moves along floors until it reaches walls and moves upwards again.  There are entrainment zones around the fan that do not get optimal mixing, however, if the fan is sized correctly for the room (check our article on choosing a ceiling fan), it’s definitely an improvement over not having a fan at all.

Image: Study: Measurement of airflow pattern induced by ceiling fan with quad-view colour sequence particle streak velocimetry

HVLS Fans

Some big rooms can be serviced by one or more High Volume Low Speed (HVLS) fans, which turn more slowly but generate much bigger cubic foot per minute (cfm) airflows in a space (read more about HVLS fans here).  Because the airflow along the floor is much deeper with HVLS fans than with normal ceiling fans, these currents on the floor are called floor jets.  The image below also shows how such a fan can cool even more effectively when fresh air vents at the bottom of the room, and exhaust vents at the top, are opened.

Source: “Need for Ventilation

Air Circulators/Destratification Fans

“Destratification” is the gold standard of air circulation in a room, because temperatures in the top, bottom and sides of the room can show that the air is being thoroughly mixed!  Without destratification, thermal “layers” can develop, and air conditioning (including heating) as well as purifiers cannot effectively service the entire volume of air.  There are several different types of fans that can break up these thermal layers.  Airius, an Australian company, makes a different type of high volume fan that is termed “bladeless” because the blades are hidden in the body of the fan but still generate significant airflow.  Their systems are termed “airflow circulation cooling fan and destratification system” and are designed to be mounted close to the ceiling; many applications are found in convention centers, dealerships and indoor stadiums. 

Source: Airius Fans Vs. HVLS Fans

Real “bladeless” fans

For residential or commercial use, true “bladeless” ceiling fans (modeled after Nicola Tesla’s bladeless turbine) offer similar destratification to circulator fans, with less noise.  According to Exhale Fans’ fact page, “The airflow is a vortex: The airflow profile makes the real difference in how you feel while in your space. Air exits the Exhale Fan in all directions 360° horizontally and at a 45° angle. This unique airflow starts a gentle rotation of the air much like a vortex. The vortex airflow profile generated by the Exhale Fan is unmatched in the ceiling fan industry. Air is not simply directed straight down but moves around the room in a pleasant cyclonic flow. What we have created is a destratified environment where floor to ceiling, wall to wall, you have a temperature balanced and comfortable space.”  The video of an Exhale Fan working in water to lift and circulate particles off the floor of the water tank is impressive!

Source: How does it work?

An “air circulator” like the Vornado ($92) is purported to have a similar pattern to ceiling and HVLS fans, however it shoots air across a room.  Here is a video comparing Vornado, Dyson and generic tabletop fan.  The reviewer (Filipino) and commenters mostly prefer the Vornado for power and value.  Another great air circulator option is the Dreo ($99); this video comparing Vornado and Dreo declares Dreo the winner, although it's virtually the same price as the Vornado.  The Dreo uses a brushless DC motor so it has more range of speeds, and uses less power than the Vornado, which uses an AC induction motor.  Dreo is also quieter across the range, even at the highest setting.  There are more economical versions of each brand that incorporate less technology but move the same amount of air.

Source: Vornado 293HD literature

Although the Dyson bladeless fans claim to be “air multipliers” because more air is entrained than is taken in through the pedestal of the fan, they lack the power to destratify and circulate air in a whole room.

Source: How does the Dyson Air Multiplier Work?

Now that you know which types of fans help to truly get all of the air in the room moving, you can decide how and where to use/place them.  Perhaps you’ve never turned on your ceiling fans…now is the time to clean them and get them running!  Considering that the purpose of an air purifier with HEPA is to filter all the air within a room, the fan used in the purifier or a separate fan paired with it is very important to the purification function. It should either have a high Clean Air Delivery Rate (CADR), or be used with a separate fan that is able to destratify the room.  

In this test, a 705 cubic foot space (approximately 9x10 foot room with 8 foot ceiling) was filled with incense smoke and different purifiers were operated to clear all traces of PM1.0ug/m3, PM2.5ug/m3 and PM10.0 ug/m3 particulate matter.  Although the location of the particulate measurement devices were not disclosed (how close to the purifier they were), the purifier with the highest CADR proved to be the fastest to clear the air (BlueAir Pure Fan Auto, in only 27 minutes); the other two purifiers tested took 1 hour 24 minutes and 2 hours 11 minutes!   However, it’s possible to pair a purifier with lower CADR with a ceiling fan or circulator or destratifier fan to improve performance..

In conclusion, the best way to purify air with a HEPA filter is to use a purifier with a high CADR, or to use the purifier in conjunction with a fan that improves whole-room circulation (and thus destratification).  In addition, we’ve always stated that the Germ Defender/Mold Guard and Air Angel units work differently from HEPA, because they send out ions into the room instead of pulling all the air through the device to filter it.  However, their function also improves when coupled with an air circulator, in order to deliver the ions more widely and evenly throughout the space.

Photo by Sidekix Media on Unsplash

What’s in a chemical filter?

What’s in a chemical filter?

Current events certainly stimulate a lot of research, and the accidental release of toxic chemicals from storage and transportation units is no exception.  When a dangerous chemical is odorless and colorless, how can we possibly protect ourselves and the air in our homes?  Enter chemical filters, which are actually already available for purchase.

Many gas filtration media start with a base material and then add (impregnate) the base material with specialized materials.  Since all of these base materials have a multitude of miniature holes that can get “plugged up” with dust, it’s best to make sure the dust filter is clean and in place to preserve the life of the chemical filter.  The base material is incredibly light because of the vast amount of internal surface area it has in its many cavities and holes.  The way these materials  purify air is called “adsorption” (in contrast to absorption).  Adsorption and absorption both “suck up” liquids or contaminants, but there is a difference:  a sponge will absorb water, but eventually the water leaks out or evaporates.  Activated carbon, activated alumina and zeolites adsorb certain chemicals, some including water, but the adsorbed liquid or gas does not escape because a chemical bond is made, until the material is regenerated with high heat.  Since adsorption is a surface phenomenon, good adsorbents are those having large surface areas per unit mass and high attractive forces for the compounds to be adsorbed, called the solute. Although all molecules are adsorbed to a certain extent, those having high polarity are likely to be more strongly adsorbed than those having low polarity. Since water is a highly polar material, it is much more strongly adsorbed than hydrocarbons, for instance. (Air and Gas Drying with Activated Alumina)

Here are the most common base materials:

A main ingredient in these filters is activated carbon.  We’ve written about it here but when you have something more dangerous than sweaty socks or cat litter smells, we like to dig a bit deeper on its capabilities and limitations.  Activated carbon removes volatile organic compounds (VOCs) and acid gasses, which make them useful against a wide variety of pollutants.  To review, VOCs are compounds that have a high vapor pressure and low water solubility.  They are natural and human-made chemicals that are used and produced in the manufacture of paints, pharmaceuticals, and refrigerants. (EPA.gov)  An acid gas is any gaseous compound which, when dissolved in water, will form an acidic solution.  Many industrial compounds are acid gasses, but did you know that we actually exhale an acid gas?  Carbon dioxide (CO2) is an acid gas, and activated carbon is a method for removing excess CO2 in a space.  

Base Material

Activated Carbon: around $1150 per ton (coconut shell)

What it adsorbs

VOCs, acid gasses

Pros

Cons

Lightweight and large surface area

Adsorption is lowered in humid environments

Fairly inexpensive

Filters exposed to the air eventually “fill up” with CO2 and water

Filters available in many sizes and price points

Not many consumer-grade activated carbon filters are “recycled”; regeneration of the media may or may not be possible depending on the chemicals adsorbed

Activated alumina is another base.  It’s a porous, solid form of aluminum oxide, otherwise known as Al2O3 or alumina. This is the same mineral that makes up the precious gems ruby and sapphire, with impurities being the source of the stones’ bright colors. After activated alumina has been evacuated of existing moisture by heating it, the high surface area and many pores of the material allow for the uptake of water and other molecules through adsorption.  (What is Activated Alumina?) At about 1.5 to 3 times the cost of activated carbon, activated alumina is pricier but very attractive for adsorbing different chemicals.

Base Material

Activated Alumina: around $1800-3600 per ton

What it adsorbs

Water, acidic gasses including CO2, and others

Pros

Cons

Lightweight and large surface area

Smaller range of adsorbed chemicals

High crush strength

Since it has a high affinity for water, moisture can reduce the capacity for adsorbing chemicals

Can also act as a catalyst for some chemical processes

Not many consumer air purifiers use this material 

Zeolites are another base material for chemical adsorbents.  They can be naturally occurring or man-made.  Zeolite has an aluminosilicate framework. Which simply means minerals composed of aluminum, silicon, and oxygen, plus countercations. This framework provides exceptional strength and stability to the honeycomb structure. It also makes it very difficult for the positively charged atoms (cations) to leach from Zeolite. (What is Zeolite?)   Molecular sieves are a type of zeolite that are manufactured to precise frameworks and pore sizes for specific applications.

Base Material

Zeolite: $1600-2200 per ton

What it adsorbs

Water, manufactured zeolite may adsorb VOCs if alumina is removed, molecular sieves can be even more chemical-specific

Pros

Cons

Lightweight and large surface area

Manufactured zeolites can be expensive

Less sensitive to water than activated carbon

Not many consumer air purifiers use this material but Austin Air is one

Higher crush strength than activated carbon

Well suited to low concentrations of VOCs

Molecular sieves can be tailored to the molecules they adsorb

Now that you know some of the base materials, additives (also called “doping”) can enhance capture/filtration of specific contaminants.  

  • Potassium Permanganate is added when sulfurous compounds may be present (such as hydrogen sulfide and sulfur dioxide).   According to this filter company, their molecular sieve impregnated with potassium permanganate oxidizes gaseous pollutants such as hydrogen sulfide, sulfur dioxide, formaldehyde, ethylene, mercaptans, and various aldehydes and alcohols.   Do you know what mercaptans are?  They are the sulfurous, rotten-egg smelling additives that are added to natural gas to help you know that there is a leak.

  • Potassium Iodide:  some AustinAir filters are impregnated with potassium iodide, for increased removal of formaldehyde and ammonia.  They are best used in places like new homes, laboratories, beauty salons, funeral homes, etc. Sources of formaldehyde in homes can be carpets, wood panel, construction materials and furniture upholstery, if not an outright chemical leak. (achooallergy.com)

  • Magnesium Dioxide and Copper Oxide: The air filter company Blueair adds these compounds in their activated carbon filters to remove carbon monoxide, ethylene oxide, and ozone.

So which filter is best for me?  It’s hard to plan for every scenario, but you may take into consideration the following:

  • This article/table by the California Air Resource Board (CARB) in response to the Aliso Canyon gas leak (California, 2015) describes what types of filters are in a number of high-end air purifiers.  The models may have changed slightly but it can give you an idea of how air purifiers can be used to reduce specific chemicals (mercaptans were judged to be the source of most peoples’ health issues).

  • If you live very close to a refinery or manufacturer of specific chemical products, you may want to find out what chemicals they manufacture, store and load, what VOCs/fumes are produced and what air filter is best to remove those VOCs. 

  • If you are interested in a particular type of filter, look for (or ask for) test data that verifies it removes what it’s designed to remove.  In an MIT study of 4 consumer-grade air cleaners, only 2 of them removed the VOCs toluene and limonene effectively.  

  • In the case of radon, activated carbon filters (and the others mentioned above) will not adsorb radon gas, but they will adsorb most of the radon decay products (termed “radon daughters or progeny”), which are actually the source of health issues associated with radon. (Reduction of Radon Working Level by a Room Air Cleaner).   Therefore, activated carbon is not recommended for first-line defense against radon infiltration into your home; a venting system is more appropriate and you should contact a professional if you have radon in your home.

  • In the end, activated carbon is widely used for a reason: it removes a lot of VOCs!  If you don’t have a specific chemical that you’re concerned about, this type of filter is a readily available, broad spectrum weapon against many pollutants.  If your air is particularly dusty, you’ll want to make sure that it also has a HEPA pre-filter to protect the activated carbon from getting clogged with dust.

Photo by Paul Teysen on Unsplash

Do you have a sixth sense? Maybe you need one!

Do you have a sixth sense?  Maybe you need one!

One of the top thermal camera manufacturers, Teledyne FLIR (which stand for “Forward Looking InfraRed”) uses the term “The World’s Sixth Sense” to describe the images they are able to capture with their cameras.  For sure, infrared is a totally different way of viewing the world than what we are used to seeing.  Infrared does not rely on light to capture images, but rather senses heat and generates an image based on relative differences in heat energy.  With an infrared (IR) camera, you could see your cat hiding in the corner of a pitch dark room, which is something “night vision” may or may not pick up, depending on the true ambient light level.   

But beyond avoiding cat attacks, is it useful to the average homeowner?  Oh, very!  There are some gadgets, like a cake pop maker, that have extremely limited use and seem to sit in your junk drawer more than they get used.  A thermal imaging camera doesn’t fall into that category.  Here are some of the varied uses from different industries that might be applied to your own home:

  • Electrical Wiring maintenance: why does that breaker keep tripping?  Are any wall switches or plugs excessively hot?

These are thermal and visual images of a damaged electrical plug (Fluke.com)


  • Security: who or what made that noise outside the window?

  • Animal Health: where is your pet experiencing “hot spots” or possible infection?

  • Lost pets: A pet hamster or lizard can be found much faster with a thermal camera (if it’s still alive).

  • Gas Detection:  when an infrared camera is pointed at a surface having a gas leak, it shows the temperature difference at the point of a leak caused by the pressure variance. (Top Applications of Thermal Imaging Cameras)

  • Water Heater or water line maintenance: a temperature difference can show where corrosion may be progressing on an older tank, just as oil industry professionals can use them to “see” corrosion.

  • Heat loss in common appliances like stoves, refrigerators, dryers and vent lines, etc.

  • Insulation: check for air sealing problems in your attic, walls, basement and crawlspace (check this video on how to “see” duct leaks)

  • Roof inspection: see where water may be leaking through your roof

  • Water leaks: spot the leak inside walls or ceilings without ripping them up. 

  • Pests:  Locate mice, bats, squirrels, termites, hornets and all sorts of warm-bodied creatures in and around your home.  Snakes, unfortunately, will not show up on an infrared camera because their body temperature is too close to their surroundings. The following images are of a termite’s nest (left) and streaks that indicate termite tunnels (right) (Detecting Pests with Thermal Imaging).  The slightly higher moisture content associated with termite tunnels needs a camera with a higher sensitivity.

  • House hunting: take your thermal camera to reveal hidden insulation and wiring problems. 

  • Car maintenance:  see if any components are overheating, and possibly spot leaks, as in brakes, tires, radiators, coolant lines, and exhaust systems.  

  • Gardening: You can possibly spot sprinkler line leaks, and underground gas leaks in your yard.

This video shows a plethora of ways to use a FLIR camera.  Although you may not need to locate enemy forces in your backyard, finding a lost pet, hidden water leaks and missing insulation could be well worth its price. 

Now that your interest is piqued, it’s best to shop around to find the camera that suits your needs within your budget.  Here are some of the main characteristics you’ll want to check out:

Resolution:  This is the number of pixels per inch, or PPI.  The resolution is usually given in two numbers, which are (Width X Height).  Higher resolution numbers give more information in each image, with less grainy edges.  Don’t try to compare the resolution of a thermal camera to a regular digital camera, however, because the role of the thermal camera is more of a sensor to detect heat differences.  Resolution is not incredibly important if you are mainly using your camera to view large areas like walls and windows, but if you are going to use it to troubleshoot electronic components (much smaller area), you’ll want higher resolution. 

Sensitivity: Thermal sensitivity is the ability of a thermal device to distinguish between temperature differences, measured in milliKelvins (mK).  (Thermal Sensitivity – Understanding Millikelvins)  The lower the number, the higher the sensitivity. For example, 150mK sensitivity means each pixel takes readings to the nearest 0.15˚C. 

Sensitivity Range:  The range of temperatures the device can sense, for example from -4 deg F to 248 deg F. 

Battery Life:  Some thermal cameras have an independent, rechargeable battery, while some run off of the battery of the phone they’re attached to.  Either way, you’ll need to make sure you have enough battery life to get the job done!

Photo by Teledyne FLIR

OH, the detergent of the atmosphere, and OH-, the ion that cleanses our homes’ air

OH, the detergent of the atmosphere, and OH-, the ion that cleanses our homes’ air

Did you know that earth’s atmosphere is self-cleaning, to an extent?  We would be A LOT worse off if it wasn’t.

OH, the hydroxyl radical, is the most important oxidizing species in the atmosphere.  In this article, we’re going to discuss how it’s formed in nature, what it does, and how it’s different from the hydroxide ion OH- that is formed in bipolar ionizers.  

You’ve probably heard that there is ozone in the earth’s atmosphere.  The majority of ozone is found in the stratosphere (about 10-25 miles above the earth), shielding us from the sun’s UV light and cosmic radiation.  This is where ozone can be destroyed by molecules that contain chlorine and bromine, such as chlorofluorocarbons (CFCs). (EPA.gov) About 10% of the ozone is found a bit lower, however, in the troposphere (where clouds are formed and planes fly).  In the troposphere, ozone performs a very important function by being a primary ingredient for the production of OH.  Here, UV energy from the sun (mostly in the UV-B range of 290-310nm)(Treatise on GeoChemistry, ch.5.5.9.1 Chemistry of the Hydroxyl Radical (OH) in the Troposphere), breaks down ozone (O3) into O + O2.  Then, in the presence of water vapor (there’s very little water vapor in the stratosphere, so this has to happen in the troposphere), the lone O molecule reacts with H2O to form 2 molecules of OH (hydroxyl radical).  

In chemistry, a radical, also called free radical, is a molecule that contains at least one unpaired electron.  OH is a radical which is highly reactive because of the configuration of electrons in its outermost shell.  Normally, atoms and molecules prefer to have 8 electrons in their outermost shell, making them most stable (called the Octet Rule), but they will compromise and share electrons if necessary.  OH has 7 electrons in its outer shell: 6 electrons are from the O atom and 1 electron from the H atom.  Each electron has a negative charge, but it is balanced by the same number of protons in the nuclei of the atoms, so that the total “charge” of the molecule remains neutral.  Electrons also like to be “paired”, and although each has a negative charge, they have opposing spin directions which causes them to seek to be “paired” with another electron.  The OH molecule constantly seeks one more electron to “pair” with the 7th electron in its outer shell.  OH only survives for nanoseconds after it is formed–because it can immediately steal that missing electron from most of the chemicals found in the troposphere.  This reaction of the OH with other molecules is called oxidation. 

(Oxidation: Despite the name, the presence of oxygen is not a requirement in an oxidation reaction.  The reaction is part of a transfer of electrons between two substances.  Oxidation occurs simultaneously with reduction in a type of chemical reaction called a reduction-oxidation or “redox” reaction.  The oxidized atom loses electrons, while the reduced atom gains electrons.  On earth, oxidation is usually an undesirable reaction.  Oxidation is another name for rust, corrosion, and breakdown of materials around us and in us.  Our bodies produce “anti-oxidants” to prevent breakdown of our cells. ) 

There are limitless reactions that can happen in the atmosphere, but OH reacts primarily with carbon monoxide (40%) to form carbon dioxide. Around 30% of the OH produced is removed from the atmosphere in reactions with organic compounds and 15% reacts with methane (CH4). The remaining 15% reacts with ozone (O3), hydroperoxy radicals (HO2) and hydrogen gas (H2). (Oxidation and OH Radicals)  With its supreme oxidation potential, hydroxyl radicals can react with molecules and chemicals that are otherwise extremely stubborn and resist oxidation. (Hydrogenlink.com)

Since OH is primarily formed with energy from the sun, OH production mainly happens during daylight hours.  The following map is a snapshot of a model showing how OH is generated as sunlight illuminates a rotating earth.  (The Atmosphere: Earth’s Security Blanket)  Because OH is so short-lived, it’s really hard to detect, so the formation or degradation of other chemicals is used to determine how much OH is in the atmosphere at any one time.  For example, this model is generated from the Tropospheric Emissions Spectrometer (TES) equipment on a NASA satellite.  TES measurements of a number of other chemical elements influenced by OH, such as ozone, carbon monoxide and nitrogen dioxide, have enabled scientists to better represent OH in these models.

Did you know that humans also generate OH indoors? (Science Daily)  Indoor air can have higher (but not dangerous) levels of ozone, which reacts with certain oils on our skin. The reaction releases a host of gas phase chemicals containing double bonds that react further in the air with ozone to generate substantial levels of OH radicals.  It’s a very new discovery (2022), which was aided with extensive computer modeling.  This is important to know, because although they are great to have in the upper level of the troposphere,  we don’t want high levels of hydroxyl radicals indoors.  They can damage tissue and frequently initiate chain reactions with other radicals and VOCs, able to produce harmful chemicals like formaldehyde. 

So far we’ve talked solely about the hydroxyl radical, OH.  This chemical formula looks similar to hydroxide ions, OH-, produced by bipolar devices like the Germ Defender, Air Angel and Whole-Home Ionizer, but they are VERY different.  Even though the hydroxyl radical OH has an unpaired electron, that molecule as a whole is considered to have a neutral charge. The hydroxide ion, on the other hand, OH-, does not have any unpaired electrons, and has a negative charge by gaining an extra electron from a hydrogen atom.   OH- is made in bipolar devices when electricity is passed through water vapor in the air, splitting the water vapor into H+ and OH- ions.  A Japanese microbial study also confirms splitting of water vapor into positive (H+) and negative (O2-) ions.  H+ ions consist essentially of the hydrogen proton, which is very small; this positively charged ion does not last long in the air, as it is quickly attracted to and absorbed by larger molecules.  When the OH- ion encounters a microbe, it behaves as a hydroxyl radical, and tends to steal a hydrogen molecule from the surface of the microbe to balance out its negative charge, which damages the surface of the microbe and renders it unable to infect.  When they encounter a positively charged dust particle, OH- ions increase the total weight of the particle and cause it to drop out of the air.  They can also react with VOCs in the air.  Therefore hydroxide ions (OH-) have many of the air cleaning capabilities of hydroxyl radicals, without the harmful effects.  They are also longer-lived, lasting about a minute in the air, so they have time to permeate a room and create a sanitizing effect.  OH- ions are found naturally in larger concentrations near waterfalls, in the atmosphere after lightning, and in forests, causing the air to have that fresh, clean smell.   By releasing OH- ions indoors, bipolar ionization is all about bringing the best of the outdoors, indoors!

Photo by Daniel Olah on Unsplash

Detecting Gas Leaks in the Home

Detecting Gas Leaks in the Home

As we pointed out in our article on Propane and Natural Gas, gas leaks outside the home are very common, especially in older neighborhoods.  Gas leaks in the home are rare, but they sure can be dangerous!  Even if you have no piped gas coming into your home, there is still the risk of radon (a naturally-occuring, cancer-causing gas in the ground), and carbon monoxide from any combustion engines or appliances operating closeby.  Here are some of the detectors and monitors you will want to consider adding to your home.

Radon: Your home is most at risk for radon accumulation if you have a basement or a crawlspace.  It’s a colorless, odorless gas that is heavier than air, so it can sit undetected in these areas.  Here are two sites you can use to find a professional in your area: NRSB.org, CertifiedRadonPros.org, or you can test your home yourself and send the results to a lab for interpretation using this popular home test kit by First Alert, $16.  If you do live in an area with high radon content, you may opt to get a monitor so that you’re always aware of the radon level in your home.  The following monitors will help you stay on top of Radon:

  • AirThings Corentium Home Radon Detector, $99, is portable so that you can occasionally move it to different locations in your home to check levels.  It has a long-term history (for trends) as well as a short-term weekly view; both be displayed at the same time.  Other devices by AirThings offer Radon plus more points of measurements like PM2.5, CO2, etc. 
  • EcoSense’s RD200 RadonEye is $175 and offers bluetooth and an app so that you can monitor radon levels remotely.

Carbon Monoxide (CO) can be easily confused with Carbon Dioxide, but they are very different and you must know why: CO in your home is deadly,  while CO2 is a sign that people are living there!  CO is a byproduct of combustion (incomplete combustion, actually), and when too much of it lingers in your home, your body will start to replace oxygen in your bloodstream with CO.  This can result in tissue damage or death, in a short amount of time. (Mayo Clinic)  For this reason, it’s imperative that all of your gas appliances are vented correctly, that your attached garage has air barriers between the garage and house, that you use a fireplace correctly, and that any running generators are located a safe distance from the house (6 feet or more).   If you have any of these (gas appliances, attached garage, working fireplace or generator), it’s great to have a CO monitor installed that will alert you to the presence of this dangerous gas.  Check out these options, all of which would get installed high on the wall or on the ceiling (as CO is slightly lighter than air and tends to go up in your home):

  • First Alert Smoke and Carbon Monoxide Detector with 9V Battery, $27:  This is a good, old fashioned wall-mounted detector that gets 1 9V battery (included!)  You don’t have to have wifi to monitor it.  Just change the batteries once a year and try the “test” button to make sure all is in working order.
  • This Combination Smoke and CO alarm by X-Sense, $40, is popular because it has a 10-year battery, allowing you to skip those battery changes for a while (focus on changing your air filters on time instead!)
  • A Plug-in Carbon Monoxide Detector by Kidde makes sense if you are renting and aren’t provided with a detector, or don’t want permanent installation but want the peace of mind of your family’s safety.  It has battery backup and does include 2 AA batteries (nice!).  Since plugs are often within reach of children, it has a “tamper-resist” mode to alert if it is accidentally unplugged.  It’s recommended to have at least one of these on each floor of your home.

You may be under the impression that these monitors may also protect you from all invisible gasses, like natural gas and propane, but that’s not the case!   Each gas has a different chemical makeup, and the detectors that find them use different technology.   So, if you have natural gas or propane piped into your home, it’s a great idea to also have the appropriate detector ready to sound the alarm if there’s a leak inside.  Here’s where you need to know which gas you have, because propane is heavier than air, so it tends to hang around at floor level, which can be a danger for children or pets who spend more time on or near  the floor.  Natural gas, on the other hand, is lighter than air so it will float up near the ceiling.  We definitely recommend reading the installation instructions thoroughly for any of these monitors, to make sure you place them correctly!  You’ll also want to know the term “LEL”.  These gasses are combustible, but only in the right mixture of fuel gas and air.  The range of combustible mixture is called the “explosive limits”, of which the least amount of gas mixed with the atmosphere is called the “Lower Explosive Limit” (LEL, which is the lean ratio) and the most amount of gas mixed with the atmosphere is called “Upper Explosive Limit” or UEL, also called the rich ratio.  Since the air is a home usually just has traces of such gasses when a leak forms, a detector may only use the LEL, and show “percentage of LEL”.  That means the alarm should go off way before the concentration of fuel gas is strong enough to ignite, like at 5 percent of LEL.  

  • Nighthawk Carbon Monoxide & Combustible Gas Detector, $44, by Kidde does double duty, and comes with a 6 foot extension cord so that it can be properly positioned to detect the correct gas.  It’s plug-in and comes with a 9V battery for backup.  The CO levels read in ppm, and the gas detector simply sounds the alarm with visible “GAS” on the LCD readout.
  • EG’s Natural Gas Detector and Propane Detector, $32, has a clear, easily read display that reads in % of LEL, where the alarm sounds at 5% LEL and you can watch the levels go up or down.  

Since I live in the country, I have a propane tank that is periodically refilled by a propane company.  Recently, while thinking about getting the gas tank in my backyard refilled, I had a thought: what if my piping is leaking in the yard?   How would I know?  Of course, I could call the propane company to come out and “sniff” the connections and ground, but if they are not quickly available, or I just want to make sure I connected my grill correctly to a small propane bottle, it’s not an ideal option.  Here are the portable detectors I thought would be especially good to have for this purpose, and while professionals use instruments that cost hundreds, serviceable home use detectors can be significantly less.

  • TOPTES PT199, $17, is suitable for LPG, methane, ethane, propane, butane, natural gas, coal gas, gas fuel, sewer gas, liquefied natural gas, etc.  Since it’s shaped like a pen, it’s easy to move it around in tight spaces to find leaks (like the back of your stove or at a wall valve).  The alarm will go off at 5% LEL and stay on until the gas clears to a lower level, and it also has an LCD readout of PPM (parts per million). 
  • You can get a professional gas detector at a reasonable price now too:  Klein Tools ET120 Gas Leak Detector, Combustible Gas Leak Tester, $102, has an 18” gooseneck that allows you to hold the instrument with one hand and move the “sniffer” around to probe for a leak.  It will detect methane, propane and other combustible gases at concentrations as low as 50 ppm, but could be used at lower sensitivity to detect concentrations as high as 10,000 ppm.
  • For added functionability, the Gas Leak Detector, Protmex HT609 Natural Gas Detector has temperature and humidity and is suitable for detecting LPG, methane, ethane, propane, butane, natural gas, coal gas, gas fuel, sewer gas and liquefied natural gas. The backlit screen aids in low light.   It has low, medium and high sensitivity selection modes.

Photo by Sugarman Joe on Unsplash

All about Propane and Natural Gas

All about Propane and Natural Gas

I’ve lived in the city, and I live (now) in the country.  In both places, there was a gas line coming into the house that could be used for gas appliances like my stove, dryer, water heater, furnace, etc.  I, like most people, don’t give the gas or these pipes a thought beyond paying the monthly bill, until there’s a leak or a catastrophe.   How can you keep from being on the 6 o’clock news?  By being aware of how these fuel gasses are supplied, and what to look out for!  

I first encountered the difference between natural gas and propane when selecting appliances. You need to know what gas comes in to your home in order to select the right appliance!  Here’s a general rule: if your gas comes from a city source (pipe coming out of the ground with a meter on it), it’s usually Natural Gas.  If you have a tank that needs to be refilled periodically, it’s usually Propane.   Chemically, natural gas occurs “naturally” in the earth, but must be cleaned.  During the cleaning process, propane is extracted.  Propane provides more than twice the heating value of natural gas (2,500 BTUs vs. 1,000 BTUs) per cubic foot, so natural gas costs at least a third less than propane.  Although some prefer natural gas to propane for grilling, it’s difficult to tell the difference between these two gasses.  They are both colorless and odorless, so utilities companies add a odorant (a chemical called mercaptan) so that leaks are easily detected.  Mercaptan is toxic and flammable, but at the levels that it is used to odorize gas, it’s no more harmful than the natural gas or propane.  (The nose can detect mercaptan at a 1.6 parts per billion, and the typical range of odorants in natural gas ranges from 0-10 parts per million). (GPL Odorizers)  Here are some facts about these gasses:

Propane:

  • Is also called “bottled gas”, it’s pressurized between 100-200 psi and becomes a liquid at this pressure (called liquified petroleum gas, or LPG, or LP for short).
  • Like natural gas, propane is one of the cleanest burning fossil fuel products, releasing negligible amounts of emissions. When burned, it leaves no ash and produces practically no sulfur oxides, particulate matter, or mercury emissions. On the other hand, burning propane produces carbon dioxide, a cause of global climate change, and it also emits nitrogen oxides which are key ingredients in the formation of urban smog and ozone. (FactsAboutPropane.pdf)
  • Is used for powering trucks and forklifts operating inside warehouses, so that air quality is preserved for workers.

Natural Gas:

  • Is most often compressed or liquified for transport, however the pressure required to do so is much higher than propane, so transportation and storage tanks are heavier.  
  • Is available in some communities and is delivered by pipeline to homes.  Unless an emergency or planned work causes the pipes to be shut down, it’s always available. 
  • Is mainly methane—a strong greenhouse gas.  The U.S. Energy Information Administration (EIA) estimates that in 2021, U.S. CO2 emissions from natural gas combustion for energy accounted for about 34% of total U.S. energy-related CO2 emissions. (eia.gov)

Many appliances can use either natural gas or propane, but the combustion orifices must be changed to accommodate one or the other.  You can purchase the conversion kit yourself, but due to the hazards of incorrectly installed parts, a licensed professional (plumber or appliance repair technician) should do the conversion. (bobvila.com)  For this reason, it’s often better to purchase the right appliance for your gas from the start, even if it is listed at a slightly higher price than appliances configured for the other gas (a lesson I learned the hard way!).  For example, the burners for gas dryers are often deep inside the appliance, requiring the removal of many parts.  

What’s that flying saucer-looking thing?

Both natural gas and propane are stored at higher pressures than the appliances use, so the pressure must be reduced before it comes into the appliance, and most often before it comes into your home.  The flying-saucer looking gadget is a “regulator” which reduces the pressure.  High -pressure gas comes into the underside of the circular disk, and is slowly released into the downstream side, governed by a diaphragm inside the disk.  The size of the diaphragm sets the correct pressure for home use.  Because gas can have impurities like rust, condensation, and dirt in it, gas pressure regulators are supposed to be changed out every five years or so.  They are designed to shut the gas flow off if the unit fails, which is good for your home.  Each regulator is typically stamped by the manufacturer with its date of production. (eatingexpired.com) Here’s a really interesting video showing how the regulator works.  Gas pressure regulators are designed to be installed close to the end use of the gas (ie, right outside your home or next to your gas barbeque grill).  Here’s something else I did not know: if you live in an area that gets a lot of snow, make sure to gently clear it off your gas meter/regulator, so that the vent on the regulator does not get blocked.  This is the reason that regulators should not be painted–you don’t want to block that vent. 

Source: The Dallas Morning News

Outside, the gas meter, shutoff valve and regulator are usually located next to the home, but occasionally they are located closer to the street (see above photo of a meter in a parking lot).  If this is the case, be proactive and ask your service provider to install a guard around it!  Collisions and damage by vehicles happens more often than you think.  

Because they come into the home under pressure, both natural gas and propane have a risk of leaks from piping or appliances.  If a new gas appliance has been installed recently in your home, or any maintenance has been done on your gas pipes, be especially vigilant of the smell of gas or  any of the following signs.  One exception is if you have a propane tank, and the gas gets low in the tank.  In this case, the smell is actually designed to let you know it’s time for a refill:  propane gas contains a few chemicals. One of these chemicals condenses out and collects as a liquid in the bottom. When the tank is low, the reduced pressure causes the odorant to evaporate and makes a strong gas odor.  Normally, gas companies recommend not letting your tank go below 20%.  If it’s refilled at that point, the gas smell should dissipate within about 2 hours.  (Wheat Energy Services)  If the gas is allowed to run out completely, a pressure test is required by the National Fuel Gas code, because joint compound used on the pipes may contract and cause leaks.  

Source: Constellation.com

If any of these are apparent, start investigating immediately. If the smell is strong, leave the area immediately. If the gas smell is faint, you may wish to try to locate the source by smell and a bubble test. Do not attempt a repair. (Five Common Home Gas Leaks You Should Know About)

  • If inside, turn off any stove or oven burners that are on; open windows and doors

  • Leave the area; go to the home of a friend or neighbor a safe distance away (Staying in your home or near the leak to make a cellphone call could spark an explosion)

  • Call a licensed plumber, your gas company, or 911 to report the smell (first responders often arrive before gas company technicians)

  • Do not turn any electrical switches on or off

  • Do not use any kind of telephone, garage door opener, doorbell or even a flashlight

  • Do not smoke, light a match or lighter

  • Do not stop or start a nearby vehicle or piece of machinery

  • Do not attempt to shut off the natural gas valve

Of course, you know the rotten eggs smell.  If there are no rotten eggs around, suspect a leak!  If you’ve just connected a propane tank to your gas grill, make sure to turn off the valve and check hose connections, let air circulate in and around the grill for five to ten minutes, and try again. Hissing sounds are a sure sign of gas escaping, so try to turn off the supply (by hand, without using tools) if possible.  You can also use a mixture of water with a few drops of dish soap in a spray bottle to find the leaky connection: simply spray it on the connection, crack open the gas valve, and look for bubbles. 

I used to think that natural gas leaks were rare.  However, since the supply lines are buried, water eats away at the pipes and shifts in the ground from drought, construction and earthquakes can cause cracks and leaks as well.  Apparently there are gas leaks everywhere, as this article points out, but most gas companies only fix those that are large or close to structures.  A leak can show up as air bubbles coming up through a mud puddle, or it can kill houseplants and outdoor plants.  The presence of natural gas prevents a plant’s roots from absorbing oxygen and can lead to wilting. Natural gas leaks can also cause smaller-than-normal leaves on trees, wilted plants and yellowish patches of grass. (Constellation.com)   One customer in northern California planted successive blueberry bushes that died each time he planted them, without knowing there was a gas leak on the edge of his property. (inewsource.org)

Although they may be signs of other types of illness, headaches, dizziness, fatigue and nausea are all symptoms of natural gas exposure.  If it is a gas leak, it will probably affect most if not all of the people in the home.  It’s very dangerous, because eventually the gas will cause suffocation and death!  If your family is experiencing these symptoms, leave the home and call 911. 

Finally, if your monthly gas bill is unusually high without the presence of very cold weather, suspect a leak and let your service company know as soon as possible.  

Even if your gas meter has not been struck by a vehicle, tool or tree, the meter or associated piping could still be leaking.  Dan Thomsen, whose company Building Doctors focuses on energy efficiency, said on about 25 percent of the homes he surveys, he finds a gas leak somewhere. (inewsource.org)  Here are some of the most common places that natural gas or propane can leak directly outside, or inside the home (Five Common Home Gas Leaks You Should Know About):

  • Gas riser – The gas riser is the pipe that emerges from the ground to connect the gas supply to your gas meter.

  • Gas regulator – the disc-shaped device near your gas meter that controls gas pressure going into your home.

  • Fireplace valve – the valve you turn with a removable key to turn on and off the flow of gas to a gas fireplace.

  • Pilot lights – these ignite the gas to produce a flame when you want to cook, heat your home or get hot water.

  • Joints and fittings – any visible joint or fitting that may not be sufficiently tightened.

Natural gas and propane make living easy and very convenient; after all, many appliances that run on gas will still work when the electricity is out!  However, supply and use of these gasses requires care and vigilance.  To help ensure that no leaks go undetected, you can also purchase and install a natural gas/propane monitor for your home (they are NOT the same as carbon monoxide monitors).  These monitors should be installed near the appliances that use the gas; however, propane is heavier than air so the monitor should be mounted near the floor, while natural gas is lighter than air so the monitor should be mounted at a height above the door and window openings. Change the battery(s) whenever you change your smoke alarm batteries, and you should be good to go!

Photo by Andrea Davis on Unsplash

Some natural methods to avoid getting the Flu

Some natural methods to avoid getting the Flu

Another virus has dominated the headlines this fall and winter 2022, an old nemesis that changes disguises (varieties) every year to trip us up–Influenza.  Of course, you could always take a gamble that the Flu vaccines offered in clinics will match the real cocktail of virus in the air, but there are a lot of other ways to reduce your chances of contracting this illness that don’t involve needles.  Let’s get started!

Yes, masks, social distancing and hand-washing are still part of the solution.  Some health advisory authorities, like the California Department of Public Health, are basing mask recommendations against flu on COVID-19 illness risk in your area, because flu and RSV (Respiratory Syncytial Virus) spread in similar ways to COVID-19.  The CDC has a searchable risk database by county here,  Infants and young children, as well as older adults and those with chronic medical conditions, are most at risk for RSV, which can cause bronchiolitis (an inflammation of the small airways in the lung) and pneumonia. (CDC.gov)  For more on masks, check out our article here.

Avoid air pollution.  It doesn’t seem like crisp winter air should come with air pollution flags, but unfortunately winter sometimes hosts the worst conditions of the year.  There are several different types of a phenomenon called “inversions” (which are well-explained in this video from the University of Illinois Extension), but they all involve a warmer layer of air above a cooler layer of air, restricting air movement and causing pollutants to be trapped near the earth’s surface.  That bad air quality will likely contain elevated levels of fine particulates like PM2.5 and PM10, carbon monoxide (CO) and sulfur dioxide (SO2), which were all shown to increase the risk of influenza-like illness (ILI) in Jinan, China (The short-term effects of air pollutants on influenza-like illness in Jinan, China, 2019).  If your area is known to have moderate to bad air quality days, keep an eye on it and adjust your plans accordingly!  Airnow.gov, breezometer.com and local news stations can all help you stay informed and healthier.

These tips can help you stay healthy against a plethora of diseases (dispatchhealth.com):

  • Stay active: get out and rake leaves, or take a brisk walk around the neighborhood or around your local mall if the weather is inclement.  Routine exercise is a simple and smart way to bolster your immune system and improve your overall health.

  • Rest well; try to get 7-9 hours of sleep every night, because sleep is critical to a well-functioning immune system.  If you have difficulty getting to sleep, reduce your caffeine intake after noon, don’t use digital devices in bed, and try a melatonin supplement.

  • Take your vitamins–in your food!  Foods that are rich in vitamins A, C, D, E, zinc and selenium naturally boost your immune system, while foods that have lots of added sugar, salt, and fried and highly processed foods may do the opposite (avoid them).  (Healthline.com)

  • Consider herbal supplements (7 Natural Remedies for Preventing the Flu):

    • Echinacea.  As shown in a 2015 study in the Czech Republic, Echinaforce Hotdrink is as effective as oseltamivir (Tamiflu Oral) in early treatment of confirmed influenza virus infections.  If this particular drink is not readily available, you can take tablets containing 6.78 milligrams of echinacea extract two to three times a day, having 900 milligrams of Echinacea root tincture daily or five to six cups of echinacea tea on the first day of symptoms, and then 1 cup a day thereafter. 

    • Oregano oil has powerful antiviral effects, too: you can take 500mg twice daily to help reduce the effects of a cold, as well as fight it off.

    • Essential oils used in a diffuser can help with congestion and headaches, as well as preventing airborne viruses from being able to infect you.   Clove,  peppermint and eucalyptus are some of the most popular.  According to a 2021 review, essential oils from Eucalyptus are recognized for their broad spectrum of action, such as antibacterial, antifungal, antiviral, anti-inflammatory, anti-immunomodulatory (against diseases that suppress the immune system), antioxidant, and wound healing properties.  One study that was reviewed showed that when the pure eucalyptus essential oil was actively diffused with a nebulizer for 15 seconds (oil concentration: 125 μg/L of air in the chamber), Influenza Virus-A was completely inactivated in the air.

And of course–keep your bipolar ionizers running!   The Germ Defender, Air Angel and Whole Home Polar Ionizer produce positive and negative ions that can disable viruses and bacteria on surfaces and in the air from across the room.  We have posted links to some of the scientific studies on this technology here.   We’re hoping that this winter you can use these natural tips to make more good memories with family and friends, and less memories of illness, missed work and school from the flu!

Photo by Suhyeon Choi on Unsplash

The unintended consequences of turning down the thermostat this winter

The unintended consequences of turning down the thermostat this winter

According to the Energy Information Administration and their Winter Fuels Outlook report, it will cost 27 percent to 28 percent more than 2021/2022 to heat your home with oil or gas.  If you heat with electricity, prices may rise by as much as 10 percent, because much of our electricity is generated from oil and gas. (Newsweek.com)

When you have a fixed or unstable budget, the decision to lower or turn off heat during the winter is not easy.  The other components of our budgets–food, housing, transportation and medical care–aren’t as flexible as those extra blankets, mittens and hats, so down the thermostat goes.  This is where what you don’t know might hurt you.

It’s not only the air temperature that changes when the heat source turns off.  Air holds a certain amount of water vapor, also called humidity, and warmer air can hold more water vapor than cooler air.  When the air cools, water vapor in the air will tend to condense on any surface that is lower than the dewpoint temperature.  That’s why you see condensation on windows and around door frames in winter: these are the points that tend to conduct cold temperatures from the outside, and moisture from the air is condensing on them.  Persistent moisture is mold-feeding moisture, and before you know it, there is a mold problem.  Even worse is that mold could be forming in places you can’t readily see, like inside walls, attics and basements, because the air temperature has dropped and cooler air just can’t hold the moisture of warmer air.   Cooler air can easily reach humidity levels of 80% or more, giving that “damp” feeling and over time, exposing the home to mold growth.  

There is a myth that when a room is not being used, it’s best to turn off heat (close registers) and close it off from the rest of the house (close the door) to save money.  If this is done without any ventilation or air circulation, it’s also a recipe for mold, because without air circulation, water vapor in stagnant air will be absorbed by furnishings and allow mold to take root.  If you need to limit heating in your home, try to leave doors to unused rooms at least cracked and leave a fan running in the room, because dynamic airflow limits moisture ingress due to evaporation. For more on finding and fixing areas prone to mold in the winter, check out our article.

If high humidity is not a problem, low humidity might be.  Low humidity can damage all kinds of decor in your house by shrinking and drying, from wood flooring, wallpaper, and furniture to fine instruments like pianos and guitars and artwork.

Then, there’s your body.  Stress due to cold is a real problem for the elderly and those with pre-existing medical conditions like asthma or heart disease.  It also makes people more likely to use alternate heating methods that could be unsafe.  Small room heaters are often known to tip over and cause fires, and electric blankets can actually cause burns.   Falling asleep on a bunched-up blanket is a common cause of burns, according to Bell, a plastic surgeon who treats many burn patients. He explains that when a hot blanket rests on the same body part for an extended period, the skin can burn. “These burn accidents usually happen because someone has fallen asleep on a bunched-up area of the blanket,” he says.  Unfortunately, people with diabetes are more vulnerable to burns from electric blankets because their condition makes them less sensitive to heat. “Electric blankets are also not recommended for infants, young children or anyone who is paralyzed or incapable of understanding how to safely operate them,” says Bell.  People with urinary incontinence also should not use electric blankets because wetness and electricity don't mix. (ul.com)  If you do use an electric blanket, follow all the safety guidelines of UL Solutions (previously Underwriters Laboratories) so that you don’t become one of these statistics!

When home heating costs rise, air quality can also worsen due to particulates in the air.  In Europe, the impacts of inflation and fuel scarcity due to the Russian-Ukrainian war is particularly hard on middle and lower income families, and they turn to alternative sources like burning wood, coal and even garbage in indoor stoves.  These stoves impact indoor and outdoor air quality.  Indoors, reloading a stove that is already burning fills the air with particulates, and combustion gasses can leak out of improperly-sealed doors and exhaust pipe fittings, exposing inhabitants to dangerous levels of carbon monoxide and particulates.   Outdoors, European cities that typically have poor air quality during the winter may have even worse this winter. A recent study from Greece showed that wood burning was responsible for almost half of the cancer-causing air pollution in Athens and a new study from New Zealand has showed an increase in serious respiratory infections when wood smoke built up in an area. (TheGuardian.com)  If you live in one of these areas, it doesn’t matter whether you are the one burning wood–you will still be breathing its effects. 

If you feel financial pressure to lower the thermostat this winter, here are some practical ways to keep the air warmer and less humid in your home (Prof Cath Noakes from the University of Leeds):

  • Move seating away from cold windows
  • Use thick curtains at night, but allow the sun to come in during the day
  • Ensure radiators or ventilation registers are not covered or blocked by furniture
  • Ventilate using high-level windows can reduce cold drafts
  • Ventilating after a shower or when cooking can prevent moisture buildup which can lead to damp and mold.

It’s sometimes harder to detect high humidity in the winter because of the lower temperatures, so don’t take a risk–keep one or more humidity sensors in your home for monitoring it.  Our bipolar ionizers like the Germ Defender, Air Angel or Whole Home Polar Ionizer actually deter mold even if humidity temporarily goes too high, making them great investments for all seasons. 

Finally, if you have a warm home, sharing it with your elderly, disabled or disadvantaged friends for a meal or a few hours could make a huge impact in their lives.  Helping them to purchase safe heating appliances and understand how to keep humidity at manageable levels also will help them to live healthier.  Warmth is not always about containment, but allowing it to radiate to others. 

Photo by Will on Unsplash

The Science of Dust

The Science of Dust

Dust.  It’s not just harmless dirt that builds up on fan blades until we can’t turn the fan on any more for fear of clumps flying everywhere.  It’s a combination of skin cells, pollen, dead bugs, bacteria, soil, dander and various fibers. (iaq.works)  Dust also carries SVOCs, or semivolatile organic compounds, that are emitted from materials and products like plasticizers from plastic products and flame retardants from upholstered furniture. "Unlike VOCs, that you can smell and that warn you of their presence, SVOCs are called stealth chemicals. They are odorless, ride on dust, and are insidious underminers of our health, "  says Marilee Nelson, co-founder of Branch Basics.  (wellandgood.com)  Then, there are the dust mites, which are microscopic organisms that feed on dust.  All in all, dust is even more disgusting than it looks!

My all-time least favorite chore as a kid was dusting.  It didn’t require a load of physical exertion, so it must have been the sheer tediousness of moving the same stuff to dust around it week after week.   We used lemon-scented Endust in the 70’s and 80’s, which actually should have made me a little giddy (it had odorless mineral spirits and 1,1,1-trichloroethane with a propellant blend of butane and isopropane, of which inhaled 1,1,1-trichloroethane acts as a central nervous system depressant and can cause effects similar to those of intoxication)...yikes!  (chemeurope.com)  Why haven’t we invented a way to keep the dust off permanently?    

I guessed the answer had something to do with static electricity.  Apparently, the “mechanism of particle adhesion” works against us in allowing dust to settle on furniture and objects in our homes.  According to Keyence.com, producer of static eliminators and ionizers, “When dust is carried on air currents generated by air conditioning and similar devices, the dust takes on a positive or negative static electric charge due to contact with various objects. Dust that has a positive electric charge will be attracted to objects that have a negative electric charge, and vice versa. The greater the amount of dust in the air, the larger the amount of dust that clings to objects within the room.

Also, if sources of dust (mainly people and clothing) are electrically charged, the dust that is generated from these sources is electrically charged as well. This attractive force generated by static electricity is known as “Coulomb force.” 

The solution to particle adhesion is to eliminate the static electricity from the object’s surface and from the air up to a few millimeters from the object’s surface.  This is easy to do using a static eliminator, which charges the air with ions.  This removes the static charge from the particles and prevents them from reattaching.  There are also lots of “anti-static” polishes on the market, however, their toxic ingredients may or may not be disclosed.

Also, the answer to dusting less also has to do with humidity.  Humidity does not reduce the literal amount of dust in your home; instead, humidity causes dust particles to adhere to one another, making them too heavy to travel through the air. Thus, dust particles are still present in your home, but the ideal humidity level makes dust particles quicker to settle and easier to clean.  

In addition, when the indoor humidity level is between 40 and 60%, dust mites are unable to thrive and spread. Dust mites prefer extremely humid atmospheres because they absorb moisture from the air in order to survive.

So, apparently there are two things that tend to keep dust (and dust mites) down to manageable levels: ionized air and the right humidity.  We fully endorse both!  Most of the HypoAir air purifying products include a bi-polar ionizer, which has the capability to kill germs at a distance by attacking them with the same ions that control the dust.  We also like to talk about keeping your home at the right humidity to fight mold growth and germ dispersion.  It’s a win-win!

With ionization and the right humidity in place, getting rid of the remaining dust should be manageable.  Cleaning experts give these tips to get the most out of your cleaning tools and time:

Get rid of feather dusters and dry cotton cloths, because they are simply flinging the dust into the air.  Also, don’t use damp cotton cloths, because they leave streaks of dust behind.  The best tool is a microfiber cloth (again, microfiber is better at holding a slight “charge” to attract dust) and your favorite all-purpose cleaner, like one of the following: 

  • HypoAir’s TotalClean, a non-toxic multi-purpose cleaner you can use throughout your home

  • Force of Nature, a non-toxic hypochlorous cleaner that can sanitize or disinfect surfaces depending on the concentration

  • Branch Basics, a non-toxic plant and mineral based cleaner

For wood surfaces, you can add some drops of a non-damaging essential oil to the spray bottle, so that wood surfaces don’t dry out and retain a nice shine. Orange oil is great for this purpose.  Since many ingredients are not disclosed on commercial dusting sprays, it may be tempting to make your own DIY dusting spray, and there are lots of recipes on the internet.  However, look at the ingredients closely, because vinegar is a key ingredient in many recipes, and it can damage many surfaces in your home.  

If an area has more dust than usual, or to avoid switching cleaning cloths too often, you can use your HEPA vacuum cleaner with a soft head attachment to “pre-dust”.  Of course, standalone HEPA filters running part-time or full-time will cut down on a lot of dust.  

Keeping the dust down in your home can lead to less allergies, sickness, and over time, better overall health because of the way ultra-fine particles can penetrate our lungs and migrate to different areas in the body.  With the right conditions (ionized air and the right humidity) and tools (microfiber cloths, non-toxic cleaners and a HEPA vacuum), regular dusting can be manageable, kind of like flossing your teeth.  Reveal the beautiful side of your home and get dusting!

Photo by Austin Ban on Unsplash

Cleaning vs. Sanitizing vs. Disinfecting: There is a Difference

Cleaning vs. Sanitizing vs. Disinfecting: There is a Difference

Hold on, we’re going to break some common misconceptions in this post!

Misconception #1: What room do you think is the dirtiest (germiest) part of your house?  

Most people said that it is the bathroom (in a study of 22 families), but in reality, it is THE KITCHEN.  Coliform bacteria –indicating possible fecal contamination—was found on: (from the Association of Home Appliance Manufacturers)

More than 75% of dish sponges and rags

45% of kitchen sinks

32% of countertops

18% of cutting boards

Overall, the 10 germiest items in the household, listed in order, are:

  • Dish sponges/rags

  • Kitchen sink

  • Toothbrush holders

  • Pet bowls

  • Coffee reservoir:  (NSF’s 2011 International Household Germ Study found yeast and mold present in 31% of households studied. In half of those, it was found in the coffee reservoir of the coffeemaker.)

  • Bathroom faucet handle

  • Pet toys

  • Countertops

  • Stove knobs: Staphyloccus aureus (staph), a common and potentially harmful type of bacteria,was found on stove knobs in 5% of the homes where the bacteria was discovered.

  • Cutting boards

Misconception #2: In the US, we tend to use the words cleaning, sanitizing and disinfecting interchangeably, but they really are not the same!  

Many people use vinegar to clean because it is a “natural” non-toxic product, but it does not sanitize.  “It’s a misconception that if you’re using vinegar to clean, you’re sanitizing,” says Mindy Costello, a registered environmental health sanitarian and the National Science Foundation’s (NSF) consumer product certification specialist. “Cleaning is just removing the soil. In sanitizing, you’re killing the microorganisms (bacteria, viruses and fungi).” If you want to reduce your risk of getting sick, sanitizing is the way to go. (Association of Home Appliance Manufacturers)  Sanitization reduces contamination or bacteria to a safe level.

Now, if you really want to go all-out, disinfection kills everything on a particular surface, according to Travers Anderson, R&D Group Manager at Clorox.  

Now that you know what cleaning, sanitizing and disinfecting are, where and when should they be used?

According to Mr. Anderson at Clorox, sanitizing is best for surfaces that don't typically come into contact with hazardous bacteria, or those that shouldn't come into contact with powerful chemicals: Think cooking tools and food prep surfaces or toys that children come into close contact with (or put into their mouths). Disinfecting is for the big messes, particularly those involving bodily fluids, blood, and the like. In household settings, you'd disinfect a toilet or sinks. (realsimple.com)  

Sanitizing can be done with a cleaning product, or with appliances that have this built-in feature, like a dishwasher or washing machine.  These appliances do so with high heat during the cycle.  It’s important to use these cycles to sanitize your laundry and dishes regularly, especially clothes and dishes worn and used by people who are ill. Sanitize high-contact surfaces regularly, and do dishes as soon as possible, as bacteria begins to grow after about two hours on soiled dishes left at room temperature according to Ms. Costello of the NSF.

Dishwashers and washing machines are tested by the NSF to ensure their sanitizing cycles are faultless.  Clothes washers must show that the sanitizing cycle removes 99.9% of microorganisms from laundry and dishwashers must show a reduction of 99.999%. During testing, three common organisms – staphyloccus aureus, klebsiella pneumoniae, and pseudomonas aeruginosa – are added to the loads of dishes or laundry. The level of bacteria is tested afterward. The water in dishwashers that earn the NSF mark for sanitization must reach 150 degrees Fahrenheit during the final rinse and stay at or above that temperature long enough to achieve the 99.999 % reduction.

The sanitizing cycle doesn’t need to be used on every load of clothing, however, because the high heat can cause colors to fade and fibers to wear over time.  It’s a good idea to use it when laundering clothing or bedding from someone who’s sick, or when washing sweaty clothing, or when towels or clothing smell musty–indicating mold growth.  (realsimple.com)

To sanitize sponges and dishrags, heat them in the microwave for two minutes while they’re wet.  

As for cleaning products, we are all for non-toxic ones.  TotalClean is an all-purpose cleaner and deodorizer that is safe to use in all areas of the home, from the kitchen to the bathroom to your childrens’ toys.  It hasn’t been tested according to the EPA’s requirements for sanitizing and disinfection yet, so we recommend it for cleaning purposes and will advise when these tests are completed!  

Bleach is a sanitizer at low concentrations and a disinfectant at higher concentrations.  However, bleach has toxic VOCs and we don’t recommend it.  Instead, try hypochlorous acid.  Even though it sounds toxic and it’s related to bleach (hypochlorite), hypochlorous is much safer as well as being a far superior disinfectant to bleach.  One of the most fundamental reasons for this is its pH. Hypochlorous acid exists at a near-neutral pH (5-7). Bleach resides at a highly-alkaline pH (8-13). The germ-killing properties of bleach are derived from the presence of hypochlorous acid. However, because of its high pH, the majority of the hypochlorous acid present in bleach ends up getting converted to hypochlorite, which is a less effective disinfectant.  (hypsosource.com)

Here’s something else you may not know: the dirtier the surface is, the less effective the disinfectant is. (sfgate.com)  Switching from using bleach to hypochlorous as a sanitizer is not complicated at all, but it may mean you need to adjust some of your cleaning protocols. For example, cleaning the area with regular soap and water first to remove the bulk of organic material present allows your sanitizer (hypochlorous acid) to disinfect much more effectively. Otherwise, the chlorine in the hypochlorous gets used up trying to break down the organic matter, instead of focusing on killing the more resilient pathogens. (hypsosource.com)  

If you aren’t convinced, check out the following table.   It shows that hypochlorous needs less concentration (parts per million or ppm) and less contact time than bleach to do the same or better job at disinfection!

Source: hypsosource.com

Now that you know about hypochlorous acid, check out the following disinfectants::

  • Force of Nature is a multi-purpose cleaner & EPA registered disinfectant that kills 99.9% of germs. It’s even EPA approved for use against Covid-19.  Best of all, you can easily make more cleaner at home with their small countertop appliance plus a capsule of salt, water & vinegar.  No bulky plastic bottles to tote home or try to recycle!  Force of Nature is hypochlorous acid, a powerful disinfectant.

  • Clean Republic’s All Purpose Cleaner is also hypochlorous acid, and it comes pre-mixed in 3 small spray bottles for $15.  The size of the bottles mean that you can carry them in your car or stash them in small spaces to use whenever and wherever you need to!  

  • Cleanwell Botanical Disinfectant Cleaning Wipes are also a great on-the-go disinfector.  They use Thymol, which is a component of botanical thyme oil that was approved in 2020 by the EPA as an effective disinfectant against SARS-CoV2, the virus that causes COVID-19. It also disinfects bacteria and viruses including MRSA, Salmonella, H1N1, Influenza A, Staph, E-Coli, Norovirus, Rhinovirus, and more. The thyme scent is very pleasant.

  • The Honest Company Disinfecting Spray uses hydrogen peroxide to clean, disinfect, and deodorize while meeting EPA’s criteria for products effective against SARS-CoV-2 and a laundry list of other germs. If you’re familiar with hydrogen peroxide, it’s one of our favorite non-toxic cleaners that you can safely use on food surfaces and children’s items.  However, it can be a bit harsh, etching marble and granite, it shouldn’t be mixed with vinegar, and can discolor fabrics.

Disinfecting shouldn’t require heavy gloves, eye protection and a respirator! Knowledge is power, and you CAN disinfect without smelly, toxic chemicals.  It’s just a matter of changing your mindset and your tools (cleaning products), so that it’s easy to do.  Breathe easier knowing that your home is clean AND disinfected, the non-toxic way! 

Photo by Kelly Sikkema on Unsplash

The Consequences of Flushing the Toilet with the Lid Open

The Consequences of Flushing the Toilet with the Lid Open

Spoiler alert: the consequences are not pretty.  This calming (Australian?) voice and wonderful orchestral soundtrack in this December 2022 video belie the serious and gross subject: how much germs and fecal matter shoot out of a toilet when you flush it.  The University of Colorado Boulder researchers who produced the video found that airborne particles ejected from the toilet traveled at speeds of up to 6.6 feet per second (that’s a very fast walk at 4.5 miles per hour) and reached 4.9 feet above the toilet and smaller particles measuring less than 5 microns hung in the air for more than a minute. 

It’s not a new subject (the subject was first revealed in a 1975 study, and another 2013 study warned about the toilet plume) but the video using UV light brings it to the forefront of our minds and hopefully, engages us in healthier bathroom habits such as closing the lid and sanitizing surfaces more frequently in our own private bathrooms. 

So what should we do?

Ever since Febreeze informed us that odor can be caused by bacteria, bathroom odors are particularly noxious, as we know that the substances that cause it definitely have dangerous bacteria.   There are different ways of removing/preventing bathroom odor (and thus bacteria).  In light of the knowledge of toilet plumes, toilet sprays like PooPourri, although emitting a pleasant odor, seem to be one of the least effective because while spraying on the bowl creates a scented vapor, it does not prevent the emission of bacteria and particulates into the atmosphere.  Other products on the market that have been invented to remove toilet odors at the source, using hardware to pull vapors from the bowl area.  These include:

  • Potty Sniffer Toilet Odor Ventilation System ($271 and up): fan directs air from bowl into a nearby vent.  This is the preferred place to direct these gasses.  However, installation is a bit more complicated as connecting to a vent may require to drill into drywall or cabinets, which needs work to conceal. 
  • JonEvac  Toilet Seat Ventilation System ($300): Replaces your toilet seat with a special seat that has ventilation channels on the underside.  Fan needs to be plugged into a regular wall outlet and activated carbon filter ($80) needs to be replaced every 1-2 years.
  • Splashblocker was invented primarily for hospital settings.  It is a portable “shield” to protect healthcare workers from disease and hazardous drugs (like chemotherapy) that are excreted in patients’ waste, which are aerosolized whenever the toilet is flushed. Previous to this invention, caregivers often placed plastic-backed absorbent pads (such as are used in keeping beds dry from incontinence) over the toilet before flushing, but the cost of these adds up and can easily be sucked down the toilet, creating big plumbing issues.
  • According to this 2020 study, a redesigned toilet seat that can spray a “liquid curtain” of water or sanitizing solution over the bowl when you flush can effectively impede upward movement of particulates, and only 1% of (bacteria/virus-laden) aerosols enter the air above the toilet seat.

The forceful flushing of vacuum-assisted flush toilets, which are commonly used in public restrooms (and all airplanes), actually do a great job of eliminating the toilet plume.  This video uses blacklight just like the study at the beginning of the article, and the difference between regular toilets and this vacuum system seem to be huge.  There were no particles coming out of the vacuum-assisted toilet, but many coming out of the regular flush toilet.  Vacuum-assist toilets still use water to help flush, but nowhere near the amount of regular gravity systems.   This fact comes from the AcornVac website (a manufacturer/supplier of vacuum toilet systems): “a 500 person commercial office building that is serviced by a single vacuum center and 1/2 gallon per flush vacuum toilets will save over 265,000 gallons per year, compared to conventional low flush toilets.”  Water savings aside, I think that the absence of a toilet plume when using a vacuum toilet is their greatest benefit, and it makes me feel a whole lot better about using the bathroom on airplanes!

What happens when the lid is lowered?

Since vacuum-assist toilets and shields are not commonly installed in residences, most people have only a lid to guard against the toilet plume.  What happens when you put the lid down and flush?  Obviously, there are particulates and germs landing on the inside of the lid.  (This is an area that gets skipped over when cleaning, I’m sure!)  The rest of the particulates exit through the spaces between the toilet, seat and lid.  Here are the good and bad results of flushing with the lid down, assessed by researchers at University College Cork:

  • Reduced the number of both visible and smaller droplets during and after flushing by 30-60%
  • increased the diameter and concentration of the bacteria in these droplets.
  • airborne microdroplets were detected for 16 minutes after flushing the toilet with the lid down, 11 minutes longer than when the toilet was flushed with the lid up. 
  • Another study concluded that lowering the lid before flushing “reduced 48% of total number concentration, 76% of total surface area concentration, and 66% of total mass concentration, respectively.”

Using the lid when flushing definitely helps, however some aerosols are still shooting out, and hanging around even longer.  What are the other things we can do to protect from THE PLUME?

  1. If you are in a public place and concerned about transmission of disease, put on an appropriate mask before going into the restroom–at least the aerosols should be filtered out of your air, and germs will not land on your nose or mouth.  As always, wash your hands thoroughly, and don’t touch your mask or face!
  2. If you’re at home, it goes without saying to clean regularly.  
    1. Use a non-toxic disinfectant on all surfaces in the bathroom.  Check out our article on the differences and methods of cleaning, sanitizing and disinfecting. 
    2. Change hand towels frequently, at least twice per week.  For towels and clothing that have been exposed to toilet plume, you can add Borax to your laundry, or pre-soak with it, as it turns into hydrogen peroxide when hot water is added to it.  It’s also generally safe for colored clothes.
    3. Use a HypoAir bipolar ionizer like Germ Defender or Upgraded Air Angel Mobile to sanitize the air and surfaces in your bathroom 24/7!
    4. Leaving your toothbrush in an open place on the bathroom counter sounds icky (for obvious reasons), but stashing it away in a plastic container or drawer is not advised either.  According to a meta-study published in 2012,  toothbrushes stored in aerated conditions had a lower number of bacteria than those stored in plastic and bacterial growth on the toothbrush increased 70% in a moist, covered environment.  What should we do with our toothbrushes?  Sanitize your toothbrush regularly by soaking it in hydrogen peroxide, Listerine, or using an approved UV sanitization device (but not in the microwave). (Is your toothbrush covered in poop? Here's how to thoroughly clean it)
    5. It’s best to switch on your bathroom exhaust fan before every flush, and leave it running for at least 15-20 minutes afterwards.  If your exhaust fan does not seem to remove odor very quickly, then you know it’s not removing the “toilet plume” aerosols.  It may be under-sized, or just old and inefficient.  Because the bathroom exhaust fan is also a very important appliance to remove humidity (and thus prevent mold), check out our article on how to check its size and where it should be vented!

Sorry, I know after seeing that first video, I couldn’t “un-see” it, but I’m grateful that non-toxic cleaners and laundry methods have been invented.  We just need to somehow lower the cost of vacuum-assisted toilets, and bathrooms will get a lot cleaner!  

Advances in Phototherapy

Advances in Phototherapy

Phototherapy, or light therapy, is the exposure to direct sunlight or artificial light at controlled wavelengths in order to treat a variety of medical disorders. (Light therapy) Light therapy has been around for a long time.  Natural sunlight is free and abundant in many climates, and doctors have known that it does other things for our bodies like assisting in producing vitamin D, elevating mood and killing dangerous bacteria and mold on our skin.  However, natural sunlight is not always available, and also has ultraviolet wavelengths that can be dangerous in longer doses.  New technology is able to select the wavelengths and with the right exposure, provide the same healing benefits as natural sunlight without additional skin cancer risks. 

Phototherapy is now a standard treatment for skin conditions like psoriasis (raised, red, scaly patches on skin), vitiligo (loss of color on patches of skin), eczema (a condition that makes your skin red and itchy), as well as various forms of skin cancer.  The key to healing is selecting the correct wavelength, intensity and duration of exposure, which are determined by research trials on animals and humans.  Ultraviolet light has been classified into three groups of descending wavelengths: UV-A, UV-B and UV-C (for more in-depth explanation on wavelength, visit our article here).  UV-A and -B are the types used for phototherapy, with UV-B being further broken down into narrow-and broad-bands.  Narrow band UV-B has been found to be most effective for psoriasis, for example, and can be produced by traditional ultraviolet lamps, or LED bulbs.  Excimer lasers have been approved by the Food and Drug Administration (FDA) for treating chronic, localized psoriasis plaques by emitting a high-intensity beam of UVB. (Phototherapy)  These treatments can be applied in doctors offices or at home using approved medical equipment and prescription.

Since we know that sunlight has the power to purify water and disinfect surfaces like sheets, fabric and plastics, we know that it is actually killing microbes as well.  Again, it’s the UV wavelengths in sunlight (including UV-C) that break up DNA and inactivate microbes and mold.  Why not apply this to skin and wounds to kill infections?  Ultraviolet light was first used to sterilize bacteria over 100 years ago, a treatment based on the work of Niels Finsen, who won the Nobel Prize in Physiology in 1903 for using filtered sunlight as a cure for skin tuberculosis.  Now uv light is being used in tandem with antibiotics to enhance their effects and overcome antibiotic resistance, which is a growing problem.  Bacteria can evolve to resist drugs, but bacteria cannot resist the destructive power of UV light.  

Antimicrobial photodynamic therapy (aPDT) is a chemical reaction triggered by visible light for use on antibiotic-resistant bacteria strains.  It involves molecular oxygen, light, and a photosensitizer (something that creates a reaction between oxygen and light). To test it, researchers used an already FDA-approved dye called methylene blue as a photosensitizer, and specially constructed panels of 25 LEDs in reflective cones.  Light and photosensitizer were tested with Methicillin-resistant Staphylococcus aureus to determine the lowest dose and shortest series of antibiotics that could weaken the bacterial membranes and other resistance mechanisms.  The resistant bacteria, weakened by aPDT treatments, were killed with far lower doses of current antibiotics, and it’s a promising method for treating resistant bacteria in wounds and reducing antibiotic use in general.  (Light-Based Therapy Weakens Antibiotic-Resistant Bacteria)

At the other end of the light spectrum (literally), red and infrared lights also promote wound healing, but possibly for different reasons.  Although a Danish physician (Niels Ryberg Finsen) received a Nobel Prize in 1903 for discovering that exposure to concentrated red light accelerated the healing of sores, scientists today are only beginning to learn how and why this happens.  Research funded by NASA in the 1990’s showed that near-infrared laser light speeds healing of wounds, particularly those that are starved for oxygen, by boosting the production of growth-factor proteins, collagen, and blood vessels.One company that spun out of NASA’s programs is Multi Radiance Medical, which produces laser units for physicians, athletic trainers, physical therapists,  chiropractors, and veterinarians.   Although lasers have the possibility of damaging surrounding tissue, and they also use a lot of energy and they’re expensive, LED arrays are a better alternative.  They are cheaper, use less energy, can be designed to emit multiple wavelengths, and cover a larger area than a laser.  (NASA Research Illuminates Medical Uses of Light)  This is where the consumer must be careful, however, as today there are many manufacturers of LED red light therapy devices, and without applying the research of specific wavelengths, intensity and timed sessions, these devices are simply lamps, not healing devices.  When searching for a red light therapy device, you want to look for a device with 600 to 900 nanometers (nm) of light, as well as one that is easy to use or easy to wear. (Red Light Therapy Review)  Therefore, it’s wise to research the manufacturer on their knowledge of the technology, dosage instructions and independent testing of their products for wavelength, flicker rate.  This manufacturer has developed a helpful blog to understand red light therapy and its uses.

Here’s the best part: despite all the technology and expense, the benefits of UV light and infrared light can be free.  We know that sunlight has the “full spectrum” of light–from ultraviolet to infrared–and it can be helpful in moderate doses, not "lying on tinfoil basking like a trout"!  With the right intensity and dosage, it doesn’t have to hurt your skin, but can actually heal it.  Our parents and grandparents might have advised us to “get out in the sun”, and moderate exposure is the key to getting more benefits than downsides.  

Photo by Kent Pilcher on Unsplash

Why choosing “Non-Toxic” is not only good for you, it’s good for your grandkids (and great-grands…)

Why choosing “Non-Toxic” is not only good for you, it’s good for your grandkids (and great-grands…)

Hmmm.  

A new study seems to say that the genes we inherit and pass on are not entirely a product of simple reproduction.  They are also influenced by the toxicants we are exposed to by accident, or even as a result of ignorant or uninformed choice.

The title “Multiple generation distinct toxicant exposures induce epigenetic transgenerational inheritance of enhanced pathology and obesity” is very foreboding and makes me think, how are there any “normal” kids born at all?  

It seems that each generation in the US (and probably world-wide) faces a different main toxin.  For example, the insecticide DDT was a major concern in the 1950s and 1960s, followed by plastics starting in the 1970s, dioxins in the 1960s and 1970s, and then the fungicide vinclozolin and herbicides glyphosate (Roundup) and atrazine in the 1980s (still used).  Researchers used rats to approximate the genetic effects by injecting them with agricultural fungicide vinclozolin in generation 0, jet fuel in generation 1, and then then pesticide dichlorodiphenyltrichloroethane (DDT) in generation 2.  They then continued to breed the rats to generations 3, 4 and 5 to analyze the changes in their genetics and pathologies that presented.  

Some results from the study: 

  • The diseases were not all “additive” meaning that each successive generation had a higher chance of acquiring them, or worse prognosis.  It varied per disease; for example, kidney and ovary pathologies tended to reach a maximum and plateau; however, obesity tended to become more additive with each generation’s exposure to toxicants.
  • Females seemed to be more affected in later generations than males.  
  • Generally, higher pathology was observed in the F4 and F5 generations. 
  • Multigenerational exposure to distinct toxicant exposures promoted transgenerational inheritance of higher disease frequency for nearly all the different diseases examined. 

Wow, given that each generation (and nowadays probably more accurately, each decade) is exposed to new toxicants, we really are stepping through a minefield when deciding where to live, what to do for a living, which personal products to use, which cleaning products to use, and even which food to eat.  The consequences show up not just in our generation–we are reaping what our grandparents sowed and we are sowing for our grandkids.  The same effects seem to be present for electromagnetic fields (EMF), as Barrie Trower, physicist and Royal Navy microwave weapons expert on EMF radiation, has warned (see our article here).  

Finally, I’ll try to end the doomsday thinking with this: “normality” or lack of genetic damage is probably a privilege given that avoiding toxins actually costs A LOT.  Here are some of the headlines that bolster this conclusion:

  • In a 2012 study examining race- and income-based disparities in cancer risks from air toxics in Cancer Alley, Louisiana, cancer risk of air toxics not only disproportionately affects socioeconomically disadvantaged and racial minority communities, but there is a gradient effect within these groups with poorer and higher minority concentrated segments being more affected than their counterparts. 
  • The lack of clean drinking water in Jackson, Mississippi seems to be a complex story of population decline, poverty, racism, politics, mismanagement and theft. (Jackson water crisis flows from century of poverty, neglect and racism)
  •  About 73 million people live within 3 miles of a Superfund site. Compared to the general population, the population within this range is more low-income, has more indigenous and people of color and is more burdened by other environmental stressors (e.g., poor air quality, lead paint, etc.). (Supporting Environmental Justice at Superfund Sites)
  • Most people agree that organic foods are better for your health than non-organic.  However, it costs on average 21% more to buy organic, with the majority of cost difference in meats.  (How Much More Do Organic Groceries Cost?

Despite the socioeconomic barriers to health, I think the best tool for achieving multi-generational health is research, knowledge and a “healthy” skepticism of heavily-marketed products or ideas. Erring on the side of caution is a good thing!  Is there reasonable concern over drinking water purity?  When you can, buy or purify your water. Is there reasonable concern over air quality?  When you can, use a mask or air purifiers.  Is there reasonable concern over food quality?  When you can, purchase the foods that you believe are safe. Genetically, at least, it is true that “The parents have eaten sour grapes, and the children's teeth are set on edge.” Look out for the sour grapes!  Additionally, if you have the means, you can get your DNA analyzed so that you can make lifestyle changes to promote the best outcome in whatever weaknesses are found.  For those who don’t have the means to buy an analysis, there are studies and trials that may be free.  Thankfully, DNA tools are no more the exclusive domain of the scientific research community, so the news doesn’t have to be all bad.  

Photo by ANIRUDH on Unsplash

Ancient homebuilding 101: How did ancient people prevent mold in their homes?

Ancient homebuilding 101: How did ancient people prevent mold in their homes?

Mold is an ancient problem, the most infamous account of which is in the 14th chapter of the book of Leviticus in the Bible.   Although it’s described as a “plague of leprosy” in the King James translation (verse 34), the references to “ingrained streaks, greenish or reddish, which appear to be deep in the wall” (verse 37 in New King James translation) are hallmarks of mold.  Indeed, some scholars investigating the meaning of the Hebrew word “Tsara’at” that was translated “leprosy” have inferred from ancient skeletal evidence and modern symptoms of mold exposure that a better translation may have been “mold”.  (Mold: “Tsara’at,” Leviticus, and the History of a Confusion).  Going forward with this assumption, the prescription for mold in the ancient Hebrew home was inspection (by the priest), identification (by shutting up the house and seeing if the mold grew), remediation (empty the house of everything valuable, remove the stones and plaster, and replace them with new stones and plaster), reinspection and cleansing, and in the case of last resort, demolition (complete dismantling and removal of the house). 

Has the problem (or plague) of mold gotten worse since ancient times?  Maybe so.  After World War II, a housing boom generated the need for faster and cheaper construction and made gypsum wallboard (drywall) much more popular than plaster as a building material.  Drywall is composed of compressed gypsum between two layers of durable paper. Gypsum readily absorbs water and dries slowly, while paper supports mold growth very readily. Since mold growth can occur within 24-48 hours of a water event, according to the US EPA, this is a perfect recipe for mold growth (just add water!).

The housing boom also caused quality of construction to decrease as volume increased, allowing for water problems to happen more frequently. “Back in the days of plaster, brick and stone construction, we didn’t have mold problems like we do now. This is in part because mold doesn’t grow on those materials very easily, if at all. Drywall, on the other hand, is like a Petri dish. What’s worse is that drywall is an ideal growth medium for Stachybotrys, the black toxic mold referenced above, because of its high cellulose content. Nearly every mold will grow on drywall given the right moisture levels, but Stachybotrys has a field day with it.  The final component of the perfect storm, which has made mold into the problem we now face as a society, here and internationally, is that our buildings are built so tightly, in the name of energy efficiency. Ever since the fuel crisis in the 70’s, there has been a huge push to reduce energy usage and create a more comfortable living environment. We have walls stuffed thick with fluffy insulation. Having a small utility bill is a bragging right at cocktail parties.” (A Brief History of Mold)

We can see that there are three things we need to consider in homebuilding to prevent the dreaded “m” word: design (for natural ventilation), construction technique (to avoid water intrusion and decay) and materials.  Here are two examples of how ancient people incorporated these mold-fighting aspects into their homes, knowingly or unknowingly:  one is from Israel and the other is from Egypt.

Building techniques in first-century Israel:

According to nazarethvillage.com, villagers in Israel often built homes on the bare ground.  They could dig into soft limestone to make caves for water or wine storage, but often just used what the topography offered.  “Building on sloping bedrock requires great care in setting the first course, starting from the lowest part of the foundation and working upwards step by step. The bedrock footing is flattened and slightly stepped, but does not need to be completely level. By fitting stones into the uneven footing, the force of gravity will secure the buildings onto the bedrock. Using the land as the ancients did makes a lot of sense – there is less to dig and less to build.”  (Site Excavation)  The mortar used to hold the stones together was primarily earth, chalk (calcium carbonate), leftover straw (to add strength and reduce cracking) and a small amount of hydrated lime for durability.  The chalk is excellent at absorbing excess moisture from the air (reducing humidity inside), while the lime also inhibits fungal growth (keep reading for more benefits of lime!).  (Mortars for building and plastering in antiquity)

House windows in first-century Galilee were typically placed relatively high in the wall for maximum ventilation and privacy. Ventilation, as we know, can discourage mold by allowing ions in the fresh air to reach interior surfaces. (Windows)  The same principles were used in design of the homes, which featured a central courtyard with rooms added around it; thus fresh air could flow through the rooms whenever doors were opened to the courtyard. 

Preparing the house for plastering inside requires placing “small chinkstones and mortar to fill cracks and create a flat substrate for the interior plaster. Although obscuring the beautiful view of exposed stone masonry, interior plaster was necessary for insulation and to prevent household pests from taking over.  Plasters also improve interior lighting by brightening up the colours of the walls. We discovered that mixing chalk with the earth plaster gives a bright yet warm tonality to the home. The homes of more wealthy residences and public buildings – such as our synagogue – were finished in white lime plaster and occasionally painted.” (Interior Plaster)

Building techniques in ancient Egypt:  The following facts were taken from the article Homes and Mud-Brick Construction in Ancient Egypt, which references the report by Virginia L. Emery, University of Chicago, UCLA Encyclopedia of Egyptology 2011, escholarship.org:

Unfired mud brick houses were common in ancient Egypt, from the simplest abodes to the grandest of palaces.  Mud brick had several advantages over stone:

  • Brick ingredients were available virtually everywhere (sand, clay, and silt combined with chopped straw or dung as temper and binding agent)
  • Mud bricks are quicker to fabricate than quarrying stone, making them more economical in that sense
  • Mud bricks are quicker and easier to build with because they don’t require the trimming or fitting that building with hewn stone demands. 

“Mud-brick walls could be constructed directly on an unprepared ground surface, though more commonly were provided with brick foundations and wall footings laid in trenches upon a bed of sand... Occasionally, particularly along high- traffic routes, the base of the wall at ground level was protected by a footing of stone, in an effort to minimize the undercutting of the wall due to water or wind damage and traffic; stone elements also could be included in the wall proper, being most common at the quoining of building corners.”

The article Mudbricks give clues to understanding the Bible, which referenced the article Mud Bricks and the Process of Construction in the Middle Bronze Age Southern Levant, confirms that unfired mudbricks are susceptible to water damage.  Water can dissolve the bricks as well as weaken them, especially near the base of the walls. Several strategies are used to help minimize water damage. Typically, the construction techniques in the Ancient Near East involved building a stone foundation of 2-3 courses of stone upon which mudbricks were then placed to the desired height. The stone foundation does two things:  it minimizes the capillary action of water and salts seeping into the lower courses of bricks; it also helps reduce the erosive effect of water splashing from the roof back onto the bricks or from water running in the street.  Another aspect of mudbrick preservation was regular plastering and re-plastering the walls, which helped retard the effects of moisture and erosion, as well as the intrusion of plants, insects, and animals. 

How do these natural building methods defeat mold?

Mud-brick, which is also called adobe in areas of Spanish influence, can still be an economical way to build. Many people think that mud-brick invites mold and dampness into your home, however, it actually inhibits mold in several ways.  Ideal conditions for mold or rot are caused when a building material absorbs moisture and is unable to later release it, or when moisture is not absorbed but condensates on a surface. Here are the ways mud-brick and other earth building techniques inhibit mold, according to Earth Building School:

  • Creating thermal mass:  Thermal mass regulates temperature by absorbing heat when it is available, storing it and slowly releasing it when ambient temperatures drop.  Keeping temperatures higher and more constant reduces condensation and dampness, because cold air holds less moisture and so will condensate on windows and walls.Earth is one of the best thermal mass materials available, because of its slow reaction time and because it naturally regulates humidity.  It is easy to retrofit earthen building elements to your existing home: Earthen plaster over drywall, inbuilt cob furniture or mudbrick feature walls - let your imagination run free while creating a beautiful, healthy living space.
  • Clay regulates humidity: You can't beat clay when it comes to balancing indoor humidity at optimum levels of 40-60% RH. A solid wall of earth bricks can absorb up to thirty times the moisture of conventional burnt bricks and a 30mm (1-3/16”) thick surface coating of clay is more than enough for daily buffering.  
  • Naturally anti-fungal: Finally, natural finishes such as clay, lime plasters or Tadelakt (Moroccan plaster) are naturally anti-fungal.  These are good finishes in areas that are often damp, such as kitchens and bathrooms.  Lime is highly alkaline (high pH) and inhibits mold growth. It can be used to fix mold problems in old buildings (once permanent water damage has been remedied) and is a good and very hygienic choice for bathrooms - even in splash areas such as hand basins and showers.  Lime plaster is water resistant and can be applied as Tadelakt, for a totally waterproof result.  Working with lime - especially in situations where waterproofing is required - is a bit more technical, so it is advisable to get a skilled person onto the job. 

Whether the building is constructed with mud-brick or stone, these are the “bones” of the walls; plaster is placed over the brick or stone, and then the final interior and exterior finishes give them the protective “skin” that really preserve the construction from the elements.  Let’s dive into the finishes of Limewash and Tadelakt to find out why they are so good at inhibiting mold.

Limewash:  This ancient paint has so many physical benefits, and topping it off, has a soft and warming aesthetic that is causing a resurgence in its popularity.  Chemically, limewash is calcium hydroxide mixed with water.  Calcium hydroxide, also known as quicklime, is a naturally-occurring mineral that is soft and easy to mine from the ground (nature also “excavates” lime deposits with water, producing caves with fantastic formations inside).   Adding just the right amount of water causes the mixture to heat up (an exothermic reaction) that can be used immediately or left to cool down and thinned out with more water.  Here are some benefits of applying limewash in your interior or exterior finishes:

  • Limewash applied to stone and wood prevents rot and erosion while allowing the structure to “breathe” and release moisture.
  • Limewash is a natural pest repellent: the active ingredient, calcium hydroxide, discourages many types of worms, beetles and even mosquitoes from infesting the structure.
  • Lime is a farmer’s friend because it naturally deodorizes.  Lime provides free calcium ions, which react and form complexes with odorous sulfur species such as hydrogen sulfide and organic mercaptans found in animal and biological waste.  Thus, waste odors are not “covered over” with lime, but actually destroyed.  (Uses of Lime/Environmental/Animal Waste)
  • The high pH of limewash (10-13) makes it anti-fungal, anti-viral and anti-bacterial when it’s wet.  When dry, the pH lowers to neutral; however certain commercial limewashes like Lime Prime by Earthpaint have proprietary resins/polymers that allow the active ingredients to rehydrate and raise the pH again, so that it continually fights mold.
  • Limewash (and the plaster beneath it) are naturally incombustible.  This property was recognized at least as far back as 1212, when the King of England decreed that buildings that survived the terrible London fire must be plastered and limewashed immediately to prevent future fires.
  • Limewash prevents rust on iron surfaces.  This makes it even easier to apply, as masking off hardware is not necessary unless for aesthetic purposes.
  • Limewash is cheap and easy to make on your own.  You’ll just need to purchase calcium oxide (also called burnt lime or quicklime) from a supplier, and be sure to wear the proper clothing and protective gear to guard against chemical burns.  There is plenty of tutorials online, and this article from a long-established UK building conservation company also describes the process.
  • Finally, if you prefer skip the DIY and use commercially prepared limewash, Earthpaint, a company that prides itself in only offering non-toxic paints and wood finishes, has a set of products that can specifically tackle damp areas and mold remediation areas: Lime Prime and Lime Seal.  These are also great on unprimed drywall in any location.

Tadelakt: Sometimes referred to as Moroccan plaster, tadelakt is a traditional plaster indigenous to the Marrakesh region of Morocco that can be used as a stylish wall covering and alternative to tiles. It can be used indoors and on exterior walls.  Tadelakt-plastered walls create a solid, waterproof surface that is seamless, has no grout lines and is resistant to mold, which are some of the reasons why this traditional plaster style has become so popular in contemporary, minimalist homes. (Tadelakt: What you Need to Know About Moroccan Plaster)

Tadelakt is applied in several coats and finished using a special technique. "The final stage of polishing is done by using a plastic trowel, Japanese trowel or a traditional Moroccan application which requires a special polishing stone," explains Ian Kozlowski, Founder of Decor Tadelakt.  It's the final stage of applying tadelakt that makes the resulting surface waterproof.  Valentin Tatanov, manager at Tadelakt London explains: "The olive oil soap that is rubbed into the surface of the product chemically reacts with the lime to form calcium stearate."

This waterproof membrane makes Tadelakt appropriate for use in shower enclosures and wet room ideas (where shower walls are not necessary and the entire room can be wetted and drained).  The seamless application means that details like benches, windowsills and shower niches are easy to create.

Tadelakt is relatively low maintenance;  it can be cleaned simply by rinsing with water because the surface resists dirt and mold. "In the shower, squeegeeing down the walls after each shower is all that is needed to maintain the tadelakt shower walls," explains Decor Tadelakt's Ian Kozlowski.  What's even better from a non-toxic standpoint, you must avoid using commercial bathroom cleaners on tadelakt, especially any containing bleach or harsh solvents, as this may destroy its waterproof quality. 

Just like a wooden countertop or cutting board needs periodic maintenance to keep it looking great, water-resistant and bacteria free, "regular recoating with soap solution ensures that the tadelakt stays in excellent condition for years to come," suggests Valentin. 

Shikkui Plaster:  The Japanese started using this type of thick plaster in the 6th century following the spread of Buddhism from the Korean peninsula.  It is made of slaked lime additives including seaweed extracts, soybean oil, natural plant fibers, and eggshells.  It is also used on interior and exterior surfaces.  According to this article, some versions of the plaster also contain plankton skeletons and special algae only found in Japan, which is hygroscopic and helps control humidity. Due to these ingredients and the plaster’s natural ability to absorb pollutants and VOC gasses, it creates healthy airflow within spaces. It is fire and earthquake resistant, has the ability to naturally control bacteria, fungi, and molds; and is naturally anti-static, which reduces dust accumulation.   This Shikkui plaster manufacturer shows the tools and techniques for applying this plaster to practically any wall surface (even wallpaper!).  It is applied quickly in two thin coats back to back, and has a highly polished finish.

For all of their benefits and non-toxicity, we shouldn't be afraid to experiment with limewash, tadelakt and even Shikkui plaster in our homes as the "new" anti-microbial coatings.  They've stood the test of time!

Photo by Anne Nygård on Unsplash

Lime: an ancient wonder-mineral

Lime: an ancient wonder-mineral

If you read our article on Ancient Homebuilding 101, your interest might be piqued about lime and its use as an anti-fungal coating inside and outside homes.  We gave a number of benefits of limewash that are still used on some farms and buildings today; if you see white walls inside a dairy barn, for example, it’s most likely limewash.  But how does limewash work to kill germs?  The answer lies in its chemical makeup before it’s completely dry, and repeating the application. 

Mold does not grow on limewash when it’s fresh.  Here is advice from Timothy Sly, a Food-borne disease epidemiologist.  To make lime-wash, quick-lime (calcium oxide, CaO) is ‘slaked’ with water to produce calcium hydroxide, Ca(OH)2. A slurry of this is applied to the wall, stone, plaster, etc. It begins as a strong alkali (base), but after a while, atmospheric acids (e.g. carbonic acid, H2CO3) react with the slaked lime to produce a neutral carbonate (CaCO3). At this stage, though still white, the surface can support molds and mildews that use pollen , soil, and other dust as a substrate. The solution is to apply more lime wash at LEAST once a year, often twice.

When lime-wash was applied frequently and regularly to house-roofs in the tropics which were - and still are - used as rainwater catchments, the water collected was partially protected with the bactericidal effect of freshly-slaked lime. But as modern options appeared, house-holders chose to use white latex paint on their roofs, which now required re-painting much less often. The problem was that all the bactericidal effect was now absent, and the water in the collection cistern was of a poorer bacterial quality, grew more algae, and had more mosquito larvae present. Another example of ‘improving’ A only to cause more problems with B. 

Lime render and mortar physically degrade because of chemical removal of the calcium ions by dissolved atmospheric acidic gases and by chemical substitution with sulphates and chlorides. As erosion occurs, spaces form in the lime providing damp niches for chemotrophs (organisms like mushrooms or bacteria which manufacture their food from inorganic substances in the presence of energy derived from inorganic compounds) which produce toxic compounds of ammonia and nitrite salts and as they die, form a nutrient base for other organisms.  (Novel Biodesign enhancements to at-risk traditional building materials

Here is a rendering of the “Lime Cycle” (from LimeWorks.us)

This diagram shows that it’s really a layer of “limestone” or CaCO3, that is formed when you limewash and allow it to dry (top of diagram). 

Let’s take that cycle one step at a time. The following is adapted from Calcium carbonate and the Lime Cycle.  Calcium carbonate is a very common mineral in the Earth's crust. It is the main building block of most animal shells, including the shells of shellfish, snails and birds’ eggs.  There are four main types of rock containing calcium carbonate: limestone, marble, chalk and calcite.

If we heat limestone to a very high temperature (to about 900 degC or 1652 degF), it decomposes - this is an example of thermal decomposition.

Calcium oxide is known as lime, or sometimes quicklime. If we heat a lump of quicklime very strongly it gives out a very bright white light. This is known as limelight. Limelight was used for stage lighting before the introduction of electricity, so famous actors and actresses were said to be in the limelight.

Quicklime reacts very violently with water giving out a lot of heat.

This reaction is called slaking. Calcium hydroxide is also known as lime, or sometimes slaked lime.

Lime mortar hardens as it dries. In addition a chemical reaction takes place between the lime and the carbon dioxide in the air.

This reaction takes place quite quickly at the surface but more slowly in the interior: not all of the lime in the lime mortar used to build the Great Pyramid has yet turned into calcium carbonate - after more than four thousand years!   The carbonation process absorbing atmospheric CO2 occurs at about 5 mm per month from the outer skin working inwards.  (Novel Biodesign enhancements to at-risk traditional building materials)

As you can see, processing limestone is a very energy-intensive process, but when compared to manufacturing Portland Cement, it’s actually more energy efficient.  Although it doesn’t actually sequester carbon (because CO2 is released during the burning process and it’s reabsorbed during the curing process), it does produce less CO2 emissions than Portland Cement.  During manufacture lime produces 20% less carbon dioxide than cement production.  Lime is burnt at a lower temperature than cement in the production process (900°C as opposed to 1300°C), therefore making lime production more economic. (The History of Lime and its Environmental Benefits)  In addition, cement does not “reabsorb” CO2 and is brittle (cracks), while lime used in cement can somewhat “heal” cracks.  If “lime putty” is added to mortar, it makes it more breathable (permeable) than Portland Cement (check out the pore structure here).

Lime’s anti-fungal properties can also be used on living trees, to protect trees from disease, sunburn and frost injury: The National Park Service used it on their historic trees, and it’s also recommended for citrus trees by a knowledgable tree service.  

If you want to use lime inside your home to deter mold or remediate a moldy area, Earth Paint has taken a 10,000 year old technology and engineered it to be safely applied directly over high moisture content, Mold and Mildew stained surfaces.  This product uses the power of lime to penetrate and saturate the porous cell structure of wood, drywall and concrete matrix.  As such, spray coating your building with Lime Prime and Lime Seal renders  a weather and air barrier outside.  Inside, before windows and drywall are hung, spraying the frame and wall cavities with Lime Prime will inhibit mold inside the walls.  (Lime Prime - Mold Abatement / Remediation)

For more benefits of limewash, be sure to visit our article on Ancient Homebuilding 101.  Lime is everywhere…did you also know that calcium carbonate is also the primary ingredient in antacids like TUMS?   You also may be walking on it or showering in it, because travertine is really a type of limestone.  It just goes to show that limestone is not just for caves; it’s a really useful (and beautiful) material in many aspects.

Photo by Anne Nygård on Unsplash

Breaking down Mycotoxins and mVOCs with Enzymes and Non-Toxic Cleaners

Breaking down Mycotoxins and mVOCs with Enzymes and Non-Toxic Cleaners

If you haven’t read our white paper on mold, mycotoxins and mVOCs, you should!  While discussing the meanings of these scientific terms with our team, we thought it would be even more helpful to break it down to the vernacular.  Mold is like most other living organisms that excrete waste products.  Mycotoxins are not similar to excrement, in that they are not secreted because of normal growth, development or reproduction of the mold (they are secondary, not primary metabolites).  They are chemicals secreted in offense and defense, and in stressful situations.  Thus, mycotoxins are like sweat–the toxic sweat of mold (yuck!).  They can be sent aloft into the air on mold spores (which are also released whenever the mold is stressed or physically agitated), or even smaller fragments of mold and dust, which are all easily breathed in.  

Microbial Volatile Organic Compou0nds (mVOCs) are gasses as a product of growth, development or reproduction (some are primary metabolites), and as a signal to other microbes around them (secondary metabolites).  This means that mold uses mVOCs to communicate and affect the behavior of other molds around it, even as a competitive tool to directly exert antimicrobial activity (suppressing or eliminating potential enemies). (Volatile affairs in microbial interactions)  As such, mVOCs are akin to body odor–the toxic body odor of mold, which it uses to intimidate other mold!   Although they are meant to signal other microbes, even humans can recognize the smell of some mVOCs in that musty, earthy smell that is a tell-tale sign of mold.

It has been shown that the mycotoxins can be eliminated by various physical means such as thermolysis (destruction by intense heat), radiation treatment and low-temperature plasma (bipolar ionization).  They can also be destroyed by chemical methods such as oxidation (removal of electrons), reduction (addition of electrons), hydrolysis (breakdown by reaction with water), alcoholysis (breakdown by reaction with alcohol), absorption and adsorption, and biological methods by using living things like bacteria or other molds. (Enzymes for Detoxification of Various Mycotoxins: Origins and Mechanisms of Catalytic Action)  Only two  of these methods are permitted to mitigate mycotoxins in foods, however, contamination of raw materials with chemicals and/or products of side reactions limit their use.

Alternatively, using enzymes to detoxify mycotoxins mostly avoids these problems.  First of all, what is an enzyme?   Enzymes are proteins produced by living organisms that act as catalysts in chemical reactions.  Enzymes can either build up or break down.  For our purposes, cleaning enzymes facilitate breaking down microbes and their byproducts that cause sickness, stinkiness or stains.  

Scientists have been exploring making artificial enzymes since the 1990’s, and many of these are mimicking enzymes found in nature.  Here are the most common types of natural enzymes (from Simple Science: How in the World do Enzymes Clean?):

  • Proteases break down protein-based soils including blood, urine, food, feces, wine and other beverages.
  • Lipases break down fat molecules like oils and grease.
  • Amylases break down starch molecules like eggs, sugars, sauces, ice cream, gravy.
  • Cellulases are used to soften fabric and restore color to fibers made up of cellulose material. They also remove particulate soil and reduce fabric graying and pilling.

Various enzymes can also be combined to treat the combinations of mycotoxins that are produced by some molds.  For example, cytochromes are enzymes that include a number of compounds consisting of an iron-containing molecule bonded to a protein (cancer.gov).  Cytochromes are usually used within mammals as detoxifying agents of multiple toxic compounds, including mycotoxins.  Cytochromes in the human liver are able to convert aflatoxin B1 (a cancer-causing mycotoxin) into Aflatoxin M1, which is 10 times weaker in carcinogenic potency.  In turn, glutathione s-transferase, another enzyme in our bodies, leads to the excretion of aflatoxins from the body (2016 study).   

Since the enzyme-based approach for degrading mycotoxins in homes is new, there aren’t that many commercial products on the market.  In fact, Green Home Solutions claimed in 2022 that it was the “is the only professional remediation company that combines the ANSI/IICRC standards for mold remediation with a state of the art proprietary disinfectant/ fungicide that not only kills bacteria and molds, but continues to work by breaking down the allergenic protein structures into harmless amino acids.”  It is only available for professional use, but their product description shows that several enzymes are combined for maximum effect on the broad range of mycotoxins that may be found in a home:

  • AMYLASE is an enzyme that digests the mold’s outer membrane or cell wall. It dissolves and causes the insides to leak out.
  • LIPASE is another enzyme in our product formula which attacks and breaks down the fatty lipids inside of and in between the mold membranes.
  • PROTEASE breaks down allergenic proteins at the mold’s core or nucleus, eliminating them from the air you are breathing.

Since we revealed the real nature of mycotoxins and mVOCs (they’re like toxic sweat and body odor), we thought you might like some real solutions you can use to get rid of these toxins in your home!   Elimination of the mold colony is first and foremost, so it’s best to contact an inspector if you can’t find or handle the problem yourself.  Getting rid of the bulk of mold will remove much of the mycotoxins and mVOCs, but mycotoxins can still be present in dust (they are very hardy and indestructible by heat), and mVOCs may be present in absorbent furnishings.  Here are some products and techniques that can rid your home of the remainder of these toxins.

  • EC3 Enzyme Cleaner Concentratie is a non-toxic solution also trusted by many mold remediation companies and mold awareness sites, such as moldfreeliving.com.  It is an enzyme solution with citrus and essential oils that is safe for food-prep surfaces, can also be used in the laundry and many surfaces around the home, even as a degreaser. It was proven effective for mold spores and mycotoxins by a 3rd-party, CAP-accredited lab.   

  • MycotoxinKlear is recommended for all mold and mycotoxin products in use of a fogger or electrostatic sprayer.  

  • The enzyme-based approach for degrading mycotoxins in homes is not common on the commercial scale.  However, some mold remediation companies use them with great results.  The Mold Pros use SurfaceGuard, which was shown in a 2019 study analyzed by RealTime Labs to break down ochratoxin, aflatoxin and gliatoxin to undetectable levels.  Unfortunately SurfaceGuard is only available to commercial remediation companies.

  • Most MVOCs can be mitigated with activated carbon filters, because they are in a gas form and can flow through and be adsorbed by the carbon molecules.  You can try our Germ Defender with carbon filters, or purchase carbon filters for your standalone HEPA unit.  Mycotoxins, however, will not be affected by carbon filters because mycotoxins are attached to spores, fragments of spores, and dust, which are not captured by carbon filters.

If you can’t remove all of the mold, the next best thing may be encapsulation.  Encapsulation is a controversial method in that it does not physically remove the mold but surrounds it with a protective layer that does not allow it to release spores or mycotoxins into the environment anymore.  If encapsulation is done properly, though, it can be a safe method that allows homeowners to save wet drywall and wood that have not dried out completely, by sealing any mold that is present and not allowing more to grow.  As demonstrated by EarthPaints, encapsulation either needs to be applied to completely dry substrates, or with a solution that allows the substrate to completely dry over time.  Their Lime Prime paint is a non flammable mineral shield that saturates wood fiber cells and pozzolanically reacts with concrete and gypsum. Encapsulated Substrates dry out properly and in 30-60 days are ready for follow up after a flood. (earthpaint.net)  The problem with mold encapsulation is that it must completely coat surfaces in a space with a durable non-toxic product, and of course the space must be clean and dehumidified, or the mold will “break through” and continue growing as dust and moisture allow it to propagate.  For more information on whether encapsulation is right for a space in your home, this article by a building biologist is very helpful.

Once again, we also find that bi-polar ionization (used in the Germ Defender, Air Angel and Whole-Home Purifier) should be effective against mycotoxins in the home.  Because bipolar ionization sends out positive and negative ions that cause small particles to clump together and fall out of the air, this reduction in particles means a reduction in mycotoxins, since mycotoxins ride on spores and fragments of mold.  More testing is needed in residential and commercial settings to confirm this, however, our case studies using bipolar ionization to reduce mold spore counts without any additional filters, are quite extraordinary!

Photo by Anne Nygård on Unsplash

Testing Your Home for mVOCs Could Point to Hidden Mold

Testing Your Home for mVOCs Could Point to Hidden Mold

In our Indoor Mold Summary White Paper, we discussed the various by-products of mold: spores, mycotoxins and mVOCs (microbial Volatile Organic Compounds).  Some of these VOCs give that characteristic musty odor, and like VOCs from other sources (like furniture or building materials that off-gas), they can be identified through air quality testing methods.  Importantly, mVOCs presence can indicate actively growing mold, and also indicate what types of mold are growing–like a “signature scent”, different molds produce unique VOCs.   Testing for mVOCs is an important part of indoor air quality, and we’ll discuss the equipment used by different mold inspection companies, as well as how the samples are tested.

Typically VOC testing is performed by professional technicians and home inspectors.  They use one of two devices to gather air samples for VOC testing.  One is Summa canisters or “mini-cans”, and the other is sorbent tubes.  Summa canisters are stainless steel spheres that are “evacuated” (the interior is placed under a vacuum) with a flow control device on top to allow the technician to control the amount of air sampled over a specific period of time.  These are used for “whole air samples”.  The other technology uses a small air sampling pump, which draws room air through a glass tube that has specialized “sorbent” in it, that is, material that adsorbs gasses in the air.  Summa canisters are only used by certified technicians, but sorbent tubes can be used by home DIYers (via the company Home Air Check) or technicians. Here are some of the pros and cons of both, according to two different sources (MVOC Fact Sheet, What are the differences between canisters and thermal desorption tubes?

Technology/Device

Pros

Cons

Summa or Silonite Canister, or Mini-can (Summa refers to the process used to apply a Nickel/Chromium oxide layer to the inside of the canister for anti-corrosion and contamination; since its development in the 1960’s, other types of coatings have been developed)

  • Useful if a broad spectrum ‘unknown’ GC/MS scan of MVOCs is desired.

  • Relative humidity in the space to be sampled should be low because moisture can cause problems with preparing the sample for ttesting (cryogenic concentration is used  before GC/MS).

  • Higher shipping and analysis costs.

  • Are only used by trained air quality technicians

  • Cleaning and certification of canisters is done by specific labs

  • “Shelf life” of unused canisters is only 30 days.

Sorbent Tubes

  • Can sample a larger volume of air (up to 40 liters)

  • Less expensive to ship and easier to store

  • “Shelf life” of sorbent tubes can be up to 2 years

  • Analysis is more accurate if a target organism is identified (what types of VOC) so that the appropriate sorbent material is used.


On the left, Summa canisters in the field, and to the right is the Home Air Check device (sizes are not equivalent).

Professional air quality and mold inspectors will use one device or the other.  If the inspection is for a government facility, often canisters will be specified under the “TO-15” (Toxic Organic  Compounds) testing requirements set forth by the EPA.  For residential testing, however, sorbent tubes are becoming more and more popular due to their portability, ease of storage, and detection capabilities, despite the claim that the sorbent needs to be targeted to the gas. To this end, a company that pioneered sorbent tube sampling, Enthalpy Analytical (formerly Prism Analytical Technologies) now offers the tubes and air pump in a DIY kit that can be returned to the lab for analysis.  Home Air Check is a patented technology similar to spore trap sampling, in that air is drawn into a specialized tube via an air pump.  The instructions are simple to operate the device and return the sample to the lab for testing.  The hardest part, however, may be preparing your home to do it:  

  • Exterior doors and windows should be closed for 24 hours before testing
  • All interior doors should be open during the test (including closets)
  • Don’t clean or dust the day before or during the test
  • Don’t cook for 12 hours before or during the test.
  • Temperature inside the home should be between 60-80 degrees
  • The HVAC should be running if it’s available, so the air is thoroughly mixed.

Testing for mVOCs to detect mold is a unique concept, because mold gives off these VOCs when it is active and growing.  If a water source dries up and the mold dries up, mVOCs are no longer produced.  In addition, the production of mVOCs is not constant throughout the life cycle of the mold(s).  However, since mVOCs are light vapors, they can even be detected through air barriers or moisture barriers that are used for home sheathing, meaning that it’s possible for  mVOCs from mold growing on the backside of siding or cladding material to be detected inside the home.

How are the samples tested for VOCs in the lab?  

VOCs are analyzed by gas chromatography/mass spectrometry, but the canisters and tubes require different preparation steps.  

How are mVOC levels interpreted?

Many VOC reports are measured in nanograms per liter (ng/l), and although it’s very small (if measuring water it is parts per trillion), the difference between for example, 3 and 20 ng/l is the difference between negligible mold growth and significant mold growth, for hypersensitive individuals (see pages 6 and 8 of a sample air survey report by Fike Analytics).  Some reports such as Home Air Check will also place your results in a curve relative to other homes/buildings (see page 3 of the sample report).  

How do mVOC levels correlate with other forms of air testing for mold?

Home Air Check is a form of active air sampling, which draws air through the tubes.  There is also passive air sampling, which allows normal air currents to pass into the sorbent material, and by at least one study was found to correlate more closely with airborne fungal concentrations (spore counts).  Passive samplers are more typically used in industrial sites, however, where the sample device is left in place for weeks or months (like on the fenceline of a chemical plant to establish exposure of the surrounding community to VOCs).    

In any case, mVOC testing can’t pinpoint where the mold is, and that’s why some inspectors don’t believe it’s worth homeowners’ money.  If mold spores were not detected in an air sample but odors or other signs point towards mold growth in a building, then mVOC sampling may be warranted. MVOCs were found to pass through poly sheeting while spores cannot. (MiraMold VOC testing) The real detective work is in a thorough examination for signs of leaks and high humidity, which mold needs in order to grow.  Is mVOC testing appropriate for you/your home?  Certain companies such as Enthalpy Analytical and Fike Analytical use mVOC, total VOC and dust sampling to give a total picture of what occupants are exposed to in the home environment.  We would say it’s an additional tool for determining if there’s a hidden problem (Are there any new mold detectors on the market?), and like the airport scent detectors, the real-time mobile version of this technology (zNose) could become as accessible and practical as walking a trained dog through your home, or using an infrared camera, to detect where that mold is hidden.  

Photo by Anne Nygård on Unsplash

Getting rid of the ICK: Mold in the Shower

Getting rid of the ICK: Mold in the Shower

Mold growth in the shower seems to me like cockroaches in a house: even luxury homes sometimes have problems with each, and sometimes it takes a number of attempts to find a non-toxic solution for them!   The shower just happens to be the ideal place for mold to grow (moisture, food, air and heat are all applied daily!), so keeping the shower from looking like a petri dish can be challenging.  Let us help you with this problem!

Since we know, wittingly or unwittingly, how to grow mold, we can look at its life source requirements and see if we can eliminate one or more to get a mold-free shower.

Moisture:  You would think that taking the “wet” out of a shower is impossible.  Of course, the shower will often be wet, but the important bit is that it’s not continually wet or wet for long periods.  There are various ways to dry it out after showering; check to see if there are any that you haven’t tried! 

  • Make the surfaces hydrophobic:  Hydro-what?  Hydrophobic is the characteristic of products like Rain-X: they repel water instead of absorbing them, so that water drops roll right off.  The active ingredient in Rain-X is Polydimethylsiloxane (PDMS), which is rated a “1” on scale of 1-10 by the Environmental Working Group (meaning it’s of very low toxicity).  In fact, here’s a tip that has worked well for me: after thoroughly cleaning your shower as well as you can (see next section), give all the surfaces, glass and otherwise, with a coat or two of Rain-X to make the water slide right off.

  • Squeegee: This tool, normally in the hands of a window-washer, is also useful for removing water from flat surfaces in the shower.  It can work somewhat on tile if the tiles are large and flat, but it works on glass even better.

  • Drain: Obviously, the water has to have somewhere to go.  If your drain is not working well, you can enlist the help of a plumber.  While the plumber is involved, inquire whether the venting of the drain is adequate (if a vent is too distant or non-existent, the drain does not work well and can cause mold build-up).  If the slope of the shower pan leaves puddles in the floor, it might be prudent to think about replacing or remodeling the shower, because continually wet floors are not only unsanitary, they’re unsafe!

Food: Molds can dine on just about anything, and dead skin cells and even bodywash and hair shampoo are on the menu.  That’s why regular cleaning can break the mold chain even if the other “links” like moisture, air and heat are present.  Find a non-abrasive sponge or brush to avoid damage, and go to town with a non-toxic cleaner:

  • TotalClean is our odorless powerhouse cleaner that can be used on any surface

  • Earth Clean is especially good as a degreaser if you have buildup of waxy products (citrus scent)

  • Force of Nature is a method of making electrolyzed water, which is a completely safe and natural disinfectant that can be used for hand sanitizing and cleaning all areas in your home that can tolerate water!  They have a line of reusable bottles and travel-size sprays that are great for the environment.

  • Vinegar-based cleaners also work, however make sure that they are safe for your shower surface first (for example, they should never be used on travertine or marble, both of which are a type of limestone that can be damaged by acids). 

Air: Of course, you can’t eliminate air from your bathroom, and some molds are even anaerobic anyway (meaning they can survive on little to no air!).  What’s best is if you can change out the air as much as possible, sweeping away excess humidity and mold spores with it.  This is what a good bathroom exhaust fan is for: get the air moving!  Professional restoration companies do the same when they bring in big blowers: air movement speeds up the drying process because it promotes evaporation of water from all the surfaces.  Check out our article on how to check if the size and venting arrangement of your bathroom exhaust fan is optimal.  Getting members of your household to use it is another feat, however this can be automatic if you have an electrician wire the switches together so that the vent always comes on with the light.  Also, here’s another way to “condition” the air in your bathroom to avoid mold:  use a Germ Defender 24/7.   The ions created by the Germ Defender not only destroy mold and its spores in the air and on surfaces, it also sanitizes surfaces after they’ve been contaminated by the dreaded toilet plume.  

Heat:  Anyone who’s cleaned out a refrigerator knows that heat is not a pre-requisite for mold to grow!   However, it certainly makes a more hospitable environment for many molds to flourish.  Using your bathroom exhaust vent after showering  certainly helps reduce moist heat in the air.  

There are also many products worth mentioning that can keep your shower cleaner for longer.  

  • That pink slime that forms around your drains and shower corners can also populate the shower head, and it’s not good!  It’s actually caused by the bacteria Serratia marcescens, and can cause urinary and respiratory tract infections, which are especially problematic for people with immune problems. (Not So Pretty in Pink: What Is That Pink Slime in My Bathroom?)  There are other types of harmful bacteria in there as well, such as NTM (nontuberculosis mycobacteria).  Soaking your showerhead to clean it does not fully resolve the problem, because it does not dry out. If you can’t seem to get rid of it from the shower spray head, swap it out with one of these:

    • Shower Clear Shower Heads ($299-319) are made of brass (a naturally anti-microbial material) and are made to open fully to dry out between uses. 

    • This showerhead by Niagara ($28) features a removable faceplate that will also allow the showerhead to dry between uses.

    • AquaDance Antimicrobial has antimicrobial rubber tips that also prevent minerals from clogging the spray jets.  (It uses the material Microban, which does contain quaternary ammonium compounds or “quats”, however).  

  • Thankfully, there are several good changes happening in the shower curtain market.  For one, PVC shower curtains are being phased out and replaced with PEVA or EVA.  Polyvinyl chloride, or PVC for short, is that plastic with the strong smell that emits toxic VOCs which can disrupt hormones, liver and kidneys, and your nervous system.  EVA (ethylene vinyl acetate) is a safer alternative to PVC, but some EVA contains formamide.  Formamide is used to make the foam soft, but it’s considered to be carcinogenic and a developmental toxin that can be absorbed through the skin. If you’re considering purchasing one of these doors made from EVA, it’s best to contact the manufacturer to ask if their product contains formamide. (hellonaturalliving.com)  

    • Sustainable Jungle also gives many organic and sustainable options to plastic shower curtains!  

    • Check out how I used TotalClean, our non-toxic all purpose cleaner, to clean the pink stains off the hem of my shower curtain.

  • And finally, what about your washcloth?  Experts say it’s a good idea to use a new one everyday, or at least several times a week.  Since it’s usually hanging in the moist shower, washcloths and scrubbies take a long time to dry, allowing microbes to grow and establish in the fibers.   

Since bathrooms are among everyone’s least favorite rooms to clean, and showers and toilets certainly also near the bottom, I’m liking the concept of wetrooms more and more.  Wetrooms are waterproofed bathrooms (at least all of the floor and some distance up the walls) that can be wetted and cleaned all in one go.  If you can’t do that, at least make your cleaning tools easy to use and accessible:

  • This Turbo Handheld Sprayer by Clorox ($50) eliminates the tiring pump, pump, pump of handsprayers.  Used with non-toxic cleaners like we suggested above, this could be a game-changer!  We don’t recommend the Clorox Turbo (or Turbo Pro) however, because it uses alkyl dimethyl benzyl ammonium chlorides, which can have asthma, respiratory, reproductive and developmental effects according to the Environmental Working Group.

  • E-Cloths Shower Cleaning Kit ($15) requires only water to have a sparkling shower.  Once you’ve cleaned it, use these two cloths on a regular basis (with no chemicals) to keep it clean.

  • The shower squeegee is a good way to remove water from the glass surfaces, but what about all the corners, curves and floor area?  If you thought about this before designing your bathroom, you might install an Airmada Air-Jet Shower Drying System.  It directs compressed air through special nozzles on the walls and ceiling of your shower, and can operate on a timer so that without your effort, water is removed from the equation and mold doesn’t have a chance to grow.  Another perk is that everyone can walk into a dry bathroom, no matter how many people have showered before you.  Now that is a great use of technology!

Photo by Curology on Unsplash

You don’t have to tell me (I can see/feel the humidity!)

You don’t have to tell me (I can see/feel the humidity!)

Although we like to measure to be sure and humidity sensors are easy, cheap ways to verify, there are signs all around us when the humidity is too high.   

Here are a few examples with the explanation why: 

  • That musty smell, of course:  Unfortunately, that smell is the telltale sign of mold, and is actually the microbial Volatile Organic Compounds (mVOCs) that molds produce.  To find out more about mVOCs, check out our detailed article

  • Doors and wooden windows that “stick” in their frames: Wood absorbs water from the air, causing it to swell, so closely-fitted wooden furniture like doors, window frames and even cabinets and drawers can “stick”.  When the interior and exterior “weather” dries out, they can work just fine again!

  • Condensation on the inside of windows:  To understand why condensation happens, it’s best to start at the concept of dew points.  You can read more about it in our article here, but the basic concept is that every temperature and pressure of air can hold a certain amount of water vapor.  Warmer air holds more water vapor than colder air.  When warm air hits a cold surface, the water vapor will condense or “drop out” of the air onto the surface–just like a glass of iced tea sweats on a warm day.  The occurrence of windows sweating on the inside will happen when warm, humid air hits a cold window frame (this happens most often with aluminum windows), and if it persists, can be a habitat for mold.

  • Salt or seasonings that clump and stick together:  This may not happen as much nowadays with the proliferation of “preservatives” used in our foods.  However back in 1911 (before air conditioning was widespread), table salt tended to cake in the container when it was rainy or muggy, because salt is hygroscopic.  This means that it has a tendency to absorb moisture, even from the air, and clump together.   Morton started to advertise using the slogan “When it rains, it pours” because they added magnesium carbonate (an anti-caking agent) to their salt, which allowed it to pour freely even in humid weather. (Today, the company uses calcium silicate.) (What’s The Weather Lore Behind The Morton Salt Slogan?)  Here’s a tip: if you are having a bit of a humid spell in your home, or even going camping, you can add a pinch of rice to the salt shaker to get it flowing.  Just like immersing a wet cell phone in a bag of rice, the rice will absorb the moisture out of the salt and allow it to flow through the holes of the shaker again.

  • Household electronics having issues--especially battery ones:  Electronics and water rarely go together, and they can get finicky when the humidity starts to creep up. Battery-operated appliances have contacts that can easily corrode.  If that happens, of course try to dry out the air, and you can use fine sandpaper on the contacts to remove corrosion.

  • Proliferation of insects and pests: Pests like fleas, ants and cockroaches love high humidity: it’s the perfect environment for them to lay eggs and develop into adults. Warm temperatures combined with high humidity is ideal for fleas, and they can rapidly multiply in these conditions. (Do Fleas Thrive in the Rain?)

  • Mildew on wooden furniture: If you have wooden furniture on a humid porch, you may have already figured out that it needs regular wipedowns and maintenance to keep it from growing “fur”!  The same thing can happen inside when it becomes too humid, because the surface of wood is very hospitable to catching dust that can feed mold.  

If you notice any of these signs, it’s time to take action before mold sets in!  The first thing we can recommend is air circulation and ventilation (outside weather permitting), which can change the indoor climate from room to room.  Air conditioners are not automatically “dehumidifiers”, so if your air conditioner does not have a dehumidification mode, you may need to add a standalone dehumidifier.  Sealing the boundaries of the home is really important to prevent intrusion of exterior humidity.  Finally, our Germ Defender, Upgraded Air Angel Mobile and Whole Home Polar Ionizer can help by sending out millions of ions to kill mold spores in the air and on surfaces. The takeaway is that after a while, you can learn to read the signs of high humidity without even glancing at an air quality monitor, and make adjustments accordingly!

“Sink” those microbes

“Sink” those microbes

According to a University of Reading study, sinks have the perfect recipe for a fungal environment and they host very similar organisms.  Researchers tested more than 250 restroom sinks for fungi, such as black molds and relatives of baker's yeast.  These fungal biomes usually don’t pose a problem for healthy individuals, but for those with compromised immune systems, sinks could be an overlooked reservoir of illness.  

One might think that with all the detergent and handsoap going down the drain, it would be squeaky clean, but for anyone who’s had to clean the drain or take it apart to unclog it or save a piece of jewelry, it’s anything but!  The types of fungi that live in sinks can tolerate high temperatures, low pH (acidic), and low nutrients. Some even use detergents, found in soap, as a source of carbon-rich food.  It’s a place with constant moisture and food sources, so…voila!  Mold galore.

If you’re concerned about the condition of your sink drain for yourself or anyone else living in your home, there are some simple ways to keep the drain clean on a regular basis without using toxic chemicals.  To be clear, the study was conducted on restroom sinks, but the principles are the same for every sink: eliminate food for mold and flush it with natural cleansers periodically.

  • Using a mesh drain strainer on your sinks prevents solids like hair from clogging it, because hair in  sink drains is just another surface for mold to grow on.   Sink Shroom is a sink stopper/filter that you can pull out, wipe it clean and replace to keep the hair out; tub and shower models are also available.

  • Plumbers agree: Never pour grease down the drain!  From cooking oil in the kitchen to any kind of body or hair moisturizing oil in the bathroom, it just doesn’t belong in the drain. 

  • Thoroughly rinse the drain with hot water when you send anything other than water down it.  Toothpaste?  Add hot water.  Extra dirty hands?  Add hot water.  You get the idea!

  • Our top choice to keep mold at bay in the sink is simply spritzing it regularly with TotalClean– our non-toxic, odorless cleaner. Its two active ingredients, iodine and copper, are elements recognized from ancient times to freshen and sanitize water and surfaces.

  • Better Homes and Gardens have also compiled a list of natural cleansers and tools for every type of sink: stainless steel, porcelain sinks and white sinks are all covered. 

As with all other areas in the home, regular cleaning and maintenance of sink drains can go a long way!  If you still find mold growing around the drain or foul odors coming from it, then it could be a hardware problem instead.  All sink, tub and shower drains are required to be plumbed with a “vent”.  Vents allow sewer gasses to rise and escape through the roof of the home.  According to the uniform plumbing code, vents must be located within six feet of the P-trap (that snake-like part under the sink); otherwise, the drain may not work properly and gasses can build up, supporting mold and microbe growth.  If this seems to be the case, it’s best to have a good plumber check out the location and condition of the sink vents and see if there are other drain problems.  

Photo by Bibi Pace on Unsplash

All about Alkaline Water

All about Alkaline Water

Although I thought that alkaline water became a fad in the early 2010’s when it became readily available in the bottled water market, in fact it was almost 80 years earlier that scientists began to research the effects of alkaline and “ionized” water on the body.  To begin, let’s talk about what alkaline water is.

Water is super-important to our bodies and health, of course.  There are many properties of water, and pH ("potential of hydrogen" or "power of hydrogen") is one of them.  pH describes the acidity or basicity by measuring concentrations of the hydrogen ion, H+.  Chemically, water is made up of hydrogen and oxygen atoms sticking together in its famous “H2O” formula.  More free hydrogen ions in water (which are the proton of the hydrogen atom when it is stripped of its electron, denoted H+), cause water to be more acidic.  Water that has more free hydroxyl ions (OH-, read more about hydroxyl ions in the air here)  is basic.  Electronic pH meters measure the potential (electric charge) between 2 electrodes immersed in water or other liquids, to assess the hydrogen ion activity in the solution. (Britannica.com)

The pH scale ranges from 0 (very acidic) to 14 (very basic) and the number 7–in the middle of the scale–is neutral, meaning it is neither acidic nor basic.  This seems simple, but this is not a linear scale–it’s logarithmic.  Each number represents a 10-fold change in the acidity/basicity of the water. Water with a pH of five is ten times more acidic than water having a pH of six.  The EPA recommends a pH of 7 to 8.5 for drinking water, and for reference black coffee has a pH of about 5 and typically handsoap falls between 8 and 10 (the soap shown below is likely soap used in automatic dishwashers).  Our blood is about 7.35 pH.   

Source: siamhillscoffee.com

Now that we understand a little more about pH, I can add a layer of complexity: alkalinity and pH are not the same.

The above chart shows relative pH, the concentration of acid protons [H+]. On the other hand, the alkalinity of a solution is its ability to neutralize acids. Alkalinity consists of ions that incorporate acid protons into their molecules so that they are not available as a free acid that can lower the pH. This is known as buffering.  (What is the relationship between pH and alkalinity?)  “Natural” or “mineral” waters contain higher concentrations of carbonate (CO32-) and bicarbonate (HCO3–) ions, which are the buffers, than purified waters. Thus they have greater alkalinity or potential to neutralize acids. 

Alkaline water is a very controversial topic because for some years, proponents stated that it changes the pH of your blood (to create an environment inhospitable to cancer and other diseases).  This theory is not true.  Our bodies tightly regulate the pH of our blood, and if it changed significantly, it would be a life-threatening condition, such as diabetic ketoacidosis.  Acidosis refers to having blood that’s too acidic, or a blood pH of less than 7.35, while alkalosis refers to having blood that’s too basic, or a blood pH of higher than 7.45. (Healthline.com).  Alkaline water does not change the pH of the blood, however, only the urine.  This is because the acids in the stomach counteract the alkalinity in the water, before it is absorbed by the body. (henryford.com)

Although research is ongoing, the more plausible cause of health benefits from drinking alkaline water is its acid-neutralizing and antioxidant potential.  There are several ways to make tap water more alkaline: electrolysis, light irradiation, ultra-sonication, treatment with a magnetic field, bubbling with gasses, collision, strong water flow, and treatment with specific minerals or rocks (2012 article).  Of these, electrolysis (ionization) and mineral treatments are probably the most popular.

Regarding mineral treatments, increasing water alkalinity can be as simple as adding a small amount of  baking soda, but this method is not particularly tasty to everyone and adds sodium as well, which can be detrimental for those on low-sodium diets.  Chemical water treatment systems add alkaline minerals such as calcium, magnesium and potassium through concentrated drops, powder supplements or water filters.   Ionization, however, is where scientists and commercial businesses have been busy testing and innovating for the better part of the last century. 

Alkaline water research began in Japan in the 1930’s.   Japan has been a major adopter of alkaline water for health benefits, where alkaline electrolyzed water (AEW) apparatus have been approved as a medical device.  The Japanese Health Ministry recognizes that alkaline electrolyzed water (AEW) improves gastrointestinal health. It neutralizes gastric acid, improves intestinal bacterial flora and improves other gastrointestinal conditions.  (Japanese Study of Daily Ingestion of Alkaline Electrolyzed Water). 

According to an ionizer manufacturer, water ionizers work by using electromagnetism to change ordinary tap water into ionized water.  Ionizers actually need calcium and magnesium in water to work. They work best with hard water as long as the water isn’t too hard. If it is, then the hardness will need to be reduced. Water ionizers are actually more prone to hard water deposits because an ionizer changes the mineral carbonates in tap water into mineral hydroxides. (Will a water ionizer work with my water?).  Plain water, besides the H2O,  is a mix of alkaline minerals and carbonate (dissolved CO2). A water ionizer separates the carbonate from the alkaline minerals. The alkaline minerals and the acidic carbonate are discharged in  separate streams of water. (How water ionizers work)  

To put it another way, a water ionizer puts a negative electrical charge into the water it makes. As a result, that negative electrical charge gives the water antioxidant potential which can be measured, just like the charge of a battery. The negative charge is called its Oxidation Reduction Potential (ORP). (What is the difference between alkaline water and ionized water?)  

Now that you theoretically know how to make alkaline water, you might want to investigate some of the latest studies on benefits of drinking it:

A 2020 clinical trial found that alkaline water consumption (pH of 9) for 10 months in mice had an anti-aging effect by increasing telomere length (which regulates cellular aging) and significantly reducing reactive oxygen species in blood. (Alkaline Water Benefits: Three Surprising Research Findings)

A clinical trial published in the Biology of Sport journal found that athletes who consumed alkaline water had “favourable changes” to hydration status compared with athletes who drank tap water. The group drinking alkaline water also had much more efficient lactate utilization, which suggests that alkaline water use during exercise may potentially improve endurance. (Alkaline Water Benefits: Three Surprising Research Findings)

A 2021 study on high-mineral alkaline water found that its consumption improved anaerobic exercise performance, supporting the potential performance benefits shown in the previously-linked study. (Alkaline Water Benefits: Three Surprising Research Findings)

A 2022 study found that postmenopausal women who drank alkaline water had significantly lower metabolite risks (fasting plasma glucose, TG/HDL, diastolic blood pressure, waist circumference), longer sleep duration and stronger handgrip strength.  However, there was no significant difference on LDL, systolic blood pressure and body weight with alkaline water drinking.

Despite these and other studies, many scientists and health experts are not convinced that drinking alkaline water has benefits.  They don’t think it’s unsafe to drink, however, so you’re free to do your own experiments and research.  Let us know about your experience with consuming alkaline water!

Photo by Johnny Z on Unsplash

How Vestibules and Foyers make your home healthier

How Vestibules and Foyers make your home healthier

In the US, not many people would say they have a “vestibule” in their home.  Vestibule is defined as an empty space or small area located just inside the entrance to a building. This sectioned-off area has the main purpose of serving as a passage from the entryway to another, usually larger, interior area of a house or building. Vestibules are used as welcoming areas, reception areas, and wait spaces. Often, people may be able to hang their coat and take off their shoes in this space. (study.com) Oh!  You may say, that’s a  foyer.  And, although there are some small differences between the two, they share much of the same functions. 

Besides serving as a transition space from the indoors to the outdoors, architects also know that the vestibule serves two other functions: to block the view of the main interior from outside and create privacy, and to control the exchange of heat between outside and the interior of a building.   In terms of air quality, now we’re getting somewhere.  It’s very useful for the comfort and cleanliness of your home to have a foyer (vestibule) for the ability to:

  1. Stop dust and mold from coming into your home by having a place to take off your outside shoes and coat (see our article on how to bring less contaminants into your home)

  2. Stop heat or cool air from flowing right on out of the house, and preventing the same from coming in (plus unwanted humidity)!

The best designs incorporate 2 sets of doors, one on the exterior and one on the interior, with enough space between them for one set to be closed.  Meaning–you can walk into the foyer, close the door, take off your shoes and coat comfortably, and proceed into the house through the interior doors.  This truly makes the foyer a “buffer zone” for your clean, climatized home.  (In businesses, guess what they invented to take up less space?  Revolving doors!  Because each section of the revolving door can be closed off while you rotate it, they really function as mini-foyers).  Mudrooms are also a type of vestibule, and their name says it all– a place to leave the mud before entering the house!  (hunker.com)  

Now that you see the purposes of the foyer or vestibule, it’s less likely that you’ll think of them as “wasted space”.  Your foyer can be elegant and grand, or simple and cozy, because it’s a “first impression” for your home.  What if you don’t have a foyer, but now you want one?  Well, of course it’s possible to renovate and put in doors, lighting, etc., but you can also “carve” out this space by using furniture and decor to give it some of the same style and function without actually having a separate room.  Simply searching for “how to create a foyer when you don't have one” brings up a ton of good ideas, some of the best of which are: (from architecturaldigest.com)

  1. Add hanging hooks and a bench, for guest coats and removing shoes. 

  2. Bring in extra storage, like a classic armoire, if you would rather not look at a pile of coats and shoes!

  3. For style, add a rug, a statement light fixture, and a small console table (the better to hide away your mail!).  Also consider adding a mirror and wall decor.  

  4. Add germ protection: Germ Defenders and Air Angels are small, discreet sanitizers that can destroy pathogens brought in from outside before they enter the rest of your home.  Plug one in and basically forget about it--just enjoy the clean air!

  5. If your front door just opens into your living space with no entryway at all, you could add a pretty folding screen to create some separation. (clutter.com)  Better yet, make a wall of plants that will not only enjoy the light coming in if you have a window or glass door, they will also filter air pollution and particulates coming in from outside!

Source: Amazon.com

You can also turn your open-ended foyer into a semi-closed one without installing doors.  You could opt for installing some beautiful insulated drapes on the open end for climate control, which can be tied back when you have a large influx of guests or furniture coming through.  Plus–they look very elegant!  Another option that is becoming super-popular are magnetically-closing fabric or plastic doors.  Because they are easy to pass through and self-closing, they can be great for kids, those with disabilities, or to section off your foyer or mud-room.  Clear plastic doors are nice because they don’t block the view, but beware of those made with EVA (ethylene vinyl acetate).  EVA is a safer alternative to PVC, but some EVA contains formamide.  Formamide is used to make the foam soft, but it’s considered to be carcinogenic and a developmental toxin that can be absorbed through the skin. If you’re considering purchasing one of these doors made from EVA, it’s best to contact the manufacturer to ask if their product contains formamide. (hellonaturalliving.com)

“Air curtains” or “Air doors” used to be features only found in restaurants or businesses like grocery stores.  You know–it’s that blast of air that greets you from above when you open the door!  Now, they are available for homes in a 36” width, so even a modest home can use this energy-saving feature (it becomes more important as the temperature difference between inside and outside increases).  Here is a diagram of how this device helps you keep your building envelope more intact while including doors. 

(Source: learnmetrics.com)

According to Berner, a longtime manufacturer of air curtains, air from the room is accelerated by the unit’s fans, then directed through a plenum for even distribution along the full length of the nozzle.  Airfoil shaped vanes in the nozzle reduce turbulence so you get a smooth flow of air.  In addition to conserving your indoor environment, air curtains also reduce flies, mosquitos, yellowjackets, and bees inside because these small insects find the air stream too powerful for them to fly through and if they try, they are blown down or sideways before they can enter the building.  Because of their design, the American Society of Heating, Refrigerating and Air-Conditioning Engineers (ASHRAE) Standard 90.1-2019 and the International Energy Conservation Code (IECC) building code allows AMCA certified air curtains as alternatives to vestibules in commercial spaces that are required to have vestibules.  The most important specs to check before purchasing an air curtain are airflow, noise level, power, and available width.  Read this article to learn about the top air curtains for the home.  

For more inspiration, this gallery of 50 stunning entryways will make you want to bring back the “grandeur” to your entrance, and may help you figure out how to do it with pieces of furniture and decor that you already have!  

Photo by Eddy Billard on Unsplash

Q: Do Air Handlers Belong in the Attic?

Q: Do Air Handlers Belong in the Attic?

A: It depends!

(Don’t you love that answer?!)  Every one’s home is different, as well as where their home is built (climate), so there aren’t hard and fast rules, but we can surely show you the pros and cons of putting your air handler in the attic.

First of all, an air handler is part of a split system central AC unit.  In these systems, there are two distinct parts: one contains the condenser that changes the refrigerant from a gas to a liquid to release the heat from inside the house (the condenser is usually located outside), and a second part that contains the evaporator (which absorbs heat from the house air) and a blower to move air through ductwork to different rooms.  This second part is called the air handler and because it’s not super quiet and can take up a good amount of space, many people install their air handler in the attic.

The attic may or may not be a good location for your air handler.  Here’s how to know: is your attic conditioned, or unconditioned?  Conditioned attics are considered part of the building envelope and they are insulated.  Conditioned attics don’t have to be “finished” per se with drywall and nice flooring, but they do need to be air-sealed from the outdoors.  Air handlers CAN belong in conditioned attics. 

Unconditioned attics (also called vented attics) are exposed to exterior temperatures through ridge vents, gable vents, soffit vents or powered vents.  There is no “air conditioning” so humidity, dust, insects and extremely high or low temperatures are all present in an unconditioned attic.  Air handlers DO NOT belong in unconditioned attics.  Why?  

  • For one, the air handler is responsible for moving the air you breathe, and even a small leak in it or the ductwork will pull humid, dusty, unconditioned air from the attic into your home.  
  • Extreme temperatures cause your air handler to work less efficiently, which translates to higher heater and cooling costs.  
  • The air handler is an expensive piece of equipment that can cost thousands of dollars; to minimize breakdowns and maximize its life, it’s best to place it in a clean, moderated environment!
  • Accessing and crawling around a dirty, dusty attic makes routine maintenance or needed repair work more difficult.
  • If the condensate drain plugs up and overflows the pan under the unit, guess where that water will go?  Onto and through your ceiling!

“Conditioned space” in your home costs money, because it is part of the square footage that realtors count when valuing your home.  For this reason, homeowners and many builders prefer to stick the air handler “out of sight and out of mind” in the attic or worse, in an unconditioned crawl space.  Now that you know better, if you have the opportunity, give your air handler an “upgraded” installation spot in your home.  Here are some tips for finding that spot:

  • The air handler should be centrally located in the home in order to minimize ductwork run lengths to all rooms.
  • Closets are better than the attic, but without enough room to do maintenance on your unit, small closets are not ideal.  Without room to walk or reach around the unit, HVAC technicians will have a hard time making good sealed connections with ductwork, and if anything needs repair, it takes longer to do it, possibly requiring removal of the whole unit.

It’s tough to understand how this air handler and ductwork were installed in such a small space.  (Source: energyvanguard.com)

  • A large utility space is ideal.  You will not want carpet or hardwood below the unit, so that any water leaks can be cleaned up easily.  Good lighting also makes it easier for you to check on the unit from time to time, and to change any filters.  

When replacing your air conditioning unit, we hope you will give serious thought on where to locate the new air handler.  Giving it preferential space inside your home will give you quality air for years to come.  It’s important, however, to make sure that:

  • This room or large closet has its own air supply and return, because when air gets sealed behind closed doors (and you will want to close the door to isolate the unit acoustically), mold can develop.  This can be accomplished by placing a grille in the return of the air handler, and placing a supply grill in the wall or through the ceiling with a “jump duct”. This article from renowned building scientist Joe Lstiburek shows the flaws of different locations and how to overcome ventilation issues.
  • Locating an air handler next to a gas appliance such as a gas hot water heater can be problematic, unless it is a “sealed combustion” unit.  The air handler will cause the room to be under slight negative pressure while the fan is on, which can affect combustion and venting of the water heater.  
  • If your furnace is a gas furnace, you’ll need to make sure it also gets adequate combustion air.

If you can’t bring it inside your building envelope, you may consider a unit that doesn’t require big air handlers–namely, mini-split units.  One external compressor/condenser can supply several indoor units (evaporators), which are typically hung on the wall, with only small refrigerant and drain lines running between the inside and outside.  Where there’s a will, there’s usually a way!


Healthy Home Chores that deserve a pat on the back

Healthy Home Chores that deserve a pat on the back

It seems like it’s been an extreme year; at times either it is way too hot or unseasonably cold; you may be getting too much rainfall or not enough.  What is our protection from all the elements?  Our homes!  Whether you’re renting or own your house, it’s smart to take care of our homes so that they will continue to protect us.  

There are a number of chores that just need to be placed on a schedule so they don’t pile up and cause problems, but when you get them done, give yourself a pat on the back or another healthy reward!   Here are some of them:

  • Evict pests. Although I don’t want to think of any animal being “homeless”, there are definitely animals I don’t want living near my house.  If you walk around your house, look for holes in the ground, nests near the ground or in the soffits (look up!), under decks and behind bushes.  Here is a fun flow-chart to understand what kind of animal made the holes (get the kids involved and soon you’ll find more holes than you knew existed!)  Why evict pests?  Groundhogs, for example, can make large holes that undermine foundations; mice and rats can carry diseases and fleas that can affect you and your pets, and of course stinging insects like yellowjackets (they live in underground nests that can be massive)  inflict pain and inflammation and make it harder to do the next job!  There are safe ways to get rid of all of them, but if you’re afraid to do it yourself, you can call a professional exterminator. 

  • Cleaning the gutters.  It’s a messy chore that can be dangerous for people with mobility problems, so if you can’t easily climb a ladder or feel uncomfortable doing it, hire a professional.  Why?  Leaves and debris building up in the gutters impede water flow, causing water to back up and overflow against your roofline and soffits, or splash over and against your house, causing rot.  Clogged gutters can also cause ice dams in the winter, a phenomenon that causes ice to creep up underneath your shingles, eventually remelting and making your attic wet! Wet debris also makes gutters drastically heavier, putting more strain on anchor points so that they’re eventually not able to be supported and fall down. If the downspouts get clogged, sometimes it’s not easy to clean them out!   There are gutter guard products that can keep most of the debris out of your gutters, but no product is perfect and will eventually require cleaning.   The other important thing to do while cleaning gutters is to inspect for rot or water intrusion along the roofline and siding, and check the condition of your roof, so that any damage can be repaired before major water intrusion causes mold issues.  Check for stinging insect nests (wasps, bees, hornets) from below before you go up on a ladder, so that you can disable them before they disable you!

  • Clear away dead wood, leaves and trash.  Of course, lawn mowing and fun in the backyard can’t happen with downed limbs and sticks in the way, and more importantly, dead wood and leaves promote termites.  If you have garbage service, you can find out which days they will pick up yard debris; if not, haul them to a more wooded section of your property where they can safely decay.  Trash and broken furnishings are invitations for mold, crawly pests and mosquitoes to take residence, so put on some gloves and haul it all to the curb or to the dump!

  • Clean windows.  I never thought of it this way, but clean windows = a clean bill of health.  Here are some of the nasty stuff that can cling to your windows outside and even affect your indoor air quality (source: Fish Window Cleaning):

    • Bird Droppings - Contact with bird excrement, which can carry up to 60 diseases, can lead to many diseases.

    • Mold and Mildew - These fungi are often found inside homes, but they can also thrive on windows. Mold and mildew exposure can aggravate respiratory allergies as well as chronic respiratory conditions like asthma.

    • Pollen - Pollen can accumulate on window panes and sills, contributing to the sneezing, eye irritation and congestion often associated with pollen allergy - even when indoors!

    • Dust - Windows can accumulate plenty of dust - and worse - dust mites. Dust mites are microscopic, insect-like pests that love dirty windows and can cause respiratory issues and allergic reactions because of their feces, which may create airborne health hazards.

  • Clean mold off sidewalks, decking, siding and landscaping: older homes that are not sealed tightly will have more air flowing into the house, even when doors and windows are closed.  Do you want it to be clean, fresh air, or air that has passed over mold growing on the side and perimeter of the house?  There are safe ways to wash it off, and it’s also necessary to trim overgrown bushes and trees so that the areas around the home can dry out and not harbor mold.  Mold can also grow on mulch, and raking your mulch regularly allows it to dry out and receive fresh air which prevents mold from growing.  Try to set a regular schedule for watering your plants too, because if you are watering your plants everyday, your mulch is wet every day. That means you are helping to create the perfect damp environment for mold to grow on your mulch. Instead, try to water your plants once or twice per week to give your mulch time to dry out. (calblendsoils.com)

Indoors, there are jobs that go beyond “spring cleaning” because they don’t produce the satisfying visual results of a clean floor…yet are oh-so-important to keep up the health of your home.

  • Clean your kitchen exhaust vent.  I know, the grease is gross but that’s why you need to do it–especially if your vent is recirculating air back into your kitchen!  Some filters can be placed directly into your dishwasher–let the machine do the work!  If it’s one that is a simple stainless steel mesh, you can order a new filter and toss the old one. Other safe ways to clean the filter are to use salt, baking soda and vinegar (check out this short video) or baking soda and dish detergent (here’s the tutorial).  Both of these methods require really hot water because melting the grease off the filter takes the least effort.

  • Clean out the refrigerator.  If you like to throw things away (it is oddly satisfying), cleaning the fridge is probably not a bad chore!  Clean shelves and good organization are nice little paybacks at the end.  Although one website says that the crispers and meat storage bins should be cleaned once a week(!), I think it’s more realistic to aim for 4 times a year.  Realsimple.com gives a good game plan on when and how to clean it.  If you find that you need some extra organization bins to help keep it clean and organized check these out (8 for $23). While you are in the cleaning mood, cleaning the refrigerator coils will help your fridge to last longer and cool more efficiently (check out our tips here). 

  • Dust the vents.  If you dust your vents weekly, bravo!  (apparently you and Martha Stewart are on the same schedule).  If not, use the soft head on your vacuum cleaner extension to suck up dust before it gets airborne with the next blast from your air conditioning or heating.  

  • Clean the fans.  Fans (ceiling and portable) are really important to keep air circulating in your house.  Air circulation prevents mold by causing excess moisture to evaporate from soft furnishings instead of settling into it.  Air circulation also prevents stale air pockets in your home, aiding air conditioning and heating.   Finally, air circulation helps dilute VOCs and pollutants from inside your home, so that you are less affected by them.  For all these reasons, it’s important to keep your fans clean!  If you have ceiling fans with a normal height ceiling (8-10 feet), then try this ceiling fan blade cleaner instead of getting up on a ladder.   If you use it every other week or so, you can keep your fans clean without having to break out the ladder, soap and water.   If you are not so diligent and the dust is pretty thick, you can try this trick from bobvila.com: take an old pillowcase and slip it over one blade to catch the majority of dust while you move it off the blade, then use a damp microfiber cloth to finish the job.  

  • Clean the dishwasher.   Dishwashers are, unfortunately, a great place for mold to grow: you got warmth (check), water (check) and air (check).  Given these optimal mold breeding grounds, the dishwasher needs deep cleaning every once in a while (like, at least once a year) to keep your dishes sanitized and looking their best.    Here’s a video on how to do it.

  • Clean the washer and dryer.  Laundry rooms can get pretty dirty and dusty, considering that all the dirty clothing of the household passes through them every few days!  Cleaning the tops of these appliances will give you a visual boost, but keep going.  Take time to wipe the seals with sanitizing or disinfecting sprays and cloths (check out our non-toxic list here) and run a full load of laundry in your washer on the hottest setting with EC3 Laundry Additive to get the mold out (a non-toxic bleach alternative).  Make sure to disconnect and clean the dryer vent at least once a year to prevent lint from building up–it’s a fire hazard!

  • Get your chimney cleaned.  If you have used your fireplace in the last few years but not cleaned the chimney, don’t wait til the snow comes down to worry about whether it needs cleaning!  A professional service will also check the damper at the bottom so that it will seal off when you’re not using it, and the guards at the top of the chimney to prevent critters from coming inside.

Of course, we know there are zillion things that can keep you from accomplishing these cleaning chores, but there are ways to lighten the load: make a deal with your best friend (my house this week, your house next week!), good music, and setting one goal at a time are just some of the tips we recommend for any de-cluttering or cleaning job.  Then, there is the “having guests” incentive: guests are a sure motivator, provided you invite people often enough!    Finally, but most importantly, these jobs are all part of maintaining a healthy home, and it’s a good feeling to know that you and your family are breathing clean air and using clean appliances.  Keep up the good work!

Photo by Clay Banks on Unsplash

Wait–I thought mold was only a problem during the summer!

Wait–I thought mold was only a problem during the summer!

When humidity levels in your home plummet during the winter months due to dry outside air and even more drying heated air inside, it’s easy to think that mold could not possibly be a problem during the winter.  We’re sorry to have to debunk that myth, but sadly mold is a year-round problem!  It flourishes in environments between 60 and 80 degrees and can grow wherever moisture or humidity is present. It’s a problem in the winter because it can grow in your walls and attic, places where it’s hard to detect. (Maryland HVAC company Griffith Energy Services)

Why does mold occur during the winter and where does it get the moisture to grow?  The answers lie in temperature differentials and air leaks.  Warm air that escapes the building envelope can cause condensation when it hits a cold surface (heat energy travels from hot to cold areas).  The worst part is that many of these unregulated “meeting places” of warm air and cold surfaces are deep inside your walls, attic, basement or crawlspace, going undetected for months until it becomes a BIG problem.  Here are some specific problematic places:

  • Do you have ice dams on your roof?  Ice dams occur near the bottom edge of a roof, and they are formed when snow melts on the roof above your attic (usually due to missing or insufficient insulation), runs down the roof to the edge and refreezes, causing a buildup of ice at the edge of the roof.  The ice can even force its way underneath shingles and sheathing, and when it reaches the attic space, will melt again and “rain” in your attic!  The condensation can drip onto insulation, run down into cavities, and cause a lot of mold.  It’s quite a damaging problem in any climate that can get freezing weather and precipitation; even just a dusting of snow can form an ice dam.  Plugged gutters that fill up and freeze can also form ice dams if they are too close to the roofline.  Here’s the “anatomy” of an ice dam:

Source: icedamcompany.com

  • Plumbing pipes that run through poorly insulated walls can create a cold surface on which warm air from the home can condense. 
  • Glass is not a great insulator; a single-pane window will have an R-value of 1 and the standard double-pane window will have an R-value of 2 (see our article on insulation for an explanation of  R-values).  Warm air inside condenses on that cold glass, and condensation that runs down windows can pool on the wooden jambs and framework, allowing mold to grow. 
  • The basement is another place where there is often high humidity, and windows, steel doors and penetrating pipes can be cold surfaces on which condensation will form, which mold loves.  

How can your dry indoor air hold so much water vapor to make condensation?  It doesn’t seem possible until you consider the dewpoint.  It’s true, air at 50% relative humidity does not have enough moisture to sustain mold growth.  The answer lies in the dewpoint of that air.  Check out this fun dew point calculator (well, I think it’s fun and incredibly useful!)  Make sure that the little blue dot is set to solve “dew point” and the units are set to deg F (or deg C if you are used to Celsius).  Now, use the little sliders to adjust the temperature and humidity to your normal indoor environment (get one of our humidity sensors if you don’t have one!), and watch how the dew point changes.  For example, 75 degF at 50% relative humidity = 55 degF dew point.  That means that any surface below 55 degF can cause water vapor to condense out of your “dry” air!  If you put your hand on a single pane glass window when it’s snowing or freezing outside and warm inside, I’m sure you’ll agree this could be a potential problem.

How can we prevent winter mold?

Look up and pay attention to your ceilings, upper stories and attics.  Since heat rises, it makes sense that the warm air from your home may cause the most problems in your upper parts of your home where warm meets cold.  Humid air will accumulate in the upper areas of your home right along with the heat.   Bring your humidity sensor upstairs (if you have a 2nd story on your home) and note the increase. 

  • Seal around can light fixtures and other openings in the ceiling. 
  • Cathedral ceilings are especially prone to mold, because the heat and humidity rise high in your home and hit the roofline (typically there are no attics above cathedral ceilings) that may be poorly insulated.  (Check out these videos by a mold restoration company in Kansas City).  If you replace your roof, consider increasing insulation in cathedral ceilings either by spray foam, or adding rigid foam boards above the sheathing.  Here’s an article by a building science expert on how to install rigid foam boards in roofing.
  • Make sure ceiling fans are moving counter-clockwise during the heating season, to draw warm air down.  
  • Seal the attic stair hatch (if you have a collapsible attic stairway) with a zippered or velcroed containment like this one, which can also save money on your heating bill.  If you have an attic access that is simply a hole cut in your ceiling with trim and loose-fitting plywood or drywall above it that you lift up to get into the attic, try to find a way to add weight to the piece of drywall or plywood (so it sits down snugly) and seal the edges with foam weatherstripping so that gaps don’t let air through.

Mold sometimes forms in plain sight during the winter.  Often bedrooms that are not used are closed off from the rest of the house, but lack of ventilation can be a recipe for mold.  It’s best to open the door and turn on a fan in the room to prevent mold growth on cold corners and walls.  Be vigilant to check north-facing walls, corners and closets, as these can be the coldest in your home.  If you discover mold in a closet, check out our article (see #6) for tips on keeping it mold-free once it’s been cleaned. 

If you have single-pane windows, you don’t necessarily have to replace them to “up” their insulation or R-value and avoid the condensation that can lead to mold.  Here are a couple of solutions:

  • Insulated drapes can prevent warm air from hitting cold windows–just make sure they go all the way to the windowsill or floor and fit closely along the sides, to make a “seal”. 
  • There is conflicting evidence whether window films (that are cut and fit to “cling” to the glass of your window) and shrink-fit window insulation actually reduce condensation on your windows.  This article by an Australian company brings up two important points: that radiant energy will still flow through the window film, and the air-tight seal required for the shrink-fit system to work will seal moisture into the space between the window and film (not good).  If condensation is a problem on your windows, it’s not clear whether these two solutions will work. 
  • Indows” are inserts that fit inside your windows (how clever is that name!).  They are custom made from measurements you provide and fit snugly against the frame with compression seals and are supposed to increase the R-value of single pane windows to 94% of double-pane windows.  This short video shows a customer measuring and fitting his new Indow.

Even if you don’t plan to replace siding on your home, there are companies that can increase your exterior wall insulation in discreet ways so that mold doesn’t form inside walls.  It may be possible to add insulation between the studs by either removing a layer of siding at the middle or top of the first floor, or drilling through the interior wall.  Then loose fill or spray foam can be blown into the cavity, and the siding replaced or the hole patched.  (attainablehome.com)  Loose fill can be sheeps wool, cellulose, fiberglass, hemp, cork or a mixture of agricultural products, like ClimaCell.

Make sure you check the basement regularly to ensure that everything is dry, so that you won’t be surprised by mold.  We have a lot of tips on preventing mold in the basement in this article

Finally, suit up with some warm layers and take a walk around your house to see where cold air might be seeping in from the outside.  Evidence of animal intrusion, missing siding, fiberglass insulation peeking out, missing shingles, and exterior mold or rot are all areas to address.  Don’t let dry winter air fool you, because unregulated “meeting places” of warm air and cold surfaces can produce moldy consequences!


Could you improve your breathing?

Could you improve your breathing?

From singers to athletes to the elderly with COPD to the young affected by asthma, there are millions of people who desire to breathe better.  Thankfully, doctors and scientists have studied the respiratory system for a long time and invented some pretty cool non-drug treatments and methods that can really improve the quality of your breathing.  We’ve written an article on How to have clear sinuses; this article focuses more on other ways to breathe better, including methods, exercises and devices.  

Wim Hof is a Dutchman, nicknamed “Iceman” who has become famous for doing unnatural feats like swimming under arctic ice and running barefoot in ice and snow.  He claims that his breathing techniques will lead to tangible health benefits: more energy, lowered stress levels and an improved immune system. Breathe properly, Hof claims, and oxygen levels in the tissues increase and adrenaline floods the body, granting strength that we didn’t know we had.(discovermagazine.com)  It also allows him to have control over fears that adverse situations (like plunging into cold water) initiates.    While the researchers still have no solid theory as to why breathing and cold exposure seem to dampen immune activity, they suggest that the release of adrenaline during such breathing plays a role. The spike in adrenaline was linked to increased levels of an anti-inflammatory protein, and decreased levels of proteins, called cytokines, responsible for signaling the immune system.  Some followers of Hof were tested and found to have less inflammation, fever and nausea after being injected with an inflammatory agent during their breathing routines, than others who did not perform the techniques.   There have been other breathing techniques like the Valsalva Maneuver (used to clear an ear blockage, clear a heart arrhythmia, or get rid of the hiccups) and Lamaze, which increases tolerance to pain and aids relaxation.  Knowing that breathing and specifically, holding your breath produces (at least temporary) physiological body changes, regular practices may produce longer term benefits.  Here is a beginner’s video tutorial on Hof’s breathing method (10 minutes).  Whether you choose to use these changes to dive into icy waters or just enjoy life with less stress and illness, is up to you!  For more information about deep breathing techniques and benefits, check out our article here

Exercising devices

If you’ve ever had a lung infection or had to do a breathing test, the doctor may have handed you a bulky plastic device with a tube called a spirometer. This device assesses how well your lungs work by measuring how much air you inhale, how much you exhale and how quickly you exhale. (mayoclinic.org)  It’s economical, for sure, as there are no electronics involved.  However, it’s not very portable for anyone who has a busy lifestyle and wants to continue treatment and strengthening.  This is where a plethora of newer (literally) hand-held devices come in.  Some exercise your inhalation muscles (inspiratory), some exercise your exhalation (expiratory) and some do both.  Besides lowering stress and improving athletic performance, doing 30 breaths per day on a spirometer for six weeks lowers systolic blood pressure by about 9 millimeters of mercury, according to researcher Daniel Craighead, an integrative physiologist at the University of Colorado Boulder.   Those reductions are about what could be expected with conventional aerobic exercise such as walking, running or cycling. (NPR.org)  The following were taken from the review “7 Best Lung Exercisers…” 

  • The Airphysio is an OPEP (oscillating positive expiratory pressure) device, which means it uses a pressure system, similar to a balloon to enact some pressure into your lungs, allowing you to train your breathing and clearing the mucus.  It’s easy to use and carry with you, and comes in low, average and sports lung capacity sizes (from $60).

  • The Airofit Breathing Trainer is designed for serious athletes and those who want to really increase their breathing capacity and endurance.  It is adjustable and allows you to train Respiratory Strength, Accessible Lung Capacity, Anaerobic Threshold, and other areas of your breathing.  It is bluetooth capable to link with an app for coaching and monitoring your progress (from $129).

  • The Breather is well-designed, affordable at $50, and easy to use.  It has 5 exhalation and 6 inhalation adjustable pressure settings to be used by people of varying goals, from athletes to COPD patients.

WellO2 is a product designed in Finland that uses resistance training and warm, moist air to improve lung function and open airways.  For athletes, deep breathing during WellO2 training stimulates the vagus nerve, which is part of the parasympathetic nervous system to calm the mind and improve sleep for better (athletic) recovery. (wello2.com)  For the elderly and those who struggle to breathe, it strengthens lungs and abdominal muscles, as well as helps to reduce congestion and clear sinuses.  It can help singers to warm up their voice before performances and stay well.  At 229 Euros, it’s not a cheap device, but could contain quite a few health benefits. 

Nasal aids

Maybe you’ve heard of BreatheRight strips, which were all the rage in the 1990’s-2000’s.  These are still very popular external devices, for athletes and those who are prone to nosebleeds or sensitivity in the nasal cavities.  Nasal stents are the next generation of these type devices, designed to open up your nostrils for better breathing while you are wearing them.  Check out this video of an ENT surgeon reviewing some of them. 

  • The Turbine claims to increase nasal air flow by 38%, and are designed for athletes to get the best breathing for the best sports results. Their trial pack includes 1 small, 1 medium and 1 large for $14.  They are reusable for 10 times per set. 

  • Mute is a nasal stent that is designed for use during sleep, to breathe and sleep better, and snore less. Their trial pack includes 1 small, 1 medium and 1 large for $8.

  • Airmax Nasal Dilators are $15 per set and made out of soft, flexible material to help optimize airflow for better sleep up to 76.1%. 

If you aren’t satisfied with your breathing or your health, why not give one or more of these a try?  They have less side effects than drugs, are less invasive than surgery, and could improve your life with better sleep and energy.  We’ve got to make the most use out of what’s free–the air around us! 

Photo by Raj Rana on Unsplash

How to choose a Whole-Home Dehumidifier

How to choose a Whole-Home Dehumidifier

If you have problems keeping the humidity below 60% in your home, we’ve written a lot on ways to lower it.  The first and foremost one should be to check for hidden air leaks in your building envelope.  Look for and correct the biggest ones first, to reap the most benefits.  To the untrained eye, these might not leap out at you, so a short visit by an energy inspector can discover big-ticket savings. Just recently, I found a big one that I should have recognized years ago: a shaft made for ventilation ducts going from my attic to my first floor was open and uninsulated!  No wonder my 2nd-story bedroom can be very cold or very warm–and I’m sure this wasn’t helping my humidity problem.  

If you have sealed up obvious air leaks, insulated appropriately, and are not considering upgrading your central air conditioner, then you can consider adding a whole-home dehumidifier.  We wrote a little about them here, but I found out a lot more recently when I had to select one for my own home!  

Sizing the dehumidifier depends on several things:

  • Square footage of your home: if you have 8-foot ceilings, this directly correlates with rated square footage for dehumidifiers.  If you have higher ceilings, this additional volume will reduce the rated coverage of the dehumidifier.

  • Where you are located geographically (exterior temperature and humidity) and/or how well sealed your home is:  Homes located in more humid climates and those that are only  loosely sealed will need more capacity in dehumidification, because humid air from outside can rapidly infiltrate the air inside a leaky home.  Infiltration rates also vary throughout the year. Infiltration can be greater in winter if the temperature difference between inside and outside is greater. For example, 75 degF inside and 0 degF outside in winter, versus 75 degF inside and 95 degF outside in summer. Infiltration rates depend on wind velocity and direction and also on the building envelope construction. (energy-models.com)

The following chart gives capacity in the number of liters of water a machine can remove from the air in one day.

Source: Sylvane.com

A few years ago the dehumidifier capacity ratings changed. The new 2019 standard considers the Integrated Energy Factor, which is more accurate in representing the capacity of a dehumidifier. The new 2019 testing procedure also tests dehumidifiers at a lower temperature (65°F) while the older standard test temperature was 80°F. (learnmetrics.com)  The sizes above are under the new 2019 standards.  Generally, the sizes required for a given square footage were reduced.  

So, you’ve determined the capacity you will need.  Here are some features to consider when shopping for a new unit:

  • Circulation: The current consensus on the best way to install a whole-house dehumidifier is to have a dedicated return, and to use the HVAC supply or a dedicated supply.  If you exhaust the dehumidifier into the HVAC supply, you can use the blower on the HVAC to always circulate air throughout the house.  Otherwise, if you choose a model with a “circulation” mode, you can set the dehumidifier to always circulate air in the house.  Since dehumidifier blowers are generally smaller than air handler blowers, you may realize a cost savings by using this function.

  • Portability: Some whole home dehumidifiers come with the option of casters so they can be rolled from room to room.  While portability can be an advantage, there are several problems with this.  First of all, they tend to be heavy, cumbersome units. Second, in the space in which you’ll use it, you’ll need to find a drain that is lower than the unit, or set it up higher to drain into a sink or shower.  This requirement alone may cause you to have it permanently installed!

  • Noise and heat:  because these larger machines than smaller room dehumidifiers, they tend to produce more noise and heat.  Therefore, amount of noise, heat, and the installation location are key characteristics to consider.  

  • If you have an open-concept living space where doors are rarely closed, you may consider an “in-wall” unit.  This can be a very unobtrusive way to get dehumidification if you don’t have a duct system (such as when window or ductless AC units are installed), and additionally it can be a super-easy installation for your HVAC technician if a power supply and drain are closeby. 

  • Power requirements: check with your electrician or HVAC technician before purchasing to make sure that the circuit on which you plan to install the dehumidifier has sufficient amperage. 

  • Filters: some dehumidifiers come with a removable, washable filter (like MERV 8).  This is nice, but if the dehumidifier has its own return, then you will want a higher MERV filter in this return so that smaller particles are not sucked into the distribution system. See our article on HVAC filter ratings here

  • Remote reading and wifi capability: at the minimum, whole house dehumidifiers should have the ability to be controlled remotely, either from a central control panel or a wireless control.  Who wants to go into the attic or crawlspace to check humidity and turn it on or off?  Your HVAC technician should be able to route the controls to a suitable place.

  • Why not add some fresh-air ventilation while you’re at it?  A whole house dehumidifier can be configured with a fresh air intake, to pull in fresh air from the outside at a timed interval so that your whole home has less CO2 and indoor pollutants, without raising the humidity level or increasing dehumidification load on your AC unit. 

If a musty smell has been taking over your home lately, don’t delay in measuring the humidity and getting it under control!  Whole-house dehumidifiers can supplement an existing air conditioning system and make your home more comfortable and healthy for everyone. 

Photo by Anne Nygård on Unsplash

Dealing with Earthquakes

Dealing with Earthquakes

Just like many other controversial topics, there is conflicting evidence on whether earthquakes are increasing.  Some news sites say that there is no increase in earthquakes; it just seems that there is an increase because reporting methods have gotten better (usgs.gov).  However, a journal for the insurance industry reports that earthquakes are increasing in US oil regions.  This 2021 article “reveals that tremors of above the magnitude of 2 on the Richter scale quadrupled in 2020…The oil and gas industry is contributing to the increased seismic activity through its practice (of) the saltwater disposal through underground injection.”  Oklahoma, Texas, Louisiana and New Mexico were the areas studied, and more frequent and larger events continue to occur.  In addition, new research published in 2023 confirms that fracking causes slow, small earthquakes or tremors.  Fracking is the process of injecting high-pressure fluids to extract oil and gas.  Using liquid carbon dioxide for fracking instead of wastewater could be better for the environment in order to keep carbon out of the atmosphere, but because it’s a liquid, it can still cause tremors and earthquakes.

California has hundreds of “fault” lines (a fracture or zone of fractures between two blocks of rock, which allow the blocks to move relative to each other) (usgs.gov), two of the most infamous being the San Andreas fault in southern California and the Hayward fault in the San Francisco bay area in northern California.  Here is a picture of what frequent earthquakes look like (source: earthquaketrack.com):

If you live in a zone where earthquakes are frequent, you’ll know that the effects of earthquakes are manifold. Here are some of them: (source: getuhoo.com)

Dust:  “A case study was done in New Zealand following the 2010 earthquake that hit Canterbury, along with its aftershocks. The data from the study shows that PM10 particulate matter levels hit 140µg/m3 over a 24 hour period, which is well over the National Environmental Standards for Air Quality (NESAQ) threshold of 50 µg/m3. The amount of PM2.5 concentration also hit 127µg/m3 at this time, about 90% of the level of PM10.”

 “The vibrations and tremors hitting buildings and homes loosens up dust and drives them into the air. Tectonic shifts can disrupt sediment and expose them to the air where they linger as particulates for days or even longer. Even in homes the jolt can release dust that is normally packed away and bring them out into the open, underscoring the importance of keeping a clean home.”  

We agree; it’s important to have dust control measures in place before a small or large earthquake shakes things up!  Here are our top ways of controlling it:

  • Minimize carpet and fabric furniture if possible

  • Frequent vacuuming with a HEPA vacuum 

  • Use of a MERV 13 filter (if possible) in your furnace/HVAC

  • Use of a standalone HEPA filter in areas where you spend a lot of time (living room, bedroom)

  • Brush and bathe pets weekly if possible

  • Keep several MERV and HEPA filter changes, as well as N95 masks, on hand for use during emergencies.

Fire and water damage:  According to earthquakeauthority.com, the primary damage in an earthquake is caused by surface rupture and ground displacement, when the ruptured fault produces vertical or horizontal movement on either side of it.  However, liquefaction is another odd consequence that damages pipelines too: solid soil will change into a “liquid” during violent shaking, causing support systems to fall away.  When this happens, pipelines break and fires can start, spewing all kinds of chemicals into the air, ground and water.  In this severe case, you should have an evacuation plan if this kind of disaster affects your immediate neighborhood.  If you are experiencing these pollutants from several or miles away, shelter in your home if possible, and keep windows and doors closed with the HVAC on “recirculation” mode with minimal fresh air.  Here are some ways to mimimize the pollutants you’re breathing inside:

  • Use of a MERV 13 filter (if possible) in your furnace/HVAC

  • Use of a standalone HEPA filter in areas where you spend a lot of time (living room, bedroom)

  • Keep several MERV and HEPA filter changes, as well as N95 masks, on hand for use during emergencies.

  • For fresh air, you can use a Window Ventilation Filter to keep smoke, dust and pollution out of your home. 

  • Units like the Germ Defenders and Air Angels will help to mitigate harmful contaminants by converting them to larger particles that will fall to the floor. 

Landslides and Tsunamis: Landslides are the movement of rock, earth, or debris down a sloped section of land, and are caused by rain, earthquakes, volcanoes, or other factors that make the slope unstable.  (nationalgeographic.org).  Obviously, this type of earth movement will trigger a lot of dust and pollution released into the air as earth and buildings and infrastructure are demolished in the path of the landslide.  Tsunamis are giant waves caused by earthquakes or volcanic eruptions under the sea. (noaa.gov)  The wave can cause catastrophic flooding upon hitting land, which brings building devastation and mold to the buildings that are not destroyed.   

There are “early warning systems” in major quake zones, however they can only provide warning to those outside of the epicenter (10 miles or more), and they only provide warnings of larger, more violent earthquakes. (caltech.edu).  

Preparedness is key.  In addition to the measures listed above, you can also prepare an evacuation kit in case you have to leave your home, which of course is useful in disasters other than earthquakes.  Judy.co is a company devoted to emergency kits that include water, food, power and tools so that families can survive for short periods following a disaster.  With advice from this page at ready.gov, you can build your own kit.  We sincerely hope that no one is injured or affected by such a disaster in their lifetime, but sadly in areas like northern California, this is not what experts predict will happen.  Earthquake risks can be high in the beauty of the South Pacific islands, the mountains of Mexico, and the plains of Oklahoma, so wherever you live, be aware and be prepared! 

Photo by Dave Goudreau on Unsplash

The Truths about Winter Air

The Truths about Winter Air

In the southeast US, I really enjoy the coolness of fall and winter after a long hot summer.  Winter air feels fresh and clean, but why is that?  And is it always fresh and clean?  What about humidity? What about static electricity?

There are so many reasons that winter smells are different!

Our sense of smell relies on several things: odor molecules, and our noses’ smelling equipment.  

  • Molecules within air, including odor molecules, move more slowly in colder weather, so we are less likely to receive good or bad odor molecules. (wonderopolis.org
  • Volatile Organic Compound (VOC) emissions slow down at colder temps.  Many VOCs (like terpenes) have strong smells, but less so with lower temperatures.
  • Humid air is generally better at trapping and delivering odorants through the atmosphere, and better at depositing those particles to the associated olfactory receptors. Winter air is drier and therefore delivers odors less efficiently. (seeker.com)
  • We perceive less smells in cold air because the receptors and vessels within our noses are constricted. This means two things: they move more deeply into our nasal passages, and fewer fragrant molecules can travel through them.
  • There is a nerve in the human body that gets stimulated when breathing in cold air called the trigeminal nerve. This nerve is responsible for the tingly sensations caused by spicy food and mint. This could be a reason as to why the smell of cold air is associated with “fresh” and “clean”. (tonichealth.co)

What about air pollution in the winter?

Surprisingly, air pollution can be worse during the winter than the summer!  This happens when something called an “inversion” forms.  There are several different types of inversions (which are well-explained in this video from the University of Illinois Extension), but they all involve a warmer layer of air above a cooler layer of air, restricting air movement and causing pollutants to be trapped near the earth’s surface.  For example, a city located in a valley and close to a mountain is more liable to experience temperature inversion than other cities. The cold air is denser and heavier; therefore it often slides down the mountain slope and ends up in a valley, leaving the warmer air above.  (airlief.com)  Inversions can last from several hours to several days.  

In addition to inversions, the burning of fossil fuel increases during the winter.  Industrial sources stay roughly the same throughout the year, but household heating and emissions from the vehicles are getting higher during the colder days of the winter.  In lower income countries, where it’s normal to burn garbage and coal for heating, the levels of PM2.5, carbon monoxide and other toxins increase significantly. (airlief.com)

“Stubble burning” is a practice in India during April-May and October-November each year, where farmers set their fields ablaze after harvest to clear the ground for the next crop.  It produces horrible air pollution in Delhi and other cities.  Unfortunately, lack of education on the damage to soil by burning and some profitable alternatives for the stubble cause farmers to continue the practice, despite the pollution.  (sciencedirect.com) Surprisingly, stubble burning is tolerated and even regulated in some countries like Australia and Canada (wikipedia).

(Lack of) Humidity in winter air causes dehydration

Cold air can hold less water vapor, which is the cause of lower relative humidity of winter air.  This drier air can literally suck the moisture out of your body in a myriad of ways. (performancehealthcenter.com)

  1. In cold weather, the body’s thirst response is diminished (by up to 40%) even when dehydrated. (study) This happens because our blood vessels constrict when we’re cold to prevent blood from flowing freely to the extremities. This enables the body to conserve heat by drawing more blood to its core.  Maintaining the body’s core temperature becomes more important than fluid balance, but because of this, the body is fooled into thinking it’s properly hydrated. Thus, in cold weather, we are less likely to drink water due to diminished thirst.  
  2. Our kidneys aren’t signaled by regulating hormones like they normally are to conserve water and therefore urine production increases, a condition called cold-induced urine diuresis.
  3. Nasal passages can dry out even though they feel like they are being flooded with moisture because of condensation (cold air hits warm nostril and water vapor instantly condenses!)
  4. We don’t even realize we are sweating because sweat dries quickly in cool, dry air.  The added weight of boots, heavy jackets, and layers of warm clothing help our bodies conserve heat, yet make the body work harder and may lead to producing more sweat than usual, yet this increased perspiration evaporates quickly in the cold dry air, so we often do not realize we are sweating. 

Therefore, it’s super-important that you drink as much or more water during winter than summer.

Here’s are some suggestions:

  • Don’t rely on caffeinated hot beverages to fill you up!  Drinks like coffee and hot chocolate are actually diuretics (they pull water from your body).  If you need to drink something hot to warm up, try herbal tea, hot water with lemon and honey, or warm milk.
  • Carry room-temperature water in insulated bottles so that it doesn’t chill into an icy drink.  Although drinking cold water can feel invigorating and increase alertness, it has more negative consequences in your body including thickened nasal mucus, increased blood pressure, teeth sensitivity, and headaches. (svalbardi.com)
  • Drink water before, during and after you exercise!
  • Wear layers and try to be aware when you start to sweat, to adjust them accordingly.
  • Juicy fruits and vegetables and broth-based soups can increase your hydration. 

Humidifiers should not be the first choice to increase humidity in the home.

According to energyvanguard.com, “the cause of dry air in winter is air leakage, so air sealing is the first and best way to keep your humidity from going too low.”  Because running a humidifier is not free, the newly humidified air leaks out just as fast as dry air comes in.  It’s a losing battle!  In addition, humidifiers need to be chosen and used judiciously because they can breed mold, and increase PM2.5 in the air (check out our post here).  They can also cause condensation and mold problems in the building itself.  

What about static electricity?

It’s true, shocks from static electricity are worse in the wintertime because of lower relative humidity.  Static electricity is a buildup of ions in a body, and the lack of moisture in the air allows them to stay put until you touch something that “grounds” you like a metal doorknob.    That’s because dry air is an insulator, not a conductor.  There are several ways you can reduce static electric shocks during the winter:

  • Wear more cotton clothing, because wool and synthetics tend to be insulators. Cotton absorbs more moisture from the air, though, so this can work against you in cold temperatures.
  • Leather-soled shoes will “ground” you more than rubber-soled shoes, because rubber is an insulator.
  • Dryer sheets can reduce static cling by equalizing electrons formed by clothes rubbing together, but many are not recommended to use because respiratory, developmental, endocrine, and reproductive effects. (for example Bounce Sping Fresh Dryer Sheets, ewg.org)  Amazingly, you can combat static in your dryer instead by crumpling up a few pieces of aluminum foil into balls and throwing them into your dryer with your clothes, to keep them static-free and separated. (Dryer Sheet Alternatives)
  • Use a bipolar ionizer in your home, such as the Whole Home Polar Ionizer, Air Angel or Germ Defenders.  These devices release a balance of positive and negative ions into the air, which help to equalize the charge in your body and sanitize surfaces.  It’s a win-win, which leads us to our last truth:

Winter air allows pathogens to stay afloat and viable for longer

Researchers have known since at least 2010 that epidemics of influenza almost always followed a drop in air humidity.  (study) The reasons for this are several: dry air allows the virus particles to float for longer times in the air, and since water vapor in the air may deform the virus’ surface, lack of water vapor keeps its infectious weaponry intact. (BBC.com)  According to the Sterling Chart below, (from a 1986 paper titled, Indirect Health Effects of Relative Humidity in Indoor Environments) you can see how the optimum humidity to ward off bacteria, fungus, and respiratory infections would be about 40-60%, but avoid going higher because of condensation and mold issues.  Keeping our homes sealed from the ingress of dry air and our bodies hydrated will be the best bet to landing in that zone!

Source: energyvanguard.com

After reading this article, you may be a little disappointed in winter air, but with awareness about the possibility of increased air pollution, dehydration and static electricity, you can take precautions and enjoy it just as much as any other season!

What’s the difference between dangerous mold and good fermentation?

What’s the difference between dangerous mold and good fermentation?

Maybe you’ve heard about fermented foods as one of the latest health fads, and are wondering (like I was), what’s the difference between green cheese discovered in the back of the fridge, and “good” stinky cheese, kombucha or sauerkraut?  They all seem to use microbes to change the flavor, so how can we tell the difference?  

Fermented foods are defined as “foods or beverages produced through controlled microbial growth, and the conversion of food components through enzymatic action” (my emphasis, from 2016 study).   The main difference, it turns out, is the intention and methods (control) of allowing food to ferment.   Fermented foods have been around for a loooong time.  When you have foods that are notoriously difficult to preserve (dairy) in a hot climate (the middle east and Africa), fermentation happens naturally and quickly.  As long ago as 10,000 BCE, people figured out how to control the natural bacteria present in cow, sheep, goat and camel milk to produce yogurt.  This is called “thermophilic lactic acid fermentation”. (Living History Farms)  This continued for centuries and in 1910, a Russian bacteriologist, Elie Metchnikoff, attributed the longer average lifespan of Bulgarians (87 years) to increased fermented milk consumption, and a particular strain of bacteria used in their fermented milk products.  Certain strains of “Lactobacillus bulgaricus” were shown to be able to survive and flourish in the human stomach and intestines, making them the first “probiotics” discovered.   Probiotics simply are live bacteria and yeasts that are good for you, especially your digestive system. (webmd.com)  The “cultures” of live bacteria and yeasts in fermented foods make them full of natural probiotics.  However, ancient peoples (through the 1900s) were likely not eating them for their health benefits.  Fermenting was simply a form of food preservation.  Cheese, bread, vinegar and beer are all products of fermentation.  Food can be fermented naturally using the microbes that are present in the food itself, or by adding a “starter culture” that has the desirable microbes included. (2019 paper)

Many studies have been conducted on the health benefits of fermented foods.  Some have been proven, and others are disputed.  For example, compounds known as biologically active peptides, which are produced by the bacteria responsible for fermentation, are also well known for their health benefits. Among these peptides, conjugated linoleic acids (CLA) have a blood pressure lowering effect, exopolysaccharides exhibit prebiotic properties, bacteriocins show anti-microbial effects, sphingolipids have anti-carcinogenic and anti-microbial properties, and bioactive peptides exhibit anti-oxidant, anti-microbial, opioid antagonist, anti-allergenic, and blood pressure lowering effects. (paper investigating the health effects of fermented foods). As a current health hot topic, it’s best for you to do your own research on any fermented food you want to start including in your diet. 

There are many types of fermentation that are culture-specific, having such a strong smell and/or taste that to the uninitiated, may be called “rotten”!  In fact, “one person’s delicious fermentation is another person’s disgusting rot, and according to fermentation guru Sandor Ellix Katz, “Learning a sense of boundaries around what it is appropriate to eat is necessary for survival. But precisely where we lay those boundaries is highly subjective, and largely culturally determined.” (americastestkitchen.com) This is the case for hákarl, an Icelandic delicacy often referred to as “rotten shark”, Surströmming, a Swedish fermented herring product, natto, a slimy fermented Japanese soybean dish, and century eggs, which are fermented for 3 years in some Southeast Asian cultures.  (18 stinky foods around the world).

Okay…we know that heat and microbes will break down food whether or not we initiate it, so just what kinds of “control” can we exert over fermentation?

One key is just as invisible to the naked eye as the microbes themselves: air.  Fermentation is generally an anaerobic process, which occurs in an airless environment. Most desirable bacteria thrive in this oxygen-free environment digesting sugars, starches, and carbohydrates and releasing alcohols, carbon dioxide, and organic acids (which are what preserve the food). Most undesirable bacteria that cause spoilage, rotting, and decay of food can’t survive in this anaerobic environment. (Living History Farms)  Unfortunately, this reference does not point out at least one major exception: Clostridium botulinum, which produces botulism.  In order to keep vegetables from developing undesirable mold, for example, they are “weighed down” under the fermenting liquid so the food does not contact the air. 

According to Paul Adams, a researcher for America’s Test Kitchen,  we have a few other tools to keep the fermented product safer and less smelly:  salt, temperature and acidity.  For example, allowing cucumbers to sit in room temperature water will usually produce a scummy pink slime in short order, but changing the water for brine (saltwater) will produce some nice tangy pickles.  Brewing beer has its best results when controlling the temperature, so brewers have developed methods to decrease or increase the temperature of their kegs depending on the ambient air temperature.  Finally, acidity is a tool for controlling fermentation.  pH is the measure of acidity or alkalinity in a solution and pH changes due to changing chemical composition produced during fermentation.  pH also can control the species of microbes in fermentation.  For example, the low pH (acidity) of kombucha, owing mainly to the production of high concentration of acetic acid, has been shown to prevent the growth of pathogenic bacteria such as Helicobacter pylori, Escherichia coli, Salmonella typhimurium and Campylobacter jejuni. (2019 paper) According to Utah State University Extension Service, for fermentation to be successful at eliminating all potential pathogens, the pH level must drop below an acidity of 4.6 verified by using a pH meter or test strip.  Foods that “appear” to be safe can still contain harmful pathogens.

What’s the difference between yeast and mold?

Yeasts and mold are both considered fungi.  Yeasts are microscopic fungi consisting of solitary cells that reproduce by budding. Molds, in contrast, are multi-cellular and occur in long filaments known as hyphae, which grow by apical extension (extending into fresh substrate). Yeasts do not produce spores; molds do.  Yeasts can grow in aerobic (with air) or anaerobic (airless) conditions; molds only grow in aerobic conditions.  Regardless of their shape or size, fungi are all heterotrophic (cannot produce their own food) and digest their food externally by releasing hydrolytic enzymes into their immediate surroundings (absorptive nutrition). (Introduction to Mycology textbook) Here is a highly magnified photo of the two:

Photo source: microbenotes.com

As a company concerned about air quality, HypoAir is typically anti-mold except where it’s cultured and processed carefully for medical and gastronomical reasons (like penicillin and cheese)!   Penicillium (P.) roqueforti, P. glaucum, and P. candidum are some common types of mold that are used in cheesemaking.  (thecheesemaker.com)  I’ve found out through researching this article that there are other types of mold that give fermented food its characteristic flavor and possible health benefits.  For example tempeh, an Indonesian fermented soybean cake, and Miso, a traditional Japanese paste of fermented soybean used to make miso soup, both contain molds that have no detrimental effects to humans.  Likewise, yeasts are familiar to those who make bread, but Kombucha, a fermented tea beverage reported to have originated in northern China, is also made with yeast.  The critical aspect of making each of these foods is providing the correct environment, including temperature, pH, humidity and salinity, to encourage the good fungus and discourage bad fungus!

Of course, there is a lot of information on the internet about making fermented foods at home.  Not all of them advise the safeguards that are necessary to prevent harmful bacteria from giving you life-threatening food poisoning, so it’s best to compare them to a source such as the USDA.  For example, this guide on safely fermenting food at home recommends starting fermentation only on fresh, clean vegetables and using non-iodized salt.  In addition, the National Center for Home Food Preservation has tips and tested recipes.

If you have any doubts about the safety of fermented food, throw it out!  The website fermentools.com gives the following advice on when to do so:

  • Visible fuzz, or white, pink, green, or black mold.
  • Extremely pungent and unpleasant stink.
  • Slimy, discolored vegetables.
  • A bad taste.  If your taste buds are offended, be safe and spit it out!

If you follow the safety guidelines, you can explore the world of fermented foods and maybe even make your own food combinations to surprise family and friends! (Who wouldn't like a delicious jar of well-preserved food?)

Photo by Brooke Lark on Unsplash

Hosting Responsibly

Hosting Responsibly

‘Tis the season for gathering together for celebrations!  More than a few years ago, “hosting responsibly” might be taken to mean monitoring alcohol consumption and driving.  Now, it also means providing good air quality where participants don’t need to worry about breathing in germs.  What a difference a few years (and a pandemic) makes!

In November 2022, in grocery stores, malls, airports and airplanes, masks and distancing are no longer mandatory.  There are also no mandatory distinctions between vaccinated and unvaccinated people.  I realize that although most places present as pre-pandemic, these norms can change at any time, and many people are still concerned about virus transmission and their health.  This elephant has been dressed up well, but he’s not going away, so it’s best to acknowledge him!

Letting your guests know about your preparations means letting them know you care, and make them even more eager to attend!  How can we get started?  Here are some questions for the host:

Is your home or gathering place well-ventilated? 

Here are a couple ways to tell:

  1. Do odors persist for hours if you don’t do anything to abate them?  This might be a little tricky to answer, because it’s definitely a good idea to use your kitchen exhaust fan while cooking, but if you clean up the food bits, wake up and can still smell last night’s dinner, there is likely a problem.
  2. Is the carbon dioxide level in your home below 1000ppm?  It’s really helpful (and surprising) to use a portable CO2 meter in your home and elsewhere.  It let me know that my house (built 1982 with building paper as the air barrier) is quite leaky at about 520-550 ppm CO2, but on the other hand, my parents’ house (renovated 2020) seems to be quite tight and in need of more ventilation (1500ppm)!  The American Society of Heating, Refrigerating and Air-Conditioning Engineers (ASHRAE), which is the dominant organization in establishing proper building ventilation rates in the US,  is hesitant to use CO2 levels as an indication of proper ventilation in homes and businesses because of lack of research and a number of variables.  However it does state in a white paper on indoor CO2 levels
  • Indoor CO2 concentrations do not provide an overall indication of IAQ, but they can be a useful tool in IAQ assessments if users understand the limitations in these applications.
  • All else being equal, higher CO2 concentrations correspond to lower outdoor air ventilation rates and the potential for an increased risk of airborne transmission.
  • Rather than using indoor CO2 concentration as an indicator of desired ventilation rates, several analyses of airborne infection risk have used CO2 as an indicator of the “rebreathed fraction” of indoor air (the fraction of inhaled air that was exhaled by someone else in the space). (Yuck!)

So, although ASHRAE did not set these values (contrary to misquotes), the generally accepted values are consistent with these:

Source: Washington State University Extension Energy Program

So, if you take a reading on your CO2 meter and find that the difference between the indoors and outdoors is less than 650 ppm (which is normally about 1000 ppm indoors), your ventilation is “acceptable”.  Above that level, your guests will have complaints of fatigue, loss of focus and concentration, and an uncomfortable ‘stuffy’ feeling in the air, all of which indicates you are not getting enough fresh air. (Kaiterra.com)  Keep in mind that with more guests, more ventilation is necessary to keep the CO2 level down!  You can crack windows to add more ventilation.

Do you have active air purification?  If so, let them know!  Just as businesses are proud to advertise that they use HypoAir products to keep their clientele safe, don’t hesitate to let your guests know if you are using active air sanitation like the Whole Home Polar Ionizer, Air Angel or Germ Defenders.  In addition, a fresh furnace filter in a higher MERV rating and/or use of a standalone HEPA filter also increase the air quality. 

How about making your gathering indoor-outdoor?  If you have a patio or yard, string lights and a firepit or chiminea make for a cozy, festive ambiance!  In addition, the opening of doors when guests enter or exit adds fresh-air ventilation to your indoor space. If you decide to light a fire in the fireplace, cracking a window will help the fire burn better with less chance of backdrafting smoke into the room.

Have you thought about food and beverage service?

If we had a throw-away mentality before COVID-19, unfortunately the pandemic has only made it worse.  Restaurants have embraced using disposable food trays, utensils and drinking glasses for sanitation, however I suspect it is now more for convenience.  According to this 2020 study, the SARS-CoV-2 virus can remain viable on inert surfaces, with varying lengths of time depending on the surface: four hours on copper, 24 hours on cardboard, 48 hours on stainless steel and up to 72 hours on plastic.  With this evidence showing that cardboard and plastic are not anti-viral, you don’t have to follow suit with everyone else regarding what you serve on.  Instead of having a large trashbin in the center of the party (although some garbage is inevitable for sure), why not fill one side of the sink with soapy water, or leave a basin with soapy water, in which to submerge dishes?  I’ve always enjoyed using real dishes over plastic or paper, so if your gathering is smaller than your collection of plates, it’s not taboo to use china and stainless steel. Marking drinking glasses with a marker or tag ensures that everyone keeps their own!  You could even DIY inexpensive beverage glasses with your guests’ names as favors.  If you decide to go with single serve drinks, cans or bottles are still best marked to avoid confusion.

What’s more important, though, is how you serve.  It’s wise to designate 1 or 2 people as “servers” who can add helpings to individual plates in order to reduce handling of the serving utensils.  If “seconds” are available, it’s best to use additional clean plates to avoid contamination.  Wrap utensils in individual napkins pre-party so that no one has to dig through a bin to get their own.  

Set containers of hand sanitizer throughout your space, and most importantly at the food and drink service area.  

Have you made sure the bathroom is clean and inviting?

  • Provide antibacterial soap and individual paper hand towels
  • If you have a bathroom vent, consider installing a switch protector or sign so that it stays on throughout the party to keep the bathroom air fresh(er!)
  • Instead of buying deodorizers that can add toxic chemicals and VOCs to the air, re-package some TotalClean in a pretty glass bottle and label “air freshener”--it really deodorizes well!

Will you have chemically sensitive guests?

Ask guests to notify you if they have chemical allergies, so you can keep it scent-free if necessary.   If you've ever had a smell irritate your nose or even cause a headache, you have a inkling of what Multiple Chemical Sensitivity (MCS) sufferers go through.

  • It’s hard to pass up candles and sprays in holiday scents, but try to do it for the sake of your friends!
  • It’s also wise to use unscented, natural products like TotalClean to get a thorough clean on all surfaces without any scent.
  • Ask other guests to abstain from using scented personal items like perfume and deodorants.

Spread the warmth from your fireplace…not the air pollution!y

Spread the warmth from your fireplace…not the air pollution!

With temps turning colder and guests coming over for the holidays, I thought to myself, wouldn’t it be nice to start a fire in the fireplace soon?  With Thanksgiving a week away, I decided to make sure that it would be a joyful experience and not a regret!  Here’s some tips for getting your fireplace and wood ready.

The fireplace:

  • If you haven’t had the chimney cleaned in several years after using it, call a professional for this job and make sure they use HEPA filters in the vacuum.  
  • If you are not having your chimney cleaned (if so the cleaner can do this check), check that the damper is working properly:  Get some safety glasses on and a flashlight for this one.  Moving your head underneath the fireplace opening, use the lever handle to open the damper and make sure it stays open when you release it.  Hopefully you do not have the surprise of wildlife or a lot of debris being released when you open it!  Close it again until you get ready to start the fire, making sure that it closes fully and seals (see next point).
  • Sealing the fireplace damper when the fireplace is not in use is really important.  Inadequately sealed fireplaces are noted as being one of the worst air leakage sources in the home. According to the D.O.E.3, by weatherstripping the fireplace, the typical U.S. home can reduce air leaks by 14% or more. (hearth.com)  Here some ways of sealing your chimney, some of which would be better avoided:
    • Top mounted chimney dampers don’t seal the chimney space off from your home, meaning that the combustion products and cold (or warm) brick is still exposed to your air.  These aren’t highly recommended.
    • Plugs are inflatable devices that seal off the chimney when it’s not in use.  The problem is that they can deflate with colder temps, allowing air to leak through, causing it to need to be reinflated sometimes.  Sometimes the product itself leaks. 
    • Glass doors don’t adequately seal off the chimney, even though they look nice.  The solution: a magnetic, insulated cover will stop the drafts if your fireplace doors are sealed to the masonry.
  • A grate is really helpful to help your fire burn cleanly and not smoke too much.  Why?  A grate gets the wood up off the floor and allows air to circulate under and through the logs.  (This is the key to those new smokeless fire pits–air holes along the bottom of the fire pit get adequate combustion air to the wood!)  Check that your grate is sturdy.  If it is corroded or broken, take it to a welding shop for repairs.  You don’t want a pile of logs shifting and rolling or throwing a cascade of sparks when you’ve already started your fire!

The wood:

  • Only burn wood that is completely dry, which usually means it was cut and stored over 6 months ago.  Only burn hardwood,
  • Don’t buy firewood a long distance from your home.  Although it may look clean and dry, wood that is harvested over 50 miles from your home may have species of pests (eggs and insects) that are new to your area and by transporting them, you could unleash an invasive pest to the trees in your county. (Forestry Commission
  • Be selective about what kind of wood you burn indoors.  Stay away from wood with a lot of resin, such as pine and spruce, because burning it forms creosote that can cause a chimney fire.  Never burn treated wood or particleboard, as these release toxic fumes. (Family Handyman)
  • It's important to store all firewood outdoors until you're ready to use it, because firewood will naturally have some mold on it.  Storing it outdoors not only keeps the mold spores from entering your home but it also reduces the risk of spiders, ants and other unwanted insects from coming inside as well.  (firewood-for-life.com)
  • If you encounter wood with a lot of visible mold, it’s best not to bring it inside at all!  If the mold is on the bark, you can try to knock the bark off with a hatchet or hammer.  Remember, mold spores spread easily through the air and disturbing a mold colony just by moving the firewood (and stacking and then tossing it into a hot fireplace) will release millions of spores into your home!

What about firestarters?

  • Firestarters are easy to buy at the hardware or grocery store, but it may be harder to determine if their ingredients are safe and non-toxic.   In a 2014 study, burning synthetic firewood logs increased breast cancer risk in women by 42%.  Wood and synthetic logs are sources of polycyclic aromatic hydrocarbons (PAHs), which cause mammary cancer in animal experiments. Both contribute to residential air pollution, but researchers found that only the synthetic logs were found to be associated with an increased risk of breast cancer.
  • If you have any concern, take the safe route and make these firestarters easily from cardboard egg cartons, wax and sawdust (great project with your kids!)  The only caveat I would add is not to use just any candles for wax; paraffin candles are made from petroleum products, and soy candles are from hydrogenated oils that usually contain some paraffins.  If you can find it, unscented beeswax is the best!

Test it out! 

  • Keep a fire extinguisher nearby.
  • First and foremost, make sure the damper is open and any plugs or stops are removed before starting a fire.  Use your safety glasses when looking up into the chimney!
  • Always clean out cold ashes from a previous fire before starting a new one.  If you use your fireplace frequently, an ash vacuum is really helpful and speeds up the job.  Don’t use just any vacuum to suck up ashes, as vacuums without a HEPA filter will blow them all over the room!
  • Prime the flue: this means getting a flow of air going up the chimney.  The cleanest, simplest way is use a hair dryer on the hot setting, or a blow torch: just hold and point it up the flue for a few minutes. 
  • Place a few firestarters or balled up newspaper under the grate and some kindling (small pieces of wood) on the grate.  Start the fire with a long-handled igniter. 
  • When the kindling is burning well, place a few logs on the grate.
  • Does your fireplace smoke? (does smoke roll out of the top of the opening into the room?)  If so, the opening may be too large in relation to the flue, causing air to stall at the top of the firebox and allow smoke to come out into the room.  Here is a great video explaining the concept and how to fix it (or buy the right smoke guard and screen if you’re not a welder).  A smoke guard is a strip of metal that extends from the top of the opening down into the fireplace 4-8” to make the opening smaller and improe draft.  This article tells about an aluminum foil trick on how to size the smoke guard before you buy one, plus other reasons the fireplace may be smoking.
  • If there’s no smoke coming into the room, add more logs slowly, making sure to place them with good air flow from below. 
Fireplaces are not the cleanest or most efficient ways to heat your home, but the fireplace is here to stay in American homes because of its tradition and ambience.  For more tips on upgrading its efficiency, check out our other post on fireplaces here.  We wish you warm and cozy memories snuggled in front of your (safe, clean-burning) fireplace!

Can my indoor air quality affect the food I eat?

Can my indoor air quality affect the food I eat?

Do you ever look at the food on your countertop, whether it’s an apple pie or bowl of potatoes, and wonder, how did that food go bad so fast?  It’s a common problem, even more so in warmer climates, so we thought you’d like to know how your indoor air quality affects your food!

Admittedly, not all spoilage comes from your own air.  It’s been recognized that food processing plants need to have better air contamination control during the food production process.  “Primary  air  pollutants  in  the food  industry  are marked,  being,  in addition  to  microorganisms, suspended particles, combustion  products (nitrogen oxide,  carbon monoxide, carbon dioxide,  sulfur oxide) and volatile organic substances.” (2019 Meat Industry Conference Paper)  The contamination of food products is dependent on:

  • air’s microbial load, and 

  • on the duration of exposure to the air, whether during specific technological processing stages (e.g. cooling) or during storage (from book: Hygienic Design of Food Factories, chapter 14: Managing Airflow and Air Filtration to Improve hygiene in food factories).  

Air in slaughterhouses and sausage production facilities, for example, is more than 10 times more laden with yeasts and molds than dairy processing facilities, because of contamination that can come in on the product (animal feces).  The second point is that the product contact with air needs to be limited in order to limit its contamination.  Air  quality  is  particularly  important  in facilities for  production and packaging of butter, if this is manufactured in open-type mixers, since these devices can also incorporate up to 5% of the surrounding air into the product [Varnam  A  and Sutherland  J  P  1996 Milk  and  Milk  Products: Technology,  Chemistry  and Microbiology 1st ed, Chapman and Hall, London, p 451].

Another factor that causes spoilage during food processing is humidity.  There are three ways that humidity affects the food: 

  • Condensation on equipment and food can accelerate microorganism growth

  • Dry foods can absorb moisture that will lead to microorganism growth

  • Packaging like paper and metal start to degrade, leading to spoilage

These insights into how food gets contaminated in factories are good for application in the home because although we can’t much control how it gets packaged, we can certainly control how it’s stored and prepared at home.  So let’s dive in…

The three main biological pollutants that cause food spoilage are bacteria, yeasts and molds. (online course)  Bacteria, yeasts and molds, which are typically small in size, can hitch a ride on larger particles like water droplets or dust.  Where do these come from?

The bathroom.  It’s not pleasant to think about, but “Germs will more likely spread after you flush, when bits of fecal matter blast into the air in aerosol form, a phenomenon known as "toilet plume." From there, Kelly Reynolds (a public health researcher at the University of Arizona) said, the "bits of fecal matter settle on surfaces, contaminate hands and then get spread to the eyes, nose or mouth." (USAToday.com)  Here are some ways to limit the spread of germs from the bathroom to the kitchen: 

  • Close the toilet lid before you flush.

  • Wash and dry hands before leaving the bathroom

  • Use an ionizer like the Germ Defender in the bathroom, to kill germs in the air and on surfaces.

Pets.  Similar to the slaughterhouse scenario, many of us have furry animals (pets) walking around in our food-processing facilities (kitchens).  Where these pets have been and what they have on their fur and feet can be really disgusting!  Worse, homes with litterboxes in the kitchen, or allowing pets to walk on the counters, is like placing a toilet in the kitchen or even on the countertop!  It’s just not pleasant to think about.  If you have pets and you have a kitchen, think about these reforms:

  • Bathing pets regularly so that bacteria and mold are minimized

  • Not allowing pets to walk on countertops

  • Keeping litterboxes in another area of the home away from the kitchen if possible

  • Spraying pets’ fur regularly with a safe anti-microbial spray like Remedy Mold Treatment Spray by CitriSafe.

  • Always wash your hands after touching your pets and especially before food preparation!

The refrigerator.  What?  How can the refrigerator work against us when we’re talking about food spoilage?  Actually, I’m not talking about inside the refrigerator, although that can be a problem (more on that later).  Here, let’s talk about what happens in the “guts” of the refrigerator, where the heat is actually released through the coils.  The speaker is Jeff May, a renowned air quality inspector.  

“I was sitting in my kitchen, and every once in a while, I’d start to wheeze, but just couldn’t understand why. One day, I realized every time the refrigerator turned on, I would have trouble breathing. Our refrigerator was only three years old, but in those days, the drip pan was accessible from the front. When I removed the grille and took it out, there was a pearl onion that somehow bounced into it. The onion had an inch and a half of Penicillium mold growing on it. So, every time the compressor turned on, it would blow mold spores out into the room. Every frost-free refrigerator has a heating cycle. The cooling coil gets full of ice, and you have to melt that ice in order for the refrigerator to cool. The water from that melt goes into a pan at the bottom. The heat from the compressor is supposed to evaporate the water, but very often, the water persists. There’s just not enough heat. So, if there’s any dust in that pan, mold growth ensues. And if you’re allergic to cats and dogs, and somebody had a pet in the house before you moved in, that refrigerator can be a perpetual source of allergens just from the dust that accumulated on the coils when the pets were there. We’ve had people who have just simply cleaned their refrigerator, and all of their allergies went away.” (Jeff May, during interview with author of moldfreeliving.com)

Now for the inside of the refrigerator: Ok, it seems like a no-brainer that you shouldn’t leave spilled food lying around in the fridge because it can contaminate other food by direct contact.  But using your fridge properly also prevents spoilage:

  • The real reason there is a Fruits and Veggies Drawer: it controls humidity in the drawer and prevents certain foods from ripening too fast.  If there is a vent or slot on the drawer, this is used to adjust the humidity and air flow (because ripening fruits also produce a gas called ethylene, which will cause other fruits exposed to it to ripen).  Closed vent or no vent = high humidity, and Open Vent = low humidity.  For a quick way to remember what to put in the “Crisper Drawers”, remember this rule of thumb: “rot-low, wilt-high.” Fruits that are prone to rot belong in the low-humidity drawer, while produce that's prone to wilting needs to be enclosed completely in the high-humidity drawer. (for a full explanation see article at epicurious.com)

  • Don’t put meat, cheese, milk and eggs in the door shelves!   The door of the refrigerator tends to stay at a higher temperature and these items will spoil more quickly (with nasty consequences) when stored there.  For more on where to store what food, this article helps a lot).

The FoodKeeper App from the FDA is a useful tool to determine how long to keep, and when to throw out specific foods.  It is also helpful to know why you need to preserve foods by refrigerating or freezing them right away (within  2 hours of cooking).  Bacteria are not killed by these colder temps, but their growth is slowed down or stopped.  Some bacteria and their endotoxins (toxins released by the bacteria through its life cycle and during death) are highly resistant to heat, so thoroughly re-heating them before eating does not kill the toxin! (check out our post on endo-and exotoxins here).  Staphylococcus aureus is one example of such a bacteria, and it can cause some serious food poisoning, even death.  

The dishwasher. Wait–the dishwasher is supposed to clean my dirty dishes, how can it be polluting my kitchen air?  If you have ever cleaned the vent on your dishwasher, you will know how absolutely filthy this spot can be.  Food residue, along with moist, steamy air will cause a thick slime to grow.  The rest of the dishwasher needs a deep clean too (not just using a bowl of vinegar and/or baking soda), but the vent especially is the area where escaping steam will carry bacteria into your kitchen air. 

Finally, keeping proper humidity in your home is super-important not only for your sinuses, but for food preservation too.  Some fruits and veggies should only be stored on the counter (check them out here), so the proper humidity will help them to stay fresh longer.  

Now you know how good air quality in your home means better food (especially in your kitchen).  By reducing the bacteria-load in the air, reducing exposure to the air, and keeping proper humidity in the air, you can waste your precious foods less, and enjoy them more!

Are my windows causing my mold allergy?

Are my windows causing my mold allergy?

If you viewed the results of my home’s mold plate testing, you probably saw the high count of mold colonies in my sunroom–which doesn’t even have air conditioning vents in it.   What the heck?  I was scratching my head until I remembered that I had placed the plate on a table only a few feet away from the exterior wall of windows.  There are 12 exterior windows in that room!

Here are some of the ways that windows can increase mold counts in your home:

  • Direct water leaks:  if the seals or caulking fail on your window(s), they could allow water to run into the wall, where mold can grow.

  • Drafty windows allow air to pass from the outside in, or inside to outside, where the temperature and humidity difference can surpass the dewpoint and cause condensation.  Condensation can occur on the windowsill or anywhere around the window that is not properly sealed.

  • Outdoor mold can grow on the screens, because they retain dust and moisture.  When you open windows, air blowing through the screens will blow mold spores right into the room.

  • Heavy window treatments create a micro-climate between the room and the window.  Although they are great at insulating the room from heat or cold, fabric curtains retain humidity/moisture, and also create a cold pocket of air without air circulation.  With drafty windows, air between long curtains and the wall can allow condensation, and offer the ideal darkness for mold to grow.    

In my case, I believe it was the drafty windows that allowed air to blow around the frames and carry mold into the room.

Here are some ways to get that mold count down:

  • Check for leaks in your windows.  Here are some warning signs that a window is leaking and how to determine where it is leaking (video):

    • Peeling paint on an interior window sill 

    • Peeling paint on an interior wall near a window

    • Rotting wood on the exterior window frame or sill

If you have any of these symptoms, it’s best to remove the outer siding materials and find out where the water is getting in, because cosmetic repairs will not fix the leak. 

  • Decide whether to replace or reseal your windows.  It’s rarely an easy decision because replacing your windows is not likely to save you money, considering the cost of the windows and installation.  However, there are some ways to know that it’s time to replace them:

    • Replacement: If your windows are extremely damaged by water infiltration, then it’s a good case for replacement. (ecohome.net)  There are many options for energy-efficient windows, available in wood, vinyl or composite (fiberglass or a combination of materials).  Like many products, the installation of the windows is just as important as the quality of the windows themselves. Quality installation is critical for an airtight fit and a continuous water barrier to prevent drafts, water damage and condensation.(efficientwindows.org)  To select windows, the National Fenestration Rating Council (nfrc.org) is a non-profit organization that gives consumers energy performance ratings and other useful information about windows, doors, and skylights.  You’ll also want to consider that new exterior windows that meet Energy Star standards fall under “qualified energy efficiency improvements” which can generate tax credits.  For windows purchased in 2022, you can claim the Residential Renewable Energy Tax Credit for 30% of the total cost, up to a maximum of $600 for exterior windows and skylights. (filemytaxesonline.org) In addition, check with your local power supplier to see if they have more incentives for replacing windows. If you do decide to replace, remember that higher-cost wood windows (which are clad in aluminum or vinyl for weather protection) are only as good as the seals and techniques of cladding them; if water penetrates the cladding, the windows can rot in just a few years.  In addition, the vinyl or aluminum skins on these windows do not permit passage of vapor from the interior to the exterior, so that condensation forms on the inside of the skin.  Condensation = rot! (video)

    • Reseal:  If the windows and frames are in good shape, but you have airtightness problems, it’s most cost-effective to apply some sealing around them. Caulk, weatherstripping and caulking cord are all products made for these purposes, and this video shows how to apply them.  In order to know where the air is coming in, you can do the following (houselogic.com):

      • Seal the house by locking all doors, windows, and skylights.

      • Close all dampers and vents.

      • Turn on all kitchen and bath exhaust fans.

      • Pass a burning incense stick along all openings -- windows, doors, fireplaces, outlets -- to pinpoint air rushing in from the outside. Smoke Pencil Pro ($44) is non-toxic smoke pencil for this purpose.

    • Clean your windows and screens!  On windows where screens are installed, a bi-annual cleaning will greatly reduce the amount of mold present.  In general it’s not better to wash the outside or the inside first, as long as both are done!  However, since outsides usually get dirtier than the insides, it may be easier to see inside dirt if you wash the outside first. You can use a bucket of warm water with a few drops of dish detergent on the outside with a long-handled brush and squeegee, and TotalClean or a mixture of one part white vinegar to two parts water in a spray bottle for the inside. 

    • Get your drapes in order!  If drapes are causing condensation to form on or around your windows, this is not a good situation and it will lead to mold if left unchecked.  Here are some suggestions:

      • Open the drapes during the warm part of the day so that temperatures between the room and window can equalize and dry out moisture. 

      • Leave the ceiling fan running in the room to promote circulation. 

      • True thermal curtains are made of 3-4 layers of material, including a vapor retarder that allows vapor to escape through the curtain.   Problems can occur if the curtains block vapor.  

If you still have a high mold count near your windows, it’s best to check with a qualified, reputable mold inspector to find out the source and be able to enjoy the sun and scenery through your windows instead of the mold!

Photo by Rob Wingate on Unsplash

Insulating drafty windows makes a difference in air quality, not just energy savings!

Insulating drafty windows makes a difference in air quality, not just energy savings!

When you’re trying to make a whole house less drafty, you should go for the low-hanging fruit first.  That means big ol’ holes in the walls, floor or ceiling (like this disconnected register) come first.  If you don’t have any big holes, you can start on the smaller ones–and sometimes the smaller ones can add up.  That was the case in my sunroom. 

My sunroom is west-facing, which means in the summertime it gets brutally hot from sunlight, and in the wintertime it’s brutally cold from westerly winds.  On top of that, it’s fairly dusty and showed some of the highest counts of mold colonies in my home.  When I saw another cold front coming later in the week in December, I finally “made” the time to insulate the windows where I felt the drafts coming in.  I saw that the lower windows didn’t seal at the bottom when closed, AND the previous owner had cut the corners on the lift at the bottom for some reason (they rubbed on the trim?).  Due to these leaks, the room stayed quite “fresh”--meaning the CO2 didn’t really budge from outdoor levels unless I lit a fire in the fireplace on the other side of the room.  If you don’t have a CO2 monitor, I highly suggest getting one: here’s a portable version.

Therefore, the cons of my leaky windows easily outweighed this one “pro”: fixing them was a no-brainer!

Pros

Cons

Better ventilation (lower CO2)

More drafts of hot or cold air (higher energy cost)

More dust or pollution

More mold 

Excess humidity in house

Here are the tools I used: 

  • A spray bottle of TotalClean and several rags for cleaning the windowsills
  • Adhesive-backed weatherstripping in a suitable color to match your windows (low-profile like this one, ¼”, is good unless your windows are very misaligned) 
  • Scissors
  • Optional: A CO2 monitor is helpful–to see the effect on the room
  • Optional: Window locks in case the windows don’t lock afterwards (see below)

If you do have a CO2 monitor, leave the windows closed and take a CO2 measurement before doing the insulation work. You might want to do it while there are a number of people in the room, or you have a propane or natural gas stove burning (I know there are a lot of gas stoves out there!).  Extra people and gas appliances do two things–they consume oxygen and they give off CO2.  These should cause the CO2 to be higher than when the room is empty or no gas appliances are lit.

Next, just get down to it: use the TotalClean and rags to clean off the window sill where the lower half of the window seats.  If you have vertical sliding windows, find the best place to attach the insulation in the vertical track and clean that.  When the track is clean and dry, start peeling the adhesive backing off and apply the weatherstripping a little at a time, cutting it when you get to the end of the track. Close and lock the window to make sure it’s placed correctly.

If you find your windows don’t lock because of the extra height of the insulation (this was the case for my windows) there are a number of window locks available that can be easily removed if you have to open the window for ventilation.  I ended up getting a thumb-screw version that can be moved up a few inches if I decide to ventilate, while still keeping the window secure.  

That’s it!  When you have all of the insulation installed, close the window and repeat the CO2 reading, with or without activity (people or gas-burning appliances).  The CO2 levels should go and stay higher because there is less fresh air coming in.  Fresh air ventilation is needed in a home, but it’s best to do it in a controlled way, not just letting the air come in wherever there’s a small gap or crack.   For more ideas on how to air seal leaky windows, check out this video.

If you’ve completed an easy project that resulted in better air quality, let us know about it! 

Photo by Rob Wingate on Unsplash

Measure it so you can improve it!

Measure it so you can improve it!

There are several great old quotes that still hold true today:

“You can’t improve what you don’t measure.” (often attributed to Peter Drucker, “father of management thinking”, Forbes.com

“When you can measure what you are speaking about, and express it in numbers, you know something about it; but when you cannot measure it, when you cannot express it in numbers, your knowledge is of a meagre and unsatisfactory kind: it may be the beginning of knowledge, but you have scarcely, in your thoughts, advanced to the stage of science, whatever the matter may be.”  (Lord Kelvin, British scientist, oxfordreference.com)

Ok, so we need to measure if we really want to know what is going on.  When you’re talking about air quality, sensors are the key!  Whether you are a homeowner or a professional, an economical sensor is a valuable thing.  Here are some of the best and their many uses.

Air Flow 

There are several instruments that can be used to measure airflow.  HVAC techs use manometers or anemometers  to verify whether the installed ductwork and fans are performing as designed.  There are also many uses for these around the house!  Here are a few:

  • Hold it below your kitchen exhaust vent fan to see if it is moving enough air out of the kitchen (you can do the same for the bathroom exhaust fan)
  • Hold it below your return air intake when the filter is clean, and when it is dirty, to see how much a dirty filter impacts your air flow.
  • Install a pollution-filtering window screen and window fan, and check the fresh airflow in and out of the room (see our post here). 

Here’s an inexpensive anemometer that not only measures wind speed, it also measures the temperature.  In order to get a volume air flow measurement in cubic feet per minute (CFM), set the output to read feet per minute and then multiply it by the square footage of the duct or window you’re measuring (width in inches x length in inches divided by 144). 

Air Pressure

We’ve written quite a bit about the “pressure” of your home; ideally it will be “balanced” so that outside air is not being pulled in through cracks and crevices (other than fresh air ventilation).  How do you really know, though, without measuring?  Air pressure sensors are called manometers and here are some other uses for them:

  • Checking the pressure drop across a new higher MERV filter (we recommend MERV 13 for the best home filtration).  You can make a small hole in the filter in order to feed one of the ported tubes through, and seal it later with some tape.
  • Check the negative pressure in rooms with the door closed, to see if the HVAC returns are getting proper air flow.  In this post we discuss tackling the problem of getting enough air movement with closed doors.  

Here’s an inexpensive manometer that detects pressure or differential pressure (with two ports) and has readouts in several different common units. 

CO2 

If you’ve read our post on CO2, then you know how important this pollutant can be to your wellbeing.  Too much CO2 comes from not having enough fresh air ventilation, and can be a big factor in feeling groggy, less energetic, and causing brain fog and poor mental performance.  Of course, then, you’ll want to measure it in your home and workplace, your car, and maybe even in your classroom, church or other public meeting place.  Here are some sensors that will help you do that:

  • To get the most bang for your buck, AirThings 2930 WavePlus combines 6 sensors in one unit: Radon, CO2, VOC, Humidity, Temp, Pressure (Barometric pressure) for about $200.
  • InkBirdPlus makes a unit that tells CO2, temperature and humidity, which are 3 key measurements for home use.  It can be hung on the wall or be portable.  This unit is about $69.

PM and VOCs

Particulate Matter (PM) is not only dust–it’s smaller than that!  Dust ranges in the 2.5-10 micron range (check out the following diagram), but when there’s smoke or cooking involved (which happen in the home all the time), particles can be less than 1 micron.  That’s where you can really see what’s going on when the toaster burns your bread!  

Source: visualcapitalist.com

Formaldehyde is a toxic VOC that is a common “off-gas” component of new furniture, flooring and pressed-wood cabinets.  It can be measured separately or as a part of Total VOCs (TVOCs).  Those who like to have their nails manicured and painted may or may not be in shock if they took a VOC meter into the salon…the same could happen in a busy restaurant with “open kitchen” concept.  Here are some sensors that you can use in the home or business (gasp!) to make sure you’re ventilating or wearing a mask when appropriate.

  • This model by Temtop has a sleek design for your desk and measures PM2.5, Formaldehyde and Total VOCs ($90).
  • Temtop Air Quality Monitor measures PM2.5, PM10, Formaldehyde, temperature and humidity, TVOC and AQI, with solid ratings on Amazon ($149).

Some sensors look like a sleek medical device and some look like a machine from Inspector Gadget, but remember, they will give you information your nose alone can’t tell you.  If you take out your sensor in a public place and someone asks you about it, you may be able to impart some timely wisdom that will help them, too!

Photo by Jorge Ramirez on Unsplash

Will a Radiant Barrier Help My Home’s Air Quality?

Will a Radiant Barrier Help My Home’s Air Quality?

Radiant barriers have been a “hot” topic for the last few years: If to install them, where to install them, and how to install them.  Are they worth the work and cost?  It’s time well-spent to do some research before diving in with such a project.

Radiation is one of the three types of heat transfer, along with convection and conduction.  A radiant barrier is a material with a shiny surface that reflects radiant heat back outside the home.  If the barrier gets dusty or is installed incorrectly, however, it does not work well. 

According to Attainablehome.com (a builder’s website devoted to building of modern, sustainable, and high quality homes that is within reach of household incomes), properly installed radiant barriers can reduce heating costs in the hottest months in southern climates, if the home’s air conditioning system is located in the attic. It can also offer a degree of protection to that equipment when the barrier is installed over the equipment, “shielding” it. 

In colder climates, however, radiant barriers are not recommended for several reasons.

  • The savings in reflecting heat away from the home in summer is minimal.

  • Cold climates can allow moisture to condense behind the barrier, creating mold issues.  Perforated radiant barriers can reduce this problem, though.

What is “properly installed”?  Here is a good video showing installation of a radiant barrier over a garage.  Radiant barriers:

  • Need an air gap: don’t install the barrier sandwiched between existing insulation, as it can conduct heat into it.  For instance, do not install radiant barrier foam board (such as LP’s Techshield) and sprayfoam over it. (energyvanguard.com)

  • Need to be relatively clean: dust will reduce the effectiveness of the barrier, so installing on the attic floor is not recommended in most cases. 

  • Must be the right type for your home/climate. There are:

    • Perforated and non-perforated: Perforated barriers allow vapors to escape through the barrier, reducing the chance that moisture or mold will build up behind it.   If you live in a hot, humid climate and have a vented attic, a highly permeable barrier like “Super-Perf” from AtticFoil is recommended to allow moisture to pass through. 

    • Made with insulation or board attached to the radiant surface

  • Must not block air flow in the attic.  Most vented attics have soffit and ridge vents, so do not block the air flow between these two, or moisture issues may result.

In a 2010 article that still applies today, energy advisor Martin Holladay stated there are 5 factors that determine whether a radiant barrier is a good option for your home (discussed in this video):

  • Do you live in a hot climate?  Yes = consider radiant barrier.

  • Do you live in a humid climate?  Yes = the radiant barrier must be carefully and correctly installed so that moisture problems are not created.

  • Do you have a one-story home?  One story homes tend to have larger roofs to cover the livable square feet, so a radiant barrier in a one-story home will be more effective than a two-story home of comparable square feet.

  • Do you have air ducts in your attic?  Yes = consider radiant barrier to shield them.

  • Is the air barrier installed correctly?  This is imperative, so the barrier has to be compatible with the insulation in your attic.

In times of low-cost energy, installing a radiant barrier may not be worth it. (energyvanguard.com)  For example, in Houston in 2011 (a hot climate in a year with similar kilowatt-hour (kwh) energy cost to today), a homeowner could save about 180 kwh per year with a radiant barrier installed on their 2000 sf newbuild home, considering that it is installed under the roof decking and the only additional cost was the more expensive barrier under the decking ($200).  This is about $25 per year savings, which would be an 8 year payback if there is no mortgage, or only about 50 cents per month if there is a mortgage (check the article for the explanation!)  It’s not a whole lot, but if energy prices go up (they will at some point), the savings could be more.

According to this video, LP Techshield (an OSB board with aluminum coating on one side) produced an 18 degree reduction in temperature in a doghouse.  Another video using the same product achieved an 8-10 degree reduction in a real house. 

So, how does all of this affect your air quality?  At HypoAir, we are in favor of not adding things that harm you or your home, so adding a radiant barrier to an existing home must be carefully considered.  Here are some steps to check whether it is right for you: 

  • If you have an unvented attic, a radiant barrier is likely not to benefit you.  If you have a vented attic, make sure the vents are not blocked and there is sufficient insulation in the walls/floors of the attic facing the conditioned space. 

  • Consider the current state of your attic and take temperature and humidity measurements in the attic and in the home as a “baseline”.  

  • If possible, you could conduct a small “experiment” in a part of your attic that faces the sun by installing one roll only (best if it shields some ductwork) and seeing how it affects attic and home temperature and humidity.  

  • If this test is favorable, continue with installation of the rest of the south- or west-facing sides.  Although I could not find much information about it, radiant heat is not very applicable on the north-or east-facing walls in the northern hemisphere. 

  • If humidity increases with the test spot under similar atmospheric conditions, it’s best to terminate the experiment and remove the barrier. 

Radiant barrier material is not very expensive, so if you can install it yourself, it can provide energy savings going forward.   It’s best to take your time and research the pros and cons of installing it in your home and not succumb to pressure from a salesperson, however.  Overall, it should not increase your energy use or humidity levels, so make sure to hold the manufacturer and/or installer to their claims.  We’d love to hear from you on how radiant barrier affects your home’s atmosphere!

Photo by Greg Rosenke on Unsplash

Do you need more INSULATION?

Do you need more INSULATION?

When seasons change it’s easier to get a fresh perspective on how well your home is performing against the elements, or we would say how well the building envelope is “sealed”.  Because it’s very difficult and expensive to build a home that is perfectly sealed, everything else is relative to the best-case scenario.  It’s best to have a good idea of what kinds of insulation are out there, before even requesting estimates to improve your insulation, so you know what the experts are talking about!  We can start by discussing what insulation does, how it is rated, and then move on to what types of insulation exist and what they do for our building envelope. 

Heat is a source of energy, and here on the surface of the earth on Monday through Sunday, energy naturally obeys certain laws (we won’t go into any sub-atomic or supersonic cases here). According to the 2nd law of thermodynamics, heat flows from hot bodies to cold bodies.  If the sun has heated up your roof and it’s cool inside because your air conditioning is running, the heat of the roof will try to flow into your cool house.  It’s just doing what is natural, like water running downhill!

Insulation is what we use to stop or retard the flow of heat, whether it’s trying to come in like the above example,  or go out on a cold winter’s day.  It’s like putting on a fluffy down jacket over your warm body, to keep the heat where you want it.  Some heat will undoubtedly escape through the openings and seams, but if you had to spend all day, every day outside, you will want the best insulation, tightest seams and the smallest openings you could get in that coat!  That’s the picture.

To rate the possible types of insulation you can stuff in the floor, walls and ceiling, we have “R-values”.  R-values measure an insulation’s resistance to heat flow; lower R-values allow more heat flow (not good) than high R-values (better).  Typically R-values can range from R-10 for some flooring materials to R-60 for some dense attic insulation materials. (Forbes Home)  These are all based on 1” of thickness, though, so one inch of R-30 is roughly equivalent to two inches of R-15. 

According to the Department of Energy, nine out of ten homes in the US are underinsulated.  (energystar.gov)  Therefore, chances are good that your home could use more insulation.  This map of the US shows 7 zones, which are basically increasing “delta T” or temperature difference between the interior and exterior of the home.  For example, the northernmost extremes in Zone 7 have the greatest temperature difference during the winter, so will need the most insulation.  It also gives guidelines on where and how to add insulation.

Because heat rises (an important part of the “stack effect” in your home), the most effective place to add insulation is in the attic.  Keep that expensive heat inside where it belongs!  This chart shows by the number of stars what value is obtained by adding insulation in the attic vs. floor (lots).  

Everything has an R-value–even carpet and glass.  Here’s a chart that shows the R-values of many common building materials.  Manufacturers generally price the insulation according to its R-value–meaning that the highest R-values are most expensive!   Because heat transfers in three different ways (convection, conduction, and radiation), some materials are better at retarding the transfer in one or more ways.  Here are the differences:

  • Convection is heat transfer from fluid to fluid.  Because air is a fluid for these purposes, air barriers (air sealing) is important to stop air from outside your home stealing heat from air inside your home.  Fiberglass batts with a paper facing are not great for protection against convection, but they are better than loose fiberfill.  Air can move through fiberglass batting, and it can actually move loose fiberfill out of the way.  Spray foam, when correctly applied, is one of the best convective thermal barriers. 

  • Conduction is heat transfer from solid to solid.  Most homes are built with 2x4 or 2x6 studs of wood that are joined directly to sheathing, then roofing or siding.  Without a conductive thermal barrier, cold from outside conducts directly through the siding, to the sheathing, to the wood stud, to the interior drywall.  Brrr!  This is why you can usually “see” the framing of a home on a thermal image on a cold day.  Conduction of heat in this manner is also called thermal “bridging”.  Newer building techniques suggest that a layer of rigid foam board between the siding and framing isolates the framing and prevents it from conducting heat into or out of the home.

  • When there is no direct contact or fluids between two bodies, heat transfer can still occur through thermal radiation.   Waves of electromagnetic radiation from the sun reach our planet and roofs everyday, and on cloudless nights, the warmth is reflected back into space.   Radiant barriers, either as part of a rigid foam board or on their own, have become popular additions in attics to retard heat radiation.  In order for radiant barriers to be effective, though, they can’t be sandwiched between other layers of insulation.  I won’t discuss radiant barriers in this article, but you can read more about them here

Here are some other pieces of information about insulation that it’s important to know:

  • Many types of insulation, like fiberglass and sheep’s wool, are “fluffy” because they are using the insulative properties tiny pockets of air within them.  Therefore when installing fluffy types of insulation, you want to “fluff” them out (wearing a respirator of course), not compress them, as compressing them actually decreases their R-value. 

  • Although the Department of Energy says that fiberglass batt insulation is fine for new construction or even laying over old insulation in attics, the building industry does not agree.  According to Family Handyman, batt insulation simply does not cover well in the attic because of its shape and inability to fill odd crevices and voids.  Of cellulose and loose fiberglass, cellulose has slightly higher R-value but fiberglass is more widely used in attics.  

  • Every insulation type must be correctly installed in order to achieve its rated R-value!

  • Loose fill insulations are very popular for ease of application and decent R-values, but in terms of air quality, most have the ability to generate dust and PM2.5.  If you are looking to use loose fill, make sure your HVAC ducts are sealed well and the area using the loose fill (for example the attic) is air-sealed from the rest of the home.

Here are the types of insulation grouped by where they are generally used:

Attic: Make sure that you have done the best air-sealing possible before adding insulation to your attic.  

Cellulose is recycled, ground-up paper with boric acid added for insect control and fire resistance (Family Handyman).  It comes in dense sacks and is installed with a blower.  Installation creates a lot of dust, but professionals can do a “wet-spray cellulose” that adds a small amount of water to keep the dust down and slightly increase the R-value, which is 3.5 per inch.  

Loose Fiberglass:  Fiberglass is small strands of glass that clump to form fluffy insulation.  It is also densely packed in bags that must be blown in.  It is very itchy to the skin and irritating to the eyes and lungs, so be careful to use full-body protection or hire a professional to install it.  It also can get entrained into your HVAC system if any ducts in the attic have leaks in them.  Fiberglass is lighter than cellulose so that if wind-washing occurs (where air/wind enters the attic through cracks), it is not a good choice for protection against heat convection. R-value: 2.5 per inch

Spray-Foam Insulation:  Spray foam generally comes in two varieties, open cell and closed cell.   To get anywhere near the R-49 recommended in attics of zones 5-8 on this chart, you’ll need to think about using closed-cell spray foam or adding rigid foam board when you replace the roof (see next point).  Open cell foam deforms easily when you poke a finger in it, and has an R-value of approximately 3.6 per inch.  Closed cell foam is typically used in extreme temperatures and under homes, because it has a higher R-value of 6 per inch, and it’s very hard, making it almost impervious to critters that tend to chew through insulation.   Besides being used as an air barrier, it’s also a total vapor barrier, and it adds a lot of structural rigidity to the cavity it’s sprayed in.  The downsides of spray foam insulation include the use of toxic blowing agents that, if improperly installed, can cause long-term off-gas issues (see our post here).  It is also difficult to detect leaks and insect damage behind the spray foam, so that major damage can be done before the problem is evident.  Spray foam must be installed by experienced professionals, and the cost is accordingly higher than other types of insulation!

Rigid foam board insulation:  Installation of foam board in attics is not as easy as blowing in loose insulation, but it adds a lot of  R-value as well as protects against conductive heat transfer.  It gives some of the closed-cell properties of spray-foam, without the offgassing (most of the off-gassing is accomplished at the factory) and installation cost (it can be installed DIY).  The most popular types of foam board are EPS (expanded polystyrene) and XPS (extruded polystyrene).  Polyisocyanurate is made of urethane and is a newer, popular choice with an R-value of 6 to 8.   The easiest way to install these boards is during roof replacement, but they can also be used to create a conditioned attic by screwing them to rafters with special fasteners like drywall (video).  Seams and penetrations can then be sealed using foil tape. 

Walls: Of course, the best time to insulate well is during construction.  However, insulation can be added to walls during siding replacement.  Here are typical wall insulations and their values: 

Fiberglass batts:  Fiberglass has been the standard for many decades now, but its R-values are limited to R-13 for a 2x4 wall, and R-20 for a 2x6 wall (since fiberglass has an R-value of 3.7 per inch,  and a 2x4 stud is 3.5” wide, it gives a value of 12.95). (learnmetrics.com)  This is not very much for northern climates, and it doesn’t address conduction transfer, so you may choose to add rigid foam board to the exterior before the siding. 

Mineral Wool batts: Mineral wool is a fiber insulation, similar to fiberglass, but is made from natural materials and not glass. There are two kinds of mineral wool available for home insulation – rock wool, which is made from fibers of stone and slag wool, are fibers made from iron ore waste.  Additional benefits of mineral wool is that it is an excellent acoustic insulator and it’s very fire-resistant. (What is mineral wool insulation?)  The R-value is about 3-3.3 per inch for a brand-name mineral wool called RockWool.  (bobvila.com)  Mineral wool is also made into boards, with an R-value of about 4.0 per inch.

Sheeps Wool batts:  For those who are sensitive to other types of insulation, or want to use some of the most natural building products available, sheeps wool fits the bill.  What you will need to ascertain, however, is if synthetic adhesives are used, and how sustainably and humanely the sheep are raised and sheared, because the industry has the potential to generate abuse.  Sheep’s wool can also regulate the humidity in your home: it can absorb around 33 percent of its weight in moisture without ever losing its insulating ability.  (buildwithrise.com)  The R-value of sheep's wool insulation ranges between 3.5 and 3.8 per inch, due to millions of tiny air pockets in the folded wool.  Sheeps wool can also come loose in bags for blowing in behind netting (see “loose fill” section below). 

Hemp batts: Hemp has an R-value of approx. 3.7 per inch, making it a very good insulation.  It is sustainable because the hemp plant grows fairly quickly (only 90-120) days, and the product uses only about a pound of raw material per square foot of R-13 HempWool, one brand name for this product.  According to BuildwithRise.com, hemp insulation is non-toxic. It is a plant-based product that contains no VOCs, no chemical binders, and does not off-gas. Hemp insulation is hypoallergenic, repellent to mold, pests, and insects.  One drawback to hemp insulation is that it is not naturally fire-resistant, so fire retardants must be added to it, potentially adding chemicals with sensitivities or toxicities. 

Recycled Denim Batts: It’s unlikely that you have enough old jeans to insulate one 2x4 cavity, but the recycled clothing industry has more than enough!  Denim insulation is actually a combination of recycled jeans and post-industrial denim and cotton, not just denim alone. The fabric is shredded and treated with boric acid to make it flame retardant, and insect, pest, and mildew resistant. (builddirect.com)  It also comes in loose fill for attics and walls, and has approximately the same R-value as fiberglass: 3.5 per inch.  It doesn’t require special protective equipment to install, but it is more difficult to cut and can take a long time to dry if it gets wet. 

Cork:  Cork is a remarkable material.  It’s harvested by hand from trees that live from 150-250 years.  Only the bark is removed every 9 years, without harming the tree.  Most of the world’s cork comes from Portugal.  ThermaCork is a product that is made from the bark and water in a superheated steam process.  It has an R-value of 4 per inch, which is on the high end.  It can be used on the interior for soundproofing, flooring and partitioning, as well as exterior walls and roofing.  It’s non-toxic and sustainably produced. 

ClimaCell: ClimaCell was developed out of an effort to find a scalable alternative to EPS, which is more commonly known as Styrofoam®. (businessinsider.com)  It’s made with paper and corn starch so that it’s fully recyclable and is a preferred packing material for cold shipments.  In residential use, it’s made in loose fill, batts and rigid boards, but only mainly available in European markets at the moment  (start saving all your cold-pack boxes!).

Rigid Foam Boards: EPS and XPS are great choices to protect the structure because of their “closed cell” insulative properties and vapor barrier properties.  Polyiso can absorb moisture, though, so it cannot be in contact with the ground or wet surfaces.  They can be installed during siding renovations or additions.  Check out this article where rigid foam insulation was used to create a continuous air barrier between the garage and the home (genius!)

Spray foam: As stated above, spray foam has good insulative, air barrier and in the case of closed cell foam, vapor barrier properties that make it an excellent choice for walls during construction.  It can also be retrofitted into existing home walls by removing a layer of siding, removing the old insulation and filling the stud cavities from the exterior.  (Removing old insulation before installing new)

Loose fill:  If you live in an older home that was poorly insulated, it may be possible to add insulation between the studs by either removing a layer of siding at the middle or top of the first floor, or drilling through the interior wall.  Then loose fill can be blown into the cavity, and the siding replaced or the hole patched.  (attainablehome.com)  Loose fill can be sheeps wool, cellulose, fiberglass, hemp, cork or a mixture of agricultural products, like ClimaCell.

Loose fill is also a popular choice for new construction, when it is used with netting to contain it.   Netting or fabric is stapled to the studs and insulation is blown into each cavity until it is full. The only problem with this is that it may settle over time, leaving gaps at the top.  

Floors:  If your home is built above the ground, it’s important to consider where your building envelope lies: at the floor, or at the ground?  If you have a crawlspace, consider closing it off and conditioning it, so that humidity and mold from the ground are not sucked into your home.  If you decide to keep the crawlspace open and ventilated, however, additional insulation can be added to the underside to keep cold air from leaking out in summer or penetrating in winter.  Any insulation should have good water-resistant properties to avoid absorbing moisture and breeding mold.

Rigid foam board is great for insulating the walls of conditioned crawlspaces.  This type of insulation may be faced with silver foil, with the foil facing inward toward the crawl space. Though the rigid foam is the chief insulator, the foil adds a bit more energy savings by reflecting heat into the crawl space. The foil, too, acts as a vapor barrier. (thespruce.com)

Closed-cell sprayfoam could be used on walls of conditioned crawlspaces, but they would need to be clean and dry first.  More often, it is used under the floors of ventilated crawlspaces to provide the thermal insulation, moisture and air barriers needed to keep the home more comfortable. 

“New” Insulations

Residential insulation is evolving all the time, and one thing we are watching is Vacuum Insulated Panels (VIPs). With the absence of air in their core, they resist all types of heat except radiation, and often they are covered with a radiant barrier that closes that gap.  They are quite expensive at the moment and shapes/sizes cannot be cut on the job, but they are very promising for roofing especially because of the need to reject heat at this high-access point.  Like other emerging technologies, we expect these to become more widely and cheaply available in the next decade. 

Aerogel is a gel is most commonly made from silica (silicon dioxide), where the liquid portion of the gel has been replaced with air or another gas.  It’s very low density but with high-crush strength, and has an R-value of 10 or more per inch.  It’s used in thin strips and sheets to eliminate thermal bridging, and also available in blanket form.   Aerogel is supposedly “low-dust” compared to loose fiberglass and batts, but silica is dangerous to breathe in so respiratory protection is still required when installing and cutting it. (A Look at Aerogel as Insulation) In addition, it repels water so it can protect your structure from water damage.  Alas, its cost is prohibitive for most residential projects at the moment.

There’s only a few year-round climates that don’t need insulation (Hawaii, anyone?), so it’s always good to stay on top of potential thermal leaks and new developments in insulation.  It’s a case of sowing some money and effort to reap comfort and energy savings down the road! 

Photo by Greg Rosenke on Unsplash

Unplugging for your sanity and your health

Unplugging for your sanity and your health

At this holiday time of year, there are so many competing digital signals that it feels like my brain is being overloaded–emails about sales, gifts and events, advertisements on TV and the internet playing constantly, and music playing on every shop and street.  I checked (yes, online of course!) and digital sensory overload is a thing: our senses send more information to our brains than we can process.  Healthy brains have highly refined “filters” that can discard most information that is not relevant, but information overload or stress occurs when people suffer from the fact that the amount of information they are confronted with is greater than their capacity to process it.  This is not unlike the stress that people who have conditions like ADHD, schizophrenia, and autism experience; they have atypical filtering that can result in painful sensory overwhelm.  (fastcompany.com)  Today’s world is a sensory onslaught that can leave us drained and disoriented.  This short video is an animated version of how you might feel after a day of being “plugged in”!

Digital overload can be an even more prominent problem to those who have a chronic illness or physical limitations, because they depend on technology to help them and/or to provide a distraction from pain or boredom.  (thehealthsessions.com)

Physical symptoms of digital sensory overload may be trouble sleeping (the blue light of digital devices delays the manufacture of melatonin), eyestrain and headaches; if addiction to digital devices is severe, it can lead to decreased bone density (from lack of physical activity), weight gain (again from sedentary behavior), increased risk of type 2 diabetes, and high blood pressure. (goodrx.com)  Emotional symptoms include increased irritability and fatigue, and people who use their devices excessively have a greater chance of experiencing symptoms of depression and anxiety. (thehealthsessions.com)

Reduced productivity from digital overload takes a heavy toll on businesses today.  Consider this: employees may take as long as 24 minutes before they are fully focused on the task they were doing before opening an email!  Sending messages to friends, scrolling through open applications, and seeing unread emails all effectively distract us while completing a task. (workspace365.net)  Those who work from home can confirm that unless you have a dedicated room and time boundaries, telecommuting successfully and efficiently is often harder to do than going to the office!

Creativity, a birthing of new thoughts and ideas, is also severely limited by digital overload.  Neuroscientists have shown that boredom is good for our brains’ health: “Boredom can actually foster creative ideas, refilling your dwindling reservoir, replenishing your work mojo and providing an incubation period for embryonic work ideas to hatch.” (Forbes.com)  Nevertheless, with a smartphone, boredom is never a “problem”. 

Here’s some interesting facts about our brains and heavy digital use: (Per Matt Richtel, Technology Reporter, New York Times, on npr.com)

  • “Multi-tasking” is a myth; we are not truly doing multiple things at the same time.  What you are basically doing is switching rapidly among those tasks, not doing them at the same time.  It does not make us more efficient.  It makes us significantly less efficient.

  • Heavy multi-taskers or technology users have more trouble filtering out irrelevant information, more trouble staying focused, and more trouble, remarkably enough, switching between tasks. 

  • The compelling need to “check” email or messages is called intermittent reinforcement; it makes us think that there may be something fascinating waiting for us, so we constantly check, and when we do, we get a dopamine burst, a little rush of adrenaline. In the absence of checking, we feel bored, so we are actually conditioned by a kind of neurochemical response.

If you are feeling overloaded with digital media and information, there are positive steps you can take to regain peace of mind.  It may not be easy at first to cut back on media exposure, but the results are worth it. 

  1. If you can, take a vacation with less or no digital media exposure. There is a “three-day rule” when it comes to vacations: it takes approximately three days for our bodies and minds to become more relaxed, and without your phone or tablet or computer, this might be hard, but will pay dividends to your mind and body.  (For more science on how long your vacation should be, check out this article).  How often do you truly experience solitude today?  Solitude is psychological detachment from society for the purpose of cultivating the inner world of the self. It is the act of emotionally isolating oneself for self-discovery, self-realization, meaning, wholeness, and heightened awareness of one’s deepest feelings, and impulses.  A survey on “wilderness solitude” was conducted at the Bob Marshall Wilderness Area in Montana in 2017, and it used four core dimensions of the 21st Century Solitude Scale: De-tethering from Digital Connectivity (disconnecting from email and other devices), Physical Separation (being away from crowds, being isolated), Introspection (thinking about who you are and your values), and Societal Release (to be away from the rules and constraints of society).  The opportunity to completely “disconnect” for days at a time is completely unique in today’s society, and the study illustrated that this type of solitude is a physical, psychological, and societal phenomenon.  (International Journal of Wilderness)

  2. Since true solitude is hard to create, sometimes it’s practical just to establish better boundaries for device exposure, in time and space.   Here’s some suggestions for boundaries (goodrx.com):

    1. Set alarms for device use, or set only a few times a day for checking messages.

    2. Turn off notifications from social media and other unnecessary notifications.

    3. Use only one device at a time…this is getting harder…

    4. Create tech free times, like at night when you can use the “do not disturb” function to keep from being awakened in your sleep.  Use other times of the day to connect with real people like family members, or take a walk outside. 

    5. Finally, create tech-free zones in your home where you enjoy other activities (like the dining room table).  

Setting examples for younger family members is important to do, because the proliferation of devices is not only causing adverse health conditions; it is leading us into “a new epoch in the human condition… Research conducted by the MIT Initiative on Technology and Self has found that younger generations of Americans are becoming more comfortable with certain technologies than they are with one another, with Turkle (the author) concluding that if “the simplification and reduction of relationship[s] is no longer something we complain about… It may become what we expect, [and] even desire.” (International Journal of Wilderness)  Face to face interactions with real people is necessary to help everyone maintain quality interpersonal relationships, adult and teen and child alike.  It’s time to “put down the phone” and stop missing the important things: conversations and feelings and walks and gorgeous sunsets and starry nights.  Get back to using the original camera: your eyes and your mind, and communicating with your own words to a loved one how awesome life can be. 

Photo by Paul Hanaoka on Unsplash

Biofilms are bastions of BACTERIA

Biofilms are bastions of BACTERIA

Far from being harmless documentaries about someone’s life, biofilms are dangerous bacterial growth that causes a “film” over the surface that is hard to remove.  Scientists have found that persistent infection problems in places such as hospitals, nursing homes, food processing plants and drinking water distribution systems is not due to free-floating “planktonic” bacteria.  Over short periods of time (hours and days), complex surface-attached communities of bacteria form, held together by self-produced polymer matrices (long chains of organic molecules made by the bacteria themselves).  (from Beyond Risk: Bacterial Biofilms and Their Regulating Approaches)  These are called biofilms, and their persistence is very problematic to our health and quite a few industries. 

Essentially, whenever you use a toothbrush or go to a dentist for teeth-cleaning, you are engaging in “biofilm control”.  In fact this is how biofilms were first described–when the inventor of the microscope, Anton Von Leeuwenhoek, saw microbial aggregates on scrapings of plaque from his teeth. (Biofilms: A microbial home)  Here are some more facts about them from this article:

  • Biofilms form on virtually all surfaces immersed in natural aqueous environments.
  • Bacteria in biofilms are 1000-1500 times more resistant to antibiotics than free-moving bacteria (also known as their planktonic state).
  • Biofilms have been found to be involved in a wide variety of microbial infections (by one estimate 80% of all infections).  Such infections include periodontal disease, musculoskeletal infections, osteomyelitis (bone infections), bacterial prostatitis, native valve endocarditis (inflammation of the heart’s lining and valves), cystic fibrosis pneumonia and GI infections, all of which can be  persistent and chronic.

Although it can happen quickly and is microscopic, the growth of a biofilm happens in 5 distinct and complex steps.  In a nutshell, these are (from Beyond Risk: Bacterial Biofilms and Their Regulating Approaches):

  • reversible attachment, where bacteria attach to surfaces
  • irreversible attachment, involving interaction between bacterial cells and a surface using bacterial adhesins
  • extracellular polymeric substances (EPS) production (helps strengthen the film)
  • maturation of biofilm (bacterial cells synthesize and release signaling molecules to sense the presence of each other)
  • dispersal/detachment (cells release and go back to an independent lifestyle).

Source: bellalindemann.com

Why do bacteria form biofilms?  It appears to be a survival strategy of “strength in numbers” to provide protection for bacteria and make them more suitable for the external environment under certain conditions.  What’s good for them, is mostly bad for us.  Biofilms are like fortified castles of infection.

Biofilms are the major mode of microbial growth, and the most challenging problem in drinking water system disinfection. Not only do biofilms contain life-threatening microbes, the way they coat the inside of pipes promotes corrosion, and reduces heat transfer.

The good news is that ancient, non-toxic materials like copper and silver are useful in sanitizing drinking-water systems.  The first installation of a copper‑silver ionization system in the United States was in 1990, where a Pittsburgh, Pennsylvania hospital showed that Legionella colonization of distal outlets (those located farthest from the source) was reduced from 75% to 0% in 3 months.  When the ionization unit was deliberately inactivated, recolonization of bacteria was delayed, and the water system remained free of Legionella for an additional 2–3 months; accumulation of ions inside the biofilm was demonstrated to be the basis for the prolonged bactericidal effect. Copper‑silver ionization has been used to control Legionella in hospitals worldwide. For example, ten cases of Legionnaires’ disease occurred at the University of Wisconsin hospital from 1985 to 1995, despite hyperchlorination. Following installation of copper‑silver ionization, Legionella was eliminated from the drinking water system and no cases were diagnosed.(Silver Ion-an overview)

Biofilms also occur on marine equipment like ships’ hulls and water-cooled heat exchangers.  Organisms like algae, barnacles and mussels build up on underwater surfaces, called “biofouling”, and cause adverse effects of slower speed and increased fuel consumption on a ship’s hull and reduced heat transfer in heat exchangers.  To combat biofouling, paint that contains copper is commonly applied to hulls, and new silicone coatings are being developed.  (Paint and Coatings Industry magazine)  For heat exchangers, slippery coatings are also a solution, as well as iodine bubble systems that can safely kill organisms and prevent them from attaching.  This is particularly helpful in sensitive marine habitats and fish hatcheries (Hatchery International).

Bacteria may have developed biofilms for survival, but scientists have found ways to penetrate the films.  

  • Biofilms on teeth can be controlled by a variety of mechanisms.  These are basically mechanical (remove with toothbrush, water pick, dental floss), or chemical (dissolve it with enzymes, antibiotics, alchohols and other rinses).  (Biofilms: A microbial home) Regular maintenance to control biofilms is key to keeping that “coat” of slime from building up, but some of that bacteria could be protected us from more harmful microbes.  Check out this short video if you want to see the colonies of plaque in your mouth!
  • Silver nanoparticles can penetrate through the bacterial biofilms to completely destroy them and can even prevent microbes from developing biofilms.  Silver nanoparticles can also be combined with antibiotics to increase the penetration power of the antibiotics. (The silver lining: towards the responsible and limited usage of silver
  • Iodine is another natural inhibitor to biofilm.  Titanium implants treated with an iodine coating were shown to have significantly less biofilm growth of Staphylococcus bacteria than the control implants (study on rats).   Iodine is a key ingredient in our TotalClean multi-surface,  multi-purpose cleaner.  
  • Some scientists are developing microscopic spiky surfaces that actually inhibit attachment of biofilms.  (statnews.com)
  • Electrical microcurrents can also disrupt the bacterias’ ability to form biofilms. Arizona-based Vomaris Innovations markets a wound dressing called Procellera that generates microcurrents to aid in wound healing. (statnews.com)
  • Because the bacteria within biofilms use a method of communication called quorum sensing, methods to interrupt this communication have shown to be successful in interrupting the establishment or continuity of the biofilm.  Foods and food-based supplements such as turmeric (containing Curcumin), garlic (containing ajoene and allicin), apple cider vinegar, vanilla beans, oregano oil (containing carvacrol) pomegranate (containing ellagic acid), and cinnamon (to name but a few) have been scientifically proven to disrupt or prevent biofilm formation. (Natural Biofilm Disruptors That Work)  Another list of quorum sensing inhibitors is found here


If you have chronic symptoms in your body (like gut or sinus infections) or your home (like mold or odor) that just won’t let up, a biofilm could be the culprit, and there may be a non-toxic, non-drug solution out there to overcome it.  Most often, a combination of natural therapies will be the best solution.  Functional medicine doctors and mold specialists alike are familiar with biofilms and can guide you to better health.  Also, polar ionizers like the Germ Defender, Air Angel and Whole Home Polar Ionizer act similarly to silver ions as the ions cling to the surface of bacteria and viruses and inhibit their ability to infect.   With biofilms, it’s a matter of working smartly and intensely–don’t give up!

Photo by Akram Huseyn on Unsplash

How can bacteria possibly grow in/on my soap?

How can bacteria possibly grow in/on my soap?

Well, it seems like a conundrum to me: our use and promotion of antibacterial products which actually have bacteria growing in them.  It’s like finding out your bar soap has bacteria on it (ahh, unfortunately it does).  So what’s the purpose of washing if the soap we are using has bacteria?

There are some heavy duty questions.  We’ll tackle them by splitting them up into parts.

Part 1: The science of soap and its intended purpose

Let’s go back to the purpose and method of washing our hands (or actually any part of the body): to get us clean.  Clean means the removal of dirt and germs, but not the killing of germs.  Our bodies naturally produce oil, and a lot of dirty surfaces have oil in them, making dirt stick to our hands and difficult to remove with water alone.  Why? Because oil and water don’t mix.  Here’s where the chemistry of soap helps.  Soap molecules are elongated and have two ends: one end that loves water (hydrophilic) and one end that repels water (hydrophobic).  When you lather your hands with soap, the end that repels water sticks to the oily dirt, and the end that loves water, well of course sticks to the water, and the soap will help lift away the oily dirt from your skin.  Any germs in the dirt are loosened with it and flushed down the drain when you rinse well with water.  Thus, the purpose of washing with soap is not to kill germs, but to wash them away!  

Part 2: Antibacterial Soaps

Antibacterial hand soaps first came on the scene after 1984, when David Poshi and Peter Divone filed for a patent for “antimicrobial soap”, which used triclosan to kill microbes. (The FDA, Soap, and Superbugs)  After several decades, the safety of triclosan came under scrutiny (it is an endocrine-disrupting chemical that may cause cancer), and in 2013, the FDA called for data proving that triclosan was safe for everyday use and more effective than preventing infections than products that didn’t contain it.  After manufacturers had not provided the necessary proof, in 2016 the FDA ruled companies couldn’t sell triclosan-containing consumer products such as antibacterial soaps anymore and stated that washing with antibacterial hand soap is not any more effective than washing with soap and water. (Triclosan)

These rules from the FDA don’t apply to handsoaps used in healthcare settings, or hand sanitizers or antibacterial wipes.  So in these cases, triclosan is allowed because of the ability to kill germs even when water is not used to flush them away.  

Part 3: The ability of soaps and even antibacterial soaps to harbor bacteria (!)

Hopefully the understanding of how soap works to loosen dirt and germs from our hands will help to override the gross fact that soap, like most other moist substances in the house, can harbor bacteria.  For normal (non-antibacterial) soaps, It all goes back to biofilms.  Biofilms are thin, slimy layers of bacteria that adhere to surfaces and to each other.  (For more on biofilms you can read our article here.)   The slime on your teeth in the morning and the slime in the dog’s water bowl are both examples of biofilms. 

Biofilms are colonies that protect the bacteria from eradication by scrubbing, or drying out, or in the case of antibacterial soap, from agents that can directly kill it.  The slime is a coat of armor to the bacteria living beneath it!  

If bacteria can form a biofilm, it’s set to thrive, because biofilms are particularly hard to eradicate.  We brush our teeth in the morning, and wash out the dogbowl, but guess what–the biofilm is back the next day, if not a few hours later.  So, it’s not surprising that the longer a container is used and has water in or around it, the more likely there’s a biofilm on it!  This goes for our water bottles, contact lens storage cases, and yes, bar soap dishes, handsoap, shampoo and body wash containers.  In fact, a study in 2011 showed that about 25% of soaps sampled from public restrooms in the US were contaminated with more than 106 colony-forming-units (CFUs) per ml (for reference, the maximum amount of contamination for eye cosmetics or baby products is 100 CFUs per gram or ml).  

Refillable containers for many different products are still thought to be the best practice to reduce plastic waste, and they do accomplish that one goal.  However, the way they are refilled is very important and can substantially increase the risk for biofilms to grow and contaminate the soap inside.  In another 2011 study, 14 refillable soap dispensers were sampled in one elementary school, and all 14 had significant bacterial contamination, which resulted in a 26-fold increase of gram-negative bacteria on hands after washing with the contaminated soap!  In a school setting, of course there adults and children, and although hand-washing technique was not dictated, washing with bacteria-contaminated soap increased bacteria on the hands for both.  Bacteria levels dropped drastically after the soap containers were changed out to accept sealed refill packets (bladders of uncontaminated soap).  

What are the lessons here?  

  • Although the FDA’s position on antibacterial soaps is probably true (antibacterial soaps do not provide any measurable benefits over plain soap outside of a healthcare setting), it is made on the premise that the soap or the container is not harboring bacteria!  

  • Refilling your soap container without using sealed soap refills may expose you to increased bacteria.  This is because without extensive cleaning of the dispenser, humid air that fills a nearly-empty dispenser is probably enough to enable a biofilm to take hold, and without thoroughly cleaning your soap dispenser, the new liquid soap poured into it becomes contaminated, too.  This article by GoJo, a soap manufacturer, outlines the risks of refilling your soap dispenser from larger containers of soap and lists these facts about soap dispensers (from article Evaluation and remediation of bulk soap dispensers for biofilm):

    • Once dispensers are contaminated with biofilm, even cleaning and soaking in bleach has been proven ineffective, as biofilms are highly resistant. 

    • It takes only a tiny number of remaining bacteria from the biofilm community to recontaminate the soap and dispenser. Recontamination occurs rapidly – within two weeks.

    • Contaminants can be present even when not obvious or visible (that’s why we call them “microorganisms” – you need a microscope to see them).

    • Biofilms can be found in bulk dispensers made of any materials (plastic, stainless steel, etc.).

Therefore, if you use liquid soap, making the switch to sealed soap refills or single-use dispensers is safer for everyone who uses the soap!   The problem is that there are virtually no “natural” soaps for the home that use sealed soap refills.  There are many “solutions” online for cleaning soap dispensers, but they are more than likely ineffective– this article showing that even industrial chemicals such as sodium hypochlorite, sodium hydroxide and benzalkonium chloride were not able to completely eradicate a biofilm of salmonella after it was allowed to establish for only 7 days.

  • Many people prefer solid bar soap to liquid soap for washing.  However, solid bar soap that sits in water allows a slimy biofilm to form that nurtures bacteria with dead skin cells and water.  If you use solid bar soap, make sure to use a dish that allows water to drain off the soap (so it’s not sitting in a puddle of water) and one that is not porous, like a good ceramic or metal dish.  Wooden grate soap dishes are popular and very “zen”-looking, but think about wet wood and all the microbes that it can sustain!   Don’t be tempted to use that “soap water”, either.  To get rid of bacteria on the surface,  washing the bar soap thoroughly with water drastically diminishes the risk of bacteria surviving on the soap. It is also recommended to wash the container where the bar soap is kept often to keep the goo from developing.  (The Shocking Truth About Bar Soap And Germs)  Check out these soap dishes:

Although it seems like an insult to a frugal, ecologically conscious mind, the most healthy soaps come in liquid single use dispensers or a bar soap situated on a well-drained soap dish.  You might keep these in mind the next time you see a super deal on a liquid soap refill, and even reconsider the merits of old-fashioned bar soap.

Photo by Matthew Tkocz on Unsplash

What size heating/cooling unit does my home need?

What size heating/cooling unit does my home need?

If you find yourself shivering or sweating and madly mashing thermostat buttons without success, it might be time for a new heating or cooling unit.  If your HVAC tech confirms that’s the case, it’s easy to just have it replaced with the same capacity unit.  But what if you were never comfortable with the capacity of the unit you had?  If it ran constantly, or started and stopped frequently, then those are signs that it may not have been sized correctly in the first place.  We briefly touched on this subject in another article, but in the process of considering a new unit for my own home, I thought you would like to know about the factors to consider when sizing a new unit, and how you can do some calculations yourself (with free online programs). 

Just as a car’s engine has to be sized correctly to provide the right horsepower for driving the car and its auxiliary functions like hauling heavy things and/or towing, a home’s heating and cooling unit must be sized correctly.  Too small, and it will run constantly and struggle to keep the setpoint temperature.  Too large, and it will start, quickly reach the set temperature, and shut down, sometimes “cycling” through the startup and shutdown frequently.  Right-sizing the unit keeps the unit running for an optimal time without wasted power.  It also allows the unit to remove more humidity from the air during the cooling season.  

Your home is a complex environment!  If you have an HVAC contractor that you trust to get you the right equipment, that’s a great resource to have.  If you aren’t sure that he’s listening or will do his “homework” as well as he should, then it’s a good idea to do your own research.  Normally when sizing a heating and cooling unit for a new construction home, architects or builders will perform what is known as a “Manual J” calculation.  Manual J is the national ANSI-recognized (American National Standards Institute) standard for producing HVAC equipment sizing loads for single-family detached homes, small multi-unit structures, condominiums, town houses, and manufactured homes. A proper load calculation, performed in accordance with the Manual J 8th Edition procedure, is required by national building codes and most state and local jurisdictions.  (Air Conditioning Contractors of America)  Engineers usually use a specialized computer program and have training to input the right numbers, so performing a complete Manual J is usually not done by homeowners.  However, not unlike the thousands of “hacks” you find online everyday, there are ways to approximate a Manual J yourself!  Even though the computer or app is doing a lot of work for you, it’s only as good as the information you put into it.  Let’s look at some of the factors that you will need to know about your home to get a moderately accurate answer. 

Climate: Heating and cooling loads depend on what is going on outside, and decades of temperature highs, lows and averages can all be derived from your address or climate zone. You can get an idea of what climate zone you live in by checking out the map on this page

Construction: Your home is unique, and the following features have impacts on your heating and cooling load by their different “R-values”, or the resistance to the flow of heat.  The most convenient online estimators supply average R-values for each factor from the date of construction of the home and the standards that were in place at that time.  For example, a home constructed in 2003 will have higher average R-values than one constructed in 1963.  (For more about R-values, check out our article here!)

  • Type of foundation: crawlspace, basement, or slab, and the insulation level of each. 

  • Floors: How many floors above grade (earth) do you have? What is the ceiling height of each floor?

  • Space above ceiling of uppermost floor: do you have a vented attic, no attic (ceiling is just below the roofline), or an unvented (conditioned) attic?

  • Walls: how are they constructed?  Are they cinder blocks, wood frame, metal frame, etc.?  What is the siding: brick, vinyl, wood, cement board, etc.?

  • Windows and doors: A full manual J will require the number and size of all windows and doors, but the estimators may only require a relative number of windows in a wall (none/low/med/high) and the type of window (single pane, double pane, etc.).  Also, there should be a spot to include any skylights. 

  • Exposure: the length of the sides facing each direction (north, south, east and west) are important.

  • Air-tightness:  if you haven’t had a “blower-door test” performed on your house, an estimator program will allow you to guesstimate whether the air-sealing of your home is tight, average, or leaky.  

  • Type of roof: Asphalt shingle, tile, and metal are popular inputs for this parameter.  

HVAC:  Now, it’s time to input what type of system you want to have.  Most of these are geared toward central heating and cooling, so the following questions reflect that:

  • Ductwork: is it a ducted or ductless system?  Is ductwork above, below, or in the conditioned space?

  • Design considerations: for example, the summer and winter indoor temperatures, and summer humidity (normally 50-55%).  

  • How many occupants normally live in the home?  If it’s only 2, Manual J will still call for 1 occupant per bedroom plus one in the living room (for example, a 3 bedroom home will have an input of 4 people).

  • Daily activity load: there may be opportunity to input the number of appliances or select an extra-large kitchen or extra refrigerator.

Now that you see all of the ways your home’s configuration and construction affects its heating and cooling load, it’s time to find free “apps” that can estimate that load with moderate effort and a good interface.  I tried several programs to check my skills and the programs’ accuracy.  For reference, my old system was rated at 3 tons, but because of high humidity it struggled to keep up on the hottest days.   Here are some of the best programs:

  • CoolCalc.com: It’s free to create an account and input your “project”.  You can also look at the loads that are calculated for free, however, you will need to pay to download the report that’s generated.  The lowest payment is $20 for 5 downloads (which I found are needed as you can go back and “tweak” any inputs).  This program had a neat feature of allowing you to look at a satellite image of your home and “trace” the first and second floor plans to estimate the square footage, but if your home is covered by too many trees or has a complex footprint, you can also input floors and rooms individually.  By simply entering the date of construction, the program suggested average R-values, which really   simplified input.  With this calculator I received the report of 29,565 Btu cooling load and  48,043 Btu heating load (Btu’s are British Thermal Units; 12,000 Btu’s = 1 “ton” of capacity): this can be rounded to 3 tons of cooling and 4 tons of heating.  This eight-minute video gives a quick tutorial on entering the necessary information to get a good result.

  • Loadcalc.net: This program did not have a fancy tab interface like CoolCalc, however it was more similar to a manual J in that square footage of the walls and windows were required (the most time-consuming element).  Don’t try to do this one on your phone; you’ll need a spreadsheet if you have any number of windows in your home!  Because of the input of wall and window exposure on the various walls, I do think this program produced the most accurate result, rendering 33,568 Btu’s cooling and 39,593 Btu’s heating load.   It has decent instruction pages that explain a lot, and is completely free and savable so that you can go back and make changes easily.  After you calculate your load, there is also a page to check that the size of the system you plan to purchase is within the specs of what you need for the load.  

  • ServiceTitan.com: This is a super-simplified web page with only a few inputs, which turned out to wildly over-size the load: it generated 60,000 Btu (5 tons) recommended capacity and would not let me recalculate unless I entered my email address.

  • Remodelingcalculator.org: This calculator promised “NOT to over-specify the unit capacity…(because) most online tools give you a higher heat load estimate than you actually need for your home to sell you more expensive equipment.“ However, it was too simplified and definitely did oversize at 53,000 cooling Btu’s and 61,000 heating Btu’s. It also advised to verify the load with loadcalc.net before purchasing any equipment. 

There is another factor that may influence sizing of your heating and cooling system: inverter heat pumps.   Because my old system did not have inverter motors in it, it was limited to the speed settings of the motors it had.  Inverter motors are a type of variable speed motor with infinite speeds, that will run at high speeds at the beginning to heat or cool quickly, then slow down to maintain the temperature, instead of constantly starting and stopping.  This actually saves energy and keeps the temperature spot-on, instead of letting it wander a couple degrees up or down until the thermostat is triggered again.   In humid climates, this type of system also removes moisture from the air more effectively because the blower runs longer at a lower speed, which is what is needed to remove more moisture from the air.  If you check the performance curves for such a unit, like the Rheem RP20 Series, the rated capacity should fall well within the range of what the unit can do.  In the case of their 3 ton unit, it should provide the calculated 34,000 Btus cooling right on up to 110 degF outside (see red dot on the chart).  That’s a good thing. 

Source: Rheem Heat Pump Specs

Because I plan on purchasing an inverter heat pump system with high SEER, am adding insulation in the attic, sealing an uninsulated duct chase and adding more weatherstripping and caulk around the house, I am going to opt for the 3 ton size again.  It will definitely handle the cooling, which is the majority of the year here in the southeast, and is a bit undersized for the heating, but I’m not worried because we only have a few really cold days per year (30 degF and below).  Before performing the calculations with these online programs, I wasn’t sure.  But now, I can purchase with confidence that my new equipment will be up for the task.  There’s so much technology online, it would be a shame not to take advantage of it.  I hope this article helps you check out the real heating and cooling loads of your home, because even if you are not replacing equipment, it’s good to know if your equipment is performing well, or if there is a big hole in your building envelope somewhere (hope not!). 

Photo by Pixasquare on Unsplash

Estimating Power Consumption for the Whole-Home Polar Ionizer

Estimating Power Consumption for the Whole-Home Polar Ionizer

According to the most recent results from the 2020 Residential Energy Consumption Survey by the US Energy Information Administration, two-thirds of U.S. households use central AC or a central heat pump as their main AC equipment.  Because a central system incorporates ductwork to distribute air throughout the rooms of the home, it is an ideal place to install a purifier or sanitizer.  HVAC technicians are now familiar with installation of technologies such as UV lights, photocatalytic generators and ionizers, but it is ionizers that have proven themselves most efficient in sanitization and energy consumption.  

Each of these technologies requires the air handler blower to be operating in order to constantly move air through the system, and in the case of ionizers, the blower also moves the ions throughout the home.  According to learnmetrics.com, a site that explains how to calculate all sizing and load aspects of HVAC, blower motors are sized by horsepower; from ⅙ hp all the way up to 1 hp.  1 horsepower is equivalent to approximately 746 (imperial) watts, which is the maximum power needed if the fan were running at 100% output all the time.  However, most furnaces use variable-speed fans that can reduce the average power consumption from 100%t o about 20%. Therefore, the average power ends up being closer to 20% of the maximum power requirement. 

Then, there is the power needed to run the bipolar ionization unit.  This varies slightly depending on what power input is used (24VDC, 110VAC or 220VAC), but at an average of 9 watts, it is a fraction of what the blower requires.  The bipolar unit should only be powered on when the blower runs. 

For best sanitization effects, we recommend running the blower and ionizer 24 hours per day to maintain a continuous flow of ions through the home.  This is accomplished by leaving the AC fan in the “ON” position instead of “Auto”.  We realize, however, that due to power consumption or personal preference, customers may choose less time per day–like 8, 12 or 16 hrs instead of 24.  Breaking it down in this way helps visualize the cost.  According to Carrier, an HVAC equipment manufacturer, residential air conditioners usually range from 1.5 to 5 tons (or, 18,000 – 60,000 BTUh).  For an average example, below we took a 3 ton unit, which normally uses a ½ horsepower blower motor, and calculated the cost for running the blower and ionizer at the national average cost of electricity (October 2022) at $0.166/kWh for these time periods per day:

8 hours per day:  $3 per month

12 hours per day: $5 per month

16 hours per day: $7 per month

24 hours per day: $10 per month

These are the costs for using the blower in addition to the existing heating and cooling needs, so if you are already running the unit for heating and cooling, the cost increase will be less than this amount (by leaving the blower set at “ON” instead of “AUTO” in order to use the ionizer).  You’ll also want to make sure that you change the system air filter on time or earlier since the unit will be constantly circulating air.

Do you want to calculate your own actual costs for running an ionizer?  Here is the formula:

(a)*(b)*(c)*(4.476)  + 1 = $/month to run the ionizer and blower for “c” hours per day.

We’re using a letter for each of the variables you’ll need to plug in:

a = Using the approximate “tonnage” of your unit, select the corresponding horsepower in decimals from the table below.  1 ton is approximately equal to 12,000 BTUs, or British Thermal Units.  You can find this information in a plate on the back of the condenser: 

Tons cooling/heating

BTU’s cooling/heating

Typical air handler blower horsepower

2

24000

⅓ (0.33)

3

36000

½ (0.5)

4

48000

¾ (0.75)

5

60000

¾ (0.75)

b = Your electricity cost in $/kw (check your electric bill)

c = How many hours per day would you like to use the ionizer?

And here is some explanation: The constant 4.476 is the combination of the conversion factor of 746 watts per horsepower, a factor of 0.2 to get the average power consumption (20%), 30 days in a month, and dividing by 1000 to convert watts to kilowatts.  The “+1” is the cost of running the ionizer, because it’s only about $1 or less per day.

If you have multiple central systems for different zones and plan to use an ionizer in each, just use the above formula for each system and add them together. 

Considering that the Whole Home Polar Ionizer has no consumable or refillable parts like filters, UV lamps or photocatalytic cells, 24/7 microbial protection for your whole home for $10 per month is quite economical in these inflationary times!

5 Benefits Of Bipolar Ionization Technology In Households

5 Benefits Of Bipolar Ionization Technology In Households

Stеp into a world whеrе thе air swirls with frеshnеss and vitality, thanks to thе еxtraordinary technology of Bipolar Ionization. As this innovativе forcе takеs cеntеr stagе, it quietly improves the air quality of housеholds worldwidе, similar to how a quiet hand dryer transforms the mundane task of drying your hands. Unsееn yеt rеmarkably potеnt, Bipolar Ionization elevates indoor air quality, vanquishes lurking pathogеns, embraces energy efficiency, and seamlessly melds with thе future’s smart homеs. Are you ready to unlock thе sеcrеts behind a breath of fresh air like never bеforе, whеrе charged ions purify your surroundings and rеvive your sеnsеs? Lеt Bipolar Ionization technology reveal a world of possibilitiеs within your vеry own abodе.

1: A Brеath of Frеsh Air: Enhancing Indoor Air Quality

Indoor air quality plays a vital role in maintaining our health and wеll-bеing. With Bipolar Ionization technology, households can now еxpеriеncе a breath of fresh air like never bеforе.

Thе process involves thе rеlеаsе of ions (charged particles) that activеly sееk out and nеutralizе harmful pollutants, allеrgеns, and pathogеns prеsеnt in thе air.

1.1 Purifying thе Air Wе Brеathе

Thе ions еmittеd by Bipolar Ionization technology act as microscopic air purifiеrs, targеting dust particlеs, pollеn, pеt dandеr, and othеr airbornе irritants.  By effectively eliminating thеsе allergens, households crеatе a hеalthiеr living еnvironmеnt, rеducing thе risk of allergies and respiratory illnesses.

1.2 Battling Against Airbornе Pathogеns

One of thе kеy еmеrging usеs of Bipolar Ionization technology is its role in combating airbornе pathogеns. Thе ions disrupt thе molеcular structurе of virusеs and bactеria, rеndеring thеm harmlеss. As a result, this technology provides an addеd layеr of protеction against infectious diseases, making it particularly relevant during flu seasons or times of increased health concerns.

1.3 A Rеfrеshing Ambiancе

Bеyond its health benefits, Bipolar Ionization technology also contributes to a morе plеasant ambiancе. The еlimination of odors from cooking, smoking, or other household activities results in a space that fееls frеshеr and inviting. Familiеs can еnjoy a homе еnvironmеnt that not only promotes hеalth but also fostеrs a sеnsе of comfort and rеlaxation. 

2: Silеnt Guardians: Rеducing Pathogеns and Gеrms

In an agе where sanitation is paramount, Bipolar Ionization technology еmеrgеs as a silеnt guardian, diligеntly safеguarding housеholds against harmful pathogеns and gеrms.

2.1 A Powеrful Sanitization Solution

The sanitization capabilities of Bipolar Ionization technology arе formidable. Thе ions efficiently neutralize bactеria and virusеs, including those rеsponsiblе for common illnеssеs. As a result, familiеs can еnjoy a clеanеr living spacе and a rеducеd risk of еxposurе to harmful gеrms. 

2.2 Lеss Sick Days, Morе Quality Timе

As technology reduces the frequency of illnesses, housеholds experience fewer sick days and medical еxpеnsеs. Parents can rest еasy, knowing their children are less likely to fall ill frequently, allowing for morе quality timе spеnt togеthеr.

2.3 Safеguarding Vulnеrablе Mеmbеrs

For housеholds with еldеrly family mеmbеrs or individuals with compromisеd immunе systеms, Bipolar Ionization technology provides an еxtra layеr of protеction. Thе sanitizing powеr of ions еnsurеs a safer and healthier living еnvironmеnt for еvеryonе, rеgardlеss of thеir hеalth status. 

3: Eco-Friеndly Approach: Reducing Dependency on Harsh Chеmicals

Embracing a more sustainablе and еco-conscious lifestyle bеcomеs еffortlеss with Bipolar Ionization—thе technology’s natural and chemical-free approach to clеaning and sanitization promotеs еnvironmеntal rеsponsibility.

3.1 Embracing Sustainability

By eliminating thе nееd for many chemical cleaners and disinfеctants, Bipolar Ionization technology contributes to a grееnеr and clеanеr planеt. Reducing chemical usage translates to a decreased environmental impact and a commitment to preserving natural resources.

3.2 Protеcting Indoor Air Quality

Traditional cleaning products oftеn rеlеаsе volatile organic compounds (VOCs) into thе air, which compromise indoor air quality. Bipolar Ionization technology еliminatеs this concеrn, еnsuring that housеholds maintain a clеan and safе living space without the negative еffеcts of VOCs. 

3.3 A Win-Win for Health and Environmеnt

Thе еco-friеndly approach of Bipolar Ionization technology crеatеs a win-win scеnario for both your health and thе еnvironmеnt. Families can еnjoy a hеalthiеr homе еnvironmеnt whilе also contributing to a sustainablе futurе for gеnеrations to comе.

4: Enеrgy-Efficiеnt Living: Lowеring Elеctricity Consumption

Enеrgy еfficiеncy is a crucial aspect of modern living, and Bipolar Ionization technology provеs to be an unexpected champion in this arеna. Its minimal еlеctricity consumption makes it an еconomical and еnvironmеntally conscious choice for housеholds.  Check out our article on how running a Whole Home Ionizer 24/7 costs less than $10 per month!

4.1 Minimizing Enеrgy Usagе

Bipolar Ionization technology opеratеs on a low-еnеrgy modеl, rеquiring only a fraction of thе electricity consumеd by convеntional air purification and sanitization systеms. This rеducеd еnеrgy usagе translates to lower electricity bills and a morе budgеt-friеndly living. 

4.2 Contributing to Climatе Goals

With thе increasing emphasis on combating climatе changе and rеducing carbon footprints, adopting energy-efficient tеchnologiеs bеcomеs paramount. Bipolar Ionization technology aligns pеrfеctly with thеsе goals, allowing housеholds to participate in thе global effort to mitigatе еnvironmеntal impact activеly.

4.3 Eco-Friеndly Living at its Bеst

The energy efficiency of Bipolar Ionization Technology complements its eco-friendly approach.  By rеducing еlеctricity consumption and promoting sustainability, housеholds can take significant stridеs towards achiеving a grееnеr lifestyle.

5: Low Maintenance and Convenience

Just as Smart homе intеgration frees up time and attention for the homeowner in order to enjoy time with family and friends, Bipolar Ionization technology frees up time spent attending to and maintaining air quality.

5.1 No need to replace filters or parts

Unlike other air purification systems, Bipolar Ionization units do not have consumable parts like filters, which can be an expensive and time-consuming task to replace regularly. 

5.2 Cleaning is not necessary 

The generation of ions happens 24/7 and doesn’t require cleaning of the unit, unlike many other appliances!  

Bipolar Ionization technology is not just an еmеrging trеnd; it is a transformativе forcе in modern housеholds. From еnhancing indoor air quality to combating harmful pathogеns, rеducing rеliancе on harsh chemicals, lowеring еlеctricity consumption, and enabling freedom from maintenance schedules, its benefits know no bounds.

So, as you еmbark on this еnlightеning odyssеy with us, rеmеmbеr thе incredible bеnеfits that Bipolar Ionization brings to your homе:

• A brеath of frеsh air, purifying and rеvitalizing your living space.

• Silеnt guardians, protеcting your lovеd onеs from harmful pathogеns. 

• An еco-friеndly approach, rеducing your impact on thе еnvironmеnt. 

• Enеrgy еfficiеncy, making your household more sustainablе and cost-effective.

• Low maintenance systems that free up homeowners to enjoy more time at home.

Expеriеncе the joy of a home that еmbracеs innovation, hеalth, and wеll-bеing. Lеt Bipolar Ionization technology revolutionize your modеrn living as part of a futurе that prioritizеs еfficiеncy, sustainability, and thе wеll-bеing of your family.

Article written by Kristel Marquez

How increased oxygenation can assist recovery from inflammatory disease

How increased oxygenation can assist recovery from inflammatory disease

If you've ever traveled to a mountain resort or done any high-altitude sports, you know that the “thin air” has an effect on our bodies.  High altitude air has the same percentage of oxygen by volume as sea level air, but because the atmospheric pressure is lower in the mountains, oxygen molecules are more sparse.  This means with every breath you take, you’re getting less oxygen.  “Altitude sickness” includes problems sleeping, fatigue, headaches, and even life-threatening pulmonary edema (buildup of fluids in the lungs).   Technically the signs of altitude sickness can begin at elevations of 5000 feet above sea level.  We know that the amount of oxygen in every breath you take is very important for people with good health; and even more so for people whose health has been compromised by biotoxins or injury.

Sadly, we understand that many of our clients come to us because they are going through mold or other biotoxin illness and know first-hand how damaging the effects can be.  One such illness is called Chronic Inflammatory Response Syndrome (CIRS), which was defined by Dr. Ritchie Shoemaker in the 1990’s.  He pioneered a treatment protocol that many doctors use today to help their patients recover from this syndrome.  Steps 8 and 9 relate to improving oxygen delivery to cells to decrease inflammation.  Although he does not prescribe respiratory methods for increasing oxygenation (it’s more through detoxification, supplements and correcting enzymes), studies have shown that supplemental oxygen can benefit CIRS patients.  

Biotoxins are extremely small, fat soluble molecules capable of going from cell to cell through membranes without being carried directly in the blood stream rendering them impossible to find in the blood stream. Biotoxins can enter through inhalation, direct contact with contaminated water, ingestion, tick bites and spider bites. These biotoxins, in genetically susceptible people whose immune system (antibodies) do not recognize and tag them, lead to chronic inflammation and long lasting chronic illness. Biotoxins bind to certain surface receptors, particularly those on white blood cells (macrophages, monocytes and dendritic cells) called antigen presenting cells. (Chronic Inflammatory Response Syndrome (CIRS) Evaluation and Treatment)

Why more oxygen?

Hypoxia (low oxygen in body tissues) can cause inflammation; for example, in persons with mountain sickness, levels of circulating proinflammatory cytokines increase, and leakage of fluid (“vascular leakage”) causes pulmonary or cerebral edema.  The reverse is also true: inflammation can cause hypoxia, such as in inflammatory bowel disease, where the entire mucosa becomes even more hypoxic.  Basically the inflammation is preventing oxygen from reaching capillaries.  Therefore inflammation and hypoxia can be interdependent. (2021 study Hypoxia and Inflammation)

In conjunction with biotoxin “detoxing” treatments, then, it’s possible that other ways of increasing oxygen could reduce inflammation.  Following are some ways proven to increase oxygenation of your cells.

  • Moderate exercise (as approved by your doctor) can be a good way to bring more oxygen to your cells and reduce inflammation.  This 2010 review shows how many studies have linked exercise with lowering of C-reactive protein (CRP) levels, which are a marker of inflammation.  This 2021 article cites benefits of exercise to sufferers of other chronic inflammatory diseases such as coronary heart patients and type 2 diabetes patients.  Although your oxygen levels may drop slightly during exercise, in the long run, exercise results in increased levels of arterial oxygen levels at rest, which will bring more oxygen to all of your cells. (Adjustments during exercise)

  • Deep-breathing techniques are helpful to everyone, not just those with chronic inflammation.  Check out our article for more information on breathing exercises that you can do without specialized equipment, and this article for devices that help improve breathing too. 

  • ELO water (a commercially available oxygen-enriched bottled drinking water ) was shown to increase arterial blood oxygen levels, improved cellular oxygenation and altered markers of mitochondrial function in rats, and was recommended as an effective adjuvant therapy even in people with longstanding diabetes already on insulin. The following charts show that this particular bottled water does indeed have higher dissolved oxygen (DO) than standard tap water, even with the bottle left open for a week.  (2021 study)

  • This 2022 study showed improvement of 75% of 49 dogs who suffered from Systemic Inflammatory Response Syndrome (SIRS) and were given HBOT sessions.  

  • Hyperbaric oxygen therapy (HBOT) has several positive effects on inflammation:

    • it may be able to stop certain types of fungus from growing in our bodies (studies). 

    • It promotes a strong immune system

    • It allows the brain to heal, improving memory and cognitive issues)

    • reduces inflammation on the cellular level by increasing anti-inflammatory cytokines and helps accelerate fibroblast activation.

  • Supplemental oxygen through a face mask or cannula and portable cannisters should only be prescribed by a doctor, because supplemental oxygen in those who are getting enough oxygen (healthy subjects) can cause airway inflammation and oxidative stress, quite the opposite of what is desired.

  • Continuous Positive Airway Pressure machines (CPAPs) do not increase the percentage of oxygen in the air you are breathing in; they just pressurize ambient air so that your airways stay open while you sleep.  However, if you have sleep apnea or problems getting enough air while you sleep, check with your doctor to see whether a CPAP would be helpful.

  • Another way to increase oxygenation safely is achieved with dedicated air-sealing and adding oxygen to your bedroom.  We’ve written an article on how Altitude Control Technology can increase the oxygen supply to your bedroom, so that your resting and sleeping hours are more productive in terms of healing your body. 

    • Although such systems are an investment, if you plan on staying in your home it could benefit you in the long term.

    • We’ve also laid out some alternatives in the article for increasing oxygen in your bedroom and home by increasing ventilation from outside.

The Downside to Smart Thermostats (and many other smart appliances): Invisible Radiation

The Downside to Smart Thermostats (and many other smart appliances): Invisible Radiation

Saving money is still a big draw for new products today… save X dollars per month on your electric bill, X dollars per month on your phone bill, etc.  According to many reviews like this one from a prominent online tech magazine, the first “pro” of using a smart thermostat is saving up to 10% on your electric bill.  In the end, it says the pros of using a smart thermostat outweigh the cons. However, the article does not mention Electromagnetic (EMF) Radiation at all.  Is EMF a problem with smart thermostats?

If you haven’t heard of EMF or don’t really know what it is, we’ve written an article to explain that.  EMF radiation, also called dirty electricity, is a byproduct of the many digital and electrical  appliances around our homes, from the microwave oven to our cell phone chargers, and especially wi-fi and all the appliances that communicate with it.  If you’re interested in knowing what some of the highest emitting EMF (but non-smart) appliances are in your home, check out this very informative article.  Spoiler alert: for this homeowner, they were the induction stove and microwave oven.  

Some smart thermostats are made to work with smart home managers.  The problem with smart home managers such as Google Nest is that they are always “on”, monitoring sounds and words so that they can pick up on keywords and execute commands quickly.  This analyzation of words often happens on the cloud because the Nest device isn’t powerful enough to do it locally.  Therefore there is constant upstream and downstream of information from the Google servers. This creates a huge radiation field of exposure, even when it is not actively executing commands. (Do Google Nest Devices Emit EMF Radiation)

CIO.com, which proclaims to be “the voice of IT leadership”, includes smart thermostats in a list of appliances that it might not be smart to live with!  In their article “Smart devices may be hazardous to your health”, they write, “Experts are already begging to warn us about the push towards adoption of smart devices at home and at work. WHO has expressed the need for caution siting corroborating evidence of possible radiation induced cancer. Working in smart buildings containing smart devices controlling HVAC, smart thermostats, smart locks, smart cameras, smart computers, smart printers, smart appliances, smart robots, smart, smart, smart may not be smart at all. “

Barrie Trower, physicist and Royal Navy microwave weapons expert on EMF radiation, is very adamant about keeping babies and children away from wi-fi.  In this video, beginning at 3:50, he describes how his physician asked him to investigate whether microwave radiation can cause “cot deaths” (infant deaths).  (Yes, it can.)  He goes on to state that “anyone who puts wi-fi into a school should be locked up for the rest of their life…they’re not fit to walk on the surface of this planet.  Because they haven’t looked at the research, and whatever incentives they have, it is not worth the genetic problems that parents are going to face with their children at birth…You are condemning the families and the children to a life of absolute hell.”  He’s referring to the damage that wi-fi causes to children and their future children because of radiation through damage of DNA in the eggs in young girls’ ovaries.  When an expert in technology that has been used as weapons (he cites several examples of low-frequency attacks on people) uses such strong language, it’s wise to pay attention!

Dave Asprey, who is the father of “biohacking”, a bestselling author and creator of Bulletproof Diet and Bulletproof Coffee, hit the nail on the head when he describes the information about EMFs today being in one of two camps: 

  1. EMFs are harmful and will give you cancer; or
  2. EMFs are totally harmless and those hippies are just trying to scare you

Dave’s in camp #1 by the way, and after describing what EMF radiation can do to your body, puts it bluntly:  Best case scenario (but still bad), your cells are under stress and you’re tired all the time. Worst case scenario, your cells’ DNA get damaged and things go haywire. We’re talking genetic mutations and cancer.  Dave’s advice for using smart thermostats?  If you already have one, “switch to a programmable version that won’t affect your quality of life in the least. Really, you’ll get used to it.”

Here’s Camp 2’s reasoning: according to the Radiation Safety Institute of Canada, which is in agreement with the World Health Organization (WHO), “approximately 25,000 articles have been published over the past 30 years…Based on a recent in-depth review of the scientific literature, the WHO concluded that current evidence does not confirm the existence of any health consequences from exposure to low level electromagnetic fields.”  According to Health Canada, “Research has shown that EMFs from electrical devices and power lines can cause weak electric currents to flow through the human body. However, these currents are much smaller than those produced naturally by your brain, nerves and heart, and are not associated with any known health risks.”

Unfortunately, the “weak electric currents” induced by EMFs are exactly the mechanism that scientists have discovered to cause DNA damage.  Electromagnetic field can activate  voltage-gated calcium channels (VGCCs) in the plasma membrane of cells, which cause large amounts of intracellular calcium (Ca2+) are produced. This excess calcium within the cells produces a chain of chemical reactions leading to the production of free radicals and oxidative stress. The free radicals then culminate in DNA damage.  (Electromagnetic fields act via activation of voltage-gated calcium channels to produce beneficial or adverse effects)  This effect was discovered in 2013, and in 2016, the Institute of Electrical and Electronics Engineers (IEEE) published an article affirming that long-term exposures to magnetic fields can lead to both useful applications in treating diseases and to undesired health effects, including changing the growth rate of cells and increased levels of reactive oxygen species and radicals, which have an association with aging, cancers, and Alzheimer’s.  The problem is that these effects are very dependent on frequency, amplitude and time.  The study of EMF radiation is a complex intersection of physics and biology, and when studies find biological effects, they must then be replicated, but if just one parameter is changed slightly, the biological effect can be lost.  In addition, funding is not always available to repeat the studies to verify their results.  Jeromy Johnson, an independent researcher who has had personal health consequences from EMFs, has written an excellent article on this quandary.  He recognizes that there is yet one more reason for industry, government and world agencies to neglect scientific evidence: it may contradict their agenda.   Here are some examples from his paper: 

Aside from EMF radiation, we also note that smart thermostats have one more unintended negative consequence: a 2022 study shows that “despite lowering overall energy consumption, smart thermostat control algorithms can severely increase the winter peak heating demand through load synchronization during the early morning hours, when solar energy is unavailable.”  Although it’s only a simulated effect found by the study, that could be a big problem in this age of extreme weather and overloaded power grids.  It also contradicts the agenda of governments like Ontario to incentivize use of smart thermostats (previous paragraph).   

Where regulatory agencies impose EMF “exposure limits” by time average, this is also a problem, because time-weighted averages are not relevant to the possibility of DNA damage by high-power peaks and spikes.  According to Mr. Pall, who authored the breakthrough study on voltage-gated calcium channels (above), it’s like saying a bullet is not deadly if you average its force over half an hour. 

“You go to the regulatory agency and say, ‘I’m afraid I’m gonna get shot by a high-powered rifle,’” Mr. Pall said as an example, “and their response to you is, ‘Oh, you don’t need to worry about it. Because if you average the forces on your body over a six-minute period or a 30-minute period, the average intensity is dropped by a factor of 100 million or whatever, so it can’t possibly do anything.’” (Artificial vs. Natural EMFs: Why Wi-Fi, Bluetooth, Cellphones Are Damaging to Cells)

Phew, that’s a lot of politics…for those who decide they want to save money in more old-fashioned ways, you can cut your home energy use by 50 percent or more without wireless.  Here are the steps from GreenAmerica.org:

  1. Turn off lights you’re not using.  You can put reminders near the door or switches until everyone gets into that habit.
  2. Schedule an energy audit, which are frequently done by local utility companies for free, or with a paid professional for a more comprehensive audit
  3. Make sure to run the dishwasher on the “air-dry” setting instead of “dry”, which uses a lot of electricity.
  4. Turn off or unplug electronics, as even “energy saver” options waste much more energy when it’s on all day than if you really turn it off.   When it’s off, you can verify that it’s not creating a “phantom load” by using a Kill-A-Watt monitor.  Simply plug the appliance into the Kill-A-Watt, and plug that into the wall, and you can see volts, amps and wattage while the appliance is on, off or sleeping.  Kill-A-Watt also lets you monitor your electrical usage by day, week, month, or year (leave the appliance plugged into the monitor to get a better picture).
  5. Wash clothes in cold water:  this one makes sense for mildly dirty clothes as many detergents are formulated to work well in cold water.  However, if you’re trying to get rid of dust mites or mold on certain items, hot water is better.
  6. Install a programmable thermostat that doesn’t require wifi.  “Almost half of American households already have programmable thermostats, but only one quarter of their owners actually use them—a big mistake, because they can save you a lot on heating and cooling costs. A programmable thermostat allows you to automate when your heating or cooling systems come on and off—for example, it can be programmed to come on to warm the house shortly before you get up, and to automatically shut off during the hours when you are sleeping or away at work. It will pay for itself in energy savings within a year.” (More Steps to Energy Efficiency)  Honeywell has a series of programmable thermostats that “work” with you: the most flexible one allows you to program each day of the week separately if you have an untraditional work week, or if you have a traditional workweek, the budget version programs in a 5 day-2 day fashion.
  7. Install Energy-Star rated ceiling fans in your most-used rooms.  Ceiling fans can help make your heating and cooling systems more efficient by increasing air circulation, which cools people and pets by evaporation and evens out the temperature in your space.

(We don’t recommend their suggestion to close vents in rooms you’re not using, because it stops air circulation and can promote mold.)

At HypoAir, we’re all for convenience and saving money, but only when it is non-toxic and safe for our families.  Essentially, we do recommend that you do your homework on the effects of EMF radiation before choosing to install a smart thermostat or any other “smart” device in your home, and do your best to limit your childrens’ access to cell phones, microwaves and smart appliances.  Sadly, what we don’t know can hurt us, so caution seems to be the best prescription!

Air-Purifying Paint? Yes Please!

Air-Purifying Paint?  Yes Please!

Every little bit helps.  Even if you haven’t changed your furniture or decor in years, most of us are constantly bringing chemicals and VOCs into our homes that come with food packaging and toiletries, new clothing and shoes, electronics and consumables like filters, printer ink and cat litter.  It’s a revolving door–even the garbage bags we use to take the garbage out (ie. scented or unscented “odor control” garbage bags) unleash a lot of VOCs into the air when we shake them out and every time we open the garbage can. (cleanlivingpodcast.com)

These are the reasons I was elated to find that something as simple as paint can purify the air in your home.  It’s brilliant, really, after all the years that paint added VOCs to the air, that now it can take them out of the rest of our homes.  And, it can deal not just with VOCs but microbes like germs and mold.  These really are super-paints, and although their cost is premium, if you can afford it, why not?  Here are some of the ones that stand out.

ECOS Paints (ecospaints.net) are marketed as “paints that you can feel good about”.  I feel that way about most no-VOC paints, but these are special.  They have categories like “Air-Purifying”, “Anti-formaldehyde”, “EMF-Shielding”, “Pet Dwelling”, and “Lullaby” (for nurseries and nursery furniture).   All formulas are water-based, are non-toxic and emit zero VOCs.  Primers, stains, varnishes, concrete and stone coatings are included.   My main fascination, however, was with the Air Purifying Paint.  At $120 per gallon, it’s quite pricey, but you can justify the price over the lifetime of the paint.  It “absorbs and neutralizes chemicals, pollutants and VOCs for improved indoor air quality.”  Their Air Purifying Paints contain a molecular sieve which is designed to both stop harmful volatile organic compounds (VOCs) from being released into the air and to trap them as they float through a room.  (What is Air-Purifying Paint)  This sieve is zeolite, which is used in water purification, similar to activated carbon.  Over time, the pores in the zeolite will become less active (the website does not say how long this takes), but considering that most people repaint every 3-5 years, renewing the paint is like changing a filter on your air purifier. 

Gush Paints contain a proprietary catalyst that constantly breaks down VOCs in the room.   Their research indicates that the gush proprietary catalyst (GPC) is proven to be effective for at least 5 - 8 years under real-life conditions, which is a considerable length of time to enjoy cleaner air.  The literature is quite technical; GPC uses the principle of lattice doping and electron hole positioning, to interact with oxygen and water vapour in the air to form radical agents on the surface of the paint.  (This is not unlike the way bipolar ions attack VOCs through hydroxl radicals.)  It claims that VOCs are broken down at the rate of 99% in 21 hours.  They also stop mold and 99.9% of infection-causing bacteria.  At $70-75 per gallon, it has air-purifying and washable versions, which the air-purifying capability also somewhat regulate humidity.   Gush paints are GreenGuard Gold certified.  The colors are very hip with names like “boogie board” and “coffee beam”... perfectly named for the area they are manufactured, southern California. 

Smog Armor is made in Florida and uses zeolite (similar to ECOS Paints), which adsorbs VOCs and carbon dioxide, too.  It does not release them back into the environment and remains active for about 5 years.  It’s currently only available for commercial projects, but we can see the market for these types of paints expanding. 

Even Sherwin-Williams has picked up on this market.  Its SuperPaint with Air Purifying Technology ($75 per gallon) is mold and mildew inhibiting, zero VOCs, and helps reduce V.O.C. levels from potential sources like carpet, cabinets and fabrics and works to reduce unwanted household odors.  It’s also GreenGuard Gold Certified, but it is a latex paint, so those with latex allergies should be advised. 

Paints that incorporate Corning Guardiant, a finely milled glass-copper powder, harness the power of copper as an antimicrobial shield for their walls.  These include PPG Copper Armor (starting at $47/gallon) and Behr Copper Force (starting at $35/gallon), both available at Home Depot in a wide selection of colors.  Copper Force is Greenguard Certified, works to continuously kill 99.9% of viruses (SARS CoV-2 and Feline calicivirus) and bacteria (Staphylococcus aureus and Pseudomonas aeruginosa) on your painted surfaces within 2 hours of exposure, for up to 6 years as long as the paint film integrity is maintained.   Copper Armor “kills 99.9% of S. aureus (staph), P. aeruginosa, K. aerogenes as well as MRSA, Enterococcus faecium, E. coli O157: H7, Salmonella enterica and viruses norovirus (feline calicivirus) and SARS CoV-2 within 2-hours of exposure when used as part of a comprehensive infection control program for up to 5-years.”

Although Airlite is an Italian company and mostly available overseas, I thought I would tell you a little about their technology, because it seems different than the other paints presented.  “Airlite uses the energy of light to generate a small concentration of electrons on the surface on which it is applied. These electrons interact with water and oxygen present in the air to generate negative ions. When the air comes into contact with the wall on which Airlite is applied, the ions present near the surface interact with the polluting molecules and transform them into water-soluble, invisible and harmless mineral salts.”  The company has partnered with a number of artists and organizations to refresh and create outdoor murals, in order to reduce outdoor pollution as well.  The efficiency of the Airlite properties are guaranteed for 10 years; as long as there is light and humidity in the air, the benefits of Airlite will be active.  With its negative ions, Airlite also destroys viruses, bacteria, and mold at its surface, and repels dust and dirt. It’s a radiant reflector, with a saving of electricity for air conditioning between 15 and 30%.  Brilliant!

A fresh coat of paint has long been uplifting to our eyes and moods, but with these added technologies, these benefits are going beyond aesthetics to better health…making it easier to live in a polluted world.  Every little bit helps!

Unseen Toxins Really Do Affect Us: 3 Disturbing Headlines

Unseen Toxins Really Do Affect Us: 3 Disturbing Headlines

While scanning the “Indoor Air Pollution” headlines, I recently came across three that caught my eye.  In the US, consumers have access to an amazing number of products manufactured everywhere in the world.  In stores and online, we can purchase virtually everything from nutritional supplements and cosmetics to home decor to automotive parts.  What are all these products made of?  Unless its a food–and even some food ingredients are kept secret–most components are undisclosed.  This wonderful banquet of products is coming back to bite us, the consumer.  Here is what I found.

  1. Uterine fibroid growth activated by phthalates, chemicals found in everyday products

I’ve written about phthalates before, and in today’s society, it’s very difficult to avoid them.  According to the National Institute of Health, Phthalates are a family of man-made chemical compounds developed in the last century to be used in the manufacture of plastics, solvents, and personal care products. They are colorless, odorless, oily liquids that do not evaporate easily and do not chemically bind to the material they are added to. The everpresent use of phthalates as an additive to PVC (polyvinyl chloride) products to make them flexible and to personal care products to make fragrances last longer in the past 50 years has resulted in widespread general population exposure.

Some examples of phthalate use is in vinyl shower curtains, plastic toothbrushes, plastic food storage containers, plastic wrap, nail polish, perfume, shampoo, lotions, scented cleaning products, vinyl gloves…(toxicfreefuture.org) The list is long and chances are that unless you work very diligently to exclude them, your home has many sources of phthalates in it.  This chemical is not banned in the US. 

Although there have been many studies on what phthalates do to animals, human data is less common.  For the first time, scientists at Northwestern Medicine have demonstrated a causal link between environmental phthalates (toxic chemicals found in everyday consumer products) and the increased growth of uterine fibroids, the most common tumors among women. Up to 80% of all women may develop a fibroid tumor during their lifetime, Bulun said. One-quarter of these women become symptomatic with excessive and uncontrolled uterine bleeding, anemia, miscarriages, infertility and large abdominal tumors necessitating technically difficult surgeries.  The new study found women with a high exposure to certain phthalates such as DEHP (used as a plasticizer to increase the durability of products such as shower curtains, car upholstery, lunchboxes, shoes and more) and its metabolites have a high risk for having a symptomatic fibroid. (sciencedaily.com)  To put it in perspective, one quarter of 80% is equal 20% of women (1 out of 5 women) will have a symptomatic fibroid, causing a lot of pain and/or health problems.  This is significant–and all because phthalates are used as an ingredient in many, many products.  Women in reproductive age seem to be more exposed to phthalates than men, probably due to the use of cosmetic and personal care products.  (National Institute of Health)

  1. In utero exposure to flame retardants increases anxiety symptoms in adolescents

Let’s start with what these flame retardant chemicals are.  Polybrominated diphenyl ethers (PBDEs) were used as flame retardants for products like furniture foam padding, wire insulation, rugs, upholstery, computers and appliances. Exposure to PBDEs during early brain development has been associated with cognitive deficits, reduced language skills and attention-deficit/hyperactivity disorder, and the chemicals were banned in the United States in 2004, but realistically, they were probably not completely eliminated from products until several years later.   

The article describes a study which enrolled 468 pregnant women in the Greater Cincinnati region from 2003-2006 and continued to follow up with their children up to 12 years later.  Blood samples from their pregnancies were correlated with test results of the adolescents.  The tragedy of the results is that each time the PBDE levels doubled in a pregnant mother's blood sample was associated with increased anxiety scores in the adolescents, suggesting PBDE exposure during pregnancy may be a risk factor for developing anxiety symptoms in early adolescence.

The children who were affected by PBDEs are now in their teenage years and older.  They are entering highschool, college or starting a career, and may have no idea why they suffer from these problems, now including depression and anxiety.  It’s tough enough to be a young person nowadays without hidden chemicals that affect your brain and hormones!  

  1. Neurotoxicity of Ortho-Phthalates: Recommendations for Critical Policy Reforms to Protect Brain Development in Children

Although the PBDE class of chemicals has been banned, phthalates are still around and also have negative effects on children.  The strongest associations have been found with hyperactivity, aggression, defiance, emotional reactivity, delinquent behaviors and other signs of attention deficit hyperactivity disorder, or ADHD, after exposure to phthalates, according to Project TENDR, a unique collaboration of leading scientists, health professionals and children’s and environmental advocates. (CNN.com)  

Phthalates are readily transferred from mother to fetus during pregnancy (study published by the National Institute of Health), and soon after birth, babies continue their exposure through plastics all around them.  Plastic food containers and packaging, medical supplies and medication, personal care products and household cleaners, as well as building materials for homes all continue the barrage of phthalates on childrens’ neurological and other developing systems. Unfortunately, economically disadvantaged children and communities of color have been shown to have the highest exposures to these chemicals. 

Although the headlines seem depressing, there is some good news.  Because of the phthlates’ health risks, Congress overwhelmingly approved legislation that outlawed three of the most hazardous phthalates in children’s toys and products in 2008. (National Resources Defense Council)

Toxicfreefuture.org tested many samples of vinyl flooring in 2015, finding high levels of phthalates in them.  Armed with test data, this organization was able to convince many of the top retailers of vinyl flooring to exclude phthalates from these products, and within 3 years (2018), tests of the same types of flooring showed no detectable levels of phthalates.  There’s hope!

If you are concerned about phthalates for yourself or your family, this article is an excellent place to start.  Written by an environmental scientist who takes her own advice, you can avoid some of the negative health outcomes from phthalates just by knowing what to look for in the products we use.  It’s worth a shot to protect yourself and your children!

What’s hiding in that pallet wall?

What’s hiding in that pallet wall?

Another embarrassing but true story:  

Once upon a time in New Orleans, I rehabbed a house that was gutted post-Katrina.  In a neighborhood built in the 1950’s, I took down a few walls and set about making this little 1500 square foot home into my Pinterest dream.  No matter that the sloping floors would make a soup can roll from front door to back with no effort and amazing speed; all of the reclaimed furniture and materials available at that time were more than sufficient to supply the ideas that came into my head.  Some of my favorite places to go were the local “Green Project” or Habitat for Humanity stores.  Green Project had a small lumber yard of reclaimed wood and salvaged architectural pieces.  I don’t know whether I found this particular piece of wood there, or from the side of the road, but it looked perfect. 

My carpenter had framed in split-level bar countertops on either side of the newly opened-up kitchen, and to keep the cost of countertops low, I decided that the top of the bar would be reclaimed wood.  The chunk of wood I found was long enough for both tops, and the color of dark chocolate, a perfect contrast to the cream-colored kitchen.  I cut the pieces, sanded the edges, coated them with a few layers of varnish and set them outside to dry for a week or so.  Time to install!  They looked beautiful.

Throughout processing this wood, I did notice a “smell”.  It didn’t seem too strong, probably because I was doing the cutting, sanding and painting outside.  But soon after I installed it inside, the headaches started.  I had a constant strong headache most days for a week, until I made the connection and removed the wood.  Bingo!  Problem solved.  This was probably a decade before home VOC-testing equipment was available, but my brain and respiratory system was telling me that this wood was poisonous. Looking back, it was probably treated with creosote, which gave it the (beautiful!) dark brown color.  Creosote is derived from the distillation of tar from wood or coal and is used as a wood preservative. Pesticide products containing creosote as the active ingredient are used to protect wood used outdoors (such as railroad ties and utility poles) against termites, fungi, mites and other pests. (epa.gov) The EPA has also determined that coal tar creosote is a probable human carcinogen (over longer exposure periods).  Thankfully, I was the only one in the household who seemed to be affected.  

I’m still a fan of reclaiming wood and other materials, but I’m a little more cautious nowadays.  That’s the major drawback to most reclaimed wood: you just don’t know its history.  Whether it’s been soaked in smelly chemicals like creosote, or sprayed with non-odorous pesticides, or just sitting outside accumulating mold and insect droppings, it has a mysterious history that you may or may not be able to neutralize when you “reclaim” it.  Following are the main dangers of using some (not all) reclaimed wood (cdawood.com) indoors.  

  • Like my experience above, reclaimed wood that has been treated with harsh chemicals, like paints or stains, or contains VOCs (volatile organic compounds), can release toxins into the air.  Unlike my experience, you may not always smell these VOCs or toxins, which is a “silent” risk.

  • Wood is quite a porous material.  Mold and mildew can be hiding in the crevices of the wood, especially reclaimed wood that has a lot of “character” (read: cracks, knots and grains).  Mold and its toxic byproducts, mycotoxins and MVOCs, can make you quite sick and even spread to other parts of your home via dust and spores.  

  • You could bring pests inside.  Anyone who’s lived in the southeastern US would be familiar with termites, possibly carpenter bees, and maybe carpenter ants.  These are all wood-loving pests that can hitch a ride into your home inside of the lovely reclaimed wood.  They generally exit or die when the wood is agitated or dried out.  But have you heard of powder-post beetles?  These tiny pests can spread to other wood furniture and even the framing of your home, reducing the wood to “powder”.  Imagine losing your grandma’s precious antique dresser, or your kitchen floor joists, to these destructive pests because you decided to “reclaim” some wood for a table top: not a good trade-off!

If part of the reason to use reclaimed wood is “saving money” (one of my original reasons for creating those bar tops), are you really saving if one or more of these problems surfaces because of using it?  Here are a few ways to be more cautious with reclaimed wood: (Brunsell.com)

  • Consider the source: Grocery store palettes are likely to have been in close contact with food, so they run a higher risk of having bacteria (from spills), so don’t use them indoors.

  • Check for signs of how the wood has been treated: Know if and how the wood’s been treated. Heat-treated wood, also known as kiln-dried wood, is generally marked with an “HT.” In terms of your health, HT wood is preferable to chemically treated wood. You forgo the chemicals, and the heating kills off bugs. 

  • Consider the end-use of the wood:  If it will be in close contact with children, pets or food, it’s best to use new, untreated wood and opt for non-toxic finishes (like the paints and stains we mention in this article). 

If your gut says, I don’t know about this piece of wood, it might be best to listen to your gut!   Manufacturers have honed in on the reclaimed trend and created vintage looking wood and furniture from new materials.  

  • CdA Wood in Coeur d’Alene, Idaho is one such company that has the slogan “Barn wood but better”.  They take new untreated wood and make it look like old barn wood without paints or stains, using a patented “Xcelerated” process.  In the words of the VP, they “age wood indoors without using paints or stains”.  

  • Another company that values indoor air quality is EarthPaint.net.   All of their coatings are non-toxic, so you can start with new wood and get a fabulous aged finish without VOCs, mold, toxins or pests.   

  • Here’s a slew of ways you can add “character” to new wood with tools and a little elbow grease; just substitute non-toxic finishes for the stains used in the last few slides.

  • Did you know that charred wood naturally resists water, pests and further aging?  Developed by the  Japanese, Shou sugi ban is the art of preserving and finishing wood using fire.  Cedar wood works best for shou sugi ban because of its natural chemical properties, but you can also use shou sugi ban on pine, hemlock, maple, or oak.  This article tells you a little about the history and how to DIY your own burnt wood!  EarthPaint.net also has “Special Linseed Oil” similar to what is used in the article.  I’ve personally used shou sugi ban on some wood supports for my shower curtain, as well as an outdoor table. 

At HypoAir, we aim to bring the best of the outdoors inside.  We’re very selective, though, to make sure that hidden pollutants or pests don’t slip in with the good stuff…and with vigilance you can be too.  It’s time to raise the bar on reclaimed wood, to make it as healthy as it is beautiful!

Start Thinking Like a Home Inspector

Start Thinking Like a Home Inspector

If you own a home, you need to learn to think like a home inspector.  A home is a great investment, but if the outside elements start to penetrate the building envelope, your great investment can start to deteriorate and become toxic!

Sometimes, after an especially hard rain, there is a different smell in my house.  This tells me that rain is probably going where it shouldn't. According to commonsensehome.com, a natural home website, the first spots to check are the roof and attic, especially around any roof penetrations like chimneys and vent lines.  

Recently one morning after such a rain, I went in earnest search of leaks inside to find the source of the musty smell.  Not finding anything in the attic, I went to the room where the smell was the strongest, the laundry room.  I checked areas around the windows because there were shelves in front of them, hiding any potential damp spots.  Uh-oh– a couple of the windowsills were wet, indicating that more of the not-so-old (10 years) windows were leaking.  I checked the corner above which there was a valley in the roof (roof valleys can be a source of leaks in a hard rain if they are improperly installed/sealed).  Thankfully all the walls were dry.

There was a gutter outside this room, and I knew from past experience (rain during the daytime), that the volume of water flowing off the roof seemed to be too fast or too much for this particular gutter, because it would shoot right over the side and pour down next to the wall.  Thinking about it, I went up onto the flat portion of the roof over the laundry room.  There were no big branches or breaks in the flat roof, but a lot of leaves and acorns were up there!  Time to get to work with the broom or leafblower, and I removed a section of the leaf guard over the gutter to clean out the gutter.  I checked to see that the downspouts were clean.

Next, I looked up to see if there were any wet spots behind or below the gutters (this only works after the sun has been out for a bit).  Thankfully, that was not the case.  Looking down the walls, I saw that there were a lot of wet leaves piled up around the foundation.  Wet leaves around the foundation do not just cause a musty smell in the house.  They can allow insects like carpenter ants and termites to come in, using the leaves as a shield to keep their tunnels moist.  I got to work with the leafblower.  

Rain can seep into basements and crawlspaces, so if I had a  basement, I would check the walls for seepage.  Bring a bright light, gloves, and if necessary a respirator (basements can be dusty!) to make sure that you don’t leave any corners/spots hidden from view; try to move any stored boxes to get a peek at every square foot of wall.  It was only after moving some storage shelves in front of the laundry room windows that I discovered the leaking windows. (Crazy, I know, my goal is to build some cabinets so that the windows will not be covered up!)

If you can't find the source of the problem, reach out to a well-reviewed professional home inspector in your area.  Remember, professional home inspection is a service dedicated to helping you find and live in healthy homes--not selling you other products or services.  You can find accredited home inspectors in your state at The International Association of Certified Home Inspectors (nachi.org).

There are a lot of good sites to help you get thinking like a home inspector.  Here are some that we’ve discovered and reference frequently.  Don't be shy about contacting them with questions!  

  • Inspectapedia.com: This website must have THOUSANDS of pages, but the “search” function is great, the website hosts answer questions very promptly (within 48 hours), and there is feedback from many homeowners and experts alike.  Highly recommended!
  • Homeinspectorsecrets.com: Created by a home inspector, this site has a lot of guides about a variety of subjects.
  • Familyhandyman.com: This website contains step by step instructions to correct any problems you may find around your home, and reviews products as well.   
  • Thespruce.com: Although not technically about home inspection, this website contains a wealth of information on a variety of home improvement topics and often contains non-toxic, safer alternatives. Their Home Improvement Review Board is made up of licensed general and specialty contractors, journeyman electricians, and journeyman plumbers, so you know that you’re getting good advice.
  • Energyvanguard.com: This website is written by a building scientist and has an extensive blog, so you can understand the “why’s” of the best building practices.  He also frequently incorporates how he investigates and solves problems at his own home. 

How do older homes compare to newer homes?

How do older homes compare to newer homes?

According to Realtor.com, older homes are those that are not built with modern building materials like high-performance concrete; typically they were constructed before the 1970's.  

Many older homes can be purchased at a discount because they have not been “updated”.  These updates of course include aesthetics like granite or marble counter tops, as well as necessary systems like modern electrical wiring, HVAC and plumbing.  Aside from the normal aspects that buyers of older homes will want to renovate, what are the hidden pros and cons that come with older homes?

Arguably, construction and maintenance of the roof and foundation of older homes may have the most to do with the condition it is in today.  

Older roofs can be much more durable, as well–here are the lifespans of typical roofs according to their materials (“composite” means the fiberglass-and-asphalt shingles which are on 80% of US homes today):

Not included is the asbestos shingle, which is estimated to last 30-50 years. (nowenvironmental.com)  Although this is a reasonably durable material, due to its health problems (fibers exposed to the air can be breathed in, causing disease), asbestos tiles are no longer sold for repairs, so an asbestos roof would likely need replacement. (rooforia.com)

In addition to the longer lifespan of older roofing materials, there is the underlayment–what the roof is attached to.  Before plywood and oriented strand board (OSB) were available, sturdy “two-by” boards such as 2x6 or 2x8’s were used over rafters to provide the base for applying a roof.  These were much more durable during severe weather, and more durable in terms of rot and deterioration. Of course, they are not used in most modern homes because of cost; homeowners would rather invest more money in something they can see!

Older homes also typically had the benefit of larger roof overhangs.  Prominent overhangs do several things that increase the longevity of the house: they deflect sunlight and UV damage from the windows and walls, and protect the same areas from rain and water intrusion.  Skimpy overhangs in modern construction do not do either!

Foundations of older homes (before concrete slabs were widely used) could be good or bad, depending on the method of construction and materials.  Here are some foundation materials commonly used (inspectapedia.com):

  • Wood, beams set on grade or on flat stone set on or close to ground level (older, very susceptible to rot and damage)

  • Stone, natural found on site or brought to the building site (older, susceptible to movement and settling)

  • Brick, less commonly used below grade, more often used from grade-level up, set on stone below grade. (older, susceptible to movement and settling)

  • "Cinder blocks" or concrete blocks (from early 1900’s, persistent through today for smaller homes)

  • Poured concrete (poured concrete footings as early as 1912; wisconsinhistory.org)

  • Pre-fabricated concrete foundation sections assembled onsite (since early 1900’s)

  • Wood, treated lumber, treated plywood on treated wood or on concrete studs (also used today for smaller homes)

Obviously, the quality and maintenance of the foundation determines the condition of the home.  It didn’t take an earthquake to start a home into deterioration; one groundhog can make a burrow that will damage a pier and cause the house to lean and crack, allowing water intrusion.

Subfloors: A floor with particle board or even higher-quality plywood as subflooring under carpeting won't feel as sturdy as one that's made from multiple layers of solid boards laid diagonally, an old technique that's now prohibitively expensive. (washingtonpost.com)

Insulation has certainly evolved over the last 50 years.  This includes the addition of air and vapor barriers, and types of insulation.  If you don’t have the opportunity (or burden) of getting down to the studs to re-insulate an older home, it could be quite uncomfortable in extreme weather like deep winter or summer.  However, some features of older homes actually had fairly “air-tight” construction.  Examples include multiple layers of lath and plaster, brick wall “insulation” or “nogging” where brick was installed between wood framing to block the wind, or a small 1" air gap is also found in older structural brick walls; the air gap in brick walls was intended to avoid transmission of moisture from outside the building to its interior. (inspectapedia.com)  Modern insulation makes all the difference in comfort, however, when it is properly installed.

Construction materials:  Even the wood of “stick built” homes has changed.   The change has to do with the loss of “old-growth” forests in the US, where trees were between 100 and 500 years old.  By 1940, old growth lumber was not available for construction anymore, and lumber came from younger trees.  Today's building lumber is made from trees that are between 12 and 20 years old. These trees have fewer growth rings per inch than old-growth trees. Older trees have more dense wood, which is also more rot-resistant.  (WisconsinHistory.org

Old-growth lumber may not be available anymore but naturally insect-resistant trees, provided they are sustainably harvested, are significantly more ecological and healthy than pressure-treated lumber.  Western Red Cedar and Redwood have unique compounds within the cells of the heartwood that protect against insect and water damage. They usually only require topical treatments for coloring or sealing. (thinkwood.com)

Before the 1920’s, “2x4” wood studs were actually 2” by 4” in dimension.  After that time, dimensions varied and ended up at 1-½” x 3-½” as the standard since 1964.  Even though you may think wood is old-fashioned, flammable, inferior to steel or concrete, or too pricey to use it for interior design such as timber-style construction, architects are using it in new ways for safety, strength and design.  “Mass Timber” is a new style of design in which wood is used for large commercial and residential buildings.  It’s appropriate since wood has many biophilic benefits that can contribute to the health and well-being of building occupants. (thinkwood.com)  New methods of laminating wood such as cross-lamination, nail-lamination, dowel-lamination and glue lamination, makes it strong and able to span long distances, as steel girders and concrete do.  The laminating adhesives and fire-retardant treatments of such products are the main concerns for use of these products, however if they follow industry-standard manufacturing practices such as ANSI A190.1 (Product Standard for Structural Glued Laminated Timber) then it should be naturally low in VOC emissions such as formaldehyde. (anthonyforest.com)

Construction methods:  Kit vs. Pre-fab vs. on-site 

Although “kit” homes were originated in the UK in the late 1800’s and became popular in the US in the early 1900’s, they were very different from the pre-fab homes of today.  Kit homes, like pre-fab homes today, were offered to make housing more accessible.  One Sears catalog assured that “anyone with rudimentary skills could have their home built in 90 days.” (thecraftsmanblog.com)  Many kit homes from the early 1900’s are still standing today and demand a premium in the housing market, a testament to the quality of materials and design in these homes.

However, the quality of pre-fab homes today do not resemble that of kit homes because they are built off-site and transported in large pieces to the building site, then assembled.  "They don't build them like they used to--and a lot of that comes in economics, labor versus material costs. Historians have documented, beginning in the 19th century, labor costs going up and up, and material costs going down and down. Now, we're in a time when bringing someone on site to do the work is the expensive part, not the material." –Bill Dupont, an architect who works for the National Trust for Historic Preservation in Washington (washingtonpost.com)

Another victim to rising labor costs has been plaster and lath.  Although mold can grow on painted or dirty plaster under the right conditions, plaster does not support microbial growth because it is non-porous and lime-based or clay.  The wood (lath) behind it, however, most certainly can harbor mold.  (lookmold.com)  In contrast, the drywall core of gypsum does not support microbial growth, but the outer paper facings do.  Which is better?  According to eSub, a construction software company, plaster is by nature a more durable finish than drywall, even high-level drywall finishes. In addition, plaster outperforms drywall in a number of key areas, including insulation, soundproofing, and fireproofing (instead of lath, modern plaster is set over a type of wallboard called blue board, which is similar to sheetrock at first glance, but it is specially formulated to handle high amounts of moisture in wet plaster, so it bonds tightly with the plaster.)  Blue board is highly water and mold resistant. Therefore, in an older home with plaster and lath walls, it may be a good choice to repair the plaster and replace it in kind with new blue board and plaster (if you can find and afford the skilled craftsman to do so!). 

Many older homes were “custom” homes, because they were hand-built by the owners.  This can be good, or not so good, depending on the design experience of the builder.  Today, “custom” homes demand a premium price, because unique plans, changes from pre-made plans and changes on site cost more money.  

Whether your style is traditional or modern, the marriage of durable materials, good design and good construction is timeless!  Make sure that any home you purchase or build has these characteristics and it can last for generations to come.

Mold is not just toxic to humans; your furry friends suffer from it too.

Mold is not just toxic to humans; your furry friends suffer from it too.

If you or anyone in your household is experiencing sensitivity to mold, it’s best to check in with your pets, too.  Since dogs, cats, rabbits and other pets spend a lot of time on the floor and the ground outside, they can be even more prone to inhalation and ingestion of mold than we are.  According to a registered vet technician on the natural pet website nhvpethealth.com, typically your dog or cat will show the following symptoms when experiencing mold:

  • itching
  • redness of the skin
  • dry, scaly skin
  • hair loss
  • chronic ear infections
  • head shaking
  • chewing/licking skin, especially the paws

It doesn’t stop with their skin, though.  Because mold affects their respiratory and digestive systems in similar ways to ours, serious breathing and digestion issues can develop from mold.

Mold is everywhere.  Here are some common types of mold your pet may encounter, and where they are found (nhvpethealth.com):

  • Aspergillus – found in plants and damp basements
  • Spondylocladium – found in plants or in air ducts
  • Hormodendrum – found on leaves
  • Fusarium – found on plants, often crops
  • Penicillium – found on plants or stored items
  • Helminthosporium – found in soil, especially in summer

You can actually test your pet's fur to see the relative amount and variety of molds they may be carrying.  To do so, you can purchase mold test plates from Immunolytics and follow their advice for testing here

Since many pets eliminate waste in the backyard, it’s almost impossible to keep mold out of their paws and fur.  However, inside is where you can control their surroundings a bit better; the following are some tips from experts!

Try to keep them out of damp basements or garages where mold proliferates.  

If your pet’s bedding is made of old carpet or furniture that can’t be effectively washed, discard it and find a new alternative that can be laundered more frequently.  When washing, try one of these:

Try to use a brush on their fur before coming inside, and wipe him/her down with a damp cloth.  Weekly baths with a soothing shampoo containing essential oils will help eliminate mold in their fur.

  • CitriSafe shampoo is non-toxic to pets and humans and safely eliminates mold in pet fur.  
  • 4Legger has a variety of gentle shampoos that smell wonderful!  

Here are 2 sprays gentle enough to be misted directly on your pet’s fur and bedding between washings to keep mold under control:

Adding an Omega3 supplement will help to strengthen the skin barrier, which helps to prevent secondary infections caused by allergies.  You can try breaking a fish oil capsule over their food, or checking with your vet for their preferred supplement.

K9 Mask is a new product that can protect dogs from breathing in mold and other allergens when it’s highest outside.  The masks can also be used in wildfire smoke and other air pollution environments.

Finally, for your own health as well as your pets’, clean for mold as much as possible using a HEPA vacuum and non-toxic cleaners like TotalClean on your surfaces, even on floors!  

Catch it EARLY

Catch it EARLY

No, I’m not talking about a movie, or even a sale.  I’m talking about water leaks.  After recently dealing with a leaky faucet (what a pain), I figured that there must be something to help me detect the leak in the first couple hours after it starts, instead of days later.  I’ve seen leak detectors that can detect as little as 1/16” of water, but that still requires placing it in the right place and hoping that the leak will puddle there first.  When I opened the doors to the area below my sink, what I sensed first, before seeing any water, was the high humidity.  Even without standing water, high humidity can cause mold to grow in virtually any area that it contacts.  

Here are my requirements for these remote hygrometers (humidity sensors):

  • Use a common, easily accessible battery
  • Place it anywhere in your home
  • Low cost of sensors to enable more monitoring places
  • Wireless alarm through phone app
  • Enabled with history to show trends of rising humidity

Bingo!  There are a few systems that fit this bill and more.

Govee is a brand known for its LED lighting and smart home appliances.  Regarding their WiFi digital thermometer hygrometer, they have great reviews on the ease of setting up the WiFi Gateway, and adding all of the sensors to the app.  The sensors can remain connected up to 230 feet away, and the gateway can connect up to 10 sensors ($119 on sale).  Let’s see, I could use one: under each bathroom sink (2), kitchen sink (1), behind the washing machine(1), next to the water heater (1), next to the HVAC air handler (1), behind the refrigerator (1), under the dishwasher (1) in bedroom closets (2-3).  Other people have used them for greenhouses, humidors, and as room sensors to balance their HVAC systems.   I easily found places for 10+ sensors in my home, and with the discounted price, they are cheaper than buying the smaller 3-sensor pack ($46) and adding more sensors separately. 

The Moen Smart Water Leak Detector ($102 for a set of 3 sensors) monitors moisture levels (through a moisture-sensing cable), humidity and temperature to send alerts to your phone through the Moen FLO app.  It does require a wifi connection, but you also have the option of installing a remotely-operated water shutoff valve ($470) that can operate manually from your smart phone, or automatically in response to a water leak detection signal from one of the monitors.  This valve also performs a nightly check of the system by shutting off the water and sensing pressure drop, to detect leaks as small as one drop per minute behind walls!  

YoLink is another smart appliance manufacturer and their temperature/humidity devices have a few differences.  For one, the wifi connection can be sustained up to ¼ mile, which is over 5 times the distance of Govee.  The YoLink can monitor extreme temperatures, which is useful if you want to place one in your attic or in your freezer (in case of a power outage). It is also compatible with Alexa.  There are  2 sensors and a hub in this pack ($60), and the hub can monitor other YoLink devices such as water leak sensors and door/window sensors. This unit runs on LoRa (Long Range wireless technology), which uses less power and transmits for longer distances than traditional bluetooth technology.

These devices are especially helpful in vacation homes and rental homes, as well as a great monitoring system to assist caretakers for the elderly and handicapped.  The Internet of Things (IoT) is making our lives less prone to worry in more ways than one.  Can it train my dog not to splash water on the floor?  Maybe not, but with sensors in other places maybe I’ll have the “bandwidth” to do it myself!

Photo by Matt Hoffman on Unsplash

What do our holiday traditions really cost?

What do our holiday traditions really cost?

Okay…we all know that visiting the Christmas Tree Lot the day after Thanksgiving can be really expensive, and prices get better the longer you can wait to get one.  That’s not what I’m talking about!   I wanted to know, are some of our traditions costing us in our health?  After my manager shared how his family “mysteriously” gets allergies every December after bringing home a live tree, I had to do some research!

As it turns out, Christmas tree allergies are real.  If you experience any of the following after bringing home a live tree or other live pine decorations, the pine may be an allergen, or it may be carrying allergens (advancedsinusandallergy.com).

  • Runny nose
  • Watery eyes
  • Sneezing
  • Coughing
  • Wheezing
  • Itchy eyes and nose
  • Dark circles under your eyes
  • Skin rash

Now that you may be making some mental connections, here is what scientists have found about homes with live trees:

  • Mold: pine trees can carry 53 different types of mold!  (Researchers at SUNY Upstate Medical University).  Many of these are allergens and especially so for infants and children.  The mold, which is attached to leaves, branches and bark, multiplies in your warm home and spores are released during the agitation of bringing the tree in, setting it up, placing lights and decorations on it and watering it.  A 2007 study found that apartments containing a live Christmas had a 6-fold increase in airborne mold, which did not return to normal until after the tree was removed.  Weed, grass and tree pollens were also found in the air during the time Christmas trees were in the house, because of course, live trees once lived in fields with other weeds and trees.  
  • The beloved pine scent emitted by Christmas trees is actually a family of VOCs called terpenes.  Terpenes are made naturally in the tree sap, and real or artificial terpenes are often used in pine-scented cleaning products and home fragrances.  Terpenes can unfortunately be allergenic to some people. 
  • Dust mites and insect droppings come with live and artificial trees that have been in storage because they naturally accumulate dust. 

Bringing home a live tree is a deeply-ingrained tradition for many American families, so unless your allergies become severe, simply treating your tree appropriately may help you to suffer a lot less this season!

  • Formerly, it was recommended to spray the tree down with water and allow it to dry naturally outside for a day or two, or blow off the water with a leaf blower before bringing it inside (advancedsinusandallergy.com).  However, water is just what mold needs to keep growing and multiplying!  Therefore, we’re going out on a limb here (pun intended) to say that the same EC3 Mold Solution Spray or  Remedy Mold Treatment Spray by CitriSafe that is safe for humans and pets, is a great treatment for live and artificial Christmas trees.  Yes, use that leaf blower on your live or artificial tree to remove dust outside (with a mask of course), and then give it a good misting of EC3 Mold Solution Spray or  Remedy Mold Treatment Spray over every branch (don’t be afraid to use too much).  This should drastically reduce the amount of mold in your home while the tree is up!  Treat live garlands, wreaths and other live decorations in the same way.
  • Dispose of the tree as soon as possible, because any mold that was not touched by the spray will continue to grow.  

If you opt for an artificial tree, you still may suffer from allergies if it’s improperly stored.  Here are some tips:

  • Storing trees and decorations in unconditioned spaces like attics and basements can expose them to mold and dust.  In these situations, don’t use cardboard boxes; change the storage container to a sealed plastic bin or optimally, make a little room in your conditioned space for storage.  
  • Use a mask when retrieving them out of storage.
  • Use a cloth misted with EC3 Mold Solution Spray or use CitriSafe's Remedy Multi-Purpose Mold Treatment Wipes to wipe down ornaments and lights before adding them to the tree. 

Scented candles and sprays may smell nice, but they can seriously irritate your respiratory system and add unwanted VOCs and toxic chemicals to your air.  Instead, we can show you a number of ways to add holiday fragrance without the allergies in this post!  With the vodka air fresheners mentioned,  if you have several spray bottles, you can “decorate” your home with different holiday scents by adding drops from an assortment of essential oils like this one

This holiday season, break the mold (pun intended) by dis-inviting mold and allergens from your decorating party: it will be less costly for your health! 

Understanding Air Barriers and Vapor Retarders: Why and Where to Place Them

Understanding Air Barriers and Vapor Retarders: Why and Where to Place Them

If you are endeavoring to build your own home or even just renovate part of it, most likely you want to do it right the first time.  Here is some inspiration to plan well from workzone.com:

“By failing to prepare, you are preparing to fail.” ― Benjamin Franklin, Founding Father of the United States

“Every minute you spend in planning saves 10 minutes in execution; this gives you a 1,000 percent return on energy!” ― Brian Tracy, author and motivational speaker

“Give me six hours to chop down a tree and I will spend the first four sharpening the axe.” ― Abraham Lincoln, former U.S. President

It’s so true.  One of my personal skills is the ability to paint walls well and enjoy doing it.   I know that planning works because the best walls I have ever painted were the ones I spent 75% of the time preparing and 25% of the time painting.   Planning ahead just makes the job so much more easy and successful.  

Building something that you want to last is the same way: the investment of time and money is well worth it when the home just works.  Layout and design seem to be the priority today, but function should take first place.  It’s like choosing the color of the living room and buying that paint before any of the structural decisions have been made or executed.  Does the roof work?  Do the walls do their job?  Does the foundation work?  Let’s get those bones built and covered, so that they will protect all the beauty of form and life inside.  (getting off my soapbox now).

Here is an article that is well worth reading: Building the Perfect Wall by Joe Lstiburek. Mr. Lstiburek argues that there are four barriers that need to be constructed to protect the home from the elements, and here they are in order of importance but not in order of installation.

  1. a rain control layer
  2. an air control layer
  3. a vapor control layer
  4. a thermal control layer

He also argues that all of these layers should be on the exterior of the structure (the bones, whether it’s wood or steel or concrete), because the structure is where the money is!  Other than the rain control layer and maybe a vapor control layer, many builders do not recognize this.  Putting the insulation on the outside of the structure?  It’s just not done enough, but it’s brilliant.  Here is a simplified diagram (buildingscience.com): 

Here are some important points to understanding why these control layers are needed and why they have these priorities.

Rain control: 

  • Water does a lot of damage.
  • UV light also does a lot of damage. 

Air control: 

  • In order to control the interior environment, for the health of the building and its occupants, you must control the air.  Controlling the air means making it air-tight, with controlled penetrations. 
  • Air can carry (transport) a lot of water: see the first point above about water doing a lot of damage.

Vapor control: 

  • Water vapor travels in two methods: air transport (see air control above) and vapor diffusion.  
  • Once again, in order to control the interior environment, you must control the vapor flow into and out of it. 

Thermal control:

  • Thermal control prevents condensation when the temperatures and dewpoints inside and outside of the home are different.
  • One final word: Comfort!

Rain control and thermal control are relatively easy for me to understand; after all, every 4-season home now has siding and insulation.  It took some digging to understand the limits of, and relationship between, air barriers and vapor retarders. It’s helpful to know that air barriers are actually rated in their ability to retard vapor, so that in modern buildings, air barriers are used as vapor retarders as well.  (The term "vapor barrier" used to be in vogue but it's actually more accurate to use "vapor retarder").  There are two terms that relate to a material’s ability to retard vapor: permeability and permeance.  To understand them, it’s helpful to know a little about water vapor.

Water vapor moves in two ways through a building:  diffusion through the building materials themselves, and air transport.  Here is a diagram illustrating the two:

Source: BuildingScience.com

Water vapor has its own pressure, which contributes to the total air pressure.  The difference in vapor pressure between two sides of a building envelope assembly is the driving force behind vapor transmission by diffusion. (buildingenclosureonline.com)

Water vapor absorbs heat differently than the air in which it is mixed.  If you think of sunshine streaming through a window and heating a room, the sun is heating air and water vapor in the room, but at different rates.  Heat applied to the air raises its temperature directly (called sensible heat). Heat applied to the water vapor raises its temperature more slowly (also sensible heat), increases vapor pressure and with the increase in ambient temperature, also increases the ability of the air to hold more water vapor; thus it causes evaporation of any water in the room (from our skin for example) without changing its temperature (called latent heat).   Sensible heat causes an increase in temperature, but latent heat causes a change in state without a change in temperature.  (Latent heat is the heat applied to melt ice or boil water; the ice cube doesn’t change temperature while it’s melting and the water in a boiling pot does not change temperature while it’s boiling.)  Vapor pressure will seek equilibrium, so that an area of high vapor pressure will try to diffuse to an area of lower pressure.  It does this by “diffusing” through the wall itself. This movement is the reason for installing a vapor retarder.

Regarding air transport of water vapor, warm air naturally holds more moisture than cooler air, so you’ll want to prevent warm humid air from moving inward during summer, and warm air from moving outward during winter (causing condensation on the way in/out). The air barrier is responsible for stopping this movement.

Permeance describes the water vapor transmission rate (by diffusion).  It is the rate over the course of one hour through one square foot of a material of a given thickness at a specified vapor pressure, expressed in perms (grams/hour●ft2●inches Mercury). (buildingenclosureonline.com) Since it deals with water vapor, permeance is also a description of how vapor retarders slow the transmission of latent heat.  

Permeability in building materials is permeance per unit of thickness—or perm-inches, which is useful when comparing different thicknesses of insulation.   

With the standard of Permeance, we are able to compare the vapor transmission qualities of different building materials.  The less permeable a building material is, the greater its resistance to water vapor transmission. A vapor retarder is essentially any building material that exhibits a very low permeance (very high resistance to water vapor transmission). (buildingenclosureonline.com)  Here is a table with some common building materials and their permeances:

Below is a diagram of The Perfect Residential Wall.  The vapor arrows denote the desired flow of moisture because “we want the assembly to dry inwards from the control layers—and to dry outwards from the control layers.” (Joe Lstiburek, Building Science)  You never, never, want to sandwich material between 2 vapor retarders.  In effect, vapor will definitely be retarded there in that sandwich, causing condensation and mold!

Source: buildingscience.com

Note that this wall has two layers of insulation, which is ok, because the insulation is not trapping moisture (however it’s probably advisable not to insulation without kraft paper inside, more on that below).  The external rigid insulation stops heat transfer to the wooden structure, and the internal insulation provides more comfort.  The Perfect Wall article also describes a “clever wall” which combines all three: air, vapor and thermal control layers with one external layer of closed-cell high-density foam insulation.  

Vapor retarders have evolved a lot over the course of just a few decades.  From the early to the late 1900’s, roofing felt/tar paper was usually the only thing that went over the sheathing and behind the siding.  There was no drainage behind the siding (and in most mid-grade homes, there is still none), and no air barrier.  Sometimes the assembly worked well to protect the structure, and sometimes it did not, but without an air barrier, only moderate thermal control could be achieved inside.  Also, the kraft-paper facing on fiberglass insulation is a permeable vapor barrier (see chart above).

Polyethylene was introduced as a vapor barrier in the 1950s (constructioncanada.net) and it had disastrous effects in many homes, because although it is a Class 1 Vapor Retarder (0.1 perm or less), correct placement of this layer was critical to avoid condensation issues.  This brings us to our final point, where is the best place for the air barrier and vapor retarder?

The construction industry has had much confusion over where to place these layers.  For a long time, installers were instructed to install the kraft paper facing of fiberglass insulation “facing the warm side”.   They were also told (true today) to install it “facing them” meaning toward the interior of the building.  What about southern buildings, which are cooler inside for most of the year, and cooler outside for only a few months?  One can’t rearrange the insulation seasonally after the wall has been sealed up (!).    The good thing is that kraft paper is semi-impermeable and, it turns out, is one of the earliest “smart” vapor retarders, meaning that it has variable permeance: low permeance in cooler, drier weather, and higher permeance in warmer, more humid weather. (greenbuildingadvisor.com) The newest vapor retarders are doing this to give a measure of flexibility to buildings in these swing climates.  Some brand names are Intello Plus, Pro Clima DB+, and MemBrain (haha).  Each of these products are marketed as air barriers AND vapor retarders, so that by installing one of them outside the structure (wood or metal or concrete), you are protecting the structure by slowing vapor diffusion through it and maximizing climatization inside the building by sealing air leakage.  Since air sealing is ranked in priority above vapor retardation, it’s critical that the product be correctly and thoroughly installed to prioritize air sealing.  For example, on a busy jobsite, different trades and change orders can make multiple unauthorized perforations in a properly installed air barrier, so signage protecting it and rules for authorizing penetrations must be given. 

Since Youtube and Pinterest are the inspiration for many renovation projects, if you are taking on a renovation as a DIYer, and even when using a contractor, go back to the beginning of this article for more inspiration on planning.  It does take extra time to read and research products and methods of installing air barriers and vapor retarders, but it’s oh-so-critical to get them right for the long-term health of your family and longevity of your home.  Some recommended sites (in no particular order) are GreenBuildingAdvisor.com, BuildingScience.com, EnergyVanguard.com, Inspectapedia.com, BuildingEnclosureOnline.com, and more.  Planning it well is more than half of building it well!

Check them at the door! (How to bring less contaminants into your house)

Check them at the door! (How to bring less contaminants into your house)

Oh, how I love to walk barefoot or bare-socked around my house!  It’s a pleasure that doesn’t happen often enough. With two (albeit non-shedding) dogs who constantly bring sand and dirt in from the outside, and my own habit of walking straight in from outside with my shoes on, walking barefoot only happens for a few hours after I vacuum and mop.  Vacuuming and mopping takes a minimum of 45 minutes to do, so how often does it get done?  Embarrassingly, not enough!

There are even more benefits to cleaner floors than walking barefoot.  After all, you and your pets are not just bringing in lifeless dirt…there are microorganisms like mold, pollen, bacteria and viruses in every grain of dirt.  These can wreak havoc on those who are more sensitive, and especially those who spend more time on the floor, like babies and young children.  At HypoAir, we’re all about avoiding bringing contaminants indoor whenever possible!

It’s hard to believe what you can’t see, so I was grateful to run across this article.   The hostess of this website became self-educated about mold after she and her family experienced numerous health problems from the homes they lived in, and she has a very informative website that includes interviews with experts!  She performed a test with a white towel laid at the door of her home, to catch dirt and mold particles as they are tracked in. She performed a mold test before and after two days.  Although the “before” mold test revealed some mold from the clean towel being stored in the garage, the “after” test was definitely more prolific and indicated that some colonies could be producing mycotoxins.  Yuck!  Unfortunately I know this is happening at my house in the woods during the very wet summer we’ve had….

This has prompted me to research strategies to avoid bringing that dirt, mold and germs in!  There are some ways that make a big difference.

  1. Leave your shoes at the door.  My main problem with this is time (like when I’m bringing in groceries), and sheer number of shoes.   Patience and dropping off loads at the door will take care of the first problem, but for the second one, If I had a “mudroom” this might be more easy to organize.   I’m not a shoe collector by any means, but I have a number of shoes that I like to wear outdoors!  This has led me to find a used low bookshelf and number of baskets so that I, my sister who lives with me, and any number of guests can feel comfortable storing them at the door.

  2. Find the best doormats for your situation, and use them!  When I went searching for “doormats” online, I was overwhelmed by the sheer number and diversity of them.  Then I refined the search to “best doormats for pets” or “best outdoor doormat”, etc. and read what people wrote about them.  I am even doubling up (one indoor, one outdoor) for more protection.Here are some good ones:

    1. Doormat for pet feet: I like the generous size and decor options for these rugs by PURRUGS, but they are made of polyester.

    2. Outdoor mat for removing dirt: 

      1. According to Spruce.com, coir (pronounced “coy”-er) is the best material for removing dirt: it’s made from coconut husks, so it’s scratchy and natural-looking.  A lot of coir mats are made with a rubber backing, which doesn’t let the dirt fall to the floor, but if you get a woven one with no backing like this one by Kempf ($43), you don’t have to shake it out as often. 

      2. For a modern look, Clean Machine Mats are made of Astroturf, but not all of them have the bright green color!  This one ($29) just takes a simple shake to empty all the sand off your porch.

    3. Indoor mat: Requirements for good indoor mats are that they need to be of a safe material that doesn’t create dangerous VOCs (polyester and PET may have endocrine-disrupting chemicals in them).  A non-slip backing is best, but solid rubber or plastic may harbor mold if moisture gets underneath, so check for mold during wet or humid weather.  Machine-washability is a plus!  

      1. Large and absorbent, these mats by Crate and Barrel ($135) are great for wet and muddy feet.  They can be spot cleaned or taken outside for scrubbing and hosing down.  The rug is made of polypropylene, which is quite durable and has a low off-gas.  The backing is made of rubber (20% recycled), which can give off a smell but doesn’t seem to be a complaint with this rug.

      2. Chenille is very absorbent and soft, which makes these rugs by Gorilla Grip a nice buy at $35-50 depending on the size.  They are machine washable!

      3. I love the idea of recessed mats, which are popular in commercial buildings and apartment buildings.  They “fit” into your floor and are very unlikely to slide around.  Water and dirt will also be more contained in a recessed mat, where you can easily vacuum it up.  You’ll need to create a standard-sized recess that is laid into your floor at the front door.

  3. If you have pets, teach them to stop at the door and wipe their feet! (cue cute video…)  More seriously, you can teach them to at least stop while their human helps them wipe their feet!  You can even hang a towel near the door for that purpose on a simple hook or more elegant towel rack.  You can also use  EC3’s Mold Solution Spray ($28 for 32 oz) for misting their fur to deactivate any mold spores they may carry in.

  4. Use a non-toxic additive or detergent to get rid of mold in the laundry.  EC3 products by Micro Balance are recommended by a number of experts and experienced laymen who know about mold!  This non-toxic, environmentally safe laundry additive ($29) is good for about 11-16 loads at the recommended dosage of 2-3 oz per load.  It’s great for washing those dirty door mats and washable shoes.  (moldfreeliving.com)

  5. For shoes that can’t be washed in the washing machine, spritz them with EC3’s Mold Solution Spray ($28 for 32 oz) before you put them back in your closet.  You can also spritz it on the indoor mat between washings.  (moldfreeliving.com)

  6. Vacuum and mop frequently(1-2x per week) in the entranceways of your home, if not your whole home.  At the beginning of this article, I was lamenting the time it took me to successively vacuum and mop the ground floor of my home (where the most dirt lies).  Well, this is the case IF you don’t have a combo vacuum/mop, which can be a total game changer!  I’m happy that I have all tile with only a few area rugs on this floor, which makes it the perfect candidate for such a machine. I grew up using cumbersome canister vacuums, which seemed to hit every doorjamb as I tugged them through the house.  My mother has already graduated to a Bissell CrossWave, and raves over it.  Here is a great review of the newest upright vac/mop combos, in which I’m sure you’ll find one that’s right for you.  The only problem with using water floor cleaners is that they tend to have chemicals of questionable toxicity in their proprietary cleaning solution (7 of 11 Bissell products earned a “D” grade on ewg.org).  If you use another solution during the warranty period, your warranty may be voided.  If that prospect does not bother you, this article gives some tips on making homemade cleaning solutions for your vacuum/mop machine that have non-toxic ingredients.

The Differences between a Cleanroom and Your Home

The Differences between a Cleanroom and Your Home

Don’t you wish your home could be called a “cleanroom”?  Well–maybe in name, but it takes a lot of expensive equipment and protocol to make it happen!   Cleanrooms were first invented by scientist Willis Whitfield while he worked at Sandia National Laboratories in New Mexico in the early 1960’s.  He developed the first forced-air filtration system to control the number of airborne particles within an enclosed space. (The History and Innovation of the Cleanroom

A cleanroom is a controlled environment that filters pollutants like dust, airborne microbes, and aerosol particles to provide the cleanest area possible.  Cleanrooms are used for many different purposes; some examples are in electronics manufacturing, medical equipment and pharmaceutical manufacturing, research labs, and hospitals.   There are nine “classes” of cleanrooms according to ISO 14644-1, which regulate the maximum number and size of particles, air change rates or airflow velocity, and percentage of ceiling coverage. (Cleanroom Classifications)  For example, Class 1 is the “cleanest” and only 0.35 particles per m3 of ≥0.5 micron particles are allowed, the air change rate must be between 360 and 600 times per hour, and airflow velocity ranges between 60-100 feet per minute, among other regulations.  In contrast, typical office building air contains from about 15,000 to 30,000 particles (0.5 microns or larger) per cubic meter of air. (A Basic Introduction to Clean Rooms)  We’re talking mega-fans, filters and restrictions to turn an office into a cleanroom!

Why must cleanrooms be so…extreme?  Well, dust is a big problem for certain products.  In the case of pharmaceutical products like syringes and medications, airborne particles provide a ride for microorganisms on which to produce, leading to contamination of product. (Keeping Clean Rooms ‘Clean’)  Other surfaces like electronics are very sensitive to contamination by dust, and dust or microbes can wreck many scientific experiments.

The biggest contamination risk to a cleanroom and its products is people.  Did you know that when you are just sitting or standing completely still , the average person is releasing up to 100,000 particles per minute which are 0.3microns or larger?  Increased activity increases these numbers, so people in the cleanroom are encouraged to move slowly (no fast walking or running, and definitely no horseplay is allowed!)

In order to keep the cleanroom, ahem, clean, people entering must follow certain common rules, of which here are some examples:

  • No personal items such as watches, keys, or phones may be brought in because of the risk of bringing in other contaminants with them.
  • No eating, smoking or chewing gum in the cleanroom.
  • No cosmetics such as perfumes, lipstick, nail polish or makeup are allowed because many cosmetics contain sodium, magnesium, silicon, calcium, potassium or iron, which can create damaging particles..
  • Don’t enter if you’re unwell–germs are definitely not welcome in the cleanroom, and frequent coughing or sneezing expels many more particles into the air than normal. 
  • Fabric or paper towels are not permitted! (They shed too many particles.)
  • Hair and facial hair must be covered up, because human hair is many times larger than permitted particles in the cleanroom.

Of course, dressing to go into a cleanroom is a production.  One suggested procedure lists 42 different steps to put on the white “bunny suits” that are made of a special lint-free material!  You must remove offending items from your pockets, wash off makeup or perfume, drink some water to rinse particles from your throat, clean your shoes and put on booties first, then move on to putting on the suit, helmet, faceshield, gloves, belt, and cleaning any equipment you take with you. 

To remove all the particles generated by people and manufacturing processes, detailed engineering and specification of the ventilation system is required.  Designers may start with the classification of the cleanroom and the required “air changes” for the size of room.  Then, they must factor in the number of people, type of work, lighting, and outside ventilation required.  For example, if hazardous fumes are developed, then the cleanroom needs to be able to filter and provide 100% outside air!  Humidity and temperature inside must also be specified and controlled.  The filter size and type must be adequate to handle the particle load for reasonable filter life, as well.  These are just some of the details that go into cleanroom ventilation design. (HVAC Cleanroom Design Calculation Explained)  This is way more intensive than your basic home HVAC design!

The “envelope” of the cleanroom, or its air circulation boundaries, are very important.  By implementing a positive or negative pressure in the cleanroom, the flow of air and contaminants are controlled.  Positive pressure cleanrooms are better at keeping outside contaminants out, such as for semiconductor manufacturing, because air rushes out of the room whenever a door is opened.  Negative pressure cleanrooms are designed so that fumes and particles generated inside it don’t escape (like for a hazardous microbe research facility).  For this reason, special air-sealed doors are often used so that an “air lock” is created and entry/exit is tightly controlled.  Sliding and swinging doors must also open slowly in order to avoid disturbing pressure gradients inside the room. (Understanding Air Pressure In Cleanrooms)

The other major concern in cleanrooms besides dust is static charge.  Not only does dust itself carry static, people generate static charge when they are walking or working, as their clothes rub together and across certain surfaces.  Did you realize that walking over a carpet can generate 35,000 volts, and the human body feels a shock when the voltage is higher than about 3,500 volts?  (Static Electricity)  Sensitive electronics can be damaged at voltages far below 3,500 volts.   For this reason, most cleanrooms are equipped with ionization equipment (similar to HypoAir’s Bipolar Ionization, actually) that disperse ions into the air so that positively or negatively charged surfaces are changed into neutral surfaces very quickly.  Ionization equipment may be installed in the fans, or attached to rods and beams that are suspended in the room.  Airflow and ionization are designed together in order to deliver the ions to work surfaces in the least amount of time, thus neutralizing charges quickly before they build up and cause damage. 

Even with all this technology of filtration and ionization, extreme manual cleaning is still required in cleanrooms.  This checklist of cleaning suggests mopping the floors, vacuuming the walls, wiping down all surfaces and cleaning all windows before every shift/between shifts.  Wow!  That’s truly the kind of clean you can “eat off of”.   

So…how do the principles of cleanrooms relate to our own homes?  Of course it would be nice to live in a space with so little dust and germs, but it’s just not practical, nor comfortable–homes just would not be homes without eating, cooking, good smells, playing games, pets, comfy soft materials and many more activities and things!   However, there are definitely some things to learn from cleanrooms. 

  • Watch what you bring into the house!  In our article “Check them at the door! ”, we explain how to bring how to bring less contaminants into your house by taking your shoes off (and having a place to store them), getting a good doormat, and manage pets that bring in contaminants.  It also helps to get a floor cleaning tool that you will use often.  I absolutely love using my CrossWave floor and area rug cleaner by Bissell ($257); it’s cut my floor cleaning time in half by vacuuming and mopping at the same time.  If you check local discount stores, there are many reconditioned models that sell for less than half this price (I got mine at Ollie’s).  In addition, of course the manufacturer wants you to use their patented floor cleaner, and states that using any other cleaner will violate the warranty.  Unfortunately, Bissell products mostly rate an “D” grade from the Environmental Working Group for toxicity to humans and the environment, but if you do decide to substitute a non-toxic cleaner, we have just the one for you: TotalClean.  With no fragrance and no toxicity, you can clean your floors as often as you want without adding more VOCs and chemicals to your home. 
  • Use the best filtration you can afford to cut down on dust and microbes in your air.  Obviously you don’t want the constant whir of ventilation or to change 14 filters a week like cleanrooms, but using a MERV 12-13 filter in your HVAC and changing it regularly will help minimize breathing in particulates.  If you live in an urban or dusty area, add standalone HEPA filters to your home. 
  • Use Bipolar Ionization to control dust, microbes and static too.  Cleanrooms depend on ionization to control static charges, but they also benefit from the other effects of this technology:  ions help the filters to grab more dust and ions disable microbes like viruses and bacteria.  Our Germ Defender, Upgraded Air Angel Mobile and Whole Home Polar Ionizer each send out millions of ions into the air to do the same thing in your home. 
  • Try to keep the cleaning on schedule.  We know, life gets in the way of routine a lot of times.  However, when the cleanroom doesn’t get cleaned on time, things start to go awry, and when your home suffers from cleaning neglect, your own health could suffer for it!  Enlist help, reward yourself, do whatever it takes to keep the dust and germs at bay, because a clean home is really a dose of good medicine for your own body! 

How do Electrostatic Filters work?

How do Electrostatic Filters work?

It seems like manufacturers are coming out with new filters all the time.  Filters for homes with pets, filters for allergies, filters against viruses…and on and on.   I recently ordered and replaced my HVAC filter with a brand name that was a pleated filter advertised as an “Electrostatic Air Cleaning Filter”.  I had to find out what that meant!

First of all, I thought that electrostatic filters had to be hooked up to electricity.   Actually, only some of them do.  Electrostatic filters encompass a broad range of devices, and the ones that do require electricity are usually called electrostatic air precipitators.  The principle behind these units uses elements to impart a charge to incoming air particles, and then attract them (make them stick to) an oppositely-charged plate.  These systems could be portable, or installed in your HVAC system, or be a part of a huge commercial operation (like a smokestack).   Typically these systems are powered by a high-voltage, low wattage system.  The “filter” is the entire unit, and instead of replacing any parts, the charged plates are simply washed clean. 

However, I bought a regular pleated-type replaceable filter with a large wire grid over it, presumably just to keep the filter in shape as you try to manipulate it to fit in your HVAC.  I don’t have any electricity supplied to the filter box of my HVAC.  How could this filter be electrostatic?

The answer lies in triboelectricity, also called static electricity.  As air whizzes through the synthetic fibers of the filter, the fibers become charged with static electricity.  Then they start to attract the particles of dust in the air.  Making the filter “pleated” increases the surface area of the filter over a flat filter, so that it can attract more particles.  Eventually, however, the fibers become coated with dust, and it no longer acts as an electrostatic filter, but continues to trap dust by the other methods of normal filters (we discuss those four methods here).  And, hopefully before the filter gets so full that dust starts to bypass it, it gets disposed and replaced or cleaned.  

Reusable, washable electrostatic filters are also available.  Washable filters typically have aluminum or galvanized frames and polyester filters so they can withstand repeated cleaning.  However, these typically have a lower MERV rating (only up to MERV 9), so they are not capturing the smaller particles of bacteria, viruses and mold spores that disposable filters can handle.  For more explanation on MERV ratings, check out this article

You can also make your “electrostatic” filter perform even better by using an ionizer in the same room as your filter.  Because ions are charged molecules in the air, as they collide with dust, they impart the same charge to the dust.  This “pre-charges” the dust and causes a greater attraction to the fibers of the filter.  In this 2015 study, researchers showed that unipolar ionization (as opposed to bipolar) enhanced the filtration by 40%, with a lower pressure drop than filters that remove finer particles.  

Whether your HVAC filter is electrostatic or not, the most important maintenance task is to clean or replace it regularly!  This is the only way you can ensure that the filter is capturing the most particles possible, making your air as clean and allergen-free as possible.  

Photo by Lorena on Unsplash

How to equip your college student with better air quality

How to equip your college student with better air quality

If you’re a parent with a son or daughter in college, of course you want to see them succeed!  It can get costly, though.  From helping with tuition, room and board and everything else, it seems like “clean, fresh air” should be a free part of the package. Unfortunately, that may not be the case.  Many colleges and universities are housed in old buildings that did not give thorough consideration to air quality when they were designed, built, or renovated.  In many cases, you are paying for the privilege of  studying there, with living as only an afterthought!  

The problem with poor air quality in the university setting is that it affects the very thing young adults go there to do: learn.  Contaminants in the air work against their body in the following ways.

High CO2 due to inadequate fresh-air ventilation decreases the ability of the brain to metabolize oxygen.  In other words, the brain becomes oxygen deprived!  This can affect learning in terrible ways.  In a Havard study in 2015, 24 participants spent 6 days in simulated offices to control for CO2 and VOCs.  Days were designated by the research team, but blinded to the participants and analysts, to be one “High CO2” day of 1400 ppm CO2, two “Conventional” days representing the average office building conditions of about 940 ppm CO2, one “Green” day representing better ventilation with conditions of approximately 740-750 ppm CO2, and two “Green +” days representing 100% outdoor ventilation (approximately 550 ppm CO2). Cognitive scores were 61% higher on the Green building day and 101% higher on the two Green+ building days than on the Conventional building day. On average, a 400-ppm increase in CO2 was associated with a 21% decrease in a typical participant’s cognitive scores across all domains after adjusting for participant (data not shown), and a 20-cfm increase in outdoor air per person was associated with an 18% increase in these scores.  This shows that for lack of fresh air in their dorm room or classroom, your student could be missing out on their chance to absorb all the material presented, with lower test scores as a result!  Here are some ways to “open the windows”, so to speak:

  • Add a Window Ventilation Filter to their dorm room.  It’s easy to install and remove, and filters out pollution, pollen and dust. 

  • For more info on how to measure CO2 in your dorm or classroom, check out our post.  If the classroom or lecture halls turn out to be high in CO2, advise students to check with their student advisor on advocating for more ventilation.  

VOCs: Most dorm rooms come equipped strictly with the basics -- a bed, desk, chair, light and garbage can, plus a small amount of storage space in the form of a dresser and/or closet. (howstuffworks.com) Therefore, moving into a new dorm room usually means getting new bedding and new accessories like rugs, wall hangings, and more storage like dressers or bookshelves.  When these things are purchased new, VOCs from off gassing can increase dramatically if the doors and windows are kept closed for most of the day.  In the study discussed previously,  a 500-μg/m3 increase in TVOCs was associated with a 13% decrease in the cognitive scores.  Once again, fresh air ventilation is really important to keep VOC levels in check. 

  • Use a portable VOC sensor to check for levels in the dorm room or wherever it’s suspected that VOCs may be high (like a newly renovated area).  

  • Install a  Window Ventilation Filter in the dorm room to get fresh air dilution. 

  • The Air Angel neutralizes VOCs with the catalytic molecules emitted by its AHPCO cell. Being portable and requiring very little maintenance, it can travel anywhere they go: on weekend sports events, home, and on vacation.

  • The Germ Defender/Mold Guard's optional carbon filter adsorbs VOCs emitted by newer items as they off-gas.

Indoor humidity plays a major role in our health: when it’s too low, disease transmissions are more likely, and when it’s too high, mold growth occurs and different mold-related conditions spike.  We can think of many reasons to keep humidity in the recommended range of 40-60% so that your loved one’s health is not at risk!  Sadly, sometimes it takes severe illness and even death to prompt renovation of problem buildings (see this article about the University of Maryland).  Here’s how to equip your student against high humidity and the risk of bacteria, viruses, and mold-related illness.

  • It’s super inexpensive to put a portable humidity sensor in their suitcase or next care package.  Ask them to message you with a photo of the sensor when you’re talking with them in the dorm room, or whenever else it seems to be high.  

  • If the humidity remains high, you can speak to the dorm manager, but also equip your student with a dehumidifier.  Amazon and big box stores can even deliver one from an online purchase.  Since the average dorm room is only about 228 square feet, and larger dehumidifiers come with complaints of extra noise and heat, you’ll want to keep it small.  This economical one by Eva-Dry only covers about 150 square feet (1200 cubic feet), but two of them plugged into different areas will help keep moisture under control.  Here is a review of other models that work great for dorm rooms. 

  • The Germ Defender/Mold Guard is perfect for small, humid spaces, and does triple-duty in a dorm room: 1) Even though the bathroom is typically always humid, mold doesn’t have to grow there… I can testify that one Mold Guard stopped mold growth when I couldn’t get a leaky shower valve repaired right away.  2) This unit also deactivates viruses and bacteria in the air and on surfaces across the room with polarized ions. 3)  Finally, it has an option for a carbon filter to adsorb stinky odors like running shoes and sweaty clothing!

  • Use an Air Angel to prevent transmission of germs and mold growth. This unit is portable and requires very little maintenance, in fact only a replacement AHPCO cell once a year.

Finally, if your college student has not adopted good cleaning habits by now, we can’t help you! (just kidding, but we can supply you with the right goods, read on!)  Statistics on bacteria in dorm rooms are pretty gross: the average women’s dorm rooms had over 1.5 million colony-forming units (CFU)/sq. in. of bacteria, while men’s dorm rooms had an average of over 6 million CFU/sq. in. (collegestats.org).  The same article breaks down the types of bacteria and where they are most concentrated, and while not all of them were bad, most of them were.  It’s time to clean up, because it’s hard to know which is worse: being sick in college or having a sick roommate who will soon infect you.  For those who do clean, equip them: 

  • Once again, Germ Defenders and Air Angels are passive sanitizers that help in activate germs between active cleaning.

  • A bottle of TotalClean goes a long way!  Since dorm rooms are small, heavy-scented chemical cleaners can be super-irritating and not always welcome to their roommates’ sense of smell.  TotalClean is unscented, non-toxic and very effective against dust, dirt, and germs on many different surfaces, even windows and mirrors. 

  • Small pump bottles of non-toxic hand sanitizer and sanitizing wipes stationed around the room and on desks help between hand-washings. 

Of course, similar to sending them off to grade school, you can’t be there 24/7 to help your college student make smart choices, but at least by this point you can give them tools to monitor and correct their own air quality for the healthiest and most productive school year.  Viva la college!

How to have clear sinuses

How to have clear sinuses

Going through yet another round of stuffy nose and headaches, I decided to research all the ways that I or my environment is sabotaging my sinuses.  

First of all, it could be sinusitis (also called rhinosinusitis): an inflammation of the paranasal sinuses, the cavities within the bones that surround the nose (Harvard Health).  Inflammation blocks the ostia, which are the narrow channels that drain into the nasal cavity, so that drainage becomes blocked.  Sinusitis can be caused by a cold, allergies, or a deformity such as deviated septum or nasal polyps.  Here are the different lengths of sinusitis (healthline.com)

  • Acute sinusitis can be caused by a cold, but then a secondary infection can happen once the sinuses get inflamed and blocked.  Technically acute sinusitis lasts less than 4 weeks.

  • Subacute sinusitis lasts from 4-12 weeks.

  • Recurrent acute sinusitis occurs when you have the same symptoms 4 or more times per year, but it lasts over 7 days each time.

  • Chronic sinusitis symptoms last over 12 weeks.

Well what is causing it?  

Normal sinuses are lined with a thin layer of mucus that traps dust, germs and other particles in the air. Tiny hair-like projections in the sinuses sweep the mucus (and whatever is trapped in it) towards openings that lead to the back of the throat. From there, it slides down to the stomach. This continual process is a normal body function.(American College of Allergy, Asthma, and Immunology) Here are some of the common irritants that can interrupt this process:

  • Dust:  A dose of good old dust, whether it’s from a woodshop, mowing the grass on a very dry day, or bringing out boxes from an attic, can overload the sinuses. The problem is that dust is a very complex mixture of irritants.  It can contain dustmites and their feces, chemicals, 

  • Pollen:  Plants have to reproduce, and sadly the weeds seem to be the worst offenders to our noses.  In addition, you’re not just imagining it: pollen really is becoming worse every year!  Check out our post on allergies here

  • Mold:  Mold is dangerous in that unlike other allergens, it can colonize and actually grow inside your sinuses, since they are warm, moist and dark.  Then, the rest of your body is susceptible to other colonizations as you breathe the mold spores and swallow them with mucous.   

  • VOCs:  VOCs can cause inflammation that leads to sinusitis.  A 2001 study showed that patients with chronic rhinosinusitis were exposed to higher levels of volatile organic compounds than healthy subjects.

We at HypoAir are not medical professionals, so we can’t recommend the techniques and drugs that doctors use for prevention and relief of sinusitis.  However, natural techniques are generally milder, and many of our clients are very sensitive to medications anyway, so we are glad to report that sinusitis can often be prevented or treated easily!  Here are some of the ways to do it:

  • I have to say that mask-wearing definitely cut down on my nasal issues when I was required/bothered to wear one.  Why?   Masks filter out many of the airborne contaminants listed above that can trigger sinusitis, as well as germs like bacteria and viruses.  Two+ years into the coronavirus pandemic, the stigma of wearing a mask is virtually nil, and there are a plethora of masks you can use to protect yourself against pollutants and germs alike (see our post on masks). 

  • Nasal irrigation is the number one defense against sinusitis according to Harvard Health (steps included in the article).  Whether you choose to use a bulb, small pitcher or neti pot, the homemade rinse works great to flush away the irritants that can block drainage and start a nasty infection.   It’s recommended to do this daily if you can!

  • Hydrate–your body as well as your nose!  Drink plenty of water during the day, and use a plain nasal saline spray several times a day if you are in a dry environment.  Adding a drop of food-grade tea tree oil or oregano oil (oregano oil is a bit harsher) to the saline spray adds a layer of antimicrobial protection to your spray. 

  • Avoid being unprotected in moldy and dusty places.  If you have to go down into a moldy basement or into a dusty attic, make sure to wear an N95 or respirator mask that seals well, and don’t take it off until you are safely in a clean place. 

  • Keep pollen, dust and pollution out while letting fresh air into your home, by installing some Window Ventilation Filters in your open windows.  They are easy to install and can be vacuumed a number of times before replacement.

  • Neutralize pollutants by adding a bipolar device by HypoAir to your home.  Positive and negative ions neutralize mold and germs by damaging their outer layers, and they cause small nanoparticles to stick together and drop out of the air in order to avoid breathing them in.

  • Be very vigilant about humidity levels in your home, so that mold does not gain a foothold.  You can monitor humidity easily using our inexpensive Humidity Sensors to maintain humidity between 40-60%.  If you see any water intrusion into your home, make sure to deal with it promptly to prevent mold growth! 

  • Use a MERV 13 filter (if possible) in your furnace/HVAC and change it regularly!

  • Use a standalone HEPA filter in areas where you spend a lot of time (living room, bedroom)

  • Clean as often as you can using a non-toxic, unscented cleaner: TotalClean fits the bill perfectly!  Safe to use around food, people and pets, TotalClean is the solution to replace all of the VOC-producing cleaners that can irritate and inflame sinus pathways. 

Think about the agony of sinusitis or a sinus infection and the time you lose while you battle it:  isn’t an ounce of prevention totally worth a pound of cure?  We think so!

How to choose a mold remediation contractor

How to choose a mold remediation contractor

It’s a scary prospect to think that mold in your “safe place”--your home–may be intruding and possibly causing illness in you or family members.  Whatever your training in other disciplines (even medical doctors), you can still be largely unprepared in knowing about mold and fungi and their effects on your home and body.  There are many “smart people” who get overwhelmed and discouraged when doctors or inspectors “miss” or mistake their symptoms.  How can you cut through to get real answers?

The assessment or consultation:

First of all, there are different opinions on who should inspect and test, and who should do the remediation work.  Often they are the same company, but the better inspectors have chosen to focus on inspection and testing, with recommended companies to do the remediation work.  It’s like a doctor who assesses and diagnoses a problem, but then refers you to a physical therapist or nutritionist for the corrective work.  For example, Brian Karr and his company We Inspect are highly recommended and fly all over the US doing inspections.  On his website, he states “We do not perform any remediation work ourselves because it’s a conflict of interest for the same company to handle both inspection and remediation.”  This is a unique position because many inspectors will also do remediation work, but it’s a very safe position to accept from the homeowner’s perspective. 

Tests are just one of the diagnostics that home inspectors use to confirm whether mold is a problem in your home. If a company wants to jump straight into air, dust, or body fluid testing (which can be a substantial revenue source for them) without some time to talk about the history of your home and your symptoms, then you may want to look elsewhere.  That’s like paying (and waiting, usually!) to see a doctor and getting to talk for less than 5 minutes before he ushers you out the door with orders for a test or a prescription. 

It’s best if you can do an in-person assessment where the consultant can come to your home, but unfortunately, many people live hours from qualified consultants so remote “visits” will be the case.  Prior to that visit, it’s always helpful to get your thoughts together and write down specific events and questions that led you to this point, such as:

  • If you are feeling ill, when did that start?

  • Have you noticed specific events that may have caused it, such as renovation work, damage by a severe weather event like flooding or roof damage, etc.?

  • Have you had other problems with the home?

  • What other life events are going on (job changes, pregnancies, new pets, etc.)

Other things to ask: 

  • Do you believe that mold can cause health issues and even cancer?  Amazingly, several reputable online sources deny that mold can cause cancer, including healthline.com, despite studies since the 1960s that have proven this link. This inspection and remediation company seemingly copied the Healthline article and adopted their stance.  Who wants to hire a skeptic of science?  

  • How do you test for mold, and do you test before and after remediation?  According to the late Dr. Jack Thrasher, a toxicology and mold pioneer, he  “always, always recommended multiple testing mechanisms for the same space. He liked dust sample testing from at least 4-5 places and ERMI (Environmental Relative Moldiness Index) testing to find out the species of mold present—he was BIG on knowing what you are dealing with, so that you could fight the battle properly. Dr. Thrasher was also a proponent of culturing surfaces, even hidden surfaces, like refrigerator coils for bacteria. For example, if everyone is getting sick in the kitchen, but the mold counts in the undisturbed air read ok, and there doesn’t seem to be moisture intrusion, start looking behind things. In this case, when he pulled out the refrigerator and tested the damp coils, he found rare and dangerous bacterial cultures. So, when the fridge was opened or closed or disturbed in anyway, a poof of bacteria and particulates was flying around, making folks sick. There’s your answer. Always dig deeper was his motto.” (moldfreeliving.com)  In addition, the mold testing facility needs to be an independent lab, so that testing can be performed properly and results are not skewed.  Having an inspection company who is independent of the mold remediation company perform the tests before, and after remediation but before reconstruction is the gold standard–because why rebuild if the mold is removed to a satisfactory level?  This second set of tests is called “clearance” testing, so that if successful, the remediators are cleared to rebuild.  This is the best way to check that the remediation was performed properly.   

  • What products do you use to “clean” mold?  Even if mold has not caused a reaction in your body, you don’t want to bring in chemicals that are unhealthy!  “ Aim for botanically-based products, like the EC3 line of products that are proven to eliminate mold but cause no harm when inhaled or ingested. Hydrogen peroxide cleaners and Borax are also effective products that will not cause additional harm to your health.” If the remediator uses things like bleach, it’s a sign that they don’t understand the health implications of these harsh chemicals and should be avoided. (moldfreeliving.com)

  • Do you have recommendations and resources to treat myself, my family and my pets as well as the home?  Because recovery from mold in your home is more than treating the building, most good mold remediation companies have recommendations on doctors who understand and can treat sicknesses caused by mold like CIRS (Chronic Inflammatory Response Syndrome) and Mast Cell Activation Syndrome (MCAS). 

  • How do you remove or inactivate any moldy materials?  You definitely want to know the company’s procedures for isolating and removing mold so it’s not spread throughout any areas of your home that have not been contaminated.

  • What are your certifications?  It’s important to check on local and national certifications, because it means that the company and employees have been trained in the best practices for their craft.  The National Association of Mold Professionals and Institute of Inspection, Cleaning and Restoration Certification are two highly respected certification organizations.  

  • Are you insured?  If the company is not insured, it is best not to hire them, as improper remediation will cost even more than doing it the right way.(moldfreeliving.com)

  • How do you decide which materials may be cleaned, which materials need to be removed, and how far away from visible mold needs to be removed?  Mold grows “tentacles” called hyphae, but these hyphae can grow up to 6-12” outside a visibly moldy area.  Therefore according to previous industry standards (ANSI IICRC S520 Standard) materials should be removed 24” around a visibly moldy area.   For example, drywall that has been wet for more than 24 hours also needs to be removed, but structural members like studs and floor plates can be cleaned if they are not water- or insect-damaged.

  • What kind of containment equipment do you use?  In order to prevent the spread of mold beyond an area, negative air machines (NAM) with HEPA filters are often used so that air laden with mold spores does not contaminate other parts of the home.  At a minimum, barriers with 6mil plastic should be created between the area being cleaned and the rest of the home, including the area where workers are carrying out debris. 

  • Do you have any personal experiences with mold?  Sometimes the business owners with personal experiences on how devastating mold can be to their health, family and home are the best in understanding every step of the discovery, remediation, rebuilding and treatment process.  For an example of how a good, experienced air quality inspector conducts his interviews and assessments, check out this interview

Finally, many companies are good at selling and less good at performance.  I once hired a plumbing contractor who was a good salesman and smooth talker, but when it came down to performance, found out that he was improperly designing and installing drain piping runs.  I fired him and because I and another contractor called him out on the mistakes, he did not charge me for the work.  Even if he had, I would only be lacking money…Your health is more costly, so don’t be afraid to “go with your gut” and if necessary, terminate a mold contractor that is using sub-standard practices to protect you and even their own employees.  Don’t be afraid to ask questions and get second opinions, because you will not be able to “heal” from mold if your home stays infected with it!

How to help seniors avoid Alzheimer’s and dementia through better air quality

How to help seniors avoid Alzheimer's and dementia through better air quality

HypoAir has many generous customers!   We frequently get orders for multiple purifiers with different ship locations, because once our customers see how well they work, they want to gift them to friends and family who don’t know about their benefits, or may not be able to afford them.  Inspired by this generous spirit, I want to let you know a few more reasons and ways to help those who need it most, the elderly.

Whether or not you have a senior in your family, it’s likely you know someone who because of age or infirmity has more difficulty cleaning their home than they used to.  Anything that involves a ladder may not be safe for them to do, and heavy vacuums take a lot of energy to maneuver.  They also may not have access to better vacuums and air purifiers with HEPA filters, which are important for filtering out fine particulates from indoor air.  So, the dust piles up and this not only leads to a sense of discouragement; it can affect their physical mental abilities.  At least one study found that air pollution exposure later in life is a risk factor for dementia.  A study published in February 2022 “found that greater improvement in long-term AQ in late life was associated with slower cognitive declines in older women. “  Exactly how was this assessed?

First of all, the researchers reference the National Ambient Air Quality Standards (NAAQS), which were created in 1970 by the EPA through the Clean Air Act.  Six pollutants were identified as “criteria” pollutants, which are carbon monoxide, lead, nitrogen dioxide, particulate matter (in which two categories of less than 10 microns and less than 2.5 microns were identified), sulfur oxides, and ground-level ozone.  (Britannica.com)  Since the enactment of the NAAQS 50 years ago, significant reductions in the average pollution levels have been seen across the US, but not in every location.  This new air pollution study used a subset database of 2,232 women aged 74-92 who were already participating in the the Women’s Health Initiative (WHI) Memory Study (WHIMS)-Epidemiology of Cognitive Health Outcomes (WHIMS-ECHO) study, which began in 2008.  The air pollution study correlated the pollution levels at each participant’s address in the first 10 years (2008-2018), according to US Environmental Protection Agency (EPA) monitoring data, to estimate annual mean concentrations of PM2.5 (in μg/m3) and NO2 (in parts per billion [ppb]).  Then they controlled for other variables such as age, education, geographical region, ApoE e4 genotypes (a gene specifically found to increase dementia risk), and cardiovascular risk factors, and excluded others with prevalent dementia and missing data.   The association of the cognitive decline of the remaining 2,232 women to the levels of air quality improvement where they lived showed that residing in locations with greater AQ improvement was associated with slower rates of decline in both general cognitive status and episodic memory.  These benefits were equivalent to slower cognitive declines in women who were 0.9 to 1.6 years younger at WHIMS-ECHO enrollment, meaning that their brains acted 0.9-1.6 years younger.

Whew, that’s a lot of information (the study was quite rigorous to read) but our customers (and really anyone interested in air quality) are seeking ways to live with the best quality of life, if not also the longest life possible.  Therefore, slowing down mental decline by 0.9 - 1.6 years is nothing to sneeze at!  It all adds up.  It just confirms what we’ve been writing about regarding the location of your home–if you are moving, it’s very important to choose a location that is low ambient air pollution.  Higher outdoor air pollution translates to poor quality air inside, if better ventilation and HEPA filters are not used.  

Fungi in the brain has been studied as a possible cause of Alzheimers and dementia patients.  This summary of recent studies, as well as a 3-part series on mold and its journey through the body on Citrisafe.com, a manufacturer of safe mold cleaning products, show how exposure to mold is a big risk to our brains.  This is another reason it’s important to investigate for mold in the homes of the seniors you know.  

Unfortunately, many seniors do not have the choice to move into better locations to improve air quality, but we can help them by making small improvements inside.  You can do what you can for your aging parents, your neighbors, and anyone else you are able to!

  • Help to identify the big “leaks” that may be letting outdoor pollution into their home.  Some of these are attic doors, leaky fireplace dampers, holes in the subfloor under bathtubs, large holes around plumbing or gas fittings, etc.  Sealing these will help to keep the ultra-fine particles and nitrogen dioxide at lower levels.

  • Encourage and/or help to change their furnace filter regularly.  Often the air return filter is under a ceiling grille, requiring a ladder.  Although it can be expensive to relocate the filter, you can suggest that they use the highest MERV filter possible for their system (up to MERV 13, check out our selection including activated carbon options here).  If renovation is possible, adding a box for a thicker filter will decrease the frequency of changes so that each filter will work longer.  

  • Suggest they buy, or give a gift of a HEPA filter.   In addition to the furnace filter, this filter can be placed in the room they use the most, so that they can breathe comfortably for most of the day.  Some filters are easily transportable to their bedroom.  If they are restricted in movement such as a recliner or bed, a small filter may be best.  IQAir’s new “ATEM” filter directs purified air in their breathing zone, and is quite portable.  HEPA filters reduce cleaning frequency and intensity by trapping dust, but the filters will need changing (a maintenance cost of running them).

  • If particulate air quality is quite good in their home but bacteria and viruses are a concern, you can suggest or gift an Air Angel.  Air Angels are also portable units that deactivate microorganisms like bacteria, viruses and mold with polarized ions.  Air Angels require very little maintenance, in fact only a replacement AHPCO cell once a year. 

  • Advocate for better ventilation.  We are BIG on fresh air ventilation, because it dilutes pollutants that come from inside (CO2, VOCs, etc.).  Our Window Ventilation Filters allow anyone to open their windows for more fresh air, but keep out pollution, pollen and dust.  They are easy to install and remove.  

  • Check for water intrusion and mold.  That “musty smell”, so often a stereotype of older persons’ homes and belongings, in reality is probably not their choice of scent–it’s an indicator that mold is growing somewhere in the home.  Mobility is often a limitation for seniors, so they may not be able to stoop and inspect under sinks, in closets or in the attic, basement or crawlspace.  If you have been reading our website, you’ll also know that if mold occurs, choosing the right contractor is not easy!  Help them to make difficult decisions of who to contract, how to deal with the remediation and what to clean and what to dispose, in order to have a healthy home going forward.

  • Have a conversation about cleaning products.  Of all of these “changes” this might be the most difficult one, because seniors often have preferred products that have been on the market for decades but in reality are toxic to their indoor air!  If you want more information on why these are toxic, and what products to use in place of them, check out our post and our own non-toxic cleaner TotalClean

Our kindness towards seniors counts, because it shows that we value life from the beginning to the end.  It also shows how we want to be cared for when we reach the same age.  Regardless of your financial ability, it’s the time and actions that show you care!

How to increase indoor air quality in mobile and manufactured homes

How to increase indoor air quality in mobile and manufactured homes

No matter where you go in the US, there are mobile and manufactured homes.  The homes we’ll discuss here can fall into 2 categories: homes that were moved from a tractor trailer, placed on pilings and realistically will never move again, and then there are recreational vehicles (RVs) that can travel the country (but many sit at home or in storage for most of the year).  There’s also vastly different reasons to live in one or the other–from financial to lifestyle choices to temporary housing.  Whatever your reason to stay in a mobile or manufactured home, we want to help you make it a healthy place. 

Mobile homes with a pier foundation are actually supposed to be called “manufactured homes” according to the industry representative, The Manufactured Housing Institute.  Mobile homes and manufactured homes are two words for the same thing: a home built in a factory on a steel frame with wheels for transport to a homesite, where the wheels are removed after it is set on a foundation.  Manufacturers and HUD prefer that they be called manufactured homes, but most people still refer to them as mobile homes.  You can have single-wide, double-wide, triple and even quadruple-wide “mobile” homes, where the extra “boxes” can be configured side by side or even on top for a second story.  Mobile homes don’t have a great reputation for quality or lifespan, but that doesn’t mean they don’t start out that way or can’t be upgraded to make them better.  Let’s discuss the ways in which mobile homes can be improved for healthier indoor air quality.  The main objective is to keep water out, seal air leaks and provide good ventilation. (source: howtolookatahouse.com)

Starting from the top down…The roof: generally speaking, less-expensive manufactured homes have flatter roofs.  This is because the higher the “pitch” or angle of the roof, more material is necessary to frame and cover it.  The problem with low pitch roofs is that rain and debris spends more time on the roof–rain doesn’t run off as quickly and debris like tree branches and pine needles don’t roll off as easily.  Roofs in general need inspection and maintenance, and low-pitched roofs need regular inspection to keep water from getting backed up and leaking through.  Many owners decide to “double-roof” their homes and this can make a huge difference in indoor temperature and longevity of the home.  I’m not talking about 

Roof overhangs tend to be short in manufactured homes, so that water coming off the roof runs right down the wall.  This is a recipe for water intrusion and mold, not to mention undermining the footings of the piers.  If the home does not have gutters, you can install gutters and downspouts to channel the water away from walls, doors, windows, decks and the foundation.

Siding is the protection for walls against wind and rain, and siding can be metal (very old homes), fiberboard (80’s and 90’s homes) or vinyl, engineered wood or hardyboard (modern homes).  Fiberboard must be continually maintained, or water ingress will cause it to degrade quickly.  Vinyl, engineered wood and cement board sidings provide longer-lasting protection, but they also need to be inspected for damage or improper installation.  The weakest points in siding are the corners, window and door casings, because the irregular joints are typically spots for water ingress.  

For many years, windows in manufactured homes were single pane with an aluminum frame.    The transport of the home to its new foundation may cause the frame to warp or the casing around the window to become unsealed, exposing the sheathing underneath to water.  If you are able to, you can upgrade the windows to double-pane for more insulation against outside weather, and make sure the new windows are installed with good flashing, casing, and caulk techniques.  Likewise, if the front door is of a thinner, lightweight quality, an upgrade to a steel door is also an opportunity to make sure it is installed correctly with flashing, casing and caulk to minimize water ingress.

Foundation: On manufactured homes that have a “skirt” or foundation, a vapor barrier must be installed on the ground (2008 HUD law).  If the home is resting on a concrete pad, then the vapor barrier is not needed because the concrete will act as a vapor barrier.  Unfortunately, the “underbelly” of the home often falls into disrepair because no one wants to go under the house to inspect it!  Directly under the home, another vapor barrier of plastic or black “belly board” will protect the insulation and subfloor from moisture and pests, but this is often damaged and missing in older homes.  Manufactured homes on piers are really sitting over a “crawl space”, so it’s important to inspect the underside of the manufactured home to see how sealing up the ground vapor barrier, belly barrier and insulation can really make a difference in comfort and humidity!  Here’s an article that goes step by step through this repair. 

Inside: the manufactured home industry has certainly had a bad reputation for formaldehyde emissions inside homes.  Formaldehyde has never been banned from the manufacture of homes, but lower limits have been set on the use of components such as plywood and particleboard by HUD and the EPA.  The problem is that there are no HUD standards for the maximum allowable level of formaldehyde gas inside a home, meaning that all the new components like flooring, cabinets, walls, furniture and drapery can have low individual levels of emissions, but a high overall level.  For this reason, it’s best to avoid purchasing or staying in new manufactured homes,  If this is not an option, you can choose to furnish it with only solid wood furniture or composite wood furniture with sealed surfaces. If you have any newer composite wood furniture that is still emitting formaldehyde gas, remove it from your home. Because the formaldehyde off-gassing diminishes over time, storing the pieces outside of your living area for a while (under cover of course) may solve the problem. (howtolookatahouse.com)  You can also ventilate as much as possible (leaving windows open in mild climates, and using a fresh-air ventilation system in more extreme climates.  And of course, increase ventilation of your home while doing any interior painting or use low VOC paint.

Some of the most important mold protection also happens on the inside of the home, because leaking pipes, sinks, showers, toilets, washing machines, etc. all need immediate attention in order not to cause mold and damage that can be very costly to repair.  The abundance of fiberboard in manufactured homes will wick up water much more quickly than hardwood, and even ambient humidity is important to control.  

Recreational Vehicles (RV’s or campers) truly are supposed to be mobile, so that you can take your home with you, and enjoy new scenery wherever it’s parked!  Like manufactured homes, there are a variety of pricepoints and features in two classes, motorized and towable.  There are 3 types of motorized RV’s, ranging from the largest, luxury bus-type (Class A), the smallest conversion van (Class B) to the in-between (Class C).  Towable RVs can be as simple as a small “Pop-up” to large “travel-trailers” and “fifth wheels”.  “Tiny homes” can look like miniature versions of homes on wheels.  Here is a more in-depth look at the differences between these classes. 

RVs have similar challenges to manufactured homes when considering water intrusion from above and vapor from below.  It’s a sad truth that RVs are going to leak, but with a lot of inspection and maintenance, you can prevent this.  Most RV’s rely on sealant and caulking, and inspection and repairs should occur every 90 days (see this video for how to inspect it).  Again, let’s take a look from the top down:

Roofs: Most RV roofs are either rubberized (a thin membrane stretched over wooden frame) or fiberglass (molded).  Considering that these materials are more fragile than the asphalt shingles or metal roofs found on manufactured homes, they need a bit more care and upkeep!  Keeping them clean and conditioned helps so that leaves and branches slide right off instead of piling up, and aftermarket coatings can extend life against the sun’s UV damage.  RV roofs can last from 10-20 years or more, depending on the care and maintenance given them.  Here is an article detailing cleaning and repair tips for each type of roof.  Ideally, RVs should be parked under a permanent roof when they are not being used in order to minimize water and sun damage, and a minimal conditioning system (like a dehumidifier) should be left running to keep the air dry inside.

Since RVs are mobile, they are more prone to separation at the roof and wall joint, as well as openings like skylights, windows and doors.  One website says that driving an RV at highway speeds is “ the equivalent of driving your house through a hurricane during an earthquake.” (!)  Any separation needs to receive prompt attention by removing old sealant, cleaning the surface, and applying new sealant.  Here is a great article on how to achieve a professional look and long-lasting finish when resealing seams.   If your RV has a slide-out, special attention needs to be paid to protecting this area, and awnings are a great way to shelter the slide-out roof and joint area by keeping leaf and branch debris, animal droppings and nests off of it, as well as rain and snow. They’re not too hard to install (instructions here) and are a great investment for your RV. 

Each penetration in the side of the RV (like vents, ports for electricity and drainage, and storage compartments) needs attention, because sealants fail over time and with sun damage.  They should have a bead of sealant at least on the top and corners of the penetration to prevent water from coming in (the best would be all around the penetration).

The underbelly (underside) of the RV also needs regular inspection and repair.  Some RV’s have fiberglass, others have wood or metal sheets, and all are susceptible to road damage or more frequently, water damage from the inside like a leaking pipe.  Here is an article with photos on how to assess and repair underbelly damage.  You can even upgrade the type of underbelly protection fairly easily, but it may take more than one person to wrangle the material into place.

Inside the RV, again, motion from road travel is constantly working to pull apart connections and seams.  Keep an eye on all sources of water leaks such as pipes, sinks, showers, toilets, etc., so that water will not damage your home on wheels and initiate mold!  Also, since many RVs have propane powered appliances such as stoves, furnaces, water heaters, etc, a propane leak can be very dangerous to your health. You can use your nose (the old “rotten eggs” smell is a clue, or detectors such as a Gassaf propane leak detector, or a propane dial manometer (to detect pressure drops in the propane system).  (rvlife.com has a great video on how to inspect your propane system).  A pressure drop-down test is recommended once a year so that you can tell if your system is leaking at all.  If you do have a leak, you can use a simple spray bottle with water and liquid dish detergent, to check all joints for leaks (the soap will cause bubbles around the joint if it’s leaking).  

Like manufactured homes, RVs tend to have an abundance of particleboard, fabric and flooring that should have formaldehyde limits individually, but corporately may give off a lot of formaldehyde when they are new from the factory.  These levels go down dramatically as an RV ages, but RV age also increases chances of other problems, like water or structural damage.  In general, less-expensive units have more adhesive-based components (which generate formaldehyde off-gassing) and could create some irritation for more sensitive RV owners. (rvtravel.com).  When checking out RVs to purchase, you can even bring a portable sensor with you to measure the levels of VOCs and formaldehyde inside them (check out our article on sensors for recommendations).  Air purifiers with activated charcoal filters, like the Germ Defender with carbon filters, absorb VOCs and formaldehyde, and fans are helpful to keep air circulating.  1-2 Germ Defenders can cover the average RV (remember that they don’t cover spaces separated by closed doors) so that your RV can be comfortable even new off the factory floor. 

Manufactured and mobile homes can be as healthy as a permanent home inside with a lot of diligence and the decision to choose your neighbors wisely!   If you are in close proximity to smokers, barbeque grills, auto exhaust or other toxins, this can seep into your home.  If possible, try to live or camp on a large lot and use HEPA filters to capture particulates inside.  In a small or large home, it’s best put your health first and live in the best place you can afford.

Photo by Jon Hieb on Unsplash

New SEER ratings and more price increases…

New SEER ratings and more price increases…

Since we’re a company dedicated to healthy indoor air, we’re going to talk about SEER in relation to heating and air conditioning, not a person who can “see” the future!  However, we can see price increases coming because new regulations are soon coming into effect...

SEER stands for Seasonal Energy Efficiency Ratio, and it gives you an idea of how efficient your cooling system is.  For example, how much cooling do you receive for the amount of electricity used?  As the SEER number increases, the electricity used to achieve the same cooling will decrease proportionately.  This means that a 12 SEER unit will cool your home using half the energy of a 6 SEER, and a new 13 SEER system is about 30% more efficient than a 10 SEER from the early 1990s. (howtolookatahouse.com)

The Department of Energy (DOE) regulates the minimum SEER ratings that may be sold and installed, and these ratings increase every few years as technology evolves so that energy usage decreases. For example, the minimum SEER for southern US states will increase beginning in January 2023, from 13 to 14.  It is part of a new rating system called SEER2, which involves a new M1 testing procedures.  As a consumer, you probably don’t want to know the specifics of the testing, but it does more accurately represent the real-world applications (seer2.com)

This regulation essentially causes a mandatory “upgrading” of new HVAC systems.  It also contains legislation that splits the country into North, South and Southwest regions, each of which have different requirements about installing “older” units.  For example, in regards to residential split-system air conditioners, in the South and Southwest, HVAC companies cannot continue to “sell through” their older units.  In these areas, all noncompliant equipment must be sold for installation prior to January 1, 2023 or shipped to the North for installation.  In the North, as long as it’s been manufactured prior to January 1, 2023, they can continue to install it.  (fieldedge.com).  

As a resident of the “South” region, this requirement to sell or ship is definitely affecting new AC prices, as I was warned by my local HVAC installer that prices will go up 15-20% at the beginning of 2023!  

Ok, so how do I know what I’m upgrading to?

There are a number of ways to find out the SEER of your current air conditioner, even if the yellow and black sticker is long gone.  From the model and serial numbers, I can tell the date of manufacture, the SEER rating, and the “tons” of capacity on the The Rheem unit on my home. 

So, if I have a SEER 13, the same cooling capacity in a 14 SEER system should gain 8% efficiency, or cost me 8% less to run (13/14 = 92%).  However, if you are replacing your home unit, there are more reasons to upgrade further.

Controlling humidity

According to Trane.com, higher SEER units often have 2 components that provide greater indoor comfort.

  • 2-stage or variable-speed compressor

  • Variable-speed blower

Air conditioners with lower SEER ratings are usually single-stage and only run on one speed. This means they’ll frequently turn on and off during mild weather and you’ll experience uneven cooling or hot and cold spots. You’ll also experience higher humidity levels which makes it feel hotter than it is. Your A/C needs to run for a long period of time to remove humidity from your home’s air. 

Tax incentives:  US legislature was recently signed to extend tax incentives to 2032.  At energystar.gov  there is guidance on obtaining a $300 tax credit for split and package air conditioning systems, as well as air source heat pumps.

Local Electric Company incentives:  If you go to the website of your local electric company, there may be details online about rebates for upgrading your home HVAC equipment. 

What does this mean for us as homeowners?  If you are thinking of replacing or upgrading your AC or heat pump, inquire with a local installer in 2022 about pricing and energy usage for higher SEER equipment.  Depending on where you live in the US, you may wait to have it installed in 2023, but you can’t save unless you know, and you can’t know unless you ask!

Photo by P. L. on Unsplash

What is a Heat Pump Dryer? What are the pros and cons of owning one?

What is a Heat Pump Dryer? What are the pros and cons of owning one?

Living in the woods has certain advantages and disadvantages.  The scenery is gorgeous and trees filtering sunlight shields my home from excessive heat in the summer, but growing vegetables and drying clothes outdoors have not been successful!  When I bought my current dryer in 2017, I looked at all the available features and finally decided on a large, mid-grade version (I wanted to be able to wash and dry comforters at home instead of going to a laundromat or sending them to the cleaners).  Despite its “eco” settings, I generally use the accusensor at the “most dry” setting to be sure my clothes are dry, because they often sit in the dryer for 12-24 hours afterwards due to forgetfulness…

There is a “new” kid on the dryer appliance block.  I call it “new” because this type of dryer has apparently been used for a long time in Europe and other countries, but has only been in the US for less than 5 years.  Heat pump dryers are one of two types of ventless dryers; the other type is condenser dryers.  Of the two, heat pump dryers are the more energy efficient in terms of electric consumption and waste heat output into the laundry room.

This video is a good overview of how heat pump dryers work, and on a practical side, the video in this article shows the typical maintenance needed on a heat pump dryer.

Regular (electric or gas) dryers cause the following problems: 

  • using a lot of energy to heat air and then immediately exhaust the heat outdoors

  • Drawing conditioned air from your home to run through the dryer (resulting in negative pressure and energy loss on the order of 200 cfm of conditioned air)

  • Release of ultra-fine particles (UFPs) into the air of your home and outdoors

The heat pump dryer may solve these problems by:

  • Recycling heated air instead of dumping it

  • Causing little-no air draw from the rest of your home 

  • No dryer vent means no dusty air leaks inside, or dumping UFPs outside.

Pros:

  • Operating cost is at least 28% less (energystar.gov) and can be up to 50% less than regular vented dryers (nytimes.com).

  • Owners of more energy-efficient homes will appreciate that a heat pump dryer will not try to pull a negative pressure by dumping conditioned air through the vent.

  • Some models operate on 120v (Miele at least), which make them more versatile.

  • No vent needs to be installed!  They can be installed in very small spaces and operate well no matter what temperature or humidity conditions are present in the house.

  • Heat pump dryers are better at fabric care because the dryer temperature is typically lower than conventional dryers (greenbuildingcanada.ca)

Cons:

  • Not all heat pump dryers perform the same.  This review of the Whirlpool YWED7990FW in 2019 claimed that it significantly raised the temperature and humidity of the small laundry room and surrounding area, and took significantly longer to dry, but a respondent claimed that his Miele dryer (a widely known German manufacturer) only raised the temp by a few degrees with the same drying time as a conventional dryer.  Another owner of a Whirlpool WED99HEDW was quite happy with his purchase after 4 years.

  • More maintenance is needed to keep the heat pump dryer working efficiently; a vacuum with soft head may be needed to clean the heat exchanger coils every so often, and it may need professional deep cleaning to remove lint deep inside the machine every few years.

  • Some heat pump dryers need to be installed near a drain, to dispose of condensed water from the clothing.  Others have reservoirs that can be emptied every so often.

  • Heat pump dryers are still relatively uncommon, so if the unit does need servicing, it may be difficult to find a knowledgeable technician if you live outside a major metro area. 

  • There is a higher upfront cost for heat pump dryers vs. conventional dryers

  • Drum capacity is typically smaller (greenbuildingcanada.ca)

You can find some 2022 reviews for heat pump dryers here, which are compact (the review is for compact washers and dryers, and most compact dryers are ventless).  Is a heat pump dryer right for you and your family?  Here are two major topics for your consideration:

  • Financial standpoint: Heat pump dryers cost more upfront, typically from between $800-$1400.  However, they save money each load in operating cost, and they save money by not pulling unconditioned air into your home throughout the load.  Let’s breakdown the costs and savings. 

    • Here is a page I used to calculate how much it costs to operate my conventional electric dryer per load:

      • My electric cost is about 10 cents per KW (from my electric bill).  My dryer uses 6240 watts (26 amps x 240 volts) per hour.  One cycle takes about 45 minutes (0.75 hour), so cost per cycle is 0.10 x 6240 x 0.75 / 1000 = 47 cents per load.

    • If I purchased a heat pump dryer and it gave me the minimum 28% energy savings, then operating the dryer would cost 34 cents per load (47 x 72%). 

    • I do about 5 loads of laundry per week, so using a heat pump dryer may save me about $34 per year (0.13 x 5 x 52).

    • These savings translate to approx. 3 years payback time for every $100 more that a heat pump dryer may cost over my current dryer.  HOWEVER, more savings come in when you consider the conditioned air you are not exhausting through your dryer vent:

    • HVAC rule of thumb: there is approx 400 cfm per ton of cooling power, and 12,000 BTU/hr (British Thermal Units).  My AC unit is 3.5 tons, so this would be 1400 cfm and 42000 BTU/hr when the AC is running.  (learnmetrics.com)  Typical electric dryers suck 200 cfm of conditioned air out of the house while running.  That’s how much cfm we’re losing, so let’s translate that into a cost.  This article tells me (in table 3) it costs $0.56 per hour to run a 3.5 ton unit (halfway between a 3 ton and a 4 ton unit), for the average US electric cost of $0.1319/kwh.  I’m going to ratio that down to my electricity cost of $0.10 per kwh, which would be $0.42/kwh to run my 3.5 ton unit. If I lose 200 cfm from the dryer, then over 45 minutes this is 9000 cubic feet of conditioned air.  9000 cf/1400 cfm = run time of 6.4 minutes to make it up, which at a cost of $0.42/hr = $0.045 extra. If I run my heater or AC 8 out of 12 months, this is 67% of the year, so we’ll multiply the 4.5 cents by 0.67 to get 3 cents per load.  The real cost to run my regular electric dryer is 47 cents per load (calculated above) plus 3 cents per load due to excess heating/cooling costs, or 50 cents per load.  The adjusted savings for using a heat pump dryer is ($0.50-0.34)x 5 loads a week x 52 weeks a year, which is about $42/year.  This gets me to about a 2.4 year payback for every $100 over regular dryer cost all because the dryer is pulling all kinds of hot and humid air into my house in the summer, or cold damp air into the house during the winter.  Honestly, in a humid environment like the southeast US, I think the actual cost is higher because of the latent heat (humidity) that the AC unit struggles to remove from the air.

  • Air Quality standpoint:  The nature of ultra-fine particles allows them not only to penetrate the air barrier of most homes, it also allows them to penetrate deep into your lungs and into your bloodstream.  Broadcasting UFPs into the outside air via the dryer exhaust allows some of them to come back into your home through air leaks (because conventional dryers pull a negative pressure on your laundry room, if not your home), and if your dryer vent line has any leaks, they are coming into your laundry room in a more direct route anyway.  With a heat pump dryer, the air is moving in a closed loop through a filter, which is cleaned in the same way as a conventional dryer filter, but the rest of the UFPs are pulled out of the airstream via condensed water.  The good thing is that the UFPs going into the condensed water are not being broadcasted into the air to cause respiratory issues.  The other good thing is that pollen and pollution outside is not being sucked into the home by the negative pressure that regular dryers generate.

The issue that is not addressed by most dryer manufacturers is how UFPs are captured in the condensate drain line.  If your new heat pump dryer has a reservoir, then emptying the condensate through a filter is easy.  If it drains into a plumbed drain, you may want to invest in a drain filter (there are a variety of drain filters designed for washing machines that would work fine, especially since the dryer will produce a lot less condensate than a washing machine drain).  Here are some options:

  • PlanetCare Microfiber filter by Celsious ($98) is a top pick because it allows you to customize your drainhose size and will soon offer recycling of the filter cartridges.

  • If you have a reservoir type machine, you can pour the accumulated condensate through a coffee filter to any drain, and toss the coffee filter.

  • There are many other solutions that can be adapted to filtering drier condensate by searching “washing machine microfiber filter”.

The bottom line is that heat pumps and dryer electronics continue to improve every year.  Although many brands and models did not have great reviews in 2019, they look much better 3 years later.  If you are fastidious about building and keeping the best air quality in your home, a heat pump dryer should be something you consider the next time you need to purchase a dryer!

Photo by Raychan on Unsplash

To Vent or Not to Vent the Dryer Indoors?

To Vent or Not to Vent the Dryer Indoors?

This was a tricky question.  We understand that many people live in poorly planned homes where they are not allowed to make changes.  However, venting a dryer inside has a lot of disadvantages, even health dangers.  It all comes down to knowing that more than just “hot air” comes out of the dryer; this is why they are supposed to be vented to the outdoors.

First of all, NEVER EXHAUST A GAS (propane or natural gas) DRYER TO THE INDOORS.  This is absolutely a safety hazard, because the combustion gas exhaust (including carbon monoxide and NOx) are mingled with that hot air, and no filter is going to remove combustion gasses.  You would be poisoning your home air quality.  If you have a gas dryer and do not see a way to install a vent to outside, stop right here and either change out your dryer for an electric one (preferably a heat pump dryer, which does not require a vent), or move your gas dryer to a location where you can exhaust the vent outdoors (which would involve moving the gas line, too).  If your dryer is electric, you can keep reading.

So, let’s first talk about what is coming out of your dryer vent.  

  1. Obviously, warm air is coming out, because, after all, if your dryer is not heating your clothes, it’s likely not drying them.
  2. Water vapor:  This is where all the water from wet clothes goes–it evaporates and goes out the vent.  Majorly humid air here.
  3. Dust: You might collect some lint from your clothing on the dryer screen, but a lot of fine dust goes right through the screen into the vent line and outside.  This is why, when dryer vent lines are not sealed well, or they come loose, the laundry room suddenly starts to become very dusty!  And, vent lines should be cleaned of dust periodically so that they don’t become a fire hazard.  

In the wintertime, it might be tempting to redirect that hot humid air back into your home to save some money on heating and humidification!  However, most people who do vent inside either don’t care about the air quality or don’t keep up with the maintenance needed to do it right.  Here are the ways that venting inside can go wrong: (Clothes Dryer Moisture Activity)

  1. With no filtration, a lot of lint gets spread around in the laundry room (and surrounding rooms and even the rest of the home via the HVAC ducts).  If anyone in your home is sensitive to dust or prone to asthma, this is not acceptable.
  2. With filtration, you may be putting the dryer vent under too much pressure to keep the air flow up. Low air flow can cause the dryer to run longer.
  3. Low air flow and lint buildup in the dryer vent can cause a fire.
  4. The laundry room (and the surrounding rooms) can get too warm when you run the dryer in summer.
  5. The laundry room (and surrounding rooms) can get too humid and create a risk for mold when you run the dryer in summer, or anytime that the humidity in the home is already high.  For every load of laundry you dry, you are venting up to a gallon of water in condensation from your dryer. This will create a sauna in your laundry room, which can cause wood to swell, paint to peel, and mold to take hold.  (Eight Problems with Indoor Dryer Vent Kits)
  6. Venting a dryer indoors is against code (illegal) in most states.
  7. There have been documented complaints that the fine particulates of lint that escape from the reservoir can cause the smoke detector to go off.  This is proof that there are loads of  particulates coming through indoor drying vents. (Eight Problems with Indoor Dryer Vent Kits)

Needless to say, the problems with venting indoors are legion. 

We want to empathize with tough living situations.  Some people live in an apartment or home that has an improvised laundry cubby in the middle of the building, and the owners did not install a vent.  Unless the laundry room is sitting over a crawlspace or basement with an unfinished ceiling, it can be difficult to install a ventline to the outside, even if you have an agreeable landlord.  In many situations telling a landlord about the problem will not solve the issue.  Sure, there are lots of positive comments about “ventless dryer filters”, but many other users are not reporting the huge humidity problems in their laundry room after drying just one load.   For all these reasons and more, we want to be kind and say that indoor dryer venting is ok, but in the end the safety considerations outweigh it.

So, here are some options:

  1. If you have the budget, plan to stay in your home a long time or are able to take a dryer with you when you move, consider purchasing a heat pump dryer (which is ventless).  
  2. If the landlord is not willing to install a vent, but the room has a window that opens, explore the options of a Dryer Vent Window Kit ($30-37).  You may also want to add a window lock if you’re permanently installing it in a ground floor window.
  3. OR, move the dryer to a room that has a window and run an extension cord to it, which would have to be plugged/unplugged every time you do laundry. 
  4. Run an extra spin cycle on your wet clothing to wring out more moisture, and air dry clothing on a rack.
  5. Offer to trade services with a friend who has a properly vented dryer (meal prep, car wash, dog walk, use your imagination!)
  6. Take your laundry to a laundromat.  

Dryers and laundry rooms in general require more planning than you think!  We tried to be creative and make the most of a difficult situation.  If you have another alternative that works for you, we’d love to hear about it!

Photo by Raychan on Unsplash

Why Onions Make You Cry (and how to avoid it!)

Why Onions Make You Cry (and how to avoid it!)

Nobody likes to cut onions because they seem to fight back!  Only a few seconds after chopping into them, your eyes start burning and tearing up so that it’s hard to concentrate and finish the job.  What exactly is invoking all this drama?  

It turns out that onions are equipped with a self-defense mechanism to make them unpalatable to predators, underground and above-ground.  When an onion is sliced or broken open, sulfoxides and onion enzymes are emitted in the form of sulfenic acid.  When the acid and onion enzymes react together, they create syn-propanethial-S-oxide gas. That gas wafts up to your eyes, reacts with the water naturally covering your eyes, and generates sulfuric acid and other irritating substances that can induce tears.  (Why Onions Make You Cry, and How to Prevent This Teary Reaction)

There are A LOT of home remedies on the internet to keep you from tearing up while cutting onions.  According to FoodandWine.com, they are mostly useless…unless you’re playing a prank on your friend by making them look silly while cutting the onions for you!  Here are their suggestions to avoid onion drama:

  • Sharpen your knife well before cutting.  This helps “slice” the onion instead of “bruising” it with a dull blade, because crushing the cells causes more acid and enzyme to react.

  • Briefly (for 30 minutes) freeze the onions before cutting, which will reduce cell “trauma” and cause resulting gases to be cooler, so that they tend to stay on the level of the cutting board and not rise to your face.  Alternatively, you can place the onion in a bowl of ice water.

  • Protect your eyes: you can use any type of clear full-face mask, onion goggles, or large sunglasses to deflect the gases away from your eyes (this works!)

  • Add a splash of citrus juice or vinegar to alter the pH enough to hamper the enzyme’s ability to function as usual.

Finally, here are the best tips from our own staff: 

  • I cut the onions next to my stove with the exhaust vent on full power.  If I can keep them at arm’s length with the onions closest to the vent, the fumes don’t have a chance to go to my eyes!

  • “Penny’s tip”: take a paper towel and dampen it with water, halfway wring it out and place it next to the onions while you cut them.  The water in the paper towel absorbs the gas and mostly prevents it from reaching your eyes.  The onion smell is detectable, but no tears!

Photo by vivek sharma on Unsplash

Negative Pressure Ventilation can be dangerous in your home! Here’s how to prevent it.

Negative Pressure Ventilation can be dangerous in your home!  Here's how to prevent it.

You may have heard the saying “Build Tight, Ventilate Right” and thought, well, that’s for newbuild homes, I can’t go back and seal my house now, it’s been completed for 30 years!  (or 2 or 5 years for that matter).  This is partly true, but we’ve detailed some ways to seal finished homes in our post here.  The thing is, without the Build Tight, you can still get good air quality if you Ventilate Right for your home. 

There are basic “flows” in the universe that are true everywhere, because energy will seek to equalize, meaning move from areas of high energy to areas of low energy.  Heat will move naturally from hot to cold.  Water will flow from high elevation to lower elevation.  A liquid or gas will flow naturally from an area of high pressure to low pressure.  Let’s examine this third example.  In order for air to move in or out of your house, you will need to have an area of high pressure and an area of low pressure.  Otherwise, there will be no air flow!  Sure, wind blowing around the house will naturally generate pockets of high or low pressure, which may act locally on different external rooms.  For moderately sealed homes with all the windows and doors closed, however, the greatest chance for natural airflow to occur is when a chimney damper is open or poorly sealed, and wind flowing across the chimney draws air up out of your house.  Otherwise, no appreciable airflow is going on unless you turn on a mechanical system.  We discussed this in our post “Do Trickle Vents Really Work?”  This lack of airflow can be good and bad.

The good thing is that pollutants from outside, as well as humidity, are not actively flowing into your home when there are no mechanical systems operating.  This is good because you don’t want these things inside, anyway.  Here ends the good. 

The bad is that you are not getting fresh air from the outside (even semi-polluted air can be fresh if it is filtered), and you are not getting bad air from inside (CO2, VOCs and dust) out.  We need active ventilation and it’s mandated for healthy living!  So, we need mechanical systems (fans and the like) to draw fresh air in and get bad air out.

Mechanical systems will always create a pressure differential if they are one-way.  In other words, if you only have an exhaust fan going in your home, it is always pulling air out and there will be a slight negative pressure inside.  If you always have a fan in your open window pointed into the room, it will be bringing air in and pressurizing the room.  If you have fans working in both directions, pressure will be more balanced/neutral, but you will still accomplish the goal of getting fresh air in and bad air out.  In our post “How Does Indoor Air Pressure Affect Ventilation and Air Quality?”  we dove into the pros and cons of different pressure schemes–negative, positive, balanced and balanced with an HRV or ERV, and why we think balanced pressure is the way to go. 

Unfortunately, for most people “ventilation” causes them to think about getting the bad air out only, and this is a problem.  In such homes there is no fresh air supply, turning the house into a stagnant air pool.  When the kitchen and bathroom exhaust fans are turned on or the clothes dryer is started, a slight negative pressure is generated (yep-check out our article on heat pump dryers, where we disclose that regular dryers dump about 200 cfm of conditioned air outside!).  

For an eye-opening demonstration on toxins going into a negative pressure home, check out this video!  

Smoke going down the chimney: 5:45 minutes

Exhaust and fumes from the attached garage: 6:20 minutes

The most dramatic increase in negative air pressure came when the demonstrator closed two interior doors in the simulated house.  The pressure dove from -1.7 paschals to 5.7 paschals!  This is the force that will pull combustion gases, chimney smoke, and garage fumes right into your living space.  Air can be suctioned from cracks in the building perimeter or worse, from combustion gas exhaust flues.  Here are the main culprits that generate negative air pressure:

Dryers

  • Many people have gas or electric dryers in rooms within their home.  When running a load of laundry, the dryer will suck about 200 cubic feet per minute (cfm) from the conditioned air in your home, and exhaust it outdoors through the vent.  (see our post on heat pump dryers and how this type of dryer eliminates this problem).

  • The loss of 200 cfm of air during a 45 minute-1 hour drying cycle not only wastes money, it creates negative pressure in your home.

  • If you close the laundry room door while operating the dryer, as many people do for noise abatement, most of the negative pressure is confined to the laundry room.  However, this means that:

    • the dryer is being starved for fresh air, which causes a longer drying cycle, and 

    • the laundry room is pulling all kinds of contaminants through cracks and crevices from other places in order to feed the dryer.  Where are many dryers located?  In the garage or next to the garage, or in the basement, which means that you are pulling air from a space that has exhaust fumes and/or mold contamination to dry your freshly-washed clothes.  Yuck!

    • If your laundry room also contains your gas-fired furnace or hot-water heater, it’s likely that the exhaust fumes from the heater are backdrafting to fill the air need for the dryer.  This means that combustion gasses are being sucked into the laundry room and dryer over your freshly-washed clothes.  Danger AND yuck!

  • If you don’t close the laundry room door, the dryer is pulling that 200 cfm of air from the rest of your home.  Add to that your kitchen exhaust range, which is usually 300 cfm or more.   Since the average home is fairly leaky, where is that air coming from?  

    • The attached garage with its car exhaust and fumes from any paints and chemicals stored there: yuck!

    • Down the chimney past a leaky damper: yuck!

    • From the dusty attic through your unsealed attic door and can lights: yuck!

    • From the neighbor’s stinky apartment: yuck!

    • From the pollen-laden or pollution-laden outdoor air through unsealed holes in the wall around your pipes, outlets and switches on exterior walls and other penetrations: yuck!

Gas-burning appliances

If your home uses any type of gas appliance, a negative pressure environment can be very dangerous.  Carbon monoxide can quickly overwhelm people in the home, causing injury or death.  “Backflow” or backdraft is airflow going in the wrong direction; in this case, instead of going out the chimney or combustion gas vent, toxic combustion gases can be sucked into the room where the exhaust fan or dryer is located.  This video from Australia shows how to test for a backdraft situation, and correct it by opening a window.  Here are the steps mentioned:

  • Make sure your gas water heater, furnace or other appliance is shut down and cold.

  • Turn on the exhaust fan(s) and dryer in your home.

  • Hold a smoke pen or candle next to the combustion gas vent.  

    • If the smoke rises straight up or is drawn into the vent, then the exhaust fan is not making enough negative pressure to affect combustion gas venting (good).

    • If the smoke moves away from the combustion gas vent and toward the exhaust fan, then a negative pressure situation is developing.   Open a window until the smoke rises straight up or toward the combustion gas vent.  Take note of how far the window must be opened for this to happen. 

There is another device to help avoid combustion gas backdraft; it’s called a Power Vent for your water heater.  Essentially, a fan in the vent duct of the heater propels gasses outside, instead of just relying on a stack effect.  Typically, power vented water heaters are installed where it’s not possible to vent vertically.  These types of vent systems are less likely to backdraft because of the vent assist (empirestateplumbing.com), but at the same time, they also draw more air from the space, adding to the negative air pressure problem. 

Fireplaces

You don’t even have to be using the fireplace to get harmful combustion residues sucked into your home.  If the chimney damper is not closed or well-sealed, air can be drawn down your chimney across layers of soot and ash, bringing it into your living room.  

Kitchen Exhaust Hoods and Bathroom Exhaust Fans

These types of fans are super-helpful to exhaust odorous fumes (and required over cookstoves), but they should be balanced with a filtered intake in order to avoid generating negative air pressure! 

How do I prevent negative pressures inside my home?

To make it all clear, we wanted to summarize what happens unknowingly when certain exhaust appliances are operated, and how to avoid these dangerous situations.

If you only have exhaust fans in your home, open a window to balance that air flow, and keep doors open or install In-Door Return Pathways so that negative pressures don’t increase. 

The best solution for prevention of negative air pressure in our opinion is installation of a Heat Recovery Ventilator (HRV) or Energy Recovery Ventilator (ERV).  These devices can recover the heat or cool in a normal exhaust (like a bathroom vent), and will supply the fresh air needed so that pressure in the home remains close to neutral.  However, it’s not usually recommended to connect the dryer or kitchen exhaust to your HRV or ERV.  Why?  These are typically “dirty” exhausts that would quickly plug up a heat exchanger with lint (in the case of the dryer) or grease (in the case of the kitchen). (Sources: greenbuildingadvisor.com here and here).

In the first part of this Home Diagnosis video, the host shows a kitchen exhaust hood with remote fan and duct silencer (brilliant devices to minimize noise in the kitchen) and preheated and filtered make up air.  Even if you don’t have a preheater/cooler, just having make up air on demand in conjunction with the range hood is a great idea, not to mention it satisfies the International Residential Code (IRC) requirement that “Exhaust hood systems capable of exhausting in excess of 400 cubic feet per minute (0.19 m3/s) shall be mechanically or naturally provided with makeup air at a rate approximately equal to the exhaust air rate.” (IRC code M1503.4)

The same should go for the dryer.  In order not to pull a suction on the rest of the house, the HRV/ERV should supply fresh air to the laundry room.  

In mild climates where air conditioning or heating is not needed for much of the year, or the homeowner simply likes the idea of opening windows for fresh air, an HRV or ERV doesn’t make much sense.  Thankfully there are ways to get that “makeup air” so that your home air pressure will stay balanced no matter what appliances/vents are running.  Here are some of them:

  • Window screen filters are a great option to get that fresh makeup air by opening a window and passing it through a nanofilter to remove the smallest particles of pollution.

  • In-Door Return Air Pathways by Tamarack Technology bridge the inevitable: closed interior doors.  Simply install these in the bottom of your hollow-core or solid wood interior doors (door must be 1-3/8” thick to fit) so that you can have privacy AND ventilation at the same time.

  • Make up air for the kitchen or balanced kitchen exhaust vents (check out this video for an explanation on how a packaged balanced vent fan works). 

  • This healthy home consultant in NC has a “Clothes Dryer Intake” that supplies make up air to your dryer. 

One last source of negative pressure in the home is power attic roof vents.  Most people think that using a power attic roof vent will cool the attic by sucking out hot attic air, and drawing cooler air in from outside.  The attic does end up being cooler, however, this is not because of outside air being drawn into the attic; the vent is actually so powerful that it is sucking the air-conditioned air from your house up through large and small crevices, into the attic! (bobvila.com) If you have your gas water heater or furnace in the attic, it can also be backdrafting.  In most cases, unobstructed natural vents at the soffit and ridge, combined with a good layer of attic floor insulation, will be better than power attic roof vents.

Just like your budget, don’t let your house go “into the negative” zone when it comes to air pressure, and get that fresh air coming in when you need it.  Balanced or Make Up Air Systems (MUAs) not only avoid pulling all kinds of pollutants into your air space, they also dilute higher CO2 and VOC levels so that you’re feeling comfortable and energized (check out our post on CO2 here).  It’s a decision that can improve your home air quality with only a medium amount of effort and money!

Retrofitting with Radiant Cooling

Retrofitting with Radiant Cooling

Radiant cooling reduces or eliminates many of the faults of forced air systems: cost of operation, noise of air rushing through ducts or vents, drafty spots, allergens and dust being blown through your home, etc.

The need for a new cooling and heating system in my home has me looking at all the possibilities, now including radiant cooling and heating, also called “hydronics”.  I never thought that this would be possible because my house is, mostly, “finished”.  Radiant systems need to go in the floor before the floor goes down, right?  

Wrong!  It turns out that there are many options to installing radiant heating after the home is “finished”.  It just depends on how creative you can get with surface areas.  First, however, I’ll go over why radiant heating and cooling is superior to forced air systems, which encompass the majority of home heating and cooling systems today.

To me, this picture says it all.

Source : iapmo.org

The reason a tiny ¾” pipe can be equivalent to the big duct systems is because water is able to absorb more than 3,500 times the heat as the same volume of air!  Mind-blowing, right?  There’s a reason those big cast-iron radiators persisted in homes for all those years!  But instead of dealing with the thunk-crack-cluck of the radiators and boilers as they warm up, and being cold on the far-end of the room, now you can enjoy cool or warmth in silence as the room changes temperature from the floor up, ceiling down, or wall-out.  That’s right, you can install pre-made panels in the ceiling or on walls, which in general are way more accessible than floors.  For this reason, I’m going to focus on ceiling and wall panels and ways to work them into your existing home.  Also because I live in the southeast US, I’m going to focus on cooling, because radiant cooling is unconventional but very needed here! 

Messana is an Italian company focused on radiant cooling.  They have a number of high-end residences and office buildings portrayed as Projects on their website, and I can see why.  Their “Ray Magic” panels bridge the gap when figuring out how to place hydronics in the ceiling, because they have gypsum board (drywall) on the surface that faces the room, the tubing embedded in lightweight aluminum panels in the middle, and 1-½” of styrofoam on the side that faces the ceiling (yup, the same width as a 2x4).  Ray Magic panels are the “body” of the system, but a sophisticated “brain” is needed so that you can segment the home or office into different zones, sense the air in the different zones and control the temperature and speed of the circulating radiant fluid so that the zones stay comfortable and above dew point (to avoid condensation).  This is what the Messana Climate Control Platform does.  Although hydronics technically does not move air around, many times “air treatment” is needed so that the need for fresh, dehumidified air is met.  For this reason, Messana offers a range of Air Treatment Units (ATUs) for accompanying ventilation.  To see their products installed, check out these two videos here and here…and the system was installed in Austin, TX.  Austin can definitely speak to needing dehumification! 

Now, comparable with other things Italian, Messana installations are on the expensive side.  According to their FAQ page, the equipment costs between $15-20 per square foot, with prices of $40-45 per square foot installed (this is based on the total square footage of your home, although the panels typically cover only 60% of the ceiling).  For a renovation, this can add up to a lot of $$$, so following are some other alternatives.  As mentioned above, radiant floors can be installed over existing subfloors.  Here are some products to make the installation easier: 

  • Thermalboard is a ⅝” thick MDF board with aluminum coating and channels for 3/8” PEX tubing.  The company WarmZone uses your floor plan to create and ship the boards to you for a custom installation that looks to be fairly simple for the average DIY homeowner.  The boards are glued, then nailed down to wood subfloors, or only glued to concrete subfloors.  Costs are about 2x of a standard baseboard radiant heating system, but 30-40% savings in long run.  The pros: the product is lightweight and easy to install on the floor or on walls.  The downside: MDF absorbs water, which with a product that uses water, seems to be, well, not too smart.  Also, MDF is manufactured with significant glues, which emit VOCs.  Thermalboard specifically tested their product and it does not off-gas formaldehyde.  

  • Warmboard R, which uses slightly larger tubing (½”) with larger spacing and thicker aluminum, but costs approximately 2x as much. 

  • EcoWarm RadiantBoard is a similar product to Warmboard R but uses plywood as the substrate.  The aluminum thickness is comparable to Thermalboard, and it uses ½” PEX.  It costs approx. 35% less than Warmboard R.  It tends to discourage use of its product with radiant cooling, however.

  • Uponor has a variety of products in radiant flooring: Quik Trak, which is similar to the above products as a plywood and aluminim substrate for the PEX, Fast Trak, which is a knobbed mat that will secure the PEX in any configuration, and Joist Trak, which can be nailed to joists for sub-floor heating and cooling. 

  • Rehau, a German company which is one of the pioneers of radiant-floor heating, has products that allow direct installation of flooring over them (RauPanels), within a joist space (RauPlate) or within a concrete overpour. 

  • Heat-Sheet is a grid system for laying out your own radiant flooring made of high density expanded polystyrene (EPS). It can be used under poured concrete or gypcrete (see next).  The panels are lightweight and interlock to minimize movement.  The website shows it being used under driveways (no more ice!) and swimming pools.

Of course, installing the radiant tubing is only half the work, because it needs to be protected with a durable covering that is not too insulative.  Radiant flooring can be covered with any number of durable flooring options, including hardwoods, tile, carpet, finished cement, etc.  Here are some options:

  • Gypcrete: You can embed radiant tubing in a mixture of gypsum plaster, Portland cement, and sand, known as gypcrete.  Therma-Floor is a trade name of this product.  Installation takes significantly more time because it doesn’t come in a snap-grid, and takes time to cure.  It also must be installed by a professional crew. 

  • With tile, laminate and carpet systems, a plywood underlayment will be needed to help provide support over the tubing.  Here are some example installations from Thermalboard.  The article also gives R-values for sample materials.  Remember, when covering a radiant floor, you’ll want your R-Value to be as low as possible, so that you’re not “insulating” the heat or cold within the flooring material!  TheSpruce.com recommends that ceramic or porcelain tile is the best material for covering a radiant floor, as it conducts heat (and cool) most efficiently.  On the other end, carpet is the most insulative and worst choice for covering.

Finally, if you already have old radiators in your home, you can replace them with these modern radiators to add a modern touch in older homes.  The manufacturer says “The Ecostyle radiators will work in almost any closed loop hot water system regardless of the heat source.”  Unfortunately, the manufacturer says they cannot be used with radiant cooling (I asked). They are designed to be wall-hung, which even if only a few inches from the floor, eliminates the problem of trying to clean underneath them.  They come in a variety of sizes to fit a small bathroom to large rooms with multiple radiators.  White is the most widely-available color but other colors can be special ordered with a 100% price markup and shipping time of several more weeks.  


If you going to maximize your installation to provide cooling as well as heating, it’s necessary to make sure that the humidity in your home is well-controlled so that you don’t end up with condensation on the radiant surface, which can cause accidents, damage your expensive flooring or furniture, and create a habitat for mold.  This requires calculating the dewpoint temperature for the ambient temperature and humidity, and staying above that dewpoint temperature.  Higher-end systems provide sensors in every room to prevent this problem, but a whole-house dehumidifier can go a long way toward keeping the air safely above the dew point temperature.

These are just a sampling of radiant products on the market.  With new products and technologies released every day, don’t take your pre-existing home features as limits when it comes to the important decision of heating and cooling.  Research, ask, test and compare so you can find the most healthy, comfortable solution for your home!

Photo by Ronnie George on Unsplash

Is “noise pollution” a problem in your home?

Is "noise pollution" a problem in your home?

Many people who are used to having the TV, radio or other entertainment on all the time in their home and cars are used to this “background noise” as a part of their home.  Even appliances like noisy fans, the washing machine and the dishwasher, and outdoor noise like cars, airplanes, lawnmowers and sirens contribute to the soundtrack that is heard inside the home.   However, it’s not widely understood that noise pollution is also detrimental to our health, like other types of pollution (air, water).  The good news is that home noise pollution can be abated with immediate good effects and without negative long-term effects.   

“Second-hand noise” is noise experienced by people who did not make the noise.  Your apartment neighbor’s loud party or blaring music is an example, and according to Les Blomberg, executive director of the Noise Pollution Clearinghouse, an anti-noise advocacy group based in Montpelier, Vermont, it’s a civil rights issue.  (2005 study)  Whether it is the consistent noisy neighbors in your apartment building, booming car stereos rolling down your street, or the airport expansion plans that threaten to start flight noise an hour earlier in the morning, you need to speak up!  Communities in the US and all over the world have lobbied for and won changes to zoning laws and operating conditions in response to their complaints about noise.

Loud noise increases blood pressure, heart rates and stress levels. According to a 1982 study, increased blood pressure seems to be a “necessary” response in our bodies to loud noise, because if the receptors that signal vasoconstriction (constriction of vessels) are blocked, the body will increase heart rate to compensate for the lack of constriction. Loud noise can be experienced by many tradespeople in different industries on an ongoing basis (construction, factory work, warehouses, transport and service industries, civil workers, etc.), making it a chronic hypertension exacerbator.

Noise affects childrens’ learning.  In 1975 a study on a school located near elevated train tracks showed that the classrooms facing the tracks were consistently behind in test scores versus those in the quieter back side of the building, and by the end of the year, were a full grade point behind their peers in the quieter classrooms.  After acoustic tiles were installed in the classrooms and the train authority treated the tracks to make them less noisy, the childrens’ reading scores improved.  Feeling annoyed by noise can cause kids to lose focus on lessons.  For infants and children learning how to talk, a noisy environment can make it harder for them to understand speech.   It also affects how they play and sleep.  Children with special sensitivities—such as Autism Spectrum Disorder (ASD), Attention-Deficit Hyperactivity Disorder (ADHD), sensory processing disorders or learning differences are affected on a higher level by environmental noise. (healthychildren.org

Noise affects our sleep!  This seems like a no-brainer, but those who struggle to get sufficient quality sleep need to make a “sleep sanctuary” a priority.  Here are some suggestions:

  • Leave your phone outside the bedroom and use an electric or windup alarm clock.  If this is not possible, set a “Do Not Disturb” time, such as 10pm-8am, so that phone calls and message “dings” will not wake you.  If you are a caretaker, it’s also possible to have rule exceptions for people who most frequently call you.  

  • If you live in an multi-family building, you can block noise coming from below by adding thick rugs on the floors.  

  • Use acoustic foam on windows to dampen outside noise.  To make it removable, you can use glue or double-sided tape to apply these sound-proofing wedges to a foam board.  

  • Over the foam board, use blackout curtains as well.  Blackout curtains are typically made of several layers of fabric that will accomplish both your noise and light-blocking goals. 

  • Get accustomed to using comfy ear plugs.  Flents Foam Ear Plugs are highly rated for comfort and noise abatement–but they won’t stop you from hearing really important noises like an emergency phone call or a smoke alarm.  Personally, earplugs have been a staple of my sleeping habits since college, because they work!  

  • If you don’t like earplugs or still have significant environmental noise, add a white-noise machine to your bedroom.  Yogasleep Dohm UNO White Noise Sound Machine is highly rated for being easy to use, customizable, and travel-friendly.

  • What not to do: don’t listen to music!  "Almost everyone thought music improves their sleep, but we found those who listened to more music slept worse," Scullin said. "What was really surprising was that instrumental music led to worse sleep quality -- instrumental music leads to about twice as many earworms." (Michael Scullin, Ph. D, in his study on how earworms, those songs that replay in your head even when the music stops, affect sleep). 

  • For more tips on getting a good night’s sleep, check out our post on Maximizing Your Sleep.

There’s an App for That

Given some of the serious consequences of too much stress and too little sleep, as a health-conscious member of your household, it’s important to set limits on the level and duration of background noise in your home.  As we said in our post about sensors, you need to measure it so you can improve it! 

  • Measuring sound levels can be as easy as going to the “app store” on your phone and downloading an app to measure decibels; you don’t need a fancy meter.  Also, you need to log these levels and length of time that they persist, so that you can have a history to point to when advocating for change.  

  • You can use the above strategies for the bedroom to create other quiet places in your home for relaxing, reading, studying, etc.  You can also negotiate quiet times so that everyone in the home is winding down and resting during certain hours.

  • Try to schedule noisier activities while you are out of the home!  For example, you can start the dishwasher or washing machine when you leave for work or to run errands, or enable them to start remotely if you have smart appliances.  

  • Make a more peaceful oasis in your backyard: Acoustifence is an 1/8 “ thick material suited to outdoor installations that reduces sounds by 28 dB through the material.  It can be printed in all manner of beautiful and lifelike scenery, including brick, garden, stone veneer, etc. and comes in pre-cut and grommeted sections of 6’ x 30’.  These can be quickly installed over existing chain link fences to deaden sounds from generator enclosures, dog parks, parking lots, sports fields, construction sites, racetracks, airports, etc. If you want to create a quieter backyard, you can plant real plants in front of a printed screen to get a green, layered effect.

  • There are also apps for your phone to notify you when the selected audio level of playback is too loud.  According to 2018 data, the average adult is streaming audio content through mobile devices for about 1 hour per day. (ENT & audiology news).  Both of the following apps allow you to monitor your listening better to prevent hearing damage. 

    • The Apple Health App has the ability to measure sound levels from headphones so that listeners can monitor their noise exposure from their devices. The app uses guidelines from the World Health Organization (WHO) to clearly indicate to listeners when their noise exposure is within acceptable limits, or if it’s at a level that is potentially dangerous to their hearing. 

    • HearAngel is an Android app that compares your listening levels to a Daily Sound Allowance (DSA). A dose allowance of 85dBA (average level) for an eight-hour period is based on Health and Safety Executive (UK) recommendations.  It also allows you to monitor your children’s listening levels via a PIN code.


Noise pollution may be a new way of thinking about unwanted sound, but once you experience the bliss of quiet, it can be the new calming “background” to your home. 

Photo by Andre Benz on Unsplash

Less Coffee, More Fresh Air!

Less Coffee, More Fresh Air!

At some point in most peoples’ lives, fatigue is a fact of daily life.  We can chalk it up to too much work and not enough sleep, or poor quality sleep, or a virus that seems to be “going around”.  But what if it could be as simple as not enough fresh air?  Simple…yet sometimes not easy to fix, when opening the windows lets in more harmful air than good.  Let’s dig into this “simple” cause…

Different regulations regarding ventilation have been around for a long time, way longer than the American Society for Heating, Refrigerating and Air-Conditioning Engineers (ASHRAE) published its first Standard 62 for ventilation. The first, ANSI/ASHRAE Standard 62-1973, Standards for Natural and Mechanical Ventilation, presented minimum and recommended ventilation rates for 266 applications and became the basis for most state codes.(ASHRAE.org)

This standard has been revised several times since 1973, and the current standard calls for homes to “receive 0.35 air changes per hour  but not less than 15 cubic feet of air per minute (cfm) per person.” (epa.gov)  Why?  According to Britannica.com, Clean, dry air consists primarily of nitrogen and oxygen—78 percent and 21 percent respectively, by volume. Without any other contaminants such as carbon monoxide (from combustion) or radon (from the earth) entering a building, humans change the composition because we take in oxygen and breathe out carbon dioxide.  Our lungs can still rebreathe this air “safely” until it decreases below 19.5% (OSHA threshold for oxygen in atmosphere), but increaseing levels of carbon dioxide (CO2) may cause occupants to grow drowsy, get headaches, or function at lower activity levels.  (healthybuildingscience.com)  What’s the threshold of CO2?  

  • NIOSH (National Institute for Occupational Safety and Health): 1,000 ppm (parts per million in air) are a marker suggesting inadequate ventilation.  

  • ASHRAE recommends that carbon dioxide levels not exceed 700 ppm above outdoor ambient levels.   (Normal range for outdoor levels are typically in the 350-450 ppm range). 

  • OSHA (the Occupational Safety and Health Administration) limits carbon dioxide concentration in the workplace to 5,000 ppm for prolonged periods, and 35,000 ppm for 15 minutes.  

Taking the most conservative route, 1000 ppm is only 0.1%.  Wow, it doesn’t take a lot of CO2 to make stale air!  If this is the gold standard, why are we suffering in stale air?   The answer is that  many places in the US do not require building permits in order to build or renovate a home.  For this reason, it’s up to the homeowner to know what is needed and make sure it’s installed.  If the HVAC technician does not design fresh air into the system, and the homeowner does not know about the need for it, the home won’t have it and the air will be stale.  Case in point: my 1982 home in the country.  It cools, heats, and circulates stale air.  

Take this tweet from Andrej Karpathy and Elon Musk, who know a bit about technology: 

And then the public chimed in: a Stanford professor used to take CO2 measurements in a lecture hall before packing 100+ students in for 1.5 hours, because some halls did not have enough ventilation to sustain deep thought!  Then a restaurant worker began to think, oh, so that’s maybe why I got dizzy sometimes during peak hours of a restaurant?  And another: his son used to wake up crying but since increasing ventilation in his room, the child sleeps a lot more peacefully.  

So if you want to measure your air, lethargy, unclear thinking and headaches don’t have to be part of your day!  There are lots of CO2 monitors on the market, with most starting about $65-70.   This monitor by INKBIRDPLUS shows temperature, humidity and CO2, and also allows you to customize an alarm for different levels of CO2 (they recommend normal (400-700 ppm), warning (700-1500 ppm), and dangerous (1500-5000 ppm)).  

Can you imagine measuring the CO2 while sitting in a conference room or in a lecture hall?  With such technology at your fingertips, there’s no reason to be ashamed to say “I need a break”.   Your brain and body will thank you!

Photo by Call Me Fred on Unsplash

Getting the Basement Dried Out

Getting the Basement Dried Out

In our post on how the basement affects our whole home’s air quality, we discussed how mold and mildew form and are sustained in the basement.  Active water leaks (flowing down the walls and pooled on the floor) are not required to make the basement a musty place.  Here are some sources of moisture coming into the basement:

  • Concrete is not a moisture barrier on its own!  Water will permeate concrete walls and floors and simply evaporate, increasing humidity.  
  • Open or broken windows allow moist air from the outside to come in and upon encountering cool walls and surfaces in the basement, condensation will form or just increase relative humidity in the air.  
  • Air leaks around windows, entry doors, unsealed wall penetrations and penetrations into the first floor above allow air to come in, in an uncontrolled way. 

Ideally the basement is inside your building envelope, whether you decide to finish it or not.  This is because it can be a suitable place for mechanical systems like HVAC air handlers and furnaces, hot water heaters, and also for storage.  To house these systems, however, the basement needs to be dry, with good air quality.  We argue that the basement air quality needs to be as good as any other floor in the home, because it will mingle with the atmosphere of the rest of your home!  There will be small leaks in the basement ceiling that make it permeable to the rest of your home.

The way to control humidity is to control:

  • Water flow into the space,
  • Airflow into the space, and
  • Air circulation within the space.

Let’s tackle each problem individually.

Water flow into the basement

Water flowing down walls in streams and puddling on the floor is a major problem– in this case, it is like living above a lake!  It will be difficult to “dehumidify” the air when open water is present, because the water will be continually vaporizing into the air as fast as a dehumidifier can take it out.  Although many basements exist like this, walls and storage of home goods in such environments can accumulate mildew rapidly.  Painting on a “waterproofing coating” will usually just act as a band-aid, because the pressure behind the wall, forcing it into your basement (called hydrostatic pressure) will eventually break through the paint and even degrade the foundation if it’s not drained away properly using interior and/or exterior drains. (basement waterproofing)  It’s best to contract several reputable basement remediation contractors in order to get their recommendations and quotes on stopping the inflow of water.  

If the water is only causing dampness on the walls but not visible condensation, then it’s possible to allow the walls to continually “dry” to the inside by doing the following:

  • Cracks and damage to the walls need to be repaired first.
  • Install rigid foam board with a “perm” rating of 1 or greater.  This allows the moisture to move through the foam and dry out, but still insulate the basement for greater thermal comfort and avoid condensation on the cold wall. Keep the foam insulation up about an inch from the floor to allow any condensation to drain.  If desired, the walls can be framed with treated wood to hang drywall inside.  An excellent cutaway diagram of the installation can be found here (page 24). Below is a picture of rigid foam board insulation from the same document (page 32).
  • An alternative to applying rigid foam board is to paint concrete walls with a waterproofer such as UGL’s Extreme Latex Masonry Waterproofer.  This product has a perm rating of less than 1 (according to this manufacturer’s video), so it is vapor semi-impermeable, but it does not have any insulating properties, like the foam board, so the walls will still be cold to the touch and allow condensation if the air inside is too warm and humid.  
  • Use dehumidification to dry things out.  
  • Decrease relative humidity by increasing the temperature slightly (the dehumidifier may raise the temperature a few degrees, but if not, you can add a small heater).
  • Increase circulation with fans so that air is evenly dehumidified.

Some notes on Vapor Permeability: A material’s permeability is measured in units called perms, which assess how much moisture can pass through a barrier in a 24-hour period according to standardized industry tests. Materials are separated into four general classes based on their permeance:

  • Vapor impermeable: 0.1 perms or less

  • Vapor semi-impermeable: 1.0 perms or less and greater than 0.1 perm

  • Vapor semi-permeable: 10 perms or less and greater than 1.0 perm

  • Vapor permeable: greater than 10 perms

Materials with lower perm ratings are better at stopping the movement of water vapor. If the perm rating is low enough, the material is a vapor retarder. If it’s really low, it is a vapor barrier. (Barricade Building Products)


Air flow into the basement

Sometimes it’s difficult to know what to do: open the windows or not?  Many reputable websites advocate “airing out the basement” (such as thisoldhouse.com), and we at HypoAir always advocate for ventilation to dilute stale air, but here’s the problem: when you don’t know the dewpoint of the air coming in or leaking in, it can cause major mold problems in the basement!  Dewpoint is the controlling factor of whether fresh-air ventilation alone can prevent mold.  As we wrote in another post

The best way to explain this (per this great article) is to find out the dewpoints of the indoor and outdoor conditions.  If the outdoor dewpoint is lower, you can ventilate with fresh air and still dry out your house!  For example on July 26, 2002, here are the conditions inside and outside my house (a relatively “dry” hot day outside!):

Inside: 76 deg F, 67% humidity = 63 deg F dewpoint (check out this easy calculator on dpcalc.org)

Outside: 91 deg F, 54% humidity = 72 deg F dewpoint (dpcalc.org)

See, in this case even though the relative humidity outdoors is lower, if I open my windows, that hot air coming inside would be cooled and relative humidity would increase, working against my humidity goals.

In the case of the basement, the air temperature could easily be lower, like 68 deg F.  If you cool 91 deg air with 54% relative humidity down to 68 degrees, water vapor in the air is going to condense, making your humidity problem worse!   Therefore we want to control all sources of air inflow and only let in drier air for ventilation.  Here is a diagram showing the problem of leaving windows open, and how to solve it:

source: bayareaunderpinning.com

  1. Close windows, block off vents, and seal the window frames with caulk, spray foam or adhesive tape made for the purpose.  Make sure exterior doors have weatherstripping. 

  2. Check for unsealed penetrations in the walls.  If you have to use a flashlight and look behind appliances such as water heaters or furnaces, be prepared with gloves and pest spray to get it done!  The best sealant for wall penetrations in the basement would be sprayfoam, because it conforms to the shape of the hole.  You may want to shove in a wad of steel wool first, because it deters animals from chewing through the foam and re-opening the hole.

  3. Look up–check the ceiling.  If there is a false ceiling in the basement, you may need to remove ceiling tiles and/or insulation in order to see the underside of the subfloor, but this is where big problems can hide!  The photo below shows the underside of a tub.  Plumbers often cut BIG holes to make their jobs easier, but this can really hurt air quality when these holes let lots of moldy air up (if there’s a negative pressure generated in the space above, this is easily done with a bathroom vent fan), or warm air down (if you are using any type of air extractor in the basement).  It’s best to seal big holes like this one by framing in a box to the surrounding joists, and using spray foam to seal the resulting cracks and holes.  It’s not recommended to insulate the ceiling of the basement (see this definitive guide, page 25) to try to separate it from the rest of the building, as this will only cause more mold problems in the basement.

Source: energyvanguard.com

Where does fresh-air ventilation come from if you’ve sealed outside access off?  According to energyvanguard.com, there are 6 ways to supply fresh air to your home in a humid climate, and for the purpose of a basement that is outside the building envelope, only one makes sense since you’re probably already using a dehumidifier: a fresh air fan that purposely pulls in outside air.  Here are some options to make it happen: 

  • Air King’s QUFresh, 120 cfm, $413 at ecomfort.com
  • Broan’s FreshIn, 180 cfm, $239 at sylvane.com
  • ACInfinity’s AIRTITAN T3 6-In Ventilation Fan, 120 cfm, $69.99, sylvane.com

The AirTitan is a good option where windows are available, because it can be retrofitted to fit in an open window more easily than the other ducted models.  Each of these models have temperature and humidity settings you can adjust so that the fan will only operate when it meets those specifications.  These may need to be set higher in hot and humid climates, but the dehumidifier should be able to handle moderate inflows of fresh air.  When you control the airflow into the basement, you can control the humidity.

And finally, Air Circulation Within the Space

Your basement may be one wide-open area, or several rooms separated by walls and doors, but in each case, good air quality requires that air is moving constantly.  Here are some tips to get the best circulation:

  • Leave doors within the basement open as much as possible
  • Leave dedicated fans running all the time.  Floor fans work great for this purpose, as you can move them around/adjust direction and speeds until you find the optimum circulation.
  • Move boxes and furnishings away from walls and up from floors so that air will circulate to dry them.  Don’t stack boxes to the ceiling.  Separate boxes by several inches to get air moving between them. 
  • Remember, the less absorbent material stored in a non-conditioned space, the better (less cardboard, less fabric, and less wood).

I hope these suggestions help you to dry out your basement so that your whole-house air quality improves, from the ground up!

How to repurpose common appliances into air purifiers

How to repurpose common appliances into air purifiers

When you think of air purifiers, sometimes placement takes a role in the decision-making process.  Where do you place it? What if you could repurpose an existing appliance in your home and turn it into an air purifier, for double duty?

Ceiling Fans

Purifan has been in business since 1998, and the purifier industry has obviously exploded since then because of the coronavirus pandemic.  This company has found a way to convert your ubiquitous, ordinary ceiling fans into air purifiers.  There are many different kits available, but the basic installation involves removing the paddle blades from the ceiling fan, bolting on the Purifan’s brackets, and then attaching the Purifan.  The Purifan cleans and circulates more than 2,000 cubic feet of air per minute, which means it cleans the air in a 20′ x 20′ x 8′ room every 90 seconds.

If you don’t go with a Purifan, you can still use your ceiling fan to filter the air.  BioStrike is the maker of these ceiling fan filters, which remove a surprising amount of dust from the air!

Kitchen Exhaust Fan

This one only works if your over-the stove exhaust is operating in recirculation mode, not venting mode. Microwave/vent hoods have the option to recirculate inside or vent outside. In order to know what yours is doing, turn on your kitchen exhaust fan and place your hand above the door to feel if it is blowing air back into the room.   Although recirculating inside is not an ideal setup (because gasses from cooking/baking are being filtered and thrown back into the room instead of vented outside), you can make your exhaust fan do double duty and use it not only as cooking exhaust, but when you are not cooking, use it as an air purifier.  Charcoal replacement filters are available for many vent fans; here is how to replace them: 

  • Check to see if your vent hood exhausts back into the room.  If not, don’t proceed with these steps as you will be only purifying air to send it outside!
  • Remove the filter at the inlet to the exhaust vent hood (on the underside). 
  • Measure and order new filters with charcoal in them.  Amazon has many of them, and you can search with your vent’s make and model number.
  • Clean the filter thoroughly (here’s a video that gives 3 non-toxic ways to do it)
  • While the cleaning agent is working on the filter, clean the surrounding  intake area of the exhaust fan. 
  • Replace the filter until your new charcoal ones arrive. 

To make the vent act as an air purifier, run the exhaust fan several hours a day while you are not cooking in order to purify air in your kitchen.

Make a reminder on your calendar to change this filter at the recommended interval (or more often if you don’t cook a lot)!  Most charcoal filters are not reusable.  If you want to upgrade and change the configuration of your venting to outside, check out our post here.

Registers/Vents

Although using the vents as air purifiers requires the air handler fan to be set to always “ON”, this is a good move because it improves air circulation in the home, reducing stagnant air and the relative humidity of soft furniture (aka mold “food”).  Adding filter media to the registers can be very simple:

We all seem to be juggling several jobs at once, so why shouldn’t your home appliances do the same? 

How healthy is dry-cleaning?

How healthy is dry-cleaning?

We’ve all done it–accidentally machine washed and ruined a “dry-clean only” piece.  It’s so frustrating–what happens in the washer and why is dry cleaning “safe” for these items?  According to Rinse, a dry cleaning and laundering service, “Dry Cleaning can be beneficial for garments made from fibers that don’t react well when exposed to water, like silk and wool. It’s also good for garments that shouldn’t be exposed to the heat of a traditional dryer.”  It consists of pre-treatment to stains, washing in a chemical solvent that is free of water, spin-drying, post-washing stain treatment and press, steam or ironing to make all clothing look new again. 

In the 1800’s and early 1900’s, many kinds of petroleum-based solvents were used to wash clothes, because they remove stains better than soap and water, with less damage to the fabric.  Perchloroethylene (PERC) is one of several non-flammable solvents created to dry-clean during the petroleum shortage created by WWII, and it became the primary solvent used in the 1940’s through the end of the century.  However, it is discovered to be a respiratory and skin irritant, neurotoxicant, liver and kidney toxicant, and reproductive and developmental toxicant, as well as a probable carcinogen. (frontiersin.org)  Dry-cleaning machines using PERC have evolved to a 5th generation, which is a closed loop of washing, drying and recycling the solvent, so that operator and the environmental exposure to PERC is much lower than the 1st generation.  Despite these advances, residuals from the chemical in cleaned clothes and in the waste process are disturbing; the chemical will be outlawed in 2023 in California.   Alternatives range from n-Propyl Bromide (n-PB), which also has toxic effects, to high-flashpoint solvents, to the safest options, liquid carbon dioxide cleaning and Professional Wet Cleaning (PWC).  PWC uses good old water and detergent in a computer-controlled process.

As consumers, the dangers of residual dry-cleaning chemicals in our clothes may not be apparent, but they are there.  PERC vaporizes from clothing and is released into your home, according to a 2011 study.  Concentrations of PERC also increase as the clothing item is dry-cleaned several times, except for silk, which does not retain PERC.  If several dry-cleaned items are left in your car, levels of PERC can rise well above permitted levels by OSHA for workplaces using the chemical.  This suggests that those who deliver dry-cleaned clothing might have more exposure than even those who process it.

In 2021, 90% of dry-cleaning shops in France still use PERC, and estimates in the US may be as low as 65% (vice.com)  Kings County, Washington has been especially proactive in helping cleaners to switch to PWC.  Education on the machines and the process, as well as financial assistance to purchase new PWC machines has been key to the transition.   It’s certainly a looming deadline for California shops, but Minneapolis already forced the transition and became PERC-free in January 2018 (americandrycleaner.com)

Dry-cleaning has been in a slight decline because of the coronavirus pandemic (less in-office work days with less formal dress) and the development of fabrics that can be successfully laundered at home.  Still, if you don’t live in Kings County, WA, California, or Minneapolis, what can you do to reduce your exposure to PERC?  Here are some suggestions:

  • Familiarize yourself with how to hand wash delicate items, and it may eliminate most of your dry cleaning!  Take these tips from Town and Country Magazine.

  • If you do go for dry clean, air the items out of their bags in a ventilated space away from your home, like the open sunshine or in a carport. 

  • Investigate cleaners that use PWC instead of PERC.  Rinse.com is a delivery service that offers laundry, fold and dry-cleaning to areas in California and New York, and states that none of their cleaners use PERC, however not all of them use PWC because they don’t recommend wet cleaning for all items.  It may be a case of calling and asking “I have this item” and “what can/would your shop use to clean it”?

  • Be wise in purchasing new clothes–avoid “Dry Clean Only” when you can.  “Dry Clean Suggested” is a more flexible option, but “Hand Wash” and “Machine Wash” are definitely preferred!

How healthy is your SprayFoam?

How healthy is your SprayFoam?

Sprayfoam has been a huge player in the home insulation industry, and is projected to grow by 4-6% CAGR through the next decade (marketsandmarkets.com).  It is used as insulation (R-3.8 for open cell and R-7 for closed cell), and can be an air barrier and/or vapor barrier when applied properly (Johns Manville).

Bud Offermann is President of Indoor Environmental Engineering, a building science consulting firm in San Francisco.  He gave a very informative interview on healthyindoors.com in July of this year, on material from a paper he presented at the International Society of Indoor Air Quality and Climate’s (ISIAQ) Indoor Air 2022 in Kuopio, Finland in January.  You can read and download the paper here.   Because of his experience with high variability in the application of spray foams and ensuing problems with chemical emissions, he can’t recommend spray polyurethane foam (SPF) to insulate your home.  This article is based on his presentations.

Some SPF installations result in chemical emissions that cause odor and irritation and that are expected to persist for decades.  Therefore, it’s important to research and consider before contracting for spray foam insulation. Can you imagine ruining your well-loved or newbuild home with something as permanent as spray foam?  

There are two components of spray foam, which we can term A-side and B-side.  These are stored in two different containers and fed through two hoses to the spray gun, where they are mixed as spraying takes place. The A-side is isocyanates, which are very reactive; they evaporate quickly and don’t hang around after application.  These chemicals are mainly a problem for the applicators, who need to wear fresh-air breathing apparatus to avoid breathing them.  The B-side is a resin which has the fire retardant, reactants and additives.  These are the components that remain in the installed foam and off-gas over a period of time. 

The main chemicals causing problems are allylchlorides, the fire retardant TCPP, BDMAEE (an amine created by breakdown of TCPP), and 1-Chloro-2 Propanol.  These can cause eye and nose irritation.  The emissions can last at a slow rate for 50-100 years.  Temperature causes an increase in irritation and odor (summertime is worst). 

Causes of offgas problems are hypothesized to include:

  • If the two components are mixed in the wrong concentration, it will not cure properly.  For example in closed cell foam, too much A makes the foam fragile and brittle.  Too-much B makes the foam too gooey. 
  • Storage of the resin (B) in the warehouse possibly allows water contamination (hydrolysis of the TCPP).  Addition of water can create 1 Chloro-2 Propanol or allylchlorides.   These substances can cause allergic reactions and continue to occur months or years later as the foam off-gasses.
  • Closed cell foam should not be installed in thicknesses greater than 3”, otherwise the interior of the foam layer will not cure.  Multiple passes are needed to achieve thicker application, but sufficient curing is needed between layers, otherwise uncured foam inside the layers will continue to off-gas. 
  • Sometimes the applicators switch between open and closed cell foam without changing the transfer pump or hoses.  They only change the B-side (resin) drum and start spraying, which makes the product in the pump and hoses an unproven mixture of open and closed cell.
  • Sometimes applicators buy the B-side and then add more chemicals for “winterizing” the foam.  This is adding chemicals after-market, which will invalidate any warranty on that foam.

If you are experiencing bad air quality after spray foam application in your home, the first step is to test.  Testing will let you know the level of the problem and if litigation is needed, proper air testing is required.  Air samples are gathered with windows and doors closed, supplemental attic ventilation turned off, no air cleaners running, and normal house HVAC running. There are specific chemicals to test for, including VOCs excluding isocyanates and formaldehyde, also samples should be gathered in different rooms and outdoors as a baseline.  After the air is sampled, an 8x8” chunk of foam is removed without disturbing the surface of the foam, to send to the testing facility (Berkeley Analytical is one recommended lab).  You should also get the material safety data sheet (MSDS) for the foam, which should disclose all non-proprietary ingredients.

If emissions of SPF continue to cause problems, as an expert in home inspection and remediation, Mr. Offermann states there are two solutions: 

  • remove the insulation and the substrate, because the substrate absorbs some of these chemicals (very costly) OR
  • attach a foil faced gypsum or rigid foam board against the trusses/studs to contain/reflect the gasses. 

If you are sensitive to chemicals, spray foam is probably not the best choice for your home.  However an alternative is to use foil-faced foam board.  Because the foam board is made in the controlled environment of a factory, then tested, you can get the same insulative properties with much less chance of continual off-gassing .  Foam board doesn’t have air barrier properties because of the way it’s installed, but air barriers can be achieved with other non-chemical methods.

In conclusion, further research on the chemical reactivity of TCPP and its suitability as a fire retardant is needed.  Where is hydrolysis occuring?  Proper storage of the B-side product and training of the application team is necessary because once spray foam is applied, emissions are unhealthy and removal can be very costly.   

Photo from Johns Manville

Wall covering products that resist mold and mildew

Wall covering products that resist mold and mildew

When my kitchen faucet caused a leak under the sink and mold spotted the drywall behind it, I thought, with what material can I replace the drywall to make it less mold-friendly?  Under the sink is a dark, damp area where water can intrude again.   Searching my local big hardware store, all I came up with was fiberboard that had a melamine coating on one side.

Doing some more research online, however, uncovered several more options.   These are not only for under sinks, but garages, basements, utility closets, porches, and anywhere that moisture can be an issue.  

Using large panels instead of smaller cladding units (tiles, boards, etc.) minimizes labor, opportunities for water ingress, and also dust, which is always an inhalation hazard for the installers and anyone else in the area.  

Interior Cladding

Trusscore is a new PVC product that not only resists moisture, it reduces installation time, labor and cost when compared with drywall.  Trusscore panels are ½” thick, so that they are the same thickness as drywall.  They are so named because of the truss-like structure inside to give them strength with flexibility (they bend enough to facilitate installation inside channels without creasing).  Once you see this product being installed, who would ever want to go back to the labor intensive, dusty, mold-prone drywall process again?  I really like the clean simplicity of this product.  My major concerns with having it in residential spaces were:

  • VOCs and off-gassing: how much harmful pollutants will it pass into your indoor air?
  • Penetrations, because inevitably, someone will want to hang a picture or shelf on it, and then you have visible, difficult to patch holes in it.  
  • What about changing the color? 

However, the company has integrated solutions into each of these problems.  

  • Trusscore addresses IAQ here: “Trusscore Wall&CeilingBoard, RibCore, and NorLock products are all low-VOC compliant, including low formaldehyde, meaning it won’t off-gas and ensure a safe and healthy space for occupants. In addition, the installation of Trusscore products does not require potential VOC sources like glue or paint for a finished installation.  Each product has been tested according to the California Department of Public Health (CDPH) Standard Method v1.2 testing standard. This is the leading VOC standard used to evaluate VOC emissions from building products such as flooring, suspended ceilings, insulation, wall panels, paints and coatings, and wall coverings. The CDPH standard is referenced by some of the most widely used green building rating systems and green construction codes including USGBC LEED, CalGreen, and more.”  Still, in a fire, I would RUN out of any area that was covered in PVC...I’d say this is definitely not the material to cover any space where welding or high heat hobbies occur.  Also, I would hesitate install to it in high ambient heat places like Las Vegas or the southwest US (it’s plastic, after all)!  
  • Trusscore makes slatwall, which makes it easy to hang things (especially useful in garages and utility rooms)
  • All the panels come pre-finished in a durable white or gray coating, and painting guidelines can be found here (Painting requires special primers so that the paint will stick).  The benefit of painting: if you can paint it, you can also patch it!

Duramax PVC Wall Panels are very similar to Trusscore, but they come in 16” widths instead of 48” widths.  They also do not have any slatwall systems, recommending instead to use hangers similar to drywall hangers to permanently hang anything.  The cost of Duramax is less than Trusscore ($2.70/sf vs. $3.60/sf). They do not have any VOC emissions information on their website or MSDS other than protection guidelines against dust generated while installing it.

MSD panels have a variety of natural and futuristic textures (brick, tile, wood, stone, etc.) for a moisture-resistant cladding for interior walls.  The video on this page contains a little bit construction, a little bit artistry as the installers hang the panels and patch the seams to make the brick wall look completely congruent. As an artist, I do like these for the realistic looks they form.  Unfortunately, they are in Spain!

EverBlock and EverWall products are like giant Legos (with these why would you want to “grow up”?).  Everblocks are made of High-Impact Polypropylene Co-Polymer (“no-break”) with UV Inhibitors added for outdoor use.  EverBlocks are recyclable. They don’t offer much insulative quality (R-2 equivalent), but they are hollow and internally reinforced.

Formica lives on!  Formica HardStop has the great variety of colors and patterns of traditional Formica, but instead of the traditional fiberboard backing that is susceptible to moisture ingress, HardStop has a fiberglass backing that makes it more durable and water-resistant. It can be applied to drywall, plywood, and particle board (which are susceptible to water) or to cement or cement board. HardStop panels are thin and flexible like the original Formica, so they do need a structural element for reinforcement behind them.  They also require adhesive (looks messy to me!).

DriCore Smartwall is a similar system that incorporates an insulated layer on the back of the panel.  Very genius, however, the system uses drywall in the panels, and wood cleats to install it and has wood interlocking sections within the panels.  Here is a video on the installation of DriCore Smartwall, which also uses patch material to make a seamless wall.

Exterior cladding

The more I read about building science, the more I see imperfections in “the way we always did it”.  There are many traditional finishes for commercial and residential buildings, but the gold standard calls for a “rainscreen” type structure that applies the cladding to a hidden track system, so that air can reach behind the rainscreen and dry things out.  Think about a rain fly for a tent, or a double roof system.  The air buffer separates water and extreme heat or cold from the exterior of the house, making for a longer-lasting house!  In his article “The Perfect Wall”, building scientist Joe Lstiburek defines the elements of this wall and how they are constructed to resist rain, snow, humidity, air intrusion, mold, heat and cold, etc.

Here are some products that work as rainscreens:

  • Nichiha: this company was founded in 1956 in Japan but now has an office and factory in Georgia.  Their cement fiberboard siding comes in architectural panels or premium planks and uses a hidden track system.  It is an upgrade to “Hardy Board” and the many imitations of it, because it “floats” on the track system with that air buffer behind it.
  • Ceraclad is a triple-coated ceramic and cement rainscreen with its own installation system. The panels are self-cleaning, with a photocatalytic coating that actually purifies the air!  The coating decomposes car exhaust and other pollutants in the air (NOx and SOx) and turns them into NO3 harmless polyatomic ions leaving the air cleaner.  According to the website, a building with 10,000 sf of external Ceraclad coating is the equivalent of 68 poplar trees!  10 Ceraclad panels are the equivalent purification to 1 poplar tree.  The coating also inactivates viruses and bacteria at its surface. 
  • Knight Wall Systems provide the hidden tracks to install your rainscreen.  They have three different types of attachment to accommodate many different types of cladding.  Although mainly commercial, this system could be used for high-end residential homes as well.
  • Monarch Metal offers cladding systems with all kinds of finishes including HPL Phenolic, stone, fiber concrete and more.  Their hanging system contains high quality “Z-clips” which are similar to french cleats that allow you to hang the facade without screwing into the face of it, also interlocking panels as you install them.

These are just a sample of ways to get less mold growth in damp areas, relying on 1) materials that don’t sustain mold and 2) siding that incorporates ventilation.  It’s building science at its best!

Photo by Phil Hearing on Unsplash

What are Endotoxins and Exotoxins and where do they come from?

What are Endotoxins and Exotoxins and where do they come from?

The word “toxin” causes my ears and eyes to perk up, because these are the types of substances that cause illness and even death.  Thankfully, it is increasingly possible to avoid toxins by understanding where they live and how they’re spread.   Science is advancing very rapidly to show us how to manage our environments, food, lifestyle and even our bodies to live more healthfully.   Endotoxins come from Gram-negative bacteria, and Exotoxins can come from either Gram-positive or -negative bacteria so we’ll start with what the “Gram” test means. 

Bacteria can be classed into two different groups: “Gram-negative” or “Gram-positive”.  These classes are based on a test developed by scientist Christian Gram in 1884, which differentiates the bacteria using a purple stain.   According to webmd.com, bacteria either have a hard outer shell, or a thick, mesh-like membrane called peptidoglycan.  The hard outer shell will resist the purple stain, and show up as a red color.  These are called “gram negative” because the purple stain did not show.  Bacteria with the peptidoglycan absorb the purple stain much more easily and are called “gram positive”.  The stain also tells more characteristics about the bacteria and the way it interacts with treatment. 

The peptidoglycan layer of Gram-negative bacteria is much thinner than that of gram-positive bacilli; instead Gram-negative have a hard, protective outer shell, making them harder to kill because of their harder cell wall.  When their cell wall is disturbed, or the bacteria are dead or dying, gram-negative bacteria release endotoxins that can make symptoms of illness worse.  In contrast, exotoxins are produced inside the bacteria and may be released while the bacteria cell is living, or during its death.

Here is a diagram that shows how the exo- and endo-toxins are released (source: microbiologyinfo.com).  (I distinguish them by remembering that endotoxins are only emitted at the “end” of life of the bacteria):

Here are some examples of gram-negative bacteria diseases (webmd.com):

  • Vibrio cholerae (Cholera, a serious intestinal infection)
  • E. coli (E. Coli infection)
  • Yersinia pestis (Plague, an infection of the lymph nodes and lungs)
  •  Bartonella henselae (Cat-scratch disease)
  • H. Pylori (gastritis, peptic ulcer disease, gastric lymphoma, and gastric cancer)
  • Campylobacter (campylobacteriosis, an infection that usually affects the digestive tract)
  • Legionella bacteria (Legionnaire's disease, a lung infection)
  • Salmonella (salmonellosis, a digestive infection caused by contaminated food)

Here are some Gram-positive bacteria (and the infections they cause): 

  • Staphylococcus aureus (MRSA, toxic shock)
  • Streptococcus group A (strep throat, toxic shock)
  • Clostridium botulinum (botulism)
  • Bacillus anthracis (Anthrax) 

As you can see, endotoxins and exotoxins are a serious matter!  Here are some of the other important differences between them (byjus.com):

Endotoxins

Exotoxins

Are released during death, mechanical damage and lysis of bacteria but also during bacterial growth and division. (bmglabtech.com)

Secreted as part of the cell’s metabolism

Does not have any enzymatic activities

Most activities are enzymatic in nature

Immune response is weaker

Immune response is stronger

Made of lipopolysaccharides

Made of proteins

Moderately toxic

Highly toxic

Cannot be made into toxoids

Can be made into toxoids

Highly resistant to heat

Can be killed by boiling

(A toxoid is a chemically modified toxin from a pathogenic microorganism, which is no longer toxic but is still antigenic and can be used as a vaccine (Oxford languages).)

There is so much to study about bacteria, however since we at HypoAir mainly focus on air quality, we’ll try to limit this post to the toxins that can be transmitted through the air.  

Endotoxins (Endotoxins: Small But Very Significant):

  • Are pyrogens, that is, they often cause a pyrogenic reaction (fever).

  • Cause fatigue, a common characteristic of sick building syndrome. 

  • Don’t produce immunity, but only a temporary resistance known as “Monday fever”. Workers in industries with significant endotoxin levels have been found to be most afflicted on Monday, with reduced effects through the week. Endotoxin resistance is lost over the weekend, with the illness beginning anew the following Monday [5]

  • Are “adjuvant”, meaning that they can amplify the effects of other harmful substances. 

  • Are associated with sepsis, an extreme immune response by the body that often ends in death.  

  • The presence of pets in indoor spaces can represent an important source of air contamination and can be linked with the level of indoor endotoxins. The presence of dogs and cats can be the main predictors of endotoxin levels in house dust [1, 4-7]. Other predictors are the presence of vermin, such as mice, and infrequent cleaning, which indicates poor hygienic conditions in the home [1]. Storage of organic household waste indoors also increases bacterial contamination in the indoor environment [1]. (intechopen.com)

Here are some more details about endotoxins.  Although it’s a little in-depth, this article gives a good explanation of what endotoxins are and how they are released (shed) from bacteria.  Basically, endotoxins are small molecules of lipopolysacchride (LPS), which comprise approximately 70% of the outer membranes of gram-negative bacteria. They are responsible for maintaining structural integrity and have been shown to be essential for bacterial survival.  Lipopolysacccharides vary in their structure, but all share three distinct regions:

  • O antigen repeats are found on the outermost domain of the LPS molecule and are responsible for host immunogenicity (the ability of the endotoxin to provoke an immune response in human cells).

  • Core domain is composed of sugars and other non-carbohydrates.

  • Lipid A is the lipid component of LPS, whose hydrophobicity (repels water) facilitates membrane anchoring. Lipid A is responsible for toxicity of the endotoxin.

Here is a diagram of this structure:

Source: What are endotoxins?

Endotoxins are naturally shed at low levels during bacterial growth, but are released in much larger quantities upon cell death when their cell membranes rupture and disintegrate.  A single E. coli cell can release up to 2 million LPS molecules!  As lipids, endotoxins are naturally hydrophobic, which gives them a strong affinity for plastics and hydrocarbon-based materials (vinyl flooring, polyurethanes and coatings on many new products).  

The Limulus Amebocyte Lysate (LAL) test detects endotoxins.  It comprises blood cells (amebocytes) from the Atlantic horseshoe crab (Limulus polyphemus) that clot when they encounter bacterial endotoxin lipopolysaccharides.  The LAL may be used to test in three different ways: to provide a yes/no (qualitative) answer to whether a sample contains a specified amount of endotoxin, or to obtain the quantity of endotoxin via how fast the clotting takes place (turbidimetric) or how intensely the color changes (chromogenic). (Bacterial Endotoxins Testing)  In the qualitative test, equal amounts of a test sample and the gel clot LAL are mixed in a test tube and incubated at 37 °C for 60 minutes.  After the incubation, the tube is inverted.  If sufficient endotoxin is present in the test sample, the solution would have clotted during the hour incubation and a gel will remain in the bottom of the inverted tube (see image below).  If the sample does not contain detectable endotoxin, no clot will form and liquid will run down the side of the inverted tube.  (LAL/TAL Endotoxin Detection Test Methods)  The enzymatic reaction between the endotoxin and lysate produces a yellow color, the intensity of which is directly linked to the quantity of endotoxin present in the sample.   

How can we reduce exposure to endotoxins?

  • Reduce Dust: According to EMLab, a commercial IAQ laboratory in North America, “ Endotoxin exposures are mainly through the air.”  “Endotoxins do not float freely, but instead are attracted to dust particles. Reduction of dust is essential for controlling endotoxin levels. Dust reduction requires both fresh air filtration and filtered air recirculation. Continuous, low flow fresh air ventilation systems without recirculation do not effectively manage indoor particulates. Endotoxin levels and dust levels are not strongly correlated indicating that they come from independent sources. A single dust particle in the 2 to 10 micron range has sufficient surface area to hold a million or more endotoxin molecules (approximately 0.1ng of endotoxin). Therefore, reduction of dust is important regardless of whether one lives in a dusty or relatively dust-free environment.” (this and following points from buildequinox.com).
  • Removal of food sources: “Coupled with proper ventilation is reduction of source generation of endotoxins. In the home environment, it is clear that kitchens are one source of endotoxin generation. Removal of food wastes and standing dishwater will reduce bacterial growth with subsequent production of endotoxins. Even a bowl of standing water will grow bacteria in a home. Bacteria and nutrients are ubiquitous indoors and outdoors, and they will land in water or moist regions where bacterial growth will occur.” Kitchens have the highest level of endotoxins, followed by living rooms and bedrooms.
  • Avoid use of misting humidifiers: “Cold temperature (misting) humidifiers are strongly linked to high endotoxin levels. Vaporizing humidifiers that heat water to boiling have not been found to produce high levels of endotoxins.” An alternative method for achieving sanitized, cold temperature humidification in a home is through plant transpiration. Plants can reduce toxins in homes [12]. The plant-root matrix releases sanitized water into the air (assuming proper plant care that does not form a wet mass promoting fungal and bacterial growth).

Exotoxins are (from textbookofbacteriology.net unless otherwise noted)

  • part of a defensive system of bacteria to avoid capture and killing by leucocytes (part of our body’s immune system). (sciencedirect.com)
  • Produced by both Gram-negative and Gram-positive bacteria 
  • More highly poisonous by mass than endotoxins, strychnine, or snake venom 
  • Can be “super-antigenic” or cause stimulation to the immune system 
  • are often encoded by mobile genetic elements, including bacteriophage (phage). Phage can transfer genetic information to the bacteria they infect. (study)
  • Can produce illness even when the microbes that produced them have been killed. (skybrary.aero)

What are the sources of exotoxins? (from intechopen.com)

  • Actinobacteria (especially Streptomycetes), Bacillus species and various other bacteria grow in moist building materials together with fungi. Elements from bacterial structures released in air include bacterial cells, bacterial spores, peptidoglycans, microbial volatile organic compounds, exotoxins, and other bacteria growing metabolites.
  • Gram-positive bacteria with exo- and endospores like Streptomyces and Bacillus can grow on moist building materials. Their spores are very resistant and can survive even if the air humidity is low.
  • Humans are an important source of indoor bacteria. The upmost layer of the normal human skin is continuously renewed, and skin scales containing bacteria are shed into the environment. Bacteria in the respiratory airways are eliminated through Pflügge droplets while talking, coughing, or sneezing. The level of air contamination is dependent on the number of persons inside a room and the efficiency of the ventilation system (natural or artificial ventilation). Bacteria that can be identified in indoor air are micrococci, staphylococci, streptococci, and corynebacteria.

How can we reduce exotoxin exposure?

  • Maintain your home so that there are no active leaks and humidity stays between 40-60%.  This will reduce actinobacteria that produce exotoxins.
  • Practice good hygiene by covering your mouth and nose while coughing or sneezing.  This reduces the amount of small particles in the air that can contain bacteria and exotoxins.  Dispose of tissues in the trash and wash hands with soap and water. 
  • According to the WHO, if exposure to the toxin via aerosol inhalation is suspected, additional exposure to the patient and others must be prevented. The patient's clothing must be removed and stored in plastic bags until it can be washed thoroughly with soap and water. The patient should shower and be decontaminated immediately. 
  • Most exotoxins can be destroyed by heating, (wikidoc.org), so eating thoroughly cooked food often eliminates the danger of ingesting the exotoxin. The WHO recommends these five strategies in food safety:
    • keep clean
    • separate raw and cooked
    • cook thoroughly
    • keep food at safe temperatures
    • use safe water and raw materials.

Use of a HEPA filter can reduce aerosols and fine particles containing bacteria, endotoxins and exotoxins, although some of the smaller phages may slip through.  This is where a healthy immune system and abstaining from smoking pick up.  Cigarette smoking is a substantial risk factor for important bacterial and viral infections. For example, smokers incur a 2- to 4-fold increased risk of invasive pneumococcal disease. (2004 study).  In addition, exposure to cigarette smoke causes MRSA bacteria (just one bacteria studied) to become even more resistant to killing by the immune system. (UCSanDiego Health News)  Of course, smoking through a dirty water pipe (bong) is inviting disaster!  Here are the details (mooselabs.us):

Bacteria, endotoxins and exotoxins are all around us (and even in us), but with good judgment and  precautions, you can avoid being one of the infection statistics!

Photo by CDC on Unsplash

What is Inverter Technology and what does it do for my Air Conditioner?

What is Inverter Technology and what does it do for my Air Conditioner?

To start, let’s review the way conventional air conditioners work.  You set your preferred temperature, and when the room gets too warm, a thermostat sensing the higher temperature will cause the air conditioner to come on.  When the room is cooled properly, the air conditioner shuts off.  The lag in turning on and off varies by unit, but it can be as much as two-three degrees:  at a set point of 72 deg F, the air conditioner doesn’t come on until the room warms up to 73, and doesn’t shut off until the room is cooled to 71 deg F or lower.  In the case of inverters in air conditioners, they can keep the room at an even 72 all day long by running continually with lower power input.  The best way to explain them may be the example of cruise control in a car.  If you try to keep the car at a steady speed, you’ll need to depress the gas pedal when you see the car decelerating, and let up when it goes over your target speed.  Letting the car’s computer keep the speed is actually more gas efficient, because it will sense speed fluctuations sooner, and meter the gas pedal more accurately than you can!  Here is a pictorial by Panasonic:

Once again, the power of computers is making our lives better by modulating the power consumption of the unit and avoiding those annoying temperature swings.   But wait–there’s more!  With only a 2-3 degree temperature swing with a traditional air conditioner, why does it feel like one minute you need an iced drink, and the next you need a sweater?  It just doesn’t seem like that should happen with only 2-3 degrees. The answer lies in the humidity of the air.  Temperature fluctuations cause the relative humidity (RH) to fluctuate, which makes a big difference in comfort levels!   Humidity gets taken out of the air as it passes over the evaporator coils, and this is an important function of the air conditioner, because as you cool the temperature, RH will go up.  If you don’t have a non-inverter air conditioner sized just right (having the optimal compressor power and refrigerant for the size of room), it will run for too long or too short, causing the RH to fluctuate:

  • Too large of a unit means it will run for short cycles, cooling the room quickly but not running long enough to remove adequate moisture from the air.  
  • Too small of a unit means that it will run for long periods of time and humidity will go down, but jump right back up when the unit shuts off.

The inverter air conditioner not only keeps temperature constant, it can also keep humidity lower and constant.  Here’s how that works:

  • Back to physics class:  There are two kinds of heat: sensible and latent heat. Here is an excellent page to understand more, but basically sensible heat is related to changing the temperature of a body (in this case the air), and latent heat is related to the phase change of the body (in this case changing the water vapor in the air to liquid so that it will drain away).  
  • Constant speed on/off systems are good at removing sensible heat to lower the temperature of the air.  However, they don’t do such a great job at removing latent heat (humidity) out of the air.  This diagram shows why: it is a diagram of how much energy is needed to push water into a different phase.  The long flat part at 100 deg C (212 deg F) shows how much energy is needed to change water from liquid to vapor, and once it is a vapor, the same amount of energy (970 BTU, or British Thermal Units) is needed to condense it back to a liquid, without even changing the temperature!
  • So, when the system is set to only lower temperature, it does not continue to supply the needed energy to change the phase of the water vapor in the air to a liquid, to condense it out of the air.  It will simply stop cooling when it hits the temperature set point.
  • Inverter technology uses a computer and variable speed fan to slow down the speed of the air crossing the evaporator coil.  When the air spends more time in the evaporator, more water vapor will condense out of the air, meaning more dehumidification occurs.    It also uses a variable speed compressor to better control the flow of refrigerant through the system, because slowing the fan alone with a standard compressor may cause the coil to freeze.  Since the system will be continually cooling instead of stopping and starting, a variable speed compressor allows for a small steady flow of refrigerant when the room is in a steady state (no one coming in or out or cooking, etc.), but also a ramp-up when someone opens a door or turns on an exhaust fan, etc. 

This is all great information, but what if you have a central AC system that’s only a couple years old, and very little budget to go making changes?  The good news is that it is possible to replace your standard single-speed blower motor with a variable speed motor.  Here are some facts about this type of upgrade:

  • The term “variable-speed” applies to two different components in an air conditioning or heat pump system: the blower motor and the compressor. A variable-speed blower can be matched with a single-speed compressor, but a variable-speed compressor must always be paired with an adjustable-speed blower. (therma.com)
  • Single speed motors in blower units are generally called “PSC” or Permanent Split Capacitor, while variable speed motors are called Electronically-Commuted Motors (ECMs) or Brushless Permanent Magnet motors (BPMs).  ECM is a trade name for BPM (BuildingScience.com)
  • ECMs come in “3 flavors”: non-variable constant torque, variable constant torque, and variable constant flow.  (David Butler, energyvanguard.com).  If you are looking for better dehumidification, you may want to go for the Variable speed, constant torque model.  The Variable speed, Constant Flow models are the most expensive.
  • ECMs are quieter and use less electricity than PSCs.
  • Retrofitting the blower fan has the following challenges:
    • You’ll need to make sure the existing electrical service is compatible with the new ECM.  Although the resulting operating current draw should be less than the PSC motor it replaced, you’ll need to check that the motor nameplate ratings don’t require upsizing the supply circuit in order to provide the necessary electrical safety.  (Titus HVAC)
    • The new motor may require a different type of mounting, ie. a “belly band” vs. a bracket, and the technician may need to use parts from several conversion kits to install it. 
    • The Building America program retrofitted PSC blower motors with ECM motors at 8 homes in upstate New York in 2013 as part of a study.  The study did extensive screening of homes and systems so that only homes with the right size hp motors, the right size blower housing and cabinets, and the right type of motor mounts were chosen, making the install straightforward for the technicians (US Dept. of Energy).  According to Titus HVAC, ECM retrofit doesn’t just mean replacing the motor. It generally means replacing the motor, the speed control, and blower assembly. It will likely also require additional components like power cables, communication cables, and a power filter. It could even require changing internal options like line and/or motor fuses.  
    • There are several manufacturers for these retrofit motors.  
      • The most well-known may be Regal Rexnord with the Genteq Evergreen motors, also offered on Amazon (this company purchased the ECM trade name).  
      • US Motors’ “HVAC Rescue Motors” series includes bluetooth-enabled motors and some that do not need the aforementioned airflow programming, making for an easier install.
      • The Concept 3 motor used by the Building America Program is currently out of production.
    • A knowledgeable HVAC technician can help you with the decision and options; don’t be afraid to get several opinions!  Ask if he will be taking pressure and power readings before and after the install.  This is key to getting your new motor running right, or preventing an ineffective change to the system.  Here are two links for more information on pressure and power draw readings.
  • Some states or power companies may offer rebates to retrofit your PSC with an ESM, such as this 2013 offer by Minnesota Power. 
  • ECMs will save power on systems that are set to have the fan always “On”, such as when a Whole-Home Polar Ionizer is installed.  This type of purifier runs 24/7 and as such needs the fan to run 24/7.  

If your whole HVAC system is nearing end of life (10 years or more), you may ask about replacing the blower and compressor with variable-speed units, which will give the best energy efficiency available in forced air units today.  Some HVAC companies will try to sell what is easiest for them to install, or what their suppliers recommend, or what has always been done, but there is always room for improvement…keep searching and asking until you find it!

It’s not the heat, it’s the air pollution!

It’s not the heat, it’s the humidity air pollution!

Decades ago, when the meteorologists predicted extreme heat, it seemed they only advised on the necessity to stay out of the sun, drink more water, and cool off more frequently (stay in the pool, yayyyy!).  Now, heat advisories come with more sinister warnings about air pollution levels, and the outdoors are less fun.  How did that happen?  The answer lies in meteorology and chemistry, all cooked up in our atmosphere.

Low-pressure systems are quite famous for moving rapidly across the US and bringing devastating weather like severe thunderstorms, hail and tornadoes.  They can also sweep pollutants like smoke and smog to other states.  High-pressure systems, on the other hand, typically cause stagnant air, which can concentrate pollutants over one area.  (scied.ucar.edu)  A “Heat Dome” is an area of high pressure that parks over a region like a lid on a pot, trapping heat. (National Geographic) A Heat Dome caused about 600 deaths in June 2021 in the Pacific NorthWest as a 1-in-1000-year event.  The heat, which broke Portland’s all time record of 107 degrees, was bad enough, but extreme heat combined with stagnant air during a heatwave increases the amount of ozone pollution and particulate pollution. (metone.com)  Here is where the chemistry comes in.

“Ground-level ozone pollution forms when heat and sunlight trigger a reaction between two other pollutants, nitrogen oxide and volatile organic compounds — which come from cars, industrial facilities, and oil and gas extraction. High temperatures therefore make ozone pollution more likely to form and harder to clean up. Drought and heat also increase the risk of wildfire, which can make air quality worse as smoke drives up levels of fine particulate matter — also known as PM2.5, or soot...Both ozone and PM2.5 carry major health risks. Ozone can cause acute symptoms, including coughing and inflamed airways, and chronic effects, including asthma and increased diabetes risk. PM2.5 exposure can lead to an increased risk of asthma, heart attack, and strokes. Globally, long-term exposure to PM2.5 caused one in five deaths in 2018, including 350,000 deaths in the United States.” (Heat waves can be life-threatening for more reasons than one)

Because of the increase in cars and industry, extreme heat forecasts are not just requirements to have bottled water and popsicles on hand and check that our elderly neighbors’ air conditioning is working.  It’s a time to make sure that those who have asthma, heart and vascular conditions stay indoors, and that you take the proper air pollution precautions, too. 

Unlike outdoor air filled with wildfire smoke, ozone and smog are not as visible and may not affect everyone immediately, but they are dangerous pollutants and shouldn’t be allowed in our homes.  Here are some steps you can take to prepare for that heatwave, and the resulting air pollution that often accompanies it!  

  • Seal doors and windows with weatherstripping, caulk and door sweeps.  

  • Find out how to adjust your HVAC system accordingly: you’ll want to close the fresh air intake and change over to recirculation, no matter whether you have central AC, a window air conditioner or portable air conditioner.

  • Purchase extra MERV 13 filters for your HVAC system, to be used on poor air quality days (caution: read our post on HVAC filters first, as using a filter with too high MERV rating can damage your system). 

  • If you live in an apartment building or condo with little control over the HVAC, consider purchasing vent filter material so you can place them in the vents into your space.  The filter material can prevent smaller particulates in smog from entering.  Carbon vent filter material will neutralize many VOCs as well.

  • Purchase a HEPA air cleaner (non-ozone producing type) and be sure to have an extra filter or two on hand.  The use of a HEPA filter will take much of the damaging fine particles out of the air you breathe!  Whenever there is bad air quality outside, run the cleaner/purifier on high for an hour and thereafter at "quiet"/medium setting (Wirecutter).  You can check out our post on standalone HEPA filters as a purchase guide.  If you can't purchase one, make one: there are many videos and instructionals online for DIY air cleaners; most only require one or more filters, a box fan, and some cardboard and tape.

  • Keep a stash of N95 respirator masks on hand.  These are a good source of protection if you have to go outside, or if power is cut to your home and indoor air quality gets bad as well.  The “95” means it blocks out 95% of particulates.   

  • Keep canned and non-perishable food on hand, so that you don’t have to cook during periods of bad air quality.  Cooking indoors increases small particulates and vapors in the air, and you won’t want to turn on your stove exhaust, as that will draw polluted outdoor air into the house.

  • If air quality is very poor (check next point), you’ll want to evacuate to a place with clean, filtered air, like indoor malls, libraries, community centers, civic centers and local government buildings (sfgate.com). 

  • Check your local air quality and receive updates from airnow.gov . Using an Air Quality Index (AQI) as a measuring tool ranging from 0-500, your local forecast and larger maps can be color coded to show whether an area is good (green), moderate (yellow), unhealthy for sensitive groups (orange), unhealthy (red), very unhealthy (purple), and hazardous (maroon).

Photo by Call Me Fred on Unsplash

Protection from Over-Chlorination

Protection from Over-Chlorination

When I think about the pool where I learned to swim, I can almost smell the chlorine!  It was a YMCA where one half of the building had a “giant” (to a 5-year old) pool with lanes divided by strings of red plastic floating buoys, and the other half filled with exercise equipment and sweating people.  Through my school years, some of my friends came there regularly to practice on the swim team and I thought, how can they endure the smell and the sting of chlorine in their eyes, and the effects of chlorine on their hair?   Swimming was fun but I preferred open water for those reasons.   

If the smell of your home tap water reminds you of a chlorinated pool or bottle of bleach, it may be a high standard use of chlorine, or the effect of free chlorination.  The City of Fort Lauderdale Public Works Department defines free chlorination as “a temporary process that distributes free chlorine in place of combined chlorine (chloramine) throughout the water distribution system as part of routine distribution system maintenance.” It is a standard procedure used by most water utilities across the United States to maintain and protect DWDSs (drinking water distribution systems). The process is often performed once every two years or so.(springwellwater.com)

There are serious side effects from too much chlorination.  These come from the chlorine reacting with the organic compounds found naturally in the water, producing haloacetic acids (HAAs) and trihalomethanes (THMs).  Inhaling the HAAs and THMs during activities like showering can be more toxic because they exist at a low vapor pressure (they easily evaporate from open water) and can concentrate in your body.  According to a 2005 academic article, THMs are more concentrated in the body when absorbed through the skin than drinking tap water that contains the chemicals (springwellwater.com).  Consuming water with HAAs or THMs can lead to several serious health complications, such as stillbirths, bladder and rectal cancer, congenital disabilities, increased risk of kidney and liver cancer. It can also cause problems with the heart, kidneys, liver, and central nervous system.

Besides the serious health effects described above, you’re probably familiar with the consequences of showering and washing your hands with chlorinated water: itchy, dry skin and frizzy, dry hair.  Who knew that “swimmer’s hair” would be the plague of everyone using the municipal water systems?

If I merely read the annual water report from my supplier, I would not have all the information.  Unfortunately (and you can see this in the following excerpt: only certain contaminants are reported), water distributors do not report the full picture.  Here is the water company’s report, that did not include Dichloroacetic acid (DCA):

And here is a reports from a watchdog group in the same year on the same water system.  From EWG.org

Results from mytapwater.org are also available in most states (but my locality was not available).  

It usually pays to dig a little deeper, and I didn’t even have to spend any money to do it (although there are plenty of test kits that will help you; see mytapscore.com).   Once you know what contaminants are in your water, you can consider ways to eliminate them.  EWG.org has a contaminant database that tells what risks toxins pose, and how to filter them.  For example, Haloacetic Acids (HAA5) can be filtered by activated carbon filters, or reverse osmosis. 

What else does excess chlorine do?

Unfortunately, chlorine also corrodes copper pipes.  Copper is very durable and highly corrosion-resistant in most underground applications (copper.org), but I would say that in this age of mass disinfection using chlorine, copper is a weak link for building piping systems.  Chlorine is a strong oxidizing agent that reacts readily with materials in the piping system, including copper, other metals and plastics to create oxide and chloride compounds. According to this industry website, “In applying shock chlorination to a copper system, a reduction in the chlorine residual over time will nearly always occur, and does not indicate that the chlorine is being depleted in fighting bacterial contamination. Therefore it is inappropriate and often damaging to the copper system to shock chlorinate the system, measure the chlorine residual and then repeat the shock chlorination and measurement multiple times trying to achieve a specified minimum drop in the chlorine content.”  Unfortunately, though, this is what municipal water systems do, because chlorine is a cheap disinfectant.  According to this 1982 study, “… free chlorine is the agent chiefly responsible for the corrosion of copper in chlorinated domestic water supplies”, but adjustment of the water pH after chlorination to 7 or 8, as well as keeping free chlorine to levels of 2mg/l or less, greatly reduces the rate of corrosion and extends the life of the copper systems.  For homes that were built with copper piping (before the advent of PEX and similar materials), this information is critical to the integrity of your piping!

Chlorine is also detrimental to plants and fish.  If you love growing plants in and around your home, “too much (chlorine) can accumulate in leaf tissue, resulting in leaves with a scorched or burned appearance. The leaves may also appear smaller than usual and may yellow and fall off early.”(springwellwater.com)  Here’s an easy way to get rid of most of the chlorine for watering plants:  run tap water into a large container or pitchers without lids, and let it stand open to the air for a day or so.  Most of the chlorine will dissipate from the water.  Fish may require more extensive filters, as the chlorine can burn their gills.  

According to the CDC, chlorinated water is safe for both humans and dogs to drink in concentrations up to 4 milligrams per liter (rover.com), but that does not take into account the organic byproducts (DCA and HAA5).  At least you could do the same for your pets by letting the chlorine evaporate from open containers before setting it out for them to drink.  At best, you can provide water from the same filters that you use!

If you sense that something is off with your water, you can speak up about it.  Erin Brockovich (the real-life heroine depicted by Julia Roberts in the 2000 movie) is the founder of the Erin Brockovich Foundation, a nonprofit organization created to educate and empower communities in their fight for clean water, and she has released a new book about the plight of America’s water systems and what individuals and groups are doing about it.  Her Facebook post on July 14, 2020 tells a lot:

“If your drinking water smells like bleach... there is a PROBLEM. Do not listen to the water utility providers when they tell you "everything is fine... your drinking water meets all the requirements"... that's just crap.

When you smell chlorine in drinking water it is most often the result of chlorine mixing with total organic carbon (DIRT) the utility fails to clean out of the water like they are supposed to. Water quality changes daily and through out the day... it is impacted by UV rays... and temperature changes. This changes how water is treated... but many utilities fail to do it right and cheat the regulatory system... many feed ammonia to sequester the chlorine and mask the real - toxic - consequences of doing so.

Bottomline... if you smell chlorine THERE IS A PROBLEM... and you need to ask questions.

1.   What is the amount of chlorine/chloramine we have in our distribution system?

2.   Are we experiencing nitrification?

3.   Are we conducting a burn or flush?

4.   What is your total organic carbon reduction percentage?

5.   Is there an algae bloom?

...and scores more... but start here. 

Stop buying their lies. You know when something is wrong! It's time we make it right!”

And on February 23, 2021, here is her response to an article on the water system in Stafford, Virginia:

“I am fed up with the barbaric practice of free chlorine burns applied  by drinking water utilities that loose control of their distribution systems... more so the ridiculous lies they tell!

"The free chlorination process does not adversely affect the water quality"... the BIG LIE

Stafford... you will have 75 days from hell... toxic levels of trihalomethanes, biofilm and sludge exposure.

"The flushing also allows any sediments or minerals that have collected in the water mains to be washed out"... right into your homes, hot water heater tanks, appliances, and drinking water.”

Bottom line: Don’t be afraid to be bold in asking questions and testing your water with regards to chlorine and other chemicals used to disinfect it.

At home, you can also start with filters that can be used in water pitchers, on the tap, under the sink, and for the whole home:

  • Get started with a water pitcher that can be stored on the counter or in the refrigerator for cold water:
    • ZeroWater 6 cup pitcher ($21) is a small size that can fill your hot water kettle or coffee maker, which because it also removes Total Dissolved Solids (TDS), is beneficial to the longevity of these types of machines.
    • AmazonBasics 10 cup pitcher ($25) gives you more capacity and filters are compatible with Brita pitchers, however it does not remove TDS.
  • AquaBliss Shower Filter ($36) can alleviate the discomfort of chlorine on your skin and hair for 10,000-12,000 gallons, which the company says is good for about 6 months of normal use.
  • Frizzlife Under Sink Water Filter, $126, can be installed by anyone in about 15 minutes and the filter cartridges remove fine silt, chlorine, chloramine and lead and heavy metals for about 10,000 gallons of water  

Chlorine is an old disinfectant for water systems, but it is not without dangers when used heavy-handedly, so be wise and avoid it when you can!

“Rust” in your sinks and toilets? Iron in your water can mean iron bacteria in the water

“Rust” in your sinks and toilets?  Iron in your water can mean iron bacteria in the water

Wait–is that rust in my toilet?  Why is the toilet looking rusty?  You might initially think that the pipes supplying the water might be rusting, and that could be a problem (however, it’s rare).  But if you know that there are no iron pipes supplying your water (if you live in the country with your own well), then you know that pipe rust is not the source of the problem.  Most likely it has to do with high iron content in the water itself, and a certain bacteria that consumes iron. At least 18 types of bacteria are classified as iron bacteria, long thread-like bacteria that “feed” on iron and secrete slime. Unlike most bacteria, which feed on organic matter, iron bacteria fulfill their energy requirements by oxidizing ferrous iron into ferric iron. (Iron Bacteria in Surface Water). 

Iron bacteria are small living organisms that naturally occur in soil, shallow groundwater, and surface waters. These bacteria combine iron (or manganese) in the soil, and oxygen to form deposits of "rust," bacterial cells, and a slimy material that sticks the bacteria to well pipes, pumps, and plumbing fixtures.  These iron bacteria don’t cause disease, but they can create an environment where other disease-causing microbes can grow (like coliform bacteria).  Iron bacteria can get into the well when the water in the well comes into contact with the soil surrounding it, or lakewater, or any rivers and streams.  (Iron Bacteria in Well Water)

If you haven’t had any work on your water system done, and you’re still suspecting the bacteria are feeding on iron pipes, here are the most common types of pipes (from 7 Types of Plumbing Pipes Used in Homes):

  1. Rigid copper pipe (water supply)

  2. PEX pipe (water supply)

  3. PVC pipe (water supply and drains)

  4. ABS pipe (drains and vent lines)

  5. Flexi Pipe (water supply)

  6. Galvanized steel and cast iron (outdated for water supply and drains)

  7. Black pipe (only used on natural gas lines)

So, you can see that out of the 5 water supply line types, only 1 has iron in it (#6) and those are considered outdated.  The cast iron and steel pipes that were used in the 1950s have gradually been replaced by one of the other plastics mentioned above.  (A Brief History of Pipe Materials)  Therefore, if your home was built after the 1960’s, it would be very common for you to have iron in the water supply lines. 

Other than causing brown stains, iron bacteria can also cause the following (Iron Bacteria in Well Water):

  • Smells: Swampy, oily or petroleum, cucumber, sewage, rotten vegetation, or musty smells, which may be more noticeable after the water has not been used for a while.

  • Colors: Yellow, orange, red, or brown stains and colored water, or a rainbow colored, oil-like sheen.

  • Deposits: Sticky rusty, yellow, brown, or grey slime, or “feathery" or filamentous growths (especially in standing water).

These are not the kinds of things you want to see in your sink or toilet!  It can also have detrimental effects on any water softening system, making the water running through it to have an off taste.  To confirm that the problem is iron bacteria, you can get the water tested by a lab.

If you do have iron bacteria, and states like Minnesota have a lot of it, it can be hard to get rid of.  Here are some steps you may consider: 

  • If you have a heavy concentration of iron bacteria, the best first step is to have the contractor remove and clean the pumping equipment, and scrub the well casing with brushes.  Make sure that they do not lay any of the equipment on the bare ground, as this could re-contaminate it!  

  • Next is chemical treatment, which is also for minor contaminations.  Treatment involves 3 steps: disinfection (or oxidation), retention time, and filtration. (How to Remove Iron Bacteria in Your Water)  Chlorine (bleach), hydrogen peroxide and ozone are frequently used.  Although many companies call all three of these “disinfectants”, the fact is that only chlorine is a disinfectant; hydrogen peroxide and ozone are oxidizers.  Disinfection is the act of killing bacteria, while oxidation causes a molecule, atom or ion to lose an electron (which also kills bacteria as a consequence).

    • Chlorine (bleach): Although bleach is cheap and will disinfect, its reactions to organic matter that may be in the water are not good–like haloacetic acids (HAAs) and trihalomethanes (THMs), which are classified as possible human carcinogens.  For more information on these byproducts, check out our article here.  

    • Of the two remaining, ozone is a stronger oxidizer than hydrogen peroxide, but hydrogen peroxide systems are less expensive and more readily available from water treatment companies.  According to USWater, extreme amounts of iron and hydrogen sulfide can be removed from the water supply effectively and consistently, it does not need a “contact tank” for retention time, and it does not cause maintenance issues with injection pumps as chlorine does.  (Chlorine or Hydrogen Peroxide – Which is Better for Treating Water?) does not have these byproducts and in addition, has several benefits: it can also rid water of hydrogen sulfide (H2S) smells (rotten eggs), and activated carbon filters used after disinfection last much longer than when used with hydrogen peroxide than with chlorine. (Eliminate Well Water Odors: Four Reasons Why Hydrogen Peroxide Water Treatment Is Best)  According the to Minnesota Rural Water Association, potassium permanganate is also a strong oxidizer that is in common use in Minnesota to remove iron and manganese. (Iron and Manganese)

    • Retention time is needed for chlorine to work, therefore the chlorine must sit in the well for a certain period, or if you are using chlorine as a continuous disinfectant, a holding tank is usually set up, with the size being dependent on your household’s normal flow rate (water usage rate).

    • Filtration is necessary to remove by-products (in the case of chlorine) and iron products (in all cases).   When chlorine contacts iron in the water, it changes the iron from a ferrous state to a ferric state, making it an insoluble particulate.  This is the state that can be easily filtered.  There are various types of filters available, the most common being activated carbon.  Reverse osmosis and some other types of filtration can remove iron from water without oxidation, and treating your water from the point it enters your home is important for all your appliances, but the iron bacteria may still thrive in your well and cause clogs up to the water treatment point. Iron can clog wells, pumps, sprinklers, dishwashers, and other devices over time. (Iron in Well Water)

If you notice these signs of brown or different colored stains, bad smell or slime deposits in your sinks or toilets, it’s a good idea to get your water tested for iron.  If iron bacteria are present, it’s likely a common problem in your area, and there are local companies who can provide the equipment needed to remove it.  However, it’s best to do your own research on these solutions to make sure that a company doesn’t try to sell you unnecessary equipment (such as a retention tank for a hydrogen peroxide system), and also it’s a good idea to get references and reviews from actual customers.

If you are skeptical about the effects of mold in homes, please stop and read this.

If you are skeptical about the effects of mold in homes, please stop and read this.

Mold is a fungus that has thousands of species and grows outdoors and indoors, year-round; every building has some level of mold in it. (Molds in the Environment, Johns Hopkins Medicine)  It spreads by microscopic spores which are carried in the air, on clothing, shoes and pets to lodge and potentially multiply indoors. (Basic Facts about Mold and Dampness, CDC) Since the spores are too small to see, many people doubt that mold in the home or workplace can actually cause illness.  Is all mold really bad, or are only some molds bad?  Why do some people become ill while staying a short time in a space while others seem to be unaffected?  What levels of mold should cause concern and what tests are best?   These are very common questions and we would like to highlight some scientific research about mold to understand the answers to these questions.  

Because edible mushrooms and molds growing on basement walls are all classified as fungus, with more adverse reactions arising from handling some than others, there are obviously harmless and harmful species in the family.  It’s overgrowth of the harmful types that can lead to problems in buildings. In the right environment they quickly grow from microscopic spores to visible mycelium (colonies), to sending out more spores into the air and starting other colonies.. 

In general, molds need the following to grow (What You Need to Know About Mold):

  • Moisture: even moisture from the air, when it is above 80% humidity, can be enough to sustain mold.
  • Warmer temperatures: most molds cannot grow below 40 deg F, which is why refrigerators are kept at 39 deg F and below. 40 -100 deg F sustains mold.
  • Organic (carbon-based) materials to digest.  Mold can even grow on glass, metal and other inhospitable environments, if it has dirt or synthetic material to feed on.
  • Protection (shade) from UV rays: ultraviolet light kills most mold, so you won’t see it growing in direct sunlight!
  • Oxygen: mold needs very little oxygen to survive, so it’s difficult to control mold by depriving it of oxygen.

Therefore, warm, moist areas with natural materials like wood, paper or fabric are great at growing mold, and mold can take root in these areas in as little as 48 hours.  Eliminating the most important material (water) quickly will stop mold in its tracks and not allow it to proliferate.

Molds can emit several types of toxins: mycotoxins and microbial volatile organic compounds (mVOCs). Mycotoxins are solid or liquid.  Of the several hundred mycotoxins identified so far, about a dozen have gained the most attention due to their severe effects on human health and their occurrences in food. (Mycotoxins, WHO). Mycotoxins have also been frequently detected in house-dust over the past decades, and they can be carried through the air on dust, spores or other fragments of mold.  (Detection of Mycotoxins in Highly Matrix-Loaded House-Dust Samples)  By contrast, MVOCs are gaseous, so they are already airborne.  Both mycotoxins and mVOCs can be emitted when the mold colony is disturbed or threatened, by humans, animals or by other microbes.

Ancient plagues and epidemics among animals and humans were likely the result of mycotoxins in foods. Here are some examples: 

  • In 1960, about 100,000 young turkeys died in the UK, and scientists discovered that aflatoxins produced by the common molds Aspergillus flavus and A. parasiticus in their feed led to the deaths.  (Mycotoxin: Its Impact on Gut Health and Microbiota)  
  • Aflatoxin can also cause liver cancer in humans.  
  • Ingestion of ergot, which is a fungal disease of rye and other grains in which black elongated fruiting bodies grow in the ears of the head of grain, can result in ergotism, a painful and often deadly disease.  Ergotism has even been implicated in premeditated poisonings and witch trials, due to its psychoactive effects and disturbances. (Ergot: from witchcraft to biotechnology)
  • Sadly, since the isolation of T-2 mycotoxin (a member of the trichothecene mycotoxins, which is emitted from several types of mold including Stachybotrys chartarum), T-2 mycotoxin has been allegedly used as a bioweapon during the military conflicts in Laos (1975-81), Kampuchea (1979-81), and Afghanistan (1979-81) to produce lethal and nonlethal casualties. (CBRNE - T-2 Mycotoxins)  

Illness by ingestion of mycotoxins from a food source occurs more frequently than by inhalation of mycotoxins (for example in dust from mold growing on or behind walls); so with the exception of bioweapons, inhalation of mycotoxins is of a lower concentration so that respiratory irritation is the usual effect.  

MVOCs, being gaseous, are highly inhalable, and their effects can range from annoyance (of the musty smell) to coughing, wheezing, fatigue, headaches, dyspnea, allergies, eczema, as well as serious respiratory issues (Sick Building Syndrome, Mølhave, L. "Encyclopedia of Environmental Health." 663-669.)

So why does mold affect some individuals more than others?  For a long time, individuals who became ill upon entering or spending time in a building were deemed to have more psychological issues than actual physical issues, because testing of the building often revealed no measurable toxins.  There are several reasons for this: 

  • First, methods of testing for toxins were not sensitive or specific enough to find the cause.  Dr. Ritchie Shoemaker, a well-known researcher and doctor in the area of mold, Chronic Inflammatory Response Syndrome (CIRS) and Water-Damaged Buildings (WDB), addressed this problem when discussing testing methods in his 2021 paper.  Air sampling methods are not adequate to pick up smaller spores, they may also miss spores outside the air flow boundary and duration of the test, and some spores (like Stachybotrys, commonly called Black Mold even though many other molds are black in appearance) are heavy and don’t become airborne in large numbers, especially if the mold colony is hidden inside a wall. 
  • Some bacteria and molds in WDB produce mVOCs, which are toxins not detected by spore air tests.  Only tests that capture mVOCs would be able to detect these. 
  • Some people are more sensitive to mold spores, mycotoxins, mVOCs and endotoxins than the general population.  They may be missing genes that allow their bodies to process the toxins, or their immune system may have been chronically overstimulated in a previous chemical or toxin exposure.  These predispositions make them much more sensitive to low levels of toxins from mold and bacteria.

Therefore, mold toxins are sometimes difficult to detect, and they don’t produce similar responses per concentration in everyone due to individual sensitivities. This phenomenon is addressed in a guidance paper to clinicians (doctors and other health practitioners) by the University of Connecticut Health Center.  The paper discusses 5 case studies of patients who were observed to have sick building syndrome due to mold issues in WDB. 

There are several reactions to exposure to mold discussed in the paper:

  1. Fungal infections: Infection usually requires direct contact with fungus, and only immuno- compromised or highly sensitive people are at-risk for fungal infections.
  2. Allergic and Hypersensitivity reactions: It is well established that fungi can cause allergic reactions in humans, and molds are typically included in the skin test panels used clinically by immunologists to screen for environmental triggers in atopic patients (those who are predisposed to immune responses). Many atopic patients experience allergic symptoms related to molds commonly encountered outdoors. The presence of mold spores in the indoor environment is not in itself a problem when the source is the normal interchange of outside air and the amount and types of spores inside are the same or less than outside. However, mold actively growing on an indoor substrate may affect the quality of the environment by degrading the surrounding materials (weakening the structure) and, more important, by potentially adding unhealthy chemicals and bioaerosols to the indoor air. Higher levels of mold spores inside than outside or the presence of different species inside than outside reflect this “amplification” of mold.  Antigens are toxins that produce antibodies, and in the case of mold, antigens could be spores or spore fragments, mycotoxins, or mVOCs.  “Individuals’ immune responses to these antigenic molecules are determined by their genetic makeup and environmental factors. Important among these factors are the frequency of exposure to the antigens and the intensity of the exposures…Development of sensitization to antigens generally requires repeat exposures, often to high ambient concentrations of the sensitizing material. Once sensitization to an antigen has developed, it requires a much lower concentration upon re-exposure to elicit the reactive phase that we recognize as the clinical manifestation of disease.  In general, the higher the exposure and the degree to which one has been sensitized, the more severe the allergic or immune-mediated response.”  

This is the pathway by which mold “allergies” progress to severe illness, and even death. All five of the cases discussed in the aforementioned paper necessitated the patients to be removed from the buildings (school, office, and home) to recover from their symptoms.  Unfortunately the death of a two-year-old boy in the UK in 2020 was the result of a severe respiratory condition due to prolonged exposure to mold (the family had reported mold in the apartment repeatedly up to three years prior, however, the housing authority did nothing to repair or mitigate it).  This highlights the need for parents to be knowledgeable about the effects of mold as advocates for their children. 

When should a house be tested for mold? We concur with this experienced mold inspector’s methodology:

  1. If you have no visible mold but high humidity, it’s probable that mold is starting to grow in the area.  Humidity is easy to feel even without sensors but to be sure, you can get 2 humidity sensors here for only $10.
  2. If you find visible mold growth, but don’t know the extent of the damage
  3. If you or someone in your family suffers from health symptoms related to mold exposure, then testing of the home would be appropriate.
  4. If you smell a musty odor, this is an indication that you have actively growing mold.  These odors are mVOCs.
  5. If you’ve already had remediation and need proof that it was performed effectively in order to move back in safely, hopefully a “before” or baseline test was performed for comparison.

What kind of tests are appropriate? 

DIY mold tests are abundant, however, in most cases you get what you pay for.  Petri dishes, while economical, do not provide the quantitative information (how much mold is in the air) and except in the case of sending the dishes in for lab analysis, do not give qualitative information about the types of species. 

If you have only a moderate budget and don’t know where the mold may be coming from, we believe non-viable air sampling can give a lot of information about the spaces in your home.  GotMold? Is an easy way to take these samples in different rooms and get them analyzed by an accredited laboratory. They include an outside sample cassette so that your inside rooms can be referenced against it.  The lowest level of indoor spores should be comparable to an outdoor sample, because mold is in the air everywhere.

If you do have an idea of where the mold is originating, adding a tape-lift, swab or bulk (air filter) sample to your tests can help confirm if a moldy-looking area is indeed mold.  

If, however, an area of your home recently flooded, or you’re experiencing new or worsening health problems, we would recommend requesting a visit from a professional, experienced mold inspector who will not only take samples: they should first of all look at the moisture problems in the home which could generate the mold.  They will also be able to distinguish which type of test is appropriate, and if mold is discovered, whether it’s active mold growth that could be causing illness or inactive mold that’s been dried out and contained behind walls for years.   There is a big difference in renovation scope and cost for active mold and inactive mold!   We understand the health impacts of critically-contaminated spaces on one end of the spectrum, but since many leaks and humidity problems can be corrected in a local, economical way, it’s often not necessary to “gut” a home to remediate it well.  

Beware if the inspector only wants to do ERMI testing.  ERMI stands for Environmental Relative Moldiness Index and was developed by the EPA for research purposes only.  Despite its popularity among many mold inspectors and a number of mail-order labs such as EnviroBiomics and Mycometrics, ERMI has a number of drawbacks that can cause it to miss major mold problems, or overstate minor ones.  

In the end, just as a leak in your outdoor shed can make a stinky, decaying mess, mold can do the same indoors–and it may or may not affect your family’s health, depending on their genetic makeup and previous experiences with mold, chemicals and toxins.   However, we do hope that you will take any water intrusion or humidity problem seriously, because it has the potential to do serious harm.  

Photo by Pawel Czerwinski on Unsplash

Can burning a candle really reduce the mold spore count in my home?

Can burning a candle really reduce the mold spore count in my home?

Candles are a super-popular home decor item, and they add to the ambiance of a home through their appearance and smell, making it cozy or sophisticated or elegant with the “snap” of a match or lighter.  Unfortunately, the VOCs and particulates aerosolized by most candles make them more of a health detriment than a plus.  Burning a candle against mold, however, is a new concept, and like so many other products, the benefits all depend on WHICH candle you’re burning!   

Several companies have formulated candles that actually reduce mold spore counts in the air while the candles burn.  Like the Bipolar Ionization technology, where ions are sent out into the air instead of using a “filter” to grab all pollutants, the flame of the candle is not the main part that kills mold spores.  For the EC3 Air Purification Candle by MicroBalance Health Products ($43 for 3), the flame melts the non-toxic soy wax and releases a proprietary natural blend of citrus seed extracts, that includes Grapefruit Seed Extract (GSE). (per the manufacturer’s answer to client question here).  The product is all natural and uses no petrol-chemicals, unlike traditional paraffin candles.  

In studies, GSE has been proven to be incredibly bactericidal even at minute dilutions: at 1:512 parts water to GSE, the extract kills gram negative and gram positive bacteria, yet is non-toxic to human cells. (The effectiveness of processed grapefruit-seed extract as an antibacterial agent: II. Mechanism of action and in vitro toxicity)

However, other studies are not so positive.  In this 1999 study, 6 commercial GSE formulations were tested and 5 of the 6 were very effective against 7 germs, including 1 yeast.  It turns out that these 5 GSEs also had traces of the synthetic antiseptic agent benzethonium chloride (a quat), while the 1 remaining GSE that contained no preservative, did not effectively eliminate the germs.  The study concluded “Thus, it is concluded that the potent as well as nearly universal antimicrobial activity being attributed to grapefruit seed extract is merely due to the synthetic preservative agents contained within. “  The American Botanical Council (proclaiming to be “your source for reliable herbal medicine information”) also confirmed, “A significant amount, and possibly a majority, of ingredients, dietary supplements and/or cosmetics labeled as or containing grapefruit seed extract (GFSE) is adulterated, and any observed antimicrobial activity is due to synthetic additives, not the grapefruit seed extract itself. “

Digging into studies on GSE against fungus found that these were mainly in liquid form.   This one showed it was effective against different types of fungus that affect asparagus plants, when used in conjunction with clove, Dahlia and Chrysanthemum extracts.   This study pitted GSE against candida (yeast) strains that tended to form a biofilm on denture resins, and it did very well.  Another study of GSE showed that it eliminated 3 Candida species that commonly infected patients with dentures.   This is great news for sufferers of oral candidiasis, but does aerosolizing citrus seed oil extracts (including GSE) work the same way?  

Although it’s not clear how citrus seed extract vapors attack mycotoxins, we did find that the EC3 candle was tested by RealTime Labs in 2012, with excellent results.  According to the letter from the lab (copied from this mold expert’s website), “Results showed that within 3 hrs of exposing the EC3 candle to known concentrations of mycotoxins, no mycotoxins were detected, if known levels of any mycotoxins were 250 ppb or below.  Concentrations of 500 to 1000 ppb were decreased by 90% in 3 hours…Given the experimental situation created in our laboratory, the EC3 candle will eliminate aflatoxins, ochratoxins, and trichothecenes at concentrations of 250 ppb or less and will reduce these toxins by 90% in 3 hrs at concentrations of 500 to 1000 ppb.”

Given that mycotoxins are hard to destroy (most are highly resistant to heat and antimicrobials), this is very good news.  MicroBalance Health Products, the maker of these candles, is an established company (founded in 2009) whose products are based on the work of Dr. Donald Dennis, a practicing Ear, Nose and Throat (ENT) surgeon who discovered that mold was the culprit of many of his clients’ health issues.  The citrus extract blends he developed are also used in their body supplements (shown here in their free sinusitis wellness protocol), so it’s probable that the citrus seed extracts used in their products (not just the candle) are of great purity.  

Another company, CitriSafe, also uses citrus extract blends in their Remedy Maintenance Candle ($16 for 1 candle) and mold solution sprays, however I could not find any studies or testing data for them.  The research behind Citrisafe Remedy products and MicroBalance Health Products (as well as BioBalance) was developed by pharmacist Dr. Walter Hayhurst and JW Biava (founder and CEO of Immunolytics, a laboratory that tests for mold and mycotoxins) in the early 2000’s. (podcast with JW Biava), therefore it’s likely that the citrus extract blends in these products are very similar.

Both MicroBalance Health Products and Citrisafe recommend using their candles with a broader treatment plan for mold in your home, but if there’s a space you spend a lot of time but you have less control over, like your office or hotel room (if you travel a lot), the candles may help significantly to clean up the air in that space.  When it comes to mold, every little (non-toxic) bit of help is welcome!

Enduring the Rainy Season

Enduring the Rainy Season

Many kinds of climates may exist in your state, from hot and dry to cool and humid, depending on your elevation, weather patterns, proximity to water, etc.  Although mold can grow anywhere (even in the desert!), more water definitely means more mold.   Your “rainy season” can come in January or July…but it matters most that you are ready for it and know what to expect!

Taken from somewhere that REALLY gets their share of rain, in the Philippines it is common for people to get sick during the rainy season and even while transitioning from one season to the next.  The following advice from the Philippines could go a long way in the US, as well!

  1. Pack your rain gear.  An umbrella is a must on days that it might rain, which includes some that start out sunny!  We’re not saying that getting wet automatically makes you sick, but here’s the connection: wet clothing can lower your body temperature.  Lowered body temperature causes the blood vessels in the nose to constrict, which in turn limits the number of white blood cells that can come to your mucous membrane to fight off infections.  This is the type of lowered immune response that leaves you susceptible to viruses and microbes!
  2. Warm up quickly after you get wet by taking a warm shower, or at least changing into warm dry clothing.  Making a habit of washing your hands after traveling also helps!
  3. Drink lots of clean water!  This is another part of keeping your body’s immune system healthy.
  4. Use mosquito repellant: It seems like new mosquito-borne diseases are discovered every year, so if you’re going to be outside, make sure they don’t target you by applying a non-toxic repellent like Wondercide Insect Repellents
  5. Make sure that mold is not creeping into your home with water intrusions.  More water outside running over your home can lead to small or major leaks, which can go undetected if you aren’t vigilant!  Keep bedroom doors open for ventilation and check unused rooms at least weekly for any signs of leaks.  You may want to also leave ceiling fans running to increase air circulation, which has a drying effect.  Mold spore counts will increase outdoors during the rainy season, but you can keep them down indoors by:
    1. Using a HEPA air cleaner:  Medify has a great selection of air purifiers that are simple to use and a good value for the size of room purified. 
    2. If you believe that mold spores are increasing in your home’s air, there are several ways to deactivate them. Plugging in a Germ Defender, Upgraded Air Angel Mobile or installing a Whole Home Polar Ionizer, all of which use bipolar technology, kills mold in the air and on surfaces. Alternatively, Air Purification Candles actually lower the spore count.  They don’t have fragrance so you don’t have to worry about nasal irritation.  You can check out our article on them here!
    3. Keep a close eye on humidity levels in your home with these inexpensive humidity sensors–place them in several rooms so you don’t have to look too long to know what’s going on with the humidity!  If you see it creeping up, it may be time to research dehumidifying settings on your HVAC system or add a dehumidifier.

Your environment may make you feel like you’re living underwater, but do your best not to let it affect your health or the health of your home.  Where there’s moisture, there’s life–just make sure it’s the beneficial, beautiful kind by preventing mold  and microbe growth.

It’s a dehumidifier that doesn’t use electricity AND has no moving parts!

It’s a dehumidifier that doesn’t use electricity AND has no moving parts!

Our clients know that here at HypoAir, we’re all about managing humidity for a healthier home.  If your house is above 60% humidity, you can start to have mold problems (the higher the humidity, the more quickly mold can grow).  We’ve written on dehumidifiers of all sizes for any room in your home, but none of them tops what this invention does.  It’s a passive dehumidifier that “sucks” the moisture out of air and evaporates it outside with help from the sun, even when the outside humidity was higher than inside!

Some of the best inventions have been developed by observing nature, called biomimicry.  In this case, researchers observed how trees “transpire” moisture, which includes lifting water from the roots to the leaves, where it evaporates through the pores, or stomata, of the leaves.  Thus, there are two parts of the tree that function in transpiration: the trunk of the tree contains xylem, which are very small capillaries or “straws”, and the pores in the leaves.  The sun’s energy starts the evaporation process and actually creates a negative pressure in the xylem, essentially sucking water up from the ground to the leaves.  (How do large trees, such as redwoods, get water from their roots to the leaves?)  

Researchers searched for similar behavior when they developed materials to mimic this water movement.  Two different materials were needed: one to absorb the water from the air (super-hygroscopic) and one to readily enable it to evaporate using the sun’s heat.  Metal-organic frameworks (MOFs) have been the subject of enormous research in the last decade.  They are like activated charcoal on steroids; because of their structured pores, internal surface area is huge.  When comparing the surface area per unit weight, the activated carbons are 400–2000 m2/g, zeolites up to 1500 m2/g, and MOFs are in the 1500–7000 m2/g range. MOFs are the porous materials with the highest surface area, with an ultra-high porosity of up to 90% of free volume.  (MOFs vs. other porous materials for carbon capture)  On top of this, MOFs can be custom-built to “adsorb” many different gasses or liquids, such as water, VOCs, metals, etc.  Thus, it made sense to make a very thirsty (hygroscopic) MOF to suck up water vapor, also known as a desiccant.  The researchers decided to try impregnating Lithium Chloride (LiCl, a salt) into an MOF. MOFs are typically granular, like sand, but the researchers wanted this component to be self-supporting, so they decided to nanospin the MOFs into a nanofibrous membrane (NFM) using polyacrylonitrile (PAN), a synthetic polymer resin.  The NFM would also enable the component to have a fast moisture absorption–desorption rate.  Thus, the “straw” component of the dehumidifier is abbreviated (PAN/MIL@LiCl) NFM, with MIL describing the “multilayer”. 

Passing the water vapor through to the outside of the space, the other component had to allow heat from the sun to evaporate this water, creating the “wicking” action.  This is the photothermal component.  Carbon black is a fine black powder produced by partial burning and pyrolysis of oil residues or natural gas at high temperatures.  (Carbon Black 101)  The black color works well to absorb solar heat, and adding it to a PAN NFM (PAN/CB) allows for great surface area, and thus evaporation rates.  The two layers put together are abbreviated PAN/MIL@LiCl-PAN/CB or for short, PML-PC NFM.

How did this layered dehumidifier configuration work out?  Impressively!  Being semi-flexible, it could be laid flat as a dehumidifier “panel” in a roof, or deformed to allow for water harvesting from the air (see diagram below). The scaled-down model of a house was constructed with dimensions of 40 cm × 50 cm × 40 cm, and a window with an area of 6 cm × 6 cm was designed for bilayer membrane installation. When light from the solar simulator illuminated the surface of the bilayer PML-PC NFM, the moisture in the indoor air was pumped by bilayer PML-PC NFM and simultaneously transported outdoors in the form of water vapor. The moisture actively moved from a high-humidity to a medium-humidity environment and also from a high-humidity to an ultra-high humidity environment through bilayer PML-PC NFM under sunlight irradiation. This is a unique advantage in terms of the dehumidification ability of the novel NFM-based moisture pump compared with traditional desiccants.  When the device was placed in an environment with an ambient humidity of 46%, the indoor RH was reduced from 70 to 48.9% within 2 h using bilayer PML-PC NFM.  When the device was placed in an environment with an ambient humidity of 80%. The indoor RH in the house model steadily decreased from 70 to 58.3% within 2 h using bilayer PML-PC NFM.  These are lower humidity ending points than that of the NFM without a photothermal layer. (Super hygroscopic nanofibrous membrane-based moisture pump for solar-driven indoor dehumidification)

Source: (Super hygroscopic nanofibrous membrane-based moisture pump for solar-driven indoor dehumidification

Now, what if night falls or clouds obscure the sun?  Since the experiment used a solar simulator of 1 kw/M2, which is the maximum amount of sunlight that can be had at the equator on a cloudless day, that would be a pretty intense artificial light needed to keep dehumidifying through the night or clouds.  For these reasons, this material would work best in an area with a high percentage of sunlight year-round, and lots of need for dehumidification (like the tropics).  Is it affordable?  Although the information in this paper is now 3 years old and other water-harvesting MOFs have been created, we don’t see any commercial applications yet, sadly.  Making such a technology affordable will do a lot to improve air quality in homes where energy (and dehumidifiers) are relatively expensive, since it doesn’t require electricity to condense humidity or regenerate the desiccant.  It could also allow many people to have access to clean drinking water by “pulling it out of thin air”.  We think it’s just too cool of an idea to keep to ourselves!

As for “natural” dehumidifiers, there are many materials that are hygroscopic: rock salt, calcium chloride (DampRid), baking soda, even sugar and honey.  The most efficient material we’ve seen is rock salt, most of all because it can be recycled: simply retain the liquid, let it evaporate in a pan outside in the sun, and break up the chunks to reuse it again (be sure to protect animals and children from drinking it by placing a screen over it!).  The downside to a rock salt dehumidifier is that it will only draw humidity down to 75%, which is the humidity that causes the salt to dissolve.  Also, using it in basements or porous/non-sealed areas is quite a lot of work for the results, as moisture is constantly being replenished from the ground through the concrete.  Finally, if you don’t recycle it, the liquid is quite toxic to vegetation, animals and can damage some surfaces.  

Some plants also act as natural dehumidifiers.  Check out the videos of the desert plant T. aphylla, native to the Middle East, which moves salts from the local soil to its branches and uses them to harvest water from the air!  The salt crystals on its branches change from a crystal structure during the day (low humidity) to drops of liquid at night, which it can absorb through its foliage.  If you have a normal “green thumb”, check out this article for a list of indoor plants that dehumidify.  Of course, we are all for natural, non-toxic and low-energy ways to improve the air in our homes!

Photo by Vivint Solar on Unsplash

10 Ways to Improve Air Quality in Your Home for $50 or less!

10 Ways to Improve Air Quality in Your Home for $50 or less!

We all like easy, cheap tasks that bring a lot of satisfaction when they’re done.  Why not focus on your air quality the next time you’re in the mood to DIY?  Here’s a list of things that only take a little preparation and a little time, but can make a big impact in the air in your home.  

  1. Are you on an HVAC filter change schedule?  If not, it’s time to change that!  Dirty HVAC filters have a number of negative consequences–from increasing the dust and mold in the evaporator/air handler, to possibly even causing damage to your expensive system.  If you don’t have any filters, just click here and order some from us, and we’ll have them at your door shortly!  If you’re not sure which “MERV” to order, read through the information on the page, and/or contact us to find out.  (Per filter cost is much less than $50).  Then, set a reminder on your calendar to change them regularly.

  2. Clean and adjust your fans for better air circulation: Fans make a BIG difference in quality of air because airflow is critical in this process to 1) get air moving, which reduces pockets of stale air or humidity, and 2) introduce fresh air, which dilutes contaminants and refreshes us!  (for more info check our article here)  Here’s a short list of fans that will need attention: 

    1. Ceiling fans need periodic cleaning and seasonal direction adjustment.  Get yourself an extendable duster that can be used wet or dry (we recommend dry first, then spritz with some TotalClean to get it cleaner).  The fan should also rotate in the correct direction: clockwise in the winter and counterclockwise in the summer (there should be a switch on the remote OR on the fan motor to control rotation direction).  

    2. Portable fans are important for spot cooling and can get pretty dusty!  Some are easy to remove the grill cover, the fan blades and dump them in a sink with soapy water.  For others, use a brush attachment on your HEPA vacuum to clean all accessible surfaces.  

    3. As long as you have your HEPA vacuum with brush attachment out, just scoot on over to the refrigerator and use it on the front grille at the bottom (and/or the back of the fridge–some models have a grille there also).

    4. Bathroom vent fans can also get pretty dusty.  Turn off the power at the wall and if you can, get on a ladder to remove the grille and dust out the inside of the unit, wash the grille and replace it.

    5. Kitchen exhaust fans probably top the list in the grime category!  We have a short article on how to clean them, and even use activated carbon media to make the kitchen smell better!

  3. Fall is the perfect time to get more fresh air into your home, but sometimes more filtration is needed.  Our Nanofiber PureAir Window Screens catch more fine particles than regular insect screens, so you can have fresh air without the dust and pollutants that normally come with it.   If you have window screens in your home, replacing them with this material is very easy, even for beginners, and we recommend several methods to do it on the product page. 

  4. You know that accomplished feeling when you’ve just cleaned the inside of your car?  Well, here’s a shortcut…order and replace your car’s Cabin Air Filter with a new one that has activated carbon in it.  True, the coffee cup behind your seat won’t disappear, but your car will smell much better, and it will filter out more pollution from other vehicles on the road. (and it might even inspire you to clean the whole inside of your car!)

  5. It may sound like a paradox, but cleaning the dishwasher every few months is really necessary!  As you can see in this video on how to easily remove and clean the filter, the hidden parts can get nasty and slimy!  If you don’t have time to properly take apart and clean your dishwasher, you can try using a highly-rated but non-toxic dishwasher cleaner, which uses citric acid as its active ingredient.  You can use TotalClean or a DIY cleaner to wipe down the door seals and any other parts that can’t be removed.

  6. Set yourself up for cleaning success!  Chances are, if you don’t have the right tools in the right place(s), cleaning will not spontaneously happen!  Case in point: I used to keep 1 spray bottle of TotalClean under the kitchen sink, and paper towels on my kitchen counter.  After researching and writing about the “toilet plume”, however, I knew I had to increase frequency of cleaning the toilet and other surfaces to at least every other day.  Here’s what to do:

    1. Keep a non-toxic spray cleaner and disposable wipes (like paper towels) in the bathroom so that you can easily clean surfaces every few days.

    2. Keep a stash of hand towels and bath towels in a closed bathroom cabinet to change them out several times a week.

    3. If you use a floor cleaning machine like my highly-rated CrossWave, make up a non-toxic cleaning solution and place it in a labeled jar so that you can break out your machine and get going at any time!  Here’s the recipe I like to use. 

    4. Keep a cleaner where you charge your phone.  (Yes, we’re not supposed to, but many of us keep our phones beside our bed at night.)  In that case, dampen a few paper towels with TotalClean and place in an airtight container so that you can sanitize your phone easily and quickly.  

  7. If you or any of your family are susceptible to toenail fungus or athlete’s foot, here is an uncomfortable fact:  fungus can live in your shoes for up to 20 months, and it can even persist in socks for several washings.  To get rid of fungus from washable shoes and socks, (and towels and sweaty clothing in separate loads), add 2 oz of EC3 Laundry Additive to the rinse cycle reservoir of your washing machine.  Not only will it eliminate mold spores from your shoes and clothing, it will also help to clean the washing machine, which can also harbor mold.  (Mold is a type of fungus).

  8. I cannot overstate the positive effects of adding mattress and pillow encasements, and ripping out old carpet in my bedroom.   My breathing and sleep quality have improved drastically by eliminating these materials where dust mites live and multiply.  Here’s what to do; it even works on old mattresses!

    1. Order a real mattress encasement and pillow covers for the bed(s) you want to protect.  Mattress encasements like these by Hospitology have tight-weave microfiber (which do tend to make you sleep warmer til you get used to it) and zipper ends that have velcro coverings so that no dust mites can get in or out!  This is death to dust mites; check out more encasement recommendations here

    2. When you decide to install your encasements, wash all your sheets and and blankets in hot water and your detergent of choice, so that any dust mites will die in the washer.

    3. Install your encasements (it may take another person because it fully encloses the mattress like an envelope that’s only zippered on one side), making sure that all toppers and thick mattress covers go inside the encasement.  You don’t want to leave anything that cannot be easily washed outside.  Now, any bugs living in your mattress and pillows will starve and be contained within the encasement (kind of gross but wayyy cheaper than buying new mattress and pillows). 

    4. Make your bed with fresh clean sheets and blankets and have a great night’s rest!

  9. The second part of the last recommendation is getting rid of old carpet in your bedroom (or any room you spend a lot of time in!).  Dust mites can also live in the carpet around your bed, especially if pets are allowed in your bedroom.  So, even if you don’t have an alternative flooring plan or budget at the moment, removing the carpet and fixing up the subfloor can still be a big improvement.   Warning: once you rip carpet out in one room, you’ll want to do it in other rooms, too!   Here’s what to do:

    1. Read our article on how to safely remove old carpet, and gather your materials/tools.  Make sure to find out how your local garbage or waste company requires you to dispose of it (bagged vs. unbagged, where and when).  Then, budget at least a few hours to get ‘er done!

    2. Fixing up the subfloor can be as simple as checking for splinters and sharp nails or screws, to sealing it with a non-toxic paint or sealer.  Check out a really helpful article here and a few companies that specialize in these types of paints:

      1. Ecos Interior Floor Paint

      2. AFM Safecoat Concrete Floor Paint

  10. Sealing Air Channels in your attic:  You’ll want to wait until cooler weather for this chore, but the idea is to tighten up your “building envelope” so that your expensive “conditioned air” (hot or cold) is not leaking out or unconditioned air leaking in!  All it really takes is some spray foam in cans, maybe some scrap wood or styrofoam sheet (to block off bigger gaps), the right personal protective gear, and time!  This is really worthwhile to do if you plan on adding insulation (must be done before adding insulation, check with your insulation company to see if they will do it).  

Okay, the last two projects take more time and effort than changing an air filter, but they do make a difference in your air quality.  In the case of #10, it should also reduce your home heating and cooling bill and stop pests and insects too.   In these cases, showing your home a bit of love will return the favor!

Photo by Heather Ford on Unsplash

Air Filter Thickness–is thicker better?

Air Filter Thickness–is thicker better?

All of the homes I’ve lived in (and there have been many) used 1” thick furnace filters.  Far and away, this is the most popular size.  I hadn’t even realized that there is a significant selection of  4-5” thick filters, until I recently went to a big-box home improvement store and looked at the actual size of some of the filters offered in the air filter aisle.  It was eye-opening.  Who uses these giant filters?  Mega-Mansions?

It turns out, even a modest-size home can use a thick filter.  The thickness of the filter:

  • Determines the frequency of filter changes.  With a 4” filter, you can go longer (3-6 months) between filter changes, vs. 1 month for a 1” filter, making life easier on the one changing the filter.   
  • Usually equates to more surface area (you’ll have to check the packages of 1” vs. thicker filters to verify).  Surface area is the square inches of filter material you are getting in the filter.  With thicker filters, they generally do give more surface area, because the pleats are deeper and more tightly spaced.  More surface area means that the pressure drop across the filter is generally lower (which is better for your system).  
  • DOES NOT refer to capacity to filter smaller particles. (Look at the next point: MERV.)  

I took a look at a popular filter site, filterbuy.com.  Here’s the comparison:

20x24x1”: (6) MERV-11 filters for $9.98 each (up to 1 month change) = $9.98 per month

20x24x4”: (6) MERV-11 filters for $19.38 each (up to 3 month change) = $6.46 per month

So, if you actually change on schedule, it seems the thicker filters can also be more economical. 

Filtering capacity: As I mentioned above, filter thickness does not affect the particle sizes that are filtered.  It is the MERV rating that does this. (Check out this post for an explanation on MERV ratings).   I selected MERV 11 for the above comparison, but MERV 13 is the optimal rating for home systems, because it filters out many of the finer particulates (from cooking, burning wood and outdoor air pollution) that can damage our lungs and bodies.  For the same size filter, a higher MERV will increase pressure drop across the filter, so make sure that your furnace/air handler will work with the MERV you select. 

I never thought of this before, but I’m sure it’s been tried because a filter manufacturer posted the answer: No, it’s not good to stack (2) 1” filters in a 2” space.  (colorfil.com)  The reason is that two 1” filters create much more pressure drop than one 2” filter, and the extra pressure drop is not good for your air handler.  Another expert (homeinspectorsecrets.com) likened this to stacking 4-5 coffee filters in your coffeemaker, adding coffee, and then turning on the machine.  It’s not going to turn out well!

Here is a summary of filter thickness:

If you want to increase time between filter changes, you can look into increasing the filter thickness.  For example, for the same cross-sectional filter area (20x24), a 4” filter can give you 3 months between changes, vs. one month for a 1” filter.  This can be good for those who are maintenance challenged (for example, an elderly person who can’t easily access the filter), or for rentals or seasonal properties where someone is paid to do maintenance.  Increasing the filter thickness may involve hiring an HVAC tech to install a deeper filter box.  Here are some points about changing to a deeper filter box:

  • If your filter is currently located at the return air grille (where the air from your house is sucked into the system for conditioning), then you’ll want to change the location of the new filter to be right next to the air handler.  This is because if you install a thick filter at the return grille, it can cause a pressure drop in the duct, which can cause air leaks from the attic, crawlspace or any other unconditioned space to come into your air duct leading to the furnace. You definitely don’t want dusty, hot attic air coming into your AC system, so it’ s better to locate this filter either underneath the furnace or alongside it (homeinspectorsecrets.com). 
  • If you are considering building a deeper filter box, also consider upgrading in MERV rating, up to MERV 13 (see next point).  The way to get a low pressure drop across such a filter is to make sure the filter box is big enough.  A simple rule of thumb for this is to allow 2.0 square feet of filter area (not counting pleats) for every 400 cfm (cubic feet per minute) of airflow.  For example, 600 cfm will require 3.0 square feet of filter (600*2/400), which can be achieved with an 18x24” filter (3.0 square feet) or a 20x24” filter (3.33 square feet).  According to Allison Bailes of EnergyVanguard.com, using this rule of thumb will avoid problems with pressure drop in your system, even with using thicker (4-6") MERV 13 filters.
  • If you are looking to increase filtration, meaning filter smaller particles from the air, you will need to increase the MERV rating on your filters.  Typically MERV 13 is the optimal residential filter, and it’s especially good for those with pets and/or allergies. 

We hope this article has cleared up some questions about these thicker filters, and maybe even induced you to switch over to them.  In this case, thicker is better!

Photo by Brett Jordan on Unsplash

Do Air Purifiers in Classrooms Reduce Illness?

Do Air Purifiers in Classrooms Reduce Illness?

Ahh, this is certainly one time when I’m glad to be working remotely!  As my co-workers send their children back to school, the illnesses (from the common cold to COVID-19) ramp up again in their families as germs get passed back and forth in classrooms.

In 2021, there was a lot of discussion about how to keep students and teachers safe from COVID-19.  Many school districts rushed out to purchase and install air purifiers, with ensuing debate on which purifiers were effective, or in fact, which were dangerous.  It can be a bit confusing, so I headed online to find studies on what works.  I found that across a wide spectrum of experts, the following three solutions to reducing illness and increasing classroom performance are, in order, 

  1. Fresh air ventilation

  2. HVAC system filter maintenance

  3. Air purifiers

This list really is in order of importance.  First of all, air purification technology is great, but we at HypoAir are always in favor of the most natural option first, one that replicates the outdoors, and that will be fresh air VENTILATION.  That’s right, you can put an air purifier in a classroom, but without a continual supply of fresh air to increase oxygen and dilute rising CO2 and virus and bacteria levels, the air purifier can only do so much.  Fresh air can be supplied through an open window if the weather or outdoor air quality is nice, but there should be fresh air ventilation built into every HVAC system so that air quality outside doesn’t limit the quality of air indoors.  Many buildings in the U.S., especially schools, do not meet recommended ventilation rates. The quantity of ventilation depends on how many people are in the room; it should be 15 cubic feet per minute per person. In one study coauthored by Rengie Chan, a research scientist at Lawrence Berkeley National Labs, 85 percent of the California classrooms included failed to meet the minimum standard of 15 CFM per person. Other studies show many American classrooms have an average ventilation rate of only 6 to 11 cfm per person.(wired.com). 

The problem with estimating actual fresh-air ventilation to a room by HVAC is that unless there is an intake from the outside in the system, air blown into the classroom is just being recirculated through the ducts and maybe only filtered once, not adding any fresh air at all.  This type of estimation requires a person knowledgeable about the building’s HVAC system.  If fresh air intake is included, then one expert (Joseph Allen, a professor at Harvard’s School of Public Health) estimates that for reducing Covid-19 risk, the air in the room should be completely replaced at least five times an hour. In a Boston school, the sensor registered about 400 cfm of fresh air coming in through the unit ventilator in one classroom. The room measured 1,010 square feet and had 9.5 foot ceilings: It had 9,595 cubic feet of air. Multiply 400 cubic feet per minute by 60 minutes, divide it by the volume, and you find that the air only gets turned over 2.5 times an hour, which was not sufficient. (wired.com)  However, when conducting another experiment in the same school, they found they could boost air changes to 17 to 20 air changes per hour by opening windows and doors.

An easier way to determine if ventilation is sufficient is by monitoring the CO2 level.  To demonstrate the effect of reducing CO2 levels on disease transmission,  researchers in Taiwan reported on the effect of ventilation on a tuberculosis outbreak at Taipei University. Many of the rooms in the school were underventilated and had CO2 levels above 3,000 ppm. When engineers improved air circulation and got CO2 levels under 600 ppm, the outbreak completely stopped. According to the research, the increase in ventilation was responsible for 97% of the decrease in transmission.(theconversation.com)

Since the coronavirus is spread through the air, higher CO2 levels in a room likely mean there is a higher chance of transmission if an infected person is inside. Based on the study above, experts recommend trying to keep the CO2 levels below 600 ppm. You can buy good CO2 meters for less than $100 online (check out our post including them); just make sure that they are accurate to within 50 ppm. (theconversation.com) What can it hurt to donate (or get together with other parents to donate) several CO2 sensors with remote readings, in order to check the levels of CO2 in your childrens’ classrooms?  

After fresh-air ventilation has been established, let’s look at air cleaning.  In any HVAC system, there should be at least filters in the air returns and they should be changed regularly.  By increasing the MERV rating on these filters to MERV 13, smaller particles like viruses can be filtered out to reduce illness transmission rates.  Changing the rating of the filters should be done in cooperation with the facilities manager in order not to overload the HVAC system, but it is quite possible even if filter box sizes need to be enlarged (see our post on Air Filter Thickness for how to increase MERV rating without increasing pressure drop). 

Third, air purifiers can be considered.  If the school has done what they can to provide adequate ventilation and HVAC filter maintenance, then air purifiers can add another layer of protection by filtering or killing the germs that get by these first two conditions.  In order to be effective, an air purifier must either:

  • pull all of the air in the room through a filter unit several times an hour, OR

  • Send out a non-toxic disinfectant that disperses to all areas of the room.

The first of these can be accomplished with units that include high-powered fans, but these can be noisy.  Noise in a classroom, just like in your home, can be distracting and debilitating for the teacher and students!  For this reason, air purifiers that depend upon air throughput for efficacy need to be evaluated for noise when running at the optimum fan speed for the size of classroom considered.  Also, replacement parts such as filters need to be considered in the total cost.  The cost of a HEPA filter (and possibly UV lamp) for every purifier, for example, can quickly add up to thousands of dollars a year when changes are needed in a school with dozens of classrooms.  Maintenance of these units will fall on the school’s facilities staff, who are likely already over-burdened with an increased cleaning schedule.  

The second option is one that HypoAir promotes because it really is akin to what goes on naturally outdoors.  Ions are one of nature’s cleaning devices, because positive and negative ions are continually floating through the air and reacting with allergens, viruses and bacteria, deactivating them.  These ions are naturally produced by natural phenomena in the air such as sunshine, lightning, crashing water like at the seashore or a waterfall, and plants.  Indoors, we produce them by passing a small electrical charge through stainless steel “needles” to produce positive and negative ions, which get distributed through the air to every part of the room (like adding drops of dye to clean water, soon every part of the water is changed!).  This is done nearly silently, because powerful fans are not required for distribution (any fans already in use in the room will boost circulation of the unit’s small fan).  In addition, maintenance on HypoAir ionizers is virtually nil, because no filters are required and there are no replacement parts.  The cost of running our ionizers is very small, as they use minimal electricity. 

So what about real world testing of these methods?  The CDC released a study on 123 elementary schools in Georgia in 2021.  The schools included did one of three things:

  1. Nothing

  2. Increased ventilation by opening doors, windows or using fans 

  3. Added HEPA filters to classrooms.

In schools that improved ventilation through dilution methods alone, COVID-19 incidence was 35% lower than the schools that did nothing, whereas in schools that combined dilution methods with filtration, incidence was 48% lower than the schools that did nothing.  The takeaway here is that ventilation and HEPA filtration work, even with some added cost for ventilation modification or filter replacements!  Doing nothing, on the other hand, increases the cost of lost school days, makeup time and medical costs for students and teachers substantially.   

It’s a new world with viruses and allergens challenging young and old alike everywhere, but the wisdom of fresh-air ventilation combined with the technology of purification can make it significantly easier to bear!

Photo by CDC on Unsplash

Why isn’t the fan making me cooler?

Why isn’t the fan making me cooler?

This is an odd post.  It’s about hitting an invisible barrier, one you don’t see until suddenly, things don’t work the way they’re supposed to.

When I see an article with the title “Fans Can Make you Hotter”, it’s an automatic click for me.  I rely on fans in every room of my home during most of the year to keep air circulating and help keep the air cooler.  How could fans ever make me hotter?

Well, we’re talking about extreme heat here: in an experiment, it was shown that fans used on volunteers in dry heat of 115 deg F heat index was more uncomfortable and detrimental than fans used on volunteers in humid heat with a heat index of 133 deg F.  In the first scenario, the lack of humidity in the circulating air caused their body temperature, strain on the heart, and thermal discomfort to increase.  In the hot and humid scenario, though, fans actually lowered body temperature and made them more comfortable.  

It’s not hard to understand why: think about a convection oven.  Above a certain temperature (104 deg F), dry air will start to impart its heat back to you, instead of whisking away heat from your skin.  Turning on a fan will only speed up the shift of hot air into the body, making you feel warmer, and potentially raising your body temperature to unhealthy levels.

In most parts of the US, dry heat like this is not a problem, but some areas of the west may certainly find it happening: garages, attics, and enclosed, unconditioned spaces quickly elevate in temperature and if there’s no humidity, be very careful of working there.  A fan in these conditions can hasten heat-related injury.  Here are some tips to stay safe:

  • If necessary to work in these conditions, wet clothing and make a wet headcovering so that the evaporation of water will cool you down.   

  • Take frequent breaks in a cool place (at least every 15 minutes)

  • Drink more water than normal and consume electrolytes

In this case it’s not the humidity, it is the heat!

Photo by Nathan Dumlao on Unsplash

From the Outside In: How to cultivate a healthy yard that will benefit your indoor air!

From the Outside In: How to cultivate a healthy yard that will benefit your indoor air!

Our yards say many things about our home and hopefully, they’re all good!  Because they surround our home, yards also directly impact our indoor air quality.  Here’s how to cultivate healthy air outside, because it will always permeate to the inside.

  • We wrote about the healthy heart benefits of green areas around the home.  To find the right trees and plants for your area, visit i-Tree Species.   Here’s some other tips for landscaping for indoor air quality:

    • Don’t plant shrubs right next to your foundation, so that mulch and soil will get air circulation and mold does not have continual shade and moisture to grow on surfaces.

    • Plants like lavender, basil, thyme, mint, lemongrass, chrysanthemums, petunias, marigolds and mosquito plants provide delicious fragrance and colors that also repel insects! (farmersalmanac.com)

    • Try natural pest repellants such as the ones we mention in this post, instead of toxic traditional repellants like malathion and pyrethoids.

  • Get the humidity right: if your yard is low-lying and frequently has standing water, it is very pest-friendly (mosquitoes, fleas and ticks all like water, not to mention mold!).  Consult landscaping companies to find the best solution for raising the elevation and/or draining water.

  • Whole-house generators are a popular addition to homes where there are frequent power outages or the possibility of extended outages (from severe storms or hurricanes, for example).  However, just like portable generators, they emit carbon monoxide (CO), carbon dioxide (CO2) and nitric oxide (NO), which can penetrate homes.  According to electricgeneratorsdirect, standby generators must be located at least 5 feet from windows and doors, and of course in compliance with local codes.   They can even be placed up to 18” next to the house where there are no windows or doors.  In our estimation however, they should be located farther from homes than the regulations require!  

  • It’s important that sewage lines are intact, so that liquids and gases stay where they should!  If they become damaged by cars or large equipment driving over them accidentally, call an inspector to view the lines with a pipe camera and assess repairs.

  • If you have a dusty road nearby, consider planting a row of trees or tall shrubs as a screen.  Bushy, hairy-leafed cotoneaster is a variety that stands tall above others in its ability to absorb particles and pollutants (theguardian.com)

  • Find a safe way to store garbage until it’s removed:  nobody wants to smell garbage, so it’s put outside where it can be “safely” stored until pick-up day.  But what about the smell?  You can try:

    • Finding a spot downwind where you can make a small hedge to shield the garbage from view and from direct sun

    • Making sure that the lid can be closed securely (bungee cords are great for this) so that critters do not get in.

    • Using an all-natural additive to remove smell and reduce flies and pests: Teraganix makes a number of microbial supplements for people, gardens, and yes even our garbage!  This one can be sprayed onto the garbage before closing the bag, or even poured down smelly drains.

  • Porches are typically cool, inviting places that say “come and relax”.  If you live near a busy freeway or road, however, pollution can travel farther than you realize, especially in the late night and early morning, traffic pollution drifts much farther than during the day. (LATimes.com)  This results from dropping temperature during the nighttime hours when the atmosphere traps car emissions, CO2, and other pollutants down near the ground. (yourairexperts.com)  During this time, it’s not good to be “porch-sitting”, but unless you have particle-filtering air purifiers inside (like a good HEPA filter), inside may not be much better. 

  • The sky is falling, the sky is falling!  If you live in a flight path or downwind of one, it’s probable that PM2.5 levels are substantially higher than in other areas.  Location may be unavoidable, but you can avoid trapping pollution next to  your house by not planting tall trees around the entire perimeter of your property or at least crosswind. Leave spaces for air to blow through and clear the pollutants.  

Interior home renovation may seem to be the most obvious way to increase interior air quality, but don’t overlook the yard outside, because what’s outside, eventually comes inside!

Is there mold hiding in your clothes?

Is there mold hiding in your clothes?

It has been one heck of a summer in the US!  More heat = more sweat, more sweat = more stinky wet clothes in the laundry hamper, and more wet clothes in the laundry hamper = more mold!   This is especially a problem with workout clothing or “outdoor work” clothing that get positively soaked with sweat.  My previous schedule of washing one time per week is not cutting it, because now I’m noticing that even after washing, my clothes are not smelling clean (I don’t use perfumed detergent).  Why can’t I get the mold out with just washing?

Mold is persistent.  Because we’ve been trained to save energy and that modern detergents and washing machines work well with cold water, I’ve basically gone to using cold water for all of my washing.  Cold water and detergent typically don’t remove mold, so after several cycles of letting them sit in my hamper, washing with cold water and drying, the smell intensified.  Something had to change!  This excellent article gives many non-toxic ways of getting rid of mold from clothing:

  1. First of all, the habit of leaving wet clothes in the hamper is not good.  If I can’t wash them right away, I need to hang them up to let the moisture dry out.
  2. If I can’t wash them right away, pretreating with a tea tree oil spray not only helps them smell better, but also kills the mold because tea tree oil is a fungicide!  Oregano Oil or Clove Oil will also work, depending on your fragrance preference.  Be sure to purchase pure oil without additives.  Here is how to make it: 
    1. Add one teaspoon of teatree oil to one cup of hot water; pour it into a spray bottle.  Shake the mixture.
    2. Spray the garment thoroughly, inside and out. 
    3. Let the mixture soak in for 10 minutes before washing.
    4. Pour the rest of the mixture into the washing machine or handwash basin.
  3. If you don’t like the smell of the essential oils (the smell does dissipate within a few hours), you can use hydrogen peroxide in a spray bottle (3% dilution works well) in the same way as the essential oils. 
  4. Borax has been around a long time for good reason– it is a good disinfectant and low toxicity (just don’t ingest it, inhale the dust or get it into your eyes). (ThoughtCo.com)  When mixed with hot water, it turns water into hydrogen peroxide. 
    1. Mix ½ cup of Borax with hot water in a large basin, stirring slowly until its fully dissolved.
    2. Soak the clothes in the mixture for at least 20 minutes.
    3. Pour the clothes into the washing machine with the mixture and wash for 2 cycles. 
  5. Vinegar and baking soda:  You’ve probably used this powerful combination before and know that it makes a foamy cleaning agent, except this time use it in separate wash cycles.
    1. 1st cycle: add 1 cup white vinegar to the detergent dispenser, with no other detergent.
    2. 2nd cycle: add ½ cup baking soda to the detergent dispenser and finish washing.
    3. Don’t ever combine vinegar and bleach!  This combination generates toxic fumes.
  6. Closets can be perfect for growing mold, because lack of air circulation can allow moisture to accumulate in the clothes, making them the perfect food source!  We posted an article “Can I avoid mold with JUST ventilation?” and the answer turned out to be oftentimes, you can.  Here are some ways to prevent mold from taking root in the nice clean clothes in your closet:
    1. Leave the closet door open.  If you are keeping your home below 60% humidity, usually this step alone can keep the closet from smelling musty–that first telltale sign of mold.
    2. Try not to pack clothing or boxes tightly together, again because air circulation around items is necessary to keep the humidity down in the clothes. 
    3. If you cannot keep the door open, try adding small dehumidifiers:
      1. DampRid is a brand name that makes a number of desiccant products that you can hang or set on a shelf or on the floor, but there are many comparable products.  Remember that water will need to be poured off, and the chemical absorbing the water will replaced, every so often.  This chemical is usually calcium chloride, which comes prepackaged in the replaceable refills.  Alternatively, you can make your own desiccant dehumidifier by purchasing silica gel or calcium chloride at the hardware store and placing it in small plastic bowls with the tops pierced (just don’t knock them over or the liquid may spill on the floor!)
      2. Small dehumidifiers can make a big difference in closets.  You can get a model to hang on a wall, or place on a shelf (just make sure there is sufficient space above and around it for air circulation).  The condensate container in these will also need to be emptied periodically (although the unit should shut off when full) so put a little reminder on your calendar to do that.  Here are some models that won’t break the bank:
        1. Eva-Dry ($22) makes several “wireless” models, which use silica gel desiccant which must be replaced every 20-30 days. This is a good option for smaller closets (up to 333 cubic feet) without a power outlet, and larger versions are available too.
        2. Eva-Dry also makes electric dehumidifiers; this model ($27) will need to be emptied every 3-4 days but it’s ultra quiet. 
      3. Many customers know that even higher humidity areas like bathrooms and closets can be kept mold free with the Mold Guard/Germ Defender.  It’s a powerful unit that emits a dense blanket of ions that can break apart/deactivate mold spores at the cellular level.  Perfect for spaces of 100 ft2 or under, this unit requires very little maintenance and can be purchased with optional charcoal filters.

The next time you put on clothing from the clean laundry and it doesn’t smell so fresh, it’s probably not you (or your deodorant), it may be mold.  Arm yourself with some natural anti-fungals like vinegar, baking soda, teatree oil, hydrogen peroxide or borax, and banish the mold from your wardrobe!

How to keep MILDEW out of your CLOSET

How to keep MILDEW out of your CLOSET

Closet doors are meant to keep closed, right?  Unless you are Martha Stewart, it’s likely your closet doors don’t stay open very long–if they close to begin with!  The problem comes when humidity and closed doors combine for a stinky problem: mildew and mold.

We sometimes think that mildew is a less toxic form of mold, but it is still mold nonetheless.  Mildew is a subclass of mold that exhibits a white or gray, flat, powdery growth, while the rest of the molds can get more fuzzy and colorful.  Both release spores, but unlike other molds, mildew doesn’t penetrate surfaces and grow into the materials it lands on (though it can still cause cosmetic damage). Instead, it grows on top of flat surfaces and often collects in places like cardboard boxes or your vintage leather jacket in the closet.  Not good!  (What is Mildew, Really? The Difference Between Mold and Mildew)

Since we know that mildew is a form of mold, we know that it needs several things to grow: a food source (ie. leather, clothing, and dust in general), moisture (even excess humidity) and air (although stagnant air is best because lack of circulation keeps humidity at surfaces high).  So, the best ways to keep mildew at bay in closets is to:

  • Clean out the dust and seal off any sources of dust

  • Keep the humidity down and ventilate

  • Store items for longevity and air circulation 

How the heck does dust get in the closet when the door’s closed?

Incredibly, some closets are like dust magnets.  If your closet is part of a tiled or vinyl floor area, dust bunnies can usually slide right under the door due to the slick surface.  If you have any penetrations in the ceiling (like a light bulb), then your closet may be part of a hidden circulation system where the framing in your walls conducts air currents throughout your home.  For example, closets near bathrooms may unknowingly supply air to the bathroom exhaust fan, if the fan’s ductwork is not sealed well in the attic or the lightbulb box is not sealed to the ceiling.  Then there are the closets that double as storage areas and HVAC equipment rooms.  If the HVAC unit is not sealed well, it just pulls air from the surrounding home into your closet.

  1. Seal

The way to keep out the dust is to seal these small air passages: at the ceiling, remove the light fixture and either use a caulk gun (less messy) or a spray foam can with a straw (very messy, be sure to cover everything!)  to seal the electrical box to the drywall.  If the closet is an upper story, you may be able to do it from above in the attic with less mess, and sealing all the ceiling penetrations may help with dust house-wide.  If you notice a lot of dust forming on the floor, it may be worth caulking the baseboards to the floor (if it’s tile or solid-surface) to seal that up as well.

  1. Clean 

Next, removing the dust should be part of a larger goal to store items properly so that cleaning will be easier and mildew will be less likely to form.  You’ll need a HEPA vacuum with brush attachments, and various storage containers.  If possible, empty the closet.  This will allow you to see all the walls and floor to see if there are any water leaks coming in that could be causing the mildew.  If not, use the vacuum to clean ALL the surfaces so you can get a fresh clean start!

It’s a great time to wash clothing and purge any items that you don’t use anymore by donating them.  Clean clothing is less likely to smell and deteriorate from body sweat and dust mites as well.

Stop right there!  If you had mildew in your closet before, you need to make ventilation changes to stop it from recurring.

  1. Ventilate/dehumidify

Mildew sometimes forms in closets because of lack of ventilation.  The great thing about moving air is that it lowers the moisture content of surfaces that come in contact with it.  If the air is not moving, the moisture content of surfaces tends to equalize with the stagnant air, and over time, mold is able to grow.  Also, if your closet is located on the corner or north side of a building, the insulation in the wall may not be sufficient to prevent warm house air from causing condensation on the cold wall.   Here are some tips:

  1. Refill the closet

Ok, you can start restocking the closet but remember this important point: maintain space between items so that air can freely circulate!  Don’t overstuff or compact items against the wall, either.  Wire shelving is great for maintaining circulation from top to bottom, too.

Storage containers matter, too–if possible, don’t use cardboard boxes because cardboard holds moisture, and it’s a favorite food for all kinds of pests: mold, roaches and silverfish like to eat it, and mice like to use it for bedding!  If you’ve cleaned and dried your clothing and excess bedding, packing them in clear storage bins is ideal so that you can easily see what’s in each.  For wool and moth-prone items, you can add cedar blocks to the bin to keep pests out.  These garment bags are great to keep dust off hanging clothes.

After mildew remediation, it’s important to check on your closet at least every few weeks until you’re sure that the changes are producing their intended effect: the ability to close the closet door without mildew taking root!

Photo by Annie Spratt on Unsplash

No-Demo Renos for Air Quality

No-Demo Renos for Air Quality

As of 2024, home renovation is still very popular in the US, but there’s been some interesting developments, such as “no demo reno”.  Eliminating demolition usually means less cost and less time--two very important commodities in renovation!  I’m waiting for designers to take it a step further to challenge themselves to redesign for air quality on a budget, to be judged by air quality experts.  Of course, you can spend thousands of dollars on the latest HVAC and purification systems, but you can also make a big impact with a lot less.  That’s what I’m talking about!

Whether you live in a sealed upper-storey apartment using forced air all the time or only use natural ventilation via windows and doors, furniture placement can affect the airflow and thus the air quality in your home.  According to a 2022 study, furniture layout is a key factor that affects the direction of airflow in a building. Different furniture heights can block or trap natural air or lower the direction of the airflow, thereby producing microscale positive or negative pressure.  It evaluated a naturally-ventilated school in Thailand which was located in a city which was plagued by high PM2.5 every January and May, mostly due to agricultural burning, and wind-blown dust. Under natural ventilation conditions, the direction of PM 2.5 distribution in the classroom was the same as that of the natural air. The air velocity and PM 2.5 concentration in the classroom were correlated positively, whereas the velocity increased, with the increasing concentration of PM 2.5. Adjusting the furniture layout of the classroom, as well as the size of the openings, affected the airflow and distribution of PM 2.5 within the classroom. 

Another study evaluated the pollution level of new furniture (VOCs).  Just by rearranging the furniture in an office with a forced-air system, there was a notable difference between the best and the worst ventilation effectiveness without any changes in the ventilation.  The key learning points were to: 

1) always try to place the pollution source (new furniture) as far away from your usual breathing zone (like sitting at the desk) as possible and, 

2) try to sit in the upflow field of the airflow.

If you aren’t trying to off-gas any new furniture, here are the rules that enable your HVAC to work at its optimum (How Furniture Placement Affects Your HVAC):

  • Make sure the furniture is not blocking any registers or vents.

  • Place furniture away from walls so that adequate airflow behind the furniture can prevent formation of mildew.  This happens when there is not enough air circulation (stagnation) to prevent humidity from saturating surfaces.  For more on how you can avoid mildew with better air circulation/ventilation, check out our article here.

  • Don’t block any windows or doors when placing large pieces such as couches or dressers near them

If you do need to obstruct a vent, try to use a deflector on the register so that air flow is directed to an open area.  They come in a number of shapes and sizes, even adjustable, to match your register/grille and desired direction of airflow.

How to visualize airflow in your space

There are professional engineering programs that can help “see” airflow, but they take quite a bit of measuring and input to get a simulation.  On the simple side, you can use the following to “see” airflow, and adjusting furniture position, window openings, vent positions and fan positions and speeds to modify air currents.

  • A helium balloon that has neutral buoyancy that “hangs” in the air below the ceiling will move with air currents (you can tie or tape a small weight onto it to adjust height).

  • A bowl of warm water with a chunk of dry ice (frozen CO2) will give off fog that moves with air currents (just be careful to use thick gloves when handling!)

  • Old-fashioned soap bubbles (you can make a wand by twisting a paperclip into a loop and use dish detergent and water) blown straight up into the air will tend to move in the direction of other air currents.

  • Candle flames/smoke may also show the direction of air currents.

  • Tape streamers or tissue paper in doorways to see which direction the air flows (tinsel also works).

  • Anemometers are fun devices to play around with, but unfortunately they usually only work very close to a vent or fan; they don’t move with minimal airflows. 

Windows: Don’t forget to pull back curtains or remove them altogether if you are using natural ventilation, because blocking windows with curtains blocks airflow and light!  Curtains are usually necessary for privacy, but you might consider trying sheer or loosely-woven curtains or a decorative fabric screen placed a foot or two inside the window, for more airflow.  If you want to open windows without letting in pollen or air pollution, check out our Nanofiber PureAir Window Screens and Window Ventilation Filters.

Fans: Portable fans can set atop furniture or even be hung on the wall to increase airflow.  Take the time to clean your ceiling fans and make sure they are running in the right direction (clockwise in the heating season and counter-clockwise for the cooling season).  

Even if you’ve lived in a space for a long time and think you have tried “every possible arrangement” of furniture, the act of rearranging furniture every so often is not futile for the following reasons (Rearranging Furniture Could Help You Use Space More Effectively and Give You a Mental Boost):

  • Moving furniture will expose dirt, dust and allergens so that you can clean under it, improving indoor air quality.

  • Moving it may force you to remove or store clutter that also collects dust

  • Moving furniture could expose other air quality problems like hidden leaks or mildew, pet stains or pest infestations

Better furniture arrangement can help you to feel less stuffy and more energetic, even if the airflow changes are minute.  Just a few last tips before you get busy redesigning a room: 

  • remember to use a measuring tape first before trying to move heavy or large furniture to a new spot! 

  • Have your cleaning supplies at the ready to vacuum up dust, cobwebs, pet hair, etc..

  • Call on your friends not only to help with the moving, but also to lend ideas.  

  • If you don't have plants, consider adding a few strategic plants as natural air purifiers (and a pop of color!)

  • Plugging in a small air purifier with a fan like the  Germ Defender or Upgraded Air Angel Mobile will freshen the air and add airflow on a micro scale.

Photo by Nathan Fertig on Unsplash

Surround yourself with trees, and your heart will thank you for it!

Surround yourself with trees, and your heart will thank you for it!

We tend to surround ourselves with what brings us comfort.  It might be your favorite music, your favorite color, your favorite art, and even your favorite pillow or type of sheets when you go to bed.  What if your source of comfort actually made you healthy?  Where you live and what you do with your property is an important choice that can affect your heart health.

We’ve been told for some time that plants have psychological and physical benefits–just look at this page of studies!  A new study (2021) correlates the proximity of living near trees, to arterial stiffness.  According to a 2010 textbook, “Arterial stiffness describes the rigidity of the arterial wall. In the last decade, there has been increasing interest in the potential role of arterial stiffening in the development of cardiovascular disease in adults.”  In addition, the 2015 book Early Vascular Aging states, “Arterial stiffness is a hallmark of arterial aging. As with all other organ systems, changes in the vascular system are induced over time.”  This is very important, because cardiovascular disease (CVD) is the leading cause of death worldwide.  Although many associate CVD with genetics, “recent estimates suggest that up to 70%–80% of CVD burden could be attributed to non-genetic environmental factors, such as lifestyle choices, socioeconomic status, air pollution, lack of surrounding greenness (2), and residential characteristics (2018 study). Indeed, emerging evidence has shown that living in greener areas results in improved health and is associated with lower mortality (2016 study on mortality of women, 2016 study on green spaces and mortality), and reduced CVD risk (2019 study, 2012 study).”

How does the “proximity to greenness” cause these positive effects?  Is it because vegetation promotes exercise or a healthier lifestyle?  Or because it reduces stress?  Trees do have the ability to filter and block particulate matter, and it has been shown that people living in greener areas were exposed to lower levels of volatile organic compounds (2020 study).The 2021 study focused on reduction of pollution, particularly ozone and PM, due to plants and trees in specific radii around the home, and the effect of the reduced pollution on the participants’ arterial data.

What is proximity to greenness?  The study used satellite-derived normalized difference vegetation index (NDVI) for a 200-m and 1-km radius around each participant’s home; the 200 m range was directly around the home, while the 1 km radius indicated walking distance.  Data on ambient levels of pollutant concentrations were retrieved from regional EPA-validated monitoring stations in the Louisville, KY region, that report daily pollutant levels.  The data included PM2.5, PM10 and ozone. 

Here are some specific results: 

  • At smaller radii (200 m) buffer around the home, inverse associations between standard deviation of NDVI and augmentation pressure, aortic pulse pressure, and aortic systolic pressure were observed (as greenness goes up, arterial stiffness goes down). 
  • Significant positive associations between several arterial stiffness metrics and pollutants in low greenness areas were observed, whereas the association between pollutants and arterial stiffness measures was not significant in areas of high greenness (as greenness goes down, arterial stiffness goes up).
  • Arterial stiffness was only associated with NDVI at the 200-m radius, but not the 1-km radius, giving support to the theory that because roadways are sources of pollutants, street trees within a 200-m radius around the individuals’ residence would be more relevant in blocking exposure to pollution. 
  • It was shown that ozone, but not PM2.5, was significantly associated with higher augmentation index (increased arterial stiffness). This suggests that ozone-induced effects on arterial stiffness are independent of PM2.5 exposure and potentially stronger.
  • In addition to modifying the effects of air pollution, proximity to greenness may improve cardiovascular health by decreasing mental stress. Exposure to natural outdoor environments has been found to be associated with better mental health and could facilitate stress reduction (2017 study), and neighborhood greenness is associated with lower levels of self-perceived stress and depression (2018 study), particularly in older adults. In our work, we have found that higher levels of residential greenness are inversely associated with urinary levels of the stress hormone—epinephrine (2018 study). Hence, it seems plausible that some of the effects of greenness on arterial stiffness may be mediated by a reduction in mental stress. 

How can we apply these findings to our own lives?  Since “greenness” is good for our bodies, plant as many trees and shrubs as possible, and encourage your neighbors to do so as well, by letting them know how good it is for them and the neighborhood.  The 200 meter radius is equivalent to 656 feet, which when converted to square feet (656 x 656) is equivalent to 2.3 acres.  That is a big green space that not many people own for their own property, but when spread out over a neighborhood or nearby park, it is certainly achievable.  If you live near a busy highway or road, definitely plant as much green area on the border of your property as you can. 

Some tree species are better than others at absorbing pollution, because as we’ve mentioned in other posts, some plants take in ground-level ozone, while other plants emit isoprene, a VOC that reacts with other atmospheric chemicals to create ozone. (Scientific American).  You definitely want the former type!   Here are some tips:

  • A free online tool called i-Tree Species helps you to select the best plants depending on desired hardiness (after all, if the plant won’t live in your area it won’t do much good to introduce it), mature height and environmental factors such as air pollution removal and air temperature reduction, among other factors.
  • In one recent study, Barbara Maher and colleagues at the University of Lancaster tested the ability of nine tree species to capture PM in wind-tunnel experiments. Silver birch, yew and elder trees were the most effective at capturing particles, and it was the hairs of their leaves that contributed to reduction rates of 79%, 71% and 70% respectively. (bbc.com)
  • Conifers, such as pines and cypresses, are the best pollution filters, while London plane, silver maple and honey locust ranked above average too, according to Jun Yang, an urban ecologist at the Center for Earth System Science, Tsinghua University in Beijing. (bbc.com)
  • If you have the opportunity to give input for city-wide greenery initiatives, be aware that taller species of trees can trap pollutants in areas, so sometimes shrubs are better when narrow streets are surrounded by tall buildings. 
  • If you do have a large property or even a city park to design, remember to diversify the species so that certain pests or adverse conditions like too much or too little rain will not wipe out the whole property.  

In all, green spaces mean gold stars for your heart health, so it’s time to start seeing green!

Photo by Pankaj Shah on Unsplash

Did you know that there is a science called “Building Biology”?

Did you know that there is a science called “Building Biology”?

In my quest one day to find individuals who are qualified to give advice on healthy homes, I ran across this term: Building Biology.  Building Biology is a building philosophy and science that originated in Germany in the early 1960’s, as “Bau-Biologie”.(econesthomes.com)  World War II forced a massive rebuilding effort in Europe and many buildings proved to be unhealthy for their residents.  Europeans realized, before North Americans, that residents’ health is very dependent on the health of their homes, so they incorporated 25 principles of nurturing environments into this field of study.  Indeed, one can see that if they followed all 25 principles, there would be no reason for ill health due to the home or its location!  It’s a holistic approach to building. 

Holistic is “characterized by comprehension of the parts of something as intimately interconnected and explicable only by reference to the whole.” (Oxford Languages)  In theory, it is a very sound practice to look at the “whole” rather than just the parts!   However in the US, “holistic” often has a bad connotation.  For instance, the term “holistic medicine” is often heard in national media sources to sarcastically or derisively describe all manner of “folk remedy" health care choices that don't usually involve actual MDs. (quora.com)  In a country of doctors who are mainly paid by insurance companies with clear financial incentives, holistic doctors tend to be in the minority.  For the same financial reasons, holistic homebuilding is in the minority as homeowners seek to build the best-looking (but not necessarily healthiest) home for their budget, and rising material costs may force builders to cut corners in material quality. (infotel.ca)  In defense of the “science” of Building Biology, there are specific test methods and evaluation guidelines used by Building Biologists.  “Building biology is science because it creates knowledge, practical to apply, practical to use knowledge, because building biology pursues research, finds facts, informs, and uncovers the truth. Building Biology Testing Methods are objective, transparent, reproducible, science-based. Knowledge forms the basis for change, improvement. Frequently, building biology ideas and pioneering projects have paved the way for necessary and long overdue scientific research. Frequently, building biology creativity and courage to bring up painful subjects have led to more sensible and compatible industrial products that protect humans and the environment. All activities within the framework of Building Biology Testing Methods are based on human needs and the nature, not the industry, not politics, not exposure limits or regulations, not the public health office, not research that got lost in too much theory and tangled in dubious ties. We building biology professionals are independent and do not care about science when science loses sight of humans and nature, when incalculable risks are generously accepted, when it turns into a wish foundation for an insatiable industry. Building biology is an essential addition to science, blazing a trail for research. Building biology blows life, especially with practical relevance, into orthodox science.” (Questions about the Standard of Building Biology Testing Methods and the Building Biology Evaluation Guidelines)

There are many of the 25 principles that relate to Healthy Indoor Air, a main focus for us at HypoAir.  We’ve written on these extensively without referring to Building Biology, but we’re definitely in agreement that a holistic approach is the best one when it comes to your health.  It all depends on your priorities.  If you have an overarching goal to make your home as healthy as possible, using materials and methods that mimic the good parts of the outdoors, then we’ve found it will positively affect your health!  Compromises need to be carefully weighed before a major investment, because sometimes it’s very difficult to regain health when a poor decision is made.  Many leaders in the fields of holistic medicine and mold sickness, just to name a few, have past stories of poor health due to living situations that forced them to make radical changes and research to resolve and heal.

How different are these principles from the typical “green buildings” of today?

Many green building principles would align with Building Biology principles.  Take these three Building Biology principles: 

  • Strive for a well-balanced ratio between thermal insulation and heat retention as well as indoor surface and air temperatures

  • Use humidity-buffering materials

  • Keep the moisture content of new construction as low as possible

However, the methods of achieving them are very different.  Traditional green building would use non-toxic modern materials to include vapor and air barriers to prevent moisture ingress.   Building Biology prefers breathable walls via Mass Wall Construction for the building envelope.  “Alternative natural materials such as earth and straw or certain types of manufactured blocks have the ability to buffer large amounts of moisture. These historically derived methods of construction differ from standard cavity wall construction techniques in that manufactured vapor barriers are not installed to retard the flow of vapor through the walls. Instead vapor is allowed to naturally flow through the massive walls. Because temperature change in the flow-through process occurs very slowly and because these hygroscopic materials such as wood and clay have the ability to adsorb and desorb large amounts of moisture without deteriorating, accumulation from condensation is insignificant. When a home is properly constructed using these mass wall techniques it will be an extremely comfortable environment with a high degree of temperature and humidity stability. Furthermore, because the solid walls themselves provide insulation and can be finished with a covering of plaster or furred-out wood applied directly to them, the need for synthetic exterior sheathing, batt insulation, gypsum board, joint fillers, and paint is eliminated. Many volatile organic compound (VOC) contamination sources are thereby eliminated as well.” (Permeable Walls and Moisture Control Factsheet)

In addition, Building Biology principles include areas in which the typical homeowner does not invest a lot of thought, but are very important to our health, like the water system.  This may be because many homes are now built with community water systems, or bottled drinking water is readily accessible, but these “systems” do not guarantee protection from Microbial, Inorganic (includes lead, asbestos), Organic (other than microbial), and Pesticides and Herbicides contaminants.  Building Biology addresses each of these contaminants with best healthy practices to eliminate them. (Water Purity Factsheet)

But what does it cost to adopt these principles into our dwellings in terms of money and time?

Like any other field, there are certified experts for hire to help you navigate healthy home choices, whether you are planning to build a home, remodel, or just find a new rental.  If you don’t have the budget to hire an expert, you can educate yourself via free videos, free fact sheets, and free downloads (BuildingBiologyInstitute.org).  

For a consultation, here are a few Building Biologist certified experts:

Because homes constructed on Building Biology principles have sustainability and health goals, some methods of construction are uncommon and some take longer than the usual quick-frame timber/vinyl siding style.  For example, EcoNest Homes in Oregon emphasizes building “Living Sanctuaries of Clay, Straw and Timber”.  However, having dabbled in the construction/remodeling industry myself, there is a very true saying: You can have two out of three, but not three out of three, of the following:

  • Good

  • Fast

  • Cheap

Good and Fast will not be Cheap.  Fast and Cheap will not be Good.   Good and Cheap will not be Fast.  However, if you want to abide by Building Biology, just keep “Good” as one of the non-negotiables by abiding by as many of their principles as possible, and you can achieve a healthy home!   This is one of my concerns: that everyone should have access to healthy housing, not just the rich.  In agreement with this concern, buildingbiology.com states that building biology “aspires to become the foundation of everyday building activities, not just a luxury for a few”, and “includes all relevant costs up front, not passing them on to future generations and the environment.”  

These are principles to live by!  

Photo by chi m on Unsplash

How droughts can even impact your air

How droughts can even impact your air

It’s been an unusual year.  In the southeast US, temperatures have been above normal with extended periods of no rain.  In the west, Lake Mead and Lake Powell have lowered by nearly 75% of where lake levels once were as the country's two largest reservoirs.  The Colorado River, which supplies these lakes, is used by seven surrounding states, and for decades annually the region was taking out about 1 million acre-feet of water more than the river was providing (Los Angeles Times).  Much of the country is in drought, and the Southwest is experiencing a megadrought–one it has not seen in 1,200 years. 

What is drought?  Drought arises only after a prolonged (>week) period of precipitation shortage that causes soil to dry up, and these period(s) may reoccur monthly.  Further, the prominent feature of drought is water deficit in both the atmosphere and the land component (e.g., soil and vegetation), resulting from the combination of precipitation shortage and increasing evapotranspirative water loss driven in part by high temperatures.   (2017 study).  When drought hits home, it’s more than water restrictions on your lawn. Here are some of the effects: 

  • Droughts increase ozone and PM2.5. A study released in 2017 examined air quality during 4 severe droughts and found that elevated ozone and PM2.5 are attributed to the combined effects of drought on deposition, natural emissions (wildfires, biogenic volatile organic compounds (BVOCs), and dust), and chemistry. In our post “It’s not the heat, it’s the humidity air pollution”,we noted the correlation between extreme heat and ozone.  Here are some other facts brought forth by the 2017 study: 

    • Meteorological conditions/extremes likely to co-occur with drought that are also associated with higher pollution levels. For example, high ozone is more likely to occur with high temperature and low RH (2016 study; 2017 study, 2016 study 2)

    • more frequent stagnation and heat waves could explain up to 40 % of the ozone and PM2.5 enhancements during drought

    • Since anthropogenic sources of ozone and PM2.5 have decreased significantly since 1990, the ozone and PM2.5 enhancements during drought are largely responses of natural processes from the land biosphere and abnormal atmospheric conditions. 

  • Droughts affect plants and their interaction with atmospheric ozone in complicated ways.  Some plants take in ground-level ozone, while other plants emit isoprene, a VOC that reacts with other atmospheric chemicals to create ozone. (Scientific American).  While studying the 2011-2015 drought in California, scientists found that: 

    • Dry conditions caused the plants to restrict water loss by closing their stomata (pores), which means taking in less ozone (ozone levels rose). Absorption did drop by about 15% during the most severe years of the drought.

    • Plants and trees were able to sustain isoprene production during the first three years by drawing on their carbon stores; isoprene helps them against heat stress. 

    • After 4 years, isoprene production dropped, and so did ozone (by 20%).  

  • Drying lakebeds (like the Great Salt Lake in Utah) expose people to toxic elements like arsenic when dust storms pick up lake bed dust, which are residuals of pesticides and agricultural chemicals that migrated into the lake over many decades.. (New York Times)  Another dried lake that causes air quality problems is Owens Lake in California, which is the country’s largest source of PM10 (geochange.er.gov).

  • Droughts can increase transmission of soil and dust-transmitted diseases like Valley Fever, which is coccidiodomycosis (Cocci for short).  Dust that is liberated from the soil during digging activities or dry, windy conditions can carry the fungus, which workers or residents can breathe in.  It causes symptoms like fever, cough and tiredness, but can occasionally be serious or deadly.

  • Trees and plants weakened by drought are more vulnerable to pests and disease, which can kill large numbers of them. Plants that succumb to drought and die cause several problems:

    • they turn from absorbing ozone and CO2 to emitting carbon via CO2.  

    • Dead plants and trees increase the risk of wildfires.

  • Droughts impact electric power generation systems (the Grid)in the following ways (americanscientist.org):

    • Hydropower is reduced because of low stream flow

    • Demand for electricity increases because increased cooling is needed in homes and offices 

    • Fossil-fuel plants (coal, natural gas) must increase production of electricity.

    • This means that air pollution increases during drought due to our electric power generation system. IF changes can be made to shift to “cleaner” generators (ie. natural gas instead of coal) during drought, it is generally better for air quality. 

In all, drought is a serious, complicated blight on both the land and the air, which we at HypoAir have felt for some time because California has been in long-term drought.  Finding ways to reduce water and energy consumption helps everyone, so don’t wait until regulations forces change–here’s a list of ways you can help your community and family before and during drought.  However, it’s the unseen increases in ozone, PM2.5, fungus and other forms of air pollution for which the public generally doesn’t prepare.  Here are some ways you can be smarter about air pollution from drought:

  • Continue to work on air sealing your home

  • Have extra MERV 13 furnace filters, air purifier filters, and filter media on hand so that you can change these more frequently

  • Have N95 respirators on hand for the immune-impaired who need to go outside