Ancient homebuilding 101: How did ancient people prevent mold in their homes?
Ancient homebuilding 101: How did ancient people prevent mold in their homes?
Mold is an ancient problem, the most infamous account of which is in the 14th chapter of the book of Leviticus in the Bible. Although it’s described as a “plague of leprosy” in the King James translation (verse 34), the references to “ingrained streaks, greenish or reddish, which appear to be deep in the wall” (verse 37 in New King James translation) are hallmarks of mold. Indeed, some scholars investigating the meaning of the Hebrew word “Tsara’at” that was translated “leprosy” have inferred from ancient skeletal evidence and modern symptoms of mold exposure that a better translation may have been “mold”. (Mold: “Tsara’at,” Leviticus, and the History of a Confusion). Going forward with this assumption, the prescription for mold in the ancient Hebrew home was inspection (by the priest), identification (by shutting up the house and seeing if the mold grew), remediation (empty the house of everything valuable, remove the stones and plaster, and replace them with new stones and plaster), reinspection and cleansing, and in the case of last resort, demolition (complete dismantling and removal of the house).
Has the problem (or plague) of mold gotten worse since ancient times? Maybe so. After World War II, a housing boom generated the need for faster and cheaper construction and made gypsum wallboard (drywall) much more popular than plaster as a building material. Drywall is composed of compressed gypsum between two layers of durable paper. Gypsum readily absorbs water and dries slowly, while paper supports mold growth very readily. Since mold growth can occur within 24-48 hours of a water event, according to the US EPA, this is a perfect recipe for mold growth (just add water!).
The housing boom also caused quality of construction to decrease as volume increased, allowing for water problems to happen more frequently. “Back in the days of plaster, brick and stone construction, we didn’t have mold problems like we do now. This is in part because mold doesn’t grow on those materials very easily, if at all. Drywall, on the other hand, is like a Petri dish. What’s worse is that drywall is an ideal growth medium for Stachybotrys, the black toxic mold referenced above, because of its high cellulose content. Nearly every mold will grow on drywall given the right moisture levels, but Stachybotrys has a field day with it. The final component of the perfect storm, which has made mold into the problem we now face as a society, here and internationally, is that our buildings are built so tightly, in the name of energy efficiency. Ever since the fuel crisis in the 70’s, there has been a huge push to reduce energy usage and create a more comfortable living environment. We have walls stuffed thick with fluffy insulation. Having a small utility bill is a bragging right at cocktail parties.” (A Brief History of Mold)
We can see that there are three things we need to consider in homebuilding to prevent the dreaded “m” word: design (for natural ventilation), construction technique (to avoid water intrusion and decay) and materials. Here are two examples of how ancient people incorporated these mold-fighting aspects into their homes, knowingly or unknowingly: one is from Israel and the other is from Egypt.
Building techniques in first-century Israel:
According to nazarethvillage.com, villagers in Israel often built homes on the bare ground. They could dig into soft limestone to make caves for water or wine storage, but often just used what the topography offered. “Building on sloping bedrock requires great care in setting the first course, starting from the lowest part of the foundation and working upwards step by step. The bedrock footing is flattened and slightly stepped, but does not need to be completely level. By fitting stones into the uneven footing, the force of gravity will secure the buildings onto the bedrock. Using the land as the ancients did makes a lot of sense – there is less to dig and less to build.” (Site Excavation) The mortar used to hold the stones together was primarily earth, chalk (calcium carbonate), leftover straw (to add strength and reduce cracking) and a small amount of hydrated lime for durability. The chalk is excellent at absorbing excess moisture from the air (reducing humidity inside), while the lime also inhibits fungal growth (keep reading for more benefits of lime!). (Mortars for building and plastering in antiquity)
House windows in first-century Galilee were typically placed relatively high in the wall for maximum ventilation and privacy. Ventilation, as we know, can discourage mold by allowing ions in the fresh air to reach interior surfaces. (Windows) The same principles were used in design of the homes, which featured a central courtyard with rooms added around it; thus fresh air could flow through the rooms whenever doors were opened to the courtyard.
Preparing the house for plastering inside requires placing “small chinkstones and mortar to fill cracks and create a flat substrate for the interior plaster. Although obscuring the beautiful view of exposed stone masonry, interior plaster was necessary for insulation and to prevent household pests from taking over. Plasters also improve interior lighting by brightening up the colours of the walls. We discovered that mixing chalk with the earth plaster gives a bright yet warm tonality to the home. The homes of more wealthy residences and public buildings – such as our synagogue – were finished in white lime plaster and occasionally painted.” (Interior Plaster)
Building techniques in ancient Egypt: The following facts were taken from the article Homes and Mud-Brick Construction in Ancient Egypt, which references the report by Virginia L. Emery, University of Chicago, UCLA Encyclopedia of Egyptology 2011, escholarship.org:
Unfired mud brick houses were common in ancient Egypt, from the simplest abodes to the grandest of palaces. Mud brick had several advantages over stone:
- Brick ingredients were available virtually everywhere (sand, clay, and silt combined with chopped straw or dung as temper and binding agent)
- Mud bricks are quicker to fabricate than quarrying stone, making them more economical in that sense
- Mud bricks are quicker and easier to build with because they don’t require the trimming or fitting that building with hewn stone demands.
“Mud-brick walls could be constructed directly on an unprepared ground surface, though more commonly were provided with brick foundations and wall footings laid in trenches upon a bed of sand... Occasionally, particularly along high- traffic routes, the base of the wall at ground level was protected by a footing of stone, in an effort to minimize the undercutting of the wall due to water or wind damage and traffic; stone elements also could be included in the wall proper, being most common at the quoining of building corners.”
The article Mudbricks give clues to understanding the Bible, which referenced the article Mud Bricks and the Process of Construction in the Middle Bronze Age Southern Levant, confirms that unfired mudbricks are susceptible to water damage. Water can dissolve the bricks as well as weaken them, especially near the base of the walls. Several strategies are used to help minimize water damage. Typically, the construction techniques in the Ancient Near East involved building a stone foundation of 2-3 courses of stone upon which mudbricks were then placed to the desired height. The stone foundation does two things: it minimizes the capillary action of water and salts seeping into the lower courses of bricks; it also helps reduce the erosive effect of water splashing from the roof back onto the bricks or from water running in the street. Another aspect of mudbrick preservation was regular plastering and re-plastering the walls, which helped retard the effects of moisture and erosion, as well as the intrusion of plants, insects, and animals.
How do these natural building methods defeat mold?
Mud-brick, which is also called adobe in areas of Spanish influence, can still be an economical way to build. Many people think that mud-brick invites mold and dampness into your home, however, it actually inhibits mold in several ways. Ideal conditions for mold or rot are caused when a building material absorbs moisture and is unable to later release it, or when moisture is not absorbed but condensates on a surface. Here are the ways mud-brick and other earth building techniques inhibit mold, according to Earth Building School:
- Creating thermal mass: Thermal mass regulates temperature by absorbing heat when it is available, storing it and slowly releasing it when ambient temperatures drop. Keeping temperatures higher and more constant reduces condensation and dampness, because cold air holds less moisture and so will condensate on windows and walls.Earth is one of the best thermal mass materials available, because of its slow reaction time and because it naturally regulates humidity. It is easy to retrofit earthen building elements to your existing home: Earthen plaster over drywall, inbuilt cob furniture or mudbrick feature walls - let your imagination run free while creating a beautiful, healthy living space.
- Clay regulates humidity: You can't beat clay when it comes to balancing indoor humidity at optimum levels of 40-60% RH. A solid wall of earth bricks can absorb up to thirty times the moisture of conventional burnt bricks and a 30mm (1-3/16”) thick surface coating of clay is more than enough for daily buffering.
- Naturally anti-fungal: Finally, natural finishes such as clay, lime plasters or Tadelakt (Moroccan plaster) are naturally anti-fungal. These are good finishes in areas that are often damp, such as kitchens and bathrooms. Lime is highly alkaline (high pH) and inhibits mold growth. It can be used to fix mold problems in old buildings (once permanent water damage has been remedied) and is a good and very hygienic choice for bathrooms - even in splash areas such as hand basins and showers. Lime plaster is water resistant and can be applied as Tadelakt, for a totally waterproof result. Working with lime - especially in situations where waterproofing is required - is a bit more technical, so it is advisable to get a skilled person onto the job.
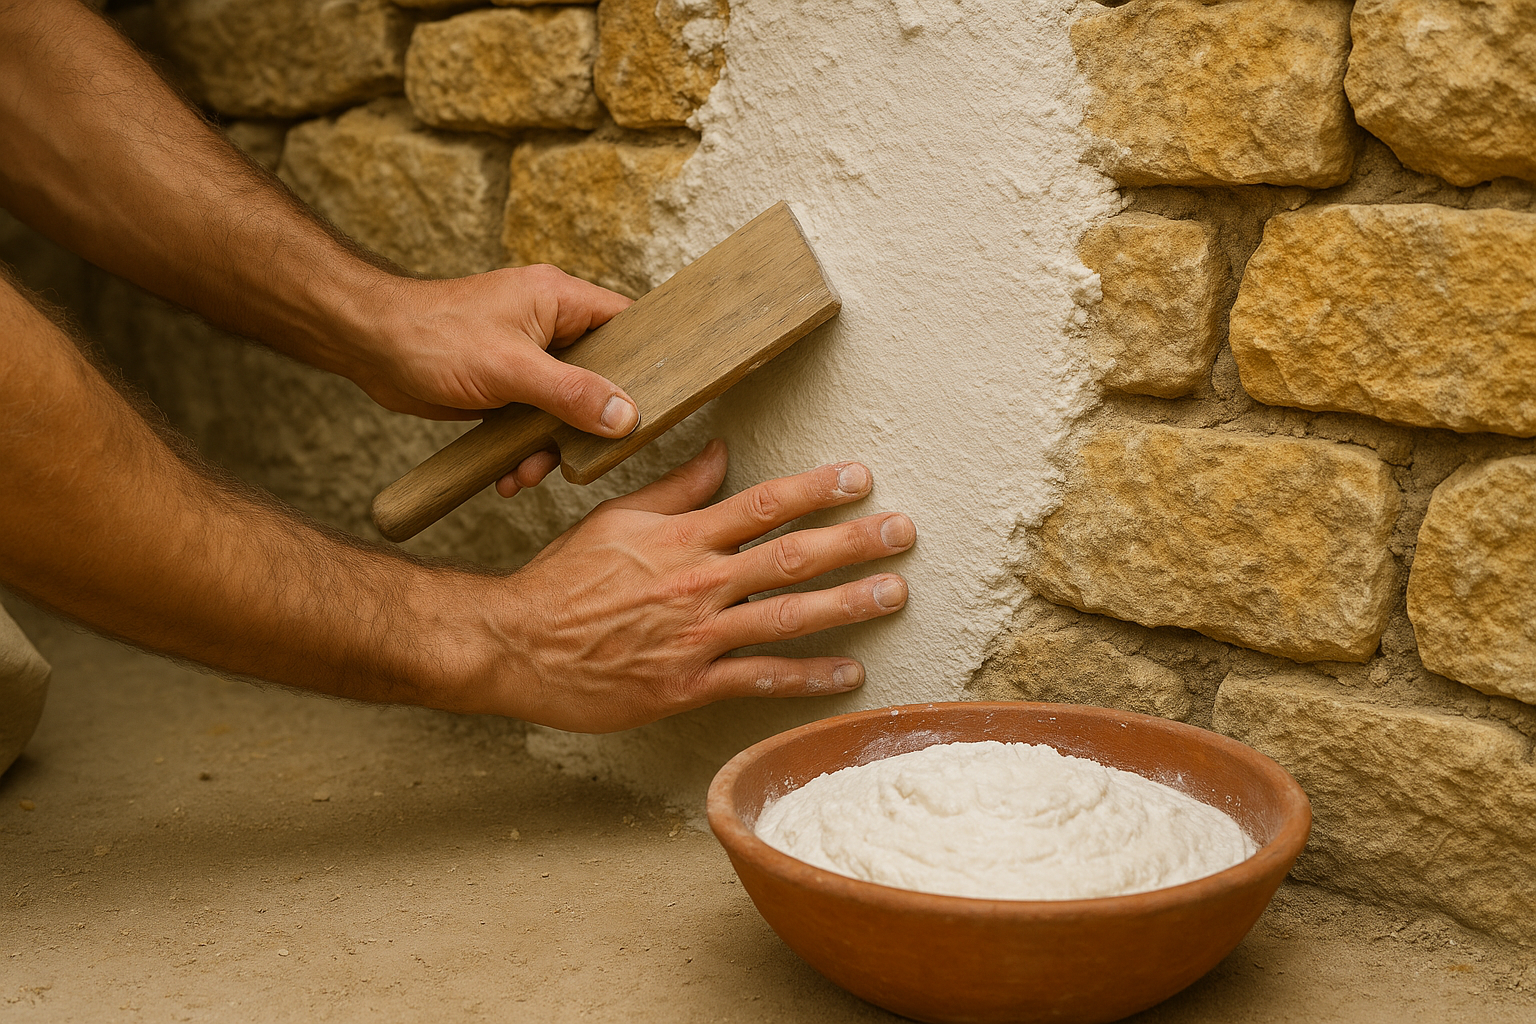
Whether the building is constructed with mud-brick or stone, these are the “bones” of the walls; plaster is placed over the brick or stone, and then the final interior and exterior finishes give them the protective “skin” that really preserve the construction from the elements. Let’s dive into the finishes of Limewash and Tadelakt to find out why they are so good at inhibiting mold.
Limewash: This ancient paint has so many physical benefits, and topping it off, has a soft and warming aesthetic that is causing a resurgence in its popularity. Chemically, limewash is calcium hydroxide mixed with water. Calcium hydroxide, also known as quicklime, is a naturally-occurring mineral that is soft and easy to mine from the ground (nature also “excavates” lime deposits with water, producing caves with fantastic formations inside). Adding just the right amount of water causes the mixture to heat up (an exothermic reaction) that can be used immediately or left to cool down and thinned out with more water. Here are some benefits of applying limewash in your interior or exterior finishes:
- Limewash applied to stone and wood prevents rot and erosion while allowing the structure to “breathe” and release moisture.
- Limewash is a natural pest repellent: the active ingredient, calcium hydroxide, discourages many types of worms, beetles and even mosquitoes from infesting the structure.
- Lime is a farmer’s friend because it naturally deodorizes. Lime provides free calcium ions, which react and form complexes with odorous sulfur species such as hydrogen sulfide and organic mercaptans found in animal and biological waste. Thus, waste odors are not “covered over” with lime, but actually destroyed. (Uses of Lime/Environmental/Animal Waste)
- The high pH of limewash (10-13) makes it anti-fungal, anti-viral and anti-bacterial when it’s wet. When dry, the pH lowers to neutral; however certain commercial limewashes like Lime Prime by Earthpaint have proprietary resins/polymers that allow the active ingredients to rehydrate and raise the pH again, so that it continually fights mold.
- Limewash (and the plaster beneath it) are naturally incombustible. This property was recognized at least as far back as 1212, when the King of England decreed that buildings that survived the terrible London fire must be plastered and limewashed immediately to prevent future fires.
- Limewash prevents rust on iron surfaces. This makes it even easier to apply, as masking off hardware is not necessary unless for aesthetic purposes.
- Limewash is cheap and easy to make on your own. You’ll just need to purchase calcium oxide (also called burnt lime or quicklime) from a supplier, and be sure to wear the proper clothing and protective gear to guard against chemical burns. There is plenty of tutorials online, and this article from a long-established UK building conservation company also describes the process.
- Finally, if you prefer skip the DIY and use commercially prepared limewash, Earthpaint, a company that prides itself in only offering non-toxic paints and wood finishes, has a set of products that can specifically tackle damp areas and mold remediation areas: Lime Prime and Lime Seal. These are also great on unprimed drywall in any location.
Tadelakt: Sometimes referred to as Moroccan plaster, tadelakt is a traditional plaster indigenous to the Marrakesh region of Morocco that can be used as a stylish wall covering and alternative to tiles. It can be used indoors and on exterior walls. Tadelakt-plastered walls create a solid, waterproof surface that is seamless, has no grout lines and is resistant to mold, which are some of the reasons why this traditional plaster style has become so popular in contemporary, minimalist homes. (Tadelakt: What you Need to Know About Moroccan Plaster)
Tadelakt is applied in several coats and finished using a special technique. "The final stage of polishing is done by using a plastic trowel, Japanese trowel or a traditional Moroccan application which requires a special polishing stone," explains Ian Kozlowski, Founder of Decor Tadelakt. It's the final stage of applying tadelakt that makes the resulting surface waterproof. Valentin Tatanov, manager at Tadelakt London explains: "The olive oil soap that is rubbed into the surface of the product chemically reacts with the lime to form calcium stearate."
This waterproof membrane makes Tadelakt appropriate for use in shower enclosures and wet room ideas (where shower walls are not necessary and the entire room can be wetted and drained). The seamless application means that details like benches, windowsills and shower niches are easy to create.
Tadelakt is relatively low maintenance; it can be cleaned simply by rinsing with water because the surface resists dirt and mold. "In the shower, squeegeeing down the walls after each shower is all that is needed to maintain the tadelakt shower walls," explains Decor Tadelakt's Ian Kozlowski. What's even better from a non-toxic standpoint, you must avoid using commercial bathroom cleaners on tadelakt, especially any containing bleach or harsh solvents, as this may destroy its waterproof quality.
Just like a wooden countertop or cutting board needs periodic maintenance to keep it looking great, water-resistant and bacteria free, "regular recoating with soap solution ensures that the tadelakt stays in excellent condition for years to come," suggests Valentin.
Shikkui Plaster: The Japanese started using this type of thick plaster in the 6th century following the spread of Buddhism from the Korean peninsula. It is made of slaked lime additives including seaweed extracts, soybean oil, natural plant fibers, and eggshells. It is also used on interior and exterior surfaces. According to this article, some versions of the plaster also contain plankton skeletons and special algae only found in Japan, which is hygroscopic and helps control humidity. Due to these ingredients and the plaster’s natural ability to absorb pollutants and VOC gasses, it creates healthy airflow within spaces. It is fire and earthquake resistant, has the ability to naturally control bacteria, fungi, and molds; and is naturally anti-static, which reduces dust accumulation. This Shikkui plaster manufacturer shows the tools and techniques for applying this plaster to practically any wall surface (even wallpaper!). It is applied quickly in two thin coats back to back, and has a highly polished finish.
For all of their benefits and non-toxicity, we shouldn't be afraid to experiment with limewash, tadelakt and even Shikkui plaster in our homes as the "new" anti-microbial coatings. They've stood the test of time!

Photo by Anne Nygård on Unsplash