Monthly Archives: December 2023

Truly Natural Air Purifiers

Truly Natural Air Purifiers

As homeowners realize the extent of air pollution inside the home, they value making or buying air purifiers all the more.  Many purifiers require expensive manufactured filters to be purchased and changed out on a regular basis.  They can certainly do the job but our ears always perk up when something using natural materials comes along!  It’s fun to research how outdoor air is purified by plants and microbes and natural materials.   Here are some of these “new” products that use ancient natural processes.

FIrst, we’ll talk about ones you can actually buy.  

Unless you live with open windows next to a pond with a lot of green stuff on the top, you’d never experience the benefits of using algae as an air purifier.  Or, you could buy an Algae Air Purifier, which cultivates the algae in a low-maintenance tube anywhere in your home.  Algae naturally feed on pollutant particles and gasses like CO2, CO, NO2, VOC`s, PM 10 and 2.5 and transform them into oxygen, turning a problem into a solution. Their ability to absorb and remove the carbon dioxide in the air is 10 times higher than large trees as their whole bodies are photosynthetic. (Can Algae Purify Air?)  AlgenAir looks like a cool modern lava lamp, which has a light, bubbles and soothing white noise.  Algae does have a life cycle of 4-8 weeks, which at the end does not have to be dumped out on the ground.  Since it’s a natural fertilizer, the algae can be poured onto your other houseplants to be used as food.  The Aerium 3.0 comes with the container, one spirulina starter kit and sterile hydrophobic filter.  The subscription plan will reship spirulina every 30, 45 or 60 days for $24.75 for each refill.  

We wrote about the power of moss to purify air previously, but Briiv is a new product that brings it indoors.  It’s a compact filter about the size of a hot water kettle, that looks like a little terrarium on your counter.  How could this green filter possibly last for a whole year?  Yet, it does.  The company claims that it’s as powerful at 3,043 medium-size houseplants, and on its maximum fan setting it delivers 53 cubic feet per minute of purified air. This equates to a CADR of 90 cubic meters per hour.  Reviewers felt more refreshed after sleeping with the Briiv running in their closed bedroom, and enjoyed the fresh outdoor scent.  Since reindeer moss grows at high latitudes and altitudes, it is certainly an uncommon houseplant!  The price of $356 sets you up with one filter which lasts one year, and multiple filters are needed for larger spaces/more rooms.  The replacement filters (moss, coconut and nano matrix) are $38 for one set.  It’s a luxury filter that imparts the scent and look of the outdoors anywhere you place it.

“Biofiltration” could describe the way the algae and moss clean the air, and in a new adaptation,  is also the method of passing air through a thin film containing immobilized bacteria and fungi.  Researchers in Chile focused on reducing volatile organic compounds (VOCs) from building materials and paint, and polycyclic aromatic hydrocarbons (PAHs) from wood-burning.  Current air purifiers typically use activated charcoal to adsorb these pollutants, but the capacity of the charcoal will get “used up” and require disposal at some point. Instead, they found that by using the fungus Fusarium solani and the bacterium Rhodococcus erythropolis, the pollutants could be completely degraded, and the  “filter” did not degrade in performance even after eight months of continuous use. Furthermore, other microbes were captured from the air, demonstrating the potential of the prototype for retaining airborne bacteria and fungi.  (Fresh research for fresh air: Harnessing microbes for removing indoor pollutants)

It is a bit costly to use these “natural” filters in your home; we’re hoping the last one using bacteria and fungi retails for less when it’s finally commercialized!  However, by harnessing the power of 25-3000 houseplants in 1 filter, they are definitely easier than maintaining a forest of indoor plants.  I like the idea of smelling fresh outdoor scents, so I think the Briiv would be my choice.  The compostable filter elements in each device are particularly attractive, and on a replacement-filter basis really are not so expensive after all when compared to many air purifiers which cannot remove VOCs or CO2.  Bravo for the natural versions, we definitely want to see more of these!

Photo by Kent Pilcher on Unsplash

How to reduce annoying Static Electricity (and distinguish it from real electricity)

How to reduce annoying Static Electricity (and distinguish it from real electricity)

Static electricity is just plain rude!  Although it can seem like someone has electrified your doorknob to play a trick on you, most likely your own body is just ridding itself of built-up static electricity.

Why and how does one accumulate that much electricity, anyway?

This topic warrants a small science lesson, so bear with us! As you walk around your house, friction will cause electrons to transfer between surfaces.  Friction on floors (especially carpet), friction between your clothing, and friction between your clothing and body will all cause transfer of electrons, usually resulting in you becoming positively charged (we tend to lose electrons).  Any kind of imbalance in electrons between two objects is basically voltage potential, so the potential continues to build until you touch something that is grounded (a metal appliance, doorknob, or another person) and BAM!  The potential dissipates immediately in the form of a spark or shock.  This means that the missing electrons are suddenly transferred back to you in a moment’s time.  Static electricity shocks are on the average 3000 volts–but very little “amps”, so although they don’t feel good, they usually do not harm you.

You may notice that static shocks in the wintertime occur more frequently or with more power.  What’s up with that?  It’s due to dry winter air.  Warmer air has more capacity to hold water vapor, which when it touches our skin can transfer electrons painlessly so voltage potential never builds up.  However, cold air has less capacity to hold water vapor, so it tends to be dry and more insulating.  That is not good for our sinuses and skin, as well as the nasty static shocks.  

If you’re concerned that it’s not actually static that is causing the shock, there are ways to tell the difference between static and real electricity.  First of all, does the object that shocked you do so every time you touch it?  Static is not constant, meaning that once the shock occurs, it takes some friction to build up the voltage potential again.  Touching the same doorknob a few seconds after a shock usually does not elicit another shock, indicating that it’s static.  Electricity, on the other hand, will cause your hand to “tingle” again every time you touch it (so don’t do this repeatedly until you can find the power source and shut it off!)  The “tingle” is actually the alternating current that powers all the appliances in the house, and it feels different from static.  You can also use a voltmeter to measure the potential between the "ground" of an electrical socket (the little round hole at the bottom of each outlet) and the doorknob. If it's real electricity, you should see about 120 volts (using the 200VAC setting) constantly (although an intermittent ground may flicker up and down). It’s not possible to measure static electricity using an ordinary voltmeter.Here are some weird and dangerous ways that real electricity can make its way to your doorknob or other metal:

  • One person found that the extension cord running under his door (which is a no-no anyway) had gotten a nick in the insulation from the door rubbing on it.  He unplugged it and there were no further shocks.
  • When doors are installed, normally there's at least one longer screw in each hinge in order to get more holding power into the door frame.  There's a chance the screw could have run into a wire, either behind the trim or in the wall (sometimes people hide wires behind trim instead of properly routing them inside the wall)
  • If there's a moisture problem in the wall, any fault in the wiring can be transmitted a longer distance to the doorknob.

Faulty wiring in the wall of a house is a serious safety issue, and even more so faulty wiring or ground problems in an RV or travel trailer.  Because these homes on wheels are insulated by rubber tires, the major way of grounding them is through the ground prong of the electrical cable.  If there is a break in the ground system and hot wires touch the frame, the potential of electrocution is very real.  In a word, if you suspect your RV has faulty wiring or ground problems, disconnect it from power and ask a knowledgeable person or electrician to examine it as soon as possible!

So, getting back to our static problem, how can you reduce the frequency and severity of these shocks?  Here are the easiest ways:

  • Check the humidity in your home and if it’s less than 50%, try adding a humidifier.  Even a kettle of water on an electric hotplate set on low (make sure to check frequently that it has plenty of water and turn it off when you leave the room) can help to alleviate static, as well as sooth your respiratory system and skin.  Adding a cinnamon stick or a few fresh herbs can add a light, pleasant scent, too!
  • Using bipolar ionizers like the Germ Defender, Upgraded Air Angel Mobile or Whole Home Polar Ionizer in your home eliminates static buildup.  Did you know that these use the same type of technology used in electronics cleanrooms to eliminate static charge?  The ions float throughout rooms in your home and help to equalize the charge wherever they touch a solid surface.  
  • Wear more natural fibers (but not silk or wool), as fibers like cotton and linen tend to build up less static charge than synthetic fibers like nylon or polyester.  Silk and wool, while they are natural, do build up static charge because they tend to insulate better than they conduct electricity.
  • Go barefoot when you can.  The practice of grounding or earthing not only avoids static shocks but also provides evidence of other health benefits.  
  • Synthetic hairbrush bristles may generate more friction and static than natural bristles such as boar’s bristles, so you may opt to change your brush.
  • Moisturize your skin and hair with lotions or conditioners to help “conduct” charges into the air.
  • Touch metal surfaces such as doorknobs with another metal first, like a key, so that the charge is not sent directly into your fingers. 

Winter doesn’t have to be so SHOCKING…now that you know where all this extra energy comes from!

Photo by Ilona Panych on Unsplash

How PCM works to keep your home cooler–and warmer

How PCM works to keep your home cooler–and warmer

We are always eager to hear about advances in technology that the average homeowner can use to live healthier lives with less expense or energy.  Lots of new materials are being engineered that use the ambient air or temperature to reduce heating or air conditioning costs.  Phase Change Materials (PCM) are not new, in fact water is one of them!  PCM describes the way that the material absorbs or gives off heat while changing phase (from ice to water or vice-versa) but does not change temperature during the phase change.  Water doesn’t give much advantage in home insulation, however, because the phase change happens at 32 degrees F or 212 degrees F, which are outside of our comfort zone in the home!  However, there are other materials being used that fall in the perfect range for keeping our homes cool or warm.

Phase change material is like a heat battery.  In warmer climates, solar heat starts to warm the roof and wall areas early in the day, but with PCM installed, the heat is absorbed in the material while the material temperature remains constant.  It continues to “melt” inside the pouches as heat is applied, and only increases in temperature after absorbing a lot of heat.  In the evening, PCM gives off the heat back into the attic or wall space, which radiates toward the outside.  In cooler climates, PCM forms a barrier to keep heat from escaping your warm home in the same way.  This is different from traditional insulation such as fiberglass, rockwool or sprayfoam, which all “resist” passage of heat over time, meaning they constantly allow some heat to pass through by conduction, convection, and radiation.  PCM insulation is not meant to replace traditional insulation, but it is a great supplement to it.

There are several companies that manufacture PCM insulation using a soybean/palm oil blends. QE Platinum is a Dallas, Texas-based company, and Phase Change Solutions is based in North Carolina.  The oils are contained in pouched sheets that are flexible.  They can be installed behind drywall (vertically, horizontally or at any angle), above ceiling tiles, or simply laid over existing batt or blown-in insulation in the attic.  The great benefits about this type of insulation are that it is 

  • Non-toxic 

  • Green, sustainable material

  • Moisture, humidity and mold-resistant

  • Self-healing (any punctures cause the material to harden and seal in remaining material

  • Long-lasting (30-year warranty) and guaranteed energy reduction

  • Class A fire rating

  • QE Platinum is also a radiant barrier

  • Has the same thermal mass as a 12” concrete wall!  QE Platinum absorbs and stores up to 100 BTUs per square foot.

  • The company can tailor the melting/solidification range of the PCM to your climate (customized!)

There are two great videos reviewing it.  This reviewer is based in San Diego; he is renovating his older home to get to net zero and is planning to install it in walls and attic.  This reviewer is based in Texas.  Both videos go into the science of PCM and why this product is a game-changer for homeowners and business owners wanting to make their spaces more energy-efficient and comfortable.  We love that it’s non-toxic and easy to install–even for DIYers.  At $2.50-3.50 per square foot, it’s expensive but not ridiculous, and the companies may be able to reduce the cost even more as production increases.  

As great as this material sounds, however, it’s not for every home.  In order for it to be cost-effective, you need to live in an area that has significant daily temperature swings, like 20 to 30 degrees between daily and nightly temperatures.  This allows the PCM to full change phase and be ready for the next day’s cycle.

Another PCM has incredible capacity, but it’s not quite ready for the residential market.  Fraunhofer’s zeolite are small pellets that can be heated, which extracts all their moisture and in the process creates and stores heat.  They can then store that heat for indefinite periods of time.  The amazing things about this zeolite is that due to the huge internal surface area, the pellets store more than 4 times the heat of water (which is has one of the highest heat capacities of any substance), the heat storage is indefinite until water is added, heat losses are very minimal over time, and the zeolite does not change temperature, making it a true PCM.  In the energetic state, zeolites are therefore completely dry; conversely, when water vapor is passed through the pellets, heat is released. The advantage of this is that the energy is not stored in the form of increased heat but in the form of a chemical state. This means that heat is not lost during long-term storage. There is one drawback: Zeolites have poor thermal conductivity, which makes transferring the heat from the heat exchanger to the material and back difficult.  The engineers have finally solved the heat transfer problem by coating the pellets with aluminum.  Amazingly, the aluminum did not impact the ability to adsorb/desorb water, but it enhanced heat transfer. (Thermal Storage for the Energy Transition)  Can you imagine, instead of receiving a heating oil delivery, receiving a delivery of pellets that are already charged with energy, but not hot?  Or using the summer heat in your attic to recharge a bank of pellets for use in the cold winter heating system?  This is incredible technology!

So, homeowners, keep dreaming and scheming to keep energy costs down and comfort levels up.  Science can sometimes satisfy our wish-lists, and when it does, do your research and ask lots of questions to make sure it’s effective and non-toxic.  PCM insulation seems to be a good fit for many smart, green buildings, with no internet connection required.

Photo by Erik Mclean on Unsplash

Specific help for asthma and allergy sufferers

Specific help for asthma and allergy sufferers

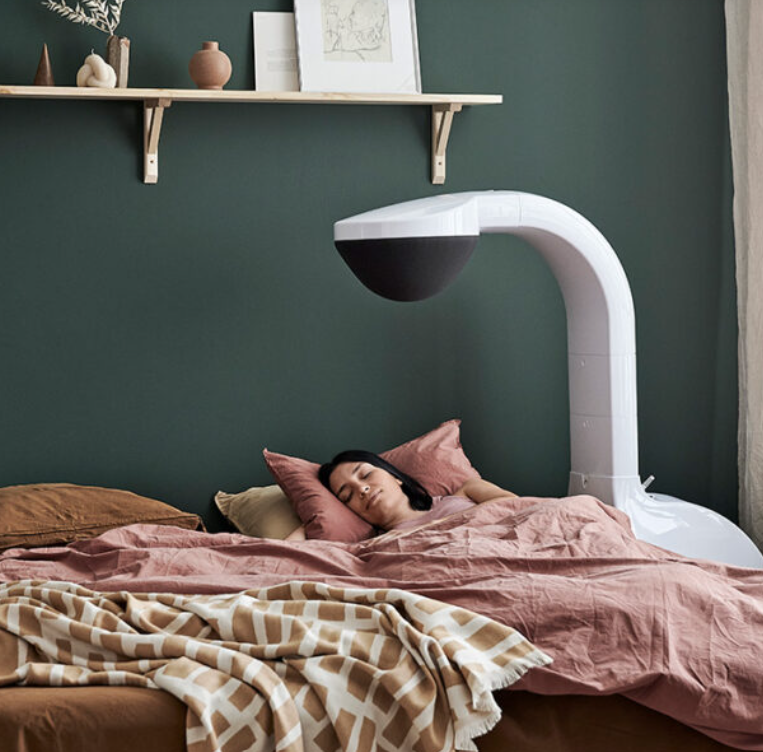
In our article “Air Quality in the Operating Room”, we described a new technology to produce laminar air flow called Opragon.  Opragon by Avidicare creates a clean air flow from the ceiling to the floor by creating a 3 degree temperature difference, which causes clean, filtered air to flow downwards, enveloping the entire operating room in clean air.  Now, the sister company AirSonett has produced a device which can drastically improve the lives of asthma and atopic dermatitis sufferers using the same technology.   Airsonett Air4 uses the unique and patented technology Temperature-controlled Laminar Airflow (TLA) to control a flow of lightly cooled, filtered clean air towards the breathing zone. The filtered air sinks with the help of gravity and pushes away the particle- and allergen-rich air from the breathing zone. In this way, at least 99.5% of all particles larger than 0.5 μm are blocked from reaching your breathing zone when you sleep.(Airsonett Air4)

Asthma can often be exacerbated by the allergens in bedclothes and bedding, which are skin dander and dustmites.  Movement in bed and a person’s body heat stir up these allergens, bringing them into their breathing zone.  Many people think that adding an air purifier to the room will help, but in fact air cleaners try to do too much–they attempt to purify the whole room, when all that’s needed is to purify the air in the breathing zone.  According to clinical trials, TLA has proven to be one hundred times more effective compared to air purifiers. (Airsonett Air4)

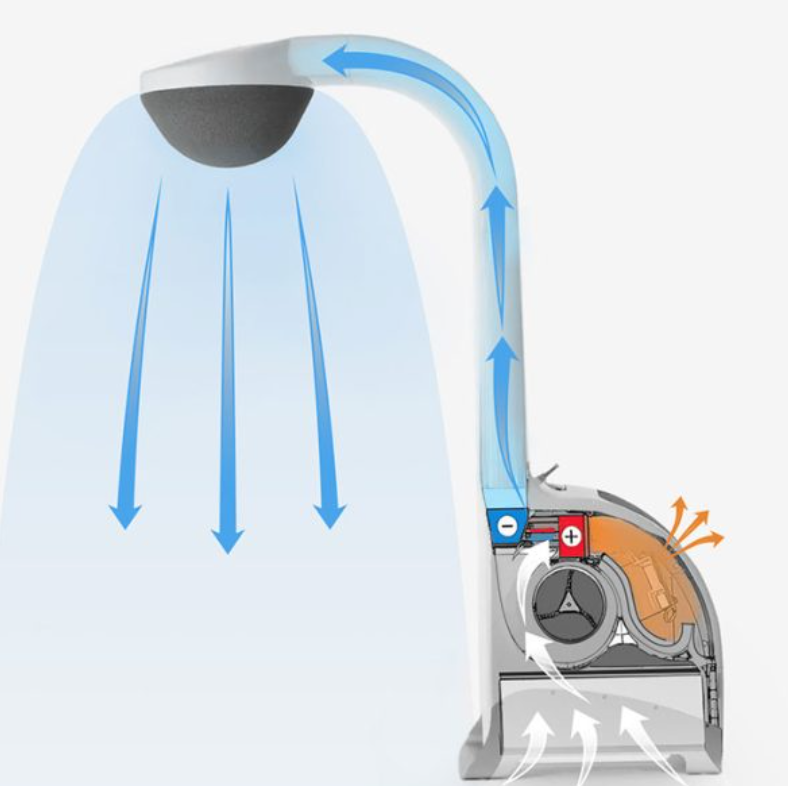
The machine works by drawing in air from the room under its base through a large HEPA filter.  The air passes through the fan and is then separated into cool and warm air streams.  The warm air stream is discharged through the back of the unit, while the slightly cooler air is moved up through the neck of the machine to the port above the sleeping person, to deliver cool air that drifts down over their breathing zone.  Since the required temperature difference to cause downdraft is small (about 3 degrees F), the unit can employ a Peltier module to cool the air, which is quiet and efficient.  Peltier modules work by passing a DC current through them, causing one side of the unit to heat up, and the other to cool down below room temperature.  Peltier modules are well suited for small cooling or heating loads, and in places where circulating liquids are not desirable (like computers).  The power consumption of the whole unit (fan, cooling and electronics) is 60W. 

Source: Airsonett Air4

This device is pricey (one medical equipment company quotes it at $88 per month for a 5 year lease), but the ease of use, efficacy, and improvement of condition may be worth it for certain individuals.  In these cases, insurance may go a long way to being able to use one in your home. For sure, there are no encumbrances like masks or tubes to deliver clean air, can be operated 24/7, and it can be situated in different areas of the home (over the bed for sleeping, or over a chair or desk for working) because the height is adjustable from 46-55 inches.  Airsonett Air4 is normally prescribed through a pediatrician, allergist, pulmonologist or dermatologist, as it is important that you are diagnosed and receive correct treatment. However, it is also possible to rent or buy Airsonett Air4 directly through the company.

Source: Airsonett Air4

Why is my house so DUSTY? Assessing the air currents gives a clue

Why is my house so DUSTY? Assessing the air currents gives a clue

This article was written in response to an actual problem.  My elderly parents moved into a “barndominium” which was converted from a 35x35’ metal workshop, in 2020.  The walls were insulated with fiberglass batts, and the attic above their 10’ ceilings was insulated with blown-in insulation.  I listened to my mom’s complaints about dust in the house. This is a real problem because the dust seemed to settle very quickly after cleaning, and my father has COPD.  Since the dust seemed to be a whitish colored dust, together we decided it must be coming from the attic, which had extra (white) insulation blown in after renovations were complete. We increased the HEPA filtration of the HVAC, with no results.  I checked for openings in the flexible ducts of the HVAC which could entrain insulation, with no results.  I tried several different times to seal the attic penetrations, which in actuality should have been done by a conscientious insulation company BEFORE the extra insulation was blown in.  I sprayed foam:

  • Around the HVAC vents
  • Around the bathroom exhaust fans
  • Around the LED puck lights (must check with the lighting manufacturer before doing this as some lighting is incompatible with direct-contact insulation.  The light needs to be “IC rated” in order to safely come into contact with the insulation.)
  • Around ceiling fan boxes
  • Around hanging shelf penetrations through the drywall of a floor-to-ceiling closet

It took multiple trips to the attic (with a good dust mask, of course) and quite a few cans of spray foam to get the job done, but sealing these areas, and one other (big) thing really helped cut the dust down.  It wasn’t until I really analyzed what was propelling the dust from the attic into the living space, that I figured out what was going on.

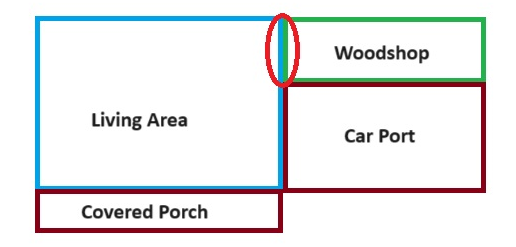
We’ve written several articles about negative pressure in your home and its negative effects. (This one has an eye-opening video linked).  I suspected that the dust was coming from the attic because negative pressure was somehow being generated in the house by the HVAC system.  However, I didn’t look at the big picture.  The living space is adjacent to a woodshop where my father carves (his hobby) and he uses a powerful dust collector to whisk the dust out of the workshop to a drum container.  The motor on this dust collector is rated for 240V so you can imagine that it’s a heavy-duty machine and being situated in the carport, can be heard from some distance from the house.  This thing SUCKS, and most of the time he’s using it with the door and window closed, so where is the makeup air coming from?  The workshop shares a common wall with a small bedroom in the living area (see red circle in diagram below).  It’s not too big of a leap to think that the dust collector may be pulling air from the house, as well, which in turn draws air from the attic when the ceiling penetrations were not sealed. 

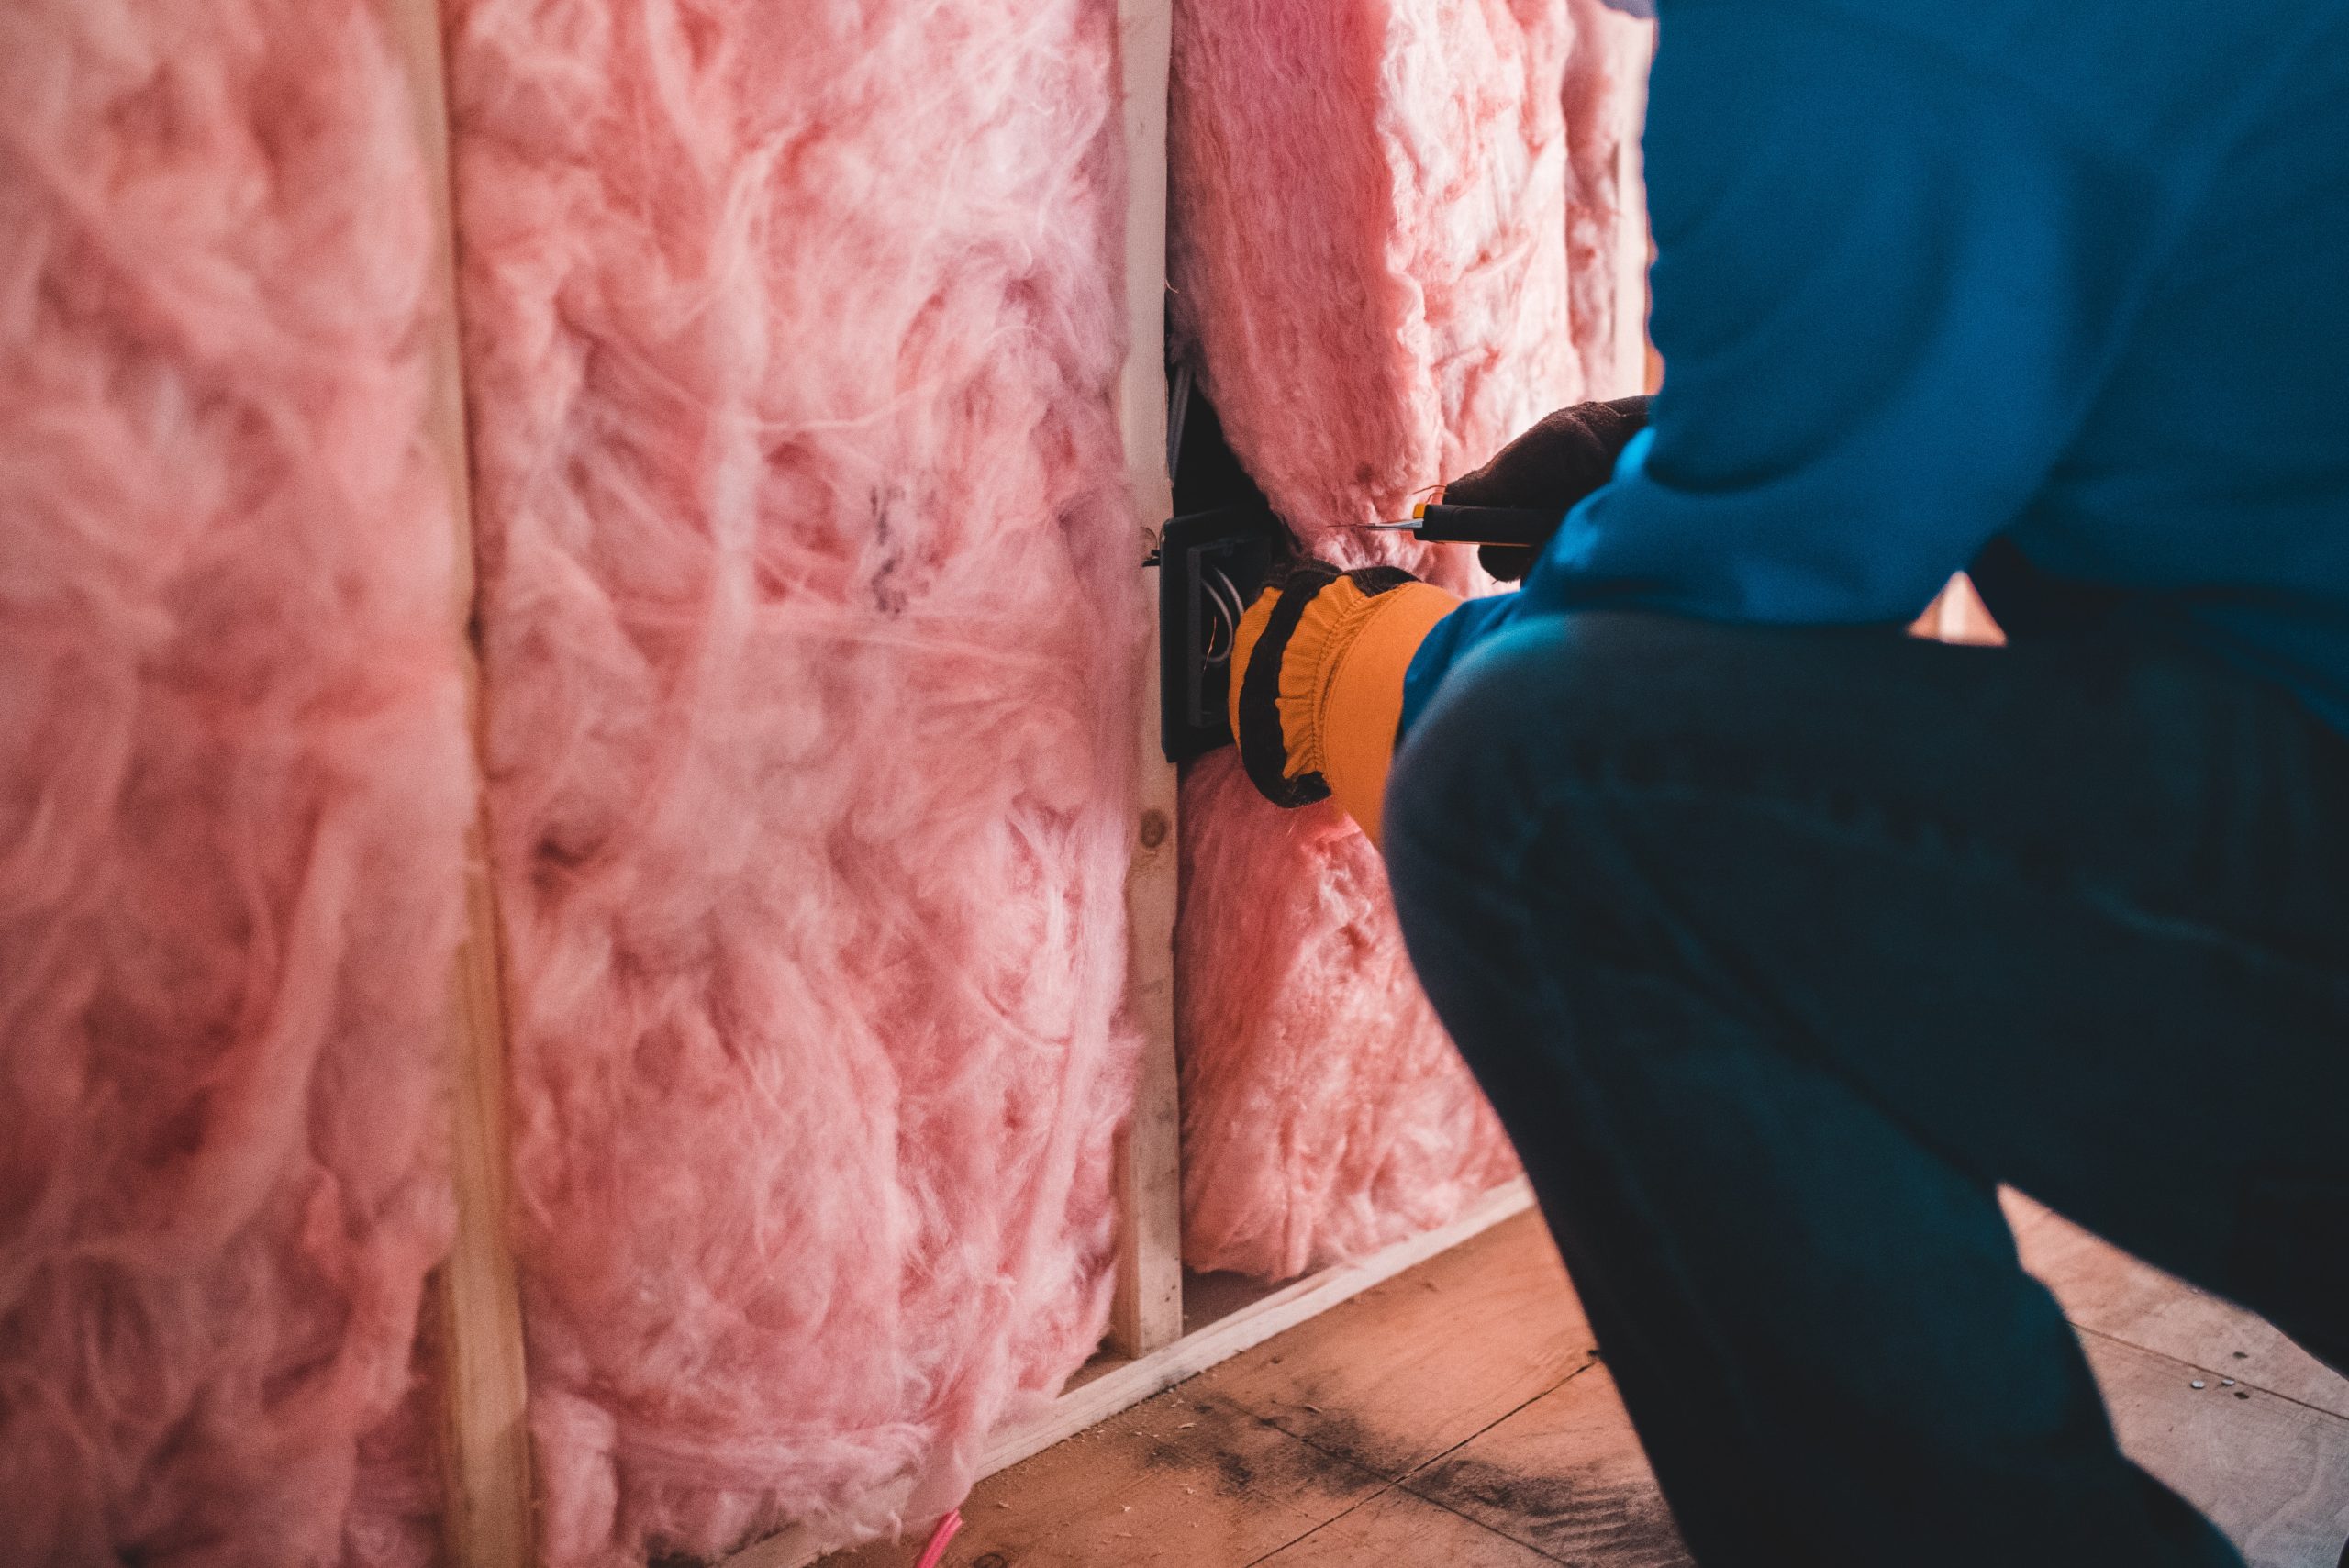
To seal the wall between the woodshop and living area, I caulked the baseboard to the floor, as well as sealed the electrical boxes by taking off the switchplate and sprayfoaming around them as much as the little foam straw would allow (extra large switch plates help if you have to cut out the drywall a little).  The drywall took care of the rest of the wall.

Sometimes it takes a bit of thought to figure out the air currents in your home, but they are well-worth investigating!  Recently I found (by accident) that some carpenters had terminated a whole-house vacuum system in the ceiling of their house instead of routing it outside.  Even though the system used a filter, the space above the tiled ceiling was thick with a fine dust. We only discovered it when a  leak forced replacement of part of the roof above it.  We extended the PVC vacuum exhaust pipe just a few more feet and ran it out through the soffit.  It just goes to show that a little investigation (and a lot of spray foam) can go a long way to maintaining less dust in the house! 

Photo by Kent Pilcher on Unsplash

Why it’s important to get a proper kitchen exhaust fan and USE IT

Why it’s important to get a proper kitchen exhaust fan and USE IT

Recently (in the last few years) gas stoves have come under fire as a source of air pollution in homes.  While we used to think that the “blue flames” were clean-burning, it turns out that natural gas stoves (the kind of gas used in cities that is piped and metered to homes) can emit a range of pollutants from carbon monoxide, formaldehyde and other harmful pollutants into the air, which can be toxic to people and pets. (Indoor Air Pollution from Cooking)  Thirty-five percent of American homes cook with it, not to mention countless restaurants and commercial kitchens.  The problem is not using gas stoves in the home, however, it is using them with inadequate ventilation.  

Many older homes don’t have a kitchen exhaust vent, or if they do, it is not close enough to the stove or powerful enough to evacuate all the toxic fumes.  Nitrogen dioxide (NO2) is another common pollutant emitted by gas stoves, which the Environmental Protection Agency says is a toxic gas that even in low concentrations can trigger breathing problems for people with asthma or chronic obstructive pulmonary disease.  According to research, including this 1992 study, children who live in a home with a gas stove have about a 20% increased risk of developing respiratory illness.  NO2 concentrations can quickly spike when using as little as the oven and 1 burner without an exhaust fan, to more than double the EPA 1-hour standard of 100 parts per billion (ppb).  (We need to talk about your gas stove, your health and climate change)

Plus, we’re not even counting the burnt food bits that emit VOCs and fine particulates.  Our article about the air pollution cost of cooking–a favorite pastime of many–tells about a test kitchen where the Thanksgiving food items generated particulates levels exceeding that of Delhi, one of the cities with the world’s worst air quality!  You may be thinking about the time(s) a smoke detector may have been set off in your own home.  In my home, cooking during Thanksgiving set off my air quality monitor several times, from cooking bacon in the morning to toasting bread for the stuffing.  And I was using a kitchen exhaust vent, and, the monitor was a good 20 feet away, meaning that levels were even higher at the stove.  Yikes.

It’s just time to cook healthier, and I’m not talking about the type of cooking oil or how much butter you use.  It’s all about the exhaust vent.

If you live in a home with an existing exhaust vent, like a small combination microwave-vent, the first thing to do is check its rated throughput.  Most fans will have a brand and model number somewhere accessible, and the internet is a great resource for looking up this information.  

In our article here, I walk you through calculating how many cubic feet per minute (CFM) of air the hood must move in order to vent properly (it depends on the size of the stove and the size of your kitchen).  Many small vents and microwave combo units are just not powerful enough for the width of stove they are supposed to cover!  That’s exactly why the air quality alarm went off in my home even while the exhaust fan was at the highest setting.

If your vent falls short in the CFM department, or you don’t have a vent, it’s time to upgrade it or supplement. Here are some things to consider if you upgrade:

  • Noise: get the quietest fan you can afford.  Really.  A noisy fan is a big deterrent to actually using it, and the kitchen is a gathering place, so you’ll want to have a fan that makes it easy to enjoy cooking and holding a conversation.  Most of them will operate between 6 and 10 sones, or around 53 to 61 decibels. A normal conversation comes in at around 6 sones, so finding a range hood that operates in that range or below will make it much easier for you to enjoy carrying on conversations in the kitchen. (How loud should a range hood be?)  Another quiet (more installation-oriented) option is to get a model that has a remote fan, which can be installed away from the kitchen in the exhaust line.

  • Direct-Current (DC) Motors: More and more appliances are using DC motors and the advantages are several: they are slim and compact, they are more energy-efficient than their AC counterparts and speed control is easier.  In addition, it may have a longer life and quieter operation.

  • Other features such as LED lighting, optional filtration and pressure--balanced models are available.

  • Make sure to vent outdoors whenever possible.  If you cannot vent outdoors due to where the stove is located or if you’re renting (see below), look for fans with carbon filters that are easy to replace.  Activated carbon removes NO2, as well as VOCs, as long as the fan is powerful enough (see CFM discussion above) and you change the filters on a regular basis.

Here are some good values:

If you don’t have room to exhaust outside above your stove, consider adding a wall fan with outdoor shutter closure:

We also realize that many people rent or live in an apartment where it’s impossible to access the outdoors, or just don’t have any say about installing permanent equipment where they live.  We get that.  Thankfully, there are several portable inventions nowadays that can help get the purifying power you need.

  • CIARRA Portable Range Hood, Desktop Range Hood with 2 Speed Exhaust Fan, $170, would work well for college dorms with a hotplate, micro apartments, or small campers.  It’s not for use with open flame cooking, only electric griddles or hot pots.  It moves about 100 cfm, which is sufficient for this type of cooking, and comes with carbon filter and an optional HEPA filter (although this may clog up quickly if you’re cooking greasy food!)

  • AirHood ($157-$197) is another small portable kitchen exhaust fan, and comes in wired or wireless models. The downside is that this model is 70 dB, which may be loud for some people.  It does not specify CFM but can be used with open flame cooking with adequate distance between the flame and the unit.

  • Air King 9155 Window Fan, 16 inch, White: $147, is a powerful fan that would work well if you have a window in or near your kitchen, preferably close to the stove!  Of course, it could get a bit greasy when drawing cooking fumes, but the fan can be taken apart and cleaned.  It also allows you to close the window behind it during stormy weather without removing the fan.

With so many options out there, there’s hardly any reasons NOT to get proper ventilation for your stove/oven.  The important thing is to USE IT…make your family members or roommates aware of the dangers of NO2 and particulates.  Even toasting bread releases a lot of particulates from the bread as well as all the crumbs left from previous toastings.  So, it’s best to turn your exhaust fan on while cooking anything in the oven, range, toaster or microwave, and leave it on for up to an additional 15 to 30 minutes after you're done to evacuate all those gasses and particulates (and smells).  The plus is that with carbon filters, you don’t have to put up with cooking smells lingering for the rest of the day (well, cleaning the cooking pans is required too).  Here’s to fresh air and easier breathing with the right kitchen exhaust fan!

Photo by Erik Mclean on Unsplash

How to eliminate many of your cleaning solutions

How to eliminate many of your cleaning solutions

Well, that is a pretty attractive headline, right?   Since the average American family of four can expect to pay at least $680 a year for cleaning products, this is a substantial sum of money.  (Cleaning Supplies Costs: How to Save Money While Keeping Your Home Clean)  How in the world can you get something clean without using a cleaning solution?  Water alone can’t clean a surface, right?

If the water is deionized, it can actually clean without any added solutions.  If it sounds crazy, you just have to check what’s actually in your water to understand.  Normal tap water has minerals such as calcium carbonate (CaCO3) which are left behind when the water evaporates from a surface, leaving water “spots”.  The spots are actually the dissolved solids in the water, which can also be ionic..  Ions are atoms or groups of atoms that have a positive or negative charge.  For the calcium carbonate example, calcium Ca has a positive charge (2+) while the carbonate CO3 (carbon and oxygen atoms) has a negative charge of 2-.  The easiest way to avoid this deposit on your surface (windows, car, etc.) is to remove the minerals from the water. 

Here’s where it may help to understand some water chemistry.

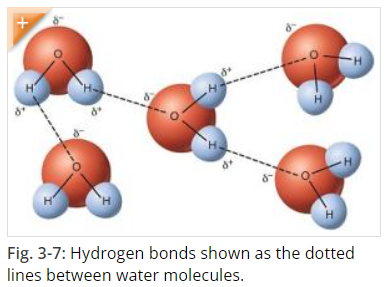
Water, as we know it H2O, is formed of hydrogen and oxygen atoms that “stick” to each other by covalent bonds.  Covalent bonds form when two or more nonmetals combine. For example, both hydrogen and oxygen are nonmetals, and when they combine to make water, they do so by forming covalent bonds. (Covalent Compounds - Formulas and Names)  Hydrogen bonding is responsible for how individual water molecules “stick” to other water molecules, because the hydrogen end of the molecule is attracted to the oxygen of other molecules.  However, because hydrogen bonds are weaker than covalent bonds, in liquid water they form, break, and reform easily.  (Hydrogen Bonds Make Water Sticky)  

Source: Hydrogen Bonds Make Water Sticky

Calcium carbonate, CaCO3, is one of the most common dissolved substances in water.  Calcium has a +2 charge, and is considered a metal, and Carbonate (CO3) has a -2 charge and is a non-metal, and the bond between metals and non-metals is called ionic.  This is a pretty strong bond, and is one of the reasons CaCO3 doesn’t actually dissolve in water.  Because  water molecules act like magnets with positive and negative ends, and both the calcium and carbonate ions have electric charges, there is some electric attraction going on between water and CaCO3.  The calcium ions hang out with the oxygen part of the water, and the carbonate ions cozy up to the hydrogen part.   However, the ionic bond within CaCO3 is stronger than the electric charges between the water and CaCO3 molecules, so the water never really breaks up or “dissolves” the CaCO3. (Is Calcium Carbonate Soluble in Water:Answer and Explanation of Reasons)  It precipitates easily, and can be removed from the water solution by several means: reverse osmosis, which is passing the water through very small filters, or by passing the water through positive and negative beds of resin that attract the CaCO3. When the impurities are removed from water, the electric charges that exist on the “ends” of the pure water molecules are freed up again, and water becomes more “sticky”, enabling it to pick up more dirt than water with CaCO3 or other impurities in it.  This is why deionized water cleans better than water with impurities in it.

The main enemy of water-based cleaning is Total Dissolved Solids, which are those impurities that get left behind when water evaporates, regardless of whether they were truly “dissolved” in the water to begin with. Car enthusiasts, window washers and solar panel cleaners are big fans of DI water.  Why?  It has no dissolved solids, so it leaves no spots or impurities behind when it dries.  Spots are unsightly, and when left to bake onto a car’s finish in the sun, can actually “etch” the clear coat of the car.. Now, many car detailers will wash their cars with normal car-washing liquids and water, but save the DI water for the final rinse.  This conserves DI water, which can be pricey because of the filtration process.  Many professional window cleaners and solar-panel cleaners, however, use it exclusively (no chemicals) with soft brushes, so that the cleaning process from start to finish relies on DI water.  Remember, windows and solar panels are big areas that are continually baked in the sun, so washing them with normal soap and water and then rinsing with DI water can cause the soap to bake on before you even get to the rinse step!  They are also very-high visibility surfaces, and spots on solar panels can translate into big efficiency losses, which are a large reason they are installed to begin with.  

True deionizatIon systems can cost a lot.  For the average person wanting to clean their home with less chemicals however, using deionized water is not out of reach.  It all depends on how you get it and how you use it!

Before we get into home deionization systems, however, you’ll want to understand the difference between distilled water and DI water.  Water distillation is a physical process where the water is boiled and the steam condensed for purification.  Although distilled water has less total dissolved solids than tap water, it’s still not free of impurities like DI water. That said, both deionized water and distilled water are safe for human consumption as long as there are no germs (viruses, bacteria, cysts), which may pass through the deionization process because these are generally not charged (ionized) particles. DI water is also not the same as “softened” water: softened water still has TDS in it and water softeners also do not remove bacteria and viruses.

That said, there are some home systems (like ZeroWater) that can produce deionized water that is safe for consumption and better for cleaning.  Because municipal water systems already employ disinfection systems like chlorination to kill bacteria and viruses, using ZeroWater filters with city water is sanitary AND free from TDS, because the ZeroWater filter removes TDS.  ZeroWater filters are 5-stage filters.  One of the stages is a mixed bed (cation & anion resins) of small sized polymeric beads. Ion exchange is a reversible chemical reaction where dissolved ions are removed from solution and replaced with other ions of the same or similar electrical charge. The cation beads contains hydrogen ions (positive charge). The anion beads contain hydroxide ions (negative charge). The resin works by exchanging contaminant ions in the water with the hydrogen and hydroxide ions.The contaminants attach to the beads while the hydrogen and hydroxide are released into the water. These two ions combine together to produce H2O.  (How does Ion Exchange Technology Work?)

Reverse Osmosis (RO) is another type of system that deionizes water.  There are many different manufacturers of RO systems, and if you have one, you’re probably very satisfied with the quality of water.  RO removes sediment and chlorine from water with a prefilter before it forces water through a semipermeable membrane to remove dissolved solids. After water exits the RO membrane, it passes through a postfilter to polish the drinking water before it enters a dedicated faucet.  RO does not remove some types of bacteria and viruses from the water, though, so this is why it should be used with municipal water or another disinfection mode, like UV light. (What Is a Reverse Osmosis System and How Does It Work?)

Therefore, if you have ZeroWater or RO water, you can test the water for TDS (many come with an included TDS meter) and use it as deionized water for cleaning.  Since filters do have a cost, however, you’ll want to maximize the use of your deionized water.  For example, a 4-pack of ZeroWater filters is $55, which is about 92 cents per gallon of water, whether you use it for drinking or cleaning. Here are our suggestions:

  • Use DI water for spray-bottle applications where you mix your own cleaner (like TotalClean)

  • Use DI water for vacuum mops/steamers so floors get cleaner and look better

  • Use DI water as a “rinse” for areas where water spots are most visible

  • Use DI water for “descaling” modes of small appliances if water is called for (like coffee machines, baby-bottle sterilizers, steam irons and other heated appliances)

Unfortunately, larger-scale DI systems used for washing cars, windows and solar panels can incur substantial cost not only in equipment but in maintenance, as they require replacement of the resin beads periodically as they become fouled with minerals.  Beware of cheap In-line water deionizers like this one, reviewed in this video, however, because they don’t work well in areas of water with high TDS. 

  • CR-Spotless Water Systems - DIC-20, $438, has 2 mixed-bed resin beads, a moveable cart, and a battery-operated TDS meter.  The reservoir should produce 300 gallons of deionized water, so theoretically the 2 replacement cartridges for $139 should give DI water at a cost of 47 cents per gallon.

  • According to this car detailing video, this On The Go dual-bed system, $600, is the best budget system if you plan on using at least 1200 gallons per year.  Now, this is a lot of DI water, but if you like to wash cars, boats, windows, showers, solar panels, etc., this could be realistic for you at about 25 cents per gallon for the refills.

Well…is deionized water a draw for you?  Maybe not, if you don’t have an abundance of cars, boats, etc, but the ZeroWater filter is a nice all-purpose drinking water filter that also provides deionized water for a small amount of spot-free cleaning.  If you have basic home cleaning needs, there are other ways to remove minerals and contaminants from your water.  Check out our article Non-Toxic Ways to Deal with Hard Water for more of them!

Photo by Andres Siimon on Unsplash

What are Probiotics for the Air?

What are Probiotics for the Air?

Probiotics have been around for a long time, even millenia!  Probiotics are live, active microorganisms ingested to alter the gastrointestinal flora for health benefits. They often are referred to as good bacteria in the gut and compete with bad bacteria to support the body in establishing optimal digestion and aid immune function. (An Introduction to Probiotics)  Now, they didn’t always exist in “capsule” form.  In fact, if you look in  the refrigerated section of the grocery store, probiotics are the cultures found in kefir, kimchi (fermented cabbage), kombucha (a fermented tea), miso (a fermented soybean paste), pickles, sauerkraut, tempeh (another fermented soybean food) and yogurt.  The common thread of all these foods includes fermentation, which is the breaking down of organic substances through the action of enzymes.  Bacteria are the carriers of these enzymes, so as the fermentation occurs, these good bacteria increase.  When we ingest fermented foods, the bacteria populate our intestines for better digestion. (Check out our article on fermentation!)

Now that you know probiotics have been in foods since antiquity, probiotics for the air and surfaces in your home is a relatively new concept.  BetterAir was the first company to use probiotics in an air purifier.  According to BetterAir President Tom Staub, “Allergens, pathogens, germs etc. do not grow in the air, but are born and propagate on surfaces and objects.  Since they are microscopic they are then propelled into the air by minute movements of air such as the wave of a hand across a tabletop or fall off a foot upon stepping onto carpet.”  BetterAir’s proprietary probiotic formula consumes organic allergens often found inside the built environment like pollen, mold spores, pet dander, and dust mite fecal matter. Staub continues, “They also consume the food sources that germs and pathogens need in order to multiply and propagate thereby minimizing their presence. Fewer pathogens on surfaces and objects results in cleaner air, surfaces and objects. “ (BetterAir: The First Air Purification Device To Utilize Probiotics To Clean Your Home’s Air)

Considering that probiotics contain live bacteria, an air purifier that sprays them into the air may be, well, a little scary to some!  Rest assured, however; BetterAir’s proprietary formula’s active ingredient consists of naturally occurring (non-GMO), safe and effective Bacillus strains.  

Bacillus encompasses a large number of bacteria types, and some are harmful, but many are helpful, such as the medically useful antibiotics  produced by B. subtilis (bacitracin). (bacillus bacteria)  In order to produce and market Enviro-Biotics, BetterAir passed all the required tests by EPA standards at EPA-certified GLP (Good Laboratory Practice) labs, became EPA registered (94339-1, August 2021), and the US Food and Drug Administration (FDA) declared Enviro-Biotics as GRAS – Generally Recognized as Safe.  Finally, it has been certified by many government and private healthwatch organizations.  So, the liquid dispersed by BetterAir systems is safe for people, pets and plants.  

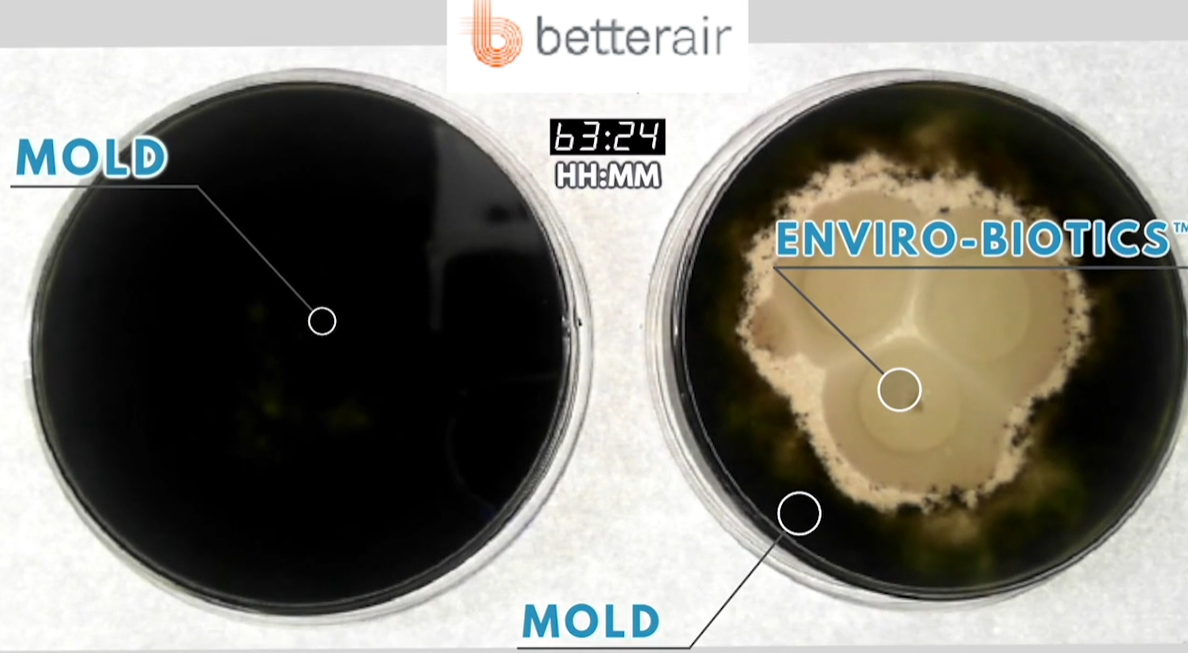
The following video screenshot shows how a petri dish treated with drops of Enviro-Biotics (right) forms a barrier that stops black mold from growing, unlike the untreated dish on the left.  This is visual proof of what their technology claims: microscopic sized Environmental Probiotics form a protective layer of microflora on all surfaces and objects, where the probiotics agents deny pathogens (mold and bacteria) access to nutrients (food), therefore obstructing and disabling growth of pathogens on these surfaces and objects.  In addition, and concurrently, Enviro-Biotics consumes harmful organic particles that are the source of allergies and diseases. Since dust and dander will be in every household to some extent, by introducing good bacteria, these allergens are used to feed the good and starve the bad bacteria.

Source: The Power of Enviro-Biotics

If your home is in an exceptionally dusty or polluted area, BetterAir has also combined a probiotic air purifier and a HEPA air purifier

Another way to use probiotics is to clean with them.   HomeBiotic has spray bottles for spritzing the air and surfaces that are smelly, which starves bad bacteria and protects from its regrowth for up to 5 days.  Their cleaning bundle has tablets that dissolve in water to make a non-toxic, powerful cleaning solution that is safe to the homebiotic bacteria they promote, and nano-sponges that clean without spreading germs around your home.  The tablets are made of washing sodas and citric acid, which are completely safe for people and pets. Citric acid in the right dose, for example, is an EPA-approved, non-toxic sanitizer that kills norovirus.  However, citric acid should not be used on natural stone or marble, wood, delicate surfaces or electronic screens because it may damage them.

Although probiotics are not a “silver bullet” for all airborne contaminants, they may help allergy sufferers and may help you to maintain health better when seasons change and new contaminants come into the home.  It’s like your gut: taking probiotic supplements feeds the good bacteria and doesn’t leave a lot of room for the bad to multiply out of control.  Therefore good effects of probiotics in the home depend on consistent use over a period of time, and avoiding chemicals like bleach that kill both good and bad bacteria indiscriminately. With new technology advancing everyday, it probably won’t be long before we can “see” exactly what is colonizing our homes and bodies, and then get tailored solutions to optimize it.  Since probiotics already live outside in the natural world (in soil, wood and other natural surfaces), like ions are present in fresh outdoor air, bringing probiotics indoors could be a good idea for keeping our homes healthy with natural methods and substances!

Advances in Phototherapy

Advances in Phototherapy

Phototherapy, or light therapy, is the exposure to direct sunlight or artificial light at controlled wavelengths in order to treat a variety of medical disorders. (Light therapy) Light therapy has been around for a long time.  Natural sunlight is free and abundant in many climates, and doctors have known that it does other things for our bodies like assisting in producing vitamin D, elevating mood and killing dangerous bacteria and mold on our skin.  However, natural sunlight is not always available, and also has ultraviolet wavelengths that can be dangerous in longer doses.  New technology is able to select the wavelengths and with the right exposure, provide the same healing benefits as natural sunlight without additional skin cancer risks. 

Phototherapy is now a standard treatment for skin conditions like psoriasis (raised, red, scaly patches on skin), vitiligo (loss of color on patches of skin), eczema (a condition that makes your skin red and itchy), as well as various forms of skin cancer.  The key to healing is selecting the correct wavelength, intensity and duration of exposure, which are determined by research trials on animals and humans.  Ultraviolet light has been classified into three groups of descending wavelengths: UV-A, UV-B and UV-C (for more in-depth explanation on wavelength, visit our article here).  UV-A and -B are the types used for phototherapy, with UV-B being further broken down into narrow-and broad-bands.  Narrow band UV-B has been found to be most effective for psoriasis, for example, and can be produced by traditional ultraviolet lamps, or LED bulbs.  Excimer lasers have been approved by the Food and Drug Administration (FDA) for treating chronic, localized psoriasis plaques by emitting a high-intensity beam of UVB. (Phototherapy)  These treatments can be applied in doctors offices or at home using approved medical equipment and prescription.

Since we know that sunlight has the power to purify water and disinfect surfaces like sheets, fabric and plastics, we know that it is actually killing microbes as well.  Again, it’s the UV wavelengths in sunlight (including UV-C) that break up DNA and inactivate microbes and mold.  Why not apply this to skin and wounds to kill infections?  Ultraviolet light was first used to sterilize bacteria over 100 years ago, a treatment based on the work of Niels Finsen, who won the Nobel Prize in Physiology in 1903 for using filtered sunlight as a cure for skin tuberculosis.  Now uv light is being used in tandem with antibiotics to enhance their effects and overcome antibiotic resistance, which is a growing problem.  Bacteria can evolve to resist drugs, but bacteria cannot resist the destructive power of UV light.  

Antimicrobial photodynamic therapy (aPDT) is a chemical reaction triggered by visible light for use on antibiotic-resistant bacteria strains.  It involves molecular oxygen, light, and a photosensitizer (something that creates a reaction between oxygen and light). To test it, researchers used an already FDA-approved dye called methylene blue as a photosensitizer, and specially constructed panels of 25 LEDs in reflective cones.  Light and photosensitizer were tested with Methicillin-resistant Staphylococcus aureus to determine the lowest dose and shortest series of antibiotics that could weaken the bacterial membranes and other resistance mechanisms.  The resistant bacteria, weakened by aPDT treatments, were killed with far lower doses of current antibiotics, and it’s a promising method for treating resistant bacteria in wounds and reducing antibiotic use in general.  (Light-Based Therapy Weakens Antibiotic-Resistant Bacteria)

At the other end of the light spectrum (literally), red and infrared lights also promote wound healing, but possibly for different reasons.  Although a Danish physician (Niels Ryberg Finsen) received a Nobel Prize in 1903 for discovering that exposure to concentrated red light accelerated the healing of sores, scientists today are only beginning to learn how and why this happens.  Research funded by NASA in the 1990’s showed that near-infrared laser light speeds healing of wounds, particularly those that are starved for oxygen, by boosting the production of growth-factor proteins, collagen, and blood vessels.One company that spun out of NASA’s programs is Multi Radiance Medical, which produces laser units for physicians, athletic trainers, physical therapists,  chiropractors, and veterinarians.   Although lasers have the possibility of damaging surrounding tissue, and they also use a lot of energy and they’re expensive, LED arrays are a better alternative.  They are cheaper, use less energy, can be designed to emit multiple wavelengths, and cover a larger area than a laser.  (NASA Research Illuminates Medical Uses of Light)  This is where the consumer must be careful, however, as today there are many manufacturers of LED red light therapy devices, and without applying the research of specific wavelengths, intensity and timed sessions, these devices are simply lamps, not healing devices.  When searching for a red light therapy device, you want to look for a device with 600 to 900 nanometers (nm) of light, as well as one that is easy to use or easy to wear. (Red Light Therapy Review)  Therefore, it’s wise to research the manufacturer on their knowledge of the technology, dosage instructions and independent testing of their products for wavelength, flicker rate.  This manufacturer has developed a helpful blog to understand red light therapy and its uses.

Here’s the best part: despite all the technology and expense, the benefits of UV light and infrared light can be free.  We know that sunlight has the “full spectrum” of light–from ultraviolet to infrared–and it can be helpful in moderate doses, not "lying on tinfoil basking like a trout"!  With the right intensity and dosage, it doesn’t have to hurt your skin, but can actually heal it.  Our parents and grandparents might have advised us to “get out in the sun”, and moderate exposure is the key to getting more benefits than downsides.  

Photo by Kent Pilcher on Unsplash

Lime: an ancient wonder-mineral

Lime: an ancient wonder-mineral

If you read our article on Ancient Homebuilding 101, your interest might be piqued about lime and its use as an anti-fungal coating inside and outside homes.  We gave a number of benefits of limewash that are still used on some farms and buildings today; if you see white walls inside a dairy barn, for example, it’s most likely limewash.  But how does limewash work to kill germs?  The answer lies in its chemical makeup before it’s completely dry, and repeating the application. 

Mold does not grow on limewash when it’s fresh.  Here is advice from Timothy Sly, a Food-borne disease epidemiologist.  To make lime-wash, quick-lime (calcium oxide, CaO) is ‘slaked’ with water to produce calcium hydroxide, Ca(OH)2. A slurry of this is applied to the wall, stone, plaster, etc. It begins as a strong alkali (base), but after a while, atmospheric acids (e.g. carbonic acid, H2CO3) react with the slaked lime to produce a neutral carbonate (CaCO3). At this stage, though still white, the surface can support molds and mildews that use pollen , soil, and other dust as a substrate. The solution is to apply more lime wash at LEAST once a year, often twice.

When lime-wash was applied frequently and regularly to house-roofs in the tropics which were - and still are - used as rainwater catchments, the water collected was partially protected with the bactericidal effect of freshly-slaked lime. But as modern options appeared, house-holders chose to use white latex paint on their roofs, which now required re-painting much less often. The problem was that all the bactericidal effect was now absent, and the water in the collection cistern was of a poorer bacterial quality, grew more algae, and had more mosquito larvae present. Another example of ‘improving’ A only to cause more problems with B. 

Lime render and mortar physically degrade because of chemical removal of the calcium ions by dissolved atmospheric acidic gases and by chemical substitution with sulphates and chlorides. As erosion occurs, spaces form in the lime providing damp niches for chemotrophs (organisms like mushrooms or bacteria which manufacture their food from inorganic substances in the presence of energy derived from inorganic compounds) which produce toxic compounds of ammonia and nitrite salts and as they die, form a nutrient base for other organisms.  (Novel Biodesign enhancements to at-risk traditional building materials

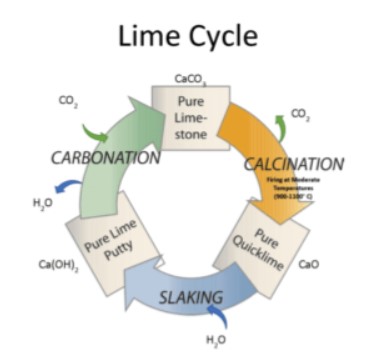
Here is a rendering of the “Lime Cycle” (from LimeWorks.us)

This diagram shows that it’s really a layer of “limestone” or CaCO3, that is formed when you limewash and allow it to dry (top of diagram). 

Let’s take that cycle one step at a time. The following is adapted from Calcium carbonate and the Lime Cycle.  Calcium carbonate is a very common mineral in the Earth's crust. It is the main building block of most animal shells, including the shells of shellfish, snails and birds’ eggs.  There are four main types of rock containing calcium carbonate: limestone, marble, chalk and calcite.

If we heat limestone to a very high temperature (to about 900 degC or 1652 degF), it decomposes - this is an example of thermal decomposition.

Calcium oxide is known as lime, or sometimes quicklime. If we heat a lump of quicklime very strongly it gives out a very bright white light. This is known as limelight. Limelight was used for stage lighting before the introduction of electricity, so famous actors and actresses were said to be in the limelight.

Quicklime reacts very violently with water giving out a lot of heat.

This reaction is called slaking. Calcium hydroxide is also known as lime, or sometimes slaked lime.

Lime mortar hardens as it dries. In addition a chemical reaction takes place between the lime and the carbon dioxide in the air.

This reaction takes place quite quickly at the surface but more slowly in the interior: not all of the lime in the lime mortar used to build the Great Pyramid has yet turned into calcium carbonate - after more than four thousand years!   The carbonation process absorbing atmospheric CO2 occurs at about 5 mm per month from the outer skin working inwards.  (Novel Biodesign enhancements to at-risk traditional building materials)

As you can see, processing limestone is a very energy-intensive process, but when compared to manufacturing Portland Cement, it’s actually more energy efficient.  Although it doesn’t actually sequester carbon (because CO2 is released during the burning process and it’s reabsorbed during the curing process), it does produce less CO2 emissions than Portland Cement.  During manufacture lime produces 20% less carbon dioxide than cement production.  Lime is burnt at a lower temperature than cement in the production process (900°C as opposed to 1300°C), therefore making lime production more economic. (The History of Lime and its Environmental Benefits)  In addition, cement does not “reabsorb” CO2 and is brittle (cracks), while lime used in cement can somewhat “heal” cracks.  If “lime putty” is added to mortar, it makes it more breathable (permeable) than Portland Cement (check out the pore structure here).

Lime’s anti-fungal properties can also be used on living trees, to protect trees from disease, sunburn and frost injury: The National Park Service used it on their historic trees, and it’s also recommended for citrus trees by a knowledgable tree service.  

If you want to use lime inside your home to deter mold or remediate a moldy area, Earth Paint has taken a 10,000 year old technology and engineered it to be safely applied directly over high moisture content, Mold and Mildew stained surfaces.  This product uses the power of lime to penetrate and saturate the porous cell structure of wood, drywall and concrete matrix.  As such, spray coating your building with Lime Prime and Lime Seal renders  a weather and air barrier outside.  Inside, before windows and drywall are hung, spraying the frame and wall cavities with Lime Prime will inhibit mold inside the walls.  (Lime Prime - Mold Abatement / Remediation)

For more benefits of limewash, be sure to visit our article on Ancient Homebuilding 101.  Lime is everywhere…did you also know that calcium carbonate is also the primary ingredient in antacids like TUMS?   You also may be walking on it or showering in it, because travertine is really a type of limestone.  It just goes to show that limestone is not just for caves; it’s a really useful (and beautiful) material in many aspects.

Photo by Anne Nygård on Unsplash

Enduring the Rainy Season

Enduring the Rainy Season

Many kinds of climates may exist in your state, from hot and dry to cool and humid, depending on your elevation, weather patterns, proximity to water, etc.  Although mold can grow anywhere (even in the desert!), more water definitely means more mold.   Your “rainy season” can come in January or July…but it matters most that you are ready for it and know what to expect!

Taken from somewhere that REALLY gets their share of rain, in the Philippines it is common for people to get sick during the rainy season and even while transitioning from one season to the next.  The following advice from the Philippines could go a long way in the US, as well!

  1. Pack your rain gear.  An umbrella is a must on days that it might rain, which includes some that start out sunny!  We’re not saying that getting wet automatically makes you sick, but here’s the connection: wet clothing can lower your body temperature.  Lowered body temperature causes the blood vessels in the nose to constrict, which in turn limits the number of white blood cells that can come to your mucous membrane to fight off infections.  This is the type of lowered immune response that leaves you susceptible to viruses and microbes!
  2. Warm up quickly after you get wet by taking a warm shower, or at least changing into warm dry clothing.  Making a habit of washing your hands after traveling also helps!
  3. Drink lots of clean water!  This is another part of keeping your body’s immune system healthy.
  4. Use mosquito repellant: It seems like new mosquito-borne diseases are discovered every year, so if you’re going to be outside, make sure they don’t target you by applying a non-toxic repellent like Wondercide Insect Repellents
  5. Make sure that mold is not creeping into your home with water intrusions.  More water outside running over your home can lead to small or major leaks, which can go undetected if you aren’t vigilant!  Keep bedroom doors open for ventilation and check unused rooms at least weekly for any signs of leaks.  You may want to also leave ceiling fans running to increase air circulation, which has a drying effect.  Mold spore counts will increase outdoors during the rainy season, but you can keep them down indoors by:
    1. Using a HEPA air cleaner:  Medify has a great selection of air purifiers that are simple to use and a good value for the size of room purified. 
    2. If you believe that mold spores are increasing in your home’s air, there are several ways to deactivate them. Plugging in a Germ Defender, Upgraded Air Angel Mobile or installing a Whole Home Polar Ionizer, all of which use bipolar technology, kills mold in the air and on surfaces. Alternatively, Air Purification Candles actually lower the spore count.  They don’t have fragrance so you don’t have to worry about nasal irritation.  You can check out our article on them here!
    3. Keep a close eye on humidity levels in your home with these inexpensive humidity sensors–place them in several rooms so you don’t have to look too long to know what’s going on with the humidity!  If you see it creeping up, it may be time to research dehumidifying settings on your HVAC system or add a dehumidifier.

Your environment may make you feel like you’re living underwater, but do your best not to let it affect your health or the health of your home.  Where there’s moisture, there’s life–just make sure it’s the beneficial, beautiful kind by preventing mold  and microbe growth.

It’s a dehumidifier that doesn’t use electricity AND has no moving parts!

It’s a dehumidifier that doesn’t use electricity AND has no moving parts!

Our clients know that here at HypoAir, we’re all about managing humidity for a healthier home.  If your house is above 60% humidity, you can start to have mold problems (the higher the humidity, the more quickly mold can grow).  We’ve written on dehumidifiers of all sizes for any room in your home, but none of them tops what this invention does.  It’s a passive dehumidifier that “sucks” the moisture out of air and evaporates it outside with help from the sun, even when the outside humidity was higher than inside!

Some of the best inventions have been developed by observing nature, called biomimicry.  In this case, researchers observed how trees “transpire” moisture, which includes lifting water from the roots to the leaves, where it evaporates through the pores, or stomata, of the leaves.  Thus, there are two parts of the tree that function in transpiration: the trunk of the tree contains xylem, which are very small capillaries or “straws”, and the pores in the leaves.  The sun’s energy starts the evaporation process and actually creates a negative pressure in the xylem, essentially sucking water up from the ground to the leaves.  (How do large trees, such as redwoods, get water from their roots to the leaves?)  

Researchers searched for similar behavior when they developed materials to mimic this water movement.  Two different materials were needed: one to absorb the water from the air (super-hygroscopic) and one to readily enable it to evaporate using the sun’s heat.  Metal-organic frameworks (MOFs) have been the subject of enormous research in the last decade.  They are like activated charcoal on steroids; because of their structured pores, internal surface area is huge.  When comparing the surface area per unit weight, the activated carbons are 400–2000 m2/g, zeolites up to 1500 m2/g, and MOFs are in the 1500–7000 m2/g range. MOFs are the porous materials with the highest surface area, with an ultra-high porosity of up to 90% of free volume.  (MOFs vs. other porous materials for carbon capture)  On top of this, MOFs can be custom-built to “adsorb” many different gasses or liquids, such as water, VOCs, metals, etc.  Thus, it made sense to make a very thirsty (hygroscopic) MOF to suck up water vapor, also known as a desiccant.  The researchers decided to try impregnating Lithium Chloride (LiCl, a salt) into an MOF. MOFs are typically granular, like sand, but the researchers wanted this component to be self-supporting, so they decided to nanospin the MOFs into a nanofibrous membrane (NFM) using polyacrylonitrile (PAN), a synthetic polymer resin.  The NFM would also enable the component to have a fast moisture absorption–desorption rate.  Thus, the “straw” component of the dehumidifier is abbreviated (PAN/MIL@LiCl) NFM, with MIL describing the “multilayer”. 

Passing the water vapor through to the outside of the space, the other component had to allow heat from the sun to evaporate this water, creating the “wicking” action.  This is the photothermal component.  Carbon black is a fine black powder produced by partial burning and pyrolysis of oil residues or natural gas at high temperatures.  (Carbon Black 101)  The black color works well to absorb solar heat, and adding it to a PAN NFM (PAN/CB) allows for great surface area, and thus evaporation rates.  The two layers put together are abbreviated PAN/MIL@LiCl-PAN/CB or for short, PML-PC NFM.

How did this layered dehumidifier configuration work out?  Impressively!  Being semi-flexible, it could be laid flat as a dehumidifier “panel” in a roof, or deformed to allow for water harvesting from the air (see diagram below). The scaled-down model of a house was constructed with dimensions of 40 cm × 50 cm × 40 cm, and a window with an area of 6 cm × 6 cm was designed for bilayer membrane installation. When light from the solar simulator illuminated the surface of the bilayer PML-PC NFM, the moisture in the indoor air was pumped by bilayer PML-PC NFM and simultaneously transported outdoors in the form of water vapor. The moisture actively moved from a high-humidity to a medium-humidity environment and also from a high-humidity to an ultra-high humidity environment through bilayer PML-PC NFM under sunlight irradiation. This is a unique advantage in terms of the dehumidification ability of the novel NFM-based moisture pump compared with traditional desiccants.  When the device was placed in an environment with an ambient humidity of 46%, the indoor RH was reduced from 70 to 48.9% within 2 h using bilayer PML-PC NFM.  When the device was placed in an environment with an ambient humidity of 80%. The indoor RH in the house model steadily decreased from 70 to 58.3% within 2 h using bilayer PML-PC NFM.  These are lower humidity ending points than that of the NFM without a photothermal layer. (Super hygroscopic nanofibrous membrane-based moisture pump for solar-driven indoor dehumidification)

Source: (Super hygroscopic nanofibrous membrane-based moisture pump for solar-driven indoor dehumidification

Now, what if night falls or clouds obscure the sun?  Since the experiment used a solar simulator of 1 kw/M2, which is the maximum amount of sunlight that can be had at the equator on a cloudless day, that would be a pretty intense artificial light needed to keep dehumidifying through the night or clouds.  For these reasons, this material would work best in an area with a high percentage of sunlight year-round, and lots of need for dehumidification (like the tropics).  Is it affordable?  Although the information in this paper is now 3 years old and other water-harvesting MOFs have been created, we don’t see any commercial applications yet, sadly.  Making such a technology affordable will do a lot to improve air quality in homes where energy (and dehumidifiers) are relatively expensive, since it doesn’t require electricity to condense humidity or regenerate the desiccant.  It could also allow many people to have access to clean drinking water by “pulling it out of thin air”.  We think it’s just too cool of an idea to keep to ourselves!

As for “natural” dehumidifiers, there are many materials that are hygroscopic: rock salt, calcium chloride (DampRid), baking soda, even sugar and honey.  The most efficient material we’ve seen is rock salt, most of all because it can be recycled: simply retain the liquid, let it evaporate in a pan outside in the sun, and break up the chunks to reuse it again (be sure to protect animals and children from drinking it by placing a screen over it!).  The downside to a rock salt dehumidifier is that it will only draw humidity down to 75%, which is the humidity that causes the salt to dissolve.  Also, using it in basements or porous/non-sealed areas is quite a lot of work for the results, as moisture is constantly being replenished from the ground through the concrete.  Finally, if you don’t recycle it, the liquid is quite toxic to vegetation, animals and can damage some surfaces.  

Some plants also act as natural dehumidifiers.  Check out the videos of the desert plant T. aphylla, native to the Middle East, which moves salts from the local soil to its branches and uses them to harvest water from the air!  The salt crystals on its branches change from a crystal structure during the day (low humidity) to drops of liquid at night, which it can absorb through its foliage.  If you have a normal “green thumb”, check out this article for a list of indoor plants that dehumidify.  Of course, we are all for natural, non-toxic and low-energy ways to improve the air in our homes!

Photo by Vivint Solar on Unsplash

These steps convert your HVAC into a whole house filter

These steps convert your HVAC into a whole house filter

Many people have central air conditioning/heating, yet they don’t know that this machine could be used year round to improve the air quality in their homes.  For such an expensive investment, it’s wise to get the most out of it–everyday!  Here are a number of tips to do just that.

  1. Air-seal the return ductwork.  We’ve written extensively on air-sealing your home, attached garage and attic, but the return ductwork is super-important too.  A lot of contractors use wood or drywall to “frame” a duct but without sealing the corners, you are pulling dusty air from wall cavities, the attic and maybe even under your house, if the return air grille is near the floor.  Here is a great video on what to do and which products to use.  Air-sealing your ductwork is not a bad idea, either.

  1. Make air filter changes top priority!

If you’ve finally gotten on a schedule of changing your HVAC filter, we applaud you!  You are protecting this expensive equipment by preventing an overly-dirty filter from damaging the fan or other components, because dirty filters increase the pressure drop, like trying to suck a Big Gulp through a coffee stirrer.  Try to use a higher MERV filter (like 11, 12 or 13), first by reading our article How can I get more filtration with my current HVAC system, then increasing the MERV if you have enough filter surface area.

  1. Seal the filter in place.

There are several ways to make sure that air is not bypassing the filter.  

  • This video shows how to seal a vent grille to the drywall using spray foam.  Although this can also be done from the attic (with less chance of dripping messy foam in your house, not all vents can be accessed from above.  

  • For the return grille: caulk the filter grille to the drywall.  

  • Use filter-sealing tape over the filter:  

    • AllergyZone FilterLock Filter Slot Seal, $10, has a magnetic closure to stick securely to your filter slot opening, sealing gaps to maximize filter use.  The video on this page for the product shows how easy it is to install.

    • Or, if you have a filter that lies flat in a filter grille, use masking tape or painter's tape to seal the edges of it to the filter grille like in this video (I prefer painter's tape because it removes more cleanly). 

  1. If you have a BP-2400 Whole Home Ionizer, install it between the return air filter and evaporator coil, or before the fan, in order to get those ions circulating through your whole home.  Once a year, it helps to de-energize the ionizer and clean of any dust from the brush heads, which will maximize its efficiency.

  1. Set the fan to “on”, not auto.  This ensures that the fan is always running even if the heat or AC is not on.  If you’re concerned about the cost of running the fan all year, you don’t have to be.  Check out our article on how to calculate this cost to see that it’s not a lot (~$10 per month or less), especially for the reward of cleaner home air.  The bonus is that circulating air with this fan redistributes air throughout your home, reducing moisture content in soft furnishings and mold growth.

You are ready to go!  Dust, cleaning and personal products, pets, cooking–they all contribute to less-than-stellar indoor air quality, so it’s wise to make the most of what you already have to improve it!

Photo by Tekton on Unsplash