Monthly Archives: August 2022

A Clean-Air Kitchen Checklist

A Clean-Air Kitchen Checklist

It’s clear from the amount of money and size of kitchens nowadays that the kitchen is where people spend a lot of time.  Big islands, comfortable chairs and features like coffee bars and wine coolers make it easy to stay and chat while the host cooks up a delicious meal.  The problem is that some things get overlooked in kitchen design and maintenance, so that hidden appliances may be making your air dirtier than your guests would expect! 

Kitchen exhaust vent

We’ve previously posted about how cooking and baking can raise fine particulates and VOCs in your kitchen to levels of a polluted city.  The best defense against spreading them to the rest of the home and breathing them in is to use your kitchen exhaust vent.  The problem is that the exhaust vent filter is often overlooked, and a clogged filter strains the vent motor and can throw particles right back into your kitchen.  Here’s where it’s important to a) check whether your vent is recirculating or exhausting to the outside, and b) clean the filter!

When I first learned about combination microwave/vent hoods, I thought, these are space-saving genius.  Being a moderately tall person, I could easily lift items in and out of the microwave, the unit was not taking up any counter space, and it doubled as a stove vent hood.  However, the more I used the one in my current home, the more disappointed I was with it.  Here are the problems with most microwave/vent hood combos:

  • The ventilation can exhaust directly back into the kitchen.  That’s right, those little grilles above the microwave door are the exit point of the exhaust fumes, which don’t get a lot of filtering before they come straight back into the kitchen.  The other option is to exhaust outside, which is far better.
  • Microwave/vent hood combos typically do not provide the cubic feet per minute (cfm) ventilation that a standard size kitchen requires, and what little you get can be further reduced if there is more than one turn in the ductwork above the unit to the outdoors.  
  • Although it’s a common situation, placing the microwave on a countertop is not a great installation either, because cooking gasses generated in the microwave are vented directly into the kitchen with no filter. 

Here’s what we recommend to get the cleanest air while you cook:

  1. If you have a combination microwave/vent hood, check two things:
    1. Does the vent hood provide the correct cfm for your kitchen?  Here is an article to help you calculate whether it’s sufficient for your kitchen.  If you don’t know the cfm of your unit, type the model number into an internet search.  If your unit does not have the necessary throughput, consider placing the microwave elsewhere and getting a more powerful standalone vent hood.  In this case proceed to #2.
    2. If the cfm is sufficient, does the microwave/vent hood exhaust back into the kitchen?  Place a microwaveable container in the microwave with some water and start to heat it.  Place your hand over the grille above the door and see if you can feel a stream of air moving into the room.  
      1. If so, then the exhaust is probably set to exhaust into the kitchen.  If you own your home and you want to change it to exhaust outside, it’s possible to take the microwave down from the wall and change the exhaust configuration.  Here’s a short video on how to rotate the blower fan of the microwave, which will change the exhaust port configuration.  This change necessitates installing a duct above the microwave and vent port outside, however.  For the venting, check this video
      2. If you are renting or otherwise can’t change the configuration of your microwave/vent hood exhaust to outside, then do your best to clean the filter on a regular basis so that cooking particulates can be trapped before they’re blown back into the room.
  2. Congratulations if you are upgrading to a standalone vent hood (our choice for the best kitchen atmosphere)!  Here are some tips to split up the microwave and vent hood and make each perform well.
    1. If budget is not a constraint, vent hoods now come in a “balanced” option, which means they not only suck fumes from your kitchen, but these are replaced with fresh air from outside.  Check out this smoke test on such a unit. 
    2. For normal budgets, good kitchen vent hoods can be purchased between $200-500 (here is a great review on the newest models, but be sure to pick one that vents externally!)  In addition to capacity, it’s also wise to get the quietest fan you can afford so that you won’t be annoyed with the sound.
    3. Now, where shall we place the microwave?  Most kitchen design professionals are happy to place it anywhere in the kitchen except the countertop, but then venting it back into the room is still polluting your indoor air.  Besides the moisture emitted from cooking steamy foods like rice or potatoes, some foods emit a lot of ultra-fine particles (UFPs).  Popcorn is one of these; in this study it was discovered that UFPs and PM2.5 generated by microwaving popcorn were 150-560 and 350-800 times higher than the emissions from microwaving water, respectively. About 90% of the total particles emitted were in the ultrafine size range.  To avoid releasing these harmful particles into your kitchen, here are the best scenarios for venting the microwave.
      1. Install it in cabinetry with a dedicated vent to the outdoors.  No questions about getting the vapors out in this case!
      2. Install it in a lower cabinet space next to the stove.  That way, steam and UFPs exhausting from the top of the unit can be drawn up and out by the range hood. “Drawer” microwaves are becoming more popular now (see photo below). 
      3. (Least effective, but still possible) Set the microwave on the counter next to the range hood but 2 feet away from it, for heat safety concerns. 

The last two options require manually turning on the range hood every time you use the microwave, but if you have a nice quiet vent hood, this shouldn’t be a problem.  

Microwave Drawer installed next to the oven/stove (source: Home Depot)

Refrigerator coils

It’s pretty obvious when the refrigerator needs cleaning: food spills inside and dirty fingerprints outside get the most attention.  However, the most important part (the working “guts” of the fridge) is easy to overlook, except for some dust gathering on the toe kick grill.  On most newer models, the cooling coils are hidden under the fridge, and all kinds of dust (especially if you have a shedding pet) will gather there and clog up the vital cooling parts. The coils should be cleaned every six months to one year to keep the fridge working properly, and keep the accumulated dust out of your air. Here’s how to clean it without a lot of hassle (realtor.com):

  • If the coils are not exposed at the back of the unit, then remove the toe kick panel in the bottom front to expose them.
  • Use a vacuum cleaner with HEPA filter (you don’t want to blow that dust back into the air) to vacuum off as much dust as you can reach.
  • Use a coil cleaning brush to get between the rows of coils, keeping your running vacuum nearby to suck up dislodged dust. 
  • Clean off the front grille with the vacuum and soap and water if necessary, and reinstall it.

The Dishwasher

Ahh, the dishwasher–what a super-convenient place to hide dirty dishes.  My cousin (an engineer) always joked that in his new house, he’s going to install 2-3 dishwashers and no cabinets.  Why?  Dishwashers are way cheaper than cabinets and no one likes to unload the dishwasher.  When you can have 1 “clean” and 1 “dirty” dishwasher at all times, you can take clean dishes from the clean one, use them and place them in the dirty one, and theoretically no cabinets are needed!  Somehow, I think his wife will have a problem with no cabinets…

Back on topic, dishwashers are appliances that use steaming hot water and caustic detergent, but are not vented to the outside.  Where does all that steam and vaporized detergent go?  Into your kitchen air, of course!  Hayward Score is a company which identifies the major issues in your home that can impact your health and gives you free personalized actionable recommendations to fix them.  They performed a study on how bad dishwashers are for your indoor air quality, and found out that it was really the “heat and dry” cycles, not the soap, that caused air quality problems.  They placed an air quality monitor in the room adjacent to the kitchen and ran the dishwasher three times:

  • Dishwasher run with standard soap, heat and dry cycle on = Air Quality: RED ZONE (bad)
  • Dishwasher run with no soap, heat and dry cycle on = Air Quality: RED ZONE (bad)
  • Dishwasher run with standard soap, heat and dry cycle off = Air Quality: BLUE ZONE (good)

Based on these results, the soap was not causing elevated levels of VOCs but high temperature combined with chlorinated water was.

When your home is supplied by city or community water, these systems typically use a lot of chlorine to keep bacteria out.  I mean, A LOT–often you can turn on the tap and it will smell like a swimming pool coming out of your faucet.  Heat and dry cycles can reach temperatures of 160 deg F or more, which when contacting chlorinated water, produces chloroform.  The chloroform can drift through your home farther than the steam does, hence the bad air quality readings taken in the next room. 

The solution to good air quality while running your dishwasher?  If your tap water is sufficiently hot to sterilize (above 120 deg F), then don’t use the heat and dry cycle settings.  Also, run your kitchen exhaust vent during and 30 minutes after the dishwasher cycle, to move steam and any other gasses outdoors.  If your tap water is below 120 deg F, then it’s a good idea to use the heat cycles to make sure everything is sanitized, but make sure to run the kitchen exhaust vent simultaneously.

Toasters, Crock Pots, Air-Fryers, Electric Skillets and all their cousins

We have a lot of miscellaneous appliances hidden in the cabinets or sitting on the countertops, which can put a lot of fine particulates and VOCs into the air when using them.  Toasters are one of the worst offenders, and start emitting toxic fumes from the moment you turn them on (University of Texas at Austin study), because they are heating up the leftover bits from previous foods, including oils.  Toasting two slices of bread caused twice as much air pollution as is seen in London for 15 to 20 minutes – meaning three times the World Health Organization’s safety limit. (dailymail.co.uk)  The solution?  Set them as close as possible to your range (2 feet away is safe if you are using the range also) and fire up that kitchen exhaust fan.  Heck, chopping your onions next to the kitchen exhaust fan can even whisk away the chemical irritant that they release to make you cry (syn-Propanethial-S-oxide).

With a good exhaust fan and little cleaning you can spend as much time as you like in your kitchen without worrying about what’s floating around in the air! 

Photo by Jimmy Dean on Unsplash

Measure it so you can improve it!

Measure it so you can improve it!

There are several great old quotes that still hold true today:

“You can’t improve what you don’t measure.” (often attributed to Peter Drucker, “father of management thinking”, Forbes.com

“When you can measure what you are speaking about, and express it in numbers, you know something about it; but when you cannot measure it, when you cannot express it in numbers, your knowledge is of a meagre and unsatisfactory kind: it may be the beginning of knowledge, but you have scarcely, in your thoughts, advanced to the stage of science, whatever the matter may be.”  (Lord Kelvin, British scientist, oxfordreference.com)

Ok, so we need to measure if we really want to know what is going on.  When you’re talking about air quality, sensors are the key!  Whether you are a homeowner or a professional, an economical sensor is a valuable thing.  Here are some of the best and their many uses.

Air Flow 

There are several instruments that can be used to measure airflow.  HVAC techs use manometers or anemometers  to verify whether the installed ductwork and fans are performing as designed.  There are also many uses for these around the house!  Here are a few:

  • Hold it below your kitchen exhaust vent fan to see if it is moving enough air out of the kitchen (you can do the same for the bathroom exhaust fan)
  • Hold it below your return air intake when the filter is clean, and when it is dirty, to see how much a dirty filter impacts your air flow.
  • Install a pollution-filtering window screen and window fan, and check the fresh airflow in and out of the room (see our post here). 

Here’s an inexpensive anemometer that not only measures wind speed, it also measures the temperature.  In order to get a volume air flow measurement in cubic feet per minute (CFM), set the output to read feet per minute and then multiply it by the square footage of the duct or window you’re measuring (width in inches x length in inches divided by 144). 

Air Pressure

We’ve written quite a bit about the “pressure” of your home; ideally it will be “balanced” so that outside air is not being pulled in through cracks and crevices (other than fresh air ventilation).  How do you really know, though, without measuring?  Air pressure sensors are called manometers and here are some other uses for them:

  • Checking the pressure drop across a new higher MERV filter (we recommend MERV 13 for the best home filtration).  You can make a small hole in the filter in order to feed one of the ported tubes through, and seal it later with some tape.
  • Check the negative pressure in rooms with the door closed, to see if the HVAC returns are getting proper air flow.  In this post we discuss tackling the problem of getting enough air movement with closed doors.  

Here’s an inexpensive manometer that detects pressure or differential pressure (with two ports) and has readouts in several different common units. 

CO2 

If you’ve read our post on CO2, then you know how important this pollutant can be to your wellbeing.  Too much CO2 comes from not having enough fresh air ventilation, and can be a big factor in feeling groggy, less energetic, and causing brain fog and poor mental performance.  Of course, then, you’ll want to measure it in your home and workplace, your car, and maybe even in your classroom, church or other public meeting place.  Here are some sensors that will help you do that:

  • To get the most bang for your buck, AirThings 2930 WavePlus combines 6 sensors in one unit: Radon, CO2, VOC, Humidity, Temp, Pressure (Barometric pressure) for about $200.
  • InkBirdPlus makes a unit that tells CO2, temperature and humidity, which are 3 key measurements for home use.  It can be hung on the wall or be portable.  This unit is about $69.

PM and VOCs

Particulate Matter (PM) is not only dust–it’s smaller than that!  Dust ranges in the 2.5-10 micron range (check out the following diagram), but when there’s smoke or cooking involved (which happen in the home all the time), particles can be less than 1 micron.  That’s where you can really see what’s going on when the toaster burns your bread!  

Source: visualcapitalist.com

Formaldehyde is a toxic VOC that is a common “off-gas” component of new furniture, flooring and pressed-wood cabinets.  It can be measured separately or as a part of Total VOCs (TVOCs).  Those who like to have their nails manicured and painted may or may not be in shock if they took a VOC meter into the salon…the same could happen in a busy restaurant with “open kitchen” concept.  Here are some sensors that you can use in the home or business (gasp!) to make sure you’re ventilating or wearing a mask when appropriate.

  • This model by Temtop has a sleek design for your desk and measures PM2.5, Formaldehyde and Total VOCs ($90).
  • Temtop Air Quality Monitor measures PM2.5, PM10, Formaldehyde, temperature and humidity, TVOC and AQI, with solid ratings on Amazon ($149).

Some sensors look like a sleek medical device and some look like a machine from Inspector Gadget, but remember, they will give you information your nose alone can’t tell you.  If you take out your sensor in a public place and someone asks you about it, you may be able to impart some timely wisdom that will help them, too!

Photo by Jorge Ramirez on Unsplash

What is a Heat Pump Dryer? What are the pros and cons of owning one?

What is a Heat Pump Dryer? What are the pros and cons of owning one?

Living in the woods has certain advantages and disadvantages.  The scenery is gorgeous and trees filtering sunlight shields my home from excessive heat in the summer, but growing vegetables and drying clothes outdoors have not been successful!  When I bought my current dryer in 2017, I looked at all the available features and finally decided on a large, mid-grade version (I wanted to be able to wash and dry comforters at home instead of going to a laundromat or sending them to the cleaners).  Despite its “eco” settings, I generally use the accusensor at the “most dry” setting to be sure my clothes are dry, because they often sit in the dryer for 12-24 hours afterwards due to forgetfulness…

There is a “new” kid on the dryer appliance block.  I call it “new” because this type of dryer has apparently been used for a long time in Europe and other countries, but has only been in the US for less than 5 years.  Heat pump dryers are one of two types of ventless dryers; the other type is condenser dryers.  Of the two, heat pump dryers are the more energy efficient in terms of electric consumption and waste heat output into the laundry room.

This video is a good overview of how heat pump dryers work, and on a practical side, the video in this article shows the typical maintenance needed on a heat pump dryer.

Regular (electric or gas) dryers cause the following problems: 

  • using a lot of energy to heat air and then immediately exhaust the heat outdoors

  • Drawing conditioned air from your home to run through the dryer (resulting in negative pressure and energy loss on the order of 200 cfm of conditioned air)

  • Release of ultra-fine particles (UFPs) into the air of your home and outdoors

The heat pump dryer may solve these problems by:

  • Recycling heated air instead of dumping it

  • Causing little-no air draw from the rest of your home 

  • No dryer vent means no dusty air leaks inside, or dumping UFPs outside.

Pros:

  • Operating cost is at least 28% less (energystar.gov) and can be up to 50% less than regular vented dryers (nytimes.com).

  • Owners of more energy-efficient homes will appreciate that a heat pump dryer will not try to pull a negative pressure by dumping conditioned air through the vent.

  • Some models operate on 120v (Miele at least), which make them more versatile.

  • No vent needs to be installed!  They can be installed in very small spaces and operate well no matter what temperature or humidity conditions are present in the house.

  • Heat pump dryers are better at fabric care because the dryer temperature is typically lower than conventional dryers (greenbuildingcanada.ca)

Cons:

  • Not all heat pump dryers perform the same.  This review of the Whirlpool YWED7990FW in 2019 claimed that it significantly raised the temperature and humidity of the small laundry room and surrounding area, and took significantly longer to dry, but a respondent claimed that his Miele dryer (a widely known German manufacturer) only raised the temp by a few degrees with the same drying time as a conventional dryer.  Another owner of a Whirlpool WED99HEDW was quite happy with his purchase after 4 years.

  • More maintenance is needed to keep the heat pump dryer working efficiently; a vacuum with soft head may be needed to clean the heat exchanger coils every so often, and it may need professional deep cleaning to remove lint deep inside the machine every few years.

  • Some heat pump dryers need to be installed near a drain, to dispose of condensed water from the clothing.  Others have reservoirs that can be emptied every so often.

  • Heat pump dryers are still relatively uncommon, so if the unit does need servicing, it may be difficult to find a knowledgeable technician if you live outside a major metro area. 

  • There is a higher upfront cost for heat pump dryers vs. conventional dryers

  • Drum capacity is typically smaller (greenbuildingcanada.ca)

You can find some 2022 reviews for heat pump dryers here, which are compact (the review is for compact washers and dryers, and most compact dryers are ventless).  Is a heat pump dryer right for you and your family?  Here are two major topics for your consideration:

  • Financial standpoint: Heat pump dryers cost more upfront, typically from between $800-$1400.  However, they save money each load in operating cost, and they save money by not pulling unconditioned air into your home throughout the load.  Let’s breakdown the costs and savings. 

    • Here is a page I used to calculate how much it costs to operate my conventional electric dryer per load:

      • My electric cost is about 10 cents per KW (from my electric bill).  My dryer uses 6240 watts (26 amps x 240 volts) per hour.  One cycle takes about 45 minutes (0.75 hour), so cost per cycle is 0.10 x 6240 x 0.75 / 1000 = 47 cents per load.

    • If I purchased a heat pump dryer and it gave me the minimum 28% energy savings, then operating the dryer would cost 34 cents per load (47 x 72%). 

    • I do about 5 loads of laundry per week, so using a heat pump dryer may save me about $34 per year (0.13 x 5 x 52).

    • These savings translate to approx. 3 years payback time for every $100 more that a heat pump dryer may cost over my current dryer.  HOWEVER, more savings come in when you consider the conditioned air you are not exhausting through your dryer vent:

    • HVAC rule of thumb: there is approx 400 cfm per ton of cooling power, and 12,000 BTU/hr (British Thermal Units).  My AC unit is 3.5 tons, so this would be 1400 cfm and 42000 BTU/hr when the AC is running.  (learnmetrics.com)  Typical electric dryers suck 200 cfm of conditioned air out of the house while running.  That’s how much cfm we’re losing, so let’s translate that into a cost.  This article tells me (in table 3) it costs $0.56 per hour to run a 3.5 ton unit (halfway between a 3 ton and a 4 ton unit), for the average US electric cost of $0.1319/kwh.  I’m going to ratio that down to my electricity cost of $0.10 per kwh, which would be $0.42/kwh to run my 3.5 ton unit. If I lose 200 cfm from the dryer, then over 45 minutes this is 9000 cubic feet of conditioned air.  9000 cf/1400 cfm = run time of 6.4 minutes to make it up, which at a cost of $0.42/hr = $0.045 extra. If I run my heater or AC 8 out of 12 months, this is 67% of the year, so we’ll multiply the 4.5 cents by 0.67 to get 3 cents per load.  The real cost to run my regular electric dryer is 47 cents per load (calculated above) plus 3 cents per load due to excess heating/cooling costs, or 50 cents per load.  The adjusted savings for using a heat pump dryer is ($0.50-0.34)x 5 loads a week x 52 weeks a year, which is about $42/year.  This gets me to about a 2.4 year payback for every $100 over regular dryer cost all because the dryer is pulling all kinds of hot and humid air into my house in the summer, or cold damp air into the house during the winter.  Honestly, in a humid environment like the southeast US, I think the actual cost is higher because of the latent heat (humidity) that the AC unit struggles to remove from the air.

  • Air Quality standpoint:  The nature of ultra-fine particles allows them not only to penetrate the air barrier of most homes, it also allows them to penetrate deep into your lungs and into your bloodstream.  Broadcasting UFPs into the outside air via the dryer exhaust allows some of them to come back into your home through air leaks (because conventional dryers pull a negative pressure on your laundry room, if not your home), and if your dryer vent line has any leaks, they are coming into your laundry room in a more direct route anyway.  With a heat pump dryer, the air is moving in a closed loop through a filter, which is cleaned in the same way as a conventional dryer filter, but the rest of the UFPs are pulled out of the airstream via condensed water.  The good thing is that the UFPs going into the condensed water are not being broadcasted into the air to cause respiratory issues.  The other good thing is that pollen and pollution outside is not being sucked into the home by the negative pressure that regular dryers generate.

The issue that is not addressed by most dryer manufacturers is how UFPs are captured in the condensate drain line.  If your new heat pump dryer has a reservoir, then emptying the condensate through a filter is easy.  If it drains into a plumbed drain, you may want to invest in a drain filter (there are a variety of drain filters designed for washing machines that would work fine, especially since the dryer will produce a lot less condensate than a washing machine drain).  Here are some options:

  • PlanetCare Microfiber filter by Celsious ($98) is a top pick because it allows you to customize your drainhose size and will soon offer recycling of the filter cartridges.

  • If you have a reservoir type machine, you can pour the accumulated condensate through a coffee filter to any drain, and toss the coffee filter.

  • There are many other solutions that can be adapted to filtering drier condensate by searching “washing machine microfiber filter”.

The bottom line is that heat pumps and dryer electronics continue to improve every year.  Although many brands and models did not have great reviews in 2019, they look much better 3 years later.  If you are fastidious about building and keeping the best air quality in your home, a heat pump dryer should be something you consider the next time you need to purchase a dryer!

Photo by Raychan on Unsplash

Negative Pressure Ventilation can be dangerous in your home! Here’s how to prevent it.

Negative Pressure Ventilation can be dangerous in your home!  Here's how to prevent it.

You may have heard the saying “Build Tight, Ventilate Right” and thought, well, that’s for newbuild homes, I can’t go back and seal my house now, it’s been completed for 30 years!  (or 2 or 5 years for that matter).  This is partly true, but we’ve detailed some ways to seal finished homes in our post here.  The thing is, without the Build Tight, you can still get good air quality if you Ventilate Right for your home. 

There are basic “flows” in the universe that are true everywhere, because energy will seek to equalize, meaning move from areas of high energy to areas of low energy.  Heat will move naturally from hot to cold.  Water will flow from high elevation to lower elevation.  A liquid or gas will flow naturally from an area of high pressure to low pressure.  Let’s examine this third example.  In order for air to move in or out of your house, you will need to have an area of high pressure and an area of low pressure.  Otherwise, there will be no air flow!  Sure, wind blowing around the house will naturally generate pockets of high or low pressure, which may act locally on different external rooms.  For moderately sealed homes with all the windows and doors closed, however, the greatest chance for natural airflow to occur is when a chimney damper is open or poorly sealed, and wind flowing across the chimney draws air up out of your house.  Otherwise, no appreciable airflow is going on unless you turn on a mechanical system.  We discussed this in our post “Do Trickle Vents Really Work?”  This lack of airflow can be good and bad.

The good thing is that pollutants from outside, as well as humidity, are not actively flowing into your home when there are no mechanical systems operating.  This is good because you don’t want these things inside, anyway.  Here ends the good. 

The bad is that you are not getting fresh air from the outside (even semi-polluted air can be fresh if it is filtered), and you are not getting bad air from inside (CO2, VOCs and dust) out.  We need active ventilation and it’s mandated for healthy living!  So, we need mechanical systems (fans and the like) to draw fresh air in and get bad air out.

Mechanical systems will always create a pressure differential if they are one-way.  In other words, if you only have an exhaust fan going in your home, it is always pulling air out and there will be a slight negative pressure inside.  If you always have a fan in your open window pointed into the room, it will be bringing air in and pressurizing the room.  If you have fans working in both directions, pressure will be more balanced/neutral, but you will still accomplish the goal of getting fresh air in and bad air out.  In our post “How Does Indoor Air Pressure Affect Ventilation and Air Quality?”  we dove into the pros and cons of different pressure schemes–negative, positive, balanced and balanced with an HRV or ERV, and why we think balanced pressure is the way to go. 

Unfortunately, for most people “ventilation” causes them to think about getting the bad air out only, and this is a problem.  In such homes there is no fresh air supply, turning the house into a stagnant air pool.  When the kitchen and bathroom exhaust fans are turned on or the clothes dryer is started, a slight negative pressure is generated (yep-check out our article on heat pump dryers, where we disclose that regular dryers dump about 200 cfm of conditioned air outside!).  

For an eye-opening demonstration on toxins going into a negative pressure home, check out this video!  

Smoke going down the chimney: 5:45 minutes

Exhaust and fumes from the attached garage: 6:20 minutes

The most dramatic increase in negative air pressure came when the demonstrator closed two interior doors in the simulated house.  The pressure dove from -1.7 paschals to 5.7 paschals!  This is the force that will pull combustion gases, chimney smoke, and garage fumes right into your living space.  Air can be suctioned from cracks in the building perimeter or worse, from combustion gas exhaust flues.  Here are the main culprits that generate negative air pressure:

Dryers

  • Many people have gas or electric dryers in rooms within their home.  When running a load of laundry, the dryer will suck about 200 cubic feet per minute (cfm) from the conditioned air in your home, and exhaust it outdoors through the vent.  (see our post on heat pump dryers and how this type of dryer eliminates this problem).

  • The loss of 200 cfm of air during a 45 minute-1 hour drying cycle not only wastes money, it creates negative pressure in your home.

  • If you close the laundry room door while operating the dryer, as many people do for noise abatement, most of the negative pressure is confined to the laundry room.  However, this means that:

    • the dryer is being starved for fresh air, which causes a longer drying cycle, and 

    • the laundry room is pulling all kinds of contaminants through cracks and crevices from other places in order to feed the dryer.  Where are many dryers located?  In the garage or next to the garage, or in the basement, which means that you are pulling air from a space that has exhaust fumes and/or mold contamination to dry your freshly-washed clothes.  Yuck!

    • If your laundry room also contains your gas-fired furnace or hot-water heater, it’s likely that the exhaust fumes from the heater are backdrafting to fill the air need for the dryer.  This means that combustion gasses are being sucked into the laundry room and dryer over your freshly-washed clothes.  Danger AND yuck!

  • If you don’t close the laundry room door, the dryer is pulling that 200 cfm of air from the rest of your home.  Add to that your kitchen exhaust range, which is usually 300 cfm or more.   Since the average home is fairly leaky, where is that air coming from?  

    • The attached garage with its car exhaust and fumes from any paints and chemicals stored there: yuck!

    • Down the chimney past a leaky damper: yuck!

    • From the dusty attic through your unsealed attic door and can lights: yuck!

    • From the neighbor’s stinky apartment: yuck!

    • From the pollen-laden or pollution-laden outdoor air through unsealed holes in the wall around your pipes, outlets and switches on exterior walls and other penetrations: yuck!

Gas-burning appliances

If your home uses any type of gas appliance, a negative pressure environment can be very dangerous.  Carbon monoxide can quickly overwhelm people in the home, causing injury or death.  “Backflow” or backdraft is airflow going in the wrong direction; in this case, instead of going out the chimney or combustion gas vent, toxic combustion gases can be sucked into the room where the exhaust fan or dryer is located.  This video from Australia shows how to test for a backdraft situation, and correct it by opening a window.  Here are the steps mentioned:

  • Make sure your gas water heater, furnace or other appliance is shut down and cold.

  • Turn on the exhaust fan(s) and dryer in your home.

  • Hold a smoke pen or candle next to the combustion gas vent.  

    • If the smoke rises straight up or is drawn into the vent, then the exhaust fan is not making enough negative pressure to affect combustion gas venting (good).

    • If the smoke moves away from the combustion gas vent and toward the exhaust fan, then a negative pressure situation is developing.   Open a window until the smoke rises straight up or toward the combustion gas vent.  Take note of how far the window must be opened for this to happen. 

There is another device to help avoid combustion gas backdraft; it’s called a Power Vent for your water heater.  Essentially, a fan in the vent duct of the heater propels gasses outside, instead of just relying on a stack effect.  Typically, power vented water heaters are installed where it’s not possible to vent vertically.  These types of vent systems are less likely to backdraft because of the vent assist (empirestateplumbing.com), but at the same time, they also draw more air from the space, adding to the negative air pressure problem. 

Fireplaces

You don’t even have to be using the fireplace to get harmful combustion residues sucked into your home.  If the chimney damper is not closed or well-sealed, air can be drawn down your chimney across layers of soot and ash, bringing it into your living room.  

Kitchen Exhaust Hoods and Bathroom Exhaust Fans

These types of fans are super-helpful to exhaust odorous fumes (and required over cookstoves), but they should be balanced with a filtered intake in order to avoid generating negative air pressure! 

How do I prevent negative pressures inside my home?

To make it all clear, we wanted to summarize what happens unknowingly when certain exhaust appliances are operated, and how to avoid these dangerous situations.

If you only have exhaust fans in your home, open a window to balance that air flow, and keep doors open or install In-Door Return Pathways so that negative pressures don’t increase. 

The best solution for prevention of negative air pressure in our opinion is installation of a Heat Recovery Ventilator (HRV) or Energy Recovery Ventilator (ERV).  These devices can recover the heat or cool in a normal exhaust (like a bathroom vent), and will supply the fresh air needed so that pressure in the home remains close to neutral.  However, it’s not usually recommended to connect the dryer or kitchen exhaust to your HRV or ERV.  Why?  These are typically “dirty” exhausts that would quickly plug up a heat exchanger with lint (in the case of the dryer) or grease (in the case of the kitchen). (Sources: greenbuildingadvisor.com here and here).

In the first part of this Home Diagnosis video, the host shows a kitchen exhaust hood with remote fan and duct silencer (brilliant devices to minimize noise in the kitchen) and preheated and filtered make up air.  Even if you don’t have a preheater/cooler, just having make up air on demand in conjunction with the range hood is a great idea, not to mention it satisfies the International Residential Code (IRC) requirement that “Exhaust hood systems capable of exhausting in excess of 400 cubic feet per minute (0.19 m3/s) shall be mechanically or naturally provided with makeup air at a rate approximately equal to the exhaust air rate.” (IRC code M1503.4)

The same should go for the dryer.  In order not to pull a suction on the rest of the house, the HRV/ERV should supply fresh air to the laundry room.  

In mild climates where air conditioning or heating is not needed for much of the year, or the homeowner simply likes the idea of opening windows for fresh air, an HRV or ERV doesn’t make much sense.  Thankfully there are ways to get that “makeup air” so that your home air pressure will stay balanced no matter what appliances/vents are running.  Here are some of them:

  • Window screen filters are a great option to get that fresh makeup air by opening a window and passing it through a nanofilter to remove the smallest particles of pollution.

  • In-Door Return Air Pathways by Tamarack Technology bridge the inevitable: closed interior doors.  Simply install these in the bottom of your hollow-core or solid wood interior doors (door must be 1-3/8” thick to fit) so that you can have privacy AND ventilation at the same time.

  • Make up air for the kitchen or balanced kitchen exhaust vents (check out this video for an explanation on how a packaged balanced vent fan works). 

  • This healthy home consultant in NC has a “Clothes Dryer Intake” that supplies make up air to your dryer. 

One last source of negative pressure in the home is power attic roof vents.  Most people think that using a power attic roof vent will cool the attic by sucking out hot attic air, and drawing cooler air in from outside.  The attic does end up being cooler, however, this is not because of outside air being drawn into the attic; the vent is actually so powerful that it is sucking the air-conditioned air from your house up through large and small crevices, into the attic! (bobvila.com) If you have your gas water heater or furnace in the attic, it can also be backdrafting.  In most cases, unobstructed natural vents at the soffit and ridge, combined with a good layer of attic floor insulation, will be better than power attic roof vents.

Just like your budget, don’t let your house go “into the negative” zone when it comes to air pressure, and get that fresh air coming in when you need it.  Balanced or Make Up Air Systems (MUAs) not only avoid pulling all kinds of pollutants into your air space, they also dilute higher CO2 and VOC levels so that you’re feeling comfortable and energized (check out our post on CO2 here).  It’s a decision that can improve your home air quality with only a medium amount of effort and money!

Is “noise pollution” a problem in your home?

Is "noise pollution" a problem in your home?

Many people who are used to having the TV, radio or other entertainment on all the time in their home and cars are used to this “background noise” as a part of their home.  Even appliances like noisy fans, the washing machine and the dishwasher, and outdoor noise like cars, airplanes, lawnmowers and sirens contribute to the soundtrack that is heard inside the home.   However, it’s not widely understood that noise pollution is also detrimental to our health, like other types of pollution (air, water).  The good news is that home noise pollution can be abated with immediate good effects and without negative long-term effects.   

“Second-hand noise” is noise experienced by people who did not make the noise.  Your apartment neighbor’s loud party or blaring music is an example, and according to Les Blomberg, executive director of the Noise Pollution Clearinghouse, an anti-noise advocacy group based in Montpelier, Vermont, it’s a civil rights issue.  (2005 study)  Whether it is the consistent noisy neighbors in your apartment building, booming car stereos rolling down your street, or the airport expansion plans that threaten to start flight noise an hour earlier in the morning, you need to speak up!  Communities in the US and all over the world have lobbied for and won changes to zoning laws and operating conditions in response to their complaints about noise.

Loud noise increases blood pressure, heart rates and stress levels. According to a 1982 study, increased blood pressure seems to be a “necessary” response in our bodies to loud noise, because if the receptors that signal vasoconstriction (constriction of vessels) are blocked, the body will increase heart rate to compensate for the lack of constriction. Loud noise can be experienced by many tradespeople in different industries on an ongoing basis (construction, factory work, warehouses, transport and service industries, civil workers, etc.), making it a chronic hypertension exacerbator.

Noise affects childrens’ learning.  In 1975 a study on a school located near elevated train tracks showed that the classrooms facing the tracks were consistently behind in test scores versus those in the quieter back side of the building, and by the end of the year, were a full grade point behind their peers in the quieter classrooms.  After acoustic tiles were installed in the classrooms and the train authority treated the tracks to make them less noisy, the childrens’ reading scores improved.  Feeling annoyed by noise can cause kids to lose focus on lessons.  For infants and children learning how to talk, a noisy environment can make it harder for them to understand speech.   It also affects how they play and sleep.  Children with special sensitivities—such as Autism Spectrum Disorder (ASD), Attention-Deficit Hyperactivity Disorder (ADHD), sensory processing disorders or learning differences are affected on a higher level by environmental noise. (healthychildren.org

Noise affects our sleep!  This seems like a no-brainer, but those who struggle to get sufficient quality sleep need to make a “sleep sanctuary” a priority.  Here are some suggestions:

  • Leave your phone outside the bedroom and use an electric or windup alarm clock.  If this is not possible, set a “Do Not Disturb” time, such as 10pm-8am, so that phone calls and message “dings” will not wake you.  If you are a caretaker, it’s also possible to have rule exceptions for people who most frequently call you.  

  • If you live in an multi-family building, you can block noise coming from below by adding thick rugs on the floors.  

  • Use acoustic foam on windows to dampen outside noise.  To make it removable, you can use glue or double-sided tape to apply these sound-proofing wedges to a foam board.  

  • Over the foam board, use blackout curtains as well.  Blackout curtains are typically made of several layers of fabric that will accomplish both your noise and light-blocking goals. 

  • Get accustomed to using comfy ear plugs.  Flents Foam Ear Plugs are highly rated for comfort and noise abatement–but they won’t stop you from hearing really important noises like an emergency phone call or a smoke alarm.  Personally, earplugs have been a staple of my sleeping habits since college, because they work!  

  • If you don’t like earplugs or still have significant environmental noise, add a white-noise machine to your bedroom.  Yogasleep Dohm UNO White Noise Sound Machine is highly rated for being easy to use, customizable, and travel-friendly.

  • What not to do: don’t listen to music!  "Almost everyone thought music improves their sleep, but we found those who listened to more music slept worse," Scullin said. "What was really surprising was that instrumental music led to worse sleep quality -- instrumental music leads to about twice as many earworms." (Michael Scullin, Ph. D, in his study on how earworms, those songs that replay in your head even when the music stops, affect sleep). 

  • For more tips on getting a good night’s sleep, check out our post on Maximizing Your Sleep.

There’s an App for That

Given some of the serious consequences of too much stress and too little sleep, as a health-conscious member of your household, it’s important to set limits on the level and duration of background noise in your home.  As we said in our post about sensors, you need to measure it so you can improve it! 

  • Measuring sound levels can be as easy as going to the “app store” on your phone and downloading an app to measure decibels; you don’t need a fancy meter.  Also, you need to log these levels and length of time that they persist, so that you can have a history to point to when advocating for change.  

  • You can use the above strategies for the bedroom to create other quiet places in your home for relaxing, reading, studying, etc.  You can also negotiate quiet times so that everyone in the home is winding down and resting during certain hours.

  • Try to schedule noisier activities while you are out of the home!  For example, you can start the dishwasher or washing machine when you leave for work or to run errands, or enable them to start remotely if you have smart appliances.  

  • Make a more peaceful oasis in your backyard: Acoustifence is an 1/8 “ thick material suited to outdoor installations that reduces sounds by 28 dB through the material.  It can be printed in all manner of beautiful and lifelike scenery, including brick, garden, stone veneer, etc. and comes in pre-cut and grommeted sections of 6’ x 30’.  These can be quickly installed over existing chain link fences to deaden sounds from generator enclosures, dog parks, parking lots, sports fields, construction sites, racetracks, airports, etc. If you want to create a quieter backyard, you can plant real plants in front of a printed screen to get a green, layered effect.

  • There are also apps for your phone to notify you when the selected audio level of playback is too loud.  According to 2018 data, the average adult is streaming audio content through mobile devices for about 1 hour per day. (ENT & audiology news).  Both of the following apps allow you to monitor your listening better to prevent hearing damage. 

    • The Apple Health App has the ability to measure sound levels from headphones so that listeners can monitor their noise exposure from their devices. The app uses guidelines from the World Health Organization (WHO) to clearly indicate to listeners when their noise exposure is within acceptable limits, or if it’s at a level that is potentially dangerous to their hearing. 

    • HearAngel is an Android app that compares your listening levels to a Daily Sound Allowance (DSA). A dose allowance of 85dBA (average level) for an eight-hour period is based on Health and Safety Executive (UK) recommendations.  It also allows you to monitor your children’s listening levels via a PIN code.


Noise pollution may be a new way of thinking about unwanted sound, but once you experience the bliss of quiet, it can be the new calming “background” to your home. 

Photo by Andre Benz on Unsplash

Getting the Basement Dried Out

Getting the Basement Dried Out

In our post on how the basement affects our whole home’s air quality, we discussed how mold and mildew form and are sustained in the basement.  Active water leaks (flowing down the walls and pooled on the floor) are not required to make the basement a musty place.  Here are some sources of moisture coming into the basement:

  • Concrete is not a moisture barrier on its own!  Water will permeate concrete walls and floors and simply evaporate, increasing humidity.  
  • Open or broken windows allow moist air from the outside to come in and upon encountering cool walls and surfaces in the basement, condensation will form or just increase relative humidity in the air.  
  • Air leaks around windows, entry doors, unsealed wall penetrations and penetrations into the first floor above allow air to come in, in an uncontrolled way. 

Ideally the basement is inside your building envelope, whether you decide to finish it or not.  This is because it can be a suitable place for mechanical systems like HVAC air handlers and furnaces, hot water heaters, and also for storage.  To house these systems, however, the basement needs to be dry, with good air quality.  We argue that the basement air quality needs to be as good as any other floor in the home, because it will mingle with the atmosphere of the rest of your home!  There will be small leaks in the basement ceiling that make it permeable to the rest of your home.

The way to control humidity is to control:

  • Water flow into the space,
  • Airflow into the space, and
  • Air circulation within the space.

Let’s tackle each problem individually.

Water flow into the basement

Water flowing down walls in streams and puddling on the floor is a major problem– in this case, it is like living above a lake!  It will be difficult to “dehumidify” the air when open water is present, because the water will be continually vaporizing into the air as fast as a dehumidifier can take it out.  Although many basements exist like this, walls and storage of home goods in such environments can accumulate mildew rapidly.  Painting on a “waterproofing coating” will usually just act as a band-aid, because the pressure behind the wall, forcing it into your basement (called hydrostatic pressure) will eventually break through the paint and even degrade the foundation if it’s not drained away properly using interior and/or exterior drains. (basement waterproofing)  It’s best to contract several reputable basement remediation contractors in order to get their recommendations and quotes on stopping the inflow of water.  

If the water is only causing dampness on the walls but not visible condensation, then it’s possible to allow the walls to continually “dry” to the inside by doing the following:

  • Cracks and damage to the walls need to be repaired first.
  • Install rigid foam board with a “perm” rating of 1 or greater.  This allows the moisture to move through the foam and dry out, but still insulate the basement for greater thermal comfort and avoid condensation on the cold wall. Keep the foam insulation up about an inch from the floor to allow any condensation to drain.  If desired, the walls can be framed with treated wood to hang drywall inside.  An excellent cutaway diagram of the installation can be found here (page 24). Below is a picture of rigid foam board insulation from the same document (page 32).
  • An alternative to applying rigid foam board is to paint concrete walls with a waterproofer such as UGL’s Extreme Latex Masonry Waterproofer.  This product has a perm rating of less than 1 (according to this manufacturer’s video), so it is vapor semi-impermeable, but it does not have any insulating properties, like the foam board, so the walls will still be cold to the touch and allow condensation if the air inside is too warm and humid.  
  • Use dehumidification to dry things out.  
  • Decrease relative humidity by increasing the temperature slightly (the dehumidifier may raise the temperature a few degrees, but if not, you can add a small heater).
  • Increase circulation with fans so that air is evenly dehumidified.

Some notes on Vapor Permeability: A material’s permeability is measured in units called perms, which assess how much moisture can pass through a barrier in a 24-hour period according to standardized industry tests. Materials are separated into four general classes based on their permeance:

  • Vapor impermeable: 0.1 perms or less

  • Vapor semi-impermeable: 1.0 perms or less and greater than 0.1 perm

  • Vapor semi-permeable: 10 perms or less and greater than 1.0 perm

  • Vapor permeable: greater than 10 perms

Materials with lower perm ratings are better at stopping the movement of water vapor. If the perm rating is low enough, the material is a vapor retarder. If it’s really low, it is a vapor barrier. (Barricade Building Products)


Air flow into the basement

Sometimes it’s difficult to know what to do: open the windows or not?  Many reputable websites advocate “airing out the basement” (such as thisoldhouse.com), and we at HypoAir always advocate for ventilation to dilute stale air, but here’s the problem: when you don’t know the dewpoint of the air coming in or leaking in, it can cause major mold problems in the basement!  Dewpoint is the controlling factor of whether fresh-air ventilation alone can prevent mold.  As we wrote in another post

The best way to explain this (per this great article) is to find out the dewpoints of the indoor and outdoor conditions.  If the outdoor dewpoint is lower, you can ventilate with fresh air and still dry out your house!  For example on July 26, 2002, here are the conditions inside and outside my house (a relatively “dry” hot day outside!):

Inside: 76 deg F, 67% humidity = 63 deg F dewpoint (check out this easy calculator on dpcalc.org)

Outside: 91 deg F, 54% humidity = 72 deg F dewpoint (dpcalc.org)

See, in this case even though the relative humidity outdoors is lower, if I open my windows, that hot air coming inside would be cooled and relative humidity would increase, working against my humidity goals.

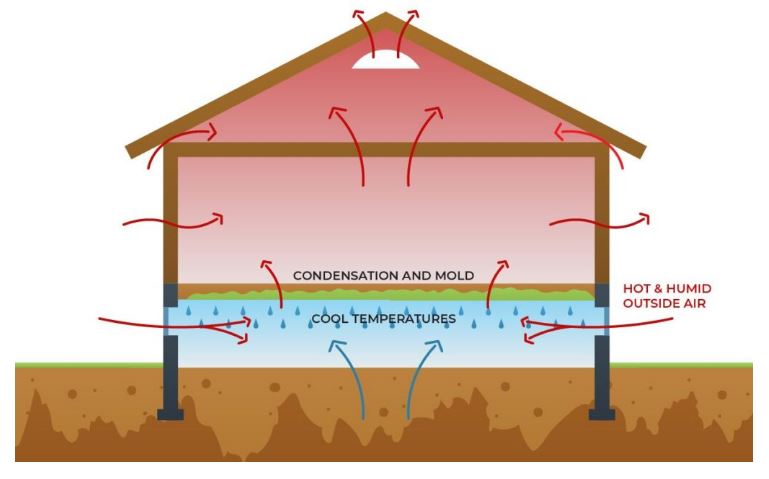
In the case of the basement, the air temperature could easily be lower, like 68 deg F.  If you cool 91 deg air with 54% relative humidity down to 68 degrees, water vapor in the air is going to condense, making your humidity problem worse!   Therefore we want to control all sources of air inflow and only let in drier air for ventilation.  Here is a diagram showing the problem of leaving windows open, and how to solve it:

source: bayareaunderpinning.com

  1. Close windows, block off vents, and seal the window frames with caulk, spray foam or adhesive tape made for the purpose.  Make sure exterior doors have weatherstripping. 

  2. Check for unsealed penetrations in the walls.  If you have to use a flashlight and look behind appliances such as water heaters or furnaces, be prepared with gloves and pest spray to get it done!  The best sealant for wall penetrations in the basement would be sprayfoam, because it conforms to the shape of the hole.  You may want to shove in a wad of steel wool first, because it deters animals from chewing through the foam and re-opening the hole.

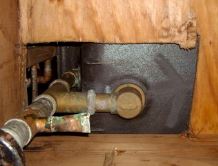
  3. Look up–check the ceiling.  If there is a false ceiling in the basement, you may need to remove ceiling tiles and/or insulation in order to see the underside of the subfloor, but this is where big problems can hide!  The photo below shows the underside of a tub.  Plumbers often cut BIG holes to make their jobs easier, but this can really hurt air quality when these holes let lots of moldy air up (if there’s a negative pressure generated in the space above, this is easily done with a bathroom vent fan), or warm air down (if you are using any type of air extractor in the basement).  It’s best to seal big holes like this one by framing in a box to the surrounding joists, and using spray foam to seal the resulting cracks and holes.  It’s not recommended to insulate the ceiling of the basement (see this definitive guide, page 25) to try to separate it from the rest of the building, as this will only cause more mold problems in the basement.

Source: energyvanguard.com

Where does fresh-air ventilation come from if you’ve sealed outside access off?  According to energyvanguard.com, there are 6 ways to supply fresh air to your home in a humid climate, and for the purpose of a basement that is outside the building envelope, only one makes sense since you’re probably already using a dehumidifier: a fresh air fan that purposely pulls in outside air.  Here are some options to make it happen: 

  • Air King’s QUFresh, 120 cfm, $413 at ecomfort.com
  • Broan’s FreshIn, 180 cfm, $239 at sylvane.com
  • ACInfinity’s AIRTITAN T3 6-In Ventilation Fan, 120 cfm, $69.99, sylvane.com

The AirTitan is a good option where windows are available, because it can be retrofitted to fit in an open window more easily than the other ducted models.  Each of these models have temperature and humidity settings you can adjust so that the fan will only operate when it meets those specifications.  These may need to be set higher in hot and humid climates, but the dehumidifier should be able to handle moderate inflows of fresh air.  When you control the airflow into the basement, you can control the humidity.

And finally, Air Circulation Within the Space

Your basement may be one wide-open area, or several rooms separated by walls and doors, but in each case, good air quality requires that air is moving constantly.  Here are some tips to get the best circulation:

  • Leave doors within the basement open as much as possible
  • Leave dedicated fans running all the time.  Floor fans work great for this purpose, as you can move them around/adjust direction and speeds until you find the optimum circulation.
  • Move boxes and furnishings away from walls and up from floors so that air will circulate to dry them.  Don’t stack boxes to the ceiling.  Separate boxes by several inches to get air moving between them. 
  • Remember, the less absorbent material stored in a non-conditioned space, the better (less cardboard, less fabric, and less wood).

I hope these suggestions help you to dry out your basement so that your whole-house air quality improves, from the ground up!

How to repurpose common appliances into air purifiers

How to repurpose common appliances into air purifiers

When you think of air purifiers, sometimes placement takes a role in the decision-making process.  Where do you place it? What if you could repurpose an existing appliance in your home and turn it into an air purifier, for double duty?

Ceiling Fans

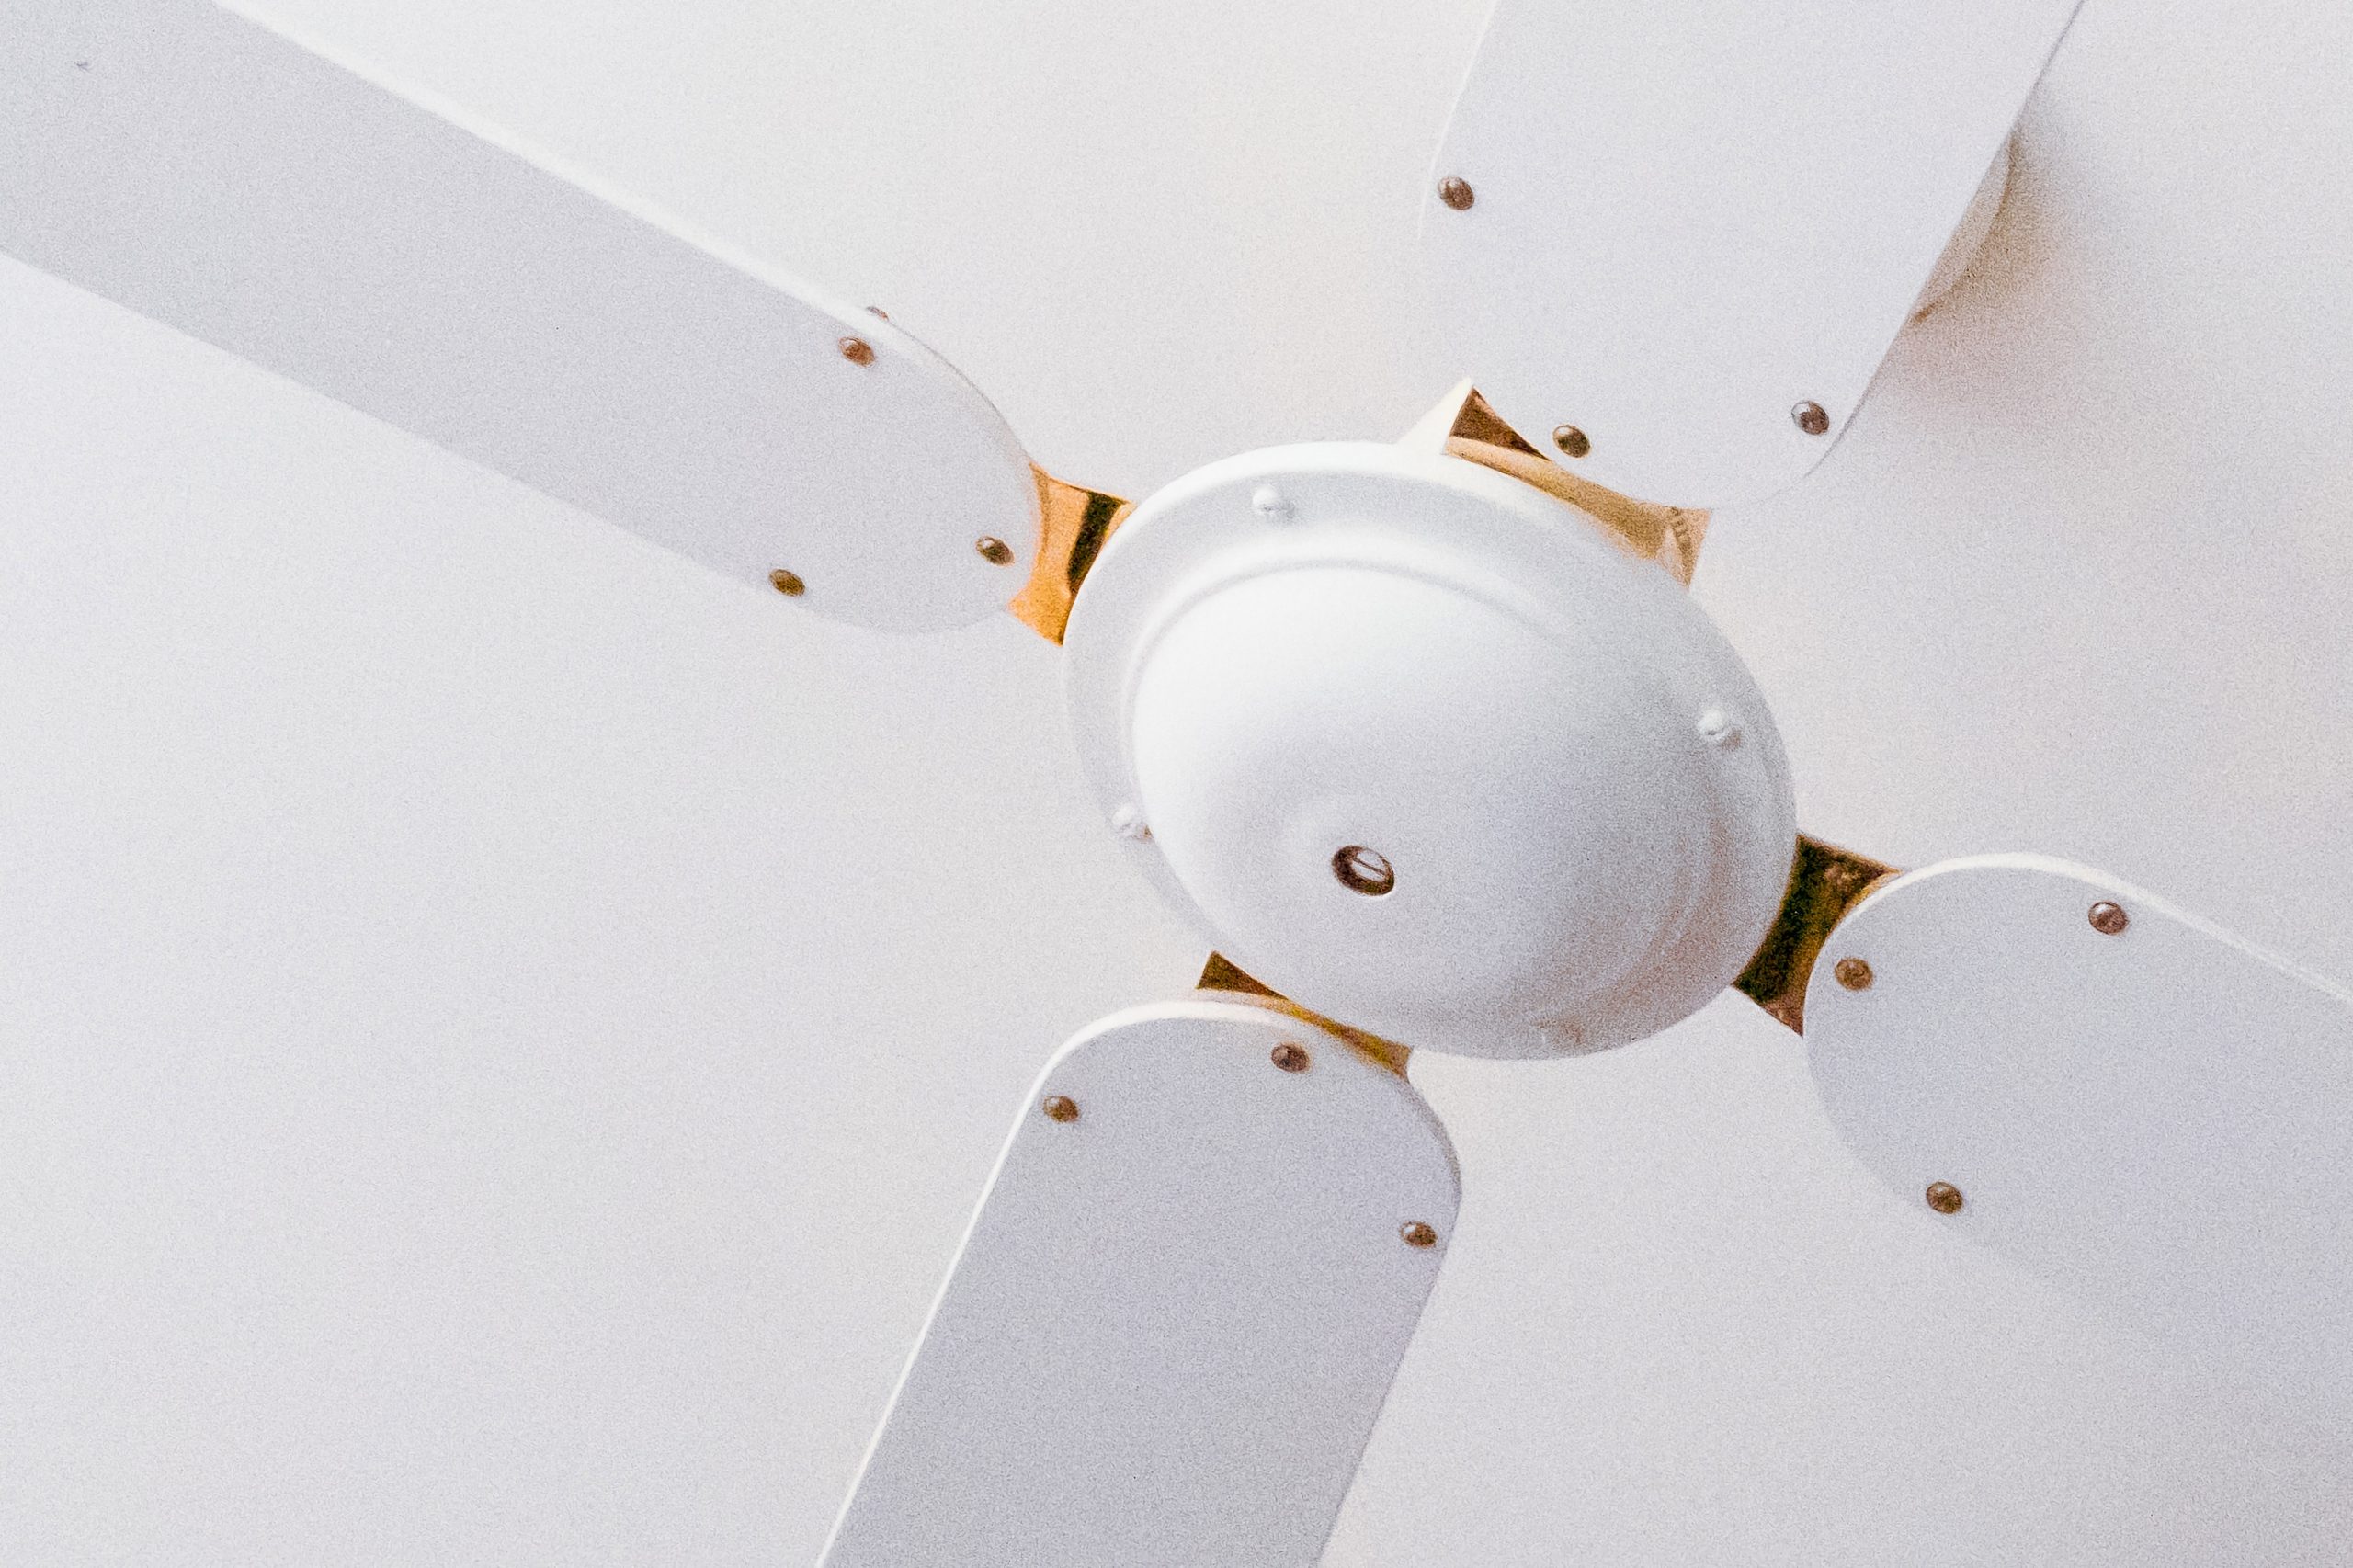
Purifan has been in business since 1998, and the purifier industry has obviously exploded since then because of the coronavirus pandemic.  This company has found a way to convert your ubiquitous, ordinary ceiling fans into air purifiers.  There are many different kits available, but the basic installation involves removing the paddle blades from the ceiling fan, bolting on the Purifan’s brackets, and then attaching the Purifan.  The Purifan cleans and circulates more than 2,000 cubic feet of air per minute, which means it cleans the air in a 20′ x 20′ x 8′ room every 90 seconds.

If you don’t go with a Purifan, you can still use your ceiling fan to filter the air.  BioStrike is the maker of these ceiling fan filters, which remove a surprising amount of dust from the air!

Kitchen Exhaust Fan

This one only works if your over-the stove exhaust is operating in recirculation mode, not venting mode. Microwave/vent hoods have the option to recirculate inside or vent outside. In order to know what yours is doing, turn on your kitchen exhaust fan and place your hand above the door to feel if it is blowing air back into the room.   Although recirculating inside is not an ideal setup (because gasses from cooking/baking are being filtered and thrown back into the room instead of vented outside), you can make your exhaust fan do double duty and use it not only as cooking exhaust, but when you are not cooking, use it as an air purifier.  Charcoal replacement filters are available for many vent fans; here is how to replace them: 

  • Check to see if your vent hood exhausts back into the room.  If not, don’t proceed with these steps as you will be only purifying air to send it outside!
  • Remove the filter at the inlet to the exhaust vent hood (on the underside). 
  • Measure and order new filters with charcoal in them.  Amazon has many of them, and you can search with your vent’s make and model number.
  • Clean the filter thoroughly (here’s a video that gives 3 non-toxic ways to do it)
  • While the cleaning agent is working on the filter, clean the surrounding  intake area of the exhaust fan. 
  • Replace the filter until your new charcoal ones arrive. 

To make the vent act as an air purifier, run the exhaust fan several hours a day while you are not cooking in order to purify air in your kitchen.

Make a reminder on your calendar to change this filter at the recommended interval (or more often if you don’t cook a lot)!  Most charcoal filters are not reusable.  If you want to upgrade and change the configuration of your venting to outside, check out our post here.

Registers/Vents

Although using the vents as air purifiers requires the air handler fan to be set to always “ON”, this is a good move because it improves air circulation in the home, reducing stagnant air and the relative humidity of soft furniture (aka mold “food”).  Adding filter media to the registers can be very simple:

We all seem to be juggling several jobs at once, so why shouldn’t your home appliances do the same? 

How healthy is dry-cleaning?

How healthy is dry-cleaning?

We’ve all done it–accidentally machine washed and ruined a “dry-clean only” piece.  It’s so frustrating–what happens in the washer and why is dry cleaning “safe” for these items?  According to Rinse, a dry cleaning and laundering service, “Dry Cleaning can be beneficial for garments made from fibers that don’t react well when exposed to water, like silk and wool. It’s also good for garments that shouldn’t be exposed to the heat of a traditional dryer.”  It consists of pre-treatment to stains, washing in a chemical solvent that is free of water, spin-drying, post-washing stain treatment and press, steam or ironing to make all clothing look new again. 

In the 1800’s and early 1900’s, many kinds of petroleum-based solvents were used to wash clothes, because they remove stains better than soap and water, with less damage to the fabric.  Perchloroethylene (PERC) is one of several non-flammable solvents created to dry-clean during the petroleum shortage created by WWII, and it became the primary solvent used in the 1940’s through the end of the century.  However, it is discovered to be a respiratory and skin irritant, neurotoxicant, liver and kidney toxicant, and reproductive and developmental toxicant, as well as a probable carcinogen. (frontiersin.org)  Dry-cleaning machines using PERC have evolved to a 5th generation, which is a closed loop of washing, drying and recycling the solvent, so that operator and the environmental exposure to PERC is much lower than the 1st generation.  Despite these advances, residuals from the chemical in cleaned clothes and in the waste process are disturbing; the chemical will be outlawed in 2023 in California.   Alternatives range from n-Propyl Bromide (n-PB), which also has toxic effects, to high-flashpoint solvents, to the safest options, liquid carbon dioxide cleaning and Professional Wet Cleaning (PWC).  PWC uses good old water and detergent in a computer-controlled process.

As consumers, the dangers of residual dry-cleaning chemicals in our clothes may not be apparent, but they are there.  PERC vaporizes from clothing and is released into your home, according to a 2011 study.  Concentrations of PERC also increase as the clothing item is dry-cleaned several times, except for silk, which does not retain PERC.  If several dry-cleaned items are left in your car, levels of PERC can rise well above permitted levels by OSHA for workplaces using the chemical.  This suggests that those who deliver dry-cleaned clothing might have more exposure than even those who process it.

In 2021, 90% of dry-cleaning shops in France still use PERC, and estimates in the US may be as low as 65% (vice.com)  Kings County, Washington has been especially proactive in helping cleaners to switch to PWC.  Education on the machines and the process, as well as financial assistance to purchase new PWC machines has been key to the transition.   It’s certainly a looming deadline for California shops, but Minneapolis already forced the transition and became PERC-free in January 2018 (americandrycleaner.com)

Dry-cleaning has been in a slight decline because of the coronavirus pandemic (less in-office work days with less formal dress) and the development of fabrics that can be successfully laundered at home.  Still, if you don’t live in Kings County, WA, California, or Minneapolis, what can you do to reduce your exposure to PERC?  Here are some suggestions:

  • Familiarize yourself with how to hand wash delicate items, and it may eliminate most of your dry cleaning!  Take these tips from Town and Country Magazine.

  • If you do go for dry clean, air the items out of their bags in a ventilated space away from your home, like the open sunshine or in a carport. 

  • Investigate cleaners that use PWC instead of PERC.  Rinse.com is a delivery service that offers laundry, fold and dry-cleaning to areas in California and New York, and states that none of their cleaners use PERC, however not all of them use PWC because they don’t recommend wet cleaning for all items.  It may be a case of calling and asking “I have this item” and “what can/would your shop use to clean it”?

  • Be wise in purchasing new clothes–avoid “Dry Clean Only” when you can.  “Dry Clean Suggested” is a more flexible option, but “Hand Wash” and “Machine Wash” are definitely preferred!

Protection from Over-Chlorination

Protection from Over-Chlorination

When I think about the pool where I learned to swim, I can almost smell the chlorine!  It was a YMCA where one half of the building had a “giant” (to a 5-year old) pool with lanes divided by strings of red plastic floating buoys, and the other half filled with exercise equipment and sweating people.  Through my school years, some of my friends came there regularly to practice on the swim team and I thought, how can they endure the smell and the sting of chlorine in their eyes, and the effects of chlorine on their hair?   Swimming was fun but I preferred open water for those reasons.   

If the smell of your home tap water reminds you of a chlorinated pool or bottle of bleach, it may be a high standard use of chlorine, or the effect of free chlorination.  The City of Fort Lauderdale Public Works Department defines free chlorination as “a temporary process that distributes free chlorine in place of combined chlorine (chloramine) throughout the water distribution system as part of routine distribution system maintenance.” It is a standard procedure used by most water utilities across the United States to maintain and protect DWDSs (drinking water distribution systems). The process is often performed once every two years or so.(springwellwater.com)

There are serious side effects from too much chlorination.  These come from the chlorine reacting with the organic compounds found naturally in the water, producing haloacetic acids (HAAs) and trihalomethanes (THMs).  Inhaling the HAAs and THMs during activities like showering can be more toxic because they exist at a low vapor pressure (they easily evaporate from open water) and can concentrate in your body.  According to a 2005 academic article, THMs are more concentrated in the body when absorbed through the skin than drinking tap water that contains the chemicals (springwellwater.com).  Consuming water with HAAs or THMs can lead to several serious health complications, such as stillbirths, bladder and rectal cancer, congenital disabilities, increased risk of kidney and liver cancer. It can also cause problems with the heart, kidneys, liver, and central nervous system.

Besides the serious health effects described above, you’re probably familiar with the consequences of showering and washing your hands with chlorinated water: itchy, dry skin and frizzy, dry hair.  Who knew that “swimmer’s hair” would be the plague of everyone using the municipal water systems?

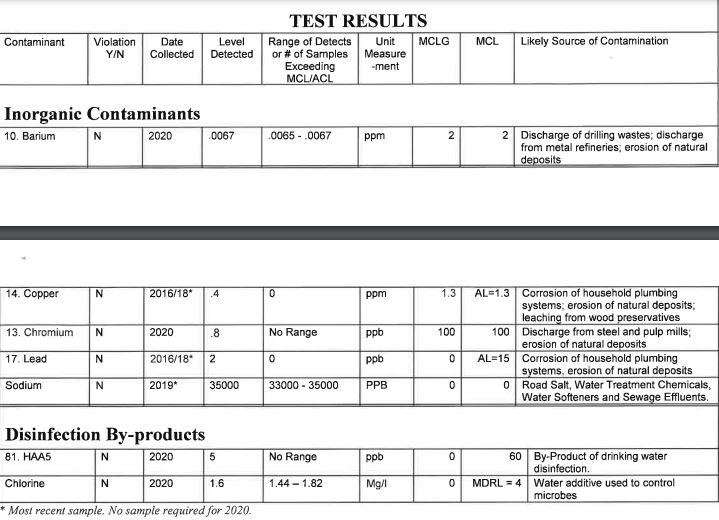
If I merely read the annual water report from my supplier, I would not have all the information.  Unfortunately (and you can see this in the following excerpt: only certain contaminants are reported), water distributors do not report the full picture.  Here is the water company’s report, that did not include Dichloroacetic acid (DCA):

And here is a reports from a watchdog group in the same year on the same water system.  From EWG.org

Results from mytapwater.org are also available in most states (but my locality was not available).  

It usually pays to dig a little deeper, and I didn’t even have to spend any money to do it (although there are plenty of test kits that will help you; see mytapscore.com).   Once you know what contaminants are in your water, you can consider ways to eliminate them.  EWG.org has a contaminant database that tells what risks toxins pose, and how to filter them.  For example, Haloacetic Acids (HAA5) can be filtered by activated carbon filters, or reverse osmosis. 

What else does excess chlorine do?

Unfortunately, chlorine also corrodes copper pipes.  Copper is very durable and highly corrosion-resistant in most underground applications (copper.org), but I would say that in this age of mass disinfection using chlorine, copper is a weak link for building piping systems.  Chlorine is a strong oxidizing agent that reacts readily with materials in the piping system, including copper, other metals and plastics to create oxide and chloride compounds. According to this industry website, “In applying shock chlorination to a copper system, a reduction in the chlorine residual over time will nearly always occur, and does not indicate that the chlorine is being depleted in fighting bacterial contamination. Therefore it is inappropriate and often damaging to the copper system to shock chlorinate the system, measure the chlorine residual and then repeat the shock chlorination and measurement multiple times trying to achieve a specified minimum drop in the chlorine content.”  Unfortunately, though, this is what municipal water systems do, because chlorine is a cheap disinfectant.  According to this 1982 study, “… free chlorine is the agent chiefly responsible for the corrosion of copper in chlorinated domestic water supplies”, but adjustment of the water pH after chlorination to 7 or 8, as well as keeping free chlorine to levels of 2mg/l or less, greatly reduces the rate of corrosion and extends the life of the copper systems.  For homes that were built with copper piping (before the advent of PEX and similar materials), this information is critical to the integrity of your piping!

Chlorine is also detrimental to plants and fish.  If you love growing plants in and around your home, “too much (chlorine) can accumulate in leaf tissue, resulting in leaves with a scorched or burned appearance. The leaves may also appear smaller than usual and may yellow and fall off early.”(springwellwater.com)  Here’s an easy way to get rid of most of the chlorine for watering plants:  run tap water into a large container or pitchers without lids, and let it stand open to the air for a day or so.  Most of the chlorine will dissipate from the water.  Fish may require more extensive filters, as the chlorine can burn their gills.  

According to the CDC, chlorinated water is safe for both humans and dogs to drink in concentrations up to 4 milligrams per liter (rover.com), but that does not take into account the organic byproducts (DCA and HAA5).  At least you could do the same for your pets by letting the chlorine evaporate from open containers before setting it out for them to drink.  At best, you can provide water from the same filters that you use!

If you sense that something is off with your water, you can speak up about it.  Erin Brockovich (the real-life heroine depicted by Julia Roberts in the 2000 movie) is the founder of the Erin Brockovich Foundation, a nonprofit organization created to educate and empower communities in their fight for clean water, and she has released a new book about the plight of America’s water systems and what individuals and groups are doing about it.  Her Facebook post on July 14, 2020 tells a lot:

“If your drinking water smells like bleach... there is a PROBLEM. Do not listen to the water utility providers when they tell you "everything is fine... your drinking water meets all the requirements"... that's just crap.

When you smell chlorine in drinking water it is most often the result of chlorine mixing with total organic carbon (DIRT) the utility fails to clean out of the water like they are supposed to. Water quality changes daily and through out the day... it is impacted by UV rays... and temperature changes. This changes how water is treated... but many utilities fail to do it right and cheat the regulatory system... many feed ammonia to sequester the chlorine and mask the real - toxic - consequences of doing so.

Bottomline... if you smell chlorine THERE IS A PROBLEM... and you need to ask questions.

1.   What is the amount of chlorine/chloramine we have in our distribution system?

2.   Are we experiencing nitrification?

3.   Are we conducting a burn or flush?

4.   What is your total organic carbon reduction percentage?

5.   Is there an algae bloom?

...and scores more... but start here. 

Stop buying their lies. You know when something is wrong! It's time we make it right!”

And on February 23, 2021, here is her response to an article on the water system in Stafford, Virginia:

“I am fed up with the barbaric practice of free chlorine burns applied  by drinking water utilities that loose control of their distribution systems... more so the ridiculous lies they tell!

"The free chlorination process does not adversely affect the water quality"... the BIG LIE

Stafford... you will have 75 days from hell... toxic levels of trihalomethanes, biofilm and sludge exposure.

"The flushing also allows any sediments or minerals that have collected in the water mains to be washed out"... right into your homes, hot water heater tanks, appliances, and drinking water.”

Bottom line: Don’t be afraid to be bold in asking questions and testing your water with regards to chlorine and other chemicals used to disinfect it.

At home, you can also start with filters that can be used in water pitchers, on the tap, under the sink, and for the whole home:

  • Get started with a water pitcher that can be stored on the counter or in the refrigerator for cold water:
    • ZeroWater 6 cup pitcher ($21) is a small size that can fill your hot water kettle or coffee maker, which because it also removes Total Dissolved Solids (TDS), is beneficial to the longevity of these types of machines.
    • AmazonBasics 10 cup pitcher ($25) gives you more capacity and filters are compatible with Brita pitchers, however it does not remove TDS.
  • AquaBliss Shower Filter ($36) can alleviate the discomfort of chlorine on your skin and hair for 10,000-12,000 gallons, which the company says is good for about 6 months of normal use.
  • Frizzlife Under Sink Water Filter, $126, can be installed by anyone in about 15 minutes and the filter cartridges remove fine silt, chlorine, chloramine and lead and heavy metals for about 10,000 gallons of water  

Chlorine is an old disinfectant for water systems, but it is not without dangers when used heavy-handedly, so be wise and avoid it when you can!

Do Air Purifiers in Classrooms Reduce Illness?

Do Air Purifiers in Classrooms Reduce Illness?

Ahh, this is certainly one time when I’m glad to be working remotely!  As my co-workers send their children back to school, the illnesses (from the common cold to COVID-19) ramp up again in their families as germs get passed back and forth in classrooms.

In 2021, there was a lot of discussion about how to keep students and teachers safe from COVID-19.  Many school districts rushed out to purchase and install air purifiers, with ensuing debate on which purifiers were effective, or in fact, which were dangerous.  It can be a bit confusing, so I headed online to find studies on what works.  I found that across a wide spectrum of experts, the following three solutions to reducing illness and increasing classroom performance are, in order, 

  1. Fresh air ventilation

  2. HVAC system filter maintenance

  3. Air purifiers

This list really is in order of importance.  First of all, air purification technology is great, but we at HypoAir are always in favor of the most natural option first, one that replicates the outdoors, and that will be fresh air VENTILATION.  That’s right, you can put an air purifier in a classroom, but without a continual supply of fresh air to increase oxygen and dilute rising CO2 and virus and bacteria levels, the air purifier can only do so much.  Fresh air can be supplied through an open window if the weather or outdoor air quality is nice, but there should be fresh air ventilation built into every HVAC system so that air quality outside doesn’t limit the quality of air indoors.  Many buildings in the U.S., especially schools, do not meet recommended ventilation rates. The quantity of ventilation depends on how many people are in the room; it should be 15 cubic feet per minute per person. In one study coauthored by Rengie Chan, a research scientist at Lawrence Berkeley National Labs, 85 percent of the California classrooms included failed to meet the minimum standard of 15 CFM per person. Other studies show many American classrooms have an average ventilation rate of only 6 to 11 cfm per person.(wired.com). 

The problem with estimating actual fresh-air ventilation to a room by HVAC is that unless there is an intake from the outside in the system, air blown into the classroom is just being recirculated through the ducts and maybe only filtered once, not adding any fresh air at all.  This type of estimation requires a person knowledgeable about the building’s HVAC system.  If fresh air intake is included, then one expert (Joseph Allen, a professor at Harvard’s School of Public Health) estimates that for reducing Covid-19 risk, the air in the room should be completely replaced at least five times an hour. In a Boston school, the sensor registered about 400 cfm of fresh air coming in through the unit ventilator in one classroom. The room measured 1,010 square feet and had 9.5 foot ceilings: It had 9,595 cubic feet of air. Multiply 400 cubic feet per minute by 60 minutes, divide it by the volume, and you find that the air only gets turned over 2.5 times an hour, which was not sufficient. (wired.com)  However, when conducting another experiment in the same school, they found they could boost air changes to 17 to 20 air changes per hour by opening windows and doors.

An easier way to determine if ventilation is sufficient is by monitoring the CO2 level.  To demonstrate the effect of reducing CO2 levels on disease transmission,  researchers in Taiwan reported on the effect of ventilation on a tuberculosis outbreak at Taipei University. Many of the rooms in the school were underventilated and had CO2 levels above 3,000 ppm. When engineers improved air circulation and got CO2 levels under 600 ppm, the outbreak completely stopped. According to the research, the increase in ventilation was responsible for 97% of the decrease in transmission.(theconversation.com)

Since the coronavirus is spread through the air, higher CO2 levels in a room likely mean there is a higher chance of transmission if an infected person is inside. Based on the study above, experts recommend trying to keep the CO2 levels below 600 ppm. You can buy good CO2 meters for less than $100 online (check out our post including them); just make sure that they are accurate to within 50 ppm. (theconversation.com) What can it hurt to donate (or get together with other parents to donate) several CO2 sensors with remote readings, in order to check the levels of CO2 in your childrens’ classrooms?  

After fresh-air ventilation has been established, let’s look at air cleaning.  In any HVAC system, there should be at least filters in the air returns and they should be changed regularly.  By increasing the MERV rating on these filters to MERV 13, smaller particles like viruses can be filtered out to reduce illness transmission rates.  Changing the rating of the filters should be done in cooperation with the facilities manager in order not to overload the HVAC system, but it is quite possible even if filter box sizes need to be enlarged (see our post on Air Filter Thickness for how to increase MERV rating without increasing pressure drop). 

Third, air purifiers can be considered.  If the school has done what they can to provide adequate ventilation and HVAC filter maintenance, then air purifiers can add another layer of protection by filtering or killing the germs that get by these first two conditions.  In order to be effective, an air purifier must either:

  • pull all of the air in the room through a filter unit several times an hour, OR

  • Send out a non-toxic disinfectant that disperses to all areas of the room.

The first of these can be accomplished with units that include high-powered fans, but these can be noisy.  Noise in a classroom, just like in your home, can be distracting and debilitating for the teacher and students!  For this reason, air purifiers that depend upon air throughput for efficacy need to be evaluated for noise when running at the optimum fan speed for the size of classroom considered.  Also, replacement parts such as filters need to be considered in the total cost.  The cost of a HEPA filter (and possibly UV lamp) for every purifier, for example, can quickly add up to thousands of dollars a year when changes are needed in a school with dozens of classrooms.  Maintenance of these units will fall on the school’s facilities staff, who are likely already over-burdened with an increased cleaning schedule.  

The second option is one that HypoAir promotes because it really is akin to what goes on naturally outdoors.  Ions are one of nature’s cleaning devices, because positive and negative ions are continually floating through the air and reacting with allergens, viruses and bacteria, deactivating them.  These ions are naturally produced by natural phenomena in the air such as sunshine, lightning, crashing water like at the seashore or a waterfall, and plants.  Indoors, we produce them by passing a small electrical charge through stainless steel “needles” to produce positive and negative ions, which get distributed through the air to every part of the room (like adding drops of dye to clean water, soon every part of the water is changed!).  This is done nearly silently, because powerful fans are not required for distribution (any fans already in use in the room will boost circulation of the unit’s small fan).  In addition, maintenance on HypoAir ionizers is virtually nil, because no filters are required and there are no replacement parts.  The cost of running our ionizers is very small, as they use minimal electricity. 

So what about real world testing of these methods?  The CDC released a study on 123 elementary schools in Georgia in 2021.  The schools included did one of three things:

  1. Nothing

  2. Increased ventilation by opening doors, windows or using fans 

  3. Added HEPA filters to classrooms.

In schools that improved ventilation through dilution methods alone, COVID-19 incidence was 35% lower than the schools that did nothing, whereas in schools that combined dilution methods with filtration, incidence was 48% lower than the schools that did nothing.  The takeaway here is that ventilation and HEPA filtration work, even with some added cost for ventilation modification or filter replacements!  Doing nothing, on the other hand, increases the cost of lost school days, makeup time and medical costs for students and teachers substantially.   

It’s a new world with viruses and allergens challenging young and old alike everywhere, but the wisdom of fresh-air ventilation combined with the technology of purification can make it significantly easier to bear!

Photo by CDC on Unsplash

What is Third-Hand Smoke? Is it Dangerous?

What is Third-Hand Smoke?  Is it Dangerous?

Smoke smells take a long time to dissipate.  I have bought wooden furniture, clothing, an SUV, and a couch from smokers (with months to years between these purchases) and I remember thinking at the time, this is not too bad.  This thought probably occurred after my sense of smell had already been deadened in the smoker’s home.  Then, I put the item in my car (or drove the SUV home) and thought, Ok, I just need to air it out well. Then, I got to my non-smoking home and realized WOW!  It was bad.  What do I need to do now?  Throw it out?  I gave the couch away to another smoker, but I managed to "salvage" the other things.  That was before I knew about the dangers of third-hand smoke.

For someone who is conditioned to recycle and reuse, throwing an item away may seem like an extreme measure, but you should consider what is making the smell.  It’s called third-hand smoke.  Smoke released in a room or car contains toxic chemicals like nicotine that cling to and penetrate walls, clothing, upholstery and other surfaces (mayoclinic.org). Results of a study published in 2010 found that when this nicotine reacts with nitrous acid in the air, it forms carcinogens, which are compounds that can cause cancer. (health.clevelandclinic.org)  It’s not clear how much damage third-hand smoke does to our bodies, but it can cause DNA breaks and is thought to be more dangerous to children.  Clearing third-hand smoke is not as easy as wiping down and airing out the item, because the “off-gassing” may occur over years. 

Sadly, we often have clients who need help dealing with smoke clean-up.  Here are some examples of how to clean smoke-contaminated items:

Ozone generators: Ozone is a proven way to remove smoke from surfaces and even within soft furnishings.  For years, hotels and auto detailers have relied on ozone generators to remove smoke from hotel rooms and cars quickly (in a matter of hours).  Because there are three oxygen atoms in an ozone molecule, it is unstable, and the extra oxygen molecule will break away and bind to other molecules, converting them to safer, less odorous molecules.  In the high concentrations that are needed to remove smells, the EPA warns that ozone can cause damage to our health, plants, rubber, electrical wire coatings, fabrics, and the dyes and pigments in some artwork.  Therefore, it’s not safe to breathe and should only be used for 2-4 hours and then the space sealed off for some time before ventilation (up to several days for maximum effect). (It’s tough to get rid of cigarette smells, but an ozone treatment can do it)

To get the most effectiveness out of the ozone treatment, all surfaces in the room or car should be thoroughly cleaned first, then you can use an ozone generator like this one to finish the smoke removal in small spaces.  The end of this video describes the safe use of the ozone generator in a car.

Vehicles:  Like couches and furniture, seat cushions don’t give up the smell very easily.  Here is an excellent video that recommends Citrol 266 used in a specific way to remove smoke permanently from fabric (but it's NOT for use on plastics).  

It’s important to realize that when the car ventilation is running, smoke can pollute the cabin air filter.  It’s best to replace the filter with a new one.

If the item is small and relatively inexpensive, you could consider tossing it and accepting the loss.  However, whole homes can be contaminated with third-hand smoke, and although costly, rehabilitation is quite possible.  

  • Carpeting and drapery is sometimes successfully cleaned with Citrol 266 at a 10:1 dilution (see video for application tips–don’t use on wood or plastics), or by using an ozone generator.  If not, these soft items should be removed and discarded because the chemicals from the smoke have penetrated to the padding, which is not accessible.
  • If removing and replacing the drywall is not an option, walls can be painted to seal in the odor by carefully cleaning and priming them before painting.  This article gives advice from a professional painter on painting smoke-impregnated walls.  He lists one non-toxic degreaser (Krud-Kutter), with an alternative more toxic one (TSP).  We would add that Earth Clean is an excellent non-toxic de-greaser that can be used on many other surfaces in the home even after the smoke is gone; the strength is customizable by adding water.  The primer (BIN) solvent completely evaporates and can be covered by any low-VOC paint.  
  • Ceilings can easily be overlooked, but they are just as (or more) smoke-absorbent than the walls!  If the ceiling is a popcorn ceiling or other decorative finish that is easily damaged by water and scrubbing, it's best to get professional help to remove it and resurface the drywall. Often popcorn texture was used to hide bad taping and floating jobs so you'll need help to get the ceiling looking good without this camouflage.
  • Hidden in your walls, ventilation ducts can hold a lot of third-hand smoke.  Particularly, the evaporator coil can trap dust and toxins, and is best cleaned by a technician (they can actually remove and clean it chemically).  This is different from cleaning the ducts alone.  If the ventilation ducts are internally insulated with fiberboard, this material is very difficult to clean safely, and the ducts may need to be replaced or encapsulated (sprayed with a coating that traps the toxins and prevents their release into the air).    
  • If you can clean the flooring with water and cleaner, it may take several rinses to get all of the nicotine and residual chemicals from the surface.  Vinegar can be helpful in this process, but again, non-toxic Earth Clean will lend professional strength to the job.  If the flooring cannot be cleaned by water, such as hardwoods, you can seal it with a number of safer products (see this article).  Professional remediation is possible but may require chemical stripping or sanding, which can release a lot of PM and VOCs.  As a last resort, you may need to budget flooring replacement! 
  • Finally, the insides of cupboards, undersides of tables, backsides of bookcases, insides of closets and mattresses are all overlooked places that smoke can hide.  Solid wood cupboards and furniture can be cleaned using Earth Clean also, but particle-board cupboards and furniture is likely to harbor even more smoke, and cleaning these with loads of water risks them soaking up water and becoming moldy. These places may be hard to clean but likely have a significant smoke reservoir.  If you can, adding a coat of sealer or primer (Earthpaint has a number of non-toxic sealers and primers) will finish the job.

It's all about thinking hard about where those wisps of smoke went and then going on a "seek and destroy" mission to eliminate them!

Photo by Daniele Fotia on Unsplash

Monitoring air quality for the sake of the youngest

Monitoring air quality for the sake of the youngest

There are so many things to avoid when you’re pregnant.  Alcohol and smoke are some of the top offenders, causing birth defects, neurodevelopmental disorders, pre-term birth and low birth weight.  Did you know that air pollution is also dangerous to expecting mothers and their infants?   

Of course, air pollution includes tobacco smoke, but it’s more than that.  Here are some of the other types of air pollution that pregnant women and newborns may be exposed to (marchofdimes.org):

  • Asbestos, carbon monoxide, ozone and radon
  • Chemicals (including cleaning product fumes) and smoke from factories
  • Dust, mold and pollen
  • Fumes from paint and strong chemicals

These pollutants can impact the lung development of a fetus, making them more susceptible to diseases and conditions like asthma and obesity later in life.  Here are some specific ways babies are impacted:

  • Both babies whose mothers smoke while pregnant and babies who are exposed to secondhand smoke after birth are more likely to die from sudden infant death syndrome (SIDS) than babies who are not exposed to cigarette smoke. (cdc.gov)
  • Pollution from vehicle traffic has many different toxins in it.  In particular, sulfur dioxide (SO2) is a big contributor to infant death according to a 2019 study in the UK and Wales.  The risk of infant death was 19% higher with increaseing SO2, compared with 7% higher with increased exposure to nitrogen dioxide (NO2) and 4% higher with increased exposure to PM10.   

There are several ways to protect yourself while pregnant, and your infant after they are born (UT Southwestern Medical Center).

  • Check outdoor air quality at airnow.gov and avoid being outside when the air quality is low.
  • Add an air purifier with HEPA filter to your home and/or office, because although inside is safer than outdoors on a low air quality day, pollution like PM2.5 infiltrates buildings that are not highly sealed.
  • Stay away from smoke, including second-hand, third-hand and wildfire smoke.  

Knowing what we do about indoor air pollution, here are some surprising sources of indoor air pollution:

  • Cooking: Fine particulates can cause your kitchen to have worse air quality than many cities when you are using the stove, oven and/or toaster!  Make sure to use a kitchen exhaust vent that exhausts outside while cooking, baking and for 30 minutes afterward while the stove cools down.
  • Cleaning: switch over to non-toxic products so that you’re not putting harmful VOCs and chemicals into the air and onto surfaces.  TotalClean is a multi-purpose wonder cleaner for non-toxic cleaning, odor and stain removal!
  • Candles:  Still incredibly popular, conventional candles can release a number of toxins including phthalates used in fragrance (an endocrine disruptor) and formaldehyde (a known carcinogen). (madesafe.org)  Try switching over to essential oil sprays and simmer pots to get the scent without the toxins (see our post).

Little lungs take time and clean air to develop properly, so it’s important to give them the best chance!

Some small plants can make a big difference!

Some small plants can make a big difference!

I have to admit that this post was inspired by an episode of Alone.  One of the participants boiled “Reindeer Moss” to eat.  That made me wonder, is moss good for anything else?

You will never see some of the best plants at filtering air pollution when strolling through the aisles at the local garden center or nursery.  Why?  Well, they just aren’t…popular.  If we only knew what they could do, maybe they would take front and center stage!

Moss: Ok, you may see moss at the garden center but it’s typically only used as a decoration to cover bare soil.  A couple of German entrepreneurs think it has a lot more to offer than decoration.  They have launched their business to bring moss walls to cities across Europe and around the world.  Moss walls are available in three configurations for installation in temporary or permanent displays.  Why moss?  

  • The moss walls filter up to 82% of fine dust from the air flowing through them.
  • Water vapor evaporates from the leaf surface of the moss, creating a cooling effect of up to 4 degrees C (about 7 deg F)
  • The moss wall also removes up to 355 kg of CO2 every year.

To make the most out of this amazing plant, fans draw in air through the moss and sensors monitor the health of the plants, providing automatic watering.  Sounds like we could use moss walls in the US!

Plankton: Unless you are a fish enthusiast, plankton is not usually very convenient to keep in your home.  Enter the Bio Orb, a glass container of bioluminescent phytoplankton, plankton that can produce light at night and fresh oxygen during the daytime.  Pyro Farms, is the maker of the Bio Orb, a glass sphere with a flat bottom and a specially designed stopper to allow air exchange but prevents excessive evaporation.  The Bio-Orb provides the ideal environment for growing PyroDinos (the bioluminescent phytoplankton) at home, in the office or at school.  (pyrofarms.com)  Scientists estimate that all plant-plankton (phytoplankton) are responsible for more than 70% of the air we breathe, so keeping plankton in your home, school or office offsets your personal carbon output. (earthsky.org)

Source: (pyrofarms.com)

Lichen: I remember learning about this plant in biology and probably geography.  Pictures of reindeer munching on lichen in the tundra come to mind.  What I don’t remember learning is that it’s not actually just a plant, but a combination of two or three organisms: a fungus and green algae or cyanobacteria, often both.  The fungus provides the structure that determines the shape of the organism, while the algae and/or cyanobacteria  provide photosynthesis to feed both the fungus and the algae/bacteria.  There are three types of lichen growth, which have various abilities to absorb pollutants and concentrate heavy metals (hobbyfarms.com).  They are like natural sensors in the environment to tell us about the pollutants in the air. 

  • Crustose lichens are flat; since they have the least amount of surface area to absorb pollutants, they are the most abundant.

  • Foliose lichens have a leafy shape and tend to stand off the substrate (wood, rock, etc) a bit.  They have a little more surface area so are a little less tolerant to air pollution.

  • Fruticose lichens are like tender, miniature shrubs, having the most surface area.  These only thrive in pristine areas with minimal air pollution.  

Next time you are on a walk, look for moss and lichen.  They are small plants that can make big contributions to healthy air!

Two "Moss Trees", source greencitysolutions.de

Going with your Gut

Going with your Gut

For several years now, I’ve been more aware of my health and doing my best to preserve it.  In the second half of 2020, I had a major health incident that “reset” my digestive system and life.  For reasons still unknown, I had lymph node swelling and pain in many places throughout my body, and I became very sensitive to gluten and lectins.  My energy plummeted and my active lifestyle generally slowed down to a crawl.  I’ve since regained some energy but my diet is still very limited.  A lot of HypoAir clients or their family members can relate to having these kinds of “limitations”.  How do we go forward?

I don’t want to make this article about all the symptoms, although many of my daily decisions are made to avoid symptoms.  I do want to talk about awareness and respect for the limitations of my body as I approach 50 years old.  Even if you are a super-healthy 30-something, it’s time to stop thinking that you are invincible!  The saying “the mind is willing but the body is weak” should be amended to “the mind is aware that the body is mortal”!

Yes, I used to be the one who rarely wore dust masks when sanding or spray-painting, pushed the envelope of squeezing working time into my week, and ate whatever I wanted to. Being thankful for all the knowledge I’ve acquired at HypoAir, it’s time to apply that knowledge to my own life.  Notwithstanding viruses, weather conditions and quantity of sleep, there is validity to the theory that if I feel “off”, it very well may be the air I’m breathing or the food I ate.  Here are some of the mental checks that can help to diagnose the source and correct the situation:

Your nose knows.  

  • If you’re smelling it, it’s already in your bloodstream.  For example, sometimes it’s easy to smell a gas leak, because the gas company adds a harmless odorant called “mercaptans” to help us know when it does leak.  That’s great, but what do we do after that first whiff?  We sniff around some more to try to find the source of the leak!  By the time you’ve determined where it is the strongest, you have probably already inhaled a good amount of the more harmful bulk of the gas, which may contain up to 21 toxins (wbur.org).  Similarly, the smells of car exhaust or gasoline mean that the harmful gasses have already entered our bloodstream by being absorbed through the lungs.  The takeaway?  Stop inhaling deeply and get out of the area as soon as possible.

  • Unless a product’s ingredients are listed and they are non-toxic, “good” smells can be deceiving.  Opt for the unscented, because you can usually add essential oils to make a wonderful scent of your own!  

  • “Stale” does mean too little ventilation.  Crack the window (if there is good quality air outside) and see what a difference it makes in the scent of the room, as well as your thinking ability (check out our post on CO2). 

  • “Musty” does mean mold.  According to the EPA, the musty smell is microbial volatile organic compounds (mVOCs), which means that mold is already growing in the building.  If you also check the humidity of the musty room and find that it’s high (above 65%), you can confirm your diagnosis with great accuracy even before finding the mold.

  • Listen to your body!  “Sick” buildings are not apparent to everyone, but your body will tell you when the building is not healthy for you.  For example, I worked once a week in a store where I had seen water coming through the ceiling after a hard rain.  Certain parts of the store smelled musty, and I tried to avoid staying too long in them.  Yet, fatigue was a routine part of my 4-hour shift.  When I started developing severe headaches after only several hours in the store, I knew I had to tender my resignation.  My health was not worth the small income that the job yielded. 

We really are what we eat (and what we eat it in).  

  • Is that dark stuff mold?  Yes, mold can hide in “fresh” food that you’ve just opened.  For example, nuts can be contaminated by mold and mycotoxins, which can get into the shell through the stem opening, or during storage after the nut is shelled.  Moldy nuts are particularly dangerous because they harbor a fungus called Aspergillus flavus, which, "produces one of the most deadly toxins known to humankind. The toxin accumulates in the liver and can cause liver cancer.” (Dr. Patrick Hickey, mold expert, bbc.com)  If the shells are intact and there’s no mold on the outside, you should be fine. 

    • Soaking the nuts in salt water removes mold and pesticides and makes them easier to digest.  Soak only the amount of nuts you will eat in a few days.

    • This article also recommends soaking nuts but then drying them to store them.

    • Here is a list of other foods that may be high in mold and what to do about them.

  • Not only does fast food contain ingredients that don’t play well with our bodies (like potassium bromate, propylene glycol, TBHQ, calcium sulfate, phosphate additives and BHT)(eatthis.com), even the wrappers have chemicals that do damage, like PFAS and phthalates. (cnn.com)

  • If it doesn’t look like the foods it came from, put it back!  Would you eat food that’s already been digested?  That sounds disgusting, but many foods on the supermarket aisles qualify to be in this new category: ultra-processed foods.  Ultra-processed foods are packaged foods that have been made by food companies using many manufactured ingredients, rather than actual foods. Those ingredients are combined in some way to make something that is edible, but it in no way maintains the integrity or nutritional content of the original foods. (mdanderson.org)  It’s best to limit these foods because they cause weight gain and have little nutritional value.  Examples are soft drinks, chips, chocolate, candy, ice-cream, sweetened breakfast cereals, packaged soups, chicken nuggets, hotdogs, fries and more. (heartandstroke.ca) Here is a chart that shows how these are made:

Source: mdanderson.org

  • Listen to your gut!  When I feel fatigued and my gut is irritated, I take a look back at what I ate the day before.  Sometimes foods do not outright make us sick, but they do not sit well and are not digested well.  When that happens, very little nutrients are absorbed and what comes out is not “normal”.  If this happens on a routine basis, start a food journal by writing down everything you eat and how you feel each day.  If you find a correlation between certain foods and your symptoms, take the (sometimes difficult) step to eliminate it from your diet and find a healthier substitute!  When you want to make a drastic improvement, Whole30 is a plan that is highly recommended by doctors and nutritionists to identify what is good for you to eat.

Does my lifestyle reflect the person I want to be?

  • Having a physically comfortable job is not always healthy.  I must admit, working from home has been good for my finances, and for the most part, my body.  Isolation protects us from viruses and bacteria to a large degree, and home can be extremely comfortable for casual dress and “office” surroundings. But, working at a computer for hours on end without significant movement is not good.  To avoid physical issues due to bad posture and poor circulation, It’s necessary to invest in a good chair and/or standing desk and set a timer to get up, stretch and move around once an hour.  
  • Adrenaline junkie + computer/phone job = poor health.  I liken this to the stock jockeys, the dispatchers, and yes, the customer service industry.  These are high-stress jobs, but without a physical outlet for the stress, the adrenaline produced continues to build up and cause inflammation and auto-immune problems.  Why?  Stress produces adrenaline in what is know as “fight or flight”. (see verywellmind.com)  Both of these actions traditionally are physical–you fight the intruder or you run away from the intruder.  But what if the stressful situation is the conversation with a customer on the other end of the phoneline, or a looming deadline and your computer is acting up?  All that stress and adrenaline are internalized (because you aren’t allowed to fight with your words!)  When this happens and you develop deteriorating physical symptoms, it’s time to talk with your employer about job modification, or look for a new job.  I know; I was a dispatcher for 2 years and a customer service representative for about 8 years.  Value your health and fight for it!
  • Does my schedule reflect my priorities?  Yes, it’s necessary to get that paycheck in order to pay the mortgage/rent/car note etc.  But along with valuing your health, value the priorities that cause you to prosper as a person.  Are you learning new skills and do you have the opportunity to use your natural abilities and passions in your job?  It may sound like a luxury, but a lower-paying job may be worth more in the long run when it is a job you really love and enjoy!  Consultants like marketingpartnershipprogram.com can help you discover these priorities and make them a reality, even increasing your reach and impact in your community and industry. 

These are just some of the ways you can “go with your gut” in order to make wiser, healthier decisions that keep you moving onward and upward and not bogged down by ill health and ill emotions.  Ideally it shouldn’t take decades to start on this path, but it’s never too late to start!