Monthly Archives: January 2024

Are there any new mold detectors on the market?

Are there any new "mold detectors" on the market?

If you have had a brush with illness-causing mold or suspect that there may be toxic mold growing somewhere in your home, we understand the desire for speedy detection and remediation!  Often, the solution also has to lie within a modest budget.  Traditionally, that demanded a trade-off between Do-It-Yourself (DIY) mold detection versus calling in professionals.  We’ve written about DIY mold test kits and how they work, but what else is available when the mold can’t be seen?  Ian Cull of the Indoor Air Quality Association made a three-part video on how to detect mold in walls, but we tend to advise homeowners NOT to do some of the things he mentions:

  1. We recommend that you DON’T cut a large hole in your drywall with a saw to peek inside.  This presents a number of problems: patching the hole if you don’t find mold, potentially cutting electrical wires or plumbing in the process, and disturbing mold that will be released throughout the home!

  2. We recommend that you DON’T “sniff” around electrical or cable outlets for microbial volatile organic compounds (mVOCs): these are the musty, earthy smells that mold produces when it’s growing. The drawbacks are that there may not be an outlet where there’s mold, and of course, you’re inhaling mVOCs and potentially mold spores and mycotoxins, very deeply into your lungs!  Instead, check out the VOCs and Mold Test option below.

  3. Use a borescope (also called an endoscope or snake camera)–it’s a very small camera that can fit through a very small hole!  Some have mirror attachments that can look at the back side of the drywall.  They used to only be used by professionals, but now are available for under $100.

  4. Looking for moisture: Since mold needs moisture to grow, a moisture meter is a cheap way to see if that moisture is present in the wall.  A more expensive piece of equipment is an infrared camera, which sometimes requires experience to understand what you are seeing.  However, these only find active moisture and mold problems (not if the area has dried out).

  5. Lab-based methods: taking samples of the air in the room. This may cause elevated counts in that room, but it will not pinpoint the source of the mold.  It may also not pick up mold in the wall.

  6. Lab-based methods: taking samples of air within the wall.  This is more specific to the area, however there’s not a threshold and this type of test may give false positives or false negatives.

Besides these (sometimes) destructive methods, we’ve written about blacklights that can show mold or water staining.  Also, using an N-95 mask or equivalent, you could:

  • Carefully remove a baseboard to see if any mold is present at the bottom of the drywall or on the plate (wood stud sitting on top of the floor).  You can also make a hole just above the plate but still under the top of the baseboard, if you want to do any testing in the wall cavity.

  • If you have pocket doors, you can peer into the cavity of the door to check the backside of the drywall. 

  • If there’s carpet in the room, use a pair of pliers to pull the carpet away in a corner to see if there’s mold under the carpet or baseboard.

  • If you have access to the wall from the attic or the crawlspace, you can use a drill to drill through the top or bottom plate and use a borescope to see “into” the wall.  Be sure to use a mask and plug up the hole afterward!

These are fairly standard ways to look for mold in a wall, but here are some new ones that have popped up recently.

VOCs and Mold Test: Because “black mold” like Stachybotrys does not always release a significant amount of spores unless it is disturbed, detecting mold that is enclosed in a wall can be difficult.  However, microbial VOCs (mVOCs) are the gasses given off by mold, they can be more easily detected, and are exactly what this test specializes in.  The sample pump and test tubes are shipped to you with instructions, which are also available in video form on the website.  After sampling, the equipment and tubes are mailed back for analysis. The only difficult part of this test may be complying with keeping the outside doors closed for 24 hours before the test.  It doesn’t detect mycotoxins, but where there’s mVOCs, there also may be mycotoxins.  The real-time version of this type of testing is called zNose, and it’s used in airports and building security, food manufacturing, and many other industries to detect VOCs from trace explosives, chemicals and microbes.

The Healthful Home 5-Minute Mold Test is unique.  The company has a patented way to check for Stachybotrys Chartarum and Penicillium/Aspergillus species using a swab test, which are just two of the most common toxic molds.  The test seems similar to an at-home pregnancy test: use liquid from a swab sample to fill the reservoir on the mold detecting devices, and wait five minutes for the “positive” lines to appear.  The test was reviewed by an actual mold inspector in this video and he found the results concurred with lab testing of the same sample.  However, readings can sometimes be misleading on the at-home test.  It’s a good start…we would like to see more tests like this.

Hire a rescue dog: According to this video, specifically trained dogs are 95% accurate.  They point out the location, and are accurate and faster than other testing.  Dogs that are specifically trained to be mold detectives are used in Canine Mold Detective.  Buddy was the first dog trained in this way, initially trained for a thousand hours in three months, and he continues his training daily with his owner Lacey.

We at HypoAir have not physically reviewed this device, but the BioMatrix Mold Monitor is a unique in that it scans temperature, relative humidity, dew point, absolute humidity, and equilibrium moisture content (EMC), and feeds these into a mold algorithm to determine if the area around it is at a high risk for mold.  The device is activated when the moisture meets one of 3 specialized sensors on the back of the unit, triggering an alarm that will alert you to potential problems. The product is powered by one 9-volt battery, which should last for 3 years (battery not included).  It also comes with a Free Virtual Mold Inspection Service by a team supervised by Industrial Hygienists experienced with mold inspection and remediation. They can perform a virtual walkthrough of the environment by video call and a structural history review to identify the potential mold exposure risks associated with each incident. Once identified, they will be available to answer any questions, provide a suggested course of action, and offer helpful resources. 

Sometime in the future, Unmanned Aerial Vehicles (UAVs or more commonly, drones) could be employed to detect indoor pollution sources.  According to this study, people have begun to try using UAVs to locate indoor gas sources, and it actually could save money: one drone could replace an extensive sensor network.  

For more advanced warning devices for mold, check out our article on leak detectors.  Overgrowth of mold in your home is just too costly in terms of your health and money to repair damages, so it’s worth looking into detectors and safeguards to detect it or its precursor, moisture. 

Photo by Ali Hajian on Unsplash

Increasing Filter Surface Area for Better HVAC Filtration

Increasing Filter Surface Area for Better HVAC Filtration

Lots of customers are jumping on the idea to use their central HVAC as a whole-house air cleaner.  Why not?  It’s a very expensive piece of equipment, it has a fan and an air filter, and it circulates air throughout the house.  The only thing is that you can’t snatch out your 1” MERV 2 filter and throw in a MERV 12 one.  At the least, the unit will protest by whistling, or delayed starts and stops, and at the worst you could cause damage it or cause a fire.  Whoa!  Let’s make the conversion to a whole-house air cleaner SAFELY.

We’ve written another article on how to increase filtration with your HVAC and why it’s dangerous to increase MERV without increasing filter surface area.  Doing this increases the pressure drop, throwing a restriction into the airflow of the system.  Basically, HVAC systems are not designed to have more than 0.25 inches water gage pressure drop over the filter (manufacturers recommend on average a 0.1 inch water gage over the filter), and adding a high MERV filter in the same slot as a low MERV filter will drastically increase the pressure drop.  

Now, you can train that dog to hunt–just put in some extra equipment!  What we’re talking about is more filter surface area.  Here’s a great rule of thumb to keep in mind: when the filter surface area in a system is doubled, the pressure drop over the filters will typically reduce by more than 50 percent. (Duct Dynasty: Confronting Restrictive Air Filters)  Another rule of thumb is to keep the filter face velocity between 200-250 feet per minute.  This allows the air enough time to interact with the filter and effectively remove even fine particles. Here’s a great video explaining the concept; even though the instructor is using an app that HVAC techs use (measureQuick), he explains the filter face velocity concept beautifully.  The difference between his velocity range (250-500 feet per minute) and ours (200-250 feet per minute) is that he’s working with commercial systems, so according to residential IAQ gurus, you’ll want to keep it between 200-250 feet per minute..  

Ok, so I need to add more surface area to my filters–what options do I have?  

  1. Adding another return grille: You can examine the layout of your current HVAC return duct and air handler to see if there is room to add another return grille, where you can place another filter.  This may be the least expensive initial cost, however, over time thicker filters (see next option) may cost less.  In order to calculate the required surface area of the additional filter, start with the cfm of your unit (see our article to determine, and divide it by 1) 200 ft/min and then 2) 250 ft/min.  This will give your max and min surface area in feet squared.  To convert these numbers to square inches, divide by 144.  Then, subtract your current filter’s square inches to get the max and min square inches of the additional filter, and look at common filter sizes to fall in this range.
  2. A thicker filter: although the cross-sectional area of the face of the filter may remain the same, increasing from a 1” to a 4” filter adds a lot more surface area with those deep pleats! They are also called media filters. These thicker filters usually also require less frequent filter replacements. You will want to check the rated cfm and clean filter pressure drop for each model you consider.  Here are some systems that fall into this category:
    1. If you have a 1” filter return filter grille on a wall somewhere, and there is enough room behind it (it doesn’t immediately narrow down), you can substitute a 4-5” thick filter for the 1” filter very easily using this type. See how the lip of the filter is designed to fit in the 1” grille, but you have a lot deeper filter behind it?  Genius!
    2. Again, if you have deep space behind your 1” return grille, you can consider an Electronic Air Cleaner, which can increase MERV with the same surface area.  For example, the Clean Comfort® brand AE14-G Series Electronic Air Cleaner, $600, claims "At rated airflow, the electronic air cleaner achieves a MERV 14 rating. With the fan running on low speed, the air cleaner increases efficiency up to a rating of MERV 16.  The static pressure drop of the electronic air cleaner is as low as 0.16” compared to 0.22" or higher for a typical 1" MERV 8 furnace filter.”
  3. Install a cabinet air filter:
    1. Honeywell F100 Air Cleaners:  At 6.25 inches wide, the cabinet is not super-wide, and it comes in 7 dimensions.  For the 20x25” filter, the cabinet and filter are $168, and replacement filters are $40 each (when buying a 2-pack of MERV 11 filters).  It’s recommended to replace the filter at least every 6 months, so $80 a year for filter changes is not bad!  The clean filter pressure drop is 0.25 inches water gage for 2000 cfm.
    2. Aprilaire also makes a media filter.  Their model 1210 is 20x25” and costs $120.  MERV 11 filters for this unit cost $50 per filter (with a 2-pack).   The clean filter pressure drop is 0.22 inches water gage for 2000 cfm.
    3. IQAir PerfectPro 2025 is a thick filter with nanofibers arranged for “hyperHEPA” filtration. It can drastically reduce the PM2.5 and PM10 in your home, as this test/review found, but the pressure drop at 2000 cfm (5 tons) is 0.32 inches water gage, which is very high!  The price tag is also quite steep at  $1,995.  
    4. Trane CleanEffects Air Cleaner is an electrostatic filter.  It uses ions to charge the incoming air to make particles more “sticky” on the filter.  There are 3 parts to the air cleaner: a prefilter which should be vacuumed every 1-3 months, a field charger (with metal pins that generate ions) that should be cleaned by a technician, and a set of “reusable collection cells” which also get vacuumed by the homeowner.  The pros: CleanEffects has the highest efficiency of particle removal with the lowest pressure drop, it has no filters to “replace”, and it’s Asthma & Allergy Friendly™ certified by the Asthma and Allergy Foundation of America. However, the cost for this device is about $2000 installed, and maintenance (cleaning) is key because its efficiency drops when it gets dirty.  These units are only sold and installed by licensed HVAC technicians.
  4. A “V-Bank” of filters: Instead of placing one filter perpendicular to the air flow, you can get more surface area by adding 2 (or more) filters in the shape of a V.  This device would usually be installed in an HVAC room (it’s not a filter grille for a wall). The only problem with this arrangement is that filter loading is not always even; air (like any fluid) will always seek the lowest pressure/resistance, and at the pointy ends where air becomes compressed, the filter load is lighter.  There are several manufacturers that sell this type of filter arrangement.
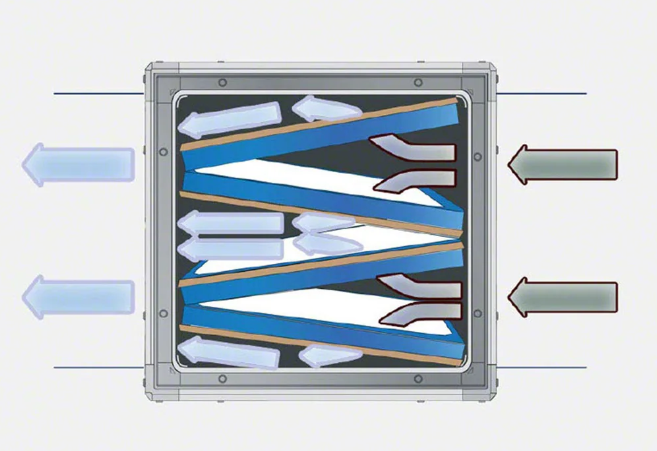
    1. IQAir also makes a double-v-bank filter, meaning that it technically has up to 4x the filter surface area of a typical single, perpendicular filter installation (see picture below).  This enables the device to exceed MERV 16, according to independent testing. The PerfectPro X 25x30 is compatible with a 5-ton HVAC system, the price tag is quite steep at  $3,395, but you do get 3 years out of the filters. The pressure drop is similar to other systems at 0.22 in H2O at 2000 cfm. 
    2. For a more economical V-bank filter system, AirScape SFB-V Series are MERV-13 V-Bank inline filter boxes.  However, their largest unit is slightly undersized for our 2000 cfm system above. The SFB-V-16x25 costs about $374 and has a min-max airflow of 1667-2778 cfm, corresponding to 300-500 feet per minute face velocity and 0.12-0.29 pressure drop.  Therefore, we would recommend you stay on the lower side and use this unit only in a 4 ton system (1600 cfm) to keep the face velocity down.

Source: IQAir Whole House Air Purifiers

If you want cleaner air with less filter changes, there are many options out there (we didn't include cabinets by Koch, GeneralAire and others simply because pressure drop information was not available).  You’ll want to take into consideration ease of obtaining (purchasing) the filters, and also placement of the cabinet for ease of changing/cleaning them.  Keeping up with filter changes is a worthwhile, minor chore if it means less dust in the house, less cleaning, and less allergens to potentially infect or annoy your family.  

Photo by frank mckenna on Unsplash

How to get free ventilation without sacrificing heat (or cool)

How to get free ventilation without sacrificing heat (or cool)

Something has piqued my interest for some time: the transfer of heat to make something cooler or warmer than the ambient air without mechanical means.  Living in the hot and humid southeast US, I’m keenly aware that air conditioning is key to my comfort during the summer.  Ventilation is necessary, but ventilation will make my house hot like the outside…or will it?   

I’m going to draw on a 2023 study that showed how to ventilate a building by natural means (no fans) but still cause it to be 7 degrees cooler than the outside, even with an internal heat source.  Whoa!  This is noteworthy.

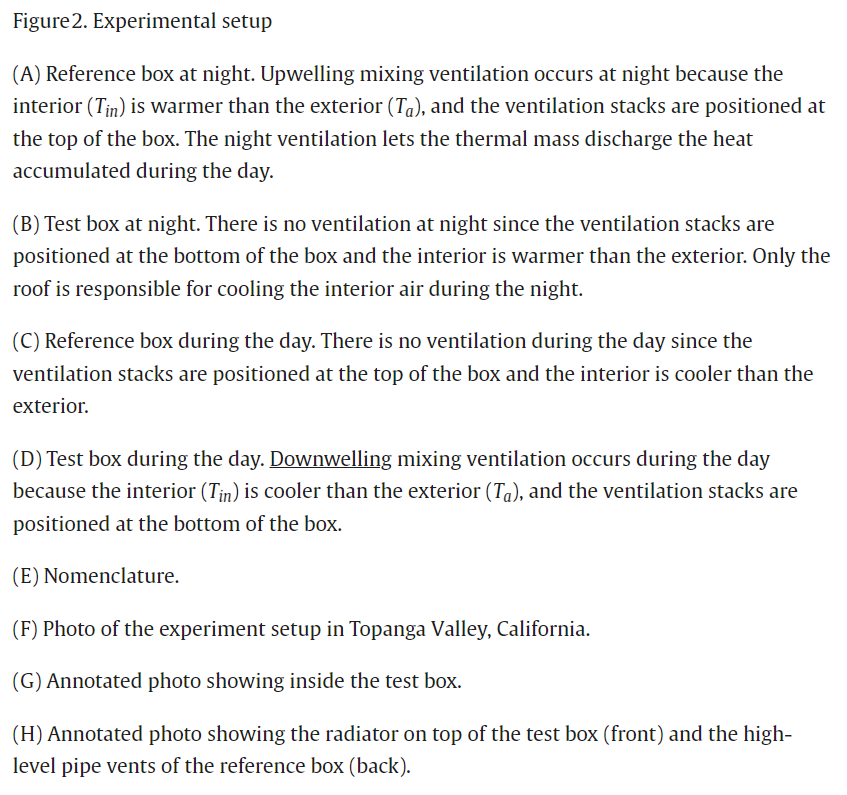
I’ll give you the simplified version. The study involved placing 2 insulated boxes on the top of a shipping container in a warm, dry climate (Topanga Valley, CA).  The “reference” box had insulation on all 6 sides.  The “test” box had insulation on the four vertical sides and bottom, but for the top had an aluminum plate on which a radiant material was glued.  The only ventilation in each box was 2 PVC pipes.  On the reference box, the ventilation pipes were in the top of the box, while on the test box, they were in the bottom of the box.  Each box contained (4 to 6) 1-liter water bottles for thermal mass, as well as a small heater to simulate lighting, fans and other electrical loads that would be operating in a home.

What happened in these boxes?  The differences of a) removing the insulation from the roof and replacing it with conductive and radiative materials, as well as b) placement of the ventilation pipes, caused a substantial difference in the way the boxes ventilated and their interior temperatures.  Here’s a schematic of the boxes:

In a nutshell, this type of natural ventilation is driven by differences in temperature.  During the day, the reference box did not ventilate because the interior stayed cooler than the exterior.  It only ventilated at night, because with cool desert temperatures at night, the interior was relatively warmer than the exterior.  However, the test box actively ventilated during the day because the cool air in the box sank out through the ventilation pipe on the bottom, and was replaced with warmer air.  However, it stayed cooler than the reference box because the conductive material on the roof (aluminum) drew heat from the inside and the radiative material reflected 93% of solar heat back into space.  Here’s a summary of the benefits of the test box setup:

  • There was a net loss of heat during the day and the night, even with an internal heat source. 

  • Ventilation during the day occurred 7 times per hour (7 ACH).  

Here’s an architectural concept of what a real house could look like:

Other details:

  • The reference box only ventilated at night and the test box only ventilated during the day.  In a real building, however, both ventilation approaches can be combined to produce continuous ventilation, switching between downwelling and upwelling by activating different vents as necessary.
  • The thermal mass inside the boxes had the purpose of modulating heat fluctuations.
  • The insulation used on the boxes was vacuum panels, which are a very effective insulation, albeit an expensive one for residential housing!  
  • Convection shields of metal with a radiative coating were placed over the sides of the boxes to prevent them from absorbing solar heat.  
  • The boxes had no penetrations except for the ventilation pipes, which is not a realistic residential scenario with no windows or doors. 
  • The boxes were tested in a warm dry climate, without humidity/mold concerns.  In a more humid climate, dehumidification would probably be necessary.  
  • Ventilation pipe size and thermal mass would need to be fine-tuned for each home and its occupants. 
  • Removing the roof insulation from a modern home is quite unusual; in fact, a previous version of movable roof panel insulation and radiant covering was key in Harold Hays’ Skytherm innovation. 

Wow, this is really quite fascinating.  Imagine having copious ventilation AND keeping your home cool in the summer.  Windows don’t have to be heat loss/gain devices, either: with new insulation materials coming into existence all the time (there’s a new aerogel made from cellulose that’s even more transparent than glass), or the Parans solar lighting system that captures sunlight and sends it indoors via fiber-optic cables, a super-insulated, light-filled home is possible (with the right budget).  The idea of thermal mass is certainly not new, either; that’s the reason stone and earth have been used in warm-climate homes for millenia!  We also wrote about a new insulation material that uses phase-change to absorb heat without transmitting it into your home.  With the invention of new radiant systems like the SkyCool system, buildings are actively rejecting solar heat and removing heat from inside the building, saving from 15-40% of cooling costs.

Even without the high-tech materials, the main takeaway of this concept is to seal up your home and ventilate naturally: to do this in warm climates it’s best to have the ventilation intakes lower in the house, on the “cool” side.  Also, look into a radiant barrier for your attic space; we give some tips in this article.   Finally, always monitor humidity, no matter the temperature.  No one can live in an ice-box and turn a blind eye to humidity and mold!

Photo by frank mckenna on Unsplash

Why you need a moisture meter (and how to use it!)

Why you need a moisture meter (and how to use it!)

Moisture meters are like thermometers.  When you think, I feel warm…do I have a fever?  You might ask someone else to put their hand on your forehead for a reference check, but if they’re not sure, what you really need is a thermometer to verify your body temperature.  Likewise, sometimes in my own home I see a dark spot on a wall or windowsill that I hadn’t noticed before, and think, is that a water stain or actively leaking water?  I place my fingers or hand on the spot to see if I feel moisture, but if it’s not sopping wet, it’s sometimes hard to tell if there’s any difference with the surrounding material.  What I need is a moisture meter.

Moisture meters work to sense moisture by electrical conductivity.  Since water is more conductive than drywall, wood and many materials (other than metal),it uses this property of water to “detect” the relative moisture.  For this reason, some types of moisture meters are made for gardeners and farmers, to tell when the soil is too dry and plants need to be watered (this type doesn’t even need a battery).  Moisture meters for home inspections, however, come in “pin” and “pinless” varieties.  The “pin” type have sharp pins for actually sticking into the material, while pinless meters–you guessed it–don’t have pins.  This type detects moisture using conductance by either radio frequency or capacitance of a material.  (Evaluating Pinless Moisture Meters Vs. Pin Moisture Meters)  Both have their place in a professional home inspector’s toolbox for different reasons.

Here are some considerations to decide which moisture meter to use:

Accessibility and Damage: Obviously, you can’t insert a pin moisture meter into materials like concrete and tile without damage, so pinless would be the way to go.  Also, if the material is highly visible and/or valuable, you might not want to insert pins into it (even though the holes are small).

Speed: Pinless meters are much faster because you don’t have to stop and insert pins into the material.

Accuracy: Both types of meters can be accurate, but pin meters are preferred by home inspectors (when possible to use them) because pins have the ability to sense deeper into the material, and their readings are very repeatable when inserted into the same holes.  

Adaptability: Pin meters may come with a variety of accessories (types of pins) for different surfaces.  There are hammer electrodes (you guessed it-for hammering them in!), deep wall probes, extension probes and baseboard probes.  

Now that you know the difference, how do you use them?

For those that like videos, here’s a good short one by This Old House.  Here are the takeaways:

  • Thermal cameras can also be used to spot moisture in a wall because of temperature differences, but unless you’re an expert, you should confirm that’s it not simply missing insulation with a moisture meter.
  • When using a moisture meter, good dry material should show between 6-9% moisture.
  • 15% or more indicates a definite water intrusion problem.   You’ll need to consider replacing the material if it’s drywall, or if it’s wood, at least removing it to assess damage, expose the backside and dry it thoroughly.
  • Some meters are “combination” meters that have pins and pinless technologies.

It’s important to know some quirks about using moisture meters.  You can watch a very interesting video (up to about minute 5:50) from a reputable home inspector showing these points, or read them here: 

  • Metal also has low resistance to electricity (high conductivity), so if there’s metal in the surface, like a metal cornerbead in drywall or metal lath behind tile or nails or screws, you can get a reading that looks like moisture when in fact it’s dry; the metal gives a false positive.
  • Moisture meters are not very accurate on tile.  The minerals in the masonry/concrete can give a false positive.  Also, there can be metal flashing under tile, especially behind shower surrounds.  You must use intuition/other tools to find real water intrusion and remediate.
  • Dry dog and especially cat urine will give false positives because the minerals in the urine will permanently alter the composition of the material (drywall, carpet, etc.), causing it to be more conductive and appear "wet" to the meter.
  • Moisture meters only read water, not mold.  Although mold needs moisture to grow, it takes a few days to take root (typically 48 hours for very wet surfaces), so if you catch the moisture soon enough and dry it out quickly, you may not have a mold issue.
  • Moisture meters may give a normal reading (false negative) even though you have mold!  This can happen when the mold is caused by humidity.  A moisture meter will typically not pick up excessive moisture when the mold is caused by condensation.  The condensation occurs only on a very thin layer of the material.  While this is sufficient to cause mold growth, it typically will produce a normal reading on a moisture meter. (Humidity and Mold in Home)

Moisture meters can be used in other situations, too!  It’s nice to know:

  • Is the firewood dry enough to burn well:  It's important to burn only wood with moisture content below 20%. Burning wood with higher moisture content creates more smoke, which contains harmful chemicals and particulates and forms creosote on your chimney. It also gives you less heat, because it takes energy to boil off the excess water. (Storing and Drying Firewood)
  • How dry does a wood surface need to be in order to paint it?  According to an Amazon Technical Bulletin, most outdoor wood, concrete, stucco and plaster surfaces must be at or below 12%, otherwise the paint may not adhere properly, or risks failing early.  Indoor wood and cabinetry should be closer to 6%. 
  • Are your hard wood floors ready to install?  Wood flooring installers typically want the moisture content of hardwood floorboards to be between 6% and 9% (based on an indoor temperature of 60–80° F and 30–50% relative humidity).  (How to Measure Moisture in Hardwood Floors)

Finally, like many other products, the more functions a moisture meter has, the more expensive it’s going to be.  Here are some functions:

  • Ability to “calibrate”: although most cheaper meters do not have a “calibration” function, some have a button to return the device to a factory preset.
  • Ability to choose a very specific material (like concrete, drywall, softwood, hardwood, etc.) Here is a video showing the differences between using a cheap moisture meter and a more expensive one for woodworking.
  • Sensitivity: Instead of soft or hardwoods, some testers allow to select based on a table of listed woods, like this one (more specific for woodworking). 

Here are some devices to consider:

Pinless meters: 

  • Wood Moisture Meter (Pinless-colors), $37, has an LED display screen that looks like an analog meter, with green to red color codes that align with the moisture content.  The pinless moisture meter is penetrates up to 0.75inches deep.  Despite the warning that it’s not recommended for drywall, many customers report using it with success in finding leaks behind drywall before they became too serious.
  • Klein Tools ET140 Pinless Moisture Meter, $42: This rugged meter seems to be very easy to use in selecting the material and verifying the moisture content.

Pin meters:

“Combo” meters:

Reading the reviews on these devices, we’ve seen many homeowners and renters who are able to make quick, informed decisions to call in professional help and get repairs going before serious water damage and mold took root in their homes.  We think it’s an important tool to have in your toolbox whether or not you think you need it right now, because water damage can escalate quickly in hours and days, and the time spent looking or ordering one could be very precious!

Gutters and downspouts: the necessary accessories that move water away from your home

Gutters and downspouts: the necessary accessories that move water away from your home

Gutters just can’t compete with kitchens.  When you save up for those long-awaited home renovations, or even as a part of a new home, gutters usually take a backseat to countertops and appliances.  We get it–spending so much time inside makes you want to beautify the things you see most.  But right now we’re going to bat for those hard-working gutters, because it turns out you’ll probably use them way more than a pot-filler behind your stove.

Unless you live in a desert (and even deserts can have pretty intense flash floods), gutters are the second line of defense (after your roof) against water intrusion.  In conjunction with downspouts, they move water away from your home so it’s less likely to cause damage and rot.   Without them, water falls directly off the roof and lands on the ground next to your home, splashing up and causing the siding to discolor at the very least from erosion, mud and vegetation that gets thrown up, or deteriorate because the water splash is coming from the opposite direction (the ground) than the siding is designed to handle.  In addition, excess water around your home’s foundation can intrude into the basement or crawlspace, causing mold problems that contaminate the home’s air quality.  One family who moved into a home in Hawaii in 2008 became very ill because of mold and myctoxins, and one of the inspection reports of the home revealed the water intrusion problem. “The crawl space had water intrusion, musty mold odor, and visible mold on floor joists. The yard sprinklers were directed towards the house and the eaves did not have rain gutters, permitting the pooling of water. Water entered the crawl space through cement walls and followed piping present in the crawl space. Smoke testing revealed communication between the crawl space and upper level bedrooms via electrical outlets and electrical ducts and plumbing. The conduit holes were not sealed, permitting observance of light coming through spaces in the floor joists. A musty odor was present in the master bathroom and noted to get stronger when the fan coil was turned on.”  The couple, their 2 young children, the family dog, and even a baby born 3 months after moving out of the house, all suffered from the mold growing in the home.  (A Water-Damaged Home and Health of Occupants: A Case Study)  

If you’ve got them, clean them regularly!  We’ve all seen gutters that sag or break because a clog in one area or the downspout makes the water back up through the rest of the gutter.  If you don’t remember from science class, water weighs about 8.3 pounds per gallon.   Let’s do a little math here.  If you have 5” K-style gutters (5” is the width), they can hold 1.2 gallons of water per foot.  (The Definitive Guide to Gutter Sizing)  If you have a gutter run on one side of your house of only 20 feet, almost 200 pounds of water (8.3x1.2x20) could be hanging out in your gutters if it becomes clogged!   Chances are, while the water is stopped up there for days or weeks, it’s dripping from seams or holes into the ground, or into the fascia board if the water line is close to the top.  Then, another rainstorm sends water pouring over the side of them, splashing on the side of your home and making it look like you didn’t have gutters at all.  

If your home doesn’t have gutters, you should investigate why.   “We took them down because they were falling down” or “they weren’t there when we moved in” is not an acceptable answer!   You need to examine the reason for their absence, and understand where rainwater is going in their absence.  That said, there are acceptable reasons and alternatives to gutters, and here are some:

Reasons not to have gutters on your home (Are Gutters Necessary?):

  1. Your home is surrounded by concrete that slopes away from the house.  In this case, the falling water still may splash on the siding, but it’s not running back toward the foundation. 

  2. If your home is on a hill that slopes in all directions away from the home, gutters may not be necessary (but splashing will still occur).

  3. Large roof overhangs (the article says 6-10 inches but that’s really not sufficient if the ground doesn’t slope away sufficiently) may preclude gutter installation.

  4. If you live in a very dry area, you may not need gutters.

  5. If you have a flat roof, gutters are not necessary, but certainly you’ll have to make sure the drains from the roof stay clean and well-maintained.

  6. Some historical societies are very strict about gutters, as they weren't commonly installed on residential homes until the mid-1900s.  In this case “built-in” or box gutters conceal the device, and “Yankee gutters” also blend in with the roof so that architectural features like rafter tails are not concealed (check out this article for more information and photos about historic gutters).

Wait, are there alternatives to gutters?  Yes, there are!  Without a gutter up high, some options allow you to bring the maintenance down to ground level. (6 Best Gutter Alternatives for Your Home (2024)):  

  1. Drip paths: Without a gutter, the water runs straight off your roof over the edge.  Without attention to the landscaping, the water hitting the ground will eventually erode the ground, also splashing on the home’s siding.  Drip paths are shallow trenches that run along the base of the home, filled with rocks, bricks, or other materials to help divert excess water away from the foundation, preventing dirt splashback, reducing erosion, and limiting soil saturation.  They are labor-intensive to install (you’ll have to dig down for the trench and bring in the stone or materials to line it) and don’t protect the siding, but they do help to prevent erosion and limit soil saturation.

  2. French drains are similar to drip paths but look better, recycle water, and can expand to the entire yard. They resemble a trench filled with gravel. Underneath the trench is a perforated pipe that funnels water into a designated area.  They often require the assistance of a landscaping company to install because of the labor, getting the slope and destination of the pipe correct, and materials required.  

  3. Yard grading: Many times the turf around Contracting a reputable landscaper will be needed to adjust the slope of your yard to drain water away from the home and its foundation. Yard grading helps with other landscaping problems, such as soggy lawns, puddles, root rot, and uneven turf.  You may have to replant grass and other plants where it’s graded (unless the landscaper can save them), but if you have a large area to grade, their equipment (and expertise) is invaluable.   For a small grading project, check out this video.  

  4. “Underground roof”: An underground roof is a deflecting surface just below grade that slopes away from the building and directs all that roof water away from the foundation. Any impervious sheet material (heavy-duty polyethylene, rubber membrane, rigid insulation) at least 3 feet wide is placed along the foundation about 8 to 12 inches below grade and sloped away from the foundation. (In a cold climate, using rigid foam insulation has the additional benefit of warming the soil, even if just a bit, beneath the insulation and next to the foundation.) Well-draining soil is placed over the sheet material up to grade and covered with a large-diameter topping material, such as pea stone or wood mulch, to break up the falling water and reduce splashback to the building.  A combination French drain/underground roof system is shown here

  5. Rainhandlers: This system is like a louvre that directs water away from your home.  It doesn’t require downspouts, which are unattractive to many homeowners.  They are not supposed to clog with debris.  In gentle rains, the water droplets will fall straight down.  In harder rains, the water is “kicked” out from the rainhandler about 3 feet.  With very intense rains, however, water could pool around your foundation if you don’t have a drain in the ground.  This renovation company prefers gutters over Rainhandlers for this reason. 

  6. Some sources state that a drip edge is an alternative to gutters.  A drip edge is part of a roof, and only keeps the water from going back up under the shingles and rotting wood or forming ice dams.  It’s not really an alternative to gutters, because it doesn’t do anything to keep water away from the foundation. 

  7. Rain chains: These decorative chains are really meant to replace downspouts, as they work with gutters to focus the runoff to one vertical place.  In downpours, they can be overwhelmed and allow erosion of the ground below, if it’s not protected by stone or a large water container.   They also make noise (from the water splashing on the metal), and can become airborne in high winds if they are not of heavy construction. 

If you are installing or replacing gutters, here are some considerations :

  • Just like buying a new heating or cooling system, gutters come in various sizes that relate to your home’s size and roof.  It’s worth doing your own gutter sizing calculations to double-check what the gutter company is offering.  After all, if your new gutters turn out to be under-sized, the foundation, siding and landscaping are all at risk for damage.

  • One reason that gutters are best installed by a professional, is that they need to be adequately sloped.  The slope should be one-half inch for every 10 feet of gutter.

  • Investigate what fasteners will be used.  Fasteners are what supports the gutters on the side of the fascia, and they are very important.  Many experts prefer gutter hangers (they clip inside the gutter and have a long screw that is angled down that is screwed into the end of the rafters) over spikes, which are basically long nails that are driven through the gutters into the fascia.  These screws will not come loose on their own, as spikes tend to do.  (Hangers vs. Spikes: How to Choose the Best Gutter Fastener)  Also, gutter hangers should be installed at least every three feet apart, or closer if you live in an area that receives a lot of snow, because snow and ice, even though snow is less dense, can pile up for feet above your gutter and roof.

  • According to the Building America Solutions Center, downspouts should be placed every 20 feet but not more than 50 feet apart.   After the downspout, you should continue the water channel in lateral pipe, ending at least 5 feet from the house. 

  • Gutter guards, or leaf guards, are perforated pieces of metal, plastic or foam that fit over your gutters to minimize clogging with leaves and debris.  They come in all designs and costs, from a roll of plastic netting (too flimsy in my experience) to plastic coated metal strips that snap into place (much better) to custom-made and installed guards.  LeafFilter and LeafGuard are among the most popular brands.  If you live in a wooded area, these can really extend gutter-cleaning intervals by keeping leaves or needles out of the gutters.  

  • From personal experience:  If you can, get the fascia boards wrapped in metal before installing gutters:  When I supervised the buildout of my parents’ “barndominium” in 2020, I balked at this one.  The porch had already taken longer to construct than I anticipated, and this step seemed unnecessary.  “Just let me prime and paint it”, I argued with the carpenter.  But I relented when he said it would only take 1 day longer and lead to much longer life of the roof.  Four years later, I have to agree.  I’ve been up there cleaning out the gutters several times a year, and despite debris that piles up sometimes, there is no sign of rot on the fascia.  It’s a good decision. 

  • Finally, aesthetics matter!  The style and color of the gutters are important to the looks of your home.  You should definitely read this article before choosing a gutter style and color, it’s packed with photos of good and bad choices.

Investing in gutters or their upkeep is not top-priority to many homeowners, but it should be just as important as making sure you get the right vitamins, because they really are preventing damage to your home and your family’s health!

Photo by Rūta Celma on Unsplash

Keep Air Quality in Mind When Exercising Outdoors

Keep Air Quality in Mind When Exercising Outdoors

When the weather is nice, many people want to shift their exercise from indoors to outdoors.  There are a lot of benefits to it, such as varied surroundings and surfaces, mood-elevating sunshine, and even a greater incentive to stick with it and go farther, whether you’re walking, running or doing more stationary exercises.  However, should a bad air quality report keep you inside?  The answer is: it depends!  The ability to exercise outside depends on a number of factors such as location, timing, and equipment.  A free and easy way to check air quality and receive updates is from airnow.gov. Using an Air Quality Index (AQI) as a measuring tool ranging from 0-500, your local forecast and larger maps can be color coded to show whether an area is good (green), moderate (yellow), unhealthy for sensitive groups (orange), unhealthy (red), very unhealthy (purple), and hazardous (maroon).  You’ll definitely want to keep AQI between 0-50 if you are more sensitive, but healthy and active athletes can keep going in conditions up to 100 with the right equipment (masks–see below).

First of all, here’s what science says.  Sixteen studies completed between 2000 and 2020 on the short-term health effects from exposure to air pollution during outdoor exercise were chosen for review.  Nine of the 16 papers reviewed demonstrated that exercising outdoors in air pollution results in short-term (temporary) health effects, with lung function impairments being the most observed. The seven other papers, which looked at different health effects, such as inflammation and blood pressure, found no effects.   Besides being nearly evenly split, there was another unexpected result: healthy people who did moderate to high intensity exercise outdoors in low or high levels of air pollution experienced less health effects than when doing low-intensity exercise.  Experts had expected to find the opposite: that low-level exercise afforded less adverse health effects.  This seems to show that deep breathing of semi-polluted air does not seem to negate the good effects of exercise.

While exercising is a good thing, those who are older or are unusually sensitive to air pollution should avoid prolonged and intensive exercise or physical activity when the air quality is moderate or higher.   (Should You Exercise Outside in Air Pollution?)  For everyone else, here are some tips to getting your workouts outdoors with the least air pollution.

Location, location, location

When setting goals to exercise outside, it’s important to have location options and check the air quality in each of them.  If you can find a green area like a large park, chances are that it’s going to have better air quality than a track next to the highway.  Coastal routes near water and marshes also are good filters for air pollution.  This is where an AQI map of your area comes in handy, because you can head to the green areas right away!

Timing, timing, timing

Like the weather, air quality changes constantly in many locations.  That run route you wanted to do during rush hour in the morning might be clearer at noon or 2pm, so don’t lose hope!  When you can be flexible, there’s a greater chance of making your favorite routine work.

Duration

If you decide to exercise outside but the air quality is closer to 100 than to 0, consider exercising at a lower intensity or shorter duration.  

Equipment

City- and valley-dwellers admittedly have a harder time finding clean air for exercising outside.  However, masks have evolved and certain kinds are much more comfortable and adaptable for exercise use.  They must fit properly, however, and make a tight seal in order to do their job.  Here are some masks that have good reviews for exercising:

  • Cambridge Mask Company, $33, make masks that are very well-suited for more polluted areas because they have a 3-layer microfilter for particulates, plus a layer of activated carbon, which not only removes smells but also some VOCs and NOx that are troublesome in high-traffic or smoky areas.  The valved mask styles are recommended for high-intensity exercise.  They are washable and reusable for up to 340 hours, which is around 3-6 months’ average wear.

  • Airweave masks by AUSAIR, $30, are very light and have a copper filter that protects from bacteria, viruses, air pollution down to PM0.1, smog, cigarette smoke, bushfire smoke, and pollen.  The copper filters last 20 days each and come in a 3-pack for $18.

  • FuturePPE Mesh Sports Mask with 5-Layer Carbon Activated Filter, $19, blocks airborne particles, dust, and pollution.  It fits snugly and a 12-pack of replacement filters are on sale at $15. 

  • N95 and P100 masks are also sufficient to filter the particles of air pollution, but they don’t actively remove gasses like VOCs and NOx as a mask with activated carbon in it.

  • Particles can also stick to your clothing, so it’s best to launder them every time you come inside after exercising.

When one or more of these conditions don’t align to let you go outside, remember that without active filtering, air pollution eventually also makes its way inside.  Therefore, use that mask indoors or try to find a gym or studio that uses air purifiers.  You may be in the minority wearing a mask indoors, but your lungs, heart and stamina will shine when you can power through a workout without “choking”.  

Photo by Chander R on Unsplash

Cancer may be a case of nature AND nuture: Why it’s time to pay attention to Inflammogens

Cancer may be a case of nature AND nuture: Why it’s time to pay attention to Inflammogens

The New Yorker article “All the Carcinogens We Cannot See” is quite eye-opening.  You’ve probably known people who lived a “bad” life, drinking or smoking or doing drugs, to a ripe old age, and then also a number of “innocent” young victims of cancer.  What’s the rhyme or reason of evading cancer or acquiring it?   This is the question that thousands of scientists engage every day as they test chemicals on bacteria or animals.  In the 1970’s, biochemist Bruce Ames was able to measure that many mutagens are carcinogens: if a chemical or toxin causes a mutation in bacteria, then it’s likely to also be a carcinogen.  Thus, the Ames test for mutagens remains the standard lab technique for screening substances that may cause cancer.  However, there are many chemicals that cause cancer but are not obviously mutagenic, such as diethylstilbestrol (DES), which increases the risk of vaginal, cervical, and breast cancer.  Also, it has been discovered that with or without exposure to mutagens, most people have a small number of mutated genes.  What is the “trigger” that begins cancer growth?

A well-known example is cigarette smoke.  It contains more than 60 mutagens, which are by extension carcinogens. Surprisingly, however, in a 2023 study that examined the characteristic fingerprints of DNA damage caused by cigarette smoke in human lung cancers, ninety-two per cent had the mutations associated with the DNA-damaging substances in smoke. But about eight per cent lacked this kind of mutagenic damage, and clear mechanisms of cancer in between 8-10 percent of smokers is lacking, causing scientists to think that there are missing cancer-causing agents.

Other studies have confirmed that a second agent is necessary to “activate” the mutations into cancerous tumors.  In one study, DMBA, a cancer-linked chemical that was found in coal tar, only caused cancer in a small percentage of the mice that were exposed to it.  However, after adding an inflammatory oil after exposure to DMBA, more than half of the mice developed malignant tumors.  In another study, mice with a powerful cancer-causing gene only developed cancer when they were also plagued with poorly healing wounds, causing chronic inflammation.  It was inflammation that triggered tumors. 

What does this tell us (other than animals do a lot of our dirty work)?  It’s not mutagens alone that cause cancer:  in many cases, malignancies are only activated when another environmental toxin causes chronic irritation that catapults them out of normalcy. “The mutant cells just lie there,” according to Allan Balmain, a cancer geneticist at the University of California, San Francisco.. “It’s the inflammation that awakens them.”

Unfortunately, there are a lot of sources of inflammation.  According to the Cleveland Clinic, the some of the most common reasons for chronic inflammation in the body are autoimmune diseases, exposure to toxins, and untreated acute inflammation, as from an infection or injury.  Then there are lifestyle factors such as drinking alcohol in excess, obesity, chronic stress and smoking. 

Air pollution also featured prominently in The New Yorker article, and it’s a frequent topic in the news today in expected areas (cities and industrial zones) and unexpected areas (wildfires in the wilderness).  In fact, British epidemiologists Richard Doll and Austin Bradford Hill, who are celebrated for determining the primary cause of lung cancer–smoking–also correlated the disease to proximity to major roadways, gasworks, industrial plants, and coal fires, and thus, by extension, exposure to high levels of air pollution.  Since then, it’s been discovered that when lung cancer occurs in people who have never smoked, the malignant cells often carry a mutation in a gene known as EGFR.  Using data from the U.K., South Korea, and Taiwan, researchers found that in each of the three countries, tthe higher the level of air pollution, the higher the incidence of EGFR-mutated lung cancer. This confirms a link between air pollution and nonsmoking-related lung cancer by mutation.  But there is something else in the air pollution besides mutagens, and it is inflammogens.  Again using all mice that were genetically primed to have EGFR mutations, mice who received larger doses of a liquid simulating air pollution (PM2.5) in their lungs, had more tumors.  The PM2.5-treated mice were full of inflammatory cells.  It seems to be the combination of mutation AND inflammation that caused the mutation to develop into cancer.  Looking more closely at the inflammation, macrophages (large cells that eat foreign particles) promoted an immune response by secreting interleukin-1 beta, a potent inflammatory signal,. If the interleukin-1 beta was blocked with an antibody, the effect of air-pollution exposure dissipated.  Accordingly,  immune-deficient mice did not have inflammation and defeated the effects of air pollution.

Whew, that’s a lot of science.  What we can take away is that inflammation could be the invisible criminal accomplice in many cancer cases, as well as in other diseases.  There’s been a big focus on knowing your genetics, and firms like The DNA Company recognize that purposefully changing your lifestyle with better food, exercise, less stress and sometimes specific supplements can mitigate the effects of DNA deficiencies by defeating the accomplice, inflammation.  In this spirit, we hope that whether you get your DNA tested or not, you are aware of the air quality in and outside your home, and do your best to avoid inflammation by ascribing to a healthy lifestyle and less stress.  These include cleaning often with non-toxic cleaners like TotalClean, changing your HVAC filters regularly, using masks and HEPA filters where necessary, and using bi-polar devices  like the Germ Defender, Upgraded Air Angel Mobile or Whole Home Polar Ionizer that can also help purify the air of VOCs and particulates.  (For more information about your immune system at a molecular level and specific ways to build it up, check out our article here).  The answer to disease, like the cause, is two-fold: take the physical steps you can avoid toxins and inflammation, and sort out the mental toxins (stresses) that cause inflammation too.   At HypoAir, we wish you a healthy home and year!

Photo by Al Elmes on Unsplash

Testing Your Home for mVOCs Could Point to Hidden Mold

Testing Your Home for mVOCs Could Point to Hidden Mold

In our Indoor Mold Summary White Paper, we discussed the various by-products of mold: spores, mycotoxins and mVOCs (microbial Volatile Organic Compounds).  Some of these VOCs give that characteristic musty odor, and like VOCs from other sources (like furniture or building materials that off-gas), they can be identified through air quality testing methods.  Importantly, mVOCs presence can indicate actively growing mold, and also indicate what types of mold are growing–like a “signature scent”, different molds produce unique VOCs.   Testing for mVOCs is an important part of indoor air quality, and we’ll discuss the equipment used by different mold inspection companies, as well as how the samples are tested.

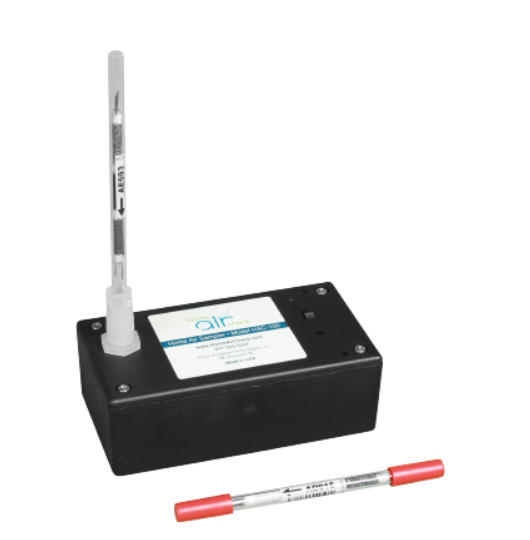
Typically VOC testing is performed by professional technicians and home inspectors.  They use one of two devices to gather air samples for VOC testing.  One is Summa canisters or “mini-cans”, and the other is sorbent tubes.  Summa canisters are stainless steel spheres that are “evacuated” (the interior is placed under a vacuum) with a flow control device on top to allow the technician to control the amount of air sampled over a specific period of time.  These are used for “whole air samples”.  The other technology uses a small air sampling pump, which draws room air through a glass tube that has specialized “sorbent” in it, that is, material that adsorbs gasses in the air.  Summa canisters are only used by certified technicians, but sorbent tubes can be used by home DIYers (via the company Home Air Check) or technicians. Here are some of the pros and cons of both, according to two different sources (MVOC Fact Sheet, What are the differences between canisters and thermal desorption tubes?

Technology/Device

Pros

Cons

Summa or Silonite Canister, or Mini-can (Summa refers to the process used to apply a Nickel/Chromium oxide layer to the inside of the canister for anti-corrosion and contamination; since its development in the 1960’s, other types of coatings have been developed)

  • Useful if a broad spectrum ‘unknown’ GC/MS scan of MVOCs is desired.

  • Relative humidity in the space to be sampled should be low because moisture can cause problems with preparing the sample for ttesting (cryogenic concentration is used  before GC/MS).

  • Higher shipping and analysis costs.

  • Are only used by trained air quality technicians

  • Cleaning and certification of canisters is done by specific labs

  • “Shelf life” of unused canisters is only 30 days.

Sorbent Tubes

  • Can sample a larger volume of air (up to 40 liters)

  • Less expensive to ship and easier to store

  • “Shelf life” of sorbent tubes can be up to 2 years

  • Analysis is more accurate if a target organism is identified (what types of VOC) so that the appropriate sorbent material is used.


On the left, Summa canisters in the field, and to the right is the Home Air Check device (sizes are not equivalent).

Professional air quality and mold inspectors will use one device or the other.  If the inspection is for a government facility, often canisters will be specified under the “TO-15” (Toxic Organic  Compounds) testing requirements set forth by the EPA.  For residential testing, however, sorbent tubes are becoming more and more popular due to their portability, ease of storage, and detection capabilities, despite the claim that the sorbent needs to be targeted to the gas. To this end, a company that pioneered sorbent tube sampling, Enthalpy Analytical (formerly Prism Analytical Technologies) now offers the tubes and air pump in a DIY kit that can be returned to the lab for analysis.  Home Air Check is a patented technology similar to spore trap sampling, in that air is drawn into a specialized tube via an air pump.  The instructions are simple to operate the device and return the sample to the lab for testing.  The hardest part, however, may be preparing your home to do it:  

  • Exterior doors and windows should be closed for 24 hours before testing
  • All interior doors should be open during the test (including closets)
  • Don’t clean or dust the day before or during the test
  • Don’t cook for 12 hours before or during the test.
  • Temperature inside the home should be between 60-80 degrees
  • The HVAC should be running if it’s available, so the air is thoroughly mixed.

Testing for mVOCs to detect mold is a unique concept, because mold gives off these VOCs when it is active and growing.  If a water source dries up and the mold dries up, mVOCs are no longer produced.  In addition, the production of mVOCs is not constant throughout the life cycle of the mold(s).  However, since mVOCs are light vapors, they can even be detected through air barriers or moisture barriers that are used for home sheathing, meaning that it’s possible for  mVOCs from mold growing on the backside of siding or cladding material to be detected inside the home.

How are the samples tested for VOCs in the lab?  

VOCs are analyzed by gas chromatography/mass spectrometry, but the canisters and tubes require different preparation steps.  

How are mVOC levels interpreted?

Many VOC reports are measured in nanograms per liter (ng/l), and although it’s very small (if measuring water it is parts per trillion), the difference between for example, 3 and 20 ng/l is the difference between negligible mold growth and significant mold growth, for hypersensitive individuals (see pages 6 and 8 of a sample air survey report by Fike Analytics).  Some reports such as Home Air Check will also place your results in a curve relative to other homes/buildings (see page 3 of the sample report).  

How do mVOC levels correlate with other forms of air testing for mold?

Home Air Check is a form of active air sampling, which draws air through the tubes.  There is also passive air sampling, which allows normal air currents to pass into the sorbent material, and by at least one study was found to correlate more closely with airborne fungal concentrations (spore counts).  Passive samplers are more typically used in industrial sites, however, where the sample device is left in place for weeks or months (like on the fenceline of a chemical plant to establish exposure of the surrounding community to VOCs).    

In any case, mVOC testing can’t pinpoint where the mold is, and that’s why some inspectors don’t believe it’s worth homeowners’ money.  If mold spores were not detected in an air sample but odors or other signs point towards mold growth in a building, then mVOC sampling may be warranted. MVOCs were found to pass through poly sheeting while spores cannot. (MiraMold VOC testing) The real detective work is in a thorough examination for signs of leaks and high humidity, which mold needs in order to grow.  Is mVOC testing appropriate for you/your home?  Certain companies such as Enthalpy Analytical and Fike Analytical use mVOC, total VOC and dust sampling to give a total picture of what occupants are exposed to in the home environment.  We would say it’s an additional tool for determining if there’s a hidden problem (Are there any new mold detectors on the market?), and like the airport scent detectors, the real-time mobile version of this technology (zNose) could become as accessible and practical as walking a trained dog through your home, or using an infrared camera, to detect where that mold is hidden.  

Photo by Anne Nygård on Unsplash

Insulating drafty windows makes a difference in air quality, not just energy savings!

Insulating drafty windows makes a difference in air quality, not just energy savings!

When you’re trying to make a whole house less drafty, you should go for the low-hanging fruit first.  That means big ol’ holes in the walls, floor or ceiling (like this disconnected register) come first.  If you don’t have any big holes, you can start on the smaller ones–and sometimes the smaller ones can add up.  That was the case in my sunroom. 

My sunroom is west-facing, which means in the summertime it gets brutally hot from sunlight, and in the wintertime it’s brutally cold from westerly winds.  On top of that, it’s fairly dusty and showed some of the highest counts of mold colonies in my home.  When I saw another cold front coming later in the week in December, I finally “made” the time to insulate the windows where I felt the drafts coming in.  I saw that the lower windows didn’t seal at the bottom when closed, AND the previous owner had cut the corners on the lift at the bottom for some reason (they rubbed on the trim?).  Due to these leaks, the room stayed quite “fresh”--meaning the CO2 didn’t really budge from outdoor levels unless I lit a fire in the fireplace on the other side of the room.  If you don’t have a CO2 monitor, I highly suggest getting one: here’s a portable version.

Therefore, the cons of my leaky windows easily outweighed this one “pro”: fixing them was a no-brainer!

Pros

Cons

Better ventilation (lower CO2)

More drafts of hot or cold air (higher energy cost)

More dust or pollution

More mold 

Excess humidity in house

Here are the tools I used: 

  • A spray bottle of TotalClean and several rags for cleaning the windowsills
  • Adhesive-backed weatherstripping in a suitable color to match your windows (low-profile like this one, ¼”, is good unless your windows are very misaligned) 
  • Scissors
  • Optional: A CO2 monitor is helpful–to see the effect on the room
  • Optional: Window locks in case the windows don’t lock afterwards (see below)

If you do have a CO2 monitor, leave the windows closed and take a CO2 measurement before doing the insulation work. You might want to do it while there are a number of people in the room, or you have a propane or natural gas stove burning (I know there are a lot of gas stoves out there!).  Extra people and gas appliances do two things–they consume oxygen and they give off CO2.  These should cause the CO2 to be higher than when the room is empty or no gas appliances are lit.

Next, just get down to it: use the TotalClean and rags to clean off the window sill where the lower half of the window seats.  If you have vertical sliding windows, find the best place to attach the insulation in the vertical track and clean that.  When the track is clean and dry, start peeling the adhesive backing off and apply the weatherstripping a little at a time, cutting it when you get to the end of the track. Close and lock the window to make sure it’s placed correctly.

If you find your windows don’t lock because of the extra height of the insulation (this was the case for my windows) there are a number of window locks available that can be easily removed if you have to open the window for ventilation.  I ended up getting a thumb-screw version that can be moved up a few inches if I decide to ventilate, while still keeping the window secure.  

That’s it!  When you have all of the insulation installed, close the window and repeat the CO2 reading, with or without activity (people or gas-burning appliances).  The CO2 levels should go and stay higher because there is less fresh air coming in.  Fresh air ventilation is needed in a home, but it’s best to do it in a controlled way, not just letting the air come in wherever there’s a small gap or crack.   For more ideas on how to air seal leaky windows, check out this video.

If you’ve completed an easy project that resulted in better air quality, let us know about it! 

Photo by Rob Wingate on Unsplash

How to keep MILDEW out of your CLOSET

How to keep MILDEW out of your CLOSET

Closet doors are meant to keep closed, right?  Unless you are Martha Stewart, it’s likely your closet doors don’t stay open very long–if they close to begin with!  The problem comes when humidity and closed doors combine for a stinky problem: mildew and mold.

We sometimes think that mildew is a less toxic form of mold, but it is still mold nonetheless.  Mildew is a subclass of mold that exhibits a white or gray, flat, powdery growth, while the rest of the molds can get more fuzzy and colorful.  Both release spores, but unlike other molds, mildew doesn’t penetrate surfaces and grow into the materials it lands on (though it can still cause cosmetic damage). Instead, it grows on top of flat surfaces and often collects in places like cardboard boxes or your vintage leather jacket in the closet.  Not good!  (What is Mildew, Really? The Difference Between Mold and Mildew)

Since we know that mildew is a form of mold, we know that it needs several things to grow: a food source (ie. leather, clothing, and dust in general), moisture (even excess humidity) and air (although stagnant air is best because lack of circulation keeps humidity at surfaces high).  So, the best ways to keep mildew at bay in closets is to:

  • Clean out the dust and seal off any sources of dust

  • Keep the humidity down and ventilate

  • Store items for longevity and air circulation 

How the heck does dust get in the closet when the door’s closed?

Incredibly, some closets are like dust magnets.  If your closet is part of a tiled or vinyl floor area, dust bunnies can usually slide right under the door due to the slick surface.  If you have any penetrations in the ceiling (like a light bulb), then your closet may be part of a hidden circulation system where the framing in your walls conducts air currents throughout your home.  For example, closets near bathrooms may unknowingly supply air to the bathroom exhaust fan, if the fan’s ductwork is not sealed well in the attic or the lightbulb box is not sealed to the ceiling.  Then there are the closets that double as storage areas and HVAC equipment rooms.  If the HVAC unit is not sealed well, it just pulls air from the surrounding home into your closet.

  1. Seal

The way to keep out the dust is to seal these small air passages: at the ceiling, remove the light fixture and either use a caulk gun (less messy) or a spray foam can with a straw (very messy, be sure to cover everything!)  to seal the electrical box to the drywall.  If the closet is an upper story, you may be able to do it from above in the attic with less mess, and sealing all the ceiling penetrations may help with dust house-wide.  If you notice a lot of dust forming on the floor, it may be worth caulking the baseboards to the floor (if it’s tile or solid-surface) to seal that up as well.

  1. Clean 

Next, removing the dust should be part of a larger goal to store items properly so that cleaning will be easier and mildew will be less likely to form.  You’ll need a HEPA vacuum with brush attachments, and various storage containers.  If possible, empty the closet.  This will allow you to see all the walls and floor to see if there are any water leaks coming in that could be causing the mildew.  If not, use the vacuum to clean ALL the surfaces so you can get a fresh clean start!

It’s a great time to wash clothing and purge any items that you don’t use anymore by donating them.  Clean clothing is less likely to smell and deteriorate from body sweat and dust mites as well.

Stop right there!  If you had mildew in your closet before, you need to make ventilation changes to stop it from recurring.

  1. Ventilate/dehumidify

Mildew sometimes forms in closets because of lack of ventilation.  The great thing about moving air is that it lowers the moisture content of surfaces that come in contact with it.  If the air is not moving, the moisture content of surfaces tends to equalize with the stagnant air, and over time, mold is able to grow.  Also, if your closet is located on the corner or north side of a building, the insulation in the wall may not be sufficient to prevent warm house air from causing condensation on the cold wall.   Here are some tips:

  1. Refill the closet

Ok, you can start restocking the closet but remember this important point: maintain space between items so that air can freely circulate!  Don’t overstuff or compact items against the wall, either.  Wire shelving is great for maintaining circulation from top to bottom, too.

Storage containers matter, too–if possible, don’t use cardboard boxes because cardboard holds moisture, and it’s a favorite food for all kinds of pests: mold, roaches and silverfish like to eat it, and mice like to use it for bedding!  If you’ve cleaned and dried your clothing and excess bedding, packing them in clear storage bins is ideal so that you can easily see what’s in each.  For wool and moth-prone items, you can add cedar blocks to the bin to keep pests out.  These garment bags are great to keep dust off hanging clothes.

After mildew remediation, it’s important to check on your closet at least every few weeks until you’re sure that the changes are producing their intended effect: the ability to close the closet door without mildew taking root!

Photo by Annie Spratt on Unsplash