Why, when and how do I clean my mini-split unit?
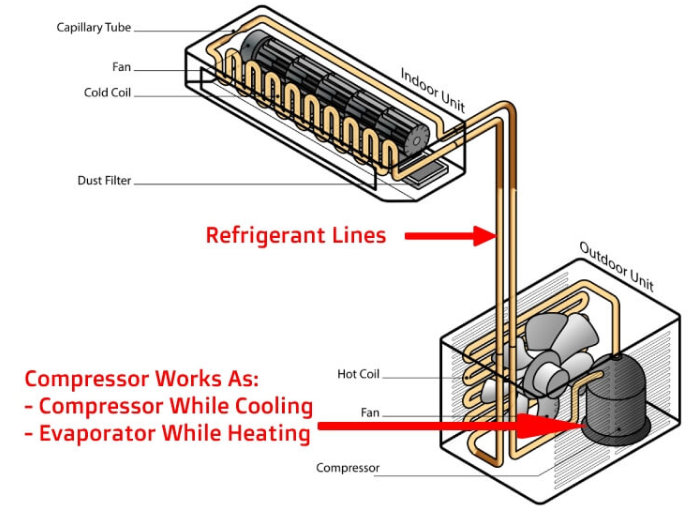
Mini-splits are the elegant cousins of window AC units (even though some window AC units are pretty darn good-looking nowadays with lower profiles that don’t block your view). Mini-splits and window AC units have some of the same internal parts, so even though mini-splits are usually less visible tucked up high on walls, they need the same attention as window AC units to perform efficiently and avoid harboring dust and mold. (If you have a window AC unit, check out our article for deep-cleaning it here). Dust and condensation (moisture) are the perfect breeding ground in a mini-split for mold, and it’s being blown directly into your indoor air. What we’re looking at today is cleaning the “indoor” part of the mini-split, which is in the top part of the diagram below. The parts that can get very dirty are:
the dust filter: it’s easy to take this filter(s) out and vacuum or wash it clean with mild soap and water every month
the cold coil (also known as the evaporator coil): deep clean at least once a year
Fan: deep clean at least once a year
the louvered cover (not labeled): deep clean at least once a year.
Image source: What are Ductless Air Conditioning Systems?
When deep-cleaning the indoor unit, since it can’t be removed from the wall without releasing refrigerant (unlike the way you can lift the whole window AC out of the window and take it outside), cleaning the coils inside will require some good waterproofing to avoid getting water, cleaning fluid and dirt on your wall and floor.
The other inconvenient part about cleaning the indoor part of a mini-split is the location: since most of them are high on a wall, you will need a very sturdy ladder and perhaps someone to help by handing equipment to you as you need it.
I like this video for a good method of a professional cleaning the indoor part of a mini-split unit. It shows the preparation and equipment professionals use. BUT you don’t have to be a professional–you can buy the “bib” cover online and use a simple garden sprayer to approximate the same cleaning power! Here is a good video of a DIY guy doing an even more thorough job (he removed the blower wheel for cleaning outside) with a bit more detail on how to take off the louvers and cover. The only things we cannot recommend is:
His choice of cleaners, which do contain toxic chemicals, some of which will be released inside.
Also, make sure to wear safety goggles or preferably a full face mask! You don’t want any moldy dirt to fly into your eyes or mouth while cleaning.
You can use a vacuum inside to remove big clumps of dust, however DON’T use a shop vac inside, unless it has a HEPA filter. If your wet/dry vac doesn’t have a HEPA filter, then use any other vacuum that has a HEPA filter on the dry dust only.
For cleaning the inside unit, you can use:
Sturdy ladder
Goggles or face mask, (gloves–optional)
Flat and phillips screwdrivers (a power screwdriver is optional)
(1-2) 5-gallon buckets (at least one for inside, another one if you want to see what comes out of the evaporator drain)
Bib for covering the unit for a cleaner job, $26: if you plan on doing your own maintenance, it’s worth investing in the cover to use every year!
Old towels
Coil cleaner (see below)
HEPA vacuum for any inside vacuuming
Regarding the coil cleaner, most aerosol coil cleaners have a “propellant” that assists with moving the liquid out of the spray can. These propellants are usually hydrocarbons with VOCs. You don’t need to buy spray coil cleaner and release this in your home! Our choice of a non-toxic coil cleaner is Viper Evap+ from Refrigeration Technologies. According to the Technical Data Sheet, it is the industry’s only non-rinsing evaporator coil cleaner utilizing slow-release enzymes in a synthetic detergent base, which is safe for all metals. If it is not rinsed off, the enzymes remain on the coils for 72 hours, starving any microbes of oxygen. The solution is gradually rinsed off by condensate production, which is drained via the condensate line. It has no VOCs, TAC (toxic air contaminants) or HAP (hazardous air pollutants). It is to be used full-strength via a pump sprayer (the garden sprayer we mentioned above works just fine).
There are two natural cleaners we can recommend that are non-toxic. The best part about these are the light citrus fragrance Please note that you should check the manufacturer literature on your mini-split unit to find out the recommended maximum acidity or alkalinity of any evaporator coil cleaning solutions, because strong acids or bases can eat metal and damage your unit! Whichever you choose, you can check the acidity with a pH test strip after dilution to make sure it’s in a safe range for your unit.
For an acidic cleaner: Nutribiotic is a grapefruit seed extract (GSE) which is highly acidic and microbial at full concentration (be very careful mixing and using it!) but can be diluted to use as a coil cleaner. According to the manufacturer, The GSE Liquid Concentrate has a pH of about 2.75 and the Maximum GSE Liquid Concentrate has a pH of about 2.2, which are both very acidic. In the article we found for using it to clean your car’s air conditioning evaporator coil, it’s recommended to use it at 2x manufacturer’s recommended dilution. (Recommended is 10 drops per 5 oz water, so 2x strength is 20 drops per 5 oz water).
For a basic (alkaline) cleaner: EarthClean by Earthpaint is a citric acid cleaner that is super-effective on greasy countertops, and when used at the manufacturer’s dilution, degreases safely on stone countertops with no damage. Alkaline cleaners can remove greasy dust more easily, so if your mini-split is near your kitchen and your unit can tolerate an alkaline cleaner, this might be the best choice.
Mini-splits look great on the wall, but their performance is only as good as their cleanliness. If you keep up with cleaning the air filter regularly (at least once a month), the unit will work better through the cooling and heating seasons, and won’t be nearly as gross or hard to clean during the yearly deep-cleaning. You can save money by doing this yourself, but hiring a reputable technician is fine for those who have too many other things going on. The most important thing is prioritizing good air quality in your home by performing or scheduling this type of cleaning regularly.
Photo by Salman Hossain Saif on Unsplash


