Monthly Archives: September 2022

Can my indoor air quality affect the food I eat?

Can my indoor air quality affect the food I eat?

Do you ever look at the food on your countertop, whether it’s an apple pie or bowl of potatoes, and wonder, how did that food go bad so fast?  It’s a common problem, even more so in warmer climates, so we thought you’d like to know how your indoor air quality affects your food!

Admittedly, not all spoilage comes from your own air.  It’s been recognized that food processing plants need to have better air contamination control during the food production process.  “Primary  air  pollutants  in  the food  industry  are marked,  being,  in addition  to  microorganisms, suspended particles, combustion  products (nitrogen oxide,  carbon monoxide, carbon dioxide,  sulfur oxide) and volatile organic substances.” (2019 Meat Industry Conference Paper)  The contamination of food products is dependent on:

  • air’s microbial load, and 

  • on the duration of exposure to the air, whether during specific technological processing stages (e.g. cooling) or during storage (from book: Hygienic Design of Food Factories, chapter 14: Managing Airflow and Air Filtration to Improve hygiene in food factories).  

Air in slaughterhouses and sausage production facilities, for example, is more than 10 times more laden with yeasts and molds than dairy processing facilities, because of contamination that can come in on the product (animal feces).  The second point is that the product contact with air needs to be limited in order to limit its contamination.  Air  quality  is  particularly  important  in facilities for  production and packaging of butter, if this is manufactured in open-type mixers, since these devices can also incorporate up to 5% of the surrounding air into the product [Varnam  A  and Sutherland  J  P  1996 Milk  and  Milk  Products: Technology,  Chemistry  and Microbiology 1st ed, Chapman and Hall, London, p 451].

Another factor that causes spoilage during food processing is humidity.  There are three ways that humidity affects the food: 

  • Condensation on equipment and food can accelerate microorganism growth

  • Dry foods can absorb moisture that will lead to microorganism growth

  • Packaging like paper and metal start to degrade, leading to spoilage

These insights into how food gets contaminated in factories are good for application in the home because although we can’t much control how it gets packaged, we can certainly control how it’s stored and prepared at home.  So let’s dive in…

The three main biological pollutants that cause food spoilage are bacteria, yeasts and molds. (online course)  Bacteria, yeasts and molds, which are typically small in size, can hitch a ride on larger particles like water droplets or dust.  Where do these come from?

The bathroom.  It’s not pleasant to think about, but “Germs will more likely spread after you flush, when bits of fecal matter blast into the air in aerosol form, a phenomenon known as "toilet plume." From there, Kelly Reynolds (a public health researcher at the University of Arizona) said, the "bits of fecal matter settle on surfaces, contaminate hands and then get spread to the eyes, nose or mouth." (USAToday.com)  Here are some ways to limit the spread of germs from the bathroom to the kitchen: 

  • Close the toilet lid before you flush.

  • Wash and dry hands before leaving the bathroom

  • Use an ionizer like the Germ Defender in the bathroom, to kill germs in the air and on surfaces.

Pets.  Similar to the slaughterhouse scenario, many of us have furry animals (pets) walking around in our food-processing facilities (kitchens).  Where these pets have been and what they have on their fur and feet can be really disgusting!  Worse, homes with litterboxes in the kitchen, or allowing pets to walk on the counters, is like placing a toilet in the kitchen or even on the countertop!  It’s just not pleasant to think about.  If you have pets and you have a kitchen, think about these reforms:

  • Bathing pets regularly so that bacteria and mold are minimized

  • Not allowing pets to walk on countertops

  • Keeping litterboxes in another area of the home away from the kitchen if possible

  • Spraying pets’ fur regularly with a safe anti-microbial spray like Remedy Mold Treatment Spray by CitriSafe.

  • Always wash your hands after touching your pets and especially before food preparation!

The refrigerator.  What?  How can the refrigerator work against us when we’re talking about food spoilage?  Actually, I’m not talking about inside the refrigerator, although that can be a problem (more on that later).  Here, let’s talk about what happens in the “guts” of the refrigerator, where the heat is actually released through the coils.  The speaker is Jeff May, a renowned air quality inspector.  

“I was sitting in my kitchen, and every once in a while, I’d start to wheeze, but just couldn’t understand why. One day, I realized every time the refrigerator turned on, I would have trouble breathing. Our refrigerator was only three years old, but in those days, the drip pan was accessible from the front. When I removed the grille and took it out, there was a pearl onion that somehow bounced into it. The onion had an inch and a half of Penicillium mold growing on it. So, every time the compressor turned on, it would blow mold spores out into the room. Every frost-free refrigerator has a heating cycle. The cooling coil gets full of ice, and you have to melt that ice in order for the refrigerator to cool. The water from that melt goes into a pan at the bottom. The heat from the compressor is supposed to evaporate the water, but very often, the water persists. There’s just not enough heat. So, if there’s any dust in that pan, mold growth ensues. And if you’re allergic to cats and dogs, and somebody had a pet in the house before you moved in, that refrigerator can be a perpetual source of allergens just from the dust that accumulated on the coils when the pets were there. We’ve had people who have just simply cleaned their refrigerator, and all of their allergies went away.” (Jeff May, during interview with author of moldfreeliving.com)

Now for the inside of the refrigerator: Ok, it seems like a no-brainer that you shouldn’t leave spilled food lying around in the fridge because it can contaminate other food by direct contact.  But using your fridge properly also prevents spoilage:

  • The real reason there is a Fruits and Veggies Drawer: it controls humidity in the drawer and prevents certain foods from ripening too fast.  If there is a vent or slot on the drawer, this is used to adjust the humidity and air flow (because ripening fruits also produce a gas called ethylene, which will cause other fruits exposed to it to ripen).  Closed vent or no vent = high humidity, and Open Vent = low humidity.  For a quick way to remember what to put in the “Crisper Drawers”, remember this rule of thumb: “rot-low, wilt-high.” Fruits that are prone to rot belong in the low-humidity drawer, while produce that's prone to wilting needs to be enclosed completely in the high-humidity drawer. (for a full explanation see article at epicurious.com)

  • Don’t put meat, cheese, milk and eggs in the door shelves!   The door of the refrigerator tends to stay at a higher temperature and these items will spoil more quickly (with nasty consequences) when stored there.  For more on where to store what food, this article helps a lot).

The FoodKeeper App from the FDA is a useful tool to determine how long to keep, and when to throw out specific foods.  It is also helpful to know why you need to preserve foods by refrigerating or freezing them right away (within  2 hours of cooking).  Bacteria are not killed by these colder temps, but their growth is slowed down or stopped.  Some bacteria and their endotoxins (toxins released by the bacteria through its life cycle and during death) are highly resistant to heat, so thoroughly re-heating them before eating does not kill the toxin! (check out our post on endo-and exotoxins here).  Staphylococcus aureus is one example of such a bacteria, and it can cause some serious food poisoning, even death.  

The dishwasher. Wait–the dishwasher is supposed to clean my dirty dishes, how can it be polluting my kitchen air?  If you have ever cleaned the vent on your dishwasher, you will know how absolutely filthy this spot can be.  Food residue, along with moist, steamy air will cause a thick slime to grow.  The rest of the dishwasher needs a deep clean too (not just using a bowl of vinegar and/or baking soda), but the vent especially is the area where escaping steam will carry bacteria into your kitchen air. 

Finally, keeping proper humidity in your home is super-important not only for your sinuses, but for food preservation too.  Some fruits and veggies should only be stored on the counter (check them out here), so the proper humidity will help them to stay fresh longer.  

Now you know how good air quality in your home means better food (especially in your kitchen).  By reducing the bacteria-load in the air, reducing exposure to the air, and keeping proper humidity in the air, you can waste your precious foods less, and enjoy them more!

Will a Radiant Barrier Help My Home’s Air Quality?

Will a Radiant Barrier Help My Home’s Air Quality?

Radiant barriers have been a “hot” topic for the last few years: If to install them, where to install them, and how to install them.  Are they worth the work and cost?  It’s time well-spent to do some research before diving in with such a project.

Radiation is one of the three types of heat transfer, along with convection and conduction.  A radiant barrier is a material with a shiny surface that reflects radiant heat back outside the home.  If the barrier gets dusty or is installed incorrectly, however, it does not work well. 

According to Attainablehome.com (a builder’s website devoted to building of modern, sustainable, and high quality homes that is within reach of household incomes), properly installed radiant barriers can reduce heating costs in the hottest months in southern climates, if the home’s air conditioning system is located in the attic. It can also offer a degree of protection to that equipment when the barrier is installed over the equipment, “shielding” it. 

In colder climates, however, radiant barriers are not recommended for several reasons.

  • The savings in reflecting heat away from the home in summer is minimal.

  • Cold climates can allow moisture to condense behind the barrier, creating mold issues.  Perforated radiant barriers can reduce this problem, though.

What is “properly installed”?  Here is a good video showing installation of a radiant barrier over a garage.  Radiant barriers:

  • Need an air gap: don’t install the barrier sandwiched between existing insulation, as it can conduct heat into it.  For instance, do not install radiant barrier foam board (such as LP’s Techshield) and sprayfoam over it. (energyvanguard.com)

  • Need to be relatively clean: dust will reduce the effectiveness of the barrier, so installing on the attic floor is not recommended in most cases. 

  • Must be the right type for your home/climate. There are:

    • Perforated and non-perforated: Perforated barriers allow vapors to escape through the barrier, reducing the chance that moisture or mold will build up behind it.   If you live in a hot, humid climate and have a vented attic, a highly permeable barrier like “Super-Perf” from AtticFoil is recommended to allow moisture to pass through. 

    • Made with insulation or board attached to the radiant surface

  • Must not block air flow in the attic.  Most vented attics have soffit and ridge vents, so do not block the air flow between these two, or moisture issues may result.

In a 2010 article that still applies today, energy advisor Martin Holladay stated there are 5 factors that determine whether a radiant barrier is a good option for your home (discussed in this video):

  • Do you live in a hot climate?  Yes = consider radiant barrier.

  • Do you live in a humid climate?  Yes = the radiant barrier must be carefully and correctly installed so that moisture problems are not created.

  • Do you have a one-story home?  One story homes tend to have larger roofs to cover the livable square feet, so a radiant barrier in a one-story home will be more effective than a two-story home of comparable square feet.

  • Do you have air ducts in your attic?  Yes = consider radiant barrier to shield them.

  • Is the air barrier installed correctly?  This is imperative, so the barrier has to be compatible with the insulation in your attic.

In times of low-cost energy, installing a radiant barrier may not be worth it. (energyvanguard.com)  For example, in Houston in 2011 (a hot climate in a year with similar kilowatt-hour (kwh) energy cost to today), a homeowner could save about 180 kwh per year with a radiant barrier installed on their 2000 sf newbuild home, considering that it is installed under the roof decking and the only additional cost was the more expensive barrier under the decking ($200).  This is about $25 per year savings, which would be an 8 year payback if there is no mortgage, or only about 50 cents per month if there is a mortgage (check the article for the explanation!)  It’s not a whole lot, but if energy prices go up (they will at some point), the savings could be more.

According to this video, LP Techshield (an OSB board with aluminum coating on one side) produced an 18 degree reduction in temperature in a doghouse.  Another video using the same product achieved an 8-10 degree reduction in a real house. 

So, how does all of this affect your air quality?  At HypoAir, we are in favor of not adding things that harm you or your home, so adding a radiant barrier to an existing home must be carefully considered.  Here are some steps to check whether it is right for you: 

  • If you have an unvented attic, a radiant barrier is likely not to benefit you.  If you have a vented attic, make sure the vents are not blocked and there is sufficient insulation in the walls/floors of the attic facing the conditioned space. 

  • Consider the current state of your attic and take temperature and humidity measurements in the attic and in the home as a “baseline”.  

  • If possible, you could conduct a small “experiment” in a part of your attic that faces the sun by installing one roll only (best if it shields some ductwork) and seeing how it affects attic and home temperature and humidity.  

  • If this test is favorable, continue with installation of the rest of the south- or west-facing sides.  Although I could not find much information about it, radiant heat is not very applicable on the north-or east-facing walls in the northern hemisphere. 

  • If humidity increases with the test spot under similar atmospheric conditions, it’s best to terminate the experiment and remove the barrier. 

Radiant barrier material is not very expensive, so if you can install it yourself, it can provide energy savings going forward.   It’s best to take your time and research the pros and cons of installing it in your home and not succumb to pressure from a salesperson, however.  Overall, it should not increase your energy use or humidity levels, so make sure to hold the manufacturer and/or installer to their claims.  We’d love to hear from you on how radiant barrier affects your home’s atmosphere!

Photo by Greg Rosenke on Unsplash

How do older homes compare to newer homes?

How do older homes compare to newer homes?

According to Realtor.com, older homes are those that are not built with modern building materials like high-performance concrete; typically they were constructed before the 1970's.  

Many older homes can be purchased at a discount because they have not been “updated”.  These updates of course include aesthetics like granite or marble counter tops, as well as necessary systems like modern electrical wiring, HVAC and plumbing.  Aside from the normal aspects that buyers of older homes will want to renovate, what are the hidden pros and cons that come with older homes?

Arguably, construction and maintenance of the roof and foundation of older homes may have the most to do with the condition it is in today.  

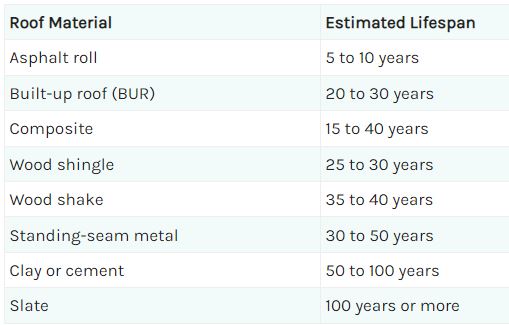
Older roofs can be much more durable, as well–here are the lifespans of typical roofs according to their materials (“composite” means the fiberglass-and-asphalt shingles which are on 80% of US homes today):

Not included is the asbestos shingle, which is estimated to last 30-50 years. (nowenvironmental.com)  Although this is a reasonably durable material, due to its health problems (fibers exposed to the air can be breathed in, causing disease), asbestos tiles are no longer sold for repairs, so an asbestos roof would likely need replacement. (rooforia.com)

In addition to the longer lifespan of older roofing materials, there is the underlayment–what the roof is attached to.  Before plywood and oriented strand board (OSB) were available, sturdy “two-by” boards such as 2x6 or 2x8’s were used over rafters to provide the base for applying a roof.  These were much more durable during severe weather, and more durable in terms of rot and deterioration. Of course, they are not used in most modern homes because of cost; homeowners would rather invest more money in something they can see!

Older homes also typically had the benefit of larger roof overhangs.  Prominent overhangs do several things that increase the longevity of the house: they deflect sunlight and UV damage from the windows and walls, and protect the same areas from rain and water intrusion.  Skimpy overhangs in modern construction do not do either!

Foundations of older homes (before concrete slabs were widely used) could be good or bad, depending on the method of construction and materials.  Here are some foundation materials commonly used (inspectapedia.com):

  • Wood, beams set on grade or on flat stone set on or close to ground level (older, very susceptible to rot and damage)

  • Stone, natural found on site or brought to the building site (older, susceptible to movement and settling)

  • Brick, less commonly used below grade, more often used from grade-level up, set on stone below grade. (older, susceptible to movement and settling)

  • "Cinder blocks" or concrete blocks (from early 1900’s, persistent through today for smaller homes)

  • Poured concrete (poured concrete footings as early as 1912; wisconsinhistory.org)

  • Pre-fabricated concrete foundation sections assembled onsite (since early 1900’s)

  • Wood, treated lumber, treated plywood on treated wood or on concrete studs (also used today for smaller homes)

Obviously, the quality and maintenance of the foundation determines the condition of the home.  It didn’t take an earthquake to start a home into deterioration; one groundhog can make a burrow that will damage a pier and cause the house to lean and crack, allowing water intrusion.

Subfloors: A floor with particle board or even higher-quality plywood as subflooring under carpeting won't feel as sturdy as one that's made from multiple layers of solid boards laid diagonally, an old technique that's now prohibitively expensive. (washingtonpost.com)

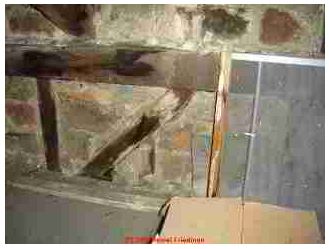
Insulation has certainly evolved over the last 50 years.  This includes the addition of air and vapor barriers, and types of insulation.  If you don’t have the opportunity (or burden) of getting down to the studs to re-insulate an older home, it could be quite uncomfortable in extreme weather like deep winter or summer.  However, some features of older homes actually had fairly “air-tight” construction.  Examples include multiple layers of lath and plaster, brick wall “insulation” or “nogging” where brick was installed between wood framing to block the wind, or a small 1" air gap is also found in older structural brick walls; the air gap in brick walls was intended to avoid transmission of moisture from outside the building to its interior. (inspectapedia.com)  Modern insulation makes all the difference in comfort, however, when it is properly installed.

Construction materials:  Even the wood of “stick built” homes has changed.   The change has to do with the loss of “old-growth” forests in the US, where trees were between 100 and 500 years old.  By 1940, old growth lumber was not available for construction anymore, and lumber came from younger trees.  Today's building lumber is made from trees that are between 12 and 20 years old. These trees have fewer growth rings per inch than old-growth trees. Older trees have more dense wood, which is also more rot-resistant.  (WisconsinHistory.org

Old-growth lumber may not be available anymore but naturally insect-resistant trees, provided they are sustainably harvested, are significantly more ecological and healthy than pressure-treated lumber.  Western Red Cedar and Redwood have unique compounds within the cells of the heartwood that protect against insect and water damage. They usually only require topical treatments for coloring or sealing. (thinkwood.com)

Before the 1920’s, “2x4” wood studs were actually 2” by 4” in dimension.  After that time, dimensions varied and ended up at 1-½” x 3-½” as the standard since 1964.  Even though you may think wood is old-fashioned, flammable, inferior to steel or concrete, or too pricey to use it for interior design such as timber-style construction, architects are using it in new ways for safety, strength and design.  “Mass Timber” is a new style of design in which wood is used for large commercial and residential buildings.  It’s appropriate since wood has many biophilic benefits that can contribute to the health and well-being of building occupants. (thinkwood.com)  New methods of laminating wood such as cross-lamination, nail-lamination, dowel-lamination and glue lamination, makes it strong and able to span long distances, as steel girders and concrete do.  The laminating adhesives and fire-retardant treatments of such products are the main concerns for use of these products, however if they follow industry-standard manufacturing practices such as ANSI A190.1 (Product Standard for Structural Glued Laminated Timber) then it should be naturally low in VOC emissions such as formaldehyde. (anthonyforest.com)

Construction methods:  Kit vs. Pre-fab vs. on-site 

Although “kit” homes were originated in the UK in the late 1800’s and became popular in the US in the early 1900’s, they were very different from the pre-fab homes of today.  Kit homes, like pre-fab homes today, were offered to make housing more accessible.  One Sears catalog assured that “anyone with rudimentary skills could have their home built in 90 days.” (thecraftsmanblog.com)  Many kit homes from the early 1900’s are still standing today and demand a premium in the housing market, a testament to the quality of materials and design in these homes.

However, the quality of pre-fab homes today do not resemble that of kit homes because they are built off-site and transported in large pieces to the building site, then assembled.  "They don't build them like they used to--and a lot of that comes in economics, labor versus material costs. Historians have documented, beginning in the 19th century, labor costs going up and up, and material costs going down and down. Now, we're in a time when bringing someone on site to do the work is the expensive part, not the material." –Bill Dupont, an architect who works for the National Trust for Historic Preservation in Washington (washingtonpost.com)

Another victim to rising labor costs has been plaster and lath.  Although mold can grow on painted or dirty plaster under the right conditions, plaster does not support microbial growth because it is non-porous and lime-based or clay.  The wood (lath) behind it, however, most certainly can harbor mold.  (lookmold.com)  In contrast, the drywall core of gypsum does not support microbial growth, but the outer paper facings do.  Which is better?  According to eSub, a construction software company, plaster is by nature a more durable finish than drywall, even high-level drywall finishes. In addition, plaster outperforms drywall in a number of key areas, including insulation, soundproofing, and fireproofing (instead of lath, modern plaster is set over a type of wallboard called blue board, which is similar to sheetrock at first glance, but it is specially formulated to handle high amounts of moisture in wet plaster, so it bonds tightly with the plaster.)  Blue board is highly water and mold resistant. Therefore, in an older home with plaster and lath walls, it may be a good choice to repair the plaster and replace it in kind with new blue board and plaster (if you can find and afford the skilled craftsman to do so!). 

Many older homes were “custom” homes, because they were hand-built by the owners.  This can be good, or not so good, depending on the design experience of the builder.  Today, “custom” homes demand a premium price, because unique plans, changes from pre-made plans and changes on site cost more money.  

Whether your style is traditional or modern, the marriage of durable materials, good design and good construction is timeless!  Make sure that any home you purchase or build has these characteristics and it can last for generations to come.

Check them at the door! (How to bring less contaminants into your house)

Check them at the door! (How to bring less contaminants into your house)

Oh, how I love to walk barefoot or bare-socked around my house!  It’s a pleasure that doesn’t happen often enough. With two (albeit non-shedding) dogs who constantly bring sand and dirt in from the outside, and my own habit of walking straight in from outside with my shoes on, walking barefoot only happens for a few hours after I vacuum and mop.  Vacuuming and mopping takes a minimum of 45 minutes to do, so how often does it get done?  Embarrassingly, not enough!

There are even more benefits to cleaner floors than walking barefoot.  After all, you and your pets are not just bringing in lifeless dirt…there are microorganisms like mold, pollen, bacteria and viruses in every grain of dirt.  These can wreak havoc on those who are more sensitive, and especially those who spend more time on the floor, like babies and young children.  At HypoAir, we’re all about avoiding bringing contaminants indoor whenever possible!

It’s hard to believe what you can’t see, so I was grateful to run across this article.   The hostess of this website became self-educated about mold after she and her family experienced numerous health problems from the homes they lived in, and she has a very informative website that includes interviews with experts!  She performed a test with a white towel laid at the door of her home, to catch dirt and mold particles as they are tracked in. She performed a mold test before and after two days.  Although the “before” mold test revealed some mold from the clean towel being stored in the garage, the “after” test was definitely more prolific and indicated that some colonies could be producing mycotoxins.  Yuck!  Unfortunately I know this is happening at my house in the woods during the very wet summer we’ve had….

This has prompted me to research strategies to avoid bringing that dirt, mold and germs in!  There are some ways that make a big difference.

  1. Leave your shoes at the door.  My main problem with this is time (like when I’m bringing in groceries), and sheer number of shoes.   Patience and dropping off loads at the door will take care of the first problem, but for the second one, If I had a “mudroom” this might be more easy to organize.   I’m not a shoe collector by any means, but I have a number of shoes that I like to wear outdoors!  This has led me to find a used low bookshelf and number of baskets so that I, my sister who lives with me, and any number of guests can feel comfortable storing them at the door.

  2. Find the best doormats for your situation, and use them!  When I went searching for “doormats” online, I was overwhelmed by the sheer number and diversity of them.  Then I refined the search to “best doormats for pets” or “best outdoor doormat”, etc. and read what people wrote about them.  I am even doubling up (one indoor, one outdoor) for more protection.Here are some good ones:

    1. Doormat for pet feet: I like the generous size and decor options for these rugs by PURRUGS, but they are made of polyester.

    2. Outdoor mat for removing dirt: 

      1. According to Spruce.com, coir (pronounced “coy”-er) is the best material for removing dirt: it’s made from coconut husks, so it’s scratchy and natural-looking.  A lot of coir mats are made with a rubber backing, which doesn’t let the dirt fall to the floor, but if you get a woven one with no backing like this one by Kempf ($43), you don’t have to shake it out as often. 

      2. For a modern look, Clean Machine Mats are made of Astroturf, but not all of them have the bright green color!  This one ($29) just takes a simple shake to empty all the sand off your porch.

    3. Indoor mat: Requirements for good indoor mats are that they need to be of a safe material that doesn’t create dangerous VOCs (polyester and PET may have endocrine-disrupting chemicals in them).  A non-slip backing is best, but solid rubber or plastic may harbor mold if moisture gets underneath, so check for mold during wet or humid weather.  Machine-washability is a plus!  

      1. Large and absorbent, these mats by Crate and Barrel ($135) are great for wet and muddy feet.  They can be spot cleaned or taken outside for scrubbing and hosing down.  The rug is made of polypropylene, which is quite durable and has a low off-gas.  The backing is made of rubber (20% recycled), which can give off a smell but doesn’t seem to be a complaint with this rug.

      2. Chenille is very absorbent and soft, which makes these rugs by Gorilla Grip a nice buy at $35-50 depending on the size.  They are machine washable!

      3. I love the idea of recessed mats, which are popular in commercial buildings and apartment buildings.  They “fit” into your floor and are very unlikely to slide around.  Water and dirt will also be more contained in a recessed mat, where you can easily vacuum it up.  You’ll need to create a standard-sized recess that is laid into your floor at the front door.

  3. If you have pets, teach them to stop at the door and wipe their feet! (cue cute video…)  More seriously, you can teach them to at least stop while their human helps them wipe their feet!  You can even hang a towel near the door for that purpose on a simple hook or more elegant towel rack.  You can also use  EC3’s Mold Solution Spray ($28 for 32 oz) for misting their fur to deactivate any mold spores they may carry in.

  4. Use a non-toxic additive or detergent to get rid of mold in the laundry.  EC3 products by Micro Balance are recommended by a number of experts and experienced laymen who know about mold!  This non-toxic, environmentally safe laundry additive ($29) is good for about 11-16 loads at the recommended dosage of 2-3 oz per load.  It’s great for washing those dirty door mats and washable shoes.  (moldfreeliving.com)

  5. For shoes that can’t be washed in the washing machine, spritz them with EC3’s Mold Solution Spray ($28 for 32 oz) before you put them back in your closet.  You can also spritz it on the indoor mat between washings.  (moldfreeliving.com)

  6. Vacuum and mop frequently(1-2x per week) in the entranceways of your home, if not your whole home.  At the beginning of this article, I was lamenting the time it took me to successively vacuum and mop the ground floor of my home (where the most dirt lies).  Well, this is the case IF you don’t have a combo vacuum/mop, which can be a total game changer!  I’m happy that I have all tile with only a few area rugs on this floor, which makes it the perfect candidate for such a machine. I grew up using cumbersome canister vacuums, which seemed to hit every doorjamb as I tugged them through the house.  My mother has already graduated to a Bissell CrossWave, and raves over it.  Here is a great review of the newest upright vac/mop combos, in which I’m sure you’ll find one that’s right for you.  The only problem with using water floor cleaners is that they tend to have chemicals of questionable toxicity in their proprietary cleaning solution (7 of 11 Bissell products earned a “D” grade on ewg.org).  If you use another solution during the warranty period, your warranty may be voided.  If that prospect does not bother you, this article gives some tips on making homemade cleaning solutions for your vacuum/mop machine that have non-toxic ingredients.

How to equip your college student with better air quality

How to equip your college student with better air quality

If you’re a parent with a son or daughter in college, of course you want to see them succeed!  It can get costly, though.  From helping with tuition, room and board and everything else, it seems like “clean, fresh air” should be a free part of the package. Unfortunately, that may not be the case.  Many colleges and universities are housed in old buildings that did not give thorough consideration to air quality when they were designed, built, or renovated.  In many cases, you are paying for the privilege of  studying there, with living as only an afterthought!  

The problem with poor air quality in the university setting is that it affects the very thing young adults go there to do: learn.  Contaminants in the air work against their body in the following ways.

High CO2 due to inadequate fresh-air ventilation decreases the ability of the brain to metabolize oxygen.  In other words, the brain becomes oxygen deprived!  This can affect learning in terrible ways.  In a Havard study in 2015, 24 participants spent 6 days in simulated offices to control for CO2 and VOCs.  Days were designated by the research team, but blinded to the participants and analysts, to be one “High CO2” day of 1400 ppm CO2, two “Conventional” days representing the average office building conditions of about 940 ppm CO2, one “Green” day representing better ventilation with conditions of approximately 740-750 ppm CO2, and two “Green +” days representing 100% outdoor ventilation (approximately 550 ppm CO2). Cognitive scores were 61% higher on the Green building day and 101% higher on the two Green+ building days than on the Conventional building day. On average, a 400-ppm increase in CO2 was associated with a 21% decrease in a typical participant’s cognitive scores across all domains after adjusting for participant (data not shown), and a 20-cfm increase in outdoor air per person was associated with an 18% increase in these scores.  This shows that for lack of fresh air in their dorm room or classroom, your student could be missing out on their chance to absorb all the material presented, with lower test scores as a result!  Here are some ways to “open the windows”, so to speak:

  • Add a Window Ventilation Filter to their dorm room.  It’s easy to install and remove, and filters out pollution, pollen and dust. 

  • For more info on how to measure CO2 in your dorm or classroom, check out our post.  If the classroom or lecture halls turn out to be high in CO2, advise students to check with their student advisor on advocating for more ventilation.  

VOCs: Most dorm rooms come equipped strictly with the basics -- a bed, desk, chair, light and garbage can, plus a small amount of storage space in the form of a dresser and/or closet. (howstuffworks.com) Therefore, moving into a new dorm room usually means getting new bedding and new accessories like rugs, wall hangings, and more storage like dressers or bookshelves.  When these things are purchased new, VOCs from off gassing can increase dramatically if the doors and windows are kept closed for most of the day.  In the study discussed previously,  a 500-μg/m3 increase in TVOCs was associated with a 13% decrease in the cognitive scores.  Once again, fresh air ventilation is really important to keep VOC levels in check. 

  • Use a portable VOC sensor to check for levels in the dorm room or wherever it’s suspected that VOCs may be high (like a newly renovated area).  

  • Install a  Window Ventilation Filter in the dorm room to get fresh air dilution. 

  • The Air Angel neutralizes VOCs with the catalytic molecules emitted by its AHPCO cell. Being portable and requiring very little maintenance, it can travel anywhere they go: on weekend sports events, home, and on vacation.

  • The Germ Defender/Mold Guard's optional carbon filter adsorbs VOCs emitted by newer items as they off-gas.

Indoor humidity plays a major role in our health: when it’s too low, disease transmissions are more likely, and when it’s too high, mold growth occurs and different mold-related conditions spike.  We can think of many reasons to keep humidity in the recommended range of 40-60% so that your loved one’s health is not at risk!  Sadly, sometimes it takes severe illness and even death to prompt renovation of problem buildings (see this article about the University of Maryland).  Here’s how to equip your student against high humidity and the risk of bacteria, viruses, and mold-related illness.

  • It’s super inexpensive to put a portable humidity sensor in their suitcase or next care package.  Ask them to message you with a photo of the sensor when you’re talking with them in the dorm room, or whenever else it seems to be high.  

  • If the humidity remains high, you can speak to the dorm manager, but also equip your student with a dehumidifier.  Amazon and big box stores can even deliver one from an online purchase.  Since the average dorm room is only about 228 square feet, and larger dehumidifiers come with complaints of extra noise and heat, you’ll want to keep it small.  This economical one by Eva-Dry only covers about 150 square feet (1200 cubic feet), but two of them plugged into different areas will help keep moisture under control.  Here is a review of other models that work great for dorm rooms. 

  • The Germ Defender/Mold Guard is perfect for small, humid spaces, and does triple-duty in a dorm room: 1) Even though the bathroom is typically always humid, mold doesn’t have to grow there… I can testify that one Mold Guard stopped mold growth when I couldn’t get a leaky shower valve repaired right away.  2) This unit also deactivates viruses and bacteria in the air and on surfaces across the room with polarized ions. 3)  Finally, it has an option for a carbon filter to adsorb stinky odors like running shoes and sweaty clothing!

  • Use an Air Angel to prevent transmission of germs and mold growth. This unit is portable and requires very little maintenance, in fact only a replacement AHPCO cell once a year.

Finally, if your college student has not adopted good cleaning habits by now, we can’t help you! (just kidding, but we can supply you with the right goods, read on!)  Statistics on bacteria in dorm rooms are pretty gross: the average women’s dorm rooms had over 1.5 million colony-forming units (CFU)/sq. in. of bacteria, while men’s dorm rooms had an average of over 6 million CFU/sq. in. (collegestats.org).  The same article breaks down the types of bacteria and where they are most concentrated, and while not all of them were bad, most of them were.  It’s time to clean up, because it’s hard to know which is worse: being sick in college or having a sick roommate who will soon infect you.  For those who do clean, equip them: 

  • Once again, Germ Defenders and Air Angels are passive sanitizers that help in activate germs between active cleaning.

  • A bottle of TotalClean goes a long way!  Since dorm rooms are small, heavy-scented chemical cleaners can be super-irritating and not always welcome to their roommates’ sense of smell.  TotalClean is unscented, non-toxic and very effective against dust, dirt, and germs on many different surfaces, even windows and mirrors. 

  • Small pump bottles of non-toxic hand sanitizer and sanitizing wipes stationed around the room and on desks help between hand-washings. 

Of course, similar to sending them off to grade school, you can’t be there 24/7 to help your college student make smart choices, but at least by this point you can give them tools to monitor and correct their own air quality for the healthiest and most productive school year.  Viva la college!

How to have clear sinuses

How to have clear sinuses

Going through yet another round of stuffy nose and headaches, I decided to research all the ways that I or my environment is sabotaging my sinuses.  

First of all, it could be sinusitis (also called rhinosinusitis): an inflammation of the paranasal sinuses, the cavities within the bones that surround the nose (Harvard Health).  Inflammation blocks the ostia, which are the narrow channels that drain into the nasal cavity, so that drainage becomes blocked.  Sinusitis can be caused by a cold, allergies, or a deformity such as deviated septum or nasal polyps.  Here are the different lengths of sinusitis (healthline.com)

  • Acute sinusitis can be caused by a cold, but then a secondary infection can happen once the sinuses get inflamed and blocked.  Technically acute sinusitis lasts less than 4 weeks.

  • Subacute sinusitis lasts from 4-12 weeks.

  • Recurrent acute sinusitis occurs when you have the same symptoms 4 or more times per year, but it lasts over 7 days each time.

  • Chronic sinusitis symptoms last over 12 weeks.

Well what is causing it?  

Normal sinuses are lined with a thin layer of mucus that traps dust, germs and other particles in the air. Tiny hair-like projections in the sinuses sweep the mucus (and whatever is trapped in it) towards openings that lead to the back of the throat. From there, it slides down to the stomach. This continual process is a normal body function.(American College of Allergy, Asthma, and Immunology) Here are some of the common irritants that can interrupt this process:

  • Dust:  A dose of good old dust, whether it’s from a woodshop, mowing the grass on a very dry day, or bringing out boxes from an attic, can overload the sinuses. The problem is that dust is a very complex mixture of irritants.  It can contain dustmites and their feces, chemicals, 

  • Pollen:  Plants have to reproduce, and sadly the weeds seem to be the worst offenders to our noses.  In addition, you’re not just imagining it: pollen really is becoming worse every year!  Check out our post on allergies here

  • Mold:  Mold is dangerous in that unlike other allergens, it can colonize and actually grow inside your sinuses, since they are warm, moist and dark.  Then, the rest of your body is susceptible to other colonizations as you breathe the mold spores and swallow them with mucous.   

  • VOCs:  VOCs can cause inflammation that leads to sinusitis.  A 2001 study showed that patients with chronic rhinosinusitis were exposed to higher levels of volatile organic compounds than healthy subjects.

We at HypoAir are not medical professionals, so we can’t recommend the techniques and drugs that doctors use for prevention and relief of sinusitis.  However, natural techniques are generally milder, and many of our clients are very sensitive to medications anyway, so we are glad to report that sinusitis can often be prevented or treated easily!  Here are some of the ways to do it:

  • I have to say that mask-wearing definitely cut down on my nasal issues when I was required/bothered to wear one.  Why?   Masks filter out many of the airborne contaminants listed above that can trigger sinusitis, as well as germs like bacteria and viruses.  Two+ years into the coronavirus pandemic, the stigma of wearing a mask is virtually nil, and there are a plethora of masks you can use to protect yourself against pollutants and germs alike (see our post on masks). 

  • Nasal irrigation is the number one defense against sinusitis according to Harvard Health (steps included in the article).  Whether you choose to use a bulb, small pitcher or neti pot, the homemade rinse works great to flush away the irritants that can block drainage and start a nasty infection.   It’s recommended to do this daily if you can!

  • Hydrate–your body as well as your nose!  Drink plenty of water during the day, and use a plain nasal saline spray several times a day if you are in a dry environment.  Adding a drop of food-grade tea tree oil or oregano oil (oregano oil is a bit harsher) to the saline spray adds a layer of antimicrobial protection to your spray. 

  • Avoid being unprotected in moldy and dusty places.  If you have to go down into a moldy basement or into a dusty attic, make sure to wear an N95 or respirator mask that seals well, and don’t take it off until you are safely in a clean place. 

  • Keep pollen, dust and pollution out while letting fresh air into your home, by installing some Window Ventilation Filters in your open windows.  They are easy to install and can be vacuumed a number of times before replacement.

  • Neutralize pollutants by adding a bipolar device by HypoAir to your home.  Positive and negative ions neutralize mold and germs by damaging their outer layers, and they cause small nanoparticles to stick together and drop out of the air in order to avoid breathing them in.

  • Be very vigilant about humidity levels in your home, so that mold does not gain a foothold.  You can monitor humidity easily using our inexpensive Humidity Sensors to maintain humidity between 40-60%.  If you see any water intrusion into your home, make sure to deal with it promptly to prevent mold growth! 

  • Use a MERV 13 filter (if possible) in your furnace/HVAC and change it regularly!

  • Use a standalone HEPA filter in areas where you spend a lot of time (living room, bedroom)

  • Clean as often as you can using a non-toxic, unscented cleaner: TotalClean fits the bill perfectly!  Safe to use around food, people and pets, TotalClean is the solution to replace all of the VOC-producing cleaners that can irritate and inflame sinus pathways. 

Think about the agony of sinusitis or a sinus infection and the time you lose while you battle it:  isn’t an ounce of prevention totally worth a pound of cure?  We think so!

How to choose a mold remediation contractor

How to choose a mold remediation contractor

It’s a scary prospect to think that mold in your “safe place”--your home–may be intruding and possibly causing illness in you or family members.  Whatever your training in other disciplines (even medical doctors), you can still be largely unprepared in knowing about mold and fungi and their effects on your home and body.  There are many “smart people” who get overwhelmed and discouraged when doctors or inspectors “miss” or mistake their symptoms.  How can you cut through to get real answers?

The assessment or consultation:

First of all, there are different opinions on who should inspect and test, and who should do the remediation work.  Often they are the same company, but the better inspectors have chosen to focus on inspection and testing, with recommended companies to do the remediation work.  It’s like a doctor who assesses and diagnoses a problem, but then refers you to a physical therapist or nutritionist for the corrective work.  For example, Brian Karr and his company We Inspect are highly recommended and fly all over the US doing inspections.  On his website, he states “We do not perform any remediation work ourselves because it’s a conflict of interest for the same company to handle both inspection and remediation.”  This is a unique position because many inspectors will also do remediation work, but it’s a very safe position to accept from the homeowner’s perspective. 

Tests are just one of the diagnostics that home inspectors use to confirm whether mold is a problem in your home. If a company wants to jump straight into air, dust, or body fluid testing (which can be a substantial revenue source for them) without some time to talk about the history of your home and your symptoms, then you may want to look elsewhere.  That’s like paying (and waiting, usually!) to see a doctor and getting to talk for less than 5 minutes before he ushers you out the door with orders for a test or a prescription. 

It’s best if you can do an in-person assessment where the consultant can come to your home, but unfortunately, many people live hours from qualified consultants so remote “visits” will be the case.  Prior to that visit, it’s always helpful to get your thoughts together and write down specific events and questions that led you to this point, such as:

  • If you are feeling ill, when did that start?

  • Have you noticed specific events that may have caused it, such as renovation work, damage by a severe weather event like flooding or roof damage, etc.?

  • Have you had other problems with the home?

  • What other life events are going on (job changes, pregnancies, new pets, etc.)

Other things to ask: 

  • Do you believe that mold can cause health issues and even cancer?  Amazingly, several reputable online sources deny that mold can cause cancer, including healthline.com, despite studies since the 1960s that have proven this link. This inspection and remediation company seemingly copied the Healthline article and adopted their stance.  Who wants to hire a skeptic of science?  

  • How do you test for mold, and do you test before and after remediation?  According to the late Dr. Jack Thrasher, a toxicology and mold pioneer, he  “always, always recommended multiple testing mechanisms for the same space. He liked dust sample testing from at least 4-5 places and ERMI (Environmental Relative Moldiness Index) testing to find out the species of mold present—he was BIG on knowing what you are dealing with, so that you could fight the battle properly. Dr. Thrasher was also a proponent of culturing surfaces, even hidden surfaces, like refrigerator coils for bacteria. For example, if everyone is getting sick in the kitchen, but the mold counts in the undisturbed air read ok, and there doesn’t seem to be moisture intrusion, start looking behind things. In this case, when he pulled out the refrigerator and tested the damp coils, he found rare and dangerous bacterial cultures. So, when the fridge was opened or closed or disturbed in anyway, a poof of bacteria and particulates was flying around, making folks sick. There’s your answer. Always dig deeper was his motto.” (moldfreeliving.com)  In addition, the mold testing facility needs to be an independent lab, so that testing can be performed properly and results are not skewed.  Having an inspection company who is independent of the mold remediation company perform the tests before, and after remediation but before reconstruction is the gold standard–because why rebuild if the mold is removed to a satisfactory level?  This second set of tests is called “clearance” testing, so that if successful, the remediators are cleared to rebuild.  This is the best way to check that the remediation was performed properly.   

  • What products do you use to “clean” mold?  Even if mold has not caused a reaction in your body, you don’t want to bring in chemicals that are unhealthy!  “ Aim for botanically-based products, like the EC3 line of products that are proven to eliminate mold but cause no harm when inhaled or ingested. Hydrogen peroxide cleaners and Borax are also effective products that will not cause additional harm to your health.” If the remediator uses things like bleach, it’s a sign that they don’t understand the health implications of these harsh chemicals and should be avoided. (moldfreeliving.com)

  • Do you have recommendations and resources to treat myself, my family and my pets as well as the home?  Because recovery from mold in your home is more than treating the building, most good mold remediation companies have recommendations on doctors who understand and can treat sicknesses caused by mold like CIRS (Chronic Inflammatory Response Syndrome) and Mast Cell Activation Syndrome (MCAS). 

  • How do you remove or inactivate any moldy materials?  You definitely want to know the company’s procedures for isolating and removing mold so it’s not spread throughout any areas of your home that have not been contaminated.

  • What are your certifications?  It’s important to check on local and national certifications, because it means that the company and employees have been trained in the best practices for their craft.  The National Association of Mold Professionals and Institute of Inspection, Cleaning and Restoration Certification are two highly respected certification organizations.  

  • Are you insured?  If the company is not insured, it is best not to hire them, as improper remediation will cost even more than doing it the right way.(moldfreeliving.com)

  • How do you decide which materials may be cleaned, which materials need to be removed, and how far away from visible mold needs to be removed?  Mold grows “tentacles” called hyphae, but these hyphae can grow up to 6-12” outside a visibly moldy area.  Therefore according to previous industry standards (ANSI IICRC S520 Standard) materials should be removed 24” around a visibly moldy area.   For example, drywall that has been wet for more than 24 hours also needs to be removed, but structural members like studs and floor plates can be cleaned if they are not water- or insect-damaged.

  • What kind of containment equipment do you use?  In order to prevent the spread of mold beyond an area, negative air machines (NAM) with HEPA filters are often used so that air laden with mold spores does not contaminate other parts of the home.  At a minimum, barriers with 6mil plastic should be created between the area being cleaned and the rest of the home, including the area where workers are carrying out debris. 

  • Do you have any personal experiences with mold?  Sometimes the business owners with personal experiences on how devastating mold can be to their health, family and home are the best in understanding every step of the discovery, remediation, rebuilding and treatment process.  For an example of how a good, experienced air quality inspector conducts his interviews and assessments, check out this interview

Finally, many companies are good at selling and less good at performance.  I once hired a plumbing contractor who was a good salesman and smooth talker, but when it came down to performance, found out that he was improperly designing and installing drain piping runs.  I fired him and because I and another contractor called him out on the mistakes, he did not charge me for the work.  Even if he had, I would only be lacking money…Your health is more costly, so don’t be afraid to “go with your gut” and if necessary, terminate a mold contractor that is using sub-standard practices to protect you and even their own employees.  Don’t be afraid to ask questions and get second opinions, because you will not be able to “heal” from mold if your home stays infected with it!

How to help seniors avoid Alzheimer’s and dementia through better air quality

How to help seniors avoid Alzheimer's and dementia through better air quality

HypoAir has many generous customers!   We frequently get orders for multiple purifiers with different ship locations, because once our customers see how well they work, they want to gift them to friends and family who don’t know about their benefits, or may not be able to afford them.  Inspired by this generous spirit, I want to let you know a few more reasons and ways to help those who need it most, the elderly.

Whether or not you have a senior in your family, it’s likely you know someone who because of age or infirmity has more difficulty cleaning their home than they used to.  Anything that involves a ladder may not be safe for them to do, and heavy vacuums take a lot of energy to maneuver.  They also may not have access to better vacuums and air purifiers with HEPA filters, which are important for filtering out fine particulates from indoor air.  So, the dust piles up and this not only leads to a sense of discouragement; it can affect their physical mental abilities.  At least one study found that air pollution exposure later in life is a risk factor for dementia.  A study published in February 2022 “found that greater improvement in long-term AQ in late life was associated with slower cognitive declines in older women. “  Exactly how was this assessed?

First of all, the researchers reference the National Ambient Air Quality Standards (NAAQS), which were created in 1970 by the EPA through the Clean Air Act.  Six pollutants were identified as “criteria” pollutants, which are carbon monoxide, lead, nitrogen dioxide, particulate matter (in which two categories of less than 10 microns and less than 2.5 microns were identified), sulfur oxides, and ground-level ozone.  (Britannica.com)  Since the enactment of the NAAQS 50 years ago, significant reductions in the average pollution levels have been seen across the US, but not in every location.  This new air pollution study used a subset database of 2,232 women aged 74-92 who were already participating in the the Women’s Health Initiative (WHI) Memory Study (WHIMS)-Epidemiology of Cognitive Health Outcomes (WHIMS-ECHO) study, which began in 2008.  The air pollution study correlated the pollution levels at each participant’s address in the first 10 years (2008-2018), according to US Environmental Protection Agency (EPA) monitoring data, to estimate annual mean concentrations of PM2.5 (in μg/m3) and NO2 (in parts per billion [ppb]).  Then they controlled for other variables such as age, education, geographical region, ApoE e4 genotypes (a gene specifically found to increase dementia risk), and cardiovascular risk factors, and excluded others with prevalent dementia and missing data.   The association of the cognitive decline of the remaining 2,232 women to the levels of air quality improvement where they lived showed that residing in locations with greater AQ improvement was associated with slower rates of decline in both general cognitive status and episodic memory.  These benefits were equivalent to slower cognitive declines in women who were 0.9 to 1.6 years younger at WHIMS-ECHO enrollment, meaning that their brains acted 0.9-1.6 years younger.

Whew, that’s a lot of information (the study was quite rigorous to read) but our customers (and really anyone interested in air quality) are seeking ways to live with the best quality of life, if not also the longest life possible.  Therefore, slowing down mental decline by 0.9 - 1.6 years is nothing to sneeze at!  It all adds up.  It just confirms what we’ve been writing about regarding the location of your home–if you are moving, it’s very important to choose a location that is low ambient air pollution.  Higher outdoor air pollution translates to poor quality air inside, if better ventilation and HEPA filters are not used.  

Fungi in the brain has been studied as a possible cause of Alzheimers and dementia patients.  This summary of recent studies, as well as a 3-part series on mold and its journey through the body on Citrisafe.com, a manufacturer of safe mold cleaning products, show how exposure to mold is a big risk to our brains.  This is another reason it’s important to investigate for mold in the homes of the seniors you know.  

Unfortunately, many seniors do not have the choice to move into better locations to improve air quality, but we can help them by making small improvements inside.  You can do what you can for your aging parents, your neighbors, and anyone else you are able to!

  • Help to identify the big “leaks” that may be letting outdoor pollution into their home.  Some of these are attic doors, leaky fireplace dampers, holes in the subfloor under bathtubs, large holes around plumbing or gas fittings, etc.  Sealing these will help to keep the ultra-fine particles and nitrogen dioxide at lower levels.

  • Encourage and/or help to change their furnace filter regularly.  Often the air return filter is under a ceiling grille, requiring a ladder.  Although it can be expensive to relocate the filter, you can suggest that they use the highest MERV filter possible for their system (up to MERV 13, check out our selection including activated carbon options here).  If renovation is possible, adding a box for a thicker filter will decrease the frequency of changes so that each filter will work longer.  

  • Suggest they buy, or give a gift of a HEPA filter.   In addition to the furnace filter, this filter can be placed in the room they use the most, so that they can breathe comfortably for most of the day.  Some filters are easily transportable to their bedroom.  If they are restricted in movement such as a recliner or bed, a small filter may be best.  IQAir’s new “ATEM” filter directs purified air in their breathing zone, and is quite portable.  HEPA filters reduce cleaning frequency and intensity by trapping dust, but the filters will need changing (a maintenance cost of running them).

  • If particulate air quality is quite good in their home but bacteria and viruses are a concern, you can suggest or gift an Air Angel.  Air Angels are also portable units that deactivate microorganisms like bacteria, viruses and mold with polarized ions.  Air Angels require very little maintenance, in fact only a replacement AHPCO cell once a year. 

  • Advocate for better ventilation.  We are BIG on fresh air ventilation, because it dilutes pollutants that come from inside (CO2, VOCs, etc.).  Our Window Ventilation Filters allow anyone to open their windows for more fresh air, but keep out pollution, pollen and dust.  They are easy to install and remove.  

  • Check for water intrusion and mold.  That “musty smell”, so often a stereotype of older persons’ homes and belongings, in reality is probably not their choice of scent–it’s an indicator that mold is growing somewhere in the home.  Mobility is often a limitation for seniors, so they may not be able to stoop and inspect under sinks, in closets or in the attic, basement or crawlspace.  If you have been reading our website, you’ll also know that if mold occurs, choosing the right contractor is not easy!  Help them to make difficult decisions of who to contract, how to deal with the remediation and what to clean and what to dispose, in order to have a healthy home going forward.

  • Have a conversation about cleaning products.  Of all of these “changes” this might be the most difficult one, because seniors often have preferred products that have been on the market for decades but in reality are toxic to their indoor air!  If you want more information on why these are toxic, and what products to use in place of them, check out our post and our own non-toxic cleaner TotalClean

Our kindness towards seniors counts, because it shows that we value life from the beginning to the end.  It also shows how we want to be cared for when we reach the same age.  Regardless of your financial ability, it’s the time and actions that show you care!

How to increase indoor air quality in mobile and manufactured homes

How to increase indoor air quality in mobile and manufactured homes

No matter where you go in the US, there are mobile and manufactured homes.  The homes we’ll discuss here can fall into 2 categories: homes that were moved from a tractor trailer, placed on pilings and realistically will never move again, and then there are recreational vehicles (RVs) that can travel the country (but many sit at home or in storage for most of the year).  There’s also vastly different reasons to live in one or the other–from financial to lifestyle choices to temporary housing.  Whatever your reason to stay in a mobile or manufactured home, we want to help you make it a healthy place. 

Mobile homes with a pier foundation are actually supposed to be called “manufactured homes” according to the industry representative, The Manufactured Housing Institute.  Mobile homes and manufactured homes are two words for the same thing: a home built in a factory on a steel frame with wheels for transport to a homesite, where the wheels are removed after it is set on a foundation.  Manufacturers and HUD prefer that they be called manufactured homes, but most people still refer to them as mobile homes.  You can have single-wide, double-wide, triple and even quadruple-wide “mobile” homes, where the extra “boxes” can be configured side by side or even on top for a second story.  Mobile homes don’t have a great reputation for quality or lifespan, but that doesn’t mean they don’t start out that way or can’t be upgraded to make them better.  Let’s discuss the ways in which mobile homes can be improved for healthier indoor air quality.  The main objective is to keep water out, seal air leaks and provide good ventilation. (source: howtolookatahouse.com)

Starting from the top down…The roof: generally speaking, less-expensive manufactured homes have flatter roofs.  This is because the higher the “pitch” or angle of the roof, more material is necessary to frame and cover it.  The problem with low pitch roofs is that rain and debris spends more time on the roof–rain doesn’t run off as quickly and debris like tree branches and pine needles don’t roll off as easily.  Roofs in general need inspection and maintenance, and low-pitched roofs need regular inspection to keep water from getting backed up and leaking through.  Many owners decide to “double-roof” their homes and this can make a huge difference in indoor temperature and longevity of the home.  I’m not talking about 

Roof overhangs tend to be short in manufactured homes, so that water coming off the roof runs right down the wall.  This is a recipe for water intrusion and mold, not to mention undermining the footings of the piers.  If the home does not have gutters, you can install gutters and downspouts to channel the water away from walls, doors, windows, decks and the foundation.

Siding is the protection for walls against wind and rain, and siding can be metal (very old homes), fiberboard (80’s and 90’s homes) or vinyl, engineered wood or hardyboard (modern homes).  Fiberboard must be continually maintained, or water ingress will cause it to degrade quickly.  Vinyl, engineered wood and cement board sidings provide longer-lasting protection, but they also need to be inspected for damage or improper installation.  The weakest points in siding are the corners, window and door casings, because the irregular joints are typically spots for water ingress.  

For many years, windows in manufactured homes were single pane with an aluminum frame.    The transport of the home to its new foundation may cause the frame to warp or the casing around the window to become unsealed, exposing the sheathing underneath to water.  If you are able to, you can upgrade the windows to double-pane for more insulation against outside weather, and make sure the new windows are installed with good flashing, casing, and caulk techniques.  Likewise, if the front door is of a thinner, lightweight quality, an upgrade to a steel door is also an opportunity to make sure it is installed correctly with flashing, casing and caulk to minimize water ingress.

Foundation: On manufactured homes that have a “skirt” or foundation, a vapor barrier must be installed on the ground (2008 HUD law).  If the home is resting on a concrete pad, then the vapor barrier is not needed because the concrete will act as a vapor barrier.  Unfortunately, the “underbelly” of the home often falls into disrepair because no one wants to go under the house to inspect it!  Directly under the home, another vapor barrier of plastic or black “belly board” will protect the insulation and subfloor from moisture and pests, but this is often damaged and missing in older homes.  Manufactured homes on piers are really sitting over a “crawl space”, so it’s important to inspect the underside of the manufactured home to see how sealing up the ground vapor barrier, belly barrier and insulation can really make a difference in comfort and humidity!  Here’s an article that goes step by step through this repair. 

Inside: the manufactured home industry has certainly had a bad reputation for formaldehyde emissions inside homes.  Formaldehyde has never been banned from the manufacture of homes, but lower limits have been set on the use of components such as plywood and particleboard by HUD and the EPA.  The problem is that there are no HUD standards for the maximum allowable level of formaldehyde gas inside a home, meaning that all the new components like flooring, cabinets, walls, furniture and drapery can have low individual levels of emissions, but a high overall level.  For this reason, it’s best to avoid purchasing or staying in new manufactured homes,  If this is not an option, you can choose to furnish it with only solid wood furniture or composite wood furniture with sealed surfaces. If you have any newer composite wood furniture that is still emitting formaldehyde gas, remove it from your home. Because the formaldehyde off-gassing diminishes over time, storing the pieces outside of your living area for a while (under cover of course) may solve the problem. (howtolookatahouse.com)  You can also ventilate as much as possible (leaving windows open in mild climates, and using a fresh-air ventilation system in more extreme climates.  And of course, increase ventilation of your home while doing any interior painting or use low VOC paint.

Some of the most important mold protection also happens on the inside of the home, because leaking pipes, sinks, showers, toilets, washing machines, etc. all need immediate attention in order not to cause mold and damage that can be very costly to repair.  The abundance of fiberboard in manufactured homes will wick up water much more quickly than hardwood, and even ambient humidity is important to control.  

Recreational Vehicles (RV’s or campers) truly are supposed to be mobile, so that you can take your home with you, and enjoy new scenery wherever it’s parked!  Like manufactured homes, there are a variety of pricepoints and features in two classes, motorized and towable.  There are 3 types of motorized RV’s, ranging from the largest, luxury bus-type (Class A), the smallest conversion van (Class B) to the in-between (Class C).  Towable RVs can be as simple as a small “Pop-up” to large “travel-trailers” and “fifth wheels”.  “Tiny homes” can look like miniature versions of homes on wheels.  Here is a more in-depth look at the differences between these classes. 

RVs have similar challenges to manufactured homes when considering water intrusion from above and vapor from below.  It’s a sad truth that RVs are going to leak, but with a lot of inspection and maintenance, you can prevent this.  Most RV’s rely on sealant and caulking, and inspection and repairs should occur every 90 days (see this video for how to inspect it).  Again, let’s take a look from the top down:

Roofs: Most RV roofs are either rubberized (a thin membrane stretched over wooden frame) or fiberglass (molded).  Considering that these materials are more fragile than the asphalt shingles or metal roofs found on manufactured homes, they need a bit more care and upkeep!  Keeping them clean and conditioned helps so that leaves and branches slide right off instead of piling up, and aftermarket coatings can extend life against the sun’s UV damage.  RV roofs can last from 10-20 years or more, depending on the care and maintenance given them.  Here is an article detailing cleaning and repair tips for each type of roof.  Ideally, RVs should be parked under a permanent roof when they are not being used in order to minimize water and sun damage, and a minimal conditioning system (like a dehumidifier) should be left running to keep the air dry inside.

Since RVs are mobile, they are more prone to separation at the roof and wall joint, as well as openings like skylights, windows and doors.  One website says that driving an RV at highway speeds is “ the equivalent of driving your house through a hurricane during an earthquake.” (!)  Any separation needs to receive prompt attention by removing old sealant, cleaning the surface, and applying new sealant.  Here is a great article on how to achieve a professional look and long-lasting finish when resealing seams.   If your RV has a slide-out, special attention needs to be paid to protecting this area, and awnings are a great way to shelter the slide-out roof and joint area by keeping leaf and branch debris, animal droppings and nests off of it, as well as rain and snow. They’re not too hard to install (instructions here) and are a great investment for your RV. 

Each penetration in the side of the RV (like vents, ports for electricity and drainage, and storage compartments) needs attention, because sealants fail over time and with sun damage.  They should have a bead of sealant at least on the top and corners of the penetration to prevent water from coming in (the best would be all around the penetration).

The underbelly (underside) of the RV also needs regular inspection and repair.  Some RV’s have fiberglass, others have wood or metal sheets, and all are susceptible to road damage or more frequently, water damage from the inside like a leaking pipe.  Here is an article with photos on how to assess and repair underbelly damage.  You can even upgrade the type of underbelly protection fairly easily, but it may take more than one person to wrangle the material into place.

Inside the RV, again, motion from road travel is constantly working to pull apart connections and seams.  Keep an eye on all sources of water leaks such as pipes, sinks, showers, toilets, etc., so that water will not damage your home on wheels and initiate mold!  Also, since many RVs have propane powered appliances such as stoves, furnaces, water heaters, etc, a propane leak can be very dangerous to your health. You can use your nose (the old “rotten eggs” smell is a clue, or detectors such as a Gassaf propane leak detector, or a propane dial manometer (to detect pressure drops in the propane system).  (rvlife.com has a great video on how to inspect your propane system).  A pressure drop-down test is recommended once a year so that you can tell if your system is leaking at all.  If you do have a leak, you can use a simple spray bottle with water and liquid dish detergent, to check all joints for leaks (the soap will cause bubbles around the joint if it’s leaking).  

Like manufactured homes, RVs tend to have an abundance of particleboard, fabric and flooring that should have formaldehyde limits individually, but corporately may give off a lot of formaldehyde when they are new from the factory.  These levels go down dramatically as an RV ages, but RV age also increases chances of other problems, like water or structural damage.  In general, less-expensive units have more adhesive-based components (which generate formaldehyde off-gassing) and could create some irritation for more sensitive RV owners. (rvtravel.com).  When checking out RVs to purchase, you can even bring a portable sensor with you to measure the levels of VOCs and formaldehyde inside them (check out our article on sensors for recommendations).  Air purifiers with activated charcoal filters, like the Germ Defender with carbon filters, absorb VOCs and formaldehyde, and fans are helpful to keep air circulating.  1-2 Germ Defenders can cover the average RV (remember that they don’t cover spaces separated by closed doors) so that your RV can be comfortable even new off the factory floor. 

Manufactured and mobile homes can be as healthy as a permanent home inside with a lot of diligence and the decision to choose your neighbors wisely!   If you are in close proximity to smokers, barbeque grills, auto exhaust or other toxins, this can seep into your home.  If possible, try to live or camp on a large lot and use HEPA filters to capture particulates inside.  In a small or large home, it’s best put your health first and live in the best place you can afford.

Photo by Jon Hieb on Unsplash

New SEER ratings and more price increases…

New SEER ratings and more price increases…

Since we’re a company dedicated to healthy indoor air, we’re going to talk about SEER in relation to heating and air conditioning, not a person who can “see” the future!  However, we can see price increases coming because new regulations are soon coming into effect...

SEER stands for Seasonal Energy Efficiency Ratio, and it gives you an idea of how efficient your cooling system is.  For example, how much cooling do you receive for the amount of electricity used?  As the SEER number increases, the electricity used to achieve the same cooling will decrease proportionately.  This means that a 12 SEER unit will cool your home using half the energy of a 6 SEER, and a new 13 SEER system is about 30% more efficient than a 10 SEER from the early 1990s. (howtolookatahouse.com)

The Department of Energy (DOE) regulates the minimum SEER ratings that may be sold and installed, and these ratings increase every few years as technology evolves so that energy usage decreases. For example, the minimum SEER for southern US states will increase beginning in January 2023, from 13 to 14.  It is part of a new rating system called SEER2, which involves a new M1 testing procedures.  As a consumer, you probably don’t want to know the specifics of the testing, but it does more accurately represent the real-world applications (seer2.com)

This regulation essentially causes a mandatory “upgrading” of new HVAC systems.  It also contains legislation that splits the country into North, South and Southwest regions, each of which have different requirements about installing “older” units.  For example, in regards to residential split-system air conditioners, in the South and Southwest, HVAC companies cannot continue to “sell through” their older units.  In these areas, all noncompliant equipment must be sold for installation prior to January 1, 2023 or shipped to the North for installation.  In the North, as long as it’s been manufactured prior to January 1, 2023, they can continue to install it.  (fieldedge.com).  

As a resident of the “South” region, this requirement to sell or ship is definitely affecting new AC prices, as I was warned by my local HVAC installer that prices will go up 15-20% at the beginning of 2023!  

Ok, so how do I know what I’m upgrading to?

There are a number of ways to find out the SEER of your current air conditioner, even if the yellow and black sticker is long gone.  From the model and serial numbers, I can tell the date of manufacture, the SEER rating, and the “tons” of capacity on the The Rheem unit on my home. 

So, if I have a SEER 13, the same cooling capacity in a 14 SEER system should gain 8% efficiency, or cost me 8% less to run (13/14 = 92%).  However, if you are replacing your home unit, there are more reasons to upgrade further.

Controlling humidity

According to Trane.com, higher SEER units often have 2 components that provide greater indoor comfort.

  • 2-stage or variable-speed compressor

  • Variable-speed blower

Air conditioners with lower SEER ratings are usually single-stage and only run on one speed. This means they’ll frequently turn on and off during mild weather and you’ll experience uneven cooling or hot and cold spots. You’ll also experience higher humidity levels which makes it feel hotter than it is. Your A/C needs to run for a long period of time to remove humidity from your home’s air. 

Tax incentives:  US legislature was recently signed to extend tax incentives to 2032.  At energystar.gov  there is guidance on obtaining a $300 tax credit for split and package air conditioning systems, as well as air source heat pumps.

Local Electric Company incentives:  If you go to the website of your local electric company, there may be details online about rebates for upgrading your home HVAC equipment. 

What does this mean for us as homeowners?  If you are thinking of replacing or upgrading your AC or heat pump, inquire with a local installer in 2022 about pricing and energy usage for higher SEER equipment.  Depending on where you live in the US, you may wait to have it installed in 2023, but you can’t save unless you know, and you can’t know unless you ask!

Photo by P. L. on Unsplash