Monthly Archives: July 2023

Sealing your Attached Garage

Sealing your Attached Garage

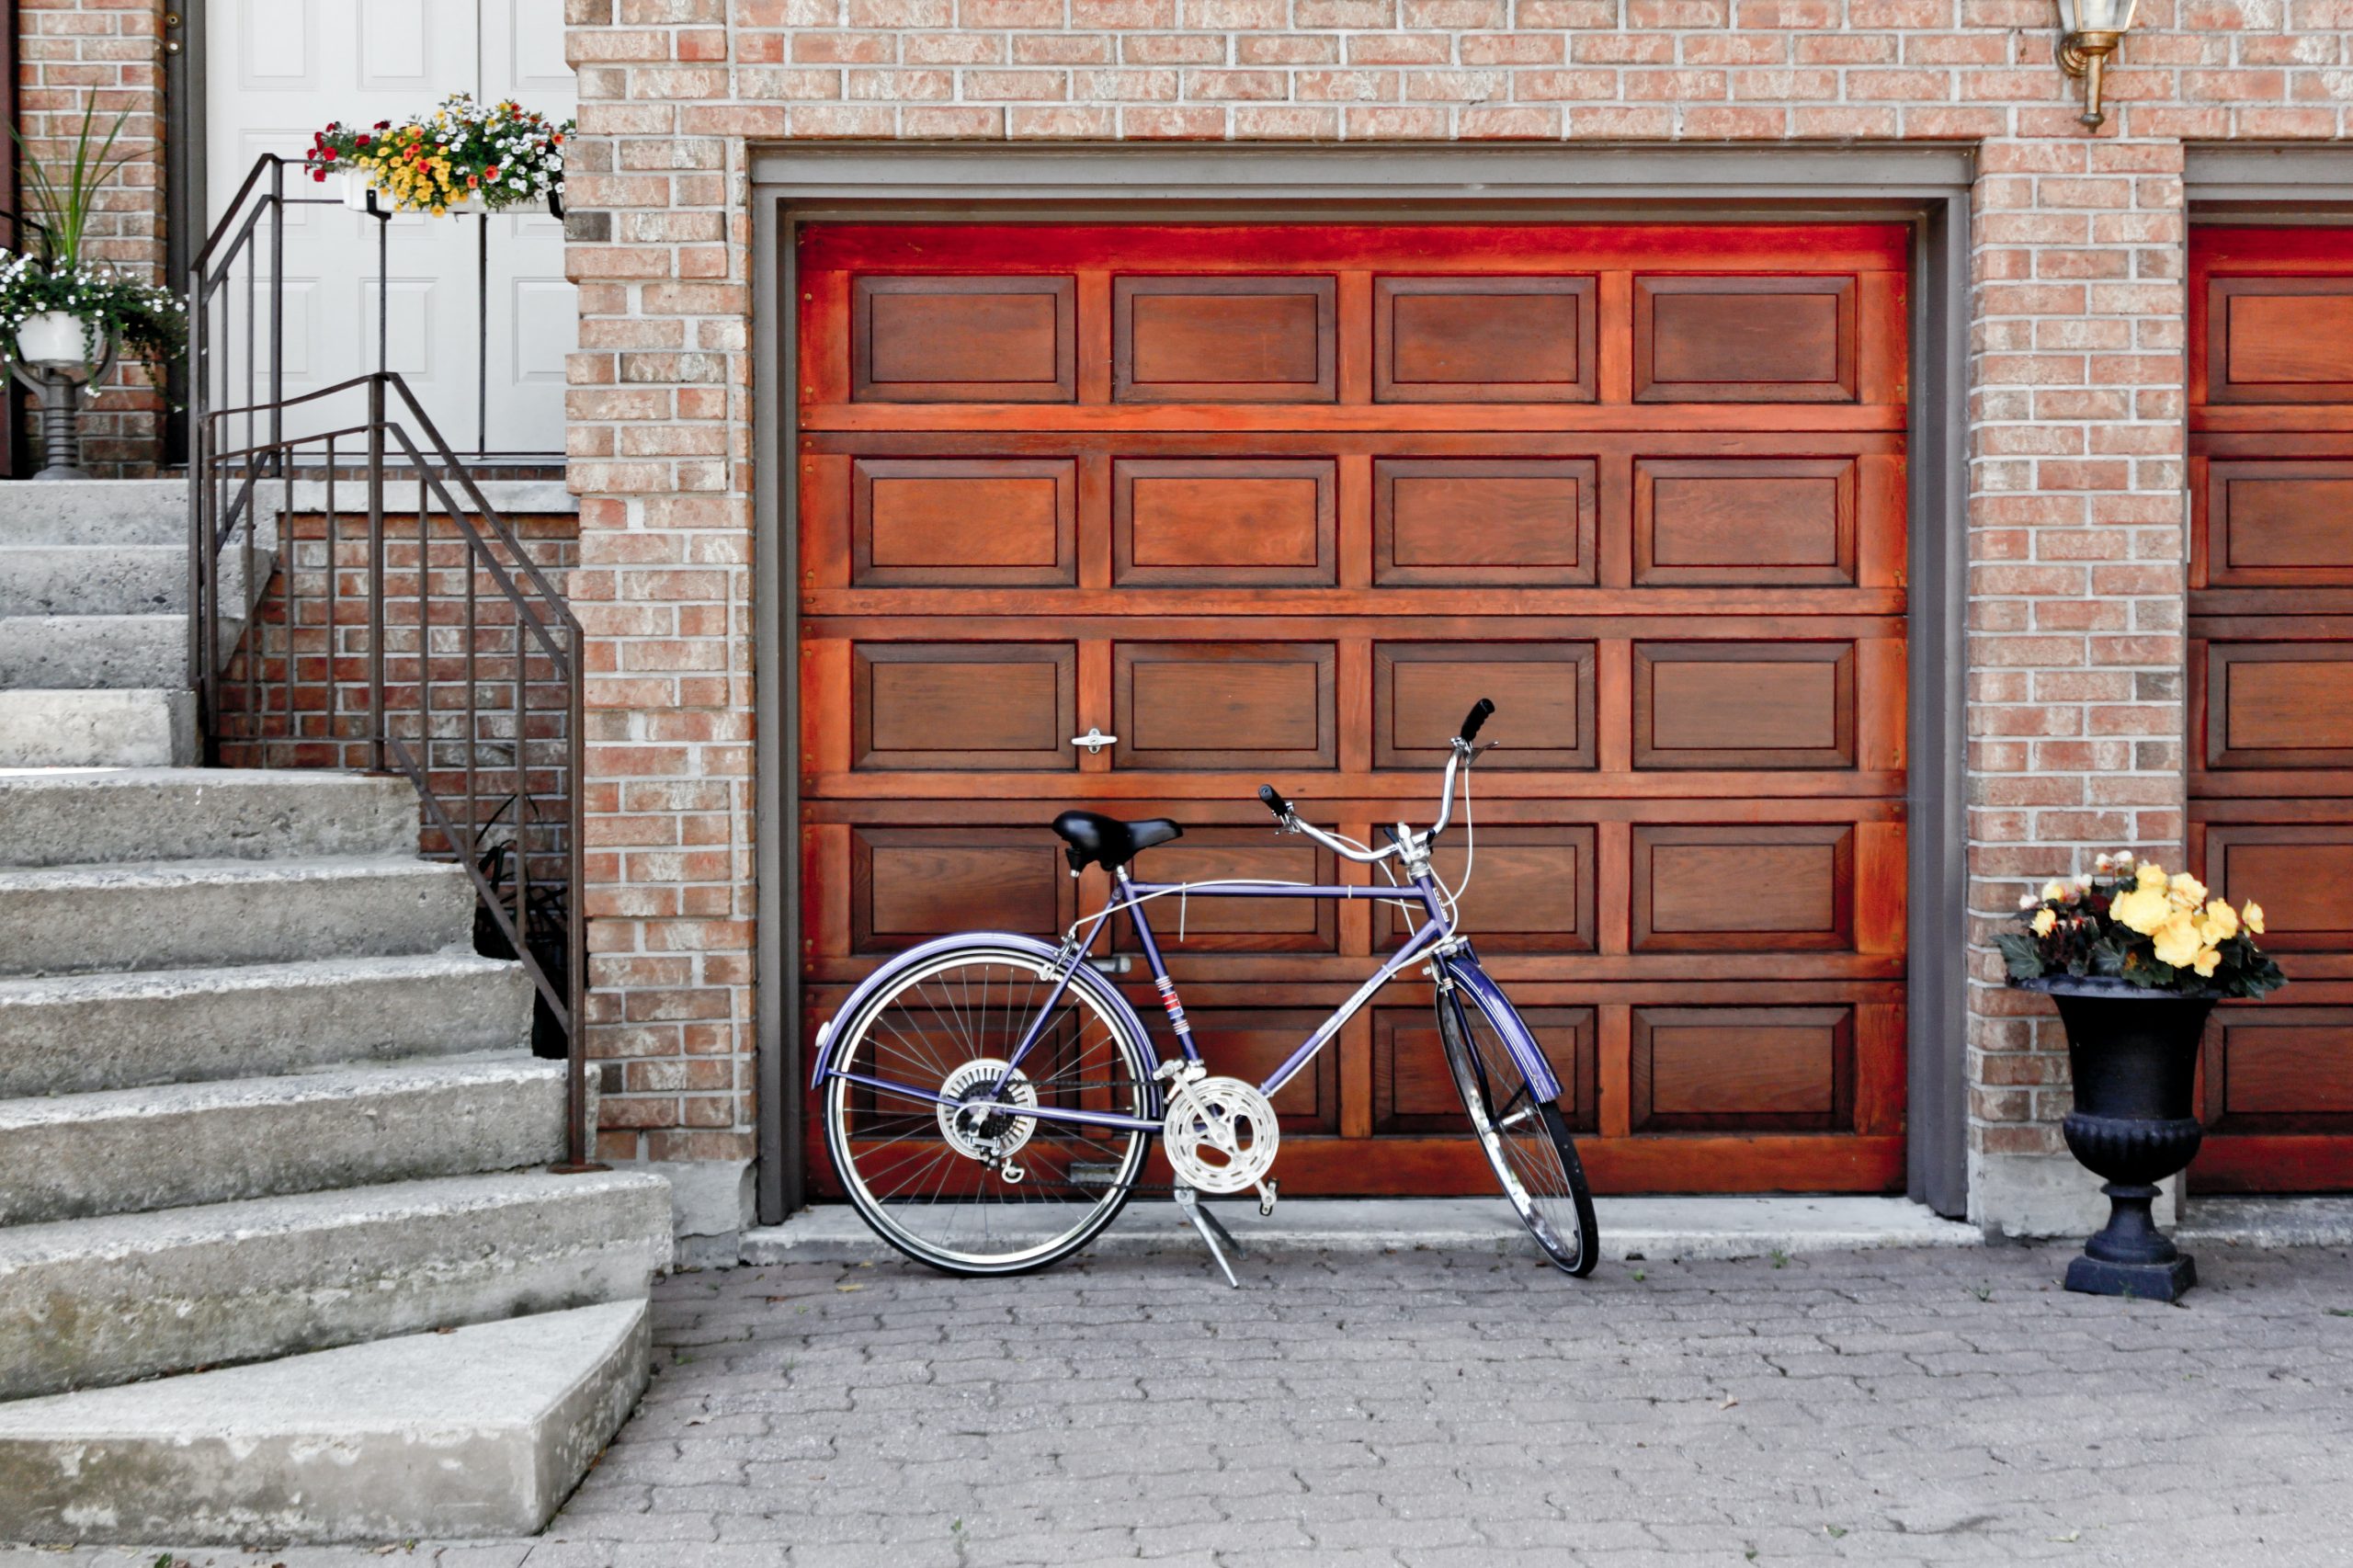
For many people an “attached garage” is an asset in a home: the convenience of parking and walking inside under cover is very attractive when there’s extreme weather outside!  However, from an air quality perspective, attached garages are actually a liability, unless the garage has been air-sealed from your house!

In our articles about negative air pressure here and here, we talked about how contaminants can enter your home from the garage.  The garage not only has car exhaust fumes, it can also have paint or chemical fumes from your hobby, VOCs from pesticides and insecticides stored there, and possibly even exhaust gases from your gas water heater, furnace or clothes dryer.  Need we  mention the mold and mildew spores when humidity and cardboard boxes create the perfect environment for mold?  It’s almost like having an unsanitary neighbor in the apartment next to you…now, does an attached garage still seem like an “asset” to your clean, healthy home?

If you are coming around to a healthier way of thinking about your garage, it’s essential to consider installing some boundaries with this unsanitary neighbor!  “Air sealing” is more than just a tight-closing door.  It goes from the ground (foundation), through walls and insulation and even into the attic.  That’s right–if the attic over your garage is not sealed from the attic over your home, you got it–there is shared airspace and the possibility of contaminants crossing over from the air that circulates there due to changing temperatures. 

As with most air-sealing projects, creating this boundary is easiest if it’s done during the building phase.  The easiest way is to build your attached garage as a “separate” building…as in this article.  Jake Bruton of Airow Building in Missouri does it this way: do all the framing for the house, install your air barrier, and only then, frame the garage on the other side of the air barrier.  Finally, any penetrations like electrical and ventilation must be properly sealed. 

Another way to airseal during construction is to hang drywall on the shared wall inside the garage, foam the penetrations like light switches and outlets on that wall, and also run plywood sheathing above it to the roofdeck, using sprayfoam to seal the entire barrier in the attic as in this video.  Sprayfoam really is the only way to effectively seal around ceiling joists, which often run straight over the wall from the home into the garage.     

This is all great...for new construction.  What if you are buying an existing home, or just now want to upgrade your home?  First of all, examine that shared wall from the garage side, from floor to ceiling. 

  • If the drywall is finished, that’s good.  Finished drywall can be an air barrier.  However, you’ll want to remove any trim like baseboards or trim around doors, faceplates like electrical plates, and uncover any penetrations.  Get some spray foam in a can and seal all of these cracks with spray foam.   You’ll want to cover the space from the sill plate to the drywall, the spaces around electrical boxes, and around any pipes sticking through the wall like gas pipes or hot water pipes if you have a hot water heater in the garage.  Make sure to seal around the door frame if there’s dead space there. 

  • If the drywall is not finished (no tape and mud or just insulation), that’s even better!  Consider removing the existing drywall on the garage side (you can install it again later if screws were used), as well as any fiberglass or rolled insulation, and sprayfoaming the entire wall.  Spray foam can be an excellent air barrier if it’s done by a pro.  Before you schedule the job, however, go to the next point and prep the attic space so that they can foam there as well.

  • If the attic space between the garage and home are shared, you’ll need to build a partition wall between them.  Of course this is not a fun job, because attics are typically low, cramped and have extreme temperatures, but it’s critical if you’re going to do a thorough job.  Then, the wall can be sprayfoamed on the attic or house side, or at least foamed around the roof, rafters and joists and taped where plywood sheets come together.  

  • Ventilation (air conditioning and heating) is something that should never be shared between a house and garage, because that is a sure way to pull those contaminants right in and distribute them around your home!  If you do have a shared system, consult with an HVAC company about terminating the vents to the garage and installing a dedicated mini-split.  For small garages, a window air conditioner and portable heater will do the trick!  

  • If flexible ventilation ducts go over the garage with no vents, it’s really hard to get an air seal around flex ducts.  If you can’t/don’t want to switch to metal ductwork, install a collar in the attic wall that separates the garage and house (the one you build as in bullet #3 above), and attach the ends of the flex duct to it, so the wall can still be adequately airsealed.  

  • The door between the house and garage, of course, is an area that needs to seal tightly.  Adjust the door so that no daylight shows around the perimeter (I know, this is easier said than done!) and use weatherstripping around the sides so that it seals when closed.  If necessary, install a “sweep” on the bottom or replace the rubber seal in the threshold so the bottom seals as well. 

Here are some product recommendations for air sealing the garage:  

  • Air-sealing tapes can be expensive, but don’t scrimp: don’t use duct-tape, vapor-barrier tape or anything less than a product that is for air-sealing.  ZIP System is a great brand and be sure to buy more than you think you will need, because there always seems to be another seam to seal!  Use this tape to seal plywood edges together, seal the door frame to the drywall (if you can’t foam it), etc. 

  • Spray foam cans come in lots of formulations: small cracks (less than ¼”), larger gaps and cracks ( ), pest block formula (who knows what kind of chemicals are in there), but just be sure to buy a good number of the small and large gap formulations before you start the job.  Wear gloves, safety goggles and old clothing (long hair safely tucked away) because this stuff is super sticky!  Also, if you use a can quickly, you can reuse the same straw on the next can, and save the extra straw in case one gets plugged or lost.  Unless you buy the “smart dispenser” version, the straws and remainder in the can cannot be reused after about 30-40 minutes, so be sure to have several spray areas ready when you start spraying!  After it hardens, you can use a utility knife or hacksaw blade to cut away excess foam.  Consider these different products:

    • Great Stuff Window and Door gently expands so that frames will not warp under pressure.

    • Great Stuff Gap and Cracks (use in gaps up to 1”)

    • Loctite Tite Foam, pack of 2 for $19

    • Great Stuff Pro (large cans, $14 each–a great tool for a large job because it’s easier to dispense and can be reused for up to 30 days); however it requires a special gun.  Users report that a can goes a LONG way (3-6 cans on a large home) but if you have more air-sealing to do, it’s worth having several more on hand.

    • And more…

Not only will your house smell better and stay cleaner after these airsealing improvements, you’ll probably notice less cold drafts in winter and hot air in summer, since most attached garages are not conditioned.  Finally, complete your sealed garage upgrade with a funny sign reminding everyone to “close the door”...after all, airsealing can only go so far when the door is open!!

Photo by Kevin Wolf on Unsplash

How to Balance Wildfire Smoke and Work

How to Balance Wildfire Smoke and Work

Wildfire smoke from Canada in 2023 has made the northern and eastern states in the US look like a Martian landscape at times.   If your job requires you to commute to the office, whether it’s one day a week or everyday, what should you consider before taking off for work?

First things first:  how is your employer reacting to this problem?  Employers and employees have been pivoting ever since COVID-19: office, home, office, schedules, communication, and air quality.  It’s a juggling act, and this new challenge (ok, maybe new for these areas, not so much for west coasters) is another fire drill.  Hopefully, everyone can continue to work together to get through it, safely.  Does your employer recognize that air quality from smoke is a safety concern just as much as viruses?   According to Thomas Brugato, counsel in the Washington office of Covington & Burling who focuses on environmental matters, as well as civil and administrative litigation, companies need to be asking whether the systems they have in place are “adequate to ensure protection and safe air during very bad air quality events”.  (How wildfire smoke should change the way companies think about return to office)  Generally speaking, companies have a duty to provide a safe work environment under federal Occupational Safety and Health Administration (OSHA) rules. 

How this applies to your commute

Technically, under the “coming and going rule,” employees are typically deemed not engaged in work while commuting, so generally, employers are not liable for wrongs committed during that time.  (Are you responsible for an employees’ commute?)  However, if you are in a job that has already redefined “office” because of air quality, to commute or not commute is now also an air quality decision, and hopefully an informed one!  If your employer is not familiar with the air quality reports at AirNow.gov, you’ll need to find a tactful way to introduce them in order to know what everyone will be facing on their commute. 

Even if you’re in a vehicle with the “recirculation” mode on, the outside atmosphere WILL come inside.  We’ve addressed vehicle air quality in this article, and changing your cabin air filter on a regular basis, especially with one that includes activated carbon, can drastically improve air quality in your car.  (Cabin air filters should be changed every 15,000 to 30,000 miles.)  Wearing a mask inside your car can also help with mild smoke conditions; it will not filter noxious gasses, but will help with particulates.  If you’re using a company car, try to find out when the cabin air filter was changed, and push for doing so if it’s overdue.  You can also ask for your employer to reimburse mask expenses for commuting. 

Research your route!  It may take a bit longer to drive through cleaner air, but it’s certainly worth it for your health.  Free apps like AirNow, BreezeOMeter and google maps (they have a new air quality “layer”) can show where the air quality is acceptable. 

Do you normally walk or bike to work?  In a 2017 review of 39 studies, scientists discovered a few conundrums that are worth considering: 

  • although biking and walking exposes you to less pollutants, the uptake of pollution is higher because you are breathing more frequently and deeply by reason of exercise

  • the years of life expectancy (YLE) gained by walking or biking compared with motorized transport are positive, meaning that cyclists and pedestrians actually gained years in life expectancy despite inhaling more particulates, due to the positive health effects of physical activity.  Cyclists gained more YLE than pedestrians because the average commute for pedestrians took longer.  

However, this study did not take wildfire smoke into account.  Because particulates from smoke are an additional burden, walking or biking on these days is not recommended!  Any other mode of transportation (car, train, bus, subway, etc.) would be advised over walking or biking on low air-quality days due to wildfire smoke.  If you don’t have a car or are close to public transportation, ask your employer or coworkers for help commuting during low air-quality days.

How this applies to your workplace

Although office workspaces usually have a HVAC system with a filter, sometimes they can be overwhelmed by bad air quality outside, especially if people are constantly entering and leaving, or service windows are being opened and closed.  It’s helpful to bring a portable air quality monitor with you and keep it at your workspace, to determine if air inside the building is healthy.  If particulates are high and changing the HVAC filter does not help, here are some ways to improve it:

  • recommend trying a higher MERV filter (MERV 13 should help)

  • recommend getting a standalone HEPA filter, if possible with activated carbon

  • recommend increasing cleaning during this time, as particulates settle into dust which can be disturbed and inhaled

  • If office-wide improvements are not welcomed, add a small air cleaner with HEPA and activated carbon to your space. 

  • Lastly, using a mask during the workday or part of the day is not pleasant but it is better than breathing polluted air!

If you work and are locked into being at a specific workplace, discussing air quality with your employer and coworkers can bring this problem to the forefront, and may also generate some creative solutions!

Photo by Ivan Bogdanov on Unsplash

Optimizing Your Window Air Conditioner for Maximum Clean, Cool Air

Optimizing Your Window Air Conditioner for Maximum Clean, Cool Air

Global average temperatures have exceeded recorded highs several times in the last month, and articles on ways to keep cool are proliferating!  In this article, I don’t have any “new” way to keep cool, but if you are among those blessed with a simple window air conditioner, let us help you make it work just as well and as efficiently as the day you bought it!

Window air conditioners are the humble yet hard-working appliances that many households can’t do without.  As one of the oldest cities in the US, New York City has an abundance of window units because about 75 percent of the buildings throughout the five boroughs were constructed before 1960, according to the NYC Department of Buildings.  (Why about a quarter of US households are stuck with ugly and loud window AC units)  The cost of retrofitting these old buildings with central air conditioning is way too high, so window air-conditioning units are the solution, and continue to be for many households across the US.  However, even if your window air conditioner is an older unit, a little time and effort can go a long way in helping it cool better, work less (lower your energy bill), and put out better quality air! 

If you have the option of upgrading your window air conditioner, there are many worthy options out there, including those with inverter motors, which save a lot of energy and control humidity better.  (To understand better what inverter technology is, check out our article here.)  Unfortunately, no one has combined an inverter air conditioner and premium filtration, but you can get premium filtration on a new air conditioner with the Friedrich Kuhl units.  These units cool (and some also heat) rooms by heat pump, with smart controls (wifi enabled and smart home compatible) AND they have MERV 13 filters available (a MERV 13 bracket kit is needed).  Until manufacturers put inverter units and premium filtration together, we have to put premium filtration in priority!

If your existing window air conditioner has a few more years of life, it helps (although not necessary) to know how a window air conditioner works.  In the first part of our article “What kind of air conditioner do you have?” we explain the workings of this type of unit.  A key lesson is knowing that unless you have a ventilation lever on your unit, there is no mixing of indoor and outdoor air.  (Check out this video to find out how to find and operate a ventilation lever.)  Therefore, the air conditioner is not pulling in outside air, it’s only recirculating indoor air.  Whatever dust, pet dander and microbes are floating around your apartment can get lodged in the air conditioner and grow into disgusting science experiments that will negatively affect your air quality!

Therefore, a clean evaporator coil is super-important.  The evaporator coils are what change your hot and humid indoor air into cooler and drier air.  Because most window air conditioners come with a flimsy clean-able filter that would qualify somewhere between MERV 1 through 4, what really ends up filtering the air is the coil–because after a season of running constantly, so much dust and dirt go through the cheap filter and get lodged in the coil!  This is not only disgusting, it’s unhealthy.  Therefore, if you’ve operated your window unit for more than one summer and never cleaned the coil, please start with this step to eliminate the majority of grime that’s lodged there.  (Be sure to have help removing the air conditioner from the window, especially if you live on an upper story!) 

After you’ve cleaned your unit (and the included filter), check that it is blowing cold air well.  It should blow air that is 15-20 degrees colder than the air it takes in.  To measure this, simply use a portable temperature gauge above the unit (out of the stream of cold air) as the intake temperature, and then move the thermometer directly into the cold air coming out, and note the difference (it’s also helpful to note the difference in humidity, to know that it’s actually removing moisture as well!).  Our portable humidity sensors will give both temperature and humidity.  If the difference in inlet and outlet temperatures does not approach 15 degrees F for a clean AC unit, then you can check into getting the refrigerant topped up.  This is best done by a licensed HVAC technician.

Next, it’s not too hard to upgrade your current filtration so that the air coming out of your air conditioner is cleaner than the air that goes in!  Here are some options:

  • Frigidaire now offers MERV 14 filters for some of its models.  Check the link in the overview for compatibility.
  • You can cut a regular HVAC filter to fit as per this video (make sure you use painter’s tape around the edges to prevent air leaking around the filter), or 
  • You can have a custom filter bracket made for your window AC, and change the filter in it often. Since the louvers in front just thwart air flow, you can actually remove the louvered panel and fit the filter inside (if it has a rectangular filter), or you can fit the filter over the louvers and secure it to the front with double-sided tape.  In order to specify the correct size for your window unit, determine which louvers are the “intake” (moving air into the unit), and measure the area covering and slightly outside of them, so that the frame and tape will seal but not cover a lot of the louvered space. 
  • You can make your own frame from 1” aluminum “u-channel” and rivets, and purchase the filter material in bulk or cut to size (these media pads are equivalent to MERV 8 and will filter a lot more dust than the cleanable factory filter!)

Finally, placing a Germ Defender or Mobile Air Angel near the air conditioner will not only help to freshen the room as ions are carried with the fresh air, it will also help to keep the coils cleaner as ions are sucked into the air conditioner by killing microbes and mold spores inside it.

If your space is feeling stuffy from being closed up all the time due to hot weather, chances are CO2 levels are rising.  Fresh air ventilation is important, so go ahead and use that ventilation lever on your window air conditioner, or crack the windows in the morning or evening when temperatures are more tolerable.  If you live in an urban or dusty area, use our window ventilation filters to get fresh air without the particulates.  May our window air conditioning units live long, cool lives!

Get more fresh air ventilation with Nanofiber Window Screens (Easy DIY Project!)

Get more fresh air ventilation with Nanofiber Window Screens (Easy DIY Project!)

If you’ve never thought about them, it’s time to give your window screens some attention.  If your windows open, you’ll want to have screens that are clean and in good repair to keep out insects and other creepy crawly things (won’t go into what could possibly come through an open window).  It’s even more important in seasons of extreme heat or power outages to have a way to get fresh air.  Keeping your windows closed all day can cause levels of CO2 to build up in your home that cause drowsiness and inability to focus or concentrate (check out our article here), so it’s best to let some fresh air in whenever the outside air temperature, humidity and quality permit.

Window screens have been around for a long time (like the 1800’s!) but even age-old products can get an upgrade, making our lives easier.  This upgrade doesn’t have to involve AI or “smart” anything, requiring the internet and electricity.  In this case, window screens have been upgraded with a new material, nanofiber.

Traditionally, window screening came in several varieties of material and color, such as aluminum and fiberglass, and black, silver, gray or bronze colors.  Standard screens have a mesh size of 18 by 16, meaning there are 18 squares per inch from the top left corner to the top right corner (also referred to as warp) and 16 squares per inch from the top left corner to the bottom left corner (also referred to as fill). (Replacement Window Screen Buying Guide)  These are able to prevent most flying insects from passing through, but they do allow a lot of dust and smaller particles to pass through.   The use of nanofibers (each fiber is less than the width of a human hair) allows the holes to become much smaller, because they are spaced very closely, allowing air but not fine particulates to pass through.  Voila!  Nanofiber window screens offer protection from the next “pest”, dust and allergens.  By just replacing the screens you already have with nanofiber material, you can save yourself some cleaning, coughing and add the ability to open your windows more often because of this protection.   What’s even better is that it doesn’t take a lot of time or special tools (just one cheap one) to replace the screen material with some new nanofiber screening.

Here’s the DIY part: replacing your screens with nanofiber screens is a homeowner project that just takes a few hours and supplies.  If you’re not familiar with how window screens are held in place, they are held into the narrow channel on the screen frame with a rubbery spline, or cord.  

There’s also an ALTERNATIVE INSTALLATION with Magnetic Tape (which is practical if your screen frames are broken or missing).  Scroll down to the bottom of this article for the alternative installation.

Here’s what you’ll need for the traditional installation:

  • The nanofiber window screen (order yours here)

  • Spline (if the spline in your screens is not cracking or falling apart, you can reuse it)

  • Window screen rolling tool, $4

  • Small flat-head screwdriver

  • Sharp utility knife to trim the screen after installation

There are lots of videos online showing how to replace screens, but I like this one for its simplicity (step 1 starts at 1:50).  Here are the basic steps:

  1. Remove old spline and screen

  2. Size and align new screen over the frame (1-2 inches extra on each side)

  3. Push screen into channel on first side (using the convex side of the tool)

  4. Insert spline into grooved screen and channel (using the concave side of tool) (Repeat steps 3 and 4 for other sides)

  5. Push spline into corners using screwdriver, trim excess screen carefully with utility knife

And here are some additional tips:

  • If you have to get new spline, take a small piece of the old stuff to the hardware store in order to select the right diameter.

  • Some people like to hold the frame in place by taping it to the work surface, but this doesn’t allow you to rotate it easily if you can’t access all 4 sides of your work surface.

  • You can use a gallon of water or full can of paint to help hold the screen in place to get started.

  • Some people like to use the spline in one length, bending it at the corners as you go around; some like to cut it at each corner. 

  • Be careful not to press too hard on the spline as you work, in case your tool slips, so that you don’t cut the screen accidentally.

  • Normally you shouldn’t have to “stretch” the screen, just gently smooth it out, while rolling the last two sides, as you don’t want too much tension on the frame when you’re done.

  • If you get too frustrated or find that one of the screen frames is broken, many small hardware stores offer “rescreening” services and repair of the frames; just bring them your nanoscreen with the frame(s).

It may take a little more time to get your first screen replaced, but you’ll get better as you go along and have some new functional “filters” in your windows.  Sit down to enjoy the fresh, clean air and admire the fruits of your hard work!  After a few months, you will notice dust collecting on the outside of your screens as they do their job, but you can easily clean them by removing them and using a gentle spray of water on them from the inside out to wash off the dust.  If necessary, use a mild detergent like liquid dish soap or car wash soap and a soft brush to remove any stubborn dirt or bird poop. 

Nanofiber window screens can help you breathe easier all year long, because let’s face it, there always seems to be an “allergen” in the air.  They can also cut down on the dust going onto your HVAC filter, your TV screens, your rugs and furniture—you name it!  Maybe most importantly, they can help you open windows for fresh air more often and be prepared for a power outage in the summer, when open windows (but not dust!) are a necessity.  

ALTERNATIVE INSTALLATION:  Many times the screen frame is broken or missing altogether, or you’re just not sure about doing the traditional install yourself.  Instead, you can use Magnetic Tape to install the screen.  The kit has everything you need to make a nice, flexibly-framed screen that installs easily over your window frame.  (Note that you’ll need to remove the screen to open or close the window, but that’s easy to do.)  The video on the product page gives step by step instructions.

Taking precautions: What to do if your home is spared from a fire, but still smells like smoke

Taking precautions: What to do if your home is spared from a fire, but still smells like smoke

We at HypoAir sincerely hope that you and your family have not been forced out of your home by any of the recent wildfires.  Even if your home is spared from fire, if it is in close proximity, danger from lingering smoke particles is a real concern that you should know about and take precautions against.  You may know that smoke is a combination of ultra-fine particles and gasses, both of which can be toxic.  The gasses may be swept away by “airing out” your home or using activated carbon filters, but the particles settle into dust that can be disturbed anytime you clean or even when the HVAC comes on.  

A study was born in the weeks after the Marshall Fire, which occurred in the Boulder area in December 2021.  It spread very quickly and destroyed more than 1,000 homes and buildings.  Those that were near the flames but not burned, like the home of air quality scientist Christine Wiedinmyer, smelled like “the day after a campfire” and had ash on the door and window sills.  (Study finds potentially harmful chemicals lingered in homes affected by Marshall Fire)  Without testing, she did not know whether it was safe for her (or the neighbors who asked) to return to their homes.  So, she became part of a team of expert scientists who tested four homes in the area (including hers) in order to determine what toxins may have been left behind.  

The scientists collected samples of particles of dust in the air and on surfaces in January and February 2022. Elevated concentrations of potentially harmful materials like polycyclic aromatic hydrocarbons (PAHs) were detected in the dust samples.  PAHs are considered carcinogens by the Environmental Protection Agency, and it’s chemicals like these that deserve extra precautions in the way residents return to and clean their homes.  

When the scientists set up their equipment in the homes, they took dust samples from windowsills and used monitors to track particulate matter in the air, minute-by-minute.  The floating particles of ash produced by the fire seemed to settle out of the air in these houses within a day or two, but the dust that Wiedinmyer had seen on her windowsills lingered. In February, the researchers took measurements as a six-person cleaning crew entered one of the homes to vacuum and mop.  The concentrations of particles in the air nearly doubled during that time. Overnight in the same house, the team saw airborne particles spike about once every 20 minutes—likely due to the home's HVAC system switching on and off.  (Study finds potentially harmful chemicals lingered in homes affected by Marshall Fire

For this reason, the scientists recommend wearing a mask when you’re cleaning up fire damage, because human activity like cleaning resuspends the dust in the air, making it easy to breathe in.  Also, be sure to change your HVAC filter more frequently during the first few months after cleanup, and only use true HEPA vacuum cleaners, so exhaust from the vacuum cleaner will not blow dust back into the air.  Wiedinmyer herself “aired out” the home for a week before re-entering to clean.  During this time and going forward, a standalone HEPA filter would be very useful to filter particles that are missed by the HVAC system (if you have one!).  Our Germ Defenders, Mobile Air Angels and Whole Home Ionizers help to ionize and agglomerate dust, making it easier for the filters to trap it.

Another part of the aftermath of wildfires is dealing with contamination to drinking water systems. According to NPR for northern Colorado, The fire damaged six public drinking water systems, and toxic chemicals leaked into pipes from damaged homes and into hydrants where low water pressure created vacuums that pulled the compounds into the distribution system.  Although the personnel in these districts were not all clear on how and where to test, they were eager to do so when experts who had managed similar disaster response teams educated them.  Andrew Whelton, a professor of civil, environmental and ecological engineering at Purdue University, has taken part in several water disaster recoveries, including the 2017 Tubbs Fire and the 2018 Camp Fire in California, the Joint Base Pearl Harbor-Hickam contamination, and a chemical spill in West Virginia.  In a study he co-authored, he said that although the Marshall Fire response was not perfect, major crisis was averted because authorities did not refuse to test.  (Sadly I think many of us can recall other disasters that did not go so well).

There were a couple reasons that contaminants were introduced into these drinking water systems.  First, when a system loses pressure, toxins like wildfire smoke can get sucked into the distribution system.  Second, overheated plastic pipe can leach benzene and other chemicals for months or even years.  According to Whelton’s research, plastic pipes were primed to leach chemicals by temperatures as low as 392 degrees Fahrenheit; wildfires can exceed 1,400 degrees.  Thirdly, flushing out the system quickly with clean water is important to prevent smoke and chemicals from reaching damaged pipe, which can act as a reservoir for such toxins.

If your home survives a fire in the future, remember that unseen dangers like carcinogens may still linger and you need to take caution with your air and your drinking water.  Although it seems that authorities in the Boulder area were for the most part very proactive for public health during the Marshall Fire response, it’s usually up to individual residents in wildfire-prone areas to have stores of masks, filters and clean drinking water.  We hope you don’t have to go through such a catastrophe, but it certainly doesn’t hurt to be prepared.

UPDATE:  Another professor, Delphine Farmer from Colorado State University, wrote a followup article explaining smoke and VOC behavior in a test house during the Chemical Assessment of Surfaces and Air, or CASA, study in 2022.   She found that VOCs that entered a home are adsorbed into surfaces and while they may temporarily clear by opening doors and windows (“airing out”), they quickly built up again after ventilation stops, and the house would slowly release those VOCs back out over the next hours, days or even months, depending on the type of VOC.  They found that air purifiers can remove only some of the VOCs that are in the air – they can’t clean the VOCs on your floors or in your walls. They also work only when they’re running, and even then, air purifiers don’t work particularly well to reduce VOCs.

The good news is that basic household cleaning–vacuuming, dusting and mopping with a commercial, nonbleach solution–removed most of the VOCs.  This means that while you’re cleaning for particles, VOCs are also removed.  Check out our article on Tackling Dust in Your Home for our recommendations on appliances and cleaning products to get ‘er done, but don’t forget to add the personal protective gear mentioned above, as well!

Photo by Egor Vikhrev on Unsplash

Termite Architecture: A Lesson in Biomimicry

Termite Architecture:  A Lesson in Biomimicry

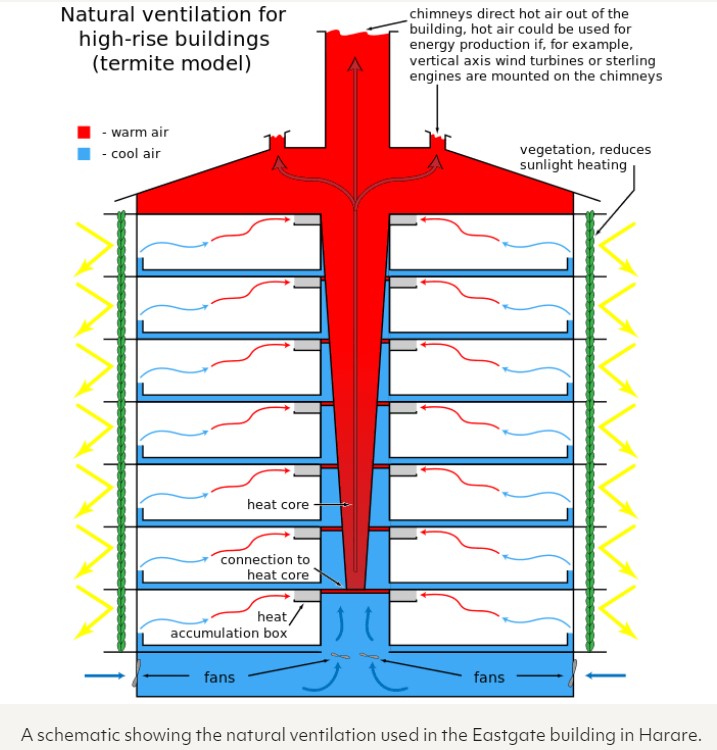
Termites in America are largely unseen, building their unwelcome nests inside walls.  Termites in Africa, on the other hand, are quite noticeable: their earthen nests can extend up to 30 feet off the ground!  (I found out that of the 2,600 species of termites, only about two dozen infest and destroy buildings.  Lucky us.)  Other than size, the amazing thing about these structures is that they stay relatively cool inside compared to the outside environment.  How do termites acclimatize their mounds?  The answer is ventilation.  Although some species make mounds that look completely solid from the outside, these actually have micropores, 99% of which are linked together.  The termites use water, soil and their own saliva to create the wall which allows air and gasses to pass through as a sort of living lung or membrane.  Other species’ mounds have “chimneys” which the termites actively open and plug up as the outside temperature changes in order keep the inside at a constant temperature.  This type of architecture is especially beneficial for the Macrotermitinae termite for keeping the nest at 87 degrees F, in order to successfully farm a certain type of fungus for food.

A year ago I wrote the article Can I avoid mold with JUST ventilation? because for those living in hot, humid climates, maintaining a healthy home almost always requires air conditioning.  I walked through the importance of ventilation and how with adequate ventilation, it’s possible to keep humidity levels low enough to avoid mold in many cases.  After finding out that the Eastgate Center in Harare, Zimbabwe is a huge office and retail building that uses no air conditioning, I had to find out how ventilation alone is sufficient in an urban commercial setting!

Zimbabwe is in the southern hemisphere, where summer temperatures and humidity peak in October through February.  Over the course of the year, the temperature typically varies from 47°F to 82°F and is rarely below 42°F or above 89°F.  (weatherspark.com) Humidity is at or above 60% for 7-8 months of the year, and being approximately 4865 ft (1483m) above sea level, Harare is in a “subtropical highland” category.  

Architect Mick Pearce took on the project, and the prohibition of using air conditioning precipitated some extreme design rules:

They said that no direct sunlight must fall on the external walls at all and the north façade [direction of summer sun] window-to-wall area must not exceed 25%. They asked for a balance between artificial and external light to minimise energy consumption and heat gain. They said all windows must be sealed because of noise pollution and unpredictable wind pressures and temperatures, relying on ducted ventilation. Above all, windows must be light filters, controlling glare, noise and security. (1)

Inspired by a television show, David Attenborough’s BBC Life series showcasing the inside of a termite nest in Nigeria, Mr. Pearce designed a building that looks more traditional than modern, but uses 35% less energy than similarly-sized office buildings nearby.  Because of this, the building can afford a decrease of 20% less rent to tenants.  Building costs were reduced by 10% at the outset by eliminating air conditioning equipment.  The following features are a sample that translate into energy savings:

  • Thick protruding concrete “teeth” expand the surface area on walls, so that heating of the walls is minimized during the day, and cooling is maximized at night. 

  • Windows are recessed to avoid exposure to direct sunlight, and ledges around the windows have vegetation to absorb more heat and beautify it.

  • The Eastgate Centre is more like the chimney mounds, as chimneys at the top of the buildings release hot air from inhabitants inside.  A ventilation space below the habitable floors houses low and high-speed fans to exchange warm, CO2-laden air with fresh, cooler air drawn in near the ground and push it up through the building. 

  • The building stays at a constant 82 degrees F during the day (and 57 degrees at night), daytime temps which would be slightly warm to most Americans, but Zimbabweans are comfortable with it.

Source: Biomimicry & Beyond

Mr. Pearce’s description of the design is fascinating!  He went on to design Council House 2 (also known as CH2) in Melbourne Australia using the same passive cooling design, with a slightly more modern façade.  Biomimicry, the emulation of natural forms and processes for the purpose to solve human design challenges, is not about copying nature–who would want to live in a building that looks like a termite mound?  But emulation of the process uses natural ventilation to save energy while providing the comfort, convenience, and productivity demanded by modern society.  

References:

(1) Atkinson, J., 1995. Emulating the termite. The Zimbabwean Review, 1(3), pp.16-19.

Tree Air Filters are Real!

Tree Air Filters are Real!

Did you know that plants and trees filter PM2.5 and PM10 from the air?

If you’re not familiar with particulates and filtration, let me do a short recap: particulate matter (PM) is a big air pollutant in the form of dust, pollen, and most currently, smoke particles.  PM is measured in microns, or a millionth of a meter, and higher levels of PM floating around in the air are dangerous for our lungs, hearts, and whole bodies, because the smallest particles can pass through your lungs directly into your blood.  PM10 is matter that is 10 microns or smaller in diameter, and PM2.5 is matter that is 2.5 microns or smaller in diameter.  The smaller the particulates, the more dangerous it tends to be for us, because in dry conditions small dust can float in the air for a long time and reach down into the deepest parts of our lungs.

The way trees "filter" dust is one reason why air near trees feels cleaner: they intercept particulate matter, which clings to the surface of the leaves, branches and trunk.  The EPA has recognized this and even created a map of certain cities and their suburbs to show how much particulates are removed by trees per year, in kg or %.  EnviroAtlas is a cool interactive tool which you can use to examine 30 cities in the US and their suburbs, to see where the most (or least) particulates are removed by trees. Other layers available are ozone, nitrogen dioxide, carbon monoxide, and sulfur dioxide.  Other tools available in this map include soil drainage and water supply/runoff/etc.  It’s a huge database at your fingertips!

To use this map, go to this link.  It will offer a tutorial, or you can follow these steps to find PM2.5 and PM10 reduction:

  • Click on the box that says “Selected Communities: Combined Communities”.

  • Select a city you’re interested in and the map will zoom to that area.  Then close the box.

  • Click “Pollutant Reduction: Air” in the left-hand column,  and a sub-menu will appear.  Then select either “Particulate Matter: PM10” and/or “Particulate Matter: PM2.5” and check whether you want to see kg/year or %.  Wait for the map to populate with colors.  

  • Once the area has fully populated in color, you can click on an area of the city and the information about that area will appear in another box.  Use the left or right arrows in the box to scroll through it.  In general, darker blue areas absorb more PM than green or beige areas because they have more trees.

  • That’s it!   You can play around with different “layers” of information and check out some of the other tools, where data exists for the whole US, not just selected cities.

Trees are used in this way to create buffers around reservoirs, to keep dust and leaves from blowing in. (Working Trees for Water Quality)  They also can make up hedgerows around fields to prevent weed seeds from blowing in.  (A Guide to Hedgerows: Plantings That Enhance Biodiversity, Sustainability and Functionality)   They are also used as “shelterbelts” to decrease the speed of wind blowing over dry soil to reduce erosion and even prevent snow drifts.  (Why more 'shelterbelts' could prevent dust storms in the future)

Trees are a well-known asset for cities and residential areas because they help reduce air pollution, absorb excess rainwater, reduce erosion and even remediate soil to an extent.  Check out our articles “From the Outside In: How to cultivate a healthy yard that will benefit your indoor air!” and “Surround yourself with trees, and your heart will thank you for it!” to find out how to benefit most from trees in your community, whether you are looking for a place to live or have the opportunity to plant some.  In addition, https://www.itreetools.org/ has free tools with free online office hours that will help you find the right trees for your yard or community space.

Keeping Your Vacation Home Fresh

Keeping Your Vacation Home Fresh

It doesn’t matter whether your “vacation home” is a pull-behind trailer, or a luxurious condo, or a humble cabin in the mountains:  when you “get away” to a relaxing place, you don’t want to spend your precious vacation time trying to figure out how to get musty smells out or remove mold from the linens because the climate inside suffered while you were away.  Here are our tips to make it welcoming and low-maintenance!

First of all, humidity is the most important factor you’ll want to control in order to keep out mold, and you’ll want to keep the humidity under 60% all the time.  If the outside climate humidity rises over 60%, that climate will come inside and settle into soft surfaces, making them a perfect habitat for mold growth. You can only control humidity inside effectively by having a tight envelope, which means sealing up passages where outside air can penetrate in.  If no one will be living there while you’re away, you won’t need fresh-air ventilation, so make your get-away home as tight as possible by sealing windows, doors, attic doors, and other penetrations.  

Also, remember that relative humidity and temperature are closely linked.  For example, if you leave an air conditioner set on 82 degrees and the humidity rises to 80%, you may be at risk of mold forming in less than 2 weeks!  (If you’re wondering how that calculation came to be, check out this fun dew point calculator.)  In addition, relative humidity in a space will increase as temperature is lowered.   Air conditioning will naturally take some of the humidity out of the air, but there are a number of factors that can allow humidity to remain high even when your air conditioner is on. 

Here are some options to keep the humidity under control while you’re not there:

  • If you have wi-fi available in your vacation home, now’s the time to take advantage of technology that can pair with existing units like mini-splits, window or portable air conditioners to enable you to monitor climate and control them remotely.  Cielo is a company that has a number of products that can help you maintain the right humidity and temperature remotely. 

  • Alternatively, if you do not have wifi or app-enabled monitoring, you’ll need to choose a temperature for setting your air conditioner.  Although it’s tempting to set the temperature just under the temperature of melting plastic (haha) to conserve energy, don’t do it!  Setting the thermostat as high as 85 degrees can cause short run times and not allow the air conditioner to remove enough humidity from the air, creating an atmosphere for mold growth.  (No, You Shouldn’t Set Your Thermostat to 85F.  Here’s Why.)  For that reason, it’s ok to set it 7-10 degrees above the temperature you normally keep it while you’re staying there IF you also take into account the outdoor temperature and humidity.  There’s no magic formula for determining this ideal energy-saving-yet-mold-preventing temperature setting, but think about it: if your vacation space is in a hot, humid climate like the southeast US, you’ll want to set the maximum indoor temperature lower than the average outdoor temperature to make the air conditioning come on often enough to remove humidity.  

  • Thirdly, if you don’t have a humidity control setting on your air conditioner, or even an air conditioner at all, it’s best to purchase a dehumidifier with a humidistat and set it to 60% maximum humidity.  This will ensure that humidity is being controlled, no matter what temperature the interior rises to!  Think of this dehumidifier as insurance against mold: if your air conditioner was to stop working, the dehumidifier can still keep your space mold-free if it’s suitably sized for your space.  Check out our article on different types and sizes of dehumidifiers, and be sure to set up a portable dehumidifier with a drain into a lower tub or sink that condensate can safely drain all the time.

  • Leave doors to rooms and closets open for best air circulation.  Just like air purifiers, portable dehumidifiers cannot reach behind closed doors.  

  • Use ceiling fans in rooms and portable fans elsewhere to keep air circulating while you’re away, which will reduce the water content in all your furnishings by evaporation.  ““Evaporation increases the humidity of the atmosphere that immediately surrounds the liquid. This humid air takes some time to dissipate into the rest of the atmosphere. The presence of a breeze, a powerful wind, or some other form of air circulation can speed up this process and make the environment of the liquid less humid. Therefore, by decreasing the humidity of the liquid’s surrounding, a powerful breeze or wind can increase the rate at which the liquid evaporates.” (Factors Affecting the Rate of Evaporation)  This is why disaster restoration companies use powerful fans to move air over wet surfaces, increasing evaporation and removal of water.  With less water in your furnishings, the chance of mold growth is reduced.   You can even add air circulation to any space that has a light socket, such as closets and pantries, by removing the light bulb and screwing in a light socket fan (which come in different designs with exposed or enclosed blades).

  • Make sure your air conditioning and dehumidifier drains are clear and a clean air filter is in place before you leave!  Many homeowners have come on vacation to find their air conditioner or dehumidifier drain pan overflowing and dripping onto ceilings, floors, and other inconvenient places–what a mess that can also turn into hazardous mold!  As a homeowner, make sure to check these drains and change the filter several times during the air conditioning season, or arrange for someone to do the same while you’re away. 

  • Window air conditioners need deep-cleaning sometimes.  If a musty smell is coming from the air conditioner when the fan cycles on, then you’ll know that dust has infiltrated the cooling coils, absorbed moisture, and is nourishing mold growth.  Check our article on how to deep clean it and restore the fresh smell.

  • If you can, shut off water at the main valve to avoid any possible leaks, and switch off the breaker to the hot water heater if it’s electric (turn off gas if it’s gas).  This will avoid water leaks under sinks, which can make a nasty moldy mess!  If you don’t do this, at the very least shut off water to the washing machine, because burst water hoses at the washer are the single largest cause of home flooding.  (Leaving the House for 3 Days or 3 Months? 5 Must-Dos Before Your Trip)

  • Bipolar ionization units like our Germ Defenders, Mobile Air Angels and Whole Home Ionizers are a great way to keep mold away too.  At the very least, plugging a Germ Defender into the bathroom will send out ions to kill mold spores in this small space where air circulation can be a challenge.

  • Leaving a portable HEPA filter with activated carbon running is not a bad idea, either.  Activated carbon will help avoid that “musty” smell.  According to firesafeliving.com,  “plug-in” scent devices are not a fire hazard if you leave them plugged in while you’re away, but we at HypoAir don’t recommend them because a) many plug-ins use toxic chemicals like phthalates and formaldehyde, and b) the freshener will dry out before you return anyway, leaving an appliance running on your wall.  What’s better: make your own reed diffusers with your favorite essential oil (or combination of oils) and place them throughout your space for a safe, no-mess fresh scent!

These extra steps may seem to take more time on those days you’re packing up to leave your vacation home, but when you come back to a home that is ready for relaxing as soon as you open the doors and windows, it will be worth it!

Photo by Lavi Perchik on Unsplash