Category Archives for "Natural Home"

A Clean-Air Kitchen Checklist

A Clean-Air Kitchen Checklist

It’s clear from the amount of money and size of kitchens nowadays that the kitchen is where people spend a lot of time.  Big islands, comfortable chairs and features like coffee bars and wine coolers make it easy to stay and chat while the host cooks up a delicious meal.  The problem is that some things get overlooked in kitchen design and maintenance, so that hidden appliances may be making your air dirtier than your guests would expect! 

Kitchen exhaust vent

We’ve previously posted about how cooking and baking can raise fine particulates and VOCs in your kitchen to levels of a polluted city.  The best defense against spreading them to the rest of the home and breathing them in is to use your kitchen exhaust vent.  The problem is that the exhaust vent filter is often overlooked, and a clogged filter strains the vent motor and can throw particles right back into your kitchen.  Here’s where it’s important to a) check whether your vent is recirculating or exhausting to the outside, and b) clean the filter!

When I first learned about combination microwave/vent hoods, I thought, these are space-saving genius.  Being a moderately tall person, I could easily lift items in and out of the microwave, the unit was not taking up any counter space, and it doubled as a stove vent hood.  However, the more I used the one in my current home, the more disappointed I was with it.  Here are the problems with most microwave/vent hood combos:

  • The ventilation can exhaust directly back into the kitchen.  That’s right, those little grilles above the microwave door are the exit point of the exhaust fumes, which don’t get a lot of filtering before they come straight back into the kitchen.  The other option is to exhaust outside, which is far better.
  • Microwave/vent hood combos typically do not provide the cubic feet per minute (cfm) ventilation that a standard size kitchen requires, and what little you get can be further reduced if there is more than one turn in the ductwork above the unit to the outdoors.  
  • Although it’s a common situation, placing the microwave on a countertop is not a great installation either, because cooking gasses generated in the microwave are vented directly into the kitchen with no filter. 

Here’s what we recommend to get the cleanest air while you cook:

  1. If you have a combination microwave/vent hood, check two things:
    1. Does the vent hood provide the correct cfm for your kitchen?  Here is an article to help you calculate whether it’s sufficient for your kitchen.  If you don’t know the cfm of your unit, type the model number into an internet search.  If your unit does not have the necessary throughput, consider placing the microwave elsewhere and getting a more powerful standalone vent hood.  In this case proceed to #2.
    2. If the cfm is sufficient, does the microwave/vent hood exhaust back into the kitchen?  Place a microwaveable container in the microwave with some water and start to heat it.  Place your hand over the grille above the door and see if you can feel a stream of air moving into the room.  
      1. If so, then the exhaust is probably set to exhaust into the kitchen.  If you own your home and you want to change it to exhaust outside, it’s possible to take the microwave down from the wall and change the exhaust configuration.  Here’s a short video on how to rotate the blower fan of the microwave, which will change the exhaust port configuration.  This change necessitates installing a duct above the microwave and vent port outside, however.  For the venting, check this video
      2. If you are renting or otherwise can’t change the configuration of your microwave/vent hood exhaust to outside, then do your best to clean the filter on a regular basis so that cooking particulates can be trapped before they’re blown back into the room.
  2. Congratulations if you are upgrading to a standalone vent hood (our choice for the best kitchen atmosphere)!  Here are some tips to split up the microwave and vent hood and make each perform well.
    1. If budget is not a constraint, vent hoods now come in a “balanced” option, which means they not only suck fumes from your kitchen, but these are replaced with fresh air from outside.  Check out this smoke test on such a unit. 
    2. For normal budgets, good kitchen vent hoods can be purchased between $200-500 (here is a great review on the newest models, but be sure to pick one that vents externally!)  In addition to capacity, it’s also wise to get the quietest fan you can afford so that you won’t be annoyed with the sound.
    3. Now, where shall we place the microwave?  Most kitchen design professionals are happy to place it anywhere in the kitchen except the countertop, but then venting it back into the room is still polluting your indoor air.  Besides the moisture emitted from cooking steamy foods like rice or potatoes, some foods emit a lot of ultra-fine particles (UFPs).  Popcorn is one of these; in this study it was discovered that UFPs and PM2.5 generated by microwaving popcorn were 150-560 and 350-800 times higher than the emissions from microwaving water, respectively. About 90% of the total particles emitted were in the ultrafine size range.  To avoid releasing these harmful particles into your kitchen, here are the best scenarios for venting the microwave.
      1. Install it in cabinetry with a dedicated vent to the outdoors.  No questions about getting the vapors out in this case!
      2. Install it in a lower cabinet space next to the stove.  That way, steam and UFPs exhausting from the top of the unit can be drawn up and out by the range hood. “Drawer” microwaves are becoming more popular now (see photo below). 
      3. (Least effective, but still possible) Set the microwave on the counter next to the range hood but 2 feet away from it, for heat safety concerns. 

The last two options require manually turning on the range hood every time you use the microwave, but if you have a nice quiet vent hood, this shouldn’t be a problem.  

Microwave Drawer installed next to the oven/stove (source: Home Depot)

Refrigerator coils

It’s pretty obvious when the refrigerator needs cleaning: food spills inside and dirty fingerprints outside get the most attention.  However, the most important part (the working “guts” of the fridge) is easy to overlook, except for some dust gathering on the toe kick grill.  On most newer models, the cooling coils are hidden under the fridge, and all kinds of dust (especially if you have a shedding pet) will gather there and clog up the vital cooling parts. The coils should be cleaned every six months to one year to keep the fridge working properly, and keep the accumulated dust out of your air. Here’s how to clean it without a lot of hassle (realtor.com):

  • If the coils are not exposed at the back of the unit, then remove the toe kick panel in the bottom front to expose them.
  • Use a vacuum cleaner with HEPA filter (you don’t want to blow that dust back into the air) to vacuum off as much dust as you can reach.
  • Use a coil cleaning brush to get between the rows of coils, keeping your running vacuum nearby to suck up dislodged dust. 
  • Clean off the front grille with the vacuum and soap and water if necessary, and reinstall it.

The Dishwasher

Ahh, the dishwasher–what a super-convenient place to hide dirty dishes.  My cousin (an engineer) always joked that in his new house, he’s going to install 2-3 dishwashers and no cabinets.  Why?  Dishwashers are way cheaper than cabinets and no one likes to unload the dishwasher.  When you can have 1 “clean” and 1 “dirty” dishwasher at all times, you can take clean dishes from the clean one, use them and place them in the dirty one, and theoretically no cabinets are needed!  Somehow, I think his wife will have a problem with no cabinets…

Back on topic, dishwashers are appliances that use steaming hot water and caustic detergent, but are not vented to the outside.  Where does all that steam and vaporized detergent go?  Into your kitchen air, of course!  Hayward Score is a company which identifies the major issues in your home that can impact your health and gives you free personalized actionable recommendations to fix them.  They performed a study on how bad dishwashers are for your indoor air quality, and found out that it was really the “heat and dry” cycles, not the soap, that caused air quality problems.  They placed an air quality monitor in the room adjacent to the kitchen and ran the dishwasher three times:

  • Dishwasher run with standard soap, heat and dry cycle on = Air Quality: RED ZONE (bad)
  • Dishwasher run with no soap, heat and dry cycle on = Air Quality: RED ZONE (bad)
  • Dishwasher run with standard soap, heat and dry cycle off = Air Quality: BLUE ZONE (good)

Based on these results, the soap was not causing elevated levels of VOCs but high temperature combined with chlorinated water was.

When your home is supplied by city or community water, these systems typically use a lot of chlorine to keep bacteria out.  I mean, A LOT–often you can turn on the tap and it will smell like a swimming pool coming out of your faucet.  Heat and dry cycles can reach temperatures of 160 deg F or more, which when contacting chlorinated water, produces chloroform.  The chloroform can drift through your home farther than the steam does, hence the bad air quality readings taken in the next room. 

The solution to good air quality while running your dishwasher?  If your tap water is sufficiently hot to sterilize (above 120 deg F), then don’t use the heat and dry cycle settings.  Also, run your kitchen exhaust vent during and 30 minutes after the dishwasher cycle, to move steam and any other gasses outdoors.  If your tap water is below 120 deg F, then it’s a good idea to use the heat cycles to make sure everything is sanitized, but make sure to run the kitchen exhaust vent simultaneously.

Toasters, Crock Pots, Air-Fryers, Electric Skillets and all their cousins

We have a lot of miscellaneous appliances hidden in the cabinets or sitting on the countertops, which can put a lot of fine particulates and VOCs into the air when using them.  Toasters are one of the worst offenders, and start emitting toxic fumes from the moment you turn them on (University of Texas at Austin study), because they are heating up the leftover bits from previous foods, including oils.  Toasting two slices of bread caused twice as much air pollution as is seen in London for 15 to 20 minutes – meaning three times the World Health Organization’s safety limit. (dailymail.co.uk)  The solution?  Set them as close as possible to your range (2 feet away is safe if you are using the range also) and fire up that kitchen exhaust fan.  Heck, chopping your onions next to the kitchen exhaust fan can even whisk away the chemical irritant that they release to make you cry (syn-Propanethial-S-oxide).

With a good exhaust fan and little cleaning you can spend as much time as you like in your kitchen without worrying about what’s floating around in the air! 

Photo by Jimmy Dean on Unsplash

The Not-So-Silent Killer: Roads and Highways

The Not-So-Silent Killer: Roads and Highways

Even with the shift towards the ability to work from home, some jobs require proximity to cities, which cause people to live in places adverse to their health.  In a recently published study from the University of Leicester in the UK, researchers identified that road noise, such as the rumble of engines, honking and braking, causes hypertension (increase in blood pressure).  The study reviewed the status of 240,000 people over 8 years and looked at the correlation between the noise of where they lived (using addresses and computer modeling tools) and their blood pressure.  It also adjusted for air pollution, because we know that fine particulates and nitrogen dioxide can also have effects on blood pressure.  It turns out that plain old traffic noise was enough to cause an increase in hypertension, even though those who are also exposed to more air pollution had the highest risk.  

Ok, so what do you do if your housing choices put you squarely in traffic central?  

Consider where the noise comes in the most, and try one or more solutions for that area, which may be enough to dampen most of the sound coming in.

Windows on an outside wall facing a busy street will certainly be the source of most of the noise, and there are several ways to block out most of it.  Single pane windows are very noise-transmissive, and double pane are a bit better, but each of them can be improved significantly with custom window inserts like those offered by Indow.  If you are a renter or don’t own your house, replacement windows are likely out of the picture, and more expensive than these inserts.  The company can provide a laser measuring system if you’re unsure about the squareness of your windows (for older homes), and once fabricated, Indows can easily be installed by one person (or two people for a large window).  The compression fit keeps them snugly in place to block sound.  

If you are not inclined to pay for window inserts, you can make your own foam board inserts to sleep soundly at night when the window’s not needed!  Just pick up a large sheet of foam board and measure and cut it carefully to the exact measurements of your window casing, attaching handles/pulls to the top and bottom of the inserts to help you install or remove them.  They can be stored in a closet, or behind long drapes during the day when they are not needed.

If you don’t want the expense of window inserts, acoustic caulk may help.  You’ll want to remove the existing caulk and replace it with the acoustic caulk.  It’s not a quick job, but if your windows are older and haven’t been caulked in a while, it will also provide needed thermal sealing too.

Thick, heavy curtains like these are much easier to install than caulk, come in a variety of colors, and are specifically made to block noise.  

Plants need light, so placing them near a window will benefit them and you–they can also absorb noise!  Plants with thick foliage and fleshy leaves are the best at absorbing and deflecting it.  This article lists a  number of plants in different styles and heights that can be placed on the floor, on stands or hung from the ceiling to deaden sound.  As a plus, some plants also absorb VOCs that can seep in around the windows from the vehicles outside.  Areca palms, rubber plants, Dracaena (Janet Craig variety), ferns and  peace lilies are common to both of these lists!

A few more Tips for Dealing with Noise from the Street can help for walls that face the street:

  • Bookcases with lots of books

  • Portable closets like armoires

  • Hang a thick tapestry or quilt as a statement piece on the wall

  • Hang large or small art canvases with the backs filled with foam board

And finally, all the other places that sound can enter and bounce around your space:

  • Add thick, cushy rugs (if you have the ability to keep them clean, of course!)

  • Install door sweeps/seals (many are easy to install with adhesive or slip-on type)

  • Add a thick curtain with retractable rod if you have an entrance hall that emits noise

  • If you like music or audio books, try listening to them with sound-canceling headphones to have a studio-feel while relaxing, working out, cleaning or just walking around.

For tips to get a more restful night’s sleep, check out our post on Maximizing Your Sleep.   We want you to have the healthiest home possible, so whatever you can do to reduce outside noise in your space will be worth it, for your heart and for your mind!

Photo by Josh Eckstein on Unsplash

Truly Natural Air Purifiers

Truly Natural Air Purifiers

As homeowners realize the extent of air pollution inside the home, they value making or buying air purifiers all the more.  Many purifiers require expensive manufactured filters to be purchased and changed out on a regular basis.  They can certainly do the job but our ears always perk up when something using natural materials comes along!  It’s fun to research how outdoor air is purified by plants and microbes and natural materials.   Here are some of these “new” products that use ancient natural processes.

FIrst, we’ll talk about ones you can actually buy.  

Unless you live with open windows next to a pond with a lot of green stuff on the top, you’d never experience the benefits of using algae as an air purifier.  Or, you could buy an Algae Air Purifier, which cultivates the algae in a low-maintenance tube anywhere in your home.  Algae naturally feed on pollutant particles and gasses like CO2, CO, NO2, VOC`s, PM 10 and 2.5 and transform them into oxygen, turning a problem into a solution. Their ability to absorb and remove the carbon dioxide in the air is 10 times higher than large trees as their whole bodies are photosynthetic. (Can Algae Purify Air?)  AlgenAir looks like a cool modern lava lamp, which has a light, bubbles and soothing white noise.  Algae does have a life cycle of 4-8 weeks, which at the end does not have to be dumped out on the ground.  Since it’s a natural fertilizer, the algae can be poured onto your other houseplants to be used as food.  The Aerium 3.0 comes with the container, one spirulina starter kit and sterile hydrophobic filter.  The subscription plan will reship spirulina every 30, 45 or 60 days for $24.75 for each refill.  

We wrote about the power of moss to purify air previously, but Briiv is a new product that brings it indoors.  It’s a compact filter about the size of a hot water kettle, that looks like a little terrarium on your counter.  How could this green filter possibly last for a whole year?  Yet, it does.  The company claims that it’s as powerful at 3,043 medium-size houseplants, and on its maximum fan setting it delivers 53 cubic feet per minute of purified air. This equates to a CADR of 90 cubic meters per hour.  Reviewers felt more refreshed after sleeping with the Briiv running in their closed bedroom, and enjoyed the fresh outdoor scent.  Since reindeer moss grows at high latitudes and altitudes, it is certainly an uncommon houseplant!  The price of $356 sets you up with one filter which lasts one year, and multiple filters are needed for larger spaces/more rooms.  The replacement filters (moss, coconut and nano matrix) are $38 for one set.  It’s a luxury filter that imparts the scent and look of the outdoors anywhere you place it.

“Biofiltration” could describe the way the algae and moss clean the air, and in a new adaptation,  is also the method of passing air through a thin film containing immobilized bacteria and fungi.  Researchers in Chile focused on reducing volatile organic compounds (VOCs) from building materials and paint, and polycyclic aromatic hydrocarbons (PAHs) from wood-burning.  Current air purifiers typically use activated charcoal to adsorb these pollutants, but the capacity of the charcoal will get “used up” and require disposal at some point. Instead, they found that by using the fungus Fusarium solani and the bacterium Rhodococcus erythropolis, the pollutants could be completely degraded, and the  “filter” did not degrade in performance even after eight months of continuous use. Furthermore, other microbes were captured from the air, demonstrating the potential of the prototype for retaining airborne bacteria and fungi.  (Fresh research for fresh air: Harnessing microbes for removing indoor pollutants)

It is a bit costly to use these “natural” filters in your home; we’re hoping the last one using bacteria and fungi retails for less when it’s finally commercialized!  However, by harnessing the power of 25-3000 houseplants in 1 filter, they are definitely easier than maintaining a forest of indoor plants.  I like the idea of smelling fresh outdoor scents, so I think the Briiv would be my choice.  The compostable filter elements in each device are particularly attractive, and on a replacement-filter basis really are not so expensive after all when compared to many air purifiers which cannot remove VOCs or CO2.  Bravo for the natural versions, we definitely want to see more of these!

Photo by Kent Pilcher on Unsplash

How to reduce annoying Static Electricity (and distinguish it from real electricity)

How to reduce annoying Static Electricity (and distinguish it from real electricity)

Static electricity is just plain rude!  Although it can seem like someone has electrified your doorknob to play a trick on you, most likely your own body is just ridding itself of built-up static electricity.

Why and how does one accumulate that much electricity, anyway?

This topic warrants a small science lesson, so bear with us! As you walk around your house, friction will cause electrons to transfer between surfaces.  Friction on floors (especially carpet), friction between your clothing, and friction between your clothing and body will all cause transfer of electrons, usually resulting in you becoming positively charged (we tend to lose electrons).  Any kind of imbalance in electrons between two objects is basically voltage potential, so the potential continues to build until you touch something that is grounded (a metal appliance, doorknob, or another person) and BAM!  The potential dissipates immediately in the form of a spark or shock.  This means that the missing electrons are suddenly transferred back to you in a moment’s time.  Static electricity shocks are on the average 3000 volts–but very little “amps”, so although they don’t feel good, they usually do not harm you.

You may notice that static shocks in the wintertime occur more frequently or with more power.  What’s up with that?  It’s due to dry winter air.  Warmer air has more capacity to hold water vapor, which when it touches our skin can transfer electrons painlessly so voltage potential never builds up.  However, cold air has less capacity to hold water vapor, so it tends to be dry and more insulating.  That is not good for our sinuses and skin, as well as the nasty static shocks.  

If you’re concerned that it’s not actually static that is causing the shock, there are ways to tell the difference between static and real electricity.  First of all, does the object that shocked you do so every time you touch it?  Static is not constant, meaning that once the shock occurs, it takes some friction to build up the voltage potential again.  Touching the same doorknob a few seconds after a shock usually does not elicit another shock, indicating that it’s static.  Electricity, on the other hand, will cause your hand to “tingle” again every time you touch it (so don’t do this repeatedly until you can find the power source and shut it off!)  The “tingle” is actually the alternating current that powers all the appliances in the house, and it feels different from static.  You can also use a voltmeter to measure the potential between the "ground" of an electrical socket (the little round hole at the bottom of each outlet) and the doorknob. If it's real electricity, you should see about 120 volts (using the 200VAC setting) constantly (although an intermittent ground may flicker up and down). It’s not possible to measure static electricity using an ordinary voltmeter.Here are some weird and dangerous ways that real electricity can make its way to your doorknob or other metal:

  • One person found that the extension cord running under his door (which is a no-no anyway) had gotten a nick in the insulation from the door rubbing on it.  He unplugged it and there were no further shocks.
  • When doors are installed, normally there's at least one longer screw in each hinge in order to get more holding power into the door frame.  There's a chance the screw could have run into a wire, either behind the trim or in the wall (sometimes people hide wires behind trim instead of properly routing them inside the wall)
  • If there's a moisture problem in the wall, any fault in the wiring can be transmitted a longer distance to the doorknob.

Faulty wiring in the wall of a house is a serious safety issue, and even more so faulty wiring or ground problems in an RV or travel trailer.  Because these homes on wheels are insulated by rubber tires, the major way of grounding them is through the ground prong of the electrical cable.  If there is a break in the ground system and hot wires touch the frame, the potential of electrocution is very real.  In a word, if you suspect your RV has faulty wiring or ground problems, disconnect it from power and ask a knowledgeable person or electrician to examine it as soon as possible!

So, getting back to our static problem, how can you reduce the frequency and severity of these shocks?  Here are the easiest ways:

  • Check the humidity in your home and if it’s less than 50%, try adding a humidifier.  Even a kettle of water on an electric hotplate set on low (make sure to check frequently that it has plenty of water and turn it off when you leave the room) can help to alleviate static, as well as sooth your respiratory system and skin.  Adding a cinnamon stick or a few fresh herbs can add a light, pleasant scent, too!
  • Using bipolar ionizers like the Germ Defender, Upgraded Air Angel Mobile or Whole Home Polar Ionizer in your home eliminates static buildup.  Did you know that these use the same type of technology used in electronics cleanrooms to eliminate static charge?  The ions float throughout rooms in your home and help to equalize the charge wherever they touch a solid surface.  
  • Wear more natural fibers (but not silk or wool), as fibers like cotton and linen tend to build up less static charge than synthetic fibers like nylon or polyester.  Silk and wool, while they are natural, do build up static charge because they tend to insulate better than they conduct electricity.
  • Go barefoot when you can.  The practice of grounding or earthing not only avoids static shocks but also provides evidence of other health benefits.  
  • Synthetic hairbrush bristles may generate more friction and static than natural bristles such as boar’s bristles, so you may opt to change your brush.
  • Moisturize your skin and hair with lotions or conditioners to help “conduct” charges into the air.
  • Touch metal surfaces such as doorknobs with another metal first, like a key, so that the charge is not sent directly into your fingers. 

Winter doesn’t have to be so SHOCKING…now that you know where all this extra energy comes from!

Photo by Ilona Panych on Unsplash

How PCM works to keep your home cooler–and warmer

How PCM works to keep your home cooler–and warmer

We are always eager to hear about advances in technology that the average homeowner can use to live healthier lives with less expense or energy.  Lots of new materials are being engineered that use the ambient air or temperature to reduce heating or air conditioning costs.  Phase Change Materials (PCM) are not new, in fact water is one of them!  PCM describes the way that the material absorbs or gives off heat while changing phase (from ice to water or vice-versa) but does not change temperature during the phase change.  Water doesn’t give much advantage in home insulation, however, because the phase change happens at 32 degrees F or 212 degrees F, which are outside of our comfort zone in the home!  However, there are other materials being used that fall in the perfect range for keeping our homes cool or warm.

Phase change material is like a heat battery.  In warmer climates, solar heat starts to warm the roof and wall areas early in the day, but with PCM installed, the heat is absorbed in the material while the material temperature remains constant.  It continues to “melt” inside the pouches as heat is applied, and only increases in temperature after absorbing a lot of heat.  In the evening, PCM gives off the heat back into the attic or wall space, which radiates toward the outside.  In cooler climates, PCM forms a barrier to keep heat from escaping your warm home in the same way.  This is different from traditional insulation such as fiberglass, rockwool or sprayfoam, which all “resist” passage of heat over time, meaning they constantly allow some heat to pass through by conduction, convection, and radiation.  PCM insulation is not meant to replace traditional insulation, but it is a great supplement to it.

There are several companies that manufacture PCM insulation using a soybean/palm oil blends. QE Platinum is a Dallas, Texas-based company, and Phase Change Solutions is based in North Carolina.  The oils are contained in pouched sheets that are flexible.  They can be installed behind drywall (vertically, horizontally or at any angle), above ceiling tiles, or simply laid over existing batt or blown-in insulation in the attic.  The great benefits about this type of insulation are that it is 

  • Non-toxic 

  • Green, sustainable material

  • Moisture, humidity and mold-resistant

  • Self-healing (any punctures cause the material to harden and seal in remaining material

  • Long-lasting (30-year warranty) and guaranteed energy reduction

  • Class A fire rating

  • QE Platinum is also a radiant barrier

  • Has the same thermal mass as a 12” concrete wall!  QE Platinum absorbs and stores up to 100 BTUs per square foot.

  • The company can tailor the melting/solidification range of the PCM to your climate (customized!)

There are two great videos reviewing it.  This reviewer is based in San Diego; he is renovating his older home to get to net zero and is planning to install it in walls and attic.  This reviewer is based in Texas.  Both videos go into the science of PCM and why this product is a game-changer for homeowners and business owners wanting to make their spaces more energy-efficient and comfortable.  We love that it’s non-toxic and easy to install–even for DIYers.  At $2.50-3.50 per square foot, it’s expensive but not ridiculous, and the companies may be able to reduce the cost even more as production increases.  

As great as this material sounds, however, it’s not for every home.  In order for it to be cost-effective, you need to live in an area that has significant daily temperature swings, like 20 to 30 degrees between daily and nightly temperatures.  This allows the PCM to full change phase and be ready for the next day’s cycle.

Another PCM has incredible capacity, but it’s not quite ready for the residential market.  Fraunhofer’s zeolite are small pellets that can be heated, which extracts all their moisture and in the process creates and stores heat.  They can then store that heat for indefinite periods of time.  The amazing things about this zeolite is that due to the huge internal surface area, the pellets store more than 4 times the heat of water (which is has one of the highest heat capacities of any substance), the heat storage is indefinite until water is added, heat losses are very minimal over time, and the zeolite does not change temperature, making it a true PCM.  In the energetic state, zeolites are therefore completely dry; conversely, when water vapor is passed through the pellets, heat is released. The advantage of this is that the energy is not stored in the form of increased heat but in the form of a chemical state. This means that heat is not lost during long-term storage. There is one drawback: Zeolites have poor thermal conductivity, which makes transferring the heat from the heat exchanger to the material and back difficult.  The engineers have finally solved the heat transfer problem by coating the pellets with aluminum.  Amazingly, the aluminum did not impact the ability to adsorb/desorb water, but it enhanced heat transfer. (Thermal Storage for the Energy Transition)  Can you imagine, instead of receiving a heating oil delivery, receiving a delivery of pellets that are already charged with energy, but not hot?  Or using the summer heat in your attic to recharge a bank of pellets for use in the cold winter heating system?  This is incredible technology!

So, homeowners, keep dreaming and scheming to keep energy costs down and comfort levels up.  Science can sometimes satisfy our wish-lists, and when it does, do your research and ask lots of questions to make sure it’s effective and non-toxic.  PCM insulation seems to be a good fit for many smart, green buildings, with no internet connection required.

Photo by Erik Mclean on Unsplash

What to do when you find yourself in an air quality emergency

What to do when you find yourself in an air quality emergency

We’ve all been on the other side of the highway when an accident snarls traffic for miles behind it, and our lanes of traffic slow down but continue to move.  Whew, glad I wasn’t on that side, we think…but sadly sometimes we may find ourselves stuck in an air quality emergency that requires calm, decisive action to quickly get to safe air.  

On Wednesday, November 8, 2023, a fire at a small chemical plant north of Houston sent plumes of black smoke into the air.   According to the Reuters report on November 9, Sound Resource Solutions blends, packages and distributes oilfield and other industrial chemicals including sulfuric acid, acetone and petrochemicals like xylene and toluene, according to the company's website.  These are chemicals that are acutely toxic with the potential to cause serious eye, skin and organ damage, as well as carcinogenic. 

A news article from a Houston news station released the list of chemicals that had been stored on the site during the last 2 years, which confirmed they are quite toxic.  

However, despite the smoke and shelter-in-place orders (which have been lifted), it seems that officials are downplaying the possible effects.

  • According to a Houston news channel video the day after the fire was extinguished (Nov. 9), the Texas Commision on Environmental Quality was monitoring the air and “did not detect any levels of concern from the samples”.  

  • In the same video, an official from the University of Houston said that rain would wash any chemicals out of the air, dilute them out and they eventually go into the ocean.  

Here are the problems we see with these assessments: black smoke was seen moving north toward Livingston, Texas.  Such smoke carries a lot of particulates, which will deposit on businesses and residents’ homes, vehicles and farms (food sources), as well as drinking water facilities.  Also, by our estimates, Shepherd, Texas is 50-60 miles from Trinity Bay, which is open to the Gulf of Mexico.  In order to get to the ocean (Gulf of Mexico), the particulates and chemicals will pass through many drinking water sources!  Once again, it’s probable that authorities are not releasing timely information about hazardous levels of chemicals in the air (and no water reports were discussed).

If you find yourself in an emergency area like Shepherd, Texas, it’s best to do one of two things: stay inside and implement air quality containment measures, or drive out of the area as soon as possible.  Here are our recommendations:

If you choose to stay inside:

  • Close all windows and turn off air conditioning and heating systems if possible.

  • Although most HVAC systems don’t have fresh air intakes, you should close these intakes if they do.  

  • Don’t use exhaust fans like the kitchen or bathroom exhaust fans.  Don’t use clothes dryers, either!  Each of these pull air out of the house, which consequently draws air into the home through cracks in windows and other penetrations.

  • If you have air purifiers, run them continuously.  If you have only one purifier, run it in one small room where you can shelter for most of your time.  If you don’t have an air purifier, here's how to make one using a box fan and a MERV-rated filter.

  • Don’t cook if possible; try eating canned food or food that doesn’t require cooking or heating.  The reason is that cooking and heating food releases even more VOCs into the air, and you shouldn’t vent these with the exhaust fan.

  • Monitor AirNow.gov for local air quality updates, because the air quality outside your home will eventually be the air quality in your home.  If air quality outside deteriorates, you may want to gather supplies and necessities and evacuate via car.

  • Use bottled (preferable) or home-filtered water until you are sure that tap water has not been contaminated (which may be weeks or months).

If you evacuate:

  • Make sure that the HVAC in your home is turned off and all windows/doors are closed before you leave.  You can leave air purifiers running in your home, however.

  • Make sure you use the best masks you have until you get out of the area.  Exchange your mask for a new one if you start to have trouble breathing. 

  • Spend as little time outside as possible. 

  • When driving, keep your air conditioner set to “recirculation” mode until you get out of the danger area.

  • Bring/buy bottled water. 

  • Monitor AirNow.gov for local air quality updates and check updates by local news authorities. 

  • Upon returning home, clean carefully and thoroughly!  We have recommendations in our article here.

Note that smoke particles, which can contain toxic chemicals, will deposit on the ground, making it easy for people and pets to bring them into the house, so you may want to be vigilant about removing shoes and cleaning pets’ paws when you can.

Many people live or drive within range of being affected by toxic spills, fires and environmental disasters, so your best bet is being prepared (and have a healthy skepticism of all-clear reports until you can research the situation).

Photo by irfan hakim on Unsplash

Air quality in the Operating Room

Air quality in the Operating Room

If you are in the position to have elective surgery, you probably assume that the hospital does its best to mitigate infections by maintaining a sterile environment and using sterile procedures.  The Operating Room (OR) is where patients are at their most vulnerable because hospital-acquired infections (HAIs) can easily happen when the skin barrier is broken, resulting in a Surgical Site Infection (SSI).  Therefore, air quality is very important for patients’ protection, and there are a number of factors that govern the quality of the air.  In the U.S., OR air quality is regulated by three organizations: the American National Standards Institute (ANSI); the American Society of Heating, Refrigerating and Air-Conditioning Engineers (ASHRAE); and the American Society for Healthcare Engineering (AHSE). Operating rooms require positive pressure, a minimum of 20 air changes per hour (ACH), with a minimum of four outdoor changes per hour. The standard specifies a minimum effective reporting value for air filter efficiency (MERV 16) but does not recommend a type of air delivery system. (Operating Room Sterilization: A Complete Guide to Air Quality)  Here are some details about these requirements:

  • Positive or negative pressure: Traditionally, hospitals make operating rooms positive pressure in order to keep contaminants from the rest of the hospital from infecting the patient on the operating table.  According to ASHRAE 170, operating rooms require positive pressurization of at least +0.01 in.w.g.  However, as operations are sometimes necessary on patients who may have contagious diseases like MERS or SARS CoV-2, hospitals are beginning to rethink whether they want to put the rest of the ward at risk of spreading a microbe from a positive pressure OR room. Discussions are underway regarding alternatives such as a positively pressured OR with negatively pressured ante/setup rooms. Another possibility is to have a negatively pressured OR with positively pressured ante/setup rooms.  (Rethinking air pressure in operating rooms could save lives)

  • The air change rate is a key factor influencing the concentration of microbe-carrying particles (MCPs). The higher exposure risks of surgical incision in the surgical microenvironment may be mitigated with increasing air changes per hour (ACH). (The impact of air change rate on the air quality of surgical microenvironment in an operating room with mixing ventilation)  

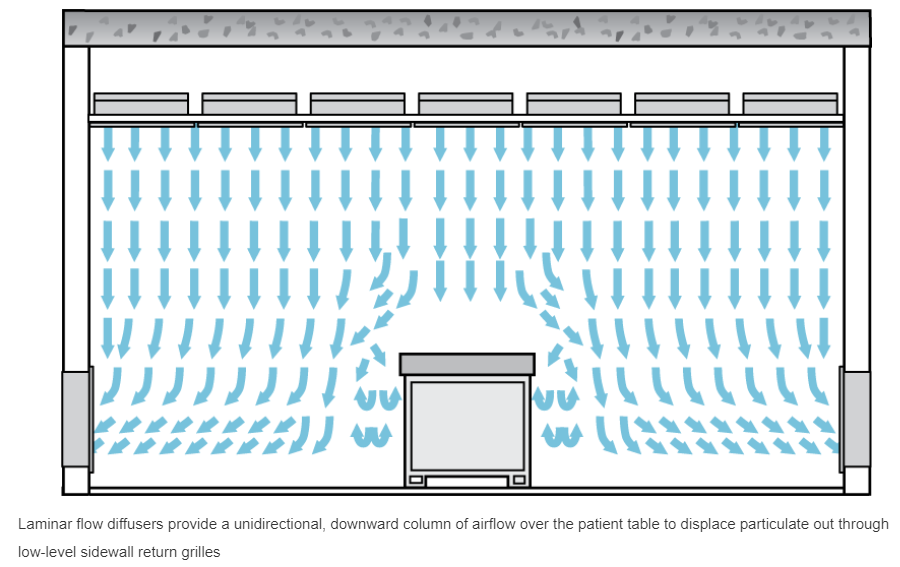
  • A key design requirement within ASHRAE 170 for operating rooms is the primary supply diffuser array. The airflow in the primary diffuser array should be unidirectional and downward, with an average velocity of 25 to 35 cfm per sq. ft.  This is recommended with the sole intent of creating a large sterile zone around the patient and medical staff. The standard dictates that the coverage area of the primary supply diffuser array should include the surgical table and extend a minimum of 12 in. beyond the footprint of the surgical table on each side and that no more than 30% of this area may be used for nondiffuser uses (like lighting, surgical gasses, electrical outlets, televisions, etc). This recommendation ensures that enough clean, filtered air is dispensed above the patient while accommodating the complex medical equipment present in today’s modern operating rooms. (How is ASHRAE Standard 170 Applied to Hospital Operating Rooms?)

Although not it’s not mandated, it’s also a good idea to have restricted access to the OR during surgical procedures.  The number of door openings are related to the number of colony-forming units (CFU) in the OR.  According to this study, increased number of door openings and surgery duration increased CFU counts in the OR, but the relationship between these variables was only observed outside the Laminar Air Flow.(LAF). Within LAF conditions, only the number of staff was associated with higher CFU. 

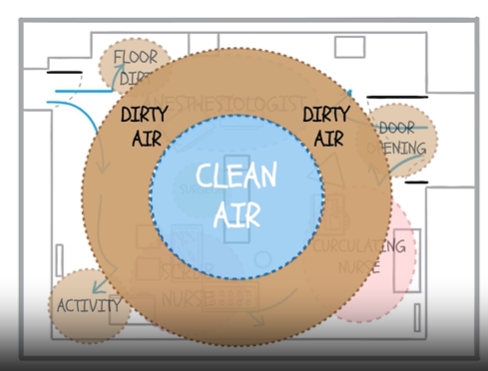
There have been several key developments in systems that promote ultra-clean operating rooms.  Laminar Air Flow (LAF) systems were developed by Sir John Charnley in the 1960s for use during joint replacement implantations.  They are useful for maintaining sterile conditions in the center of the operating room (under the diffusers) because they produce a continuous flow of microorganism-free air, which improves air quality by reducing infectious microbes. However, a 2023 meta-analysis agreed with multiple studies that have found it ineffective for reducing SSIs, and even possibly increasing the likelihood of SSIs, during orthopedic procedures.  (Laminar airflow ventilation systems in orthopaedic operating room do not prevent surgical site infections: a systematic review and meta-analysis)  In addition, air outside of the sterile field (that which is supplied by the LAF system) is often called the “dirty donut” because it is not effectively sterilized by the LAF; air in the dirty donut can be up to 100 times more contaminated than the center.  There are several solutions to improving the air in the dirty donut; Aerobiotix has developed a mobile unit called Illuvia that can reduce the contaminants.  

Source: Cleaning up the Dirty Donut

There is no standard for LAF design in the US.  In addition to the filters employed, different sterilization devices can be employed within or outside the LAF cabinet to increase deactivation of pathogens.  According to Steris, a major design/manufacture/installation firm for OR suites, the following technologies are improving LAF cabinets: 

  • UV light: Use of mobile and ceiling mounted UV light systems is restricted to when patients and staff use full personal protective equipment.  This type of light is also limited to line-of-sight, meaning that disinfection is obstructed by ceiling mounted fixtures and other equipment.  UV light may also embrittle certain materials and fixtures.  Therefore, in-duct UV sterilizers are preferred.

  • In-duct hydroxyl generator systems ultraviolet energy to produce reactive oxygen species known as hydroxyls. Airborne hydroxyls are ideal sanitizing agents which reduce pathogens and neutralize volatile organic compounds (VOC) and a broad range of chemicals. Atmospheric hydroxyls are natural-occurring molecules produced by the action of the sun’s ultraviolet energy on oxygen and water in our atmosphere. The hydroxyls are a natural oxidant and safe for patients and staff to be present during treatment without additional PPE. The system can run continuously and year-round, providing the potential for maximum surgical uptime. An added benefit is that hydroxyls help mitigate odors caused by surgical smoke and cauterized tissues.

According to this 2018 paper, it may be wise to adopt some standards of cleanrooms in ORs.  One such principle is maximizing the use of ceiling space to make the ceiling one large diffuser.  The reason for this is that every gap in airflow delivery (for instance, around a light connection) causes a low pressure area into which airflow is directed, producing turbulence.  Therefore, the operating room would look more like this: 

Source: How is ASHRAE Standard 170 Applied to Hospital Operating Rooms?

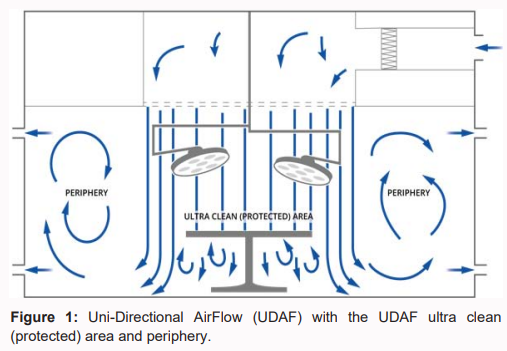
LAF is also described as Uni-Directional Air Flow (UDAF), but UDAF may not always be laminar.   Here’s the difference: UDAF describes the direction of flow, however the velocity must be below 90 feet per minute in order to be described as laminar (non-turbulent).  It’s easy to see that the periphery (outside the Ultra Clean Ventilation area in the center) has a lot of turbulent air flow.  Although the large lights over the operating table do produce some turbulence, it is not visualized here.

Source: Air Quality in the Periphery of Operating Rooms during Surgery

Previous LAF systems utilized fans to force air down.  A new type of LAF system called Opragon was developed by the Swedish firm AvidCare, and the system uses Temperature-controlled AirFlow (TcAF).  The technology behind TcAF is based on the ventilation system pumping out slightly cooled air into a zone around the operating table. By taking advantage of the fundamental laws of nature, TcAF breaks the convection currents in an effective and energy-efficient manner. Since cool air is denser than the surrounding warmer air, it drops towards the floor. The air speed is dictated by the temperature difference in the room.  a temperature difference (ΔT value) of -1.5 to -3°C is required between the ultra-clean air and the ambient room air at the operating table to guarantee a fall speed of about 0.25 m/s at the level of the operating table. The technology continually checks to ensure that the ultra-clean air maintains a constant under-temperature of 1.5–3°C regardless of the temperature of the ambient room air. (Temperature-controlled AirFlow)

Air curtain systems like Mediclean emit an air curtain around the perimeter of the sterile area.  The Mediclean system uses Continuous Particle Monitoring (CPM) to measure airborne particles in real-time and uses simple visual alarms. When particles are detected, Mediclean® CPM systems automatically increase the airflow from the UCV to quickly flush the contamination away from the safety-critical area, protecting both patients and surgical staff.

Other innovations include:

  • Surgicube, which is positioned just above the operating table, emits sterile air for minor surgeries.

  • Surgibox, a portable sterile surgical field with self-supporting battery and filter system

  • Air Barrier System, which is a portable diffuser to bathe the surgical site in ultra-clean air 

  • A novel upward-flow design to ventilate using natural stack effect, which is less complex requiring fewer scarce components, lower maintenance commitments, lower energy requirements and operating costs.

And, it’s likely that even more innovations are in the pipeline.  We thought it would be helpful to let you know that even the air in operating rooms is important for the operation’s success and your healing, so you might want to check into it if you need to have surgery!

Specific help for asthma and allergy sufferers

Specific help for asthma and allergy sufferers

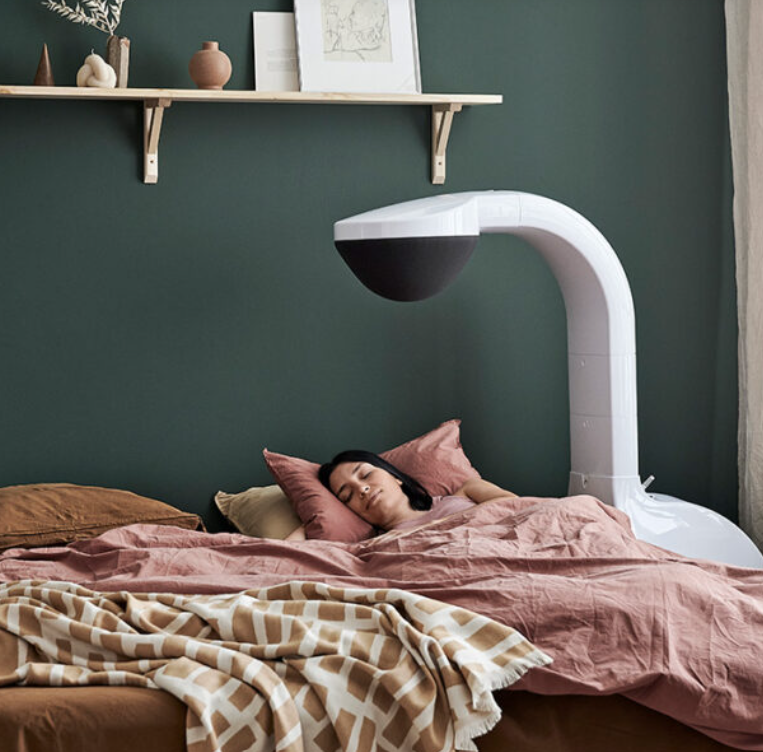
In our article “Air Quality in the Operating Room”, we described a new technology to produce laminar air flow called Opragon.  Opragon by Avidicare creates a clean air flow from the ceiling to the floor by creating a 3 degree temperature difference, which causes clean, filtered air to flow downwards, enveloping the entire operating room in clean air.  Now, the sister company AirSonett has produced a device which can drastically improve the lives of asthma and atopic dermatitis sufferers using the same technology.   Airsonett Air4 uses the unique and patented technology Temperature-controlled Laminar Airflow (TLA) to control a flow of lightly cooled, filtered clean air towards the breathing zone. The filtered air sinks with the help of gravity and pushes away the particle- and allergen-rich air from the breathing zone. In this way, at least 99.5% of all particles larger than 0.5 μm are blocked from reaching your breathing zone when you sleep.(Airsonett Air4)

Asthma can often be exacerbated by the allergens in bedclothes and bedding, which are skin dander and dustmites.  Movement in bed and a person’s body heat stir up these allergens, bringing them into their breathing zone.  Many people think that adding an air purifier to the room will help, but in fact air cleaners try to do too much–they attempt to purify the whole room, when all that’s needed is to purify the air in the breathing zone.  According to clinical trials, TLA has proven to be one hundred times more effective compared to air purifiers. (Airsonett Air4)

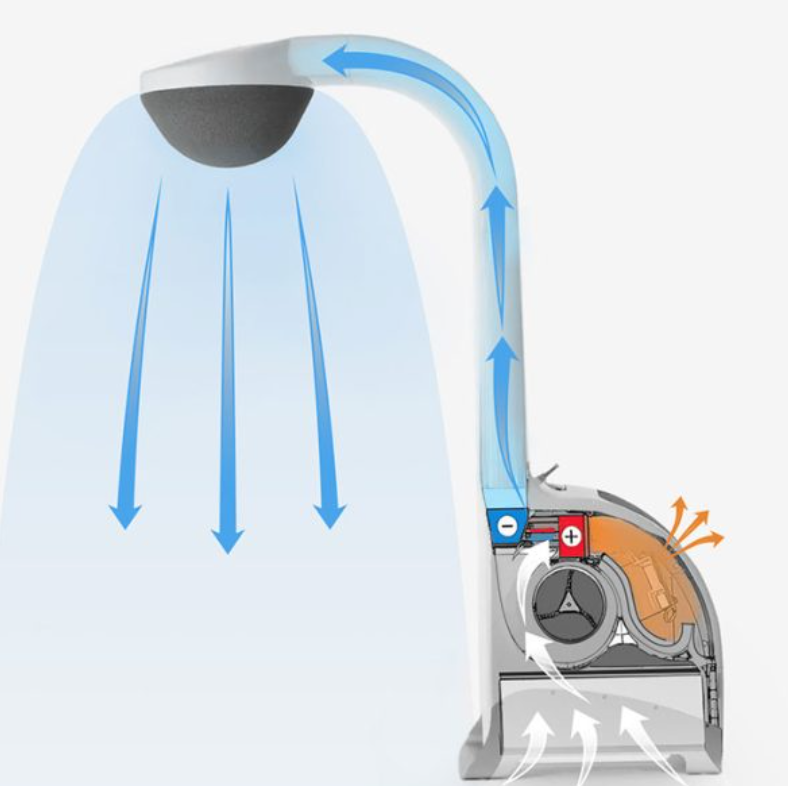
The machine works by drawing in air from the room under its base through a large HEPA filter.  The air passes through the fan and is then separated into cool and warm air streams.  The warm air stream is discharged through the back of the unit, while the slightly cooler air is moved up through the neck of the machine to the port above the sleeping person, to deliver cool air that drifts down over their breathing zone.  Since the required temperature difference to cause downdraft is small (about 3 degrees F), the unit can employ a Peltier module to cool the air, which is quiet and efficient.  Peltier modules work by passing a DC current through them, causing one side of the unit to heat up, and the other to cool down below room temperature.  Peltier modules are well suited for small cooling or heating loads, and in places where circulating liquids are not desirable (like computers).  The power consumption of the whole unit (fan, cooling and electronics) is 60W. 

Source: Airsonett Air4

This device is pricey (one medical equipment company quotes it at $88 per month for a 5 year lease), but the ease of use, efficacy, and improvement of condition may be worth it for certain individuals.  In these cases, insurance may go a long way to being able to use one in your home. For sure, there are no encumbrances like masks or tubes to deliver clean air, can be operated 24/7, and it can be situated in different areas of the home (over the bed for sleeping, or over a chair or desk for working) because the height is adjustable from 46-55 inches.  Airsonett Air4 is normally prescribed through a pediatrician, allergist, pulmonologist or dermatologist, as it is important that you are diagnosed and receive correct treatment. However, it is also possible to rent or buy Airsonett Air4 directly through the company.

Source: Airsonett Air4

Why is my house so DUSTY? Assessing the air currents gives a clue

Why is my house so DUSTY? Assessing the air currents gives a clue

This article was written in response to an actual problem.  My elderly parents moved into a “barndominium” which was converted from a 35x35’ metal workshop, in 2020.  The walls were insulated with fiberglass batts, and the attic above their 10’ ceilings was insulated with blown-in insulation.  I listened to my mom’s complaints about dust in the house. This is a real problem because the dust seemed to settle very quickly after cleaning, and my father has COPD.  Since the dust seemed to be a whitish colored dust, together we decided it must be coming from the attic, which had extra (white) insulation blown in after renovations were complete. We increased the HEPA filtration of the HVAC, with no results.  I checked for openings in the flexible ducts of the HVAC which could entrain insulation, with no results.  I tried several different times to seal the attic penetrations, which in actuality should have been done by a conscientious insulation company BEFORE the extra insulation was blown in.  I sprayed foam:

  • Around the HVAC vents
  • Around the bathroom exhaust fans
  • Around the LED puck lights (must check with the lighting manufacturer before doing this as some lighting is incompatible with direct-contact insulation.  The light needs to be “IC rated” in order to safely come into contact with the insulation.)
  • Around ceiling fan boxes
  • Around hanging shelf penetrations through the drywall of a floor-to-ceiling closet

It took multiple trips to the attic (with a good dust mask, of course) and quite a few cans of spray foam to get the job done, but sealing these areas, and one other (big) thing really helped cut the dust down.  It wasn’t until I really analyzed what was propelling the dust from the attic into the living space, that I figured out what was going on.

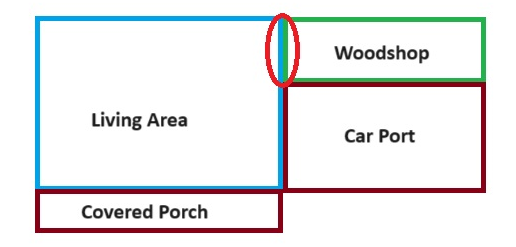
We’ve written several articles about negative pressure in your home and its negative effects. (This one has an eye-opening video linked).  I suspected that the dust was coming from the attic because negative pressure was somehow being generated in the house by the HVAC system.  However, I didn’t look at the big picture.  The living space is adjacent to a woodshop where my father carves (his hobby) and he uses a powerful dust collector to whisk the dust out of the workshop to a drum container.  The motor on this dust collector is rated for 240V so you can imagine that it’s a heavy-duty machine and being situated in the carport, can be heard from some distance from the house.  This thing SUCKS, and most of the time he’s using it with the door and window closed, so where is the makeup air coming from?  The workshop shares a common wall with a small bedroom in the living area (see red circle in diagram below).  It’s not too big of a leap to think that the dust collector may be pulling air from the house, as well, which in turn draws air from the attic when the ceiling penetrations were not sealed. 

To seal the wall between the woodshop and living area, I caulked the baseboard to the floor, as well as sealed the electrical boxes by taking off the switchplate and sprayfoaming around them as much as the little foam straw would allow (extra large switch plates help if you have to cut out the drywall a little).  The drywall took care of the rest of the wall.

Sometimes it takes a bit of thought to figure out the air currents in your home, but they are well-worth investigating!  Recently I found (by accident) that some carpenters had terminated a whole-house vacuum system in the ceiling of their house instead of routing it outside.  Even though the system used a filter, the space above the tiled ceiling was thick with a fine dust. We only discovered it when a  leak forced replacement of part of the roof above it.  We extended the PVC vacuum exhaust pipe just a few more feet and ran it out through the soffit.  It just goes to show that a little investigation (and a lot of spray foam) can go a long way to maintaining less dust in the house! 

Photo by Kent Pilcher on Unsplash

Why it’s important to get a proper kitchen exhaust fan and USE IT

Why it’s important to get a proper kitchen exhaust fan and USE IT

Recently (in the last few years) gas stoves have come under fire as a source of air pollution in homes.  While we used to think that the “blue flames” were clean-burning, it turns out that natural gas stoves (the kind of gas used in cities that is piped and metered to homes) can emit a range of pollutants from carbon monoxide, formaldehyde and other harmful pollutants into the air, which can be toxic to people and pets. (Indoor Air Pollution from Cooking)  Thirty-five percent of American homes cook with it, not to mention countless restaurants and commercial kitchens.  The problem is not using gas stoves in the home, however, it is using them with inadequate ventilation.  

Many older homes don’t have a kitchen exhaust vent, or if they do, it is not close enough to the stove or powerful enough to evacuate all the toxic fumes.  Nitrogen dioxide (NO2) is another common pollutant emitted by gas stoves, which the Environmental Protection Agency says is a toxic gas that even in low concentrations can trigger breathing problems for people with asthma or chronic obstructive pulmonary disease.  According to research, including this 1992 study, children who live in a home with a gas stove have about a 20% increased risk of developing respiratory illness.  NO2 concentrations can quickly spike when using as little as the oven and 1 burner without an exhaust fan, to more than double the EPA 1-hour standard of 100 parts per billion (ppb).  (We need to talk about your gas stove, your health and climate change)

Plus, we’re not even counting the burnt food bits that emit VOCs and fine particulates.  Our article about the air pollution cost of cooking–a favorite pastime of many–tells about a test kitchen where the Thanksgiving food items generated particulates levels exceeding that of Delhi, one of the cities with the world’s worst air quality!  You may be thinking about the time(s) a smoke detector may have been set off in your own home.  In my home, cooking during Thanksgiving set off my air quality monitor several times, from cooking bacon in the morning to toasting bread for the stuffing.  And I was using a kitchen exhaust vent, and, the monitor was a good 20 feet away, meaning that levels were even higher at the stove.  Yikes.

It’s just time to cook healthier, and I’m not talking about the type of cooking oil or how much butter you use.  It’s all about the exhaust vent.

If you live in a home with an existing exhaust vent, like a small combination microwave-vent, the first thing to do is check its rated throughput.  Most fans will have a brand and model number somewhere accessible, and the internet is a great resource for looking up this information.  

In our article here, I walk you through calculating how many cubic feet per minute (CFM) of air the hood must move in order to vent properly (it depends on the size of the stove and the size of your kitchen).  Many small vents and microwave combo units are just not powerful enough for the width of stove they are supposed to cover!  That’s exactly why the air quality alarm went off in my home even while the exhaust fan was at the highest setting.

If your vent falls short in the CFM department, or you don’t have a vent, it’s time to upgrade it or supplement. Here are some things to consider if you upgrade:

  • Noise: get the quietest fan you can afford.  Really.  A noisy fan is a big deterrent to actually using it, and the kitchen is a gathering place, so you’ll want to have a fan that makes it easy to enjoy cooking and holding a conversation.  Most of them will operate between 6 and 10 sones, or around 53 to 61 decibels. A normal conversation comes in at around 6 sones, so finding a range hood that operates in that range or below will make it much easier for you to enjoy carrying on conversations in the kitchen. (How loud should a range hood be?)  Another quiet (more installation-oriented) option is to get a model that has a remote fan, which can be installed away from the kitchen in the exhaust line.

  • Direct-Current (DC) Motors: More and more appliances are using DC motors and the advantages are several: they are slim and compact, they are more energy-efficient than their AC counterparts and speed control is easier.  In addition, it may have a longer life and quieter operation.

  • Other features such as LED lighting, optional filtration and pressure--balanced models are available.

  • Make sure to vent outdoors whenever possible.  If you cannot vent outdoors due to where the stove is located or if you’re renting (see below), look for fans with carbon filters that are easy to replace.  Activated carbon removes NO2, as well as VOCs, as long as the fan is powerful enough (see CFM discussion above) and you change the filters on a regular basis.

Here are some good values:

If you don’t have room to exhaust outside above your stove, consider adding a wall fan with outdoor shutter closure:

We also realize that many people rent or live in an apartment where it’s impossible to access the outdoors, or just don’t have any say about installing permanent equipment where they live.  We get that.  Thankfully, there are several portable inventions nowadays that can help get the purifying power you need.

  • CIARRA Portable Range Hood, Desktop Range Hood with 2 Speed Exhaust Fan, $170, would work well for college dorms with a hotplate, micro apartments, or small campers.  It’s not for use with open flame cooking, only electric griddles or hot pots.  It moves about 100 cfm, which is sufficient for this type of cooking, and comes with carbon filter and an optional HEPA filter (although this may clog up quickly if you’re cooking greasy food!)

  • AirHood ($157-$197) is another small portable kitchen exhaust fan, and comes in wired or wireless models. The downside is that this model is 70 dB, which may be loud for some people.  It does not specify CFM but can be used with open flame cooking with adequate distance between the flame and the unit.

  • Air King 9155 Window Fan, 16 inch, White: $147, is a powerful fan that would work well if you have a window in or near your kitchen, preferably close to the stove!  Of course, it could get a bit greasy when drawing cooking fumes, but the fan can be taken apart and cleaned.  It also allows you to close the window behind it during stormy weather without removing the fan.

With so many options out there, there’s hardly any reasons NOT to get proper ventilation for your stove/oven.  The important thing is to USE IT…make your family members or roommates aware of the dangers of NO2 and particulates.  Even toasting bread releases a lot of particulates from the bread as well as all the crumbs left from previous toastings.  So, it’s best to turn your exhaust fan on while cooking anything in the oven, range, toaster or microwave, and leave it on for up to an additional 15 to 30 minutes after you're done to evacuate all those gasses and particulates (and smells).  The plus is that with carbon filters, you don’t have to put up with cooking smells lingering for the rest of the day (well, cleaning the cooking pans is required too).  Here’s to fresh air and easier breathing with the right kitchen exhaust fan!

Photo by Erik Mclean on Unsplash

Non-toxic ways to deal with Hard Water

Non-toxic ways to deal with Hard Water

Many of us live in areas with very “hard” water.  How can water be hard?  It’s a way of saying there are a significant amount of minerals in the water, which can leave spots on your appliances, clog your pipes or leave a filmy residue on your hair or skin after showering.  If, despite frequent cleaning, your toilet looks like the following, you probably have hard water! 

Hard water is not necessarily bad for you; after all, many “mineral waters” for consumption capitalize on these very minerals that we are not fond of looking at on our appliances. 

According to the science, “hard” water can be categorized into alkaline (e.g., calcium carbonate CaCO3), non-alkaline (e.g., CaSO4), and silica based, with alkaline being the most common.  This water chemistry will of course affect the ability to prevent scale.  

Since CaCO3 is the most common type of mineral, most findings are delivered as a number that reports the concentration of calcium carbonate or calcium carbonate equivalents for a given unit of water. This result may be expressed in grains per gallon (gpg), parts per million (ppm), or milligrams per liter (mg/L). According to the Water Quality Association, the hardness scale, measured in gpg of calcium carbonate, can be represented as follows:

Less than 1 gpg is considered soft

Between 1 and 3.5 gpg is considered slightly hard

Between 3.5 and 7 gpg is considered moderately hard

Between 7 and 10.5 gpg is considered hard

More than 10.5 gpg is considered very hard

(Source: How is water hardness measured?)

If you want to “soften” your water, there are many solutions ranging from a few dollars to thousands of dollars, and from chemical-free to lots of chemicals.  Obviously, the best would be chemical-free and cheap…but most preferably chemical-free.  Here are 3 proposed solutions to keeping minerals from adhering to the surfaces your water comes in contact with (shower doors, bathtubs, toilets, sinks, etc.).  You can:

  1. Add a true water “softener” into your water source to remove the minerals
  2. Add a slick “film” or coating to the appliances so that the minerals don’t stick.
  3. Change the chemistry of the water so that the minerals don’t stick (EMF, MWT, AMT)

Let’s dig into these to find out which is best for you.  Our first recommendation is to test your water.  There are a lot of water testing kits on the market, some of which have 16-20 functions (a lot of tiny colors on the strip!)  While these are good for getting an overall picture of water quality, if you are interested in hardness, a specific test for hardness has better clarity.  This one by Varify retails for $12 on Amazon.  If your water comes in more on the green side (low minerals), you may need to do more research on the nature of your water “stains” because that result shows it’s actually low in minerals.

If your water shows as moderately to very hard (above 3 grains per gallon), then you might want to do something about it.  Moving on to our 3 proposed solutions:

Water Softeners

Softener systems actually remove minerals such as calcium and magnesium from your water by using an “ion exchange” process. The softener passes incoming water through a bed of resin beads, where minerals are attracted to the beads and softened water flows out of the tank.  Once in a while, the beads must be regenerated by flushing it with a strong solution of sodium chloride (salt) or potassium chloride, causing the minerals to release from the beads.  Then the system is ready to soften water again.   Softeners come in different sizes, for “whole-home” or smaller “appliance” use.  Although the upfront cost is more, the per-gallon cost is typically lower on whole-home systems.  In addition, appliances all over your home, from your coffee maker to your washing machine perform better with softer water.  However, there are disadvantages to using whole-home softeners: they can corrode pipes (it’s not recommended to soften water on very new pipes; you’ll want to wait several weeks to months so that an internal mineral film will develop), it does add a small amount of sodium to your drinking water, and regular testing of the water and maintenance of the softener is necessary to make sure the softener is working properly. (Home Water Softening Frequently Asked Questions)   Since there are many whole home systems available, we chose to review a few systems that soften specific appliances where people see the most impact.

Water softeners also lower the surface tension of water, making it feel “wetter” or “more slippery”.  On a porous surface, having a lower surface tension allows water to penetrate deeper allowing for better cleaning.  The addition of soap or the use of hot water will both lower the surface tension of water… Water softeners function through the process of ion exchange, i.e. exchange calcium and magnesium ions for sodium ions.  The conclusion can be drawn that sodium lowers the surface tension of water while calcium and magnesium ions increase the surface tension…There are other factors that influence the "wetness" or "slippery" feel of soft water including pH and alkalinity.  Typically the higher the alkalinity and pH, the greater the impact of this phenomenon.  This may help to explain why naturally soft water or reverse osmosis water do not have the same "wetness" or "slippery" feel. (The Kinetics and Aesthetics of Soft Water)

Softeners are measured by the number of “grains” they remove before regeneration is needed.  Here’s where you need to know how hard your water is (hence testing is needed!).  For example, if your water is 10 gpg, there are 3 people in your household and since the average person in the US uses about 75 gallons of water per day, that means 10 x 3 x 75 = 2,250 grains per day.  A water softener is usually sized to regenerate about one time per week, so that means a softener of 15,750 grains would work (16,000 grains like this one is ideal for an RV or live-aboard boat).   This article has very good information about the salt efficiency of different softeners, as using a lot of salt to regenerate is not only costly, it’s not good for the environment 

Washing dishes and clothes in hard water doesn’t yield great results.  Just like the inside of the sink or toilet, minerals can build up on your washed clothing over time, making them feel stiff and look dingy. In the dishwasher, minerals deposit on dishes causing spots and incomplete rinses.  “Water softening tablets” are available for use in the laundry or dishwasher and here are some non-toxic brands that work well with hard water:

  • Calgon 4 in 1 Water Softening Tablets, $51, for 75 tablets for laundry washing machine: add 1 tablet with each load of laundry (and use your own detergent).  Mainly composed of polycarboxylates, these tablets prevent minerals from depositing on surfaces and are generally deemed safe for human contact (after rinsing) and the environment.  Therefore, although these are “chemicals”, you can safely add softeners to your dishwasher or laundry:
  • BioKleen Free & Clear Natural Laundry Detergent, $35 for 150 loads, is very low cost for a natural detergent and is said to work well for moderately hard water.  Like many non-toxic detergents, it dissolves and works better in warm water rather than cold.
  • Planet Automatic Free & Clear Dishwasher Pacs, $6 for 20 pacs, is among the lowest cost per load, has transparent ingredients, and is good for hard water according to reviews. 
  • Blueland Dishwasher Detergent Tablet Starter Set, $30 for 60 tablets, do not have wrappers at all and are good for hard water according to reviews.

Shower “filters” are a great idea to prevent the harsh chemicals that municipal water treatment companies employ to keep drinking water safe.  Mostly we’re talking about chlorine and its by-products (see our article about the nasty effects of using too much chlorine).  But most shower filters don’t address hard water (which causes all those spots on your glass shower doors), or iron or sulfur in the water.  However, there are some shower filters that do; you must read the product description carefully to see what is removed.  The first product below is primarily a water softener to remove hard water minerals; the next 2 products are filters with some water softening capabilities.

  • ShowerStick Shower Water Softener, $260: This company has done its homework on water softening and actually allows the customer to do so as well, by providing a water testing kit with their kit. Using the water test weekly will show you when to “regenerate” the resin beads inside, which accomplish the softening.  Depending on how often you use the shower, regeneration may need to be done on a weekly basis.  The company also offers a KDF water filter to remove 95-99% of chlorine and controls the buildup of microorganisms such as bacteria, algae, fungi and mold.
  • PureAction Water Softener Shower Head Filter for Hard Water, $40, is a shower head meant to replace your existing shower head.  It comes with 2 extra filters that are replaceable (the filter cartridge is what removes the minerals and chlorine).  According to reviews, customers with sensitive skin have had good results with this showerhead. 
  • AquaEarth 15 Stage Shower Filter, $30, is an in-line water filter that allows you to add your own shower head.  It lasts approximately 6 months and replacements run about $7.50 each ($30 for a pack of 4).

Coatings that inhibit scale formation

There are a lot of anti-scale coatings available for commercial equipment, but not so many for residential use.  The application of a coating is sometimes not so difficult when a fixture is new (like a new toilet), but doing the necessary cleaning and application in an older fixture can be a lot of work.  In addition, the chemicals that make surfaces slick enough to inhibit scale are often not disclosed.  For example, Spotless Toilet Coating contains 84-94% isopropyl alcohol (for quick drying) and 0.5-1% of a proprietary acid, leaving 5-10% undisclosed ingredients. (MSDS)

Salt-free Water Conditioners

There are a number of water “conditioners” that do not use salt, electricity, or other energy to keep minerals from depositing in your appliances.  Here is a rundown of these technologies:

  • Template-Assisted Crystallization (TAC) uses surface-treated resin beads to convert (not remove) dissolved hardness ions to microscopic scale-resistant crystals. The polymeric beads are fluidized, creating agitation that releases the microscopic crystals and allows for further formation of crystals. Once these crystals are formed and released from the beads, they are insoluble particles that do not form scale on surfaces. In some cases, a fine dust may form on dishes but it can be wiped away. Template-assisted crystallization systems typically require relatively clean water as the input, and may require pretreatment if the water contains high iron and manganese concentrations or other sediment..(Drinking Water Treatment Salt-Free Water “Softener” Options)  Brand names include Aquasana, AO Smith and Pentair-Pelican.
  • Ultrafiltration and Nanofiltration: These processes use very fine filters to remove bacteria, viruses, and some salts from water.  This article by the Safe Drinking Water Foundation shows the different substances these processes can remove. 
  • Reverse Osmosis: These systems work by pushing water through a microscopically small filter material.  This semi-permeable membrane has a pore size of around 0.0001 microns, effectively only allowing the small water molecules through and catching any larger molecules of contaminants, organic materials or even salt. Originally designed to desalinate seawater and reduce high chemical contaminant material such as heavy metals, reverse osmosis is now in use in many government, commercial, military and even residential applications.  It does produce ultra-pure water, but also wastes a lot of water due to back-flushing requirements, and is relatively expensive. (Learn The Pros And Cons Of Reverse Osmosis Water Filtration Systems)

Magnetic Water Treatment, Anti-Scale Magnetic Treatment, Electromagnetic Fields

There’s been a fair amount of studies on AMT (anti-scale magnetic treatment) or MWT (magnetic water treatment) or EMF (Electromagnetic Fields).  Wikipedia states that it is “unproven and unscientific.”  However, EMF has seen a lot of study since 2010, and one meta-study concluded that although different results were reported regarding the influence of EMF in minerals precipitation, the results support the same hypothesis that EMF induce bulk precipitation of crystals rather than adhesion to the surface of reactors, pipes and vessels or to membrane surfaces. If we consider the bulk precipitation enhancement as effective EMF treatment, the percentage of effective EMF cases can reach 95% for the discussed 48 studies, 5% of the studies observed negligible improvement with EMF treatment, none of them has negative results.  This is not “unproven and unscientific.”  

There are two configurations of an EMF device used in water systems: permanent magnet and solenoid coil (uses alternating or direct current).    The efficiency of EMF depends on the properties of the field, including intensity, waveform, and frequency (the field strength varies with the number of coils or the thickness of the wire used), the material of pipe or surface, pH of the water, temperature of the water, residence time (how long the water is exposed to the EMF), and suspended particles (in some cases the presence of suspended particles such as silica is necessary for EMF water treatment to be effective, which can adsorb metal ions and increase bulk precipitation). (EMF meta-study)

Under ordinary circumstances, the scale forms through heterogeneous nucleation of CaCO3 (calcium carbonate) on the substrate surface. By contrast, when magnetically treated is used, nucleation (formation of crystals at a molecular level) takes place homogeneously in the body of the water, and small disc-shaped crystallites (about 50 #m in diameter and 1 #m thick) are formed.  Initially suspended, these crystallites gradually settle as a sediment at the bottom of the container.  (Magnetic Treatment of Water: A Theoretical Quantum Model)

When magnetic water treatment was first patented in 1945 by a Belgian company, there was not a complete understanding of how magnetic fields inhibited scale formation.  Today, however, one theory is presented here:  “Through the efforts of universities and their extensive laboratories, the performance of the magnetic water treatment for scale prevention has moved from being a phenomenon to understanding that the magnetic field creates a hardness crystal called Aragonite. It forms this because a tiny percentage of water is always dissociating – hydrogen (proton) leaving and forming H3O or hydronium – and the energy imparted to the water by the magnet causes the percentage of hydronium to increase dramatically. Water missing the hydrogen reacts differently with calcium bicarbonate (calcium hardness) than does water with full hydrogen in the size, shape, and texture of calcium carbonate crystals formed as evidenced in electron microscope photos. All crystals are void of charge so they won’t adhere to metals, however, the aragonite form is softer and is easily flushed through plumbing. No magic and no mystery. The performance relative to scale prevention is directly proportional to magnetic field strength and speed of water through alternating magnetic fields.” (Magnetic water treatment for scale prevention)

This is similar to the explanation given in a paper from 2000: MWT changes the form of calcium in water. The researchers tested MWT by passing water through a magnetic field of 1000 Gauss (0.1 Tesla).  The samples were then heated in open beakers, forming scale when the water evaporated.  The scale was inspected by X-ray diffraction (which can reveal what it’s made of) and an electron microscope (to view the structure).

The results confirm earlier claims that there are two different types of calcium deposits made: calcite and aragonite.  They are both made of the same stuff (calcium), but form in different structures.  The small beads of calcite tend to make hard scale that clings well to surfaces.  Aragonite forms in longer shapes which are less prone to form hard scale, and keep moving along with the water.  The data they collected also confirms that the effect can last over a period of time, as much as 200 hours.

Source: Magnetic Water Treatment, K&J Magnets, Inc.

In conclusion, if you have calcium carbonate in your water, then MWT may work in preventing some scale buildup.  Since it’s likely that many small magnet systems are not strong enough for the amount of water flow, it’s best to purchase from a company that knows its science (and offers different size magnets/appliances for different size pipes).:

  1. Magnation: this company employs several technologies, not just magnets, into their products.  They have a questionnaire enabling you to find the right product.
  2. ESF scale preventer uses permanent magnets, but you need to install them in-line with the water pipe, which may require a plumber. (contact company for price)
  3. Build your own: Using K&J’s equations, they have calculated the strength of the magnets necessary to do the work, and they sell them!  Basically you just have to measure the diameter of the inlet pipe where you are going to place the magnets, and build a system to place them opposed over the pipe so they don’t fall off or slam into each other.  They offer magnets in strong, stronger and strongest energy.

One more product was tested by one of our team members.  Krazy Klean is a magnet-based product that is placed in the toilet tank to reduce scaling in the toilet bowl, leading to less cleaning and use of chemicals.  In the toilet we tested, it definitely worked.  Old deposits were not removed, but once the bowl was cleaned (see our article here for non-toxic methods), it stayed clean for a month test period (from waste and minerals) with the Krazy Klean device in the tank, whereas it was previously cleaned about 2x per week yet still had waste and mineral residues building up.  The manufacturer advertises "Just drop it in your tank and eliminate scrubbing for an entire decade", however, we promote cleaning your toilet bowl regularly with non-toxic cleaners to reduce germs.  The company provides a report of its scientific testing on its website if you'd like to check out how it works.

Photo by Andres Siimon on Unsplash

How to eliminate many of your cleaning solutions

How to eliminate many of your cleaning solutions

Well, that is a pretty attractive headline, right?   Since the average American family of four can expect to pay at least $680 a year for cleaning products, this is a substantial sum of money.  (Cleaning Supplies Costs: How to Save Money While Keeping Your Home Clean)  How in the world can you get something clean without using a cleaning solution?  Water alone can’t clean a surface, right?

If the water is deionized, it can actually clean without any added solutions.  If it sounds crazy, you just have to check what’s actually in your water to understand.  Normal tap water has minerals such as calcium carbonate (CaCO3) which are left behind when the water evaporates from a surface, leaving water “spots”.  The spots are actually the dissolved solids in the water, which can also be ionic..  Ions are atoms or groups of atoms that have a positive or negative charge.  For the calcium carbonate example, calcium Ca has a positive charge (2+) while the carbonate CO3 (carbon and oxygen atoms) has a negative charge of 2-.  The easiest way to avoid this deposit on your surface (windows, car, etc.) is to remove the minerals from the water. 

Here’s where it may help to understand some water chemistry.

Water, as we know it H2O, is formed of hydrogen and oxygen atoms that “stick” to each other by covalent bonds.  Covalent bonds form when two or more nonmetals combine. For example, both hydrogen and oxygen are nonmetals, and when they combine to make water, they do so by forming covalent bonds. (Covalent Compounds - Formulas and Names)  Hydrogen bonding is responsible for how individual water molecules “stick” to other water molecules, because the hydrogen end of the molecule is attracted to the oxygen of other molecules.  However, because hydrogen bonds are weaker than covalent bonds, in liquid water they form, break, and reform easily.  (Hydrogen Bonds Make Water Sticky)  

Source: Hydrogen Bonds Make Water Sticky

Calcium carbonate, CaCO3, is one of the most common dissolved substances in water.  Calcium has a +2 charge, and is considered a metal, and Carbonate (CO3) has a -2 charge and is a non-metal, and the bond between metals and non-metals is called ionic.  This is a pretty strong bond, and is one of the reasons CaCO3 doesn’t actually dissolve in water.  Because  water molecules act like magnets with positive and negative ends, and both the calcium and carbonate ions have electric charges, there is some electric attraction going on between water and CaCO3.  The calcium ions hang out with the oxygen part of the water, and the carbonate ions cozy up to the hydrogen part.   However, the ionic bond within CaCO3 is stronger than the electric charges between the water and CaCO3 molecules, so the water never really breaks up or “dissolves” the CaCO3. (Is Calcium Carbonate Soluble in Water:Answer and Explanation of Reasons)  It precipitates easily, and can be removed from the water solution by several means: reverse osmosis, which is passing the water through very small filters, or by passing the water through positive and negative beds of resin that attract the CaCO3. When the impurities are removed from water, the electric charges that exist on the “ends” of the pure water molecules are freed up again, and water becomes more “sticky”, enabling it to pick up more dirt than water with CaCO3 or other impurities in it.  This is why deionized water cleans better than water with impurities in it.

The main enemy of water-based cleaning is Total Dissolved Solids, which are those impurities that get left behind when water evaporates, regardless of whether they were truly “dissolved” in the water to begin with. Car enthusiasts, window washers and solar panel cleaners are big fans of DI water.  Why?  It has no dissolved solids, so it leaves no spots or impurities behind when it dries.  Spots are unsightly, and when left to bake onto a car’s finish in the sun, can actually “etch” the clear coat of the car.. Now, many car detailers will wash their cars with normal car-washing liquids and water, but save the DI water for the final rinse.  This conserves DI water, which can be pricey because of the filtration process.  Many professional window cleaners and solar-panel cleaners, however, use it exclusively (no chemicals) with soft brushes, so that the cleaning process from start to finish relies on DI water.  Remember, windows and solar panels are big areas that are continually baked in the sun, so washing them with normal soap and water and then rinsing with DI water can cause the soap to bake on before you even get to the rinse step!  They are also very-high visibility surfaces, and spots on solar panels can translate into big efficiency losses, which are a large reason they are installed to begin with.  

True deionizatIon systems can cost a lot.  For the average person wanting to clean their home with less chemicals however, using deionized water is not out of reach.  It all depends on how you get it and how you use it!

Before we get into home deionization systems, however, you’ll want to understand the difference between distilled water and DI water.  Water distillation is a physical process where the water is boiled and the steam condensed for purification.  Although distilled water has less total dissolved solids than tap water, it’s still not free of impurities like DI water. That said, both deionized water and distilled water are safe for human consumption as long as there are no germs (viruses, bacteria, cysts), which may pass through the deionization process because these are generally not charged (ionized) particles. DI water is also not the same as “softened” water: softened water still has TDS in it and water softeners also do not remove bacteria and viruses.

That said, there are some home systems (like ZeroWater) that can produce deionized water that is safe for consumption and better for cleaning.  Because municipal water systems already employ disinfection systems like chlorination to kill bacteria and viruses, using ZeroWater filters with city water is sanitary AND free from TDS, because the ZeroWater filter removes TDS.  ZeroWater filters are 5-stage filters.  One of the stages is a mixed bed (cation & anion resins) of small sized polymeric beads. Ion exchange is a reversible chemical reaction where dissolved ions are removed from solution and replaced with other ions of the same or similar electrical charge. The cation beads contains hydrogen ions (positive charge). The anion beads contain hydroxide ions (negative charge). The resin works by exchanging contaminant ions in the water with the hydrogen and hydroxide ions.The contaminants attach to the beads while the hydrogen and hydroxide are released into the water. These two ions combine together to produce H2O.  (How does Ion Exchange Technology Work?)

Reverse Osmosis (RO) is another type of system that deionizes water.  There are many different manufacturers of RO systems, and if you have one, you’re probably very satisfied with the quality of water.  RO removes sediment and chlorine from water with a prefilter before it forces water through a semipermeable membrane to remove dissolved solids. After water exits the RO membrane, it passes through a postfilter to polish the drinking water before it enters a dedicated faucet.  RO does not remove some types of bacteria and viruses from the water, though, so this is why it should be used with municipal water or another disinfection mode, like UV light. (What Is a Reverse Osmosis System and How Does It Work?)

Therefore, if you have ZeroWater or RO water, you can test the water for TDS (many come with an included TDS meter) and use it as deionized water for cleaning.  Since filters do have a cost, however, you’ll want to maximize the use of your deionized water.  For example, a 4-pack of ZeroWater filters is $55, which is about 92 cents per gallon of water, whether you use it for drinking or cleaning. Here are our suggestions:

  • Use DI water for spray-bottle applications where you mix your own cleaner (like TotalClean)

  • Use DI water for vacuum mops/steamers so floors get cleaner and look better

  • Use DI water as a “rinse” for areas where water spots are most visible

  • Use DI water for “descaling” modes of small appliances if water is called for (like coffee machines, baby-bottle sterilizers, steam irons and other heated appliances)

Unfortunately, larger-scale DI systems used for washing cars, windows and solar panels can incur substantial cost not only in equipment but in maintenance, as they require replacement of the resin beads periodically as they become fouled with minerals.  Beware of cheap In-line water deionizers like this one, reviewed in this video, however, because they don’t work well in areas of water with high TDS. 

  • CR-Spotless Water Systems - DIC-20, $438, has 2 mixed-bed resin beads, a moveable cart, and a battery-operated TDS meter.  The reservoir should produce 300 gallons of deionized water, so theoretically the 2 replacement cartridges for $139 should give DI water at a cost of 47 cents per gallon.

  • According to this car detailing video, this On The Go dual-bed system, $600, is the best budget system if you plan on using at least 1200 gallons per year.  Now, this is a lot of DI water, but if you like to wash cars, boats, windows, showers, solar panels, etc., this could be realistic for you at about 25 cents per gallon for the refills.

Well…is deionized water a draw for you?  Maybe not, if you don’t have an abundance of cars, boats, etc, but the ZeroWater filter is a nice all-purpose drinking water filter that also provides deionized water for a small amount of spot-free cleaning.  If you have basic home cleaning needs, there are other ways to remove minerals and contaminants from your water.  Check out our article Non-Toxic Ways to Deal with Hard Water for more of them!

Photo by Andres Siimon on Unsplash

How do water-based vacuums work and are they better than traditional vacuum cleaners?

How do water-based vacuums work and are they better than traditional vacuum cleaners?

Do you like how fresh the air seems after a rainstorm?  Well, that is the effect of the rain “washing” dust and microbes out of the air.  Sure, on a hot summer’s day it’s not long until these contaminants return, but it’s a welcome respite.  It’s nature’s air purifier!

This brings us to the topic of water-based vacuum cleaners.  Mechanically, the suction part of the vacuum (with or without a rotary brush to dislodge dirt) is the same as traditional vacuum cleaners.  However, using water to “filter” dust out of the air stream is the main difference. 

Let’s talk about how filtration using water as a filter is different from filtration using other mechanical means, such as a cyclonic separator or filter.  When a stream of dirty air is filtered by water, the dirt or dust in the air gets wet and heavy, and thus becomes entrained in the water, leaving the air “clean” on exit.  However, most water-based vacuums also use HEPA filters, in order to prevent any remaining dust or dust in water droplets from leaving the machine.   These HEPA filters are designed to get wet, whereas non-water-based vacuums do not have filters that can get wet.  

In traditional vacuums, the incoming dirty air stream usually first passes through a vacuum bag or cyclone, which filters out larger particles of dirt and hair.   In bagless systems, the cyclone uses centrifugal force to “spin” out these large particles so that the user only has to empty a cup of dirt, not replace the bag.  Single-stage or multi-stage cyclones can be employed, where a multi-stage cyclone allows the vacuum to operate longer without losing suction.  After the bag or cyclone, a final filter (this is where the HEPA filter is found if the vacuum has one) filters out any remaining dust in the air stream before exhaust.

The attraction and “wow” factor of water-based vacuums usually lies in the dirty water that you empty from the vacuum after cleaning.  If the floor is cleaned with a traditional vacuum and then with a water-based vacuum, being able to “see” the dirt that’s left behind drives enthusiasm for the water-based vacuum.  No one cuts open the bag from their traditional vacuum after cleaning, so the satisfaction of seeing that dirty water makes one think that water-based vacuums provide superior cleaning power. 

Although we haven’t tested them, we thought we’d share some insight on the most common water-based vacuum brands and what their customers like and dislike about them. 

Rainbow Vacuum Cleaners

You may have heard of or viewed a Rainbow Vacuum Cleaner, the first vacuum to remove dust from its vacuum stream using water.  The manufacturer, RexAir, was formed in the 1920’s and has been improving the Rainbow ever since it was introduced in the 1950’s. (The Original Water-Based Cleaning System)  It relies on a rotating brush to dislodge dirt, and the suction power of the vacuum motor to bring it into the machine, where the filters purify the air before exhaust.  According to product literature, its unique water filtration system captures typical household dirt, while remaining microscopic particles are caught by the HEPA Neutralizer Filtration System. This two-stage filtration combination removes nearly 100% of dirt and contaminants.  The company uses a network of Independent Authorized Rainbow Distributors which demonstrate the product in homes and businesses, so it’s not sold online.  Purchase prices for these units are not published either, however, customers seem to verify that these vacuums are the most expensive on the market.  Devoted Rainbow customers seem to keep their vacuums for 15-20 years, so the price per vacuum may be a very good value.  The units weigh in at about 20 pounds and rely on smooth casters to roll through your home.  Rainbow is “Certified Asthma & Allergy Friendly” and AHAM Certified: The Association of Home Appliance Manufacturers (AHAM) certifies that the Rainbow is a proven air cleaner designed to reduce air pollutants that contribute to poor indoor air quality.  The weight of the E2 model is approximately 40 lbs and comes with an 8 year warranty.

Sirena vacuums ($600-990) are designed and made in Canada.  They can pick up wet or dry messes, and come with an assortment of tools to get into nearly every crevice.  The motor is quite powerful, providing ample suction, and the water reservoir hold 3.5 liters of water maximum, which is quite a lot of water in which to filter out dust and dirt.  It weighs 40 lbs and comes with a 10 year warranty.

Quantum X ($439) is an upright vacuum, meaning you don’t have to drag a canister around with you while you clean.  The power head can extend up to 18”, making it a good competitor to most canister vacuums, and it has a hose for smaller cleaning attachments.  The upright style affords less room for the water compartment, but this also allows it to be more portable.  It weighs 27.1 lbs. 

Kalorik Water Filtration Canister Vacuum Cleaner ($120) is a good budget cleaner made by a Belgian company that has been in business since 1930. Termed the “poor man’s Rainbow” by one reviewer, it’s a great option for those with pets and/or allergies, and it’s a lot lighter at 14.3 lbs.  The suction head does not have a rotating brush, but it has a high/low adjustment, very powerful suction, and picks up wet and dry messes. Without the rotating brush, it’s best suited for hard floors and not carpets.  It has a 1 year warranty.  

These four vacuums all use water as a filter, but are different from cleaners that vacuum and mop at the same time.  I use the CrossWave floor and area rug cleaner by Bissell ($257), which uses water to clean AND filter out dust.  For homes that have no wall-to-wall carpet or a lot of area rugs, these types of upright vacuums are convenient and ideal because they perform two functions at one time–vacuuming and mopping, with good efficiency (check out our article on using these types of vacuums to tackle dust in your home).

In all, many customers (including myself) prefer water-based vacuums over traditional ones because:

  1. You can see the dirt they pull off your floors very readily when you empty the vacuum, which is both satisfying and disgusting.  Whether this is more than the dirt that is captured by traditional vacuums is not measured.

  2. There’s no bag to retain smelly dirt (especially pet hair).  With traditional vacuums, this smelly dirt stays in your home until you replace the bag, and it also expels smelly air every time you vacuum until you replace the bag.  (As a pet owner, I appreciate this!)

  3. There are no bags to purchase and replace! 

  4. They are very good at retaining suction (most work until the suction compartment is completely clogged with debris or pet hair), and restoring suction is very easy to do–empty the compartment!

  5. Many of these models remove wet or dry messes (traditional vacuums can only handle dry dirt). 

  6. Many of these models allow addition of essential oils to the filter water or cleaning water for a fresh scent of your choice, and some, like the Rainbow and Sirena, double as air purifiers.

The “cons” of water-based vacuums are that: 

  1. Of course, water is heavy and more quality construction can make the unit VERY heavy and bulky, to the point of not being mobile enough to clean separate floors in a home if you are physically challenged.  Most water-based models are “cannister” type instead of “upright” in order to more easily and stably move the water around.

  2. Water-based vacuums can be more costly than traditional vacuums.

  3. Some water-based vacuums (like the Bissell CrossWave) require a detergent to enhance cleaning of the floors.  This detergent is an added operating cost and can have toxic ingredients in it (unless you make your own, check out our recipe here). 

  4. If your vacuum uses water to “scrub” and then suck up dirt and debris, water that stays on your floor can temporarily increase humidity in your home, albeit less than regular mopping.  If water is used to clean carpeting, you must be careful that it’s thoroughly dried, and quickly, so that mold doesn’t have a chance to take root.

Do you prefer another type of vacuum that we haven’t discussed?  Let us know!

Photo by No Revisions on Unsplash

Hidden benefits in the scents of the holidays

Hidden benefits in the scents of the holidays

In the US, you know that winter holidays are coming when pine-scented, cinnamon, clove and peppermint candles and essential oils come out.  Besides giving a fresh, yet cozy scent to your home, each of these have hidden benefits in their chemistry.

Pine oil (which emits a concentrated fragrance due to the terpenes it contains) has many health benefits.  Primarily, the terpenes (which are biogenic volatile organic compounds or BVOCs) are phytoncides. Phytoncides are aromatic compounds from plants which can increase your number and activity of natural killer cells, a type of white blood cell that supports the immune system and is linked with a lower risk of cancer (see our article about why it’s good to take walks in the forest!).  These BVOCS produced by the pine tree include  α-pinene and α-phellandrene, both have which have shown to have anti-inflammatory properties and anti-cancer properties when inhaled and d-limonene and p-cymene phytoncides, which have shown to specifically act against allergic lung inflammation too.  (How Pine Can Benefit Your Respiratory Health)

Hinoki cypress, cedar, oak, pine and spruce are just some of the trees to release phytoncides.  Camphene is a common monoterpene and phytoncide found typically above 10% in many essential oils including white fir, black spruce, hemlock and Engelman spruce. Camphene is noted for its antioxidant and mucolytic properties. It’s similar to camphor; both have a well-known smell that is invigorating and refreshing. (3 Essential Oils High in Terpenes)

Cinnamon scents are synonymous with holiday baking, but did you know that it is also useful in combating mold in your home?  The cinnamon sticks you may be familiar with are actually the inner bark of several types of trees, which are rolled into “quills” and dried.  Cinnamon powder is made by grinding it and cinnamon oil can also be extracted from the bark.  You can use cinnamon essential oil diluted in water to clean small patches of mold and mildew from surfaces, or place it in a diffuser to combat airborne mold spores.  Cinnamon powder can be sprinkled or mopped onto floors to fight mold, or used as a paste to clean surfaces (beware that it can stain however).  Boiling cinnamon sticks in water gives a double benefit; besides making your home smell lovely, the water will become more concentrated with cinnamon liquid, which can be added to your cleaning solutions as well.  Check out this helpful article for more tips on using cinnamon.  Scientists are also exploring use of the leaves; there were 16 compounds found in the active fraction of cinnamon leaf extracts and 3 dominant compounds that are anti-fungal compounds. (Antifungal Activities Of Cinnamon Leaf Extracts Against Sigatoka Fungus (Pseudocercospora Fijiensis))

Growing up, my family used to stick cloves into oranges to make pretty scented holiday decorations. These little sticks actually come from the flower buds of the clove tree, which primarily grows in Indonesia.   Clove oil has so many uses!  It has a strong, earthy smell, which are the BVOCs.  It is antibacterial, antiviral and antifungal, and can be used in throat sprays and oral hygiene, as an analgesic to relieve nerve pain, infused into syrups, honey or vinegar or in a diffuser to reduce airborne mold and microbes.  (5 Health Benefits Of Clove Oil You Need To Know)  It’s also a dermatological fungus-buster: both clove essential oil and its volatile vapor strongly inhibit spore germination and mycelial growth of dermatophytic fungi (fungi that require keratin, a protein in hair, skin and nails, for growth). The volatile vapor of clove essential oil showed fungistatic activity whereas direct application of clove essential oil showed fungicidal activity.  (Antifungal Activity of Clove Essential Oil and its Volatile Vapour Against Dermatophytic Fungi)

Menthol is the monoterpenoid in peppermint that gives that fresh smell and taste. The high menthol content in Peppermint make this essential oil excellent for diffusion and inhalation to reduce congestion and clear the airways. It is one of the best essential oils for colds, flu, bronchitis and asthma, with studies showing that Peppermint oil is rich in compounds that are anti-microbial, antiviral and antibacterial.  It can also help with seasonal allergies, helping to unclog the sinuses and clear pollen out of the nasal passages.  (Peppermint Benefits) Peppermint oil is a key ingredient in many natural pesticides and pest deterrents, because insects hate the smell!  Spray peppermint oil around your home to repel ants, spiders, mosquitoes, roaches, ticks, and even mice.

You can also apply peppermint oil directly on the skin as a natural bug repellant (if you have sensitive skin, you can use a carrier oil).  Peppermint oil is a natural antifungal, antimicrobial, and antiviral. Spray it over countertops, especially in bathrooms, and kitchens. (20 Uses For Peppermint Essential Oil)  Check out this natural floor and surface cleaner using essential oil–my favorite is peppermint oil to give a fresh scent to all surfaces!

  • 1-¾  cups TotalClean Concentrate

  • ⅛ cup rubbing alcohol

  • ⅛ tsp dish soap

  • 5-10 drops essential oil (optional)

These are only some of the hidden benefits of the scents we associate with winter and holidays…you might want to research your other favorites to find new uses for them in your health regime and home!

Hydrogen Peroxide as an Air Cleaner

Hydrogen Peroxide as an Air Cleaner

Hydrogen peroxide has been around for a long time.  The brown bottle you may keep in your bathroom as an antiseptic for treating wounds has many, many more uses!  It was discovered in 1818 by scientist Louis Jacques Thénard as he reacted barium peroxide with nitric acid.  Today, it’s still used medically, as well as in many diverse applications such as launching rockets and satellites into space, or as a more environmentally-friendly alternative to chlorine-based bleaching products in the manufacture of paper.   (Peroxide Power)

Hydrogen peroxide is chemically written as H2O2, meaning it has 2 hydrogen atoms and 2 oxygen atoms.  It is an oxidizing agent, releasing an oxygen atom when it decomposes.  Decomposition happens quickly in the presence of organic matter like microbes or reactive compounds (hence the bubbling fizzing action on wounds or with baking soda), but it will also decompose slowly in storage, which is why it’s sold in those brown bottles to protect it from light and the ambient air.  

Hydrogen peroxide can be used as a disinfectant in appropriate dilutions on surfaces, in laundry, and in the air.   In the air, hydrogen peroxide is safe in concentrations up to 1ppm according to the Occupational Safety and Health Administration (OSHA). Because it’s chemically very similar to water, it can be produced from water and decomposes into water.  Yet as common and beneficial of a substance as it is, bulk hydrogen peroxide is surprisingly hard to produce and transport.  Currently, large quantities of hydrogen peroxide are made through what’s known as the “anthraquinone process.” This method is energy-intense, requires large-scale production, and produces large quantities of carbon dioxide (CO2) as a byproduct. While directly reacting hydrogen and oxygen to make hydrogen peroxide would be ideal, thermodynamics prefers to form the more stable water (H2O) over hydrogen peroxide.  (Producing hydrogen peroxide when, and where, it’s needed)  However, since only a minimal amount of hydrogen peroxide is needed and proven safe to kill microbes in the air, purifiers are now using different technologies to produce “dry” hydrogen peroxide and distribute it for air cleaning.  Here are some examples:

  • Photohydroionization (PHI) is a technology developed by RGF Environmental Group that uses a broad-spectrum, high intensity UV light targeted on a hydrated quad-metallic catalyst. The UV light in conjunction with the catalyst promotes the conversion of naturally occurring water vapor into airborne molecules of hydrogen peroxide (H2O2). These airborne H2O2 molecules revert to oxygen and hydrogen once they have come in contact with a pollutant. (PHI) This company produces standalone and in-duct products.
  • The TADIRAN AIROW technology fractures Oxygen (O2) into two separate “O” molecules by using a discharge current. These “free O” atoms combine with the H2O molecules in the airflow, transforming into hydrogen peroxide (H2O2). The H2O2 is then distributed through the indoor unit of the air conditioner into the conditioned living space. The amount of hydrogen peroxide that Tadiran’s new TADIRAN AIROW releases into the conditioned space is below the safety requirement as determined by OSHA of 1ppm. TADIRAN AIROW has been proven to release less than 7ppb of hydrogen peroxide. (HYDROGEN PEROXIDE TECHNOLOGY FOR INDOOR AIR PURIFICATION)
  • AirROS purifiers utilize and create 7 species of ROS (Reactive Oxygen Species).  The first stage, which occurs inside the device, includes 5 of these ROS (atomic oxygen, singlet oxygen, hydroxyl radicals, superoxide and peroxynitrite), and 2 species (gas-phased H2O2- dry hydrogen peroxide and low concentration levels of O3-ozone) leave the reactor and move into the room for further disinfection.  According to AirROS, “...Dry Hydrogen Peroxide purifiers technology can only provide short-distance surface treatment within the air purifier because of the short life of hydrogen peroxide. If you have a surface not close to the purifier, it will be untreated and left vulnerable to contamination.  AirROS commercial air and surface purifiers offer long-distance surface treatment because of the Trioxidane that forms from O3 and H2O2 combined, which means you can treat any surface, no matter how far away it is from the purifier. As a result, it provides an added layer of protection against surface contamination and eliminates odor effectively.  Trioxidane decomposes very quickly in water but has a half-life of 16 minutes in normal ambient conditions, making it one of the longest lasting hydroxyl radicals. It’s theorized that the human body also produces trioxidane as a powerful oxidant against invading bacteria because the body also produces singlet oxygen and has lots of water, the two ingredients for making trioxidane.  (Trioxidane)
  • AsepticSure Oxidation by Medizone International (UK company) is a system that uses hydrogen peroxide and ozone to clean unmanned rooms. According to EPA registration, personnel must be trained, the room must be sealed, and the ozone generated can have severe effects on certain materials, such as natural rubber and nylon.  The time to disinfect, personnel required to operate the system and limitations (not to be used with contraindicative materials or with life-saving equipment or with personnel in the room), all seem to be quite restrictive, yet the system has been sold to and installed at many medical facilities.
  • A hydrogen peroxide generator composed of a TiO2 catalyst that is activated with UV light was studied in 2022.  The photocatalyst becomes activated by light given off by a nearby UV-A bulb which excites electrons across the bandgap of TiO2, converting water vapor in the air stream passing through the catalyst into H2O2.  The researchers were aware that it is theoretically possible that H2O2, OH radicals, and hydroperoxide radicals can enter an air stream that passes through an operating photocatalytic TiO2 structure. From an indoor air space standpoint, however, only H2O2 will survive long enough to be detected at distances greater than about 1 cm from the photocatalyst. Over time, the H2O2 that has entered the room will either react with organic species within the indoor space or decay naturally into the benign products, water and oxygen. Hydrogen peroxide can last up to 30 minutes, depending on temperature, humidity, and reactive contents in the room.

Limitations of dry hydrogen peroxide include:

  • Position of the unit: position is very important, because dry hydrogen peroxide has relatively high reactivity, which can diminish its effective lifetime. For instance, H2O2 is known to react with metal surfaces such as those provided by the metal ductwork in the bypass duct. As the pathlength between the device and the room becomes longer, the H2O2  concentration could possibly become diminished (due to reactions with the metal ducting) to a point where MS2 inactivation is minimal or no longer even occurs (2022 study Evaluation of a Gaseous Hydrogen Peroxide Generating Device). 
  • Sensitivity: The other product, trioxidane, is a product of ozone and hydrogen peroxide.  Although devices are restricted in ozone output in the US, those who have asthma or other respiratory issues may want to use them with caution. 

Photo by Bill Jelen on Unsplash

A Clean Way to Update Your Popcorn Ceiling

A Clean Way to Update Your Popcorn Ceiling

Do you have an old ceiling that needs updating?  “Popcorn”, acoustic tile and other types of textured ceilings can become brittle and contribute to bad air quality because they can hold dust and mold spores, as well as fall off in big or small chunks whenever they’re disturbed (think small flying toys, changing light fixtures, cleaning cobwebs or any type of paint touch-up!).  Worst of all, some ceilings installed before/through the 1980s may have asbestos in them (here is a helpful article if you suspect your ceilings may have asbestos).  Refinishing or replacing such a ceiling is a major undertaking that involves removing or covering all the furniture, blocking off the HVAC and doorways, and using personal protective gear to avoid inhaling the dust.  It’s daunting and expensive even for seasoned DIYer’s, and not a realistic option for renters.  

It’s important that homeowners or renters with older popcorn ceilings be aware that ceilings installed before the early 1980s may have asbestos in them. Asbestos is a mineral fiber that occurs in rock and soil (Learn About Asbestos). According to the EPA, most uses of asbestos are not banned; however, it was banned from spray-applied surfacing materials (such as ceiling textures) in 1978. (EPA Actions to Protect the Public from Exposure to Asbestos).  So, it’s unlikely for any ceilings constructed/finished in the late 1980s to have asbestos.  Although professional removal of asbestos-containing materials is best, encapsulation of the ceiling by professional stretch ceiling installers is a (likely less-expensive) alternative. 

Stretch ceilings are a design idea that’s new to the US, but has been more popular in Europe and the Middle East for some time now.  Far from being relegated to the renovation industry, architects even specify them in some designs, and they are ideal for athletic and commercial spaces. 

There are two types of stretch ceilings: fabric or PVC.  Unfortunately, PVC must be heated during installation (usually with propane heat cannons) and it will start to off-gas and continue to off-gas throughout its life (up to 20 years).  (Two Kinds of Stretch Ceilings)  Therefore, in this article we will focus on fabric ceilings, which still have plenty of design choices, colors and aesthetics.  Fabric ceilings from Popcorn Ceiling Solutions are made from 100% knit polyester strands, infused with a water-based polyurethane (PU) coating, which makes them hydrophobic and mildew resistant.  They are VOC-tested and CE-certificated. 

According to stretch ceiling websites, there are many advantages to these installations.  Here are a few:

  • Lighting can be installed under or over stretch fabric ceilings.  Underneath, led lighting installations can be configured as spotlights or tracks in any design, with individual and dimmer controls available.  Traditional flush and pendant lights can be installed through the ceiling so that traditional design aesthetics can be maintained.  

  • Acoustic insulation can be hidden above a stretch ceiling, which is an obvious benefit for schools and athletic buildings to dampen noise.  You can also add it to your apartment or bedroom to get more privacy and peace.

  • Moisture and mildew resistance is a plus for humid environments like bathrooms, athletic facilities and indoor swimming pools. 

  • Many city apartment or condo buildings have concrete ceilings, which have limited lighting and design options.  A stretch ceiling adds many more possibilities.

  • Renters can upgrade their stained, dated ceilings by asking them (or asking permission) to install stretch ceilings. 

  • Stretch ceilings only lower ceilings by inches: the typical installation requires a minimum of 1” clearance, so substantial ceiling height is not compromised.

  • Cleaning with a mild soap and water are all that’s needed if the ceiling becomes soiled.  

  • Most installation companies give warranties that the ceiling will not sag or drop during the warranty period.

  • The fabric may be fire-rated.  According to Popcorn Ceiling Solutions, their fabric has the highest fire rating for building materials and a Class A. Fire and Smoke certificate is available upon request. (Frequently Asked Questions)

  • Multiple designs and colors are available; it’s even possible to paint your own ceiling (however it may void the manufacturer’s warranty). 

  • Stretch ceilings appear even smoother than skim-coated drywall and are completely level.

So, if you have a flaky or unsightly ceiling that may be contributing to bad air quality at home, check into fabric stretch ceiling installers in your area.  Then the ceiling will be one less source of dust and allergies in your home!

Are there any new mold detectors on the market?

Are there any new "mold detectors" on the market?

If you have had a brush with illness-causing mold or suspect that there may be toxic mold growing somewhere in your home, we understand the desire for speedy detection and remediation!  Often, the solution also has to lie within a modest budget.  Traditionally, that demanded a trade-off between Do-It-Yourself (DIY) mold detection versus calling in professionals.  We’ve written about DIY mold test kits and how they work, but what else is available when the mold can’t be seen?  Ian Cull of the Indoor Air Quality Association made a three-part video on how to detect mold in walls, but we tend to advise homeowners NOT to do some of the things he mentions:

  1. We recommend that you DON’T cut a large hole in your drywall with a saw to peek inside.  This presents a number of problems: patching the hole if you don’t find mold, potentially cutting electrical wires or plumbing in the process, and disturbing mold that will be released throughout the home!

  2. We recommend that you DON’T “sniff” around electrical or cable outlets for microbial volatile organic compounds (mVOCs): these are the musty, earthy smells that mold produces when it’s growing. The drawbacks are that there may not be an outlet where there’s mold, and of course, you’re inhaling mVOCs and potentially mold spores and mycotoxins, very deeply into your lungs!  Instead, check out the VOCs and Mold Test option below.

  3. Use a borescope (also called an endoscope or snake camera)–it’s a very small camera that can fit through a very small hole!  Some have mirror attachments that can look at the back side of the drywall.  They used to only be used by professionals, but now are available for under $100.

  4. Looking for moisture: Since mold needs moisture to grow, a moisture meter is a cheap way to see if that moisture is present in the wall.  A more expensive piece of equipment is an infrared camera, which sometimes requires experience to understand what you are seeing.  However, these only find active moisture and mold problems (not if the area has dried out).

  5. Lab-based methods: taking samples of the air in the room. This may cause elevated counts in that room, but it will not pinpoint the source of the mold.  It may also not pick up mold in the wall.

  6. Lab-based methods: taking samples of air within the wall.  This is more specific to the area, however there’s not a threshold and this type of test may give false positives or false negatives.

Besides these (sometimes) destructive methods, we’ve written about blacklights that can show mold or water staining.  Also, using an N-95 mask or equivalent, you could:

  • Carefully remove a baseboard to see if any mold is present at the bottom of the drywall or on the plate (wood stud sitting on top of the floor).  You can also make a hole just above the plate but still under the top of the baseboard, if you want to do any testing in the wall cavity.

  • If you have pocket doors, you can peer into the cavity of the door to check the backside of the drywall. 

  • If there’s carpet in the room, use a pair of pliers to pull the carpet away in a corner to see if there’s mold under the carpet or baseboard.

  • If you have access to the wall from the attic or the crawlspace, you can use a drill to drill through the top or bottom plate and use a borescope to see “into” the wall.  Be sure to use a mask and plug up the hole afterward!

These are fairly standard ways to look for mold in a wall, but here are some new ones that have popped up recently.

VOCs and Mold Test: Because “black mold” like Stachybotrys does not always release a significant amount of spores unless it is disturbed, detecting mold that is enclosed in a wall can be difficult.  However, microbial VOCs (mVOCs) are the gasses given off by mold, they can be more easily detected, and are exactly what this test specializes in.  The sample pump and test tubes are shipped to you with instructions, which are also available in video form on the website.  After sampling, the equipment and tubes are mailed back for analysis. The only difficult part of this test may be complying with keeping the outside doors closed for 24 hours before the test.  It doesn’t detect mycotoxins, but where there’s mVOCs, there also may be mycotoxins.  The real-time version of this type of testing is called zNose, and it’s used in airports and building security, food manufacturing, and many other industries to detect VOCs from trace explosives, chemicals and microbes.

The Healthful Home 5-Minute Mold Test is unique.  The company has a patented way to check for Stachybotrys Chartarum and Penicillium/Aspergillus species using a swab test, which are just two of the most common toxic molds.  The test seems similar to an at-home pregnancy test: use liquid from a swab sample to fill the reservoir on the mold detecting devices, and wait five minutes for the “positive” lines to appear.  The test was reviewed by an actual mold inspector in this video and he found the results concurred with lab testing of the same sample.  However, readings can sometimes be misleading on the at-home test.  It’s a good start…we would like to see more tests like this.

Hire a rescue dog: According to this video, specifically trained dogs are 95% accurate.  They point out the location, and are accurate and faster than other testing.  Dogs that are specifically trained to be mold detectives are used in Canine Mold Detective.  Buddy was the first dog trained in this way, initially trained for a thousand hours in three months, and he continues his training daily with his owner Lacey.

We at HypoAir have not physically reviewed this device, but the BioMatrix Mold Monitor is a unique in that it scans temperature, relative humidity, dew point, absolute humidity, and equilibrium moisture content (EMC), and feeds these into a mold algorithm to determine if the area around it is at a high risk for mold.  The device is activated when the moisture meets one of 3 specialized sensors on the back of the unit, triggering an alarm that will alert you to potential problems. The product is powered by one 9-volt battery, which should last for 3 years (battery not included).  It also comes with a Free Virtual Mold Inspection Service by a team supervised by Industrial Hygienists experienced with mold inspection and remediation. They can perform a virtual walkthrough of the environment by video call and a structural history review to identify the potential mold exposure risks associated with each incident. Once identified, they will be available to answer any questions, provide a suggested course of action, and offer helpful resources. 

Sometime in the future, Unmanned Aerial Vehicles (UAVs or more commonly, drones) could be employed to detect indoor pollution sources.  According to this study, people have begun to try using UAVs to locate indoor gas sources, and it actually could save money: one drone could replace an extensive sensor network.  

For more advanced warning devices for mold, check out our article on leak detectors.  Overgrowth of mold in your home is just too costly in terms of your health and money to repair damages, so it’s worth looking into detectors and safeguards to detect it or its precursor, moisture. 

Photo by Ali Hajian on Unsplash

Increasing Filter Surface Area for Better HVAC Filtration

Increasing Filter Surface Area for Better HVAC Filtration

Lots of customers are jumping on the idea to use their central HVAC as a whole-house air cleaner.  Why not?  It’s a very expensive piece of equipment, it has a fan and an air filter, and it circulates air throughout the house.  The only thing is that you can’t snatch out your 1” MERV 2 filter and throw in a MERV 12 one.  At the least, the unit will protest by whistling, or delayed starts and stops, and at the worst you could cause damage it or cause a fire.  Whoa!  Let’s make the conversion to a whole-house air cleaner SAFELY.

We’ve written another article on how to increase filtration with your HVAC and why it’s dangerous to increase MERV without increasing filter surface area.  Doing this increases the pressure drop, throwing a restriction into the airflow of the system.  Basically, HVAC systems are not designed to have more than 0.25 inches water gage pressure drop over the filter (manufacturers recommend on average a 0.1 inch water gage over the filter), and adding a high MERV filter in the same slot as a low MERV filter will drastically increase the pressure drop.  

Now, you can train that dog to hunt–just put in some extra equipment!  What we’re talking about is more filter surface area.  Here’s a great rule of thumb to keep in mind: when the filter surface area in a system is doubled, the pressure drop over the filters will typically reduce by more than 50 percent. (Duct Dynasty: Confronting Restrictive Air Filters)  Another rule of thumb is to keep the filter face velocity between 200-250 feet per minute.  This allows the air enough time to interact with the filter and effectively remove even fine particles. Here’s a great video explaining the concept; even though the instructor is using an app that HVAC techs use (measureQuick), he explains the filter face velocity concept beautifully.  The difference between his velocity range (250-500 feet per minute) and ours (200-250 feet per minute) is that he’s working with commercial systems, so according to residential IAQ gurus, you’ll want to keep it between 200-250 feet per minute..  

Ok, so I need to add more surface area to my filters–what options do I have?  

  1. Adding another return grille: You can examine the layout of your current HVAC return duct and air handler to see if there is room to add another return grille, where you can place another filter.  This may be the least expensive initial cost, however, over time thicker filters (see next option) may cost less.  In order to calculate the required surface area of the additional filter, start with the cfm of your unit (see our article to determine, and divide it by 1) 200 ft/min and then 2) 250 ft/min.  This will give your max and min surface area in feet squared.  To convert these numbers to square inches, divide by 144.  Then, subtract your current filter’s square inches to get the max and min square inches of the additional filter, and look at common filter sizes to fall in this range.
  2. A thicker filter: although the cross-sectional area of the face of the filter may remain the same, increasing from a 1” to a 4” filter adds a lot more surface area with those deep pleats! They are also called media filters. These thicker filters usually also require less frequent filter replacements. You will want to check the rated cfm and clean filter pressure drop for each model you consider.  Here are some systems that fall into this category:
    1. If you have a 1” filter return filter grille on a wall somewhere, and there is enough room behind it (it doesn’t immediately narrow down), you can substitute a 4-5” thick filter for the 1” filter very easily using this type. See how the lip of the filter is designed to fit in the 1” grille, but you have a lot deeper filter behind it?  Genius!
    2. Again, if you have deep space behind your 1” return grille, you can consider an Electronic Air Cleaner, which can increase MERV with the same surface area.  For example, the Clean Comfort® brand AE14-G Series Electronic Air Cleaner, $600, claims "At rated airflow, the electronic air cleaner achieves a MERV 14 rating. With the fan running on low speed, the air cleaner increases efficiency up to a rating of MERV 16.  The static pressure drop of the electronic air cleaner is as low as 0.16” compared to 0.22" or higher for a typical 1" MERV 8 furnace filter.”
  3. Install a cabinet air filter:
    1. Honeywell F100 Air Cleaners:  At 6.25 inches wide, the cabinet is not super-wide, and it comes in 7 dimensions.  For the 20x25” filter, the cabinet and filter are $168, and replacement filters are $40 each (when buying a 2-pack of MERV 11 filters).  It’s recommended to replace the filter at least every 6 months, so $80 a year for filter changes is not bad!  The clean filter pressure drop is 0.25 inches water gage for 2000 cfm.
    2. Aprilaire also makes a media filter.  Their model 1210 is 20x25” and costs $120.  MERV 11 filters for this unit cost $50 per filter (with a 2-pack).   The clean filter pressure drop is 0.22 inches water gage for 2000 cfm.
    3. IQAir PerfectPro 2025 is a thick filter with nanofibers arranged for “hyperHEPA” filtration. It can drastically reduce the PM2.5 and PM10 in your home, as this test/review found, but the pressure drop at 2000 cfm (5 tons) is 0.32 inches water gage, which is very high!  The price tag is also quite steep at  $1,995.  
    4. Trane CleanEffects Air Cleaner is an electrostatic filter.  It uses ions to charge the incoming air to make particles more “sticky” on the filter.  There are 3 parts to the air cleaner: a prefilter which should be vacuumed every 1-3 months, a field charger (with metal pins that generate ions) that should be cleaned by a technician, and a set of “reusable collection cells” which also get vacuumed by the homeowner.  The pros: CleanEffects has the highest efficiency of particle removal with the lowest pressure drop, it has no filters to “replace”, and it’s Asthma & Allergy Friendly™ certified by the Asthma and Allergy Foundation of America. However, the cost for this device is about $2000 installed, and maintenance (cleaning) is key because its efficiency drops when it gets dirty.  These units are only sold and installed by licensed HVAC technicians.
  4. A “V-Bank” of filters: Instead of placing one filter perpendicular to the air flow, you can get more surface area by adding 2 (or more) filters in the shape of a V.  This device would usually be installed in an HVAC room (it’s not a filter grille for a wall). The only problem with this arrangement is that filter loading is not always even; air (like any fluid) will always seek the lowest pressure/resistance, and at the pointy ends where air becomes compressed, the filter load is lighter.  There are several manufacturers that sell this type of filter arrangement.
    1. IQAir also makes a double-v-bank filter, meaning that it technically has up to 4x the filter surface area of a typical single, perpendicular filter installation (see picture below).  This enables the device to exceed MERV 16, according to independent testing. The PerfectPro X 25x30 is compatible with a 5-ton HVAC system, the price tag is quite steep at  $3,395, but you do get 3 years out of the filters. The pressure drop is similar to other systems at 0.22 in H2O at 2000 cfm. 
    2. For a more economical V-bank filter system, AirScape SFB-V Series are MERV-13 V-Bank inline filter boxes.  However, their largest unit is slightly undersized for our 2000 cfm system above. The SFB-V-16x25 costs about $374 and has a min-max airflow of 1667-2778 cfm, corresponding to 300-500 feet per minute face velocity and 0.12-0.29 pressure drop.  Therefore, we would recommend you stay on the lower side and use this unit only in a 4 ton system (1600 cfm) to keep the face velocity down.

Source: IQAir Whole House Air Purifiers

If you want cleaner air with less filter changes, there are many options out there (we didn't include cabinets by Koch, GeneralAire and others simply because pressure drop information was not available).  You’ll want to take into consideration ease of obtaining (purchasing) the filters, and also placement of the cabinet for ease of changing/cleaning them.  Keeping up with filter changes is a worthwhile, minor chore if it means less dust in the house, less cleaning, and less allergens to potentially infect or annoy your family.  

Photo by frank mckenna on Unsplash

How to get free ventilation without sacrificing heat (or cool)

How to get free ventilation without sacrificing heat (or cool)

Something has piqued my interest for some time: the transfer of heat to make something cooler or warmer than the ambient air without mechanical means.  Living in the hot and humid southeast US, I’m keenly aware that air conditioning is key to my comfort during the summer.  Ventilation is necessary, but ventilation will make my house hot like the outside…or will it?   

I’m going to draw on a 2023 study that showed how to ventilate a building by natural means (no fans) but still cause it to be 7 degrees cooler than the outside, even with an internal heat source.  Whoa!  This is noteworthy.

I’ll give you the simplified version. The study involved placing 2 insulated boxes on the top of a shipping container in a warm, dry climate (Topanga Valley, CA).  The “reference” box had insulation on all 6 sides.  The “test” box had insulation on the four vertical sides and bottom, but for the top had an aluminum plate on which a radiant material was glued.  The only ventilation in each box was 2 PVC pipes.  On the reference box, the ventilation pipes were in the top of the box, while on the test box, they were in the bottom of the box.  Each box contained (4 to 6) 1-liter water bottles for thermal mass, as well as a small heater to simulate lighting, fans and other electrical loads that would be operating in a home.

What happened in these boxes?  The differences of a) removing the insulation from the roof and replacing it with conductive and radiative materials, as well as b) placement of the ventilation pipes, caused a substantial difference in the way the boxes ventilated and their interior temperatures.  Here’s a schematic of the boxes:

In a nutshell, this type of natural ventilation is driven by differences in temperature.  During the day, the reference box did not ventilate because the interior stayed cooler than the exterior.  It only ventilated at night, because with cool desert temperatures at night, the interior was relatively warmer than the exterior.  However, the test box actively ventilated during the day because the cool air in the box sank out through the ventilation pipe on the bottom, and was replaced with warmer air.  However, it stayed cooler than the reference box because the conductive material on the roof (aluminum) drew heat from the inside and the radiative material reflected 93% of solar heat back into space.  Here’s a summary of the benefits of the test box setup:

  • There was a net loss of heat during the day and the night, even with an internal heat source. 

  • Ventilation during the day occurred 7 times per hour (7 ACH).  

Here’s an architectural concept of what a real house could look like:

Other details:

  • The reference box only ventilated at night and the test box only ventilated during the day.  In a real building, however, both ventilation approaches can be combined to produce continuous ventilation, switching between downwelling and upwelling by activating different vents as necessary.
  • The thermal mass inside the boxes had the purpose of modulating heat fluctuations.
  • The insulation used on the boxes was vacuum panels, which are a very effective insulation, albeit an expensive one for residential housing!  
  • Convection shields of metal with a radiative coating were placed over the sides of the boxes to prevent them from absorbing solar heat.  
  • The boxes had no penetrations except for the ventilation pipes, which is not a realistic residential scenario with no windows or doors. 
  • The boxes were tested in a warm dry climate, without humidity/mold concerns.  In a more humid climate, dehumidification would probably be necessary.  
  • Ventilation pipe size and thermal mass would need to be fine-tuned for each home and its occupants. 
  • Removing the roof insulation from a modern home is quite unusual; in fact, a previous version of movable roof panel insulation and radiant covering was key in Harold Hays’ Skytherm innovation. 

Wow, this is really quite fascinating.  Imagine having copious ventilation AND keeping your home cool in the summer.  Windows don’t have to be heat loss/gain devices, either: with new insulation materials coming into existence all the time (there’s a new aerogel made from cellulose that’s even more transparent than glass), or the Parans solar lighting system that captures sunlight and sends it indoors via fiber-optic cables, a super-insulated, light-filled home is possible (with the right budget).  The idea of thermal mass is certainly not new, either; that’s the reason stone and earth have been used in warm-climate homes for millenia!  We also wrote about a new insulation material that uses phase-change to absorb heat without transmitting it into your home.  With the invention of new radiant systems like the SkyCool system, buildings are actively rejecting solar heat and removing heat from inside the building, saving from 15-40% of cooling costs.

Even without the high-tech materials, the main takeaway of this concept is to seal up your home and ventilate naturally: to do this in warm climates it’s best to have the ventilation intakes lower in the house, on the “cool” side.  Also, look into a radiant barrier for your attic space; we give some tips in this article.   Finally, always monitor humidity, no matter the temperature.  No one can live in an ice-box and turn a blind eye to humidity and mold!

Photo by frank mckenna on Unsplash

Why you need a moisture meter (and how to use it!)

Why you need a moisture meter (and how to use it!)

Moisture meters are like thermometers.  When you think, I feel warm…do I have a fever?  You might ask someone else to put their hand on your forehead for a reference check, but if they’re not sure, what you really need is a thermometer to verify your body temperature.  Likewise, sometimes in my own home I see a dark spot on a wall or windowsill that I hadn’t noticed before, and think, is that a water stain or actively leaking water?  I place my fingers or hand on the spot to see if I feel moisture, but if it’s not sopping wet, it’s sometimes hard to tell if there’s any difference with the surrounding material.  What I need is a moisture meter.

Moisture meters work to sense moisture by electrical conductivity.  Since water is more conductive than drywall, wood and many materials (other than metal),it uses this property of water to “detect” the relative moisture.  For this reason, some types of moisture meters are made for gardeners and farmers, to tell when the soil is too dry and plants need to be watered (this type doesn’t even need a battery).  Moisture meters for home inspections, however, come in “pin” and “pinless” varieties.  The “pin” type have sharp pins for actually sticking into the material, while pinless meters–you guessed it–don’t have pins.  This type detects moisture using conductance by either radio frequency or capacitance of a material.  (Evaluating Pinless Moisture Meters Vs. Pin Moisture Meters)  Both have their place in a professional home inspector’s toolbox for different reasons.

Here are some considerations to decide which moisture meter to use:

Accessibility and Damage: Obviously, you can’t insert a pin moisture meter into materials like concrete and tile without damage, so pinless would be the way to go.  Also, if the material is highly visible and/or valuable, you might not want to insert pins into it (even though the holes are small).

Speed: Pinless meters are much faster because you don’t have to stop and insert pins into the material.

Accuracy: Both types of meters can be accurate, but pin meters are preferred by home inspectors (when possible to use them) because pins have the ability to sense deeper into the material, and their readings are very repeatable when inserted into the same holes.  

Adaptability: Pin meters may come with a variety of accessories (types of pins) for different surfaces.  There are hammer electrodes (you guessed it-for hammering them in!), deep wall probes, extension probes and baseboard probes.  

Now that you know the difference, how do you use them?

For those that like videos, here’s a good short one by This Old House.  Here are the takeaways:

  • Thermal cameras can also be used to spot moisture in a wall because of temperature differences, but unless you’re an expert, you should confirm that’s it not simply missing insulation with a moisture meter.
  • When using a moisture meter, good dry material should show between 6-9% moisture.
  • 15% or more indicates a definite water intrusion problem.   You’ll need to consider replacing the material if it’s drywall, or if it’s wood, at least removing it to assess damage, expose the backside and dry it thoroughly.
  • Some meters are “combination” meters that have pins and pinless technologies.

It’s important to know some quirks about using moisture meters.  You can watch a very interesting video (up to about minute 5:50) from a reputable home inspector showing these points, or read them here: 

  • Metal also has low resistance to electricity (high conductivity), so if there’s metal in the surface, like a metal cornerbead in drywall or metal lath behind tile or nails or screws, you can get a reading that looks like moisture when in fact it’s dry; the metal gives a false positive.
  • Moisture meters are not very accurate on tile.  The minerals in the masonry/concrete can give a false positive.  Also, there can be metal flashing under tile, especially behind shower surrounds.  You must use intuition/other tools to find real water intrusion and remediate.
  • Dry dog and especially cat urine will give false positives because the minerals in the urine will permanently alter the composition of the material (drywall, carpet, etc.), causing it to be more conductive and appear "wet" to the meter.
  • Moisture meters only read water, not mold.  Although mold needs moisture to grow, it takes a few days to take root (typically 48 hours for very wet surfaces), so if you catch the moisture soon enough and dry it out quickly, you may not have a mold issue.
  • Moisture meters may give a normal reading (false negative) even though you have mold!  This can happen when the mold is caused by humidity.  A moisture meter will typically not pick up excessive moisture when the mold is caused by condensation.  The condensation occurs only on a very thin layer of the material.  While this is sufficient to cause mold growth, it typically will produce a normal reading on a moisture meter. (Humidity and Mold in Home)

Moisture meters can be used in other situations, too!  It’s nice to know:

  • Is the firewood dry enough to burn well:  It's important to burn only wood with moisture content below 20%. Burning wood with higher moisture content creates more smoke, which contains harmful chemicals and particulates and forms creosote on your chimney. It also gives you less heat, because it takes energy to boil off the excess water. (Storing and Drying Firewood)
  • How dry does a wood surface need to be in order to paint it?  According to an Amazon Technical Bulletin, most outdoor wood, concrete, stucco and plaster surfaces must be at or below 12%, otherwise the paint may not adhere properly, or risks failing early.  Indoor wood and cabinetry should be closer to 6%. 
  • Are your hard wood floors ready to install?  Wood flooring installers typically want the moisture content of hardwood floorboards to be between 6% and 9% (based on an indoor temperature of 60–80° F and 30–50% relative humidity).  (How to Measure Moisture in Hardwood Floors)

Finally, like many other products, the more functions a moisture meter has, the more expensive it’s going to be.  Here are some functions:

  • Ability to “calibrate”: although most cheaper meters do not have a “calibration” function, some have a button to return the device to a factory preset.
  • Ability to choose a very specific material (like concrete, drywall, softwood, hardwood, etc.) Here is a video showing the differences between using a cheap moisture meter and a more expensive one for woodworking.
  • Sensitivity: Instead of soft or hardwoods, some testers allow to select based on a table of listed woods, like this one (more specific for woodworking). 

Here are some devices to consider:

Pinless meters: 

  • Wood Moisture Meter (Pinless-colors), $37, has an LED display screen that looks like an analog meter, with green to red color codes that align with the moisture content.  The pinless moisture meter is penetrates up to 0.75inches deep.  Despite the warning that it’s not recommended for drywall, many customers report using it with success in finding leaks behind drywall before they became too serious.
  • Klein Tools ET140 Pinless Moisture Meter, $42: This rugged meter seems to be very easy to use in selecting the material and verifying the moisture content.

Pin meters:

“Combo” meters:

Reading the reviews on these devices, we’ve seen many homeowners and renters who are able to make quick, informed decisions to call in professional help and get repairs going before serious water damage and mold took root in their homes.  We think it’s an important tool to have in your toolbox whether or not you think you need it right now, because water damage can escalate quickly in hours and days, and the time spent looking or ordering one could be very precious!

Gutters and downspouts: the necessary accessories that move water away from your home

Gutters and downspouts: the necessary accessories that move water away from your home

Gutters just can’t compete with kitchens.  When you save up for those long-awaited home renovations, or even as a part of a new home, gutters usually take a backseat to countertops and appliances.  We get it–spending so much time inside makes you want to beautify the things you see most.  But right now we’re going to bat for those hard-working gutters, because it turns out you’ll probably use them way more than a pot-filler behind your stove.

Unless you live in a desert (and even deserts can have pretty intense flash floods), gutters are the second line of defense (after your roof) against water intrusion.  In conjunction with downspouts, they move water away from your home so it’s less likely to cause damage and rot.   Without them, water falls directly off the roof and lands on the ground next to your home, splashing up and causing the siding to discolor at the very least from erosion, mud and vegetation that gets thrown up, or deteriorate because the water splash is coming from the opposite direction (the ground) than the siding is designed to handle.  In addition, excess water around your home’s foundation can intrude into the basement or crawlspace, causing mold problems that contaminate the home’s air quality.  One family who moved into a home in Hawaii in 2008 became very ill because of mold and myctoxins, and one of the inspection reports of the home revealed the water intrusion problem. “The crawl space had water intrusion, musty mold odor, and visible mold on floor joists. The yard sprinklers were directed towards the house and the eaves did not have rain gutters, permitting the pooling of water. Water entered the crawl space through cement walls and followed piping present in the crawl space. Smoke testing revealed communication between the crawl space and upper level bedrooms via electrical outlets and electrical ducts and plumbing. The conduit holes were not sealed, permitting observance of light coming through spaces in the floor joists. A musty odor was present in the master bathroom and noted to get stronger when the fan coil was turned on.”  The couple, their 2 young children, the family dog, and even a baby born 3 months after moving out of the house, all suffered from the mold growing in the home.  (A Water-Damaged Home and Health of Occupants: A Case Study)  

If you’ve got them, clean them regularly!  We’ve all seen gutters that sag or break because a clog in one area or the downspout makes the water back up through the rest of the gutter.  If you don’t remember from science class, water weighs about 8.3 pounds per gallon.   Let’s do a little math here.  If you have 5” K-style gutters (5” is the width), they can hold 1.2 gallons of water per foot.  (The Definitive Guide to Gutter Sizing)  If you have a gutter run on one side of your house of only 20 feet, almost 200 pounds of water (8.3x1.2x20) could be hanging out in your gutters if it becomes clogged!   Chances are, while the water is stopped up there for days or weeks, it’s dripping from seams or holes into the ground, or into the fascia board if the water line is close to the top.  Then, another rainstorm sends water pouring over the side of them, splashing on the side of your home and making it look like you didn’t have gutters at all.  

If your home doesn’t have gutters, you should investigate why.   “We took them down because they were falling down” or “they weren’t there when we moved in” is not an acceptable answer!   You need to examine the reason for their absence, and understand where rainwater is going in their absence.  That said, there are acceptable reasons and alternatives to gutters, and here are some:

Reasons not to have gutters on your home (Are Gutters Necessary?):

  1. Your home is surrounded by concrete that slopes away from the house.  In this case, the falling water still may splash on the siding, but it’s not running back toward the foundation. 

  2. If your home is on a hill that slopes in all directions away from the home, gutters may not be necessary (but splashing will still occur).

  3. Large roof overhangs (the article says 6-10 inches but that’s really not sufficient if the ground doesn’t slope away sufficiently) may preclude gutter installation.

  4. If you live in a very dry area, you may not need gutters.

  5. If you have a flat roof, gutters are not necessary, but certainly you’ll have to make sure the drains from the roof stay clean and well-maintained.

  6. Some historical societies are very strict about gutters, as they weren't commonly installed on residential homes until the mid-1900s.  In this case “built-in” or box gutters conceal the device, and “Yankee gutters” also blend in with the roof so that architectural features like rafter tails are not concealed (check out this article for more information and photos about historic gutters).

Wait, are there alternatives to gutters?  Yes, there are!  Without a gutter up high, some options allow you to bring the maintenance down to ground level. (6 Best Gutter Alternatives for Your Home (2024)):  

  1. Drip paths: Without a gutter, the water runs straight off your roof over the edge.  Without attention to the landscaping, the water hitting the ground will eventually erode the ground, also splashing on the home’s siding.  Drip paths are shallow trenches that run along the base of the home, filled with rocks, bricks, or other materials to help divert excess water away from the foundation, preventing dirt splashback, reducing erosion, and limiting soil saturation.  They are labor-intensive to install (you’ll have to dig down for the trench and bring in the stone or materials to line it) and don’t protect the siding, but they do help to prevent erosion and limit soil saturation.

  2. French drains are similar to drip paths but look better, recycle water, and can expand to the entire yard. They resemble a trench filled with gravel. Underneath the trench is a perforated pipe that funnels water into a designated area.  They often require the assistance of a landscaping company to install because of the labor, getting the slope and destination of the pipe correct, and materials required.  

  3. Yard grading: Many times the turf around Contracting a reputable landscaper will be needed to adjust the slope of your yard to drain water away from the home and its foundation. Yard grading helps with other landscaping problems, such as soggy lawns, puddles, root rot, and uneven turf.  You may have to replant grass and other plants where it’s graded (unless the landscaper can save them), but if you have a large area to grade, their equipment (and expertise) is invaluable.   For a small grading project, check out this video.  

  4. “Underground roof”: An underground roof is a deflecting surface just below grade that slopes away from the building and directs all that roof water away from the foundation. Any impervious sheet material (heavy-duty polyethylene, rubber membrane, rigid insulation) at least 3 feet wide is placed along the foundation about 8 to 12 inches below grade and sloped away from the foundation. (In a cold climate, using rigid foam insulation has the additional benefit of warming the soil, even if just a bit, beneath the insulation and next to the foundation.) Well-draining soil is placed over the sheet material up to grade and covered with a large-diameter topping material, such as pea stone or wood mulch, to break up the falling water and reduce splashback to the building.  A combination French drain/underground roof system is shown here

  5. Rainhandlers: This system is like a louvre that directs water away from your home.  It doesn’t require downspouts, which are unattractive to many homeowners.  They are not supposed to clog with debris.  In gentle rains, the water droplets will fall straight down.  In harder rains, the water is “kicked” out from the rainhandler about 3 feet.  With very intense rains, however, water could pool around your foundation if you don’t have a drain in the ground.  This renovation company prefers gutters over Rainhandlers for this reason. 

  6. Some sources state that a drip edge is an alternative to gutters.  A drip edge is part of a roof, and only keeps the water from going back up under the shingles and rotting wood or forming ice dams.  It’s not really an alternative to gutters, because it doesn’t do anything to keep water away from the foundation. 

  7. Rain chains: These decorative chains are really meant to replace downspouts, as they work with gutters to focus the runoff to one vertical place.  In downpours, they can be overwhelmed and allow erosion of the ground below, if it’s not protected by stone or a large water container.   They also make noise (from the water splashing on the metal), and can become airborne in high winds if they are not of heavy construction. 

If you are installing or replacing gutters, here are some considerations :

  • Just like buying a new heating or cooling system, gutters come in various sizes that relate to your home’s size and roof.  It’s worth doing your own gutter sizing calculations to double-check what the gutter company is offering.  After all, if your new gutters turn out to be under-sized, the foundation, siding and landscaping are all at risk for damage.

  • One reason that gutters are best installed by a professional, is that they need to be adequately sloped.  The slope should be one-half inch for every 10 feet of gutter.

  • Investigate what fasteners will be used.  Fasteners are what supports the gutters on the side of the fascia, and they are very important.  Many experts prefer gutter hangers (they clip inside the gutter and have a long screw that is angled down that is screwed into the end of the rafters) over spikes, which are basically long nails that are driven through the gutters into the fascia.  These screws will not come loose on their own, as spikes tend to do.  (Hangers vs. Spikes: How to Choose the Best Gutter Fastener)  Also, gutter hangers should be installed at least every three feet apart, or closer if you live in an area that receives a lot of snow, because snow and ice, even though snow is less dense, can pile up for feet above your gutter and roof.

  • According to the Building America Solutions Center, downspouts should be placed every 20 feet but not more than 50 feet apart.   After the downspout, you should continue the water channel in lateral pipe, ending at least 5 feet from the house. 

  • Gutter guards, or leaf guards, are perforated pieces of metal, plastic or foam that fit over your gutters to minimize clogging with leaves and debris.  They come in all designs and costs, from a roll of plastic netting (too flimsy in my experience) to plastic coated metal strips that snap into place (much better) to custom-made and installed guards.  LeafFilter and LeafGuard are among the most popular brands.  If you live in a wooded area, these can really extend gutter-cleaning intervals by keeping leaves or needles out of the gutters.  

  • From personal experience:  If you can, get the fascia boards wrapped in metal before installing gutters:  When I supervised the buildout of my parents’ “barndominium” in 2020, I balked at this one.  The porch had already taken longer to construct than I anticipated, and this step seemed unnecessary.  “Just let me prime and paint it”, I argued with the carpenter.  But I relented when he said it would only take 1 day longer and lead to much longer life of the roof.  Four years later, I have to agree.  I’ve been up there cleaning out the gutters several times a year, and despite debris that piles up sometimes, there is no sign of rot on the fascia.  It’s a good decision. 

  • Finally, aesthetics matter!  The style and color of the gutters are important to the looks of your home.  You should definitely read this article before choosing a gutter style and color, it’s packed with photos of good and bad choices.

Investing in gutters or their upkeep is not top-priority to many homeowners, but it should be just as important as making sure you get the right vitamins, because they really are preventing damage to your home and your family’s health!

Photo by Rūta Celma on Unsplash

Keep Air Quality in Mind When Exercising Outdoors

Keep Air Quality in Mind When Exercising Outdoors

When the weather is nice, many people want to shift their exercise from indoors to outdoors.  There are a lot of benefits to it, such as varied surroundings and surfaces, mood-elevating sunshine, and even a greater incentive to stick with it and go farther, whether you’re walking, running or doing more stationary exercises.  However, should a bad air quality report keep you inside?  The answer is: it depends!  The ability to exercise outside depends on a number of factors such as location, timing, and equipment.  A free and easy way to check air quality and receive updates is from airnow.gov. Using an Air Quality Index (AQI) as a measuring tool ranging from 0-500, your local forecast and larger maps can be color coded to show whether an area is good (green), moderate (yellow), unhealthy for sensitive groups (orange), unhealthy (red), very unhealthy (purple), and hazardous (maroon).  You’ll definitely want to keep AQI between 0-50 if you are more sensitive, but healthy and active athletes can keep going in conditions up to 100 with the right equipment (masks–see below).

First of all, here’s what science says.  Sixteen studies completed between 2000 and 2020 on the short-term health effects from exposure to air pollution during outdoor exercise were chosen for review.  Nine of the 16 papers reviewed demonstrated that exercising outdoors in air pollution results in short-term (temporary) health effects, with lung function impairments being the most observed. The seven other papers, which looked at different health effects, such as inflammation and blood pressure, found no effects.   Besides being nearly evenly split, there was another unexpected result: healthy people who did moderate to high intensity exercise outdoors in low or high levels of air pollution experienced less health effects than when doing low-intensity exercise.  Experts had expected to find the opposite: that low-level exercise afforded less adverse health effects.  This seems to show that deep breathing of semi-polluted air does not seem to negate the good effects of exercise.

While exercising is a good thing, those who are older or are unusually sensitive to air pollution should avoid prolonged and intensive exercise or physical activity when the air quality is moderate or higher.   (Should You Exercise Outside in Air Pollution?)  For everyone else, here are some tips to getting your workouts outdoors with the least air pollution.

Location, location, location

When setting goals to exercise outside, it’s important to have location options and check the air quality in each of them.  If you can find a green area like a large park, chances are that it’s going to have better air quality than a track next to the highway.  Coastal routes near water and marshes also are good filters for air pollution.  This is where an AQI map of your area comes in handy, because you can head to the green areas right away!

Timing, timing, timing

Like the weather, air quality changes constantly in many locations.  That run route you wanted to do during rush hour in the morning might be clearer at noon or 2pm, so don’t lose hope!  When you can be flexible, there’s a greater chance of making your favorite routine work.

Duration

If you decide to exercise outside but the air quality is closer to 100 than to 0, consider exercising at a lower intensity or shorter duration.  

Equipment

City- and valley-dwellers admittedly have a harder time finding clean air for exercising outside.  However, masks have evolved and certain kinds are much more comfortable and adaptable for exercise use.  They must fit properly, however, and make a tight seal in order to do their job.  Here are some masks that have good reviews for exercising:

  • Cambridge Mask Company, $33, make masks that are very well-suited for more polluted areas because they have a 3-layer microfilter for particulates, plus a layer of activated carbon, which not only removes smells but also some VOCs and NOx that are troublesome in high-traffic or smoky areas.  The valved mask styles are recommended for high-intensity exercise.  They are washable and reusable for up to 340 hours, which is around 3-6 months’ average wear.

  • Airweave masks by AUSAIR, $30, are very light and have a copper filter that protects from bacteria, viruses, air pollution down to PM0.1, smog, cigarette smoke, bushfire smoke, and pollen.  The copper filters last 20 days each and come in a 3-pack for $18.

  • FuturePPE Mesh Sports Mask with 5-Layer Carbon Activated Filter, $19, blocks airborne particles, dust, and pollution.  It fits snugly and a 12-pack of replacement filters are on sale at $15. 

  • N95 and P100 masks are also sufficient to filter the particles of air pollution, but they don’t actively remove gasses like VOCs and NOx as a mask with activated carbon in it.

  • Particles can also stick to your clothing, so it’s best to launder them every time you come inside after exercising.

When one or more of these conditions don’t align to let you go outside, remember that without active filtering, air pollution eventually also makes its way inside.  Therefore, use that mask indoors or try to find a gym or studio that uses air purifiers.  You may be in the minority wearing a mask indoors, but your lungs, heart and stamina will shine when you can power through a workout without “choking”.  

Photo by Chander R on Unsplash

So you’re in the market for a new car? With or without New Car Smell?

So you’re in the market for a new car?  With or without New Car Smell?

If the idea of driving a new car is appealing, you may need to educate your nose to accept that the new car smell is not a good thing.  Thankfully, many automakers are becoming conscious of the dangers of volatile organic compounds (VOCs) that compose most new car smells, and are taking steps to reduce them.  Not a small driver for this is the new car market of China.  Over 11% of buyers in China complained about the odors they found in their new cars, according to the 2019 JD Power China Initial Quality Study. (The Self-Poisoning Car)  Apparently, Chinese prefer for their new cars to have no smell at all, which makes sense due to their genetics.  Many Asians possess a less functional acetaldehyde dehydrogenase enzyme, which is responsible for breaking this VOC down, therefore they may be especially susceptible to its allergenic effects. 

When you know about what is in the “new car smell”, you might not be too disappointed when it fades away!  Most of the smells are due to VOCs, some toxic ones at worst.   The sources are varied:

  • Residual compounds from the manufacturing process and material treatment of different interior components and textiles.   These include flame retardants (FRs), of which tris(1-chloro-isopropyl) phosphate (TCIPP) had a 99% detection frequency in a 2024 study.  TCIPP was the dominant FR detected in the vehicle seat foam, and air concentrations of this chemical increased with increasing temperature.     
  • Adhesives and carrier solvents that will de-gas – as much as 2kg of adhesive can be found in a modern car, much higher than in the past where mechanical riveting and bolting was more common]
  • Degradation of cabin materials over the longer term as a result of oxidation, ultra-violet light and heat. 

There are no worldwide standards for interior VOCs on new cars, but Asian countries seem to have some of the most well-defined guidelines.  Here are some of them:

Source: The Self-Poisoning Car

Testing VOCs with professional equipment can yield surprising results.  Even in a 1-year old gasoline Hyundai i10 (an economy car produced in India but not sold in the US because it was deemed too lightweight), methanol and acetone rose dramatically as the car stood in the sun for 5 hours, only reaching 68 degrees F.  After the five hour test without the engine on, the car was started, windows rolled up and AC on max with recirculation mode.  This yielded another surprise: some VOCs such as acetaldehyde rose steeply during the fourth to sixth minutes. During this phase acetaldehyde concentrations rose from an initial base of approximately 50 to 550 μg/m3, more than ten times the regulated limit in China and Japan. It was suspected that the air conditioner acted as a “sink” for some VOCs, which was flushing them out during this time.  (The Self-Poisoning Car)

VOCs in cars have even led to a new condition: Sick Car Syndrome (SCS), a phenomenon in which drivers and passengers experience short-term health problems owing to the accumulation of volatile organic compounds (VOCs) in vehicle cabins [1], [2] and is particularly prominent in new rarely used cars. The symptoms of SCS include irritation of the eyes, nose, and throat, headaches, and dizziness, among other symptoms, with potential long-term health consequences.  (Elevated volatile organic compound emissions from coated thermoplastic polyester elastomer in automotive interior parts: Importance of plastic swelling)

Some solutions from automotive material suppliers include: 

  • UK company Aqdot has introduced the product Aqfresh, which is a powder composed of barrel-shaped molecules with a hollow hydrophobic cavity and polar portals, enabling them to tightly bind a wide spectrum of unwanted molecules.  Aqfresh can be applied to textiles via dry impregnation, as well as by spraying and padding during the finishing process.  It can also be incorporated via compounding or polymer masterbatch into rigid plastic parts such as dashboards and other trim pieces.  
  • 3M has developed low VOC adhesive tapes and a water-based spray-on adhesive (no VOCs) that meet the Japanese Automobile Manufacturers Association (JAMA) standards for nine substances with defined limits for vehicle indoor air quality (VIAQ).  
  • POM is an acronym for the chemical name polyoxymethylene. It is generally referred to as polyacetal or acetal resin.  POM has a number of applications in cars where it replaces metal such as door locks, fuel system parts, door rollers, and clips to hold trim in place.  It has properties of durability, oil and chemical resistance, and self-lubrication.  However, traditionally POM was a source of formaldehyde.  Polyplastics has developed a number of grades of POM that are low-VOC in its DURACON® POM LV Series

Although there are some brands that historically have higher customer ratings for interior air quality (like Honda), the last comprehensive survey of new car VOCs was in 2012, and recent reports by individual automakers regarding interior VOCs are very hard to find.  You can definitely call individual manufacturers and inquire about VOCs while shopping, but when it comes down to deciding,it’s best to see/test cars in person:  What you see in a “floor model” may not be what you get in your delivered car, either, since a 2007 study showed that interior VOC emissions varied greatly between makes, models and trims and even within the same make/model/trim.

You can do a lot to rid your car’s interior of most of its VOCs. Here are some tips to do it (How to Get Rid of That New Car Smell (Step by Step))

  • Heat, ventilation, and time are certainly the main ways to offgas a vehicle. You can heat it by putting it in the sun, by running the heating system, or even with space heaters (very carefully in a small space).  When you are heating materials you are releasing the VOCs and also creating new VOCs (this study explains), so make sure when you are heating up the new vehicle you are airing it out substantially at the same time so that the gasses have somewhere to go.  Windows should be open while you are heating the vehicle. Windows can also be left open anytime it’s safe to do so.
  • Deep clean the vehicle with non-toxic products:
    • You can use AFM Carpet Shampoo to deep clean carpets and upholstery; just make sure not to soak these surfaces in order to extract all the water and prevent mold growth.
    • Vacuum frequently with a HEPA vacuum.
    • Wipe down hard surfaces with disposable cleaning cloths so that you can throw them away after picking up dust, which is what many chemicals from the plastic bind to.  TotalClean is a non-toxic cleaner that’s safe for cleaning soft or hard surfaces in the car (again beware of soaking soft surfaces, however, because of the danger of mold and water rings when the material dries.)
    • Use an adsorbent like activated charcoal.  You can cut and place this filter media wherever you want in the car, and even use large pieces of it to cover seats when you’re not using them.  
    • Use an Air Angel all the time; the AHPCO cell is especially good at removing VOCs, and you can use it from your car’s power plugs while driving, or plug it into a wall receptacle via extension cord in your garage.
    • Unfortunately, flame retardants used in the foam parts may continue to off-gas for the life of the parts, so use fresh-air ventilation whenever you are driving and the outside air pollution permits you do so.

If VOCs are not reduced through the heat, ventilation and time method, you can block them using sealants. This really is the last resort, because sealing prevents further offgassing.  AFM makes a number of non-toxic products for this purpose and questions about their best application can be answered by The Green Design Center.

  • Fabric seats and carpet: AFM Lock-Out is sprayed on.
  • Vinyl: AFM Hard Seal is applied in thin coats using a sponge
  • Other Plastic Surfaces: AFM Acrilaq is best applied with a pad applicator in 3 light coats, sanding lightly between coats. .


If you’re used to the good old-fashioned “smells” of just fresh air and sunshine, ditching the new car smell should not be hard for you…hopefully it’s the same for whoever else will be driving your new car.  A final option would be to look for a lightly used car from someone with non-toxic habits–just like the price, the VOCs should also be reduced considerably, and even if it was “professionally cleaned” by a dealership, those cleaning chemicals can be removed using the same steps above.  Goodbye, little air freshener trees, hello fresh air!

Photo by Sarah Brown on Unsplash

Which is a healthier home habitat: the forest or the desert?

Which is a healthier home habitat: the forest or the desert?

Is it more healthy to live in or near a forest or a desert?  Spoiler alert: we’re not going to call that decision.  Each habitat has its advantages and disadvantages, so we’ll explore them to see which one is best for you.

You might think that these two climes are extremely opposite, but they do have (at least) one thing in common: trees!  Granted, there are many more trees in forests, but trees in the desert can accomplish many of the same purposes.  In a 2020 study, one particular type of tree found in Qatar (desert region), Acacia tortilis, was found to be the most efficient tree species for reducing air pollution, having good capacity to intercept storm water runoff, reducing energy consumption and reducing air pollution levels through dry deposition, avoiding further pollution formation and CO2 removal.  Mature trees (with diameter greater than 45 inches) were much more efficient at accomplishing these goals than younger trees (diameter 10 inches). 

According to the US Department of Agriculture (USDA), trees provide many benefits, including the ability to clean our atmospheric environment both directly underneath their canopies, and at a larger, regional scale. Because leaves transpire large amounts of moisture, trees have a cooling effect on the surrounding environment—like air conditioning. By cooling and cleansing the atmosphere, trees help to make air safer for breathing by plants, animals, and humans and have positive benefits on habitat. In fact, air quality underneath a closed tree canopy is often significantly better than above that tree canopy, especially for ozone—a common air pollutant that forms downwind of urban air pollution sources. On a regional scale, forests also scrub ozone and other nitrogen and sulfur-containing air pollutants out of the prevailing winds, protecting more sensitive areas.  Healthy forests with large, widely-spaced trees also protect from wildfire smoke because pines and other fire-adapted trees with their thick, fire retardant bark better resist fire in all but the most extremely hot, dry, and windy conditions.

Interestingly, some trees contribute to ozone production, while others reduce it.  This is because species like black locust, European oak and poplar intensively emit isoprene, which results in higher ozone and PM10 concentrations, while tree species emitting primarily monoterpenes such as beech, magnolia and wayfaring trees yield less of both.  (Impact of vegetative emissions on urban ozone and biogenic secondary organic aerosol: Box model study for Berlin, Germany)

Another common denominator between forests and deserts is animals–whether they are domesticated or wild, contact with animals is more frequent in remote areas than in urban areas.  There is also much research that shows how exposure to animals benefits us.  In one study, the researchers recruited 2 groups of young men:  20 young men who were raised for the first 15 years of life on farms with farm animals, and a second group of 20 young men who were raised for the first 15 years of life in a city of over 100,000 people, without daily exposure to pets. Both groups were then given Trier Social Stress Test (TSST), a model of acute psychosocial stress in humans. The results revealed that those who grew up in cities without daily exposure to pets, and thus lacked exposure to diverse microbial environments during childhood, responded to psychosocial stress with exaggerated inflammation markers,  (Less immune activation following social stress in rural vs. urban participants raised with regular or no animal contact, respectively)

Now, let’s talk about some specifics of each habitat.

Deserts

Although the stereotypical desert is hot, dry and sandy, only one of these words accurately describes every desert (dry).  Most experts agree that a desert is an area of land that receives no more than 25 centimeters (10 inches) of precipitation a year. The amount of evaporation in a desert often greatly exceeds the annual rainfall. Surprisingly, areas near water can actually be deserts, because humidity in the air doesn’t predict or cause rainfall.  The Atacama Desert, on the Pacific shores of Chile, is a coastal desert. Some areas of the Atacama are often covered by fog. But the region can go decades without rainfall. In fact, the Atacama Desert is the driest place on Earth, and some weather stations in the Atacama have never recorded a drop of rain.  (Desert)

Low humidity is obviously a benefit to keeping mold from growing on outdoor or indoor surfaces, if air conditioning is not needed.  Dryness would lead some to believe that mold could not be a problem in the desert.  However, mold spores are present everywhere, and lack of home maintenance can allow even a small amount of rainfall to turn into a mold disaster.  Mold can start growing undetected in attics, crawlspaces and walls during one of the infrequent rains, and can turn into a big problem whenever it is disturbed, such as during renovation or further deterioration.  If air conditioning is used, it can generate mold problems when moist air (like from cooking or showering) hits cold air, or around the surfaces where cold condensate is produced.   

Low humidity also means little to no mosquitoes and many other biting insects.  Low pollution (when the wind is not kicking up dust) and warm weather can also be a positive for those who suffer from breathing problems like asthma.  

One problem of low humidity is its effects on the human body (see our article).  Dehydration can become evident in dry skin, hair and nails, respiratory system and through your whole body, affecting every major system.  In addition, static electricity builds up in your clothing and furniture, which can hurt and damage electronics.  Finally, dry air allows pathogens to stay afloat in the air for longer periods of time.  

Most deserts have very little cloud cover and thus a lot of sunshine.  This, for sure has its benefits and drawbacks; it can be the cure for Seasonal Affective Disorder (SAD) but also present higher risk for skin and eye damage and cancer.  Exposure to UV sunlight was associated with lower systolic blood pressure (the first number in a blood pressure reading) regardless of the temperature. (Could sunshine lower blood pressure? Study offers enlightenment)  In addition, sunlight assists your body in making vitamin D, which strengthens bones, and sunlight promotes collagen production in your connective tissue, which helps you move quickly. (7 Health Benefits of Living in the Desert)

The purifying power of sunlight should not be underestimated.  Those who live in or near the desert can use the UV rays of sunlight to purify water, their laundry, and anything else they can bring outside for a good “freshening”. 

One important disadvantage to desert life is dust.  In fact, you don’t have to live in the desert to suffer from the effect of desert dust, because dust from deserts can be transported on the wind and even injected into the troposphere, allowing it to travel great distances (such as across the Atlantic Ocean in the case of Saharan dust).  Dust clouds at surface levels bring particulate matter, coarse and fine, worsening air quality and posing respiratory or even cardiovascular risks.(What is desert dust and how does it change atmosphere and the air we breathe?)  The danger of dust presents in two different ways: size of the particles and content of the particles.  Particles that are approximately between 2.5 to 10 microns (PM10) are inhalable, but can be trapped and cleared from the upper respiratory tract.  Particles less than 2.5 microns (PM2.5) can lung alveoli, entering the blood stream where they cause systemic harm to other organs in the human body. (A Retrospective Cohort Study of Military Deployment and Postdeployment Medical Encounters for Respiratory Conditions)  Especially concerning is the class of particles less than 1.0microns (PM1.0), which are sure to enter directly into the bloodstream and may also cross the blood-brain barrier.  The toxic content of dust can be pathogens such as bacteria, including some that carry respiratory diseases (Characterization of Bacteria on Aerosols From Dust Events in Dakar, Senegal, West Africa), and most importantly, a fungus Coccidioides which causes Valley Fever.  It can also be bioreactive metals such as copper, chromium, nickel, lead and zinc, as well as pesticides, herbicides, radioactive particulates and aerosolized sewage (yuck!!). (Desert dust storms carry human-made toxic pollutants, and the health risk extends indoors)

Increased heat and low humidity also tends to decrease the number of negative ions in the air.  Elevated negative air ion levels are widely reported to have beneficial effects on humans including enhanced feeling of relaxation, and reduced tiredness, stress levels, irritability, depression, and tenseness. Depleted ion levels and enhanced positive ion levels are reported to have no effect, or deleterious effects. (Air Ion Effects

The study of how gasses in the earth’s atmosphere react with each other is very complex.  For example, it’s been shown that desert soil releases nitrogen species gasses into the air.  The release of NOx from desert soil and subsequent effective oxidation in the atmosphere indicates that the desert ecosystem is an important area for ozone production. This has been manifested by higher ozone in the desert air than the regional background from many observations (Güsten et al., 1996; Hoffer et al., 1982).  (Active Nitrogen Cycle Driven by Solar Radiation in Clean Desert Air)  Thus, higher levels of ozone in the desert could make it unhealthy for sensitive individuals.  These could become particularly high after rains, when microbes in the soil emit N2O (nitrous oxide, also known as laughing gas).  (Following rain, desert microbes exhale potent greenhouse gas)  In addition, it’s been shown that “stratospheric intrusions” (ozone-rich air descending from the stratosphere during spring storms) can also capture ozone created by pollution from Asia as they descend and transport it to desert areas of the southwest.  Particularly in the area of Las Vegas, these can create short episodes of high ozone that exceed federal air quality standards without factoring in local pollution.  (Background ozone burdens Las Vegas’ air quality in spring)

The other side of the coin is that in some areas of the world (like Atacama and Sechura deserts in Chile and Peru), dust from deserts can contain significant iodine, which actually destroys ozone.  (Iodine in Desert Dust Destroys Ozone)  Therefore, the mineral makeup of the soil in deserts is very important in characterizing what’s in the air. 

Living in/near the Forest

Forest bathing” is a Japanese term that emerged during the 1980’s as an antidote to tech burnout: it’s being calm and quiet amongst the trees, observing nature around you whilst breathing deeply can help both adults and children de-stress and boost health and wellbeing in a natural way. (How to start forest bathing)  If you regularly spend quiet time in the outdoors, perhaps you are already aware of its benefits: lower blood pressure, heart rate, and levels of harmful hormones like cortisol.  (Forest bathing: What it is and why you should try it)

What is in the air of forests?

Phytoncides are aromatic compounds from plants which can increase your number and activity of natural killer cells, a type of white blood cell that supports the immune system and is linked with a lower risk of cancer. These cells are also believed to be important in fighting infections and inflammation, a common marker of disease.  In one study, researchers found that people who took a long walk through a forest for two days in a row increased their natural killer cells by 50% and the activity of these cells by 56%. Those activity levels also remained 23% higher than usual for the month following those walks. (Why Spring Is the Perfect Time to Take Your Workout Outdoors)

Hinoki cypress, cedar, oak, pine and spruce are just some of the trees to release phytoncides (aromatic compounds), which include alpha-pinene and d-limonene.  Although these are actually VOCs, they are termed biogenic VOCs (BVOCs) because they are naturally made, unlike chemical VOCs that are manufactured.  Pinene and limonene are monoterpenes, which global annual emissions amount to 330–480 million tons. When visiting a forest, monoterpene VOCs such as limonene and pinene are mainly absorbed through inhalation, their blood levels rapidly rise after exposure, and they are mostly eliminated unchanged both in exhaled air and in the urine.  The tree composition can markedly influence the concentration of specific VOCs in the forest air.  Although essential oils do contain BVOCs, not all BVOCs are present in essential oils, and some molecules included in essential oils are not part of the BVOC molecular suite but are rather artifacts of distillation. (Forest Volatile Organic Compounds and Their Effects on Human Health: A State-of-the-Art Review)

Some other benefits of forest living are:

  • Humidity: in moderate amounts, humidity is good for the skin and respiratory system, 

  • Cooling effect: trees cool air through evapotranspiration. As trees transpire, they release water into the atmosphere through their leaves. As the water changes state from liquid to vapor, the surrounding air is cooled, similar to how we sweat.

  • Particulate matter capture: Forests can improve public health greatly by catching dust, ash, pollen and smoke on their leaves, keeping it out of our lungs.

  • Trees are sinks for other harmful pollutants, such as nitrogen oxides, ammonia and ozone, which can all cause respiratory problems from repeated exposure. (The Important Relationship between Forests and Air)

  • Healthy forest air includes bacteria, fungal spores, plant and animal particles and pollen, which may have good and bad effects.  Good effects of exposure to these include desensitization to allergies (exposure therapy), and certain bacteria, like Mycobacterium vaccae (a bacteria strain that lives in soil), which can stimulate serotonin production, and can make you feel relaxed and happier, as well as reduce inflammatory responses to stress. According to Dr. Christopher Lowry, “Surprisingly, when adults engage in soil-mixing activities for ten minutes with soil that is ‘spiked’ with M. vaccae ATCC 15483, there is a rapid alteration in brain activity within the occipital cortex and alteration in the plasma metabolome, relative to soil that is not spiked with M. vaccae ATCC 15483 [35]; this suggests that exposures to mycobacteria not only have long-term immunoregulatory effects but also alter physiology and neurophysiology within minutes. Perhaps we all really should spend more time playing in the dirt.” 

  • Ions: That “fresh air” feeling in the forest also comes from higher than normal presence of ions.  Negative air ions (NAIs) are an important indicator of air quality, and are significant for the evaluation of air conditions. In a 2020 study of a scenic area in China, negative air ions were present in forested areas  approximately 3.2-3.4 times over the numbers in open areas or the lake.  (For more information on the cleansing power of ions, read our post here!)

And the cons of forest living: 

  • Humidity: many forests are high in humidity, which can promote mold growth.  Without dehumidification in a home, it would be difficult to live in many forested areas because of mold growth. 

  • Radon: Trees are sources, sinks, and conduits for gas exchange between the atmosphere and soil, so radon, a product of uranium decay in the soil, is naturally expired by trees along with other gasses.  Although radon accumulation in homes through their foundation (the rocks and soil below the foundation) is most concerning, emission of radon by trees will cause a forest to have a higher level of radon than unforested areas, because radon is approximately 7.5 times heavier than air, so that living in or near the forest may increase the ambient level of radon outside the home depending on winds.  There are two units of measurement for radon, picocuries per liter, and becquerels per cubic meter.  According to a 2015 study in Brazil, radon concentrations as high as 40 kBq/m3 (40,000 Bq/m3) were found in a national forest.  The EPA recommends that homeowners take action to lower radon levels in their homes if there is a level above 2 pCi/L.  Since one pCi/L is equivalent to 37 Bq/m3, the measurement in the Brazilian forest showed 1,081 pCi/L, or 250 times the upper limit of radon recommended by the EPA!  Thus, the study rightly inferred that “the results indicated considerable radon hazard for human occupation in the neighborhood.”

Overall, the desert and the forest are two vastly different climates, yet each have potential for healthy lifestyles for those who can live further away from urban areas.   From forest bathing to hiking to biking, there are plenty of ways that each environment offers us to connect with nature and take in its natural health benefits. 

Enjoy Your Favorite Scents and (Effortlessly) Reap the Benefits!

Enjoy Your Favorite Scents and (Effortlessly) Reap the Benefits!

You might have said this of different tasks in your life, that you can “do it while sleeping”, meaning that you don’t have to use much conscious thought to do them.   Well, here’s a literally simple way to boost cognitive capacity and avoid dementia-related diseases: plug in an essential oil diffuser before you go to sleep!  

Previously, a 2009 study showed that olfactory enrichment (the daily exposure to multiple odorants) could improve both memory and neurogenesis (the formation of new neurons) in the mouse brain. In addition, novelty was the critical element in this kind of stimulation, as exposure to odorant mixtures did not produce these changes, while exposure to multiple odorants individually did.  

When some COVID-19 patients began to lose sense of smell, researchers tested subjects and found that MRI scans from individuals both pre-infection and post-infection have revealed neural deterioration that resembles a decade of aging in brain regions that receive olfactory-system projections.  Because olfactory loss precedes or accompanies cognitive decline in dementia-related diseases like Alzheimer’s and Parkinson’s diseases, researchers hypothesized that easy and affordable intervention to prevent cognitive decline could be using scents.

In a study, 20 participants (the Enriched Group) between ages 60 to 85 were given a diffuser and 7 essential oil odorants (rose, orange, eucalyptus, lemon, peppermint, rosemary, and lavender) in identical glass vials that each fit into the diffuser. They were asked to turn on the diffuser when they went to bed, and the odorant was released into the air during the night for 2 h when they first went to sleep. They rotated through the different odorants each night, continuing at home for 6 months. Twenty-three individuals in the control group also were provided with an odorant diffuser, and they followed the same regimen as the olfactory enrichment participants, however they were provided with bottles that contained distilled water with an undetectable amount of odorant added. 

The results showed a 226% difference between enriched and control older adults in performance on the Rey Auditory Verbal Learning Test (RAVLT). This test evaluates verbal learning and memory, including proactive interference, retroactive interference, delayed recall, retention, and recognition memory.  (Overnight olfactory enrichment using an odorant diffuser improves memory and modifies the uncinate fasciculus in older adults)

Before and after MRIs also showed that parts of the brain that receive input from the olfactory system, specifically the uncinate fasciculus, are modified by olfactory enrichment.  The researchers found a moderate increase in the mean diffusivity (MD) of the left uncinate fasciculus in the enriched group compared to controls, which correlates to increased integrity of that specific brain pathway.

What does this mean for the average senior?  Olfactory stimulation (smelling different scents) can be an important way to avoid dementia-causing diseases, and the cost of a programmable essential oil diffuser and a variety of different oils is not prohibitively expensive.  Here are a few options:

Best of all, this method is not hard to do; basically, with a little preparation, you can “do it while sleeping”! 

Photo by Kelly Sikkema on Unsplash

Keeping safe when using supplemental heat

Keeping safe when using supplemental heat

When the weather turns chilly, sometimes your main heat source doesn’t heat quickly or completely, or it’s expensive to run, and you may turn to supplemental heaters for a quick way to warm up.  Supplemental heating sources like radiators, space heaters, and fireplaces are alternative options to simply turning up the heat in your home or installing a new, main heating system.  However, they have limitations and safety considerations you should note!

Portable space heaters

Type

Pros

Cons

Ceramic

  • Heats whole space, not limited to line-of-sight

  • Lightweight

  • Because it’s convection heat, it usually requires a fan to direct the heat

  • Can dry out the air excessively

  • Lose heat due to convection (heating air instead of objects)

  • May take longer to heat 

Infrared/ Quartz

  • Great for small, open spaces

  • Cost depends on which power source it uses: electric or gas (natural or propane).

  • Quickly heats due to direct transfer of radiant heat

  • More efficient than ceramic heaters (over 90% efficiency)

  • Must be in line-of-sight of the heater to feel warmth

  • Not good for large spaces

Oil-filled Radiator (electric)

  • Quiet!  Fans are not necessary in these models.  

  • Modern versions have features like programmable timers and adjustable thermostats. 

  • Radiant heat is very comfortable and continues even after the heater is turned off.

  • Surfaces become hot and may endanger children and pets.

  • These type of heaters may take longer to heat up a room initially.

  • They are heavy but most are equipped with casters for portability.

Kerosene

  • Kerosene stores well for long periods so it can be a good emergency heater for power outages.

  • Inexpensive

  • Quiet because no fans are needed

  • Can heat larger spaces like garages

  • Because it burns fuel liquid inside your home, you must take abundant safety precautions around flammable furnishings, children and pets.

  • Combustion byproducts mean that carbon monoxide monitors must ALWAYS be used, and room should be ventilated adequately (possibly losing heat).

  • They’re illegal to use indoors in MA and possibly other states

  • They produce water vapor, which can cause excess humidity

  • Kerosene can emit significant particulate pollutants, especially if burners/wicks are not kept clean

Sometimes the permanent heating system in your home is undersized and it can’t heat the whole home adequately.  In other cases, if you have a gas furnace, propane or natural gas can become relatively expensive!  In these cases, permanent supplemental heating (the installation of a heater in one part of the home) can help. 

Permanent Supplemental Heating

Type

Pros

Cons

Electric Radiators or wall-mounted heaters

  • Provides steady heat with minimal safety issues

  • Unobtrusive because they are located on or near a wall

  • Can consume a lot of electricity during prolonged cold spells

Electric Heat Pump Mini-Split

  • Heat pumps are more efficient for larger spaces than portable electric heaters

  • Heater can be sized to the space very easily

  • Air handler portion is mounted on a wall, out of the way

  • Can be regulated with a programmable thermostat

  • Units typically heat and cool, making them very versatile

  • Long life

  • May also include an electric coil for emergency backup heating

  • More expensive initial investment than portable heaters

  • Requires exterior space for the heat pump

Wood heating systems

  • Wood burning fireplaces are attractive

  • Very economical if you have the ability to cut and haul wood

  • Fireplaces do not require power

  • Wood pellet stoves produce very little ash, burn cleanly and easy to operate

  • Long-lasting

  • Sealed fireplace inserts increase heat efficiency while decreasing emissions

  • Professional installation is recommended

  • Wood pellet stoves require electricity to operate the fan and feeder motor

  • Flues must be cleaned at least annually to prevent fire risk

  • Carbon monoxide monitors must ALWAYS be used and it’s a good idea to monitor for CO2 and NOx

  • Unsealed fireplaces always have risks of dangerous smoke and embers coming out of the firebox into your living space

Vented

Gas Fireplace or heater

  • Gas fireplaces are attractive and vented models are readily available

  • Can work when the power is off but are more efficient when using the fan to disperse heat

  • Environmentally friendly

  • Professional installation is recommended for any permanent combustion heater

  • Requires a nearby gas line

  • Carbon monoxide monitors must ALWAYS be used and it’s a good idea to monitor for CO2 and NOx

Unvented

Propane or Natural Gas Heater

  • Very efficient and inexpensive

  • Available with safety features such as oxygen depletion sensor (ODS) that immediately shuts down the blue flame heater if carbon monoxide or lack of oxygen is detected

  • Can work when power is off but are more efficient when using the fan to disperse heat

  • Broad choice of unvented models; however read the precautions below

  • Professional installation is recommended for any permanent combustion heater

  • Requires a nearby gas line

  • Lack of venting required does not mean lack of air pollution.  NO2 and CO2 levels can become relatively high if ventilation is not used.

  • Combustion byproducts mean that carbon monoxide monitors must ALWAYS be used, and room should be ventilated adequately (possibly losing heat)

  • Should not be left burning when the room is unattended

We want you to be knowledgeable about and avoid air quality poisons that are created just by heating your home with a combustion unit!  According to a Japanese study of propane, kerosene and electric space heaters used in a non-ventilated, 215 ft2 room:

  • concentrations of NO2 and CO2 from all the heaters except the electric heater exceeded the 1-hr Environmental Quality Standards (NO2: 0.04-0.06 ppm) and the Building Sanitation Management Standards (BSMS, CO2: 1,000 ppm).  

  • The CO concentration emitted from reflection kerosene and natural gas heaters slightly exceeded the BSMS (10 ppm). 

  • The concentrations of suspended particulate matter and polynuclear aromatic hydrocarbons showed an increasing tendency during the use of kerosene-fueled heaters. 

In a study of kerosene heaters, NOx, CO2 and CO are the main gaseous pollutants emitted by kerosene space heaters. In addition, carbonyl compounds (formaldehyde, acetaldehyde, acetone) were identified, as well as ∼50 other VOCs, six of which presenting a risk for human health (1,3-butadiene, benzene, ethylene, propene, isobutene and acetylene). There is an accumulation of soot on wick heaters after a few hours of operation, which causes incomplete combustion that increases CO emissions, (CO poisonings are frequent with kerosene heater use). Therefore, the recommendation with any combustion gas heater is to ventilate profusely, or go with a vented heater model.  This article on BuildingGreen.com concurs that we should avoid unvented gas heaters. 

Photo by Jessica Johnston on Unsplash

“Sleeper” bacteria spores are like mold spores

“Sleeper” bacteria spores are like mold spores

One of the unsavory facts about mold is its ability to lie dormant when food and moisture sources dry up, until conditions allow it to “bloom” again.  Scientists are finding out that there are other microbes that exhibit this same behavior, necessitating finding new ways to detect their presence.  

One of these is Acinetobacter Baumannii.  This superbug is usually present in wet environments, such as soil and mud, ponds, wetlands, wastewater, fish farms and seawater.  Healthy people can also carry the Acinetobacter bacteria on their skin, particularly if they work in a healthcare setting. It can survive for a long time on dry surfaces, making it difficult to eliminate. (Acinetobacter: What to know)  

Scientists have recently discovered a new state of “life” of this bacteria.  When living conditions become too stressful, many bacteria enter a dormant state that is almost death-like, showing no metabolic activity. These are known as spores. 

Acinetobacter baumannii can alternatively form special cells which are in a kind of deep sleep. Although these cells still show signs of life and breathe, it is no longer possible to cultivate them on culture media in Petri dishes. "We know this state from cholera bacteria, for example; it is referred to as the viable but non-culturable (VBNC) state," explains Professor Volker Müller of Goethe University Frankfurt.  (The deep slumber of a hospital pathogen: Why infections with Acinetobacter baumannii can flare up again and again)

As of the study date (September 2023), scientists have kept the acinetobacter in VBNC state for 11 months, and are still able to “wake them up” after 2 days of “rehab” with special nutrients and oxygen.  No end is in sight for the length of time these bacteria can hibernate.  

The danger is that courses of normal antibiotics and culture procedures (on a plate) can yield negative culture results, which would indicate that a patient is clear of such dangerous microbes.  However, VBNC cells can be hiding in nooks and crannies of the body, waiting to resurge when stress or antibiotics are removed  Tests like PCR (Polymerase Chain Reaction) can be used to detect VBNC cells because they identify specific genes that cause virulence and predict antibiotic resistance, but it’s probable that these are not used in smaller hospitals currently.

Acinetobacter Baumannii is not the only bacteria with “sleeper” capabilities; dormancy or persistence is just a “state” that many bacteria can occupy.  Mycobacterium smegmatis, which is related to the bacteria that causes pneumonia, was studied in 2013 and discovered that “persister” bacteria continued to divide and die even during antibiotic treatment so that the total number of bacteria stayed approximately the same.  The fact that the cells weren’t classically “dormant” but still continued to divide, makes them technically “dynamically resistant” to antibiotics, while other microbes use other techniques to evade death and can be labeled “tolerant, latent, indifferent, dormant and non-multiplying”.  (Sleeper cells – the secret lives of invincible bacteria) However, it all comes back to their ability to survive antibiotics, which is dangerous for us!

Here is some recent literature on other “sleeper cells”

Since persistent bacteria are difficult to kill with traditional antibiotics, scientists are pursuing several strategies to take them out.  One is to find ways to wake all of them up, so that they are easy to kill with accessible drugs.  The second is to discover what genes or proteins allow them to stay alive in sleep mode.  Some of these “upregulate” cell functions (like scavenging for iron), and some of them downregulate cell functions (like digestive functions).  A third tactic would be to look for drugs that kill the sleeper cells, not just active ones.  

To the layman, all this sounds like poking into a hibernating bear’s den with different sticks until you find one of the right length poking in the right place, and having the best gun or trap ready for when he wakes up!  The sad fact is that people regularly suffer from hosting these persistent bacteria in their bodies and we sincerely hope that scientists can find the right triggers in labs to find the combination of methods to help patients who need it.

Bacteria, mold and other microbes also populate our homes in the form of spores, persisting for years until the right moisture AND nutrients come along.  Although there is no “silver bullet” like an antibiotic to remove them completely, we can use the same principles to keep the population under control so that our bodies don’t suffer!

  • Clean regularly with non-toxic ingredients.  The less dust and dirt we allow to accumulate in our homes, the less microbe spores are lying around.  Check out our article on Tackling Dust in Your Home.

  • The FDA states that over-the-counter antibacterial hand soaps don’t protect us from disease any better than regular soap and water.  The cleansing action happens in the thorough agitation of soap and water over hands, and a good rinse with water.  Many “antibacterial” soaps also contain ingredients, like triclosan, which can be harmful to us over time.  

  • Since you can’t easily scrub and rinse items like your countertop or toilet seat with soap and water, however, different solutions need to be employed there.  Sure, you can get antibacterial cleaning sprays, but the same concerns apply: are they safe long-term?  Instead, opt for cleaners that are non-toxic and are less likely to create antibiotic resistance.  We’ve recommended the following cleaners for these reasons:

    • Our all-purpose, non-toxic cleaner TotalClean combines both copper and iodine, and when they are combined, they produce peroxide!  In simple terms, the peroxide acts as an “oxidizing agent”, destroying the means for bacteria to take in oxygen and suffocating them.  

    • The Honest Company Disinfecting Spray also uses hydrogen peroxide to clean, disinfect, and deodorize while meeting EPA’s criteria for products effective against SARS-CoV-2 and a laundry list of other germs.

    • Because hypochlorous acid is an oxidant, it leaves nothing behind for bacteria and viruses to create resistance to and therefore does not contribute to the superbug (multidrug-resistant organisms) dilemma.(The Role of Hypochlorous Acid in Managing Wounds: Reduction in Antibiotic Usage)   Hypochlorous is not bleach; in fact, it’s superior to bleach.  Some hypochlorous cleaners include Force of Nature and Clean Republic’s All Purpose Cleaner.

  • Of course, change your HVAC filter regularly so that spores do not find their way to your air handler’s evaporator coil, where moisture can allow them to reactivate.  We’ve got some great filters with activated carbon and MERV 10-14 ratings (for more on MERV, check out our article HVAC filter changes are vital to your indoor air quality

  • The technology in our bipolar ionizers like our Germ Defender, Upgraded Air Angel Mobile and Whole Home Polar Ionizer has been tested against bacteria such as E. coli, MRSA and C. diff (see test results here), so why not add them to your non-toxic cleaning arsenal as a passive way to keep the spores under control? 

There’s a lot about the microscopic world of bacteria and mold that we don’t know, and obsessing over it doesn’t help much!  Thankfully, there are quite a few ways to keep safe using non-toxic products and methods that are tried and true. 

Photo by CDC on Unsplash

Mold Spores, Endospores and Exospores…what are the differences?

Mold Spores, Endospores and Exospores…what are the differences?

I think most of us are familiar with spores that mold produces, which act similarly to dandelion seeds that can be carried off by air currents to relocate and start growing new “plants” elsewhere.  However, there are similar terms using the word “spore” in the bacteria world that don’t always mean the same thing!   Here’s some explanation to clear things up.  

First of all, it’s good to get refreshed regarding the two major classes of bacteria,  “Gram-negative” and “Gram-positive”.  These classes are based on a test developed by scientist Christian Gram in 1884, which differentiates the bacteria using a purple stain.   According to webmd.com, bacteria either have a hard, outer shell, or a thick, mesh-like membrane called peptidoglycan.  The hard outer shell will resist the purple stain, and show up as a red color.  These are called “gram negative” because the purple stain did not show.  Bacteria with the peptidoglycan absorb the purple stain much more easily and are called “gram positive”.  Here is a diagram showing the differences in the cell walls between these two types:

Source: Difference Between Gram-Positive and Gram-Negative Bacteria

These differences in cell structure cause gram-positive bacteria to release toxins that are different from gram-negative bacteria, as we explained in our article What are Endotoxins and Exotoxins and where do they come from?

Here is a diagram from that article that’s helpful:

Source: Differences Between Exotoxins and Endotoxins

Here’s where it gets confusing, however, because the “Exo-” prefix associated with gram-positive bacteria, and “Endo-” with gram-negative bacteria only applies to their toxins.  Moving on to spores, bacterial “spores” usually refers to endospores, endospores are usually associated with gram-positive bacteria, and endospores aren’t formed the same way that mold spores are.  Let’s look at endospores first…  

Endospores are not tiny little “seeds” released by a gram-positive bacteria.  Instead, they are a hardened shell that forms inside a bacterial cell when it starts to sense that resources (food and water) are drying up.  This little endospore with its essential life-code inside is then left when the original bacterial cell dies, and the endospore is tough-as-nails while waiting for a better environment  to allow it to flourish and multiply again.  One author describes them as being harder than Bruce Willis to kill (in the movie Die Hard, of course)!   (Endotoxins or Endospores?)  Endospores exhibit no signs of life, however when the environment returns to a favorable state for bacterial growth the bacterial endospore will germinate and return to a normal state.  (What are Bacterial Endospores?)  So, unlike mold spores of which one mold cell can make thousands of spores, if not millions, only one gram-positive bacteria makes one endospore.  The tough outer layer of an endospore is actually called an exosporium, which makes it a little bit more confusing.

Exospores are more similar to mold spores and they are a form of bacterial reproduction.  Exospores are produced by the members of the phylum Actinobacteria (Actinomyces, Streptomyces, etc).  They form outside the bacterial wall and are released by “budding” when they separate from the bacterial wall.  Exospores are also resistant to destruction and do not show signs of life until their environments have sufficient water and nutrients for them to grow.  Here is a diagram showing the difference between endospores and exospores:

Source: Difference Between Endospore and Exospore

Here are some similarities between Endospores and Exospores:

  • Endospore and Exospore both spores are produced under unfavorable environmental conditions.

  • Endospore and Exospore both are unicellular and have a resistant structure.

  • The process of making spores in both types of known as sporulation.

  • Endospores and Exospores both are reproductive cells.

Now that we know WHAT they are, what is the danger of spore-forming bacteria?  Bacterial spores may be in the quiescent state for dozens or hundreds of years but after they appear in the favorable conditions of a human or animal organism, they turn into vegetative forms causing an infectious process. We wrote about these in our article “‘Sleeper’ bacteria spores are like mold spores”.  The greatest threat among the pathogenic spore-forming bacteria is posed by the bacterial agents of anthrax (B. anthracis), food toxicoinfection (B. cereus), pseudomembranous colitis (C. difficile), botulism (C. botulinum), and gas gangrene (C. perfringens). (Learning from Nature: Bacterial Spores as a Target for Current Technologies in Medicine (Review)

Endospores literally work inside our immune system to accomplish their deadly mission.  In the example of illness caused by anthrax, when these endospores are inhaled by a human or animal host, they are engulfed by macrophages and dendrite cells, which are immune cells that circulate in the lymphatic system.  Spores transition from endospores to active bacteria inside the phagocytes and dendrite cells, multiply, and produce toxins. In the lymph nodes, immune cell death takes place with subsequent bacterial invasion to the blood flow, active proliferation, and toxin production which mediates clinical manifestations of the infection, resulting in lethal outcome.  (Learning from Nature: Bacterial Spores as a Target for Current Technologies in Medicine (Review))  Sadly, animals like cows and sheep are also susceptible to anthrax, especially when grazing land is dry and the soil can be inhaled as dust, because these endospores are found naturally in the soil.  This was the case in Australia in February 2024 when 10 beef cattle died of anthrax poisoning and a similar number of sheep died from anthrax poisoning in 2023.

How do you get rid of Endospores and Exospores?

Endospores are one of the most resistant specialized dormant cells, being able to resist high temperature (up to 100 °C), ionizing radiation, chemical solvents and detergents.   Mature exospores produced by Streptomyces are more resistant to desiccation, low temperature and osmotic changes (changes in permeability) than vegetative (living) cells. However, they are less resistant to heat and desiccation than endospores.  (Multiple roads lead to Rome: unique morphology and chemistry of endospores, exospores, myxospores, cysts and akinetes in bacteria)  Killing endospores, then, represents the most difficult task.  Autoclaves for cleaning medical equipment are set to run at the proper time, pressure and temperature. Using an exposure time of at least 15 minutes and 15 PSI at 121 celsius usually kills endospores on durable medical equipment.  For entire rooms, however, sporicides are used at preset times (like biweekly or monthly).  (Endotoxins or Endospores?) Sporicides can be composed of toxic chemicals like phenol (a mutagen, which is a potential cancer risk); this is the chemical used in the popular Sporicidin Disinfectant Solution.  However, less harmful chemicals like Hydrogen Peroxide and Acetic Acid are also used.  The combination of those two compounds is Peroxyacetic Acid (PAA). Acetic acid is also known as vinegar and has that acidic smell; PAA also has a vinegar smell so that personal protective equipment like masks, goggles and gloves may be required to use them.  The majority of sporicides on the EPA’s Registered Antimicrobial Products Effective Against C. diff Spores [List K] are sodium hypochlorite (bleach).  Bleach is definitely something you want to avoid bringing into your home.    

There is a very non-toxic product on this endospore-killing list, however: hypochlorous acid.  Even though it sounds toxic and it’s related to bleach (which is sodium hypochlorite), hypochlorous acid is much safer as well as being a far superior disinfectant to bleach.  One of the most fundamental reasons for this is its pH. Hypochlorous acid exists at a near-neutral pH (5-7). Bleach resides at a highly-alkaline pH (8-13). The germ-killing properties of bleach are derived from the presence of hypochlorous acid. However, because of its high pH, the majority of the hypochlorous acid present in bleach ends up getting converted to hypochlorite, which is a less effective disinfectant.  (Hypochlorous acid versus bleach: What's the difference?)

Other strategies to killing endospores are mentioned in this paper according to the part of the endospore they target; here are some interesting ones:

  • “Germinate to eradicate” involves tricking the endospore into reviving and then killing the vegetative cells, because the vegetative cells are easier to kill.  Triggers for spore germination include temperatures close to 37°C (98.6°F, sound familiar?), making water available to “rehydrate” the cell through its bacterial cell walls, and the availability of nutrients.  (Why Are Bacterial Spores Hard To Sterilize?)   However, warm water and gloppy nutrients are not at all suitable for your home’s surfaces!

  • Alcohols and aldehydes like ethanol and gluteraldehyde can work against the inner membrane of the endospore, but glutaraldehyde (0.5%) can irritate nasal passages and eyes, as well as severely burn skin. 

  • Enzymes like proteases can degrade the “coat” of the endospore and even induce germination, so that it is easier to kill. (Enzyme-driven bacillus spore coat degradation leading to spore killing)

  • Dodecylamine, a yellow liquid with an ammonia like odor, kills spores of all species that have been tested, including Bacillus species and C. diff.; however, it’s toxic to humans and animals. 

The most important thing about killing spores is to make sure they are dead, or if they are not, to make sure they are damaged beyond being able to reproduce!   Unfortunately, only a lab can determine whether endospores are present (PCR test, by re-animating them, or using a special green staining technique), so don’t “guess” whether a DIY solution has taken care of them.  Using a non-toxic product from the EPA’s list K (like hypochlorous acid) and making sure you give it ample “residence time” (ie. read the usage instructions and don’t mop it up right away) will ensure that you don’t suffer from those tough endospores re-animating in your home or body.    Here are some additional tips:

  • Clean regularly with non-toxic ingredients.  The less dust and dirt we allow to accumulate in our homes, the less microbe spores are lying around.  Check out our article on Tackling Dust in Your Home.

  • The FDA states that over-the-counter antibacterial hand soaps don’t protect us from disease any better than regular soap and water.  The cleansing action happens in the thorough agitation of soap and water over hands, and a good rinse with water.  Many “antibacterial” soaps also contain ingredients, like triclosan, which can be harmful to us over time.  

  • Since you can’t easily scrub and rinse items like your countertop or toilet seat with soap and water, however, different solutions need to be employed there.  Sure, you can get antibacterial cleaning sprays, but the same concerns apply: are they safe long-term?  Instead, opt for cleaners that are non-toxic and are less likely to create antibiotic resistance.  We’ve recommended the following cleaners for these reasons:

    • Because hypochlorous acid is an oxidant, it leaves nothing behind for bacteria and viruses to create resistance to and therefore does not contribute to the superbug (multidrug-resistant organisms) dilemma.(The Role of Hypochlorous Acid in Managing Wounds: Reduction in Antibiotic Usage)   Hypochlorous is not bleach; in fact, it’s superior to bleach.  Some hypochlorous cleaners include Force of Nature and CleanSmart Daily Surface Cleaner

      • Our all-purpose, non-toxic cleaner TotalClean combines both copper and iodine, and when they are combined, they produce peroxide!  In simple terms, the peroxide acts as an “oxidizing agent”, destroying the means for bacteria to take in oxygen and suffocating them.  

  • Of course, change your HVAC filter regularly so that spores do not find their way to your air handler’s evaporator coil, where moisture can allow them to reactivate.  We’ve got some great filters with activated carbon and MERV 10-14 ratings (for more on MERV, check out our article HVAC filter changes are vital to your indoor air quality

  • The technology in our bipolar ionizers like our Germ Defender, Upgraded Air Angel Mobile and Whole Home Polar Ionizer has been tested against bacteria such as E. coli, MRSA and C. diff (see test results here), so why not add them to your non-toxic cleaning arsenal as a passive way to keep the spores under control? 

Photo by CDC on Unsplash

Enter your text here...

How do emergency shelters get fresh air?

How do emergency shelters get fresh air?

If you must go into an emergency shelter, then you can bet that conditions outside are not good, whether it’s a natural disaster, war or safety from criminal activity. You can store many supplies such as food and water for staying in a shelter, but without clean air, survival will only be minutes instead of days, weeks or months!  There are a number of things that air and ventilation systems need to accomplish for shelters:

  1. Providing a positive pressure at all times so that contaminated air from leaks or outside sources does not enter the shelter.

  2. Filtering out contaminants such as nuclear, biological, chemical (NBC) or smoke toxins. 

  3. When the shelter must be completely closed up due to bad air quality outside, two things must happen: 

    1. Removing carbon dioxide (CO2) byproducts of the people residing in the shelter.

    2. Providing supplemental oxygen to replace the oxygen depleted by residents

Let’s go through these in order.  When the shelter is not being used or only tested during good external conditions, then its ventilation system can operate like your home system: bring in outside air, send it through filter(s) to remove dust and normal microbes like mold and bacteria, and keep a slight “overpressure” of 0.3 inches of water so that leaks in the shelter’s walls and doors will only cause air to move out, never in.  The exhaust “vents” are really one-way valves that only let air go out, so that air coming in is controlled.  They also protect residents of the shelter from any explosive “blast” of pressure and debris.  For this reason, they are called overpressure blast valves.   

The flow of fresh air should be similar to what is required at home: according to US standards, that is 0.35 air changes per hour (ACH) or 5 cubic feet per minute per person, whichever is greater (5 cfm is the specified minimum required by the US military, whereas 15 cfm is the recommended supply for ventilation in residential and commercial buildings).  That said, 5 cfm is usually the design criteria to remove the moisture and carbon dioxide (CO2) that shelter residents exhale, and make them feel comfortable.  The air intake must be protected from water and animal intrusion and sufficiently distant from the exhaust (overpressure blast valve) so that used air is not recycled through the shelter.  Routing airflow through the shelter ensures that the exhaust is in the airlock (the chamber where residents enter and exit) so that any outdoor contamination is flushed out with the positive air pressure.

NBC filtration (or as the military defines it CBRN: Chemical, Biological, Radiological, and Nuclear) requires unique filter material.  Pre-filters are used to keep dust and particulates out of the airstream, and then activated carbon impregnated with specific minerals is used to adsorb gasses that may be emitted during disasters or wars.  For example, the activated carbon may be mixed or “doped” with potassium permanganate, potassium iodide, or magnesium dioxide or copper dioxide (see our article on what these materials remove from air). These are not typical systems used in home ventilation, as the activated carbon must be in sufficient purity and quantity to allow filtration for a number of days until outside air clears.

In the event that outside air is heavily contaminated, the ventilation system will need to be completely sealed off and the shelter will operate more like a submarine, where supplemental oxygen is added and CO2 is removed.  The atmosphere needs to be maintained close to ambient outdoor air, at 19.5% oxygen and less than 0.2% (2000 ppb) CO2, and that’s a complex task when humans are using oxygen and expelling CO2 every minute!  It’s good in this case to use the same two principals we introduced in our article on submarines: use good instruments to measure the air quality and have redundant systems to ensure that each function is maintained in case of system failure.  In well-planned shelters, it’s common to have the following instruments: thermometer, humidity meter, differential pressure gauge (to maintain 0.3” water overpressure), smoke alarm, low oxygen detector, carbon monoxide alarm, carbon dioxide alarm, and a radon meter. (NBC Air Filtration Systems)

Although NBC filtration systems can be expensive, systems for adding oxygen and removing CO2 are even more expensive and complex.  Here are some ways that military and professional systems do it (Air Supply Principles in Isolated Shelters & Chambers):

Supplemental Oxygen is available in three different methods:  

  1. Oxygen can be stored in a gas form under pressure or as liquid oxygen in cylinders, and released from these tanks when needed.

  2. Oxygen generators can separate oxygen from compressed air stored in the tanks, or even generate oxygen from electrolysis of water (passing an electric current through it).

  3. Oxygen “candles”, also called chlorate candles, are a very hot-burning cylindrical candle that actually puts out oxygen instead of consuming it.  

Removal of CO2 requires even more chemistry. On average, each person produces 1 kg of CO2 per day, and buildup of CO2 in the air is lethal (see our article on CO2 levels).  Therefore one or more of the following systems is needed:

  1. CO2 scrubbers use a soda lime or lithium hydroxide material to remove CO2 from the airstream, but they produce a lot of moisture and heat and require space for storage of filters and material, which could be prohibitive for smaller bunkers.

  2. Regenerative carbon-dioxide removal systems use a solid amine material and are advantageous in terms of space required, but have a high energy consumption and are costly to install.  

Since air supply is one of, if not the most, critical aspects of a shelter, these systems are best designed and installed by professionals who have experience.  In the survival shelter industry, NBC filter systems made by Israeli and European (Finnish and Swiss) companies differ significantly from those made in the US and UK.  The former systems are more robust, with significantly better materials, engineering and more generous carbon supply than others.  (NBC Air Filtration Systems)

Due to threats of war, disease and scarcity, many people are becoming interested in emergency shelters, but an improperly designed or constructed shelter can be more life-threatening than life-saving!  If you are interested in building or buying an emergency shelter, we recommend you check out this article and research first.  Having a place to retreat in emergency requires a lot of forethought and planning to truly make it "safe"!

Photo by Billy Freeman on Unsplash

Indoor Mold Summary White Paper

Indoor Mold Summary White Paper

What is indoor Mold and how does it affect us? 

Overgrowth of mold in the home can produce high levels of mycotoxins and microbial volatile organic compounds (mVOCs), causing illness.  

While there is much more for the scientific community to explore, thankfully there is a growing focus on mold in our environment with a significant amount of new research being conducted on these topics.  

What are mold, mycotoxins and mVOCs?

Mold includes various types of fungus that grow on damp or decaying organic matter.  Mold can grow outdoors or indoors; it only needs moisture and a carbon source. 1  Outdoors, moisture from the ground and decaying leaves or wood provide the perfect habitat for mold.  Indoors, moisture from the air (excess humidity) or from a leaking pipe or roof will saturate a substrate such as wood, cardboard or even dust, and provide the moisture and carbon food for mold to grow. It produces particulate pollution (physical spores that replicate and spread) as well as various chemical byproducts. 

Mycotoxins are secondary metabolites, which are organic compounds that are produced by various organisms that are not directly involved in the growth, development, or reproduction of the organism but are essential in the ecological and other activities (contrasted with primary metabolites, which are directly involved with these activities).2  These are chemicals that are specifically toxic to humans, which scientists believe the mold produces to cause plant disease, defend the mold from other microbes, or simply when the mold is stressed. 

Mold can cause two broad types of disease, mycoses and mycotoxicoses.

(1) Human mycoses3:

  • Are caused by growth of the fungi on or in our bodies, which can be treated with antifungals.  (Mycotoxins produced while the mold is in the body cause a secondary reaction).

  • are mainly caused by opportunistic fungi, which produce illness by taking advantage of debilitated or immunocompromised hosts 

  • are frequently acquired via inhalation of mold spores from an environmental reservoir or by unusual growth of a commensal species that is normally resident on human skin or the gastrointestinal tract

  • portal of entry can be through the pulmonary tract or direct contact with the skin

  • are largely diseases of the developed world, usually occurring in patients whose immune systems have been compromised by advanced medical treatment.

(2) In contrast, mycotoxicoses: 

  • Are caused by dietary, respiratory, dermal, and other exposures to the mycotoxins, causing “poisoning by natural means” similar to the pathologies caused by exposure to pesticides or heavy metal residues.3

  • Can be successfully treated by regimens of mycotoxin antigens, sauna, oxygen therapy, and nutrient..4

  • Are common in underdeveloped nations due lack of resources to harvest and store foods properly.3 However, it is hypothesized that mycotoxicoses in the Western World are mainly due to inhalation of mycotoxins from mold growing in indoor environments (our inference from mold experts). 

As a company focused mainly on air quality, HypoAir has focused on mycotoxins that cause illness due to inhalation (which are mainly mycotoxicoses), as a result of mold growing indoors and releasing conidia (entire spores or fragments of mold or its spores) that contain mycotoxins.  In samples collected from water-damaged indoor environments in Sweden in 20075, here are the main mycotoxins found:

  • Trichodermol and Verrucarol are trichothecenes. Trichothecenes are a very large family of chemically related mycotoxins produced by various species of Fusarium, Myrothecium, Trichoderma, Trichothecium, Cephalosporium, Verticimonosporium, and Stachybotrys molds. Trichothecenes inhibit protein synthesis in human and animal cells. 6,7

  • Sterigmatocystin is also generated by Aspergillus molds.  It is structurally and biologically related to aflatoxins and is regarded as a precursor of aflatoxin B1 (see below). Therefore, the acute toxicity and carcinogenic properties of this mycotoxin are similar to those presented by aflatoxins, although less potent, and Sterigmatocystin has been recognized as a group 2B carcinogen.8

  • Satratoxins G and H are produced by the black mold Stachybotrys chartarum.  Neurotoxicity and inflammation within the nose and brain are potential adverse health effects of exposure to satratoxins and Stachybotrys in the indoor air of water-damaged buildings.9

  • Gliotoxin is produced by the common indoor mold genus Aspergillus and is immunosuppressive (it can dampen the body's ability to ward off disease and infection). To do this it impairs the activation of T-cells and induces cell death in monocytes, a type of white blood cell.10

  • Aflatoxin B1 (AFB1) is one of the most potent carcinogens in foods, and it was postulated to account for the prevalence of hepatocellular carcinoma (HCC) in high exposure areas. 11

Volatile Organic Compounds (VOCs)

VOCs are gasses and can be anthropogenic (produced by human activity) or biogenic (produced by living organisms, but more specifically plants and animals).   A subclass of biogenic VOCs is microbial VOCs (mVOCs), which are gasses produced by bacteria or fungi.  Indoors, mVOCs diffuse through and sometimes accumulate in the air.  Some mVOCs are responsible for that “musty” odor that is the telltale sign of mold growth (such as geosmin and 1-octen-3-ol), but others can be odorless. Compounds with eight carbon atoms, such as 1-octen-3-ol, 3-octanol and 3-octanone are among the most common fungal VOCs, and among fifteen of the most prevalent mVOCs in water-damaged buildings (thse are 2-methyl-1-propanol, 3-methyl-1-butanol, 3-methyl-2-butanol, 2-pentanol, 3-octanol, 1-octen-3-ol, 2-octen-3-ol , 3-methylfuran, 2-hexanone, 2-heptanone, 3-octanone, 2-methylisoborneol, 2-isopropyl-3-methoxy-pyrazine, geosmin, and dimethyl disulphide).12  Although these mVOCs have not been tested for carcinogenicity, DNA damage was detected for all fifteen of the common mVOCs. 13  Low concentrations of the vapor form of several C-8 compounds including 1-octen-3-ol are toxic to larvae and adult fruit flies.  Moreover, 1-octen-3-ol (octenol for short and also called mushroom alcohol) selectively affects dopaminergic neurons in adult Drosophila (fruit fly) brain and induces Parkinson’s-like behavioral alterations in a fly model for this disease.14,15  Volatile phase 1-octen-3-ol was 80 times more toxic than the volatile phase of toluene in stem cells studies.16  Unfortunately, due to studies mostly conducted on the liquid phase of octenol, the FDA has approved it for use in foods and perfumes, and the EPA has approved it for use in insect lures. The problem with the vapor phase octenol is, like other VOCs, concentrations can build up in enclosed spaces like basements, attics, and even whole homes if they are not ventilated.

Image source: (17) 

How do mycotoxins and mVOCs overlap?

Mycotoxins are only found in solid or liquid form, while mVOCs are gaseous.  However, mycotoxins and many mVOCs are both toxic products of mold.  Therefore, overlap exists in the toxic category, but the science community doesn’t think that mVOCs should be called mycotoxins.   Why?

  1. The condition of secondary metabolites: mycotoxins are all secondary metabolites, encoded by clustered genes that are easy to detect in genomic data. Only some fungal volatiles (e.g., the terpenoids) are secondary metabolites. 18 

  2. There already are other classes of toxic metabolites made by fungi that are not called mycotoxins. Terms like “antibiotic,” (compounds toxic to bacteria), “mushroom poison” (compounds made by mushrooms) and “phytotoxin” (compounds toxic to plants, or confusingly, made by plants19) are used to label certain other categories of fungal products with toxigenic properties. 18 

  3. Since many of the VOCs that have been studied are breakdown products of fatty acids, mediated by lipoxygenases, or are made by simple biotransformation steps from amino acids, we are not certain whether the VOCs we detect in profiles from growing fungi are the direct products of fungal metabolism or are merely incidental breakdown products.18

For these reasons, one article proposes the name “volatoxin” for those mycotoxins which are volatiles.18  Whatever they are officially named, mVOCs have the potential to be harmful to humans, especially if they are allowed to accumulate in a closed space.

Mold Naturally found outside vs trapped indoors

Mycotoxins and mVOCs found outside are normally diluted due to the abundant circulation of fresh air around and through them.  It is entirely different indoors.  Just as CO2 can build up from exhalation of inhabitants in a closed space, mVOCs from mold can also become concentrated in closed atmospheres, and mycotoxins become airborne whenever mold is disturbed, even from the airflow created when a window or door is opened.  

Where are these high concentrations found?  Spaces like the following are ripe for “biohazard” conditions concerning mVOCs and mycotoxins: 

  • Damp basements

  • Enclosed crawl spaces

  • Attics with leaky roofs or otherwise high ambient humidity

  • Backyard sheds

  • Non-climatized storage units

  • Vacation homes that are closed up without air conditioning or ventilation

  • Homes damaged by natural disasters or neglect, that are abandoned

  • Commercial buildings that have not been occupied or climatized in some time

The combination of lack of ventilation (for dilution) and excess humidity and darkness makes these spaces the perfect environment to grow mold and all of the toxins it emits.

How does Polar Ionization affect mycotoxins and mVOCs?

Our Polar Ionization uses Carbon Brush style Needlepoint Ionization to split the normal water vapor (H2O) in the air into millions of positive Hydrogen ions and negative Oxygen ions, without the production of ozone.  These natural ions are in proper balance and are stable enough that they can last a minute or longer as they travel in the airflows of an HVAC system or room giving them sufficient time to interact with air and surface contaminants in large buildings. Ions are any molecule or atom where the number of electrons does not equal the number of protons. These ions are very effective against a wide range of particulate, biological and chemical contaminants.  

Due to their type and stability they:

  • can provide purification for large areas with reasonable upfront costs and no ongoing replacement parts 

  • can react with both airborne and surface based contaminants opening up many new applications for safe active sanitization of occupied spaces.

  • Remove static electricity, and as such are able to travel much further than negative ions.  

  • Due to their balanced nature, they do not create unwanted ozone unlike devices that produce negative only ionization

Ability of Polar Ionization to protect against Mycotoxins and Mold Related Particulates

Mycotoxins can be transmitted through ingesting contaminated food, or they can become airborne, attached to spores of mold (conidia) or fragments of conidia.  According to a 2005 study 20, mycotoxins from Stachybotrys Chartarum (specifically trichothecene mycotoxins) were found on intact spores, which are larger (about 5 microns in diameter) as well as fragments of mold and other smaller particles (1.2 microns and below). These mycotoxins are known to react primarily with mucous membranes of the upper respiratory tract and eyes, leading to irritating erythema, inflammation, and pain. 20  In an earlier study, Trichothecene mycotoxins were found on Stachybotrys atra conidia of 5 micron diameter on average, indicating that these mycotoxins are easily respirable.21

The term PM2.5 is often used to refer to particulates 2.5 microns and less in diameter. For reference, a human hair is around 50-100 microns (μm) in diameter.  The human body has many natural defenses against large particulates like these.  In general, we consider extremely small PM2.5 contaminants to be far more dangerous and difficult to remove than larger particulates. Even smaller, 0.3 microns are considered the Most Penetrating Particle Size (MPPS) due to their difficulty to capture.  A HEPA filter's efficiency rating is specifically tested at 0.3 microns (not larger or smaller particles) because it is addressing a variant of the filter's minimum efficiency. 

Polar Ionization removes particulates from the air primarily through making them group together making them larger, heavier, and often with a negative or positive charge.   Those same larger, heavier, and charged particles can not stay airborne for long and are relatively easy to trap in a mechanical filter or easily vacuumed up from the ground after they settled.   Polar Ionization can quickly remove well over 95% of airborne particulates (including spores) without any physical mechanical filtration whatsoever (HEPA).  Due to its mode of action, it can also improve the filter rating of any mechanical filter used in the same space by several levels.  The use of mechanical filtration in addition to Polar Ionization is often unnecessary, however it can improve the speed of removal of particulates especially with those with high sensitivities.  At HypoAir we are quick to recommend redundancies in air purification where the needs of the occupants require faster removal of particulates and when finances allow. 

Numerous case studies conducted by independent labs show how mold spore counts (and thus by inference, mycotoxins carried on the mold spores)  were dramatically reduced in the air of closed environments by employing HypoAir’s Polar Ionization without additional filters.22 

Ability of Polar Ionization to break down mVOCs

The Polar Ions are also effective at breaking down VOCs & odors at a molecular level, specifically gasses with electron volt potential below 11. This is by design as the power output is capped at 12.07eV in order to prevent the formation of ozone since oxygen has an electron volt potential of 12. Formaldehyde (CH2O) for example has 10.88 as its electron volt potential and can be dismantled down into harmless carbon dioxide (CO2) and water vapor (H2O).  Similarly Ammonia (NH3) with an electron volt potential of 10.07 is broken down into harmless nitrogen (N2) and water vapor (H2O) (nitrogen naturally makes up about 78% of earth’s atmosphere).   Due to the method of production and stability of the ions, no ozone is produced in this process and the theoretical issue of incomplete oxidation or unintended byproducts is addressed with net VOC reduction.  One example showing proof of these breakdown reactions was obtained by measurement before and after installation of a bi-polar ionization device in the HVAC system of Houston Methodist Hospital, which reduced Total VOCs (TVOCs) to acceptable levels with activation of the device after many months of poor air quality complaints and failure of carbon filters to adequately clean the polluted air intake.23

The following are electron volt potentials of some of the most common mVOCs in water-damaged buildings24:  

Common mVOCs

Electron Volt Potentials

2-methyl-1-propanol

9.7

3-methylfuran

8.39

2-hexanone

9.34

2-heptanone

9.33

3-octanone

9.19

dimethyl disulphide

8.46

Additional efficacy against more complex chemical compounds and high concentrations of odors can be found with our products that combine Polar Ionization with Activated Carbon, AHPCO and/or our TotalClean i2 spray.

Ability of Polar Ionization to Neutralize Biological Contaminants on Surfaces and in the Air

Polar Ionization has been well tested in our products and in other devices that produce the same type of ions to neutralize certain bacteria, mold, and viruses in the air and on surfaces.  Polar Ionization & Mold Spores in particular have been tested many times, including a 99.50% kill rate tested by GCA over a 24 hour period. 25 The Polar Ions are effective at disrupting these biological contaminants by breaking down their surface proteins which results in inactivation or lysis.  The efficacy of Polar ionization on viral (Feline Coronavirus, Coxsackie Virus, Polio Virus, SARS Coronavirus) and other biological threats (TB, MRSA, VRE, C. Diff) has been proven for years by a wide range of independent studies with more information, sources, and studies found on hypoair.com.

For more info about our proprietary products and technologies, please visit www.hypoair.com

References:

  1. Indoor Environmental Quality: What is Mold? (n.d.). Retrieved from https://www.cdc.gov/niosh/topics/indoorenv/whatismold.html

  2. Sapkota, A. (18 January 2022). Primary vs Secondary Metabolites- Definition, 12 Differences, Examples. Retrieved from https://microbenotes.com/primary-vs-secondary-metabolites/

  3. Bennett, J. W., Klich,  M. (2003). Mycotoxins. Clinical Microbiology Reviews, 16(3), 497–516.  https://doi.org/10.1128%2FCMR.16.3.497-516.2003

  4. Rea, W.J. (2018). A Large Case-series of Successful Treatment of Patients Exposed to Mold and Mycotoxin. Clinical Therapeutics, 40(6), 889-893. https://doi.org/10.1016/j.clinthera.2018.05.003

  5. Bloom, E., Nyman, E., Must, A., Pehrson, C., Larsson,  L. (2009).  Mycotoxins produced by molds in water-damaged indoor environments.  Journal of Occupational and Environmental Hygiene, 6(11), 671–678. http://dx.doi.org/10.1080/15459620903252053

  6. Trichodermol (T3D3717). (n.d.). Retrieved from http://www.t3db.ca/toxins/T3D3717

  7. Verrucarol (T3D3723). (n.d.). Retrieved from http://www.t3db.ca/toxins/T3D3723

  8. Vieira, T., Cunha, S., Casal, S. (2015). 25.3.3 Sterigmatocystin. In V.R. Preedy (Ed.), Coffee in Health and Disease Prevention (pp. 225-233). Elsevier Inc.

  9. Islam, Z., Harkema, J.R., Pestka, J.J. (2006). Satratoxin G from the black mold Stachybotrys chartarum evokes olfactory sensory neuron loss and inflammation in the murine nose and brain. Environmental Health Perspectives, 114(7), 1099-1107. https://doi.org/10.1289/ehp.8854

  10. Gliotoxin. (n.d.). Retrieved from https://healthmatters.io/understand-blood-test-results/gliotoxin

  11. Ferk, F., Speer, K., Mišík, M., Nersesyan, A., Knasmüller, S. (2015). Chapter 66 - Protective Effects of Coffee Against Induction of DNA Damage and Cancer by Aflatoxin B1. In V.R. Preedy (Ed.), Coffee in Health and Disease Prevention (pp. 587-596). Elsevier Inc.

  12. Korpi, A., Järnberg, J., Pasanen, A-L. (2009).  Microbial volatile organic compounds.  Critical Reviews in Toxicology, 39(2), 39-193. https://doi.org/10.1080/10408440802291497 

  13. Kreja, L., Seidel,  H-J. (2002). Evaluation of the genotoxic potential of some microbial volatile organic compounds (MVOC) with the comet assay, the micronucleus assay and the HPRT gene mutation assay.  Mutation Research, 513(1-2), pp. 143-150.  https://doi.org/10.1016/s1383-5718(01)00306-0

  14. Inamdar, A.A., Masurekar, P., Bennett, J.W. (2010).  Neurotoxicity of fungal volatile organic compounds in Drosophila melanogaster. Toxicological Sciences, 117, pp. 418–426. https://doi.org/10.1093/toxsci/kfq222

  15. Inamdar, A.A., Hossain, M.M., Bernstein, A.I., Miller, G.W., Richardson, J.R.,  Bennett, J.W. (2013). The fungal derived semiochemical 1-octen-3-ol disrupts dopamine packaging and causes neurodegeneration. Proceedings of the National Academy of Sciences USA, 110, 19561–19566. https://doi.org/10.1073/pnas.1318830110

  16. Inamdar, A.A., Moore, J.C., Cohen, R.I., Bennett, J.W. (2012).  A model to evaluate the cytotoxicity of the fungal volatile organic compound 1-octen-3-o1 in human embryonic stem cells. Mycopathologia, 173, 13–20.  https://doi.org/10.1007/s11046-011-9457-z

  17. Morse, R., Acker, D. (22 February 2017). Indoor Air Quality And Mold Prevention Of The Building Envelope. Retrieved from https://www.wbdg.org/resources/indoor-air-quality-and-mold-prevention-building-envelope

  18.  Bennett, J.W., Inamdar, A.A., (2015). Are Some Fungal Volatile Organic Compounds (VOCs) Mycotoxins? Toxins (Basel), 7(9), 3785–3804. https://doi.org/10.3390%2Ftoxins7093785

  19.  A.Graniti (1972). “The evolution of the toxic concept in plant pathology.” In: Wood R.K., Ballio A., Graniti A., editors. Phytotoxins in Plant Diseases (pp. 1–18). Academic Press.

  20. Brasel, T. L., Douglas, D. R., Wilson, S. C., Straus, D. C. (2005).  Detection of Airborne Stachybotrys chartarum Macrocyclic Trichothecene Mycotoxins on Particulates Smaller than Conidia.  Applied and Environmental Microbiology. 71(1),  114–122.  https://doi.org/10.1128%2FAEM.71.1.114-122.2005

  21. Sorenson, W. G., Frazer, D.G., Jarvis, B.B., Simpson, J., Robinson,  V.A. (1987). Trichothecene Mycotoxins in Aerosolized Conidia of Stachybotrys atra. Applied and Environmental Microbiology, 53(6), 1370-1375. https://doi.org/10.1128%2Faem.53.6.1370-1375.1987

  22. Milburn, D. Case Studies, Mold Focus_Part 1. (n.d.) Retrieved from https://docs.google.com/presentation/d/1RSgZYhSq0M_-fzlPUP1Q8z2btVuDi8so/edit#slide=id.p1

  23. Schurk, D. Houston Methodist Hospital Test Study Results Needle Point Bi-Polar Air Ionization for VOC Remediation. (n.d.). Retrieved from http://www.victordistcontrols.com/wp-content/uploads/2014/03/Methodist_Hospital_VOC_Remediation_Project_Test_Results_2014.pdf

  24. Electron Volt (eV) Potential Chart for Industrial Gases: UNDERSTANDING eV POTENTIAL PAPER. (n.d.). Retrieved from https://egeda.be/wp-content/uploads/2020/11/Electron-Volt-potential-chart.pdf

  25. Waddell, C. GPS Reports on Pathogen Testing,(n.d.) Retrieved from https://gpsair.com/uploads/customer-resources/Service-Logic/White-Paper-GPS-Reports-on-Pathogen-Testing-03-2020.pdf

Photo by Josh Eckstein on Unsplash

Sealing your Attached Garage

Sealing your Attached Garage

For many people an “attached garage” is an asset in a home: the convenience of parking and walking inside under cover is very attractive when there’s extreme weather outside!  However, from an air quality perspective, attached garages are actually a liability, unless the garage has been air-sealed from your house!

In our articles about negative air pressure here and here, we talked about how contaminants can enter your home from the garage.  The garage not only has car exhaust fumes, it can also have paint or chemical fumes from your hobby, VOCs from pesticides and insecticides stored there, and possibly even exhaust gases from your gas water heater, furnace or clothes dryer.  Need we  mention the mold and mildew spores when humidity and cardboard boxes create the perfect environment for mold?  It’s almost like having an unsanitary neighbor in the apartment next to you…now, does an attached garage still seem like an “asset” to your clean, healthy home?

If you are coming around to a healthier way of thinking about your garage, it’s essential to consider installing some boundaries with this unsanitary neighbor!  “Air sealing” is more than just a tight-closing door.  It goes from the ground (foundation), through walls and insulation and even into the attic.  That’s right–if the attic over your garage is not sealed from the attic over your home, you got it–there is shared airspace and the possibility of contaminants crossing over from the air that circulates there due to changing temperatures. 

As with most air-sealing projects, creating this boundary is easiest if it’s done during the building phase.  The easiest way is to build your attached garage as a “separate” building…as in this article.  Jake Bruton of Airow Building in Missouri does it this way: do all the framing for the house, install your air barrier, and only then, frame the garage on the other side of the air barrier.  Finally, any penetrations like electrical and ventilation must be properly sealed. 

Another way to airseal during construction is to hang drywall on the shared wall inside the garage, foam the penetrations like light switches and outlets on that wall, and also run plywood sheathing above it to the roofdeck, using sprayfoam to seal the entire barrier in the attic as in this video.  Sprayfoam really is the only way to effectively seal around ceiling joists, which often run straight over the wall from the home into the garage.     

This is all great...for new construction.  What if you are buying an existing home, or just now want to upgrade your home?  First of all, examine that shared wall from the garage side, from floor to ceiling. 

  • If the drywall is finished, that’s good.  Finished drywall can be an air barrier.  However, you’ll want to remove any trim like baseboards or trim around doors, faceplates like electrical plates, and uncover any penetrations.  Get some spray foam in a can and seal all of these cracks with spray foam.   You’ll want to cover the space from the sill plate to the drywall, the spaces around electrical boxes, and around any pipes sticking through the wall like gas pipes or hot water pipes if you have a hot water heater in the garage.  Make sure to seal around the door frame if there’s dead space there. 

  • If the drywall is not finished (no tape and mud or just insulation), that’s even better!  Consider removing the existing drywall on the garage side (you can install it again later if screws were used), as well as any fiberglass or rolled insulation, and sprayfoaming the entire wall.  Spray foam can be an excellent air barrier if it’s done by a pro.  Before you schedule the job, however, go to the next point and prep the attic space so that they can foam there as well.

  • If the attic space between the garage and home are shared, you’ll need to build a partition wall between them.  Of course this is not a fun job, because attics are typically low, cramped and have extreme temperatures, but it’s critical if you’re going to do a thorough job.  Then, the wall can be sprayfoamed on the attic or house side, or at least foamed around the roof, rafters and joists and taped where plywood sheets come together.  

  • Ventilation (air conditioning and heating) is something that should never be shared between a house and garage, because that is a sure way to pull those contaminants right in and distribute them around your home!  If you do have a shared system, consult with an HVAC company about terminating the vents to the garage and installing a dedicated mini-split.  For small garages, a window air conditioner and portable heater will do the trick!  

  • If flexible ventilation ducts go over the garage with no vents, it’s really hard to get an air seal around flex ducts.  If you can’t/don’t want to switch to metal ductwork, install a collar in the attic wall that separates the garage and house (the one you build as in bullet #3 above), and attach the ends of the flex duct to it, so the wall can still be adequately airsealed.  

  • The door between the house and garage, of course, is an area that needs to seal tightly.  Adjust the door so that no daylight shows around the perimeter (I know, this is easier said than done!) and use weatherstripping around the sides so that it seals when closed.  If necessary, install a “sweep” on the bottom or replace the rubber seal in the threshold so the bottom seals as well. 

Here are some product recommendations for air sealing the garage:  

  • Air-sealing tapes can be expensive, but don’t scrimp: don’t use duct-tape, vapor-barrier tape or anything less than a product that is for air-sealing.  ZIP System is a great brand and be sure to buy more than you think you will need, because there always seems to be another seam to seal!  Use this tape to seal plywood edges together, seal the door frame to the drywall (if you can’t foam it), etc. 

  • Spray foam cans come in lots of formulations: small cracks (less than ¼”), larger gaps and cracks ( ), pest block formula (who knows what kind of chemicals are in there), but just be sure to buy a good number of the small and large gap formulations before you start the job.  Wear gloves, safety goggles and old clothing (long hair safely tucked away) because this stuff is super sticky!  Also, if you use a can quickly, you can reuse the same straw on the next can, and save the extra straw in case one gets plugged or lost.  Unless you buy the “smart dispenser” version, the straws and remainder in the can cannot be reused after about 30-40 minutes, so be sure to have several spray areas ready when you start spraying!  After it hardens, you can use a utility knife or hacksaw blade to cut away excess foam.  Consider these different products:

    • Great Stuff Window and Door gently expands so that frames will not warp under pressure.

    • Great Stuff Gap and Cracks (use in gaps up to 1”)

    • Loctite Tite Foam, pack of 2 for $19

    • Great Stuff Pro (large cans, $14 each–a great tool for a large job because it’s easier to dispense and can be reused for up to 30 days); however it requires a special gun.  Users report that a can goes a LONG way (3-6 cans on a large home) but if you have more air-sealing to do, it’s worth having several more on hand.

    • And more…

Not only will your house smell better and stay cleaner after these airsealing improvements, you’ll probably notice less cold drafts in winter and hot air in summer, since most attached garages are not conditioned.  Finally, complete your sealed garage upgrade with a funny sign reminding everyone to “close the door”...after all, airsealing can only go so far when the door is open!!

Photo by Kevin Wolf on Unsplash

What happens behind closed doors…

What happens behind closed doors…

What happens behind closed doors…is STAGNATION!  When you close the door to a room in your home, air is trapped in the room, resulting in the following:

  • If there is no fan operating, air will not circulate, and any humidity present in the air will saturate soft furnishings, increasing the likelihood that mold will grow (see our article on ventilation and one of our favorite tools, dpcalc.org).

  • If central air conditioning or heating is pushing air into the room, the closed door prevents proper cycling of air out of the room, causing the system to a create a negative pressure zone near the return grille and placing stress on the system’s mechanical parts like blower motors.

  • Again, central air conditioning or heating with closed doors causes imbalances in the temperature of the home, because conditioned air is prevented from mixing, which in turn affects the thermostat and causes the system to run longer to reach the temperature set point.

Keeping doors closed, in other words, is just not good for proper ventilation in your home!  This makes sense to us…until the question of privacy is brought up.  Of course, not everyone wants their door to be open at all times, even if it’s just cracked open.  Don’t worry, there are ways to get good ventilation even with closed doors!

The best solutions are brought in during the design phase of the home, before construction begins.  This is where our first idea is best incorporated.  Transfer grilles offset high/low in a wall cavity use the cavity to muffle sound, so that this design affords  the maximum privacy.  However, in order to avoid entraining dust and other building toxins from surrounding spaces, the cavity needs to be sealed by gluing the drywall to the studs and plates…meaning that this solution needs to be built in during construction.

Source: Building America Solution Center

If you’re realizing you need better air circulation after construction, then there are still more solutions to consider.  You can use a back-to-back grille over a door (or any high space on a shared wall), which have sheet metal baffles to block sound and light while still allowing the passage of air through the wall.  Here are some diagrams to show back-to-back grilles:

Source: Building America Solution Center

Thirdly, if wall space is an issue and you have attic space above the rooms, you could install a jump duct using flexible duct, two ceiling grilles, and foam sealant (to make sure air from the attic does not leak into your home).  Theoretically, a jump duct could also be placed through/under the floor to bridge two spaces, but in either place, take care to make sure the flexible duct is not crimped, and do not cut any structural beams like rafters or joists to install it.

Source: Building America Solution Center

Lastly, there’s a solution which I consider to be the easiest of all of these.  In-Door Return Air Pathways by Tamarack Technology are easily installed in the bottom of your hollow-core or solid wood interior doors (door must be 1-3/8” thick to fit).  Simply remove the door from the frame (I find that tapping the hinge pins out is easiest), lay it down, trace the provided template on the bottom of the door, cut it with a jigsaw, install the grille with two screws (provided) and re-install the door.  They do provide less privacy than the previous two options, but are quick to install (less than 30 minutes in my experience) and can be left white or spray painted to match any door color with paint suitable for plastic. 

In-Door Return Air Pathway installed in a solid wood door.

When you have the door closed with any of these three solutions, air is free to mix with the rest of the home, rooms do not become positively or negatively pressured, and you definitely have an advantage in keeping mold from forming in that room.  Additionally, the continuous use of the following in the closed room costs very little energy, but boosts your mold protection even more: 

Sure, we get it…everyone needs their privacy, but for health’s sake, make sure the air is flowing freely!  

Photo by Storiès on Unsplash

Better bedroom ventilation = better sleep quality

Better bedroom ventilation = better sleep quality

Have you ever wondered why you’re not sleeping well?  We have quite a few suggestions for better sleep, but there’s one more (invisible) thing that can negate the others: CO2.  Sleeping in a stuffy bedroom does not enable quality sleep!  It turns out that you need “fresh air” even when you’re not conscious of it.  A new study shows that CO2 concentrations in the bedroom above 750 ppm affect your sleep and as a consequence, your cognitive performance is lower the next day.

In the 18-month study, 36 healthy college-age men and women volunteered to sleep for a week each in furnished bedrooms where their sleep was analyzed.  The levels of CO2 varied during the week: the first night was not included in the study (for adaptation), but then two nights each of three ventilation conditions were used to approximate CO2 levels of 750 ppm, 1,000 ppm and 1,300 ppm.  Sleep quality was monitored with wristband sleep trackers.  Salivary cortisol concentrations were measured upon waking also, as elevated cortisol levels correspond with decreasing sleep quality.  Overall, the researchers found that compared with ventilation causing an average CO2 concentration of 750 ppm (fresh air scenario), sleep quality was significantly reduced at the ventilation rates causing CO2 concentrations of 1,000 ppm and 1,300 ppm.  Sleep efficiency was reduced by 1.3 % and 1.8 % and time awake increased by 5.0 min and 7.8 min, respectively. Deep sleep duration decreased at the ventilation rate causing CO2 concentration of 1,300 ppm as compared to 750 ppm along with a significant increase in salivary cortisol after waking, which suggests increased stress and sympathetic activity. 

The takeaway from this study is to try and ventilate your bedroom with fresh air at night to simulate outdoor CO2 levels (450-500 outdoors is normal, up to 750ppm).  Obviously the best way to get fresh air is to open one or more windows, and windows don’t actually need to be fully open to achieve it.  By using a CO2 monitor near your bed, you can experiment to see how wide open 2the windows need to be.  If you live in a quiet suburb or country setting, it’s not too hard to install insect screens and do this.  However, there are lots of areas and circumstances that aren’t so simple!  We want to suggest some products and ways to help.

What if it’s too hot or humid or rainy outside to open my windows?  

  • In this case, the best solution is to install a window air conditioning unit that has a fresh air intake (not all of them do).  If you’re buying a new air conditioner, you may also want to look for one with inverter technology (it dehumidifies the air better and operates more efficiently) and upgraded air filter.  
  • If you have an existing window unit with no fresh air intake, you modify the weatherization around the unit (on the sides or bottom) to allow fresh air to “leak” into the room.  
  • If you have central air conditioning already, you should only need to open the windows about 1” to get enough fresh air to lower CO2 levels below 1000 ppm.
  • If you live in a quiet but rainy area, using a product like the Invisible Awning Rain Guard, $35-40, allows you to open your windows and ventilate, even during a storm.
  • If rain is the problem, here are two window fans that will help:

What if I live in an area with a lot of air pollution, like in a city or near busy roads?

While CO2 is not good for sleep, other types of air pollution like NOx (nitrous oxides) and particulates may be just as bad or worse, so we understand the need for outside air to be filtered.  Depending on the severity of your area, we have two products that can help:

  • The Window Ventilation Filter, $40-50, has an 11” height and reduces dust, dirt and was tested to remove 94% of ragweed pollen.  It also keeps out rain, snow and mild wind.
  • Nanofiber PureAir Window Screens, $40, cover approximately 3-4 average window screen panels.  They are transparent (so your view is not blocked) and use electrostatic adsorption to block particulates.
  • Medify has a great selection of HEPA air purifiers which can be sized according to your room.  All units are equipped with a pre-filter, True HEPA H13 or H14, and active carbon filter.  The active carbon filter is what will remove the VOCs in traffic and industrial pollution.

What if I live in an area where it’s not safe to keep the windows open? 

Security, of course, trumps fresh air…but you can have both if you secure a small window opening with a latch or lock.  It can also prevent children from opening the window too far and falling out.  One thing you’ll need to keep in mind, however, is fire safety; if the window is your safety exit in the case of a fire, you’ll need to make sure the key remains nearby if you lock it.

  • MiniLatches, $69, are pricey but well-made.  They are sized to allow fresh air in but prevent any indoor cats from going out.
  • Stainless Steel Window Chain Locks, $19, are very sturdy
  • Window Security Bars, $50 for a pack of 4, are easily adjustable and installed, and can be used on vertical or horizontal sliding windows and doors.

What if I don’t have a window in my bedroom?

“Fresh air” doesn’t always have to come from windows.  If your bedroom is an interior room, you’ll need to either use the central air conditioning system or create ventilation pathways to bring in fresh air from the rest of the house.

  • If your house is tightly built, it’s a great idea to add a fresh air intake.  Heat recovery ventilators (HRVs) and energy recovery ventilators (ERVs) minimize the heat and humidity losses of bringing in fresh air and exhausting stale air (ERV’s are recommended for more humid climates).  That way, fresh air comes into all parts of the home and having a window to open is not necessary.  For more on HRVs and ERVs, check out our article here.
  • If your room doesn’t have central air conditioning, you can have privacy and better ventilation by adding grilles in the wall or door.  We discuss four options to do it in this article.
  • If you can’t modify the walls or door, you can still have some security by using a Door Chain Lock ($7 for 2-pack) that will allow your door to open slightly and let more air flow in.  

Here’s a pictorial summary of the ventilation recommendations:

Source: Ventilation causing an average CO2 concentration of 1000 ppm negatively affects sleep: a field-lab study on healthy young people

The bottom line is…a lot of our comfort and well-being depends on how well we sleep.  Measure your bedroom CO2 in the morning before exiting (with the door closed) and if it’s above 1000 ppm, research your options for better ventilation.  Ventilate your bedroom tonight for a better day tomorrow!

Photo by Storiès on Unsplash

Materials to Exclude from a Healthy Home

Materials to Exclude from a Healthy Home

Everyone has at least one  “young and dumb” story where they are thankful not to have had more serious consequences from doing something un-wise, to put it mildly.  One of mine is repurposing a chunk of mystery wood for bar-tops in my 1950’s home.  It had a beautiful rustic espresso color and texture; a couple nail-holes here and there, and seemed very hard.  I cut it to length outside, put several coats of clear polyurethane on it and fitted it in place.  Then the headaches began.  For several weeks I could not shake the headaches…and since I was in the middle of finishing the house, I didn’t immediately recognize the culprit.  Suddenly, the “aroma” of creosote came back to me from cutting the pieces of wood.  It’s a potent preservative used for telephone poles and railroad ties, but definitely not meant for interior residential use.  I yanked out those bar-tops and, not one to throw anything out if I could help it, added them to my landscaping in the far corner of the yard.  No more headaches: I learned that creosote is a no-tolerance VOC for me!

The point of this story is that people can become very sensitive to chemicals and VOCs, often by accident, so education is probably our best defense!  Multiple Chemical Sensitivity (MCS) is a condition for anyone that has a reaction to formaldehyde, fragrance, VOCs, etc. and can be self-diagnosed.  One in four Americans suffer when exposed to certain chemicals (25%), and half of those are medically diagnosed with MCS. (One in four Americans suffer when exposed to common chemicals)  

For those of you who are fascinated by the right way to build (and building disaster stories), a  fun podcast to watch/listen to is BS* and Beer, which BS of course stands for Building Science.  I was intrigued by the headline of what NOT to include in my home, and also because the guest speaker is Corinne Segura, author of mychemicalfreehouse.net.  Her website and facebook page are a wealth of information for building a healthy home.  Corinne survived extreme chemical sensitivities in her first tiny home and she has consulted for approximately eight years on building techniques and products, notably for many highly chemically-sensitive people.  Mold tends to underlie these sensitivities, and in Corrine’s experience with this community, MCS has strong links to depression.  Here is her list of materials to avoid:

  1. Two-part spray foam tops the list. It offgasses more than expected (1-3 years), and contains flame retardants (FR).  When substitutions are made with soy and castor oil, these components do not change the offgassing.  VOCs are a major concern.
  2. Vinyl sheet flooring (used frequently in mobile homes) off gases at high rates, it uses plasticizers and may contain phthalates, which continually leach out. Linoleum (which is a natural product) is not vinyl sheet flooring.
  3. Rubber flooring, used for gym floors and especially made from recycled rubber tires, has high off gassing.  Many of us may know this when we get a new spare tire, if it’s stored inside the vehicle or in a trunk that’s not sealed from the cabin.  Phew!
  4. Some carpet: nylon carpet has high off gas levels.  Glues used for glue-down and padding also offgas.  Flame retardants and stain-proofing, which contain PFAS, can also be included.  However good carpet is zero-VOC.  There are very good wool, polyester and a nylon brands available.
  5. Some caulking and sealants: liquid asphalt and hot-mopping (for roofs), butyl caulks and sealants, and polyurethane caulks and sealants are high off gas.  The best types are made of silicone and polyether (however you will need to check warranties for the intended use area), and acrylic caulk has the next lowest offgas..
  6. PFAS (per- and polyfluoroalkyl substances) are used as stain guard substances, stone sealers, floor sealers and artificial turf.  They are highly persistent in the environment and have health concerns.  If you are chemically sensitive, you’ll particularly need to consider the type of stone you want, because there is not a lot of choice in stone sealers without PFAS (particularly for white stones)!
  7. Oil paints: solvent-based oil paints and primers are high VOC and slow to off-gas!  Water-based alkyd paints are a much better choice.
  8. Solvent-based stains for wood: same as #7.  Unfortunately water-based stains are finicky and the contractor needs to have experience with them.  However, there are natural oil-based stains which are not as harsh (such as tung oil, which can be applied with citrus solvent).  Rubio Monocoat is a plant-based, hardwax oil wood finish that is 0% VOC, durable, matte and keeps the natural look and feel of the wood.
  9. Fiberboards and particle boards are called medium density fiberboard (MDF) and high-density fiberboard (HDF), and are typically high in formaldehyde.  Alternatively, plywood is quicker to offgas. 
  10. Tiles with lead: some tiles test as much as 3x higher than leaded paint!  Cutting and working with these tiles is very concerning, as cutting tile releases more dust than demolishing it. 

Corinne had more advice to offer during the Q&A session. Here are some points:

  • Water-based is not always great because it may have other chemicals in it; it’s best to determine this from the MSDS or use brands that are known for non-toxicity (EarthPaint and AFM Safecoat are two that come to my mind).
  • UV-cured painted surfaces are good because this process is completed in the factory and has limited off-gassing by the time it arrives in the home.
  • Some people adversely react to natural VOCs like alpha-pinene, so natural materials are not always better in terms of VOCs.  You can actually reach a VOC level over CARB in a log house where everything’s made of wood!
  • Canned spray foam is actually way better than 2-part spray foam because it’s 1 part, it’s thinner, way smaller amounts.  
  • What makes a vinyl plank “luxury” (also called multi-layer rigid planks), besides marketing?  It has several parts to it: an SPC core (limestone-vinyl plasticizers in the core) with vinyl on top and cheap foam underlayment.  They are mainly zero-VOC and not on the “unhealthy” list. 
  • Some “antique” products like pressed-wood kitchen cabinets from the 1960’s have usually finished off gassing, but 40-60 year old vinyl flooring may still leach phthalates chemicals (forever). 
  • In her estimation, ventilation is way more helpful than air purifiers and Corinne would spend her money on ventilation strategies (ERV, HRV) before air purifiers.  These ventilation strategies, according to one of the hosts of the podcasts, work well even with “leaky” houses.
  • Furniture foam is a different substance than 2 part spray foam.  It contains polyurethane, which has plasticizers but not flame retardants (phased out).  Only natural latex is a good substitute for polyurethane foam, but it’s not that much of a difference to chemically sensitive people because both have some off-gassing.
  • Epoxy coatings are similar to the concept of 2 part spray foam if they are not mixed properly; they can offgas for some time and may have BPA.  

Corinne advises that if you are chemically sensitive, you should compile a list of your sensitivities and use a consultant who is able to specify materials for these needs, instead of just telling them “I have MCS, I need a chemical-free house”.   Since she was not currently consulting at the time of the podcast (early 2024) , she advises that Andrew Pace, Paula Baker-Laporte and Caroline Blazovsky are three that are expert consultants in this area.  She does, however, answer every question sent to her website.  Ask away and avoid, shall we say, “uninformed” mistakes!

Photo by Storiès on Unsplash

PSA: How to quickly shut off water to your home, and systems that can do it automatically

PSA: How to quickly shut off water to your home, and systems that can do it automatically

Think quick: do you know where your home’s water shut-off valve(s) are?   Imagine for a moment that you hear the sound of water gushing in the kitchen, and walk in to find it pouring out from under the kitchen sink.  If it’s not the dishwasher or kitchen faucet, then the leak may be in the wall–what do you do?  

Emergency water leaks are a realistic scenario, and every year, 1 in 12 homes experience a leak.  That’s more often than burglary or fires!  (Plumbing Leak Facts)  Therefore, it should be top priority to find your home’s water shut-off valve right away, and show it to other family members/housemates so that they know what to do, too.  It’s a good idea to practice gently closing and opening these valves every so often so that you know they work.  We use the term “gently” because old plastic valves and old plastic lines can break if they are manipulated with too much force!  If they are in bad repair, it’s time to replace them (or call a plumber to replace them) asap.

There could be multiple main water shut-off valves.  They are typically: (Two methods to turn off your homes water supply)

  1. In the main riser– this is where the water pipe comes out of the ground outside, and enters the home through the side.  If you live in a cold climate, there may not be an exposed valve outside to avoid freezing!
  2. In the garage or basement.  Normally it’s in the wall next to the garage door. 
  3. At the water meter box, you can use a meter key (special long-handled wrench) to shut off the water to the whole home.
  4. If you live in an apartment, there is one valve that serves the whole apartment.  It’s usually near your hot water heater or in a utility closet.

If you know where the water is coming from and you can shut it off at a specific appliance, go for it!  Here are the locations of specific water supply valves throughout a home: (How to shut off water supply in an apartment)

  • Toilets: Below and behind the toilet at the wall.  These can be ¼ turn valves or fully opening and closing valves.
  • Refrigerator: You’ll need to pull out the refrigerator to access the valve that supplies the icemaker; it’s usually recessed in the wall.  These are usually ¼ turn valves.
  • Dishwasher: look underneath the sink for a supply line that goes toward the dishwasher. 
  • Kitchen and bathroom sinks: under the sink, there are usually two for hot and cold. 
  • Washing machine: the valves should be about 2-3 feet off the floor behind or next to the machine in the wall. 
  • Water heater:  first, shut off the gas or electricity to the water heater.  Then, shut off the water supply by closing the valve(s) on the lines coming into the water heater at the top.  Then, relieve pressure to the lines by opening a sink faucet.  You can also help the water heater to drain to an appropriate place (like outside) by connecting a garden hose to the drain valve on the side, and opening the valve.  (How To Turn Off a Leaking Water Heater)
  • Showers and baths: if there is not an access panel in the opposite side of the wall where the shower/bath valves are located, go and shut off water at one of the main supply valves mentioned above.

Here’s a trick if the main shut-off valve(s) is not closing all the way, and water is continuing to come in at a reduced rate.  You can open the other faucets with drains in the home, like bathtub, sinks, etc., to relieve pressure at the leak until the plumber can get there.

Now that you know where your water supply valves are, you might want to consider automatic water shut-off options.  There are many systems that can shut off your whole home’s water supply, but they fall into 2 categories: moisture detection and flow sensing.  Basically, the water valve is shut off if the system senses water on the floor (via water detectors scattered around the home) or if the water flow in the main supply exceeds a pre-set user amount (water runs for too long).  Here are some pros and cons for these systems:

System

Leak Detector System

Flow-Sensing System

Pros

  • May detect smaller leaks if water falls on/near sensors
  • Will determine exact location of leak
  • May shut off water faster than a flow-sensing system if leak detector is placed in right location
  • Some qualify for home insurance discount
  • If wi-fi goes out, it can still shut off water in case of leaks 
  • Can catch very small leaks if loss of pressure is detected

Cons

  • Detector could get kicked out of place
  • If moisture sensors require batteries, they could fail if not changed regularly
  • If wi-fi goes out, individual leak detector may not communicate with shutoff valve
  • Doesn’t detect leaks behind walls, floors, etc. 
  • Most systems require wi-fi
  • No way to tell where leak is located
  • Water flow must exceed pre-set limits to shut off water, so small leaks could go undetected in some systems

Here are some systems for each:

Leak Detection: We spoke about individual leak detectors in this article, but the systems below can also shut off water:

  • Phyn ($50-579) offers leak detection via moisture-detecting “pucks” you can place around your home under sinks and other water appliances, but it also has a “smart water assistant” that can notify you of leaks via pressure waves in the system in both your hot and cold water lines.  It also has a “plumbing check” function to detect pinhole-size leaks.  The Phyn Plus will shut off your water in case leak parameters are exceeded. 
  • YoLink has a variety of water leak sensors that connect to their hub and thus can be programmed to activate an automatic water shutoff valve that is connected to the same app.

Flow-sensing: 

  • Water Hero ($900-1250): This is a whole-home system that is installed on the main water line just inside or outside (only in non-freezing climates) your home.  The motorized valve is installed by your plumber, and then it can be activated when you connect the unit to wi-fi and set up the water usage parameters for your home online.  If the water usage exceeds the parameters you set (for example, for 20 minutes continuously), the valve shuts, limiting water leakage in the home.
  • FloLogic ($2000-2900): This is also a whole-home system that is installed on the water main line, indoors or outdoors (outdoors with precipitation protection).  It has a more sophisticated flow sensor; FloLogic’s EverWatch™ leak sensing technology can see leaks in real time starting a ½ ounces per-minute (about a tablespoon).  Normal water use happens in intervals. Leaks are constant. Once flow begins, FloLogic measures the time duration. If the flow time exceeds the allowance, a leak is suspected and the water is shut off automatically.   The system can have a local control panel or app-based control.
  • Moen Flo Smart Water Monitor and Automatic Shutoff Sensor ($500) is an app-based product that “learns” your home appliances’ water usages and can shut off flow when leaks are detected through their FloSense technology.  The app is free with the product and the system is compatible with Amazon Alexa, Google Assistant, and Control4. 
  • YoLink FlowSmart Control: Meter & Valve Controller, $40-1180, is an AC or battery-powered device (4 AA batteries) that monitors water usage and will shut-off water if flow exceeds pre-determined limits you set on the app.  This device requires a YoLink “hub” as it doesn’t connect directly to the app or your wi-fi.  

There are additional considerations as well.  Most of these valves are recommended to be installed by a licensed plumber.  You’ll also need to check what kind of battery backup they have so that in case of a power outage, you’re still protected from leaks.  If you don’t want wi-fi control, only one system (FloLogic) seems to have a local panel option instead of the app.  Despite these details, the time and money you spend on selecting such a system could be “a drop in the bucket” compared to costly renovations from water damage if you didn’t have this protection.  Busy lives and unattended homes need help to keep the water where it should be–in the pipes and drains!

Photo by Jimmy Chang on Unsplash

Do HypoAir products kill the “good” bacteria as well as “bad” bacteria?

Do HypoAir products kill the “good” bacteria as well as “bad” bacteria?

Short answer: yes, some good bacteria are killed, but let us explain a little about the nature of bacteria, and how this technology affects them!

Since HypoAir’s bipolar ionization is made for the home, we are talking about “good” bacteria for humans, found on exposed home surfaces, the skin, and upper respiratory tract, because this type of ionization does not penetrate to interior surfaces.

So the answer is: yes, bipolar ionization does kill some “good” bacteria, but the type of bacteria, on which surfaces, at what humidity, at what concentration of ions, and so on, are highly variable!   We find that the biological and air quality contaminants found in homes are typically in high unhealthy concentrations, which are typically not found in the outside air.   We want to reintroduce natural counterbalances to suppress the spread and growth of these biologicals indoors, to make them more similar to what's found in nature.  However, our technologies are not going to sterilize the environment; they're just designed to cut concentrations and reduce illness in families.  In 20-30 years, technologies like ours could become very cost effective and installed throughout a home to have a nearly sterilizing effect in our indoor environments.  We don't want that!  At that point, the intentional reintroduction of a positive biome would be advisable.  If you are concerned that the use of bipolar kills too many good bacteria, you may want to investigate probiotics for the air to replace those good bacteria on surfaces, and use gentle cleansers and soap for your skin, dispensed from containers that don’t promote the growth of bacteria.  And, consider the fact that pets (and dogs especially) vary the nature of your home’s microbiota a lot too!  

Getting back to bacteria, here’s a short refresher from an article about bacteria, endotoxins and exotoxins:  bacteria can be classed into two different groups: “Gram-negative” or “Gram-positive”.  These classes are based on a test developed by scientist Christian Gram in 1884, which differentiates the bacteria using a purple stain.   According to webmd.com, bacteria either have a hard, outer shell, or a thick, mesh-like membrane called peptidoglycan.  The hard outer shell will resist the purple stain, and show up as a red color.  These are called “gram negative” because the purple stain did not show.  Bacteria with the peptidoglycan absorb the purple stain much more easily and are called “gram positive”.  The stain also tells many more characteristics about the bacteria and the way it interacts with bipolar ions.

Bipolar technology is also called cold atmospheric-pressure plasma (CAP), or non-thermal plasma (NTP).  In a study which analyzed how plasma affected bacteria in soil, it turned out that the non-treated soil consisted of both gram-positive and gram-negative bacteria from different phyla (a level of classification).  After treatment with plasma, however, the gram-negative bacteria were mainly eradicated, and only the major phyla of Firmicutes (gram-positive) were left.  Presumably this has to do with the structure of the bacteria.

The authors cited two previous studies on treatment of E. Coli (gram-negative) and S. Aureus (gram-positive) with cold plasma.  In the first study, the treated Gram-positive bacteria was mainly inactivated by intracellular damage, while the Gram-negative bacteria expired mainly by cell leakage.  The second study showed that plasma treatment led to damage of the bacterial cell wall of both E. coli and S. aureus and a decrease in the total concentrations of nucleic acid and cellular protein. However, S. aureus (gram positive) was less susceptible to plasma exposure in comparison to E. coli (gram-negative).

The sum of these three studies seem to indicate that gram-positive and gram-negative bacteria are affected by plasma differently, and chances of survival of bacteria after treatment with cold plasma is higher if a bacteria is gram-positive, having more of the mesh-like membrane (peptidoglycan).  One can see from the diagrams below that these peptidoglycan layers are relatively thick on the gram-positive type, which may account for its resistance to plasma.  Depending on the relative humidity of the air, plasma can form varying quantities of reactive oxygen species such as hydroxide ions (OH-), hydroxyl radicals (•OH), atomic oxygen (O), hydrogen peroxide (H2O2), and singlet oxygen (1O2).   Ozone (O3) is another ROS formed by plasma generators, however we’ve excluded it from HypoAir ionizers by limiting the input energy.  These ROS are reported to damage the bacterial structure and functions.  In addition, the multiple reactive nitrogen species (RNS), including nitric oxide (NO), peroxinitrites (ONOO−), nitrites (NO2−), and nitrates (NO3−), can play a major role in the plasma’s biocidal process by altering the cell wall components, the functions and the structure of the phospholipid bilayer, the structure of nucleic acids and cellular proteins, gene expressions, and protein synthesis. (Effects of Atmospheric Plasma Corona Discharges on Soil Bacteria Viability)

Image source: Difference between gram-positive and gram-negative cell wall

However, there are factors other than gram-type that affect bacterial eradication via plasma technology, such as pH, humidity, and the surface on which the bacteria were placed during plasma exposure.  Specifically, 

  • Lower pH can translate to higher kill rates.  A reduction of 4.9 log was observed when Bacillus cereus was treated at pH 5, while a reduction of only 2.1 log was observed at pH 7.  Interestingly, the same study showed that “No appreciable differences between gram-positive and gram-negative pathogens were observed, although the spore-forming B. cereus was more resistant to plasma than non-spore-formers.” (Spores in bacteria are not the same as mold spores; only one bacteria makes one spore). 
  • Humidity was also reported as an important parameter; increasing the relative humidity was correlated to efficiency in plasma inactivation of Aspergillus niger, which was explained by the generation of more hydroxyl radicals. However, the same study showed that “In contrast, B. subtilis showed slightly poorer inactivation at high gas humidity.”
  • Regarding the surface on which the bacteria were placed during plasma treatment, higher eradication was observed when microorganisms were loaded on a filter compared to a fruit surface, because the microbes could “migrate” to the interior of the fruit.  Therefore, if the bacteria could migrate into a moist surface, it was more likely to survive. (Cold Atmospheric Plasma Disinfection of Cut Fruit Surfaces Contaminated with Migrating Microorganisms)  Wow, bacteria can migrate! 

Now that we know that there are a lot of variables in your home that affect the mortality of bacteria, how likely is it that “good” bacteria on skin, your upper respiratory system, and home surfaces will be killed?

First of all, let’s look at what types of bacteria these are.  Staphylococcus epidermidis (phylum Firmicutes, gram-positive)  is a part of the skin microbiota (aka skin flora) and another type of good bacteria is Roseomonas mucosa (phylum pseudomona dota, gram-negative), which is naturally present on the skin and contributes to an overall healthy skin microbiome. (Dermatologists Break Down the Difference Between Good and Bad Bacteria)  In addition, the optimal pH value of skin on most of our face and body lies between 4.7 and 5.75, which is mildly acidic. (Understanding skin – Skin’s pH)  According to the studies above, it’s not known whether good bacteria on healthy skin survive plasma treatment, because although healthy skin is normally mildly acidic (which promotes their death by ions), moist skin favors preservation of good bacteria. Therefore, no matter what relative humidity is in your home, it’s a good idea to keep your skin hydrated!  

Concerning the upper-respiratory tract, potential keystone microbiota are Dolosigranulum and Corynebacterium species (both gram-positive), as they have been strongly associated with respiratory health and the exclusion of potential pathogens, most notably Streptococcus pneumoniae, in several epidemiological and mechanistic studies. (The microbiota of the respiratory tract: gatekeeper to respiratory health)  Regarding pH, airway surface liquid pH in normal airways ranges in vivo between 5.6 and 6.7 in the nasal mucosa, and is around 7.0 in bronchia.  (Airway Surface Liquid pH Regulation in Airway Epithelium Current Understandings and Gaps in Knowledge) Therefore it’s mildly acidic in the upper regions, and tending toward neutral pH in the lower regions.  Being gram-positive favors survival, as does being in mucous, but being on a mildly acidic surface favors eradication of these good bacteria.  Again, keeping your mucous membranes moist via water intake and plain saline sprays is a good idea!

Finally, most of the ions that are emitted by bipolar devices will contact surfaces in our homes.  What kind of good bacteria live on surfaces?  Forty homes in North Carolina were sampled for a study in August 2011.  Standard places like cutting boards, kitchen counters, door handles, toilet seats and pillowcases were sampled.  The bacterial families with the highest relative abundances across all of the collected samples were the Streptococcaceae (8.9%) (gram-positive), Corynebacteriaceae (5.6%) (gram-positive), and Lactobacillaceae (5.1%) (gram-positive).  Since these are all gram-positive, their survival would also depend upon the acidity and nature of the surface.  Keeping the humidity in the home in the sweet range of 40-60% will favor the production of more bacteria-killing hydroxyl radicals, and cleaning regularly is important.  Wet, dusty or cluttered surfaces will actually promote good bacteria survival, but they also promote bad bacteria survival too, so to play it safe, it’s best to keep surfaces clean!  

Is it ok to walk around barefoot in my home? I’m concerned about my feet absorbing mycotoxins.

Is it ok to walk around barefoot in my home?  I’m concerned about my feet absorbing mycotoxins.

Often we end up researching and writing articles in response to client questions, and this is one such article.  If your floors are warm or carpeted, it often feels good to walk around barefoot in the house.  However, this may or may not be a good idea, depending on what is on your floors.  Can toxins really go into or out of your feet?

“Foot detoxing” pads, baths and creams have been popular for a while.  Usually they show the pad or water turning brown with “toxins” after supposedly releasing them from your body through the feet.  However, there have been very few studies on their effectiveness.  In a small 2012 study, the researchers sampled water from before and after foot baths with the popular IonCleanse device, as well as hair and urine samples.  They found no evidence to suggest that ionic footbaths help promote the elimination of toxic elements from the body through the feet, urine, or hair.   So, it’s unlikely that these methods are able to pull toxins out of the body.

However, some molecules can be absorbed through the skin (particularly the feet) into the bloodstream.   You can even “taste” with your feet; if you apply garlic to the soles of your feet in a plastic bag ala this video, you can taste it in your mouth between 15 minutes to one hour later.  This is because small, light molecules like allicin (the chemical released in freshly-cut garlic) can penetrate the skin and the bloodstream, traveling throughout your body.  Dimethyl sulfoxide (DMSO) is a chemical that has similarities to allicin and is very easily absorbed through the skin.  Part of the DMSO is transformed to the volatile metabolite dimethyl sulfide, which gives a characteristic garlic- or oyster-like smell when excreted through the lungs.  (Adverse reactions of dimethyl sulfoxide in humans: a systematic review)  Therefore, we are susceptible to chemicals that behave in this way.  Scientists and drug-researchers are constantly in search of chemicals that can deliver drugs more easily to the bloodstream, and therefore new “carriers” are of great interest.  

What about mycotoxins that may happen to be on the floors?  Can we get mycotoxin poisoning from walking around barefoot?   Although there’s no direct answer via testing, research on individual mycotoxins shows that they can be absorbed through the skin, so it’s reasonable to assume that they can be absorbed through the skin of the soles of the feet.  Since mycotoxin concentration on surfaces is highly variable, however, it remains to be seen whether concentrations sufficient to cause illness are present on floors. 

We found that a 2014 paper summarizing previous research on the absorption of the most common mycotoxins through skin and their effects, was most helpful.   This research documented mostly animal trials to determine toxicity, but there are also reports of workers who were accidentally exposed to these toxins.   The actual methods of damage incurred by these toxins can be quite complex, so we will spare you the details, but many of them cause oxidative stress that stimulate the immune system, triggering inflammation and cell damage.  Here are some examples:

  • T-2 toxin, a member of the trichothecene mycotoxin family, is produced by various species of Fusarium fungus, which can infect corn, wheat, barley and rice crops in the field or during storage.  It’s infamous for allegedly being used as a bioweapon during the military conflicts in Laos (1975-81), Kampuchea (1979-81), and Afghanistan (1979-81) to produce lethal and nonlethal casualties. (CBRNE - T-2 Mycotoxins) T-2 toxin causes oxidative stress, which releases cytokines (proteins that help control inflammation in the body) that are thought to cause the death of the outer layer of skin cells (keratinocyte apoptosis).   T-2 mycotoxicosis can cause nausea, vomiting, diarrhea, leukopenia, hemorrhaging, skin inflammation, and in severe cases, death. (T-2 Mycotoxicosis)  The reported LD50 (amount which causes death in 50% of exposures) of T-2 toxin is approximately 1 mg/kg of body weight. (Medical Aspects of Chemical and Biological Warfare)
  • Citrinin (CTN) is a product of several fungal species belonging to the genera Penicillium, Aspergillus and Monascus. To summarize, CTN under in vivo conditions has the ability to cause oxidative stress and ROS-mediated DNA damage in mouse skin upon topical exposure, leading to skin death.
  • Patulin (PAT) is a toxic chemical naturally produced by several species of mold, especially within Aspergillus, Penicillium and Byssochlamys.  A single topical application of PAT to mouse skin generates ROS, which causes DNA damage in skin cells.  In small doses it causes death of the cells, but in larger doses it initiates tumor growth.
  • Aflatoxins are products of  several types of Aspergillus molds, with AFB1 known as the  most potent teratogen (causing malformation of embryos), mutagen and hepatocarcinogen (causes liver cancer) of all aflatoxins. Like in the case of PAT, AFB1 may also cause skin tumors in mouse skin after long-term and higher-dose application.
  • Ochratoxin A (OTA) is a fungal metabolite produced by Aspergillus ochraceus and Penicillium verrucosum. OTA is found in a variety of plant food products such as cereals. To summarize, a single topical exposure of OTA at the dose level of 20–80 μg/mouse (20-80 millionths of a gram, with a mouse weight of 40-45 grams, translates to 0.5-2.0 ppm) induces the production of ROS, resulting in the skin cell death. On the other hand, a single topical exposure of OTA at a dose level of 100 nmol/mouse causes significant enhancement of short-term markers of skin tumor promotion in mouse skin.

As you can see, the least effect of these mycotoxins is to cause skin cell death, but the worst effects are whole-body!  They are effectively absorbed through the skin.  However, is it reasonable to assume that they would be found on your floors, in a sufficient quantity to cause illness?  

A 2012 study of a family that started to experience illness shortly after moving to a home in Hawaii in 2008 indicates that mycotoxin levels in the low parts-per-billion range on various surfaces in the home (including a sandal and a bath towel), as well as elevated fungal counts, can cause systemic illness.  The father and mother, aged 40 and 39, had an 8 year old daughter, a 5 year old son and a pet dog, living in a 2-story home with a crawlspace that had water intrusion.  According to one of the two inspection companies hired to investigate the home for mold, “A serious moisture/mold problem is observed in the crawlspace directly below the bedrooms. Moisture is penetrating the walls of the foundation. The HVAC system is designed to force air into the crawl space, forcing crawl space air into the bedrooms and other areas above. Moisture intrusion also results from the master shower into the crawl space as well as from sprinklers, damp soil against the foundation, lack of roof gutters, and poor grading.” Similar findings were in the second report, plus: “Smoke testing revealed communication between the crawl space and upper level bedrooms via electrical outlets and electrical ducts and plumbing. The conduit holes were not sealed, permitting observance of light coming through spaces in the floor joists. A musty odor was present in the master bathroom and noted to get stronger when the fan coil was turned on.”  ERMI tests for mold indicated ERMI levels of 2 to 3 throughout the home, which “represent a moderately high index, and further investigation should be conducted to establish if your home has a mold contamination problem”.  (Interpreting ERMI test results) Here are the test results for mycotoxins; mycotoxins can be measured from air or dust samples and in this case the dust was analyzed:

All four of the family members and the dog tested positive for OTA and some for tricothecenes in their urine; they had health problems involving the upper and lower respiratory tract, headaches, neurocognitive deficits, and severe sinusitis. They had chronic sinusitis and nasal inflammation, and the isolation of bacteria (Pseudomonas and Acinetobacter) and molds (Penicillium and Aspergillus) from nasal secretions from the father and daughter is consistent with other cause and effect symptoms of mold exposure.  Even the dog suffered from 72 lesions, an ear mass and lipomas (which were surgically removed), in were found OTA and tricothecenes.  The mother gave birth to a daughter 3 months after moving out of the home, which had skin inflammation and discolorations because of being exposed to mycotoxins in the womb and via breastmilk.  

Therefore, we can conclude from this sad scenario that mold, bacteria and mycotoxins are a real concern in house dust when the home has water intrusion and mold issues.  There’s no way to know how much of the mycotoxins were inhaled versus absorbed through their skin, but of course young children are closer to the floor, often crawling and sitting on it, thus sitting in dust, stirring up dust, and breathing it in.  The dog obviously suffered from laying on the floor!  

According to IndoorScience, a reputable indoor air-quality testing company, 

  • there are no guidelines for “acceptable” amounts of mycotoxins in house dust, 

  • mycotoxin testing is much more expensive than standard mold testing, and 

  • there are only a few labs that perform mycotoxin testing.   

However, if you have water intrusion or mold problems in your home that you suspect are causing health problems, mycotoxins or toxins from actinobacteria (see our article here) could very well be the culprit.  In these cases, solving the water intrusion problem and remediation and thorough cleaning will also remove the mycotoxins and bacterial toxins!  Here are some tips for maintaining a cleaner home from our related article

  • Invest in a HEPA air cleaner to remove dust from the air

  • Clean floors regularly with a HEPA vacuum and mopping (some appliances do both)

  • Filter the air that comes into your home via window filters

  • Change your HVAC filter regularly and even upgrade it if possible

  • Try to remove your outdoor shoes at the door, and wear indoor shoes or slippers only in the home

  • Minimize clutter, upholstery and carpets that can hold dust. 

These are also common recommendations of doctors and practitioners who see mold illness in their patients, because removing them from surfaces is helpful whether the toxins are inhaled or absorbed.  If you suspect water intrusion anywhere in your home (even in places you can’t see, like the crawlspace or attic),  of course you’ll need to address remediation in the moldy area pronto.  However, since you don’t know how air currents may be carrying dust and toxins into the living space, it’s a safe bet to also step up the cleaning and keep your shoes on!

Photo by Jimmy Chang on Unsplash

Excuse me but your fireplace is open!

Excuse me but your window fireplace is open!

Heading into the winter heating season, many of us are thinking of cozy nights snuggled inside our homes, not the cold drafts that spoil the atmosphere in more ways than one–ahem, even our heating bills!  Drafts are invisible sucks on our budget, like “phantom” power leeches that use electricity.  The drafts coming from the fireplace are comparable to leaving a window cracked open.  In our article about how to keep the fireplace from polluting the house, we noted that the average household can save 14% on their heating bill by weatherstripping the fireplace.   It’s time to prepare for maximum coziness!

Working fireplaces have dampers, and these should work well.   Dampers are like “valves” that should be closed when the fireplace is not in use, to prevent outside air (and smoke particles from the flue) from coming back into our homes when we’re not using the fireplace.  However, dampers are not air-tight; they just don’t have the ability to block drafts.  Here are several other places to really air-seal your fireplace:

1) At the chimney cap: this requires you to get up on the roof or hire someone to do that.

2) Inside the flue with a balloon: the balloon, however, can shrink as temperatures get colder, or get punctured on a rough surface and leak.

3) At the hearth (bottom): this is the most physically convenient place, and can be easily removable for those times you want to use your fireplace.

Although the first two can accomplish air sealing well with the right products, #3 is actually the healthiest because the chimney and firebox (with smoke particles on their surfaces) stays separated from your house air.  

Here are some ways we’ve found to seal out those drafts all year long: 

If your fireplace is a bare opening in the bricks, like mine, this is the most difficult to seal but worth the effort.  Here is are two ways to do it:

Method 1: You’ll need: 

  • 4 pieces of wood (at least 1” square, larger is better) or metal tubing cut to fit the length and width of the opening (see diagram below)
  • Foam insulation tape to go around the frame in the opening
  • Glue gun and glue if adhesive on insulation doesn’t work well
  • Magnetic tape or velcro tape
  • Optional: 1-2  tension rods will help stabilize the frame if the wood doesn’t fit snugly.
  • An insulated blanket or piece of plywood cut fit over the frame.

You’ll want to thoroughly plan out how the frame will fit together before cutting your wood or metal to length!  Here’s how I cut mine:

Then, add insulation to the perimeter of the pieces using the adhesive on them, or a glue gun, and fit the wood snugly back into the opening–you may need to re-cut the pieces to accommodate the increased thickness due to the insulation.  

You can add 1-2 adjustable tension rods across the opening or up and down for added stability.

Next, add magnetic tape or velcro to the front of the wood pieces in order to attach the insulation.  You can use all kinds of materials to cover the opening and get creative!  Just remember that there will be a temperature differential in winter or summer, so adding some insulation to the back of the material makes it even more energy efficient.

  • Foam board or cardboard (if cut to fit snugly, no tape is needed to secure it in the opening)

  • Bed blanket with extra insulation glued or stitched to back or inside

  • Old electric blanket with wire removed and extra insulation added inside (stitched in place)

  • Plywood

  • Drywall

Of course, if you decide to use the fireplace, remove ALL of these materials and store them away for re-installing later. 

Method 2 involves taking a baby or pet gate and setting it to firmly span the opening, then cutting a foam board or cardboard to fit exactly over it (you can cover the foam board with wallpaper or fabric).  While this method can be sturdier and quicker to do, it does involve finding an unused gate and cutting the foam very carefully so that it seals the opening. Alternatively, you could cut a used foam mattress topper slightly larger than the opening, and squeeze it into place to cover the gate (again, covering the foam with any decorative material). 

Here’s how my fireplace draft blocker turned out with a fleece blanket, 2 sheets of cardboard glued together, and a staple gun (admittedly I could have stretched the fleece a bit more or made a border for more visual interest):


Voila!  Just sticking my head into my fireplace one time during this project and smelling the lingering smoke smell made me think, why didn’t I do this sooner?  Drafts and smoke be gone all year long!

Norovirus: one tough virus to avoid

Norovirus: one tough virus to avoid

There’s a lot to be said for cruising on ships.  If you want a pre-planned vacation that offers as much or as little adventure as you desire, cruises top the list.  The economy of cruise ships, though, depends on the number of passengers, and with all those passengers come a number of microbes that your body may not tolerate well.  Although norovirus is a disease that can happen anywhere, health officials track illness more closely on cruise ships, so norovirus outbreaks on cruise ships tend to be more extensively documented and publicized. (Facts About Noroviruses on Cruise Ships)

Norovirus is the illness caused by viruses in the Caliciviridae family. When the virus enters your body, it makes your stomach and intestines swell or become inflamed. This is a condition called gastroenteritis, which leads to symptoms that typically include diarrhea, vomiting, nausea and stomach pain. Mild fever and aches are possible. Although it’s often called the “stomach flu”, norovirus is not the influenza or “flu” virus.  (Norovirus appears to keep spreading as rate of positive tests exceeds last year's peak)    

So how does the norovirus get transferred so quickly?  Infected people “shed” billions of particles of the virus through feces and vomit, and it only takes 1 particle of virus to become infected.  This “viral shedding” happens because viruses make copies of themselves very quickly. Every time a virus infects a cell, the number of viruses increases more and more rapidly. The immune system does its best to neutralize the virus by using antibodies, but it can take the immune system a long time to make enough antibodies to kill all the virus living inside one person. In the meantime, the virus has already spread to other people by taking it in orally.  (Viral Shedding and What It Means for COVID-19)  Sometimes, certain foods, including oysters and other seafood, are naturally contaminated with norovirus, so you can get it from eating contaminated foods too. (Norovirus)   

Although norovirus cases usually peak in the wintertime, places like cruise ships foster the environment that helps it to spread quickly (close contact), so it’s not really surprising that a norovirus outbreak on a cruise ship in June 2023 caused approximately 175 people to fall ill.  Here are some facts you need to know: 

  • After you come into contact with norovirus, it can take 12 to 48 hours before you start to show symptoms. This amount of time before you get sick is called an incubation period. Most people get better within 1-3 days.  After your symptoms stop, you’re still contagious for up to 48 hours.  That means an infected person could be contagious for 2+3+2 days, or a whole week! (Norovirus: Why Cases are on The Rise and How to Avoid It)

  • The virus can thrive in food buffets and cafeterias because many people touch the utensils that are used to serve the food.  According to the CDC, norovirus can stay viable on surfaces for days or weeks!

  • Although alcohol-based sanitizers are effective on many other types of viruses, norovirus is alcohol-resistant, because it lacks a lipid-based envelope.  Therefore, you can’t depend on an alcohol-based hand sanitizer to beat norovirus.  (How Much Effect Does Alcohol Have Against Alcohol-Resistant Norovirus?)  Another popular (but toxic) ingredient in hand sanitizers is Quaternary compounds (Benzalkonium chloride), which is NOT effective against norovirus either.  (Norovirus fact sheet for environmental cleaning)

  • Soap and water are recommended for cleaning hands because they can lubricate your hands enough to loosen the virus particles and wash them down the drain.

  • Noroviruses are relatively resistant to heat also. They can survive temperatures as high as 140°F and quick steaming processes that are often used for cooking shellfish. (Norovirus Illness: Key Facts)

  • There are many types of norovirus and sadly, you can get it more than once.  

Whew, these facts are hard…how can an uninfected person to stay well during an outbreak of norovirus?  Keep in mind that unlike rhinoviruses, which are mainly spread through the air, norovirus is mainly spread by touching infected surfaces and then touching your mouth or eyes. Here are some tips from the CDC:

  1. Wash hands thoroughly with soap and water for at least 20 seconds (humming the happy birthday song twice is about 20 seconds).  You should wash after using the bathroom, before preparing or serving food, and especially after contact with an infected person. 

  2. Wash fruits and veggies and cook seafood thoroughly.

  3. Don’t prepare food for others while you’re sick and for 3 days after you recover.

  4. Clean and disinfect contaminated surfaces like the bathroom and kitchen, doorknobs and railings.

  5. Wash laundry thoroughly.  

One problem is that not everyone who carries the virus is symptomatic, but everyone who carries it sheds virus particles, whether they show symptoms or not!  Therefore, when in close contact with a lot of people, extreme vigilance will help you to ward off illness that could ruin your cruise (or conference, or family reunion…)   

Of course we like to find the most non-toxic ways for you to disinfect all these surfaces!  Chlorine bleach, Glutaraldehyde (0.5%) or Iodine (0.8%) mixed at the manufacturer’s recommendations ARE effective at killing the virus.  Of these, only iodine is safe and effective as a hand sanitizer.  A study showed that antiseptics containing 10% povidone-iodine (equivalent to 1% available iodine) reduced virus at a rate higher than that achieved with any of the alcohol-based sanitizers, non-alcoholic sanitizers or antimicrobial soaps that were tested as well.

Although the same study showed that Glutaraldehyde (0.5%) was effective at killing the virus, like bleach it can irritate nasal passages and eyes, as well as severely burn skin.  A study performed in 1993 showed the virucidal effect of copper, iron and mixtures of these two elements with peroxide, on 5 viruses.   The copper-peroxide mixture performed the best, even better than glutaraldehyde.  The study proposed that a formulation comprising 0.05% copper and 5% peroxide should have a virucidal efficacy comparable to that of glutaraldehyde at 2%, the concentration (used for 2 to 20 min), which was currently recommended for disinfection of a wide variety of medical devices.  

The great news is that our all-purpose, non-toxic cleaner TotalClean combines both copper and iodine, and when they are combined, they produce peroxide!  In simple terms, the peroxide acts as an “oxidizing agent”, destroying the means for bacteria to take in oxygen and suffocating them. 

You can also go to this page on the EPA’s website to find products that are capable of inactivating norovirus, or many other viruses!  Norovirus is a “tier 3” virus, which are small, nonenveloped viruses that are the hardest to inactivate. (For more information on “enveloped” vs. “non-enveloped” viruses, this video is very informative.)  Both their protein capsids and their small size make them less vulnerable to disinfectants compared to other viruses.  Norovirus is not able to be cultivated for testing in human cell cultures, but the closest relatives, Feline or Murine Calicivirus, can be inactivated by the following non-toxic disinfectants: Hypochlorous Acid (a safer chemical related to bleach), hydrogen peroxide, thymol (a natural antiseptic produced from thyme), peracetic acid and citric acid, among others.  The sortable database also gives brand names so you can find these products online or in stores.

The bipolar ionization in Germ Defender, Upgraded Air Angel Mobile and Whole Home Polar Ionizer can kill microbes in the air and on surfaces by creating positive and negative ions that disperse through the air and interact with the microbes to inactivate them.   In order for ions to inactivate the norovirus, they would need to fight the virus on surfaces, also called fomites.   Although this technology has not, to our knowledge, been tested against norovirus or other non-enveloped viruses, in a 2015 study using influenza A and animals, negative ionization caused 2 effects: inactivation of virus particles in the air, and more efficient capture of the particles on a collector plate (because the particles became negatively charged and the plate had a slight positive charge).  

So, if you happen to be in close contact with a lot of people, remember the advice that many mothers give: wash your hands and avoid touching your mouth or eyes.  And we would add: disinfect surfaces using a safe, non-toxic disinfectant approved to do so.  These steps could well spare you a big stomach-ache and pain!  

Photo by Adam Gonzales on Unsplash

More Enzymatic Cleaners to the Rescue!

More Enzymatic Cleaners to the Rescue!

If you read our article “Breaking down Mycotoxins and mVOCs with Enzymes and Non-Toxic Cleaners”, we described that certain enzymes can be used to break down mycotoxins, the toxic products of mold, which can otherwise be very hard to eliminate.  Enzymatic cleaners specifically targeting mold and mycotoxins are few, but we wanted to let you know that all-purpose enzymatic cleaners work on stains, odors, and general cleaning duties all around the house!

First of all: What is an enzyme?   Enzymes are proteins produced by living organisms that act as catalysts in chemical reactions.  Enzymes can either build up or break down.  For our purposes, cleaning enzymes facilitate breaking down microbes and their byproducts that cause sickness, stinkiness or stains.  

Scientists have been exploring making artificial enzymes since the 1990’s, and many of these are mimicking enzymes found in nature.  Here are the most common types of natural enzymes (from Simple Science: How in the World do Enzymes Clean?):

  • Proteases break down protein-based soils including blood, urine, food, feces, wine and other beverages.

  • Lipases break down fat molecules like oils and grease.

  • Amylases break down starch molecules like eggs, sugars, sauces, ice cream, gravy.

  • Cellulases are used to soften fabric and restore color to fibers made up of cellulose material. They also remove particulate soil and reduce fabric graying and pilling.

Enzymes were initially produced by extraction from glands of various animals; however, modern enzyme production is done through fermentation of various fungi and bacteria through the steps of fermentation, recovery, and standardization.   (about Cleaning Products: Enzyme Science

Enzymes and purely enzymatic cleaners are not “alive”.  Bio-enzymatic cleaners, however, do combine enzymes with bacteria, which are “alive”. Examples are drain cleaners and some pet stain removers.  

Enzymatic cleaners are marketed to pet owners (and even more so to cat owners) because cat urine can be especially concentrated (cats make the most of the little water they drink), and so once it’s deposited, the ammonia and hormones in the urine start to smell, and bacteria start breaking it down into urea.  It’s an unmistakable fragrance, and enzymatic cleaners are regularly recommended by veterinarian and pet experts for pet accident cleanup (the ASPCA, mobile vet company The Vets, and professional veterinary site DVM360 are just a few examples).  

Some of the benefits of enzymatic cleaners are:

  • They tend to be more powerful by working on more substrates (surfaces, conditions) in lower concentration than chemical cleaners.  Therefore you use less, resulting in less packaging.

  • They work at moderate pH and temperature, allowing for milder detergents and less energy, like cold-water laundry detergents.

  • Enzymes are not mutagenic (causing changes in DNA) and not clastogenic (causing breaks in chromosomes).  They are not reproductive or developmental toxins and have a low toxicity to aquatic systems.

Some of the cons of enzymatic cleaners are:

  • They can have storage time limitations before the enzymes become less active.

  • They can have storage temperature limitations.

  • They can take longer to work.

  • Some enzymatic cleaners (especially carpet cleaners as in this video) can leave an oily sticky residue if the cleaner is not washed away, which can attract soil/stain even more.

  • They can have inhalation dangers if the cleaner is in powder form, but many formulations are now in dust-free granules that avoid this danger.

  • They can be incompatible with other cleaners like bleach and chemical disinfectants, which can deactivate the enzymes.

So, here are some enzyme cleaners you might like to try:

For pet owners:  Rocco & Roxie Stain & Odor Eliminator for Strong Odor - Enzyme Pet Odor Eliminator for Home has a LOT of fans for the way it quickly and thoroughly eliminates pet odors and stains (just read some of the comments/watch videos).  Although their ingredients are a bit mysterious (Water, advanced biological blend, non-ionic surfactant, odor counteractant), the company says it is safe to use around pets and children, and certified safe for all carpets from the Carpet and Rug Institute (CRI).  They also offer a 100% money-back guarantee if you’re not satisfied.

For anyone who cleans: TweetMint Enzyme Cleaner contains no volatile organic compounds (VOC) or synthetic chemicals. It's completely free of artificial colors & fragrances, preservatives, animal products or by-products and has not been tested on animals.  Since it’s concentrated, a little (just ½ oz) will make ½ gallon of medium-strength concentrate, and the website publishes a whole list of jobs like cleaning windows and floors, degreasing, stain removal, odor elimination, and even pest control (garden and home).  The active ingredients are purified water, anionic/nonionic surfactant blend, glycerin, enzymes, peppermint oil, sodium borate. Sodium borate is a naturally-occurring compound made of boron, oxygen, hydrogen, and sodium, and in 2020 the Cosmetic Ingredient Review (CIR) Expert Panel evaluated data and concluded that sodium borate is safe as a cosmetic ingredients in concentrations less than or equal to 5%.. (Sodium Borate: Is it Safe?)

For anyone who showers or washes clothes:  Zerotaboos (ok, just put a space in there to easily say it: zero taboos!) is a woman-owned company which uses prebiotics (simple sugars, which are food for beneficial bacteria) and postbiotics (Lactobacilli ferment filtrate) in their products to encourage growth of good bacteria so that you don’t need harsh chemicals and fragrances to smell better.  Their Laundry Enzymes contain 10% nuclease enzymes, the strongest concentration available and the best for breaking down body odor.  It doesn’t replace your regular laundry detergent, but does a good job of removing troublesome body odor from clothing so that it actually smells fresh again after washing!  This owner knows her stuff and cares about her customers (see video on why she stopped offering refill packaging). For sure, bacteria and their byproducts have fed odors and fears long enough…it’s time to turn the tables by putting good bacteria and enzymes to work for us!

Photo by Daiga Ellaby on Unsplash

Glowing under blacklight

Glowing under blacklight

I’ve heard that in the 1960’s, blacklight posters were all the rage.  Glowing things are cool!  How does blacklight actually cause things to glow?  

“Blacklight” is an invisible form of light that operates in the ultraviolet range.  Because light takes on a wave form, the frequency of the peaks and troughs in the wave are known as wavelengths.  In the visible spectrum, reds and oranges have the longest wavelengths, and at the other end of the spectrum, blues and violets have the shortest wavelengths, meaning they have higher frequency.   Ultraviolet light is not visible to us, yet exists beyond the violet shade.  The wavelengths of ultraviolet light are grouped into 3 bands: A, B and C.   

UV-A, with wavelengths ranging from 320-400 nanometers (nm), is the safest form of UV light and often referred to as Longwave UV.  This kind of UV light is generated by Blacklight units (the dark purple fluorescent tubes) as well as UV LED flashlights.  Black lights are considered safe for use in the home as well as theatres and night clubs etc.  Most quality sunglasses will protect eyes against UV-A.  

UV-B, at 280-320nm wavelength, is the one that can cause sunburn when over-exposed. It can also be used in the medical treatment of certain skin conditions.  Most quality sunglasses will protect eyes against UV-B.

UV-C, at 200-280nm wavelength, is totally absorbed by the Earth's atmosphere, but also widely used as a germicidal sterilizer in hospitals. 

Obviously, UV light has had good and bad press.  As you may know, certain types of UV light are known to cause eye and skin damage and cancer.   And certain types of UV light are used to kill microbes, making the air you breathe (or surfaces you touch) safer.  We have a whole article on some of the ways researchers are using UV light to sanitize.  In this article, however, we’re going to look at some of the more useful ways to use blacklight (UV-A) in your life–to literally “see” the invisible!

Blacklight makes some of the invisible, visible, because it illuminates items that fluoresce.  These items contain exposed phosphorus atoms that reflect short wavelength UV light back to our eyes. For instance, paper shines under a blacklight because of the fluorescent chemicals added as a whitener. (Using Blacklights to Find Pet Urine)

Urine glows under UV light because it contains phosphorus. 

Pet Urine:  Unlike the synthetic fluorescents added to white paper, natural fluorescent substances such as dog and cat urine etc, do not glow brightly under UV. In fact, they are generally quite dim, so do not expect a supernova!  You will be looking for patches a little brighter than their background; you’ll know them when you see them.  Cat urine glows particularly well under a black light, as it contains high levels of phosphorus, but the intensity of the glow can vary depending on the animal’s diet and health.  When examining soft surfaces like carpet and fabrics, remember that liquids can quickly soak down into them, so that not a lot of urine remains on the surface to “glow”. It’s also easier to find it:

  • When fully dried, because liquid or damp urine will not glow.
  • When new–the “glow” slowly fades over time as the urine ages.

If you do find “accidents”, try a cleanser that uses enzymes.   You can read all about enzyme cleansers in our article.  (Stain Detective Pro)

Rodent Urine: Rats and mice are incontinent and will urinate and defecate on the move, up to 80 times a day! This means you will be looking for a trail of urine droplets or streaks leading in the direction of travel. Urine and droppings are deposited where the rodents spend most of their time and where they travel.  Amino acids in rodent urine will fluoresce, or emit light of a different color, when exposed to ultraviolet light. This makes it possible to see rodent, rat, mouse, hamster, guinea-pig or squirrel urine even in dark places. (Rodent Detector Pro)

Mold often glows under blacklight.  In this video, mold stains that are not visible in normal light are shown on the ceiling under blacklight.  If you are not seeing stains in an area that has leaked before, or has a high level of humidity, the key may be to shine the light at an angle against the wall.  You should shine the ultraviolet light closely along the sides of the suspected surface or walls. The angle of illumination will show the presence of fungus, however, some cleaning products also leave a glow, so be careful not to mistake cleaning residues for mold. (How To Detect Mold With A Blacklight)

Hand Washing: Blacklights make it possible to see if you are washing your hands effectively and make training on hand-washing easy!  If you apply some UV Germ Grease (which simulates the way germs cover your hands; it’s just a clingy grease with glowing particles), wash according to this video and check them under blacklight to see if any of the grease remains, you’re more likely to get your hands cleaner after this training.

Here are some other interesting items you can get to “glow” in your home: (Got a new UV torch? Here are some things to shine it on

  • Tonic water – the quinine in tonic water glows blue
  • Honey – the aromatic molecules in honey can glow green
  • Turmeric root – the curcumin in turmeric glows yellow
  • Eggs – a compound in eggshells called protoporphyrin IX can glow red
  • Rocks, jewels and gemstones – lots of minerals glow under UV light
  • Cash – banknotes have added photoluminescent details to prevent fraud
  • Cleaning materials – detergents (including laundry detergents) often have photoluminescent molecules to make them easy to see
  • Highlighters and dyes – fluorescence is a type of photoluminescence, so fluorescent markers and dyes will often glow under UV light
  • Vitamins: Vitamin A and the B vitamins thiamine, niacin, and riboflavin are strongly fluorescent. Try crushing a vitamin B-12 tablet and dissolving it in vinegar. The solution will glow bright yellow under a black light. (16 Things That Glow Under Black Light)
  • Antiques that have been repaired or touched up will glow or fluoresce differently in the area where the repair has been made.
  • Insects such as scorpions glow bright green, and Harvestman (Opiliones, also sometimes called Daddy Long Legs) glow blue, as do certain other spiders.

Here are some tips about selecting UV blacklights: 

  • Although many people associate blacklight with a purple light, if you can see the light, it’s not blacklight, and the contribution of visible light diminishes the ability to “see” any hidden markings. 
  • The frequency of UV light emitted determines the quality of results obtained.  There is a sweet-spot for UV which is between 365nm and 385nm.  However, to manufacture LEDs capable of emitting in this frequency range is far more expensive.
  • There are different types of lamps that are used to make UV light:
    • Mercury vapor lamps are used in theaters and large spaces where it’s needed to project UV light over a distance
    • UV fluorescent tubes or bulbs are smaller and more portable, with decent quality
    • UV LED lights: these come in a wide spectrum of quality (wavelengths), but they are very portable and consume little energy.

So....I went sleuthing one night with a small, inexpensive blacklight borrowed from a friend, and it works!  First I looked around some registers I knew had sweated when I had an older, less efficient HVAC system, and there they were--old stains and mold that was not even visible in the daylight (I have some popcorn ceilings so shining the light at an angle really accentuates the stain).  Next, I looked and saw a white patch where stains had been "touched up"--proof that not everything was stained or mold.  Then, I found a pet stain in a small rug that had absorbed and was unnoticeable in daylight. 

A small blacklight flashlight could be a cool science project for you and your kids, by not only finding things that glow, but eliminating the yucky animal pee and poo as well with enzyme cleansers.  Remember that the wavelength (365-385nm) is important to get quality black light, and many cheap flashlights don’t fall in that range. Here are some lights that will give the best results for your detective work:

Photo by h heyerlein on Unsplash

What are xenobiotics and POPs and how do our bodies deal with them?

What are xenobiotics and POPs and how do our bodies deal with them?

Xenobiotics surround us everyday!  If you have an illness that you can pinpoint to a chemical or environmental exposure, then you know what a xenobiotic is and how it can seriously affect your health.     

  • Xenobiotics have been defined as chemicals to which an organism is exposed that are extrinsic to the normal metabolism of that organism. (Progress in Molecular Biology and Translational Science).  Since mold produces mycotoxins that are not made in our own bodies, these mycotoxins are xenobiotics to us, as are many man-made chemicals like POPs. (Alcohol is also a xenobiotic).

  • Persistent Organic Pollutants (POPs) are chemicals of global concern due to their potential for long-range transport, persistence in the environment, ability to bio-magnify and bio-accumulate in ecosystems, as well as their significant negative effects on human health and the environment. The most commonly encountered POPs are organochlorine pesticides, such as DDT, industrial chemicals, polychlorinated biphenyls (PCB) as well as unintentional by-products of many industrial processes, especially polychlorinated dibenzo-p-dioxins (PCDD) and dibenzofurans (PCDF), commonly known as dioxins. (Food safety: Persistent organic pollutants (POPs))  POPs are fat-soluable, and tend to accumulate in our fat tissues. POPs are xenobiotics, but not all xenobiotics are POPs. Exposure to POPs has been associated with diabetes, cardiovascular diseases and many other chronic diseases. (Glutathione!)  

Most of these xenobiotics are transformed by enzymes in the liver, and are then eliminated by excretion.  First of all: What is an enzyme?   Enzymes are complex proteins produced by living organisms that act as catalysts in chemical reactions.  Enzymes can either build up or break down.  Enzymes themselves are not consumed.

This is where our genes come in.  “GST” genes are important for detoxification of the body, in that they manufacture those enzymes that facilitate the detoxification reaction.  One of the most important GST enzymes is GSTP1.  

The GST pi gene encodes (provides instructions for building) the enzyme Glutathione S‑transferase Pi (GSTP1), which plays an important regulatory role in detoxification, anti‑oxidative damage, and the occurrence of various diseases.  The detoxification reaction is called “glutathione conjugation”.  (GSTP1 and cancer: Expression, methylation, polymorphisms and signaling (Review))  Following is an example of glutathione conjugation; note that the “SH” site on glutathione (sulfur) is the binding site for the xenobiotic:

Source: The role of glutathione-S-transferase in anti-cancer drug resistance

GSTP1 has a wide range of physiological functions: It is involved in metabolism, detoxification and elimination of potentially genotoxic foreign complexes, metabolizes a variety of carcinogenic compounds, and protects cells against DNA damage and canceration.  However, while GST mediates detoxification from accidental xenobiotics, like exposures to pesticide for example, GSTs have also been implicated in the development of resistance toward chemotherapy agents, especially platinum-based chemotherapy drugs. (GSTP1 and cancer: Expression, methylation, polymorphisms and signaling (Review))

Here are several more genetic terms that will help to understand how GST and GSTP1 work: 

  • Gene expression is how GST directs the manufacture of GSTP1 (for more on how gene expression works, check out this article)

  • Methylation is a chemical modification of DNA and other molecules that may be retained as cells divide to make more cells. When found in DNA, methylation can alter gene expression. In this process, chemical tags called methyl groups attach to a particular location within DNA where they turn a gene on or off, thereby regulating the production of proteins that the gene encodes. (National Human Genome Research Institute)

  • Polymorphism, as related to genomics, refers to the presence of two or more variant forms of a specific DNA sequence that can occur among different individuals or populations. The most common type of polymorphism involves variation at a single nucleotide (also called a single-nucleotide polymorphism, or SNP). Other polymorphisms can be much larger, involving longer stretches of DNA. (National Human Genome Research Institute)

GSTP1 methylation can affect gene expression, inactivating the GST gene.  GSTP1 methylation has been associated with the development or recurrence of prostate cancer (PCa), liver and breast cancers. 

In addition, during detoxification of xenobiotics, GSTP1 may become damaged, causing polymorphism (a variation).  Some polymorphisms are associated with specific cancer types. For example, the genetic polymorphism of GSTP1 may be associated with the detoxification of polycyclic aromatic hydrocarbons (PAHs) in cigarette smoke and exhibits the highest expression in lung tissue.  More polymorphisms of GSTP1 and associated cancer risks are shown in the next table:

Source: (GSTP1 and cancer: Expression, methylation, polymorphisms and signaling (Review)

Therefore, xenobiotics can not only overload the GST detoxification processes, but they can damage GST and the enzymes it encodes, like GSTP1.  Restricting xenobiotics and stress is crucial to keeping this important defense system working optimally!

Here’s a bit more on how these genes detoxify.  Although GST genes do not make glutathione (GSS genes do), they regulate its use.

Glutathione has been described as “the mother of all antioxidants” because it recycles vitamins C and E, which are other antioxidants, and of course it binds and modifies toxins from our environment so that we can get rid of them.  According to Dr. Mark Hyman, “The secret of its (glutathione’s) power is the sulfur (SH) chemical groups it contains. Sulfur is a sticky, smelly molecule. It acts like fly paper and all the bad things in the body stick onto it, including free radicals and toxins like mercury and other heavy metals.” (Glutathione: The Mother of All Antioxidants)

Glutathione (GSH) is a tripeptide molecule consisting of the amino acids glutamate, cysteine, and glycine. It is the most abundant antioxidant in the human body that contains thiol (an organic sulfur compound).  Peptides are chains of 2 to 50 amino acids that are linked together.  For reference, proteins are also chains of amino acids linked together, but these number over 50 and usually more than 100. Here is a visual aid, noting that Glutathione falls under the Peptides category. 

Source: The Difference between Peptides and Proteins

Glutathione exists in two states in cells: reduced (GSH) and oxidized (GSSG).  Oxidized glutathione is actually 2 reduced glutathiones bound together at the sulfur atoms.

Source: Glutathione!

The difference between reduced and oxidized glutathione is that GSH (reduced) is the “recharged” version, while GSSG (oxidized, also called glutathione disulfide) is the “spent” version. GSH is also called “free glutathione” in that it has its sulfur site ready to bind to xenobiotics, while the site on the spent version is not available because it’s stuck to another glutathione molecule. 

The body is constantly recycling glutathione from the oxidized to the reduced version (for more on how this happens, this video is really helpful) .  Healthy cells at rest have a GSH/GSSG ratio >100:1, meaning that there is much more GSH (recharged) available than GSSG (spent).  When cells are exposed to oxidant stress such as xenobiotics, the ratio can drop to 1:10. This is very dangerous, because depletion of GSH and accumulation of GSSG is actually directly toxic to cells, causing their death (apoptosis).  (Glutathione!)  

Glutathione (GSH) production also drops with age and disease. Unfortunately you can’t just “pop a pill” for more GSH (contrary to many medical claims on the internet!). The body, however, can  make its own GSH in the liver with the amino acids cysteine, glutamate, and glycine. The best ways to boost our bodies’ manufacturing of GSH are to eat foods rich in glutathione or its building blocks (amino acids of cysteine, glutamate, and glycine), increasing your intake of vitamin C, and getting enough sleep and exercise.  (10 Natural Ways to Increase Your Glutathione Level)

Here’s a recap about GST, GSTP1, and glutathione:

  • GST is the gene responsible for encoding GSTP1.

  • GSTP1 is the enzyme that regulates the ability of glutathione to bind to xenobiotics.

  • Glutathione is an an enzyme that exists in 2 forms: GSH (reduced) and GSSG (oxidized).

  • GSH is also called “free glutathione” and in healthy cells, exists in a 100:1 ratio with GSSG.

  • Xenobiotics are those chemicals to which we are exposed that come from outside our bodies.  POPs (persistent organic pollutants) are xenobiotics.

  • GSH binds with xenobiotics in the presence of the GSTP1 enzyme.

  • GSSG cannot be used to bind xenobiotics, it first must be converted back to GSH.

  • Stress and xenobiotics are dangerous in that they can cause changes to GST and GSTP1 which affect their ability to detoxify our bodies, making the body prone to cancer.

  • Unchecked stress and xenobiotics also overwhelm free glutathione, causing cell death.

  • We can help restore proper glutathione balance and immune function by limiting stress and xenobiotics, eating the right foods for manufacture of GSH and getting enough sleep and exercise.

Photo by Al Elmes on Unsplash

Cancer may be a case of nature AND nuture: Why it’s time to pay attention to Inflammogens

Cancer may be a case of nature AND nuture: Why it’s time to pay attention to Inflammogens

The New Yorker article “All the Carcinogens We Cannot See” is quite eye-opening.  You’ve probably known people who lived a “bad” life, drinking or smoking or doing drugs, to a ripe old age, and then also a number of “innocent” young victims of cancer.  What’s the rhyme or reason of evading cancer or acquiring it?   This is the question that thousands of scientists engage every day as they test chemicals on bacteria or animals.  In the 1970’s, biochemist Bruce Ames was able to measure that many mutagens are carcinogens: if a chemical or toxin causes a mutation in bacteria, then it’s likely to also be a carcinogen.  Thus, the Ames test for mutagens remains the standard lab technique for screening substances that may cause cancer.  However, there are many chemicals that cause cancer but are not obviously mutagenic, such as diethylstilbestrol (DES), which increases the risk of vaginal, cervical, and breast cancer.  Also, it has been discovered that with or without exposure to mutagens, most people have a small number of mutated genes.  What is the “trigger” that begins cancer growth?

A well-known example is cigarette smoke.  It contains more than 60 mutagens, which are by extension carcinogens. Surprisingly, however, in a 2023 study that examined the characteristic fingerprints of DNA damage caused by cigarette smoke in human lung cancers, ninety-two per cent had the mutations associated with the DNA-damaging substances in smoke. But about eight per cent lacked this kind of mutagenic damage, and clear mechanisms of cancer in between 8-10 percent of smokers is lacking, causing scientists to think that there are missing cancer-causing agents.

Other studies have confirmed that a second agent is necessary to “activate” the mutations into cancerous tumors.  In one study, DMBA, a cancer-linked chemical that was found in coal tar, only caused cancer in a small percentage of the mice that were exposed to it.  However, after adding an inflammatory oil after exposure to DMBA, more than half of the mice developed malignant tumors.  In another study, mice with a powerful cancer-causing gene only developed cancer when they were also plagued with poorly healing wounds, causing chronic inflammation.  It was inflammation that triggered tumors. 

What does this tell us (other than animals do a lot of our dirty work)?  It’s not mutagens alone that cause cancer:  in many cases, malignancies are only activated when another environmental toxin causes chronic irritation that catapults them out of normalcy. “The mutant cells just lie there,” according to Allan Balmain, a cancer geneticist at the University of California, San Francisco.. “It’s the inflammation that awakens them.”

Unfortunately, there are a lot of sources of inflammation.  According to the Cleveland Clinic, the some of the most common reasons for chronic inflammation in the body are autoimmune diseases, exposure to toxins, and untreated acute inflammation, as from an infection or injury.  Then there are lifestyle factors such as drinking alcohol in excess, obesity, chronic stress and smoking. 

Air pollution also featured prominently in The New Yorker article, and it’s a frequent topic in the news today in expected areas (cities and industrial zones) and unexpected areas (wildfires in the wilderness).  In fact, British epidemiologists Richard Doll and Austin Bradford Hill, who are celebrated for determining the primary cause of lung cancer–smoking–also correlated the disease to proximity to major roadways, gasworks, industrial plants, and coal fires, and thus, by extension, exposure to high levels of air pollution.  Since then, it’s been discovered that when lung cancer occurs in people who have never smoked, the malignant cells often carry a mutation in a gene known as EGFR.  Using data from the U.K., South Korea, and Taiwan, researchers found that in each of the three countries, tthe higher the level of air pollution, the higher the incidence of EGFR-mutated lung cancer. This confirms a link between air pollution and nonsmoking-related lung cancer by mutation.  But there is something else in the air pollution besides mutagens, and it is inflammogens.  Again using all mice that were genetically primed to have EGFR mutations, mice who received larger doses of a liquid simulating air pollution (PM2.5) in their lungs, had more tumors.  The PM2.5-treated mice were full of inflammatory cells.  It seems to be the combination of mutation AND inflammation that caused the mutation to develop into cancer.  Looking more closely at the inflammation, macrophages (large cells that eat foreign particles) promoted an immune response by secreting interleukin-1 beta, a potent inflammatory signal,. If the interleukin-1 beta was blocked with an antibody, the effect of air-pollution exposure dissipated.  Accordingly,  immune-deficient mice did not have inflammation and defeated the effects of air pollution.

Whew, that’s a lot of science.  What we can take away is that inflammation could be the invisible criminal accomplice in many cancer cases, as well as in other diseases.  There’s been a big focus on knowing your genetics, and firms like The DNA Company recognize that purposefully changing your lifestyle with better food, exercise, less stress and sometimes specific supplements can mitigate the effects of DNA deficiencies by defeating the accomplice, inflammation.  In this spirit, we hope that whether you get your DNA tested or not, you are aware of the air quality in and outside your home, and do your best to avoid inflammation by ascribing to a healthy lifestyle and less stress.  These include cleaning often with non-toxic cleaners like TotalClean, changing your HVAC filters regularly, using masks and HEPA filters where necessary, and using bi-polar devices  like the Germ Defender, Upgraded Air Angel Mobile or Whole Home Polar Ionizer that can also help purify the air of VOCs and particulates.  (For more information about your immune system at a molecular level and specific ways to build it up, check out our article here).  The answer to disease, like the cause, is two-fold: take the physical steps you can avoid toxins and inflammation, and sort out the mental toxins (stresses) that cause inflammation too.   At HypoAir, we wish you a healthy home and year!

Photo by Al Elmes on Unsplash

Tenant Rights to a Habitable Home: Mold and Smoke Issues

Tenant Rights to a Habitable Home: Mold and Smoke Issues

What can a renter do when their home becomes “inhabitable” due to mold or second-hand smoke?

When tenants sign lease agreements with building owners or landlords, they agree to abide by certain rules while living at the property, which protect both the tenant and the landlord.  In the US, certain tenant rights are protected under federal, state, and local laws.  For the purposes of this article, we are going to examine a tenant’s right to a habitable home.  

The “implied warranty of habitability” is the legal term for a renter’s right to a home that keeps out rain and snow, has sufficient hot water and heat, sturdy walls and floors, free from environmental dangers such as lead, asbestos and mold, and reasonable protection from criminal intrusion.  According to Nolo.com, all states except one (Arkansas) recognize the implied warranty of habitability.  Even if a landlord offers lower rent in exchange for the tenant “waiving” habitability rights, such waivers are typically not upheld in court.  There are differences between habitability problems and “minor repair” problems, though, so that landlords are not legally required to fix every problem that elicits a complaint. 

For purposes of safety and air quality, some habitability problems may be:

-a roof leak or plugged air conditioner drain that results in moldy walls

-improperly vented water heater that causes exhaust gasses to leak into the apartment/home

-neighbors that do things that cause you to be unhealthy, like smoke inside, make a lot of noise during sleeping hours, etc.

If the landlord does not acknowledge or repair the problem, there are ways that tenants can enforce the implied warranty of habitability.  If this applies to you, make sure that you have properly notified the landlord and given them time to respond, and then you may want to notify the local building inspector.  Be prepared, however, to move out if the inspector deems the problem causes your home to be uninhabitable!   “Bigger stick” actions for the renter include, depending on state laws:

  • withholding rent
 (make sure you are completely up-to-date on rent before withholding it for habitability reasons)

  • paying for repairs yourself and deducting the cost from the rent
 (also make sure you are completely up-to-date on rent before doing this)

  • sue the landlord, or 


  • move out without notice (break the lease) and without liability for future rent. 

To check whether your state has a precedent for withholding rent or paying for repairs and deducting them from your rent, you can check this page.  Here is more information about these options. 

Specific problems that constitute inhabitable spaces:

Although mold can be a serious health issue, there are no federal laws regarding permissible exposure limits or building tolerance standards for mold in residential buildings, and only a few states and cities have established guidelines regarding mold in indoor air.  (Nolo.com)  Because of the following, it has been difficult for tenants to get landlords to fix or compensate for mold:

  • Mold causes a plethora of symptoms and health problems that are not exclusive to mold

  • Blood or urine tests are the only way to confirm its presence in the body

  • There is are many types of molds present in most homes and rentals, however, only a few have been implicated in serious health issues (such as Stachybotrus Chartrum or Aspergillus)

  • The term “toxic mold” is not a legal term, but the above mentioned species are “toxigenic”, meaning that they can produce mycotoxins.  

There have been successful lawsuits; in 2021 a Florida jury awarded $48 million in a habitability/mold case. (TysonMendes.com)  This is an exceptional compensation, but the vast majority of tenants living with mold that causes health problems do not get any compensation, sometimes due to weak local and state laws on habitability.  For example, in Washington state there are no explicit protections from mold for tenants, and the law doesn’t hold landlords liable when they don’t provide the “mold addendum”. (whyy.org) Here are what legal experts recommend to make your voice heard (based on advice from a Virginia lawyer in this video):

  • Make sure you notify the landlord or owner of the problem in writing and the way prescribed in your lease, and document all communication with them about the problem.  Describe the condition of the area, photograph it, include any lab results and any health effects that may have come from it.

  • If the landlord does not respond or fix the problem, in Virginia you can file an official document called a Tenant Assertion and Complaint.  Definitely check with legal experts on your rights to withhold rent or move out (which as stated above, vary from state to state; withholding rent is not allowed in Virginia).  

  • If you believe health issues have resulted from the mold, it’s best to contact a specialist or personal injury attorney.  

Second-hand smoke and vapors are a serious problem in multi-family dwellings.  This document from the American Lung Association and Public Health Law Center at Mitchell Hamline School of Law outlines tenant rights to healthy air inside their homes, and guidelines on options available to them in California, including:

  1. Approaching the neighbor who smokes/vapes.  They may be unaware of the impact it’s having on you or your family.

  2. Contacting the landlord, if the smoking/vaping doesn’t stop.  Always document your communication with the neighbor or landlord.  

  3. Reviewing your lease and ask the landlord in writing to enforce the non-smoking clause.

  4. Reviewing local laws, as they may have specific requirements to force landlord action. 

  5. California allows withholding of rent, however this could trigger an eviction response from the landlord.  In this case, uninhabitable conditions is a reasonable defense, and if the landlord does evict, the courts will decide whether rent abatement is appropriate. 

  6. Lawsuits include small-claims court, which is used for claims $10,000 or less, and trial court, which in general is only used when there has been substantial harm from repeated, significant exposure to secondhand smoke.  Appropriate charges against the landlord would include breach of contract, disability claims, nuisance claims, covenant of quiet enjoyment, and constructive eviction (if the tenant is forced to move out because of uninhabitable conditions).  

Unfortunately, rights for tenants vary from state to state, but you must do what is healthy for you in deciding whether to stay in or leave an unhealthy home.  We have written another article with specific suggestions if you can’t afford to move out or really want to stay, and mitigate the problem.

Photo by Al Elmes on Unsplash

Are Tiny Homes built from Sheds a Good Idea?

Are Tiny Homes built from Sheds a Good Idea?

At least every other day, I see an ad for a tiny home or office that companies or individuals built from what used to be backyard “sheds”.  Now, don’t get me wrong, I am all for repurposing buildings and materials, when they are done the right way!  (In fact, I even repurposed a large metal workshop building into a 2 bed/1.5 bath “condo” for my parents.  This one is on a concrete slab and for all intents and purposes, could have been built that way as a home). What are the advantages, and what are the cautions, of making a home from a shed?  (Many great points adapted from Living in a Shed: 9 Things (2023) You Must Know):

The advantages to living in a tiny home are many, for example:

  • Up-front cost is cheaper than a house
  • Smaller utility bill
  • Less square footage to clean
  • Less impact on the environment
  • Privacy
  • Portability
  • Customization
  • Ability to live in nature or “off-grid” more easily

However, “sheds” are only a subset of tiny homes, specifically, tiny homes that started out as prefab backyard buildings.  Let’s take a look at what could go wrong from making one of these into a habitation.

First of all, when considering whether to build out a shed as a home, you should check into local building codes.  If you live within city limits, there are likely laws about what type of buildings can be built or placed on your property to become “habitations”.  Plopping a shed down and running electricity to it for your teenager to live in could be a big problem whenever it’s noticed by the building inspectors!  Moving it to the middle of a few acres in the country doesn’t normally pose these legal issues, but again, it’s best to check with your local building inspector!   If it’s illegal to live in a shed, it may be legal to live in an ADU-an Accessory Dwelling Unit.  For example, ADU’s in California are required to be at least the size of an efficiency unit (at least 150 sq. ft. livable space plus a bathroom), they must contain a kitchen, a bathroom, they must be built on a permanent foundation, and must be able to turn on/off the ADU utilities without entering the primary unit.  (ADU vs Finished Shed Comparison)

Construction: This is the largest area of caution we see.  Within this topic, we need to highlight: 

  • Off-gassing of toxic compounds from interior building materials.  If the building was never meant for habitation (even as a chicken coop!), then it may contain building materials that are rated for “outdoor use only” which may give off dangerous pesticides/weatherization chemicals.
  • Inferior flooring and framing techniques:  We’ve seen them: sheds built to hold push lawnmowers and Christmas decorations may not hold up to daily living over a number of years.  Holes or loose joints that develop inevitably allow pests to come in (they want to be cool/warm/fed too!).  
  • Inferior foundation: Setting a shed on a few cinder blocks is typically not sufficient for daily living and if the floor begins to sag, all kinds of structural issues (including leaks and mold) can ensue. 
  • Poor insulation:  Typically, storage sheds only need to keep the paint from freezing, not keep a person comfortable, so insulation may not be optimal.  This includes roof and floor insulation–yes, if your shed is not mounted to a slab foundation, it needs to be insulated!
  • Improper sealing (which can cause moisture infiltration and mold growth): If siding is applied over the frame without an air or vapor barrier, it’s easy for moisture to condense inside the walls if they are heated for a living space, or similarly cooled during a hot summer.  These steps in normal construction are what inspectors look for, for the safety of the homeowner and longevity of the building.
  • Addition of water and sewage facilities warrants several considerations:
    • Where is your water source and how will you deal with sewage?  Sewage service is probably the biggest hurdle to overcome, as there are 3 options which may or may not be permitted in your locale: connection to the city’s sewer system, installing a septic tank, or installing a composting toilet. 
    • Plumbing in sinks, toilets, showers and drains also is done by code for a reason–leaks can cause serious mold and hygiene issues.  It’s not a good idea to buy that shed if these appliances are added without proper spacing and materials by someone who knows plumbing code.
  • Addition of power to the shed:  Sometimes power service to a shed (50-100 amp service) is not what you would get for a normal home (200 amp service).  Like the plumbing, wiring the shed for power should be done by someone who knows electrical code, so that it’s wired safely!
  • Addition of HVAC to the shed: Sticking a “window unit” AC or space heater in the side of the shed may keep you cool or warm if it’s the right size, but without proper ventilation, you could build up CO2 and mold very quickly.  CO2 is the product of insufficient ventilation, and face it, a shed is just a small, closed room unless proper ventilation is planned and built-in!  The mold can result from simply living in that closed room, because along with CO2, every human exudes water vapor through their lungs and skin.  If there are 2 people living there, the air quality will be even worse.

So far, it may sound like a major “NO” to use sheds as homes, but that’s just not true.  If you’re allowed to use one in your locale, you can safely do so by starting from scratch (buying a bare-bones model) or buying one from a builder that knows good home construction.  Then you can make sure that the construction, outfitting and customization will work for years to come without causing health issues.  Let’s face it, home ownership is expensive, but saving on a tiny home just to live uncomfortably from lack of weatherization or get sick from mold is definitely not worth the savings.  Therefore, planning is essential!

Photo by Andrea Davis on Unsplash

How to Balance Wildfire Smoke and Work

How to Balance Wildfire Smoke and Work

Wildfire smoke from Canada in 2023 has made the northern and eastern states in the US look like a Martian landscape at times.   If your job requires you to commute to the office, whether it’s one day a week or everyday, what should you consider before taking off for work?

First things first:  how is your employer reacting to this problem?  Employers and employees have been pivoting ever since COVID-19: office, home, office, schedules, communication, and air quality.  It’s a juggling act, and this new challenge (ok, maybe new for these areas, not so much for west coasters) is another fire drill.  Hopefully, everyone can continue to work together to get through it, safely.  Does your employer recognize that air quality from smoke is a safety concern just as much as viruses?   According to Thomas Brugato, counsel in the Washington office of Covington & Burling who focuses on environmental matters, as well as civil and administrative litigation, companies need to be asking whether the systems they have in place are “adequate to ensure protection and safe air during very bad air quality events”.  (How wildfire smoke should change the way companies think about return to office)  Generally speaking, companies have a duty to provide a safe work environment under federal Occupational Safety and Health Administration (OSHA) rules. 

How this applies to your commute

Technically, under the “coming and going rule,” employees are typically deemed not engaged in work while commuting, so generally, employers are not liable for wrongs committed during that time.  (Are you responsible for an employees’ commute?)  However, if you are in a job that has already redefined “office” because of air quality, to commute or not commute is now also an air quality decision, and hopefully an informed one!  If your employer is not familiar with the air quality reports at AirNow.gov, you’ll need to find a tactful way to introduce them in order to know what everyone will be facing on their commute. 

Even if you’re in a vehicle with the “recirculation” mode on, the outside atmosphere WILL come inside.  We’ve addressed vehicle air quality in this article, and changing your cabin air filter on a regular basis, especially with one that includes activated carbon, can drastically improve air quality in your car.  (Cabin air filters should be changed every 15,000 to 30,000 miles.)  Wearing a mask inside your car can also help with mild smoke conditions; it will not filter noxious gasses, but will help with particulates.  If you’re using a company car, try to find out when the cabin air filter was changed, and push for doing so if it’s overdue.  You can also ask for your employer to reimburse mask expenses for commuting. 

Research your route!  It may take a bit longer to drive through cleaner air, but it’s certainly worth it for your health.  Free apps like AirNow, BreezeOMeter and google maps (they have a new air quality “layer”) can show where the air quality is acceptable. 

Do you normally walk or bike to work?  In a 2017 review of 39 studies, scientists discovered a few conundrums that are worth considering: 

  • although biking and walking exposes you to less pollutants, the uptake of pollution is higher because you are breathing more frequently and deeply by reason of exercise

  • the years of life expectancy (YLE) gained by walking or biking compared with motorized transport are positive, meaning that cyclists and pedestrians actually gained years in life expectancy despite inhaling more particulates, due to the positive health effects of physical activity.  Cyclists gained more YLE than pedestrians because the average commute for pedestrians took longer.  

However, this study did not take wildfire smoke into account.  Because particulates from smoke are an additional burden, walking or biking on these days is not recommended!  Any other mode of transportation (car, train, bus, subway, etc.) would be advised over walking or biking on low air-quality days due to wildfire smoke.  If you don’t have a car or are close to public transportation, ask your employer or coworkers for help commuting during low air-quality days.

How this applies to your workplace

Although office workspaces usually have a HVAC system with a filter, sometimes they can be overwhelmed by bad air quality outside, especially if people are constantly entering and leaving, or service windows are being opened and closed.  It’s helpful to bring a portable air quality monitor with you and keep it at your workspace, to determine if air inside the building is healthy.  If particulates are high and changing the HVAC filter does not help, here are some ways to improve it:

  • recommend trying a higher MERV filter (MERV 13 should help)

  • recommend getting a standalone HEPA filter, if possible with activated carbon

  • recommend increasing cleaning during this time, as particulates settle into dust which can be disturbed and inhaled

  • If office-wide improvements are not welcomed, add a small air cleaner with HEPA and activated carbon to your space. 

  • Lastly, using a mask during the workday or part of the day is not pleasant but it is better than breathing polluted air!

If you work and are locked into being at a specific workplace, discussing air quality with your employer and coworkers can bring this problem to the forefront, and may also generate some creative solutions!

Photo by Ivan Bogdanov on Unsplash

Optimizing Your Window Air Conditioner for Maximum Clean, Cool Air

Optimizing Your Window Air Conditioner for Maximum Clean, Cool Air

Global average temperatures have exceeded recorded highs several times in the last month, and articles on ways to keep cool are proliferating!  In this article, I don’t have any “new” way to keep cool, but if you are among those blessed with a simple window air conditioner, let us help you make it work just as well and as efficiently as the day you bought it!

Window air conditioners are the humble yet hard-working appliances that many households can’t do without.  As one of the oldest cities in the US, New York City has an abundance of window units because about 75 percent of the buildings throughout the five boroughs were constructed before 1960, according to the NYC Department of Buildings.  (Why about a quarter of US households are stuck with ugly and loud window AC units)  The cost of retrofitting these old buildings with central air conditioning is way too high, so window air-conditioning units are the solution, and continue to be for many households across the US.  However, even if your window air conditioner is an older unit, a little time and effort can go a long way in helping it cool better, work less (lower your energy bill), and put out better quality air! 

If you have the option of upgrading your window air conditioner, there are many worthy options out there, including those with inverter motors, which save a lot of energy and control humidity better.  (To understand better what inverter technology is, check out our article here.)  Unfortunately, no one has combined an inverter air conditioner and premium filtration, but you can get premium filtration on a new air conditioner with the Friedrich Kuhl units.  These units cool (and some also heat) rooms by heat pump, with smart controls (wifi enabled and smart home compatible) AND they have MERV 13 filters available (a MERV 13 bracket kit is needed).  Until manufacturers put inverter units and premium filtration together, we have to put premium filtration in priority!

If your existing window air conditioner has a few more years of life, it helps (although not necessary) to know how a window air conditioner works.  In the first part of our article “What kind of air conditioner do you have?” we explain the workings of this type of unit.  A key lesson is knowing that unless you have a ventilation lever on your unit, there is no mixing of indoor and outdoor air.  (Check out this video to find out how to find and operate a ventilation lever.)  Therefore, the air conditioner is not pulling in outside air, it’s only recirculating indoor air.  Whatever dust, pet dander and microbes are floating around your apartment can get lodged in the air conditioner and grow into disgusting science experiments that will negatively affect your air quality!

Therefore, a clean evaporator coil is super-important.  The evaporator coils are what change your hot and humid indoor air into cooler and drier air.  Because most window air conditioners come with a flimsy clean-able filter that would qualify somewhere between MERV 1 through 4, what really ends up filtering the air is the coil–because after a season of running constantly, so much dust and dirt go through the cheap filter and get lodged in the coil!  This is not only disgusting, it’s unhealthy.  Therefore, if you’ve operated your window unit for more than one summer and never cleaned the coil, please start with this step to eliminate the majority of grime that’s lodged there.  (Be sure to have help removing the air conditioner from the window, especially if you live on an upper story!) 

After you’ve cleaned your unit (and the included filter), check that it is blowing cold air well.  It should blow air that is 15-20 degrees colder than the air it takes in.  To measure this, simply use a portable temperature gauge above the unit (out of the stream of cold air) as the intake temperature, and then move the thermometer directly into the cold air coming out, and note the difference (it’s also helpful to note the difference in humidity, to know that it’s actually removing moisture as well!).  Our portable humidity sensors will give both temperature and humidity.  If the difference in inlet and outlet temperatures does not approach 15 degrees F for a clean AC unit, then you can check into getting the refrigerant topped up.  This is best done by a licensed HVAC technician.

Next, it’s not too hard to upgrade your current filtration so that the air coming out of your air conditioner is cleaner than the air that goes in!  Here are some options:

  • Frigidaire now offers MERV 14 filters for some of its models.  Check the link in the overview for compatibility.
  • You can cut a regular HVAC filter to fit as per this video (make sure you use painter’s tape around the edges to prevent air leaking around the filter), or 
  • You can have a custom filter bracket made for your window AC, and change the filter in it often. Since the louvers in front just thwart air flow, you can actually remove the louvered panel and fit the filter inside (if it has a rectangular filter), or you can fit the filter over the louvers and secure it to the front with double-sided tape.  In order to specify the correct size for your window unit, determine which louvers are the “intake” (moving air into the unit), and measure the area covering and slightly outside of them, so that the frame and tape will seal but not cover a lot of the louvered space. 
  • You can make your own frame from 1” aluminum “u-channel” and rivets, and purchase the filter material in bulk or cut to size (these media pads are equivalent to MERV 8 and will filter a lot more dust than the cleanable factory filter!)

Finally, placing a Germ Defender or Mobile Air Angel near the air conditioner will not only help to freshen the room as ions are carried with the fresh air, it will also help to keep the coils cleaner as ions are sucked into the air conditioner by killing microbes and mold spores inside it.

If your space is feeling stuffy from being closed up all the time due to hot weather, chances are CO2 levels are rising.  Fresh air ventilation is important, so go ahead and use that ventilation lever on your window air conditioner, or crack the windows in the morning or evening when temperatures are more tolerable.  If you live in an urban or dusty area, use our window ventilation filters to get fresh air without the particulates.  May our window air conditioning units live long, cool lives!

Wash your hands AND your wristband!

Wash your hands AND your wristband!

Their popularity never seems to diminish, and where there’s one, there’s usually a stack of them: wristbands.  Silicone is a popular material choice because it is flexible, durable, can be colorful, shaped into wide or small bands, and even hold useful appliances like smart watches and gym passes.  However, depending on the material and the wearer, wristbands can carry harmful germs that don’t get as much attention as they should. 

According to a study by Florida Atlantic University's Charles E. Schmidt College of Science, there is a correlation between the material (plastic, rubber, cloth, leather and metal (gold and silver)) and the prevalence of bacteria.  Plastic and rubber had the highest incidence of bacteria because they tend to hold moisture between it and the wearer’s skin, and foster microbial growth unless some sort of antibacterial coating is incorporated.  Not surprisingly, gold and silver had virtually no bacteria (these are age-old non-toxic anti-microbial materials due to the ions they release).  

The other variable was the activity (hygiene) of the subject at sampling time. (no significant differences between males and females were detected in the occurrence or distribution of the bacteria groups).   This means that more activity (exercise) and specifically going to the gym, increased bacteria counts.  Here are the types of bacteria monitored:

  • Staphylococcus and Pseudomonas, which are common skin residents.  The highest staphylococcal counts were found on wristbands from gym-goers.  Besides the skin, Staphylococcus aureus is a type of bacteria found in the nose, armpit, groin and other areas, and causes a wide variety of diseases. Pseudomonas spp. can cause infections in blood, lungs (pneumonia) or other parts of the body following surgery. 

  • Intestinal organisms of the genera Escherichia, specifically E. coli: these are prevalent in the bathroom and can land anywhere on you after you flush a toilet (don’t fear, we show you how to protect against this here).  However, raw foods in the kitchen are another source for these bacteria.

Thankfully, the study also investigated what types of cleaners were the most effective at reducing bacteria: 

  • Lysol™ Disinfectant Spray and 70 percent ethanol were highly effective regardless of the wristband material with 99.99 percent kill rate within 30 seconds.  While Lysol has been trusted for disinfection for many years, it’s not non-toxic: most of the spray can formulations earned an “F” rating on the Environmental Working Group’s website.  Instead, try hypochlorous acid, like this Force of Nature Starter Kit.  For more about hypochlorous acid, check out our post here

  • Apple cider vinegar, a common “DIY” cleaning ingredient, was not as potent and required a full two-minute exposure to reduce bacterial counts.

Although they weren’t tested in the study, we do have some simple alternatives to help you wear your wristbands with less germs:

  • If it’s flexible enough, turn your wristband inside-out once in a while during the day to expose the underside to light and air.  The UV rays in sunlight, as well as the ions in fresh air, kill germs!

  • Although many wristbands can be worn 24/7, it’s a good idea to take them off after showering to let your skin and the underside of the band dry out.  Leaving them off overnight is even better.

  • Hand sanitizers:  Sanitizers are super convenient when soap and water is not available, so whenever using it on your hands, spread some around the wristband and your wrists. The same goes for washing your hands–just make sure to rinse off the soap.

If you decide to upgrade your rubber silicone wristband, think gold or silver.   In this case, you will get what you pay for–less germs!

Get more fresh air ventilation with Nanofiber Window Screens (Easy DIY Project!)

Get more fresh air ventilation with Nanofiber Window Screens (Easy DIY Project!)

If you’ve never thought about them, it’s time to give your window screens some attention.  If your windows open, you’ll want to have screens that are clean and in good repair to keep out insects and other creepy crawly things (won’t go into what could possibly come through an open window).  It’s even more important in seasons of extreme heat or power outages to have a way to get fresh air.  Keeping your windows closed all day can cause levels of CO2 to build up in your home that cause drowsiness and inability to focus or concentrate (check out our article here), so it’s best to let some fresh air in whenever the outside air temperature, humidity and quality permit.

Window screens have been around for a long time (like the 1800’s!) but even age-old products can get an upgrade, making our lives easier.  This upgrade doesn’t have to involve AI or “smart” anything, requiring the internet and electricity.  In this case, window screens have been upgraded with a new material, nanofiber.

Traditionally, window screening came in several varieties of material and color, such as aluminum and fiberglass, and black, silver, gray or bronze colors.  Standard screens have a mesh size of 18 by 16, meaning there are 18 squares per inch from the top left corner to the top right corner (also referred to as warp) and 16 squares per inch from the top left corner to the bottom left corner (also referred to as fill). (Replacement Window Screen Buying Guide)  These are able to prevent most flying insects from passing through, but they do allow a lot of dust and smaller particles to pass through.   The use of nanofibers (each fiber is less than the width of a human hair) allows the holes to become much smaller, because they are spaced very closely, allowing air but not fine particulates to pass through.  Voila!  Nanofiber window screens offer protection from the next “pest”, dust and allergens.  By just replacing the screens you already have with nanofiber material, you can save yourself some cleaning, coughing and add the ability to open your windows more often because of this protection.   What’s even better is that it doesn’t take a lot of time or special tools (just one cheap one) to replace the screen material with some new nanofiber screening.

Here’s the DIY part: replacing your screens with nanofiber screens is a homeowner project that just takes a few hours and supplies.  If you’re not familiar with how window screens are held in place, they are held into the narrow channel on the screen frame with a rubbery spline, or cord.  

There’s also an ALTERNATIVE INSTALLATION with Magnetic Tape (which is practical if your screen frames are broken or missing).  Scroll down to the bottom of this article for the alternative installation.

Here’s what you’ll need for the traditional installation:

  • The nanofiber window screen (order yours here)

  • Spline (if the spline in your screens is not cracking or falling apart, you can reuse it)

  • Window screen rolling tool, $4

  • Small flat-head screwdriver

  • Sharp utility knife to trim the screen after installation

There are lots of videos online showing how to replace screens, but I like this one for its simplicity (step 1 starts at 1:50).  Here are the basic steps:

  1. Remove old spline and screen

  2. Size and align new screen over the frame (1-2 inches extra on each side)

  3. Push screen into channel on first side (using the convex side of the tool)

  4. Insert spline into grooved screen and channel (using the concave side of tool) (Repeat steps 3 and 4 for other sides)

  5. Push spline into corners using screwdriver, trim excess screen carefully with utility knife

And here are some additional tips:

  • If you have to get new spline, take a small piece of the old stuff to the hardware store in order to select the right diameter.

  • Some people like to hold the frame in place by taping it to the work surface, but this doesn’t allow you to rotate it easily if you can’t access all 4 sides of your work surface.

  • You can use a gallon of water or full can of paint to help hold the screen in place to get started.

  • Some people like to use the spline in one length, bending it at the corners as you go around; some like to cut it at each corner. 

  • Be careful not to press too hard on the spline as you work, in case your tool slips, so that you don’t cut the screen accidentally.

  • Normally you shouldn’t have to “stretch” the screen, just gently smooth it out, while rolling the last two sides, as you don’t want too much tension on the frame when you’re done.

  • If you get too frustrated or find that one of the screen frames is broken, many small hardware stores offer “rescreening” services and repair of the frames; just bring them your nanoscreen with the frame(s).

It may take a little more time to get your first screen replaced, but you’ll get better as you go along and have some new functional “filters” in your windows.  Sit down to enjoy the fresh, clean air and admire the fruits of your hard work!  After a few months, you will notice dust collecting on the outside of your screens as they do their job, but you can easily clean them by removing them and using a gentle spray of water on them from the inside out to wash off the dust.  If necessary, use a mild detergent like liquid dish soap or car wash soap and a soft brush to remove any stubborn dirt or bird poop. 

Nanofiber window screens can help you breathe easier all year long, because let’s face it, there always seems to be an “allergen” in the air.  They can also cut down on the dust going onto your HVAC filter, your TV screens, your rugs and furniture—you name it!  Maybe most importantly, they can help you open windows for fresh air more often and be prepared for a power outage in the summer, when open windows (but not dust!) are a necessity.  

ALTERNATIVE INSTALLATION:  Many times the screen frame is broken or missing altogether, or you’re just not sure about doing the traditional install yourself.  Instead, you can use Magnetic Tape to install the screen.  The kit has everything you need to make a nice, flexibly-framed screen that installs easily over your window frame.  (Note that you’ll need to remove the screen to open or close the window, but that’s easy to do.)  The video on the product page gives step by step instructions.

Navigating Electromagnetic Frequency (EMF) Radiation

Navigating Electromagnetic Frequency (EMF) Radiation

Convenience and technology go hand in hand.  If you want to save money at your store, the store’s “app” gives you the deals straight to your cellphone.  Smart doorbells and smart thermostats keep us safe and comfortable.  Baby monitors and cameras help us to keep an eye on the kids.  What could be better than knowing and doing more than your parents ever could?

The only problem with these perks is the energy they emit while helping you.  It’s called electromagnetic frequency radiation, or EMF for short.  Now, don’t get me wrong.  Anything that uses electricity, even a washing machine motor from the 1960’s, will have an electricmagnetic field associated with it, because that’s what electricity does.  Electrons move inside the electric supply cord, back and forth at the rate of about 60 cycles per second (60 hertz) in the US.  When the motor is energized, the electrons moving through the coils of the motor generate an electric field that spins the drum, and another motor that pumps out the water.  Electricity is right up there with indoor plumbing as something we wouldn’t want to be without!  

There is a big difference, however, between the way an old washing machine and a new cellphone use electricity and emit radiation.  The old washing machine had two modes, on and off, and it used power straight from the wall (110-120 volts alternating current, 60 hertz) with no transformers, inverters or rectifiers involved.   The cellphone, however, could never be plugged into the wall because it uses low voltage (12 volts) and “direct current” (DC).  The charger is plugged into the wall to convert high AC to low DC voltage to feed it to the sensitive electronics of the phone.  The phone, once charged, is essentially a battery with several different modes and the ability to radiate signals in a radius around it (about 30 feet for Bluetooth).  This generates two different problems with it: the way the charger manipulates electricity (taking the AC and converting it to DC and lowering the voltage) and the way both the charger and cellphone emit radiation.

“Dirty electricity” is admittedly not easy to understand.  After all, electricity is promoted to be the world’s cleanest energy, right?  We are enticed to replace everything that emits carbon with newer appliances that are “greener” for the planet with “no” emissions.   Yet, there is no such thing as free.  There are trade-offs for every convenience and savings in the pocket don’t always mean a savings to our peace of mind or health.

Since dirty electricity can’t be seen, smelled or touched, the best way to describe it is in pictures.   The photo below is of an alternating current electrical signal.  (If you don’t understand the difference between alternating and direct current, here is a really good video). The bright green line is clean power, which in alternating current is a smooth rolling sine wave (the peaks and valleys occur 60 times per minute, hence 60 hertz).  The green fuzz is dirty electricity, which is made up of jagged spikes that cause more radiation and can cause damage to equipment.  Where does the green fuzz come from?

Source: What is Dirty Electricity?

The green fuzz, or dirty power, is what is left over when you convert AC into DC or maneuver it in other ways.  Here is a video that visualizes what the little transformer/rectifiers on your cellphone charger and laptop chargers are doing to convert the power from the wall (120 volts AC) into usable power for your device (12 volts DC).  Chopping up the signal and smoothing it out causes some power “noise” and energy wastage.  Have you ever felt the transformer plug of the phone, or of your laptop computer?  Heat is another sign that there is energy being wasted.  

The green fuzz is not just ruining a nice picture of a sine wave.  The spikes and unpredictable energy can cause damage to electronics as well as to our bodies.  Dirty electricity can cause the following health issues (What is Dirty Electricity?) :

  • Headaches
  • Sleep Disturbances
  • Fatigue
  • Tinnitus
  • Cognitive Impairment
  • Heart Arrhythmia
  • Mood Swings
  • Weakening of the nervous, endocrine and immune systems
  • Increased risk of serious chronic illnesses such as cancer

Why does dirty electricity affect us?  Because we, as humans, run on electricity too.  The nervous system that regulates many functions in our bodies is electrical, and its sensitive equipment and signals can be affected by outside electromagnetic radiation.  For example, scientists have known for a while that some types of EMF radiation can actually cause bone to grow, and calcium channel blockers (which are frequently prescribed for heart arrhythmias) block EMF effects because they block electrical activity in the body. (Electromagnetic fields act via activation of voltage-gated calcium channels to produce beneficial or adverse effects)

Many health effects are only manifested when a major change occurs, like the installation of a smart meter on our home, or a newly installed cellphone tower coming online nearby, or moving into an apartment with wi-fi signals surrounding yours.  However, symptoms can also be gradual as well.  Like the effects of mold and mycotoxins, EMF radiation seems to affect those who are most sensitive to them.  When most of the population are not affected outwardly, regulation of new and more profuse radiation is not a priority.  However, quantified effects on our microbiology such as blood, organs and DNA through research should be enough to increase awareness of its dangers.

Although governments and health organizations (including the WHO) have denied that there is any risk to our health from dirty electricity, here is a short list of studies that have shown there is a cause and effect.  Since animals are even more sensitive than humans (termed “canaries”), included are a couple of real-world case studies on how EMF has affected farm animals, with detrimental effects on their behavior, output and reproduction.

The good news is that you can take control in your own home and eliminate some causes of dirty electricity.  Dimmer switches and compact fluorescent bulbs (CFLs) are some of the worst offenders, so try to eliminate these in your home.  Unplug computer and cellphone chargers whenever they are not in use, and when they are in use, keep them as far from you as possible.   Special paints, coverings and cases can help to shield you from harmful EMF--you can check out these types of shields here

Other sources of EMF radiation can be controlled as well: 

  • Smart meters: Smart meters are power meters that broadcast a signal similar to your cellphone, to the electric company so that they can monitor power usage remotely.  Although many utility companies claim that their meters only “broadcast” less than a minute per day, the pulses sent by the meter (typically 3 milliseconds each) can be over 10,000 times per day.  (Frequently Asked Questions about Smart Meters)  If you can, opt out of having a smart meter placed on your building and have it replaced with an analog meter.  If you cannot, there are meter cages available that can significantly block EMF radiation from the meter.  This video shows how high and frequently EMF radiation can be emitted from Smart Meters.
  • Wireless routers: Unplug wireless routers at night and place them away from bedrooms or areas where people spend extended periods of time.  
  • Baby Monitors: Research the baby monitor you use to see whether it is safe, and place it a safe distance from the crib or bed.  
  • Cellphones: Restrict cellphone use by children and for adults, opt to use headsets or  speakerphone as often as possible, carrying the phone in a purse or away from your body.  
  • Solar power inverters:  the process of converting low-voltage direct current into high voltage alternating current produces dirty electricity, which can build up over time to dangerous levels inside your home.

There are two types of devices that can detect EMF radiation: a Graham-Stetzer meter that measures dirty electricity in GS units (I’ll discuss this next), OR simply an AM radio!  AM radios can pick up low-order harmonics.  Tune it down to the lowest amplitude, about 500 kHz, to start, and turn up the volume a bit to hear the static.  Bring it near a possible EMF emitter like a cellphone or its charger plug, and listen for an increase in static or “ticks” to indicate it is emitting EMF radiation.  You can also tune the amplitude up to its highest, to about 1600 kHz, to see what’s going on there.  (This setting is better for “hearing” the EMF from your cellphone, which typically broadcasts on even higher frequencies).  This video shows how to use an AM radio inside your home to detect relative volumes of EMF radiation from different appliances (the dimmer switch really puts out a lot)!  Another video shows you how to detect whether EMF radiation is coming from the line power (from the power company), or from the devices, like lighting and electronics, in your house.  

If you find you have a lot of EMF radiation with the AM radio, then you might want to invest in a more quantitative meter that shows the real levels of radiation.  With a meter designed to detect EMF radiation, you can walk around your home to measure these levels.  The original meter, called a Graham-Stetzer Microsurge meter (after its inventors) measures EMF radiation in units of “GS”.  According to Dave Stetzer, a GS unit is a measure of the energy on electrical wires generated by high frequency transients and harmonics, and is influenced by voltage, amplitude and frequency. (presentation by Dr. Magda Havas, PhD).  According to one electrician, under 200 GS is good and acceptable, but Dr. Havas has noted that those who are more sensitive and already have health issues like diabetics and multiple sclerosis patients, require readings under 40 GS.  In order to reduce EMF, a “Stetzerizer filter” can simply be plugged into any normal electrical outlet.  This video shows how to use a Graham-Stetzer meter and Stetzerizer filters to get rid of dirty electricity.  After removing as many offending appliances as possible like dimmer switches, CFL bulbs and unused electronic charges, the filters are very easy to use–just plug them in! 

If you have unexplained or chronic health issues, it’s worth exploring and measuring EMF radiation in your home.  This type of pollution can’t be seen, smelled or heard but the health effects on many people are debilitating, and intervention can provide significant relief.  We hope you will do your own research on EMF radiation!

Taking precautions: What to do if your home is spared from a fire, but still smells like smoke

Taking precautions: What to do if your home is spared from a fire, but still smells like smoke

We at HypoAir sincerely hope that you and your family have not been forced out of your home by any of the recent wildfires.  Even if your home is spared from fire, if it is in close proximity, danger from lingering smoke particles is a real concern that you should know about and take precautions against.  You may know that smoke is a combination of ultra-fine particles and gasses, both of which can be toxic.  The gasses may be swept away by “airing out” your home or using activated carbon filters, but the particles settle into dust that can be disturbed anytime you clean or even when the HVAC comes on.  

A study was born in the weeks after the Marshall Fire, which occurred in the Boulder area in December 2021.  It spread very quickly and destroyed more than 1,000 homes and buildings.  Those that were near the flames but not burned, like the home of air quality scientist Christine Wiedinmyer, smelled like “the day after a campfire” and had ash on the door and window sills.  (Study finds potentially harmful chemicals lingered in homes affected by Marshall Fire)  Without testing, she did not know whether it was safe for her (or the neighbors who asked) to return to their homes.  So, she became part of a team of expert scientists who tested four homes in the area (including hers) in order to determine what toxins may have been left behind.  

The scientists collected samples of particles of dust in the air and on surfaces in January and February 2022. Elevated concentrations of potentially harmful materials like polycyclic aromatic hydrocarbons (PAHs) were detected in the dust samples.  PAHs are considered carcinogens by the Environmental Protection Agency, and it’s chemicals like these that deserve extra precautions in the way residents return to and clean their homes.  

When the scientists set up their equipment in the homes, they took dust samples from windowsills and used monitors to track particulate matter in the air, minute-by-minute.  The floating particles of ash produced by the fire seemed to settle out of the air in these houses within a day or two, but the dust that Wiedinmyer had seen on her windowsills lingered. In February, the researchers took measurements as a six-person cleaning crew entered one of the homes to vacuum and mop.  The concentrations of particles in the air nearly doubled during that time. Overnight in the same house, the team saw airborne particles spike about once every 20 minutes—likely due to the home's HVAC system switching on and off.  (Study finds potentially harmful chemicals lingered in homes affected by Marshall Fire

For this reason, the scientists recommend wearing a mask when you’re cleaning up fire damage, because human activity like cleaning resuspends the dust in the air, making it easy to breathe in.  Also, be sure to change your HVAC filter more frequently during the first few months after cleanup, and only use true HEPA vacuum cleaners, so exhaust from the vacuum cleaner will not blow dust back into the air.  Wiedinmyer herself “aired out” the home for a week before re-entering to clean.  During this time and going forward, a standalone HEPA filter would be very useful to filter particles that are missed by the HVAC system (if you have one!).  Our Germ Defenders, Mobile Air Angels and Whole Home Ionizers help to ionize and agglomerate dust, making it easier for the filters to trap it.

Another part of the aftermath of wildfires is dealing with contamination to drinking water systems. According to NPR for northern Colorado, The fire damaged six public drinking water systems, and toxic chemicals leaked into pipes from damaged homes and into hydrants where low water pressure created vacuums that pulled the compounds into the distribution system.  Although the personnel in these districts were not all clear on how and where to test, they were eager to do so when experts who had managed similar disaster response teams educated them.  Andrew Whelton, a professor of civil, environmental and ecological engineering at Purdue University, has taken part in several water disaster recoveries, including the 2017 Tubbs Fire and the 2018 Camp Fire in California, the Joint Base Pearl Harbor-Hickam contamination, and a chemical spill in West Virginia.  In a study he co-authored, he said that although the Marshall Fire response was not perfect, major crisis was averted because authorities did not refuse to test.  (Sadly I think many of us can recall other disasters that did not go so well).

There were a couple reasons that contaminants were introduced into these drinking water systems.  First, when a system loses pressure, toxins like wildfire smoke can get sucked into the distribution system.  Second, overheated plastic pipe can leach benzene and other chemicals for months or even years.  According to Whelton’s research, plastic pipes were primed to leach chemicals by temperatures as low as 392 degrees Fahrenheit; wildfires can exceed 1,400 degrees.  Thirdly, flushing out the system quickly with clean water is important to prevent smoke and chemicals from reaching damaged pipe, which can act as a reservoir for such toxins.

If your home survives a fire in the future, remember that unseen dangers like carcinogens may still linger and you need to take caution with your air and your drinking water.  Although it seems that authorities in the Boulder area were for the most part very proactive for public health during the Marshall Fire response, it’s usually up to individual residents in wildfire-prone areas to have stores of masks, filters and clean drinking water.  We hope you don’t have to go through such a catastrophe, but it certainly doesn’t hurt to be prepared.

UPDATE:  Another professor, Delphine Farmer from Colorado State University, wrote a followup article explaining smoke and VOC behavior in a test house during the Chemical Assessment of Surfaces and Air, or CASA, study in 2022.   She found that VOCs that entered a home are adsorbed into surfaces and while they may temporarily clear by opening doors and windows (“airing out”), they quickly built up again after ventilation stops, and the house would slowly release those VOCs back out over the next hours, days or even months, depending on the type of VOC.  They found that air purifiers can remove only some of the VOCs that are in the air – they can’t clean the VOCs on your floors or in your walls. They also work only when they’re running, and even then, air purifiers don’t work particularly well to reduce VOCs.

The good news is that basic household cleaning–vacuuming, dusting and mopping with a commercial, nonbleach solution–removed most of the VOCs.  This means that while you’re cleaning for particles, VOCs are also removed.  Check out our article on Tackling Dust in Your Home for our recommendations on appliances and cleaning products to get ‘er done, but don’t forget to add the personal protective gear mentioned above, as well!

Photo by Egor Vikhrev on Unsplash

Tight homes need ventilation, but what do I do when it’s smokey outside?

Tight homes need ventilation, but what do I do when it’s smokey outside?

If you’re blessed to be living in a “tight” home (one that doesn’t allow much unintentional air leakage), you should know that mechanical ventilation is really helpful, if not necessary, to achieve healthy indoor air.  Humidity, CO2, particulates and VOCs can build up inside your tight home and without intentional ventilation, can lead to major mold and health problems quickly.  In this case, many people opt for an ERV or HRV so that the energy savings on their tight home don’t go “out the window” (literally!) by exhausting indoor air and pulling in outdoor air without some kind of energy exchange.   For more basic information on building tightness, ERVs and HRVs, check out our article here.

If you have an HRV or ERV and live in an area prone to wildfires, you should prepare for them by having the proper filters in place and knowing what to do with your system.  We’ve helped several clients prepare for this scenario recently, and the “smoke” was not all from wildfires!  Sometimes neighbors with bad or even innocent habits like smoking, barbequing, or sittin’-round-the-campfire can all wreak havoc on your air quality.

First of all, be familiar with your HRV/ERV unit!  This means knowing where it is, how to change its filters, and how to operate the different modes.  Hopefully the installer did a good job of allowing room for maintenance, because just like a furnace/air handler, the filters must be changed or cleaned regularly in order for the unit to work well for many years.  

Many units only come with standard MERV 8 filters, but these are not adequate to handle smoke.  Smoke presents 2 problems: particulate matter (PM10 and PM2.5) and volatile organic compounds (VOCs).  According to the US EPA, a HRV or ERV unit filter must have a Minimum Efficiency Reporting Value (MERV) of 13 to provide effective protection against particulate matter in the air we're going to breathe inside a home or office building if it's smokey outside. (How to keep wildfire smoke out of homes with mechanical ventilation systems?)  Therefore, you’ll need to know what grade filters are in your unit now, and if they are below MERV 13, inquire with the manufacturer on which filters to upgrade to. 

Before you buy new filters, however, you should consider the other part of smoke: VOCs.  You can have a MERV 16 in your unit, but it will not capture VOCs and your home will be filled with the smell of smoke if there is smoke outside!  These insidious gasses are most easily removed with activated carbon.  Therefore, a layered filter (with MERV13 or more plus activated carbon) is really the best defense against smoke.  Since not all units/manufacturers offer carbon in their filters, here are some other options to get rid of the particulates AND VOCs: 

  • Check our offerings to see if we have your filter size in a MERV 13 filter plus carbon.
  • If not, you can cut and layer activated carbon media behind/under your manufacturer’s MERV 13 filter.
  • ((Some units use “panel” filters which are basically squares of bulk filter cut to fit the unit.  In this case you can cut your own using laminated MERV 13 and carbon media. ))

The following options are adapted from HRV with Smoke Filtration:

  • Ensure there is positive pressure inside the house during wildfire events (some ERVs like Panasonic ERV can be balanced to deliver more air than is exhausted from home) so that smoke never wants to come in “illegally”.  
  • Add an inline fan/filter to the intake of the ERV.  This would generate additional positive pressure without overloading the ERV fan and also filter the air before it hits the ERV.  This one has a MERV 13.
  • Get a local HVAC shop to fabricate a filter box that uses a regular furnace filter with MERV 13 (or higher) and carbon, sized sufficiently to overcome any static pressure concerns, and install it in the fresh air intake before the HRV, OR you can add a media filter cabinet to the fresh air intake of your HRV/ERV and leave out the HRV/ERV filter on that side.  We can help with calculations on sizing the cabinet if you have the model of HRV/ERV available (basically it comes down to airflow/CFM). 
  • Lastly, you could add one or more air purifiers or Corsi-Rosenthal cubes (CR cubes) with HEPA/carbon) to your home.  However, this is not ideal because the pollutants have already entered your home and you’re relying on these purifiers to clean your air, instead of having a “guard” filter at the entrance.

Now, here’s the part which requires discernment: in which mode to use the HRV/ERV.  

According to this article on how to keep wildfire smoke out of your home, the intake dampers of HVAC systems should be closed during wildfire incidents, and the equipment should be configured to only recirculate indoor air.  Before any smoke event occurs, you should check that the intake dampers have seals on them and they actually close tightly.  In case you think that you would run out of oxygen in a very short time in this scenario, that just isn’t the case.  Consider this calculation for 1 person staying in a completely sealed space of approximately 600 ft2; they would possibly die of carbon dioxide poisoning (at 12 days!) before low oxygen would be an issue.  Here’s where having carbon in your filters is also good, because it can also filter out some CO2 from inside your home while you close the outside vent and recirculate.  We think that a CO2 meter is a great thing to keep on hand whether or not your home is tightly sealed, and especially if you have any combustion appliances (like gas stoves, water heaters, furnaces, dryers, etc.)  

(I wouldn’t even worry about this “12 days” deadline, either, because very-tightly sealed homes are very rare!  A home in Alaska currently holds the record for being the world’s tightest home, and the owner/builder took the ingenious route of building a “box within a box” in order to air-seal and insulate it well enough for the climate.  At 600 ft2, it has a rating of 0.05 air changes per hour at 50 pascals of pressure (ACH50).  This is less than 10% of the very rigorous Passivhaus standard, which is 0.60 ACH50.)  

So, recirculating air instead of bringing in outside smokey air has a few benefits:

  • It saves your filters and uses them only to filter the small amount of smoke that leaks in through unauthorized leaks (or briefly opening a door). 
  • It maintains the air quality of the room above that which you would have if you were bringing in outside smokey air.
  • Depending on where the intake filter is located, it could save you cleaning your HRV by not passing unfiltered smokey air through it.

This last point may not be obvious, but not all HRV/ERV manufacturers consider that wildfire smoke is a real threat to the operation of their units, because some have intake filters on the exhaust side of the heat exchanger:

Source: “How ERVs Work”

Do you see the “Fresh air from outside” on the lower left?  Imagine that this is “smoky air from outside”, passing through the fan and then through the heat exchanger, before passing through the filter on the upper right.  All those particulates just passed through a heat exchanger, and it’s likely that some of them get stuck there until they are manually cleaned out. Particles sticking to a heat exchanger reduce its efficiency and depending on their chemical makeup, may damage the surface of the heat exchanger.  Now, placing the filter on the lower left poses a maintenance issue, but it shouldn’t negatively affect the operation of the fan or heat exchanger.  This is why having a separate filter on the fresh air intake before the HRV/ERV and leaving off that top right filter inside the unit, may be the best option in wildfire areas. 

One last point: although we’re not huge fans of completely “smart” homes due to the EMF they emit, if you travel a lot or have an HRV/ERV system installed in a vacation home, it is worth practicing operating it remotely (via an app).  In real emergencies, roads can be closed quickly and if you are not able to get home right away, it becomes the difference between being able to come “home” to a clean house and one that smell like smoke (because even carbon filters will not be able to adsorb VOCs for an extended or intense event).  

Any smoke (cigarette, wildfire, campfire, barbeque, industrial or traffic accidents, etc.) is very unhealthy, so we need to do our best to keep it out of our homes, even at the cost of not ventilating for the duration of the smoke event.  The particulate matter in smoke is especially dangerous for children and people with respiratory or cardiac conditions, because fine particulates can pass from the lungs to the bloodstream. The best line of defense against particulate matter is an airtight building envelope, which by extension means closing the intake dampers of ventilation systems.  Filters with a MERV 13 rating or higher, and activated carbon if possible, should be used in HRV or ERV systems and central air conditioning units so that these units can remove any smoke that gets in.  One or more portable air cleaners with a HEPA filter and carbon are also a very good addition for use in common rooms or bedrooms at night.  It all comes down to preparation…having the filters on hand (or better yet, already installed) and knowing how your unit works is worth a lot of clean air when the smoke suddenly appears around your home! 

Photo by Egor Vikhrev on Unsplash

Marijuana smoke, just like cigarette smoke, is an air quality problem that affects a lot of people.

Marijuana smoke, just like cigarette smoke, is an air quality problem that affects a lot of people.

According to Gallup Polls, approximately 17% of Americans smoked marijuana in 2023, which is up from 12% in 2017-2021.  By inference, approximately 83% of Americans don’t directly smoke marijuana, for any number of reasons, but a good number of them deal with it as secondhand smoke (as evidenced by the number of inquiries we receive about how to protect against/remove it).  

A misguided perception: According to Beth Cohen, MD, MA,  a primary care doctor and researcher in California, her research showed that in 2017, 26% of people thought that it was safer to smoke a cannabis joint than a cigarette daily. In 2021, over 44% chose cannabis as the safer option. People were similarly more likely to rate secondhand cannabis smoke as being “completely safe” compared with tobacco smoke, even for vulnerable groups such as children and pregnant women. (Many people think cannabis smoke is harmless − a physician explains how that belief can put people at risk)  

Yet despite these increasing opinions that marijuana smoke is less dangerous than traditional cigarette smoke,  “Smoke is smoke. Both tobacco and marijuana smoke impair blood vessel function similarly. People should avoid both, and governments who are protecting people against secondhand smoke exposure should include marijuana in those rules.”  -Matthew Springer, cardiovascular researcher and Associate Professor of Medicine, University of California, San Francisco

If non-smokers are in the majority, why are they having to fight for the right not to breathe it?  We can think of several reasons:

  • Conflicting studies done over the last decade have perpetuated confusion.  For example:
    • This 2012 study found that occasional and low cumulative marijuana use was not associated with adverse effects on pulmonary function, specifically air flow rate and lung capacity.  
    • In 2022, Researchers from Ottawa Hospital General in Canada compared approximately 150 lung scans from marijuana smokers, tobacco-only smokers and nonsmokers. The study found that rates of emphysema, airway inflammation and enlarged breast tissue were higher in marijuana than in tobacco smokers.  The scans showed that 75% of the marijuana smokers had emphysema. Slightly less than 70% of tobacco-only smokers had emphysema, while only 5% of nonsmokers had it. Emphysema, a form of chronic obstructive lung disease (COPD), is the third leading cause of death in the U.S. (Smoking marijuana may be more harmful to lungs than smoking cigarettes, study finds)
  • Tobacco giants Altria and Reynolds American together with convenience store retailer networks have invested billions into the marijuana industry and actively support legalization.  They produce and market products that support both tobacco and marijuana, like e-cigarettes and vape pens.  (Protecting Nonsmokers from Secondhand Marijuana Smoke)
  • Have societal norms flip-flopped?  Less than 20 years ago, cannabis users were advised to be “discreet”, but with widespread legalization, that’s no longer applicable.  Furthermore, you could say that those who don’t smoke are now being pressured to be discreet!.  Included in the 2008 paper “Civic Norms and Etiquettes Regarding Marijuana Use in Public Settings in New York City” is a resource from the Cannabis Action Network’s 2005 “Good Neighbor Guidelines” promoting both marijuana use and etiquettes: “Have fun with cannabis, but in your neighborhood keep a kind, discrete, polite profile. Do not consume your cannabis openly. The fewer people who know you have cannabis around, the smaller your exposure to rip-offs, overeager youths, cops, and mooches. Keep cannabis plants hidden from public view. Avoid actions that would lead to nuisance complaints like ... overly loud music or too many freaky parties.... Do not keep your stash and paraphernalia in plain view of the doors or windows. Take measures to minimize the distinct odors cannabis has when grown, smoked, or just sitting around.”

Whether it comes down to money or public opinion, we’re finding that people who do not want to inhale second-hand marijuana smoke have to fight for that right, despite some disturbing facts (Secondhand Marijuana Smoke Fact Sheet):

  • Particulate levels from secondhand marijuana smoke are even higher than particulate levels from secondhand tobacco smoke. A study comparing indoor particulate matter 2.5 (PM2.5) levels from secondhand marijuana smoke and secondhand tobacco smoke concluded that “the average PM2.5 emission rate of the pre-rolled marijuana joints was found to be 3.5 times the average emission rate of Marlboro tobacco cigarettes, the most popular US cigarette brand. 
  • Significant amounts of mercury, cadmium, nickel, lead, hydrogen cyanide, and chromium, as well as 3 times the amount of ammonia, are found in mainstream marijuana smoke than is in tobacco smoke.  (A comparison of mainstream and sidestream marijuana and tobacco cigarette smoke produced under two machine smoking conditions)
  • One minute of exposure to marijuana SHS (secondhand smoke) substantially impairs endothelial function in rats for at least 90 minutes, considerably longer than comparable impairment by tobacco SHS. (Endothelial function is the way blood nourishes surrounding tissues via the endothelium, the single-layer cells that line our blood vessels). The findings in rats suggest that SHS can exert similar adverse cardiovascular effects regardless of whether it is from tobacco or marijuana. (One Minute of Marijuana Secondhand Smoke Exposure Substantially Impairs Vascular Endothelial Function)
  • And many more…

So how do people who don’t want these health risks overcome them?

People living in multifamily buildings, whether they are apartments or condos, frequently have problems with this issue, because: the units are commonly leaky, landlords are reluctant to impose sanctions on smoking tenants who are otherwise ideal habitants, and in many states, it’s expensive and risky to bring about legal action. Therefore, it’s the burden of the non-smoker to either “prove” the harm or mitigate the problem on their own.  

In response to our own clients’ problems, we’ve done some research and want to try to help “clear the air”. 

Testing: Since marijuana smoke produces even more particulates than tobacco smoke, tenants with neighbors who smoke or vape marijuana could invest in a particulate monitor like the PurpleAir (or similar) in order to establish a history of particulates. A study used a PurpleAir monitor (PurpleAirTM Model PA-II, PurpleAir.com) alongside expensive lab equipment to show that PurpleAir is just as effective to show secondhand PM2.5 exposure to marijuana aerosol from vaping.  The benefit of using such a monitor is that data is uploaded to the internet every 2 minutes, so that a history can be established.

In addition, if the smoke is particularly heavy or your apartment is particularly leaky, test kits can be used to discover THC residue in your space (THC Surface Residue Detection Test by Mistral, $10, THC Surface Residue/Vape Oil (Pouch) Drug Test, $10)  More expensive laboratory test kits could be used if necessary: EMSL has Marijuana Smoke Contamination Test Kit that costs $95 for lab analysis upon return.  A terpenes test kit from LCS Laboratory is $200-300. The marijuana plant contains a high concentration of terpenes that are responsible for the characteristic smell of marijuana products. Terpenes are natural organic compounds that can be found in most plants, industrial solvents (as turpentine), and many cleaning supplies with the floral or citrus smell.

Cleaning: Due to the chemicals left behind by marijuana smoke, personal protective gear should be used depending on the severity of the residue::gloves, eye protectors, respirators and possibly Tyvek suits are all standard for professional cleaning crews..The best non-toxic cleaners seem to be SmokeOut and THC-Ya:

  • SmokeOut Cannabis RTU Spray by EcoClear is safe for people, pets and wildlife as per the company’s policy.  It neutralizes cannabis odor on contact.  $20/32 oz. from this distributor.
  • THC-Ya! By MoMar is an enzymatic cleaner compatible with hard and soft surfaces.  It encapsulates and neutralizes odors on contact while built-in detergents and beneficial bacteria destroy and remove the source of the odors. 100% biodegradable, no dyes, no solvents, and no phosphates. Non-flammable, non-corrosive, and non-toxic.

According to Restoration and Remediation Magazine, there are several other options for deodorizing and deep-cleaning soft surfaces: hydroxyl generators or ozone machines.  Their preference was hydroxyl generators.  However, both hydroxyl generators and ozone machines have drawbacks.  They may cause more harm than good by generating oxidant byproducts. In a 2021 study, hydroxyl radicals generated by a device reacted with volatile organic compounds present in the indoor space. This led to chemical reactions that quickly formed organic acids and secondary organic aerosols that can cause health problems. Secondary organic aerosols are a major component of PM2.5 (particulate matter with a diameter smaller than 2.5 mm), and exposure to PM2.5 has been associated with cardiopulmonary diseases and millions of deaths per year. (Joo et al.)

Regarding ozone machines, ozone reacts with tetrahydrocannabinol (THC) to produce at least three new oxidant products, from concentrations of ozone as low as found in the natural air.  Therefore, using an ozone generator could increase these byproducts. (Science Daily)  Another study by Berkeley Lab’s Indoor Environment Group found that ozone can remove nicotine and polycyclic aromatic hydrocarbons (PAHs) that had adsorbed onto fabrics after smoking, but that people need to wait a few hours after the generator has run and allow the space to be ventilated of new contaminants generated by the ozone, before going back inside. (thirdhandsmoke.org)

Ventilation: Although ventilation with fresh outside air does dilute contaminants,ventilation does not eliminate all the poisonous toxins and chemical components of secondhand smoke.  The Board of Directors for the American Society of Heating, Refrigerating, and Air Conditioning Engineers (ASHRAE), the international standard-setting body for indoor air quality, unanimously adopted an important position statement on secondhand tobacco smoke at its summer 2005 conference.  ASHRAE Standard 62.1 reaffirms:

  • There is no safe level of exposure to secondhand smoke.
  • Ventilation and other air filtration technologies cannot eliminate all the health risks caused by secondhand smoke exposure.
  • Tobacco smoke does not belong in indoor areas.

In 2013, the Standard was amended to state:

  • Marijuana smoke should not be allowed indoors.
  • Emissions from electronic smoking devices should not be allowed indoors.

The “ASHRAE Position Document on Environmental Tobacco Smoke” was again approved.  According to this position statement, “ASHRAE holds the position that the only means of avoiding health effects and eliminating indoor ETS exposure is to ban all smoking activity inside and near buildings.”  (Protecting Nonsmokers from Secondhand Marijuana Smoke)

Air purifiers: Our most effective products against these types of contaminants are the Upgraded Air Angel Mobile and Activated Carbon Filter Media; the Air Angel’s AHPCO cell and the media are most potent against VOCs.  Our Germ Defender and Whole Home Polar Ionizer (installed in central AC) work to reduce particulates by causing them to clump together and fall on surfaces, where they can be more easily cleaned.  If you have a central air conditioning unit, you can also use our Whole Home Filters with Activated Carbon to filter and deodorize, setting the fan to “on” so that it’s always filtering.  We also recommend standalone HEPA filters like Medify Air Purifiers (sized for your space).

We get you and have written on how to walk the fine line of dealing with neighbors’ health hazards.  Just like your rights to a habitable home free from mold, tenants should also have a home free from secondhand smoke.  No-smoke.org has similar good suggestions about communicating with smokers and landlords, as well as a new one: getting a note from your doctor!  You can never have too many allies in this fight for clean air, and we want to help as much as possible.

Photo by Ahmed Zayan on Unsplash

How to make your home less susceptible to flooding

How to make your home less susceptible to flooding

Weather forecasts for rain can strike fear in homeowners.  Different parts of the world are experiencing rainfalls that surpass a year’s average within just a few days, or even a few hours.  What can we do to lessen the chance of having to use mops, pumps, demolition and expensive contractors in the aftermath?  

There’s nothing like firsthand experience.  There is an area in Laval, Montreal that historically never flooded, yet in recent years received two “one-hundred year” floods from the Ottawa river.  Andrew Henry is a homeowner who fought very hard to keep his home from flooding for the 2nd time in April/May 2019.  He described his flood prevention/mitigation steps in a series of videos, categorizing them into three main parts:

  1. Keeping the river out of your house:  Sandbags and plastic sheeting are the primary defense for this, adding reinforcements to the back of the sandbag wall where necessary (sadly, they can fail if the water gets too deep).   You may want to keep plastic sheeting and tape on hand at the minimum if authorities in your area supply sandbags.
  2. High water table: Super-saturated soil around your foundation will seep in any cracks in the walls.  
    • In an emergency, you can dig down outside your foundation and set up sump pumps to act as temporary “french drains”.
    • You can also break the floor inside your lowest level at strategic points to install sump-pumps.   This involves a concrete saw and/or jack hammer in most cases, so preparation is key!  If you live in an area prone to flooding, it’s also wise to have spare sump-pumps on hand, along with tubing/piping for expelling the water away from the house, and plenty of extension cords. 
    • Have an emergency power source (small generator) to keep your sump pumps going even if the power fails!
  3. Drains inside the home: you can sand-bag them closed but ideally have sump pumps at the ready or installed in the drains.  For toilets, the best thing you can do is remove the toilet and install a toilet plug (see minute 1:00 in this video).  Andrew did not say it, but chances are that he immediately removed all carpeting/rugs from the ground floor (if he had rugs) in order to clearly see where any water comes in.

There are a lot of great tips in the videos of what he learns as he goes, and his determination pays off, and one month later he can remove the 8 tons of sandbags.  Other seriously flooded homes survived also!  See this house at minute 3:45

City planners and inspectors sometimes have good advice too.  Here is a helpful video from the City of Toronto that suggests the following:

  • If you have any trees running near your sewer line, it may be worth getting a plumber to scope the sewer line to see if tree roots have infiltrated or broken the line, which can cause backups of sewage into your home, even without flooding.  If you don’t have a sewer cleanout, this is also the time to have a licensed plumber to install one.
  • Foundations need to be maintained.  This kind of work includes:
    • Repairing cracks and gaps promptly.  If you have never used it, hydraulic cement is a great product.  You can use it to patch any visible cracks when the walls are dry, and keep the rest of the tub for emergencies, because it even works to seal water out when wet.  It sets extraordinarily fast (3-5 minutes) so you should only mix and use a small amount at a time. 
    • Regrading the soil around your home so it slopes away, not toward the foundation
    • Get a licensed foundation contractor to upgrade your foundation flood protection (see below)
  • Declutter your gutters:  Gutters are important because they direct water off the roof and through the downspout, away from the home.  If they are blocked by leaves and debris, water will pour over them and down the walls of your house.
  • Make sure that downspouts are directed away from the foundation, and discharge at least 2 meters (about 6 feet) from the foundation.

According to the Natural Resources Defense Council (NRDC), some ways to flood-proof your house involve researching flood plain maps before you buy your home (but with storms that break historic precedents, even that doesn’t always work), buying flood insurance, and considering relocating.  Of course, if you really like where you live or can’t move, they also suggest the following:

  • Install a sewage water backstop:  If your basement floor drain backs up after heavy rains, consider getting help from a licensed plumber to install backflow prevention valve(s) and other devices to keep overtaxed sewer mains from backing up into basements.
  • Changing your landscaping includes the following: 
    • Digging depressions known as swales to channel stormwater runoff away from your foundation.  Swales carry water in a non-erosive way.  They can have river rocks or water-loving plants.  
    • Converting concrete or asphalt driveways to gravel or brick
    • Using absorbent mulch can help manage heavy rain and reduce potential flood damage. 
    • Placing a rain barrel beneath a gutter downspout 

Although rain gardens can be used in dry areas to manage water runoff, they can also be used in flood prone areas to lessen the chance that storm drains will become clogged and overflow, leading to flooded properties.  They are depressions made and planted with water loving plants that can absorb large amounts of water and drain it slowly.  If you are able to motivate your neighbors to do the same, the effects are multiplied and can save thousands of gallons of water from pooling or flooding the neighborhood.  Here is a great video showing where and how to make a rain garden.

If grading your lawn and maintaining the gutters and downspouts is not enough to keep your ground floor or basement dry, you may need to have foundation work done.  This can involve setting french drains inside or outside the basement or ground floor, applying a sealant to the exterior of the basement walls, and/or a last resort, waterproofing the interior of the walls.  The reason we mention this as a last resort is because waterproof paint is not a replacement for good drainage–it simply can’t hold back a large amount of water for a long time (check out our article here).  Also, waterproofing should never be installed on both sides of a wall, because it needs to be able to dry out from one side.  Since foundation work is costly and intrusive, it’s best to get plans and quotes from several reputable companies before proceeding.   

Flood conditions can rise very quickly, so there is no substitute for planning and supplies.  Here’s to hoping that you are able to stem the flood/tide and keep your home dry this spring, and all year long!

Photo by jim gade on Unsplash

Termite Architecture: A Lesson in Biomimicry

Termite Architecture:  A Lesson in Biomimicry

Termites in America are largely unseen, building their unwelcome nests inside walls.  Termites in Africa, on the other hand, are quite noticeable: their earthen nests can extend up to 30 feet off the ground!  (I found out that of the 2,600 species of termites, only about two dozen infest and destroy buildings.  Lucky us.)  Other than size, the amazing thing about these structures is that they stay relatively cool inside compared to the outside environment.  How do termites acclimatize their mounds?  The answer is ventilation.  Although some species make mounds that look completely solid from the outside, these actually have micropores, 99% of which are linked together.  The termites use water, soil and their own saliva to create the wall which allows air and gasses to pass through as a sort of living lung or membrane.  Other species’ mounds have “chimneys” which the termites actively open and plug up as the outside temperature changes in order keep the inside at a constant temperature.  This type of architecture is especially beneficial for the Macrotermitinae termite for keeping the nest at 87 degrees F, in order to successfully farm a certain type of fungus for food.

A year ago I wrote the article Can I avoid mold with JUST ventilation? because for those living in hot, humid climates, maintaining a healthy home almost always requires air conditioning.  I walked through the importance of ventilation and how with adequate ventilation, it’s possible to keep humidity levels low enough to avoid mold in many cases.  After finding out that the Eastgate Center in Harare, Zimbabwe is a huge office and retail building that uses no air conditioning, I had to find out how ventilation alone is sufficient in an urban commercial setting!

Zimbabwe is in the southern hemisphere, where summer temperatures and humidity peak in October through February.  Over the course of the year, the temperature typically varies from 47°F to 82°F and is rarely below 42°F or above 89°F.  (weatherspark.com) Humidity is at or above 60% for 7-8 months of the year, and being approximately 4865 ft (1483m) above sea level, Harare is in a “subtropical highland” category.  

Architect Mick Pearce took on the project, and the prohibition of using air conditioning precipitated some extreme design rules:

They said that no direct sunlight must fall on the external walls at all and the north façade [direction of summer sun] window-to-wall area must not exceed 25%. They asked for a balance between artificial and external light to minimise energy consumption and heat gain. They said all windows must be sealed because of noise pollution and unpredictable wind pressures and temperatures, relying on ducted ventilation. Above all, windows must be light filters, controlling glare, noise and security. (1)

Inspired by a television show, David Attenborough’s BBC Life series showcasing the inside of a termite nest in Nigeria, Mr. Pearce designed a building that looks more traditional than modern, but uses 35% less energy than similarly-sized office buildings nearby.  Because of this, the building can afford a decrease of 20% less rent to tenants.  Building costs were reduced by 10% at the outset by eliminating air conditioning equipment.  The following features are a sample that translate into energy savings:

  • Thick protruding concrete “teeth” expand the surface area on walls, so that heating of the walls is minimized during the day, and cooling is maximized at night. 

  • Windows are recessed to avoid exposure to direct sunlight, and ledges around the windows have vegetation to absorb more heat and beautify it.

  • The Eastgate Centre is more like the chimney mounds, as chimneys at the top of the buildings release hot air from inhabitants inside.  A ventilation space below the habitable floors houses low and high-speed fans to exchange warm, CO2-laden air with fresh, cooler air drawn in near the ground and push it up through the building. 

  • The building stays at a constant 82 degrees F during the day (and 57 degrees at night), daytime temps which would be slightly warm to most Americans, but Zimbabweans are comfortable with it.

Source: Biomimicry & Beyond

Mr. Pearce’s description of the design is fascinating!  He went on to design Council House 2 (also known as CH2) in Melbourne Australia using the same passive cooling design, with a slightly more modern façade.  Biomimicry, the emulation of natural forms and processes for the purpose to solve human design challenges, is not about copying nature–who would want to live in a building that looks like a termite mound?  But emulation of the process uses natural ventilation to save energy while providing the comfort, convenience, and productivity demanded by modern society.  

References:

(1) Atkinson, J., 1995. Emulating the termite. The Zimbabwean Review, 1(3), pp.16-19.

Tree Air Filters are Real!

Tree Air Filters are Real!

Did you know that plants and trees filter PM2.5 and PM10 from the air?

If you’re not familiar with particulates and filtration, let me do a short recap: particulate matter (PM) is a big air pollutant in the form of dust, pollen, and most currently, smoke particles.  PM is measured in microns, or a millionth of a meter, and higher levels of PM floating around in the air are dangerous for our lungs, hearts, and whole bodies, because the smallest particles can pass through your lungs directly into your blood.  PM10 is matter that is 10 microns or smaller in diameter, and PM2.5 is matter that is 2.5 microns or smaller in diameter.  The smaller the particulates, the more dangerous it tends to be for us, because in dry conditions small dust can float in the air for a long time and reach down into the deepest parts of our lungs.

The way trees "filter" dust is one reason why air near trees feels cleaner: they intercept particulate matter, which clings to the surface of the leaves, branches and trunk.  The EPA has recognized this and even created a map of certain cities and their suburbs to show how much particulates are removed by trees per year, in kg or %.  EnviroAtlas is a cool interactive tool which you can use to examine 30 cities in the US and their suburbs, to see where the most (or least) particulates are removed by trees. Other layers available are ozone, nitrogen dioxide, carbon monoxide, and sulfur dioxide.  Other tools available in this map include soil drainage and water supply/runoff/etc.  It’s a huge database at your fingertips!

To use this map, go to this link.  It will offer a tutorial, or you can follow these steps to find PM2.5 and PM10 reduction:

  • Click on the box that says “Selected Communities: Combined Communities”.

  • Select a city you’re interested in and the map will zoom to that area.  Then close the box.

  • Click “Pollutant Reduction: Air” in the left-hand column,  and a sub-menu will appear.  Then select either “Particulate Matter: PM10” and/or “Particulate Matter: PM2.5” and check whether you want to see kg/year or %.  Wait for the map to populate with colors.  

  • Once the area has fully populated in color, you can click on an area of the city and the information about that area will appear in another box.  Use the left or right arrows in the box to scroll through it.  In general, darker blue areas absorb more PM than green or beige areas because they have more trees.

  • That’s it!   You can play around with different “layers” of information and check out some of the other tools, where data exists for the whole US, not just selected cities.

Trees are used in this way to create buffers around reservoirs, to keep dust and leaves from blowing in. (Working Trees for Water Quality)  They also can make up hedgerows around fields to prevent weed seeds from blowing in.  (A Guide to Hedgerows: Plantings That Enhance Biodiversity, Sustainability and Functionality)   They are also used as “shelterbelts” to decrease the speed of wind blowing over dry soil to reduce erosion and even prevent snow drifts.  (Why more 'shelterbelts' could prevent dust storms in the future)

Trees are a well-known asset for cities and residential areas because they help reduce air pollution, absorb excess rainwater, reduce erosion and even remediate soil to an extent.  Check out our articles “From the Outside In: How to cultivate a healthy yard that will benefit your indoor air!” and “Surround yourself with trees, and your heart will thank you for it!” to find out how to benefit most from trees in your community, whether you are looking for a place to live or have the opportunity to plant some.  In addition, https://www.itreetools.org/ has free tools with free online office hours that will help you find the right trees for your yard or community space.

Keeping Your Vacation Home Fresh

Keeping Your Vacation Home Fresh

It doesn’t matter whether your “vacation home” is a pull-behind trailer, or a luxurious condo, or a humble cabin in the mountains:  when you “get away” to a relaxing place, you don’t want to spend your precious vacation time trying to figure out how to get musty smells out or remove mold from the linens because the climate inside suffered while you were away.  Here are our tips to make it welcoming and low-maintenance!

First of all, humidity is the most important factor you’ll want to control in order to keep out mold, and you’ll want to keep the humidity under 60% all the time.  If the outside climate humidity rises over 60%, that climate will come inside and settle into soft surfaces, making them a perfect habitat for mold growth. You can only control humidity inside effectively by having a tight envelope, which means sealing up passages where outside air can penetrate in.  If no one will be living there while you’re away, you won’t need fresh-air ventilation, so make your get-away home as tight as possible by sealing windows, doors, attic doors, and other penetrations.  

Also, remember that relative humidity and temperature are closely linked.  For example, if you leave an air conditioner set on 82 degrees and the humidity rises to 80%, you may be at risk of mold forming in less than 2 weeks!  (If you’re wondering how that calculation came to be, check out this fun dew point calculator.)  In addition, relative humidity in a space will increase as temperature is lowered.   Air conditioning will naturally take some of the humidity out of the air, but there are a number of factors that can allow humidity to remain high even when your air conditioner is on. 

Here are some options to keep the humidity under control while you’re not there:

  • If you have wi-fi available in your vacation home, now’s the time to take advantage of technology that can pair with existing units like mini-splits, window or portable air conditioners to enable you to monitor climate and control them remotely.  Cielo is a company that has a number of products that can help you maintain the right humidity and temperature remotely. 

  • Alternatively, if you do not have wifi or app-enabled monitoring, you’ll need to choose a temperature for setting your air conditioner.  Although it’s tempting to set the temperature just under the temperature of melting plastic (haha) to conserve energy, don’t do it!  Setting the thermostat as high as 85 degrees can cause short run times and not allow the air conditioner to remove enough humidity from the air, creating an atmosphere for mold growth.  (No, You Shouldn’t Set Your Thermostat to 85F.  Here’s Why.)  For that reason, it’s ok to set it 7-10 degrees above the temperature you normally keep it while you’re staying there IF you also take into account the outdoor temperature and humidity.  There’s no magic formula for determining this ideal energy-saving-yet-mold-preventing temperature setting, but think about it: if your vacation space is in a hot, humid climate like the southeast US, you’ll want to set the maximum indoor temperature lower than the average outdoor temperature to make the air conditioning come on often enough to remove humidity.  

  • Thirdly, if you don’t have a humidity control setting on your air conditioner, or even an air conditioner at all, it’s best to purchase a dehumidifier with a humidistat and set it to 60% maximum humidity.  This will ensure that humidity is being controlled, no matter what temperature the interior rises to!  Think of this dehumidifier as insurance against mold: if your air conditioner was to stop working, the dehumidifier can still keep your space mold-free if it’s suitably sized for your space.  Check out our article on different types and sizes of dehumidifiers, and be sure to set up a portable dehumidifier with a drain into a lower tub or sink that condensate can safely drain all the time.

  • Leave doors to rooms and closets open for best air circulation.  Just like air purifiers, portable dehumidifiers cannot reach behind closed doors.  

  • Use ceiling fans in rooms and portable fans elsewhere to keep air circulating while you’re away, which will reduce the water content in all your furnishings by evaporation.  ““Evaporation increases the humidity of the atmosphere that immediately surrounds the liquid. This humid air takes some time to dissipate into the rest of the atmosphere. The presence of a breeze, a powerful wind, or some other form of air circulation can speed up this process and make the environment of the liquid less humid. Therefore, by decreasing the humidity of the liquid’s surrounding, a powerful breeze or wind can increase the rate at which the liquid evaporates.” (Factors Affecting the Rate of Evaporation)  This is why disaster restoration companies use powerful fans to move air over wet surfaces, increasing evaporation and removal of water.  With less water in your furnishings, the chance of mold growth is reduced.   You can even add air circulation to any space that has a light socket, such as closets and pantries, by removing the light bulb and screwing in a light socket fan (which come in different designs with exposed or enclosed blades).

  • Make sure your air conditioning and dehumidifier drains are clear and a clean air filter is in place before you leave!  Many homeowners have come on vacation to find their air conditioner or dehumidifier drain pan overflowing and dripping onto ceilings, floors, and other inconvenient places–what a mess that can also turn into hazardous mold!  As a homeowner, make sure to check these drains and change the filter several times during the air conditioning season, or arrange for someone to do the same while you’re away. 

  • Window air conditioners need deep-cleaning sometimes.  If a musty smell is coming from the air conditioner when the fan cycles on, then you’ll know that dust has infiltrated the cooling coils, absorbed moisture, and is nourishing mold growth.  Check our article on how to deep clean it and restore the fresh smell.

  • If you can, shut off water at the main valve to avoid any possible leaks, and switch off the breaker to the hot water heater if it’s electric (turn off gas if it’s gas).  This will avoid water leaks under sinks, which can make a nasty moldy mess!  If you don’t do this, at the very least shut off water to the washing machine, because burst water hoses at the washer are the single largest cause of home flooding.  (Leaving the House for 3 Days or 3 Months? 5 Must-Dos Before Your Trip)

  • Bipolar ionization units like our Germ Defenders, Mobile Air Angels and Whole Home Ionizers are a great way to keep mold away too.  At the very least, plugging a Germ Defender into the bathroom will send out ions to kill mold spores in this small space where air circulation can be a challenge.

  • Leaving a portable HEPA filter with activated carbon running is not a bad idea, either.  Activated carbon will help avoid that “musty” smell.  According to firesafeliving.com,  “plug-in” scent devices are not a fire hazard if you leave them plugged in while you’re away, but we at HypoAir don’t recommend them because a) many plug-ins use toxic chemicals like phthalates and formaldehyde, and b) the freshener will dry out before you return anyway, leaving an appliance running on your wall.  What’s better: make your own reed diffusers with your favorite essential oil (or combination of oils) and place them throughout your space for a safe, no-mess fresh scent!

These extra steps may seem to take more time on those days you’re packing up to leave your vacation home, but when you come back to a home that is ready for relaxing as soon as you open the doors and windows, it will be worth it!

Photo by Lavi Perchik on Unsplash

Summer Cooling: What are our options?

Summer Cooling: What are our options?

Many places in the US and around the world have broken temperature records this June.  Whether you’re in Minnesota or south Texas, it can be tough to keep your home cool during summer while maintaining a decent air quality.  We’ll go over some of the most popular ways of cooling your home and maybe some you haven’t thought of.  

If you’re not familiar with the different types of air conditioners and how they work, check out this article.  Note that newer air conditioners are also often “heat pumps” that can reverse the flow of refrigerant to provide heating in the winter.   

Central Air:  About 66% of homes in the US have central air conditioning, but this is not spread out evenly over the country.  As one would expect, central A/C is more prevalent in the south (37%), west (22%), and midwest (21%), versus the northeast (17%), and newer homes are more likely to have it.  (How Much Value Does Central Air Add to Your Home?) The best thing about central air conditioning is its distribution system, which allows multiple rooms to receive cooling and filtration from one unit.  With any air conditioning, it’s very important to do the following things:

  • Keep your home closed (a sealed system) so that warm, moist air is not introduced.  Letting in humid air from the outside will quickly increase humidity inside, because air at a lower temperature cannot hold as much moisture as warmer air, and humidity climbs.  This applies to windows, doors, and any significant leaks (like the door to an unconditioned attic or crawlspace).   

  • Change the filter on your unit regularly!   We can’t emphasize this enough: a dirty filter not only puts extra stress on the machinery like fans and compressors, but it increases cooling costs, and when the filter gets dirty enough, air will start to leak around the filter and get your evaporator coil dirty, providing food for mold.  Using the highest MERV possible for your unit will help keep the system clean and your air clean as well.  You can check out our article here to find out how to get more filtration out of your current AC system. 

  • For extra filtration, you can cut filter material to fit your vents, just don’t forget to clean or change these regularly, too. 

  • Get your unit serviced regularly.  Here are some things that the HVAC tech will do for you during a service visit:  inspect the inside coils, clean the outside coils and straighten fins if necessary, check the refrigerant levels and add refrigerant if necessary, and test the thermostat.  An HVAC system is a big investment (average $7000), so you’ll want to take care of it!  

  • Make sure your insulation is up-to-par: check air ducts to make sure they are not crimped and are fully insulated, and make sure there are no “bare spots” in the home’s conditioned-space envelope (ceiling or roof).  You’ve got to keep that cool air where it belongs!

Mini-Splits have most of the same parts as a central system, but they don’t have ducts to distribute cool air.  Instead, you could have one outdoor unit combined with up to eight indoor units, with the outdoor unit distributing refrigerant, not air.  In this way, you’ll have eight separate fans and filters inside, but these are smaller.  Mini-splits also have filters, so you’ll want to clean or change these on a regular basis.  One disadvantage with mini-splits is that the air filters tend to be similar to window air conditioners, which are cleanable, but they don’t provide high filtration, just large dust capture.  You will also want to get your units serviced regularly by an HVAC technician.  To get additional dust filtration, try adding standalone HEPA filters in the rooms that seem to get the most dust. 

Window Air Conditioners have come a long way in efficiency and looks!  They are one of the quickest installations, too: from buying one in your local home improvement store to having cool air in your space, could take as little as 1 hour.  Window air conditioners are a sort of “plug and play” cooling solution, but they also require regular maintenance of cleaning the filter.  Because the filter is equivalent to a very low MERV, like mini-splits, you’ll want to add a standalone HEPA filter to reduce pollen and dust.  In addition, if your window unit is more than several years old, it would benefit from a deep cleaning (see our article for tips on how to do that).   Some window air conditioners also have a feature that mini-splits and basic central systems don’t: a fresh air vent.  When this vent is open, you can get a small stream of fresh air from the outside, to dilute stale indoor air.  The only problem is that this air is usually not filtered or conditioned:  it’s the same as “cracking the window” without a screen.  To find this feature and operate it correctly, sometimes you’ll need to refer to the owner’s manual.   New window units with “inverter” type motors can be extremely efficient and this “saddle” style unit by Soleus even gives you your window view back, because it hangs below the window on each side.  It also has a dehumidifier setting to lower the humidity in your space. 

Portable Air Conditioners have become popular because like the name suggests, they are the most portable.  They can cool spaces without a window, as long as you have a place nearby to send the heat through the exhaust duct (through a sliding door with an adapter kit, for example).  You will also need a drain to collect condensate, or you will need to empty the reservoir every so often.  Portable air conditioners have the minimal filters similar to window air conditioners and mini-splits, so they are not able to filter smaller particulates.  It’s really important to clean these filters on a regular basis to keep your air conditioner working well!  Another downside to portable air conditioners is that they are less efficient than window air conditioners, and they have bulky hoses that aren’t the most attractive.  

Fans are the most common cooling systems we have, and many are cheap, at less than $50.  Fans cause evaporative cooling, where the circulated air carries heat away from our bodies in the form of water vapor.  Fans work well to cool us down if there is some humidity in the air.  (See our article about the detrimental effect of fans in extreme dry heat.)  You can use a combination of ceiling fans and portable fans to move air from cooler to warmer areas of your home.  Dreo Air Circulators are very powerful, efficient, and quiet because of the fan design, and because they use brushless DC motors that have a large range of speed with low energy consumption.  Since most fans don’t have filters, you can add standalone HEPA filters to cut down on dust, or add cloth filters to your tower fans. Filters for box fans (20x20”) are mainly the replaceable type, not cleanable, but $45 for a 4-pack of MERV-13 filters could help your space stay a lot less dusty.

Opening the windows is an option if you live outside of polluted urban areas, wildfire smoke, or excessive heat and humidity.  In these cases, it’s best to leave the windows closed and curtains drawn to preserve coolness as long as possible in the day.  If inside temperatures start to equalize with outdoors, however, you can use regular window screens in pristine areas, and Window Ventilation Filters in more polluted areas.  Although the filters restrict airflow slightly, they provide a good buffer against dust and pollen.  Here again, standalone HEPA filters will also help reduce dust in your home. 

Evaporative coolers, also known as Swamp Coolers, began to be popular in the 1920’s and 30’s when electricity was available, but residential air conditioning was not affordable/accessible. (Window air conditioners were invented in 1931 and central air conditioning was offered in 1931 but many Americans could not purchase them due to the Depression).   Swamp coolers use a fan to blow air over a wet membrane, which, if not cleaned regularly, begins to grow algae and smell like a swamp!  This older type of membrane is definitely not something we would recommend for air quality, but newer models like those made by Big Ass Fans uses a proprietary resin coating on the media that resists the growth of algae and mold to keep your airflow clean and people healthy.  Following the cleaning and maintenance guidelines are very important, too.  Another downside of this type of cooling is the massive airflow that could kick up a lot of dust.  However, if you have a large outdoor or unconditioned space and adding humidity into the air is not a problem, then an evaporative cooler could help you stay cool.  It would even help to cool a porch, from which you can open up air to your home to take in cooler air.

Heat Pump Water Heaters can actually cool your space.  It sounds counterintuitive–til you consider what this machine is actually doing.  Instead of creating heat by an electric coil or gas furnace, this type of water heater pulls heat from the surrounding air–in effect making the room in which it’s installed, cooler!  If you have the water heater installed in the garage or another unconditioned space, you can still reap the benefits by using ducts to bring warm air from your house to the heat pump, and cool air from the heat pump back to your house.  Heat pump water heaters do cost more than the basic electric or gas varieties, but according to the Department of Energy, they can be two to three times more efficient than a regular electric water heater.  However, when you consider you’re getting free cooling during the summer, you can deduct this cost from your cooling bill.  Another consideration is the size of room where it is installed.  It must be installed in a room at least 12’x12’, or have ducting to access larger areas, so it can pull the heat it needs from the ambient air.   If it’s time to replace your water heater, check with your plumber to see if a heat pump water heater would work for you!

There are many ways to move cool air from the basement into your home, but consider the quality of basement air before you make this move.  If it’s musty or moldy smelling, you’ll definitely want to get rid of that mold before trying to move that air upstairs.  For this reason, we can’t recommend circulating basement air in the rest of your home.

Whichever way you decide to cool your home, make sure that air quality doesn’t suffer.  Our Germ Defenders, Mobile Air Angels and Whole Home Ionizers sanitize air using bipolar ionization, killing microbes and agglomerating dust and pollen so it’s easy to filter or clean.   Extreme heat tends to lead to increased air pollution, so be conscious of air quality when you open the windows, or even when they are closed and outdoor air seeps in (as it always does except in the tightest of homes).   Check out our article to find out how to ride out a heat/air pollution wave safely!

Photo by Glen Carrie on Unsplash

Should I move out of my home during mold remediation?

Should I move out of my home during mold remediation?

We get this question a lot from homeowners who have discovered mold in their homes and need professional remediation to remove it.  Should I try to stay while the mold is removed and my house is put back together, or find another temporary home?

There are several considerations in making this decision, and they’re not easy.  Sadly, mold remediation is not “elective” or optional once you find it and discover the extent of mold damage.  The traditional option of renovating “room-by-room” is not available here because if it has mold, it has to be remediated as soon as possible if you want to live in your home!  

Why should I move out during remediation?

First off, If you’re not used to putting yourself first, you need to consider the value of your health.  Staying in your home while mold is removed and materials are replaced simply may not be safe for certain individuals.  The following are just some of the conditions that make it safer to leave:

  • Anyone diagnosed with Chronic Inflammatory Response Syndrome (CIRS) or Mast Cell Syndrome (MCS)

  • A compromised respiratory system or respiratory illness like asthma, COPD, emphysema, cystic fibrosis or any number of similar conditions.  Why?  Small particles and mold released into the air can directly affect your lungs and can be extremely dangerous for immuno-compromised individuals.

  • Heart conditions like arrhythmia, congestive heart failure, unstable angina, and any number of similar conditions.  Why?  Small particles and mold released into the air can directly affect your heart when they pass through your lungs into your bloodstream and can be extremely dangerous for immuno-compromised individuals.

  • Mobility handicapped people and the elderly may find it difficult to perform more cleaning and move around areas under construction

  • Work-from-home employees:  construction noise can be distracting and unproductive

  • Families with young children and/or pets  Even with protective barriers between you and the construction, you may find that your living space has increased dust on all surfaces, danger of children and/or pets getting into construction zones,  and construction noise from 7am on any time during the workday.

Secondly, most remediators will say that moving out is the best option to minimize time and labor.  According to Anna Williams, founder of Your Beautiful Home, there are multiple reasons.  If you live at home during the work, the construction crew will have to take extra care to clean up each evening before leaving, as well as pack up their tools.  This takes at least 30 minutes in the evening, plus time in the morning to unpack tools. (Move out during renovation or live through it? That is the question!)  Also, they may not have the easiest access if you are living there, for instance walking and carting tools to the back door to avoid your living space.  So, making it easier and quicker on the remediators means less time and money spent.

And of course, if the remediation requires extensive gutting to your home, it may be just too inconvenient to try to live there.

If you decide to leave, family and friends usually have the cheapest “rates” of any accommodations, but will your relationship survive the remediation?  If your contractor has a reputation for completing projects on-time, staying with family may be a good option.  Alternatives include:

  • Vacation rentals like Airbnb and VRBO

  • Extended stay suites

  • Sublets

  • Corporate housing/short-term rentals (contact a corporate housing agency)

If you move out, you’ll want to make sure to do the following:

  • Store food items in airtight bins

  • Discuss power requirements and when the power will be cut off (will it affect your freezer/any other climatization?

  • Place plastic dust covers on furniture, clothing and carpets if possible

  • Secure any areas of the home that contractors don’t need to access, take or lock up valuables

  • Notify your home insurance and security company

  • Check the “containment” that the contractor has set up.  Be sure to discuss your HVAC system, which can broadcast mold and dust throughout your home if it’s not secured!  If temporary ventilation is needed during extreme heat or cold, the contractor should be able to provide it.  

  • Plan for extra weeks or months in case the remediation schedule doesn’t proceed as planned.

Why should I stay?

Finding alternate accommodations can be stressful if you have to stay with others, or expensive if you have to pay for a rental for your family.  For these reasons, many decide to stay at home.  Homeowners who decide to try to live in their home during remediation should know about the stresses they may endure!  It’s not easy to have workers coming and going through your personal space.  Here are just a few considerations:

  • Increased dust throughout the home

  • Increased noise during workdays

  • Temporary (or prolonged) power and water disruptions

  • Ventilation during extreme temperatures

  • Child safety

  • Parking issues–will there be many vehicles and/or a dumpster parked in front of your house?

  • Access to your kitchen

  • Access to at least one bathroom and shower or tub

  • Access to laundry facilities

  • Sufficient clean space for your family to sleep

  • Sufficient space to work if working from home

  • Delays to the schedule may make the remediation longer than expected

It’s a lot to consider.  Of course, make sure you have as many options available as possible before deciding, including knowing if your insurance will pick up any of the cost for relocation.  If not, you can check with local, state and federal agencies for assistance.  

Staying at home during a mold remediation carries an extra risk: airborne mold.  For this reason, we recommend purchasing extra HEPA filters to place around your living area and portable air sanitizers like the Air Angel and Germ Defender.  Containment of dust and mold spores has to be top-notch–make sure that the contractor follows all safety standards for containment!

Working with the contractor on setting a budget and timeline should be a top priority.  Many contractors may think that delays are acceptable if the homeowner is living in the home or with family–after all, you won’t be paying rent–but make sure that this is not their mindset by including deadlines in the contract, and penalties or cost reductions if they are not met.

By all means, ask for help whenever you can.  Whether it’s taking a weekend getaway break, taking vacation during the remediation, asking for help with children and pets, or having dinner with friends more often, you’ll need to pace yourself so that your health and your relationships aren’t “gutted” either!  

BALOs: voracious good bacteria

BALOs: voracious good bacteria

Bacteria in general have bad connotations: infection and illness to name a few.  But increasing awareness about the benefits of probiotics and natural gut bacteria have taught us that not all bacteria are bad: there are good bacteria too.  Bdellovibrio is in the good bacteria category and recent discoveries about it are spurring more possible uses.

Bdellovibrio bacteriovorus, which was first discovered in 1962, is a gram-negative, aerobic bacteria, which means it has a hard, outer shell that resists the purple stain used to differentiate strains of bacteria.  (For more information on gram negative and gram positive bacteria, check out our post here.)

Bdellovibrio is also a predator.  It is capable of killing and replicating inside over 100 different types of Gram-negative bacteria, including antibiotic-resistant pathogens, giving it a reputation of being a “living antibiotic”.  These prey bacteria include such well-known pathogens as Escherichia coli, Helicobacter pylori, Klebsiella pneumoniae, Pseudomonas, and Salmonella.  This predation behavior has even spawned a new acronym for this type of bacteria: Bdellovibrio and Like Organisms, or BALOs.

According to the following analysis, Bdellovibrio sounds like a voracious alien by attaching to, penetrating, and killing host bacteria, then using them to incubate its own progeny:  “In the wild, B. bacteriovorus uses chemotaxis and a single polar flagellum to hunt groups of prey bacteria. Once in close proximity, B. bacteriovorus collides with individual prey and attaches through an unknown mechanism. Next, B. bacteriovorus invades the prey periplasm (layers around the cell), likely through use of retractable pili, and secretes hydrolytic enzymes that kill the prey within 10 to 20 min of invasion. The predator subsequently remodels host peptidoglycan to form the spherical bdelloplast, where it degrades intracellular contents to fuel its own filamentous growth (liquidates the insides of the prey to fuel replication). Finally, 3 to 4 h following initial contact, the prey cell is lysed (ruptured), and four to six daughter cells emerge from their protected niche (the bdellovibrio babies emerge). Wow!   

Bdellovibrio is found naturally in soil and water, including rivers, lakes, the open ocean, and sewage and wastewater treatment plants (WWTPs).  They are also found in the gills of certain aquatic animals like crabs and oysters, and some mammal intestines.  

Here are some of the proposed uses of BALOs:

  • It could be used in a probiotic to foster healthy human gut microbiota (Higher Prevalence and Abundance of Bdellovibrio bacteriovorus in the Human Gut of Healthy Subjects)

  • It could be an effective treatment for pneumonia in lungs, as both B. bacteriovorus and M. aeruginosavorus could reduce the burden of K. pneumoniae in rat lungs, and B. bacteriovorus treatment is also effective in Yersinia pestis infection of mouse lungs. However, it was found that B. bacteriovorus and M. aeruginosavorus did not reduce pathogenic colonies in the blood, as it did in the lungs of these animals.  (Predatory Bacteria Attenuate Klebsiella pneumoniae Burden in Rat Lungs, Susceptibility of Virulent Yersinia pestis Bacteria to Predator Bacteria in the Lungs of Mice)

  • It could be an effective treatment for Cystic Fibrosis (CF), in which patients have a defective gene that hampers immune response and causes them to be prone to chronic lung infections with an exaggerated inflammatory response.  In CF patients, instead of a diversity of microbiota, only two pathogenic microbes prevail, namely usually the Gram-negative P. aeruginosa and the Gram-positive S. aureus.  Therefore Bdellovibrio was used in a 2014 study to “challenge” these 2 strains in a lab setting, and it was able to reduce the biofilm of both cultures dramatically, even in “flow” settings.  The scientists were even able to photograph (at 30-50 times magnification) Bdellovibrio preying on S. aureus bacteria (see photo below).

Source: Study: Bdellovibrio bacteriovorus directly attacks Pseudomonas aeruginosa and Staphylococcus aureus Cystic fibrosis isolates

  • Prolong food storage:  This study proposes that Bdellovibrio could be used to prolong the shelf life and reduce additives to packaged meat, because it was tested on chicken slices and canned beef and found to reduce colonies of E.Coli by 4.3 log and 2.1 log respectively.  The Bdellovibrio was able to lyse (rupture) all the strains of E. Coli that were tested.  In a separate investigation of Bdellovibrio and E. Coli, this video shows how an actual Bdellovibrio cell multiplies inside an E.Coli cell and destroys it from the inside out.

  • It’s already been recognized as a mode of controlling bacteria in water supply systems.  In 2020 in Varberg, Sweden, a municipal water supply company decided to replace its chlorination system with ultrafiltration, which is an ultrafine mesh filter that prevents microbes from passing through.  Scientists monitored the results closely following discontinuation of chlorine, and some bacteria grew, but then decreased drastically.  By the third month, Bdellovibrio had flourished and harmful bacteria had diminished.  This showed that chlorine had actually suppressed the natural predatory action of bdellovibrio in the biofilm on the inside of drinking water distribution pipes where the good and bad bacteria live. (Predatory bacteria could be used to purify water in the future, study suggests)

So, what’s keeping us from using BALOS as natural antibiotics?  Of course, scientists want to make sure that there will be no harm to humans.  A number of studies using the two BALOs B. bacteriovorus and M. aeruginosavorus “demonstrate their inability to invade mammalian cells, and no apparent pathological effects or signs of cytotoxicity or reduction in cell viability, supporting the proposition that these two BALOs are inherently non-pathogenic to mammals.” (Biotechnological Potential of Bdellovibrio and Like Organisms and Their Secreted Enzymes)  However, scientists are also concerned that prey bacteria could become resistant to it, if it incompletely eradicates the prey. 

In addition, varying amounts of oxygen are necessary for BALOs to work on their prey.  Finally, in complex microbial environments like in our bodies or even in a wastewater treatment plant, it’s not always easy to predict how introduced BALOs will change the biome or which microbes they will prey on, although some do have preferred prey.  Certain chemicals also reduce their effectiveness.

In conclusion, it’s amazing what goes on all around us in microscopic realms.  BALOs could be harnessed in many different ways to improve our health: just the Swedish experiment of removing chlorine showed that it’s not always necessary to use harmful chemicals to kill bad microbes.  Although a lot more research needs to be done, it’s good to know that there are bacteria out there that are on our side! 

Photo by CDC on Unsplash

How a moth’s wings could make your home quieter

How a moth’s wings could make your home quieter

Noise is an important part of our home environment.  The most beautiful, well-designed home, if situated next to a busy, noisy road, falls in value due to its location, location, location.   Apartments in the city may have beautiful balconies that are never used because of the drone of traffic all around.  What if nature offered an innovative sound-absorbing “cloak” for your home?

Bats use echolocation to find their prey.  Smooth surfaces that lack scales or fur make the echoes louder, allowing the bat to close in quickly.  Animals with fur or scales, however, can elude the bat more often.  Scientists have discovered that a certain type of moth have scales that overlap in unique ways to provide exceptional sound-dampening. 

Diamond Light Source is a synchrotron in the UK (a synchrotron is a circular particle accelerator), which was used to examine the nanosized scales on the wings.  According to Professor Christoph Rau, a scientist at this synchrotron, the sound absorbing properties of thoracic moth scales are capable of absorbing about two thirds of the sound energy emitted by their predator, the bat, and significantly increases the insect's survivability.

A separate study by the University of Bristol's School of Biological Sciences showed that the wings absorb as much as 87% of the incoming sound energy. The effect is also broadband and omnidirectional, covering a wide range of frequencies and sound incident angles.

"What is even more impressive is that the wings are doing this whilst being incredibly thin, with the scale layer being only 1/50th of the thickness of the wavelength of the sound that they are absorbing," explained lead author Dr. Thomas Neil.

What could we do with such incredible sound-absorbing performance?  Certain types of noise, like car horns and screeching tires can be detrimental to our health, as we detailed in this article.  Then, there’s also the noise pollution that comes from neighbors or even your own home, which can affect your sleep or concentration while studying or working from home.    Wallpaper or ultra thin sound absorbing panels would vastly improve interiors or exteriors in cities and other loud locations.  Office walls and places where highly sensitive information is discussed could use it.  Even libraries, children’s nurseries and our own bedrooms could use it.  Can you get too much quiet in a space?  I don’t think so, when the world’s noise is only a few steps away!

Tackling Dust in Your Home

Tackling Dust in Your Home

Dust is one of those things that never completely goes away, like mold, but keeping both at a minimum in your home is key!  There are a lot of weather conditions that increase dust, but in general, heat and low humidity are two of them.  When these occur, you’ll not only see an increase of dust in your home, you’ll be breathing more of it because the less humidity, the longer particles stay afloat.  Yuck!  Getting it under control takes some effort, but we’d like to help!

Invest in the right tools

We see deep discounts all the time on home appliances that look like they make our lives easier–but they end up to be a waste of money.   This is where it pays to research–and only buy what will do the job, not the gadget with the most features.  The tools we’re going to talk about are very important to your family’s health, so we hope that you keep these requirements in mind and buy wisely! 

  1. Air Cleaner

With dust in the air, you can do all the cleaning you want and then–BOOM–the dust continues to fall out of the air after you stop cleaning, not to mention all the dust you are filtering with your nose and lungs!  If you live in a dusty area, an air cleaner that uses HEPA filters is imperative.  

For value and solid performance, Medify Air has a range of air purifiers that is hard to beat.  You can find one for every size room in your home, from small nurseries to “great” rooms, with simple controls and most with filters that can be vacuumed gently once a month on the pre-filter side to extend their life.  They use True HEPA H13 filters, which in general last 3 to 6 months.  

Another great option is the CoWay AirMega Mighty, which has been highly rated for a number of years by the NY Times Wirecutter review for dusty rooms up to 250 square feet.  Their testing has used the same filter for up to a year with good performance (however of course you’ll want to have new filters on hand just in case you are caught in an exceptionally-poor air quality day).  

  1. Dusting, Vacuuming, and Mopping

I wish I could tell you differently, but these chores are a must.  If you invest in the right tool(s), however, you can enjoy your clean surfaces with less work!  Dusting should be done with a dry microfiber cloth (check out this video to learn how to dust properly–yes there are techniques that are more effective with less work!)  Then, get both vacuuming and mopping done at the same time with this ONE TOOL (I’ve touted it in other articles, but here it is again): with the CrossWave floor and area rug cleaner by Bissell ($257).  It leaves your floor cleaner than if you had vacuumed and mopped separately!  It has a rug cleaning function, and it has a HEPA filter included, so no dust is escaping your machine and going back into the air.   For people who have mobility or strength issues, this machine absolutely reduces the straining scrubbing actions that normal mopping requires, and it also comes in a cordless option.  If you check local discount stores, there are many reconditioned models that sell for less than half this price (I got my corded one at Ollie’s).  In addition, of course the manufacturer wants you to use their patented floor cleaner, and states that using any other cleaner will violate the warranty.  Unfortunately, Bissell products mostly rate an “D” grade from the Environmental Working Group for toxicity to humans and the environment, but if you do decide to substitute a non-toxic cleaner, we have just the one for you: a recipe using TotalClean.  TotalClean has no fragrance and no toxicity, you can clean your floors as often as you want without adding more VOCs and chemicals to your home.  Here’s the full recipe for a Bissell-like non-toxic floor cleaner:

Machine Floor Cleaner Concentrate Recipe (this is the concentrated cleaner so you add it in replace of the manufacturer’s cleaner, with the recommended amount of water, adapted from this very informative article):

  • 1-¾  cups TotalClean Concentrate
  • ⅛ cup rubbing alcohol
  • ⅛ tsp dish soap
  • 5-10 drops essential oil (optional)

If you simply must have a separate vacuum and mop, though, make sure the vacuum uses certified true (make sure the label says “true”) HEPA filters with an airtight, sealed filtration system.  You don’t want that dust to be recycled right back into the air!  As for mops, The Maker’s Mop is an ingenious tool for dry and wet-mopping, dusting, and cleaning up after huge spills.  And, being “cordless”, I guess it’s handy to have around in the case of a power outage!  (20 Tips To Prevent And Reduce Dust In Your Home)  

  1. Fresh-air ventilation WITH filtration

If your rooms are stuffy (too much CO2!) and you don’t have central air conditioning, make sure you only open windows with filters in them!  That’s right, screens may prevent mosquitoes and flies from coming in, but they do nothing to filter dust.  Our Window Ventilation Filters are adjustable so that you can still open your windows for fresh air and block out most of the dust. 

If you like to open your windows wide for fresh air often, you should consider replacing the fitted window screens with nanoscreening.  Nanoscreening does cut visibility through the screen somewhat compared to normal insect screens, but many customers like the additional privacy it offers.  AllergyGuard nanoscreen offers a kit that is super-easy to install with double-sided tape.   If you re-screen a few windows with this kit and like how it performs, you can go to their website for a larger roll and video on how to install it with spline, the skinny rubber tubing that is normally used to keep screens in place.  

  1. Change your HVAC filter more frequently.  

If you have a hard time remembering to do this, just enroll in an auto-ship subscription to make it easy to have them available when you need them.  If you’re concerned about changing it too frequently, check out our tips for getting that interval just right.

  1. Don’t carry the dust in with you!

We’ve written a lot about this practice, which ranges from taking your shoes off at the door and using a doormat, to doing your best to clean dusty pets off before they come inside (umm, can we teach them how to brush themselves?)

  1. Minimize.

This says so much in one word.  Minimize the fluffy pillows, fuzzy throws, carpeted flooring (don’t rip out carpet if you’re renting, though, obviously), knick-knacks and tchotchkes, piles of clothing, anything that you can do without, that catches loads of dust (children not included)!   If you want to have area rugs or carpet, consider changing them to wool carpets.  According to a 2015 study, wool carpets significantly improve indoor air quality by rapidly absorbing the common pollutants formaldehyde, sulphur dioxide and nitrogen oxides, known as volatile organic compounds, or VOCs, which are released from many common household items such as cleaners and disinfectants, air fresheners, printers and home furnishings.  A high level of formaldehyde (300 parts per million) was reduced to virtually zero in four hours, and nitrogen oxides from 300 to 5 parts per million in 24 hours, whereas nylon carpets did not perform as well.  The wool carpets retained the formaldehyde and did not remit them into the atmosphere.  When you choose a carpet, low pile heights are favorable so that dust and debris is easier for the vacuum to remove (with your True HEPA vacuum, of course!).    


How can I apply Altitude Simulation to my home?

How can I apply Altitude Simulation to my home?

Visitors and full-time residents in high-altitude locations are susceptible to altitude sickness, also called Mountain Sickness.  This is due to the lower atmospheric pressure and consequently lower oxygen molecules by volume, found in the mountains.  These illnesses include problems sleeping, fatigue, headaches, and even life-threatening pulmonary edema (buildup of fluids in the lungs).  At just 6,000 feet many people experience trouble sleeping, and, according to the Cleveland Clinic, about half of people who ascend to 8,000 feet will experience some form of altitude symptoms, and almost 75 percent of people will have effects at 10,000 feet. (Oxygenation for Mountain Hotels and Resorts)  Even one of the premier experts on altitude sickness, Dr. Peter Hackett, had a close call with pulmonary edema while mountaineering (video). Technically, even people at sea level can get “hypoxia” (the condition of low oxygen content in tissues) if the atmosphere is low in oxygen or their breathing function is impaired.  

Studies have shown that supplementing oxygen during sleeping reduces the effects of altitude sickness or hypoxia, while also improving daytime oxygen saturation and ability to function during the day.

Altitude Control Technologies (ACT) works with ordinary homeowners, as well as the US Air Force, US Navy, universities, professional sports teams, Olympic training facilities, etc. to provide “altitude simulation” for enhanced health and performance.  It’s a unique technology that raises oxygen levels in a room to “simulate” lower altitudes.  In homes, ACT only services bedrooms because with 8 hours of sleep at a simulated lower altitude, people can become better acclimatized to their physical altitude during the rest of the day.  This informative video shows the machines, how they work, where they are installed and how they are controlled.

ACT machines take in air from outside, splits up oxygen and nitrogen, sends the nitrogen out of the house, and the oxygen to the bedroom(s).  For example in Colorado, oxygen levels are increased by about 30% to simulate an altitude closer to sea level.  The control sensors monitor the oxygen saturation, barometric pressure and CO2 in the room constantly.   In this way, too much oxygen (which violates the National Fire Protection Code) is never a problem.  

The oxygen machines installed by ACT use molecular sieves.  They are placed outside the bedroom(s) in the attic, mechanical space or crawlspace so that noise and heat created by the machines does not impact the restful area of the bedroom.  To counter the heat of the machines that could otherwise place an additional burden on the HVAC system, ACT has developed an Alticool™ system uses a combination of fresh mountain air and exhaust fans to cool the machinery space.

Although the machines used by ACT are proprietary, many of the machines used by oxygen medical supply companies use Pressure Swing Adsorption (PSA) systems to separate oxygen from nitrogen.  Two pressure vessels are filled with Carbon Molecular Sieves (CMS).  In the first pressure vessel, clean compressed air is introduced, where the nitrogen and carbon dioxide is attracted to the CMS and oxygen is allowed to pass through.  The second pressure vessel is regenerated to “purge” the nitrogen and carbon dioxide from the CMS by vacuum and a small stream of pure oxygen.  Then, the vessels switch placement in the process and the first vessel is regenerated while the second vessel produces oxygen. (How Oxygen PSA Generators Work)

Because air pressure is lower at higher altitude, simulating a lower altitude in a room involves adding oxygen, which also increases air pressure in the room.  In building science, this is a “positive pressure” scenario, where good air sealing must accompany the installation so that the newly added oxygen doesn’t leak out of the room and cancel the work of the equipment!   For this reason, detailed engineering of the space(s) to be oxygenated precedes any installation.  The engineers take into account the room boundaries including doors, windows, walls and ventilation systems that are shared with other spaces, often specifying dampers that are activated when the system is in use.  New construction and pre-existing structures are candidates for the system, however it’s always less costly and easier to plan for such a system before the home is under construction. 

So you may be saying, how does all this apply to my home at sea level?  Even if you don’t live at or visit high altitudes, you can apply some of the principles of this technology to make your bedroom the optimal place for your body to recharge and repair itself while you sleep.  Let’s recap to understand how this applies to your bedroom:

  • Getting a better sleep at night increases performance and cognitive facilities during the day. 

  • Air-seal the room boundaries from pollutants by using air-sealing techniques at the door(s), window(s), corners, outlets and openings like can lights and ceiling fans.

  • If you want more fresh, clean air, you can consider the following: 

    • Use a window ventilation filter where you can open the window comfortably without excess humidity, heat or cold.

    • If you have central air conditioning, you could switch the bedroom to a dedicated mini-split with its own filter and option to intake fresh air from outside, OR

    • Add a fresh-air intake in your HVAC system and add an inline duct fan and filter to the vents serving your bedroom (here’s an inline duct filter). 

    • Add plants that are low-maintenance and produce the most oxygen while filtering pollutants. 

  • Check with your doctor to see if you suffer from sleep apnea or hypoxia.  Usually these are diagnosed through a sleep study.  If you are a relatively stationary sleeper, you could add oxygen to your sleep routine with a portable oxygen concentrator and mask or cannula.  Continuous positive airway pressure machines (CPAPs) are popularly prescribed but they do not increase the oxygen content of the incoming air;  CPAPs just increase air pressure slightly to keep breathing airways open while you sleep.

  • Consider that outside noise can also reduce your sleep quality, so check out our recommendations to seal out unwanted noise, as well. 

  • Make it a priority to clean surfaces and change your sheets at least once a week.  To help combat dust and allergens between cleanings, add an Air Angel and a standalone HEPA filter.  A dustmite-proof mattress encasement also helps to transform your bed from being a dustmite haven to a clean “nest”!

Consider what and how you are breathing during the most important time of the day–your sleep–and you may find that making small changes can improve your daytime enjoyment immensely!

Photo by Jason Hogan on Unsplash

Which DIY mold test kit should I get?

Which DIY mold test kit should I get?

Every home has some mold, because mold spores practically hitchhike into the home on our clothing, groceries, and even the air.  The difference between acceptable levels of mold and an infestation, however, is whether the moisture and food sources exist to feed an infestation.  There are many reasons to test your home for unacceptable levels of mold, some of which are:

  • Musty smells in an area

  • Recent flooding in or around your home

  • Roof damage

  • Renovations like roof, siding or foundation repair that expose your home to the elements

  • Mysterious health issues in any resident of your home

If you suspect an infestation of mold in your home, there’s no time to waste in testing, stopping the growth and removing the mold!  The health effects of living with a mold infestation are too costly not to do anything! 

Of course, if you have the resources and are able to hire a trained, reputable mold inspection and remediation company, they are often preferable to DIY kits because these inspectors have the training and equipment to make a thorough inspection and testing of your home.  However, working on a budget often means if you spend too much on inspection, there isn’t enough money to make a thorough remediation.  We get it, and so do makers of DIY mold testing kits.  For this reason, we have investigated some DIY kits and even partnered with one. 

There are several types of DIY mold testing you can do in your home.  Here is a description of each, from lowest to highest costs:

  • Gravity plates (also commonly called petri dishes)--an Air Sampling method:  When opening a sealed petri dish to the air in your home, mold spores in the air land on the sugar coating (agar) lining the dish and start to grow.  This method does grow mold!  However, unless you get your samples analyzed by a lab, you will not know for sure what species of mold is present, and even then, only “relative” quantities of mold colonies can be inferred.  If you decide to go this route, we recommend Micro Balance Health Products’ EC3 Mold Screening Test Kit - 6 Pack, which retails for $36.  It has detailed, easy to follow instructions to determine a relative “mold burden” in your home, but does not include the option to have your samples analyzed by a lab.  Because it’s sold by a company that has developed several mold abatement products and  many more highly reviewed health supplement products, you can be sure that they are interested in your best health!

  • Spore traps–an Air Sampling Method: GotMold combines the best of professional technology with DIY convenience.  Although it’s a major step-up in pricing from agar plates (a 3-room kit is $299 including return shipping and analysis), you can use the same sampling procedure that professionals use, and professional lab analysis is included in that package.  Their patented BioVac™ Air Sampler can be reused, so if you decide you’d like to retest after completing renovations to make sure the mold is gone (wise idea), you can get refill “cassettes” to use with your machine (again, postage and analysis is included in the cost of the cassettes).  In the lab report, each area tested will be grouped under the following severity of mold: 

    • GREEN — Not Evident

    • YELLOW — Slightly Evident

    • ORANGE — Moderately Evident

    • RED — Significantly Evident

Then, you’ll get spore counts from 4 common and 14 other types of mold, as well as an indication of whether these molds are usually found with water damage.  It gives “next step” recommendations in the conclusion of the report.

  • Immunolytics’ Kit–Combination Air and Swab sampling method: Since not all types of mold reveal themselves in an air sample, Immunolytics offers a Quickstart Kit ($198) made up of gravity plates and 1 swab or “Build Your Own” kit ($33 per sample) that combines the two methods. Like Micro Balance Health Products’ kit, gravity plates are interpreted by number of colonies formed, and swab samples give a percentage of specific molds found in the sample.  You can also ask for a consultation to determine the next steps for your home. 

  • EMMA–Air or Swab sampling method:  Offered by RealTime Labs, This method is VERY simple in that you use the provided swabs or gauze, or cut out a section of your home’s AC filter.  The separate samples can be combined into 1 sample, or charged as separate samples. This test is ideal for homeowners who are already experiencing mold-related illness symptoms, as their “combo” tests not only test your home for 12 of the most common molds, but also detect 5 of the most common mycotoxins (mycotoxins are responsible for illness).  Knowing the mycotoxins floating around your home may help you develop a treatment plan with your doctor, and the company also offers urine tests, pet tests, and tests for other known toxins.  One disadvantage of this method is that combination of samples will not allow you to learn where the mold is coming from (which room has the highest count).  Check out our article “What’s the Difference between EMMA and ERMI?” to learn more about EMMA.  

  • HERTSMI-2–Dust sampling method:  ERMI was a test developed for research purposes by the US government.  Although it can tell you the presence of specific molds, it is unreliable for determining whether a building is safe to re-enter after remediation.  HERTSMI-2 is a method of interpreting the results of ERMI that is much more reliable (for mold scores less than 10) of whether you will get sick again when returning to a water-damaged building (WDB). HERTSMI-2 analyzes the results for 5 specific molds, also called the “Big 5”, which are most likely to cause relapse of symptoms for patients.  EnvironBiomics offers a very reasonable price ($130) and fast service for HERTSMI-2.  They also offer separate tests for endotoxins (bacterial toxins) and actino microbes (gram-positive bacteria), which are not common to be tested (see our article here about endo-and exotoxins).  If your home was heavily water-damaged or had water damage in multiple areas, you may want to opt for a HERTSMI-2 to make sure it’s safe to inhabit after the remediation.

Since the unconditioned outdoors has its own mold biome, it’s a  helpful baseline to reference.  Most tests do not suggest taking an outdoor sample, but GotMold includes one air cassette specifically for the outdoors in each of their kits.  That way, you can see the types and concentrations of mold directly outside your home, which may be influencing your indoor scores.  We have chosen to partner with this company because of the owner’s passion for helping average homeowners detect mold in an economical way (read his personal story and the company’s philosophy here).  Their air sampler was one of the first affordable machines for DIY air sampling.   

Of course, there are many more test kits out there, but be sure to do your research!  Some have extra fees for lab analysis, postage, or consultation, and each lab report reveals different information.  Companies started by physicians (like Realtime Lab or SurvivingMold.com) are even more helpful because they have taken the time to screen and affiliate with doctors around the US who can physically treat homeowners and their families who have been affected by mold.  Whichever method you choose, don’t stop looking for the source of mold in your home and remediation of the damage until retesting comes back with an acceptable score.  Even then, “acceptable” to one person may cause relapse in someone whose health has been severely impacted by mold.   Mold can be sneaky and hard to find, so if DIY tests don’t reveal the problem, check out our articles on Taking our Homes Back from Mold and article on How to Choose a Mold Remediation Contractor (which also speaks about inspection) to partner with professionals.  We at HypoAir are also available to help with products that can help keep mold at bay while you're remediating or on a maintenance basis. 

Our Top Articles for Reference by Topic

Our Top Articles for Reference by Topic

We have published a lot of information for you on our website, so we understand it can be a lot to digest!  Here’s a shortlist of our top articles 

Mold and Mycotoxins

Mold Prevention

Mold Testing

Cleaning

Air Filtration

Humidity

New Home Search

Ventilation

Home Projects for Better Air Quality

HVAC

Disaster/Emergency Preparation

Mold in the Toilet

Mold in the Toilet

The bathroom is a room that’s very susceptible to mold growth, and once you understand what mold needs to grow, it’s easy to understand why. Basically, it just needs moisture (shower=check, sink=check, toilet=check), and food (dust=check, organic matter=check), so the bathroom sometimes becomes a petri dish that’s hard to keep up with.  Fortunately for you, we’re tackling this problem by appliance, so check out our other articles here:

Now, back to mold in the toilet.  Mold can be mistaken for those stubborn mineral toilet rings, until it starts to turn weird colors, like black, brown or pink. 

What type of mold is the black mold in the toilet?

Although you may know that Stachybotrys chartarum is the most commonly termed “black” mold, another mold that appears black is Aspergillus Niger, as shown in Figure 2 of this 2017 study from India.  Aspergillus Niger can be a cause of some forms of pneumonia, so it’s definitely not something you want in your bathroom!  The study identified five types of mold in public toilets, resulting from airborne spread of spores and improper or infrequent cleaning procedures.

Alternaria and Cladosporium are two other types of mold that can produce black growths. (10 Types of Mold Colors Commonly Found in the House)  The most important thing to know is that these molds can produce mycotoxins and mVOCs every time they are disturbed!  Stachybotrys has been demonstrated to produce a number of Macrocyclic Trichothecene mycotoxins.  (Black Mold and Stachybotrys Exposure Guide)  Aspergillus niger can produce Ochratoxin A, Cladosporium produces mVOCs which can be irritating, and Alternaria species produce more than 70 mycotoxins! (Alternaria host-specific (HSTs) toxins: An overview of chemical characterization, target sites, regulation and their toxic effects)

Brown stains in the toilet are another problem–they could be caused by a number of molds, such as Pithomyces chartarum, Aureobasidium pullulans, Stemonitis, Taeoniella, Cladosporium or Mucor.  Arguably the most harmful mold of these is Mucor, which can cause a life-threatening blood infection called mucormycosis. However, it’s not always brownt any point during its life cycle it can be brown, yellow, black, white, or gray.  (10 Types of Mold Colors Commonly Found in the House)

Pink slime in the toilet is actually not mold.  As we mentioned in our article about the shower, that pink slime that can also form around drains and at the bottom of the shower curtain is caused by the bacteria Serratia marcescens, and can cause urinary and respiratory tract infections, which are especially problematic for people with immune problems. 

If you decide to try to find out what type of mold is growing, you can test it with a lab, but in any case it’s wise to treat it as a dangerous air pollutant.  Don’t disturb it unless you spray a cleaner on it first (to immobilize the spores), or are using a mask!

What is the cause of mold in the toilet bowl?

There are several possible causes for mold in the toilet bowl, some of which can be easily resolved and some need more effort!  

  • One of the easiest methods is just flushing the toilet more often. Toilets that are not used every day can allow mold and bacteria to attach to the bowl.  After cleaning the toilet, try to remind yourself to swing by and flush the toilet at least every other day so that these microbes don’t have a chance to proliferate.
  • Next, if the toilet does get used or flushed often, more frequent cleaning is often needed.  However, you need to skip traditional bleach based toilet cleaners, as they are toxic for you!  The following are some non-toxic cleaners that are very effective for bacteria and germs, however note that citric acid is not always effective on mold (read below on citric acid** and get a few more recommendations from Zero-Waste Memoirs):
    • Force of Nature is hypochlorous acid, a safe alternative to bleach that is a hospital-grade, EPA-registered disinfectant that kills 99.9% of germs including Staph, MRSA, Norovirus, Influenza A, Salmonella, and Listeria when used as directed.  You can spray Force of Nature in the toilet as a final disinfectant, but it should not be mixed with essential oils or cleaners that contain essential oils, as this can reduce its disinfecting power. 
    • Fragrance-free powder: Seventh Generation Zero Plastic Toilet Bowl Cleaner ($22) has citric acid as its main cleaning agent.  This non-toxic ingredient is registered with the FDA in products certified to kill feline calicivirus (a testing substitute for norovirus), so we know that it works.  If you or anyone in your household is exhibiting symptoms of this illness or a similar one, we would suggest cleaning toilets full-strength and often with a product like this!   If you like a little lemony fragrance, try the Probiotic Toilet Bowl Cleaner by Etee ($45), which also uses citric acid.  It may seem expensive, but it’s not bad on a per-use basis ($1.50), and some customers find that using less than the prescribed amount (1 TBSP) works just fine.  Added probiotics help to keep your septic system functioning optimally.
    • Dissolving strips:  Nature Clean Natural Toilet Bowl Cleaners Strips ($17) are highly rated too.  They use sodium coco sulfate as the main ingredient, which is a blend of the fatty acids in coconut oil. (Sodium Coco Sulfate: Is It Natural?)  It is a synthetic detergent with one of its ingredients being sodium lauryl sulfate (SLS), however it is less irritating should you immerse your skin in the soapy water (highly unlikely for a toilet bowl cleaner!) Lastly, the essential oils including Australian tea tree oil, provide a pleasant scent and antiseptic properties.
    • Liquid: Mrs. Meyer’s Liquid Toilet Bowl Cleaner, $6, uses citric acid and essential oils like lemon verbena to get a fresh-smelling clean, all in a bottle made from at least 30% post-consumer plastic (recycled).  

Safe descaling of your toilet bowl:  mineral stains and some molds may be removed by simply using the concentrated citric acid** (as you’ve read, a non-toxic ingredient in many toilet bowl cleaners), which comes in a granule or powder form.  Granules are safer to use because they are mostly dust-free (they’ve been formed into little clumps that don’t kick up dust when you handle them).  

The following is adapted from a post on Moral Fibres.  Their method did not work without scrubbing but I learned a few things working on my own toilets:

  • Gather your supplies: a large pitcher for clean water, ½ cup of citric acid powder or granules, latex or plastic gloves, an abrasive scrub sponge that’s safe for porcelain, Bar-Keeper’s Friend Cleanser (optional), several paper towels, small disposable cup, tape for closing the lid (optional), about ¼ cup baking soda. 

  • Turn off/close the water valve on the wall completely.

  • Flush the toilet.  The tank and the bowl won’t refill this time. 

  • Fill a large pitcher full of hot water from your sink and pour it into the toilet bowl. The water should not be boiling hot as it could crack your toilet.  Also, make sure to add it slowly so that the water doesn’t drain completely from the bowl; you’ll want the water at or above the water ring stain.

  • Put on gloves and add about ½ cup of citric acid powder or granules to your toilet bowl. (use a mask if your citric acid comes in powder form)

  • Swish the water in the bowl gently with your toilet brush to dissolve it, but don’t swirl too vigorously because it will cause water to drain from the bowl.  After you add the citric acid to the bowl, don’t add more water, because this will dilute the acid. Add paper towels around the bowl to cover all the stained porcelain, and use the disposable cup to wet them with liquid from the bowl.  The bowl should be lined with paper towels stuck to the inside wherever there are stains.

  • Close the lid and put tape and a sign to prevent people from using it! 

  • Leave the citric acid in the toilet bowl, without flushing, for at least one hour, or preferably before going to bed, so it can soak the scale overnight.

  • After leaving the solution to soak, use the bowl brush or gloved hands to remove the paper towels, and try using your toilet brush to remove scale deposits. If it doesn’t move, use gloved hands, the scrub sponge, and Bar-Keeper’s Friend or another agent safe for porcelain.  Scrub away!

  • Finish by adding the baking soda to neutralize the acid, swish with the bowl brush, open the water valve, wait for the tank to fill, and flush!

  • If your toilet is particularly stained, then it may need a second application to remove stubborn deposits.

Citric acid**: The interesting thing about this chemical is that it is commercially produced by the mold Aspergillus Niger, which may be the same type of mold you’re trying to eliminate.  Manufactured Citric Acid (MCA) is one of the most common food additives in the world, and has received the status of “generally recognized as safe” (GRAS) with the FDA.  However, there have been isolated cases of inflammation due to ingestion of foods with MCA, due to its great tolerance to heat and large potential that byproducts of A. niger remain in the final MCA product. (Potential role of the common food additive manufactured citric acid in eliciting significant inflammatory reactions contributing to serious disease states: A series of four case reports)  Unfortunately, we weren’t able to determine whether MCA actually kills Aspergillus Niger growing in your toilet, but it does a great job with all the other molds 

The atmosphere of the bathroom is also very important in preventing mold.  Here are two ways to keep the air in the bathroom less hospitable to mold: 

  • Bathroom exhaust fans are a must for any bathroom with an actual shower or bath.  If you have a fan but not sure if it’s large enough, check the cubic feet of air per minute rating (cfm) on the fan (you may have to remove the cover) and this article to see if it’s large enough for your bathroom.  In addition, go outside and see if you can see the little flapper lifting to show that air is indeed being exhausted.  If you can't find the exhaust of this fan, it's possible that the moisture is being exhausted in the attic, which needs to be fixed.  If your kids or guests are not switching on the exhaust fan during their showers, get an electrician to tie the fan and light switch together so that the fan MUST come on when the light is on.  Finally, if you don't have an exhaust fan, get a window fan like this one and make sure the kids use it!
  • Bipolar ionization units like our Germ Defenders, Mobile Air Angels and Whole Home Ionizers are a great way to keep mold away too.  At the very least, plugging a Germ Defender into the bathroom will send out ions to kill mold spores in this small space where air circulation can be a challenge.

If the mold keeps coming back despite flushing and cleaning, then there are several possible causes for this:

  • Older toilets commonly have pitting in the ceramic which can harbor mold. This video shows that no matter how hard a toilet is scrubbed with different products, pits in the ceramic are microscopic reservoirs that shelter bits of the mold, allowing it to come back again.  The safest solution in this case is to replace the old toilet with a new one.  The radical (but toxic) solution to keep your old toilet but lose the mold is to use diluted muriatic acid (also known as hydrochloric acid) to clean the pits.  However, the mold will eventually come back and inhabit those pits again unless you take another step to renew the enamel on your toilet bowl (a bit extreme to save an old toilet). 
  • Improper venting.  You may not know it, but all drains in your home require a vent to work properly.  We’re not talking about the air vents in ceilings and walls, but a gas vent for the drain line.  These are hidden in your walls.  According to the uniform plumbing code, vents must be located within six feet of the P-trap (that snake-like part under the sink and the S-curve under the back of the toilet); otherwise, the drain may not work properly and gasses can build up, supporting mold and microbe growth.  If this seems to be the case, it’s best to have a good plumber check out the location and condition of the toilet and sink vents and see if there are other drain problems.   
  • This next one is a difficult truth: there may be a cache of mold hidden in your home that is “seeding” spores into your air, causing mold to grow wherever there’s a water source (sinks, showers, and of course your toilet).  According to a respected mold inspection and remediation company, Mold hotspots include the basement, attic, windowsills and door frames, crawlspaces, appliances, and underneath the sinks. Do you feel worse in some rooms of your home and better after leaving them?  This gives a clue to where the mold contamination may be originating.  If you don’t see anything obvious, you could have a hidden leak somewhere, like in the walls or flooring, that’s allowing mold to grow. There are two things you can do in this case: 
    • Order some spore traps from GotMold or even just a set of EC3 test plates ($36 for 6-pack) by MicroBalance Health Products to check the relative mold level in rooms to narrow it down!
    • If you suspect a problem or are having chronic symptoms, it’s best to hire a qualified mold inspector.

There are many non-toxic ways to clean and keep clean nowadays, and with a little research and effort the toilet can be as clean and healthy as the rest of your bathroom and home!

Photo by Jas Min on Unsplash

7 Ways Air Quality Impacts Our Skin Health

7 Ways Air Quality Impacts Our Skin Health

Pollution is not only harmful to internal organs: it can also damage the body's surface. Here is the connection between air quality and skin health.

While we often think of air pollution as affecting our respiratory system, its effects go beyond our lungs. It can also be detrimental to other organs.  The skin is the largest organ in our body and serves as a protective barrier against external factors such as pollution, UV radiation, and other environmental stressors. However, when exposed to poor air, the body's ability to protect itself can be compromised, leading to many problems. From dryness and premature aging to acne and eczema — air quality impacts skin health in a big way.  Below, we will analyze the seven most common ways air quality impacts skin health.

1. Dryness: making the skin dry, flaky, and itchy

Poor air quality can have a significant impact on the skin's natural oil, leading to dryness, flakiness, and itchiness. Particulate matter such as PM2.5, can penetrate the layers of the epidermis, causing oxidative stress and inflammation that disrupts natural oil production. Indoor pollutants, like smoke and volatile organic compounds for example, can also contribute to skin dryness and other issues.

It is essential to take protective measures against the detrimental effects of poor air quality on the skin's natural oils. This includes using a gentle cleanser, moisturizing regularly, avoiding heavily polluted areas, and using a humidifier when necessary to add moisture back into the air, so that relative humidity stays between 40-60%.

2. Premature aging: the destruction of collagen and elastin

Exposure to these same pollutants can break down collagen and elastin, proteins that give the epidermis its firmness. When these compounds are destroyed, skin can become saggy, loose, and more prone to wrinkles. Moreover, exposure to ultraviolet radiation, especially in polluted areas, only exacerbates this process.

To safeguard yourself from contaminants and UV rays, you should utilize protective clothing, apply sunscreen, and stay away from places with high levels of air pollution for extended periods.

3. Acne: clogging pores and causing inflammation

Pollution affects the appearance of our skin on the surface and changes it underneath. Inflammatory acne, characterized by red, swollen pimples, is particularly sensitive to air quality. Environmental contaminants, such as tobacco smoke, clog pores and irritate, leading to inflammation and blemishes.

Keeping up with a consistent skincare regimen that involves cleansing, exfoliating, and moisturizing is crucial in countering the harmful impacts of air pollution on the skin.

4. Pigmentation: affecting melanin production

Harmful substances from polluted air can penetrate the skin and stimulate melanin production, the pigment that gives skin its color. Increased melanin can lead to dark spots and blemishes on the body. These pigmentation problems can be more pronounced on skin areas that are frequently exposed, such as the face and hands.

Ultraviolet radiation can contribute to pigmentation issues, the intensity of which decreases depending on air quality.  It can lead to a harmful and uneven tan.

5. Eczema: irritating and exacerbating diseases

Eczema, a chronic inflammatory skin condition, can be particularly sensitive to environmental factors such as air quality. Pollution not only triggers flare-ups but can also worsen existing inflammatory symptoms.

Indoor pollutants such as dust and pet dander can also contribute to eczema flare-ups. The presence of these harmful substances can irritate the skin and prompt the body's immune system to react, resulting in the manifestation of disease symptoms.

To minimize your exposure to eczema, avoid areas with polluted air and wear protective clothing. In cases where disease flare-ups persist, medical treatment may be necessary. A dermatologist may recommend topical creams and ointments to reduce inflammation and soothe irritated skin, as well as oral medications in severe cases.

6. Rosacea: causing skin redness, flushing, and inflammation

Rosacea is also a chronic inflammatory skin condition characterized by redness, visible blood vessels, and small, pus-filled bumps on the face. Although the exact causes of disease are not yet fully understood, environmental factors such as air pollution can trigger its exacerbation.

Exposure to pollutants, along with UV radiation, can cause skin inflammation. It underscores the importance of protecting the skin from both contaminants and UV radiation during condition treatment.

7. Sensitivity: depriving the skin of its natural protective barrier

Air quality can also affect skin sensitivity, especially in people with pre-existing conditions. Exposure to pollutants and irritants can cause inflammation and damage the skin barrier, leading to increased skin sensitivity and the development of new types.

Then again, the composition of the air, such as nitrogen dioxide or particulate matter, can react with UV radiation to produce free radicals that can damage the skin, leading to the development of sensitivity.

Final remarks

Air quality can have a significant impact on the skin, resulting in various problems such as dryness, premature aging, acne, pigmentation, eczema, rosacea, and skin sensitivity. Such habits as smoking, environmental stressors, and UV exposure can exacerbate these issues.

As a countermeasure to the harmful effects of air quality, red light therapy can be a powerful tool since it is effective in treating and preventing several skin disorders, including acne, rosacea, and premature aging. According to the Heliotherapy Institute, this procedure can be more effective, cheaper, and safer than invasive methods.  You can check with a dermatologist to see if they offer powerful in-office red light therapy.

Fortunately, we can do something to protect our skin from harmful irritants in the air. Wearing protective clothing, using air filters, keeping your home at optimal humidity (40-60% relative humidity) and avoiding heavily polluted areas can help keep your skin healthy and vibrant.

Article by Benjamin Allemon

How does the amount of oxygen in the air affect us?

How does the amount of oxygen in the air affect us?

We mostly take air for granted.   It’s a (boring) mixture of 78 percent nitrogen and 20.9 percent oxygen with small amounts of other gasses such as carbon dioxide, neon, and hydrogen.  (10 Interesting Things About Air)  Even though the news headlines seem to revolve around increasing carbon dioxide, let’s look at the gas humans are most in need of: oxygen.

The majority of the world’s oxygen levels are the same: 20.9% if the humidity is 0%.  Water vapor in the air displaces oxygen, and oxygen can go down to 20.1% if the relative humidity is 100%.  This holds true at sea level and high altitude, where the air is said to be “thinner”.  At high altitude, the percentage of oxygen in the air is the same, 20.9%.  However, lower pressure of the atmosphere causes all molecules of air to spread out. That means you get less oxygen in every breath you take, compared to sea level.  (Living in Thin Air)

According to scientists, oxygen levels in the atmosphere in prehistoric times averaged around 30% to 35%, compared to only 21% today – and that the levels are even less in densely populated, polluted city centers and industrial complexes, perhaps only 15 % or lower. (The Oxygen Crisis)  Fifteen percent sounds extreme, first of all because OSHA has defined atmospheric oxygen concentration below 19.5 percent to be unsafe.  We can only take 19.5% as a guideline, because oxygen in our blood is measured in partial pressure, which may vary slightly according to altitude and the CO2 our bodies are attempting to expel.   In general when figuring in humidity, there’s a margin between normal and unsafe of only 1.3%!   And, in populated areas, this margin is getting even smaller.   

A 2021 study showed that oxygen deficiency can happen in large cities due to a number of factors: increased combustion in vehicles and factories consuming oxygen, lack of green space restricting oxygen production or replenishment, and stalling weather patterns that can stop the flow of fresh air into the city.  The study correlated 391 global large cities (with a population of more than 1 million people) using the oxygen index (OI), which is the ratio of oxygen consumption to oxygen production. Results showed that the global urban areas, occupying only 3.8% of the global land surface, accounted for 39% (14.3 ± 1.5 Gt/yr) of the global terrestrial oxygen consumption during 2001−2015. It was estimated that 75% of cities with a population more than 5 million had an OI of greater than 100. Also, cities with larger OI values were correlated with more frequent heatwaves and severe water withdrawals.  In fact, oxygen in large cities has been declining by 4 ppm per year since the 1980’s, and that rate is actually accelerating. 

When the oxygen in air gets too low, as in high altitudes or confined spaces, the body can enter a state of hypoxia, where low levels of oxygen in your body tissues causes symptoms like confusion, restlessness, difficulty breathing, rapid heart rate, and bluish skin.  (Hypoxia)  Unfortunately, many people in mountainous regions around the world suffer from hypoxia and other effects of high-altitude, which are together called Chronic Mountain Sickness (CMS).

To restore proper tissue function, you’ve got to get more oxygen.  Getting more oxygen in your lungs has a long-recognized stimulant effect, allowing you to focus, concentrate and generally perform better mentally.  In your lungs, more oxygen causes the blood vessels in your lungs to dilate, which improves cleansing and tissue repair within them, and helps them exchange gasses more easily.  In the rest of your body, more oxygen lowers blood pressure and heart rate (your heart doesn’t have to pump as much blood to get the correct amount of oxygen), your tissues heal faster, and digestion is improved. (Surprising Health Benefits of Getting Fresh Air)

Whether it’s increasing levels of carbon dioxide (check our article here) or decreasing levels of oxygen, our bodies are not made to live in cities or houses without adequate ventilation!  Ventilation restores oxygen levels to a safe level above 20% and flushes out harmful gasses like carbon dioxide, radon and VOCs.  It’s interesting to note the differences between fresh air and exhaled air:

Fresh Air

Exhaled Air

Nitrogen

78%

78%

Oxygen

21%

17%

Other gases

1%

1%

Carbon dioxide 

0.04%

4%

(The composition of inhaled and exhaled air. What should and shouldn’t contain?)

A note on rescue breathing: although 17% oxygen is less than the OSHA safety minimum of 19.5%, it is more oxygen than unconscious victims who are not breathing are getting (0%), so rescue breathing does help to save lives.  The problem is that anytime we are conscious (breathing on our own), we should be getting oxygen levels at close to fresh air levels (21%)! 

Unless you live in a major city during a heat wave as described above, low oxygen levels in our air at home shouldn’t be a cause for worry.   Why?  Because even if you lived in a sealed room for 12 days, you would die of carbon dioxide poisoning before running out of oxygen.  Thus, carbon dioxide levels are the greater concern, and more so if your home is really well sealed.  Note that furnaces and gas stoves require oxygen to burn their fuel.  If you operate a furnace or gas stove in a space that’s not well-ventilated, you’re going to get high levels of carbon dioxide first, and when the oxygen level drops enough to cause the furnace to have incomplete combustion, carbon monoxide is produced.  There is a simple fix for this: ventilate the space continuously, and install CO and CO2 monitor(s). 

There may be several other scenarios where oxygen concentration in your home suffers, and these are real, life-threatening situations.

  1. If you live in the mountains, you know that although the percentage of oxygen in the air is the same, the same volume that you breathe in contains less oxygen than at sea-level.  Our bodies compensate for the lower oxygen by increasing heart rate and respiration rate in order to cycle more air through our lungs.  Athletes sometimes train at high altitudes to gain “an edge” while competing at sea level.

  2. Fire requires at least 16% oxygen to continue to burn.  This is not a problem for most wildfires; as the air within a wildfire heats up dramatically, fresh air is sucked from surrounding areas.  If you live in an area prone to wildfires, you may experience high winds bringing fresh air–until the wind changes and smoke is the major problem.  In this case, smoke inhalation is deadly because of extreme heat of the smoke, oxygen depletion (hypoxia), and inhalation of noxious gasses carbon monoxide (CO), cyanide or hydrogen cyanide (CN or HCN), phosgene, ammonia, sulfur dioxide, hydrogen sulfide (H2S), formaldehyde, and acrylonitriles.  (Smoke Inhalation Injury: Etiopathogenesis, Diagnosis, and Management)  In this case, the presence of toxic gasses may be more life-threatening than low oxygen.

  3. As we mentioned above, living in a city during extreme heat or even inversion (many times this occurs during the winter), oxygen at ground level becomes depleted and this layer becomes more polluted and less oxygenated.  

Each of these situations can become life-threatening.  If you find yourself living in risk of any of them, the first step would be to monitor oxygen (and other pollutants for situations 2 and 3).  Unfortunately, most web-enabled monitors do not have oxygen sensors.  In fact, the only multi-sensor home monitor I could find that included oxygen is by Airovita, which is made in Europe and not sold in the US.  Don’t let this “hole” in the market stop you from being informed, however; handheld meters like this one ($100) that measure O2, CO, H2S, and explosive gasses are accessible so that you can be aware of how the atmosphere outside is affecting your home’s air.  In the case of high-altitude air, however, be aware that oxygen levels will register as “normal” (20-21%) but because of the low atmospheric pressure, you still may have trouble breathing!  

Unfortunately, making your air more breathable costs money.  The Washington Post notes that during wildfires, wealthier families flee smoky areas, staying in second homes or renting expensive hotels or vacation residences. Not all families can afford air purifiers, which start at about $200 and clean only one room. During frequent power outages that happen during fire season, only wealthier families that can afford expensive backup generators will still be able to run their purifiers.  Nonetheless, here are some solutions for making life safer and more comfortable: 

  • If you desire to add more oxygen to any room in the home (especially the bedroom, where your body repairs itself while you sleep), then companies like ACT (Altitude Control Technology) offer “altitude control”, meaning that with their controllers, ventilation and oxygen generators, you can change the atmosphere of that room to mimic living at a lower altitude.  Athletes can even use the system to change their workout room to a higher “altitude”.  Selecting a lower altitude creates an artificial “pressure” so that your lungs will receive more oxygen with less work.  Their equipment also includes particulate air filters to eliminate dust, viruses, bacteria, and fine particles as small as .3 microns to keep the air pure.  Truly, this system is the gold standard in creating the desired altitude, because of its oxygen machines, control system and custom designs for each room.  Alarms notify the user(s) of any unsafe conditions, and the air separation units are under low pressure.   

  • Since toxic gasses and particulates can be even more likely than low oxygen during a wildfire event, it’s best to start using air quality monitors to plan your days during these events.  When air outside is bad, closing up your home and using air filters can make it better.  As shown in the graphic below, indoor air sensors (left) are better than outdoor air sensors (right). (How much wildfire smoke is infiltrating our homes?)  Also, check out our article on how to prepare for wildfires and keep your air quality safe.

  • Ultra-filtration and oxygen generation technology can be adapted to any shelter, provided you have the budget!  “Bunkers” are not what they used to be.  Nowadays the mega-wealthy have underground swimming pools, gardens, and entertainment to escape whatever is happening above-ground.  Some developers are also acquiring decommissioned military bunkers and missile silos built by the United States or Soviet governments – sites that would cost hundreds of millions of dollars to build today. The fortified structures are designed to withstand a nuclear strike and come equipped with power systems, water purification systems, blast valves, and Nuclear-Biological-Chemical (NBC) air filtration. (Billionaire bunkers: How the 1% are preparing for the apocalypse

So, although oxygen depletion rarely happens at lower altitudes, if you have concern about it, make sure to measure it and then take action.  As John F. Kennedy said, “The time to repair the roof is when the sun is shining,” or in our case, the time to prepare our air is now!  Don’t wait for that extreme event to buy an air filter, learn how to control your home’s ventilation, or search for a getaway spot, because that’s what the majority of people will be doing.  Now’s the time to get ahead of the curve!

Photo by Jason Hogan on Unsplash

Knock out the NOx

Knock out the NOx

This title may sound like an ad for high-octane gasoline, but I’m talking about air pollution here!  In air purification “PM” or particulate matter often steals the show and drives the decisions behind purchasing this filter versus that filter and this purifier over that one.  But what about the gasses in air pollution?  Gasses are not particulates–they are harmful molecules in the air that cannot be filtered out by plain HEPA filters.  So what are they and how can we get rid of them?

NOx is one term for two nitrogen gasses commonly found in urban areas.  It includes nitric oxide (NO), which is a colorless, odorless gas, and nitrogen dioxide (NO2), which is a reddish-brown gas with a pungent odor.  They are produced during combustion: in factories, in transportation vehicles, and even boilers for heating apartments, office buildings, hospitals, universities, etc.  They’re also produced indoors by gas stoves and furnaces when they are not properly vented. 

Nitric oxide in ambient conditions is not harmful, as it dilates (relaxes) blood vessels and improves oxygenation.  However in higher concentrations, it does two things: it will create a burning sensation in your throat and chest as it changes into nitric and nitrous acid, and it goes deep into your lungs to react with blood cells and eventually be excreted by the kidneys.   Nitric oxide in the air that is not breathed in is converted to NO2, the other dangerous nitrogen gas, or precipitated in moisture as acid rain.  (Poison Facts: Low Chemicals: Nitric Oxide)  

According to Clarity.io, a manufacturer of air monitoring sensors, nitrogen dioxide pollution stays mostly concentrated in the area where it is emitted, meaning that areas with high vehicle traffic like urban areas tend to have the highest NO2 levels. (Clean air cities: Innovative approaches to improving air quality in urban settings)  NO2 is a pretty nasty gas: it causes inflammation of the respiratory pathways, worsened cough and wheezing, reduced lung function, increased asthma attacks and is likely to be a cause of asthma in children. (Nitrogen Dioxide)  

If you’ve been reading our articles or have any experience with air pollution or wildfire smoke, you’ll know that outside pollution eventually makes it into our homes, because they’re leaky.  Thus, we don’t have a “safe place” to get away from air pollution unless we leave the city or take steps to make our home air cleaner.  As we already discussed, just buying a plain HEPA filter or making a DIY air filter (Corsi-Rosenthal box) will not take NOx out of your home.  There are ways to get rid of NOx, however: upgrade to a HEPA filter with activated carbon, AND eliminate the sources of NOx inside your home.

A 2014 study conducted in Baltimore, MD found that a two-pronged approach really helped reduce the NO2 in homes:  

  1. Replacement of unvented gas stoves with electric stoves reduced NO2 concentrations by 51% and 42% in the kitchen and bedroom, respectively, indicating that stove replacement impacts NO2 concentrations beyond the kitchen (even when the home also has a gas furnace or drier).

  2. Placement of air purifiers with HEPA and carbon filters in the home results in a nearly 27% decrease in median kitchen NO2 concentrations immediately (1 week after placement), and reductions were maintained at 3 months following intervention. 

Although the study also included the addition of a ventilation hood in some homes, it was unclear whether the hood helped lower NO2 emissions (ventilation does help remove air pollution, but it depends on strict use of the hood during and after cooking).  

Activated carbon adsorbs the NO2 and secures it in the filter, until the filter is changed.  Adsorption of NO2 can be enhanced by 38-55% by adding coatings to the activated carbon, such as potassium hydroxide (KOH).  (Development of an activated carbon filter to remove NO2 and HONO in indoor air)  Even wildfire smoke has NO2 in it; according to this Canadian government environmental webpage, wildfire smoke is a complex mixture of gases, particles and water vapour that contains pollutants such as: sulphur dioxide, nitrogen dioxide, carbon monoxide, volatile organic compounds, fine particulate matter (PM2.5), and ozone.  Activated carbon can handle these gasses and VOCs, while HEPA filtration is used against PM2.5

Therefore, city dwellers, take note!  Whether it’s “business as usual” as pollution from downtown traffic penetrates your home, or wildfires hundreds of miles away turn the skies orange and hazy, a purifier with HEPA and activated carbon is your best bet to knock out the NOx.  Be on the lookout for purifier giveaways, too!   Here are some programs being offered at this time:

  • San Joaquin Valley Air Pollution Control District (California) is giving away air purifiers to keep residents safe from air pollution.  If you live in the area, you can apply for one here

  • The City of Philadelphia is giving air purifiers to early-childhood education centers and schools.  You can learn more and link to an interest form in this article.

  • Project N95, a national non-profit working to protect people and their communities during the COVID-19 pandemic and beyond, has begun a donation pilot program of air purifiers for schools and other organizations.  You can fill out their form here.

Keep your eyes and browser open, as other organizations may spontaneously donate during events like the Canadian wildfires (the University of Connecticut gave away 100 DIY purifiers on June 8, 2023).  During such a time, it’s the neighborly thing to do!

Photo by Jacek Dylag on Unsplash

The purifying power of sunlight

The purifying power of sunlight

“Letting the sunshine in” has several purifying benefits–and sunshine is free!  Ultraviolet (UV) radiation has a higher frequency than visible light (you can’t see it), but it kills microbes.  UV radiation has three wavelength zones: UV-A, UV-B, and UV-C, and it is this last region, the shortwave UV-C, that has germicidal properties for disinfection.  the optimum range for UV energy absorption by nucleic acids is about 240-280 nanometers (nm); at this wavelength the UV breaks bonds in the nucleic acids of microorganisms, killing them.  Artificial UV lamps for germicidal use tend to emit energy around the middle of this range, at 260 nm.  (UV Disinfection)  If you want to know more about the sanitizing power of UV light, check out our first article here.  Here are some ways to put it to good use:

Purify water with sunlight (salt and lime juice optional):  UV radiation is sometimes used in municipal water purification systems (more often in Europe).  It doesn’t affect the taste or smell of the water (unlike chlorine), so this is an advantage over that chemical.  However, turbidity of the water (amount of particles present) will decrease the effectiveness of UV radiation, so it should be pre-filtered first.  Here’s where the salt comes in:  if you have a plastic or glass bottle of water that is slightly turbid, add a pinch of salt, which will help the particles settle to the bottom of the container, allowing the UV radiation to penetrate farther into the bottle.   Leave it out in the sun for 6 hours, and the microbes will be dead!  If you want to speed up the process, add some lime juice.  Lime juice cuts down the amount of time necessary to disinfect a two liter bottle of water from six hours to just half an hour!  Limes contain chemical compounds called psoralens, which have been shown to kill pathogens in blood and, now, also in water.  (To Disinfect Water Cheaply, Just Add Sunlight (and Salt or Lime Juice))  Psoralens are also used together with UV light to treat psoriasis, vitiligo, and skin nodules of cutaneous T-cell lymphoma. (National Cancer Institute Dictionary)  Many fruits and vegetables like parsnips, carrots and celery are high in psoralens too, so they would work, but the juice of a lime is probably the most tasty. Of course, the sunlight doesn’t remove pathogens, so if you have the opportunity, you can run the disinfected water through a post-filter. 

Sanitize sheets, bedding and any upholstered item by laying them out in the sun and flipping over after 1-2 hours to expose the reverse side.  UV light kills dust mites and mold!  The key is cleaning off any dirt first (ie, wash anything that can be washed first), and making sure that it dries COMPLETELY in the sun.  Therefore, obviously sheets, quilts and comforters can go in the washer, but bulky items like rugs, mattresses and upholstered chairs should get a vacuuming and surface cleaning using a non-toxic fabric cleaner.  Be aware that sunlight can fade colors, so avoid leaving colorful or fragile items out for more than several hours in direct sunlight. 

“Bleach” plastic containers by leaving them in the sun:  UV light can also take stains out of plastic.  Spaghetti sauce stains be gone!  (Things You Can Clean With Sunlight)

Mildewed things:  Once again, surface cleaning is the important first step in order to get wooden furniture, books, leather, and anything else looking and smelling better.  Then, let the sun do its work!  

What does living near a farm mean? It’s not all cute baby animals.

What does living near a farm mean?  It’s not all cute baby animals.

I didn’t grow up near a farm, but I spent a lot of time on one.  My mother’s uncle was a farmer who raised soybeans, corn, a few pigs and an extensive home garden.  Although my sister and I had to shell a lot of peas and shuck a lot of corn, we also got to play on the hay bales and jump in the soybean pile when the adults weren’t looking.  Farms through the eyes of a child are wonderful until we really learn what makes the garden grow (and not be eaten up by pests). 

I feel for farmers.  They are at the mercy of the weather (which has been crazy during the past few years) and pests, as well as an economy that expects perfect specimens of fruits, vegetables and meats delivered to their front door (literally) for the cheapest price possible.  Although I’m indebted to farms for providing the food I buy at the supermarket, I wouldn’t want to live near one.  At least not the kind that produces non-organic food for the supermarket, because it takes a lot of pesticides, herbicides and fertilizers in order to get that kind of production to a profitable level.   

Application of pesticides is often done by airplane, and low level pesticide vapors that are present in the air linger for days and sometimes weeks after application on food crops. Some pesticides react with sunlight (in a process known as photolysis) to form new chemicals that are more toxic than the original.  (Living Near Agriculture Increases Health Problems)

Many studies show that adverse effects from pesticides can be seen in people living up to one mile away from where they are sprayed.  In rural areas where farms abound, it can be difficult to stay out of this zone, and for the farmer’s family, it’s a fact of life  Some of the diseases which have higher rates surrounding farms include:

  • Diabetes: 21 studies presented at the 2015 European Association for the Study of Diabetes show pesticides increase the risk of diabetes by 61%. 
  • Birth defects: According to this 2001 study, ifpesticide exposure of pre-born babies occurred between the 3rd and 8th week of pregnancy, there was a 40% increase in major birth defects ending in fetal death.
  • Brain cancer: Researchers from the Boston University School of Public Health compared the home locations of approximately 1000 cancer patients to the home locations of 1000 patients dying of illnesses not related to cancer. Results showed that living within 2600 feet of the cranberry growing area resulted in twice the risk for all brain cancers and nearly a 7-fold increased risk for a type of brain cancer known as astrocytoma.
  • Autism: the study, “Maternal Residence Near Agricultural Pesticide Applications and Autism Spectrum Disorders among Children in the California Central Valley”  showd that the risk of having a child with Autism Spectrum Disorder (ASD) was 7.6 times higher than normal if their homes were located within 500 meters (< 1/3 mile) from pesticide treated fields, crops were treated using the pesticides dicofol and endosulfan, and the pesticides were applied between week 1 and week 8 after conception.  The risk of ASD increased with the pounds of pesticide used and decreased with distance from the treated fields.
  • And many more, including infertility, miscarriage, Parkinson's Disease, immune system damage, leukemia, developmental brain damage in children, higher rates of child cancers, non-Hodgkin's lymphoma, autoimmune disorders, arthritis and lupus.

Many of these diseases can be prevented by our body’s own first line of defense, a liver enzyme known as cytochrome P-450. It breaks down pesticides in the blood into a less toxic form. Some people, however, have only 1/3rd the normal levels of these important enzymes, and therefore, would have higher levels of pesticides in their blood for longer periods of time, thereby resulting in more harm from the chemical.  In addition, Glyphosate residues are found in the main foods of the Western diet, comprised primarily of sugar, corn, soy and wheat. Glyphosate, the active ingredient in Roundup®, is the most popular herbicide used worldwide. Glyphosate's inhibition of cytochrome P450 (CYP) enzymes is an overlooked component of its toxicity to mammals. (Glyphosate’s Suppression of Cytochrome P450 Enzymes and Amino Acid Biosynthesis by the Gut Microbiome: Pathways to Modern Diseases)  

What about livestock farms?  Like other industries, farms tend to survive by merging, and the largest livestock farms are termed “CAFOs” for Concentrated Animal Feeding Operations.  CAFOs are agricultural meat, dairy, or egg facilities where animals are kept and raised in confinement. Instead of grazing or eating in pastures, fields, or on range lands, animals are given food.  The animals, feed, waste, and production operations are all confined to a small area of land.  (Environmental Health: Concentrated Animal Feeding Operations (CAFOs))  CAFOs are not all bad: Potential benefits of CAFOs include an economy of scale that affords more efficient sewage and manure management and, in some cases, improved control of some pathogens. For example, trichinosis from pork has been significantly reduced by the improved rodent control made possible by confined feeding operations. (