Category Archives for "Natural Home"

Non-toxic ways to deal with Hard Water

Non-toxic ways to deal with Hard Water

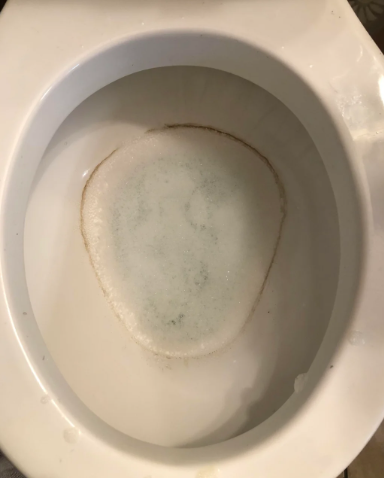
Many of us live in areas with very “hard” water.  How can water be hard?  It’s a way of saying there are a significant amount of minerals in the water, which can leave spots on your appliances, clog your pipes or leave a filmy residue on your hair or skin after showering.  If, despite frequent cleaning, your toilet looks like the following, you probably have hard water! 

Hard water is not necessarily bad for you; after all, many “mineral waters” for consumption capitalize on these very minerals that we are not fond of looking at on our appliances. 

According to the science, “hard” water can be categorized into alkaline (e.g., calcium carbonate CaCO3), non-alkaline (e.g., CaSO4), and silica based, with alkaline being the most common.  This water chemistry will of course affect the ability to prevent scale.  

Since CaCO3 is the most common type of mineral, most findings are delivered as a number that reports the concentration of calcium carbonate or calcium carbonate equivalents for a given unit of water. This result may be expressed in grains per gallon (gpg), parts per million (ppm), or milligrams per liter (mg/L). According to the Water Quality Association, the hardness scale, measured in gpg of calcium carbonate, can be represented as follows:

Less than 1 gpg is considered soft

Between 1 and 3.5 gpg is considered slightly hard

Between 3.5 and 7 gpg is considered moderately hard

Between 7 and 10.5 gpg is considered hard

More than 10.5 gpg is considered very hard

(Source: How is water hardness measured?)

If you want to “soften” your water, there are many solutions ranging from a few dollars to thousands of dollars, and from chemical-free to lots of chemicals.  Obviously, the best would be chemical-free and cheap…but most preferably chemical-free.  Here are 3 proposed solutions to keeping minerals from adhering to the surfaces your water comes in contact with (shower doors, bathtubs, toilets, sinks, etc.).  You can:

  1. Add a true water “softener” into your water source to remove the minerals
  2. Add a slick “film” or coating to the appliances so that the minerals don’t stick.
  3. Change the chemistry of the water so that the minerals don’t stick (EMF, MWT, AMT)

Let’s dig into these to find out which is best for you.  Our first recommendation is to test your water.  There are a lot of water testing kits on the market, some of which have 16-20 functions (a lot of tiny colors on the strip!)  While these are good for getting an overall picture of water quality, if you are interested in hardness, a specific test for hardness has better clarity.  This one by Varify retails for $12 on Amazon.  If your water comes in more on the green side (low minerals), you may need to do more research on the nature of your water “stains” because that result shows it’s actually low in minerals.

If your water shows as moderately to very hard (above 3 grains per gallon), then you might want to do something about it.  Moving on to our 3 proposed solutions:

Water Softeners

Softener systems actually remove minerals such as calcium and magnesium from your water by using an “ion exchange” process. The softener passes incoming water through a bed of resin beads, where minerals are attracted to the beads and softened water flows out of the tank.  Once in a while, the beads must be regenerated by flushing it with a strong solution of sodium chloride (salt) or potassium chloride, causing the minerals to release from the beads.  Then the system is ready to soften water again.   Softeners come in different sizes, for “whole-home” or smaller “appliance” use.  Although the upfront cost is more, the per-gallon cost is typically lower on whole-home systems.  In addition, appliances all over your home, from your coffee maker to your washing machine perform better with softer water.  However, there are disadvantages to using whole-home softeners: they can corrode pipes (it’s not recommended to soften water on very new pipes; you’ll want to wait several weeks to months so that an internal mineral film will develop), it does add a small amount of sodium to your drinking water, and regular testing of the water and maintenance of the softener is necessary to make sure the softener is working properly. (Home Water Softening Frequently Asked Questions)   Since there are many whole home systems available, we chose to review a few systems that soften specific appliances where people see the most impact.

Water softeners also lower the surface tension of water, making it feel “wetter” or “more slippery”.  On a porous surface, having a lower surface tension allows water to penetrate deeper allowing for better cleaning.  The addition of soap or the use of hot water will both lower the surface tension of water… Water softeners function through the process of ion exchange, i.e. exchange calcium and magnesium ions for sodium ions.  The conclusion can be drawn that sodium lowers the surface tension of water while calcium and magnesium ions increase the surface tension…There are other factors that influence the "wetness" or "slippery" feel of soft water including pH and alkalinity.  Typically the higher the alkalinity and pH, the greater the impact of this phenomenon.  This may help to explain why naturally soft water or reverse osmosis water do not have the same "wetness" or "slippery" feel. (The Kinetics and Aesthetics of Soft Water)

Softeners are measured by the number of “grains” they remove before regeneration is needed.  Here’s where you need to know how hard your water is (hence testing is needed!).  For example, if your water is 10 gpg, there are 3 people in your household and since the average person in the US uses about 75 gallons of water per day, that means 10 x 3 x 75 = 2,250 grains per day.  A water softener is usually sized to regenerate about one time per week, so that means a softener of 15,750 grains would work (16,000 grains like this one is ideal for an RV or live-aboard boat).   This article has very good information about the salt efficiency of different softeners, as using a lot of salt to regenerate is not only costly, it’s not good for the environment 

Washing dishes and clothes in hard water doesn’t yield great results.  Just like the inside of the sink or toilet, minerals can build up on your washed clothing over time, making them feel stiff and look dingy. In the dishwasher, minerals deposit on dishes causing spots and incomplete rinses.  “Water softening tablets” are available for use in the laundry or dishwasher and here are some non-toxic brands that work well with hard water:

  • Calgon 4 in 1 Water Softening Tablets, $51, for 75 tablets for laundry washing machine: add 1 tablet with each load of laundry (and use your own detergent).  Mainly composed of polycarboxylates, these tablets prevent minerals from depositing on surfaces and are generally deemed safe for human contact (after rinsing) and the environment.  Therefore, although these are “chemicals”, you can safely add softeners to your dishwasher or laundry:
  • BioKleen Free & Clear Natural Laundry Detergent, $35 for 150 loads, is very low cost for a natural detergent and is said to work well for moderately hard water.  Like many non-toxic detergents, it dissolves and works better in warm water rather than cold.
  • Planet Automatic Free & Clear Dishwasher Pacs, $6 for 20 pacs, is among the lowest cost per load, has transparent ingredients, and is good for hard water according to reviews. 
  • Blueland Dishwasher Detergent Tablet Starter Set, $30 for 60 tablets, do not have wrappers at all and are good for hard water according to reviews.

Shower “filters” are a great idea to prevent the harsh chemicals that municipal water treatment companies employ to keep drinking water safe.  Mostly we’re talking about chlorine and its by-products (see our article about the nasty effects of using too much chlorine).  But most shower filters don’t address hard water (which causes all those spots on your glass shower doors), or iron or sulfur in the water.  However, there are some shower filters that do; you must read the product description carefully to see what is removed.  The first product below is primarily a water softener to remove hard water minerals; the next 2 products are filters with some water softening capabilities.

  • ShowerStick Shower Water Softener, $260: This company has done its homework on water softening and actually allows the customer to do so as well, by providing a water testing kit with their kit. Using the water test weekly will show you when to “regenerate” the resin beads inside, which accomplish the softening.  Depending on how often you use the shower, regeneration may need to be done on a weekly basis.  The company also offers a KDF water filter to remove 95-99% of chlorine and controls the buildup of microorganisms such as bacteria, algae, fungi and mold.
  • PureAction Water Softener Shower Head Filter for Hard Water, $40, is a shower head meant to replace your existing shower head.  It comes with 2 extra filters that are replaceable (the filter cartridge is what removes the minerals and chlorine).  According to reviews, customers with sensitive skin have had good results with this showerhead. 
  • AquaEarth 15 Stage Shower Filter, $30, is an in-line water filter that allows you to add your own shower head.  It lasts approximately 6 months and replacements run about $7.50 each ($30 for a pack of 4).

Coatings that inhibit scale formation

There are a lot of anti-scale coatings available for commercial equipment, but not so many for residential use.  The application of a coating is sometimes not so difficult when a fixture is new (like a new toilet), but doing the necessary cleaning and application in an older fixture can be a lot of work.  In addition, the chemicals that make surfaces slick enough to inhibit scale are often not disclosed.  For example, Spotless Toilet Coating contains 84-94% isopropyl alcohol (for quick drying) and 0.5-1% of a proprietary acid, leaving 5-10% undisclosed ingredients. (MSDS)

Salt-free Water Conditioners

There are a number of water “conditioners” that do not use salt, electricity, or other energy to keep minerals from depositing in your appliances.  Here is a rundown of these technologies:

  • Template-Assisted Crystallization (TAC) uses surface-treated resin beads to convert (not remove) dissolved hardness ions to microscopic scale-resistant crystals. The polymeric beads are fluidized, creating agitation that releases the microscopic crystals and allows for further formation of crystals. Once these crystals are formed and released from the beads, they are insoluble particles that do not form scale on surfaces. In some cases, a fine dust may form on dishes but it can be wiped away. Template-assisted crystallization systems typically require relatively clean water as the input, and may require pretreatment if the water contains high iron and manganese concentrations or other sediment..(Drinking Water Treatment Salt-Free Water “Softener” Options)  Brand names include Aquasana, AO Smith and Pentair-Pelican.
  • Ultrafiltration and Nanofiltration: These processes use very fine filters to remove bacteria, viruses, and some salts from water.  This article by the Safe Drinking Water Foundation shows the different substances these processes can remove. 
  • Reverse Osmosis: These systems work by pushing water through a microscopically small filter material.  This semi-permeable membrane has a pore size of around 0.0001 microns, effectively only allowing the small water molecules through and catching any larger molecules of contaminants, organic materials or even salt. Originally designed to desalinate seawater and reduce high chemical contaminant material such as heavy metals, reverse osmosis is now in use in many government, commercial, military and even residential applications.  It does produce ultra-pure water, but also wastes a lot of water due to back-flushing requirements, and is relatively expensive. (Learn The Pros And Cons Of Reverse Osmosis Water Filtration Systems)

Magnetic Water Treatment, Anti-Scale Magnetic Treatment, Electromagnetic Fields

There’s been a fair amount of studies on AMT (anti-scale magnetic treatment) or MWT (magnetic water treatment) or EMF (Electromagnetic Fields).  Wikipedia states that it is “unproven and unscientific.”  However, EMF has seen a lot of study since 2010, and one meta-study concluded that although different results were reported regarding the influence of EMF in minerals precipitation, the results support the same hypothesis that EMF induce bulk precipitation of crystals rather than adhesion to the surface of reactors, pipes and vessels or to membrane surfaces. If we consider the bulk precipitation enhancement as effective EMF treatment, the percentage of effective EMF cases can reach 95% for the discussed 48 studies, 5% of the studies observed negligible improvement with EMF treatment, none of them has negative results.  This is not “unproven and unscientific.”  

There are two configurations of an EMF device used in water systems: permanent magnet and solenoid coil (uses alternating or direct current).    The efficiency of EMF depends on the properties of the field, including intensity, waveform, and frequency (the field strength varies with the number of coils or the thickness of the wire used), the material of pipe or surface, pH of the water, temperature of the water, residence time (how long the water is exposed to the EMF), and suspended particles (in some cases the presence of suspended particles such as silica is necessary for EMF water treatment to be effective, which can adsorb metal ions and increase bulk precipitation). (EMF meta-study)

Under ordinary circumstances, the scale forms through heterogeneous nucleation of CaCO3 (calcium carbonate) on the substrate surface. By contrast, when magnetically treated is used, nucleation (formation of crystals at a molecular level) takes place homogeneously in the body of the water, and small disc-shaped crystallites (about 50 #m in diameter and 1 #m thick) are formed.  Initially suspended, these crystallites gradually settle as a sediment at the bottom of the container.  (Magnetic Treatment of Water: A Theoretical Quantum Model)

When magnetic water treatment was first patented in 1945 by a Belgian company, there was not a complete understanding of how magnetic fields inhibited scale formation.  Today, however, one theory is presented here:  “Through the efforts of universities and their extensive laboratories, the performance of the magnetic water treatment for scale prevention has moved from being a phenomenon to understanding that the magnetic field creates a hardness crystal called Aragonite. It forms this because a tiny percentage of water is always dissociating – hydrogen (proton) leaving and forming H3O or hydronium – and the energy imparted to the water by the magnet causes the percentage of hydronium to increase dramatically. Water missing the hydrogen reacts differently with calcium bicarbonate (calcium hardness) than does water with full hydrogen in the size, shape, and texture of calcium carbonate crystals formed as evidenced in electron microscope photos. All crystals are void of charge so they won’t adhere to metals, however, the aragonite form is softer and is easily flushed through plumbing. No magic and no mystery. The performance relative to scale prevention is directly proportional to magnetic field strength and speed of water through alternating magnetic fields.” (Magnetic water treatment for scale prevention)

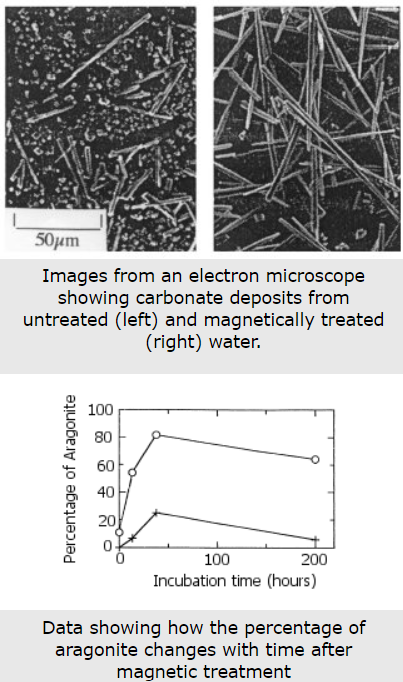
This is similar to the explanation given in a paper from 2000: MWT changes the form of calcium in water. The researchers tested MWT by passing water through a magnetic field of 1000 Gauss (0.1 Tesla).  The samples were then heated in open beakers, forming scale when the water evaporated.  The scale was inspected by X-ray diffraction (which can reveal what it’s made of) and an electron microscope (to view the structure).

The results confirm earlier claims that there are two different types of calcium deposits made: calcite and aragonite.  They are both made of the same stuff (calcium), but form in different structures.  The small beads of calcite tend to make hard scale that clings well to surfaces.  Aragonite forms in longer shapes which are less prone to form hard scale, and keep moving along with the water.  The data they collected also confirms that the effect can last over a period of time, as much as 200 hours.

Source: Magnetic Water Treatment, K&J Magnets, Inc.

In conclusion, if you have calcium carbonate in your water, then MWT may work in preventing some scale buildup.  Since it’s likely that many small magnet systems are not strong enough for the amount of water flow, it’s best to purchase from a company that knows its science (and offers different size magnets/appliances for different size pipes).:

  1. Magnation: this company employs several technologies, not just magnets, into their products.  They have a questionnaire enabling you to find the right product.
  2. ESF scale preventer uses permanent magnets, but you need to install them in-line with the water pipe, which may require a plumber. (contact company for price)
  3. Build your own: Using K&J’s equations, they have calculated the strength of the magnets necessary to do the work, and they sell them!  Basically you just have to measure the diameter of the inlet pipe where you are going to place the magnets, and build a system to place them opposed over the pipe so they don’t fall off or slam into each other.  They offer magnets in strong, stronger and strongest energy.

One more product was tested by one of our team members.  Krazy Klean is a magnet-based product that is placed in the toilet tank to reduce scaling in the toilet bowl, leading to less cleaning and use of chemicals.  In the toilet we tested, it definitely worked.  Old deposits were not removed, but once the bowl was cleaned (see our article here for non-toxic methods), it stayed clean for a month test period (from waste and minerals) with the Krazy Klean device in the tank, whereas it was previously cleaned about 2x per week yet still had waste and mineral residues building up.  The manufacturer advertises "Just drop it in your tank and eliminate scrubbing for an entire decade", however, we promote cleaning your toilet bowl regularly with non-toxic cleaners to reduce germs.  The company provides a report of its scientific testing on its website if you'd like to check out how it works.

Photo by Andres Siimon on Unsplash

How to eliminate many of your cleaning solutions

How to eliminate many of your cleaning solutions

Well, that is a pretty attractive headline, right?   Since the average American family of four can expect to pay at least $680 a year for cleaning products, this is a substantial sum of money.  (Cleaning Supplies Costs: How to Save Money While Keeping Your Home Clean)  How in the world can you get something clean without using a cleaning solution?  Water alone can’t clean a surface, right?

If the water is deionized, it can actually clean without any added solutions.  If it sounds crazy, you just have to check what’s actually in your water to understand.  Normal tap water has minerals such as calcium carbonate (CaCO3) which are left behind when the water evaporates from a surface, leaving water “spots”.  The spots are actually the dissolved solids in the water, which can also be ionic..  Ions are atoms or groups of atoms that have a positive or negative charge.  For the calcium carbonate example, calcium Ca has a positive charge (2+) while the carbonate CO3 (carbon and oxygen atoms) has a negative charge of 2-.  The easiest way to avoid this deposit on your surface (windows, car, etc.) is to remove the minerals from the water. 

Here’s where it may help to understand some water chemistry.

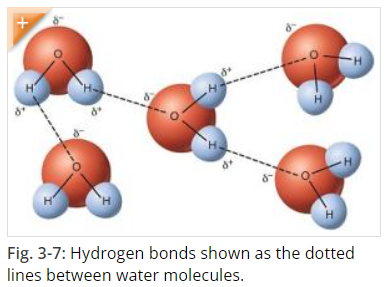
Water, as we know it H2O, is formed of hydrogen and oxygen atoms that “stick” to each other by covalent bonds.  Covalent bonds form when two or more nonmetals combine. For example, both hydrogen and oxygen are nonmetals, and when they combine to make water, they do so by forming covalent bonds. (Covalent Compounds - Formulas and Names)  Hydrogen bonding is responsible for how individual water molecules “stick” to other water molecules, because the hydrogen end of the molecule is attracted to the oxygen of other molecules.  However, because hydrogen bonds are weaker than covalent bonds, in liquid water they form, break, and reform easily.  (Hydrogen Bonds Make Water Sticky)  

Source: Hydrogen Bonds Make Water Sticky

Calcium carbonate, CaCO3, is one of the most common dissolved substances in water.  Calcium has a +2 charge, and is considered a metal, and Carbonate (CO3) has a -2 charge and is a non-metal, and the bond between metals and non-metals is called ionic.  This is a pretty strong bond, and is one of the reasons CaCO3 doesn’t actually dissolve in water.  Because  water molecules act like magnets with positive and negative ends, and both the calcium and carbonate ions have electric charges, there is some electric attraction going on between water and CaCO3.  The calcium ions hang out with the oxygen part of the water, and the carbonate ions cozy up to the hydrogen part.   However, the ionic bond within CaCO3 is stronger than the electric charges between the water and CaCO3 molecules, so the water never really breaks up or “dissolves” the CaCO3. (Is Calcium Carbonate Soluble in Water:Answer and Explanation of Reasons)  It precipitates easily, and can be removed from the water solution by several means: reverse osmosis, which is passing the water through very small filters, or by passing the water through positive and negative beds of resin that attract the CaCO3. When the impurities are removed from water, the electric charges that exist on the “ends” of the pure water molecules are freed up again, and water becomes more “sticky”, enabling it to pick up more dirt than water with CaCO3 or other impurities in it.  This is why deionized water cleans better than water with impurities in it.

The main enemy of water-based cleaning is Total Dissolved Solids, which are those impurities that get left behind when water evaporates, regardless of whether they were truly “dissolved” in the water to begin with. Car enthusiasts, window washers and solar panel cleaners are big fans of DI water.  Why?  It has no dissolved solids, so it leaves no spots or impurities behind when it dries.  Spots are unsightly, and when left to bake onto a car’s finish in the sun, can actually “etch” the clear coat of the car.. Now, many car detailers will wash their cars with normal car-washing liquids and water, but save the DI water for the final rinse.  This conserves DI water, which can be pricey because of the filtration process.  Many professional window cleaners and solar-panel cleaners, however, use it exclusively (no chemicals) with soft brushes, so that the cleaning process from start to finish relies on DI water.  Remember, windows and solar panels are big areas that are continually baked in the sun, so washing them with normal soap and water and then rinsing with DI water can cause the soap to bake on before you even get to the rinse step!  They are also very-high visibility surfaces, and spots on solar panels can translate into big efficiency losses, which are a large reason they are installed to begin with.  

True deionizatIon systems can cost a lot.  For the average person wanting to clean their home with less chemicals however, using deionized water is not out of reach.  It all depends on how you get it and how you use it!

Before we get into home deionization systems, however, you’ll want to understand the difference between distilled water and DI water.  Water distillation is a physical process where the water is boiled and the steam condensed for purification.  Although distilled water has less total dissolved solids than tap water, it’s still not free of impurities like DI water. That said, both deionized water and distilled water are safe for human consumption as long as there are no germs (viruses, bacteria, cysts), which may pass through the deionization process because these are generally not charged (ionized) particles. DI water is also not the same as “softened” water: softened water still has TDS in it and water softeners also do not remove bacteria and viruses.

That said, there are some home systems (like ZeroWater) that can produce deionized water that is safe for consumption and better for cleaning.  Because municipal water systems already employ disinfection systems like chlorination to kill bacteria and viruses, using ZeroWater filters with city water is sanitary AND free from TDS, because the ZeroWater filter removes TDS.  ZeroWater filters are 5-stage filters.  One of the stages is a mixed bed (cation & anion resins) of small sized polymeric beads. Ion exchange is a reversible chemical reaction where dissolved ions are removed from solution and replaced with other ions of the same or similar electrical charge. The cation beads contains hydrogen ions (positive charge). The anion beads contain hydroxide ions (negative charge). The resin works by exchanging contaminant ions in the water with the hydrogen and hydroxide ions.The contaminants attach to the beads while the hydrogen and hydroxide are released into the water. These two ions combine together to produce H2O.  (How does Ion Exchange Technology Work?)

Reverse Osmosis (RO) is another type of system that deionizes water.  There are many different manufacturers of RO systems, and if you have one, you’re probably very satisfied with the quality of water.  RO removes sediment and chlorine from water with a prefilter before it forces water through a semipermeable membrane to remove dissolved solids. After water exits the RO membrane, it passes through a postfilter to polish the drinking water before it enters a dedicated faucet.  RO does not remove some types of bacteria and viruses from the water, though, so this is why it should be used with municipal water or another disinfection mode, like UV light. (What Is a Reverse Osmosis System and How Does It Work?)

Therefore, if you have ZeroWater or RO water, you can test the water for TDS (many come with an included TDS meter) and use it as deionized water for cleaning.  Since filters do have a cost, however, you’ll want to maximize the use of your deionized water.  For example, a 4-pack of ZeroWater filters is $55, which is about 92 cents per gallon of water, whether you use it for drinking or cleaning. Here are our suggestions:

  • Use DI water for spray-bottle applications where you mix your own cleaner (like TotalClean)

  • Use DI water for vacuum mops/steamers so floors get cleaner and look better

  • Use DI water as a “rinse” for areas where water spots are most visible

  • Use DI water for “descaling” modes of small appliances if water is called for (like coffee machines, baby-bottle sterilizers, steam irons and other heated appliances)

Unfortunately, larger-scale DI systems used for washing cars, windows and solar panels can incur substantial cost not only in equipment but in maintenance, as they require replacement of the resin beads periodically as they become fouled with minerals.  Beware of cheap In-line water deionizers like this one, reviewed in this video, however, because they don’t work well in areas of water with high TDS. 

  • CR-Spotless Water Systems - DIC-20, $438, has 2 mixed-bed resin beads, a moveable cart, and a battery-operated TDS meter.  The reservoir should produce 300 gallons of deionized water, so theoretically the 2 replacement cartridges for $139 should give DI water at a cost of 47 cents per gallon.

  • According to this car detailing video, this On The Go dual-bed system, $600, is the best budget system if you plan on using at least 1200 gallons per year.  Now, this is a lot of DI water, but if you like to wash cars, boats, windows, showers, solar panels, etc., this could be realistic for you at about 25 cents per gallon for the refills.

Well…is deionized water a draw for you?  Maybe not, if you don’t have an abundance of cars, boats, etc, but the ZeroWater filter is a nice all-purpose drinking water filter that also provides deionized water for a small amount of spot-free cleaning.  If you have basic home cleaning needs, there are other ways to remove minerals and contaminants from your water.  Check out our article Non-Toxic Ways to Deal with Hard Water for more of them!

Photo by Andres Siimon on Unsplash
How do water-based vacuums work and are they better than traditional vacuum cleaners?

How do water-based vacuums work and are they better than traditional vacuum cleaners?

Do you like how fresh the air seems after a rainstorm?  Well, that is the effect of the rain “washing” dust and microbes out of the air.  Sure, on a hot summer’s day it’s not long until these contaminants return, but it’s a welcome respite.  It’s nature’s air purifier!

This brings us to the topic of water-based vacuum cleaners.  Mechanically, the suction part of the vacuum (with or without a rotary brush to dislodge dirt) is the same as traditional vacuum cleaners.  However, using water to “filter” dust out of the air stream is the main difference. 

Let’s talk about how filtration using water as a filter is different from filtration using other mechanical means, such as a cyclonic separator or filter.  When a stream of dirty air is filtered by water, the dirt or dust in the air gets wet and heavy, and thus becomes entrained in the water, leaving the air “clean” on exit.  However, most water-based vacuums also use HEPA filters, in order to prevent any remaining dust or dust in water droplets from leaving the machine.   These HEPA filters are designed to get wet, whereas non-water-based vacuums do not have filters that can get wet.  

In traditional vacuums, the incoming dirty air stream usually first passes through a vacuum bag or cyclone, which filters out larger particles of dirt and hair.   In bagless systems, the cyclone uses centrifugal force to “spin” out these large particles so that the user only has to empty a cup of dirt, not replace the bag.  Single-stage or multi-stage cyclones can be employed, where a multi-stage cyclone allows the vacuum to operate longer without losing suction.  After the bag or cyclone, a final filter (this is where the HEPA filter is found if the vacuum has one) filters out any remaining dust in the air stream before exhaust.

The attraction and “wow” factor of water-based vacuums usually lies in the dirty water that you empty from the vacuum after cleaning.  If the floor is cleaned with a traditional vacuum and then with a water-based vacuum, being able to “see” the dirt that’s left behind drives enthusiasm for the water-based vacuum.  No one cuts open the bag from their traditional vacuum after cleaning, so the satisfaction of seeing that dirty water makes one think that water-based vacuums provide superior cleaning power. 

Although we haven’t tested them, we thought we’d share some insight on the most common water-based vacuum brands and what their customers like and dislike about them. 

Rainbow Vacuum Cleaners

You may have heard of or viewed a Rainbow Vacuum Cleaner, the first vacuum to remove dust from its vacuum stream using water.  The manufacturer, RexAir, was formed in the 1920’s and has been improving the Rainbow ever since it was introduced in the 1950’s. (The Original Water-Based Cleaning System)  It relies on a rotating brush to dislodge dirt, and the suction power of the vacuum motor to bring it into the machine, where the filters purify the air before exhaust.  According to product literature, its unique water filtration system captures typical household dirt, while remaining microscopic particles are caught by the HEPA Neutralizer Filtration System. This two-stage filtration combination removes nearly 100% of dirt and contaminants.  The company uses a network of Independent Authorized Rainbow Distributors which demonstrate the product in homes and businesses, so it’s not sold online.  Purchase prices for these units are not published either, however, customers seem to verify that these vacuums are the most expensive on the market.  Devoted Rainbow customers seem to keep their vacuums for 15-20 years, so the price per vacuum may be a very good value.  The units weigh in at about 20 pounds and rely on smooth casters to roll through your home.  Rainbow is “Certified Asthma & Allergy Friendly” and AHAM Certified: The Association of Home Appliance Manufacturers (AHAM) certifies that the Rainbow is a proven air cleaner designed to reduce air pollutants that contribute to poor indoor air quality.  The weight of the E2 model is approximately 40 lbs and comes with an 8 year warranty.

Sirena vacuums ($600-990) are designed and made in Canada.  They can pick up wet or dry messes, and come with an assortment of tools to get into nearly every crevice.  The motor is quite powerful, providing ample suction, and the water reservoir hold 3.5 liters of water maximum, which is quite a lot of water in which to filter out dust and dirt.  It weighs 40 lbs and comes with a 10 year warranty.

Quantum X ($439) is an upright vacuum, meaning you don’t have to drag a canister around with you while you clean.  The power head can extend up to 18”, making it a good competitor to most canister vacuums, and it has a hose for smaller cleaning attachments.  The upright style affords less room for the water compartment, but this also allows it to be more portable.  It weighs 27.1 lbs. 

Kalorik Water Filtration Canister Vacuum Cleaner ($120) is a good budget cleaner made by a Belgian company that has been in business since 1930. Termed the “poor man’s Rainbow” by one reviewer, it’s a great option for those with pets and/or allergies, and it’s a lot lighter at 14.3 lbs.  The suction head does not have a rotating brush, but it has a high/low adjustment, very powerful suction, and picks up wet and dry messes. Without the rotating brush, it’s best suited for hard floors and not carpets.  It has a 1 year warranty.  

These four vacuums all use water as a filter, but are different from cleaners that vacuum and mop at the same time.  I use the CrossWave floor and area rug cleaner by Bissell ($257), which uses water to clean AND filter out dust.  For homes that have no wall-to-wall carpet or a lot of area rugs, these types of upright vacuums are convenient and ideal because they perform two functions at one time–vacuuming and mopping, with good efficiency (check out our article on using these types of vacuums to tackle dust in your home).

In all, many customers (including myself) prefer water-based vacuums over traditional ones because:

  1. You can see the dirt they pull off your floors very readily when you empty the vacuum, which is both satisfying and disgusting.  Whether this is more than the dirt that is captured by traditional vacuums is not measured.

  2. There’s no bag to retain smelly dirt (especially pet hair).  With traditional vacuums, this smelly dirt stays in your home until you replace the bag, and it also expels smelly air every time you vacuum until you replace the bag.  (As a pet owner, I appreciate this!)

  3. There are no bags to purchase and replace! 

  4. They are very good at retaining suction (most work until the suction compartment is completely clogged with debris or pet hair), and restoring suction is very easy to do–empty the compartment!

  5. Many of these models remove wet or dry messes (traditional vacuums can only handle dry dirt). 

  6. Many of these models allow addition of essential oils to the filter water or cleaning water for a fresh scent of your choice, and some, like the Rainbow and Sirena, double as air purifiers.

The “cons” of water-based vacuums are that: 

  1. Of course, water is heavy and more quality construction can make the unit VERY heavy and bulky, to the point of not being mobile enough to clean separate floors in a home if you are physically challenged.  Most water-based models are “cannister” type instead of “upright” in order to more easily and stably move the water around.

  2. Water-based vacuums can be more costly than traditional vacuums.

  3. Some water-based vacuums (like the Bissell CrossWave) require a detergent to enhance cleaning of the floors.  This detergent is an added operating cost and can have toxic ingredients in it (unless you make your own, check out our recipe here). 

  4. If your vacuum uses water to “scrub” and then suck up dirt and debris, water that stays on your floor can temporarily increase humidity in your home, albeit less than regular mopping.  If water is used to clean carpeting, you must be careful that it’s thoroughly dried, and quickly, so that mold doesn’t have a chance to take root.

Do you prefer another type of vacuum that we haven’t discussed?  Let us know!

Photo by No Revisions on Unsplash

Hidden benefits in the scents of the holidays

Hidden benefits in the scents of the holidays

In the US, you know that winter holidays are coming when pine-scented, cinnamon, clove and peppermint candles and essential oils come out.  Besides giving a fresh, yet cozy scent to your home, each of these have hidden benefits in their chemistry.

Pine oil (which emits a concentrated fragrance due to the terpenes it contains) has many health benefits.  Primarily, the terpenes (which are biogenic volatile organic compounds or BVOCs) are phytoncides. Phytoncides are aromatic compounds from plants which can increase your number and activity of natural killer cells, a type of white blood cell that supports the immune system and is linked with a lower risk of cancer (see our article about why it’s good to take walks in the forest!).  These BVOCS produced by the pine tree include  α-pinene and α-phellandrene, both have which have shown to have anti-inflammatory properties and anti-cancer properties when inhaled and d-limonene and p-cymene phytoncides, which have shown to specifically act against allergic lung inflammation too.  (How Pine Can Benefit Your Respiratory Health)

Hinoki cypress, cedar, oak, pine and spruce are just some of the trees to release phytoncides.  Camphene is a common monoterpene and phytoncide found typically above 10% in many essential oils including white fir, black spruce, hemlock and Engelman spruce. Camphene is noted for its antioxidant and mucolytic properties. It’s similar to camphor; both have a well-known smell that is invigorating and refreshing. (3 Essential Oils High in Terpenes)

Cinnamon scents are synonymous with holiday baking, but did you know that it is also useful in combating mold in your home?  The cinnamon sticks you may be familiar with are actually the inner bark of several types of trees, which are rolled into “quills” and dried.  Cinnamon powder is made by grinding it and cinnamon oil can also be extracted from the bark.  You can use cinnamon essential oil diluted in water to clean small patches of mold and mildew from surfaces, or place it in a diffuser to combat airborne mold spores.  Cinnamon powder can be sprinkled or mopped onto floors to fight mold, or used as a paste to clean surfaces (beware that it can stain however).  Boiling cinnamon sticks in water gives a double benefit; besides making your home smell lovely, the water will become more concentrated with cinnamon liquid, which can be added to your cleaning solutions as well.  Check out this helpful article for more tips on using cinnamon.  Scientists are also exploring use of the leaves; there were 16 compounds found in the active fraction of cinnamon leaf extracts and 3 dominant compounds that are anti-fungal compounds. (Antifungal Activities Of Cinnamon Leaf Extracts Against Sigatoka Fungus (Pseudocercospora Fijiensis))

Growing up, my family used to stick cloves into oranges to make pretty scented holiday decorations. These little sticks actually come from the flower buds of the clove tree, which primarily grows in Indonesia.   Clove oil has so many uses!  It has a strong, earthy smell, which are the BVOCs.  It is antibacterial, antiviral and antifungal, and can be used in throat sprays and oral hygiene, as an analgesic to relieve nerve pain, infused into syrups, honey or vinegar or in a diffuser to reduce airborne mold and microbes.  (5 Health Benefits Of Clove Oil You Need To Know)  It’s also a dermatological fungus-buster: both clove essential oil and its volatile vapor strongly inhibit spore germination and mycelial growth of dermatophytic fungi (fungi that require keratin, a protein in hair, skin and nails, for growth). The volatile vapor of clove essential oil showed fungistatic activity whereas direct application of clove essential oil showed fungicidal activity.  (Antifungal Activity of Clove Essential Oil and its Volatile Vapour Against Dermatophytic Fungi)

Menthol is the monoterpenoid in peppermint that gives that fresh smell and taste. The high menthol content in Peppermint make this essential oil excellent for diffusion and inhalation to reduce congestion and clear the airways. It is one of the best essential oils for colds, flu, bronchitis and asthma, with studies showing that Peppermint oil is rich in compounds that are anti-microbial, antiviral and antibacterial.  It can also help with seasonal allergies, helping to unclog the sinuses and clear pollen out of the nasal passages.  (Peppermint Benefits) Peppermint oil is a key ingredient in many natural pesticides and pest deterrents, because insects hate the smell!  Spray peppermint oil around your home to repel ants, spiders, mosquitoes, roaches, ticks, and even mice.

You can also apply peppermint oil directly on the skin as a natural bug repellant (if you have sensitive skin, you can use a carrier oil).  Peppermint oil is a natural antifungal, antimicrobial, and antiviral. Spray it over countertops, especially in bathrooms, and kitchens. (20 Uses For Peppermint Essential Oil)  Check out this natural floor and surface cleaner using essential oil–my favorite is peppermint oil to give a fresh scent to all surfaces!

  • 1-¾  cups TotalClean Concentrate

  • ⅛ cup rubbing alcohol

  • ⅛ tsp dish soap

  • 5-10 drops essential oil (optional)

These are only some of the hidden benefits of the scents we associate with winter and holidays…you might want to research your other favorites to find new uses for them in your health regime and home!

Hydrogen Peroxide as an Air Cleaner

Hydrogen Peroxide as an Air Cleaner

Hydrogen peroxide has been around for a long time.  The brown bottle you may keep in your bathroom as an antiseptic for treating wounds has many, many more uses!  It was discovered in 1818 by scientist Louis Jacques Thénard as he reacted barium peroxide with nitric acid.  Today, it’s still used medically, as well as in many diverse applications such as launching rockets and satellites into space, or as a more environmentally-friendly alternative to chlorine-based bleaching products in the manufacture of paper.   (Peroxide Power)

Hydrogen peroxide is chemically written as H2O2, meaning it has 2 hydrogen atoms and 2 oxygen atoms.  It is an oxidizing agent, releasing an oxygen atom when it decomposes.  Decomposition happens quickly in the presence of organic matter like microbes or reactive compounds (hence the bubbling fizzing action on wounds or with baking soda), but it will also decompose slowly in storage, which is why it’s sold in those brown bottles to protect it from light and the ambient air.  

Hydrogen peroxide can be used as a disinfectant in appropriate dilutions on surfaces, in laundry, and in the air.   In the air, hydrogen peroxide is safe in concentrations up to 1ppm according to the Occupational Safety and Health Administration (OSHA). Because it’s chemically very similar to water, it can be produced from water and decomposes into water.  Yet as common and beneficial of a substance as it is, bulk hydrogen peroxide is surprisingly hard to produce and transport.  Currently, large quantities of hydrogen peroxide are made through what’s known as the “anthraquinone process.” This method is energy-intense, requires large-scale production, and produces large quantities of carbon dioxide (CO2) as a byproduct. While directly reacting hydrogen and oxygen to make hydrogen peroxide would be ideal, thermodynamics prefers to form the more stable water (H2O) over hydrogen peroxide.  (Producing hydrogen peroxide when, and where, it’s needed)  However, since only a minimal amount of hydrogen peroxide is needed and proven safe to kill microbes in the air, purifiers are now using different technologies to produce “dry” hydrogen peroxide and distribute it for air cleaning.  Here are some examples:

  • Photohydroionization (PHI) is a technology developed by RGF Environmental Group that uses a broad-spectrum, high intensity UV light targeted on a hydrated quad-metallic catalyst. The UV light in conjunction with the catalyst promotes the conversion of naturally occurring water vapor into airborne molecules of hydrogen peroxide (H2O2). These airborne H2O2 molecules revert to oxygen and hydrogen once they have come in contact with a pollutant. (PHI) This company produces standalone and in-duct products.
  • The TADIRAN AIROW technology fractures Oxygen (O2) into two separate “O” molecules by using a discharge current. These “free O” atoms combine with the H2O molecules in the airflow, transforming into hydrogen peroxide (H2O2). The H2O2 is then distributed through the indoor unit of the air conditioner into the conditioned living space. The amount of hydrogen peroxide that Tadiran’s new TADIRAN AIROW releases into the conditioned space is below the safety requirement as determined by OSHA of 1ppm. TADIRAN AIROW has been proven to release less than 7ppb of hydrogen peroxide. (HYDROGEN PEROXIDE TECHNOLOGY FOR INDOOR AIR PURIFICATION)
  • AirROS purifiers utilize and create 7 species of ROS (Reactive Oxygen Species).  The first stage, which occurs inside the device, includes 5 of these ROS (atomic oxygen, singlet oxygen, hydroxyl radicals, superoxide and peroxynitrite), and 2 species (gas-phased H2O2- dry hydrogen peroxide and low concentration levels of O3-ozone) leave the reactor and move into the room for further disinfection.  According to AirROS, “...Dry Hydrogen Peroxide purifiers technology can only provide short-distance surface treatment within the air purifier because of the short life of hydrogen peroxide. If you have a surface not close to the purifier, it will be untreated and left vulnerable to contamination.  AirROS commercial air and surface purifiers offer long-distance surface treatment because of the Trioxidane that forms from O3 and H2O2 combined, which means you can treat any surface, no matter how far away it is from the purifier. As a result, it provides an added layer of protection against surface contamination and eliminates odor effectively.  Trioxidane decomposes very quickly in water but has a half-life of 16 minutes in normal ambient conditions, making it one of the longest lasting hydroxyl radicals. It’s theorized that the human body also produces trioxidane as a powerful oxidant against invading bacteria because the body also produces singlet oxygen and has lots of water, the two ingredients for making trioxidane.  (Trioxidane)
  • AsepticSure Oxidation by Medizone International (UK company) is a system that uses hydrogen peroxide and ozone to clean unmanned rooms. According to EPA registration, personnel must be trained, the room must be sealed, and the ozone generated can have severe effects on certain materials, such as natural rubber and nylon.  The time to disinfect, personnel required to operate the system and limitations (not to be used with contraindicative materials or with life-saving equipment or with personnel in the room), all seem to be quite restrictive, yet the system has been sold to and installed at many medical facilities.
  • A hydrogen peroxide generator composed of a TiO2 catalyst that is activated with UV light was studied in 2022.  The photocatalyst becomes activated by light given off by a nearby UV-A bulb which excites electrons across the bandgap of TiO2, converting water vapor in the air stream passing through the catalyst into H2O2.  The researchers were aware that it is theoretically possible that H2O2, OH radicals, and hydroperoxide radicals can enter an air stream that passes through an operating photocatalytic TiO2 structure. From an indoor air space standpoint, however, only H2O2 will survive long enough to be detected at distances greater than about 1 cm from the photocatalyst. Over time, the H2O2 that has entered the room will either react with organic species within the indoor space or decay naturally into the benign products, water and oxygen. Hydrogen peroxide can last up to 30 minutes, depending on temperature, humidity, and reactive contents in the room.

Limitations of dry hydrogen peroxide include:

  • Position of the unit: position is very important, because dry hydrogen peroxide has relatively high reactivity, which can diminish its effective lifetime. For instance, H2O2 is known to react with metal surfaces such as those provided by the metal ductwork in the bypass duct. As the pathlength between the device and the room becomes longer, the H2O2  concentration could possibly become diminished (due to reactions with the metal ducting) to a point where MS2 inactivation is minimal or no longer even occurs (2022 study Evaluation of a Gaseous Hydrogen Peroxide Generating Device). 
  • Sensitivity: The other product, trioxidane, is a product of ozone and hydrogen peroxide.  Although devices are restricted in ozone output in the US, those who have asthma or other respiratory issues may want to use them with caution. 

Photo by Bill Jelen on Unsplash

A Clean Way to Update Your Popcorn Ceiling

A Clean Way to Update Your Popcorn Ceiling

Do you have an old ceiling that needs updating?  “Popcorn”, acoustic tile and other types of textured ceilings can become brittle and contribute to bad air quality because they can hold dust and mold spores, as well as fall off in big or small chunks whenever they’re disturbed (think small flying toys, changing light fixtures, cleaning cobwebs or any type of paint touch-up!).  Worst of all, some ceilings installed before/through the 1980s may have asbestos in them (here is a helpful article if you suspect your ceilings may have asbestos).  Refinishing or replacing such a ceiling is a major undertaking that involves removing or covering all the furniture, blocking off the HVAC and doorways, and using personal protective gear to avoid inhaling the dust.  It’s daunting and expensive even for seasoned DIYer’s, and not a realistic option for renters.  

It’s important that homeowners or renters with older popcorn ceilings be aware that ceilings installed before the early 1980s may have asbestos in them. Asbestos is a mineral fiber that occurs in rock and soil (Learn About Asbestos). According to the EPA, most uses of asbestos are not banned; however, it was banned from spray-applied surfacing materials (such as ceiling textures) in 1978. (EPA Actions to Protect the Public from Exposure to Asbestos).  So, it’s unlikely for any ceilings constructed/finished in the late 1980s to have asbestos.  Although professional removal of asbestos-containing materials is best, encapsulation of the ceiling by professional stretch ceiling installers is a (likely less-expensive) alternative. 

Stretch ceilings are a design idea that’s new to the US, but has been more popular in Europe and the Middle East for some time now.  Far from being relegated to the renovation industry, architects even specify them in some designs, and they are ideal for athletic and commercial spaces. 

There are two types of stretch ceilings: fabric or PVC.  Unfortunately, PVC must be heated during installation (usually with propane heat cannons) and it will start to off-gas and continue to off-gas throughout its life (up to 20 years).  (Two Kinds of Stretch Ceilings)  Therefore, in this article we will focus on fabric ceilings, which still have plenty of design choices, colors and aesthetics.  Fabric ceilings from Popcorn Ceiling Solutions are made from 100% knit polyester strands, infused with a water-based polyurethane (PU) coating, which makes them hydrophobic and mildew resistant.  They are VOC-tested and CE-certificated. 

According to stretch ceiling websites, there are many advantages to these installations.  Here are a few:

  • Lighting can be installed under or over stretch fabric ceilings.  Underneath, led lighting installations can be configured as spotlights or tracks in any design, with individual and dimmer controls available.  Traditional flush and pendant lights can be installed through the ceiling so that traditional design aesthetics can be maintained.  

  • Acoustic insulation can be hidden above a stretch ceiling, which is an obvious benefit for schools and athletic buildings to dampen noise.  You can also add it to your apartment or bedroom to get more privacy and peace.

  • Moisture and mildew resistance is a plus for humid environments like bathrooms, athletic facilities and indoor swimming pools. 

  • Many city apartment or condo buildings have concrete ceilings, which have limited lighting and design options.  A stretch ceiling adds many more possibilities.

  • Renters can upgrade their stained, dated ceilings by asking them (or asking permission) to install stretch ceilings. 

  • Stretch ceilings only lower ceilings by inches: the typical installation requires a minimum of 1” clearance, so substantial ceiling height is not compromised.

  • Cleaning with a mild soap and water are all that’s needed if the ceiling becomes soiled.  

  • Most installation companies give warranties that the ceiling will not sag or drop during the warranty period.

  • The fabric may be fire-rated.  According to Popcorn Ceiling Solutions, their fabric has the highest fire rating for building materials and a Class A. Fire and Smoke certificate is available upon request. (Frequently Asked Questions)

  • Multiple designs and colors are available; it’s even possible to paint your own ceiling (however it may void the manufacturer’s warranty). 

  • Stretch ceilings appear even smoother than skim-coated drywall and are completely level.

So, if you have a flaky or unsightly ceiling that may be contributing to bad air quality at home, check into fabric stretch ceiling installers in your area.  Then the ceiling will be one less source of dust and allergies in your home!

Are there any new mold detectors on the market?

Are there any new "mold detectors" on the market?

If you have had a brush with illness-causing mold or suspect that there may be toxic mold growing somewhere in your home, we understand the desire for speedy detection and remediation!  Often, the solution also has to lie within a modest budget.  Traditionally, that demanded a trade-off between Do-It-Yourself (DIY) mold detection versus calling in professionals.  We’ve written about DIY mold test kits and how they work, but what else is available when the mold can’t be seen?  Ian Cull of the Indoor Air Quality Association made a three-part video on how to detect mold in walls, but we tend to advise homeowners NOT to do some of the things he mentions:

  1. We recommend that you DON’T cut a large hole in your drywall with a saw to peek inside.  This presents a number of problems: patching the hole if you don’t find mold, potentially cutting electrical wires or plumbing in the process, and disturbing mold that will be released throughout the home!

  2. We recommend that you DON’T “sniff” around electrical or cable outlets for microbial volatile organic compounds (mVOCs): these are the musty, earthy smells that mold produces when it’s growing. The drawbacks are that there may not be an outlet where there’s mold, and of course, you’re inhaling mVOCs and potentially mold spores and mycotoxins, very deeply into your lungs!  Instead, check out the VOCs and Mold Test option below.

  3. Use a borescope (also called an endoscope or snake camera)–it’s a very small camera that can fit through a very small hole!  Some have mirror attachments that can look at the back side of the drywall.  They used to only be used by professionals, but now are available for under $100.

  4. Looking for moisture: Since mold needs moisture to grow, a moisture meter is a cheap way to see if that moisture is present in the wall.  A more expensive piece of equipment is an infrared camera, which sometimes requires experience to understand what you are seeing.  However, these only find active moisture and mold problems (not if the area has dried out).

  5. Lab-based methods: taking samples of the air in the room. This may cause elevated counts in that room, but it will not pinpoint the source of the mold.  It may also not pick up mold in the wall.

  6. Lab-based methods: taking samples of air within the wall.  This is more specific to the area, however there’s not a threshold and this type of test may give false positives or false negatives.

Besides these (sometimes) destructive methods, we’ve written about blacklights that can show mold or water staining.  Also, using an N-95 mask or equivalent, you could:

  • Carefully remove a baseboard to see if any mold is present at the bottom of the drywall or on the plate (wood stud sitting on top of the floor).  You can also make a hole just above the plate but still under the top of the baseboard, if you want to do any testing in the wall cavity.

  • If you have pocket doors, you can peer into the cavity of the door to check the backside of the drywall. 

  • If there’s carpet in the room, use a pair of pliers to pull the carpet away in a corner to see if there’s mold under the carpet or baseboard.

  • If you have access to the wall from the attic or the crawlspace, you can use a drill to drill through the top or bottom plate and use a borescope to see “into” the wall.  Be sure to use a mask and plug up the hole afterward!

These are fairly standard ways to look for mold in a wall, but here are some new ones that have popped up recently.

VOCs and Mold Test: Because “black mold” like Stachybotrys does not always release a significant amount of spores unless it is disturbed, detecting mold that is enclosed in a wall can be difficult.  However, microbial VOCs (mVOCs) are the gasses given off by mold, they can be more easily detected, and are exactly what this test specializes in.  The sample pump and test tubes are shipped to you with instructions, which are also available in video form on the website.  After sampling, the equipment and tubes are mailed back for analysis. The only difficult part of this test may be complying with keeping the outside doors closed for 24 hours before the test.  It doesn’t detect mycotoxins, but where there’s mVOCs, there also may be mycotoxins.  The real-time version of this type of testing is called zNose, and it’s used in airports and building security, food manufacturing, and many other industries to detect VOCs from trace explosives, chemicals and microbes.

The Healthful Home 5-Minute Mold Test is unique.  The company has a patented way to check for Stachybotrys Chartarum and Penicillium/Aspergillus species using a swab test, which are just two of the most common toxic molds.  The test seems similar to an at-home pregnancy test: use liquid from a swab sample to fill the reservoir on the mold detecting devices, and wait five minutes for the “positive” lines to appear.  The test was reviewed by an actual mold inspector in this video and he found the results concurred with lab testing of the same sample.  However, readings can sometimes be misleading on the at-home test.  It’s a good start…we would like to see more tests like this.

Hire a rescue dog: According to this video, specifically trained dogs are 95% accurate.  They point out the location, and are accurate and faster than other testing.  Dogs that are specifically trained to be mold detectives are used in Canine Mold Detective.  Buddy was the first dog trained in this way, initially trained for a thousand hours in three months, and he continues his training daily with his owner Lacey.

We at HypoAir have not physically reviewed this device, but the BioMatrix Mold Monitor is a unique in that it scans temperature, relative humidity, dew point, absolute humidity, and equilibrium moisture content (EMC), and feeds these into a mold algorithm to determine if the area around it is at a high risk for mold.  The device is activated when the moisture meets one of 3 specialized sensors on the back of the unit, triggering an alarm that will alert you to potential problems. The product is powered by one 9-volt battery, which should last for 3 years (battery not included).  It also comes with a Free Virtual Mold Inspection Service by a team supervised by Industrial Hygienists experienced with mold inspection and remediation. They can perform a virtual walkthrough of the environment by video call and a structural history review to identify the potential mold exposure risks associated with each incident. Once identified, they will be available to answer any questions, provide a suggested course of action, and offer helpful resources. 

Sometime in the future, Unmanned Aerial Vehicles (UAVs or more commonly, drones) could be employed to detect indoor pollution sources.  According to this study, people have begun to try using UAVs to locate indoor gas sources, and it actually could save money: one drone could replace an extensive sensor network.  

For more advanced warning devices for mold, check out our article on leak detectors.  Overgrowth of mold in your home is just too costly in terms of your health and money to repair damages, so it’s worth looking into detectors and safeguards to detect it or its precursor, moisture. 

Photo by Ali Hajian on Unsplash

Increasing Filter Surface Area for Better HVAC Filtration

Increasing Filter Surface Area for Better HVAC Filtration

Lots of customers are jumping on the idea to use their central HVAC as a whole-house air cleaner.  Why not?  It’s a very expensive piece of equipment, it has a fan and an air filter, and it circulates air throughout the house.  The only thing is that you can’t snatch out your 1” MERV 2 filter and throw in a MERV 12 one.  At the least, the unit will protest by whistling, or delayed starts and stops, and at the worst you could cause damage it or cause a fire.  Whoa!  Let’s make the conversion to a whole-house air cleaner SAFELY.

We’ve written another article on how to increase filtration with your HVAC and why it’s dangerous to increase MERV without increasing filter surface area.  Doing this increases the pressure drop, throwing a restriction into the airflow of the system.  Basically, HVAC systems are not designed to have more than 0.25 inches water gage pressure drop over the filter (manufacturers recommend on average a 0.1 inch water gage over the filter), and adding a high MERV filter in the same slot as a low MERV filter will drastically increase the pressure drop.  

Now, you can train that dog to hunt–just put in some extra equipment!  What we’re talking about is more filter surface area.  Here’s a great rule of thumb to keep in mind: when the filter surface area in a system is doubled, the pressure drop over the filters will typically reduce by more than 50 percent. (Duct Dynasty: Confronting Restrictive Air Filters)  Another rule of thumb is to keep the filter face velocity between 200-250 feet per minute.  This allows the air enough time to interact with the filter and effectively remove even fine particles. Here’s a great video explaining the concept; even though the instructor is using an app that HVAC techs use (measureQuick), he explains the filter face velocity concept beautifully.  The difference between his velocity range (250-500 feet per minute) and ours (200-250 feet per minute) is that he’s working with commercial systems, so according to residential IAQ gurus, you’ll want to keep it between 200-250 feet per minute..  

Ok, so I need to add more surface area to my filters–what options do I have?  

  1. Adding another return grille: You can examine the layout of your current HVAC return duct and air handler to see if there is room to add another return grille, where you can place another filter.  This may be the least expensive initial cost, however, over time thicker filters (see next option) may cost less.  In order to calculate the required surface area of the additional filter, start with the cfm of your unit (see our article to determine, and divide it by 1) 200 ft/min and then 2) 250 ft/min.  This will give your max and min surface area in feet squared.  To convert these numbers to square inches, divide by 144.  Then, subtract your current filter’s square inches to get the max and min square inches of the additional filter, and look at common filter sizes to fall in this range.
  2. A thicker filter: although the cross-sectional area of the face of the filter may remain the same, increasing from a 1” to a 4” filter adds a lot more surface area with those deep pleats! They are also called media filters. These thicker filters usually also require less frequent filter replacements. You will want to check the rated cfm and clean filter pressure drop for each model you consider.  Here are some systems that fall into this category:
    1. If you have a 1” filter return filter grille on a wall somewhere, and there is enough room behind it (it doesn’t immediately narrow down), you can substitute a 4-5” thick filter for the 1” filter very easily using this type. See how the lip of the filter is designed to fit in the 1” grille, but you have a lot deeper filter behind it?  Genius!
    2. Again, if you have deep space behind your 1” return grille, you can consider an Electronic Air Cleaner, which can increase MERV with the same surface area.  For example, the Clean Comfort® brand AE14-G Series Electronic Air Cleaner, $600, claims "At rated airflow, the electronic air cleaner achieves a MERV 14 rating. With the fan running on low speed, the air cleaner increases efficiency up to a rating of MERV 16.  The static pressure drop of the electronic air cleaner is as low as 0.16” compared to 0.22" or higher for a typical 1" MERV 8 furnace filter.”
  3. Install a cabinet air filter:
    1. Honeywell F100 Air Cleaners:  At 6.25 inches wide, the cabinet is not super-wide, and it comes in 7 dimensions.  For the 20x25” filter, the cabinet and filter are $168, and replacement filters are $40 each (when buying a 2-pack of MERV 11 filters).  It’s recommended to replace the filter at least every 6 months, so $80 a year for filter changes is not bad!  The clean filter pressure drop is 0.25 inches water gage for 2000 cfm.
    2. Aprilaire also makes a media filter.  Their model 1210 is 20x25” and costs $120.  MERV 11 filters for this unit cost $50 per filter (with a 2-pack).   The clean filter pressure drop is 0.22 inches water gage for 2000 cfm.
    3. IQAir PerfectPro 2025 is a thick filter with nanofibers arranged for “hyperHEPA” filtration. It can drastically reduce the PM2.5 and PM10 in your home, as this test/review found, but the pressure drop at 2000 cfm (5 tons) is 0.32 inches water gage, which is very high!  The price tag is also quite steep at  $1,995.  
    4. Trane CleanEffects Air Cleaner is an electrostatic filter.  It uses ions to charge the incoming air to make particles more “sticky” on the filter.  There are 3 parts to the air cleaner: a prefilter which should be vacuumed every 1-3 months, a field charger (with metal pins that generate ions) that should be cleaned by a technician, and a set of “reusable collection cells” which also get vacuumed by the homeowner.  The pros: CleanEffects has the highest efficiency of particle removal with the lowest pressure drop, it has no filters to “replace”, and it’s Asthma & Allergy Friendly™ certified by the Asthma and Allergy Foundation of America. However, the cost for this device is about $2000 installed, and maintenance (cleaning) is key because its efficiency drops when it gets dirty.  These units are only sold and installed by licensed HVAC technicians.
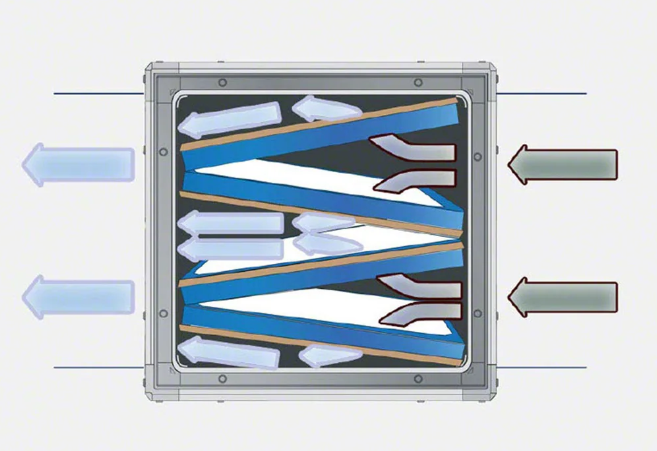
  4. A “V-Bank” of filters: Instead of placing one filter perpendicular to the air flow, you can get more surface area by adding 2 (or more) filters in the shape of a V.  This device would usually be installed in an HVAC room (it’s not a filter grille for a wall). The only problem with this arrangement is that filter loading is not always even; air (like any fluid) will always seek the lowest pressure/resistance, and at the pointy ends where air becomes compressed, the filter load is lighter.  There are several manufacturers that sell this type of filter arrangement.
    1. IQAir also makes a double-v-bank filter, meaning that it technically has up to 4x the filter surface area of a typical single, perpendicular filter installation (see picture below).  This enables the device to exceed MERV 16, according to independent testing. The PerfectPro X 25x30 is compatible with a 5-ton HVAC system, the price tag is quite steep at  $3,395, but you do get 3 years out of the filters. The pressure drop is similar to other systems at 0.22 in H2O at 2000 cfm. 
    2. For a more economical V-bank filter system, AirScape SFB-V Series are MERV-13 V-Bank inline filter boxes.  However, their largest unit is slightly undersized for our 2000 cfm system above. The SFB-V-16x25 costs about $374 and has a min-max airflow of 1667-2778 cfm, corresponding to 300-500 feet per minute face velocity and 0.12-0.29 pressure drop.  Therefore, we would recommend you stay on the lower side and use this unit only in a 4 ton system (1600 cfm) to keep the face velocity down.

Source: IQAir Whole House Air Purifiers

If you want cleaner air with less filter changes, there are many options out there (we didn't include cabinets by Koch, GeneralAire and others simply because pressure drop information was not available).  You’ll want to take into consideration ease of obtaining (purchasing) the filters, and also placement of the cabinet for ease of changing/cleaning them.  Keeping up with filter changes is a worthwhile, minor chore if it means less dust in the house, less cleaning, and less allergens to potentially infect or annoy your family.  

Photo by frank mckenna on Unsplash

How to get free ventilation without sacrificing heat (or cool)

How to get free ventilation without sacrificing heat (or cool)

Something has piqued my interest for some time: the transfer of heat to make something cooler or warmer than the ambient air without mechanical means.  Living in the hot and humid southeast US, I’m keenly aware that air conditioning is key to my comfort during the summer.  Ventilation is necessary, but ventilation will make my house hot like the outside…or will it?   

I’m going to draw on a 2023 study that showed how to ventilate a building by natural means (no fans) but still cause it to be 7 degrees cooler than the outside, even with an internal heat source.  Whoa!  This is noteworthy.

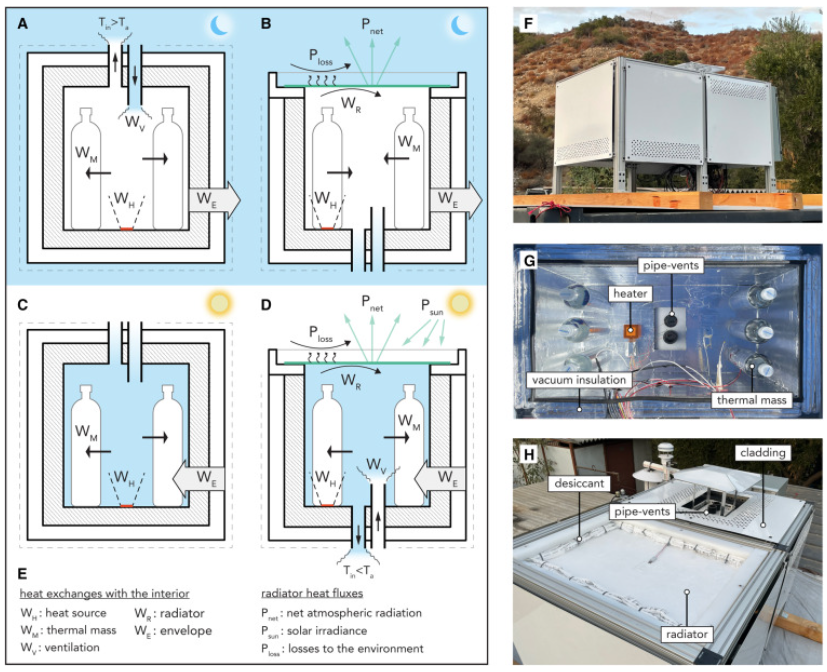
I’ll give you the simplified version. The study involved placing 2 insulated boxes on the top of a shipping container in a warm, dry climate (Topanga Valley, CA).  The “reference” box had insulation on all 6 sides.  The “test” box had insulation on the four vertical sides and bottom, but for the top had an aluminum plate on which a radiant material was glued.  The only ventilation in each box was 2 PVC pipes.  On the reference box, the ventilation pipes were in the top of the box, while on the test box, they were in the bottom of the box.  Each box contained (4 to 6) 1-liter water bottles for thermal mass, as well as a small heater to simulate lighting, fans and other electrical loads that would be operating in a home.

What happened in these boxes?  The differences of a) removing the insulation from the roof and replacing it with conductive and radiative materials, as well as b) placement of the ventilation pipes, caused a substantial difference in the way the boxes ventilated and their interior temperatures.  Here’s a schematic of the boxes:

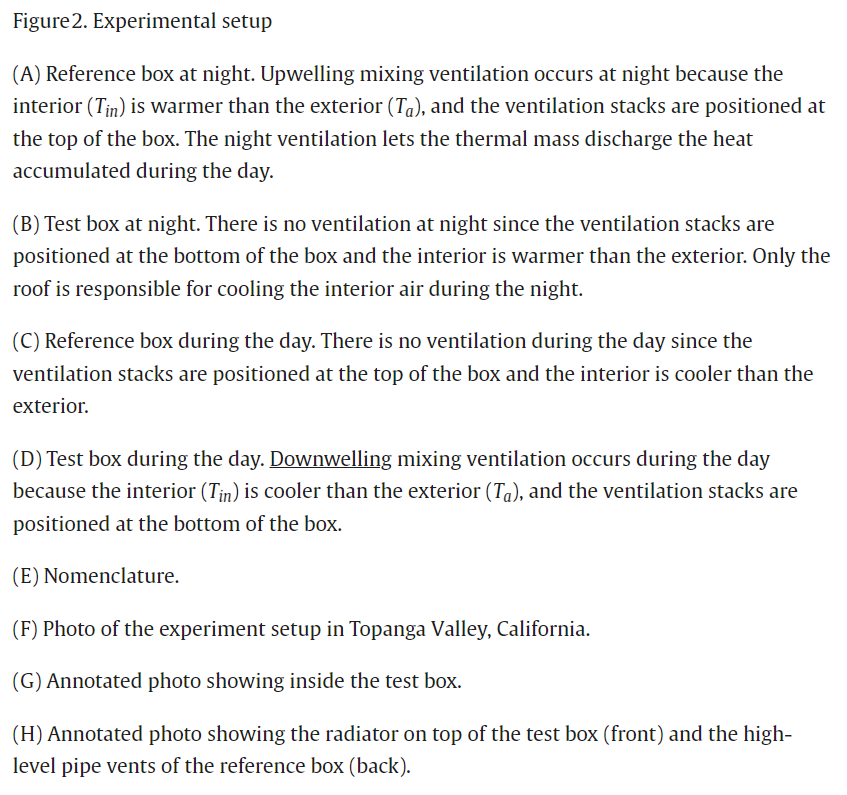
In a nutshell, this type of natural ventilation is driven by differences in temperature.  During the day, the reference box did not ventilate because the interior stayed cooler than the exterior.  It only ventilated at night, because with cool desert temperatures at night, the interior was relatively warmer than the exterior.  However, the test box actively ventilated during the day because the cool air in the box sank out through the ventilation pipe on the bottom, and was replaced with warmer air.  However, it stayed cooler than the reference box because the conductive material on the roof (aluminum) drew heat from the inside and the radiative material reflected 93% of solar heat back into space.  Here’s a summary of the benefits of the test box setup:

  • There was a net loss of heat during the day and the night, even with an internal heat source. 

  • Ventilation during the day occurred 7 times per hour (7 ACH).  

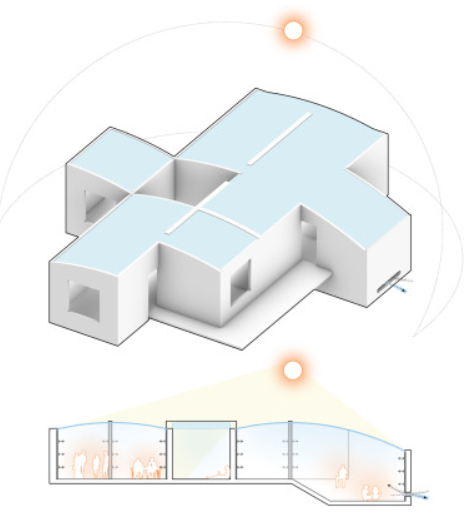
Here’s an architectural concept of what a real house could look like:

Other details:

  • The reference box only ventilated at night and the test box only ventilated during the day.  In a real building, however, both ventilation approaches can be combined to produce continuous ventilation, switching between downwelling and upwelling by activating different vents as necessary.
  • The thermal mass inside the boxes had the purpose of modulating heat fluctuations.
  • The insulation used on the boxes was vacuum panels, which are a very effective insulation, albeit an expensive one for residential housing!  
  • Convection shields of metal with a radiative coating were placed over the sides of the boxes to prevent them from absorbing solar heat.  
  • The boxes had no penetrations except for the ventilation pipes, which is not a realistic residential scenario with no windows or doors. 
  • The boxes were tested in a warm dry climate, without humidity/mold concerns.  In a more humid climate, dehumidification would probably be necessary.  
  • Ventilation pipe size and thermal mass would need to be fine-tuned for each home and its occupants. 
  • Removing the roof insulation from a modern home is quite unusual; in fact, a previous version of movable roof panel insulation and radiant covering was key in Harold Hays’ Skytherm innovation. 

Wow, this is really quite fascinating.  Imagine having copious ventilation AND keeping your home cool in the summer.  Windows don’t have to be heat loss/gain devices, either: with new insulation materials coming into existence all the time (there’s a new aerogel made from cellulose that’s even more transparent than glass), or the Parans solar lighting system that captures sunlight and sends it indoors via fiber-optic cables, a super-insulated, light-filled home is possible (with the right budget).  The idea of thermal mass is certainly not new, either; that’s the reason stone and earth have been used in warm-climate homes for millenia!  We also wrote about a new insulation material that uses phase-change to absorb heat without transmitting it into your home.  With the invention of new radiant systems like the SkyCool system, buildings are actively rejecting solar heat and removing heat from inside the building, saving from 15-40% of cooling costs.

Even without the high-tech materials, the main takeaway of this concept is to seal up your home and ventilate naturally: to do this in warm climates it’s best to have the ventilation intakes lower in the house, on the “cool” side.  Also, look into a radiant barrier for your attic space; we give some tips in this article.   Finally, always monitor humidity, no matter the temperature.  No one can live in an ice-box and turn a blind eye to humidity and mold!

Photo by frank mckenna on Unsplash

Why you need a moisture meter (and how to use it!)

Why you need a moisture meter (and how to use it!)

Moisture meters are like thermometers.  When you think, I feel warm…do I have a fever?  You might ask someone else to put their hand on your forehead for a reference check, but if they’re not sure, what you really need is a thermometer to verify your body temperature.  Likewise, sometimes in my own home I see a dark spot on a wall or windowsill that I hadn’t noticed before, and think, is that a water stain or actively leaking water?  I place my fingers or hand on the spot to see if I feel moisture, but if it’s not sopping wet, it’s sometimes hard to tell if there’s any difference with the surrounding material.  What I need is a moisture meter.

Moisture meters work to sense moisture by electrical conductivity.  Since water is more conductive than drywall, wood and many materials (other than metal),it uses this property of water to “detect” the relative moisture.  For this reason, some types of moisture meters are made for gardeners and farmers, to tell when the soil is too dry and plants need to be watered (this type doesn’t even need a battery).  Moisture meters for home inspections, however, come in “pin” and “pinless” varieties.  The “pin” type have sharp pins for actually sticking into the material, while pinless meters–you guessed it–don’t have pins.  This type detects moisture using conductance by either radio frequency or capacitance of a material.  (Evaluating Pinless Moisture Meters Vs. Pin Moisture Meters)  Both have their place in a professional home inspector’s toolbox for different reasons.

Here are some considerations to decide which moisture meter to use:

Accessibility and Damage: Obviously, you can’t insert a pin moisture meter into materials like concrete and tile without damage, so pinless would be the way to go.  Also, if the material is highly visible and/or valuable, you might not want to insert pins into it (even though the holes are small).

Speed: Pinless meters are much faster because you don’t have to stop and insert pins into the material.

Accuracy: Both types of meters can be accurate, but pin meters are preferred by home inspectors (when possible to use them) because pins have the ability to sense deeper into the material, and their readings are very repeatable when inserted into the same holes.  

Adaptability: Pin meters may come with a variety of accessories (types of pins) for different surfaces.  There are hammer electrodes (you guessed it-for hammering them in!), deep wall probes, extension probes and baseboard probes.  

Now that you know the difference, how do you use them?

For those that like videos, here’s a good short one by This Old House.  Here are the takeaways:

  • Thermal cameras can also be used to spot moisture in a wall because of temperature differences, but unless you’re an expert, you should confirm that’s it not simply missing insulation with a moisture meter.
  • When using a moisture meter, good dry material should show between 6-9% moisture.
  • 15% or more indicates a definite water intrusion problem.   You’ll need to consider replacing the material if it’s drywall, or if it’s wood, at least removing it to assess damage, expose the backside and dry it thoroughly.
  • Some meters are “combination” meters that have pins and pinless technologies.

It’s important to know some quirks about using moisture meters.  You can watch a very interesting video (up to about minute 5:50) from a reputable home inspector showing these points, or read them here: 

  • Metal also has low resistance to electricity (high conductivity), so if there’s metal in the surface, like a metal cornerbead in drywall or metal lath behind tile or nails or screws, you can get a reading that looks like moisture when in fact it’s dry; the metal gives a false positive.
  • Moisture meters are not very accurate on tile.  The minerals in the masonry/concrete can give a false positive.  Also, there can be metal flashing under tile, especially behind shower surrounds.  You must use intuition/other tools to find real water intrusion and remediate.
  • Dry dog and especially cat urine will give false positives because the minerals in the urine will permanently alter the composition of the material (drywall, carpet, etc.), causing it to be more conductive and appear "wet" to the meter.
  • Moisture meters only read water, not mold.  Although mold needs moisture to grow, it takes a few days to take root (typically 48 hours for very wet surfaces), so if you catch the moisture soon enough and dry it out quickly, you may not have a mold issue.
  • Moisture meters may give a normal reading (false negative) even though you have mold!  This can happen when the mold is caused by humidity.  A moisture meter will typically not pick up excessive moisture when the mold is caused by condensation.  The condensation occurs only on a very thin layer of the material.  While this is sufficient to cause mold growth, it typically will produce a normal reading on a moisture meter. (Humidity and Mold in Home)

Moisture meters can be used in other situations, too!  It’s nice to know:

  • Is the firewood dry enough to burn well:  It's important to burn only wood with moisture content below 20%. Burning wood with higher moisture content creates more smoke, which contains harmful chemicals and particulates and forms creosote on your chimney. It also gives you less heat, because it takes energy to boil off the excess water. (Storing and Drying Firewood)
  • How dry does a wood surface need to be in order to paint it?  According to an Amazon Technical Bulletin, most outdoor wood, concrete, stucco and plaster surfaces must be at or below 12%, otherwise the paint may not adhere properly, or risks failing early.  Indoor wood and cabinetry should be closer to 6%. 
  • Are your hard wood floors ready to install?  Wood flooring installers typically want the moisture content of hardwood floorboards to be between 6% and 9% (based on an indoor temperature of 60–80° F and 30–50% relative humidity).  (How to Measure Moisture in Hardwood Floors)

Finally, like many other products, the more functions a moisture meter has, the more expensive it’s going to be.  Here are some functions:

  • Ability to “calibrate”: although most cheaper meters do not have a “calibration” function, some have a button to return the device to a factory preset.
  • Ability to choose a very specific material (like concrete, drywall, softwood, hardwood, etc.) Here is a video showing the differences between using a cheap moisture meter and a more expensive one for woodworking.
  • Sensitivity: Instead of soft or hardwoods, some testers allow to select based on a table of listed woods, like this one (more specific for woodworking). 

Here are some devices to consider:

Pinless meters: 

  • Wood Moisture Meter (Pinless-colors), $37, has an LED display screen that looks like an analog meter, with green to red color codes that align with the moisture content.  The pinless moisture meter is penetrates up to 0.75inches deep.  Despite the warning that it’s not recommended for drywall, many customers report using it with success in finding leaks behind drywall before they became too serious.
  • Klein Tools ET140 Pinless Moisture Meter, $42: This rugged meter seems to be very easy to use in selecting the material and verifying the moisture content.

Pin meters:

“Combo” meters:

Reading the reviews on these devices, we’ve seen many homeowners and renters who are able to make quick, informed decisions to call in professional help and get repairs going before serious water damage and mold took root in their homes.  We think it’s an important tool to have in your toolbox whether or not you think you need it right now, because water damage can escalate quickly in hours and days, and the time spent looking or ordering one could be very precious!