All Posts by Jennifer Faul

About the Author

Mold is not just toxic to humans; your furry friends suffer from it too.

Mold is not just toxic to humans; your furry friends suffer from it too.

If you or anyone in your household is experiencing sensitivity to mold, it’s best to check in with your pets, too.  Since dogs, cats, rabbits and other pets spend a lot of time on the floor and the ground outside, they can be even more prone to inhalation and ingestion of mold than we are.  According to a registered vet technician on the natural pet website nhvpethealth.com, typically your dog or cat will show the following symptoms when experiencing mold:

  • itching
  • redness of the skin
  • dry, scaly skin
  • hair loss
  • chronic ear infections
  • head shaking
  • chewing/licking skin, especially the paws

It doesn’t stop with their skin, though.  Because mold affects their respiratory and digestive systems in similar ways to ours, serious breathing and digestion issues can develop from mold.

Mold is everywhere.  Here are some common types of mold your pet may encounter, and where they are found (nhvpethealth.com):

  • Aspergillus – found in plants and damp basements
  • Spondylocladium – found in plants or in air ducts
  • Hormodendrum – found on leaves
  • Fusarium – found on plants, often crops
  • Penicillium – found on plants or stored items
  • Helminthosporium – found in soil, especially in summer

You can actually test your pet's fur to see the relative amount and variety of molds they may be carrying.  To do so, you can purchase mold test plates from Immunolytics and follow their advice for testing here

Since many pets eliminate waste in the backyard, it’s almost impossible to keep mold out of their paws and fur.  However, inside is where you can control their surroundings a bit better; the following are some tips from experts!

Try to keep them out of damp basements or garages where mold proliferates.  

If your pet’s bedding is made of old carpet or furniture that can’t be effectively washed, discard it and find a new alternative that can be laundered more frequently.  When washing, try one of these:

Try to use a brush on their fur before coming inside, and wipe him/her down with a damp cloth.  Weekly baths with a soothing shampoo containing essential oils will help eliminate mold in their fur.

  • CitriSafe shampoo is non-toxic to pets and humans and safely eliminates mold in pet fur.  
  • 4Legger has a variety of gentle shampoos that smell wonderful!  

Here are 2 sprays gentle enough to be misted directly on your pet’s fur and bedding between washings to keep mold under control:

Adding an Omega3 supplement will help to strengthen the skin barrier, which helps to prevent secondary infections caused by allergies.  You can try breaking a fish oil capsule over their food, or checking with your vet for their preferred supplement.

K9 Mask is a new product that can protect dogs from breathing in mold and other allergens when it’s highest outside.  The masks can also be used in wildfire smoke and other air pollution environments.

Finally, for your own health as well as your pets’, clean for mold as much as possible using a HEPA vacuum and non-toxic cleaners like TotalClean on your surfaces, even on floors!  

Catch it EARLY

Catch it EARLY

No, I’m not talking about a movie, or even a sale.  I’m talking about water leaks.  After recently dealing with a leaky faucet (what a pain), I figured that there must be something to help me detect the leak in the first couple hours after it starts, instead of days later.  I’ve seen leak detectors that can detect as little as 1/16” of water, but that still requires placing it in the right place and hoping that the leak will puddle there first.  When I opened the doors to the area below my sink, what I sensed first, before seeing any water, was the high humidity.  Even without standing water, high humidity can cause mold to grow in virtually any area that it contacts.  

Here are my requirements for these remote hygrometers (humidity sensors):

  • Use a common, easily accessible battery
  • Place it anywhere in your home
  • Low cost of sensors to enable more monitoring places
  • Wireless alarm through phone app
  • Enabled with history to show trends of rising humidity

Bingo!  There are a few systems that fit this bill and more.

Govee is a brand known for its LED lighting and smart home appliances.  Regarding their WiFi digital thermometer hygrometer, they have great reviews on the ease of setting up the WiFi Gateway, and adding all of the sensors to the app.  The sensors can remain connected up to 230 feet away, and the gateway can connect up to 10 sensors ($119 on sale).  Let’s see, I could use one: under each bathroom sink (2), kitchen sink (1), behind the washing machine(1), next to the water heater (1), next to the HVAC air handler (1), behind the refrigerator (1), under the dishwasher (1) in bedroom closets (2-3).  Other people have used them for greenhouses, humidors, and as room sensors to balance their HVAC systems.   I easily found places for 10+ sensors in my home, and with the discounted price, they are cheaper than buying the smaller 3-sensor pack ($46) and adding more sensors separately. 

The Moen Smart Water Leak Detector ($102 for a set of 3 sensors) monitors moisture levels (through a moisture-sensing cable), humidity and temperature to send alerts to your phone through the Moen FLO app.  It does require a wifi connection, but you also have the option of installing a remotely-operated water shutoff valve ($470) that can operate manually from your smart phone, or automatically in response to a water leak detection signal from one of the monitors.  This valve also performs a nightly check of the system by shutting off the water and sensing pressure drop, to detect leaks as small as one drop per minute behind walls!  

YoLink is another smart appliance manufacturer and their temperature/humidity devices have a few differences.  For one, the wifi connection can be sustained up to ¼ mile, which is over 5 times the distance of Govee.  The YoLink can monitor extreme temperatures, which is useful if you want to place one in your attic or in your freezer (in case of a power outage). It is also compatible with Alexa.  There are  2 sensors and a hub in this pack ($60), and the hub can monitor other YoLink devices such as water leak sensors and door/window sensors. This unit runs on LoRa (Long Range wireless technology), which uses less power and transmits for longer distances than traditional bluetooth technology.

These devices are especially helpful in vacation homes and rental homes, as well as a great monitoring system to assist caretakers for the elderly and handicapped.  The Internet of Things (IoT) is making our lives less prone to worry in more ways than one.  Can it train my dog not to splash water on the floor?  Maybe not, but with sensors in other places maybe I’ll have the “bandwidth” to do it myself!

Photo by Matt Hoffman on Unsplash

What do our holiday traditions really cost?

What do our holiday traditions really cost?

Okay…we all know that visiting the Christmas Tree Lot the day after Thanksgiving can be really expensive, and prices get better the longer you can wait to get one.  That’s not what I’m talking about!   I wanted to know, are some of our traditions costing us in our health?  After my manager shared how his family “mysteriously” gets allergies every December after bringing home a live tree, I had to do some research!

As it turns out, Christmas tree allergies are real.  If you experience any of the following after bringing home a live tree or other live pine decorations, the pine may be an allergen, or it may be carrying allergens (advancedsinusandallergy.com).

  • Runny nose
  • Watery eyes
  • Sneezing
  • Coughing
  • Wheezing
  • Itchy eyes and nose
  • Dark circles under your eyes
  • Skin rash

Now that you may be making some mental connections, here is what scientists have found about homes with live trees:

  • Mold: pine trees can carry 53 different types of mold!  (Researchers at SUNY Upstate Medical University).  Many of these are allergens and especially so for infants and children.  The mold, which is attached to leaves, branches and bark, multiplies in your warm home and spores are released during the agitation of bringing the tree in, setting it up, placing lights and decorations on it and watering it.  A 2007 study found that apartments containing a live Christmas had a 6-fold increase in airborne mold, which did not return to normal until after the tree was removed.  Weed, grass and tree pollens were also found in the air during the time Christmas trees were in the house, because of course, live trees once lived in fields with other weeds and trees.  
  • The beloved pine scent emitted by Christmas trees is actually a family of VOCs called terpenes.  Terpenes are made naturally in the tree sap, and real or artificial terpenes are often used in pine-scented cleaning products and home fragrances.  Terpenes can unfortunately be allergenic to some people. 
  • Dust mites and insect droppings come with live and artificial trees that have been in storage because they naturally accumulate dust. 

Bringing home a live tree is a deeply-ingrained tradition for many American families, so unless your allergies become severe, simply treating your tree appropriately may help you to suffer a lot less this season!

  • Formerly, it was recommended to spray the tree down with water and allow it to dry naturally outside for a day or two, or blow off the water with a leaf blower before bringing it inside (advancedsinusandallergy.com).  However, water is just what mold needs to keep growing and multiplying!  Therefore, we’re going out on a limb here (pun intended) to say that the same EC3 Mold Solution Spray or  Remedy Mold Treatment Spray by CitriSafe that is safe for humans and pets, is a great treatment for live and artificial Christmas trees.  Yes, use that leaf blower on your live or artificial tree to remove dust outside (with a mask of course), and then give it a good misting of EC3 Mold Solution Spray or  Remedy Mold Treatment Spray over every branch (don’t be afraid to use too much).  This should drastically reduce the amount of mold in your home while the tree is up!  Treat live garlands, wreaths and other live decorations in the same way.
  • Dispose of the tree as soon as possible, because any mold that was not touched by the spray will continue to grow.  

If you opt for an artificial tree, you still may suffer from allergies if it’s improperly stored.  Here are some tips:

  • Storing trees and decorations in unconditioned spaces like attics and basements can expose them to mold and dust.  In these situations, don’t use cardboard boxes; change the storage container to a sealed plastic bin or optimally, make a little room in your conditioned space for storage.  
  • Use a mask when retrieving them out of storage.
  • Use a cloth misted with EC3 Mold Solution Spray or use CitriSafe's Remedy Multi-Purpose Mold Treatment Wipes to wipe down ornaments and lights before adding them to the tree. 

Scented candles and sprays may smell nice, but they can seriously irritate your respiratory system and add unwanted VOCs and toxic chemicals to your air.  Instead, we can show you a number of ways to add holiday fragrance without the allergies in this post!  With the vodka air fresheners mentioned,  if you have several spray bottles, you can “decorate” your home with different holiday scents by adding drops from an assortment of essential oils like this one

This holiday season, break the mold (pun intended) by dis-inviting mold and allergens from your decorating party: it will be less costly for your health! 

Understanding Air Barriers and Vapor Retarders: Why and Where to Place Them

Understanding Air Barriers and Vapor Retarders: Why and Where to Place Them

If you are endeavoring to build your own home or even just renovate part of it, most likely you want to do it right the first time.  Here is some inspiration to plan well from workzone.com:

“By failing to prepare, you are preparing to fail.” ― Benjamin Franklin, Founding Father of the United States

“Every minute you spend in planning saves 10 minutes in execution; this gives you a 1,000 percent return on energy!” ― Brian Tracy, author and motivational speaker

“Give me six hours to chop down a tree and I will spend the first four sharpening the axe.” ― Abraham Lincoln, former U.S. President

It’s so true.  One of my personal skills is the ability to paint walls well and enjoy doing it.   I know that planning works because the best walls I have ever painted were the ones I spent 75% of the time preparing and 25% of the time painting.   Planning ahead just makes the job so much more easy and successful.  

Building something that you want to last is the same way: the investment of time and money is well worth it when the home just works.  Layout and design seem to be the priority today, but function should take first place.  It’s like choosing the color of the living room and buying that paint before any of the structural decisions have been made or executed.  Does the roof work?  Do the walls do their job?  Does the foundation work?  Let’s get those bones built and covered, so that they will protect all the beauty of form and life inside.  (getting off my soapbox now).

Here is an article that is well worth reading: Building the Perfect Wall by Joe Lstiburek. Mr. Lstiburek argues that there are four barriers that need to be constructed to protect the home from the elements, and here they are in order of importance but not in order of installation.

  1. a rain control layer
  2. an air control layer
  3. a vapor control layer
  4. a thermal control layer

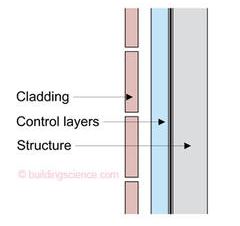
He also argues that all of these layers should be on the exterior of the structure (the bones, whether it’s wood or steel or concrete), because the structure is where the money is!  Other than the rain control layer and maybe a vapor control layer, many builders do not recognize this.  Putting the insulation on the outside of the structure?  It’s just not done enough, but it’s brilliant.  Here is a simplified diagram (buildingscience.com): 

Here are some important points to understanding why these control layers are needed and why they have these priorities.

Rain control: 

  • Water does a lot of damage.
  • UV light also does a lot of damage. 

Air control: 

  • In order to control the interior environment, for the health of the building and its occupants, you must control the air.  Controlling the air means making it air-tight, with controlled penetrations. 
  • Air can carry (transport) a lot of water: see the first point above about water doing a lot of damage.

Vapor control: 

  • Water vapor travels in two methods: air transport (see air control above) and vapor diffusion.  
  • Once again, in order to control the interior environment, you must control the vapor flow into and out of it. 

Thermal control:

  • Thermal control prevents condensation when the temperatures and dewpoints inside and outside of the home are different.
  • One final word: Comfort!

Rain control and thermal control are relatively easy for me to understand; after all, every 4-season home now has siding and insulation.  It took some digging to understand the limits of, and relationship between, air barriers and vapor retarders. It’s helpful to know that air barriers are actually rated in their ability to retard vapor, so that in modern buildings, air barriers are used as vapor retarders as well.  (The term "vapor barrier" used to be in vogue but it's actually more accurate to use "vapor retarder").  There are two terms that relate to a material’s ability to retard vapor: permeability and permeance.  To understand them, it’s helpful to know a little about water vapor.

Water vapor moves in two ways through a building:  diffusion through the building materials themselves, and air transport.  Here is a diagram illustrating the two:

Source: BuildingScience.com

Water vapor has its own pressure, which contributes to the total air pressure.  The difference in vapor pressure between two sides of a building envelope assembly is the driving force behind vapor transmission by diffusion. (buildingenclosureonline.com)

Water vapor absorbs heat differently than the air in which it is mixed.  If you think of sunshine streaming through a window and heating a room, the sun is heating air and water vapor in the room, but at different rates.  Heat applied to the air raises its temperature directly (called sensible heat). Heat applied to the water vapor raises its temperature more slowly (also sensible heat), increases vapor pressure and with the increase in ambient temperature, also increases the ability of the air to hold more water vapor; thus it causes evaporation of any water in the room (from our skin for example) without changing its temperature (called latent heat).   Sensible heat causes an increase in temperature, but latent heat causes a change in state without a change in temperature.  (Latent heat is the heat applied to melt ice or boil water; the ice cube doesn’t change temperature while it’s melting and the water in a boiling pot does not change temperature while it’s boiling.)  Vapor pressure will seek equilibrium, so that an area of high vapor pressure will try to diffuse to an area of lower pressure.  It does this by “diffusing” through the wall itself. This movement is the reason for installing a vapor retarder.

Regarding air transport of water vapor, warm air naturally holds more moisture than cooler air, so you’ll want to prevent warm humid air from moving inward during summer, and warm air from moving outward during winter (causing condensation on the way in/out). The air barrier is responsible for stopping this movement.

Permeance describes the water vapor transmission rate (by diffusion).  It is the rate over the course of one hour through one square foot of a material of a given thickness at a specified vapor pressure, expressed in perms (grams/hour●ft2●inches Mercury). (buildingenclosureonline.com) Since it deals with water vapor, permeance is also a description of how vapor retarders slow the transmission of latent heat.  

Permeability in building materials is permeance per unit of thickness—or perm-inches, which is useful when comparing different thicknesses of insulation.   

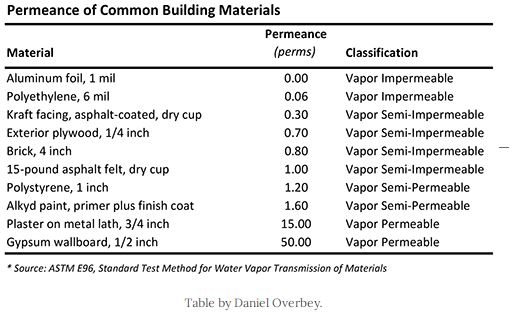
With the standard of Permeance, we are able to compare the vapor transmission qualities of different building materials.  The less permeable a building material is, the greater its resistance to water vapor transmission. A vapor retarder is essentially any building material that exhibits a very low permeance (very high resistance to water vapor transmission). (buildingenclosureonline.com)  Here is a table with some common building materials and their permeances:

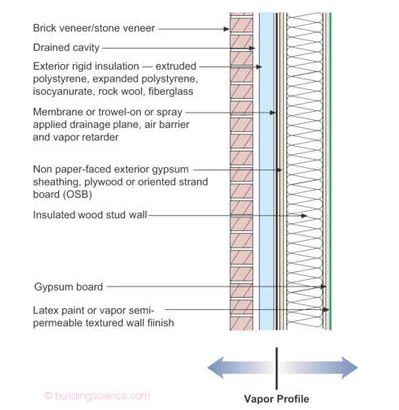
Below is a diagram of The Perfect Residential Wall.  The vapor arrows denote the desired flow of moisture because “we want the assembly to dry inwards from the control layers—and to dry outwards from the control layers.” (Joe Lstiburek, Building Science)  You never, never, want to sandwich material between 2 vapor retarders.  In effect, vapor will definitely be retarded there in that sandwich, causing condensation and mold!

Source: buildingscience.com

Note that this wall has two layers of insulation, which is ok, because the insulation is not trapping moisture (however it’s probably advisable not to insulation without kraft paper inside, more on that below).  The external rigid insulation stops heat transfer to the wooden structure, and the internal insulation provides more comfort.  The Perfect Wall article also describes a “clever wall” which combines all three: air, vapor and thermal control layers with one external layer of closed-cell high-density foam insulation.  

Vapor retarders have evolved a lot over the course of just a few decades.  From the early to the late 1900’s, roofing felt/tar paper was usually the only thing that went over the sheathing and behind the siding.  There was no drainage behind the siding (and in most mid-grade homes, there is still none), and no air barrier.  Sometimes the assembly worked well to protect the structure, and sometimes it did not, but without an air barrier, only moderate thermal control could be achieved inside.  Also, the kraft-paper facing on fiberglass insulation is a permeable vapor barrier (see chart above).

Polyethylene was introduced as a vapor barrier in the 1950s (constructioncanada.net) and it had disastrous effects in many homes, because although it is a Class 1 Vapor Retarder (0.1 perm or less), correct placement of this layer was critical to avoid condensation issues.  This brings us to our final point, where is the best place for the air barrier and vapor retarder?

The construction industry has had much confusion over where to place these layers.  For a long time, installers were instructed to install the kraft paper facing of fiberglass insulation “facing the warm side”.   They were also told (true today) to install it “facing them” meaning toward the interior of the building.  What about southern buildings, which are cooler inside for most of the year, and cooler outside for only a few months?  One can’t rearrange the insulation seasonally after the wall has been sealed up (!).    The good thing is that kraft paper is semi-impermeable and, it turns out, is one of the earliest “smart” vapor retarders, meaning that it has variable permeance: low permeance in cooler, drier weather, and higher permeance in warmer, more humid weather. (greenbuildingadvisor.com) The newest vapor retarders are doing this to give a measure of flexibility to buildings in these swing climates.  Some brand names are Intello Plus, Pro Clima DB+, and MemBrain (haha).  Each of these products are marketed as air barriers AND vapor retarders, so that by installing one of them outside the structure (wood or metal or concrete), you are protecting the structure by slowing vapor diffusion through it and maximizing climatization inside the building by sealing air leakage.  Since air sealing is ranked in priority above vapor retardation, it’s critical that the product be correctly and thoroughly installed to prioritize air sealing.  For example, on a busy jobsite, different trades and change orders can make multiple unauthorized perforations in a properly installed air barrier, so signage protecting it and rules for authorizing penetrations must be given. 

Since Youtube and Pinterest are the inspiration for many renovation projects, if you are taking on a renovation as a DIYer, and even when using a contractor, go back to the beginning of this article for more inspiration on planning.  It does take extra time to read and research products and methods of installing air barriers and vapor retarders, but it’s oh-so-critical to get them right for the long-term health of your family and longevity of your home.  Some recommended sites (in no particular order) are GreenBuildingAdvisor.com, BuildingScience.com, EnergyVanguard.com, Inspectapedia.com, BuildingEnclosureOnline.com, and more.  Planning it well is more than half of building it well!

Check them at the door! (How to bring less contaminants into your house)

Check them at the door! (How to bring less contaminants into your house)

Oh, how I love to walk barefoot or bare-socked around my house!  It’s a pleasure that doesn’t happen often enough. With two (albeit non-shedding) dogs who constantly bring sand and dirt in from the outside, and my own habit of walking straight in from outside with my shoes on, walking barefoot only happens for a few hours after I vacuum and mop.  Vacuuming and mopping takes a minimum of 45 minutes to do, so how often does it get done?  Embarrassingly, not enough!

There are even more benefits to cleaner floors than walking barefoot.  After all, you and your pets are not just bringing in lifeless dirt…there are microorganisms like mold, pollen, bacteria and viruses in every grain of dirt.  These can wreak havoc on those who are more sensitive, and especially those who spend more time on the floor, like babies and young children.  At HypoAir, we’re all about avoiding bringing contaminants indoor whenever possible!

It’s hard to believe what you can’t see, so I was grateful to run across this article.   The hostess of this website became self-educated about mold after she and her family experienced numerous health problems from the homes they lived in, and she has a very informative website that includes interviews with experts!  She performed a test with a white towel laid at the door of her home, to catch dirt and mold particles as they are tracked in. She performed a mold test before and after two days.  Although the “before” mold test revealed some mold from the clean towel being stored in the garage, the “after” test was definitely more prolific and indicated that some colonies could be producing mycotoxins.  Yuck!  Unfortunately I know this is happening at my house in the woods during the very wet summer we’ve had….

This has prompted me to research strategies to avoid bringing that dirt, mold and germs in!  There are some ways that make a big difference.

  1. Leave your shoes at the door.  My main problem with this is time (like when I’m bringing in groceries), and sheer number of shoes.   Patience and dropping off loads at the door will take care of the first problem, but for the second one, If I had a “mudroom” this might be more easy to organize.   I’m not a shoe collector by any means, but I have a number of shoes that I like to wear outdoors!  This has led me to find a used low bookshelf and number of baskets so that I, my sister who lives with me, and any number of guests can feel comfortable storing them at the door.

  2. Find the best doormats for your situation, and use them!  When I went searching for “doormats” online, I was overwhelmed by the sheer number and diversity of them.  Then I refined the search to “best doormats for pets” or “best outdoor doormat”, etc. and read what people wrote about them.  I am even doubling up (one indoor, one outdoor) for more protection.Here are some good ones:

    1. Doormat for pet feet: I like the generous size and decor options for these rugs by PURRUGS, but they are made of polyester.

    2. Outdoor mat for removing dirt: 

      1. According to Spruce.com, coir (pronounced “coy”-er) is the best material for removing dirt: it’s made from coconut husks, so it’s scratchy and natural-looking.  A lot of coir mats are made with a rubber backing, which doesn’t let the dirt fall to the floor, but if you get a woven one with no backing like this one by Kempf ($43), you don’t have to shake it out as often. 

      2. For a modern look, Clean Machine Mats are made of Astroturf, but not all of them have the bright green color!  This one ($29) just takes a simple shake to empty all the sand off your porch.

    3. Indoor mat: Requirements for good indoor mats are that they need to be of a safe material that doesn’t create dangerous VOCs (polyester and PET may have endocrine-disrupting chemicals in them).  A non-slip backing is best, but solid rubber or plastic may harbor mold if moisture gets underneath, so check for mold during wet or humid weather.  Machine-washability is a plus!  

      1. Large and absorbent, these mats by Crate and Barrel ($135) are great for wet and muddy feet.  They can be spot cleaned or taken outside for scrubbing and hosing down.  The rug is made of polypropylene, which is quite durable and has a low off-gas.  The backing is made of rubber (20% recycled), which can give off a smell but doesn’t seem to be a complaint with this rug.

      2. Chenille is very absorbent and soft, which makes these rugs by Gorilla Grip a nice buy at $35-50 depending on the size.  They are machine washable!

      3. I love the idea of recessed mats, which are popular in commercial buildings and apartment buildings.  They “fit” into your floor and are very unlikely to slide around.  Water and dirt will also be more contained in a recessed mat, where you can easily vacuum it up.  You’ll need to create a standard-sized recess that is laid into your floor at the front door.

  3. If you have pets, teach them to stop at the door and wipe their feet! (cue cute video…)  More seriously, you can teach them to at least stop while their human helps them wipe their feet!  You can even hang a towel near the door for that purpose on a simple hook or more elegant towel rack.  You can also use  EC3’s Mold Solution Spray ($28 for 32 oz) for misting their fur to deactivate any mold spores they may carry in.

  4. Use a non-toxic additive or detergent to get rid of mold in the laundry.  EC3 products by Micro Balance are recommended by a number of experts and experienced laymen who know about mold!  This non-toxic, environmentally safe laundry additive ($29) is good for about 11-16 loads at the recommended dosage of 2-3 oz per load.  It’s great for washing those dirty door mats and washable shoes.  (moldfreeliving.com)

  5. For shoes that can’t be washed in the washing machine, spritz them with EC3’s Mold Solution Spray ($28 for 32 oz) before you put them back in your closet.  You can also spritz it on the indoor mat between washings.  (moldfreeliving.com)

  6. Vacuum and mop frequently(1-2x per week) in the entranceways of your home, if not your whole home.  At the beginning of this article, I was lamenting the time it took me to successively vacuum and mop the ground floor of my home (where the most dirt lies).  Well, this is the case IF you don’t have a combo vacuum/mop, which can be a total game changer!  I’m happy that I have all tile with only a few area rugs on this floor, which makes it the perfect candidate for such a machine. I grew up using cumbersome canister vacuums, which seemed to hit every doorjamb as I tugged them through the house.  My mother has already graduated to a Bissell CrossWave, and raves over it.  Here is a great review of the newest upright vac/mop combos, in which I’m sure you’ll find one that’s right for you.  The only problem with using water floor cleaners is that they tend to have chemicals of questionable toxicity in their proprietary cleaning solution (7 of 11 Bissell products earned a “D” grade on ewg.org).  If you use another solution during the warranty period, your warranty may be voided.  If that prospect does not bother you, this article gives some tips on making homemade cleaning solutions for your vacuum/mop machine that have non-toxic ingredients.

The Differences between a Cleanroom and Your Home

The Differences between a Cleanroom and Your Home

Don’t you wish your home could be called a “cleanroom”?  Well–maybe in name, but it takes a lot of expensive equipment and protocol to make it happen!   Cleanrooms were first invented by scientist Willis Whitfield while he worked at Sandia National Laboratories in New Mexico in the early 1960’s.  He developed the first forced-air filtration system to control the number of airborne particles within an enclosed space. (The History and Innovation of the Cleanroom

A cleanroom is a controlled environment that filters pollutants like dust, airborne microbes, and aerosol particles to provide the cleanest area possible.  Cleanrooms are used for many different purposes; some examples are in electronics manufacturing, medical equipment and pharmaceutical manufacturing, research labs, and hospitals.   There are nine “classes” of cleanrooms according to ISO 14644-1, which regulate the maximum number and size of particles, air change rates or airflow velocity, and percentage of ceiling coverage. (Cleanroom Classifications)  For example, Class 1 is the “cleanest” and only 0.35 particles per m3 of ≥0.5 micron particles are allowed, the air change rate must be between 360 and 600 times per hour, and airflow velocity ranges between 60-100 feet per minute, among other regulations.  In contrast, typical office building air contains from about 15,000 to 30,000 particles (0.5 microns or larger) per cubic meter of air. (A Basic Introduction to Clean Rooms)  We’re talking mega-fans, filters and restrictions to turn an office into a cleanroom!

Why must cleanrooms be so…extreme?  Well, dust is a big problem for certain products.  In the case of pharmaceutical products like syringes and medications, airborne particles provide a ride for microorganisms on which to produce, leading to contamination of product. (Keeping Clean Rooms ‘Clean’)  Other surfaces like electronics are very sensitive to contamination by dust, and dust or microbes can wreck many scientific experiments.

The biggest contamination risk to a cleanroom and its products is people.  Did you know that when you are just sitting or standing completely still , the average person is releasing up to 100,000 particles per minute which are 0.3microns or larger?  Increased activity increases these numbers, so people in the cleanroom are encouraged to move slowly (no fast walking or running, and definitely no horseplay is allowed!)

In order to keep the cleanroom, ahem, clean, people entering must follow certain common rules, of which here are some examples:

  • No personal items such as watches, keys, or phones may be brought in because of the risk of bringing in other contaminants with them.
  • No eating, smoking or chewing gum in the cleanroom.
  • No cosmetics such as perfumes, lipstick, nail polish or makeup are allowed because many cosmetics contain sodium, magnesium, silicon, calcium, potassium or iron, which can create damaging particles..
  • Don’t enter if you’re unwell–germs are definitely not welcome in the cleanroom, and frequent coughing or sneezing expels many more particles into the air than normal. 
  • Fabric or paper towels are not permitted! (They shed too many particles.)
  • Hair and facial hair must be covered up, because human hair is many times larger than permitted particles in the cleanroom.

Of course, dressing to go into a cleanroom is a production.  One suggested procedure lists 42 different steps to put on the white “bunny suits” that are made of a special lint-free material!  You must remove offending items from your pockets, wash off makeup or perfume, drink some water to rinse particles from your throat, clean your shoes and put on booties first, then move on to putting on the suit, helmet, faceshield, gloves, belt, and cleaning any equipment you take with you. 

To remove all the particles generated by people and manufacturing processes, detailed engineering and specification of the ventilation system is required.  Designers may start with the classification of the cleanroom and the required “air changes” for the size of room.  Then, they must factor in the number of people, type of work, lighting, and outside ventilation required.  For example, if hazardous fumes are developed, then the cleanroom needs to be able to filter and provide 100% outside air!  Humidity and temperature inside must also be specified and controlled.  The filter size and type must be adequate to handle the particle load for reasonable filter life, as well.  These are just some of the details that go into cleanroom ventilation design. (HVAC Cleanroom Design Calculation Explained)  This is way more intensive than your basic home HVAC design!

The “envelope” of the cleanroom, or its air circulation boundaries, are very important.  By implementing a positive or negative pressure in the cleanroom, the flow of air and contaminants are controlled.  Positive pressure cleanrooms are better at keeping outside contaminants out, such as for semiconductor manufacturing, because air rushes out of the room whenever a door is opened.  Negative pressure cleanrooms are designed so that fumes and particles generated inside it don’t escape (like for a hazardous microbe research facility).  For this reason, special air-sealed doors are often used so that an “air lock” is created and entry/exit is tightly controlled.  Sliding and swinging doors must also open slowly in order to avoid disturbing pressure gradients inside the room. (Understanding Air Pressure In Cleanrooms)

The other major concern in cleanrooms besides dust is static charge.  Not only does dust itself carry static, people generate static charge when they are walking or working, as their clothes rub together and across certain surfaces.  Did you realize that walking over a carpet can generate 35,000 volts, and the human body feels a shock when the voltage is higher than about 3,500 volts?  (Static Electricity)  Sensitive electronics can be damaged at voltages far below 3,500 volts.   For this reason, most cleanrooms are equipped with ionization equipment (similar to HypoAir’s Bipolar Ionization, actually) that disperse ions into the air so that positively or negatively charged surfaces are changed into neutral surfaces very quickly.  Ionization equipment may be installed in the fans, or attached to rods and beams that are suspended in the room.  Airflow and ionization are designed together in order to deliver the ions to work surfaces in the least amount of time, thus neutralizing charges quickly before they build up and cause damage. 

Even with all this technology of filtration and ionization, extreme manual cleaning is still required in cleanrooms.  This checklist of cleaning suggests mopping the floors, vacuuming the walls, wiping down all surfaces and cleaning all windows before every shift/between shifts.  Wow!  That’s truly the kind of clean you can “eat off of”.   

So…how do the principles of cleanrooms relate to our own homes?  Of course it would be nice to live in a space with so little dust and germs, but it’s just not practical, nor comfortable–homes just would not be homes without eating, cooking, good smells, playing games, pets, comfy soft materials and many more activities and things!   However, there are definitely some things to learn from cleanrooms. 

  • Watch what you bring into the house!  In our article “Check them at the door! ”, we explain how to bring how to bring less contaminants into your house by taking your shoes off (and having a place to store them), getting a good doormat, and manage pets that bring in contaminants.  It also helps to get a floor cleaning tool that you will use often.  I absolutely love using my CrossWave floor and area rug cleaner by Bissell ($257); it’s cut my floor cleaning time in half by vacuuming and mopping at the same time.  If you check local discount stores, there are many reconditioned models that sell for less than half this price (I got mine at Ollie’s).  In addition, of course the manufacturer wants you to use their patented floor cleaner, and states that using any other cleaner will violate the warranty.  Unfortunately, Bissell products mostly rate an “D” grade from the Environmental Working Group for toxicity to humans and the environment, but if you do decide to substitute a non-toxic cleaner, we have just the one for you: TotalClean.  With no fragrance and no toxicity, you can clean your floors as often as you want without adding more VOCs and chemicals to your home. 
  • Use the best filtration you can afford to cut down on dust and microbes in your air.  Obviously you don’t want the constant whir of ventilation or to change 14 filters a week like cleanrooms, but using a MERV 12-13 filter in your HVAC and changing it regularly will help minimize breathing in particulates.  If you live in an urban or dusty area, add standalone HEPA filters to your home. 
  • Use Bipolar Ionization to control dust, microbes and static too.  Cleanrooms depend on ionization to control static charges, but they also benefit from the other effects of this technology:  ions help the filters to grab more dust and ions disable microbes like viruses and bacteria.  Our Germ Defender, Upgraded Air Angel Mobile and Whole Home Polar Ionizer each send out millions of ions into the air to do the same thing in your home. 
  • Try to keep the cleaning on schedule.  We know, life gets in the way of routine a lot of times.  However, when the cleanroom doesn’t get cleaned on time, things start to go awry, and when your home suffers from cleaning neglect, your own health could suffer for it!  Enlist help, reward yourself, do whatever it takes to keep the dust and germs at bay, because a clean home is really a dose of good medicine for your own body! 

How do Electrostatic Filters work?

How do Electrostatic Filters work?

It seems like manufacturers are coming out with new filters all the time.  Filters for homes with pets, filters for allergies, filters against viruses…and on and on.   I recently ordered and replaced my HVAC filter with a brand name that was a pleated filter advertised as an “Electrostatic Air Cleaning Filter”.  I had to find out what that meant!

First of all, I thought that electrostatic filters had to be hooked up to electricity.   Actually, only some of them do.  Electrostatic filters encompass a broad range of devices, and the ones that do require electricity are usually called electrostatic air precipitators.  The principle behind these units uses elements to impart a charge to incoming air particles, and then attract them (make them stick to) an oppositely-charged plate.  These systems could be portable, or installed in your HVAC system, or be a part of a huge commercial operation (like a smokestack).   Typically these systems are powered by a high-voltage, low wattage system.  The “filter” is the entire unit, and instead of replacing any parts, the charged plates are simply washed clean. 

However, I bought a regular pleated-type replaceable filter with a large wire grid over it, presumably just to keep the filter in shape as you try to manipulate it to fit in your HVAC.  I don’t have any electricity supplied to the filter box of my HVAC.  How could this filter be electrostatic?

The answer lies in triboelectricity, also called static electricity.  As air whizzes through the synthetic fibers of the filter, the fibers become charged with static electricity.  Then they start to attract the particles of dust in the air.  Making the filter “pleated” increases the surface area of the filter over a flat filter, so that it can attract more particles.  Eventually, however, the fibers become coated with dust, and it no longer acts as an electrostatic filter, but continues to trap dust by the other methods of normal filters (we discuss those four methods here).  And, hopefully before the filter gets so full that dust starts to bypass it, it gets disposed and replaced or cleaned.  

Reusable, washable electrostatic filters are also available.  Washable filters typically have aluminum or galvanized frames and polyester filters so they can withstand repeated cleaning.  However, these typically have a lower MERV rating (only up to MERV 9), so they are not capturing the smaller particles of bacteria, viruses and mold spores that disposable filters can handle.  For more explanation on MERV ratings, check out this article

You can also make your “electrostatic” filter perform even better by using an ionizer in the same room as your filter.  Because ions are charged molecules in the air, as they collide with dust, they impart the same charge to the dust.  This “pre-charges” the dust and causes a greater attraction to the fibers of the filter.  In this 2015 study, researchers showed that unipolar ionization (as opposed to bipolar) enhanced the filtration by 40%, with a lower pressure drop than filters that remove finer particles.  

Whether your HVAC filter is electrostatic or not, the most important maintenance task is to clean or replace it regularly!  This is the only way you can ensure that the filter is capturing the most particles possible, making your air as clean and allergen-free as possible.  

Photo by Lorena on Unsplash

How to equip your college student with better air quality

How to equip your college student with better air quality

If you’re a parent with a son or daughter in college, of course you want to see them succeed!  It can get costly, though.  From helping with tuition, room and board and everything else, it seems like “clean, fresh air” should be a free part of the package. Unfortunately, that may not be the case.  Many colleges and universities are housed in old buildings that did not give thorough consideration to air quality when they were designed, built, or renovated.  In many cases, you are paying for the privilege of  studying there, with living as only an afterthought!  

The problem with poor air quality in the university setting is that it affects the very thing young adults go there to do: learn.  Contaminants in the air work against their body in the following ways.

High CO2 due to inadequate fresh-air ventilation decreases the ability of the brain to metabolize oxygen.  In other words, the brain becomes oxygen deprived!  This can affect learning in terrible ways.  In a Havard study in 2015, 24 participants spent 6 days in simulated offices to control for CO2 and VOCs.  Days were designated by the research team, but blinded to the participants and analysts, to be one “High CO2” day of 1400 ppm CO2, two “Conventional” days representing the average office building conditions of about 940 ppm CO2, one “Green” day representing better ventilation with conditions of approximately 740-750 ppm CO2, and two “Green +” days representing 100% outdoor ventilation (approximately 550 ppm CO2). Cognitive scores were 61% higher on the Green building day and 101% higher on the two Green+ building days than on the Conventional building day. On average, a 400-ppm increase in CO2 was associated with a 21% decrease in a typical participant’s cognitive scores across all domains after adjusting for participant (data not shown), and a 20-cfm increase in outdoor air per person was associated with an 18% increase in these scores.  This shows that for lack of fresh air in their dorm room or classroom, your student could be missing out on their chance to absorb all the material presented, with lower test scores as a result!  Here are some ways to “open the windows”, so to speak:

  • Add a Window Ventilation Filter to their dorm room.  It’s easy to install and remove, and filters out pollution, pollen and dust. 

  • For more info on how to measure CO2 in your dorm or classroom, check out our post.  If the classroom or lecture halls turn out to be high in CO2, advise students to check with their student advisor on advocating for more ventilation.  

VOCs: Most dorm rooms come equipped strictly with the basics -- a bed, desk, chair, light and garbage can, plus a small amount of storage space in the form of a dresser and/or closet. (howstuffworks.com) Therefore, moving into a new dorm room usually means getting new bedding and new accessories like rugs, wall hangings, and more storage like dressers or bookshelves.  When these things are purchased new, VOCs from off gassing can increase dramatically if the doors and windows are kept closed for most of the day.  In the study discussed previously,  a 500-μg/m3 increase in TVOCs was associated with a 13% decrease in the cognitive scores.  Once again, fresh air ventilation is really important to keep VOC levels in check. 

  • Use a portable VOC sensor to check for levels in the dorm room or wherever it’s suspected that VOCs may be high (like a newly renovated area).  

  • Install a  Window Ventilation Filter in the dorm room to get fresh air dilution. 

  • The Air Angel neutralizes VOCs with the catalytic molecules emitted by its AHPCO cell. Being portable and requiring very little maintenance, it can travel anywhere they go: on weekend sports events, home, and on vacation.

  • The Germ Defender/Mold Guard's optional carbon filter adsorbs VOCs emitted by newer items as they off-gas.

Indoor humidity plays a major role in our health: when it’s too low, disease transmissions are more likely, and when it’s too high, mold growth occurs and different mold-related conditions spike.  We can think of many reasons to keep humidity in the recommended range of 40-60% so that your loved one’s health is not at risk!  Sadly, sometimes it takes severe illness and even death to prompt renovation of problem buildings (see this article about the University of Maryland).  Here’s how to equip your student against high humidity and the risk of bacteria, viruses, and mold-related illness.

  • It’s super inexpensive to put a portable humidity sensor in their suitcase or next care package.  Ask them to message you with a photo of the sensor when you’re talking with them in the dorm room, or whenever else it seems to be high.  

  • If the humidity remains high, you can speak to the dorm manager, but also equip your student with a dehumidifier.  Amazon and big box stores can even deliver one from an online purchase.  Since the average dorm room is only about 228 square feet, and larger dehumidifiers come with complaints of extra noise and heat, you’ll want to keep it small.  This economical one by Eva-Dry only covers about 150 square feet (1200 cubic feet), but two of them plugged into different areas will help keep moisture under control.  Here is a review of other models that work great for dorm rooms. 

  • The Germ Defender/Mold Guard is perfect for small, humid spaces, and does triple-duty in a dorm room: 1) Even though the bathroom is typically always humid, mold doesn’t have to grow there… I can testify that one Mold Guard stopped mold growth when I couldn’t get a leaky shower valve repaired right away.  2) This unit also deactivates viruses and bacteria in the air and on surfaces across the room with polarized ions. 3)  Finally, it has an option for a carbon filter to adsorb stinky odors like running shoes and sweaty clothing!

  • Use an Air Angel to prevent transmission of germs and mold growth. This unit is portable and requires very little maintenance, in fact only a replacement AHPCO cell once a year.

Finally, if your college student has not adopted good cleaning habits by now, we can’t help you! (just kidding, but we can supply you with the right goods, read on!)  Statistics on bacteria in dorm rooms are pretty gross: the average women’s dorm rooms had over 1.5 million colony-forming units (CFU)/sq. in. of bacteria, while men’s dorm rooms had an average of over 6 million CFU/sq. in. (collegestats.org).  The same article breaks down the types of bacteria and where they are most concentrated, and while not all of them were bad, most of them were.  It’s time to clean up, because it’s hard to know which is worse: being sick in college or having a sick roommate who will soon infect you.  For those who do clean, equip them: 

  • Once again, Germ Defenders and Air Angels are passive sanitizers that help in activate germs between active cleaning.

  • A bottle of TotalClean goes a long way!  Since dorm rooms are small, heavy-scented chemical cleaners can be super-irritating and not always welcome to their roommates’ sense of smell.  TotalClean is unscented, non-toxic and very effective against dust, dirt, and germs on many different surfaces, even windows and mirrors. 

  • Small pump bottles of non-toxic hand sanitizer and sanitizing wipes stationed around the room and on desks help between hand-washings. 

Of course, similar to sending them off to grade school, you can’t be there 24/7 to help your college student make smart choices, but at least by this point you can give them tools to monitor and correct their own air quality for the healthiest and most productive school year.  Viva la college!

How to have clear sinuses

How to have clear sinuses

Going through yet another round of stuffy nose and headaches, I decided to research all the ways that I or my environment is sabotaging my sinuses.  

First of all, it could be sinusitis (also called rhinosinusitis): an inflammation of the paranasal sinuses, the cavities within the bones that surround the nose (Harvard Health).  Inflammation blocks the ostia, which are the narrow channels that drain into the nasal cavity, so that drainage becomes blocked.  Sinusitis can be caused by a cold, allergies, or a deformity such as deviated septum or nasal polyps.  Here are the different lengths of sinusitis (healthline.com)

  • Acute sinusitis can be caused by a cold, but then a secondary infection can happen once the sinuses get inflamed and blocked.  Technically acute sinusitis lasts less than 4 weeks.

  • Subacute sinusitis lasts from 4-12 weeks.

  • Recurrent acute sinusitis occurs when you have the same symptoms 4 or more times per year, but it lasts over 7 days each time.

  • Chronic sinusitis symptoms last over 12 weeks.

Well what is causing it?  

Normal sinuses are lined with a thin layer of mucus that traps dust, germs and other particles in the air. Tiny hair-like projections in the sinuses sweep the mucus (and whatever is trapped in it) towards openings that lead to the back of the throat. From there, it slides down to the stomach. This continual process is a normal body function.(American College of Allergy, Asthma, and Immunology) Here are some of the common irritants that can interrupt this process:

  • Dust:  A dose of good old dust, whether it’s from a woodshop, mowing the grass on a very dry day, or bringing out boxes from an attic, can overload the sinuses. The problem is that dust is a very complex mixture of irritants.  It can contain dustmites and their feces, chemicals, 

  • Pollen:  Plants have to reproduce, and sadly the weeds seem to be the worst offenders to our noses.  In addition, you’re not just imagining it: pollen really is becoming worse every year!  Check out our post on allergies here

  • Mold:  Mold is dangerous in that unlike other allergens, it can colonize and actually grow inside your sinuses, since they are warm, moist and dark.  Then, the rest of your body is susceptible to other colonizations as you breathe the mold spores and swallow them with mucous.   

  • VOCs:  VOCs can cause inflammation that leads to sinusitis.  A 2001 study showed that patients with chronic rhinosinusitis were exposed to higher levels of volatile organic compounds than healthy subjects.

We at HypoAir are not medical professionals, so we can’t recommend the techniques and drugs that doctors use for prevention and relief of sinusitis.  However, natural techniques are generally milder, and many of our clients are very sensitive to medications anyway, so we are glad to report that sinusitis can often be prevented or treated easily!  Here are some of the ways to do it:

  • I have to say that mask-wearing definitely cut down on my nasal issues when I was required/bothered to wear one.  Why?   Masks filter out many of the airborne contaminants listed above that can trigger sinusitis, as well as germs like bacteria and viruses.  Two+ years into the coronavirus pandemic, the stigma of wearing a mask is virtually nil, and there are a plethora of masks you can use to protect yourself against pollutants and germs alike (see our post on masks). 

  • Nasal irrigation is the number one defense against sinusitis according to Harvard Health (steps included in the article).  Whether you choose to use a bulb, small pitcher or neti pot, the homemade rinse works great to flush away the irritants that can block drainage and start a nasty infection.   It’s recommended to do this daily if you can!

  • Hydrate–your body as well as your nose!  Drink plenty of water during the day, and use a plain nasal saline spray several times a day if you are in a dry environment.  Adding a drop of food-grade tea tree oil or oregano oil (oregano oil is a bit harsher) to the saline spray adds a layer of antimicrobial protection to your spray. 

  • Avoid being unprotected in moldy and dusty places.  If you have to go down into a moldy basement or into a dusty attic, make sure to wear an N95 or respirator mask that seals well, and don’t take it off until you are safely in a clean place. 

  • Keep pollen, dust and pollution out while letting fresh air into your home, by installing some Window Ventilation Filters in your open windows.  They are easy to install and can be vacuumed a number of times before replacement.

  • Neutralize pollutants by adding a bipolar device by HypoAir to your home.  Positive and negative ions neutralize mold and germs by damaging their outer layers, and they cause small nanoparticles to stick together and drop out of the air in order to avoid breathing them in.

  • Be very vigilant about humidity levels in your home, so that mold does not gain a foothold.  You can monitor humidity easily using our inexpensive Humidity Sensors to maintain humidity between 40-60%.  If you see any water intrusion into your home, make sure to deal with it promptly to prevent mold growth! 

  • Use a MERV 13 filter (if possible) in your furnace/HVAC and change it regularly!

  • Use a standalone HEPA filter in areas where you spend a lot of time (living room, bedroom)

  • Clean as often as you can using a non-toxic, unscented cleaner: TotalClean fits the bill perfectly!  Safe to use around food, people and pets, TotalClean is the solution to replace all of the VOC-producing cleaners that can irritate and inflame sinus pathways. 

Think about the agony of sinusitis or a sinus infection and the time you lose while you battle it:  isn’t an ounce of prevention totally worth a pound of cure?  We think so!

How to choose a mold remediation contractor

How to choose a mold remediation contractor

It’s a scary prospect to think that mold in your “safe place”--your home–may be intruding and possibly causing illness in you or family members.  Whatever your training in other disciplines (even medical doctors), you can still be largely unprepared in knowing about mold and fungi and their effects on your home and body.  There are many “smart people” who get overwhelmed and discouraged when doctors or inspectors “miss” or mistake their symptoms.  How can you cut through to get real answers?

The assessment or consultation:

First of all, there are different opinions on who should inspect and test, and who should do the remediation work.  Often they are the same company, but the better inspectors have chosen to focus on inspection and testing, with recommended companies to do the remediation work.  It’s like a doctor who assesses and diagnoses a problem, but then refers you to a physical therapist or nutritionist for the corrective work.  For example, Brian Karr and his company We Inspect are highly recommended and fly all over the US doing inspections.  On his website, he states “We do not perform any remediation work ourselves because it’s a conflict of interest for the same company to handle both inspection and remediation.”  This is a unique position because many inspectors will also do remediation work, but it’s a very safe position to accept from the homeowner’s perspective. 

Tests are just one of the diagnostics that home inspectors use to confirm whether mold is a problem in your home. If a company wants to jump straight into air, dust, or body fluid testing (which can be a substantial revenue source for them) without some time to talk about the history of your home and your symptoms, then you may want to look elsewhere.  That’s like paying (and waiting, usually!) to see a doctor and getting to talk for less than 5 minutes before he ushers you out the door with orders for a test or a prescription. 

It’s best if you can do an in-person assessment where the consultant can come to your home, but unfortunately, many people live hours from qualified consultants so remote “visits” will be the case.  Prior to that visit, it’s always helpful to get your thoughts together and write down specific events and questions that led you to this point, such as:

  • If you are feeling ill, when did that start?

  • Have you noticed specific events that may have caused it, such as renovation work, damage by a severe weather event like flooding or roof damage, etc.?

  • Have you had other problems with the home?

  • What other life events are going on (job changes, pregnancies, new pets, etc.)

Other things to ask: 

  • Do you believe that mold can cause health issues and even cancer?  Amazingly, several reputable online sources deny that mold can cause cancer, including healthline.com, despite studies since the 1960s that have proven this link. This inspection and remediation company seemingly copied the Healthline article and adopted their stance.  Who wants to hire a skeptic of science?  

  • How do you test for mold, and do you test before and after remediation?  According to the late Dr. Jack Thrasher, a toxicology and mold pioneer, he  “always, always recommended multiple testing mechanisms for the same space. He liked dust sample testing from at least 4-5 places and ERMI (Environmental Relative Moldiness Index) testing to find out the species of mold present—he was BIG on knowing what you are dealing with, so that you could fight the battle properly. Dr. Thrasher was also a proponent of culturing surfaces, even hidden surfaces, like refrigerator coils for bacteria. For example, if everyone is getting sick in the kitchen, but the mold counts in the undisturbed air read ok, and there doesn’t seem to be moisture intrusion, start looking behind things. In this case, when he pulled out the refrigerator and tested the damp coils, he found rare and dangerous bacterial cultures. So, when the fridge was opened or closed or disturbed in anyway, a poof of bacteria and particulates was flying around, making folks sick. There’s your answer. Always dig deeper was his motto.” (moldfreeliving.com)  In addition, the mold testing facility needs to be an independent lab, so that testing can be performed properly and results are not skewed.  Having an inspection company who is independent of the mold remediation company perform the tests before, and after remediation but before reconstruction is the gold standard–because why rebuild if the mold is removed to a satisfactory level?  This second set of tests is called “clearance” testing, so that if successful, the remediators are cleared to rebuild.  This is the best way to check that the remediation was performed properly.   

  • What products do you use to “clean” mold?  Even if mold has not caused a reaction in your body, you don’t want to bring in chemicals that are unhealthy!  “ Aim for botanically-based products, like the EC3 line of products that are proven to eliminate mold but cause no harm when inhaled or ingested. Hydrogen peroxide cleaners and Borax are also effective products that will not cause additional harm to your health.” If the remediator uses things like bleach, it’s a sign that they don’t understand the health implications of these harsh chemicals and should be avoided. (moldfreeliving.com)

  • Do you have recommendations and resources to treat myself, my family and my pets as well as the home?  Because recovery from mold in your home is more than treating the building, most good mold remediation companies have recommendations on doctors who understand and can treat sicknesses caused by mold like CIRS (Chronic Inflammatory Response Syndrome) and Mast Cell Activation Syndrome (MCAS). 

  • How do you remove or inactivate any moldy materials?  You definitely want to know the company’s procedures for isolating and removing mold so it’s not spread throughout any areas of your home that have not been contaminated.

  • What are your certifications?  It’s important to check on local and national certifications, because it means that the company and employees have been trained in the best practices for their craft.  The National Association of Mold Professionals and Institute of Inspection, Cleaning and Restoration Certification are two highly respected certification organizations.  

  • Are you insured?  If the company is not insured, it is best not to hire them, as improper remediation will cost even more than doing it the right way.(moldfreeliving.com)

  • How do you decide which materials may be cleaned, which materials need to be removed, and how far away from visible mold needs to be removed?  Mold grows “tentacles” called hyphae, but these hyphae can grow up to 6-12” outside a visibly moldy area.  Therefore according to previous industry standards (ANSI IICRC S520 Standard) materials should be removed 24” around a visibly moldy area.   For example, drywall that has been wet for more than 24 hours also needs to be removed, but structural members like studs and floor plates can be cleaned if they are not water- or insect-damaged.

  • What kind of containment equipment do you use?  In order to prevent the spread of mold beyond an area, negative air machines (NAM) with HEPA filters are often used so that air laden with mold spores does not contaminate other parts of the home.  At a minimum, barriers with 6mil plastic should be created between the area being cleaned and the rest of the home, including the area where workers are carrying out debris. 

  • Do you have any personal experiences with mold?  Sometimes the business owners with personal experiences on how devastating mold can be to their health, family and home are the best in understanding every step of the discovery, remediation, rebuilding and treatment process.  For an example of how a good, experienced air quality inspector conducts his interviews and assessments, check out this interview

Finally, many companies are good at selling and less good at performance.  I once hired a plumbing contractor who was a good salesman and smooth talker, but when it came down to performance, found out that he was improperly designing and installing drain piping runs.  I fired him and because I and another contractor called him out on the mistakes, he did not charge me for the work.  Even if he had, I would only be lacking money…Your health is more costly, so don’t be afraid to “go with your gut” and if necessary, terminate a mold contractor that is using sub-standard practices to protect you and even their own employees.  Don’t be afraid to ask questions and get second opinions, because you will not be able to “heal” from mold if your home stays infected with it!

1 13 14 15 16 17 30