All Posts by Jennifer Faul

About the Author

Hosting Responsibly

Hosting Responsibly

‘Tis the season for gathering together for celebrations!  More than a few years ago, “hosting responsibly” might be taken to mean monitoring alcohol consumption and driving.  Now, it also means providing good air quality where participants don’t need to worry about breathing in germs.  What a difference a few years (and a pandemic) makes!

In November 2022, in grocery stores, malls, airports and airplanes, masks and distancing are no longer mandatory.  There are also no mandatory distinctions between vaccinated and unvaccinated people.  I realize that although most places present as pre-pandemic, these norms can change at any time, and many people are still concerned about virus transmission and their health.  This elephant has been dressed up well, but he’s not going away, so it’s best to acknowledge him!

Letting your guests know about your preparations means letting them know you care, and make them even more eager to attend!  How can we get started?  Here are some questions for the host:

Is your home or gathering place well-ventilated? 

Here are a couple ways to tell:

  1. Do odors persist for hours if you don’t do anything to abate them?  This might be a little tricky to answer, because it’s definitely a good idea to use your kitchen exhaust fan while cooking, but if you clean up the food bits, wake up and can still smell last night’s dinner, there is likely a problem.
  2. Is the carbon dioxide level in your home below 1000ppm?  It’s really helpful (and surprising) to use a portable CO2 meter in your home and elsewhere.  It let me know that my house (built 1982 with building paper as the air barrier) is quite leaky at about 520-550 ppm CO2, but on the other hand, my parents’ house (renovated 2020) seems to be quite tight and in need of more ventilation (1500ppm)!  The American Society of Heating, Refrigerating and Air-Conditioning Engineers (ASHRAE), which is the dominant organization in establishing proper building ventilation rates in the US,  is hesitant to use CO2 levels as an indication of proper ventilation in homes and businesses because of lack of research and a number of variables.  However it does state in a white paper on indoor CO2 levels
  • Indoor CO2 concentrations do not provide an overall indication of IAQ, but they can be a useful tool in IAQ assessments if users understand the limitations in these applications.
  • All else being equal, higher CO2 concentrations correspond to lower outdoor air ventilation rates and the potential for an increased risk of airborne transmission.
  • Rather than using indoor CO2 concentration as an indicator of desired ventilation rates, several analyses of airborne infection risk have used CO2 as an indicator of the “rebreathed fraction” of indoor air (the fraction of inhaled air that was exhaled by someone else in the space). (Yuck!)

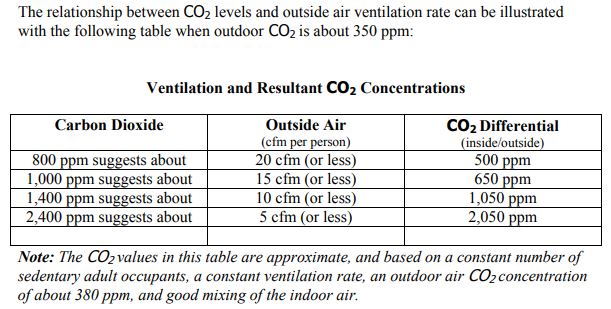
So, although ASHRAE did not set these values (contrary to misquotes), the generally accepted values are consistent with these:

Source: Washington State University Extension Energy Program

So, if you take a reading on your CO2 meter and find that the difference between the indoors and outdoors is less than 650 ppm (which is normally about 1000 ppm indoors), your ventilation is “acceptable”.  Above that level, your guests will have complaints of fatigue, loss of focus and concentration, and an uncomfortable ‘stuffy’ feeling in the air, all of which indicates you are not getting enough fresh air. (Kaiterra.com)  Keep in mind that with more guests, more ventilation is necessary to keep the CO2 level down!  You can crack windows to add more ventilation.

Do you have active air purification?  If so, let them know!  Just as businesses are proud to advertise that they use HypoAir products to keep their clientele safe, don’t hesitate to let your guests know if you are using active air sanitation like the Whole Home Polar Ionizer, Air Angel or Germ Defenders.  In addition, a fresh furnace filter in a higher MERV rating and/or use of a standalone HEPA filter also increase the air quality. 

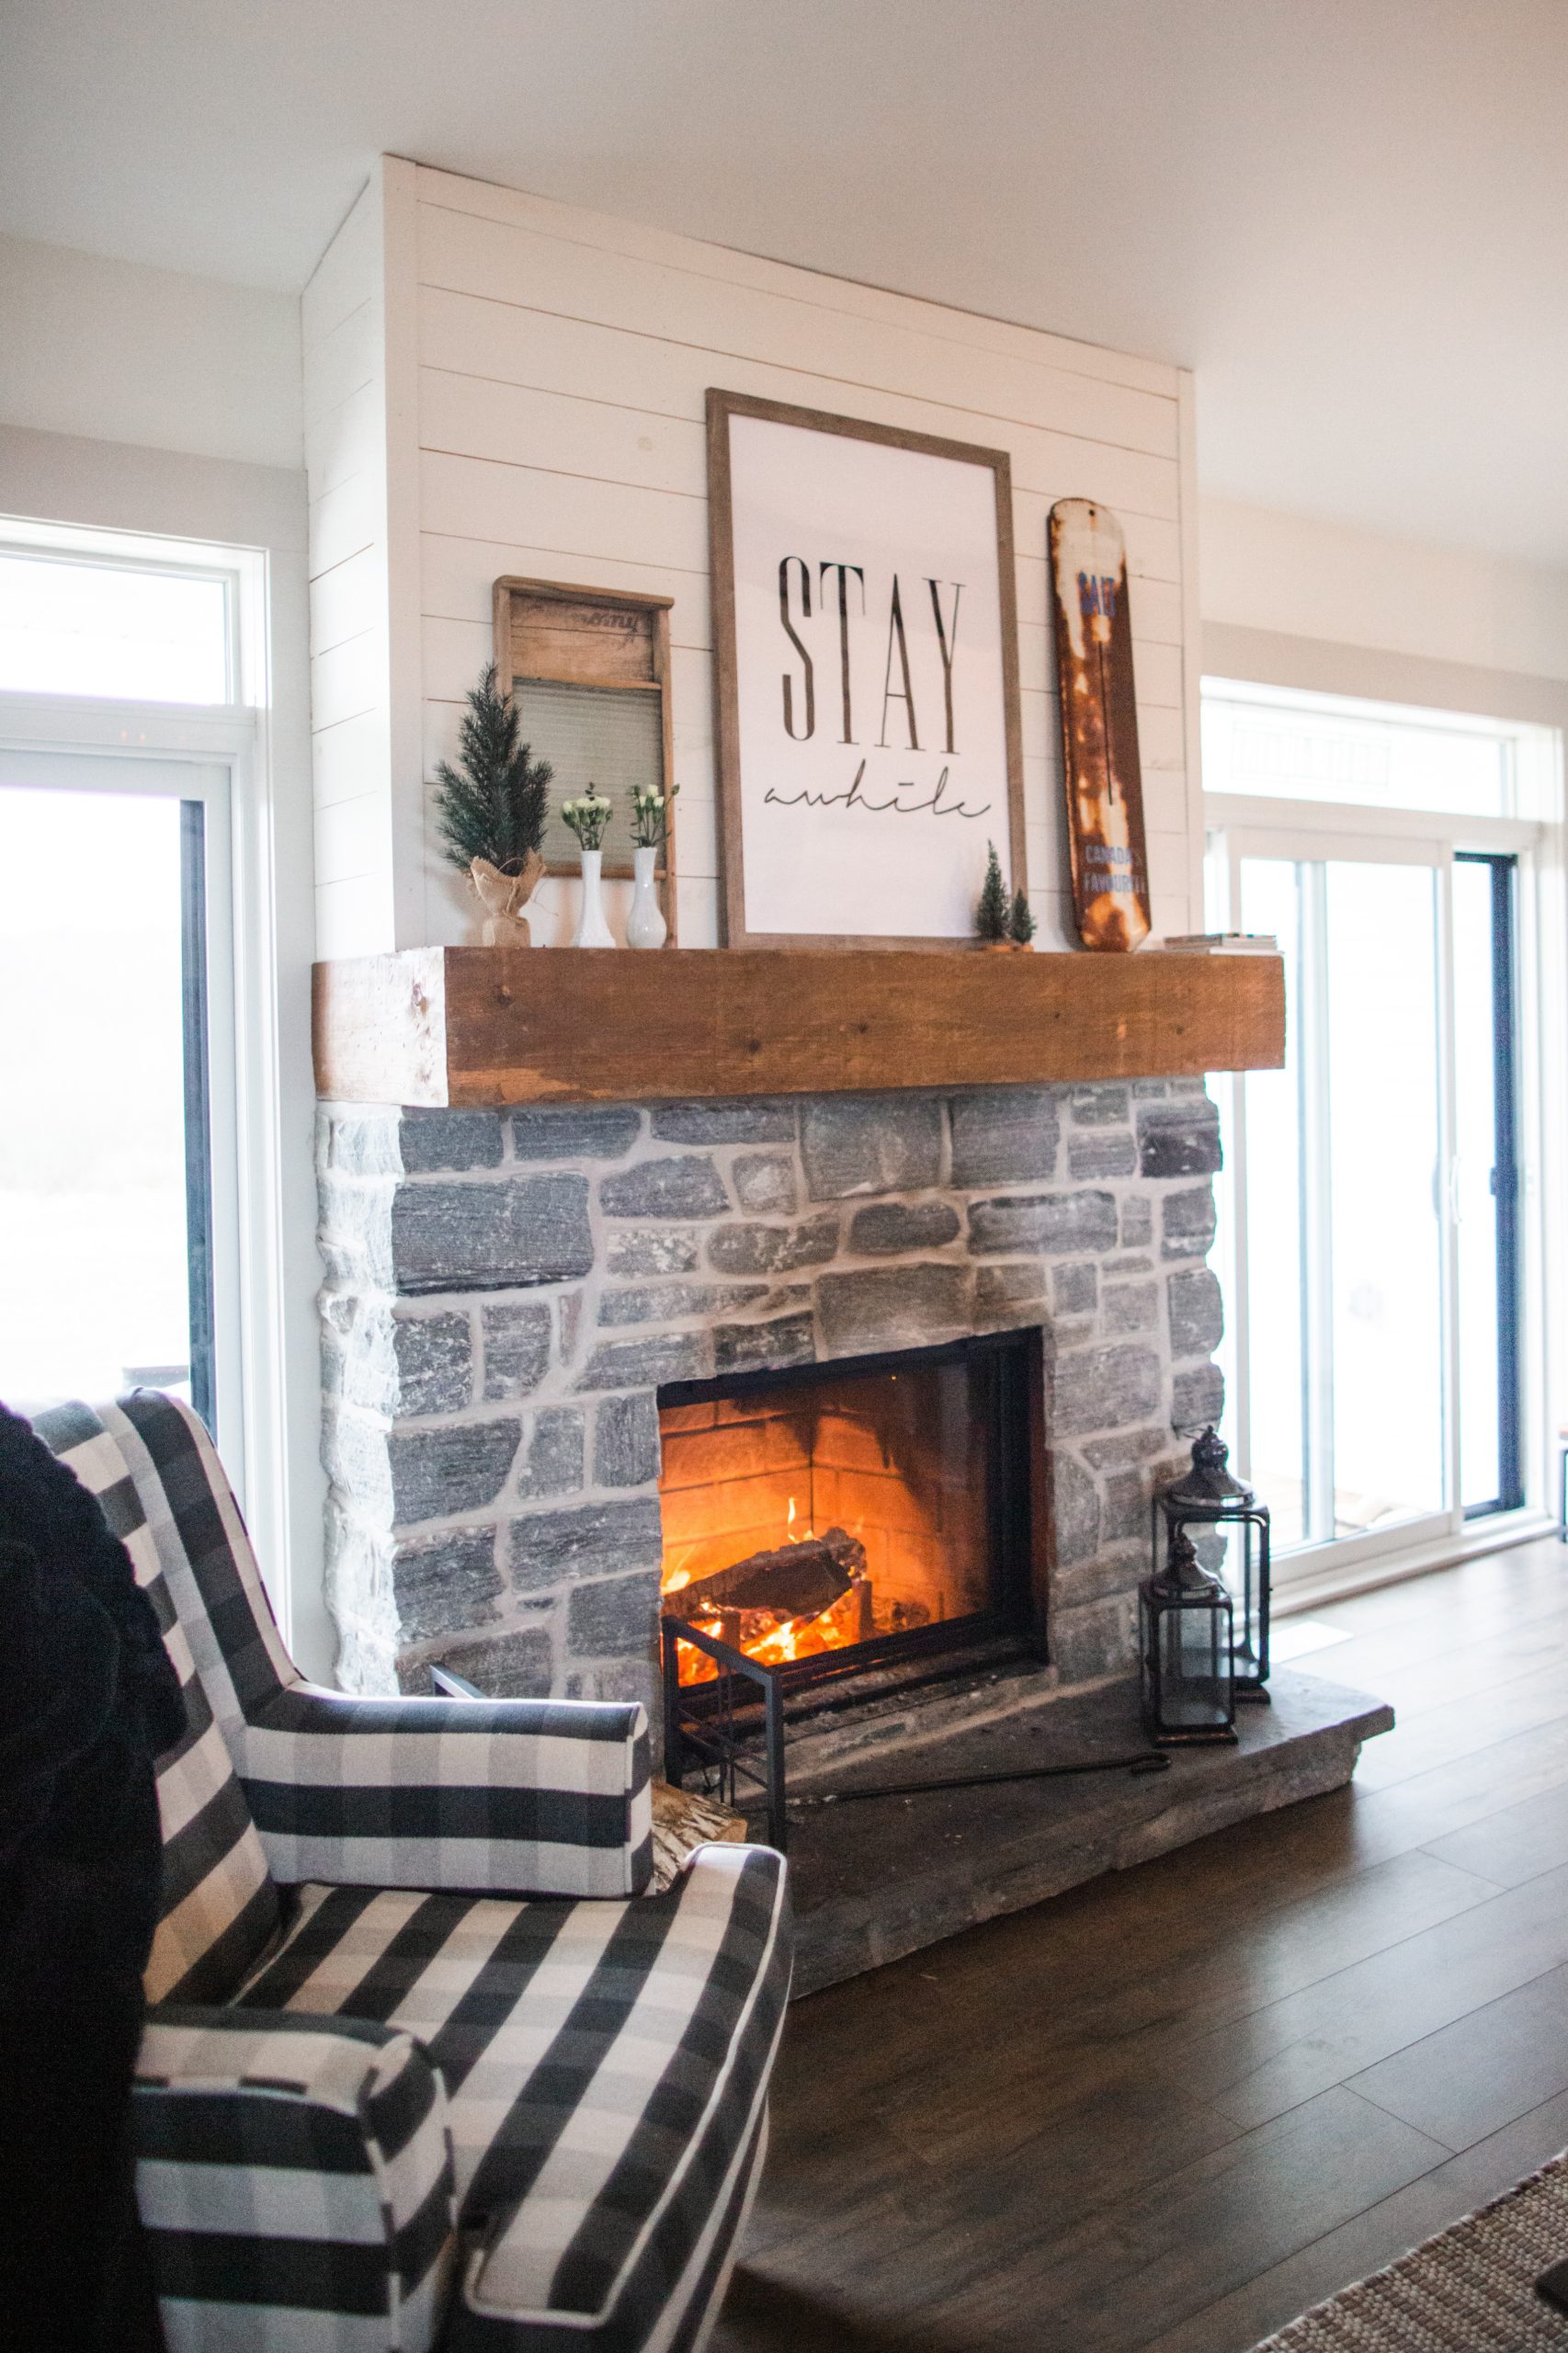
How about making your gathering indoor-outdoor?  If you have a patio or yard, string lights and a firepit or chiminea make for a cozy, festive ambiance!  In addition, the opening of doors when guests enter or exit adds fresh-air ventilation to your indoor space. If you decide to light a fire in the fireplace, cracking a window will help the fire burn better with less chance of backdrafting smoke into the room.

Have you thought about food and beverage service?

If we had a throw-away mentality before COVID-19, unfortunately the pandemic has only made it worse.  Restaurants have embraced using disposable food trays, utensils and drinking glasses for sanitation, however I suspect it is now more for convenience.  According to this 2020 study, the SARS-CoV-2 virus can remain viable on inert surfaces, with varying lengths of time depending on the surface: four hours on copper, 24 hours on cardboard, 48 hours on stainless steel and up to 72 hours on plastic.  With this evidence showing that cardboard and plastic are not anti-viral, you don’t have to follow suit with everyone else regarding what you serve on.  Instead of having a large trashbin in the center of the party (although some garbage is inevitable for sure), why not fill one side of the sink with soapy water, or leave a basin with soapy water, in which to submerge dishes?  I’ve always enjoyed using real dishes over plastic or paper, so if your gathering is smaller than your collection of plates, it’s not taboo to use china and stainless steel. Marking drinking glasses with a marker or tag ensures that everyone keeps their own!  You could even DIY inexpensive beverage glasses with your guests’ names as favors.  If you decide to go with single serve drinks, cans or bottles are still best marked to avoid confusion.

What’s more important, though, is how you serve.  It’s wise to designate 1 or 2 people as “servers” who can add helpings to individual plates in order to reduce handling of the serving utensils.  If “seconds” are available, it’s best to use additional clean plates to avoid contamination.  Wrap utensils in individual napkins pre-party so that no one has to dig through a bin to get their own.  

Set containers of hand sanitizer throughout your space, and most importantly at the food and drink service area.  

Have you made sure the bathroom is clean and inviting?

  • Provide antibacterial soap and individual paper hand towels
  • If you have a bathroom vent, consider installing a switch protector or sign so that it stays on throughout the party to keep the bathroom air fresh(er!)
  • Instead of buying deodorizers that can add toxic chemicals and VOCs to the air, re-package some TotalClean in a pretty glass bottle and label “air freshener”--it really deodorizes well!

Will you have chemically sensitive guests?

Ask guests to notify you if they have chemical allergies, so you can keep it scent-free if necessary.   If you've ever had a smell irritate your nose or even cause a headache, you have a inkling of what Multiple Chemical Sensitivity (MCS) sufferers go through.

  • It’s hard to pass up candles and sprays in holiday scents, but try to do it for the sake of your friends!
  • It’s also wise to use unscented, natural products like TotalClean to get a thorough clean on all surfaces without any scent.
  • Ask other guests to abstain from using scented personal items like perfume and deodorants.

Spread the warmth from your fireplace…not the air pollution!y

Spread the warmth from your fireplace…not the air pollution!

With temps turning colder and guests coming over for the holidays, I thought to myself, wouldn’t it be nice to start a fire in the fireplace soon?  With Thanksgiving a week away, I decided to make sure that it would be a joyful experience and not a regret!  Here’s some tips for getting your fireplace and wood ready.

The fireplace:

  • If you haven’t had the chimney cleaned in several years after using it, call a professional for this job and make sure they use HEPA filters in the vacuum.  
  • If you are not having your chimney cleaned (if so the cleaner can do this check), check that the damper is working properly:  Get some safety glasses on and a flashlight for this one.  Moving your head underneath the fireplace opening, use the lever handle to open the damper and make sure it stays open when you release it.  Hopefully you do not have the surprise of wildlife or a lot of debris being released when you open it!  Close it again until you get ready to start the fire, making sure that it closes fully and seals (see next point).
  • Sealing the fireplace damper when the fireplace is not in use is really important.  Inadequately sealed fireplaces are noted as being one of the worst air leakage sources in the home. According to the D.O.E.3, by weatherstripping the fireplace, the typical U.S. home can reduce air leaks by 14% or more. (hearth.com)  Here some ways of sealing your chimney, some of which would be better avoided:
    • Top mounted chimney dampers don’t seal the chimney space off from your home, meaning that the combustion products and cold (or warm) brick is still exposed to your air.  These aren’t highly recommended.
    • Plugs are inflatable devices that seal off the chimney when it’s not in use.  The problem is that they can deflate with colder temps, allowing air to leak through, causing it to need to be reinflated sometimes.  Sometimes the product itself leaks. 
    • Glass doors don’t adequately seal off the chimney, even though they look nice.  The solution: a magnetic, insulated cover will stop the drafts if your fireplace doors are sealed to the masonry.
  • A grate is really helpful to help your fire burn cleanly and not smoke too much.  Why?  A grate gets the wood up off the floor and allows air to circulate under and through the logs.  (This is the key to those new smokeless fire pits–air holes along the bottom of the fire pit get adequate combustion air to the wood!)  Check that your grate is sturdy.  If it is corroded or broken, take it to a welding shop for repairs.  You don’t want a pile of logs shifting and rolling or throwing a cascade of sparks when you’ve already started your fire!

The wood:

  • Only burn wood that is completely dry, which usually means it was cut and stored over 6 months ago.  Only burn hardwood,
  • Don’t buy firewood a long distance from your home.  Although it may look clean and dry, wood that is harvested over 50 miles from your home may have species of pests (eggs and insects) that are new to your area and by transporting them, you could unleash an invasive pest to the trees in your county. (Forestry Commission
  • Be selective about what kind of wood you burn indoors.  Stay away from wood with a lot of resin, such as pine and spruce, because burning it forms creosote that can cause a chimney fire.  Never burn treated wood or particleboard, as these release toxic fumes. (Family Handyman)
  • It's important to store all firewood outdoors until you're ready to use it, because firewood will naturally have some mold on it.  Storing it outdoors not only keeps the mold spores from entering your home but it also reduces the risk of spiders, ants and other unwanted insects from coming inside as well.  (firewood-for-life.com)
  • If you encounter wood with a lot of visible mold, it’s best not to bring it inside at all!  If the mold is on the bark, you can try to knock the bark off with a hatchet or hammer.  Remember, mold spores spread easily through the air and disturbing a mold colony just by moving the firewood (and stacking and then tossing it into a hot fireplace) will release millions of spores into your home!

What about firestarters?

  • Firestarters are easy to buy at the hardware or grocery store, but it may be harder to determine if their ingredients are safe and non-toxic.   In a 2014 study, burning synthetic firewood logs increased breast cancer risk in women by 42%.  Wood and synthetic logs are sources of polycyclic aromatic hydrocarbons (PAHs), which cause mammary cancer in animal experiments. Both contribute to residential air pollution, but researchers found that only the synthetic logs were found to be associated with an increased risk of breast cancer.
  • If you have any concern, take the safe route and make these firestarters easily from cardboard egg cartons, wax and sawdust (great project with your kids!)  The only caveat I would add is not to use just any candles for wax; paraffin candles are made from petroleum products, and soy candles are from hydrogenated oils that usually contain some paraffins.  If you can find it, unscented beeswax is the best!

Test it out! 

  • Keep a fire extinguisher nearby.
  • First and foremost, make sure the damper is open and any plugs or stops are removed before starting a fire.  Use your safety glasses when looking up into the chimney!
  • Always clean out cold ashes from a previous fire before starting a new one.  If you use your fireplace frequently, an ash vacuum is really helpful and speeds up the job.  Don’t use just any vacuum to suck up ashes, as vacuums without a HEPA filter will blow them all over the room!
  • Prime the flue: this means getting a flow of air going up the chimney.  The cleanest, simplest way is use a hair dryer on the hot setting, or a blow torch: just hold and point it up the flue for a few minutes. 
  • Place a few firestarters or balled up newspaper under the grate and some kindling (small pieces of wood) on the grate.  Start the fire with a long-handled igniter. 
  • When the kindling is burning well, place a few logs on the grate.
  • Does your fireplace smoke? (does smoke roll out of the top of the opening into the room?)  If so, the opening may be too large in relation to the flue, causing air to stall at the top of the firebox and allow smoke to come out into the room.  Here is a great video explaining the concept and how to fix it (or buy the right smoke guard and screen if you’re not a welder).  A smoke guard is a strip of metal that extends from the top of the opening down into the fireplace 4-8” to make the opening smaller and improe draft.  This article tells about an aluminum foil trick on how to size the smoke guard before you buy one, plus other reasons the fireplace may be smoking.
  • If there’s no smoke coming into the room, add more logs slowly, making sure to place them with good air flow from below. 
Fireplaces are not the cleanest or most efficient ways to heat your home, but the fireplace is here to stay in American homes because of its tradition and ambience.  For more tips on upgrading its efficiency, check out our other post on fireplaces here.  We wish you warm and cozy memories snuggled in front of your (safe, clean-burning) fireplace!

Can my indoor air quality affect the food I eat?

Can my indoor air quality affect the food I eat?

Do you ever look at the food on your countertop, whether it’s an apple pie or bowl of potatoes, and wonder, how did that food go bad so fast?  It’s a common problem, even more so in warmer climates, so we thought you’d like to know how your indoor air quality affects your food!

Admittedly, not all spoilage comes from your own air.  It’s been recognized that food processing plants need to have better air contamination control during the food production process.  “Primary  air  pollutants  in  the food  industry  are marked,  being,  in addition  to  microorganisms, suspended particles, combustion  products (nitrogen oxide,  carbon monoxide, carbon dioxide,  sulfur oxide) and volatile organic substances.” (2019 Meat Industry Conference Paper)  The contamination of food products is dependent on:

  • air’s microbial load, and 

  • on the duration of exposure to the air, whether during specific technological processing stages (e.g. cooling) or during storage (from book: Hygienic Design of Food Factories, chapter 14: Managing Airflow and Air Filtration to Improve hygiene in food factories).  

Air in slaughterhouses and sausage production facilities, for example, is more than 10 times more laden with yeasts and molds than dairy processing facilities, because of contamination that can come in on the product (animal feces).  The second point is that the product contact with air needs to be limited in order to limit its contamination.  Air  quality  is  particularly  important  in facilities for  production and packaging of butter, if this is manufactured in open-type mixers, since these devices can also incorporate up to 5% of the surrounding air into the product [Varnam  A  and Sutherland  J  P  1996 Milk  and  Milk  Products: Technology,  Chemistry  and Microbiology 1st ed, Chapman and Hall, London, p 451].

Another factor that causes spoilage during food processing is humidity.  There are three ways that humidity affects the food: 

  • Condensation on equipment and food can accelerate microorganism growth

  • Dry foods can absorb moisture that will lead to microorganism growth

  • Packaging like paper and metal start to degrade, leading to spoilage

These insights into how food gets contaminated in factories are good for application in the home because although we can’t much control how it gets packaged, we can certainly control how it’s stored and prepared at home.  So let’s dive in…

The three main biological pollutants that cause food spoilage are bacteria, yeasts and molds. (online course)  Bacteria, yeasts and molds, which are typically small in size, can hitch a ride on larger particles like water droplets or dust.  Where do these come from?

The bathroom.  It’s not pleasant to think about, but “Germs will more likely spread after you flush, when bits of fecal matter blast into the air in aerosol form, a phenomenon known as "toilet plume." From there, Kelly Reynolds (a public health researcher at the University of Arizona) said, the "bits of fecal matter settle on surfaces, contaminate hands and then get spread to the eyes, nose or mouth." (USAToday.com)  Here are some ways to limit the spread of germs from the bathroom to the kitchen: 

  • Close the toilet lid before you flush.

  • Wash and dry hands before leaving the bathroom

  • Use an ionizer like the Germ Defender in the bathroom, to kill germs in the air and on surfaces.

Pets.  Similar to the slaughterhouse scenario, many of us have furry animals (pets) walking around in our food-processing facilities (kitchens).  Where these pets have been and what they have on their fur and feet can be really disgusting!  Worse, homes with litterboxes in the kitchen, or allowing pets to walk on the counters, is like placing a toilet in the kitchen or even on the countertop!  It’s just not pleasant to think about.  If you have pets and you have a kitchen, think about these reforms:

  • Bathing pets regularly so that bacteria and mold are minimized

  • Not allowing pets to walk on countertops

  • Keeping litterboxes in another area of the home away from the kitchen if possible

  • Spraying pets’ fur regularly with a safe anti-microbial spray like Remedy Mold Treatment Spray by CitriSafe.

  • Always wash your hands after touching your pets and especially before food preparation!

The refrigerator.  What?  How can the refrigerator work against us when we’re talking about food spoilage?  Actually, I’m not talking about inside the refrigerator, although that can be a problem (more on that later).  Here, let’s talk about what happens in the “guts” of the refrigerator, where the heat is actually released through the coils.  The speaker is Jeff May, a renowned air quality inspector.  

“I was sitting in my kitchen, and every once in a while, I’d start to wheeze, but just couldn’t understand why. One day, I realized every time the refrigerator turned on, I would have trouble breathing. Our refrigerator was only three years old, but in those days, the drip pan was accessible from the front. When I removed the grille and took it out, there was a pearl onion that somehow bounced into it. The onion had an inch and a half of Penicillium mold growing on it. So, every time the compressor turned on, it would blow mold spores out into the room. Every frost-free refrigerator has a heating cycle. The cooling coil gets full of ice, and you have to melt that ice in order for the refrigerator to cool. The water from that melt goes into a pan at the bottom. The heat from the compressor is supposed to evaporate the water, but very often, the water persists. There’s just not enough heat. So, if there’s any dust in that pan, mold growth ensues. And if you’re allergic to cats and dogs, and somebody had a pet in the house before you moved in, that refrigerator can be a perpetual source of allergens just from the dust that accumulated on the coils when the pets were there. We’ve had people who have just simply cleaned their refrigerator, and all of their allergies went away.” (Jeff May, during interview with author of moldfreeliving.com)

Now for the inside of the refrigerator: Ok, it seems like a no-brainer that you shouldn’t leave spilled food lying around in the fridge because it can contaminate other food by direct contact.  But using your fridge properly also prevents spoilage:

  • The real reason there is a Fruits and Veggies Drawer: it controls humidity in the drawer and prevents certain foods from ripening too fast.  If there is a vent or slot on the drawer, this is used to adjust the humidity and air flow (because ripening fruits also produce a gas called ethylene, which will cause other fruits exposed to it to ripen).  Closed vent or no vent = high humidity, and Open Vent = low humidity.  For a quick way to remember what to put in the “Crisper Drawers”, remember this rule of thumb: “rot-low, wilt-high.” Fruits that are prone to rot belong in the low-humidity drawer, while produce that's prone to wilting needs to be enclosed completely in the high-humidity drawer. (for a full explanation see article at epicurious.com)

  • Don’t put meat, cheese, milk and eggs in the door shelves!   The door of the refrigerator tends to stay at a higher temperature and these items will spoil more quickly (with nasty consequences) when stored there.  For more on where to store what food, this article helps a lot).

The FoodKeeper App from the FDA is a useful tool to determine how long to keep, and when to throw out specific foods.  It is also helpful to know why you need to preserve foods by refrigerating or freezing them right away (within  2 hours of cooking).  Bacteria are not killed by these colder temps, but their growth is slowed down or stopped.  Some bacteria and their endotoxins (toxins released by the bacteria through its life cycle and during death) are highly resistant to heat, so thoroughly re-heating them before eating does not kill the toxin! (check out our post on endo-and exotoxins here).  Staphylococcus aureus is one example of such a bacteria, and it can cause some serious food poisoning, even death.  

The dishwasher. Wait–the dishwasher is supposed to clean my dirty dishes, how can it be polluting my kitchen air?  If you have ever cleaned the vent on your dishwasher, you will know how absolutely filthy this spot can be.  Food residue, along with moist, steamy air will cause a thick slime to grow.  The rest of the dishwasher needs a deep clean too (not just using a bowl of vinegar and/or baking soda), but the vent especially is the area where escaping steam will carry bacteria into your kitchen air. 

Finally, keeping proper humidity in your home is super-important not only for your sinuses, but for food preservation too.  Some fruits and veggies should only be stored on the counter (check them out here), so the proper humidity will help them to stay fresh longer.  

Now you know how good air quality in your home means better food (especially in your kitchen).  By reducing the bacteria-load in the air, reducing exposure to the air, and keeping proper humidity in the air, you can waste your precious foods less, and enjoy them more!

Are my windows causing my mold allergy?

Are my windows causing my mold allergy?

If you viewed the results of my home’s mold plate testing, you probably saw the high count of mold colonies in my sunroom–which doesn’t even have air conditioning vents in it.   What the heck?  I was scratching my head until I remembered that I had placed the plate on a table only a few feet away from the exterior wall of windows.  There are 12 exterior windows in that room!

Here are some of the ways that windows can increase mold counts in your home:

  • Direct water leaks:  if the seals or caulking fail on your window(s), they could allow water to run into the wall, where mold can grow.

  • Drafty windows allow air to pass from the outside in, or inside to outside, where the temperature and humidity difference can surpass the dewpoint and cause condensation.  Condensation can occur on the windowsill or anywhere around the window that is not properly sealed.

  • Outdoor mold can grow on the screens, because they retain dust and moisture.  When you open windows, air blowing through the screens will blow mold spores right into the room.

  • Heavy window treatments create a micro-climate between the room and the window.  Although they are great at insulating the room from heat or cold, fabric curtains retain humidity/moisture, and also create a cold pocket of air without air circulation.  With drafty windows, air between long curtains and the wall can allow condensation, and offer the ideal darkness for mold to grow.    

In my case, I believe it was the drafty windows that allowed air to blow around the frames and carry mold into the room.

Here are some ways to get that mold count down:

  • Check for leaks in your windows.  Here are some warning signs that a window is leaking and how to determine where it is leaking (video):

    • Peeling paint on an interior window sill 

    • Peeling paint on an interior wall near a window

    • Rotting wood on the exterior window frame or sill

If you have any of these symptoms, it’s best to remove the outer siding materials and find out where the water is getting in, because cosmetic repairs will not fix the leak. 

  • Decide whether to replace or reseal your windows.  It’s rarely an easy decision because replacing your windows is not likely to save you money, considering the cost of the windows and installation.  However, there are some ways to know that it’s time to replace them:

    • Replacement: If your windows are extremely damaged by water infiltration, then it’s a good case for replacement. (ecohome.net)  There are many options for energy-efficient windows, available in wood, vinyl or composite (fiberglass or a combination of materials).  Like many products, the installation of the windows is just as important as the quality of the windows themselves. Quality installation is critical for an airtight fit and a continuous water barrier to prevent drafts, water damage and condensation.(efficientwindows.org)  To select windows, the National Fenestration Rating Council (nfrc.org) is a non-profit organization that gives consumers energy performance ratings and other useful information about windows, doors, and skylights.  You’ll also want to consider that new exterior windows that meet Energy Star standards fall under “qualified energy efficiency improvements” which can generate tax credits.  For windows purchased in 2022, you can claim the Residential Renewable Energy Tax Credit for 30% of the total cost, up to a maximum of $600 for exterior windows and skylights. (filemytaxesonline.org) In addition, check with your local power supplier to see if they have more incentives for replacing windows. If you do decide to replace, remember that higher-cost wood windows (which are clad in aluminum or vinyl for weather protection) are only as good as the seals and techniques of cladding them; if water penetrates the cladding, the windows can rot in just a few years.  In addition, the vinyl or aluminum skins on these windows do not permit passage of vapor from the interior to the exterior, so that condensation forms on the inside of the skin.  Condensation = rot! (video)

    • Reseal:  If the windows and frames are in good shape, but you have airtightness problems, it’s most cost-effective to apply some sealing around them. Caulk, weatherstripping and caulking cord are all products made for these purposes, and this video shows how to apply them.  In order to know where the air is coming in, you can do the following (houselogic.com):

      • Seal the house by locking all doors, windows, and skylights.

      • Close all dampers and vents.

      • Turn on all kitchen and bath exhaust fans.

      • Pass a burning incense stick along all openings -- windows, doors, fireplaces, outlets -- to pinpoint air rushing in from the outside. Smoke Pencil Pro ($44) is non-toxic smoke pencil for this purpose.

    • Clean your windows and screens!  On windows where screens are installed, a bi-annual cleaning will greatly reduce the amount of mold present.  In general it’s not better to wash the outside or the inside first, as long as both are done!  However, since outsides usually get dirtier than the insides, it may be easier to see inside dirt if you wash the outside first. You can use a bucket of warm water with a few drops of dish detergent on the outside with a long-handled brush and squeegee, and TotalClean or a mixture of one part white vinegar to two parts water in a spray bottle for the inside. 

    • Get your drapes in order!  If drapes are causing condensation to form on or around your windows, this is not a good situation and it will lead to mold if left unchecked.  Here are some suggestions:

      • Open the drapes during the warm part of the day so that temperatures between the room and window can equalize and dry out moisture. 

      • Leave the ceiling fan running in the room to promote circulation. 

      • True thermal curtains are made of 3-4 layers of material, including a vapor retarder that allows vapor to escape through the curtain.   Problems can occur if the curtains block vapor.  

If you still have a high mold count near your windows, it’s best to check with a qualified, reputable mold inspector to find out the source and be able to enjoy the sun and scenery through your windows instead of the mold!

Photo by Rob Wingate on Unsplash

Insulating drafty windows makes a difference in air quality, not just energy savings!

Insulating drafty windows makes a difference in air quality, not just energy savings!

When you’re trying to make a whole house less drafty, you should go for the low-hanging fruit first.  That means big ol’ holes in the walls, floor or ceiling (like this disconnected register) come first.  If you don’t have any big holes, you can start on the smaller ones–and sometimes the smaller ones can add up.  That was the case in my sunroom. 

My sunroom is west-facing, which means in the summertime it gets brutally hot from sunlight, and in the wintertime it’s brutally cold from westerly winds.  On top of that, it’s fairly dusty and showed some of the highest counts of mold colonies in my home.  When I saw another cold front coming later in the week in December, I finally “made” the time to insulate the windows where I felt the drafts coming in.  I saw that the lower windows didn’t seal at the bottom when closed, AND the previous owner had cut the corners on the lift at the bottom for some reason (they rubbed on the trim?).  Due to these leaks, the room stayed quite “fresh”--meaning the CO2 didn’t really budge from outdoor levels unless I lit a fire in the fireplace on the other side of the room.  If you don’t have a CO2 monitor, I highly suggest getting one: here’s a portable version.

Therefore, the cons of my leaky windows easily outweighed this one “pro”: fixing them was a no-brainer!

Pros

Cons

Better ventilation (lower CO2)

More drafts of hot or cold air (higher energy cost)

More dust or pollution

More mold 

Excess humidity in house

Here are the tools I used: 

  • A spray bottle of TotalClean and several rags for cleaning the windowsills
  • Adhesive-backed weatherstripping in a suitable color to match your windows (low-profile like this one, ¼”, is good unless your windows are very misaligned) 
  • Scissors
  • Optional: A CO2 monitor is helpful–to see the effect on the room
  • Optional: Window locks in case the windows don’t lock afterwards (see below)

If you do have a CO2 monitor, leave the windows closed and take a CO2 measurement before doing the insulation work. You might want to do it while there are a number of people in the room, or you have a propane or natural gas stove burning (I know there are a lot of gas stoves out there!).  Extra people and gas appliances do two things–they consume oxygen and they give off CO2.  These should cause the CO2 to be higher than when the room is empty or no gas appliances are lit.

Next, just get down to it: use the TotalClean and rags to clean off the window sill where the lower half of the window seats.  If you have vertical sliding windows, find the best place to attach the insulation in the vertical track and clean that.  When the track is clean and dry, start peeling the adhesive backing off and apply the weatherstripping a little at a time, cutting it when you get to the end of the track. Close and lock the window to make sure it’s placed correctly.

If you find your windows don’t lock because of the extra height of the insulation (this was the case for my windows) there are a number of window locks available that can be easily removed if you have to open the window for ventilation.  I ended up getting a thumb-screw version that can be moved up a few inches if I decide to ventilate, while still keeping the window secure.  

That’s it!  When you have all of the insulation installed, close the window and repeat the CO2 reading, with or without activity (people or gas-burning appliances).  The CO2 levels should go and stay higher because there is less fresh air coming in.  Fresh air ventilation is needed in a home, but it’s best to do it in a controlled way, not just letting the air come in wherever there’s a small gap or crack.   For more ideas on how to air seal leaky windows, check out this video.

If you’ve completed an easy project that resulted in better air quality, let us know about it! 

Photo by Rob Wingate on Unsplash

Measure it so you can improve it!

Measure it so you can improve it!

There are several great old quotes that still hold true today:

“You can’t improve what you don’t measure.” (often attributed to Peter Drucker, “father of management thinking”, Forbes.com

“When you can measure what you are speaking about, and express it in numbers, you know something about it; but when you cannot measure it, when you cannot express it in numbers, your knowledge is of a meagre and unsatisfactory kind: it may be the beginning of knowledge, but you have scarcely, in your thoughts, advanced to the stage of science, whatever the matter may be.”  (Lord Kelvin, British scientist, oxfordreference.com)

Ok, so we need to measure if we really want to know what is going on.  When you’re talking about air quality, sensors are the key!  Whether you are a homeowner or a professional, an economical sensor is a valuable thing.  Here are some of the best and their many uses.

Air Flow 

There are several instruments that can be used to measure airflow.  HVAC techs use manometers or anemometers  to verify whether the installed ductwork and fans are performing as designed.  There are also many uses for these around the house!  Here are a few:

  • Hold it below your kitchen exhaust vent fan to see if it is moving enough air out of the kitchen (you can do the same for the bathroom exhaust fan)
  • Hold it below your return air intake when the filter is clean, and when it is dirty, to see how much a dirty filter impacts your air flow.
  • Install a pollution-filtering window screen and window fan, and check the fresh airflow in and out of the room (see our post here). 

Here’s an inexpensive anemometer that not only measures wind speed, it also measures the temperature.  In order to get a volume air flow measurement in cubic feet per minute (CFM), set the output to read feet per minute and then multiply it by the square footage of the duct or window you’re measuring (width in inches x length in inches divided by 144). 

Air Pressure

We’ve written quite a bit about the “pressure” of your home; ideally it will be “balanced” so that outside air is not being pulled in through cracks and crevices (other than fresh air ventilation).  How do you really know, though, without measuring?  Air pressure sensors are called manometers and here are some other uses for them:

  • Checking the pressure drop across a new higher MERV filter (we recommend MERV 13 for the best home filtration).  You can make a small hole in the filter in order to feed one of the ported tubes through, and seal it later with some tape.
  • Check the negative pressure in rooms with the door closed, to see if the HVAC returns are getting proper air flow.  In this post we discuss tackling the problem of getting enough air movement with closed doors.  

Here’s an inexpensive manometer that detects pressure or differential pressure (with two ports) and has readouts in several different common units. 

CO2 

If you’ve read our post on CO2, then you know how important this pollutant can be to your wellbeing.  Too much CO2 comes from not having enough fresh air ventilation, and can be a big factor in feeling groggy, less energetic, and causing brain fog and poor mental performance.  Of course, then, you’ll want to measure it in your home and workplace, your car, and maybe even in your classroom, church or other public meeting place.  Here are some sensors that will help you do that:

  • To get the most bang for your buck, AirThings 2930 WavePlus combines 6 sensors in one unit: Radon, CO2, VOC, Humidity, Temp, Pressure (Barometric pressure) for about $200.
  • InkBirdPlus makes a unit that tells CO2, temperature and humidity, which are 3 key measurements for home use.  It can be hung on the wall or be portable.  This unit is about $69.

PM and VOCs

Particulate Matter (PM) is not only dust–it’s smaller than that!  Dust ranges in the 2.5-10 micron range (check out the following diagram), but when there’s smoke or cooking involved (which happen in the home all the time), particles can be less than 1 micron.  That’s where you can really see what’s going on when the toaster burns your bread!  

Source: visualcapitalist.com

Formaldehyde is a toxic VOC that is a common “off-gas” component of new furniture, flooring and pressed-wood cabinets.  It can be measured separately or as a part of Total VOCs (TVOCs).  Those who like to have their nails manicured and painted may or may not be in shock if they took a VOC meter into the salon…the same could happen in a busy restaurant with “open kitchen” concept.  Here are some sensors that you can use in the home or business (gasp!) to make sure you’re ventilating or wearing a mask when appropriate.

  • This model by Temtop has a sleek design for your desk and measures PM2.5, Formaldehyde and Total VOCs ($90).
  • Temtop Air Quality Monitor measures PM2.5, PM10, Formaldehyde, temperature and humidity, TVOC and AQI, with solid ratings on Amazon ($149).

Some sensors look like a sleek medical device and some look like a machine from Inspector Gadget, but remember, they will give you information your nose alone can’t tell you.  If you take out your sensor in a public place and someone asks you about it, you may be able to impart some timely wisdom that will help them, too!

Photo by Jorge Ramirez on Unsplash

Will a Radiant Barrier Help My Home’s Air Quality?

Will a Radiant Barrier Help My Home’s Air Quality?

Radiant barriers have been a “hot” topic for the last few years: If to install them, where to install them, and how to install them.  Are they worth the work and cost?  It’s time well-spent to do some research before diving in with such a project.

Radiation is one of the three types of heat transfer, along with convection and conduction.  A radiant barrier is a material with a shiny surface that reflects radiant heat back outside the home.  If the barrier gets dusty or is installed incorrectly, however, it does not work well. 

According to Attainablehome.com (a builder’s website devoted to building of modern, sustainable, and high quality homes that is within reach of household incomes), properly installed radiant barriers can reduce heating costs in the hottest months in southern climates, if the home’s air conditioning system is located in the attic. It can also offer a degree of protection to that equipment when the barrier is installed over the equipment, “shielding” it. 

In colder climates, however, radiant barriers are not recommended for several reasons.

  • The savings in reflecting heat away from the home in summer is minimal.

  • Cold climates can allow moisture to condense behind the barrier, creating mold issues.  Perforated radiant barriers can reduce this problem, though.

What is “properly installed”?  Here is a good video showing installation of a radiant barrier over a garage.  Radiant barriers:

  • Need an air gap: don’t install the barrier sandwiched between existing insulation, as it can conduct heat into it.  For instance, do not install radiant barrier foam board (such as LP’s Techshield) and sprayfoam over it. (energyvanguard.com)

  • Need to be relatively clean: dust will reduce the effectiveness of the barrier, so installing on the attic floor is not recommended in most cases. 

  • Must be the right type for your home/climate. There are:

    • Perforated and non-perforated: Perforated barriers allow vapors to escape through the barrier, reducing the chance that moisture or mold will build up behind it.   If you live in a hot, humid climate and have a vented attic, a highly permeable barrier like “Super-Perf” from AtticFoil is recommended to allow moisture to pass through. 

    • Made with insulation or board attached to the radiant surface

  • Must not block air flow in the attic.  Most vented attics have soffit and ridge vents, so do not block the air flow between these two, or moisture issues may result.

In a 2010 article that still applies today, energy advisor Martin Holladay stated there are 5 factors that determine whether a radiant barrier is a good option for your home (discussed in this video):

  • Do you live in a hot climate?  Yes = consider radiant barrier.

  • Do you live in a humid climate?  Yes = the radiant barrier must be carefully and correctly installed so that moisture problems are not created.

  • Do you have a one-story home?  One story homes tend to have larger roofs to cover the livable square feet, so a radiant barrier in a one-story home will be more effective than a two-story home of comparable square feet.

  • Do you have air ducts in your attic?  Yes = consider radiant barrier to shield them.

  • Is the air barrier installed correctly?  This is imperative, so the barrier has to be compatible with the insulation in your attic.

In times of low-cost energy, installing a radiant barrier may not be worth it. (energyvanguard.com)  For example, in Houston in 2011 (a hot climate in a year with similar kilowatt-hour (kwh) energy cost to today), a homeowner could save about 180 kwh per year with a radiant barrier installed on their 2000 sf newbuild home, considering that it is installed under the roof decking and the only additional cost was the more expensive barrier under the decking ($200).  This is about $25 per year savings, which would be an 8 year payback if there is no mortgage, or only about 50 cents per month if there is a mortgage (check the article for the explanation!)  It’s not a whole lot, but if energy prices go up (they will at some point), the savings could be more.

According to this video, LP Techshield (an OSB board with aluminum coating on one side) produced an 18 degree reduction in temperature in a doghouse.  Another video using the same product achieved an 8-10 degree reduction in a real house. 

So, how does all of this affect your air quality?  At HypoAir, we are in favor of not adding things that harm you or your home, so adding a radiant barrier to an existing home must be carefully considered.  Here are some steps to check whether it is right for you: 

  • If you have an unvented attic, a radiant barrier is likely not to benefit you.  If you have a vented attic, make sure the vents are not blocked and there is sufficient insulation in the walls/floors of the attic facing the conditioned space. 

  • Consider the current state of your attic and take temperature and humidity measurements in the attic and in the home as a “baseline”.  

  • If possible, you could conduct a small “experiment” in a part of your attic that faces the sun by installing one roll only (best if it shields some ductwork) and seeing how it affects attic and home temperature and humidity.  

  • If this test is favorable, continue with installation of the rest of the south- or west-facing sides.  Although I could not find much information about it, radiant heat is not very applicable on the north-or east-facing walls in the northern hemisphere. 

  • If humidity increases with the test spot under similar atmospheric conditions, it’s best to terminate the experiment and remove the barrier. 

Radiant barrier material is not very expensive, so if you can install it yourself, it can provide energy savings going forward.   It’s best to take your time and research the pros and cons of installing it in your home and not succumb to pressure from a salesperson, however.  Overall, it should not increase your energy use or humidity levels, so make sure to hold the manufacturer and/or installer to their claims.  We’d love to hear from you on how radiant barrier affects your home’s atmosphere!

Photo by Greg Rosenke on Unsplash

Do you need more INSULATION?

Do you need more INSULATION?

When seasons change it’s easier to get a fresh perspective on how well your home is performing against the elements, or we would say how well the building envelope is “sealed”.  Because it’s very difficult and expensive to build a home that is perfectly sealed, everything else is relative to the best-case scenario.  It’s best to have a good idea of what kinds of insulation are out there, before even requesting estimates to improve your insulation, so you know what the experts are talking about!  We can start by discussing what insulation does, how it is rated, and then move on to what types of insulation exist and what they do for our building envelope. 

Heat is a source of energy, and here on the surface of the earth on Monday through Sunday, energy naturally obeys certain laws (we won’t go into any sub-atomic or supersonic cases here). According to the 2nd law of thermodynamics, heat flows from hot bodies to cold bodies.  If the sun has heated up your roof and it’s cool inside because your air conditioning is running, the heat of the roof will try to flow into your cool house.  It’s just doing what is natural, like water running downhill!

Insulation is what we use to stop or retard the flow of heat, whether it’s trying to come in like the above example,  or go out on a cold winter’s day.  It’s like putting on a fluffy down jacket over your warm body, to keep the heat where you want it.  Some heat will undoubtedly escape through the openings and seams, but if you had to spend all day, every day outside, you will want the best insulation, tightest seams and the smallest openings you could get in that coat!  That’s the picture.

To rate the possible types of insulation you can stuff in the floor, walls and ceiling, we have “R-values”.  R-values measure an insulation’s resistance to heat flow; lower R-values allow more heat flow (not good) than high R-values (better).  Typically R-values can range from R-10 for some flooring materials to R-60 for some dense attic insulation materials. (Forbes Home)  These are all based on 1” of thickness, though, so one inch of R-30 is roughly equivalent to two inches of R-15. 

According to the Department of Energy, nine out of ten homes in the US are underinsulated.  (energystar.gov)  Therefore, chances are good that your home could use more insulation.  This map of the US shows 7 zones, which are basically increasing “delta T” or temperature difference between the interior and exterior of the home.  For example, the northernmost extremes in Zone 7 have the greatest temperature difference during the winter, so will need the most insulation.  It also gives guidelines on where and how to add insulation.

Because heat rises (an important part of the “stack effect” in your home), the most effective place to add insulation is in the attic.  Keep that expensive heat inside where it belongs!  This chart shows by the number of stars what value is obtained by adding insulation in the attic vs. floor (lots).  

Everything has an R-value–even carpet and glass.  Here’s a chart that shows the R-values of many common building materials.  Manufacturers generally price the insulation according to its R-value–meaning that the highest R-values are most expensive!   Because heat transfers in three different ways (convection, conduction, and radiation), some materials are better at retarding the transfer in one or more ways.  Here are the differences:

  • Convection is heat transfer from fluid to fluid.  Because air is a fluid for these purposes, air barriers (air sealing) is important to stop air from outside your home stealing heat from air inside your home.  Fiberglass batts with a paper facing are not great for protection against convection, but they are better than loose fiberfill.  Air can move through fiberglass batting, and it can actually move loose fiberfill out of the way.  Spray foam, when correctly applied, is one of the best convective thermal barriers. 

  • Conduction is heat transfer from solid to solid.  Most homes are built with 2x4 or 2x6 studs of wood that are joined directly to sheathing, then roofing or siding.  Without a conductive thermal barrier, cold from outside conducts directly through the siding, to the sheathing, to the wood stud, to the interior drywall.  Brrr!  This is why you can usually “see” the framing of a home on a thermal image on a cold day.  Conduction of heat in this manner is also called thermal “bridging”.  Newer building techniques suggest that a layer of rigid foam board between the siding and framing isolates the framing and prevents it from conducting heat into or out of the home.

  • When there is no direct contact or fluids between two bodies, heat transfer can still occur through thermal radiation.   Waves of electromagnetic radiation from the sun reach our planet and roofs everyday, and on cloudless nights, the warmth is reflected back into space.   Radiant barriers, either as part of a rigid foam board or on their own, have become popular additions in attics to retard heat radiation.  In order for radiant barriers to be effective, though, they can’t be sandwiched between other layers of insulation.  I won’t discuss radiant barriers in this article, but you can read more about them here

Here are some other pieces of information about insulation that it’s important to know:

  • Many types of insulation, like fiberglass and sheep’s wool, are “fluffy” because they are using the insulative properties tiny pockets of air within them.  Therefore when installing fluffy types of insulation, you want to “fluff” them out (wearing a respirator of course), not compress them, as compressing them actually decreases their R-value. 

  • Although the Department of Energy says that fiberglass batt insulation is fine for new construction or even laying over old insulation in attics, the building industry does not agree.  According to Family Handyman, batt insulation simply does not cover well in the attic because of its shape and inability to fill odd crevices and voids.  Of cellulose and loose fiberglass, cellulose has slightly higher R-value but fiberglass is more widely used in attics.  

  • Every insulation type must be correctly installed in order to achieve its rated R-value!

  • Loose fill insulations are very popular for ease of application and decent R-values, but in terms of air quality, most have the ability to generate dust and PM2.5.  If you are looking to use loose fill, make sure your HVAC ducts are sealed well and the area using the loose fill (for example the attic) is air-sealed from the rest of the home.

Here are the types of insulation grouped by where they are generally used:

Attic: Make sure that you have done the best air-sealing possible before adding insulation to your attic.  

Cellulose is recycled, ground-up paper with boric acid added for insect control and fire resistance (Family Handyman).  It comes in dense sacks and is installed with a blower.  Installation creates a lot of dust, but professionals can do a “wet-spray cellulose” that adds a small amount of water to keep the dust down and slightly increase the R-value, which is 3.5 per inch.  

Loose Fiberglass:  Fiberglass is small strands of glass that clump to form fluffy insulation.  It is also densely packed in bags that must be blown in.  It is very itchy to the skin and irritating to the eyes and lungs, so be careful to use full-body protection or hire a professional to install it.  It also can get entrained into your HVAC system if any ducts in the attic have leaks in them.  Fiberglass is lighter than cellulose so that if wind-washing occurs (where air/wind enters the attic through cracks), it is not a good choice for protection against heat convection. R-value: 2.5 per inch

Spray-Foam Insulation:  Spray foam generally comes in two varieties, open cell and closed cell.   To get anywhere near the R-49 recommended in attics of zones 5-8 on this chart, you’ll need to think about using closed-cell spray foam or adding rigid foam board when you replace the roof (see next point).  Open cell foam deforms easily when you poke a finger in it, and has an R-value of approximately 3.6 per inch.  Closed cell foam is typically used in extreme temperatures and under homes, because it has a higher R-value of 6 per inch, and it’s very hard, making it almost impervious to critters that tend to chew through insulation.   Besides being used as an air barrier, it’s also a total vapor barrier, and it adds a lot of structural rigidity to the cavity it’s sprayed in.  The downsides of spray foam insulation include the use of toxic blowing agents that, if improperly installed, can cause long-term off-gas issues (see our post here).  It is also difficult to detect leaks and insect damage behind the spray foam, so that major damage can be done before the problem is evident.  Spray foam must be installed by experienced professionals, and the cost is accordingly higher than other types of insulation!

Rigid foam board insulation:  Installation of foam board in attics is not as easy as blowing in loose insulation, but it adds a lot of  R-value as well as protects against conductive heat transfer.  It gives some of the closed-cell properties of spray-foam, without the offgassing (most of the off-gassing is accomplished at the factory) and installation cost (it can be installed DIY).  The most popular types of foam board are EPS (expanded polystyrene) and XPS (extruded polystyrene).  Polyisocyanurate is made of urethane and is a newer, popular choice with an R-value of 6 to 8.   The easiest way to install these boards is during roof replacement, but they can also be used to create a conditioned attic by screwing them to rafters with special fasteners like drywall (video).  Seams and penetrations can then be sealed using foil tape. 

Walls: Of course, the best time to insulate well is during construction.  However, insulation can be added to walls during siding replacement.  Here are typical wall insulations and their values: 

Fiberglass batts:  Fiberglass has been the standard for many decades now, but its R-values are limited to R-13 for a 2x4 wall, and R-20 for a 2x6 wall (since fiberglass has an R-value of 3.7 per inch,  and a 2x4 stud is 3.5” wide, it gives a value of 12.95). (learnmetrics.com)  This is not very much for northern climates, and it doesn’t address conduction transfer, so you may choose to add rigid foam board to the exterior before the siding. 

Mineral Wool batts: Mineral wool is a fiber insulation, similar to fiberglass, but is made from natural materials and not glass. There are two kinds of mineral wool available for home insulation – rock wool, which is made from fibers of stone and slag wool, are fibers made from iron ore waste.  Additional benefits of mineral wool is that it is an excellent acoustic insulator and it’s very fire-resistant. (What is mineral wool insulation?)  The R-value is about 3-3.3 per inch for a brand-name mineral wool called RockWool.  (bobvila.com)  Mineral wool is also made into boards, with an R-value of about 4.0 per inch.

Sheeps Wool batts:  For those who are sensitive to other types of insulation, or want to use some of the most natural building products available, sheeps wool fits the bill.  What you will need to ascertain, however, is if synthetic adhesives are used, and how sustainably and humanely the sheep are raised and sheared, because the industry has the potential to generate abuse.  Sheep’s wool can also regulate the humidity in your home: it can absorb around 33 percent of its weight in moisture without ever losing its insulating ability.  (buildwithrise.com)  The R-value of sheep's wool insulation ranges between 3.5 and 3.8 per inch, due to millions of tiny air pockets in the folded wool.  Sheeps wool can also come loose in bags for blowing in behind netting (see “loose fill” section below). 

Hemp batts: Hemp has an R-value of approx. 3.7 per inch, making it a very good insulation.  It is sustainable because the hemp plant grows fairly quickly (only 90-120) days, and the product uses only about a pound of raw material per square foot of R-13 HempWool, one brand name for this product.  According to BuildwithRise.com, hemp insulation is non-toxic. It is a plant-based product that contains no VOCs, no chemical binders, and does not off-gas. Hemp insulation is hypoallergenic, repellent to mold, pests, and insects.  One drawback to hemp insulation is that it is not naturally fire-resistant, so fire retardants must be added to it, potentially adding chemicals with sensitivities or toxicities. 

Recycled Denim Batts: It’s unlikely that you have enough old jeans to insulate one 2x4 cavity, but the recycled clothing industry has more than enough!  Denim insulation is actually a combination of recycled jeans and post-industrial denim and cotton, not just denim alone. The fabric is shredded and treated with boric acid to make it flame retardant, and insect, pest, and mildew resistant. (builddirect.com)  It also comes in loose fill for attics and walls, and has approximately the same R-value as fiberglass: 3.5 per inch.  It doesn’t require special protective equipment to install, but it is more difficult to cut and can take a long time to dry if it gets wet. 

Cork:  Cork is a remarkable material.  It’s harvested by hand from trees that live from 150-250 years.  Only the bark is removed every 9 years, without harming the tree.  Most of the world’s cork comes from Portugal.  ThermaCork is a product that is made from the bark and water in a superheated steam process.  It has an R-value of 4 per inch, which is on the high end.  It can be used on the interior for soundproofing, flooring and partitioning, as well as exterior walls and roofing.  It’s non-toxic and sustainably produced. 

ClimaCell: ClimaCell was developed out of an effort to find a scalable alternative to EPS, which is more commonly known as Styrofoam®. (businessinsider.com)  It’s made with paper and corn starch so that it’s fully recyclable and is a preferred packing material for cold shipments.  In residential use, it’s made in loose fill, batts and rigid boards, but only mainly available in European markets at the moment  (start saving all your cold-pack boxes!).

Rigid Foam Boards: EPS and XPS are great choices to protect the structure because of their “closed cell” insulative properties and vapor barrier properties.  Polyiso can absorb moisture, though, so it cannot be in contact with the ground or wet surfaces.  They can be installed during siding renovations or additions.  Check out this article where rigid foam insulation was used to create a continuous air barrier between the garage and the home (genius!)

Spray foam: As stated above, spray foam has good insulative, air barrier and in the case of closed cell foam, vapor barrier properties that make it an excellent choice for walls during construction.  It can also be retrofitted into existing home walls by removing a layer of siding, removing the old insulation and filling the stud cavities from the exterior.  (Removing old insulation before installing new)

Loose fill:  If you live in an older home that was poorly insulated, it may be possible to add insulation between the studs by either removing a layer of siding at the middle or top of the first floor, or drilling through the interior wall.  Then loose fill can be blown into the cavity, and the siding replaced or the hole patched.  (attainablehome.com)  Loose fill can be sheeps wool, cellulose, fiberglass, hemp, cork or a mixture of agricultural products, like ClimaCell.

Loose fill is also a popular choice for new construction, when it is used with netting to contain it.   Netting or fabric is stapled to the studs and insulation is blown into each cavity until it is full. The only problem with this is that it may settle over time, leaving gaps at the top.  

Floors:  If your home is built above the ground, it’s important to consider where your building envelope lies: at the floor, or at the ground?  If you have a crawlspace, consider closing it off and conditioning it, so that humidity and mold from the ground are not sucked into your home.  If you decide to keep the crawlspace open and ventilated, however, additional insulation can be added to the underside to keep cold air from leaking out in summer or penetrating in winter.  Any insulation should have good water-resistant properties to avoid absorbing moisture and breeding mold.

Rigid foam board is great for insulating the walls of conditioned crawlspaces.  This type of insulation may be faced with silver foil, with the foil facing inward toward the crawl space. Though the rigid foam is the chief insulator, the foil adds a bit more energy savings by reflecting heat into the crawl space. The foil, too, acts as a vapor barrier. (thespruce.com)

Closed-cell sprayfoam could be used on walls of conditioned crawlspaces, but they would need to be clean and dry first.  More often, it is used under the floors of ventilated crawlspaces to provide the thermal insulation, moisture and air barriers needed to keep the home more comfortable. 

“New” Insulations

Residential insulation is evolving all the time, and one thing we are watching is Vacuum Insulated Panels (VIPs). With the absence of air in their core, they resist all types of heat except radiation, and often they are covered with a radiant barrier that closes that gap.  They are quite expensive at the moment and shapes/sizes cannot be cut on the job, but they are very promising for roofing especially because of the need to reject heat at this high-access point.  Like other emerging technologies, we expect these to become more widely and cheaply available in the next decade. 

Aerogel is a gel is most commonly made from silica (silicon dioxide), where the liquid portion of the gel has been replaced with air or another gas.  It’s very low density but with high-crush strength, and has an R-value of 10 or more per inch.  It’s used in thin strips and sheets to eliminate thermal bridging, and also available in blanket form.   Aerogel is supposedly “low-dust” compared to loose fiberglass and batts, but silica is dangerous to breathe in so respiratory protection is still required when installing and cutting it. (A Look at Aerogel as Insulation) In addition, it repels water so it can protect your structure from water damage.  Alas, its cost is prohibitive for most residential projects at the moment.

There’s only a few year-round climates that don’t need insulation (Hawaii, anyone?), so it’s always good to stay on top of potential thermal leaks and new developments in insulation.  It’s a case of sowing some money and effort to reap comfort and energy savings down the road! 

Photo by Greg Rosenke on Unsplash

Unplugging for your sanity and your health

Unplugging for your sanity and your health

At this holiday time of year, there are so many competing digital signals that it feels like my brain is being overloaded–emails about sales, gifts and events, advertisements on TV and the internet playing constantly, and music playing on every shop and street.  I checked (yes, online of course!) and digital sensory overload is a thing: our senses send more information to our brains than we can process.  Healthy brains have highly refined “filters” that can discard most information that is not relevant, but information overload or stress occurs when people suffer from the fact that the amount of information they are confronted with is greater than their capacity to process it.  This is not unlike the stress that people who have conditions like ADHD, schizophrenia, and autism experience; they have atypical filtering that can result in painful sensory overwhelm.  (fastcompany.com)  Today’s world is a sensory onslaught that can leave us drained and disoriented.  This short video is an animated version of how you might feel after a day of being “plugged in”!

Digital overload can be an even more prominent problem to those who have a chronic illness or physical limitations, because they depend on technology to help them and/or to provide a distraction from pain or boredom.  (thehealthsessions.com)

Physical symptoms of digital sensory overload may be trouble sleeping (the blue light of digital devices delays the manufacture of melatonin), eyestrain and headaches; if addiction to digital devices is severe, it can lead to decreased bone density (from lack of physical activity), weight gain (again from sedentary behavior), increased risk of type 2 diabetes, and high blood pressure. (goodrx.com)  Emotional symptoms include increased irritability and fatigue, and people who use their devices excessively have a greater chance of experiencing symptoms of depression and anxiety. (thehealthsessions.com)

Reduced productivity from digital overload takes a heavy toll on businesses today.  Consider this: employees may take as long as 24 minutes before they are fully focused on the task they were doing before opening an email!  Sending messages to friends, scrolling through open applications, and seeing unread emails all effectively distract us while completing a task. (workspace365.net)  Those who work from home can confirm that unless you have a dedicated room and time boundaries, telecommuting successfully and efficiently is often harder to do than going to the office!

Creativity, a birthing of new thoughts and ideas, is also severely limited by digital overload.  Neuroscientists have shown that boredom is good for our brains’ health: “Boredom can actually foster creative ideas, refilling your dwindling reservoir, replenishing your work mojo and providing an incubation period for embryonic work ideas to hatch.” (Forbes.com)  Nevertheless, with a smartphone, boredom is never a “problem”. 

Here’s some interesting facts about our brains and heavy digital use: (Per Matt Richtel, Technology Reporter, New York Times, on npr.com)

  • “Multi-tasking” is a myth; we are not truly doing multiple things at the same time.  What you are basically doing is switching rapidly among those tasks, not doing them at the same time.  It does not make us more efficient.  It makes us significantly less efficient.

  • Heavy multi-taskers or technology users have more trouble filtering out irrelevant information, more trouble staying focused, and more trouble, remarkably enough, switching between tasks. 

  • The compelling need to “check” email or messages is called intermittent reinforcement; it makes us think that there may be something fascinating waiting for us, so we constantly check, and when we do, we get a dopamine burst, a little rush of adrenaline. In the absence of checking, we feel bored, so we are actually conditioned by a kind of neurochemical response.

If you are feeling overloaded with digital media and information, there are positive steps you can take to regain peace of mind.  It may not be easy at first to cut back on media exposure, but the results are worth it. 

  1. If you can, take a vacation with less or no digital media exposure. There is a “three-day rule” when it comes to vacations: it takes approximately three days for our bodies and minds to become more relaxed, and without your phone or tablet or computer, this might be hard, but will pay dividends to your mind and body.  (For more science on how long your vacation should be, check out this article).  How often do you truly experience solitude today?  Solitude is psychological detachment from society for the purpose of cultivating the inner world of the self. It is the act of emotionally isolating oneself for self-discovery, self-realization, meaning, wholeness, and heightened awareness of one’s deepest feelings, and impulses.  A survey on “wilderness solitude” was conducted at the Bob Marshall Wilderness Area in Montana in 2017, and it used four core dimensions of the 21st Century Solitude Scale: De-tethering from Digital Connectivity (disconnecting from email and other devices), Physical Separation (being away from crowds, being isolated), Introspection (thinking about who you are and your values), and Societal Release (to be away from the rules and constraints of society).  The opportunity to completely “disconnect” for days at a time is completely unique in today’s society, and the study illustrated that this type of solitude is a physical, psychological, and societal phenomenon.  (International Journal of Wilderness)

  2. Since true solitude is hard to create, sometimes it’s practical just to establish better boundaries for device exposure, in time and space.   Here’s some suggestions for boundaries (goodrx.com):

    1. Set alarms for device use, or set only a few times a day for checking messages.

    2. Turn off notifications from social media and other unnecessary notifications.

    3. Use only one device at a time…this is getting harder…

    4. Create tech free times, like at night when you can use the “do not disturb” function to keep from being awakened in your sleep.  Use other times of the day to connect with real people like family members, or take a walk outside. 

    5. Finally, create tech-free zones in your home where you enjoy other activities (like the dining room table).  

Setting examples for younger family members is important to do, because the proliferation of devices is not only causing adverse health conditions; it is leading us into “a new epoch in the human condition… Research conducted by the MIT Initiative on Technology and Self has found that younger generations of Americans are becoming more comfortable with certain technologies than they are with one another, with Turkle (the author) concluding that if “the simplification and reduction of relationship[s] is no longer something we complain about… It may become what we expect, [and] even desire.” (International Journal of Wilderness)  Face to face interactions with real people is necessary to help everyone maintain quality interpersonal relationships, adult and teen and child alike.  It’s time to “put down the phone” and stop missing the important things: conversations and feelings and walks and gorgeous sunsets and starry nights.  Get back to using the original camera: your eyes and your mind, and communicating with your own words to a loved one how awesome life can be. 

Photo by Paul Hanaoka on Unsplash

Biofilms are bastions of BACTERIA

Biofilms are bastions of BACTERIA

Far from being harmless documentaries about someone’s life, biofilms are dangerous bacterial growth that causes a “film” over the surface that is hard to remove.  Scientists have found that persistent infection problems in places such as hospitals, nursing homes, food processing plants and drinking water distribution systems is not due to free-floating “planktonic” bacteria.  Over short periods of time (hours and days), complex surface-attached communities of bacteria form, held together by self-produced polymer matrices (long chains of organic molecules made by the bacteria themselves).  (from Beyond Risk: Bacterial Biofilms and Their Regulating Approaches)  These are called biofilms, and their persistence is very problematic to our health and quite a few industries. 

Essentially, whenever you use a toothbrush or go to a dentist for teeth-cleaning, you are engaging in “biofilm control”.  In fact this is how biofilms were first described–when the inventor of the microscope, Anton Von Leeuwenhoek, saw microbial aggregates on scrapings of plaque from his teeth. (Biofilms: A microbial home)  Here are some more facts about them from this article:

  • Biofilms form on virtually all surfaces immersed in natural aqueous environments.
  • Bacteria in biofilms are 1000-1500 times more resistant to antibiotics than free-moving bacteria (also known as their planktonic state).
  • Biofilms have been found to be involved in a wide variety of microbial infections (by one estimate 80% of all infections).  Such infections include periodontal disease, musculoskeletal infections, osteomyelitis (bone infections), bacterial prostatitis, native valve endocarditis (inflammation of the heart’s lining and valves), cystic fibrosis pneumonia and GI infections, all of which can be  persistent and chronic.

Although it can happen quickly and is microscopic, the growth of a biofilm happens in 5 distinct and complex steps.  In a nutshell, these are (from Beyond Risk: Bacterial Biofilms and Their Regulating Approaches):

  • reversible attachment, where bacteria attach to surfaces
  • irreversible attachment, involving interaction between bacterial cells and a surface using bacterial adhesins
  • extracellular polymeric substances (EPS) production (helps strengthen the film)
  • maturation of biofilm (bacterial cells synthesize and release signaling molecules to sense the presence of each other)
  • dispersal/detachment (cells release and go back to an independent lifestyle).

Source: bellalindemann.com

Why do bacteria form biofilms?  It appears to be a survival strategy of “strength in numbers” to provide protection for bacteria and make them more suitable for the external environment under certain conditions.  What’s good for them, is mostly bad for us.  Biofilms are like fortified castles of infection.

Biofilms are the major mode of microbial growth, and the most challenging problem in drinking water system disinfection. Not only do biofilms contain life-threatening microbes, the way they coat the inside of pipes promotes corrosion, and reduces heat transfer.

The good news is that ancient, non-toxic materials like copper and silver are useful in sanitizing drinking-water systems.  The first installation of a copper‑silver ionization system in the United States was in 1990, where a Pittsburgh, Pennsylvania hospital showed that Legionella colonization of distal outlets (those located farthest from the source) was reduced from 75% to 0% in 3 months.  When the ionization unit was deliberately inactivated, recolonization of bacteria was delayed, and the water system remained free of Legionella for an additional 2–3 months; accumulation of ions inside the biofilm was demonstrated to be the basis for the prolonged bactericidal effect. Copper‑silver ionization has been used to control Legionella in hospitals worldwide. For example, ten cases of Legionnaires’ disease occurred at the University of Wisconsin hospital from 1985 to 1995, despite hyperchlorination. Following installation of copper‑silver ionization, Legionella was eliminated from the drinking water system and no cases were diagnosed.(Silver Ion-an overview)

Biofilms also occur on marine equipment like ships’ hulls and water-cooled heat exchangers.  Organisms like algae, barnacles and mussels build up on underwater surfaces, called “biofouling”, and cause adverse effects of slower speed and increased fuel consumption on a ship’s hull and reduced heat transfer in heat exchangers.  To combat biofouling, paint that contains copper is commonly applied to hulls, and new silicone coatings are being developed.  (Paint and Coatings Industry magazine)  For heat exchangers, slippery coatings are also a solution, as well as iodine bubble systems that can safely kill organisms and prevent them from attaching.  This is particularly helpful in sensitive marine habitats and fish hatcheries (Hatchery International).

Bacteria may have developed biofilms for survival, but scientists have found ways to penetrate the films.  

  • Biofilms on teeth can be controlled by a variety of mechanisms.  These are basically mechanical (remove with toothbrush, water pick, dental floss), or chemical (dissolve it with enzymes, antibiotics, alchohols and other rinses).  (Biofilms: A microbial home) Regular maintenance to control biofilms is key to keeping that “coat” of slime from building up, but some of that bacteria could be protected us from more harmful microbes.  Check out this short video if you want to see the colonies of plaque in your mouth!
  • Silver nanoparticles can penetrate through the bacterial biofilms to completely destroy them and can even prevent microbes from developing biofilms.  Silver nanoparticles can also be combined with antibiotics to increase the penetration power of the antibiotics. (The silver lining: towards the responsible and limited usage of silver
  • Iodine is another natural inhibitor to biofilm.  Titanium implants treated with an iodine coating were shown to have significantly less biofilm growth of Staphylococcus bacteria than the control implants (study on rats).   Iodine is a key ingredient in our TotalClean multi-surface,  multi-purpose cleaner.  
  • Some scientists are developing microscopic spiky surfaces that actually inhibit attachment of biofilms.  (statnews.com)
  • Electrical microcurrents can also disrupt the bacterias’ ability to form biofilms. Arizona-based Vomaris Innovations markets a wound dressing called Procellera that generates microcurrents to aid in wound healing. (statnews.com)
  • Because the bacteria within biofilms use a method of communication called quorum sensing, methods to interrupt this communication have shown to be successful in interrupting the establishment or continuity of the biofilm.  Foods and food-based supplements such as turmeric (containing Curcumin), garlic (containing ajoene and allicin), apple cider vinegar, vanilla beans, oregano oil (containing carvacrol) pomegranate (containing ellagic acid), and cinnamon (to name but a few) have been scientifically proven to disrupt or prevent biofilm formation. (Natural Biofilm Disruptors That Work)  Another list of quorum sensing inhibitors is found here


If you have chronic symptoms in your body (like gut or sinus infections) or your home (like mold or odor) that just won’t let up, a biofilm could be the culprit, and there may be a non-toxic, non-drug solution out there to overcome it.  Most often, a combination of natural therapies will be the best solution.  Functional medicine doctors and mold specialists alike are familiar with biofilms and can guide you to better health.  Also, polar ionizers like the Germ Defender, Air Angel and Whole Home Polar Ionizer act similarly to silver ions as the ions cling to the surface of bacteria and viruses and inhibit their ability to infect.   With biofilms, it’s a matter of working smartly and intensely–don’t give up!

Photo by Akram Huseyn on Unsplash

1 11 12 13 14 15 30