Tag Archives for " ventilation "

Hosting Responsibly

Hosting Responsibly

‘Tis the season for gathering together for celebrations!  More than a few years ago, “hosting responsibly” might be taken to mean monitoring alcohol consumption and driving.  Now, it also means providing good air quality where participants don’t need to worry about breathing in germs.  What a difference a few years (and a pandemic) makes!

In November 2022, in grocery stores, malls, airports and airplanes, masks and distancing are no longer mandatory.  There are also no mandatory distinctions between vaccinated and unvaccinated people.  I realize that although most places present as pre-pandemic, these norms can change at any time, and many people are still concerned about virus transmission and their health.  This elephant has been dressed up well, but he’s not going away, so it’s best to acknowledge him!

Letting your guests know about your preparations means letting them know you care, and make them even more eager to attend!  How can we get started?  Here are some questions for the host:

Is your home or gathering place well-ventilated? 

Here are a couple ways to tell:

  1. Do odors persist for hours if you don’t do anything to abate them?  This might be a little tricky to answer, because it’s definitely a good idea to use your kitchen exhaust fan while cooking, but if you clean up the food bits, wake up and can still smell last night’s dinner, there is likely a problem.
  2. Is the carbon dioxide level in your home below 1000ppm?  It’s really helpful (and surprising) to use a portable CO2 meter in your home and elsewhere.  It let me know that my house (built 1982 with building paper as the air barrier) is quite leaky at about 520-550 ppm CO2, but on the other hand, my parents’ house (renovated 2020) seems to be quite tight and in need of more ventilation (1500ppm)!  The American Society of Heating, Refrigerating and Air-Conditioning Engineers (ASHRAE), which is the dominant organization in establishing proper building ventilation rates in the US,  is hesitant to use CO2 levels as an indication of proper ventilation in homes and businesses because of lack of research and a number of variables.  However it does state in a white paper on indoor CO2 levels
  • Indoor CO2 concentrations do not provide an overall indication of IAQ, but they can be a useful tool in IAQ assessments if users understand the limitations in these applications.
  • All else being equal, higher CO2 concentrations correspond to lower outdoor air ventilation rates and the potential for an increased risk of airborne transmission.
  • Rather than using indoor CO2 concentration as an indicator of desired ventilation rates, several analyses of airborne infection risk have used CO2 as an indicator of the “rebreathed fraction” of indoor air (the fraction of inhaled air that was exhaled by someone else in the space). (Yuck!)

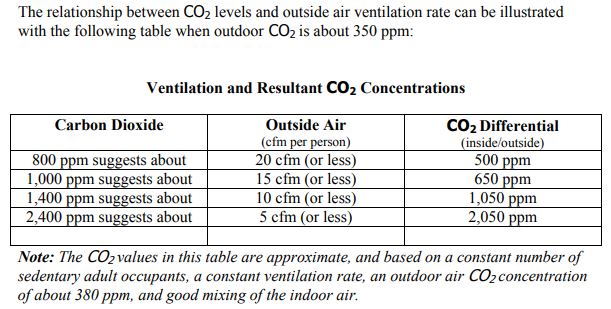
So, although ASHRAE did not set these values (contrary to misquotes), the generally accepted values are consistent with these:

Source: Washington State University Extension Energy Program

So, if you take a reading on your CO2 meter and find that the difference between the indoors and outdoors is less than 650 ppm (which is normally about 1000 ppm indoors), your ventilation is “acceptable”.  Above that level, your guests will have complaints of fatigue, loss of focus and concentration, and an uncomfortable ‘stuffy’ feeling in the air, all of which indicates you are not getting enough fresh air. (Kaiterra.com)  Keep in mind that with more guests, more ventilation is necessary to keep the CO2 level down!  You can crack windows to add more ventilation.

Do you have active air purification?  If so, let them know!  Just as businesses are proud to advertise that they use HypoAir products to keep their clientele safe, don’t hesitate to let your guests know if you are using active air sanitation like the Whole Home Polar Ionizer, Air Angel or Germ Defenders.  In addition, a fresh furnace filter in a higher MERV rating and/or use of a standalone HEPA filter also increase the air quality. 

How about making your gathering indoor-outdoor?  If you have a patio or yard, string lights and a firepit or chiminea make for a cozy, festive ambiance!  In addition, the opening of doors when guests enter or exit adds fresh-air ventilation to your indoor space. If you decide to light a fire in the fireplace, cracking a window will help the fire burn better with less chance of backdrafting smoke into the room.

Have you thought about food and beverage service?

If we had a throw-away mentality before COVID-19, unfortunately the pandemic has only made it worse.  Restaurants have embraced using disposable food trays, utensils and drinking glasses for sanitation, however I suspect it is now more for convenience.  According to this 2020 study, the SARS-CoV-2 virus can remain viable on inert surfaces, with varying lengths of time depending on the surface: four hours on copper, 24 hours on cardboard, 48 hours on stainless steel and up to 72 hours on plastic.  With this evidence showing that cardboard and plastic are not anti-viral, you don’t have to follow suit with everyone else regarding what you serve on.  Instead of having a large trashbin in the center of the party (although some garbage is inevitable for sure), why not fill one side of the sink with soapy water, or leave a basin with soapy water, in which to submerge dishes?  I’ve always enjoyed using real dishes over plastic or paper, so if your gathering is smaller than your collection of plates, it’s not taboo to use china and stainless steel. Marking drinking glasses with a marker or tag ensures that everyone keeps their own!  You could even DIY inexpensive beverage glasses with your guests’ names as favors.  If you decide to go with single serve drinks, cans or bottles are still best marked to avoid confusion.

What’s more important, though, is how you serve.  It’s wise to designate 1 or 2 people as “servers” who can add helpings to individual plates in order to reduce handling of the serving utensils.  If “seconds” are available, it’s best to use additional clean plates to avoid contamination.  Wrap utensils in individual napkins pre-party so that no one has to dig through a bin to get their own.  

Set containers of hand sanitizer throughout your space, and most importantly at the food and drink service area.  

Have you made sure the bathroom is clean and inviting?

  • Provide antibacterial soap and individual paper hand towels
  • If you have a bathroom vent, consider installing a switch protector or sign so that it stays on throughout the party to keep the bathroom air fresh(er!)
  • Instead of buying deodorizers that can add toxic chemicals and VOCs to the air, re-package some TotalClean in a pretty glass bottle and label “air freshener”--it really deodorizes well!

Will you have chemically sensitive guests?

Ask guests to notify you if they have chemical allergies, so you can keep it scent-free if necessary.   If you've ever had a smell irritate your nose or even cause a headache, you have a inkling of what Multiple Chemical Sensitivity (MCS) sufferers go through.

  • It’s hard to pass up candles and sprays in holiday scents, but try to do it for the sake of your friends!
  • It’s also wise to use unscented, natural products like TotalClean to get a thorough clean on all surfaces without any scent.
  • Ask other guests to abstain from using scented personal items like perfume and deodorants.

Less Coffee, More Fresh Air!

Less Coffee, More Fresh Air!

At some point in most peoples’ lives, fatigue is a fact of daily life.  We can chalk it up to too much work and not enough sleep, or poor quality sleep, or a virus that seems to be “going around”.  But what if it could be as simple as not enough fresh air?  Simple…yet sometimes not easy to fix, when opening the windows lets in more harmful air than good.  Let’s dig into this “simple” cause…

Different regulations regarding ventilation have been around for a long time, way longer than the American Society for Heating, Refrigerating and Air-Conditioning Engineers (ASHRAE) published its first Standard 62 for ventilation. The first, ANSI/ASHRAE Standard 62-1973, Standards for Natural and Mechanical Ventilation, presented minimum and recommended ventilation rates for 266 applications and became the basis for most state codes.(ASHRAE.org)

This standard has been revised several times since 1973, and the current standard calls for homes to “receive 0.35 air changes per hour  but not less than 15 cubic feet of air per minute (cfm) per person.” (epa.gov)  Why?  According to Britannica.com, Clean, dry air consists primarily of nitrogen and oxygen—78 percent and 21 percent respectively, by volume. Without any other contaminants such as carbon monoxide (from combustion) or radon (from the earth) entering a building, humans change the composition because we take in oxygen and breathe out carbon dioxide.  Our lungs can still rebreathe this air “safely” until it decreases below 19.5% (OSHA threshold for oxygen in atmosphere), but increaseing levels of carbon dioxide (CO2) may cause occupants to grow drowsy, get headaches, or function at lower activity levels.  (healthybuildingscience.com)  What’s the threshold of CO2?  

  • NIOSH (National Institute for Occupational Safety and Health): 1,000 ppm (parts per million in air) are a marker suggesting inadequate ventilation.  

  • ASHRAE recommends that carbon dioxide levels not exceed 700 ppm above outdoor ambient levels.   (Normal range for outdoor levels are typically in the 350-450 ppm range). 

  • OSHA (the Occupational Safety and Health Administration) limits carbon dioxide concentration in the workplace to 5,000 ppm for prolonged periods, and 35,000 ppm for 15 minutes.  

Taking the most conservative route, 1000 ppm is only 0.1%.  Wow, it doesn’t take a lot of CO2 to make stale air!  If this is the gold standard, why are we suffering in stale air?   The answer is that  many places in the US do not require building permits in order to build or renovate a home.  For this reason, it’s up to the homeowner to know what is needed and make sure it’s installed.  If the HVAC technician does not design fresh air into the system, and the homeowner does not know about the need for it, the home won’t have it and the air will be stale.  Case in point: my 1982 home in the country.  It cools, heats, and circulates stale air.  

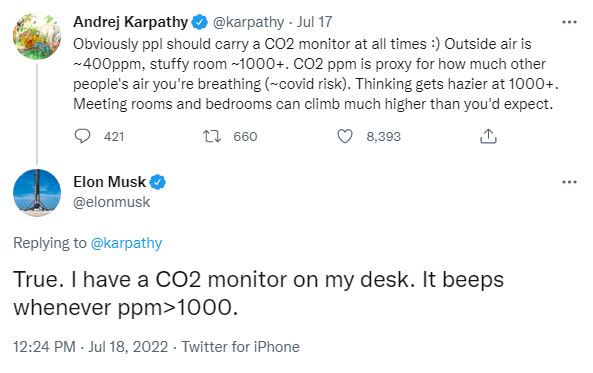
Take this tweet from Andrej Karpathy and Elon Musk, who know a bit about technology: 

And then the public chimed in: a Stanford professor used to take CO2 measurements in a lecture hall before packing 100+ students in for 1.5 hours, because some halls did not have enough ventilation to sustain deep thought!  Then a restaurant worker began to think, oh, so that’s maybe why I got dizzy sometimes during peak hours of a restaurant?  And another: his son used to wake up crying but since increasing ventilation in his room, the child sleeps a lot more peacefully.  

So if you want to measure your air, lethargy, unclear thinking and headaches don’t have to be part of your day!  There are lots of CO2 monitors on the market, with most starting about $65-70.   This monitor by INKBIRDPLUS shows temperature, humidity and CO2, and also allows you to customize an alarm for different levels of CO2 (they recommend normal (400-700 ppm), warning (700-1500 ppm), and dangerous (1500-5000 ppm)).  

Can you imagine measuring the CO2 while sitting in a conference room or in a lecture hall?  With such technology at your fingertips, there’s no reason to be ashamed to say “I need a break”.   Your brain and body will thank you!

Photo by Call Me Fred on Unsplash

Getting the Basement Dried Out

Getting the Basement Dried Out

In our post on how the basement affects our whole home’s air quality, we discussed how mold and mildew form and are sustained in the basement.  Active water leaks (flowing down the walls and pooled on the floor) are not required to make the basement a musty place.  Here are some sources of moisture coming into the basement:

  • Concrete is not a moisture barrier on its own!  Water will permeate concrete walls and floors and simply evaporate, increasing humidity.  
  • Open or broken windows allow moist air from the outside to come in and upon encountering cool walls and surfaces in the basement, condensation will form or just increase relative humidity in the air.  
  • Air leaks around windows, entry doors, unsealed wall penetrations and penetrations into the first floor above allow air to come in, in an uncontrolled way. 

Ideally the basement is inside your building envelope, whether you decide to finish it or not.  This is because it can be a suitable place for mechanical systems like HVAC air handlers and furnaces, hot water heaters, and also for storage.  To house these systems, however, the basement needs to be dry, with good air quality.  We argue that the basement air quality needs to be as good as any other floor in the home, because it will mingle with the atmosphere of the rest of your home!  There will be small leaks in the basement ceiling that make it permeable to the rest of your home.

The way to control humidity is to control:

  • Water flow into the space,
  • Airflow into the space, and
  • Air circulation within the space.

Let’s tackle each problem individually.

Water flow into the basement

Water flowing down walls in streams and puddling on the floor is a major problem– in this case, it is like living above a lake!  It will be difficult to “dehumidify” the air when open water is present, because the water will be continually vaporizing into the air as fast as a dehumidifier can take it out.  Although many basements exist like this, walls and storage of home goods in such environments can accumulate mildew rapidly.  Painting on a “waterproofing coating” will usually just act as a band-aid, because the pressure behind the wall, forcing it into your basement (called hydrostatic pressure) will eventually break through the paint and even degrade the foundation if it’s not drained away properly using interior and/or exterior drains. (basement waterproofing)  It’s best to contract several reputable basement remediation contractors in order to get their recommendations and quotes on stopping the inflow of water.  

If the water is only causing dampness on the walls but not visible condensation, then it’s possible to allow the walls to continually “dry” to the inside by doing the following:

  • Cracks and damage to the walls need to be repaired first.
  • Install rigid foam board with a “perm” rating of 1 or greater.  This allows the moisture to move through the foam and dry out, but still insulate the basement for greater thermal comfort and avoid condensation on the cold wall. Keep the foam insulation up about an inch from the floor to allow any condensation to drain.  If desired, the walls can be framed with treated wood to hang drywall inside.  An excellent cutaway diagram of the installation can be found here (page 24). Below is a picture of rigid foam board insulation from the same document (page 32).
  • An alternative to applying rigid foam board is to paint concrete walls with a waterproofer such as UGL’s Extreme Latex Masonry Waterproofer.  This product has a perm rating of less than 1 (according to this manufacturer’s video), so it is vapor semi-impermeable, but it does not have any insulating properties, like the foam board, so the walls will still be cold to the touch and allow condensation if the air inside is too warm and humid.  
  • Use dehumidification to dry things out.  
  • Decrease relative humidity by increasing the temperature slightly (the dehumidifier may raise the temperature a few degrees, but if not, you can add a small heater).
  • Increase circulation with fans so that air is evenly dehumidified.

Some notes on Vapor Permeability: A material’s permeability is measured in units called perms, which assess how much moisture can pass through a barrier in a 24-hour period according to standardized industry tests. Materials are separated into four general classes based on their permeance:

  • Vapor impermeable: 0.1 perms or less

  • Vapor semi-impermeable: 1.0 perms or less and greater than 0.1 perm

  • Vapor semi-permeable: 10 perms or less and greater than 1.0 perm

  • Vapor permeable: greater than 10 perms

Materials with lower perm ratings are better at stopping the movement of water vapor. If the perm rating is low enough, the material is a vapor retarder. If it’s really low, it is a vapor barrier. (Barricade Building Products)


Air flow into the basement

Sometimes it’s difficult to know what to do: open the windows or not?  Many reputable websites advocate “airing out the basement” (such as thisoldhouse.com), and we at HypoAir always advocate for ventilation to dilute stale air, but here’s the problem: when you don’t know the dewpoint of the air coming in or leaking in, it can cause major mold problems in the basement!  Dewpoint is the controlling factor of whether fresh-air ventilation alone can prevent mold.  As we wrote in another post

The best way to explain this (per this great article) is to find out the dewpoints of the indoor and outdoor conditions.  If the outdoor dewpoint is lower, you can ventilate with fresh air and still dry out your house!  For example on July 26, 2002, here are the conditions inside and outside my house (a relatively “dry” hot day outside!):

Inside: 76 deg F, 67% humidity = 63 deg F dewpoint (check out this easy calculator on dpcalc.org)

Outside: 91 deg F, 54% humidity = 72 deg F dewpoint (dpcalc.org)

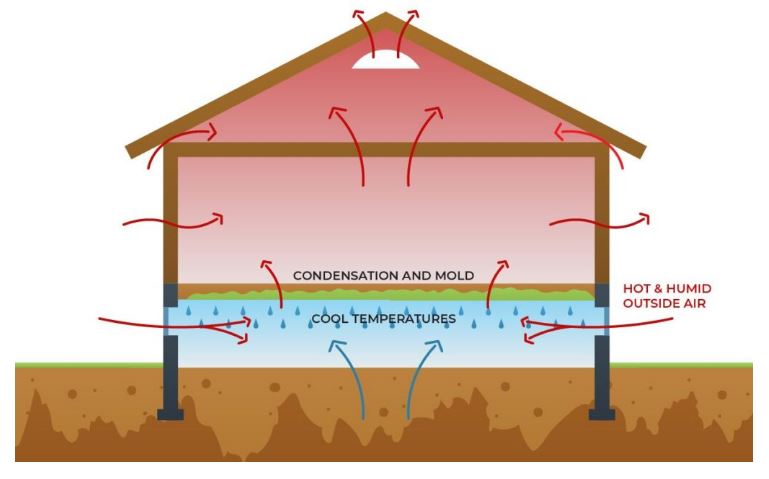
See, in this case even though the relative humidity outdoors is lower, if I open my windows, that hot air coming inside would be cooled and relative humidity would increase, working against my humidity goals.

In the case of the basement, the air temperature could easily be lower, like 68 deg F.  If you cool 91 deg air with 54% relative humidity down to 68 degrees, water vapor in the air is going to condense, making your humidity problem worse!   Therefore we want to control all sources of air inflow and only let in drier air for ventilation.  Here is a diagram showing the problem of leaving windows open, and how to solve it:

source: bayareaunderpinning.com

  1. Close windows, block off vents, and seal the window frames with caulk, spray foam or adhesive tape made for the purpose.  Make sure exterior doors have weatherstripping. 

  2. Check for unsealed penetrations in the walls.  If you have to use a flashlight and look behind appliances such as water heaters or furnaces, be prepared with gloves and pest spray to get it done!  The best sealant for wall penetrations in the basement would be sprayfoam, because it conforms to the shape of the hole.  You may want to shove in a wad of steel wool first, because it deters animals from chewing through the foam and re-opening the hole.

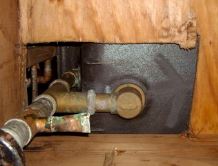
  3. Look up–check the ceiling.  If there is a false ceiling in the basement, you may need to remove ceiling tiles and/or insulation in order to see the underside of the subfloor, but this is where big problems can hide!  The photo below shows the underside of a tub.  Plumbers often cut BIG holes to make their jobs easier, but this can really hurt air quality when these holes let lots of moldy air up (if there’s a negative pressure generated in the space above, this is easily done with a bathroom vent fan), or warm air down (if you are using any type of air extractor in the basement).  It’s best to seal big holes like this one by framing in a box to the surrounding joists, and using spray foam to seal the resulting cracks and holes.  It’s not recommended to insulate the ceiling of the basement (see this definitive guide, page 25) to try to separate it from the rest of the building, as this will only cause more mold problems in the basement.

Source: energyvanguard.com

Where does fresh-air ventilation come from if you’ve sealed outside access off?  According to energyvanguard.com, there are 6 ways to supply fresh air to your home in a humid climate, and for the purpose of a basement that is outside the building envelope, only one makes sense since you’re probably already using a dehumidifier: a fresh air fan that purposely pulls in outside air.  Here are some options to make it happen: 

  • Air King’s QUFresh, 120 cfm, $413 at ecomfort.com
  • Broan’s FreshIn, 180 cfm, $239 at sylvane.com
  • ACInfinity’s AIRTITAN T3 6-In Ventilation Fan, 120 cfm, $69.99, sylvane.com

The AirTitan is a good option where windows are available, because it can be retrofitted to fit in an open window more easily than the other ducted models.  Each of these models have temperature and humidity settings you can adjust so that the fan will only operate when it meets those specifications.  These may need to be set higher in hot and humid climates, but the dehumidifier should be able to handle moderate inflows of fresh air.  When you control the airflow into the basement, you can control the humidity.

And finally, Air Circulation Within the Space

Your basement may be one wide-open area, or several rooms separated by walls and doors, but in each case, good air quality requires that air is moving constantly.  Here are some tips to get the best circulation:

  • Leave doors within the basement open as much as possible
  • Leave dedicated fans running all the time.  Floor fans work great for this purpose, as you can move them around/adjust direction and speeds until you find the optimum circulation.
  • Move boxes and furnishings away from walls and up from floors so that air will circulate to dry them.  Don’t stack boxes to the ceiling.  Separate boxes by several inches to get air moving between them. 
  • Remember, the less absorbent material stored in a non-conditioned space, the better (less cardboard, less fabric, and less wood).

I hope these suggestions help you to dry out your basement so that your whole-house air quality improves, from the ground up!

How to keep MILDEW out of your CLOSET

How to keep MILDEW out of your CLOSET

Closet doors are meant to keep closed, right?  Unless you are Martha Stewart, it’s likely your closet doors don’t stay open very long–if they close to begin with!  The problem comes when humidity and closed doors combine for a stinky problem: mildew and mold.

We sometimes think that mildew is a less toxic form of mold, but it is still mold nonetheless.  Mildew is a subclass of mold that exhibits a white or gray, flat, powdery growth, while the rest of the molds can get more fuzzy and colorful.  Both release spores, but unlike other molds, mildew doesn’t penetrate surfaces and grow into the materials it lands on (though it can still cause cosmetic damage). Instead, it grows on top of flat surfaces and often collects in places like cardboard boxes or your vintage leather jacket in the closet.  Not good!  (What is Mildew, Really? The Difference Between Mold and Mildew)

Since we know that mildew is a form of mold, we know that it needs several things to grow: a food source (ie. leather, clothing, and dust in general), moisture (even excess humidity) and air (although stagnant air is best because lack of circulation keeps humidity at surfaces high).  So, the best ways to keep mildew at bay in closets is to:

  • Clean out the dust and seal off any sources of dust

  • Keep the humidity down and ventilate

  • Store items for longevity and air circulation 

How the heck does dust get in the closet when the door’s closed?

Incredibly, some closets are like dust magnets.  If your closet is part of a tiled or vinyl floor area, dust bunnies can usually slide right under the door due to the slick surface.  If you have any penetrations in the ceiling (like a light bulb), then your closet may be part of a hidden circulation system where the framing in your walls conducts air currents throughout your home.  For example, closets near bathrooms may unknowingly supply air to the bathroom exhaust fan, if the fan’s ductwork is not sealed well in the attic or the lightbulb box is not sealed to the ceiling.  Then there are the closets that double as storage areas and HVAC equipment rooms.  If the HVAC unit is not sealed well, it just pulls air from the surrounding home into your closet.

  1. Seal

The way to keep out the dust is to seal these small air passages: at the ceiling, remove the light fixture and either use a caulk gun (less messy) or a spray foam can with a straw (very messy, be sure to cover everything!)  to seal the electrical box to the drywall.  If the closet is an upper story, you may be able to do it from above in the attic with less mess, and sealing all the ceiling penetrations may help with dust house-wide.  If you notice a lot of dust forming on the floor, it may be worth caulking the baseboards to the floor (if it’s tile or solid-surface) to seal that up as well.

  1. Clean 

Next, removing the dust should be part of a larger goal to store items properly so that cleaning will be easier and mildew will be less likely to form.  You’ll need a HEPA vacuum with brush attachments, and various storage containers.  If possible, empty the closet.  This will allow you to see all the walls and floor to see if there are any water leaks coming in that could be causing the mildew.  If not, use the vacuum to clean ALL the surfaces so you can get a fresh clean start!

It’s a great time to wash clothing and purge any items that you don’t use anymore by donating them.  Clean clothing is less likely to smell and deteriorate from body sweat and dust mites as well.

Stop right there!  If you had mildew in your closet before, you need to make ventilation changes to stop it from recurring.

  1. Ventilate/dehumidify

Mildew sometimes forms in closets because of lack of ventilation.  The great thing about moving air is that it lowers the moisture content of surfaces that come in contact with it.  If the air is not moving, the moisture content of surfaces tends to equalize with the stagnant air, and over time, mold is able to grow.  Also, if your closet is located on the corner or north side of a building, the insulation in the wall may not be sufficient to prevent warm house air from causing condensation on the cold wall.   Here are some tips:

  1. Refill the closet

Ok, you can start restocking the closet but remember this important point: maintain space between items so that air can freely circulate!  Don’t overstuff or compact items against the wall, either.  Wire shelving is great for maintaining circulation from top to bottom, too.

Storage containers matter, too–if possible, don’t use cardboard boxes because cardboard holds moisture, and it’s a favorite food for all kinds of pests: mold, roaches and silverfish like to eat it, and mice like to use it for bedding!  If you’ve cleaned and dried your clothing and excess bedding, packing them in clear storage bins is ideal so that you can easily see what’s in each.  For wool and moth-prone items, you can add cedar blocks to the bin to keep pests out.  These garment bags are great to keep dust off hanging clothes.

After mildew remediation, it’s important to check on your closet at least every few weeks until you’re sure that the changes are producing their intended effect: the ability to close the closet door without mildew taking root!

Photo by Annie Spratt on Unsplash

No-Demo Renos for Air Quality

No-Demo Renos for Air Quality

As of 2024, home renovation is still very popular in the US, but there’s been some interesting developments, such as “no demo reno”.  Eliminating demolition usually means less cost and less time--two very important commodities in renovation!  I’m waiting for designers to take it a step further to challenge themselves to redesign for air quality on a budget, to be judged by air quality experts.  Of course, you can spend thousands of dollars on the latest HVAC and purification systems, but you can also make a big impact with a lot less.  That’s what I’m talking about!

Whether you live in a sealed upper-storey apartment using forced air all the time or only use natural ventilation via windows and doors, furniture placement can affect the airflow and thus the air quality in your home.  According to a 2022 study, furniture layout is a key factor that affects the direction of airflow in a building. Different furniture heights can block or trap natural air or lower the direction of the airflow, thereby producing microscale positive or negative pressure.  It evaluated a naturally-ventilated school in Thailand which was located in a city which was plagued by high PM2.5 every January and May, mostly due to agricultural burning, and wind-blown dust. Under natural ventilation conditions, the direction of PM 2.5 distribution in the classroom was the same as that of the natural air. The air velocity and PM 2.5 concentration in the classroom were correlated positively, whereas the velocity increased, with the increasing concentration of PM 2.5. Adjusting the furniture layout of the classroom, as well as the size of the openings, affected the airflow and distribution of PM 2.5 within the classroom. 

Another study evaluated the pollution level of new furniture (VOCs).  Just by rearranging the furniture in an office with a forced-air system, there was a notable difference between the best and the worst ventilation effectiveness without any changes in the ventilation.  The key learning points were to: 

1) always try to place the pollution source (new furniture) as far away from your usual breathing zone (like sitting at the desk) as possible and, 

2) try to sit in the upflow field of the airflow.

If you aren’t trying to off-gas any new furniture, here are the rules that enable your HVAC to work at its optimum (How Furniture Placement Affects Your HVAC):

  • Make sure the furniture is not blocking any registers or vents.

  • Place furniture away from walls so that adequate airflow behind the furniture can prevent formation of mildew.  This happens when there is not enough air circulation (stagnation) to prevent humidity from saturating surfaces.  For more on how you can avoid mildew with better air circulation/ventilation, check out our article here.

  • Don’t block any windows or doors when placing large pieces such as couches or dressers near them

If you do need to obstruct a vent, try to use a deflector on the register so that air flow is directed to an open area.  They come in a number of shapes and sizes, even adjustable, to match your register/grille and desired direction of airflow.

How to visualize airflow in your space

There are professional engineering programs that can help “see” airflow, but they take quite a bit of measuring and input to get a simulation.  On the simple side, you can use the following to “see” airflow, and adjusting furniture position, window openings, vent positions and fan positions and speeds to modify air currents.

  • A helium balloon that has neutral buoyancy that “hangs” in the air below the ceiling will move with air currents (you can tie or tape a small weight onto it to adjust height).

  • A bowl of warm water with a chunk of dry ice (frozen CO2) will give off fog that moves with air currents (just be careful to use thick gloves when handling!)

  • Old-fashioned soap bubbles (you can make a wand by twisting a paperclip into a loop and use dish detergent and water) blown straight up into the air will tend to move in the direction of other air currents.

  • Candle flames/smoke may also show the direction of air currents.

  • Tape streamers or tissue paper in doorways to see which direction the air flows (tinsel also works).

  • Anemometers are fun devices to play around with, but unfortunately they usually only work very close to a vent or fan; they don’t move with minimal airflows. 

Windows: Don’t forget to pull back curtains or remove them altogether if you are using natural ventilation, because blocking windows with curtains blocks airflow and light!  Curtains are usually necessary for privacy, but you might consider trying sheer or loosely-woven curtains or a decorative fabric screen placed a foot or two inside the window, for more airflow.  If you want to open windows without letting in pollen or air pollution, check out our Nanofiber PureAir Window Screens and Window Ventilation Filters.

Fans: Portable fans can set atop furniture or even be hung on the wall to increase airflow.  Take the time to clean your ceiling fans and make sure they are running in the right direction (clockwise in the heating season and counter-clockwise for the cooling season).  

Even if you’ve lived in a space for a long time and think you have tried “every possible arrangement” of furniture, the act of rearranging furniture every so often is not futile for the following reasons (Rearranging Furniture Could Help You Use Space More Effectively and Give You a Mental Boost):

  • Moving furniture will expose dirt, dust and allergens so that you can clean under it, improving indoor air quality.

  • Moving it may force you to remove or store clutter that also collects dust

  • Moving furniture could expose other air quality problems like hidden leaks or mildew, pet stains or pest infestations

Better furniture arrangement can help you to feel less stuffy and more energetic, even if the airflow changes are minute.  Just a few last tips before you get busy redesigning a room: 

  • remember to use a measuring tape first before trying to move heavy or large furniture to a new spot! 

  • Have your cleaning supplies at the ready to vacuum up dust, cobwebs, pet hair, etc..

  • Call on your friends not only to help with the moving, but also to lend ideas.  

  • If you don't have plants, consider adding a few strategic plants as natural air purifiers (and a pop of color!)

  • Plugging in a small air purifier with a fan like the  Germ Defender or Upgraded Air Angel Mobile will freshen the air and add airflow on a micro scale.

Photo by Nathan Fertig on Unsplash

Help! My basement has flooded!

Help!  My basement has flooded!

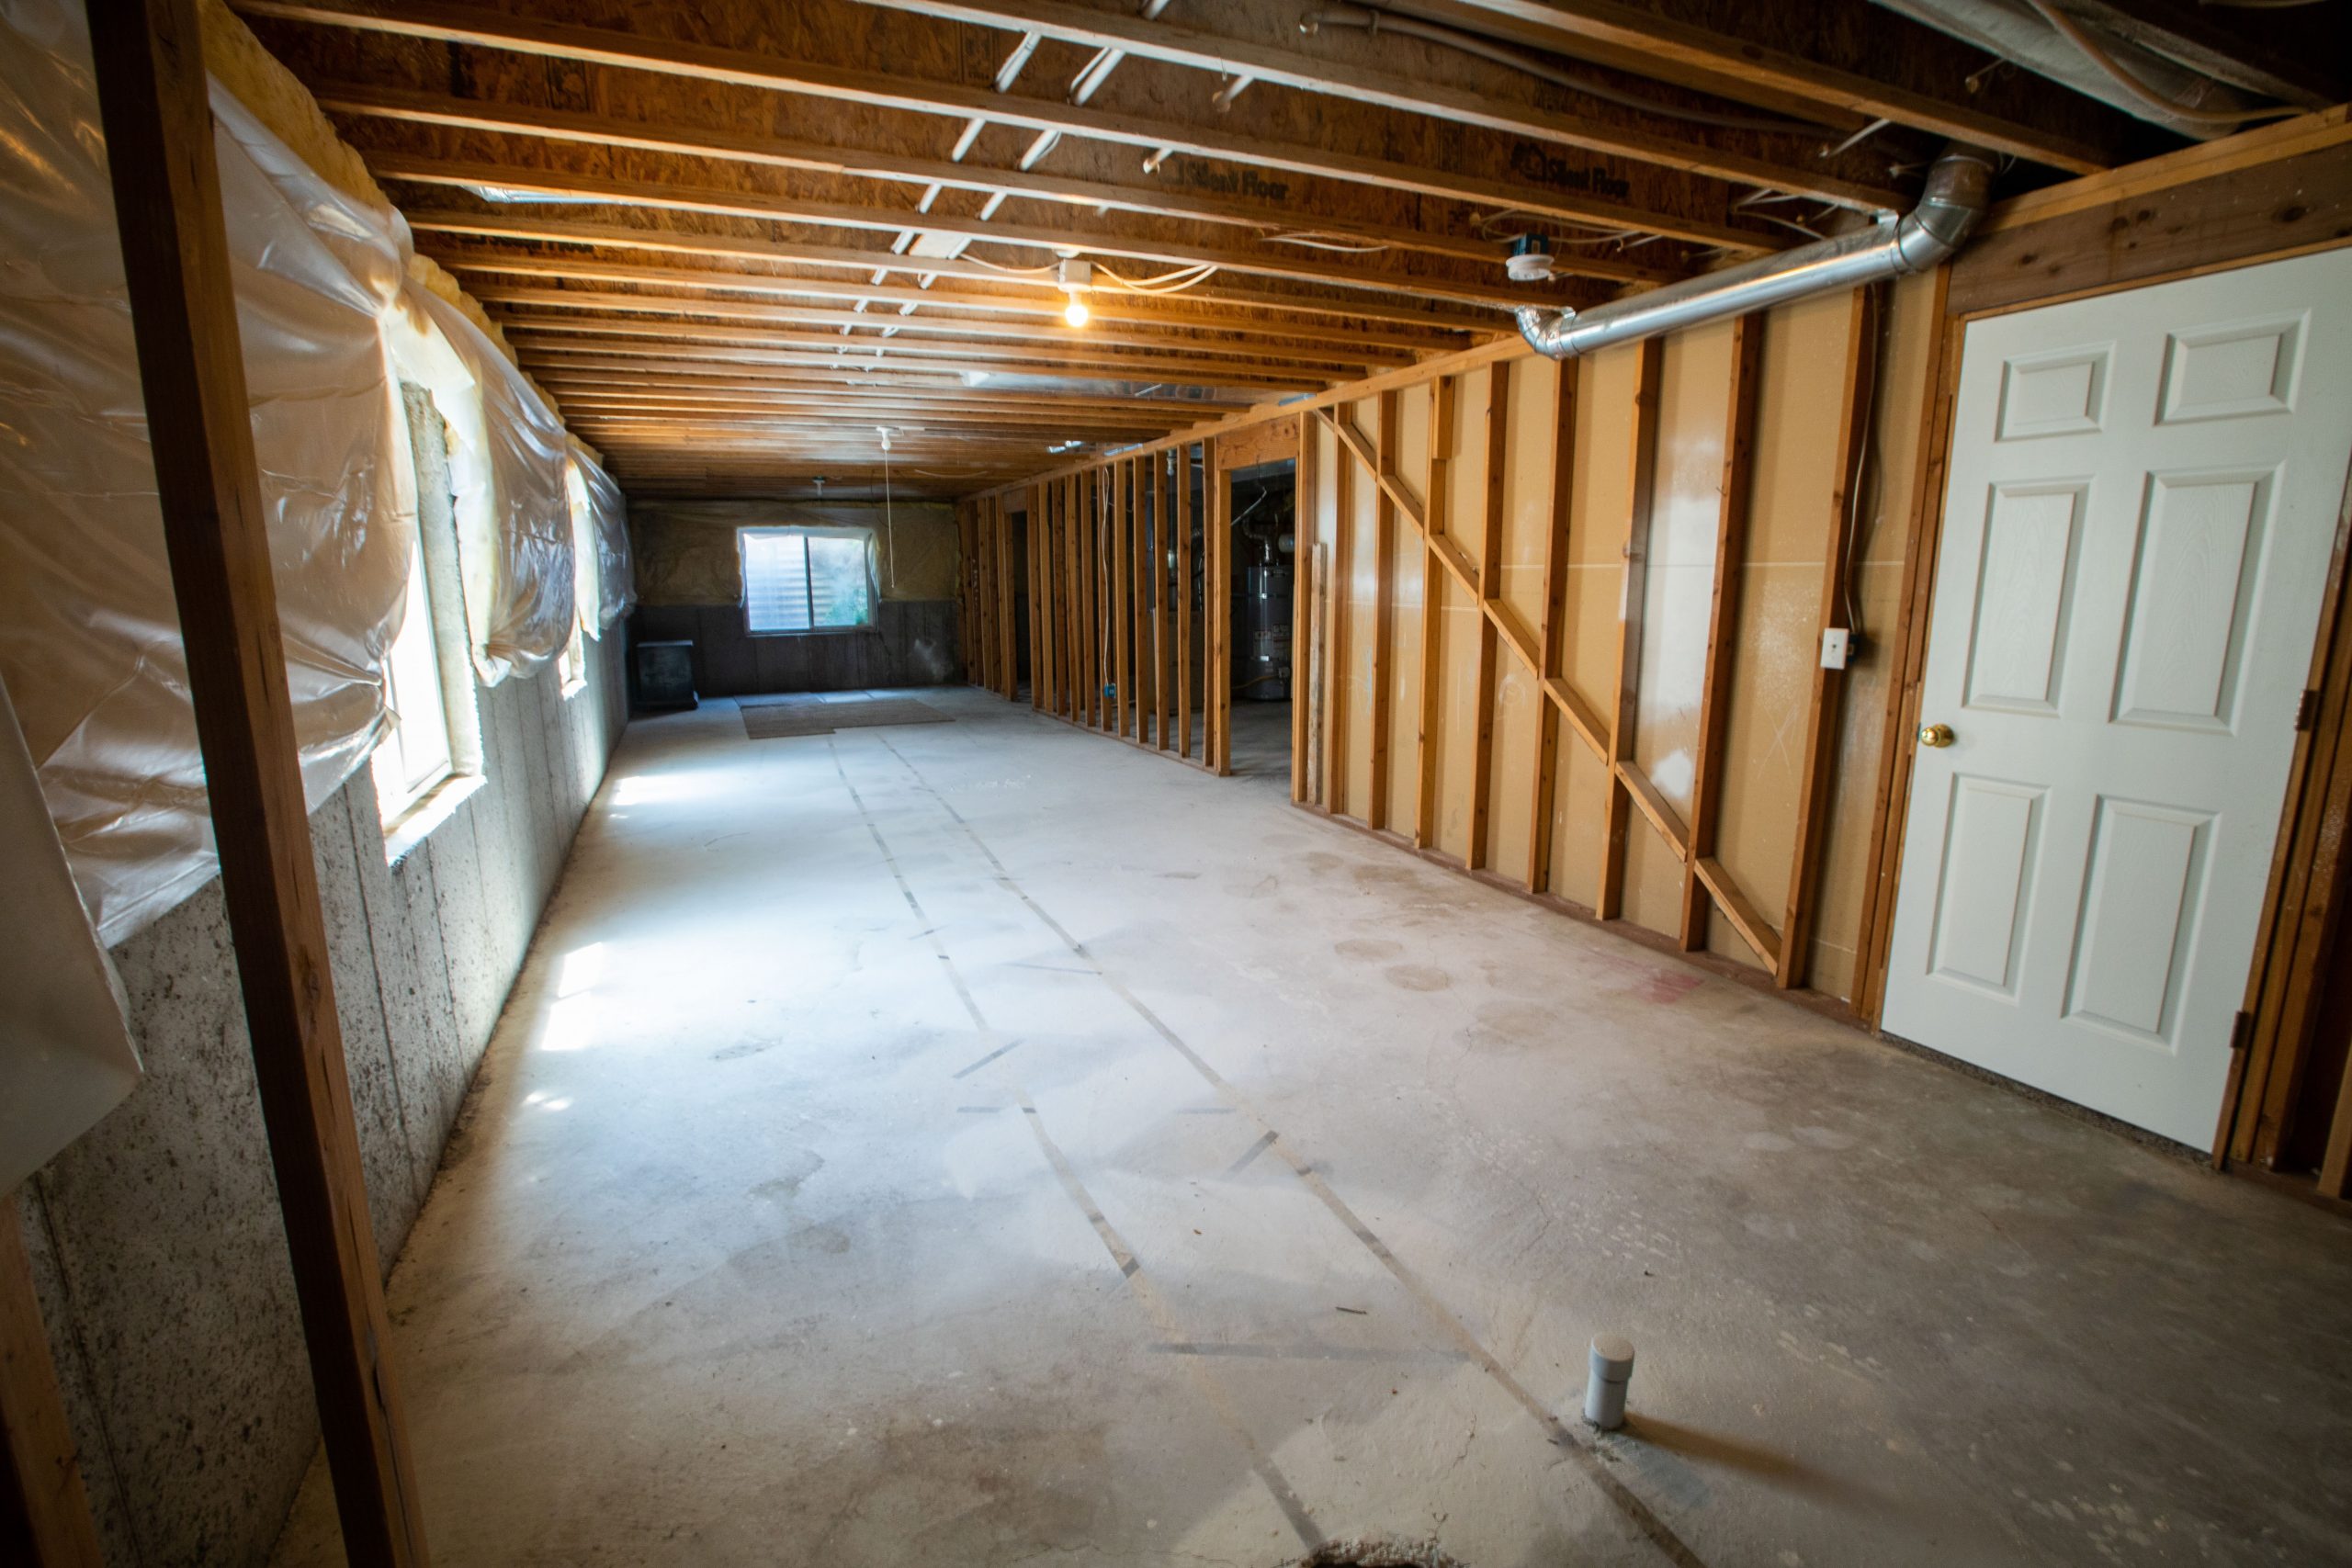
While some are suffering in the US from droughts, others are walking ankle-deep through water in their basement.  Unfortunately water in the basement is different from other areas of the home because 1) it doesn’t easily drain away because you can’t just “cut a hole in the floor”, 2) being below ground level means you may be already fighting ground water problems that are just looking for ways to intrude, 3) ventilation is typically sub-par, meaning that drying it out takes a lot of power equipment, not just opening windows!  It can be very daunting for a homeowner with limited renovation funds, but don’t turn a blind eye on a flooded basement, because the mold that ensues can quickly affect the rest of your home.

Call for help–immediately!

If your area was hit by a storm, chances are that a lot of other people have the same problem you do–they need restoration professionals too!  However, you can’t afford to wait 3 days after the water hits the floor, because mold can start to take root in your walls and furnishings only 48 hours after they get wet.  Here are some ideas for resources:

  • Family (of course!)

  • Neighbors (they probably need help too)

  • If your state officials have declared a state of emergency, the Federal Emergency Management Agency (FEMA) may be able to help.

  • The American Red Cross has disaster assistance services.

  • Local churches often set up assistance centers for homeowners.

  • Workers for hire often gather at local home improvement stores, but be wary of giving anyone without a contractor’s license a job in your home for safety and insurance reasons.

What needs to be done?  If you don’t hire a professional restoration service, you can use the following as a guide.

  1. First of all, don’t walk through any standing water if there’s a chance that electrical appliances sitting in it may be energized.  This presents a big problem if the circuit breakers for the basement are IN the basement, but do your best to disconnect power before walking through the water.

  2. If your basement sustained a sewage backup as part of the flood event, be very cautious about contacting/working in the dirty water, as open wounds can become infected by microbes from the sewage.  In any case you’ll want waterproof boots, goggles and gloves at the minimum!

  3. Open windows to the outside if it is low humidity outside–this will help with the drying process.

  4. Standing water has to go.  Small amounts of water can be picked up by a wet-dry vac (make sure you have the right type of filter installed for wet suction), but if you have a lot more water, you’re going to want to find a dewatering pump that doesn’t need to be emptied; it pumps the water outside via a hose (away from the house!).  

  5. Silt or mud may have accumulated on hard floors from floodwaters, making it slippery.   If you have any snow shovels or flat shovels and buckets, these are the tools you need to remove it. 

  6. Wet carpeting and padding has to go; it is very difficult to dry and successfully salvage large areas of carpeting, except for area rugs, which must be professionally cleaned as soon as possible (consider cleaning cost versus value).  From this point on, all wet materials removed from the basement should be piled near the road where waste management can pick them up, or if you will have to haul them yourself, on a trailer outside.

  7. Wet upholstered furniture and bedding (mattresses and boxsprings) have to go, because like carpet, it is too difficult to get the center of the upholstery completely dry. 

  8. If you have any solid wood furniture without upholstery, you can move it outside for drying and wiping down if the weather is good.  Use rags and a cleaner like TotalClean to remove dirt and let them dry in the sun.

  9. Walls: Remove all drywall and insulation below the floodline, as well as 2-4 feet up the wall.  This is because the drywall wicks up water, and the insulation behind it will be wet also.  The goal is to get the studs and all of the wall cavity dry.  If you have built-in cabinetry that has gotten wet (even an inch or two), we’re very sorry to inform you that it has to be ripped out, because there’s no way to completely dry the back of the cabinet.  🙁

  10. Once the wet materials have been removed,, and throw all your tools at the remaining moisture: we’re talking fans, heaters and dehumidifiers, as each will do a different role in drying.  Fans improve air circulation.  If the temperature is cool, add a heater so that relative humidity will go down and speed up drying more.  Dehumidifiers also lower the relative humidity.  According to Cleaning and Maintenance Management, a property restoration company, here is how we can understand the drying process: “Low relative humidity (RH) is necessary for drying, as moisture in materials and air seek equilibrium. The lower the RH of the air, the quicker the wet materials will give up their moisture to become equal with the moisture in the air. …Air movement is the workhorse of drying by displacing high RH at the surface of wet materials with lower RH. Circulation airflow moves wet air to our dehumidification systems (either mechanical or ventilation), allowing us to manage RH and water vapor in the air.” 

  11. If you find that musty odors have started to form, you can clear particulates from the air using a large HEPA filter with activated carbon such as our Cleanroom WindPRO 650, or if you don’t have the budget, make a Box Fan Air Cleaner, to which you can also add activated carbon to remove odors. 

  12. Plugging in  Germ Defenders and Upgraded Air Angel Mobile units will assist in deterring mold growth around the basement.

  13. Once everything is dry, it’s good to invite an experienced waterproofing/foundation company to inspect your basement to see if there’s anything that can be repaired or upgraded so that you (hopefully) will not have to go through such an ordeal again.  We have several articles you can use to educate yourself on waterproofing techniques: Getting the Basement Dried Out and a cautionary article: Waterproof Wall Coatings: Should You Use Them in Your Basement?  so that you will have background for a conversation with professionals on their suggested course of action.

Since “an ounce of prevention is worth a pound of cure”, if you are reading this before any flood occurs, check into preparing for such disasters by reading our article here.  As always, we are here to field questions or help with equipment, because flood restoration can be stressful and overwhelming.  Don’t give up!