Tag Archives for " ventilation "

What happens behind closed doors…

What happens behind closed doors…

What happens behind closed doors…is STAGNATION!  When you close the door to a room in your home, air is trapped in the room, resulting in the following:

  • If there is no fan operating, air will not circulate, and any humidity present in the air will saturate soft furnishings, increasing the likelihood that mold will grow (see our article on ventilation and one of our favorite tools, dpcalc.org).

  • If central air conditioning or heating is pushing air into the room, the closed door prevents proper cycling of air out of the room, causing the system to a create a negative pressure zone near the return grille and placing stress on the system’s mechanical parts like blower motors.

  • Again, central air conditioning or heating with closed doors causes imbalances in the temperature of the home, because conditioned air is prevented from mixing, which in turn affects the thermostat and causes the system to run longer to reach the temperature set point.

Keeping doors closed, in other words, is just not good for proper ventilation in your home!  This makes sense to us…until the question of privacy is brought up.  Of course, not everyone wants their door to be open at all times, even if it’s just cracked open.  Don’t worry, there are ways to get good ventilation even with closed doors!

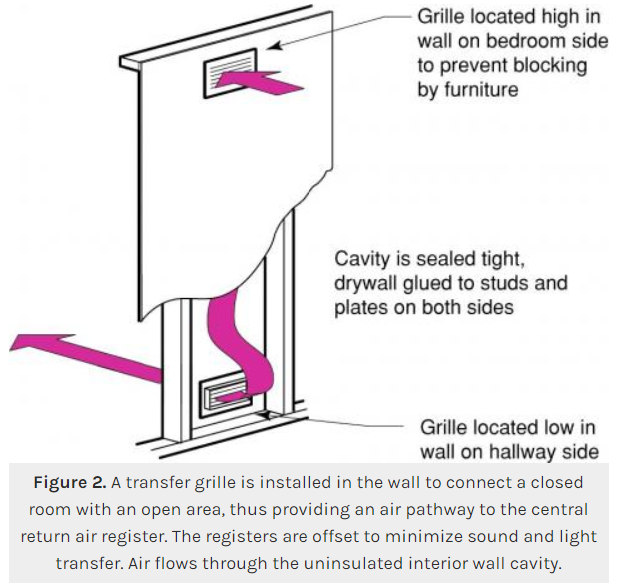
The best solutions are brought in during the design phase of the home, before construction begins.  This is where our first idea is best incorporated.  Transfer grilles offset high/low in a wall cavity use the cavity to muffle sound, so that this design affords  the maximum privacy.  However, in order to avoid entraining dust and other building toxins from surrounding spaces, the cavity needs to be sealed by gluing the drywall to the studs and plates…meaning that this solution needs to be built in during construction.

Source: Building America Solution Center

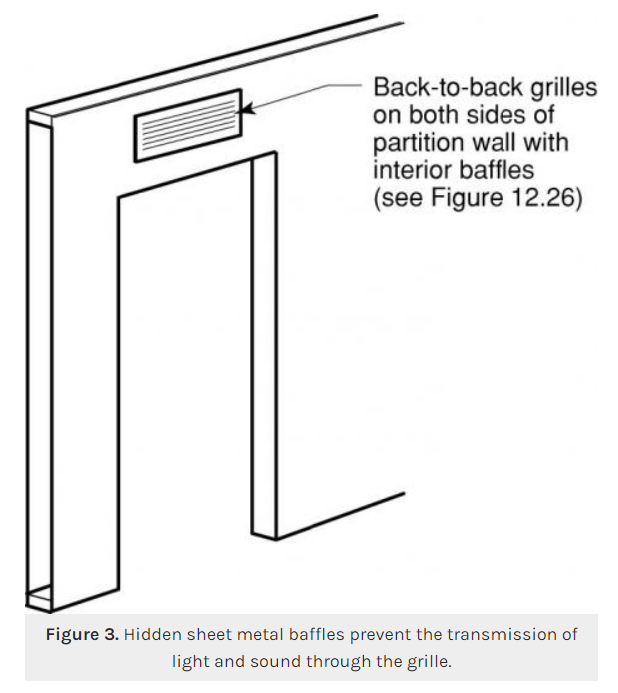
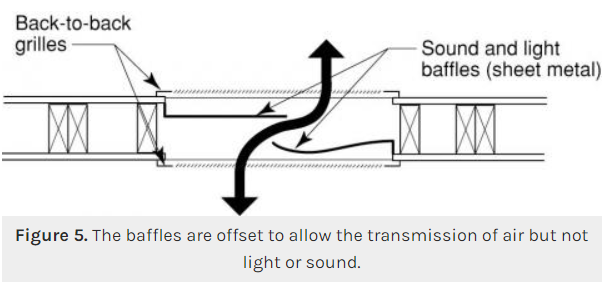
If you’re realizing you need better air circulation after construction, then there are still more solutions to consider.  You can use a back-to-back grille over a door (or any high space on a shared wall), which have sheet metal baffles to block sound and light while still allowing the passage of air through the wall.  Here are some diagrams to show back-to-back grilles:

Source: Building America Solution Center

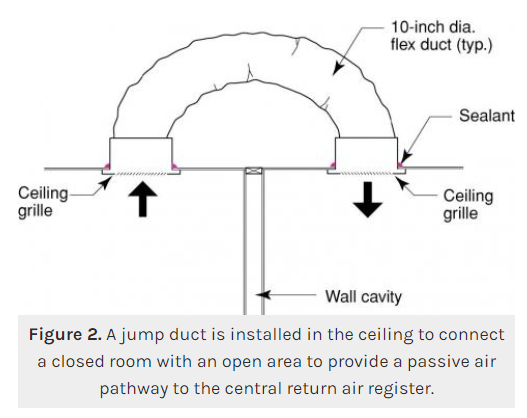
Thirdly, if wall space is an issue and you have attic space above the rooms, you could install a jump duct using flexible duct, two ceiling grilles, and foam sealant (to make sure air from the attic does not leak into your home).  Theoretically, a jump duct could also be placed through/under the floor to bridge two spaces, but in either place, take care to make sure the flexible duct is not crimped, and do not cut any structural beams like rafters or joists to install it.

Source: Building America Solution Center

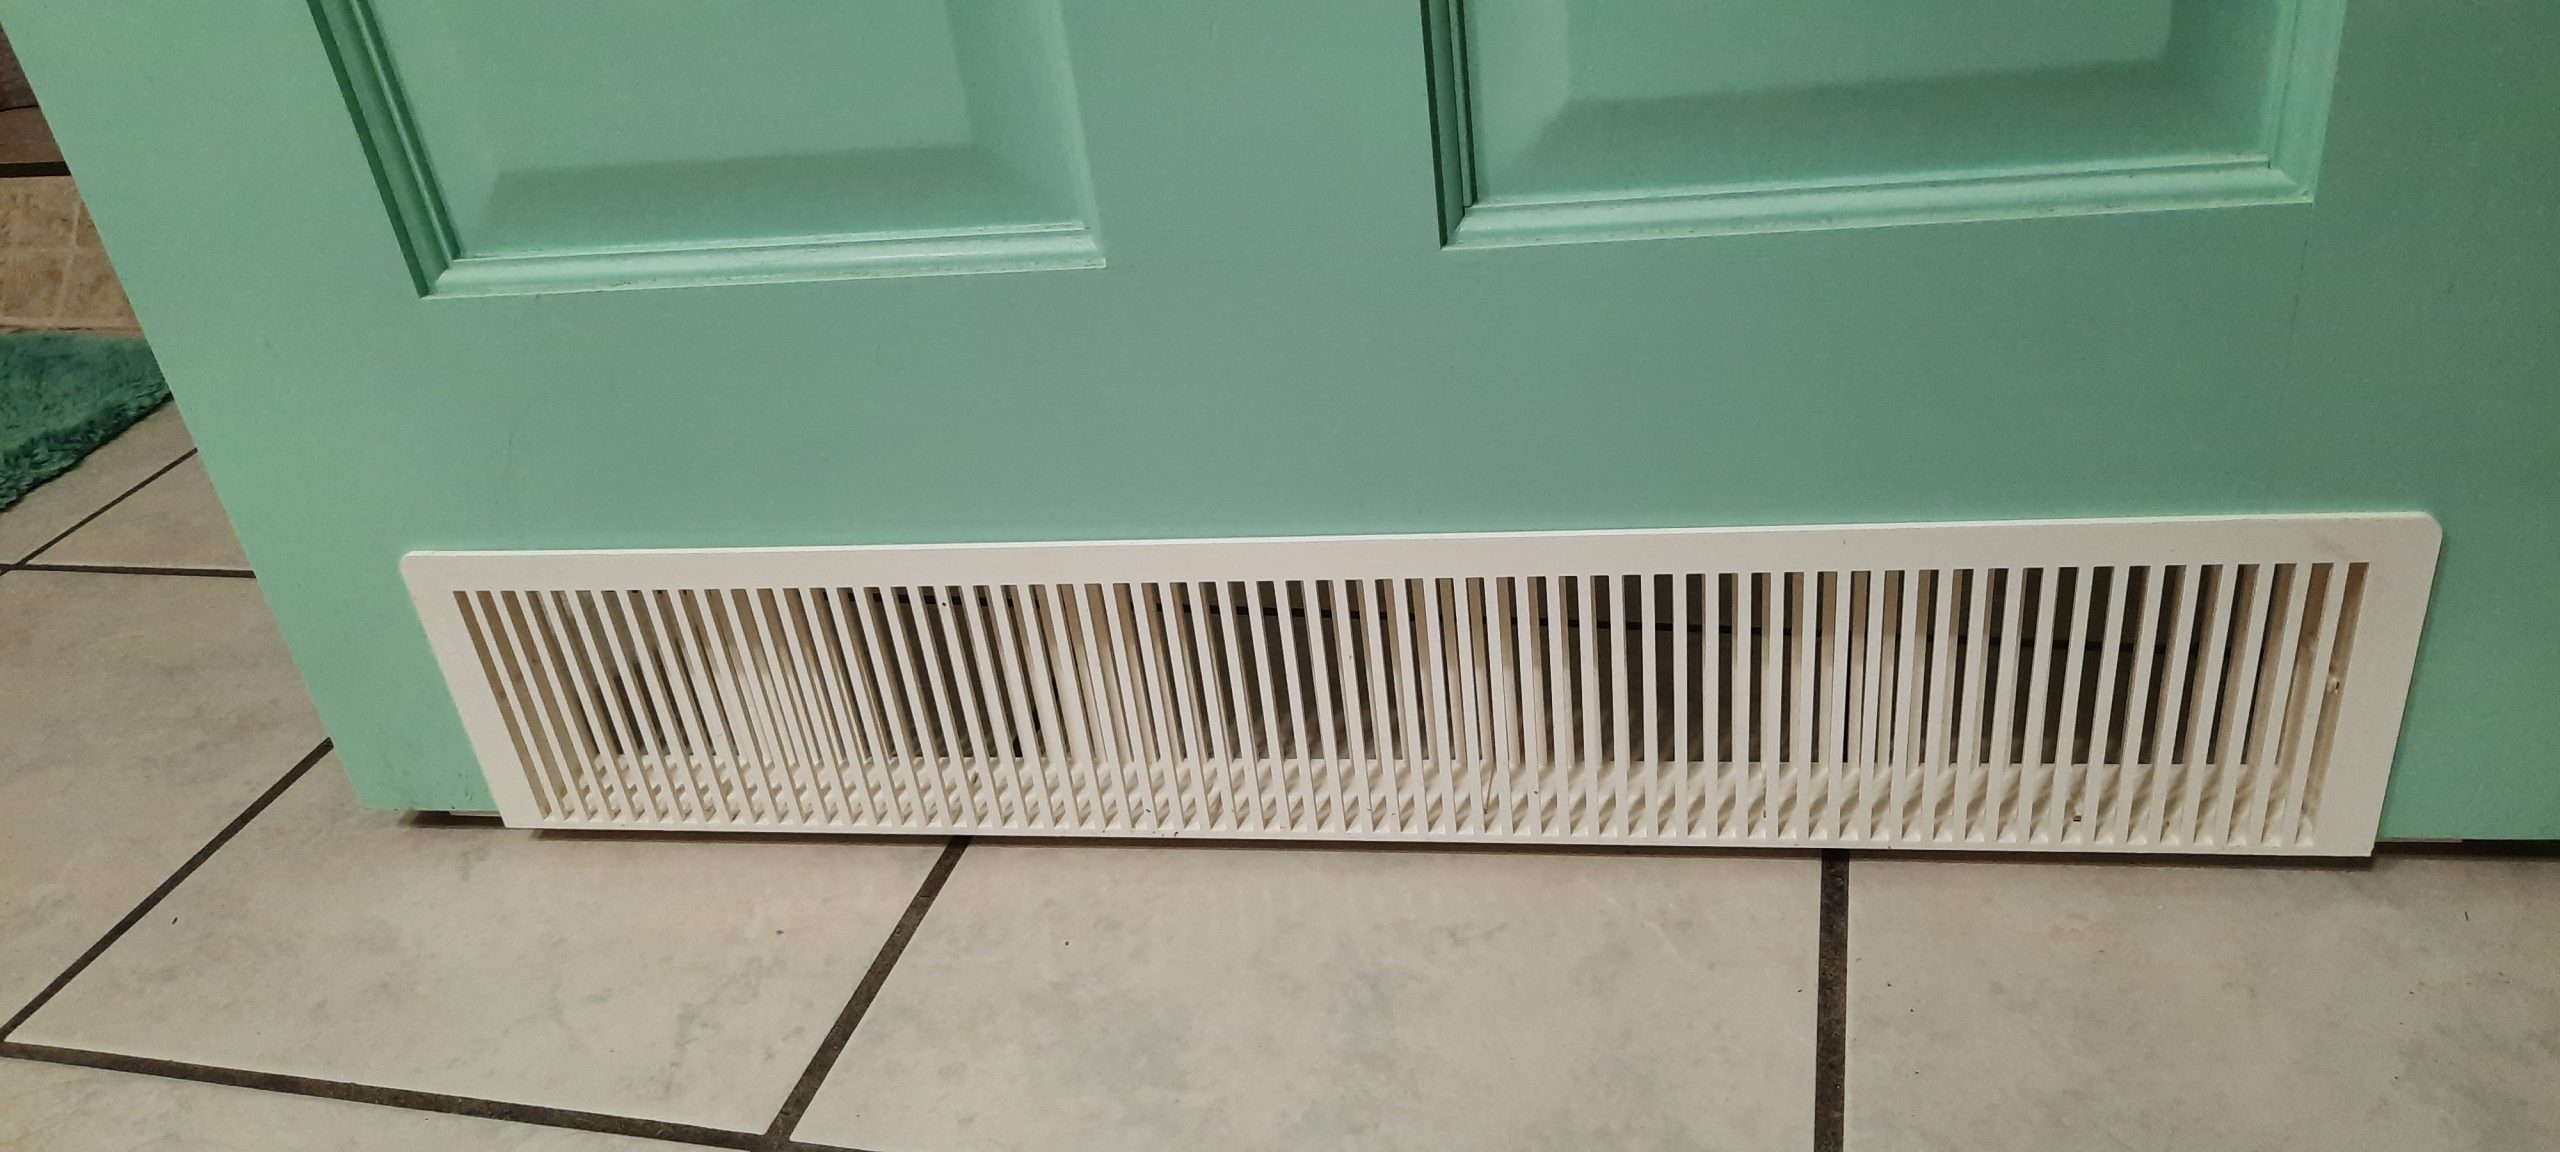
Lastly, there’s a solution which I consider to be the easiest of all of these.  In-Door Return Air Pathways by Tamarack Technology are easily installed in the bottom of your hollow-core or solid wood interior doors (door must be 1-3/8” thick to fit).  Simply remove the door from the frame (I find that tapping the hinge pins out is easiest), lay it down, trace the provided template on the bottom of the door, cut it with a jigsaw, install the grille with two screws (provided) and re-install the door.  They do provide less privacy than the previous two options, but are quick to install (less than 30 minutes in my experience) and can be left white or spray painted to match any door color with paint suitable for plastic. 

In-Door Return Air Pathway installed in a solid wood door.

When you have the door closed with any of these three solutions, air is free to mix with the rest of the home, rooms do not become positively or negatively pressured, and you definitely have an advantage in keeping mold from forming in that room.  Additionally, the continuous use of the following in the closed room costs very little energy, but boosts your mold protection even more: 

Sure, we get it…everyone needs their privacy, but for health’s sake, make sure the air is flowing freely!  

Photo by Storiès on Unsplash

Get more fresh air ventilation with Nanofiber Window Screens (Easy DIY Project!)

Get more fresh air ventilation with Nanofiber Window Screens (Easy DIY Project!)

If you’ve never thought about them, it’s time to give your window screens some attention.  If your windows open, you’ll want to have screens that are clean and in good repair to keep out insects and other creepy crawly things (won’t go into what could possibly come through an open window).  It’s even more important in seasons of extreme heat or power outages to have a way to get fresh air.  Keeping your windows closed all day can cause levels of CO2 to build up in your home that cause drowsiness and inability to focus or concentrate (check out our article here), so it’s best to let some fresh air in whenever the outside air temperature, humidity and quality permit.

Window screens have been around for a long time (like the 1800’s!) but even age-old products can get an upgrade, making our lives easier.  This upgrade doesn’t have to involve AI or “smart” anything, requiring the internet and electricity.  In this case, window screens have been upgraded with a new material, nanofiber.

Traditionally, window screening came in several varieties of material and color, such as aluminum and fiberglass, and black, silver, gray or bronze colors.  Standard screens have a mesh size of 18 by 16, meaning there are 18 squares per inch from the top left corner to the top right corner (also referred to as warp) and 16 squares per inch from the top left corner to the bottom left corner (also referred to as fill). (Replacement Window Screen Buying Guide)  These are able to prevent most flying insects from passing through, but they do allow a lot of dust and smaller particles to pass through.   The use of nanofibers (each fiber is less than the width of a human hair) allows the holes to become much smaller, because they are spaced very closely, allowing air but not fine particulates to pass through.  Voila!  Nanofiber window screens offer protection from the next “pest”, dust and allergens.  By just replacing the screens you already have with nanofiber material, you can save yourself some cleaning, coughing and add the ability to open your windows more often because of this protection.   What’s even better is that it doesn’t take a lot of time or special tools (just one cheap one) to replace the screen material with some new nanofiber screening.

Here’s the DIY part: replacing your screens with nanofiber screens is a homeowner project that just takes a few hours and supplies.  If you’re not familiar with how window screens are held in place, they are held into the narrow channel on the screen frame with a rubbery spline, or cord.  

There’s also an ALTERNATIVE INSTALLATION with Magnetic Tape (which is practical if your screen frames are broken or missing).  Scroll down to the bottom of this article for the alternative installation.

Here’s what you’ll need for the traditional installation:

  • The nanofiber window screen (order yours here)

  • Spline (if the spline in your screens is not cracking or falling apart, you can reuse it)

  • Window screen rolling tool, $4

  • Small flat-head screwdriver

  • Sharp utility knife to trim the screen after installation

There are lots of videos online showing how to replace screens, but I like this one for its simplicity (step 1 starts at 1:50).  Here are the basic steps:

  1. Remove old spline and screen

  2. Size and align new screen over the frame (1-2 inches extra on each side)

  3. Push screen into channel on first side (using the convex side of the tool)

  4. Insert spline into grooved screen and channel (using the concave side of tool) (Repeat steps 3 and 4 for other sides)

  5. Push spline into corners using screwdriver, trim excess screen carefully with utility knife

And here are some additional tips:

  • If you have to get new spline, take a small piece of the old stuff to the hardware store in order to select the right diameter.

  • Some people like to hold the frame in place by taping it to the work surface, but this doesn’t allow you to rotate it easily if you can’t access all 4 sides of your work surface.

  • You can use a gallon of water or full can of paint to help hold the screen in place to get started.

  • Some people like to use the spline in one length, bending it at the corners as you go around; some like to cut it at each corner. 

  • Be careful not to press too hard on the spline as you work, in case your tool slips, so that you don’t cut the screen accidentally.

  • Normally you shouldn’t have to “stretch” the screen, just gently smooth it out, while rolling the last two sides, as you don’t want too much tension on the frame when you’re done.

  • If you get too frustrated or find that one of the screen frames is broken, many small hardware stores offer “rescreening” services and repair of the frames; just bring them your nanoscreen with the frame(s).

It may take a little more time to get your first screen replaced, but you’ll get better as you go along and have some new functional “filters” in your windows.  Sit down to enjoy the fresh, clean air and admire the fruits of your hard work!  After a few months, you will notice dust collecting on the outside of your screens as they do their job, but you can easily clean them by removing them and using a gentle spray of water on them from the inside out to wash off the dust.  If necessary, use a mild detergent like liquid dish soap or car wash soap and a soft brush to remove any stubborn dirt or bird poop. 

Nanofiber window screens can help you breathe easier all year long, because let’s face it, there always seems to be an “allergen” in the air.  They can also cut down on the dust going onto your HVAC filter, your TV screens, your rugs and furniture—you name it!  Maybe most importantly, they can help you open windows for fresh air more often and be prepared for a power outage in the summer, when open windows (but not dust!) are a necessity.  

ALTERNATIVE INSTALLATION:  Many times the screen frame is broken or missing altogether, or you’re just not sure about doing the traditional install yourself.  Instead, you can use Magnetic Tape to install the screen.  The kit has everything you need to make a nice, flexibly-framed screen that installs easily over your window frame.  (Note that you’ll need to remove the screen to open or close the window, but that’s easy to do.)  The video on the product page gives step by step instructions.

Our Top Articles for Reference by Topic

Our Top Articles for Reference by Topic

We have published a lot of information for you on our website, so we understand it can be a lot to digest!  Here’s a shortlist of our top articles 

Mold and Mycotoxins

Mold Prevention

Mold Testing

Cleaning

Air Filtration

Humidity

New Home Search

Ventilation

Home Projects for Better Air Quality

HVAC

Disaster/Emergency Preparation

What Effects Do HVAC Systems Have on House Theatres and Entertainment Areas?

What Effects Do HVAC Systems Have on House Theatres and Entertainment Areas?

Home theatres and entertainment rooms are designed for family fun and relaxation. These rooms in your house are the most important to you when it comes to socializing, relaxing, and having fun. You and your loved ones can gather in these rooms to enjoy a performance of a film, play, or musical.

The entertainment rooms are a part of the house that should be well cared for. These areas need to be cleaned regularly to keep them in top condition. Many people in the home often use them, so it is always crucial to keep them clean. HVAC systems are another option for keeping these rooms comfortable. A good HVAC system makes watching movies or listening to music more enjoyable.

What are House Theatres and Entertainment Areas?

A theatre room with state-of-the-art projection and sound equipment is specifically designed for watching films. The walls of such spaces are typically covered in movie posters and other film-related memorabilia. In addition, they provide relaxing seating options, so you can kick back and enjoy your favorite program or film.

An entertainment area, often adjacent to the living room or family room, keeps guests entertained during social gatherings such as birthdays and anniversaries. Putting in pool, arcade, or foosball tables will give people something to do while waiting for food or drinks. This will provide them with a fun activity while waiting for their dinner to be served.

What Is an HVAC System?

HVAC stands for heating, ventilation, and air conditioning. In homes, businesses, and even indoor stadiums, air conditioning and heating systems control the air temperature inside the building. HVAC systems come in a wide variety, but they all work similarly. Mechanical ventilation provides fresh outdoor air through the system.

HVAC systems often include air cleaners to prevent the spread of airborne pathogens such as bacteria, fungi, and viruses. A specialist in the field will visit your home to assess its readiness for HVAC installation. Dallas HVAC installation service is one of the experts who will find the best HVAC setup for your home. They can install a new HVAC system for your home or business and also provide the repair service. 

To ensure your new HVAC system is installed correctly, you should hire a professional with a wealth of knowledge and experience. Professional HVAC installers help clients determine which heating and cooling systems are right for them. They can help you determine which size unit suits your space and how big your ducts need to be.

How HVAC Systems Affect Home Theatres and Entertainment Areas

When you plan to install a home theatre or entertainment area, it is crucial to understand how the HVAC system will affect these areas. The most common problems that arise from inadequate HVAC systems include the following:

Temperature 

Most home theatre components are not made to work in extreme heat or cold and may malfunction if exposed to such conditions. If your heating and cooling system is not running correctly, the temperature inside your home could fluctuate wildly. Either of these extreme temperature conditions can destroy sensitive audio and electronic equipment.  The equipment itself produces heat, so that must be accounted for in the “load” of the system.

The quality of the sound delivered to a home theatre will be affected by the temperature of the HVAC system. When the air temperature in a room is too low, the sound quality suffers. If the temperature is too high, you'll hear crackling sounds. The optimal viewing temperature for a home theatre is between 68 and 72 degrees Fahrenheit (20 and 22 degrees Celsius).

In addition, if your home theatre or entertainment area is sized for a number of people that significantly exceeds the people living in the house, you’ll need to consider the “load” that the extra people place on the system, because they will increase the temperature, humidity and CO2 of the room(s).  Too high or low of a temperature will also make it hard to focus on the plot of the movie or TV show you're watching. With reliable HVAC installations, you should be able to keep the temperature comfortable.

Humidity 

Water vapor in the air is what is quantified when discussing humidity. It affects how your home theatre and entertainment areas function.

Home theatre systems are not designed to withstand the high levels of humidity found outdoors. When exposed to humidity, most indoor equipment rusts, corrodes, or otherwise breaks down. HVAC controls ventilation, heating, and air conditioning to maintain a healthy indoor climate.

A high humidity level can make it uncomfortable to spend time indoors. You may feel overheated and wet all the time. Humidity levels in your home theatre could be quite high. Extreme heat and humidity are bad for your hair and skin. When the air in your home is too dry, you may experience a chill, discomfort, and dry skin.

If you have a humidifier in your house, ensure it's set to keep humidity levels at 30-40% during winter. For most house theatres and entertainment areas, this range is ideal. In the summer, that percentage can reach fifty to sixty percent.

An HVAC system that incorporates both a humidifier and a dehumidifier is the most efficient way to control moisture in a home. No matter the season, you can maintain optimal humidity levels in your home theatres and entertainment areas with HVAC installations.

Airflow

Airflow can affect how well you hear the dialogue in movies and TV shows and how you can listen to sound effects. It also affects the clarity of your surrounding system.

The lack of proper airflow is one of the biggest problems facing people who want to set up an effective home theatre system in their homes today. 

Poor airflow can lead to condensation on the walls and windows in your house theatre. This will cause mold growth and damage your furniture or other items within the space. Mold can grow inside the space and damage appliances.

Poor ventilation from the outdoors will allow CO2 levels to rise within the space, making everyone feel drowsy and irritable, the opposite of the environment you’re planning!  Without proper ventilation, microbial contaminants can also increase as people in close proximity exhale, laugh, cough or sniffle.   It’s critical to make sure that adequate ventilation is provided to keep everyone healthy!  Adding an air sanitizer device like the Whole Home Polar Ionizer or Air Angel will work to keep all the air fresh and clean in these spaces. 

HVAC systems can help maintain constant airflow throughout your home, keeping the temperature tolerable for those inside. The HVAC system uses ducts to distribute the conditioned air to different rooms in your home and especially entertainment areas. 

What Makes a Good Home Theatre and Entertainment Area?

Home theatres or entertainment rooms are more than just couches and speakers. It's a place to take a break from the stress of everyday life with your loved ones and friends. To make the area more fun and friendlier for anybody who visits, you'd probably want to improve it a little.

Ensure the room has enough seating for all those watching shows or movies. With a well-functioning heating, ventilation, and air conditioning system (HVAC), your guests can enjoy the show in comfort.

Installing an appropriate HVAC system should be a top priority. It will keep dust off your electronics, extending their life and ensuring they function properly. It will also keep your home at a temperature that will allow you to watch comfortably.  If you already have a central HVAC system, you may want to consider adding an additional unit for these entertainment areas, like a mini-split, to make sure your home theatre HVAC system maintains a consistent temperature, humidity and airflow.

Conclusion

Heating, ventilation, and air conditioning (HVAC) systems for a home theatre have unique design parameters that must be strictly adhered to for the best possible viewing environment for the audience. The system must be efficient and silent for the viewing experience to be satisfying. Creating a comfortable environment for watching movies or TV shows at home requires careful planning of the HVAC installations.  With all these things in mind, choose an HVAC system that keeps your home and entertainment areas safe and comfortable.

Guest post by Daniel Martin

Getting rid of the ICK: Mold in the Shower

Getting rid of the ICK: Mold in the Shower

Mold growth in the shower seems to me like cockroaches in a house: even luxury homes sometimes have problems with each, and sometimes it takes a number of attempts to find a non-toxic solution for them!   The shower just happens to be the ideal place for mold to grow (moisture, food, air and heat are all applied daily!), so keeping the shower from looking like a petri dish can be challenging.  Let us help you with this problem!

Since we know, wittingly or unwittingly, how to grow mold, we can look at its life source requirements and see if we can eliminate one or more to get a mold-free shower.

Moisture:  You would think that taking the “wet” out of a shower is impossible.  Of course, the shower will often be wet, but the important bit is that it’s not continually wet or wet for long periods.  There are various ways to dry it out after showering; check to see if there are any that you haven’t tried! 

  • Make the surfaces hydrophobic:  Hydro-what?  Hydrophobic is the characteristic of products like Rain-X: they repel water instead of absorbing them, so that water drops roll right off.  The active ingredient in Rain-X is Polydimethylsiloxane (PDMS), which is rated a “1” on scale of 1-10 by the Environmental Working Group (meaning it’s of very low toxicity).  In fact, here’s a tip that has worked well for me: after thoroughly cleaning your shower as well as you can (see next section), give all the surfaces, glass and otherwise, with a coat or two of Rain-X to make the water slide right off.

  • Squeegee: This tool, normally in the hands of a window-washer, is also useful for removing water from flat surfaces in the shower.  It can work somewhat on tile if the tiles are large and flat, but it works on glass even better.

  • Drain: Obviously, the water has to have somewhere to go.  If your drain is not working well, you can enlist the help of a plumber.  While the plumber is involved, inquire whether the venting of the drain is adequate (if a vent is too distant or non-existent, the drain does not work well and can cause mold build-up).  If the slope of the shower pan leaves puddles in the floor, it might be prudent to think about replacing or remodeling the shower, because continually wet floors are not only unsanitary, they’re unsafe!

Food: Molds can dine on just about anything, and dead skin cells and even bodywash and hair shampoo are on the menu.  That’s why regular cleaning can break the mold chain even if the other “links” like moisture, air and heat are present.  Find a non-abrasive sponge or brush to avoid damage, and go to town with a non-toxic cleaner:

  • TotalClean is our odorless powerhouse cleaner that can be used on any surface

  • Earth Clean is especially good as a degreaser if you have buildup of waxy products (citrus scent)

  • Force of Nature is a method of making electrolyzed water, which is a completely safe and natural disinfectant that can be used for hand sanitizing and cleaning all areas in your home that can tolerate water!  They have a line of reusable bottles and travel-size sprays that are great for the environment.

  • Vinegar-based cleaners also work, however make sure that they are safe for your shower surface first (for example, they should never be used on travertine or marble, both of which are a type of limestone that can be damaged by acids). 

Air: Of course, you can’t eliminate air from your bathroom, and some molds are even anaerobic anyway (meaning they can survive on little to no air!).  What’s best is if you can change out the air as much as possible, sweeping away excess humidity and mold spores with it.  This is what a good bathroom exhaust fan is for: get the air moving!  Professional restoration companies do the same when they bring in big blowers: air movement speeds up the drying process because it promotes evaporation of water from all the surfaces.  Check out our article on how to check if the size and venting arrangement of your bathroom exhaust fan is optimal.  Getting members of your household to use it is another feat, however this can be automatic if you have an electrician wire the switches together so that the vent always comes on with the light.  Also, here’s another way to “condition” the air in your bathroom to avoid mold:  use a Germ Defender 24/7.   The ions created by the Germ Defender not only destroy mold and its spores in the air and on surfaces, it also sanitizes surfaces after they’ve been contaminated by the dreaded toilet plume.  

Heat:  Anyone who’s cleaned out a refrigerator knows that heat is not a pre-requisite for mold to grow!   However, it certainly makes a more hospitable environment for many molds to flourish.  Using your bathroom exhaust vent after showering  certainly helps reduce moist heat in the air.  

There are also many products worth mentioning that can keep your shower cleaner for longer.  

  • That pink slime that forms around your drains and shower corners can also populate the shower head, and it’s not good!  It’s actually caused by the bacteria Serratia marcescens, and can cause urinary and respiratory tract infections, which are especially problematic for people with immune problems. (Not So Pretty in Pink: What Is That Pink Slime in My Bathroom?)  There are other types of harmful bacteria in there as well, such as NTM (nontuberculosis mycobacteria).  Soaking your showerhead to clean it does not fully resolve the problem, because it does not dry out. If you can’t seem to get rid of it from the shower spray head, swap it out with one of these:

    • Shower Clear Shower Heads ($299-319) are made of brass (a naturally anti-microbial material) and are made to open fully to dry out between uses. 

    • This showerhead by Niagara ($28) features a removable faceplate that will also allow the showerhead to dry between uses.

    • AquaDance Antimicrobial has antimicrobial rubber tips that also prevent minerals from clogging the spray jets.  (It uses the material Microban, which does contain quaternary ammonium compounds or “quats”, however).  

  • Thankfully, there are several good changes happening in the shower curtain market.  For one, PVC shower curtains are being phased out and replaced with PEVA or EVA.  Polyvinyl chloride, or PVC for short, is that plastic with the strong smell that emits toxic VOCs which can disrupt hormones, liver and kidneys, and your nervous system.  EVA (ethylene vinyl acetate) is a safer alternative to PVC, but some EVA contains formamide.  Formamide is used to make the foam soft, but it’s considered to be carcinogenic and a developmental toxin that can be absorbed through the skin. If you’re considering purchasing one of these doors made from EVA, it’s best to contact the manufacturer to ask if their product contains formamide. (hellonaturalliving.com)  

    • Sustainable Jungle also gives many organic and sustainable options to plastic shower curtains!  

    • Check out how I used TotalClean, our non-toxic all purpose cleaner, to clean the pink stains off the hem of my shower curtain.

  • And finally, what about your washcloth?  Experts say it’s a good idea to use a new one everyday, or at least several times a week.  Since it’s usually hanging in the moist shower, washcloths and scrubbies take a long time to dry, allowing microbes to grow and establish in the fibers.   

Since bathrooms are among everyone’s least favorite rooms to clean, and showers and toilets certainly also near the bottom, I’m liking the concept of wetrooms more and more.  Wetrooms are waterproofed bathrooms (at least all of the floor and some distance up the walls) that can be wetted and cleaned all in one go.  If you can’t do that, at least make your cleaning tools easy to use and accessible:

  • This Turbo Handheld Sprayer by Clorox ($50) eliminates the tiring pump, pump, pump of handsprayers.  Used with non-toxic cleaners like we suggested above, this could be a game-changer!  We don’t recommend the Clorox Turbo (or Turbo Pro) however, because it uses alkyl dimethyl benzyl ammonium chlorides, which can have asthma, respiratory, reproductive and developmental effects according to the Environmental Working Group.

  • E-Cloths Shower Cleaning Kit ($15) requires only water to have a sparkling shower.  Once you’ve cleaned it, use these two cloths on a regular basis (with no chemicals) to keep it clean.

  • The shower squeegee is a good way to remove water from the glass surfaces, but what about all the corners, curves and floor area?  If you thought about this before designing your bathroom, you might install an Airmada Air-Jet Shower Drying System.  It directs compressed air through special nozzles on the walls and ceiling of your shower, and can operate on a timer so that without your effort, water is removed from the equation and mold doesn’t have a chance to grow.  Another perk is that everyone can walk into a dry bathroom, no matter how many people have showered before you.  Now that is a great use of technology!

Photo by Curology on Unsplash

You don’t have to tell me (I can see/feel the humidity!)

You don’t have to tell me (I can see/feel the humidity!)

Although we like to measure to be sure and humidity sensors are easy, cheap ways to verify, there are signs all around us when the humidity is too high.   

Here are a few examples with the explanation why: 

  • That musty smell, of course:  Unfortunately, that smell is the telltale sign of mold, and is actually the microbial Volatile Organic Compounds (mVOCs) that molds produce.  To find out more about mVOCs, check out our detailed article

  • Doors and wooden windows that “stick” in their frames: Wood absorbs water from the air, causing it to swell, so closely-fitted wooden furniture like doors, window frames and even cabinets and drawers can “stick”.  When the interior and exterior “weather” dries out, they can work just fine again!

  • Condensation on the inside of windows:  To understand why condensation happens, it’s best to start at the concept of dew points.  You can read more about it in our article here, but the basic concept is that every temperature and pressure of air can hold a certain amount of water vapor.  Warmer air holds more water vapor than colder air.  When warm air hits a cold surface, the water vapor will condense or “drop out” of the air onto the surface–just like a glass of iced tea sweats on a warm day.  The occurrence of windows sweating on the inside will happen when warm, humid air hits a cold window frame (this happens most often with aluminum windows), and if it persists, can be a habitat for mold.

  • Salt or seasonings that clump and stick together:  This may not happen as much nowadays with the proliferation of “preservatives” used in our foods.  However back in 1911 (before air conditioning was widespread), table salt tended to cake in the container when it was rainy or muggy, because salt is hygroscopic.  This means that it has a tendency to absorb moisture, even from the air, and clump together.   Morton started to advertise using the slogan “When it rains, it pours” because they added magnesium carbonate (an anti-caking agent) to their salt, which allowed it to pour freely even in humid weather. (Today, the company uses calcium silicate.) (What’s The Weather Lore Behind The Morton Salt Slogan?)  Here’s a tip: if you are having a bit of a humid spell in your home, or even going camping, you can add a pinch of rice to the salt shaker to get it flowing.  Just like immersing a wet cell phone in a bag of rice, the rice will absorb the moisture out of the salt and allow it to flow through the holes of the shaker again.

  • Household electronics having issues--especially battery ones:  Electronics and water rarely go together, and they can get finicky when the humidity starts to creep up. Battery-operated appliances have contacts that can easily corrode.  If that happens, of course try to dry out the air, and you can use fine sandpaper on the contacts to remove corrosion.

  • Proliferation of insects and pests: Pests like fleas, ants and cockroaches love high humidity: it’s the perfect environment for them to lay eggs and develop into adults. Warm temperatures combined with high humidity is ideal for fleas, and they can rapidly multiply in these conditions. (Do Fleas Thrive in the Rain?)

  • Mildew on wooden furniture: If you have wooden furniture on a humid porch, you may have already figured out that it needs regular wipedowns and maintenance to keep it from growing “fur”!  The same thing can happen inside when it becomes too humid, because the surface of wood is very hospitable to catching dust that can feed mold.  

If you notice any of these signs, it’s time to take action before mold sets in!  The first thing we can recommend is air circulation and ventilation (outside weather permitting), which can change the indoor climate from room to room.  Air conditioners are not automatically “dehumidifiers”, so if your air conditioner does not have a dehumidification mode, you may need to add a standalone dehumidifier.  Sealing the boundaries of the home is really important to prevent intrusion of exterior humidity.  Finally, our Germ Defender, Upgraded Air Angel Mobile and Whole Home Polar Ionizer can help by sending out millions of ions to kill mold spores in the air and on surfaces. The takeaway is that after a while, you can learn to read the signs of high humidity without even glancing at an air quality monitor, and make adjustments accordingly!

Hosting Responsibly

Hosting Responsibly

‘Tis the season for gathering together for celebrations!  More than a few years ago, “hosting responsibly” might be taken to mean monitoring alcohol consumption and driving.  Now, it also means providing good air quality where participants don’t need to worry about breathing in germs.  What a difference a few years (and a pandemic) makes!

In November 2022, in grocery stores, malls, airports and airplanes, masks and distancing are no longer mandatory.  There are also no mandatory distinctions between vaccinated and unvaccinated people.  I realize that although most places present as pre-pandemic, these norms can change at any time, and many people are still concerned about virus transmission and their health.  This elephant has been dressed up well, but he’s not going away, so it’s best to acknowledge him!

Letting your guests know about your preparations means letting them know you care, and make them even more eager to attend!  How can we get started?  Here are some questions for the host:

Is your home or gathering place well-ventilated? 

Here are a couple ways to tell:

  1. Do odors persist for hours if you don’t do anything to abate them?  This might be a little tricky to answer, because it’s definitely a good idea to use your kitchen exhaust fan while cooking, but if you clean up the food bits, wake up and can still smell last night’s dinner, there is likely a problem.
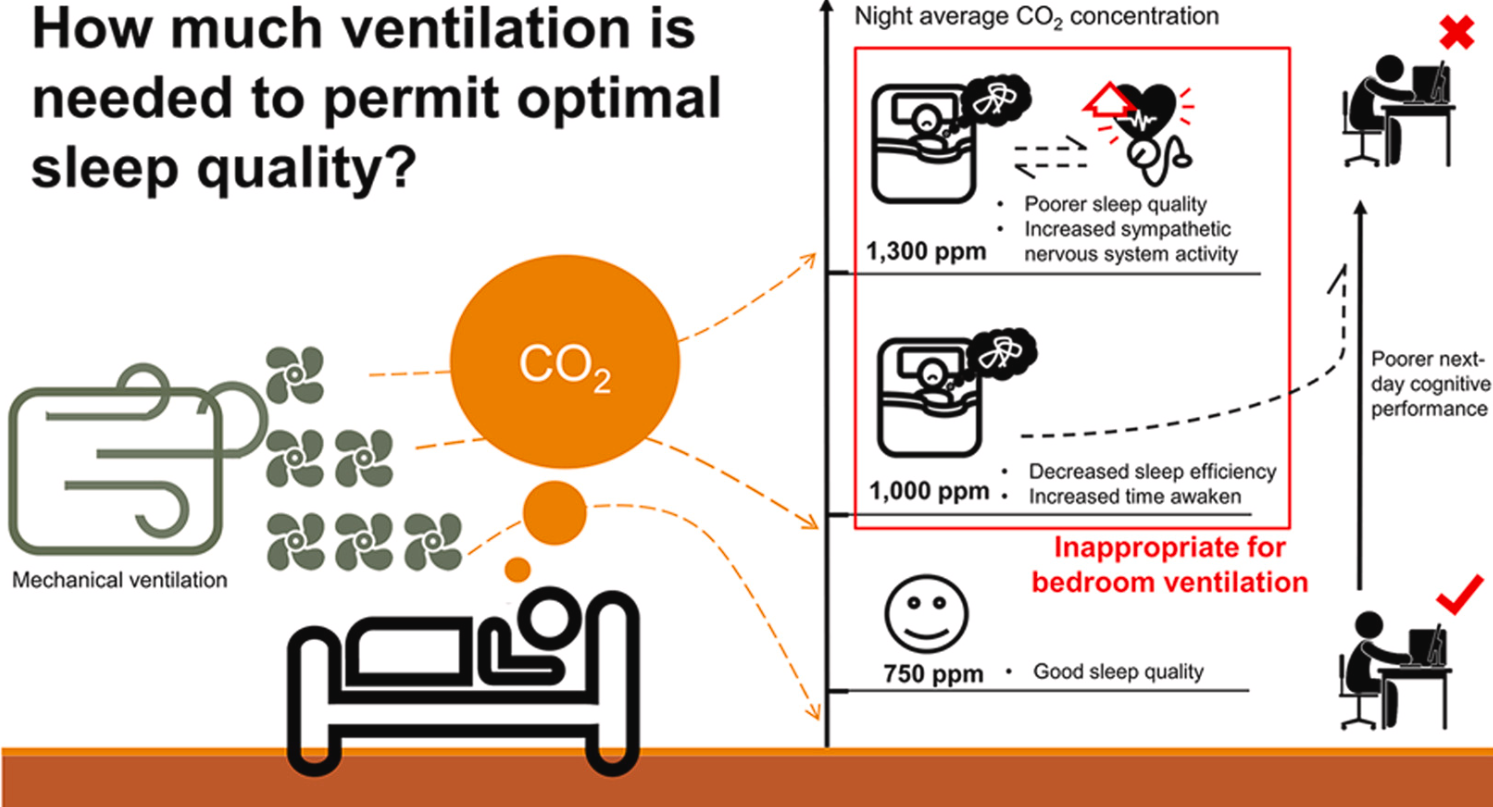
  2. Is the carbon dioxide level in your home below 1000ppm?  It’s really helpful (and surprising) to use a portable CO2 meter in your home and elsewhere.  It let me know that my house (built 1982 with building paper as the air barrier) is quite leaky at about 520-550 ppm CO2, but on the other hand, my parents’ house (renovated 2020) seems to be quite tight and in need of more ventilation (1500ppm)!  The American Society of Heating, Refrigerating and Air-Conditioning Engineers (ASHRAE), which is the dominant organization in establishing proper building ventilation rates in the US,  is hesitant to use CO2 levels as an indication of proper ventilation in homes and businesses because of lack of research and a number of variables.  However it does state in a white paper on indoor CO2 levels
  • Indoor CO2 concentrations do not provide an overall indication of IAQ, but they can be a useful tool in IAQ assessments if users understand the limitations in these applications.
  • All else being equal, higher CO2 concentrations correspond to lower outdoor air ventilation rates and the potential for an increased risk of airborne transmission.
  • Rather than using indoor CO2 concentration as an indicator of desired ventilation rates, several analyses of airborne infection risk have used CO2 as an indicator of the “rebreathed fraction” of indoor air (the fraction of inhaled air that was exhaled by someone else in the space). (Yuck!)

So, although ASHRAE did not set these values (contrary to misquotes), the generally accepted values are consistent with these:

Source: Washington State University Extension Energy Program

So, if you take a reading on your CO2 meter and find that the difference between the indoors and outdoors is less than 650 ppm (which is normally about 1000 ppm indoors), your ventilation is “acceptable”.  Above that level, your guests will have complaints of fatigue, loss of focus and concentration, and an uncomfortable ‘stuffy’ feeling in the air, all of which indicates you are not getting enough fresh air. (Kaiterra.com)  Keep in mind that with more guests, more ventilation is necessary to keep the CO2 level down!  You can crack windows to add more ventilation.

Do you have active air purification?  If so, let them know!  Just as businesses are proud to advertise that they use HypoAir products to keep their clientele safe, don’t hesitate to let your guests know if you are using active air sanitation like the Whole Home Polar Ionizer, Air Angel or Germ Defenders.  In addition, a fresh furnace filter in a higher MERV rating and/or use of a standalone HEPA filter also increase the air quality. 

How about making your gathering indoor-outdoor?  If you have a patio or yard, string lights and a firepit or chiminea make for a cozy, festive ambiance!  In addition, the opening of doors when guests enter or exit adds fresh-air ventilation to your indoor space. If you decide to light a fire in the fireplace, cracking a window will help the fire burn better with less chance of backdrafting smoke into the room.

Have you thought about food and beverage service?

If we had a throw-away mentality before COVID-19, unfortunately the pandemic has only made it worse.  Restaurants have embraced using disposable food trays, utensils and drinking glasses for sanitation, however I suspect it is now more for convenience.  According to this 2020 study, the SARS-CoV-2 virus can remain viable on inert surfaces, with varying lengths of time depending on the surface: four hours on copper, 24 hours on cardboard, 48 hours on stainless steel and up to 72 hours on plastic.  With this evidence showing that cardboard and plastic are not anti-viral, you don’t have to follow suit with everyone else regarding what you serve on.  Instead of having a large trashbin in the center of the party (although some garbage is inevitable for sure), why not fill one side of the sink with soapy water, or leave a basin with soapy water, in which to submerge dishes?  I’ve always enjoyed using real dishes over plastic or paper, so if your gathering is smaller than your collection of plates, it’s not taboo to use china and stainless steel. Marking drinking glasses with a marker or tag ensures that everyone keeps their own!  You could even DIY inexpensive beverage glasses with your guests’ names as favors.  If you decide to go with single serve drinks, cans or bottles are still best marked to avoid confusion.

What’s more important, though, is how you serve.  It’s wise to designate 1 or 2 people as “servers” who can add helpings to individual plates in order to reduce handling of the serving utensils.  If “seconds” are available, it’s best to use additional clean plates to avoid contamination.  Wrap utensils in individual napkins pre-party so that no one has to dig through a bin to get their own.  

Set containers of hand sanitizer throughout your space, and most importantly at the food and drink service area.  

Have you made sure the bathroom is clean and inviting?

  • Provide antibacterial soap and individual paper hand towels
  • If you have a bathroom vent, consider installing a switch protector or sign so that it stays on throughout the party to keep the bathroom air fresh(er!)
  • Instead of buying deodorizers that can add toxic chemicals and VOCs to the air, re-package some TotalClean in a pretty glass bottle and label “air freshener”--it really deodorizes well!

Will you have chemically sensitive guests?

Ask guests to notify you if they have chemical allergies, so you can keep it scent-free if necessary.   If you've ever had a smell irritate your nose or even cause a headache, you have a inkling of what Multiple Chemical Sensitivity (MCS) sufferers go through.

  • It’s hard to pass up candles and sprays in holiday scents, but try to do it for the sake of your friends!
  • It’s also wise to use unscented, natural products like TotalClean to get a thorough clean on all surfaces without any scent.
  • Ask other guests to abstain from using scented personal items like perfume and deodorants.

Less Coffee, More Fresh Air!

Less Coffee, More Fresh Air!

At some point in most peoples’ lives, fatigue is a fact of daily life.  We can chalk it up to too much work and not enough sleep, or poor quality sleep, or a virus that seems to be “going around”.  But what if it could be as simple as not enough fresh air?  Simple…yet sometimes not easy to fix, when opening the windows lets in more harmful air than good.  Let’s dig into this “simple” cause…

Different regulations regarding ventilation have been around for a long time, way longer than the American Society for Heating, Refrigerating and Air-Conditioning Engineers (ASHRAE) published its first Standard 62 for ventilation. The first, ANSI/ASHRAE Standard 62-1973, Standards for Natural and Mechanical Ventilation, presented minimum and recommended ventilation rates for 266 applications and became the basis for most state codes.(ASHRAE.org)

This standard has been revised several times since 1973, and the current standard calls for homes to “receive 0.35 air changes per hour  but not less than 15 cubic feet of air per minute (cfm) per person.” (epa.gov)  Why?  According to Britannica.com, Clean, dry air consists primarily of nitrogen and oxygen—78 percent and 21 percent respectively, by volume. Without any other contaminants such as carbon monoxide (from combustion) or radon (from the earth) entering a building, humans change the composition because we take in oxygen and breathe out carbon dioxide.  Our lungs can still rebreathe this air “safely” until it decreases below 19.5% (OSHA threshold for oxygen in atmosphere), but increaseing levels of carbon dioxide (CO2) may cause occupants to grow drowsy, get headaches, or function at lower activity levels.  (healthybuildingscience.com)  What’s the threshold of CO2?  

  • NIOSH (National Institute for Occupational Safety and Health): 1,000 ppm (parts per million in air) are a marker suggesting inadequate ventilation.  

  • ASHRAE recommends that carbon dioxide levels not exceed 700 ppm above outdoor ambient levels.   (Normal range for outdoor levels are typically in the 350-450 ppm range). 

  • OSHA (the Occupational Safety and Health Administration) limits carbon dioxide concentration in the workplace to 5,000 ppm for prolonged periods, and 35,000 ppm for 15 minutes.  

Taking the most conservative route, 1000 ppm is only 0.1%.  Wow, it doesn’t take a lot of CO2 to make stale air!  If this is the gold standard, why are we suffering in stale air?   The answer is that  many places in the US do not require building permits in order to build or renovate a home.  For this reason, it’s up to the homeowner to know what is needed and make sure it’s installed.  If the HVAC technician does not design fresh air into the system, and the homeowner does not know about the need for it, the home won’t have it and the air will be stale.  Case in point: my 1982 home in the country.  It cools, heats, and circulates stale air.  

Take this tweet from Andrej Karpathy and Elon Musk, who know a bit about technology: 

And then the public chimed in: a Stanford professor used to take CO2 measurements in a lecture hall before packing 100+ students in for 1.5 hours, because some halls did not have enough ventilation to sustain deep thought!  Then a restaurant worker began to think, oh, so that’s maybe why I got dizzy sometimes during peak hours of a restaurant?  And another: his son used to wake up crying but since increasing ventilation in his room, the child sleeps a lot more peacefully.  

So if you want to measure your air, lethargy, unclear thinking and headaches don’t have to be part of your day!  There are lots of CO2 monitors on the market, with most starting about $65-70.   This monitor by INKBIRDPLUS shows temperature, humidity and CO2, and also allows you to customize an alarm for different levels of CO2 (they recommend normal (400-700 ppm), warning (700-1500 ppm), and dangerous (1500-5000 ppm)).  

Can you imagine measuring the CO2 while sitting in a conference room or in a lecture hall?  With such technology at your fingertips, there’s no reason to be ashamed to say “I need a break”.   Your brain and body will thank you!

Photo by Call Me Fred on Unsplash

Getting the Basement Dried Out

Getting the Basement Dried Out

In our post on how the basement affects our whole home’s air quality, we discussed how mold and mildew form and are sustained in the basement.  Active water leaks (flowing down the walls and pooled on the floor) are not required to make the basement a musty place.  Here are some sources of moisture coming into the basement:

  • Concrete is not a moisture barrier on its own!  Water will permeate concrete walls and floors and simply evaporate, increasing humidity.  
  • Open or broken windows allow moist air from the outside to come in and upon encountering cool walls and surfaces in the basement, condensation will form or just increase relative humidity in the air.  
  • Air leaks around windows, entry doors, unsealed wall penetrations and penetrations into the first floor above allow air to come in, in an uncontrolled way. 

Ideally the basement is inside your building envelope, whether you decide to finish it or not.  This is because it can be a suitable place for mechanical systems like HVAC air handlers and furnaces, hot water heaters, and also for storage.  To house these systems, however, the basement needs to be dry, with good air quality.  We argue that the basement air quality needs to be as good as any other floor in the home, because it will mingle with the atmosphere of the rest of your home!  There will be small leaks in the basement ceiling that make it permeable to the rest of your home.

The way to control humidity is to control:

  • Water flow into the space,
  • Airflow into the space, and
  • Air circulation within the space.

Let’s tackle each problem individually.

Water flow into the basement

Water flowing down walls in streams and puddling on the floor is a major problem– in this case, it is like living above a lake!  It will be difficult to “dehumidify” the air when open water is present, because the water will be continually vaporizing into the air as fast as a dehumidifier can take it out.  Although many basements exist like this, walls and storage of home goods in such environments can accumulate mildew rapidly.  Painting on a “waterproofing coating” will usually just act as a band-aid, because the pressure behind the wall, forcing it into your basement (called hydrostatic pressure) will eventually break through the paint and even degrade the foundation if it’s not drained away properly using interior and/or exterior drains. (basement waterproofing)  It’s best to contract several reputable basement remediation contractors in order to get their recommendations and quotes on stopping the inflow of water.  

If the water is only causing dampness on the walls but not visible condensation, then it’s possible to allow the walls to continually “dry” to the inside by doing the following:

  • Cracks and damage to the walls need to be repaired first.
  • Install rigid foam board with a “perm” rating of 1 or greater.  This allows the moisture to move through the foam and dry out, but still insulate the basement for greater thermal comfort and avoid condensation on the cold wall. Keep the foam insulation up about an inch from the floor to allow any condensation to drain.  If desired, the walls can be framed with treated wood to hang drywall inside.  An excellent cutaway diagram of the installation can be found here (page 24). Below is a picture of rigid foam board insulation from the same document (page 32).
  • An alternative to applying rigid foam board is to paint concrete walls with a waterproofer such as UGL’s Extreme Latex Masonry Waterproofer.  This product has a perm rating of less than 1 (according to this manufacturer’s video), so it is vapor semi-impermeable, but it does not have any insulating properties, like the foam board, so the walls will still be cold to the touch and allow condensation if the air inside is too warm and humid.  
  • Use dehumidification to dry things out.  
  • Decrease relative humidity by increasing the temperature slightly (the dehumidifier may raise the temperature a few degrees, but if not, you can add a small heater).
  • Increase circulation with fans so that air is evenly dehumidified.

Some notes on Vapor Permeability: A material’s permeability is measured in units called perms, which assess how much moisture can pass through a barrier in a 24-hour period according to standardized industry tests. Materials are separated into four general classes based on their permeance:

  • Vapor impermeable: 0.1 perms or less

  • Vapor semi-impermeable: 1.0 perms or less and greater than 0.1 perm

  • Vapor semi-permeable: 10 perms or less and greater than 1.0 perm

  • Vapor permeable: greater than 10 perms

Materials with lower perm ratings are better at stopping the movement of water vapor. If the perm rating is low enough, the material is a vapor retarder. If it’s really low, it is a vapor barrier. (Barricade Building Products)


Air flow into the basement

Sometimes it’s difficult to know what to do: open the windows or not?  Many reputable websites advocate “airing out the basement” (such as thisoldhouse.com), and we at HypoAir always advocate for ventilation to dilute stale air, but here’s the problem: when you don’t know the dewpoint of the air coming in or leaking in, it can cause major mold problems in the basement!  Dewpoint is the controlling factor of whether fresh-air ventilation alone can prevent mold.  As we wrote in another post

The best way to explain this (per this great article) is to find out the dewpoints of the indoor and outdoor conditions.  If the outdoor dewpoint is lower, you can ventilate with fresh air and still dry out your house!  For example on July 26, 2002, here are the conditions inside and outside my house (a relatively “dry” hot day outside!):

Inside: 76 deg F, 67% humidity = 63 deg F dewpoint (check out this easy calculator on dpcalc.org)

Outside: 91 deg F, 54% humidity = 72 deg F dewpoint (dpcalc.org)

See, in this case even though the relative humidity outdoors is lower, if I open my windows, that hot air coming inside would be cooled and relative humidity would increase, working against my humidity goals.

In the case of the basement, the air temperature could easily be lower, like 68 deg F.  If you cool 91 deg air with 54% relative humidity down to 68 degrees, water vapor in the air is going to condense, making your humidity problem worse!   Therefore we want to control all sources of air inflow and only let in drier air for ventilation.  Here is a diagram showing the problem of leaving windows open, and how to solve it:

source: bayareaunderpinning.com

  1. Close windows, block off vents, and seal the window frames with caulk, spray foam or adhesive tape made for the purpose.  Make sure exterior doors have weatherstripping. 

  2. Check for unsealed penetrations in the walls.  If you have to use a flashlight and look behind appliances such as water heaters or furnaces, be prepared with gloves and pest spray to get it done!  The best sealant for wall penetrations in the basement would be sprayfoam, because it conforms to the shape of the hole.  You may want to shove in a wad of steel wool first, because it deters animals from chewing through the foam and re-opening the hole.

  3. Look up–check the ceiling.  If there is a false ceiling in the basement, you may need to remove ceiling tiles and/or insulation in order to see the underside of the subfloor, but this is where big problems can hide!  The photo below shows the underside of a tub.  Plumbers often cut BIG holes to make their jobs easier, but this can really hurt air quality when these holes let lots of moldy air up (if there’s a negative pressure generated in the space above, this is easily done with a bathroom vent fan), or warm air down (if you are using any type of air extractor in the basement).  It’s best to seal big holes like this one by framing in a box to the surrounding joists, and using spray foam to seal the resulting cracks and holes.  It’s not recommended to insulate the ceiling of the basement (see this definitive guide, page 25) to try to separate it from the rest of the building, as this will only cause more mold problems in the basement.

Source: energyvanguard.com

Where does fresh-air ventilation come from if you’ve sealed outside access off?  According to energyvanguard.com, there are 6 ways to supply fresh air to your home in a humid climate, and for the purpose of a basement that is outside the building envelope, only one makes sense since you’re probably already using a dehumidifier: a fresh air fan that purposely pulls in outside air.  Here are some options to make it happen: 

  • Air King’s QUFresh, 120 cfm, $413 at ecomfort.com
  • Broan’s FreshIn, 180 cfm, $239 at sylvane.com
  • ACInfinity’s AIRTITAN T3 6-In Ventilation Fan, 120 cfm, $69.99, sylvane.com

The AirTitan is a good option where windows are available, because it can be retrofitted to fit in an open window more easily than the other ducted models.  Each of these models have temperature and humidity settings you can adjust so that the fan will only operate when it meets those specifications.  These may need to be set higher in hot and humid climates, but the dehumidifier should be able to handle moderate inflows of fresh air.  When you control the airflow into the basement, you can control the humidity.

And finally, Air Circulation Within the Space

Your basement may be one wide-open area, or several rooms separated by walls and doors, but in each case, good air quality requires that air is moving constantly.  Here are some tips to get the best circulation:

  • Leave doors within the basement open as much as possible
  • Leave dedicated fans running all the time.  Floor fans work great for this purpose, as you can move them around/adjust direction and speeds until you find the optimum circulation.
  • Move boxes and furnishings away from walls and up from floors so that air will circulate to dry them.  Don’t stack boxes to the ceiling.  Separate boxes by several inches to get air moving between them. 
  • Remember, the less absorbent material stored in a non-conditioned space, the better (less cardboard, less fabric, and less wood).

I hope these suggestions help you to dry out your basement so that your whole-house air quality improves, from the ground up!