Tag Archives for " non-toxic cleaner "

How to safely remove old carpet

How to safely remove old carpet

Upon testing my bedroom carpet as part of a series of mold tests in my home, I found this:

I scheduled time to remove the carpet the next week.  Now, how do I do this safely?

Research revealed two extremes:

  1. removing the carpet with no breathing equipment and no dust abatement (although this guy has some great tips, I cringe at the way he’s throwing the carpet around with no dust mask)

  2. removing the carpet with breathing equipment, a zillion garbage bags and gallons of mold eliminator (this method is costly and WET!) 

I had to find a solution in the median.  Here’s what I came up with for my situation (I am moderately sensitive to mold). 

Supply list:

  • Respirator with extra set of filters

  • Heavy gloves

  • Old clothes

  • Knee pads

  • TotalClean concentrate (or several pre-mixed spray bottles)

  • Clean garden sprayer

  • Rags

  • Plastic sheeting and painters tape for taping off vents and covering heavy furniture

  • Old towels to block under door

  • Heavy duty garbage bags (also known as contractor bags)

  • Carpet knife with extra blades or utility knife with extra blades

  • Duct tape

  • Pliers for pulling carpet

  • Nail puller to remove staples in padding

  • Pry bar and hammer to remove tack strips

  • HEPA vacuum with new bag for cleanup

  • Air Angel and/or Germ Defender: helps with dust and mold mitigation

Prep, prep, prep…it’s tedious but so worth it.  

  • Move whatever furniture, clothing and decor you can easily move, into another room. I took the long-overdue opportunity to get a new mattress, so I could escort my old one to the dump!

  • Use dollies on furniture that is too heavy or large to move out of the room.

  • Turn off the HVAC and cover any ceiling, floor or wall registers with plastic sheeting and painter’s tape

  • Measure TotalClean concentrate and water into garden sprayer at 1:7 parts respectively or empty pre-mixed spray bottles into sprayer.

  • Block under door(s) with old towels so that dust doesn’t migrate through the house.

  • Open window and remove screen if you plan to toss the carpet out of the window (also block off the area below)

  • Turn on the Air Angel and/or Germ Defender to help dust particles clump together and fall to the floor; the ions also destroy mold and bacteria on contact

  • Suit up with all protective gear including your respirator!

My strategies for minimizing dust will be to dampen a section of the carpet with the sprayer; cut the carpet into a  manageable section, remove it, and do the same three steps for the carpet pad underneath.  You’ll want to make the least number of cuts, because cutting through the carpet releases a lot of dust and fibers into the air.  I realize that this method will only wet the top of the carpet and not the cut edge or bottom, but short of soaking the carpet and subfloor, I found this is the best solution.  I liked the idea of tossing the carpet out of the window on a good weather day and bagging or binning it outside so that I didn’t drag the bags through the house.  I removed the carpet, padding and staples as I went, because I had a heavy piece of furniture left in the room and did not want to move it around more than necessary.

  1. Starting in one corner, use the sprayer to dampen the carpet in a 2’x8’ section.  Cut just inside that section with the carpet knife.  

  2. Use pliers to grab the carpet in the corner and wrestle it from the tack strips. If you can’t get it out, try cutting the corner out with your knife and pulling out just the corner.

  3. Roll it up gently and dispose of it in a contractor bag (or toss it out a window!)  If bagging it, then you can use the duct tape to keep it rolled tightly.

  4. Spray the carpet pad underneath and cut it.

  5. Dispose of it in the same way.

  6. Remove staples holding the padding to the floor with the nail puller.

  7. Remove tack strips using the pry bar and hammer.  They are super-sharp!  (If you plan on replacing with new carpet and the tack strips are not rusty or damaged, you can leave them in place).  

Repeat steps 1-5 until the whole room is devoid of carpet and padding!  If you can handle more than 2x8’ of damp carpet at a time, you can  Then, use a HEPA vacuum to thoroughly vacuum the floors to remove dust.  You will want to wipe down the walls, window(s) and ceiling fan with TotalClean because dust is now everywhere.  Finally, you can remove the sheeting from your register(s) and change clothes and shower–you earned it!  It’s best to add a bit of EC3 Laundry Additive to your clothing when washing it to avoid spreading mold to any of your clean clothing. 

If you have a new floor already scheduled for installation, good for you! Make sure that the subfloor dries out completely before 48 hours have passed, and definitely before installing new flooring (use of the sprayer makes it unlikely to soak the subfloor).   If you haven’t picked out new flooring yet, you can remove/replace any nails or screws that are sticking out, use a non-toxic floor paint, and/or use an area rug to cover over any rough areas until that day comes.  Try not to wait too long, however, so that excessive wear of the subfloor doesn’t occur.  

Photo by Julie Marsh on Unsplash

How to equip your college student with better air quality

How to equip your college student with better air quality

If you’re a parent with a son or daughter in college, of course you want to see them succeed!  It can get costly, though.  From helping with tuition, room and board and everything else, it seems like “clean, fresh air” should be a free part of the package. Unfortunately, that may not be the case.  Many colleges and universities are housed in old buildings that did not give thorough consideration to air quality when they were designed, built, or renovated.  In many cases, you are paying for the privilege of  studying there, with living as only an afterthought!  

The problem with poor air quality in the university setting is that it affects the very thing young adults go there to do: learn.  Contaminants in the air work against their body in the following ways.

High CO2 due to inadequate fresh-air ventilation decreases the ability of the brain to metabolize oxygen.  In other words, the brain becomes oxygen deprived!  This can affect learning in terrible ways.  In a Havard study in 2015, 24 participants spent 6 days in simulated offices to control for CO2 and VOCs.  Days were designated by the research team, but blinded to the participants and analysts, to be one “High CO2” day of 1400 ppm CO2, two “Conventional” days representing the average office building conditions of about 940 ppm CO2, one “Green” day representing better ventilation with conditions of approximately 740-750 ppm CO2, and two “Green +” days representing 100% outdoor ventilation (approximately 550 ppm CO2). Cognitive scores were 61% higher on the Green building day and 101% higher on the two Green+ building days than on the Conventional building day. On average, a 400-ppm increase in CO2 was associated with a 21% decrease in a typical participant’s cognitive scores across all domains after adjusting for participant (data not shown), and a 20-cfm increase in outdoor air per person was associated with an 18% increase in these scores.  This shows that for lack of fresh air in their dorm room or classroom, your student could be missing out on their chance to absorb all the material presented, with lower test scores as a result!  Here are some ways to “open the windows”, so to speak:

  • Add a Window Ventilation Filter to their dorm room.  It’s easy to install and remove, and filters out pollution, pollen and dust. 

  • For more info on how to measure CO2 in your dorm or classroom, check out our post.  If the classroom or lecture halls turn out to be high in CO2, advise students to check with their student advisor on advocating for more ventilation.  

VOCs: Most dorm rooms come equipped strictly with the basics -- a bed, desk, chair, light and garbage can, plus a small amount of storage space in the form of a dresser and/or closet. (howstuffworks.com) Therefore, moving into a new dorm room usually means getting new bedding and new accessories like rugs, wall hangings, and more storage like dressers or bookshelves.  When these things are purchased new, VOCs from off gassing can increase dramatically if the doors and windows are kept closed for most of the day.  In the study discussed previously,  a 500-μg/m3 increase in TVOCs was associated with a 13% decrease in the cognitive scores.  Once again, fresh air ventilation is really important to keep VOC levels in check. 

  • Use a portable VOC sensor to check for levels in the dorm room or wherever it’s suspected that VOCs may be high (like a newly renovated area).  

  • Install a  Window Ventilation Filter in the dorm room to get fresh air dilution. 

  • The Air Angel neutralizes VOCs with the catalytic molecules emitted by its AHPCO cell. Being portable and requiring very little maintenance, it can travel anywhere they go: on weekend sports events, home, and on vacation.

  • The Germ Defender/Mold Guard's optional carbon filter adsorbs VOCs emitted by newer items as they off-gas.

Indoor humidity plays a major role in our health: when it’s too low, disease transmissions are more likely, and when it’s too high, mold growth occurs and different mold-related conditions spike.  We can think of many reasons to keep humidity in the recommended range of 40-60% so that your loved one’s health is not at risk!  Sadly, sometimes it takes severe illness and even death to prompt renovation of problem buildings (see this article about the University of Maryland).  Here’s how to equip your student against high humidity and the risk of bacteria, viruses, and mold-related illness.

  • It’s super inexpensive to put a portable humidity sensor in their suitcase or next care package.  Ask them to message you with a photo of the sensor when you’re talking with them in the dorm room, or whenever else it seems to be high.  

  • If the humidity remains high, you can speak to the dorm manager, but also equip your student with a dehumidifier.  Amazon and big box stores can even deliver one from an online purchase.  Since the average dorm room is only about 228 square feet, and larger dehumidifiers come with complaints of extra noise and heat, you’ll want to keep it small.  This economical one by Eva-Dry only covers about 150 square feet (1200 cubic feet), but two of them plugged into different areas will help keep moisture under control.  Here is a review of other models that work great for dorm rooms. 

  • The Germ Defender/Mold Guard is perfect for small, humid spaces, and does triple-duty in a dorm room: 1) Even though the bathroom is typically always humid, mold doesn’t have to grow there… I can testify that one Mold Guard stopped mold growth when I couldn’t get a leaky shower valve repaired right away.  2) This unit also deactivates viruses and bacteria in the air and on surfaces across the room with polarized ions. 3)  Finally, it has an option for a carbon filter to adsorb stinky odors like running shoes and sweaty clothing!

  • Use an Air Angel to prevent transmission of germs and mold growth. This unit is portable and requires very little maintenance, in fact only a replacement AHPCO cell once a year.

Finally, if your college student has not adopted good cleaning habits by now, we can’t help you! (just kidding, but we can supply you with the right goods, read on!)  Statistics on bacteria in dorm rooms are pretty gross: the average women’s dorm rooms had over 1.5 million colony-forming units (CFU)/sq. in. of bacteria, while men’s dorm rooms had an average of over 6 million CFU/sq. in. (collegestats.org).  The same article breaks down the types of bacteria and where they are most concentrated, and while not all of them were bad, most of them were.  It’s time to clean up, because it’s hard to know which is worse: being sick in college or having a sick roommate who will soon infect you.  For those who do clean, equip them: 

  • Once again, Germ Defenders and Air Angels are passive sanitizers that help in activate germs between active cleaning.

  • A bottle of TotalClean goes a long way!  Since dorm rooms are small, heavy-scented chemical cleaners can be super-irritating and not always welcome to their roommates’ sense of smell.  TotalClean is unscented, non-toxic and very effective against dust, dirt, and germs on many different surfaces, even windows and mirrors. 

  • Small pump bottles of non-toxic hand sanitizer and sanitizing wipes stationed around the room and on desks help between hand-washings. 

Of course, similar to sending them off to grade school, you can’t be there 24/7 to help your college student make smart choices, but at least by this point you can give them tools to monitor and correct their own air quality for the healthiest and most productive school year.  Viva la college!

10 Ways to Improve Air Quality in Your Home for $50 or less!

10 Ways to Improve Air Quality in Your Home for $50 or less!

We all like easy, cheap tasks that bring a lot of satisfaction when they’re done.  Why not focus on your air quality the next time you’re in the mood to DIY?  Here’s a list of things that only take a little preparation and a little time, but can make a big impact in the air in your home.  

  1. Are you on an HVAC filter change schedule?  If not, it’s time to change that!  Dirty HVAC filters have a number of negative consequences–from increasing the dust and mold in the evaporator/air handler, to possibly even causing damage to your expensive system.  If you don’t have any filters, just click here and order some from us, and we’ll have them at your door shortly!  If you’re not sure which “MERV” to order, read through the information on the page, and/or contact us to find out.  (Per filter cost is much less than $50).  Then, set a reminder on your calendar to change them regularly.

  2. Clean and adjust your fans for better air circulation: Fans make a BIG difference in quality of air because airflow is critical in this process to 1) get air moving, which reduces pockets of stale air or humidity, and 2) introduce fresh air, which dilutes contaminants and refreshes us!  (for more info check our article here)  Here’s a short list of fans that will need attention: 

    1. Ceiling fans need periodic cleaning and seasonal direction adjustment.  Get yourself an extendable duster that can be used wet or dry (we recommend dry first, then spritz with some TotalClean to get it cleaner).  The fan should also rotate in the correct direction: clockwise in the winter and counterclockwise in the summer (there should be a switch on the remote OR on the fan motor to control rotation direction).  

    2. Portable fans are important for spot cooling and can get pretty dusty!  Some are easy to remove the grill cover, the fan blades and dump them in a sink with soapy water.  For others, use a brush attachment on your HEPA vacuum to clean all accessible surfaces.  

    3. As long as you have your HEPA vacuum with brush attachment out, just scoot on over to the refrigerator and use it on the front grille at the bottom (and/or the back of the fridge–some models have a grille there also).

    4. Bathroom vent fans can also get pretty dusty.  Turn off the power at the wall and if you can, get on a ladder to remove the grille and dust out the inside of the unit, wash the grille and replace it.

    5. Kitchen exhaust fans probably top the list in the grime category!  We have a short article on how to clean them, and even use activated carbon media to make the kitchen smell better!

  3. Fall is the perfect time to get more fresh air into your home, but sometimes more filtration is needed.  Our Nanofiber PureAir Window Screens catch more fine particles than regular insect screens, so you can have fresh air without the dust and pollutants that normally come with it.   If you have window screens in your home, replacing them with this material is very easy, even for beginners, and we recommend several methods to do it on the product page. 

  4. You know that accomplished feeling when you’ve just cleaned the inside of your car?  Well, here’s a shortcut…order and replace your car’s Cabin Air Filter with a new one that has activated carbon in it.  True, the coffee cup behind your seat won’t disappear, but your car will smell much better, and it will filter out more pollution from other vehicles on the road. (and it might even inspire you to clean the whole inside of your car!)

  5. It may sound like a paradox, but cleaning the dishwasher every few months is really necessary!  As you can see in this video on how to easily remove and clean the filter, the hidden parts can get nasty and slimy!  If you don’t have time to properly take apart and clean your dishwasher, you can try using a highly-rated but non-toxic dishwasher cleaner, which uses citric acid as its active ingredient.  You can use TotalClean or a DIY cleaner to wipe down the door seals and any other parts that can’t be removed.

  6. Set yourself up for cleaning success!  Chances are, if you don’t have the right tools in the right place(s), cleaning will not spontaneously happen!  Case in point: I used to keep 1 spray bottle of TotalClean under the kitchen sink, and paper towels on my kitchen counter.  After researching and writing about the “toilet plume”, however, I knew I had to increase frequency of cleaning the toilet and other surfaces to at least every other day.  Here’s what to do:

    1. Keep a non-toxic spray cleaner and disposable wipes (like paper towels) in the bathroom so that you can easily clean surfaces every few days.

    2. Keep a stash of hand towels and bath towels in a closed bathroom cabinet to change them out several times a week.

    3. If you use a floor cleaning machine like my highly-rated CrossWave, make up a non-toxic cleaning solution and place it in a labeled jar so that you can break out your machine and get going at any time!  Here’s the recipe I like to use. 

    4. Keep a cleaner where you charge your phone.  (Yes, we’re not supposed to, but many of us keep our phones beside our bed at night.)  In that case, dampen a few paper towels with TotalClean and place in an airtight container so that you can sanitize your phone easily and quickly.  

  7. If you or any of your family are susceptible to toenail fungus or athlete’s foot, here is an uncomfortable fact:  fungus can live in your shoes for up to 20 months, and it can even persist in socks for several washings.  To get rid of fungus from washable shoes and socks, (and towels and sweaty clothing in separate loads), add 2 oz of EC3 Laundry Additive to the rinse cycle reservoir of your washing machine.  Not only will it eliminate mold spores from your shoes and clothing, it will also help to clean the washing machine, which can also harbor mold.  (Mold is a type of fungus).

  8. I cannot overstate the positive effects of adding mattress and pillow encasements, and ripping out old carpet in my bedroom.   My breathing and sleep quality have improved drastically by eliminating these materials where dust mites live and multiply.  Here’s what to do; it even works on old mattresses!

    1. Order a real mattress encasement and pillow covers for the bed(s) you want to protect.  Mattress encasements like these by Hospitology have tight-weave microfiber (which do tend to make you sleep warmer til you get used to it) and zipper ends that have velcro coverings so that no dust mites can get in or out!  This is death to dust mites; check out more encasement recommendations here

    2. When you decide to install your encasements, wash all your sheets and and blankets in hot water and your detergent of choice, so that any dust mites will die in the washer.

    3. Install your encasements (it may take another person because it fully encloses the mattress like an envelope that’s only zippered on one side), making sure that all toppers and thick mattress covers go inside the encasement.  You don’t want to leave anything that cannot be easily washed outside.  Now, any bugs living in your mattress and pillows will starve and be contained within the encasement (kind of gross but wayyy cheaper than buying new mattress and pillows). 

    4. Make your bed with fresh clean sheets and blankets and have a great night’s rest!

  9. The second part of the last recommendation is getting rid of old carpet in your bedroom (or any room you spend a lot of time in!).  Dust mites can also live in the carpet around your bed, especially if pets are allowed in your bedroom.  So, even if you don’t have an alternative flooring plan or budget at the moment, removing the carpet and fixing up the subfloor can still be a big improvement.   Warning: once you rip carpet out in one room, you’ll want to do it in other rooms, too!   Here’s what to do:

    1. Read our article on how to safely remove old carpet, and gather your materials/tools.  Make sure to find out how your local garbage or waste company requires you to dispose of it (bagged vs. unbagged, where and when).  Then, budget at least a few hours to get ‘er done!

    2. Fixing up the subfloor can be as simple as checking for splinters and sharp nails or screws, to sealing it with a non-toxic paint or sealer.  Check out a really helpful article here and a few companies that specialize in these types of paints:

      1. Ecos Interior Floor Paint

      2. AFM Safecoat Concrete Floor Paint

  10. Sealing Air Channels in your attic:  You’ll want to wait until cooler weather for this chore, but the idea is to tighten up your “building envelope” so that your expensive “conditioned air” (hot or cold) is not leaking out or unconditioned air leaking in!  All it really takes is some spray foam in cans, maybe some scrap wood or styrofoam sheet (to block off bigger gaps), the right personal protective gear, and time!  This is really worthwhile to do if you plan on adding insulation (must be done before adding insulation, check with your insulation company to see if they will do it).  

Okay, the last two projects take more time and effort than changing an air filter, but they do make a difference in your air quality.  In the case of #10, it should also reduce your home heating and cooling bill and stop pests and insects too.   In these cases, showing your home a bit of love will return the favor!

Photo by Heather Ford on Unsplash

Why, when and how do I clean my mini-split unit?

Why, when and how do I clean my mini-split unit?

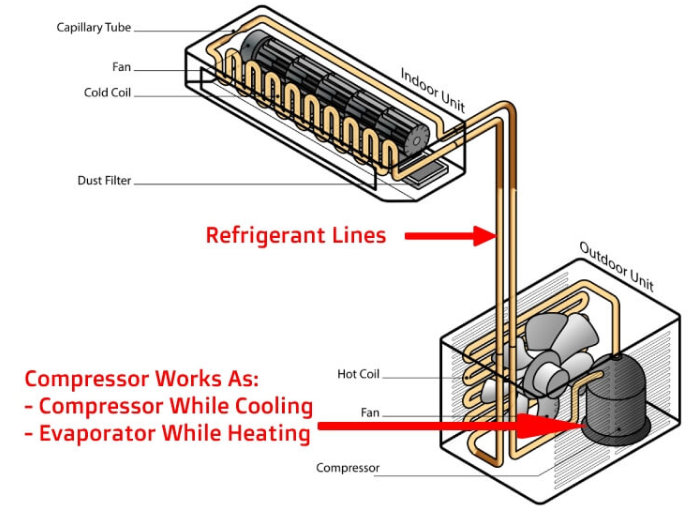
Mini-splits are the elegant cousins of window AC units (even though some window AC units are pretty darn good-looking nowadays with lower profiles that don’t block your view).   Mini-splits and window AC units have some of the same internal parts, so even though mini-splits are usually less visible tucked up high on walls, they need the same attention as window AC units to perform efficiently and avoid harboring dust and mold.   (If you have a window AC unit, check out our article for deep-cleaning it here).  Dust and condensation (moisture) are the perfect breeding ground in a mini-split for mold, and it’s being blown directly into your indoor air. What we’re looking at today is cleaning the “indoor” part of the mini-split, which is in the top part of the diagram below.  The parts that can get very dirty are: 

  • the dust filter: it’s easy to take this filter(s) out and vacuum or wash it clean with mild soap and water every month

  • the cold coil (also known as the evaporator coil): deep clean at least once a year

  • Fan: deep clean at least once a year

  • the louvered cover (not labeled): deep clean at least once a year. 

Image source: What are Ductless Air Conditioning Systems?

When deep-cleaning the indoor unit, since it can’t be removed from the wall without releasing refrigerant (unlike the way you can lift the whole window AC out of the window and take it outside), cleaning the coils inside will require some good waterproofing to avoid getting water, cleaning fluid and dirt on your wall and floor.

The other inconvenient part about cleaning the indoor part of a mini-split is the location: since most of them are high on a wall, you will need a very sturdy ladder and perhaps someone to help by handing equipment to you as you need it. 

I like this video for a good method of a professional cleaning the indoor part of a mini-split unit.  It shows the preparation and equipment professionals use.   BUT you don’t have to be a professional–you can buy the “bib” cover online and use a simple garden sprayer to approximate the same cleaning power!  Here is a good video of a DIY guy doing an even more thorough job (he removed the blower wheel for cleaning outside) with a bit more detail on how to take off the louvers and cover.   The only things we cannot recommend is:

  • His choice of cleaners, which do contain toxic chemicals, some of which will be released inside.  

  • Also, make sure to wear safety goggles or preferably a full face mask!  You don’t want any moldy dirt to fly into your eyes or mouth while cleaning.

  • You can use a vacuum inside to remove big clumps of dust, however DON’T use a shop vac inside, unless it has a HEPA filter.  If your wet/dry vac doesn’t have a HEPA filter, then use any other vacuum that has a HEPA filter on the dry dust only.

For cleaning the inside unit, you can use:

  • Sturdy ladder

  • Goggles or face mask, (gloves–optional)

  • Flat and phillips screwdrivers (a power screwdriver is optional)

  • (1-2) 5-gallon buckets (at least one for inside, another one if you want to see what comes out of the evaporator drain)

  • Garden or pump sprayer

  • Bib for covering the unit for a cleaner job, $26: if you plan on doing your own maintenance, it’s worth investing in the cover to use every year!

  • Old towels

  • Coil cleaner (see below)

  • HEPA vacuum for any inside vacuuming

Regarding the coil cleaner, most aerosol coil cleaners have a “propellant” that assists with moving the liquid out of the spray can.  These propellants are usually hydrocarbons with VOCs.  You don’t need to buy spray coil cleaner and release this in your home!  Our choice of a non-toxic coil cleaner is Viper Evap+ from Refrigeration Technologies.  According to the Technical Data Sheet, it is the industry’s only non-rinsing evaporator coil cleaner utilizing slow-release enzymes in a synthetic detergent base, which is safe for all metals.  If it is not rinsed off, the enzymes remain on the coils for 72 hours, starving any microbes of oxygen.  The solution is gradually rinsed off by condensate production, which is drained via the condensate line.  It has no VOCs, TAC (toxic air contaminants) or HAP (hazardous air pollutants).  It is to be used full-strength via a pump sprayer (the garden sprayer we mentioned above works just fine). 

There are two natural cleaners we can recommend that are non-toxic.  The best part about these are the light citrus fragrance Please note that you should check the manufacturer literature on your mini-split unit to find out the recommended maximum acidity or alkalinity of any evaporator coil cleaning solutions, because strong acids or bases can eat metal and damage your unit!  Whichever you choose, you can check the acidity with a pH test strip after dilution to make sure it’s in a safe range for your unit.

  • For an acidic cleaner:  Nutribiotic is a grapefruit seed extract (GSE) which is highly acidic and microbial at full concentration (be very careful mixing and using it!) but can be diluted to use as a coil cleaner.  According to the manufacturer, The GSE Liquid Concentrate has a pH of about 2.75 and the Maximum GSE Liquid Concentrate has a pH of about 2.2, which are both very acidic.  In the article we found for using it to clean your car’s air conditioning evaporator coil, it’s recommended to use it at 2x manufacturer’s recommended dilution.  (Recommended is 10 drops per 5 oz water, so 2x strength is 20 drops per 5 oz water).  

  • For a basic (alkaline) cleaner: EarthClean by Earthpaint is a citric acid cleaner that is super-effective on greasy countertops, and when used at the manufacturer’s dilution, degreases safely on stone countertops with no damage.   Alkaline cleaners can remove greasy dust more easily, so if your mini-split is near your kitchen and your unit can tolerate an alkaline cleaner, this might be the best choice.

Mini-splits look great on the wall, but their performance is only as good as their cleanliness.  If you keep up with cleaning the air filter regularly (at least once a month), the unit will work better through the cooling and heating seasons, and won’t be nearly as gross or hard to clean during the yearly deep-cleaning.  You can save money by doing this yourself, but hiring a reputable technician is fine for those who have too many other things going on.  The most important thing is prioritizing good air quality in your home by performing or scheduling this type of cleaning regularly.