Tag Archives for " humidity "

Can my indoor air quality affect the food I eat?

Can my indoor air quality affect the food I eat?

Do you ever look at the food on your countertop, whether it’s an apple pie or bowl of potatoes, and wonder, how did that food go bad so fast?  It’s a common problem, even more so in warmer climates, so we thought you’d like to know how your indoor air quality affects your food!

Admittedly, not all spoilage comes from your own air.  It’s been recognized that food processing plants need to have better air contamination control during the food production process.  “Primary  air  pollutants  in  the food  industry  are marked,  being,  in addition  to  microorganisms, suspended particles, combustion  products (nitrogen oxide,  carbon monoxide, carbon dioxide,  sulfur oxide) and volatile organic substances.” (2019 Meat Industry Conference Paper)  The contamination of food products is dependent on:

  • air’s microbial load, and 

  • on the duration of exposure to the air, whether during specific technological processing stages (e.g. cooling) or during storage (from book: Hygienic Design of Food Factories, chapter 14: Managing Airflow and Air Filtration to Improve hygiene in food factories).  

Air in slaughterhouses and sausage production facilities, for example, is more than 10 times more laden with yeasts and molds than dairy processing facilities, because of contamination that can come in on the product (animal feces).  The second point is that the product contact with air needs to be limited in order to limit its contamination.  Air  quality  is  particularly  important  in facilities for  production and packaging of butter, if this is manufactured in open-type mixers, since these devices can also incorporate up to 5% of the surrounding air into the product [Varnam  A  and Sutherland  J  P  1996 Milk  and  Milk  Products: Technology,  Chemistry  and Microbiology 1st ed, Chapman and Hall, London, p 451].

Another factor that causes spoilage during food processing is humidity.  There are three ways that humidity affects the food: 

  • Condensation on equipment and food can accelerate microorganism growth

  • Dry foods can absorb moisture that will lead to microorganism growth

  • Packaging like paper and metal start to degrade, leading to spoilage

These insights into how food gets contaminated in factories are good for application in the home because although we can’t much control how it gets packaged, we can certainly control how it’s stored and prepared at home.  So let’s dive in…

The three main biological pollutants that cause food spoilage are bacteria, yeasts and molds. (online course)  Bacteria, yeasts and molds, which are typically small in size, can hitch a ride on larger particles like water droplets or dust.  Where do these come from?

The bathroom.  It’s not pleasant to think about, but “Germs will more likely spread after you flush, when bits of fecal matter blast into the air in aerosol form, a phenomenon known as "toilet plume." From there, Kelly Reynolds (a public health researcher at the University of Arizona) said, the "bits of fecal matter settle on surfaces, contaminate hands and then get spread to the eyes, nose or mouth." (USAToday.com)  Here are some ways to limit the spread of germs from the bathroom to the kitchen: 

  • Close the toilet lid before you flush.

  • Wash and dry hands before leaving the bathroom

  • Use an ionizer like the Germ Defender in the bathroom, to kill germs in the air and on surfaces.

Pets.  Similar to the slaughterhouse scenario, many of us have furry animals (pets) walking around in our food-processing facilities (kitchens).  Where these pets have been and what they have on their fur and feet can be really disgusting!  Worse, homes with litterboxes in the kitchen, or allowing pets to walk on the counters, is like placing a toilet in the kitchen or even on the countertop!  It’s just not pleasant to think about.  If you have pets and you have a kitchen, think about these reforms:

  • Bathing pets regularly so that bacteria and mold are minimized

  • Not allowing pets to walk on countertops

  • Keeping litterboxes in another area of the home away from the kitchen if possible

  • Spraying pets’ fur regularly with a safe anti-microbial spray like Remedy Mold Treatment Spray by CitriSafe.

  • Always wash your hands after touching your pets and especially before food preparation!

The refrigerator.  What?  How can the refrigerator work against us when we’re talking about food spoilage?  Actually, I’m not talking about inside the refrigerator, although that can be a problem (more on that later).  Here, let’s talk about what happens in the “guts” of the refrigerator, where the heat is actually released through the coils.  The speaker is Jeff May, a renowned air quality inspector.  

“I was sitting in my kitchen, and every once in a while, I’d start to wheeze, but just couldn’t understand why. One day, I realized every time the refrigerator turned on, I would have trouble breathing. Our refrigerator was only three years old, but in those days, the drip pan was accessible from the front. When I removed the grille and took it out, there was a pearl onion that somehow bounced into it. The onion had an inch and a half of Penicillium mold growing on it. So, every time the compressor turned on, it would blow mold spores out into the room. Every frost-free refrigerator has a heating cycle. The cooling coil gets full of ice, and you have to melt that ice in order for the refrigerator to cool. The water from that melt goes into a pan at the bottom. The heat from the compressor is supposed to evaporate the water, but very often, the water persists. There’s just not enough heat. So, if there’s any dust in that pan, mold growth ensues. And if you’re allergic to cats and dogs, and somebody had a pet in the house before you moved in, that refrigerator can be a perpetual source of allergens just from the dust that accumulated on the coils when the pets were there. We’ve had people who have just simply cleaned their refrigerator, and all of their allergies went away.” (Jeff May, during interview with author of moldfreeliving.com)

Now for the inside of the refrigerator: Ok, it seems like a no-brainer that you shouldn’t leave spilled food lying around in the fridge because it can contaminate other food by direct contact.  But using your fridge properly also prevents spoilage:

  • The real reason there is a Fruits and Veggies Drawer: it controls humidity in the drawer and prevents certain foods from ripening too fast.  If there is a vent or slot on the drawer, this is used to adjust the humidity and air flow (because ripening fruits also produce a gas called ethylene, which will cause other fruits exposed to it to ripen).  Closed vent or no vent = high humidity, and Open Vent = low humidity.  For a quick way to remember what to put in the “Crisper Drawers”, remember this rule of thumb: “rot-low, wilt-high.” Fruits that are prone to rot belong in the low-humidity drawer, while produce that's prone to wilting needs to be enclosed completely in the high-humidity drawer. (for a full explanation see article at epicurious.com)

  • Don’t put meat, cheese, milk and eggs in the door shelves!   The door of the refrigerator tends to stay at a higher temperature and these items will spoil more quickly (with nasty consequences) when stored there.  For more on where to store what food, this article helps a lot).

The FoodKeeper App from the FDA is a useful tool to determine how long to keep, and when to throw out specific foods.  It is also helpful to know why you need to preserve foods by refrigerating or freezing them right away (within  2 hours of cooking).  Bacteria are not killed by these colder temps, but their growth is slowed down or stopped.  Some bacteria and their endotoxins (toxins released by the bacteria through its life cycle and during death) are highly resistant to heat, so thoroughly re-heating them before eating does not kill the toxin! (check out our post on endo-and exotoxins here).  Staphylococcus aureus is one example of such a bacteria, and it can cause some serious food poisoning, even death.  

The dishwasher. Wait–the dishwasher is supposed to clean my dirty dishes, how can it be polluting my kitchen air?  If you have ever cleaned the vent on your dishwasher, you will know how absolutely filthy this spot can be.  Food residue, along with moist, steamy air will cause a thick slime to grow.  The rest of the dishwasher needs a deep clean too (not just using a bowl of vinegar and/or baking soda), but the vent especially is the area where escaping steam will carry bacteria into your kitchen air. 

Finally, keeping proper humidity in your home is super-important not only for your sinuses, but for food preservation too.  Some fruits and veggies should only be stored on the counter (check them out here), so the proper humidity will help them to stay fresh longer.  

Now you know how good air quality in your home means better food (especially in your kitchen).  By reducing the bacteria-load in the air, reducing exposure to the air, and keeping proper humidity in the air, you can waste your precious foods less, and enjoy them more!

Insulating drafty windows makes a difference in air quality, not just energy savings!

Insulating drafty windows makes a difference in air quality, not just energy savings!

When you’re trying to make a whole house less drafty, you should go for the low-hanging fruit first.  That means big ol’ holes in the walls, floor or ceiling (like this disconnected register) come first.  If you don’t have any big holes, you can start on the smaller ones–and sometimes the smaller ones can add up.  That was the case in my sunroom. 

My sunroom is west-facing, which means in the summertime it gets brutally hot from sunlight, and in the wintertime it’s brutally cold from westerly winds.  On top of that, it’s fairly dusty and showed some of the highest counts of mold colonies in my home.  When I saw another cold front coming later in the week in December, I finally “made” the time to insulate the windows where I felt the drafts coming in.  I saw that the lower windows didn’t seal at the bottom when closed, AND the previous owner had cut the corners on the lift at the bottom for some reason (they rubbed on the trim?).  Due to these leaks, the room stayed quite “fresh”--meaning the CO2 didn’t really budge from outdoor levels unless I lit a fire in the fireplace on the other side of the room.  If you don’t have a CO2 monitor, I highly suggest getting one: here’s a portable version.

Therefore, the cons of my leaky windows easily outweighed this one “pro”: fixing them was a no-brainer!

Pros

Cons

Better ventilation (lower CO2)

More drafts of hot or cold air (higher energy cost)

More dust or pollution

More mold 

Excess humidity in house

Here are the tools I used: 

  • A spray bottle of TotalClean and several rags for cleaning the windowsills
  • Adhesive-backed weatherstripping in a suitable color to match your windows (low-profile like this one, ¼”, is good unless your windows are very misaligned) 
  • Scissors
  • Optional: A CO2 monitor is helpful–to see the effect on the room
  • Optional: Window locks in case the windows don’t lock afterwards (see below)

If you do have a CO2 monitor, leave the windows closed and take a CO2 measurement before doing the insulation work. You might want to do it while there are a number of people in the room, or you have a propane or natural gas stove burning (I know there are a lot of gas stoves out there!).  Extra people and gas appliances do two things–they consume oxygen and they give off CO2.  These should cause the CO2 to be higher than when the room is empty or no gas appliances are lit.

Next, just get down to it: use the TotalClean and rags to clean off the window sill where the lower half of the window seats.  If you have vertical sliding windows, find the best place to attach the insulation in the vertical track and clean that.  When the track is clean and dry, start peeling the adhesive backing off and apply the weatherstripping a little at a time, cutting it when you get to the end of the track. Close and lock the window to make sure it’s placed correctly.

If you find your windows don’t lock because of the extra height of the insulation (this was the case for my windows) there are a number of window locks available that can be easily removed if you have to open the window for ventilation.  I ended up getting a thumb-screw version that can be moved up a few inches if I decide to ventilate, while still keeping the window secure.  

That’s it!  When you have all of the insulation installed, close the window and repeat the CO2 reading, with or without activity (people or gas-burning appliances).  The CO2 levels should go and stay higher because there is less fresh air coming in.  Fresh air ventilation is needed in a home, but it’s best to do it in a controlled way, not just letting the air come in wherever there’s a small gap or crack.   For more ideas on how to air seal leaky windows, check out this video.

If you’ve completed an easy project that resulted in better air quality, let us know about it! 

Photo by Rob Wingate on Unsplash

Catch it EARLY

Catch it EARLY

No, I’m not talking about a movie, or even a sale.  I’m talking about water leaks.  After recently dealing with a leaky faucet (what a pain), I figured that there must be something to help me detect the leak in the first couple hours after it starts, instead of days later.  I’ve seen leak detectors that can detect as little as 1/16” of water, but that still requires placing it in the right place and hoping that the leak will puddle there first.  When I opened the doors to the area below my sink, what I sensed first, before seeing any water, was the high humidity.  Even without standing water, high humidity can cause mold to grow in virtually any area that it contacts.  

Here are my requirements for these remote hygrometers (humidity sensors):

  • Use a common, easily accessible battery
  • Place it anywhere in your home
  • Low cost of sensors to enable more monitoring places
  • Wireless alarm through phone app
  • Enabled with history to show trends of rising humidity

Bingo!  There are a few systems that fit this bill and more.

Govee is a brand known for its LED lighting and smart home appliances.  Regarding their WiFi digital thermometer hygrometer, they have great reviews on the ease of setting up the WiFi Gateway, and adding all of the sensors to the app.  The sensors can remain connected up to 230 feet away, and the gateway can connect up to 10 sensors ($119 on sale).  Let’s see, I could use one: under each bathroom sink (2), kitchen sink (1), behind the washing machine(1), next to the water heater (1), next to the HVAC air handler (1), behind the refrigerator (1), under the dishwasher (1) in bedroom closets (2-3).  Other people have used them for greenhouses, humidors, and as room sensors to balance their HVAC systems.   I easily found places for 10+ sensors in my home, and with the discounted price, they are cheaper than buying the smaller 3-sensor pack ($46) and adding more sensors separately. 

The Moen Smart Water Leak Detector ($102 for a set of 3 sensors) monitors moisture levels (through a moisture-sensing cable), humidity and temperature to send alerts to your phone through the Moen FLO app.  It does require a wifi connection, but you also have the option of installing a remotely-operated water shutoff valve ($470) that can operate manually from your smart phone, or automatically in response to a water leak detection signal from one of the monitors.  This valve also performs a nightly check of the system by shutting off the water and sensing pressure drop, to detect leaks as small as one drop per minute behind walls!  

YoLink is another smart appliance manufacturer and their temperature/humidity devices have a few differences.  For one, the wifi connection can be sustained up to ¼ mile, which is over 5 times the distance of Govee.  The YoLink can monitor extreme temperatures, which is useful if you want to place one in your attic or in your freezer (in case of a power outage). It is also compatible with Alexa.  There are  2 sensors and a hub in this pack ($60), and the hub can monitor other YoLink devices such as water leak sensors and door/window sensors. This unit runs on LoRa (Long Range wireless technology), which uses less power and transmits for longer distances than traditional bluetooth technology.

These devices are especially helpful in vacation homes and rental homes, as well as a great monitoring system to assist caretakers for the elderly and handicapped.  The Internet of Things (IoT) is making our lives less prone to worry in more ways than one.  Can it train my dog not to splash water on the floor?  Maybe not, but with sensors in other places maybe I’ll have the “bandwidth” to do it myself!

Photo by Matt Hoffman on Unsplash

How to equip your college student with better air quality

How to equip your college student with better air quality

If you’re a parent with a son or daughter in college, of course you want to see them succeed!  It can get costly, though.  From helping with tuition, room and board and everything else, it seems like “clean, fresh air” should be a free part of the package. Unfortunately, that may not be the case.  Many colleges and universities are housed in old buildings that did not give thorough consideration to air quality when they were designed, built, or renovated.  In many cases, you are paying for the privilege of  studying there, with living as only an afterthought!  

The problem with poor air quality in the university setting is that it affects the very thing young adults go there to do: learn.  Contaminants in the air work against their body in the following ways.

High CO2 due to inadequate fresh-air ventilation decreases the ability of the brain to metabolize oxygen.  In other words, the brain becomes oxygen deprived!  This can affect learning in terrible ways.  In a Havard study in 2015, 24 participants spent 6 days in simulated offices to control for CO2 and VOCs.  Days were designated by the research team, but blinded to the participants and analysts, to be one “High CO2” day of 1400 ppm CO2, two “Conventional” days representing the average office building conditions of about 940 ppm CO2, one “Green” day representing better ventilation with conditions of approximately 740-750 ppm CO2, and two “Green +” days representing 100% outdoor ventilation (approximately 550 ppm CO2). Cognitive scores were 61% higher on the Green building day and 101% higher on the two Green+ building days than on the Conventional building day. On average, a 400-ppm increase in CO2 was associated with a 21% decrease in a typical participant’s cognitive scores across all domains after adjusting for participant (data not shown), and a 20-cfm increase in outdoor air per person was associated with an 18% increase in these scores.  This shows that for lack of fresh air in their dorm room or classroom, your student could be missing out on their chance to absorb all the material presented, with lower test scores as a result!  Here are some ways to “open the windows”, so to speak:

  • Add a Window Ventilation Filter to their dorm room.  It’s easy to install and remove, and filters out pollution, pollen and dust. 

  • For more info on how to measure CO2 in your dorm or classroom, check out our post.  If the classroom or lecture halls turn out to be high in CO2, advise students to check with their student advisor on advocating for more ventilation.  

VOCs: Most dorm rooms come equipped strictly with the basics -- a bed, desk, chair, light and garbage can, plus a small amount of storage space in the form of a dresser and/or closet. (howstuffworks.com) Therefore, moving into a new dorm room usually means getting new bedding and new accessories like rugs, wall hangings, and more storage like dressers or bookshelves.  When these things are purchased new, VOCs from off gassing can increase dramatically if the doors and windows are kept closed for most of the day.  In the study discussed previously,  a 500-μg/m3 increase in TVOCs was associated with a 13% decrease in the cognitive scores.  Once again, fresh air ventilation is really important to keep VOC levels in check. 

  • Use a portable VOC sensor to check for levels in the dorm room or wherever it’s suspected that VOCs may be high (like a newly renovated area).  

  • Install a  Window Ventilation Filter in the dorm room to get fresh air dilution. 

  • The Air Angel neutralizes VOCs with the catalytic molecules emitted by its AHPCO cell. Being portable and requiring very little maintenance, it can travel anywhere they go: on weekend sports events, home, and on vacation.

  • The Germ Defender/Mold Guard's optional carbon filter adsorbs VOCs emitted by newer items as they off-gas.

Indoor humidity plays a major role in our health: when it’s too low, disease transmissions are more likely, and when it’s too high, mold growth occurs and different mold-related conditions spike.  We can think of many reasons to keep humidity in the recommended range of 40-60% so that your loved one’s health is not at risk!  Sadly, sometimes it takes severe illness and even death to prompt renovation of problem buildings (see this article about the University of Maryland).  Here’s how to equip your student against high humidity and the risk of bacteria, viruses, and mold-related illness.

  • It’s super inexpensive to put a portable humidity sensor in their suitcase or next care package.  Ask them to message you with a photo of the sensor when you’re talking with them in the dorm room, or whenever else it seems to be high.  

  • If the humidity remains high, you can speak to the dorm manager, but also equip your student with a dehumidifier.  Amazon and big box stores can even deliver one from an online purchase.  Since the average dorm room is only about 228 square feet, and larger dehumidifiers come with complaints of extra noise and heat, you’ll want to keep it small.  This economical one by Eva-Dry only covers about 150 square feet (1200 cubic feet), but two of them plugged into different areas will help keep moisture under control.  Here is a review of other models that work great for dorm rooms. 

  • The Germ Defender/Mold Guard is perfect for small, humid spaces, and does triple-duty in a dorm room: 1) Even though the bathroom is typically always humid, mold doesn’t have to grow there… I can testify that one Mold Guard stopped mold growth when I couldn’t get a leaky shower valve repaired right away.  2) This unit also deactivates viruses and bacteria in the air and on surfaces across the room with polarized ions. 3)  Finally, it has an option for a carbon filter to adsorb stinky odors like running shoes and sweaty clothing!

  • Use an Air Angel to prevent transmission of germs and mold growth. This unit is portable and requires very little maintenance, in fact only a replacement AHPCO cell once a year.

Finally, if your college student has not adopted good cleaning habits by now, we can’t help you! (just kidding, but we can supply you with the right goods, read on!)  Statistics on bacteria in dorm rooms are pretty gross: the average women’s dorm rooms had over 1.5 million colony-forming units (CFU)/sq. in. of bacteria, while men’s dorm rooms had an average of over 6 million CFU/sq. in. (collegestats.org).  The same article breaks down the types of bacteria and where they are most concentrated, and while not all of them were bad, most of them were.  It’s time to clean up, because it’s hard to know which is worse: being sick in college or having a sick roommate who will soon infect you.  For those who do clean, equip them: 

  • Once again, Germ Defenders and Air Angels are passive sanitizers that help in activate germs between active cleaning.

  • A bottle of TotalClean goes a long way!  Since dorm rooms are small, heavy-scented chemical cleaners can be super-irritating and not always welcome to their roommates’ sense of smell.  TotalClean is unscented, non-toxic and very effective against dust, dirt, and germs on many different surfaces, even windows and mirrors. 

  • Small pump bottles of non-toxic hand sanitizer and sanitizing wipes stationed around the room and on desks help between hand-washings. 

Of course, similar to sending them off to grade school, you can’t be there 24/7 to help your college student make smart choices, but at least by this point you can give them tools to monitor and correct their own air quality for the healthiest and most productive school year.  Viva la college!

To Vent or Not to Vent the Dryer Indoors?

To Vent or Not to Vent the Dryer Indoors?

This was a tricky question.  We understand that many people live in poorly planned homes where they are not allowed to make changes.  However, venting a dryer inside has a lot of disadvantages, even health dangers.  It all comes down to knowing that more than just “hot air” comes out of the dryer; this is why they are supposed to be vented to the outdoors.

First of all, NEVER EXHAUST A GAS (propane or natural gas) DRYER TO THE INDOORS.  This is absolutely a safety hazard, because the combustion gas exhaust (including carbon monoxide and NOx) are mingled with that hot air, and no filter is going to remove combustion gasses.  You would be poisoning your home air quality.  If you have a gas dryer and do not see a way to install a vent to outside, stop right here and either change out your dryer for an electric one (preferably a heat pump dryer, which does not require a vent), or move your gas dryer to a location where you can exhaust the vent outdoors (which would involve moving the gas line, too).  If your dryer is electric, you can keep reading.

So, let’s first talk about what is coming out of your dryer vent.  

  1. Obviously, warm air is coming out, because, after all, if your dryer is not heating your clothes, it’s likely not drying them.
  2. Water vapor:  This is where all the water from wet clothes goes–it evaporates and goes out the vent.  Majorly humid air here.
  3. Dust: You might collect some lint from your clothing on the dryer screen, but a lot of fine dust goes right through the screen into the vent line and outside.  This is why, when dryer vent lines are not sealed well, or they come loose, the laundry room suddenly starts to become very dusty!  And, vent lines should be cleaned of dust periodically so that they don’t become a fire hazard.  

In the wintertime, it might be tempting to redirect that hot humid air back into your home to save some money on heating and humidification!  However, most people who do vent inside either don’t care about the air quality or don’t keep up with the maintenance needed to do it right.  Here are the ways that venting inside can go wrong: (Clothes Dryer Moisture Activity)

  1. With no filtration, a lot of lint gets spread around in the laundry room (and surrounding rooms and even the rest of the home via the HVAC ducts).  If anyone in your home is sensitive to dust or prone to asthma, this is not acceptable.
  2. With filtration, you may be putting the dryer vent under too much pressure to keep the air flow up. Low air flow can cause the dryer to run longer.
  3. Low air flow and lint buildup in the dryer vent can cause a fire.
  4. The laundry room (and the surrounding rooms) can get too warm when you run the dryer in summer.
  5. The laundry room (and surrounding rooms) can get too humid and create a risk for mold when you run the dryer in summer, or anytime that the humidity in the home is already high.  For every load of laundry you dry, you are venting up to a gallon of water in condensation from your dryer. This will create a sauna in your laundry room, which can cause wood to swell, paint to peel, and mold to take hold.  (Eight Problems with Indoor Dryer Vent Kits)
  6. Venting a dryer indoors is against code (illegal) in most states.
  7. There have been documented complaints that the fine particulates of lint that escape from the reservoir can cause the smoke detector to go off.  This is proof that there are loads of  particulates coming through indoor drying vents. (Eight Problems with Indoor Dryer Vent Kits)

Needless to say, the problems with venting indoors are legion. 

We want to empathize with tough living situations.  Some people live in an apartment or home that has an improvised laundry cubby in the middle of the building, and the owners did not install a vent.  Unless the laundry room is sitting over a crawlspace or basement with an unfinished ceiling, it can be difficult to install a ventline to the outside, even if you have an agreeable landlord.  In many situations telling a landlord about the problem will not solve the issue.  Sure, there are lots of positive comments about “ventless dryer filters”, but many other users are not reporting the huge humidity problems in their laundry room after drying just one load.   For all these reasons and more, we want to be kind and say that indoor dryer venting is ok, but in the end the safety considerations outweigh it.

So, here are some options:

  1. If you have the budget, plan to stay in your home a long time or are able to take a dryer with you when you move, consider purchasing a heat pump dryer (which is ventless).  
  2. If the landlord is not willing to install a vent, but the room has a window that opens, explore the options of a Dryer Vent Window Kit ($30-37).  You may also want to add a window lock if you’re permanently installing it in a ground floor window.
  3. OR, move the dryer to a room that has a window and run an extension cord to it, which would have to be plugged/unplugged every time you do laundry. 
  4. Run an extra spin cycle on your wet clothing to wring out more moisture, and air dry clothing on a rack.
  5. Offer to trade services with a friend who has a properly vented dryer (meal prep, car wash, dog walk, use your imagination!)
  6. Take your laundry to a laundromat.  

Dryers and laundry rooms in general require more planning than you think!  We tried to be creative and make the most of a difficult situation.  If you have another alternative that works for you, we’d love to hear about it!

Photo by Raychan on Unsplash

Wall covering products that resist mold and mildew

Wall covering products that resist mold and mildew

When my kitchen faucet caused a leak under the sink and mold spotted the drywall behind it, I thought, with what material can I replace the drywall to make it less mold-friendly?  Under the sink is a dark, damp area where water can intrude again.   Searching my local big hardware store, all I came up with was fiberboard that had a melamine coating on one side.

Doing some more research online, however, uncovered several more options.   These are not only for under sinks, but garages, basements, utility closets, porches, and anywhere that moisture can be an issue.  

Using large panels instead of smaller cladding units (tiles, boards, etc.) minimizes labor, opportunities for water ingress, and also dust, which is always an inhalation hazard for the installers and anyone else in the area.  

Interior Cladding

Trusscore is a new PVC product that not only resists moisture, it reduces installation time, labor and cost when compared with drywall.  Trusscore panels are ½” thick, so that they are the same thickness as drywall.  They are so named because of the truss-like structure inside to give them strength with flexibility (they bend enough to facilitate installation inside channels without creasing).  Once you see this product being installed, who would ever want to go back to the labor intensive, dusty, mold-prone drywall process again?  I really like the clean simplicity of this product.  My major concerns with having it in residential spaces were:

  • VOCs and off-gassing: how much harmful pollutants will it pass into your indoor air?
  • Penetrations, because inevitably, someone will want to hang a picture or shelf on it, and then you have visible, difficult to patch holes in it.  
  • What about changing the color? 

However, the company has integrated solutions into each of these problems.  

  • Trusscore addresses IAQ here: “Trusscore Wall&CeilingBoard, RibCore, and NorLock products are all low-VOC compliant, including low formaldehyde, meaning it won’t off-gas and ensure a safe and healthy space for occupants. In addition, the installation of Trusscore products does not require potential VOC sources like glue or paint for a finished installation.  Each product has been tested according to the California Department of Public Health (CDPH) Standard Method v1.2 testing standard. This is the leading VOC standard used to evaluate VOC emissions from building products such as flooring, suspended ceilings, insulation, wall panels, paints and coatings, and wall coverings. The CDPH standard is referenced by some of the most widely used green building rating systems and green construction codes including USGBC LEED, CalGreen, and more.”  Still, in a fire, I would RUN out of any area that was covered in PVC...I’d say this is definitely not the material to cover any space where welding or high heat hobbies occur.  Also, I would hesitate install to it in high ambient heat places like Las Vegas or the southwest US (it’s plastic, after all)!  
  • Trusscore makes slatwall, which makes it easy to hang things (especially useful in garages and utility rooms)
  • All the panels come pre-finished in a durable white or gray coating, and painting guidelines can be found here (Painting requires special primers so that the paint will stick).  The benefit of painting: if you can paint it, you can also patch it!

Duramax PVC Wall Panels are very similar to Trusscore, but they come in 16” widths instead of 48” widths.  They also do not have any slatwall systems, recommending instead to use hangers similar to drywall hangers to permanently hang anything.  The cost of Duramax is less than Trusscore ($2.70/sf vs. $3.60/sf). They do not have any VOC emissions information on their website or MSDS other than protection guidelines against dust generated while installing it.

MSD panels have a variety of natural and futuristic textures (brick, tile, wood, stone, etc.) for a moisture-resistant cladding for interior walls.  The video on this page contains a little bit construction, a little bit artistry as the installers hang the panels and patch the seams to make the brick wall look completely congruent. As an artist, I do like these for the realistic looks they form.  Unfortunately, they are in Spain!

EverBlock and EverWall products are like giant Legos (with these why would you want to “grow up”?).  Everblocks are made of High-Impact Polypropylene Co-Polymer (“no-break”) with UV Inhibitors added for outdoor use.  EverBlocks are recyclable. They don’t offer much insulative quality (R-2 equivalent), but they are hollow and internally reinforced.

Formica lives on!  Formica HardStop has the great variety of colors and patterns of traditional Formica, but instead of the traditional fiberboard backing that is susceptible to moisture ingress, HardStop has a fiberglass backing that makes it more durable and water-resistant. It can be applied to drywall, plywood, and particle board (which are susceptible to water) or to cement or cement board. HardStop panels are thin and flexible like the original Formica, so they do need a structural element for reinforcement behind them.  They also require adhesive (looks messy to me!).

DriCore Smartwall is a similar system that incorporates an insulated layer on the back of the panel.  Very genius, however, the system uses drywall in the panels, and wood cleats to install it and has wood interlocking sections within the panels.  Here is a video on the installation of DriCore Smartwall, which also uses patch material to make a seamless wall.

Exterior cladding

The more I read about building science, the more I see imperfections in “the way we always did it”.  There are many traditional finishes for commercial and residential buildings, but the gold standard calls for a “rainscreen” type structure that applies the cladding to a hidden track system, so that air can reach behind the rainscreen and dry things out.  Think about a rain fly for a tent, or a double roof system.  The air buffer separates water and extreme heat or cold from the exterior of the house, making for a longer-lasting house!  In his article “The Perfect Wall”, building scientist Joe Lstiburek defines the elements of this wall and how they are constructed to resist rain, snow, humidity, air intrusion, mold, heat and cold, etc.

Here are some products that work as rainscreens:

  • Nichiha: this company was founded in 1956 in Japan but now has an office and factory in Georgia.  Their cement fiberboard siding comes in architectural panels or premium planks and uses a hidden track system.  It is an upgrade to “Hardy Board” and the many imitations of it, because it “floats” on the track system with that air buffer behind it.
  • Ceraclad is a triple-coated ceramic and cement rainscreen with its own installation system. The panels are self-cleaning, with a photocatalytic coating that actually purifies the air!  The coating decomposes car exhaust and other pollutants in the air (NOx and SOx) and turns them into NO3 harmless polyatomic ions leaving the air cleaner.  According to the website, a building with 10,000 sf of external Ceraclad coating is the equivalent of 68 poplar trees!  10 Ceraclad panels are the equivalent purification to 1 poplar tree.  The coating also inactivates viruses and bacteria at its surface. 
  • Knight Wall Systems provide the hidden tracks to install your rainscreen.  They have three different types of attachment to accommodate many different types of cladding.  Although mainly commercial, this system could be used for high-end residential homes as well.
  • Monarch Metal offers cladding systems with all kinds of finishes including HPL Phenolic, stone, fiber concrete and more.  Their hanging system contains high quality “Z-clips” which are similar to french cleats that allow you to hang the facade without screwing into the face of it, also interlocking panels as you install them.

These are just a sample of ways to get less mold growth in damp areas, relying on 1) materials that don’t sustain mold and 2) siding that incorporates ventilation.  It’s building science at its best!

Photo by Phil Hearing on Unsplash

Enduring the Rainy Season

Enduring the Rainy Season

Many kinds of climates may exist in your state, from hot and dry to cool and humid, depending on your elevation, weather patterns, proximity to water, etc.  Although mold can grow anywhere (even in the desert!), more water definitely means more mold.   Your “rainy season” can come in January or July…but it matters most that you are ready for it and know what to expect!

Taken from somewhere that REALLY gets their share of rain, in the Philippines it is common for people to get sick during the rainy season and even while transitioning from one season to the next.  The following advice from the Philippines could go a long way in the US, as well!

  1. Pack your rain gear.  An umbrella is a must on days that it might rain, which includes some that start out sunny!  We’re not saying that getting wet automatically makes you sick, but here’s the connection: wet clothing can lower your body temperature.  Lowered body temperature causes the blood vessels in the nose to constrict, which in turn limits the number of white blood cells that can come to your mucous membrane to fight off infections.  This is the type of lowered immune response that leaves you susceptible to viruses and microbes!
  2. Warm up quickly after you get wet by taking a warm shower, or at least changing into warm dry clothing.  Making a habit of washing your hands after traveling also helps!
  3. Drink lots of clean water!  This is another part of keeping your body’s immune system healthy.
  4. Use mosquito repellant: It seems like new mosquito-borne diseases are discovered every year, so if you’re going to be outside, make sure they don’t target you by applying a non-toxic repellent like Wondercide Insect Repellents
  5. Make sure that mold is not creeping into your home with water intrusions.  More water outside running over your home can lead to small or major leaks, which can go undetected if you aren’t vigilant!  Keep bedroom doors open for ventilation and check unused rooms at least weekly for any signs of leaks.  You may want to also leave ceiling fans running to increase air circulation, which has a drying effect.  Mold spore counts will increase outdoors during the rainy season, but you can keep them down indoors by:
    1. Using a HEPA air cleaner:  Medify has a great selection of air purifiers that are simple to use and a good value for the size of room purified. 
    2. If you believe that mold spores are increasing in your home’s air, there are several ways to deactivate them. Plugging in a Germ Defender, Upgraded Air Angel Mobile or installing a Whole Home Polar Ionizer, all of which use bipolar technology, kills mold in the air and on surfaces. Alternatively, Air Purification Candles actually lower the spore count.  They don’t have fragrance so you don’t have to worry about nasal irritation.  You can check out our article on them here!
    3. Keep a close eye on humidity levels in your home with these inexpensive humidity sensors–place them in several rooms so you don’t have to look too long to know what’s going on with the humidity!  If you see it creeping up, it may be time to research dehumidifying settings on your HVAC system or add a dehumidifier.

Your environment may make you feel like you’re living underwater, but do your best not to let it affect your health or the health of your home.  Where there’s moisture, there’s life–just make sure it’s the beneficial, beautiful kind by preventing mold  and microbe growth.

It’s a dehumidifier that doesn’t use electricity AND has no moving parts!

It’s a dehumidifier that doesn’t use electricity AND has no moving parts!

Our clients know that here at HypoAir, we’re all about managing humidity for a healthier home.  If your house is above 60% humidity, you can start to have mold problems (the higher the humidity, the more quickly mold can grow).  We’ve written on dehumidifiers of all sizes for any room in your home, but none of them tops what this invention does.  It’s a passive dehumidifier that “sucks” the moisture out of air and evaporates it outside with help from the sun, even when the outside humidity was higher than inside!

Some of the best inventions have been developed by observing nature, called biomimicry.  In this case, researchers observed how trees “transpire” moisture, which includes lifting water from the roots to the leaves, where it evaporates through the pores, or stomata, of the leaves.  Thus, there are two parts of the tree that function in transpiration: the trunk of the tree contains xylem, which are very small capillaries or “straws”, and the pores in the leaves.  The sun’s energy starts the evaporation process and actually creates a negative pressure in the xylem, essentially sucking water up from the ground to the leaves.  (How do large trees, such as redwoods, get water from their roots to the leaves?)  

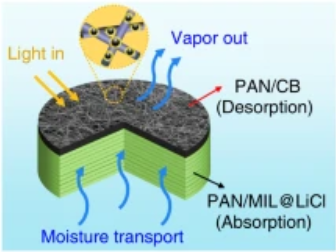
Researchers searched for similar behavior when they developed materials to mimic this water movement.  Two different materials were needed: one to absorb the water from the air (super-hygroscopic) and one to readily enable it to evaporate using the sun’s heat.  Metal-organic frameworks (MOFs) have been the subject of enormous research in the last decade.  They are like activated charcoal on steroids; because of their structured pores, internal surface area is huge.  When comparing the surface area per unit weight, the activated carbons are 400–2000 m2/g, zeolites up to 1500 m2/g, and MOFs are in the 1500–7000 m2/g range. MOFs are the porous materials with the highest surface area, with an ultra-high porosity of up to 90% of free volume.  (MOFs vs. other porous materials for carbon capture)  On top of this, MOFs can be custom-built to “adsorb” many different gasses or liquids, such as water, VOCs, metals, etc.  Thus, it made sense to make a very thirsty (hygroscopic) MOF to suck up water vapor, also known as a desiccant.  The researchers decided to try impregnating Lithium Chloride (LiCl, a salt) into an MOF. MOFs are typically granular, like sand, but the researchers wanted this component to be self-supporting, so they decided to nanospin the MOFs into a nanofibrous membrane (NFM) using polyacrylonitrile (PAN), a synthetic polymer resin.  The NFM would also enable the component to have a fast moisture absorption–desorption rate.  Thus, the “straw” component of the dehumidifier is abbreviated (PAN/MIL@LiCl) NFM, with MIL describing the “multilayer”. 

Passing the water vapor through to the outside of the space, the other component had to allow heat from the sun to evaporate this water, creating the “wicking” action.  This is the photothermal component.  Carbon black is a fine black powder produced by partial burning and pyrolysis of oil residues or natural gas at high temperatures.  (Carbon Black 101)  The black color works well to absorb solar heat, and adding it to a PAN NFM (PAN/CB) allows for great surface area, and thus evaporation rates.  The two layers put together are abbreviated PAN/MIL@LiCl-PAN/CB or for short, PML-PC NFM.

How did this layered dehumidifier configuration work out?  Impressively!  Being semi-flexible, it could be laid flat as a dehumidifier “panel” in a roof, or deformed to allow for water harvesting from the air (see diagram below). The scaled-down model of a house was constructed with dimensions of 40 cm × 50 cm × 40 cm, and a window with an area of 6 cm × 6 cm was designed for bilayer membrane installation. When light from the solar simulator illuminated the surface of the bilayer PML-PC NFM, the moisture in the indoor air was pumped by bilayer PML-PC NFM and simultaneously transported outdoors in the form of water vapor. The moisture actively moved from a high-humidity to a medium-humidity environment and also from a high-humidity to an ultra-high humidity environment through bilayer PML-PC NFM under sunlight irradiation. This is a unique advantage in terms of the dehumidification ability of the novel NFM-based moisture pump compared with traditional desiccants.  When the device was placed in an environment with an ambient humidity of 46%, the indoor RH was reduced from 70 to 48.9% within 2 h using bilayer PML-PC NFM.  When the device was placed in an environment with an ambient humidity of 80%. The indoor RH in the house model steadily decreased from 70 to 58.3% within 2 h using bilayer PML-PC NFM.  These are lower humidity ending points than that of the NFM without a photothermal layer. (Super hygroscopic nanofibrous membrane-based moisture pump for solar-driven indoor dehumidification)

Source: (Super hygroscopic nanofibrous membrane-based moisture pump for solar-driven indoor dehumidification

Now, what if night falls or clouds obscure the sun?  Since the experiment used a solar simulator of 1 kw/M2, which is the maximum amount of sunlight that can be had at the equator on a cloudless day, that would be a pretty intense artificial light needed to keep dehumidifying through the night or clouds.  For these reasons, this material would work best in an area with a high percentage of sunlight year-round, and lots of need for dehumidification (like the tropics).  Is it affordable?  Although the information in this paper is now 3 years old and other water-harvesting MOFs have been created, we don’t see any commercial applications yet, sadly.  Making such a technology affordable will do a lot to improve air quality in homes where energy (and dehumidifiers) are relatively expensive, since it doesn’t require electricity to condense humidity or regenerate the desiccant.  It could also allow many people to have access to clean drinking water by “pulling it out of thin air”.  We think it’s just too cool of an idea to keep to ourselves!

As for “natural” dehumidifiers, there are many materials that are hygroscopic: rock salt, calcium chloride (DampRid), baking soda, even sugar and honey.  The most efficient material we’ve seen is rock salt, most of all because it can be recycled: simply retain the liquid, let it evaporate in a pan outside in the sun, and break up the chunks to reuse it again (be sure to protect animals and children from drinking it by placing a screen over it!).  The downside to a rock salt dehumidifier is that it will only draw humidity down to 75%, which is the humidity that causes the salt to dissolve.  Also, using it in basements or porous/non-sealed areas is quite a lot of work for the results, as moisture is constantly being replenished from the ground through the concrete.  Finally, if you don’t recycle it, the liquid is quite toxic to vegetation, animals and can damage some surfaces.  

Some plants also act as natural dehumidifiers.  Check out the videos of the desert plant T. aphylla, native to the Middle East, which moves salts from the local soil to its branches and uses them to harvest water from the air!  The salt crystals on its branches change from a crystal structure during the day (low humidity) to drops of liquid at night, which it can absorb through its foliage.  If you have a normal “green thumb”, check out this article for a list of indoor plants that dehumidify.  Of course, we are all for natural, non-toxic and low-energy ways to improve the air in our homes!

Photo by Vivint Solar on Unsplash