Tag Archives for " dust "

Why is my house so DUSTY? Assessing the air currents gives a clue

Why is my house so DUSTY? Assessing the air currents gives a clue

This article was written in response to an actual problem.  My elderly parents moved into a “barndominium” which was converted from a 35x35’ metal workshop, in 2020.  The walls were insulated with fiberglass batts, and the attic above their 10’ ceilings was insulated with blown-in insulation.  I listened to my mom’s complaints about dust in the house. This is a real problem because the dust seemed to settle very quickly after cleaning, and my father has COPD.  Since the dust seemed to be a whitish colored dust, together we decided it must be coming from the attic, which had extra (white) insulation blown in after renovations were complete. We increased the HEPA filtration of the HVAC, with no results.  I checked for openings in the flexible ducts of the HVAC which could entrain insulation, with no results.  I tried several different times to seal the attic penetrations, which in actuality should have been done by a conscientious insulation company BEFORE the extra insulation was blown in.  I sprayed foam:

  • Around the HVAC vents
  • Around the bathroom exhaust fans
  • Around the LED puck lights (must check with the lighting manufacturer before doing this as some lighting is incompatible with direct-contact insulation.  The light needs to be “IC rated” in order to safely come into contact with the insulation.)
  • Around ceiling fan boxes
  • Around hanging shelf penetrations through the drywall of a floor-to-ceiling closet

It took multiple trips to the attic (with a good dust mask, of course) and quite a few cans of spray foam to get the job done, but sealing these areas, and one other (big) thing really helped cut the dust down.  It wasn’t until I really analyzed what was propelling the dust from the attic into the living space, that I figured out what was going on.

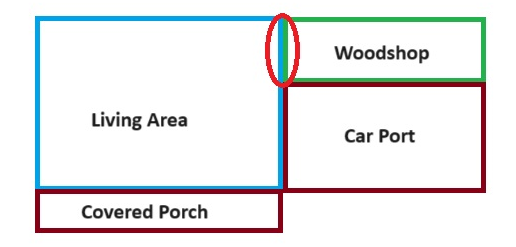
We’ve written several articles about negative pressure in your home and its negative effects. (This one has an eye-opening video linked).  I suspected that the dust was coming from the attic because negative pressure was somehow being generated in the house by the HVAC system.  However, I didn’t look at the big picture.  The living space is adjacent to a woodshop where my father carves (his hobby) and he uses a powerful dust collector to whisk the dust out of the workshop to a drum container.  The motor on this dust collector is rated for 240V so you can imagine that it’s a heavy-duty machine and being situated in the carport, can be heard from some distance from the house.  This thing SUCKS, and most of the time he’s using it with the door and window closed, so where is the makeup air coming from?  The workshop shares a common wall with a small bedroom in the living area (see red circle in diagram below).  It’s not too big of a leap to think that the dust collector may be pulling air from the house, as well, which in turn draws air from the attic when the ceiling penetrations were not sealed. 

To seal the wall between the woodshop and living area, I caulked the baseboard to the floor, as well as sealed the electrical boxes by taking off the switchplate and sprayfoaming around them as much as the little foam straw would allow (extra large switch plates help if you have to cut out the drywall a little).  The drywall took care of the rest of the wall.

Sometimes it takes a bit of thought to figure out the air currents in your home, but they are well-worth investigating!  Recently I found (by accident) that some carpenters had terminated a whole-house vacuum system in the ceiling of their house instead of routing it outside.  Even though the system used a filter, the space above the tiled ceiling was thick with a fine dust. We only discovered it when a  leak forced replacement of part of the roof above it.  We extended the PVC vacuum exhaust pipe just a few more feet and ran it out through the soffit.  It just goes to show that a little investigation (and a lot of spray foam) can go a long way to maintaining less dust in the house! 

Photo by Kent Pilcher on Unsplash

How do water-based vacuums work and are they better than traditional vacuum cleaners?

How do water-based vacuums work and are they better than traditional vacuum cleaners?

Do you like how fresh the air seems after a rainstorm?  Well, that is the effect of the rain “washing” dust and microbes out of the air.  Sure, on a hot summer’s day it’s not long until these contaminants return, but it’s a welcome respite.  It’s nature’s air purifier!

This brings us to the topic of water-based vacuum cleaners.  Mechanically, the suction part of the vacuum (with or without a rotary brush to dislodge dirt) is the same as traditional vacuum cleaners.  However, using water to “filter” dust out of the air stream is the main difference. 

Let’s talk about how filtration using water as a filter is different from filtration using other mechanical means, such as a cyclonic separator or filter.  When a stream of dirty air is filtered by water, the dirt or dust in the air gets wet and heavy, and thus becomes entrained in the water, leaving the air “clean” on exit.  However, most water-based vacuums also use HEPA filters, in order to prevent any remaining dust or dust in water droplets from leaving the machine.   These HEPA filters are designed to get wet, whereas non-water-based vacuums do not have filters that can get wet.  

In traditional vacuums, the incoming dirty air stream usually first passes through a vacuum bag or cyclone, which filters out larger particles of dirt and hair.   In bagless systems, the cyclone uses centrifugal force to “spin” out these large particles so that the user only has to empty a cup of dirt, not replace the bag.  Single-stage or multi-stage cyclones can be employed, where a multi-stage cyclone allows the vacuum to operate longer without losing suction.  After the bag or cyclone, a final filter (this is where the HEPA filter is found if the vacuum has one) filters out any remaining dust in the air stream before exhaust.

The attraction and “wow” factor of water-based vacuums usually lies in the dirty water that you empty from the vacuum after cleaning.  If the floor is cleaned with a traditional vacuum and then with a water-based vacuum, being able to “see” the dirt that’s left behind drives enthusiasm for the water-based vacuum.  No one cuts open the bag from their traditional vacuum after cleaning, so the satisfaction of seeing that dirty water makes one think that water-based vacuums provide superior cleaning power. 

Although we haven’t tested them, we thought we’d share some insight on the most common water-based vacuum brands and what their customers like and dislike about them. 

Rainbow Vacuum Cleaners

You may have heard of or viewed a Rainbow Vacuum Cleaner, the first vacuum to remove dust from its vacuum stream using water.  The manufacturer, RexAir, was formed in the 1920’s and has been improving the Rainbow ever since it was introduced in the 1950’s. (The Original Water-Based Cleaning System)  It relies on a rotating brush to dislodge dirt, and the suction power of the vacuum motor to bring it into the machine, where the filters purify the air before exhaust.  According to product literature, its unique water filtration system captures typical household dirt, while remaining microscopic particles are caught by the HEPA Neutralizer Filtration System. This two-stage filtration combination removes nearly 100% of dirt and contaminants.  The company uses a network of Independent Authorized Rainbow Distributors which demonstrate the product in homes and businesses, so it’s not sold online.  Purchase prices for these units are not published either, however, customers seem to verify that these vacuums are the most expensive on the market.  Devoted Rainbow customers seem to keep their vacuums for 15-20 years, so the price per vacuum may be a very good value.  The units weigh in at about 20 pounds and rely on smooth casters to roll through your home.  Rainbow is “Certified Asthma & Allergy Friendly” and AHAM Certified: The Association of Home Appliance Manufacturers (AHAM) certifies that the Rainbow is a proven air cleaner designed to reduce air pollutants that contribute to poor indoor air quality.  The weight of the E2 model is approximately 40 lbs and comes with an 8 year warranty.

Sirena vacuums ($600-990) are designed and made in Canada.  They can pick up wet or dry messes, and come with an assortment of tools to get into nearly every crevice.  The motor is quite powerful, providing ample suction, and the water reservoir hold 3.5 liters of water maximum, which is quite a lot of water in which to filter out dust and dirt.  It weighs 40 lbs and comes with a 10 year warranty.

Quantum X ($439) is an upright vacuum, meaning you don’t have to drag a canister around with you while you clean.  The power head can extend up to 18”, making it a good competitor to most canister vacuums, and it has a hose for smaller cleaning attachments.  The upright style affords less room for the water compartment, but this also allows it to be more portable.  It weighs 27.1 lbs. 

Kalorik Water Filtration Canister Vacuum Cleaner ($120) is a good budget cleaner made by a Belgian company that has been in business since 1930. Termed the “poor man’s Rainbow” by one reviewer, it’s a great option for those with pets and/or allergies, and it’s a lot lighter at 14.3 lbs.  The suction head does not have a rotating brush, but it has a high/low adjustment, very powerful suction, and picks up wet and dry messes. Without the rotating brush, it’s best suited for hard floors and not carpets.  It has a 1 year warranty.  

These four vacuums all use water as a filter, but are different from cleaners that vacuum and mop at the same time.  I use the CrossWave floor and area rug cleaner by Bissell ($257), which uses water to clean AND filter out dust.  For homes that have no wall-to-wall carpet or a lot of area rugs, these types of upright vacuums are convenient and ideal because they perform two functions at one time–vacuuming and mopping, with good efficiency (check out our article on using these types of vacuums to tackle dust in your home).

In all, many customers (including myself) prefer water-based vacuums over traditional ones because:

  1. You can see the dirt they pull off your floors very readily when you empty the vacuum, which is both satisfying and disgusting.  Whether this is more than the dirt that is captured by traditional vacuums is not measured.

  2. There’s no bag to retain smelly dirt (especially pet hair).  With traditional vacuums, this smelly dirt stays in your home until you replace the bag, and it also expels smelly air every time you vacuum until you replace the bag.  (As a pet owner, I appreciate this!)

  3. There are no bags to purchase and replace! 

  4. They are very good at retaining suction (most work until the suction compartment is completely clogged with debris or pet hair), and restoring suction is very easy to do–empty the compartment!

  5. Many of these models remove wet or dry messes (traditional vacuums can only handle dry dirt). 

  6. Many of these models allow addition of essential oils to the filter water or cleaning water for a fresh scent of your choice, and some, like the Rainbow and Sirena, double as air purifiers.

The “cons” of water-based vacuums are that: 

  1. Of course, water is heavy and more quality construction can make the unit VERY heavy and bulky, to the point of not being mobile enough to clean separate floors in a home if you are physically challenged.  Most water-based models are “cannister” type instead of “upright” in order to more easily and stably move the water around.

  2. Water-based vacuums can be more costly than traditional vacuums.

  3. Some water-based vacuums (like the Bissell CrossWave) require a detergent to enhance cleaning of the floors.  This detergent is an added operating cost and can have toxic ingredients in it (unless you make your own, check out our recipe here). 

  4. If your vacuum uses water to “scrub” and then suck up dirt and debris, water that stays on your floor can temporarily increase humidity in your home, albeit less than regular mopping.  If water is used to clean carpeting, you must be careful that it’s thoroughly dried, and quickly, so that mold doesn’t have a chance to take root.

Do you prefer another type of vacuum that we haven’t discussed?  Let us know!

Photo by No Revisions on Unsplash

Which is a healthier home habitat: the forest or the desert?

Which is a healthier home habitat: the forest or the desert?

Is it more healthy to live in or near a forest or a desert?  Spoiler alert: we’re not going to call that decision.  Each habitat has its advantages and disadvantages, so we’ll explore them to see which one is best for you.

You might think that these two climes are extremely opposite, but they do have (at least) one thing in common: trees!  Granted, there are many more trees in forests, but trees in the desert can accomplish many of the same purposes.  In a 2020 study, one particular type of tree found in Qatar (desert region), Acacia tortilis, was found to be the most efficient tree species for reducing air pollution, having good capacity to intercept storm water runoff, reducing energy consumption and reducing air pollution levels through dry deposition, avoiding further pollution formation and CO2 removal.  Mature trees (with diameter greater than 45 inches) were much more efficient at accomplishing these goals than younger trees (diameter 10 inches). 

According to the US Department of Agriculture (USDA), trees provide many benefits, including the ability to clean our atmospheric environment both directly underneath their canopies, and at a larger, regional scale. Because leaves transpire large amounts of moisture, trees have a cooling effect on the surrounding environment—like air conditioning. By cooling and cleansing the atmosphere, trees help to make air safer for breathing by plants, animals, and humans and have positive benefits on habitat. In fact, air quality underneath a closed tree canopy is often significantly better than above that tree canopy, especially for ozone—a common air pollutant that forms downwind of urban air pollution sources. On a regional scale, forests also scrub ozone and other nitrogen and sulfur-containing air pollutants out of the prevailing winds, protecting more sensitive areas.  Healthy forests with large, widely-spaced trees also protect from wildfire smoke because pines and other fire-adapted trees with their thick, fire retardant bark better resist fire in all but the most extremely hot, dry, and windy conditions.

Interestingly, some trees contribute to ozone production, while others reduce it.  This is because species like black locust, European oak and poplar intensively emit isoprene, which results in higher ozone and PM10 concentrations, while tree species emitting primarily monoterpenes such as beech, magnolia and wayfaring trees yield less of both.  (Impact of vegetative emissions on urban ozone and biogenic secondary organic aerosol: Box model study for Berlin, Germany)

Another common denominator between forests and deserts is animals–whether they are domesticated or wild, contact with animals is more frequent in remote areas than in urban areas.  There is also much research that shows how exposure to animals benefits us.  In one study, the researchers recruited 2 groups of young men:  20 young men who were raised for the first 15 years of life on farms with farm animals, and a second group of 20 young men who were raised for the first 15 years of life in a city of over 100,000 people, without daily exposure to pets. Both groups were then given Trier Social Stress Test (TSST), a model of acute psychosocial stress in humans. The results revealed that those who grew up in cities without daily exposure to pets, and thus lacked exposure to diverse microbial environments during childhood, responded to psychosocial stress with exaggerated inflammation markers,  (Less immune activation following social stress in rural vs. urban participants raised with regular or no animal contact, respectively)

Now, let’s talk about some specifics of each habitat.

Deserts

Although the stereotypical desert is hot, dry and sandy, only one of these words accurately describes every desert (dry).  Most experts agree that a desert is an area of land that receives no more than 25 centimeters (10 inches) of precipitation a year. The amount of evaporation in a desert often greatly exceeds the annual rainfall. Surprisingly, areas near water can actually be deserts, because humidity in the air doesn’t predict or cause rainfall.  The Atacama Desert, on the Pacific shores of Chile, is a coastal desert. Some areas of the Atacama are often covered by fog. But the region can go decades without rainfall. In fact, the Atacama Desert is the driest place on Earth, and some weather stations in the Atacama have never recorded a drop of rain.  (Desert)

Low humidity is obviously a benefit to keeping mold from growing on outdoor or indoor surfaces, if air conditioning is not needed.  Dryness would lead some to believe that mold could not be a problem in the desert.  However, mold spores are present everywhere, and lack of home maintenance can allow even a small amount of rainfall to turn into a mold disaster.  Mold can start growing undetected in attics, crawlspaces and walls during one of the infrequent rains, and can turn into a big problem whenever it is disturbed, such as during renovation or further deterioration.  If air conditioning is used, it can generate mold problems when moist air (like from cooking or showering) hits cold air, or around the surfaces where cold condensate is produced.   

Low humidity also means little to no mosquitoes and many other biting insects.  Low pollution (when the wind is not kicking up dust) and warm weather can also be a positive for those who suffer from breathing problems like asthma.  

One problem of low humidity is its effects on the human body (see our article).  Dehydration can become evident in dry skin, hair and nails, respiratory system and through your whole body, affecting every major system.  In addition, static electricity builds up in your clothing and furniture, which can hurt and damage electronics.  Finally, dry air allows pathogens to stay afloat in the air for longer periods of time.  

Most deserts have very little cloud cover and thus a lot of sunshine.  This, for sure has its benefits and drawbacks; it can be the cure for Seasonal Affective Disorder (SAD) but also present higher risk for skin and eye damage and cancer.  Exposure to UV sunlight was associated with lower systolic blood pressure (the first number in a blood pressure reading) regardless of the temperature. (Could sunshine lower blood pressure? Study offers enlightenment)  In addition, sunlight assists your body in making vitamin D, which strengthens bones, and sunlight promotes collagen production in your connective tissue, which helps you move quickly. (7 Health Benefits of Living in the Desert)

The purifying power of sunlight should not be underestimated.  Those who live in or near the desert can use the UV rays of sunlight to purify water, their laundry, and anything else they can bring outside for a good “freshening”. 

One important disadvantage to desert life is dust.  In fact, you don’t have to live in the desert to suffer from the effect of desert dust, because dust from deserts can be transported on the wind and even injected into the troposphere, allowing it to travel great distances (such as across the Atlantic Ocean in the case of Saharan dust).  Dust clouds at surface levels bring particulate matter, coarse and fine, worsening air quality and posing respiratory or even cardiovascular risks.(What is desert dust and how does it change atmosphere and the air we breathe?)  The danger of dust presents in two different ways: size of the particles and content of the particles.  Particles that are approximately between 2.5 to 10 microns (PM10) are inhalable, but can be trapped and cleared from the upper respiratory tract.  Particles less than 2.5 microns (PM2.5) can lung alveoli, entering the blood stream where they cause systemic harm to other organs in the human body. (A Retrospective Cohort Study of Military Deployment and Postdeployment Medical Encounters for Respiratory Conditions)  Especially concerning is the class of particles less than 1.0microns (PM1.0), which are sure to enter directly into the bloodstream and may also cross the blood-brain barrier.  The toxic content of dust can be pathogens such as bacteria, including some that carry respiratory diseases (Characterization of Bacteria on Aerosols From Dust Events in Dakar, Senegal, West Africa), and most importantly, a fungus Coccidioides which causes Valley Fever.  It can also be bioreactive metals such as copper, chromium, nickel, lead and zinc, as well as pesticides, herbicides, radioactive particulates and aerosolized sewage (yuck!!). (Desert dust storms carry human-made toxic pollutants, and the health risk extends indoors)

Increased heat and low humidity also tends to decrease the number of negative ions in the air.  Elevated negative air ion levels are widely reported to have beneficial effects on humans including enhanced feeling of relaxation, and reduced tiredness, stress levels, irritability, depression, and tenseness. Depleted ion levels and enhanced positive ion levels are reported to have no effect, or deleterious effects. (Air Ion Effects

The study of how gasses in the earth’s atmosphere react with each other is very complex.  For example, it’s been shown that desert soil releases nitrogen species gasses into the air.  The release of NOx from desert soil and subsequent effective oxidation in the atmosphere indicates that the desert ecosystem is an important area for ozone production. This has been manifested by higher ozone in the desert air than the regional background from many observations (Güsten et al., 1996; Hoffer et al., 1982).  (Active Nitrogen Cycle Driven by Solar Radiation in Clean Desert Air)  Thus, higher levels of ozone in the desert could make it unhealthy for sensitive individuals.  These could become particularly high after rains, when microbes in the soil emit N2O (nitrous oxide, also known as laughing gas).  (Following rain, desert microbes exhale potent greenhouse gas)  In addition, it’s been shown that “stratospheric intrusions” (ozone-rich air descending from the stratosphere during spring storms) can also capture ozone created by pollution from Asia as they descend and transport it to desert areas of the southwest.  Particularly in the area of Las Vegas, these can create short episodes of high ozone that exceed federal air quality standards without factoring in local pollution.  (Background ozone burdens Las Vegas’ air quality in spring)

The other side of the coin is that in some areas of the world (like Atacama and Sechura deserts in Chile and Peru), dust from deserts can contain significant iodine, which actually destroys ozone.  (Iodine in Desert Dust Destroys Ozone)  Therefore, the mineral makeup of the soil in deserts is very important in characterizing what’s in the air. 

Living in/near the Forest

Forest bathing” is a Japanese term that emerged during the 1980’s as an antidote to tech burnout: it’s being calm and quiet amongst the trees, observing nature around you whilst breathing deeply can help both adults and children de-stress and boost health and wellbeing in a natural way. (How to start forest bathing)  If you regularly spend quiet time in the outdoors, perhaps you are already aware of its benefits: lower blood pressure, heart rate, and levels of harmful hormones like cortisol.  (Forest bathing: What it is and why you should try it)

What is in the air of forests?

Phytoncides are aromatic compounds from plants which can increase your number and activity of natural killer cells, a type of white blood cell that supports the immune system and is linked with a lower risk of cancer. These cells are also believed to be important in fighting infections and inflammation, a common marker of disease.  In one study, researchers found that people who took a long walk through a forest for two days in a row increased their natural killer cells by 50% and the activity of these cells by 56%. Those activity levels also remained 23% higher than usual for the month following those walks. (Why Spring Is the Perfect Time to Take Your Workout Outdoors)

Hinoki cypress, cedar, oak, pine and spruce are just some of the trees to release phytoncides (aromatic compounds), which include alpha-pinene and d-limonene.  Although these are actually VOCs, they are termed biogenic VOCs (BVOCs) because they are naturally made, unlike chemical VOCs that are manufactured.  Pinene and limonene are monoterpenes, which global annual emissions amount to 330–480 million tons. When visiting a forest, monoterpene VOCs such as limonene and pinene are mainly absorbed through inhalation, their blood levels rapidly rise after exposure, and they are mostly eliminated unchanged both in exhaled air and in the urine.  The tree composition can markedly influence the concentration of specific VOCs in the forest air.  Although essential oils do contain BVOCs, not all BVOCs are present in essential oils, and some molecules included in essential oils are not part of the BVOC molecular suite but are rather artifacts of distillation. (Forest Volatile Organic Compounds and Their Effects on Human Health: A State-of-the-Art Review)

Some other benefits of forest living are:

  • Humidity: in moderate amounts, humidity is good for the skin and respiratory system, 

  • Cooling effect: trees cool air through evapotranspiration. As trees transpire, they release water into the atmosphere through their leaves. As the water changes state from liquid to vapor, the surrounding air is cooled, similar to how we sweat.

  • Particulate matter capture: Forests can improve public health greatly by catching dust, ash, pollen and smoke on their leaves, keeping it out of our lungs.

  • Trees are sinks for other harmful pollutants, such as nitrogen oxides, ammonia and ozone, which can all cause respiratory problems from repeated exposure. (The Important Relationship between Forests and Air)

  • Healthy forest air includes bacteria, fungal spores, plant and animal particles and pollen, which may have good and bad effects.  Good effects of exposure to these include desensitization to allergies (exposure therapy), and certain bacteria, like Mycobacterium vaccae (a bacteria strain that lives in soil), which can stimulate serotonin production, and can make you feel relaxed and happier, as well as reduce inflammatory responses to stress. According to Dr. Christopher Lowry, “Surprisingly, when adults engage in soil-mixing activities for ten minutes with soil that is ‘spiked’ with M. vaccae ATCC 15483, there is a rapid alteration in brain activity within the occipital cortex and alteration in the plasma metabolome, relative to soil that is not spiked with M. vaccae ATCC 15483 [35]; this suggests that exposures to mycobacteria not only have long-term immunoregulatory effects but also alter physiology and neurophysiology within minutes. Perhaps we all really should spend more time playing in the dirt.” 

  • Ions: That “fresh air” feeling in the forest also comes from higher than normal presence of ions.  Negative air ions (NAIs) are an important indicator of air quality, and are significant for the evaluation of air conditions. In a 2020 study of a scenic area in China, negative air ions were present in forested areas  approximately 3.2-3.4 times over the numbers in open areas or the lake.  (For more information on the cleansing power of ions, read our post here!)

And the cons of forest living: 

  • Humidity: many forests are high in humidity, which can promote mold growth.  Without dehumidification in a home, it would be difficult to live in many forested areas because of mold growth. 

  • Radon: Trees are sources, sinks, and conduits for gas exchange between the atmosphere and soil, so radon, a product of uranium decay in the soil, is naturally expired by trees along with other gasses.  Although radon accumulation in homes through their foundation (the rocks and soil below the foundation) is most concerning, emission of radon by trees will cause a forest to have a higher level of radon than unforested areas, because radon is approximately 7.5 times heavier than air, so that living in or near the forest may increase the ambient level of radon outside the home depending on winds.  There are two units of measurement for radon, picocuries per liter, and becquerels per cubic meter.  According to a 2015 study in Brazil, radon concentrations as high as 40 kBq/m3 (40,000 Bq/m3) were found in a national forest.  The EPA recommends that homeowners take action to lower radon levels in their homes if there is a level above 2 pCi/L.  Since one pCi/L is equivalent to 37 Bq/m3, the measurement in the Brazilian forest showed 1,081 pCi/L, or 250 times the upper limit of radon recommended by the EPA!  Thus, the study rightly inferred that “the results indicated considerable radon hazard for human occupation in the neighborhood.”

Overall, the desert and the forest are two vastly different climates, yet each have potential for healthy lifestyles for those who can live further away from urban areas.   From forest bathing to hiking to biking, there are plenty of ways that each environment offers us to connect with nature and take in its natural health benefits. 

Optimizing Your Window Air Conditioner for Maximum Clean, Cool Air

Optimizing Your Window Air Conditioner for Maximum Clean, Cool Air

Global average temperatures have exceeded recorded highs several times in the last month, and articles on ways to keep cool are proliferating!  In this article, I don’t have any “new” way to keep cool, but if you are among those blessed with a simple window air conditioner, let us help you make it work just as well and as efficiently as the day you bought it!

Window air conditioners are the humble yet hard-working appliances that many households can’t do without.  As one of the oldest cities in the US, New York City has an abundance of window units because about 75 percent of the buildings throughout the five boroughs were constructed before 1960, according to the NYC Department of Buildings.  (Why about a quarter of US households are stuck with ugly and loud window AC units)  The cost of retrofitting these old buildings with central air conditioning is way too high, so window air-conditioning units are the solution, and continue to be for many households across the US.  However, even if your window air conditioner is an older unit, a little time and effort can go a long way in helping it cool better, work less (lower your energy bill), and put out better quality air! 

If you have the option of upgrading your window air conditioner, there are many worthy options out there, including those with inverter motors, which save a lot of energy and control humidity better.  (To understand better what inverter technology is, check out our article here.)  Unfortunately, no one has combined an inverter air conditioner and premium filtration, but you can get premium filtration on a new air conditioner with the Friedrich Kuhl units.  These units cool (and some also heat) rooms by heat pump, with smart controls (wifi enabled and smart home compatible) AND they have MERV 13 filters available (a MERV 13 bracket kit is needed).  Until manufacturers put inverter units and premium filtration together, we have to put premium filtration in priority!

If your existing window air conditioner has a few more years of life, it helps (although not necessary) to know how a window air conditioner works.  In the first part of our article “What kind of air conditioner do you have?” we explain the workings of this type of unit.  A key lesson is knowing that unless you have a ventilation lever on your unit, there is no mixing of indoor and outdoor air.  (Check out this video to find out how to find and operate a ventilation lever.)  Therefore, the air conditioner is not pulling in outside air, it’s only recirculating indoor air.  Whatever dust, pet dander and microbes are floating around your apartment can get lodged in the air conditioner and grow into disgusting science experiments that will negatively affect your air quality!

Therefore, a clean evaporator coil is super-important.  The evaporator coils are what change your hot and humid indoor air into cooler and drier air.  Because most window air conditioners come with a flimsy clean-able filter that would qualify somewhere between MERV 1 through 4, what really ends up filtering the air is the coil–because after a season of running constantly, so much dust and dirt go through the cheap filter and get lodged in the coil!  This is not only disgusting, it’s unhealthy.  Therefore, if you’ve operated your window unit for more than one summer and never cleaned the coil, please start with this step to eliminate the majority of grime that’s lodged there.  (Be sure to have help removing the air conditioner from the window, especially if you live on an upper story!) 

After you’ve cleaned your unit (and the included filter), check that it is blowing cold air well.  It should blow air that is 15-20 degrees colder than the air it takes in.  To measure this, simply use a portable temperature gauge above the unit (out of the stream of cold air) as the intake temperature, and then move the thermometer directly into the cold air coming out, and note the difference (it’s also helpful to note the difference in humidity, to know that it’s actually removing moisture as well!).  Our portable humidity sensors will give both temperature and humidity.  If the difference in inlet and outlet temperatures does not approach 15 degrees F for a clean AC unit, then you can check into getting the refrigerant topped up.  This is best done by a licensed HVAC technician.

Next, it’s not too hard to upgrade your current filtration so that the air coming out of your air conditioner is cleaner than the air that goes in!  Here are some options:

  • Frigidaire now offers MERV 14 filters for some of its models.  Check the link in the overview for compatibility.
  • You can cut a regular HVAC filter to fit as per this video (make sure you use painter’s tape around the edges to prevent air leaking around the filter), or 
  • You can have a custom filter bracket made for your window AC, and change the filter in it often. Since the louvers in front just thwart air flow, you can actually remove the louvered panel and fit the filter inside (if it has a rectangular filter), or you can fit the filter over the louvers and secure it to the front with double-sided tape.  In order to specify the correct size for your window unit, determine which louvers are the “intake” (moving air into the unit), and measure the area covering and slightly outside of them, so that the frame and tape will seal but not cover a lot of the louvered space. 
  • You can make your own frame from 1” aluminum “u-channel” and rivets, and purchase the filter material in bulk or cut to size (these media pads are equivalent to MERV 8 and will filter a lot more dust than the cleanable factory filter!)

Finally, placing a Germ Defender or Mobile Air Angel near the air conditioner will not only help to freshen the room as ions are carried with the fresh air, it will also help to keep the coils cleaner as ions are sucked into the air conditioner by killing microbes and mold spores inside it.

If your space is feeling stuffy from being closed up all the time due to hot weather, chances are CO2 levels are rising.  Fresh air ventilation is important, so go ahead and use that ventilation lever on your window air conditioner, or crack the windows in the morning or evening when temperatures are more tolerable.  If you live in an urban or dusty area, use our window ventilation filters to get fresh air without the particulates.  May our window air conditioning units live long, cool lives!

Get more fresh air ventilation with Nanofiber Window Screens (Easy DIY Project!)

Get more fresh air ventilation with Nanofiber Window Screens (Easy DIY Project!)

If you’ve never thought about them, it’s time to give your window screens some attention.  If your windows open, you’ll want to have screens that are clean and in good repair to keep out insects and other creepy crawly things (won’t go into what could possibly come through an open window).  It’s even more important in seasons of extreme heat or power outages to have a way to get fresh air.  Keeping your windows closed all day can cause levels of CO2 to build up in your home that cause drowsiness and inability to focus or concentrate (check out our article here), so it’s best to let some fresh air in whenever the outside air temperature, humidity and quality permit.

Window screens have been around for a long time (like the 1800’s!) but even age-old products can get an upgrade, making our lives easier.  This upgrade doesn’t have to involve AI or “smart” anything, requiring the internet and electricity.  In this case, window screens have been upgraded with a new material, nanofiber.

Traditionally, window screening came in several varieties of material and color, such as aluminum and fiberglass, and black, silver, gray or bronze colors.  Standard screens have a mesh size of 18 by 16, meaning there are 18 squares per inch from the top left corner to the top right corner (also referred to as warp) and 16 squares per inch from the top left corner to the bottom left corner (also referred to as fill). (Replacement Window Screen Buying Guide)  These are able to prevent most flying insects from passing through, but they do allow a lot of dust and smaller particles to pass through.   The use of nanofibers (each fiber is less than the width of a human hair) allows the holes to become much smaller, because they are spaced very closely, allowing air but not fine particulates to pass through.  Voila!  Nanofiber window screens offer protection from the next “pest”, dust and allergens.  By just replacing the screens you already have with nanofiber material, you can save yourself some cleaning, coughing and add the ability to open your windows more often because of this protection.   What’s even better is that it doesn’t take a lot of time or special tools (just one cheap one) to replace the screen material with some new nanofiber screening.

Here’s the DIY part: replacing your screens with nanofiber screens is a homeowner project that just takes a few hours and supplies.  If you’re not familiar with how window screens are held in place, they are held into the narrow channel on the screen frame with a rubbery spline, or cord.  

There’s also an ALTERNATIVE INSTALLATION with Magnetic Tape (which is practical if your screen frames are broken or missing).  Scroll down to the bottom of this article for the alternative installation.

Here’s what you’ll need for the traditional installation:

  • The nanofiber window screen (order yours here)

  • Spline (if the spline in your screens is not cracking or falling apart, you can reuse it)

  • Window screen rolling tool, $4

  • Small flat-head screwdriver

  • Sharp utility knife to trim the screen after installation

There are lots of videos online showing how to replace screens, but I like this one for its simplicity (step 1 starts at 1:50).  Here are the basic steps:

  1. Remove old spline and screen

  2. Size and align new screen over the frame (1-2 inches extra on each side)

  3. Push screen into channel on first side (using the convex side of the tool)

  4. Insert spline into grooved screen and channel (using the concave side of tool) (Repeat steps 3 and 4 for other sides)

  5. Push spline into corners using screwdriver, trim excess screen carefully with utility knife

And here are some additional tips:

  • If you have to get new spline, take a small piece of the old stuff to the hardware store in order to select the right diameter.

  • Some people like to hold the frame in place by taping it to the work surface, but this doesn’t allow you to rotate it easily if you can’t access all 4 sides of your work surface.

  • You can use a gallon of water or full can of paint to help hold the screen in place to get started.

  • Some people like to use the spline in one length, bending it at the corners as you go around; some like to cut it at each corner. 

  • Be careful not to press too hard on the spline as you work, in case your tool slips, so that you don’t cut the screen accidentally.

  • Normally you shouldn’t have to “stretch” the screen, just gently smooth it out, while rolling the last two sides, as you don’t want too much tension on the frame when you’re done.

  • If you get too frustrated or find that one of the screen frames is broken, many small hardware stores offer “rescreening” services and repair of the frames; just bring them your nanoscreen with the frame(s).

It may take a little more time to get your first screen replaced, but you’ll get better as you go along and have some new functional “filters” in your windows.  Sit down to enjoy the fresh, clean air and admire the fruits of your hard work!  After a few months, you will notice dust collecting on the outside of your screens as they do their job, but you can easily clean them by removing them and using a gentle spray of water on them from the inside out to wash off the dust.  If necessary, use a mild detergent like liquid dish soap or car wash soap and a soft brush to remove any stubborn dirt or bird poop. 

Nanofiber window screens can help you breathe easier all year long, because let’s face it, there always seems to be an “allergen” in the air.  They can also cut down on the dust going onto your HVAC filter, your TV screens, your rugs and furniture—you name it!  Maybe most importantly, they can help you open windows for fresh air more often and be prepared for a power outage in the summer, when open windows (but not dust!) are a necessity.  

ALTERNATIVE INSTALLATION:  Many times the screen frame is broken or missing altogether, or you’re just not sure about doing the traditional install yourself.  Instead, you can use Magnetic Tape to install the screen.  The kit has everything you need to make a nice, flexibly-framed screen that installs easily over your window frame.  (Note that you’ll need to remove the screen to open or close the window, but that’s easy to do.)  The video on the product page gives step by step instructions.

Taking precautions: What to do if your home is spared from a fire, but still smells like smoke

Taking precautions: What to do if your home is spared from a fire, but still smells like smoke

We at HypoAir sincerely hope that you and your family have not been forced out of your home by any of the recent wildfires.  Even if your home is spared from fire, if it is in close proximity, danger from lingering smoke particles is a real concern that you should know about and take precautions against.  You may know that smoke is a combination of ultra-fine particles and gasses, both of which can be toxic.  The gasses may be swept away by “airing out” your home or using activated carbon filters, but the particles settle into dust that can be disturbed anytime you clean or even when the HVAC comes on.  

A study was born in the weeks after the Marshall Fire, which occurred in the Boulder area in December 2021.  It spread very quickly and destroyed more than 1,000 homes and buildings.  Those that were near the flames but not burned, like the home of air quality scientist Christine Wiedinmyer, smelled like “the day after a campfire” and had ash on the door and window sills.  (Study finds potentially harmful chemicals lingered in homes affected by Marshall Fire)  Without testing, she did not know whether it was safe for her (or the neighbors who asked) to return to their homes.  So, she became part of a team of expert scientists who tested four homes in the area (including hers) in order to determine what toxins may have been left behind.  

The scientists collected samples of particles of dust in the air and on surfaces in January and February 2022. Elevated concentrations of potentially harmful materials like polycyclic aromatic hydrocarbons (PAHs) were detected in the dust samples.  PAHs are considered carcinogens by the Environmental Protection Agency, and it’s chemicals like these that deserve extra precautions in the way residents return to and clean their homes.  

When the scientists set up their equipment in the homes, they took dust samples from windowsills and used monitors to track particulate matter in the air, minute-by-minute.  The floating particles of ash produced by the fire seemed to settle out of the air in these houses within a day or two, but the dust that Wiedinmyer had seen on her windowsills lingered. In February, the researchers took measurements as a six-person cleaning crew entered one of the homes to vacuum and mop.  The concentrations of particles in the air nearly doubled during that time. Overnight in the same house, the team saw airborne particles spike about once every 20 minutes—likely due to the home's HVAC system switching on and off.  (Study finds potentially harmful chemicals lingered in homes affected by Marshall Fire

For this reason, the scientists recommend wearing a mask when you’re cleaning up fire damage, because human activity like cleaning resuspends the dust in the air, making it easy to breathe in.  Also, be sure to change your HVAC filter more frequently during the first few months after cleanup, and only use true HEPA vacuum cleaners, so exhaust from the vacuum cleaner will not blow dust back into the air.  Wiedinmyer herself “aired out” the home for a week before re-entering to clean.  During this time and going forward, a standalone HEPA filter would be very useful to filter particles that are missed by the HVAC system (if you have one!).  Our Germ Defenders, Mobile Air Angels and Whole Home Ionizers help to ionize and agglomerate dust, making it easier for the filters to trap it.

Another part of the aftermath of wildfires is dealing with contamination to drinking water systems. According to NPR for northern Colorado, The fire damaged six public drinking water systems, and toxic chemicals leaked into pipes from damaged homes and into hydrants where low water pressure created vacuums that pulled the compounds into the distribution system.  Although the personnel in these districts were not all clear on how and where to test, they were eager to do so when experts who had managed similar disaster response teams educated them.  Andrew Whelton, a professor of civil, environmental and ecological engineering at Purdue University, has taken part in several water disaster recoveries, including the 2017 Tubbs Fire and the 2018 Camp Fire in California, the Joint Base Pearl Harbor-Hickam contamination, and a chemical spill in West Virginia.  In a study he co-authored, he said that although the Marshall Fire response was not perfect, major crisis was averted because authorities did not refuse to test.  (Sadly I think many of us can recall other disasters that did not go so well).

There were a couple reasons that contaminants were introduced into these drinking water systems.  First, when a system loses pressure, toxins like wildfire smoke can get sucked into the distribution system.  Second, overheated plastic pipe can leach benzene and other chemicals for months or even years.  According to Whelton’s research, plastic pipes were primed to leach chemicals by temperatures as low as 392 degrees Fahrenheit; wildfires can exceed 1,400 degrees.  Thirdly, flushing out the system quickly with clean water is important to prevent smoke and chemicals from reaching damaged pipe, which can act as a reservoir for such toxins.

If your home survives a fire in the future, remember that unseen dangers like carcinogens may still linger and you need to take caution with your air and your drinking water.  Although it seems that authorities in the Boulder area were for the most part very proactive for public health during the Marshall Fire response, it’s usually up to individual residents in wildfire-prone areas to have stores of masks, filters and clean drinking water.  We hope you don’t have to go through such a catastrophe, but it certainly doesn’t hurt to be prepared.

UPDATE:  Another professor, Delphine Farmer from Colorado State University, wrote a followup article explaining smoke and VOC behavior in a test house during the Chemical Assessment of Surfaces and Air, or CASA, study in 2022.   She found that VOCs that entered a home are adsorbed into surfaces and while they may temporarily clear by opening doors and windows (“airing out”), they quickly built up again after ventilation stops, and the house would slowly release those VOCs back out over the next hours, days or even months, depending on the type of VOC.  They found that air purifiers can remove only some of the VOCs that are in the air – they can’t clean the VOCs on your floors or in your walls. They also work only when they’re running, and even then, air purifiers don’t work particularly well to reduce VOCs.

The good news is that basic household cleaning–vacuuming, dusting and mopping with a commercial, nonbleach solution–removed most of the VOCs.  This means that while you’re cleaning for particles, VOCs are also removed.  Check out our article on Tackling Dust in Your Home for our recommendations on appliances and cleaning products to get ‘er done, but don’t forget to add the personal protective gear mentioned above, as well!

Photo by Egor Vikhrev on Unsplash

Summer Cooling: What are our options?

Summer Cooling: What are our options?

Many places in the US and around the world have broken temperature records this June.  Whether you’re in Minnesota or south Texas, it can be tough to keep your home cool during summer while maintaining a decent air quality.  We’ll go over some of the most popular ways of cooling your home and maybe some you haven’t thought of.  

If you’re not familiar with the different types of air conditioners and how they work, check out this article.  Note that newer air conditioners are also often “heat pumps” that can reverse the flow of refrigerant to provide heating in the winter.   

Central Air:  About 66% of homes in the US have central air conditioning, but this is not spread out evenly over the country.  As one would expect, central A/C is more prevalent in the south (37%), west (22%), and midwest (21%), versus the northeast (17%), and newer homes are more likely to have it.  (How Much Value Does Central Air Add to Your Home?) The best thing about central air conditioning is its distribution system, which allows multiple rooms to receive cooling and filtration from one unit.  With any air conditioning, it’s very important to do the following things:

  • Keep your home closed (a sealed system) so that warm, moist air is not introduced.  Letting in humid air from the outside will quickly increase humidity inside, because air at a lower temperature cannot hold as much moisture as warmer air, and humidity climbs.  This applies to windows, doors, and any significant leaks (like the door to an unconditioned attic or crawlspace).   

  • Change the filter on your unit regularly!   We can’t emphasize this enough: a dirty filter not only puts extra stress on the machinery like fans and compressors, but it increases cooling costs, and when the filter gets dirty enough, air will start to leak around the filter and get your evaporator coil dirty, providing food for mold.  Using the highest MERV possible for your unit will help keep the system clean and your air clean as well.  You can check out our article here to find out how to get more filtration out of your current AC system. 

  • For extra filtration, you can cut filter material to fit your vents, just don’t forget to clean or change these regularly, too. 

  • Get your unit serviced regularly.  Here are some things that the HVAC tech will do for you during a service visit:  inspect the inside coils, clean the outside coils and straighten fins if necessary, check the refrigerant levels and add refrigerant if necessary, and test the thermostat.  An HVAC system is a big investment (average $7000), so you’ll want to take care of it!  

  • Make sure your insulation is up-to-par: check air ducts to make sure they are not crimped and are fully insulated, and make sure there are no “bare spots” in the home’s conditioned-space envelope (ceiling or roof).  You’ve got to keep that cool air where it belongs!

Mini-Splits have most of the same parts as a central system, but they don’t have ducts to distribute cool air.  Instead, you could have one outdoor unit combined with up to eight indoor units, with the outdoor unit distributing refrigerant, not air.  In this way, you’ll have eight separate fans and filters inside, but these are smaller.  Mini-splits also have filters, so you’ll want to clean or change these on a regular basis.  One disadvantage with mini-splits is that the air filters tend to be similar to window air conditioners, which are cleanable, but they don’t provide high filtration, just large dust capture.  You will also want to get your units serviced regularly by an HVAC technician.  To get additional dust filtration, try adding standalone HEPA filters in the rooms that seem to get the most dust. 

Window Air Conditioners have come a long way in efficiency and looks!  They are one of the quickest installations, too: from buying one in your local home improvement store to having cool air in your space, could take as little as 1 hour.  Window air conditioners are a sort of “plug and play” cooling solution, but they also require regular maintenance of cleaning the filter.  Because the filter is equivalent to a very low MERV, like mini-splits, you’ll want to add a standalone HEPA filter to reduce pollen and dust.  In addition, if your window unit is more than several years old, it would benefit from a deep cleaning (see our article for tips on how to do that).   Some window air conditioners also have a feature that mini-splits and basic central systems don’t: a fresh air vent.  When this vent is open, you can get a small stream of fresh air from the outside, to dilute stale indoor air.  The only problem is that this air is usually not filtered or conditioned:  it’s the same as “cracking the window” without a screen.  To find this feature and operate it correctly, sometimes you’ll need to refer to the owner’s manual.   New window units with “inverter” type motors can be extremely efficient and this “saddle” style unit by Soleus even gives you your window view back, because it hangs below the window on each side.  It also has a dehumidifier setting to lower the humidity in your space. 

Portable Air Conditioners have become popular because like the name suggests, they are the most portable.  They can cool spaces without a window, as long as you have a place nearby to send the heat through the exhaust duct (through a sliding door with an adapter kit, for example).  You will also need a drain to collect condensate, or you will need to empty the reservoir every so often.  Portable air conditioners have the minimal filters similar to window air conditioners and mini-splits, so they are not able to filter smaller particulates.  It’s really important to clean these filters on a regular basis to keep your air conditioner working well!  Another downside to portable air conditioners is that they are less efficient than window air conditioners, and they have bulky hoses that aren’t the most attractive.  

Fans are the most common cooling systems we have, and many are cheap, at less than $50.  Fans cause evaporative cooling, where the circulated air carries heat away from our bodies in the form of water vapor.  Fans work well to cool us down if there is some humidity in the air.  (See our article about the detrimental effect of fans in extreme dry heat.)  You can use a combination of ceiling fans and portable fans to move air from cooler to warmer areas of your home.  Dreo Air Circulators are very powerful, efficient, and quiet because of the fan design, and because they use brushless DC motors that have a large range of speed with low energy consumption.  Since most fans don’t have filters, you can add standalone HEPA filters to cut down on dust, or add cloth filters to your tower fans. Filters for box fans (20x20”) are mainly the replaceable type, not cleanable, but $45 for a 4-pack of MERV-13 filters could help your space stay a lot less dusty.

Opening the windows is an option if you live outside of polluted urban areas, wildfire smoke, or excessive heat and humidity.  In these cases, it’s best to leave the windows closed and curtains drawn to preserve coolness as long as possible in the day.  If inside temperatures start to equalize with outdoors, however, you can use regular window screens in pristine areas, and Window Ventilation Filters in more polluted areas.  Although the filters restrict airflow slightly, they provide a good buffer against dust and pollen.  Here again, standalone HEPA filters will also help reduce dust in your home. 

Evaporative coolers, also known as Swamp Coolers, began to be popular in the 1920’s and 30’s when electricity was available, but residential air conditioning was not affordable/accessible. (Window air conditioners were invented in 1931 and central air conditioning was offered in 1931 but many Americans could not purchase them due to the Depression).   Swamp coolers use a fan to blow air over a wet membrane, which, if not cleaned regularly, begins to grow algae and smell like a swamp!  This older type of membrane is definitely not something we would recommend for air quality, but newer models like those made by Big Ass Fans uses a proprietary resin coating on the media that resists the growth of algae and mold to keep your airflow clean and people healthy.  Following the cleaning and maintenance guidelines are very important, too.  Another downside of this type of cooling is the massive airflow that could kick up a lot of dust.  However, if you have a large outdoor or unconditioned space and adding humidity into the air is not a problem, then an evaporative cooler could help you stay cool.  It would even help to cool a porch, from which you can open up air to your home to take in cooler air.

Heat Pump Water Heaters can actually cool your space.  It sounds counterintuitive–til you consider what this machine is actually doing.  Instead of creating heat by an electric coil or gas furnace, this type of water heater pulls heat from the surrounding air–in effect making the room in which it’s installed, cooler!  If you have the water heater installed in the garage or another unconditioned space, you can still reap the benefits by using ducts to bring warm air from your house to the heat pump, and cool air from the heat pump back to your house.  Heat pump water heaters do cost more than the basic electric or gas varieties, but according to the Department of Energy, they can be two to three times more efficient than a regular electric water heater.  However, when you consider you’re getting free cooling during the summer, you can deduct this cost from your cooling bill.  Another consideration is the size of room where it is installed.  It must be installed in a room at least 12’x12’, or have ducting to access larger areas, so it can pull the heat it needs from the ambient air.   If it’s time to replace your water heater, check with your plumber to see if a heat pump water heater would work for you!

There are many ways to move cool air from the basement into your home, but consider the quality of basement air before you make this move.  If it’s musty or moldy smelling, you’ll definitely want to get rid of that mold before trying to move that air upstairs.  For this reason, we can’t recommend circulating basement air in the rest of your home.

Whichever way you decide to cool your home, make sure that air quality doesn’t suffer.  Our Germ Defenders, Mobile Air Angels and Whole Home Ionizers sanitize air using bipolar ionization, killing microbes and agglomerating dust and pollen so it’s easy to filter or clean.   Extreme heat tends to lead to increased air pollution, so be conscious of air quality when you open the windows, or even when they are closed and outdoor air seeps in (as it always does except in the tightest of homes).   Check out our article to find out how to ride out a heat/air pollution wave safely!

Photo by Glen Carrie on Unsplash

Should I move out of my home during mold remediation?

Should I move out of my home during mold remediation?

We get this question a lot from homeowners who have discovered mold in their homes and need professional remediation to remove it.  Should I try to stay while the mold is removed and my house is put back together, or find another temporary home?

There are several considerations in making this decision, and they’re not easy.  Sadly, mold remediation is not “elective” or optional once you find it and discover the extent of mold damage.  The traditional option of renovating “room-by-room” is not available here because if it has mold, it has to be remediated as soon as possible if you want to live in your home!  

Why should I move out during remediation?

First off, If you’re not used to putting yourself first, you need to consider the value of your health.  Staying in your home while mold is removed and materials are replaced simply may not be safe for certain individuals.  The following are just some of the conditions that make it safer to leave:

  • Anyone diagnosed with Chronic Inflammatory Response Syndrome (CIRS) or Mast Cell Syndrome (MCS)

  • A compromised respiratory system or respiratory illness like asthma, COPD, emphysema, cystic fibrosis or any number of similar conditions.  Why?  Small particles and mold released into the air can directly affect your lungs and can be extremely dangerous for immuno-compromised individuals.

  • Heart conditions like arrhythmia, congestive heart failure, unstable angina, and any number of similar conditions.  Why?  Small particles and mold released into the air can directly affect your heart when they pass through your lungs into your bloodstream and can be extremely dangerous for immuno-compromised individuals.

  • Mobility handicapped people and the elderly may find it difficult to perform more cleaning and move around areas under construction

  • Work-from-home employees:  construction noise can be distracting and unproductive

  • Families with young children and/or pets  Even with protective barriers between you and the construction, you may find that your living space has increased dust on all surfaces, danger of children and/or pets getting into construction zones,  and construction noise from 7am on any time during the workday.

Secondly, most remediators will say that moving out is the best option to minimize time and labor.  According to Anna Williams, founder of Your Beautiful Home, there are multiple reasons.  If you live at home during the work, the construction crew will have to take extra care to clean up each evening before leaving, as well as pack up their tools.  This takes at least 30 minutes in the evening, plus time in the morning to unpack tools. (Move out during renovation or live through it? That is the question!)  Also, they may not have the easiest access if you are living there, for instance walking and carting tools to the back door to avoid your living space.  So, making it easier and quicker on the remediators means less time and money spent.

And of course, if the remediation requires extensive gutting to your home, it may be just too inconvenient to try to live there.

If you decide to leave, family and friends usually have the cheapest “rates” of any accommodations, but will your relationship survive the remediation?  If your contractor has a reputation for completing projects on-time, staying with family may be a good option.  Alternatives include:

  • Vacation rentals like Airbnb and VRBO

  • Extended stay suites

  • Sublets

  • Corporate housing/short-term rentals (contact a corporate housing agency)

If you move out, you’ll want to make sure to do the following:

  • Store food items in airtight bins

  • Discuss power requirements and when the power will be cut off (will it affect your freezer/any other climatization?

  • Place plastic dust covers on furniture, clothing and carpets if possible

  • Secure any areas of the home that contractors don’t need to access, take or lock up valuables

  • Notify your home insurance and security company

  • Check the “containment” that the contractor has set up.  Be sure to discuss your HVAC system, which can broadcast mold and dust throughout your home if it’s not secured!  If temporary ventilation is needed during extreme heat or cold, the contractor should be able to provide it.  

  • Plan for extra weeks or months in case the remediation schedule doesn’t proceed as planned.

Why should I stay?

Finding alternate accommodations can be stressful if you have to stay with others, or expensive if you have to pay for a rental for your family.  For these reasons, many decide to stay at home.  Homeowners who decide to try to live in their home during remediation should know about the stresses they may endure!  It’s not easy to have workers coming and going through your personal space.  Here are just a few considerations:

  • Increased dust throughout the home

  • Increased noise during workdays

  • Temporary (or prolonged) power and water disruptions

  • Ventilation during extreme temperatures

  • Child safety

  • Parking issues–will there be many vehicles and/or a dumpster parked in front of your house?

  • Access to your kitchen

  • Access to at least one bathroom and shower or tub

  • Access to laundry facilities

  • Sufficient clean space for your family to sleep

  • Sufficient space to work if working from home

  • Delays to the schedule may make the remediation longer than expected

It’s a lot to consider.  Of course, make sure you have as many options available as possible before deciding, including knowing if your insurance will pick up any of the cost for relocation.  If not, you can check with local, state and federal agencies for assistance.  

Staying at home during a mold remediation carries an extra risk: airborne mold.  For this reason, we recommend purchasing extra HEPA filters to place around your living area and portable air sanitizers like the Air Angel and Germ Defender.  Containment of dust and mold spores has to be top-notch–make sure that the contractor follows all safety standards for containment!

Working with the contractor on setting a budget and timeline should be a top priority.  Many contractors may think that delays are acceptable if the homeowner is living in the home or with family–after all, you won’t be paying rent–but make sure that this is not their mindset by including deadlines in the contract, and penalties or cost reductions if they are not met.

By all means, ask for help whenever you can.  Whether it’s taking a weekend getaway break, taking vacation during the remediation, asking for help with children and pets, or having dinner with friends more often, you’ll need to pace yourself so that your health and your relationships aren’t “gutted” either!  

Tackling Dust in Your Home

Tackling Dust in Your Home

Dust is one of those things that never completely goes away, like mold, but keeping both at a minimum in your home is key!  There are a lot of weather conditions that increase dust, but in general, heat and low humidity are two of them.  When these occur, you’ll not only see an increase of dust in your home, you’ll be breathing more of it because the less humidity, the longer particles stay afloat.  Yuck!  Getting it under control takes some effort, but we’d like to help!

Invest in the right tools

We see deep discounts all the time on home appliances that look like they make our lives easier–but they end up to be a waste of money.   This is where it pays to research–and only buy what will do the job, not the gadget with the most features.  The tools we’re going to talk about are very important to your family’s health, so we hope that you keep these requirements in mind and buy wisely! 

  1. Air Cleaner

With dust in the air, you can do all the cleaning you want and then–BOOM–the dust continues to fall out of the air after you stop cleaning, not to mention all the dust you are filtering with your nose and lungs!  If you live in a dusty area, an air cleaner that uses HEPA filters is imperative.  

For value and solid performance, Medify Air has a range of air purifiers that is hard to beat.  You can find one for every size room in your home, from small nurseries to “great” rooms, with simple controls and most with filters that can be vacuumed gently once a month on the pre-filter side to extend their life.  They use True HEPA H13 filters, which in general last 3 to 6 months.  

Another great option is the CoWay AirMega Mighty, which has been highly rated for a number of years by the NY Times Wirecutter review for dusty rooms up to 250 square feet.  Their testing has used the same filter for up to a year with good performance (however of course you’ll want to have new filters on hand just in case you are caught in an exceptionally-poor air quality day).  

  1. Dusting, Vacuuming, and Mopping

I wish I could tell you differently, but these chores are a must.  If you invest in the right tool(s), however, you can enjoy your clean surfaces with less work!  Dusting should be done with a dry microfiber cloth (check out this video to learn how to dust properly–yes there are techniques that are more effective with less work!)  Then, get both vacuuming and mopping done at the same time with this ONE TOOL (I’ve touted it in other articles, but here it is again): with the CrossWave floor and area rug cleaner by Bissell ($257).  It leaves your floor cleaner than if you had vacuumed and mopped separately!  It has a rug cleaning function, and it has a HEPA filter included, so no dust is escaping your machine and going back into the air.   For people who have mobility or strength issues, this machine absolutely reduces the straining scrubbing actions that normal mopping requires, and it also comes in a cordless option.  If you check local discount stores, there are many reconditioned models that sell for less than half this price (I got my corded one at Ollie’s).  In addition, of course the manufacturer wants you to use their patented floor cleaner, and states that using any other cleaner will violate the warranty.  Unfortunately, Bissell products mostly rate an “D” grade from the Environmental Working Group for toxicity to humans and the environment, but if you do decide to substitute a non-toxic cleaner, we have just the one for you: a recipe using TotalClean.  TotalClean has no fragrance and no toxicity, you can clean your floors as often as you want without adding more VOCs and chemicals to your home.  Here’s the full recipe for a Bissell-like non-toxic floor cleaner:

Machine Floor Cleaner Concentrate Recipe (this is the concentrated cleaner so you add it in replace of the manufacturer’s cleaner, with the recommended amount of water, adapted from this very informative article):

  • 1-¾  cups TotalClean Concentrate
  • ⅛ cup rubbing alcohol
  • ⅛ tsp dish soap
  • 5-10 drops essential oil (optional)

If you simply must have a separate vacuum and mop, though, make sure the vacuum uses certified true (make sure the label says “true”) HEPA filters with an airtight, sealed filtration system.  You don’t want that dust to be recycled right back into the air!  As for mops, The Maker’s Mop is an ingenious tool for dry and wet-mopping, dusting, and cleaning up after huge spills.  And, being “cordless”, I guess it’s handy to have around in the case of a power outage!  (20 Tips To Prevent And Reduce Dust In Your Home)  

  1. Fresh-air ventilation WITH filtration

If your rooms are stuffy (too much CO2!) and you don’t have central air conditioning, make sure you only open windows with filters in them!  That’s right, screens may prevent mosquitoes and flies from coming in, but they do nothing to filter dust.  Our Window Ventilation Filters are adjustable so that you can still open your windows for fresh air and block out most of the dust. 

If you like to open your windows wide for fresh air often, you should consider replacing the fitted window screens with nanoscreening.  Nanoscreening does cut visibility through the screen somewhat compared to normal insect screens, but many customers like the additional privacy it offers.  AllergyGuard nanoscreen offers a kit that is super-easy to install with double-sided tape.   If you re-screen a few windows with this kit and like how it performs, you can go to their website for a larger roll and video on how to install it with spline, the skinny rubber tubing that is normally used to keep screens in place.  

  1. Change your HVAC filter more frequently.  

If you have a hard time remembering to do this, just enroll in an auto-ship subscription to make it easy to have them available when you need them.  If you’re concerned about changing it too frequently, check out our tips for getting that interval just right.

  1. Don’t carry the dust in with you!

We’ve written a lot about this practice, which ranges from taking your shoes off at the door and using a doormat, to doing your best to clean dusty pets off before they come inside (umm, can we teach them how to brush themselves?)

  1. Minimize.

This says so much in one word.  Minimize the fluffy pillows, fuzzy throws, carpeted flooring (don’t rip out carpet if you’re renting, though, obviously), knick-knacks and tchotchkes, piles of clothing, anything that you can do without, that catches loads of dust (children not included)!   If you want to have area rugs or carpet, consider changing them to wool carpets.  According to a 2015 study, wool carpets significantly improve indoor air quality by rapidly absorbing the common pollutants formaldehyde, sulphur dioxide and nitrogen oxides, known as volatile organic compounds, or VOCs, which are released from many common household items such as cleaners and disinfectants, air fresheners, printers and home furnishings.  A high level of formaldehyde (300 parts per million) was reduced to virtually zero in four hours, and nitrogen oxides from 300 to 5 parts per million in 24 hours, whereas nylon carpets did not perform as well.  The wool carpets retained the formaldehyde and did not remit them into the atmosphere.  When you choose a carpet, low pile heights are favorable so that dust and debris is easier for the vacuum to remove (with your True HEPA vacuum, of course!).    


How to safely remove old carpet

How to safely remove old carpet

Upon testing my bedroom carpet as part of a series of mold tests in my home, I found this:

I scheduled time to remove the carpet the next week.  Now, how do I do this safely?

Research revealed two extremes:

  1. removing the carpet with no breathing equipment and no dust abatement (although this guy has some great tips, I cringe at the way he’s throwing the carpet around with no dust mask)

  2. removing the carpet with breathing equipment, a zillion garbage bags and gallons of mold eliminator (this method is costly and WET!) 

I had to find a solution in the median.  Here’s what I came up with for my situation (I am moderately sensitive to mold). 

Supply list:

  • Respirator with extra set of filters

  • Heavy gloves

  • Old clothes

  • Knee pads

  • TotalClean concentrate (or several pre-mixed spray bottles)

  • Clean garden sprayer

  • Rags

  • Plastic sheeting and painters tape for taping off vents and covering heavy furniture

  • Old towels to block under door

  • Heavy duty garbage bags (also known as contractor bags)

  • Carpet knife with extra blades or utility knife with extra blades

  • Duct tape

  • Pliers for pulling carpet

  • Nail puller to remove staples in padding

  • Pry bar and hammer to remove tack strips

  • HEPA vacuum with new bag for cleanup

  • Air Angel and/or Germ Defender: helps with dust and mold mitigation

Prep, prep, prep…it’s tedious but so worth it.  

  • Move whatever furniture, clothing and decor you can easily move, into another room. I took the long-overdue opportunity to get a new mattress, so I could escort my old one to the dump!

  • Use dollies on furniture that is too heavy or large to move out of the room.

  • Turn off the HVAC and cover any ceiling, floor or wall registers with plastic sheeting and painter’s tape

  • Measure TotalClean concentrate and water into garden sprayer at 1:7 parts respectively or empty pre-mixed spray bottles into sprayer.

  • Block under door(s) with old towels so that dust doesn’t migrate through the house.

  • Open window and remove screen if you plan to toss the carpet out of the window (also block off the area below)

  • Turn on the Air Angel and/or Germ Defender to help dust particles clump together and fall to the floor; the ions also destroy mold and bacteria on contact

  • Suit up with all protective gear including your respirator!

My strategies for minimizing dust will be to dampen a section of the carpet with the sprayer; cut the carpet into a  manageable section, remove it, and do the same three steps for the carpet pad underneath.  You’ll want to make the least number of cuts, because cutting through the carpet releases a lot of dust and fibers into the air.  I realize that this method will only wet the top of the carpet and not the cut edge or bottom, but short of soaking the carpet and subfloor, I found this is the best solution.  I liked the idea of tossing the carpet out of the window on a good weather day and bagging or binning it outside so that I didn’t drag the bags through the house.  I removed the carpet, padding and staples as I went, because I had a heavy piece of furniture left in the room and did not want to move it around more than necessary.

  1. Starting in one corner, use the sprayer to dampen the carpet in a 2’x8’ section.  Cut just inside that section with the carpet knife.  

  2. Use pliers to grab the carpet in the corner and wrestle it from the tack strips. If you can’t get it out, try cutting the corner out with your knife and pulling out just the corner.

  3. Roll it up gently and dispose of it in a contractor bag (or toss it out a window!)  If bagging it, then you can use the duct tape to keep it rolled tightly.

  4. Spray the carpet pad underneath and cut it.

  5. Dispose of it in the same way.

  6. Remove staples holding the padding to the floor with the nail puller.

  7. Remove tack strips using the pry bar and hammer.  They are super-sharp!  (If you plan on replacing with new carpet and the tack strips are not rusty or damaged, you can leave them in place).  

Repeat steps 1-5 until the whole room is devoid of carpet and padding!  If you can handle more than 2x8’ of damp carpet at a time, you can  Then, use a HEPA vacuum to thoroughly vacuum the floors to remove dust.  You will want to wipe down the walls, window(s) and ceiling fan with TotalClean because dust is now everywhere.  Finally, you can remove the sheeting from your register(s) and change clothes and shower–you earned it!  It’s best to add a bit of EC3 Laundry Additive to your clothing when washing it to avoid spreading mold to any of your clean clothing. 

If you have a new floor already scheduled for installation, good for you! Make sure that the subfloor dries out completely before 48 hours have passed, and definitely before installing new flooring (use of the sprayer makes it unlikely to soak the subfloor).   If you haven’t picked out new flooring yet, you can remove/replace any nails or screws that are sticking out, use a non-toxic floor paint, and/or use an area rug to cover over any rough areas until that day comes.  Try not to wait too long, however, so that excessive wear of the subfloor doesn’t occur.  

Photo by Julie Marsh on Unsplash

1 2 3