Tag Archives for " Air Quality "

What to do when you find yourself in an air quality emergency

What to do when you find yourself in an air quality emergency

We’ve all been on the other side of the highway when an accident snarls traffic for miles behind it, and our lanes of traffic slow down but continue to move.  Whew, glad I wasn’t on that side, we think…but sadly sometimes we may find ourselves stuck in an air quality emergency that requires calm, decisive action to quickly get to safe air.  

On Wednesday, November 8, 2023, a fire at a small chemical plant north of Houston sent plumes of black smoke into the air.   According to the Reuters report on November 9, Sound Resource Solutions blends, packages and distributes oilfield and other industrial chemicals including sulfuric acid, acetone and petrochemicals like xylene and toluene, according to the company's website.  These are chemicals that are acutely toxic with the potential to cause serious eye, skin and organ damage, as well as carcinogenic. 

A news article from a Houston news station released the list of chemicals that had been stored on the site during the last 2 years, which confirmed they are quite toxic.  

However, despite the smoke and shelter-in-place orders (which have been lifted), it seems that officials are downplaying the possible effects.

  • According to a Houston news channel video the day after the fire was extinguished (Nov. 9), the Texas Commision on Environmental Quality was monitoring the air and “did not detect any levels of concern from the samples”.  

  • In the same video, an official from the University of Houston said that rain would wash any chemicals out of the air, dilute them out and they eventually go into the ocean.  

Here are the problems we see with these assessments: black smoke was seen moving north toward Livingston, Texas.  Such smoke carries a lot of particulates, which will deposit on businesses and residents’ homes, vehicles and farms (food sources), as well as drinking water facilities.  Also, by our estimates, Shepherd, Texas is 50-60 miles from Trinity Bay, which is open to the Gulf of Mexico.  In order to get to the ocean (Gulf of Mexico), the particulates and chemicals will pass through many drinking water sources!  Once again, it’s probable that authorities are not releasing timely information about hazardous levels of chemicals in the air (and no water reports were discussed).

If you find yourself in an emergency area like Shepherd, Texas, it’s best to do one of two things: stay inside and implement air quality containment measures, or drive out of the area as soon as possible.  Here are our recommendations:

If you choose to stay inside:

  • Close all windows and turn off air conditioning and heating systems if possible.

  • Although most HVAC systems don’t have fresh air intakes, you should close these intakes if they do.  

  • Don’t use exhaust fans like the kitchen or bathroom exhaust fans.  Don’t use clothes dryers, either!  Each of these pull air out of the house, which consequently draws air into the home through cracks in windows and other penetrations.

  • If you have air purifiers, run them continuously.  If you have only one purifier, run it in one small room where you can shelter for most of your time.  If you don’t have an air purifier, here's how to make one using a box fan and a MERV-rated filter.

  • Don’t cook if possible; try eating canned food or food that doesn’t require cooking or heating.  The reason is that cooking and heating food releases even more VOCs into the air, and you shouldn’t vent these with the exhaust fan.

  • Monitor AirNow.gov for local air quality updates, because the air quality outside your home will eventually be the air quality in your home.  If air quality outside deteriorates, you may want to gather supplies and necessities and evacuate via car.

  • Use bottled (preferable) or home-filtered water until you are sure that tap water has not been contaminated (which may be weeks or months).

If you evacuate:

  • Make sure that the HVAC in your home is turned off and all windows/doors are closed before you leave.  You can leave air purifiers running in your home, however.

  • Make sure you use the best masks you have until you get out of the area.  Exchange your mask for a new one if you start to have trouble breathing. 

  • Spend as little time outside as possible. 

  • When driving, keep your air conditioner set to “recirculation” mode until you get out of the danger area.

  • Bring/buy bottled water. 

  • Monitor AirNow.gov for local air quality updates and check updates by local news authorities. 

  • Upon returning home, clean carefully and thoroughly!  We have recommendations in our article here.

Note that smoke particles, which can contain toxic chemicals, will deposit on the ground, making it easy for people and pets to bring them into the house, so you may want to be vigilant about removing shoes and cleaning pets’ paws when you can.

Many people live or drive within range of being affected by toxic spills, fires and environmental disasters, so your best bet is being prepared (and have a healthy skepticism of all-clear reports until you can research the situation).

Photo by irfan hakim on Unsplash

Why you need a moisture meter (and how to use it!)

Why you need a moisture meter (and how to use it!)

Moisture meters are like thermometers.  When you think, I feel warm…do I have a fever?  You might ask someone else to put their hand on your forehead for a reference check, but if they’re not sure, what you really need is a thermometer to verify your body temperature.  Likewise, sometimes in my own home I see a dark spot on a wall or windowsill that I hadn’t noticed before, and think, is that a water stain or actively leaking water?  I place my fingers or hand on the spot to see if I feel moisture, but if it’s not sopping wet, it’s sometimes hard to tell if there’s any difference with the surrounding material.  What I need is a moisture meter.

Moisture meters work to sense moisture by electrical conductivity.  Since water is more conductive than drywall, wood and many materials (other than metal),it uses this property of water to “detect” the relative moisture.  For this reason, some types of moisture meters are made for gardeners and farmers, to tell when the soil is too dry and plants need to be watered (this type doesn’t even need a battery).  Moisture meters for home inspections, however, come in “pin” and “pinless” varieties.  The “pin” type have sharp pins for actually sticking into the material, while pinless meters–you guessed it–don’t have pins.  This type detects moisture using conductance by either radio frequency or capacitance of a material.  (Evaluating Pinless Moisture Meters Vs. Pin Moisture Meters)  Both have their place in a professional home inspector’s toolbox for different reasons.

Here are some considerations to decide which moisture meter to use:

Accessibility and Damage: Obviously, you can’t insert a pin moisture meter into materials like concrete and tile without damage, so pinless would be the way to go.  Also, if the material is highly visible and/or valuable, you might not want to insert pins into it (even though the holes are small).

Speed: Pinless meters are much faster because you don’t have to stop and insert pins into the material.

Accuracy: Both types of meters can be accurate, but pin meters are preferred by home inspectors (when possible to use them) because pins have the ability to sense deeper into the material, and their readings are very repeatable when inserted into the same holes.  

Adaptability: Pin meters may come with a variety of accessories (types of pins) for different surfaces.  There are hammer electrodes (you guessed it-for hammering them in!), deep wall probes, extension probes and baseboard probes.  

Now that you know the difference, how do you use them?

For those that like videos, here’s a good short one by This Old House.  Here are the takeaways:

  • Thermal cameras can also be used to spot moisture in a wall because of temperature differences, but unless you’re an expert, you should confirm that’s it not simply missing insulation with a moisture meter.
  • When using a moisture meter, good dry material should show between 6-9% moisture.
  • 15% or more indicates a definite water intrusion problem.   You’ll need to consider replacing the material if it’s drywall, or if it’s wood, at least removing it to assess damage, expose the backside and dry it thoroughly.
  • Some meters are “combination” meters that have pins and pinless technologies.

It’s important to know some quirks about using moisture meters.  You can watch a very interesting video (up to about minute 5:50) from a reputable home inspector showing these points, or read them here: 

  • Metal also has low resistance to electricity (high conductivity), so if there’s metal in the surface, like a metal cornerbead in drywall or metal lath behind tile or nails or screws, you can get a reading that looks like moisture when in fact it’s dry; the metal gives a false positive.
  • Moisture meters are not very accurate on tile.  The minerals in the masonry/concrete can give a false positive.  Also, there can be metal flashing under tile, especially behind shower surrounds.  You must use intuition/other tools to find real water intrusion and remediate.
  • Dry dog and especially cat urine will give false positives because the minerals in the urine will permanently alter the composition of the material (drywall, carpet, etc.), causing it to be more conductive and appear "wet" to the meter.
  • Moisture meters only read water, not mold.  Although mold needs moisture to grow, it takes a few days to take root (typically 48 hours for very wet surfaces), so if you catch the moisture soon enough and dry it out quickly, you may not have a mold issue.
  • Moisture meters may give a normal reading (false negative) even though you have mold!  This can happen when the mold is caused by humidity.  A moisture meter will typically not pick up excessive moisture when the mold is caused by condensation.  The condensation occurs only on a very thin layer of the material.  While this is sufficient to cause mold growth, it typically will produce a normal reading on a moisture meter. (Humidity and Mold in Home)

Moisture meters can be used in other situations, too!  It’s nice to know:

  • Is the firewood dry enough to burn well:  It's important to burn only wood with moisture content below 20%. Burning wood with higher moisture content creates more smoke, which contains harmful chemicals and particulates and forms creosote on your chimney. It also gives you less heat, because it takes energy to boil off the excess water. (Storing and Drying Firewood)
  • How dry does a wood surface need to be in order to paint it?  According to an Amazon Technical Bulletin, most outdoor wood, concrete, stucco and plaster surfaces must be at or below 12%, otherwise the paint may not adhere properly, or risks failing early.  Indoor wood and cabinetry should be closer to 6%. 
  • Are your hard wood floors ready to install?  Wood flooring installers typically want the moisture content of hardwood floorboards to be between 6% and 9% (based on an indoor temperature of 60–80° F and 30–50% relative humidity).  (How to Measure Moisture in Hardwood Floors)

Finally, like many other products, the more functions a moisture meter has, the more expensive it’s going to be.  Here are some functions:

  • Ability to “calibrate”: although most cheaper meters do not have a “calibration” function, some have a button to return the device to a factory preset.
  • Ability to choose a very specific material (like concrete, drywall, softwood, hardwood, etc.) Here is a video showing the differences between using a cheap moisture meter and a more expensive one for woodworking.
  • Sensitivity: Instead of soft or hardwoods, some testers allow to select based on a table of listed woods, like this one (more specific for woodworking). 

Here are some devices to consider:

Pinless meters: 

  • Wood Moisture Meter (Pinless-colors), $37, has an LED display screen that looks like an analog meter, with green to red color codes that align with the moisture content.  The pinless moisture meter is penetrates up to 0.75inches deep.  Despite the warning that it’s not recommended for drywall, many customers report using it with success in finding leaks behind drywall before they became too serious.
  • Klein Tools ET140 Pinless Moisture Meter, $42: This rugged meter seems to be very easy to use in selecting the material and verifying the moisture content.

Pin meters:

“Combo” meters:

Reading the reviews on these devices, we’ve seen many homeowners and renters who are able to make quick, informed decisions to call in professional help and get repairs going before serious water damage and mold took root in their homes.  We think it’s an important tool to have in your toolbox whether or not you think you need it right now, because water damage can escalate quickly in hours and days, and the time spent looking or ordering one could be very precious!

Sealing your Attached Garage

Sealing your Attached Garage

For many people an “attached garage” is an asset in a home: the convenience of parking and walking inside under cover is very attractive when there’s extreme weather outside!  However, from an air quality perspective, attached garages are actually a liability, unless the garage has been air-sealed from your house!

In our articles about negative air pressure here and here, we talked about how contaminants can enter your home from the garage.  The garage not only has car exhaust fumes, it can also have paint or chemical fumes from your hobby, VOCs from pesticides and insecticides stored there, and possibly even exhaust gases from your gas water heater, furnace or clothes dryer.  Need we  mention the mold and mildew spores when humidity and cardboard boxes create the perfect environment for mold?  It’s almost like having an unsanitary neighbor in the apartment next to you…now, does an attached garage still seem like an “asset” to your clean, healthy home?

If you are coming around to a healthier way of thinking about your garage, it’s essential to consider installing some boundaries with this unsanitary neighbor!  “Air sealing” is more than just a tight-closing door.  It goes from the ground (foundation), through walls and insulation and even into the attic.  That’s right–if the attic over your garage is not sealed from the attic over your home, you got it–there is shared airspace and the possibility of contaminants crossing over from the air that circulates there due to changing temperatures. 

As with most air-sealing projects, creating this boundary is easiest if it’s done during the building phase.  The easiest way is to build your attached garage as a “separate” building…as in this article.  Jake Bruton of Airow Building in Missouri does it this way: do all the framing for the house, install your air barrier, and only then, frame the garage on the other side of the air barrier.  Finally, any penetrations like electrical and ventilation must be properly sealed. 

Another way to airseal during construction is to hang drywall on the shared wall inside the garage, foam the penetrations like light switches and outlets on that wall, and also run plywood sheathing above it to the roofdeck, using sprayfoam to seal the entire barrier in the attic as in this video.  Sprayfoam really is the only way to effectively seal around ceiling joists, which often run straight over the wall from the home into the garage.     

This is all great...for new construction.  What if you are buying an existing home, or just now want to upgrade your home?  First of all, examine that shared wall from the garage side, from floor to ceiling. 

  • If the drywall is finished, that’s good.  Finished drywall can be an air barrier.  However, you’ll want to remove any trim like baseboards or trim around doors, faceplates like electrical plates, and uncover any penetrations.  Get some spray foam in a can and seal all of these cracks with spray foam.   You’ll want to cover the space from the sill plate to the drywall, the spaces around electrical boxes, and around any pipes sticking through the wall like gas pipes or hot water pipes if you have a hot water heater in the garage.  Make sure to seal around the door frame if there’s dead space there. 

  • If the drywall is not finished (no tape and mud or just insulation), that’s even better!  Consider removing the existing drywall on the garage side (you can install it again later if screws were used), as well as any fiberglass or rolled insulation, and sprayfoaming the entire wall.  Spray foam can be an excellent air barrier if it’s done by a pro.  Before you schedule the job, however, go to the next point and prep the attic space so that they can foam there as well.

  • If the attic space between the garage and home are shared, you’ll need to build a partition wall between them.  Of course this is not a fun job, because attics are typically low, cramped and have extreme temperatures, but it’s critical if you’re going to do a thorough job.  Then, the wall can be sprayfoamed on the attic or house side, or at least foamed around the roof, rafters and joists and taped where plywood sheets come together.  

  • Ventilation (air conditioning and heating) is something that should never be shared between a house and garage, because that is a sure way to pull those contaminants right in and distribute them around your home!  If you do have a shared system, consult with an HVAC company about terminating the vents to the garage and installing a dedicated mini-split.  For small garages, a window air conditioner and portable heater will do the trick!  

  • If flexible ventilation ducts go over the garage with no vents, it’s really hard to get an air seal around flex ducts.  If you can’t/don’t want to switch to metal ductwork, install a collar in the attic wall that separates the garage and house (the one you build as in bullet #3 above), and attach the ends of the flex duct to it, so the wall can still be adequately airsealed.  

  • The door between the house and garage, of course, is an area that needs to seal tightly.  Adjust the door so that no daylight shows around the perimeter (I know, this is easier said than done!) and use weatherstripping around the sides so that it seals when closed.  If necessary, install a “sweep” on the bottom or replace the rubber seal in the threshold so the bottom seals as well. 

Here are some product recommendations for air sealing the garage:  

  • Air-sealing tapes can be expensive, but don’t scrimp: don’t use duct-tape, vapor-barrier tape or anything less than a product that is for air-sealing.  ZIP System is a great brand and be sure to buy more than you think you will need, because there always seems to be another seam to seal!  Use this tape to seal plywood edges together, seal the door frame to the drywall (if you can’t foam it), etc. 

  • Spray foam cans come in lots of formulations: small cracks (less than ¼”), larger gaps and cracks ( ), pest block formula (who knows what kind of chemicals are in there), but just be sure to buy a good number of the small and large gap formulations before you start the job.  Wear gloves, safety goggles and old clothing (long hair safely tucked away) because this stuff is super sticky!  Also, if you use a can quickly, you can reuse the same straw on the next can, and save the extra straw in case one gets plugged or lost.  Unless you buy the “smart dispenser” version, the straws and remainder in the can cannot be reused after about 30-40 minutes, so be sure to have several spray areas ready when you start spraying!  After it hardens, you can use a utility knife or hacksaw blade to cut away excess foam.  Consider these different products:

    • Great Stuff Window and Door gently expands so that frames will not warp under pressure.

    • Great Stuff Gap and Cracks (use in gaps up to 1”)

    • Loctite Tite Foam, pack of 2 for $19

    • Great Stuff Pro (large cans, $14 each–a great tool for a large job because it’s easier to dispense and can be reused for up to 30 days); however it requires a special gun.  Users report that a can goes a LONG way (3-6 cans on a large home) but if you have more air-sealing to do, it’s worth having several more on hand.

    • And more…

Not only will your house smell better and stay cleaner after these airsealing improvements, you’ll probably notice less cold drafts in winter and hot air in summer, since most attached garages are not conditioned.  Finally, complete your sealed garage upgrade with a funny sign reminding everyone to “close the door”...after all, airsealing can only go so far when the door is open!!

Photo by Kevin Wolf on Unsplash

What happens behind closed doors…

What happens behind closed doors…

What happens behind closed doors…is STAGNATION!  When you close the door to a room in your home, air is trapped in the room, resulting in the following:

  • If there is no fan operating, air will not circulate, and any humidity present in the air will saturate soft furnishings, increasing the likelihood that mold will grow (see our article on ventilation and one of our favorite tools, dpcalc.org).

  • If central air conditioning or heating is pushing air into the room, the closed door prevents proper cycling of air out of the room, causing the system to a create a negative pressure zone near the return grille and placing stress on the system’s mechanical parts like blower motors.

  • Again, central air conditioning or heating with closed doors causes imbalances in the temperature of the home, because conditioned air is prevented from mixing, which in turn affects the thermostat and causes the system to run longer to reach the temperature set point.

Keeping doors closed, in other words, is just not good for proper ventilation in your home!  This makes sense to us…until the question of privacy is brought up.  Of course, not everyone wants their door to be open at all times, even if it’s just cracked open.  Don’t worry, there are ways to get good ventilation even with closed doors!

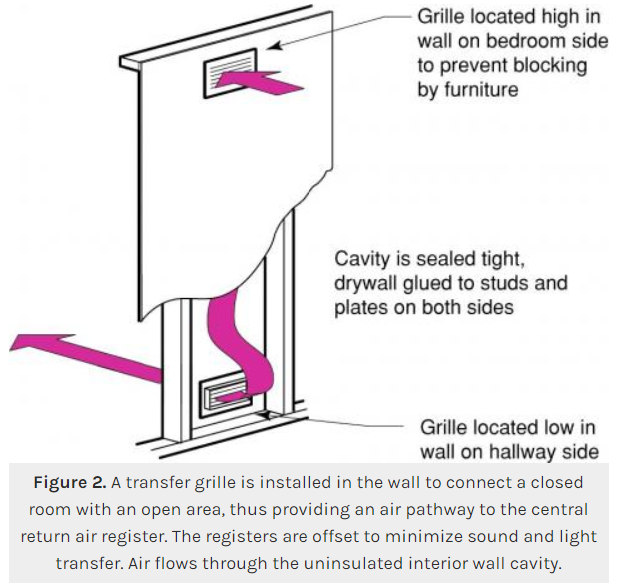
The best solutions are brought in during the design phase of the home, before construction begins.  This is where our first idea is best incorporated.  Transfer grilles offset high/low in a wall cavity use the cavity to muffle sound, so that this design affords  the maximum privacy.  However, in order to avoid entraining dust and other building toxins from surrounding spaces, the cavity needs to be sealed by gluing the drywall to the studs and plates…meaning that this solution needs to be built in during construction.

Source: Building America Solution Center

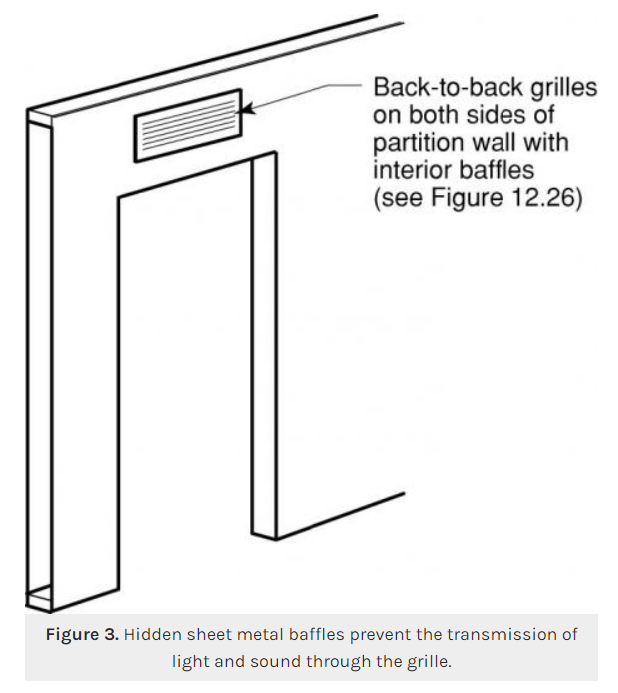
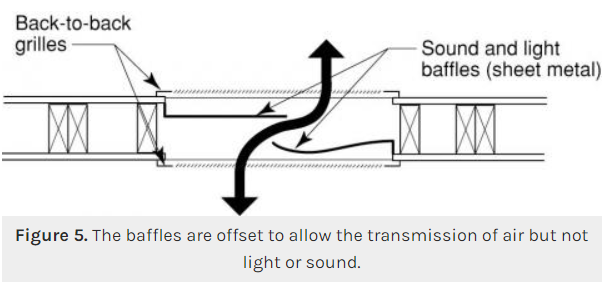
If you’re realizing you need better air circulation after construction, then there are still more solutions to consider.  You can use a back-to-back grille over a door (or any high space on a shared wall), which have sheet metal baffles to block sound and light while still allowing the passage of air through the wall.  Here are some diagrams to show back-to-back grilles:

Source: Building America Solution Center

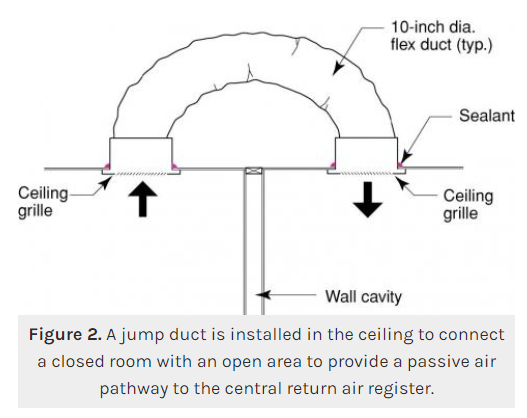
Thirdly, if wall space is an issue and you have attic space above the rooms, you could install a jump duct using flexible duct, two ceiling grilles, and foam sealant (to make sure air from the attic does not leak into your home).  Theoretically, a jump duct could also be placed through/under the floor to bridge two spaces, but in either place, take care to make sure the flexible duct is not crimped, and do not cut any structural beams like rafters or joists to install it.

Source: Building America Solution Center

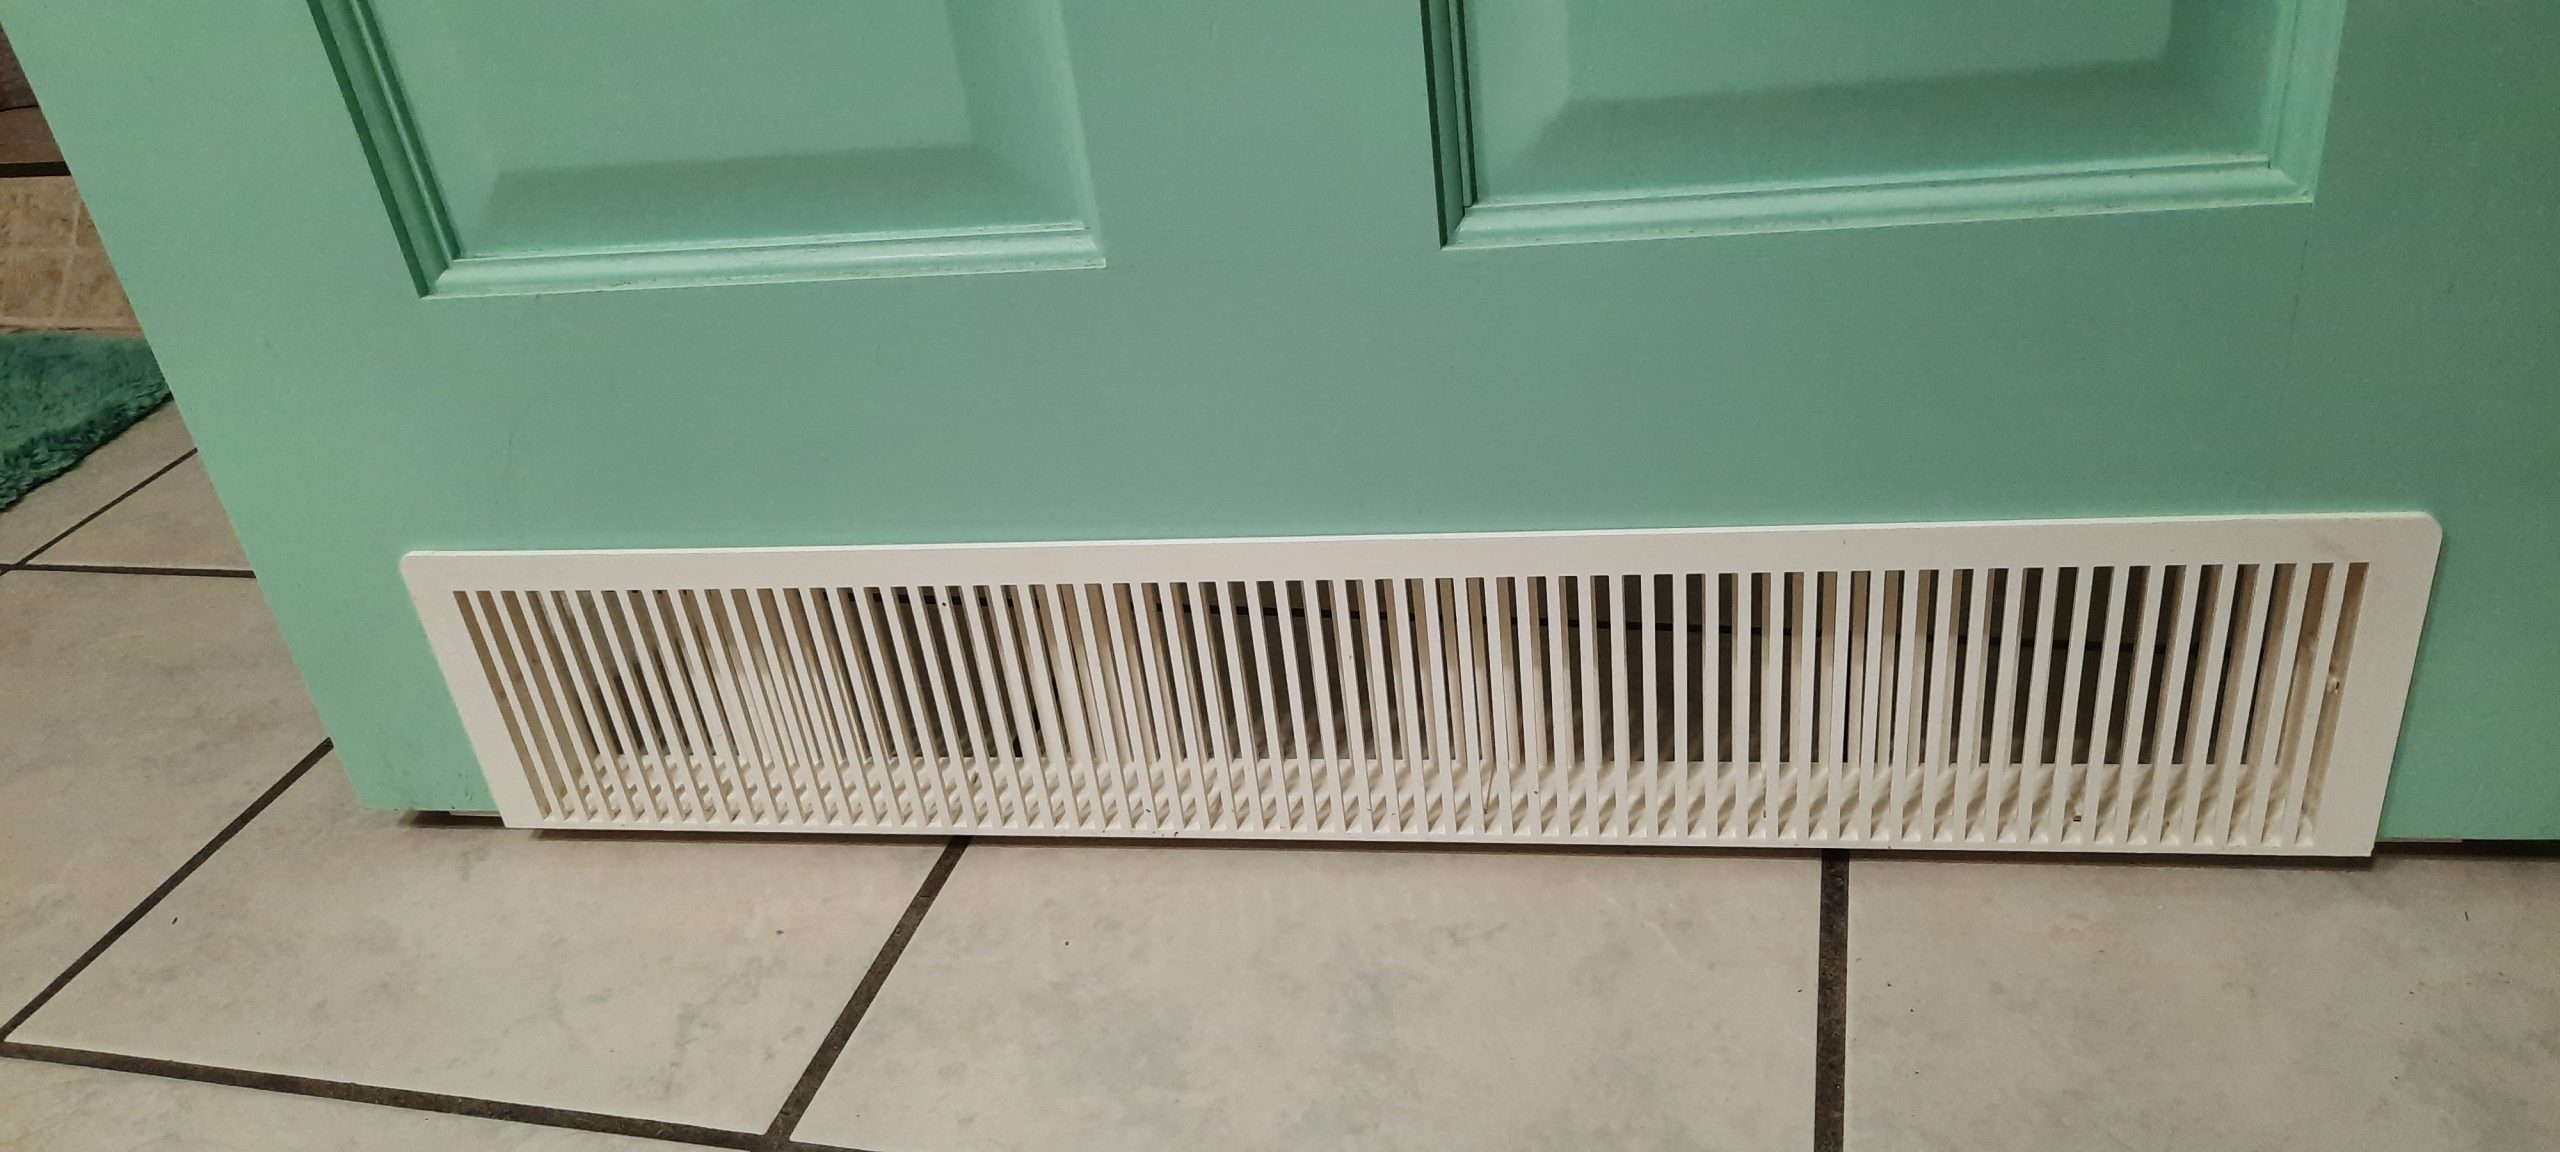
Lastly, there’s a solution which I consider to be the easiest of all of these.  In-Door Return Air Pathways by Tamarack Technology are easily installed in the bottom of your hollow-core or solid wood interior doors (door must be 1-3/8” thick to fit).  Simply remove the door from the frame (I find that tapping the hinge pins out is easiest), lay it down, trace the provided template on the bottom of the door, cut it with a jigsaw, install the grille with two screws (provided) and re-install the door.  They do provide less privacy than the previous two options, but are quick to install (less than 30 minutes in my experience) and can be left white or spray painted to match any door color with paint suitable for plastic. 

In-Door Return Air Pathway installed in a solid wood door.

When you have the door closed with any of these three solutions, air is free to mix with the rest of the home, rooms do not become positively or negatively pressured, and you definitely have an advantage in keeping mold from forming in that room.  Additionally, the continuous use of the following in the closed room costs very little energy, but boosts your mold protection even more: 

Sure, we get it…everyone needs their privacy, but for health’s sake, make sure the air is flowing freely!  

Photo by Storiès on Unsplash

Excuse me but your fireplace is open!

Excuse me but your window fireplace is open!

Heading into the winter heating season, many of us are thinking of cozy nights snuggled inside our homes, not the cold drafts that spoil the atmosphere in more ways than one–ahem, even our heating bills!  Drafts are invisible sucks on our budget, like “phantom” power leeches that use electricity.  The drafts coming from the fireplace are comparable to leaving a window cracked open.  In our article about how to keep the fireplace from polluting the house, we noted that the average household can save 14% on their heating bill by weatherstripping the fireplace.   It’s time to prepare for maximum coziness!

Working fireplaces have dampers, and these should work well.   Dampers are like “valves” that should be closed when the fireplace is not in use, to prevent outside air (and smoke particles from the flue) from coming back into our homes when we’re not using the fireplace.  However, dampers are not air-tight; they just don’t have the ability to block drafts.  Here are several other places to really air-seal your fireplace:

1) At the chimney cap: this requires you to get up on the roof or hire someone to do that.

2) Inside the flue with a balloon: the balloon, however, can shrink as temperatures get colder, or get punctured on a rough surface and leak.

3) At the hearth (bottom): this is the most physically convenient place, and can be easily removable for those times you want to use your fireplace.

Although the first two can accomplish air sealing well with the right products, #3 is actually the healthiest because the chimney and firebox (with smoke particles on their surfaces) stays separated from your house air.  

Here are some ways we’ve found to seal out those drafts all year long: 

If your fireplace is a bare opening in the bricks, like mine, this is the most difficult to seal but worth the effort.  Here is are two ways to do it:

Method 1: You’ll need: 

  • 4 pieces of wood (at least 1” square, larger is better) or metal tubing cut to fit the length and width of the opening (see diagram below)
  • Foam insulation tape to go around the frame in the opening
  • Glue gun and glue if adhesive on insulation doesn’t work well
  • Magnetic tape or velcro tape
  • Optional: 1-2  tension rods will help stabilize the frame if the wood doesn’t fit snugly.
  • An insulated blanket or piece of plywood cut fit over the frame.

You’ll want to thoroughly plan out how the frame will fit together before cutting your wood or metal to length!  Here’s how I cut mine:

Then, add insulation to the perimeter of the pieces using the adhesive on them, or a glue gun, and fit the wood snugly back into the opening–you may need to re-cut the pieces to accommodate the increased thickness due to the insulation.  

You can add 1-2 adjustable tension rods across the opening or up and down for added stability.

Next, add magnetic tape or velcro to the front of the wood pieces in order to attach the insulation.  You can use all kinds of materials to cover the opening and get creative!  Just remember that there will be a temperature differential in winter or summer, so adding some insulation to the back of the material makes it even more energy efficient.

  • Foam board or cardboard (if cut to fit snugly, no tape is needed to secure it in the opening)

  • Bed blanket with extra insulation glued or stitched to back or inside

  • Old electric blanket with wire removed and extra insulation added inside (stitched in place)

  • Plywood

  • Drywall

Of course, if you decide to use the fireplace, remove ALL of these materials and store them away for re-installing later. 

Method 2 involves taking a baby or pet gate and setting it to firmly span the opening, then cutting a foam board or cardboard to fit exactly over it (you can cover the foam board with wallpaper or fabric).  While this method can be sturdier and quicker to do, it does involve finding an unused gate and cutting the foam very carefully so that it seals the opening. Alternatively, you could cut a used foam mattress topper slightly larger than the opening, and squeeze it into place to cover the gate (again, covering the foam with any decorative material). 

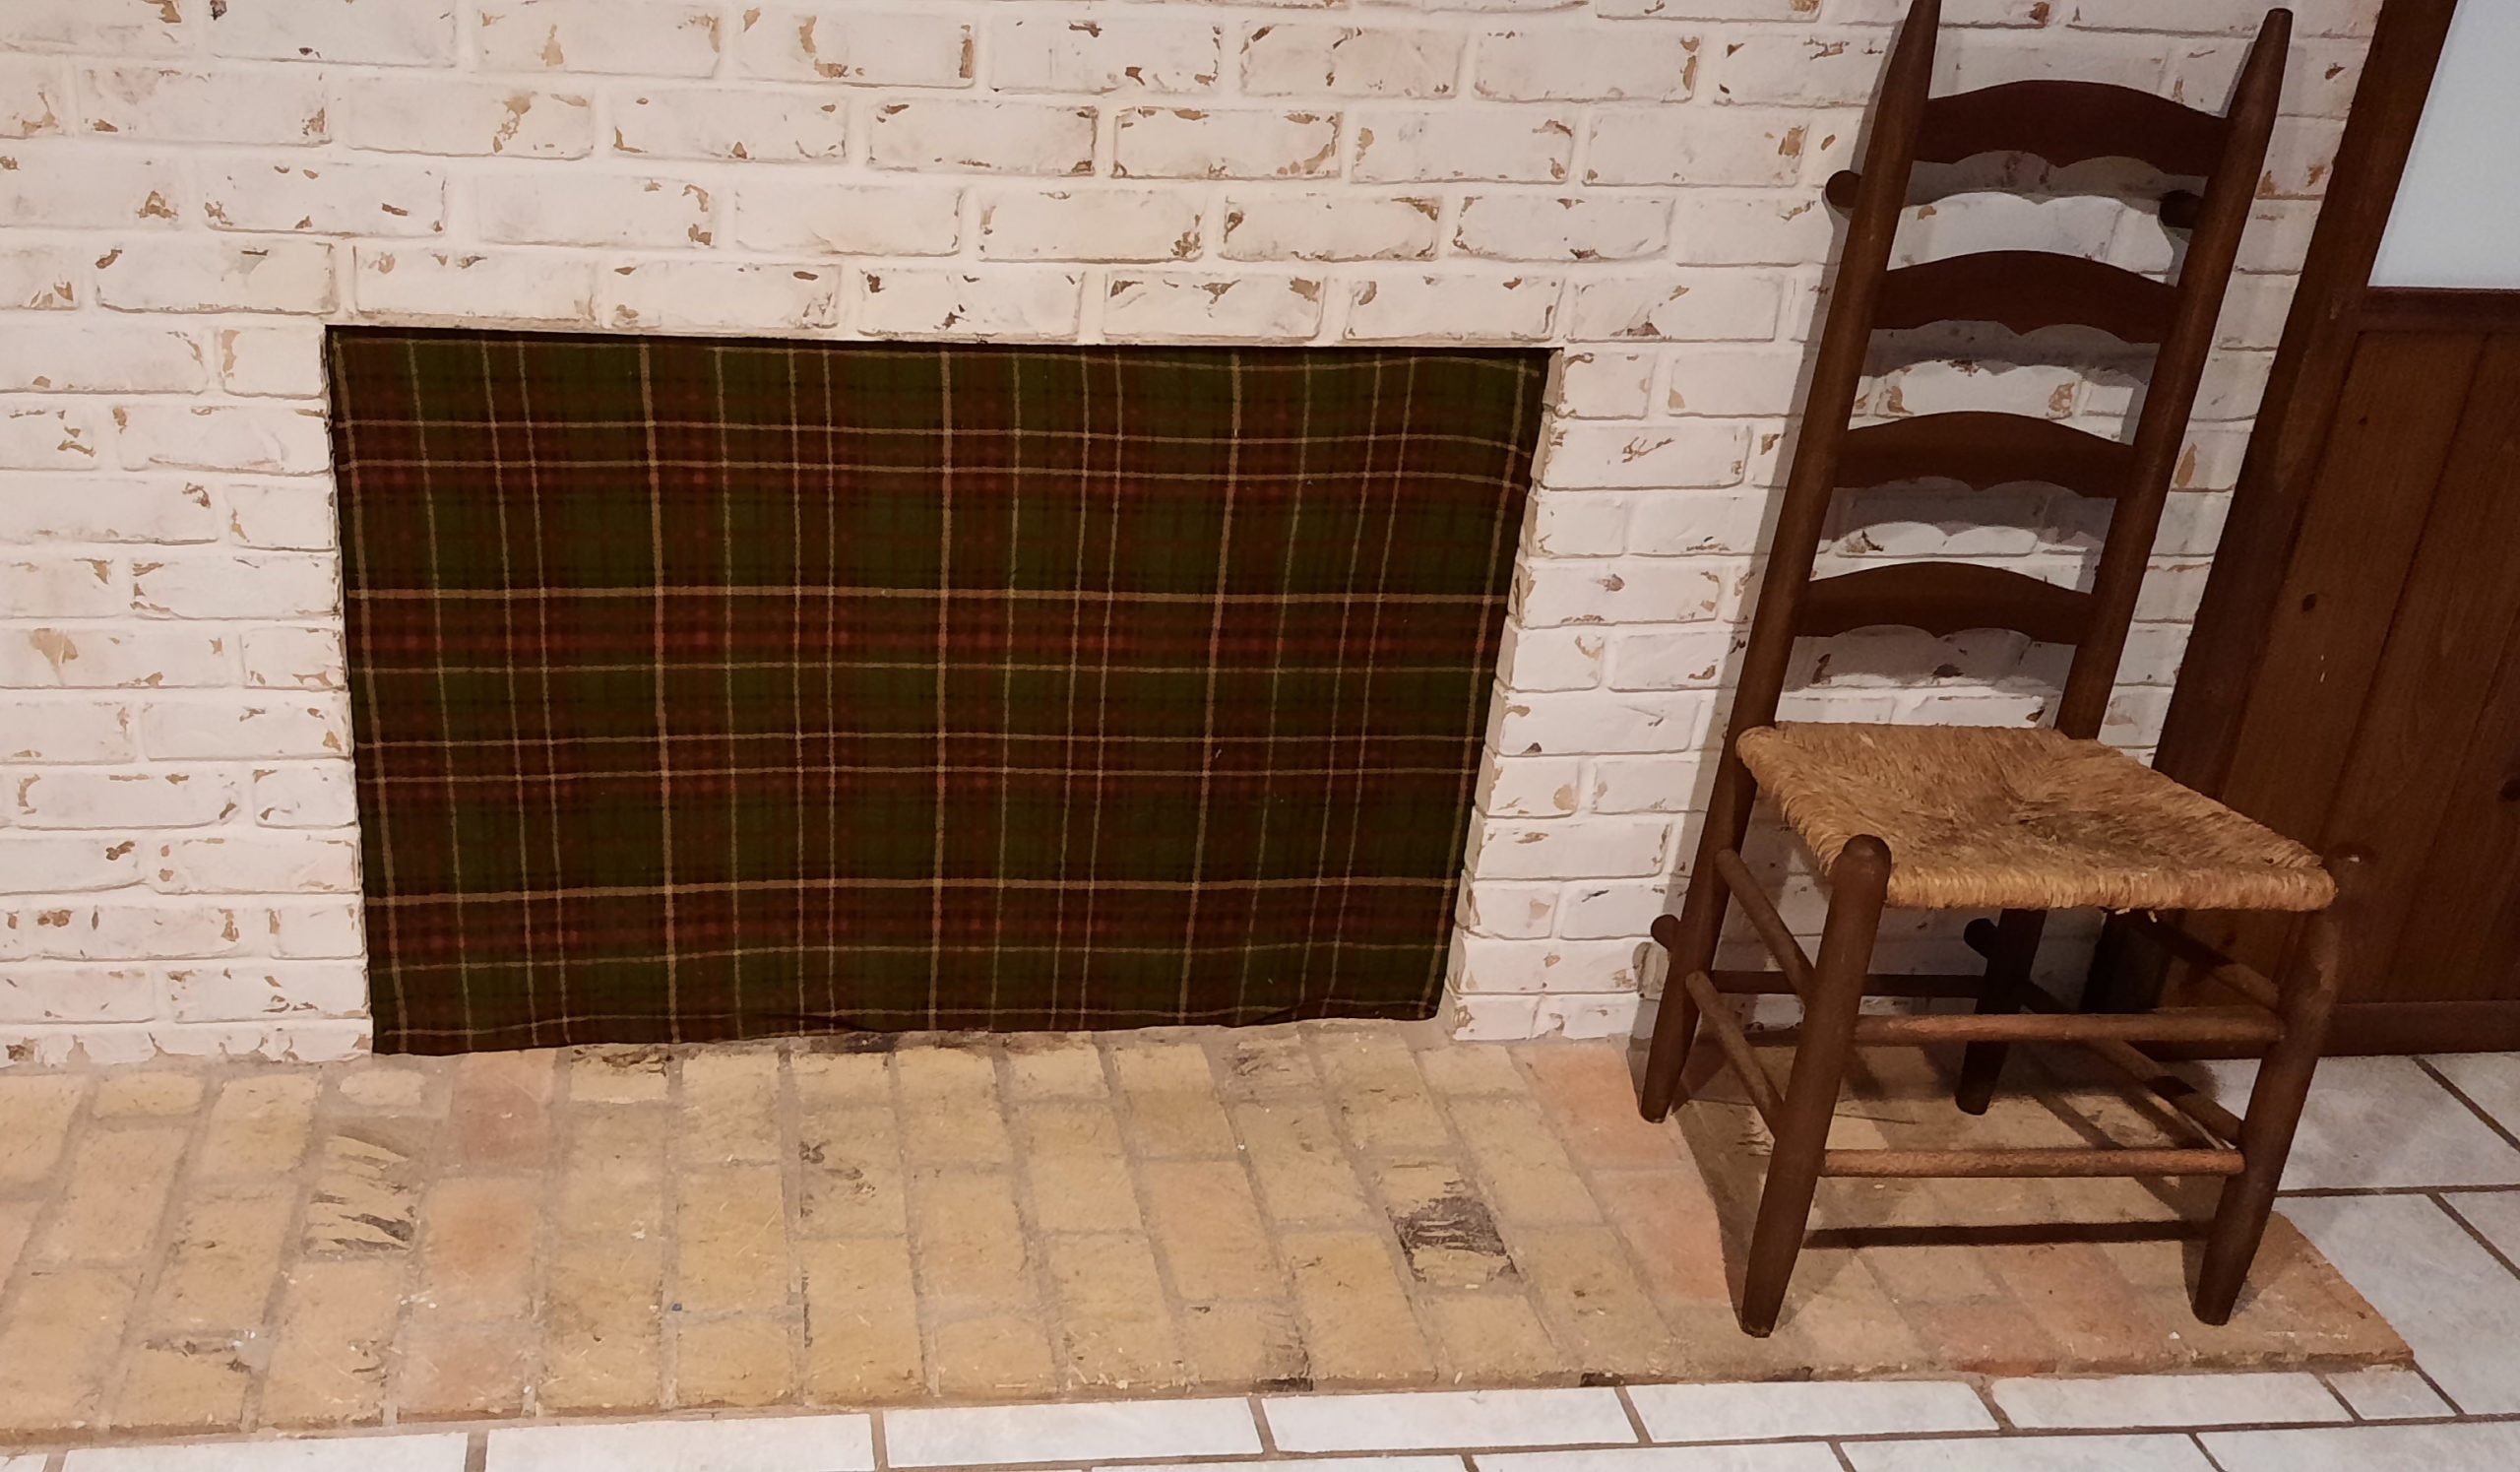
Here’s how my fireplace draft blocker turned out with a fleece blanket, 2 sheets of cardboard glued together, and a staple gun (admittedly I could have stretched the fleece a bit more or made a border for more visual interest):


Voila!  Just sticking my head into my fireplace one time during this project and smelling the lingering smoke smell made me think, why didn’t I do this sooner?  Drafts and smoke be gone all year long!

Summer Cooling: What are our options?

Summer Cooling: What are our options?

Many places in the US and around the world have broken temperature records this June.  Whether you’re in Minnesota or south Texas, it can be tough to keep your home cool during summer while maintaining a decent air quality.  We’ll go over some of the most popular ways of cooling your home and maybe some you haven’t thought of.  

If you’re not familiar with the different types of air conditioners and how they work, check out this article.  Note that newer air conditioners are also often “heat pumps” that can reverse the flow of refrigerant to provide heating in the winter.   

Central Air:  About 66% of homes in the US have central air conditioning, but this is not spread out evenly over the country.  As one would expect, central A/C is more prevalent in the south (37%), west (22%), and midwest (21%), versus the northeast (17%), and newer homes are more likely to have it.  (How Much Value Does Central Air Add to Your Home?) The best thing about central air conditioning is its distribution system, which allows multiple rooms to receive cooling and filtration from one unit.  With any air conditioning, it’s very important to do the following things:

  • Keep your home closed (a sealed system) so that warm, moist air is not introduced.  Letting in humid air from the outside will quickly increase humidity inside, because air at a lower temperature cannot hold as much moisture as warmer air, and humidity climbs.  This applies to windows, doors, and any significant leaks (like the door to an unconditioned attic or crawlspace).   

  • Change the filter on your unit regularly!   We can’t emphasize this enough: a dirty filter not only puts extra stress on the machinery like fans and compressors, but it increases cooling costs, and when the filter gets dirty enough, air will start to leak around the filter and get your evaporator coil dirty, providing food for mold.  Using the highest MERV possible for your unit will help keep the system clean and your air clean as well.  You can check out our article here to find out how to get more filtration out of your current AC system. 

  • For extra filtration, you can cut filter material to fit your vents, just don’t forget to clean or change these regularly, too. 

  • Get your unit serviced regularly.  Here are some things that the HVAC tech will do for you during a service visit:  inspect the inside coils, clean the outside coils and straighten fins if necessary, check the refrigerant levels and add refrigerant if necessary, and test the thermostat.  An HVAC system is a big investment (average $7000), so you’ll want to take care of it!  

  • Make sure your insulation is up-to-par: check air ducts to make sure they are not crimped and are fully insulated, and make sure there are no “bare spots” in the home’s conditioned-space envelope (ceiling or roof).  You’ve got to keep that cool air where it belongs!

Mini-Splits have most of the same parts as a central system, but they don’t have ducts to distribute cool air.  Instead, you could have one outdoor unit combined with up to eight indoor units, with the outdoor unit distributing refrigerant, not air.  In this way, you’ll have eight separate fans and filters inside, but these are smaller.  Mini-splits also have filters, so you’ll want to clean or change these on a regular basis.  One disadvantage with mini-splits is that the air filters tend to be similar to window air conditioners, which are cleanable, but they don’t provide high filtration, just large dust capture.  You will also want to get your units serviced regularly by an HVAC technician.  To get additional dust filtration, try adding standalone HEPA filters in the rooms that seem to get the most dust. 

Window Air Conditioners have come a long way in efficiency and looks!  They are one of the quickest installations, too: from buying one in your local home improvement store to having cool air in your space, could take as little as 1 hour.  Window air conditioners are a sort of “plug and play” cooling solution, but they also require regular maintenance of cleaning the filter.  Because the filter is equivalent to a very low MERV, like mini-splits, you’ll want to add a standalone HEPA filter to reduce pollen and dust.  In addition, if your window unit is more than several years old, it would benefit from a deep cleaning (see our article for tips on how to do that).   Some window air conditioners also have a feature that mini-splits and basic central systems don’t: a fresh air vent.  When this vent is open, you can get a small stream of fresh air from the outside, to dilute stale indoor air.  The only problem is that this air is usually not filtered or conditioned:  it’s the same as “cracking the window” without a screen.  To find this feature and operate it correctly, sometimes you’ll need to refer to the owner’s manual.   New window units with “inverter” type motors can be extremely efficient and this “saddle” style unit by Soleus even gives you your window view back, because it hangs below the window on each side.  It also has a dehumidifier setting to lower the humidity in your space. 

Portable Air Conditioners have become popular because like the name suggests, they are the most portable.  They can cool spaces without a window, as long as you have a place nearby to send the heat through the exhaust duct (through a sliding door with an adapter kit, for example).  You will also need a drain to collect condensate, or you will need to empty the reservoir every so often.  Portable air conditioners have the minimal filters similar to window air conditioners and mini-splits, so they are not able to filter smaller particulates.  It’s really important to clean these filters on a regular basis to keep your air conditioner working well!  Another downside to portable air conditioners is that they are less efficient than window air conditioners, and they have bulky hoses that aren’t the most attractive.  

Fans are the most common cooling systems we have, and many are cheap, at less than $50.  Fans cause evaporative cooling, where the circulated air carries heat away from our bodies in the form of water vapor.  Fans work well to cool us down if there is some humidity in the air.  (See our article about the detrimental effect of fans in extreme dry heat.)  You can use a combination of ceiling fans and portable fans to move air from cooler to warmer areas of your home.  Dreo Air Circulators are very powerful, efficient, and quiet because of the fan design, and because they use brushless DC motors that have a large range of speed with low energy consumption.  Since most fans don’t have filters, you can add standalone HEPA filters to cut down on dust, or add cloth filters to your tower fans. Filters for box fans (20x20”) are mainly the replaceable type, not cleanable, but $45 for a 4-pack of MERV-13 filters could help your space stay a lot less dusty.

Opening the windows is an option if you live outside of polluted urban areas, wildfire smoke, or excessive heat and humidity.  In these cases, it’s best to leave the windows closed and curtains drawn to preserve coolness as long as possible in the day.  If inside temperatures start to equalize with outdoors, however, you can use regular window screens in pristine areas, and Window Ventilation Filters in more polluted areas.  Although the filters restrict airflow slightly, they provide a good buffer against dust and pollen.  Here again, standalone HEPA filters will also help reduce dust in your home. 

Evaporative coolers, also known as Swamp Coolers, began to be popular in the 1920’s and 30’s when electricity was available, but residential air conditioning was not affordable/accessible. (Window air conditioners were invented in 1931 and central air conditioning was offered in 1931 but many Americans could not purchase them due to the Depression).   Swamp coolers use a fan to blow air over a wet membrane, which, if not cleaned regularly, begins to grow algae and smell like a swamp!  This older type of membrane is definitely not something we would recommend for air quality, but newer models like those made by Big Ass Fans uses a proprietary resin coating on the media that resists the growth of algae and mold to keep your airflow clean and people healthy.  Following the cleaning and maintenance guidelines are very important, too.  Another downside of this type of cooling is the massive airflow that could kick up a lot of dust.  However, if you have a large outdoor or unconditioned space and adding humidity into the air is not a problem, then an evaporative cooler could help you stay cool.  It would even help to cool a porch, from which you can open up air to your home to take in cooler air.

Heat Pump Water Heaters can actually cool your space.  It sounds counterintuitive–til you consider what this machine is actually doing.  Instead of creating heat by an electric coil or gas furnace, this type of water heater pulls heat from the surrounding air–in effect making the room in which it’s installed, cooler!  If you have the water heater installed in the garage or another unconditioned space, you can still reap the benefits by using ducts to bring warm air from your house to the heat pump, and cool air from the heat pump back to your house.  Heat pump water heaters do cost more than the basic electric or gas varieties, but according to the Department of Energy, they can be two to three times more efficient than a regular electric water heater.  However, when you consider you’re getting free cooling during the summer, you can deduct this cost from your cooling bill.  Another consideration is the size of room where it is installed.  It must be installed in a room at least 12’x12’, or have ducting to access larger areas, so it can pull the heat it needs from the ambient air.   If it’s time to replace your water heater, check with your plumber to see if a heat pump water heater would work for you!

There are many ways to move cool air from the basement into your home, but consider the quality of basement air before you make this move.  If it’s musty or moldy smelling, you’ll definitely want to get rid of that mold before trying to move that air upstairs.  For this reason, we can’t recommend circulating basement air in the rest of your home.

Whichever way you decide to cool your home, make sure that air quality doesn’t suffer.  Our Germ Defenders, Mobile Air Angels and Whole Home Ionizers sanitize air using bipolar ionization, killing microbes and agglomerating dust and pollen so it’s easy to filter or clean.   Extreme heat tends to lead to increased air pollution, so be conscious of air quality when you open the windows, or even when they are closed and outdoor air seeps in (as it always does except in the tightest of homes).   Check out our article to find out how to ride out a heat/air pollution wave safely!

Photo by Glen Carrie on Unsplash

What is Salutogenic Design? How can we use it in our homes?

What is Salutogenic Design?  How can we use it in our homes?

Salutogenic design comes from the two Latin words ‘salus’ meaning health and ‘genesis’ meaning origin.  It is the study of the origins of human health.  Aaron Antonovsky was an immigrant to the US in the 1920’s, eventually being drafted into the US Army in World War II and serving in the Pacific.  Much later after obtaining his doctorate in sociology, Aaron studied survivors of concentration camps and wondered, why aren’t more of them in very poor health?  It was his questioning of the means and causes of good health, rather than what causes disease, that set him apart. (The Handbook of Salutogenesis, Chapter 3, Aaron Antonovsky, the Scholar and the Man Behind Salutogenesis

Normally salutogenesis is focused on healthcare settings and providers.  However, we can take the same concepts and apply them to our workspaces and homes. In today’s news, we’re constantly being made aware of environmental and human threats like viruses and toxic spills that threaten our health.  The possible effects,  such as cancer, high blood pressure, and sickness, are always presented to admonish us, avoid this or suffer consequences!  It’s definitely hard to tune out these sources.  However, if we’re able to focus on what makes us feel good, the results could be much greater.  Whether you’re designing a home from the ground up or have some time and budget to make some changes, here are some concepts from salutogenesis to keep your perspective in the right place: your health.

Louisa Grey is a designer living in north London who has embraced salutogenic design.  She prioritizes space, light and air in her projects by identifying the direction of natural light and the optimum layout to encourage airflow.  She admires the design of southern Italy’s trulli (ancient homes made out of limestone with conical roofs) and often incorporates a similar building material–clay–in her modern works, because it is naturally abundant, has acoustic-controlling qualities, is dehumidifying, regulates temperature and can improve air quality.  Clay plaster on walls has a soothing texture and appearance that gives a rustic, hand-crafted look to rooms, which also saves on energy in manufacturing and reduces waste. (Interiors expert Louisa Grey on how to embrace salutogenic design)  

Well-placed windows should allow the right amount of sunlight into your home, such that it doesn’t cause a large cooling load but rather allow a range of filtered or dappled light.  There are a number of companies that also offer faux skylights (thus avoiding any leaks or roof problems!) when natural light is at a premium.  

Open-concept floor plans do have the advantage of seeming more spacious than the same size traditional floor plan, but there is also comfort and peace in having walls and doors define some spaces, like an office or home library.   

Porches, courtyards and the ability to open large windows or doors to the outdoors (in areas with good air quality) are very beneficial because they allow fresh air to fill your home and to warm or cool it.  Plus, they are an ideal place to keep plants that need a little shade or protection and surround your seating areas in green.  Even views of green–from inside the house–lower stress, lower blood pressure, improve cognitive functions (like your ability to learn or focus), increase productivity, reduce anxiety, improve mood … the list is extensive! (How Your Home’s Design Can Improve Your Health)

If you are not building from the ground up, however, there are still ways to apply this type of design in your home.  According to the previous source, one of the most popular methods of salutogenic design is to incorporate biophilic design, which is based on human’s innate connection to nature. To do this, you can incorporate plants into your home, a calming mural, or the actual “architecture” of nature such as a natural stone fireplace, spiral staircase, or live-edge shelving that protrudes at different widths and heights on a wall.  Honeycomb shelving or tiled floors also mimic natural shapes.

Texture and comfort inside the home are very important.  (Although rugs and upholstery can hold dust and dust-mites, the way they “warm up” a room to make it inviting and comforting is important enough to use them when you can.  Also according to Louisa Grey, scents are can also be a healing part of your home: try to use natural oils and purifying mists and flowers that are grown locally. (How to design a healing home – and the power of salutogenic design)

Salutogenic design can even encourage healthy behavior when features like stairs or a swimming pool are included, or workout areas are not tucked away into a back corner or basement (you pass by them on a regular basis).  A beautiful library space, whether it’s an entire room or several bookshelves and a comfortable chair with good light also encourages learning. (Salutogenic Approach to Design is at the Core of Wellbeing)

Salutogenic design follows the principle that “an ounce of prevention is worth a pound of cure”.  Many homeowners make this choice everyday: should we go for small pieces of quality workmanship in our decor, appliances and clothing, or larger but lower-quality items?  It’s true that good design, building and decor may cost more than “builder’s grade” plans and materials, but what you should reap is a lifetime (or at least as long as you can live there) of better air quality, ergonomic ease, increased productivity and creativity, lower stress and overall wellbeing.  Who can put a price on that?

Photo by Andrea Davis on Unsplash

Q: Do Air Handlers Belong in the Attic?

Q: Do Air Handlers Belong in the Attic?

A: It depends!

(Don’t you love that answer?!)  Every one’s home is different, as well as where their home is built (climate), so there aren’t hard and fast rules, but we can surely show you the pros and cons of putting your air handler in the attic.

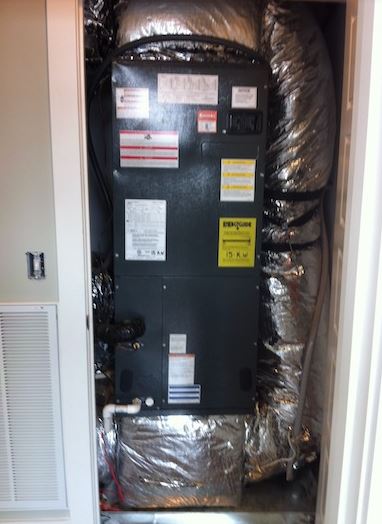
First of all, an air handler is part of a split system central AC unit.  In these systems, there are two distinct parts: one contains the condenser that changes the refrigerant from a gas to a liquid to release the heat from inside the house (the condenser is usually located outside), and a second part that contains the evaporator (which absorbs heat from the house air) and a blower to move air through ductwork to different rooms.  This second part is called the air handler and because it’s not super quiet and can take up a good amount of space, many people install their air handler in the attic.

The attic may or may not be a good location for your air handler.  Here’s how to know: is your attic conditioned, or unconditioned?  Conditioned attics are considered part of the building envelope and they are insulated.  Conditioned attics don’t have to be “finished” per se with drywall and nice flooring, but they do need to be air-sealed from the outdoors.  Air handlers CAN belong in conditioned attics. 

Unconditioned attics (also called vented attics) are exposed to exterior temperatures through ridge vents, gable vents, soffit vents or powered vents.  There is no “air conditioning” so humidity, dust, insects and extremely high or low temperatures are all present in an unconditioned attic.  Air handlers DO NOT belong in unconditioned attics.  Why?  

  • For one, the air handler is responsible for moving the air you breathe, and even a small leak in it or the ductwork will pull humid, dusty, unconditioned air from the attic into your home.  
  • Extreme temperatures cause your air handler to work less efficiently, which translates to higher heater and cooling costs.  
  • The air handler is an expensive piece of equipment that can cost thousands of dollars; to minimize breakdowns and maximize its life, it’s best to place it in a clean, moderated environment!
  • Accessing and crawling around a dirty, dusty attic makes routine maintenance or needed repair work more difficult.
  • If the condensate drain plugs up and overflows the pan under the unit, guess where that water will go?  Onto and through your ceiling!

“Conditioned space” in your home costs money, because it is part of the square footage that realtors count when valuing your home.  For this reason, homeowners and many builders prefer to stick the air handler “out of sight and out of mind” in the attic or worse, in an unconditioned crawl space.  Now that you know better, if you have the opportunity, give your air handler an “upgraded” installation spot in your home.  Here are some tips for finding that spot:

  • The air handler should be centrally located in the home in order to minimize ductwork run lengths to all rooms.
  • Closets are better than the attic, but without enough room to do maintenance on your unit, small closets are not ideal.  Without room to walk or reach around the unit, HVAC technicians will have a hard time making good sealed connections with ductwork, and if anything needs repair, it takes longer to do it, possibly requiring removal of the whole unit.

It’s tough to understand how this air handler and ductwork were installed in such a small space.  (Source: energyvanguard.com)

  • A large utility space is ideal.  You will not want carpet or hardwood below the unit, so that any water leaks can be cleaned up easily.  Good lighting also makes it easier for you to check on the unit from time to time, and to change any filters.  

When replacing your air conditioning unit, we hope you will give serious thought on where to locate the new air handler.  Giving it preferential space inside your home will give you quality air for years to come.  It’s important, however, to make sure that:

  • This room or large closet has its own air supply and return, because when air gets sealed behind closed doors (and you will want to close the door to isolate the unit acoustically), mold can develop.  This can be accomplished by placing a grille in the return of the air handler, and placing a supply grill in the wall or through the ceiling with a “jump duct”. This article from renowned building scientist Joe Lstiburek shows the flaws of different locations and how to overcome ventilation issues.
  • Locating an air handler next to a gas appliance such as a gas hot water heater can be problematic, unless it is a “sealed combustion” unit.  The air handler will cause the room to be under slight negative pressure while the fan is on, which can affect combustion and venting of the water heater.  
  • If your furnace is a gas furnace, you’ll need to make sure it also gets adequate combustion air.

If you can’t bring it inside your building envelope, you may consider a unit that doesn’t require big air handlers–namely, mini-split units.  One external compressor/condenser can supply several indoor units (evaporators), which are typically hung on the wall, with only small refrigerant and drain lines running between the inside and outside.  Where there’s a will, there’s usually a way!


Insulating drafty windows makes a difference in air quality, not just energy savings!

Insulating drafty windows makes a difference in air quality, not just energy savings!

When you’re trying to make a whole house less drafty, you should go for the low-hanging fruit first.  That means big ol’ holes in the walls, floor or ceiling (like this disconnected register) come first.  If you don’t have any big holes, you can start on the smaller ones–and sometimes the smaller ones can add up.  That was the case in my sunroom. 

My sunroom is west-facing, which means in the summertime it gets brutally hot from sunlight, and in the wintertime it’s brutally cold from westerly winds.  On top of that, it’s fairly dusty and showed some of the highest counts of mold colonies in my home.  When I saw another cold front coming later in the week in December, I finally “made” the time to insulate the windows where I felt the drafts coming in.  I saw that the lower windows didn’t seal at the bottom when closed, AND the previous owner had cut the corners on the lift at the bottom for some reason (they rubbed on the trim?).  Due to these leaks, the room stayed quite “fresh”--meaning the CO2 didn’t really budge from outdoor levels unless I lit a fire in the fireplace on the other side of the room.  If you don’t have a CO2 monitor, I highly suggest getting one: here’s a portable version.

Therefore, the cons of my leaky windows easily outweighed this one “pro”: fixing them was a no-brainer!

Pros

Cons

Better ventilation (lower CO2)

More drafts of hot or cold air (higher energy cost)

More dust or pollution

More mold 

Excess humidity in house

Here are the tools I used: 

  • A spray bottle of TotalClean and several rags for cleaning the windowsills
  • Adhesive-backed weatherstripping in a suitable color to match your windows (low-profile like this one, ¼”, is good unless your windows are very misaligned) 
  • Scissors
  • Optional: A CO2 monitor is helpful–to see the effect on the room
  • Optional: Window locks in case the windows don’t lock afterwards (see below)

If you do have a CO2 monitor, leave the windows closed and take a CO2 measurement before doing the insulation work. You might want to do it while there are a number of people in the room, or you have a propane or natural gas stove burning (I know there are a lot of gas stoves out there!).  Extra people and gas appliances do two things–they consume oxygen and they give off CO2.  These should cause the CO2 to be higher than when the room is empty or no gas appliances are lit.

Next, just get down to it: use the TotalClean and rags to clean off the window sill where the lower half of the window seats.  If you have vertical sliding windows, find the best place to attach the insulation in the vertical track and clean that.  When the track is clean and dry, start peeling the adhesive backing off and apply the weatherstripping a little at a time, cutting it when you get to the end of the track. Close and lock the window to make sure it’s placed correctly.

If you find your windows don’t lock because of the extra height of the insulation (this was the case for my windows) there are a number of window locks available that can be easily removed if you have to open the window for ventilation.  I ended up getting a thumb-screw version that can be moved up a few inches if I decide to ventilate, while still keeping the window secure.  

That’s it!  When you have all of the insulation installed, close the window and repeat the CO2 reading, with or without activity (people or gas-burning appliances).  The CO2 levels should go and stay higher because there is less fresh air coming in.  Fresh air ventilation is needed in a home, but it’s best to do it in a controlled way, not just letting the air come in wherever there’s a small gap or crack.   For more ideas on how to air seal leaky windows, check out this video.

If you’ve completed an easy project that resulted in better air quality, let us know about it! 

Photo by Rob Wingate on Unsplash

Will a Radiant Barrier Help My Home’s Air Quality?

Will a Radiant Barrier Help My Home’s Air Quality?

Radiant barriers have been a “hot” topic for the last few years: If to install them, where to install them, and how to install them.  Are they worth the work and cost?  It’s time well-spent to do some research before diving in with such a project.

Radiation is one of the three types of heat transfer, along with convection and conduction.  A radiant barrier is a material with a shiny surface that reflects radiant heat back outside the home.  If the barrier gets dusty or is installed incorrectly, however, it does not work well. 

According to Attainablehome.com (a builder’s website devoted to building of modern, sustainable, and high quality homes that is within reach of household incomes), properly installed radiant barriers can reduce heating costs in the hottest months in southern climates, if the home’s air conditioning system is located in the attic. It can also offer a degree of protection to that equipment when the barrier is installed over the equipment, “shielding” it. 

In colder climates, however, radiant barriers are not recommended for several reasons.

  • The savings in reflecting heat away from the home in summer is minimal.

  • Cold climates can allow moisture to condense behind the barrier, creating mold issues.  Perforated radiant barriers can reduce this problem, though.

What is “properly installed”?  Here is a good video showing installation of a radiant barrier over a garage.  Radiant barriers:

  • Need an air gap: don’t install the barrier sandwiched between existing insulation, as it can conduct heat into it.  For instance, do not install radiant barrier foam board (such as LP’s Techshield) and sprayfoam over it. (energyvanguard.com)

  • Need to be relatively clean: dust will reduce the effectiveness of the barrier, so installing on the attic floor is not recommended in most cases. 

  • Must be the right type for your home/climate. There are:

    • Perforated and non-perforated: Perforated barriers allow vapors to escape through the barrier, reducing the chance that moisture or mold will build up behind it.   If you live in a hot, humid climate and have a vented attic, a highly permeable barrier like “Super-Perf” from AtticFoil is recommended to allow moisture to pass through. 

    • Made with insulation or board attached to the radiant surface

  • Must not block air flow in the attic.  Most vented attics have soffit and ridge vents, so do not block the air flow between these two, or moisture issues may result.

In a 2010 article that still applies today, energy advisor Martin Holladay stated there are 5 factors that determine whether a radiant barrier is a good option for your home (discussed in this video):

  • Do you live in a hot climate?  Yes = consider radiant barrier.

  • Do you live in a humid climate?  Yes = the radiant barrier must be carefully and correctly installed so that moisture problems are not created.

  • Do you have a one-story home?  One story homes tend to have larger roofs to cover the livable square feet, so a radiant barrier in a one-story home will be more effective than a two-story home of comparable square feet.

  • Do you have air ducts in your attic?  Yes = consider radiant barrier to shield them.

  • Is the air barrier installed correctly?  This is imperative, so the barrier has to be compatible with the insulation in your attic.

In times of low-cost energy, installing a radiant barrier may not be worth it. (energyvanguard.com)  For example, in Houston in 2011 (a hot climate in a year with similar kilowatt-hour (kwh) energy cost to today), a homeowner could save about 180 kwh per year with a radiant barrier installed on their 2000 sf newbuild home, considering that it is installed under the roof decking and the only additional cost was the more expensive barrier under the decking ($200).  This is about $25 per year savings, which would be an 8 year payback if there is no mortgage, or only about 50 cents per month if there is a mortgage (check the article for the explanation!)  It’s not a whole lot, but if energy prices go up (they will at some point), the savings could be more.

According to this video, LP Techshield (an OSB board with aluminum coating on one side) produced an 18 degree reduction in temperature in a doghouse.  Another video using the same product achieved an 8-10 degree reduction in a real house. 

So, how does all of this affect your air quality?  At HypoAir, we are in favor of not adding things that harm you or your home, so adding a radiant barrier to an existing home must be carefully considered.  Here are some steps to check whether it is right for you: 

  • If you have an unvented attic, a radiant barrier is likely not to benefit you.  If you have a vented attic, make sure the vents are not blocked and there is sufficient insulation in the walls/floors of the attic facing the conditioned space. 

  • Consider the current state of your attic and take temperature and humidity measurements in the attic and in the home as a “baseline”.  

  • If possible, you could conduct a small “experiment” in a part of your attic that faces the sun by installing one roll only (best if it shields some ductwork) and seeing how it affects attic and home temperature and humidity.  

  • If this test is favorable, continue with installation of the rest of the south- or west-facing sides.  Although I could not find much information about it, radiant heat is not very applicable on the north-or east-facing walls in the northern hemisphere. 

  • If humidity increases with the test spot under similar atmospheric conditions, it’s best to terminate the experiment and remove the barrier. 

Radiant barrier material is not very expensive, so if you can install it yourself, it can provide energy savings going forward.   It’s best to take your time and research the pros and cons of installing it in your home and not succumb to pressure from a salesperson, however.  Overall, it should not increase your energy use or humidity levels, so make sure to hold the manufacturer and/or installer to their claims.  We’d love to hear from you on how radiant barrier affects your home’s atmosphere!

Photo by Greg Rosenke on Unsplash

How to increase indoor air quality in mobile and manufactured homes

How to increase indoor air quality in mobile and manufactured homes

No matter where you go in the US, there are mobile and manufactured homes.  The homes we’ll discuss here can fall into 2 categories: homes that were moved from a tractor trailer, placed on pilings and realistically will never move again, and then there are recreational vehicles (RVs) that can travel the country (but many sit at home or in storage for most of the year).  There’s also vastly different reasons to live in one or the other–from financial to lifestyle choices to temporary housing.  Whatever your reason to stay in a mobile or manufactured home, we want to help you make it a healthy place. 

Mobile homes with a pier foundation are actually supposed to be called “manufactured homes” according to the industry representative, The Manufactured Housing Institute.  Mobile homes and manufactured homes are two words for the same thing: a home built in a factory on a steel frame with wheels for transport to a homesite, where the wheels are removed after it is set on a foundation.  Manufacturers and HUD prefer that they be called manufactured homes, but most people still refer to them as mobile homes.  You can have single-wide, double-wide, triple and even quadruple-wide “mobile” homes, where the extra “boxes” can be configured side by side or even on top for a second story.  Mobile homes don’t have a great reputation for quality or lifespan, but that doesn’t mean they don’t start out that way or can’t be upgraded to make them better.  Let’s discuss the ways in which mobile homes can be improved for healthier indoor air quality.  The main objective is to keep water out, seal air leaks and provide good ventilation. (source: howtolookatahouse.com)

Starting from the top down…The roof: generally speaking, less-expensive manufactured homes have flatter roofs.  This is because the higher the “pitch” or angle of the roof, more material is necessary to frame and cover it.  The problem with low pitch roofs is that rain and debris spends more time on the roof–rain doesn’t run off as quickly and debris like tree branches and pine needles don’t roll off as easily.  Roofs in general need inspection and maintenance, and low-pitched roofs need regular inspection to keep water from getting backed up and leaking through.  Many owners decide to “double-roof” their homes and this can make a huge difference in indoor temperature and longevity of the home.  I’m not talking about 

Roof overhangs tend to be short in manufactured homes, so that water coming off the roof runs right down the wall.  This is a recipe for water intrusion and mold, not to mention undermining the footings of the piers.  If the home does not have gutters, you can install gutters and downspouts to channel the water away from walls, doors, windows, decks and the foundation.

Siding is the protection for walls against wind and rain, and siding can be metal (very old homes), fiberboard (80’s and 90’s homes) or vinyl, engineered wood or hardyboard (modern homes).  Fiberboard must be continually maintained, or water ingress will cause it to degrade quickly.  Vinyl, engineered wood and cement board sidings provide longer-lasting protection, but they also need to be inspected for damage or improper installation.  The weakest points in siding are the corners, window and door casings, because the irregular joints are typically spots for water ingress.  

For many years, windows in manufactured homes were single pane with an aluminum frame.    The transport of the home to its new foundation may cause the frame to warp or the casing around the window to become unsealed, exposing the sheathing underneath to water.  If you are able to, you can upgrade the windows to double-pane for more insulation against outside weather, and make sure the new windows are installed with good flashing, casing, and caulk techniques.  Likewise, if the front door is of a thinner, lightweight quality, an upgrade to a steel door is also an opportunity to make sure it is installed correctly with flashing, casing and caulk to minimize water ingress.

Foundation: On manufactured homes that have a “skirt” or foundation, a vapor barrier must be installed on the ground (2008 HUD law).  If the home is resting on a concrete pad, then the vapor barrier is not needed because the concrete will act as a vapor barrier.  Unfortunately, the “underbelly” of the home often falls into disrepair because no one wants to go under the house to inspect it!  Directly under the home, another vapor barrier of plastic or black “belly board” will protect the insulation and subfloor from moisture and pests, but this is often damaged and missing in older homes.  Manufactured homes on piers are really sitting over a “crawl space”, so it’s important to inspect the underside of the manufactured home to see how sealing up the ground vapor barrier, belly barrier and insulation can really make a difference in comfort and humidity!  Here’s an article that goes step by step through this repair. 

Inside: the manufactured home industry has certainly had a bad reputation for formaldehyde emissions inside homes.  Formaldehyde has never been banned from the manufacture of homes, but lower limits have been set on the use of components such as plywood and particleboard by HUD and the EPA.  The problem is that there are no HUD standards for the maximum allowable level of formaldehyde gas inside a home, meaning that all the new components like flooring, cabinets, walls, furniture and drapery can have low individual levels of emissions, but a high overall level.  For this reason, it’s best to avoid purchasing or staying in new manufactured homes,  If this is not an option, you can choose to furnish it with only solid wood furniture or composite wood furniture with sealed surfaces. If you have any newer composite wood furniture that is still emitting formaldehyde gas, remove it from your home. Because the formaldehyde off-gassing diminishes over time, storing the pieces outside of your living area for a while (under cover of course) may solve the problem. (howtolookatahouse.com)  You can also ventilate as much as possible (leaving windows open in mild climates, and using a fresh-air ventilation system in more extreme climates.  And of course, increase ventilation of your home while doing any interior painting or use low VOC paint.

Some of the most important mold protection also happens on the inside of the home, because leaking pipes, sinks, showers, toilets, washing machines, etc. all need immediate attention in order not to cause mold and damage that can be very costly to repair.  The abundance of fiberboard in manufactured homes will wick up water much more quickly than hardwood, and even ambient humidity is important to control.  

Recreational Vehicles (RV’s or campers) truly are supposed to be mobile, so that you can take your home with you, and enjoy new scenery wherever it’s parked!  Like manufactured homes, there are a variety of pricepoints and features in two classes, motorized and towable.  There are 3 types of motorized RV’s, ranging from the largest, luxury bus-type (Class A), the smallest conversion van (Class B) to the in-between (Class C).  Towable RVs can be as simple as a small “Pop-up” to large “travel-trailers” and “fifth wheels”.  “Tiny homes” can look like miniature versions of homes on wheels.  Here is a more in-depth look at the differences between these classes. 

RVs have similar challenges to manufactured homes when considering water intrusion from above and vapor from below.  It’s a sad truth that RVs are going to leak, but with a lot of inspection and maintenance, you can prevent this.  Most RV’s rely on sealant and caulking, and inspection and repairs should occur every 90 days (see this video for how to inspect it).  Again, let’s take a look from the top down:

Roofs: Most RV roofs are either rubberized (a thin membrane stretched over wooden frame) or fiberglass (molded).  Considering that these materials are more fragile than the asphalt shingles or metal roofs found on manufactured homes, they need a bit more care and upkeep!  Keeping them clean and conditioned helps so that leaves and branches slide right off instead of piling up, and aftermarket coatings can extend life against the sun’s UV damage.  RV roofs can last from 10-20 years or more, depending on the care and maintenance given them.  Here is an article detailing cleaning and repair tips for each type of roof.  Ideally, RVs should be parked under a permanent roof when they are not being used in order to minimize water and sun damage, and a minimal conditioning system (like a dehumidifier) should be left running to keep the air dry inside.

Since RVs are mobile, they are more prone to separation at the roof and wall joint, as well as openings like skylights, windows and doors.  One website says that driving an RV at highway speeds is “ the equivalent of driving your house through a hurricane during an earthquake.” (!)  Any separation needs to receive prompt attention by removing old sealant, cleaning the surface, and applying new sealant.  Here is a great article on how to achieve a professional look and long-lasting finish when resealing seams.   If your RV has a slide-out, special attention needs to be paid to protecting this area, and awnings are a great way to shelter the slide-out roof and joint area by keeping leaf and branch debris, animal droppings and nests off of it, as well as rain and snow. They’re not too hard to install (instructions here) and are a great investment for your RV. 

Each penetration in the side of the RV (like vents, ports for electricity and drainage, and storage compartments) needs attention, because sealants fail over time and with sun damage.  They should have a bead of sealant at least on the top and corners of the penetration to prevent water from coming in (the best would be all around the penetration).

The underbelly (underside) of the RV also needs regular inspection and repair.  Some RV’s have fiberglass, others have wood or metal sheets, and all are susceptible to road damage or more frequently, water damage from the inside like a leaking pipe.  Here is an article with photos on how to assess and repair underbelly damage.  You can even upgrade the type of underbelly protection fairly easily, but it may take more than one person to wrangle the material into place.

Inside the RV, again, motion from road travel is constantly working to pull apart connections and seams.  Keep an eye on all sources of water leaks such as pipes, sinks, showers, toilets, etc., so that water will not damage your home on wheels and initiate mold!  Also, since many RVs have propane powered appliances such as stoves, furnaces, water heaters, etc, a propane leak can be very dangerous to your health. You can use your nose (the old “rotten eggs” smell is a clue, or detectors such as a Gassaf propane leak detector, or a propane dial manometer (to detect pressure drops in the propane system).  (rvlife.com has a great video on how to inspect your propane system).  A pressure drop-down test is recommended once a year so that you can tell if your system is leaking at all.  If you do have a leak, you can use a simple spray bottle with water and liquid dish detergent, to check all joints for leaks (the soap will cause bubbles around the joint if it’s leaking).  

Like manufactured homes, RVs tend to have an abundance of particleboard, fabric and flooring that should have formaldehyde limits individually, but corporately may give off a lot of formaldehyde when they are new from the factory.  These levels go down dramatically as an RV ages, but RV age also increases chances of other problems, like water or structural damage.  In general, less-expensive units have more adhesive-based components (which generate formaldehyde off-gassing) and could create some irritation for more sensitive RV owners. (rvtravel.com).  When checking out RVs to purchase, you can even bring a portable sensor with you to measure the levels of VOCs and formaldehyde inside them (check out our article on sensors for recommendations).  Air purifiers with activated charcoal filters, like the Germ Defender with carbon filters, absorb VOCs and formaldehyde, and fans are helpful to keep air circulating.  1-2 Germ Defenders can cover the average RV (remember that they don’t cover spaces separated by closed doors) so that your RV can be comfortable even new off the factory floor. 

Manufactured and mobile homes can be as healthy as a permanent home inside with a lot of diligence and the decision to choose your neighbors wisely!   If you are in close proximity to smokers, barbeque grills, auto exhaust or other toxins, this can seep into your home.  If possible, try to live or camp on a large lot and use HEPA filters to capture particulates inside.  In a small or large home, it’s best put your health first and live in the best place you can afford.

Photo by Jon Hieb on Unsplash

These steps convert your HVAC into a whole house filter

These steps convert your HVAC into a whole house filter

Many people have central air conditioning/heating, yet they don’t know that this machine could be used year round to improve the air quality in their homes.  For such an expensive investment, it’s wise to get the most out of it–everyday!  Here are a number of tips to do just that.

  1. Air-seal the return ductwork.  We’ve written extensively on air-sealing your home, attached garage and attic, but the return ductwork is super-important too.  A lot of contractors use wood or drywall to “frame” a duct but without sealing the corners, you are pulling dusty air from wall cavities, the attic and maybe even under your house, if the return air grille is near the floor.  Here is a great video on what to do and which products to use.  Air-sealing your ductwork is not a bad idea, either.

  1. Make air filter changes top priority!

If you’ve finally gotten on a schedule of changing your HVAC filter, we applaud you!  You are protecting this expensive equipment by preventing an overly-dirty filter from damaging the fan or other components, because dirty filters increase the pressure drop, like trying to suck a Big Gulp through a coffee stirrer.  Try to use a higher MERV filter (like 11, 12 or 13), first by reading our article How can I get more filtration with my current HVAC system, then increasing the MERV if you have enough filter surface area.

  1. Seal the filter in place.

There are several ways to make sure that air is not bypassing the filter.  

  • This video shows how to seal a vent grille to the drywall using spray foam.  Although this can also be done from the attic (with less chance of dripping messy foam in your house, not all vents can be accessed from above.  

  • For the return grille: caulk the filter grille to the drywall.  

  • Use filter-sealing tape over the filter:  

    • AllergyZone FilterLock Filter Slot Seal, $10, has a magnetic closure to stick securely to your filter slot opening, sealing gaps to maximize filter use.  The video on this page for the product shows how easy it is to install.

    • Or, if you have a filter that lies flat in a filter grille, use masking tape or painter's tape to seal the edges of it to the filter grille like in this video (I prefer painter's tape because it removes more cleanly). 

  1. If you have a BP-2400 Whole Home Ionizer, install it between the return air filter and evaporator coil, or before the fan, in order to get those ions circulating through your whole home.  Once a year, it helps to de-energize the ionizer and clean of any dust from the brush heads, which will maximize its efficiency.

  1. Set the fan to “on”, not auto.  This ensures that the fan is always running even if the heat or AC is not on.  If you’re concerned about the cost of running the fan all year, you don’t have to be.  Check out our article on how to calculate this cost to see that it’s not a lot (~$10 per month or less), especially for the reward of cleaner home air.  The bonus is that circulating air with this fan redistributes air throughout your home, reducing moisture content in soft furnishings and mold growth.

You are ready to go!  Dust, cleaning and personal products, pets, cooking–they all contribute to less-than-stellar indoor air quality, so it’s wise to make the most of what you already have to improve it!

Photo by Tekton on Unsplash

What non-toxic multipurpose spray cleaners really work?

What non-toxic multipurpose spray cleaners really work?

If it wasn’t on your mind before 2020, it most likely is now…. is it CLEAN?  Many people wonder before touching surfaces, outside and inside the home.   The solutions for  “concern” over cleanliness are also being absorbed into our skin, drying out our skin, being inhaled into our lungs, and broadcasted into the atmosphere.  So, let’s get to the bottom of it: what cleaners are safe, and of those, what cleaners really CLEAN?  As in, clean up the mess AND disinfect.  Give me some of those!

For true disinfectants, the EPA has developed a list “N” that will even kill the SARS-CoV-2 virus; however, this list is full of products with ingredients that will also harm us.  In response, TURI (Toxics Use Reduction Institute based at the University of Massachusetts Lowell) has produced a list of “Safer Cleaners” that do not have toxic ingredients.  From 431 formulations on the List N that are classified for “Residential Use”, only 15 made the list by TURI for non-toxic ingredients!  That’s only 3.5%!  The reason is that most of the active ingredients classified by the EPA as disinfectants, and some of the “inert ingredients” are also toxic to us.  For example, over half of the products on List N contain quaternary ammonium compounds (Quats) as active ingredient.  Quats kill microbes by binding to the negatively-charged surfaces of microbes.  They have been studied to induce asthma in cleaning workers, decreased lung function in farmers, and greater immune reactions and decreased fertility in mice, among other effects. They are very persistent and are difficult to remove from surfaces, so it’s important not to use them on food prep surfaces.  This is the type of info we need!  Unfortunately, I just identified a common quat (Benzalkonium chloride) in one of the anti-bacterial soaps I use at home :(.  Time to get safer! 

I wanted to focus on spraying cleaners, because we’ve all been doing a lot of spraying lately.  Spraying counter tops, spraying doorknobs, spraying toilets, spraying toys, spraying steering wheels…you name it!  If we could spray each other, I’m sure we would.  Back to the task: it would be so much simpler if we could buy one spray for the whole house, right?  Such cleaners do exist… check out our shortlist here!

  • TotalClean is our new offering that is safe for adults, children and pets, and is fragrance free!  Using an iodine-based formula, it cleans surfaces and removes odors, without adding harsh chemicals like quats or overwhelming fragrance.  Use it anywhere you can use a water-based cleaner: counter tops, toilets, leather, glass, marble, stone, linoleum, tile, stainless steel, painted surfaces, fabrics, carpet, stove tops, appliance exteriors, sinks, floors, cabinets, tubs and walls.
  • Force of Nature is great for those concerned with toxic chemicals and environmental preservation!  In addition to being an EPA-registered disinfectant, it is a safe cleaner using only vinegar, salt and water, and their “bundles” includes the spray bottle and appliance and “capsules” used to make the cleaner.  This avoids lots of packaging waste and all you have to do is add water and electricity (plug in the appliance) to make a refill.  Genius!
  • Lysol with Hydrogen Peroxide Multi-Purpose Cleaner is an EPA-registered disinfectant that dissolves grease and soap scum, and comes in a number of scents (Citrus Sparkle, Fresh, Cool Spring Breeze and Oxygen Splash are the ones I’ve seen). As one of the household names of bleach (most of their cleaners are bleach-based), you need to make sure that the multi-purpose cleaner you buy is “bleach-free” to avoid that chemical.
  • Arm and Hammer Essentials Disinfecting Wipes are a convenient way to disinfect–great for keeping in the car, bathroom, classrooms, etc.  Using citric acid, they are a registered disinfectant by the EPA. 

Can I make them myself?  Yes, but some are better than others.

For example, you’ve probably seen countless recommendations for using vinegar-based home cleaners, which do break down dirt and help remove it.  However, vinegar is not the best disinfectant according to the EPA.  In order to be classified as a disinfectant, the product must kill 99.9% of harmful germs within 5 to 10 minutes, and vinegar only kills some of those germs, including E. Coli and Salmonella (healthline.com).  If you want to make your own disinfectant, look at the ingredients on the Safer Cleaner list.  The first three, citric acid, ethanol (ethyl alcohol) and hydrogen peroxide, are cheap and accessible ingredients!  Here are some recipes for cleaners based on these ingredients:

  • Ethanol-based cleaner with white vinegar (I like this recipe because it incorporates eucalyptus oil, which is a powerful antimicrobial essential oil).  
  • Citric acid is quite powerful and the Method brand on the TURI list is 5% citric acid and 95% inert ingredients.  It is not recommended to use on natural stone or marble, wood, delicate surfaces or electronic screens because of its acidic effects. For this reason, and the popularity of natural stone counter tops in the US, I’m not going to post a recipe for homemade citric acid multi-purpose cleaner here, but citric acid is best used in descaling and de-greasing appliances.  Here is how to clean 5 household items using citric acid. 
  • Hydrogen peroxide (3-6%) is safe to spray undiluted on surfaces, meaning you can pour a brown bottle from the drug store straight into your spray bottle. “According to The Ohio State University Extension, cleaning counters with undiluted hydrogen peroxide is effective at killing E. coli and Salmonella bacteria on hard surfaces like counters when it’s allowed to sit on the surface for 10 minutes at room temperature.”  (healthline.com also has 21 other ways to use it).  However, according to this website it is slightly acidic, and can damage natural stone counter tops over time (don't use it every day).  There are various recipes to make cleaners, however hydrogen peroxide should never be mixed with vinegar because it makes peracetic acid, which has dangerous fumes.   Hydrogen peroxide should also be used within 6 months of opening the original bottle, because it decomposes into oxygen and water by being exposed to sunlight and heat, losing its disinfecting properties. 

Air Pollution from Oil Wells is real–and you may not even realize how close the wells are!

Air Pollution from Oil Wells is real–and you may not even realize how close the wells are!

I live in a geologically rich state, Mississippi.  Rich for those with mineral rights…and not so rich for those who get to smell their hydrocarbons, sometimes on a weekly basis!  At least several times a month, I wake up to a pungent, rotten egg smell in my house that I recognize immediately from having previously worked in refineries (hydrogen sulfide)…except there are no refineries near me.  One day I decided to find out where the rotten eggs were. 

There are a number of online maps that will show you where active and inactive oil gas wells are.  Some maps give more info than others, and I found that my state has a pretty good one, listing the operators, what type of well (dry hole, oil production, injection or disposal) and data on the well.  I found one dry well less than a mile away.  The field in production closest to me (3 miles away) has 61 wells, 35 of which are in oil production, the remaining mostly dry holes and some disposal. Another one that is 6 miles away has 59 wells, 41 of which are in production, with the remaining as disposals, dry holes and a few injections.  I want to find out which one is throwing the eggs!  It turns out, it may not even be the ones that are in production.  According to Reuters, millions of abandoned (no longer in production) oil wells in the US are leaking methane and other toxic gasses like hydrogen sulfide. Some have been around since the late 1800’s!

SO….it’s not just the rotten eggs that concern me: they seem to go away within several hours.  What about the odorless gasses?  Yes, according to this summary of a study from California, researchers found increased air pollution within 2.5 miles of an oil or gas well, such as PM2.5 (toxic particulate matter), carbon monoxide, nitrous oxide, ozone and volatile organic compounds (VOCs).  When a new well is being drilled or reaches 100 barrels of oil production per day, PM2.5 increases by approximately 2 micrograms per cubic meter one mile from the site.  This “small” uptick can be significant, however, because oil wells can remain in production for decades, and a different study concluded that even an increase of one microgram of PM2.5 per cubic meter, increases the risk of death by COVID-19 by 11 percent.  Air pollution becomes worse and more widespread on windy days, which is how I figure I am smelling hydrocarbons from a well 3 or more miles away.  Thankfully I live upwind most days (the pollutants of wells flow away from me most of the time).  And thankfully, I am not surrounded by wells like the residents of southern Los Angeles or those along the Mississippi River between Baton Rouge and New Orleans. 

A study from Harvard released in January 2022 links increased mortality rate for people aged 65 and over to living close to “unconventional oil and gas drilling” operations, or UOGD.  UOGD includes directional (non-vertical) drilling and  “fracking”, or hydraulic fracturing, which is the injection of high-pressure liquid and materials to fracture shale and stimulate oil and gas production (ipaa.org).  The results point to air pollution from the wells causing the increased mortality, although there are hardly any air quality  monitoring stations near the wells. 

In order to confirm what your nose (or sadly, your overall health) is telling you, you can start monitoring and logging indoor and outdoor quality.  Of course, with indoor measurements you’ll want to note what air purification systems you have running (HEPA filter, air purifier, etc.).  Keep a journal or computer log (the device you use may keep records for you) and also note weather conditions, so that wind, temperature, humidity, precipitation, etc. can be referenced along with the air quality.  You’ll want a sensor that measures VOC and PM2.5 levels, and this unit is a great budget-friendly option to get started!  You can easily travel with it too.

For persistent indoor air quality problems due to oil well emissions, you’ll want to get a HEPA filter for PM2.5.  Depending on the model, the unit may also handle VOCs if it has activated carbon in the filter.  The Air Angel helps in both of these areas because it has polar ionization and AHPCO technology, but pairing it with a stand-alone HEPA filter is recommended.  Check out our post on portable HEPA filters for recommendations!

Who can help us get something done about wellhead emissions?  There are rules of law for well emissions (example), however without the know-how, technical equipment, or access to the well to measure air quality, it’s hard to know whether a well is in violation.  Also, there are many abandoned wellheads, for which it is hard to get anyone to take responsibility in many cases.  So, it’s best to start by trying to contact someone locally, and work your way up.  Start with your city or county representative, as often these officials are aware of problems and resources.  Typically, individual states are responsible for cleaning/managing their own wells, unless there are wells on federal or tribal land, which is managed by the federal government.  Your state may or may not be easy to contact with air quality problems, but give it a try!  For example, Mississippi is not excessively progressive because it only has a couple addresses and fax numbers listed for air quality complaints.  Some states with high drilling activity have started their own “orphaned well” programs, and this 2021 report summarizes the efforts of reporting states to register and close orphan wells.  It has a lot of information about states agencies and websites.  The EPA, also, has an email form you can use.  

Air is one thing that is free, but free doesn’t always mean good.  We urge you to persist in making your indoor and outdoor air as good as it can be!

Some Home Automation Can Make for a Healthier Home

Some home automation can make for a healthier home

Confession: I have not made it a priority to automate my home via smart technology.  Being an artist, I tend to allocate my budget more for aesthetics, like a nicer couch or new faucets.  There are some devices in which I’m not remotely interested, like a smart toilet (TMI for Alexa!)  but I’m starting to yearn for some of the health benefits of other elements of home automation and I might cave soon!  I want to discuss some unique smart appliances that not only make our lives easier, but make our homes more healthy for all the inhabitants, even pets.

Before I get to the goodies, I must divulge that the type of home automation discussed here (smart home technology) operates on wireless signals, which is a type of electromagnetic field (EMF).  The potential health effects of EMFs is a subject that is debated by consumers and scientists alike.  We at HypoAir have some very healthy clientele who are always in search of what will take them to the next level.  They are constantly judging the health benefits of any technology against any unhealthy aspects of it--as we all should!  That said, I encourage you to research EMF to be aware of the invisible magnetic fields all around us, including in our homes.  Then you can be the judge: are these smart appliances worth it for you?


  • Lighting: set your lights to dim or change color (to less blue ranges) in the evening to cue children and adults that it’s time to get ready for bed.  The easiest way to retrofit your lighting is by installing smart light bulbs, which you can control by voice, app, or your home’s smart system like Alexa (called a “hub”).  Some of the best smart bulbs are: 
  • Air Purifiers: To use smart filtration or not?  It’s possible to set your air purifier on “auto” mode to save energy and only kick on when needed, but several reviews like the Wirecutter tend to believe that either the air quality monitor or its settings in many purifiers may not be optimal, leading to above average pollutants in your home space.  Rather, employ an independent, high-quality air monitor that will give you alerts to bad air quality, in order to get the purifier activated. 
  • Mattresses: Some of us sleep like a log, from the minute our heads hit any pillow, and some of us roll around like a rotisserie chicken (more my style).  For anyone who is on a quest for a better night’s sleep, smart beds may know our sleep better than we do, and can adjust automatically to help us achieve more rest even when we’re in “la-la land”.  The Sleep Foundation has a great page explaining what smart mattresses are and the features they offer.  Most smart beds are air beds, which allow a great range of firmness options.  The ReST bed, Eight Sleep, Saatva Solaire made two “best of” reviews: Sleep Foundation and Tom’s Guide
    • Saatva Solaire: this mattress was rated best for back pain relief, and is also the most non-toxic bed we’ve found.  It was not the most high-tech, because it is only controlled by remotes (one for each side of the bed with no control over the other side: sorry sleeping partners to snorers!) but it is approved by the American Chiropractic Association (ACA), so it’s well-suited to people with neck and back pain (Tom’s Guide).  The best part for those who are VOC conscious: the anti-microbial treatment on the fabric covering is botanical, and includes natural latex and Certi-pur US certified gel-infused memory foam. At about $2900 for a queen model, it is also one of the most economical. 
    • Best all-around: ReST Essential Smart Bed: this one has many bells and whistles and with up to 64,000 firmness combinations on each side in manual mode, it easily suits everyone.  The best part for restless sleepers is how it automatically moves air to different chambers when you switch positions during the night (from side to stomach for example), so that pressure-point pain is avoided (pressure-point pain is what tends to wake up many people).  It’s not the most expensive bed but certainly falls in the mid-upper range of pricing ($3800 for a queen mattress). 
    • Best for hot sleepers and couples: EightSleep The Pod Pro Smart Bed has a water-based climate-control system (water beds are not extinct!) which can be customized for each side of the mattress.  The sensors in their Active Grid layer collect information about your pulse, breathing, movement and sleep quality, and also has a gentle vibrating alarm option to wake you up (a nice alternative to an audio alarm which can wake both people!).  At about $2900 for a queen mattress, this is also a great mid-level priced bed.
    • If you can’t afford a smart bed or just invested in a conventional mattress, you can still get sleep data by using Withings Sleep Tracking Pad, which is a pad placed under the mattress to record your movement, breathing and breathing disturbances, sleep cycles and more.  It can also be connected to your home’s smart system to automatically turn off/on lights or modify room temperature when you get into/out of the bed.
  • There are many “smart watches” out there that connect to apps designed to improve your health, but I have not seen one more stylish than the Withings ScanWatch. It can detect Atrial Fibrillation (abnormal heart beat) and blood oxygen levels, for those who are prone to these health issues!  It works with Apple Health, FitBit, Google Fit and others to monitor your activity and workouts.  It also works as a sleep monitor to record sleep duration, cycles, heartrate data and sleep apnea problems.  All this and a fantastic (30-day) battery life?  Yes please!
  • Smart Garage Doors: Anyone with a garage has at one point wondered: did I close the door? Usually this happens miles away from the house, and adds a level of stress to any trip if you can’t go back and verify.  I’m all for reducing stress, since driving can be stressful enough!   There are kits that can convert your existing garage door opener to a smart door, allowing it to open by voice or app or on a schedule, or you can purchase a smart door from the start. Most require a strong wi-fi signal. The Chamberlain's MyQ Smart Garage Hub is very economical at about $30, is able to check the open/closed status on the door, and open or close it remotely via its app, and it’s highly rated for ease of installation.  Upgrades to this product include a keypad and camera.
  • Pets are a recognized source of comfort and well-being which are often considered family members!  It makes sense then, to be able to care for them 24/7 almost like a family member, even if you have to go away to work or a short trip.  Here are some devices that help with that:
    • Smart Pet Feeders are great to extend your time away from home even if you have pets who like their schedules!  “Leaving out bowls” may work for cats, who tend to be more picky eaters, but most dogs I’ve encountered indeed would eat as soon as you set the bowl down.  Enter the ideal pet feeders that can operate on a schedule, or manually through an app, with the ability to work even if the wi-fi or power goes out.  
      • Pet feeders need to have sizes and features that fit the pet you’re feeding.  PetSafe’s WiFi -enabled Smart Feed Automatic Pet Feeder holds up to 24 cups of food and allows you to schedule meals, dispense a snack, or even “slow-feed”: an option for pets that eat too fast, enabling it to dole out the meal over a 15-minute period.  
      • Fish feeders are great even when you are home, as anyone who multi-task knows that some items may not get the attention they deserve!  This review rated the Eheim Everyday Fish Feeder as best in class due to its ability to dispense many different types of fish food with accuracy, to be mounted in several ways, and customizable feedings up to 4 times per day.  
    • Smart Pet Doors are an excellent way to alleviate stress of not getting home on time to “let the dog out”, while providing more security to your home and pet than the average dog door.  PetSafe Electronic SmartDoor is not app-enabled, but operates with an RFID tag that is attached to your pet’s collar,  to open only when your pet approaches.  It has two sizes: one for cats and small dogs, and another for large dogs.  Other brands operate with the microchip that is implanted in your pet,  No more free meals, Ricky Raccoon or neighbor cat! 
  • Smart flood sensors are awesome!  Anyone who has experienced the stress and cost of flooding, be it from a broken water heater, washer or AC drip pan, knows that this kind of warning could be priceless.  The Govee WiFi Water Sensor 3 pack can produce an audible alarm (100 dB) as well as an app notification, to let you know that water has been sensed.  This model sits directly on the floor of the area to be monitored, and includes the necessary 6 AAA batteries to get them going (2 per device). 

And for some of the plain-old convenience advantages, check out these smart appliances (from Living Things):

  • Set your oven to preheat before you’re even home, to make cooking less time-consuming
  • Set your coffeepot to come on before you need it (ok, old technology for sure but it's updated when you can sync it with the wake-up alarm on your phone!) 
  • Set your washing machine to start in the morning after you loaded it the night before
  • Go on vacation on the spur of the moment, when you have automated sprinklers and doors and cameras.

What is the best smart device you’ve discovered for your home?

Photo by BENCE BOROS on Unsplash

Wildfire Smoke: Not just for California anymore

Wildfire Smoke: Not just for California anymore

Historically most wildfires happened between May and October, and USDA Forest Service employees were traditionally trained knowing that the four months of June, July, August and September have the worst risk.  However, now the Forest Service is shifting to the concept of a fire year.  Because winter snows are melting earlier and rains are coming later in the fall, it’s a sad reality that fires in the winter months are becoming the norm and there is no longer a “season” for wildfires anymore.  Localities change, too:  as of the time of writing this post in early March 2022, there were more than a dozen fires burning in Oklahoma.

Even if you don’t live in an area directly threatened by fire, wildfires can be devastating to your air quality, just like second-hand smoke.  Air currents can carry the smoke up to thousands of miles away, affecting millions.  According to the EPA, “Smoke is made up of a complex mixture of gases and fine particles produced when wood and other organic materials burn. The biggest health threat from smoke is from fine particles. These microscopic particles can penetrate deep into your lungs. They can cause a range of health problems, from burning eyes and a runny nose to aggravated chronic heart and lung diseases. Exposure to particle pollution is even linked to premature death.”  Yikes!

Here at HypoAir, we get many questions on how to protect indoor air from the pollution of smoke outside.  The EPA has excellent suggestions on what to do on this page, most of which need some time to prepare!  So as drought conditions in your state or surrounding areas persist, get ready now by doing the following:

  • Seal doors and windows with weatherstripping, caulk and door sweeps.  
  • Find out how to adjust your HVAC system accordingly: you’ll want to close the fresh air intake and change over to recirculation, no matter whether you have central AC, a window air conditioner or portable air conditioner.
  • Purchase extra MERV 13 or higher filters for your HVAC system, to be used on poor air quality days (caution: read our post on HVAC filters first, as using a filter with too high MERV rating can damage your system). 
  • If you live in an apartment building or condo with little control over the HVAC, consider purchasing vent filter material so you can place them in the vents into your space.  The filter material can prevent smaller particulates in smoke from entering.  Carbon vent filter material will neutralize many VOCs as well.
  • Purchase a HEPA air cleaner (non-ozone producing type) and be sure to have an extra filter or two on hand.  The use of a HEPA filter will take much of the damaging fine particles out of the air you breathe!  During a wildfire or whenever there is bad air quality outside, run the cleaner/purifier on high for an hour and thereafter at "quiet"/medium setting (Wirecutter).  You can check out our post on standalone HEPA filters as a purchase guide.  If you can't purchase one, make one: there are many videos and instructionals online for DIY air cleaners; most only require one or more filters, a box fan, and some cardboard and tape. 
  • Keep a stash of N95 respirator masks on hand.  These are a good source of protection if you have to go outside, or if power is cut to your home and indoor air quality gets bad as well.  The “95” means it blocks out 95% of particulates.   
  • Keep canned and non-perishable food on hand, so that you don’t have to cook during periods of bad air quality.  Cooking indoors increases small particulates and vapors in the air, and you won’t want to turn on your stove exhaust, as that will draw polluted outdoor air into the house.
  • If air quality is very poor (check next point), you’ll want to evacuate to a place with clean, filtered air, like indoor malls, libraries, community centers, civic centers and local government buildings (sfgate.com).
  • Check your local air quality and receive updates from airnow.gov . Fire and smoke maps are available under the heading fire.airnow.gov .  Using an Air Quality Index (AQI) as a measuring tool ranging from 0-500, your local forecast and larger maps can be color coded to show whether an area is good (green), moderate (yellow), unhealthy for sensitive groups (orange), unhealthy (red), very unhealthy (purple), and hazardous (maroon).

Photo by Tobias Seidl on Unsplash

HVAC filter changes are vital to your indoor air quality!

HVAC filter changes are vital to your indoor air quality!

It can be a little confusing.  Some people call them furnace filters, some call them AC filters, but they are the same!  Your HVAC system uses one filter, and it was originally designed to protect the working parts of the HVAC from damage and reduced efficiency.  A dirty filter can cause your HVAC unit to work harder and make it prone to more breakdowns. Thus, it’s found in the intake (suction or “return” side) of the system, to filter out dust before it goes into the air handler.  There is one exception: if your system has a “fresh air intake”, then it usually has its own filter (located close to the air handler) so that air coming in from the outside is properly filtered. 

With increased importance placed on indoor air quality, we know that what goes into the system, gets blown out the other side, plus some!  Here’s what can happen:

  • Dust that goes into the HVAC system can feed mold when it comes into contact with moisture on the coils or in the drip pan, which can quickly grow and produce mold spores that are distributed through the home.
  • Pet allergens, bacteria, viruses and VOCs that start out in one room of the home can be distributed throughout the home by the HVAC system (ie. onto the towels you use to dry off and the pillows and bedding you sleep on!)

So, it’s important to change out the filter on time.  What’s “on time”?  The time of change used to be dependent on whether the filter was flat or pleated,  which gave the filter less or more surface area.  In general, flat filters have less surface area and are less expensive, but they clog more quickly, requiring more frequent changes (change every month).  Pleated filters have more surface area, allowing them to filter more allergens and have less frequent changes (up to 3 months).  Surface area is just one measurement of a filter’s efficiency, however.

MERV ratings: MERV stands for minimum efficiency reporting value, developed by the American Society of Heating, Refrigerating, and Air Conditioning Engineers (ASHRAE) in 1987.    The range is from 1 to 20, and designates with what efficiency the filter removes small particles between 0.3 and 10 micrometers in diameter.  (If you’ve read our FAQ on HEPA ratings, then you know that HEPA filters are rated on their ability to remove particles 0.3 micrometers and smaller.  Furnace filters cannot use standard HEPA filters because they are too dense and cause too large of a pressure drop in the system, however, the good news is that “Experiments indicate that less obstructive, medium-efficiency filters of MERV 7 to 13 are almost as effective as true HEPA filters at removing allergens within residential air handling units.” (wikipedia).   Flat filters including the fiberglass ones usually fall in the MERV 1-4 range, filtering out the largest particles like pollen, dust mites, and carpet and textile fibers.  The best residential filters are higher up the scale at MERV 9-12, which can capture legionella bacteria, humidifier droplets, and lead dust.  We always recommend purchasing the best filter you can afford, with the following rules in mind:

  • Check your furnace manual for the maximum MERV rating.  This is very important because you don’t want to cause the system to overwork or be damaged by drawing air through a filter that is too “tight” and causes too great of a pressure drop.  Think of it like this: which is more difficult to suck liquid through: a small straw or a large straw?  The small straw, of course, because of the small diameter.  It’s the same relative to the smaller “holes” or passages in a higher-rated MERV filter. 
  • MERV filters in the range of 9-12 may need to be changed more frequently than a lower-rated filter, during periods where a lot of contaminants are entering the house.  For example, if there is a wildfire near your home, or renovation is going on inside the home, or you house-sit a shedding pet that is not usually in your home, these situations all call for more frequent changes, because the filter density is capturing almost everything in the air.  
  • Filter life and efficiency depends not only on the time the furnace system is used, but also the fan speed.  Many times a filter performs better when the fan speed is on high, according to this Consumer Reports review, but this also causes the filter life to be the shortest. 

There are other filter ratings scales out there, too.  This page has a good chart which combines all three and their efficiency with common household contaminants. 

  • “FPR” is the Filter Performance Rating devised by The Home Depot.  It uses a number system from 4-10, with filters rated good at 4-5, and 10 being their premium filters.  This creates an easy rating system for filters sold at Home Depot, but does not apply to any other filters.
  • “MPR” is Microparticle Performance Rating, created by 3M/Filtrete for its own filters.  The scale of 300 to 2800 refers to the filter’s ability to trap particles smaller than 1 micron, with 300 being basic and 2800 being premium.  As with FPR, this scale is exclusive because only 3M/Filtrete products are rated on it. 

But wait…there’s more!  You can get other features in your filter:

  • Take all the guesswork out of when to change your filter by purchasing a smart filter and downloading the app on your phone or tablet.  Filtrete’s Smart Air Filters “track air filter life by detecting changes in air pressure over time. Filtrete then determines your filter life based on air flow and usage, not just time…” 
  • Filters with carbon reduce odors and VOCs.  If you are moving into a new build apartment or house, this is a great option to reduce the VOCs and odors coming from new paint, flooring (especially carpets), fixtures and furniture.  
  • Enviroklenz makes patented filters that use high surface area metal oxide materials like Magnesium Oxide, Zinc Oxide and Titanium Dioxide (no carbon), to capture and neutralize contaminants through a process called adsorptive neutralization. They are tested to remove particulates equivalent to a MERV 8, which is a mid-range level of filtration.  However, they also remove VOCs, mold, bacteria and viruses, making them unique in HVAC filters.
  • Colorfil manufactures filters that are especially helpful to pet owners, who deal with ammonia smells and related chemicals in urine.  The filter material turns from a magenta pink when clean, to a dull yellow when dirty, due to citric acid compounds that react with contaminants.  The company began to create innovative filter systems for NASA spacesuits in 2016 and moved on cabin air filters for vehicles and HVAC filters.
  • Electrostatic filters create static electricity as the air flows through the filter, causing larger particles like dander and pollen to stick to the filter.  They come in 2 types: disposable and reusable.  The disposable filters have high ratings (#1 in this review) but the reusable filters need to be washed and allowed to dry once a month and generally are not as effective on smaller particles such as mold spores, bacteria and viruses.and they must be maintained (cleaned) once per month   or the dirty filter can actually release pollutants back into the HVAC system.
  • Professionally installed filter boxes may include custom filters that have larger surface area (with deeper pleats) or electrically-charged plates.  Both of these have more upfront cost, but less frequent cleaning or replacement schedules.  Check out the end of this video to see examples.

It’s the Season…to stand strong against allergens!

It's the Season...to stand strong against allergens!

Just like the song (and the Bible verses that inspired it): For everything, there is a season.  In this case, there is a perfect time in nature to send out pollen, make flowers, plants and fruit, send more rain, make mold, dry out the ground (make dust), and send colder temps to give it all a rest.  If only our bodies reacted as well as our natural surroundings to the seasons!

According to the Asthma and Allergy Foundation of America (aafa.org), there are seven types of allergies, which are drug, food, insect, latex, mold, pet and pollen.  We discussed allergies in the post “Oh (BLANK), It’s Allergy Season again!” and how you can combat allergens inside your home.  In this post, I’ll go more in depth about the different allergy seasons for pollen, mold, insects and pets (the ones that can be tied to seasons)  and why they seem to get worse every year. 

Pollen

According to this graph given in a video on Vox, ragweed pollen production is directly related to CO2 levels in the atmosphere.  Why?  Plants take in carbon dioxide like we breathe in oxygen, and they use it to grow and propagate.  More CO2 = more pollen.  

Then, there is another effect of more CO2 in the atmosphere: warmer temperatures.  More warmer days extend the time that plants like ragweed have to send out pollen.  The graph below shows that over the last 50 years, the US on average has gained about 10 days to the typical growing season.  While this is good for farmers, it is not good for allergy sufferers. 

So, we aren’t just imagining it: pollen does increase in intensity and duration, year over year!

Pollen affects some people because their bodies deem it to be an intruder and produce antibodies, which bind to specific kinds of white cells, called mast cells.  Upon recognizing pollen, the mast cells break open, releasing histamines that cause inflammation and increased blood flow to fight the “infection”.  Itchy, watery eyes and a runny nose and sneezing are all results of increased histamines in your system.  

This is the body’s response to most allergens, including dust, mold, and pet dander, etc.  First, we’ll look at the different plant allergens. 

The morning weather report may not tell you which particular plant pollen is peaking when it broadcasts a “high pollen count”, and it’s usually not the pretty flowers we notice.  For example, pollen season in Mississippi usually starts around the time azaleas are blooming (February to early March), but it’s not the azaleas that are the culprit! 

To know what kind of invisible pollen grains are doing you wrong, go to Pollen.com.  Zoom in on the national map, then select a blue pin near you.  This will give you the pollen count, what plants are currently high, and even a 5-day forecast!  For example, on this day in early March 2022 in Mississippi, we have a score of 10.2 due to juniper, ash and oak trees.  At the time of writing this, I don’t even know what juniper and ash trees look like, but it’s likely they are causing my stuffy head and itchy eyes.  Pollen.com even has an app that you can install to access this information quickly.  Pollen counts are the average number of pollen grains in a cubic meter of air.  They are certainly tied to the weather, because rainy days provide relief (rain knocks pollen out of the atmosphere), and sunny, breezy days are worse because the pollen is able to dry out and blow off the tree (sometimes in visible clouds!).  This website has other tools and info that are super-helpful to those of us who want to know the why (?!).  Because there are so many types of plants that produce pollen and different blooming seasons, different pollens peak at different times of the year.  This map groups them into 3 main categories: Ragweed, Grass, and Tree. Ragweed is notorious because it is a small plant that is part of the daisy family, producing little green flowers that can produce up to 1 billion grains (!) of pollen per plant.  Particularly, the reaction is known as hay fever!  Peak ragweed season is August and September in the US.  Grass may be constant throughout the growing season, and trees typically peak in the early to mid springtime.  

Mold: Mold grows throughout the year, but it can definitely increase outdoors after periods of rain, warmer temperatures and increased humidity (late spring through early fall).  Mold is a beneficial part of nature, because it helps to decompose plant material, creating rich soil and nutrients for plants.  However, it propagates by sending out spores that cause our bodies to react in ways similar to, and sometimes worse than, pollen.

Our bodies detect mold spores as intruders, and send out histamines to fight them.  The difference between these spores and pollen, however, is that some mold spores produce mycotoxins, which are toxic chemicals.  Therefore, depending on your sensitivity and the type of mold, breathing in mold spores can cause “just” typical allergy symptoms, or a more serious illness that mimics flu or viral infections.  Check out our post on mycotoxins and how to avoid them. 

Leaf molds are a typical source of mold allergy, which can be particularly high in the fall season. Leaves fall from trees and rains saturate the ground, creating the perfect environment for mold.  According to Dr. Dean Mitchell of the Mitchell Medical Group in NY, “Usually, once the ground frosts over, mold dies off and the symptoms subside.”

Indoor mold can definitely be higher during the warmer, humid summer months too.  When the humidity climbs outdoors, it does the same indoors, and this is when you’ll want to check your humidity sensor often to make sure your home stays below 60%.  Stay vigilant that rooms like bathrooms, basements and laundry rooms are free of standing water (like water in the shower) and soft materials that can allow molds to take root easily.  During the winter, be sure to clean any humidifiers regularly, so that mold doesn’t grow in them.  Check out our Indoor Moisture Inventory to help keep moisture down in all areas of the house!

Insects: According to the AAFA, “Bees, wasps, hornets, yellow jackets and fire ants are the most common stinging insects that cause an allergic reaction. Non-stinging insects can also cause allergic reactions. The most common are cockroaches and the insect-like dust mite. Allergies to these two insects may be the most common cause of year-round allergy and asthma.”

Stinging and biting insects certainly have seasons: summer to early fall.  This is when they are building nests, foraging for food, and generally annoying the heck out of those of us who enjoy the outdoors!  They can even be more aggressive in the late summer and early fall, because the colonies have grown and they know to prepare: winter is coming.  Surprisingly, wasps and yellowjackets are carnivores!  They are not looking to eat us, but will go after smaller insects and any dead, rotting flesh (think: barbeque left-overs in the grill).  The way we opt to control stinging and biting insects (besides swatting them) is very important to our families’ health, so it’s best to check out our post on outdoor pesticides (Enjoying the Outdoors Naturally: Making your backyard a NO FLY zone). 

Dust mites are the new “no-see-um”.  Unlike bed bugs, which are visible and leave visible bites and droppings, dust mites operate invisibly because of their size.  At one-quarter to one-third of a millimeter, they are just too small to see with the naked eye.  What’s more, they are related to spiders (cringe).  That’s all I need to know: millions of tiny spiders in my bed, year-round!  Check out our post on Bedding for Better Sleep to find out how to keep the dust mites and their allergic reactions to a minimum. 

There are two overlapping allergens common to Insects and Pets, which are fleas and ticks.  Having owned many dogs and a few cats, I know that fleas tend to “bloom” in numbers after it rains, and according to this site, are a problem in the fall months especially because animals will get their thicker coats and moisture outside still allows the fleas to live on the ground.  Flea bites are super-irritating to animals and their humans, even causing death if the animal is depleted of too much blood.  Ticks are also very dangerous because of the diseases they can carry: Lymes’ Disease can affect animals and humans in debilitating ways.  Check out our post on “Enjoying the Outdoors Naturally: Making your backyard a NO FLY zone” to learn what products and strategies can keep you and your pets healthy outdoors.

Pets: Lots of pets love to be outside, and they tend to bring the allergens from outside, inside!  For example, even dogs that don’t shed fur like Labradoodles and Yorkshire Terriers love to run around outside and roll in the grass, gathering allergens like pollen and mold in their fur, which they will promptly bring inside and shake into the air or roll on the bed!  It’s our job as wise humans to mitigate the allergens they bring in, as well as the ones that they create all year long (dander, saliva, urine and feces).   In our post “How to Improve Indoor Air Quality with Pets” I discussed what causes pet allergies, and the tips and products that can make a difference in our quality of life together.  Dander can definitely be worse during the wintertime, when pets and humans stay inside more, and the drier climate can exacerbate dry, flaky skin. Minute particles of dead skin can float in the air and also provide food for more dust mites!   I also recommend reading our FAQ on What is HEPA, and the post on HVAC filter changes. 

All in all, it seems there is not a season free from allergens.  The traditional route of medicine is to medicate, medicate, medicate…but we can do a lot to protect ourselves from the allergens through education and prevention (hence the other posts I mentioned).  For those who continue to suffer from allergies after preventative steps, you may consider:

  • Saline sinus rinses with a drop of either TeaTree oil or Oregano Oil really help remove the pollen from your sinuses and disinfect against any mold or fungus that has lodged there.  This page has information on which essential oils have antimicrobial properties and how to use them.  I have successfully used 1 drop of teatree oil in 1 cup of warm saline water, used in a neti pot, to combat severe allergies this year (2022)!

  • Sublingual immunotherapy (SLIT) can help your body alter its immune response.  This type of therapy is safe, doesn’t require painful shots, and with it many holistic doctors have enabled their patients to greatly reduce their allergies.  

At the time of writing (2022) articles and interest in our “gut microbiome” (the bacteria that live in our digestive system) is very high, along with interest in pre- and pro-biotics and other ways of altering the gut biome.  Not too surprisingly, studies have shown that our sinuses have their own microbiome, and it is affected by the gut microbiome.  Oral probiotic use has been of benefit in treating chronic rhinosinusitis (CRS) in two studies (German study, Texas study) which is an ailment of many allergy sufferers.  It’s a case for making our whole body stronger, not just treating symptoms!

Photo by freestocks on Unsplash

Indoor Pesticides–why you should get rid of Raid!

Indoor Pesticides–why you should get rid of Raid!

Confession: I carried the rascals in!  While preparing to move from my last home, I looked at the price of cardboard boxes and said to myself, this is a big city.  Someone else just moved here, so why not ask for their boxes?  Craigslist had several postings a day for free boxes.  Unfortunately, free boxes have free roaches, and one or two roaches can quickly turn into dozens which took up residence in my kitchen.  Short of calling an exterminator, I did my best with over-the-counter pesticides to get rid of them, but on moving day my kitchen still had an infestation.  It was depressing, because I thought that only “dirty” homes got roaches but no matter how much I cleaned, they persisted (more on this later).  In hindsight I think they liked the consistent heat of the pilot light and some crumbs and drippings in my antique gas stove.  It was not my intention to leave a problem like this to the new homeowners (sorry)… but I got my reward. The bugs hitched a ride to my new house and although I tried more commercial and home remedies, they would not budge.  I even tore out the toekicks under my cabinets, thinking they had set up house there.  To my disappointment (because of my affinity for most things German), I even learned that they were called German cockroaches.  A week before Thanksgiving I broke down and called a pro, who required that I empty all my kitchen cabinets so that my cooking and storage containers would not be sprayed (he also cautioned me to wash anything that came in contact with the spray residue).  To my relief, the critters all died or left the house.  But now I wonder, what was in all the pesticides I tried, what did he use, and since I haven’t had a pest problem for about 4 years, how are these chemicals affecting me? 

Whether you or the professionals tackle the insect or pest problem, it’s important to consider the effect of pesticides on your air quality.  According to the EPA,  80 percent of most people's exposure to pesticides occurs indoors and that measurable levels of up to a dozen pesticides have been found in the air inside homes.  Whoa!  The exposure to airborne chemicals when spraying pesticides is obvious, however, there is also accidental ingestion and absorption to consider.  All in all, it’s a desperate and dangerous conundrum for those who are aware of toxins in pesticides…do I have to live with the pests or live with the poison? 

First, what kinds of pests are we talking about?  According to the EPA, there are 5 different types of pests and therefore 5 different types of pesticides:

  • insects (insecticides)
  • termites (termiticides)
  • rodents (rodenticides)
  • fungi (fungicides)
  • microbes (disinfectants)

What’s in these different types of pesticides?  If there’s a label on the bottle, then you can use this informative page to decode what each ingredient is and its risks to you. 

According to nontoxicforhealth.com, “Most indoor insecticides, including those you use on your pets, contain some type of Pyrethroids. These are amped up synthetic versions of natural chemicals found in chrysanthemums (the natural chemicals breakdown quickly in sunlight so they are less effective).”  These are possible carcinogens, endocrine disrupters, nervous and respiratory system toxins.  

In addition to the active (toxic) ingredients, manufacturers are not required to list all the inert (carrier and amplifying) ingredients, which can be even more harmful on their own.  Inert ingredients are called adjuvants, and they increase the effectiveness of the active ingredients by helping them spread out, stick to pests or weeds, and penetrate their outer layers.  “Among these are carcinogens like coal tar, naphthalene, hexane and xylene. And endocrine disruptors like dibutyl phthalate, plus hydrochloric and nitric acid and many petroleum distillates and fuel oils.” (nontoxicforhealth.com)  These inert ingredients do the same when they encounter your skin or clothing; they help the pesticide or herbicide stick to and penetrate so the active chemical can enter your body. Once inside, the inert ingredients alone are quite harmful. “...a 2016 study found that two inert ingredients, APG (alkyl polyglucosides) and POEA (polyethoxylated tallowamine) were 15–18 times and 1200–2000 times more toxic to cells than the active ingredient glyphosate, respectively.  And the inert/active ingredient glyphosate combo doesn’t just kill more body cells. They also disrupt your endocrine system at much lower levels than glyphosate alone.”  (nontoxicforhealth.com)  

One of the most common insecticides is Raid.  What happens when one sees an unwanted guest like a spider or roach?  They reach for the can of Raid under the sink, spray it, then wait to see if there are any other intruders!   I went to the official website (whatsinsideSCJohnson.com) to check on one version, “Raid Spray Multi-Insect Killer”.  The active ingredients are d-Phenothrin and Prallethrin. Both of these chemicals are Pyrethroids.  Then, there are the inactive ingredients (99+% of the product), the first three of which are Propane, Butane and Petroleum Distillate.  These 3 are VOCs, and the 5th, fragrances, contains many VOCs.  Here’s the problem: the product label recommends “Do not allow people or pets to enter treated area until vapors, mists and aerosols have dispersed, and the treated area has been thoroughly ventilated. Wait two hours after application, then open windows, vents and doors for two hours. “  I doubt that many people leave the area (especially an open-concept home) for 2 hours and then open the windows for 2 more hours, so consumers are breathing in the VOCs of the “other ingredients”, which carry the active ingredients to their intended destination, the insects, but also float through the air for 4 or more hours!

In order to clear the air, you’ll need to get rid of the VOCs.  Be proactive and get started with some pest prevention

  • Cut them off!  No, not with a knife, but with caulk, door sweeps, foam sealant, screening, etc.  There are many videos out there on how to seal out pests: make sure doors, windows, and ventilation openings have screens, install door sweeps and weatherstripping on doors and gaps around AC units, and fill cracks with silicone or latex caulk. 
  • Repair leaky piping to limit water sources for pests.
  • Install wire mesh (hardware cloth) on attic openings, roof, chimney and crawlspace vents.  
  • Use airtight containers for food storage. 
  • Clean up after meals and try not to leave any crumbs!  I left this one for last  because even clean homes can get roaches (they can live for a month without food and a week without water).   Do your best not to sustain them by limiting food sources, so the occasional foraging pest will not have reason to stick around.  Food sources even include non-food items: newspaper, cardboard (hence my moving box problem), “book bindings, leather, wallpaper paste, grease, soap, toothpaste, feces, and even human hair.” (resteasypestcontrol.com)  Gross!

Now here’s where you can take control with natural pest control solutions (source: nontoxicforhealth.com):

  • Wondercide is an essential oil-based natural pesticide that comes in flea and tick, mosquito, indoor and outdoor formulations. 
  • Food-grade diatomaceous earth is a fine white powder made from the fossilized remains of tiny aquatic organisms called diatoms.  When sprinkled over surfaces where pests crawl, the earth sticks to their legs and makes small cuts in them and dries out their bodies.  It can also be sprinkled into the fur of dogs, cats, rabbits, etc. to kill fleas, as the earth is non-toxic if they decide to lick themselves.  The fleas start dying within hours!  I used this on my pet rabbit with success, because he liked to hop around the backyard during the day where fleas also roam.  Sprinkle it into carpets for fleas or ants as well.  Just be sure to use a mask when applying it, because the dust is harmful to your lungs (don’t use if you have lung problems).   Also, although many people claim it is safe for humans to eat, I have seen several articles about its danger to our intestines (may block absorption of nutrients).  
  • A hand vacuum will get pests where you can reach, and it’s so satisfying to suck them up!  You can catch-and-release outside, or drown them by emptying the contents of the bin into a bucket of soapy water.  There are lots of hand vacuums available and if you are buying one or replacing yours, be sure to get one with a HEPA filter so that dust and microbes are not expelled into the air while you’re getting that spider!  This one comes with several suction heads and 2 washable HEPA filters.  

Educate yourself–there are no excuses now that we have the internet at our fingertips!  Integrative Pest Management (IPM) is long-term prevention of pests or their damage by managing the ecosystem (University of California).  Basically the following are the four methods of IPM:

  • Biological control: use enemies of the pests to keep them under control!  For example, cats kill rodents.  Many people keep outdoor cats, and never see mice.  Spiders kill insects and mosquitoes.  By allowing small non-poisonous spiders to live around your home, you will have less insects.  Chickens will search and destroy insects too–and roaches are one of their favorite snacks!  The popularity of keeping backyard chickens has grown greatly.
  • Cultural controls: this mostly applies to how food is grown and cultivated, but if you are keeping plants inside, be aware that mold can grow if you overwater the plant and the soil stays too moist.
  • Mechanical and physical controls: keep the pests out by using the methods discussed under pest prevention, and if you need to, use mechanical or chemical traps in safe places so that children and pets aren’t harmed.
  • Chemical control: pesticides are a last resort, and only those that will be safe for the user and the environment. 

Here are two more posts that will be of interest to homeowners: Termiticides: safe for indoor use? (more personal experience here) and Enjoying the Outdoors Naturally…because we love the fresh air but not the creepy-crawly things!

Photo by hybridnighthawk on Unsplash

Termiticides: Safe for Indoor Use?

Termiticides: Safe for Indoor Use?

Termites are tough buggers.  Having lived in New Orleans for 10+years, it is hard to understand how any wooden structures are still standing, considering that the city is the perfect climate for termites: hot and humid!  I learned without any formal research that the Formosan species of termites does not need any ground contact (so much for termite barriers) to survive; it actually does well in a moist section of your attic or roofing, destroying the wood that holds up your roof!  I renovated a house after Hurricane Katrina and wanting to seal the home well with insulation, I went with a spray foam made from sugar cane.  In hindsight I think spray foam in general was a big mistake!  When I purchased the home in 2009, it had very few signs of termite damage, as all the walls and ceilings were open, and I knew the home (having been built in 1952) just had traditional fiberglass insulation before.  After 7 years of living in it, I had to call the exterminator several times a year for different colonies that invaded parts of the attic, one of which made their way down a wall and into a wood floor!  I think the insulation contained just enough moisture to help them live, and provided great shelter as they munched through the house.  I didn’t notice them at all until I saw a few droppings emerging through the foam, and could actually hear a slight “crinkling” sound in the insulation near the infestation, if the house was completely quiet. 

Many professional exterminators use Termidor, which is a formulation of Fipronil.   Fipronil is used in dog and cat flea medications (Frontline), and used in some outdoor pest applications.  Termidor is labelled as “safe for indoor use”, however, low concentrations are deadly to fish, shrimp, crawfish, honeybees and lizards.  It kills insects by affecting their nervous system, and in other animals, it causes nausea, dizziness, aggression, and interrupts hormones and reproduction.  Fipronil breaks down in sunlight to a chemical that is ten times more toxic, which is fipronil-desulfinyl.  This chemical is more easily absorbed into the skin, as well. (pesticide.org)  Fipronil is also the active ingredient in another termite treatment, Taurus SC.  There is likely gallons of Fipronil in the one house I lived in! 

There are other popular termiticides that are used outdoors, to prevent termites from getting to the precious wood in your home:

  • Imidacloprid is an insecticide that is popular in many other countries besides the US.  It is a sort of synthetic nicotine modeled after natural extracts of the tobacco plant.   It is quite toxic to fish, which is important for homes in areas that runoff to streams, lakes, etc.  It is very persistent in soil, meaning it does not deactivate quickly.  It’s also toxic to some birds, acutely toxic to earthworms, bees, and toxic to some plants.   Imidacloprid is the active ingredient in the flea and tick medication Advantage used for cats, however it is toxic to some cats.  Although it is of low toxicity to humans, why poison our surroundings with something so toxic to nature?  Fuse, Premise and Dominion are products that use imidacloprid to control termites.

  • Chlorfenapyr is a newer insecticide in the class of pyrroles that affect insects’ ability to produce energy.  It works on insects that have become resistant to pyrethroids.  It is supposedly only “moderately” toxic to humans; however, severe poisoning and death have been reported by ingestion, inhalation and exposure to skin.  Spectre 2 SC and Phantom are two products that use chlorfenapyr. 

  • Why put yourself into close contact with a chemical, just to avoid termites or insects?

Fine then–how do I keep termites at bay without using toxic chemicals? Here are some more natural tips:

  • Keep roofs and gutters in good repair, in order to minimize water sources for termites

  • Don’t use mulch next to your foundation; instead, keep it 6-12” away.  This allows air to circulate and doesn't encourage termites to enter the house under cover of mulch. 

  • Stack firewood at least 20 feet away from the house, and raise it off the ground about 8” or more.  This allows air circulation and visual inspection for termite tunnels. 

  • Keep trees and shrubs trimmed so that branches don’t touch your house; also don’t allow dead branches to accumulate on the ground.  Keep large plants away from the foundation, because they can block inspection.   Remember: sunlight and heat are the worst natural enemies of termites and they can’t stay in a hot dry area for very long!

  • For homes that are built above ground on pilings, make sure that termite guards are properly installed on each piling. 

  • Declutter the inside of your house!  I know a landlord whose tenant had stacked newspapers in piles all over the living room floor, which are a favorite termite food.  Now she has to replace the subfloor and some of the joists, which will cost thousands!  Look for telltale piles of sawdust under furniture that has a wooden structure like sofas and beds, and don’t store cardboard boxes or newspapers in your home.  

  • For areas that are prone to underground termites, there is now a stainless steel mesh that can be installed around foundations and underground pipes.  It’s marine grade stainless steel warrantied for 10+ years, called Termi-Mesh

  • Application of Bora-Care or other borate products to unpainted wood is a great deterrent to termites, and borate products can be used in baiting systems.  Boron is a non-toxic element that humans and plants need, in low concentrations.  Therefore, according to the University of Nebraska-Lincoln Cooperative Extension, “Although boric acid is relatively safe to humans and other mammals, it can be harmful if accidentally ingested and must be kept away from food, children and pets. Care must be taken not to breathe in the dust when you apply it. Like other dust formulations, it should be used in places where it will not move around.”  In addition to termite protection, it does not allow molds and fungus to grow. 

  • If you live in an area that is high risk for termites, you will be familiar with swarming season.  During this time, the “alates” or reproductive termites will leave the colony in a brief flight and look for a mate to start another colony.  Usually in late spring, this is when you see swarms of termites surrounding outdoor lights at dusk and after sunset.  It can be a scary sight to homeowners, but don’t let it frighten you!  Turn off outdoor lights on and near your home during swarming season, close drapes or blinds to block light from windows, and make sure you have window screens and weatherstripping installed to keep them out of the house.  If any termites do enter the house, they will die within the day if they do not find moist areas or leaks, so proper maintenance will make sure they don’t start a new colony in your home.  If you do see them entering through a crack or pinhole in the wall, you can use a vacuum to suck them up, ensuring again that there is no moist wood or drywall to sustain them. 

  • If gardening is one of your interests, you may consider planting some of the following around your home, as they have been studied to repel termites: catnip, vetiver grass, and lemongrass. Marigolds are also a favorite of gardeners to deter pests, but they have not been scientifically shown to deter termites.

  • Newer insecticides like Chlorantraniliprole are of very low toxicity to humans, bees and fish, while they cause death to termites by paralysis. 

  • Baiting stations are environmentally safer than pouring chemicals into the ground around your house, because the poison within them is only carried by the worker termites out of the station and into the nest.  However, they can be slow to work and must be checked several times a year, if not monthly, by an exterminator.   If a termite inspection reveals that you have no active infestations in your home, then this may be a good preventative measure.  

Alaska may be the only state that is free from termites, but with some vigilance, they don’t have to take over your home!

Enjoying the Outdoors Naturally: Making your backyard a NO-FLY zone

Enjoying the Outdoors Naturally: Making your backyard a NO-FLY zone 

When summer gets going, the high-pitched “hummm” of mosquitoes in the yard or nearby woods is all we need to hurry inside when dusk comes.  But this is YOUR property, right?  There are many ways to take it back…some healthy and some not so healthy.  On the latter side, I know the smell of Malathion by heart, even though my mother told my sister and I to get inside immediately when we heard the drone of the fogging truck coming up our wooded lane.  Later I heard stories from baby boomers who as children went out to play behind the truck in the fog as it buzzed down the streets of New Orleans.  With the advent of west Nile and Zika viruses in the US, mosquitoes are still quite a serious concern, but knowing that Malathion can cause mutated genes in blood cells, breast cancer, abnormalities in sperm, and increased Non-Hodgkin’s Lymphoma among farmers that use it, among other effects, Malathion might be the greater danger! 

Similarly, many of the outdoor sprays, including the most popular Permethrin in the US, have active ingredients in the class of pyrethroids.  While pyrethroids are safer to us when dry (up to 2 hours later), they can be absorbed through skin while applying them, or drift into our homes through open windows or crevices (such as when an exhaust fan is being used inside the house, pulling in outside air).  Pyrethroids are a synthetic version of pyrethrins, which are extracts from the chrysanthemum plant.  Pyrethroids are possible carcinogens, endocrine disruptors, and nervous and respiratory system toxins. 

Several years ago, I was gifted a newer mosquito “lamp” called the Thermacell.  It works by heating up a small pad saturated in Allethrin (a pyrethroid), that creates a vaporous barrier of about 15x15 feet around you.  It takes a few minutes (10-15) to fully establish the chemical barrier.  Although it works, the product warnings include keeping it away from uncovered food and to avoid directly inhaling the vapors.  Huh?  In order to be effective, you are sitting in the 15x15 area…directly or indirectly inhaling the vapors. (?!)

I hope you enjoyed our post on mosquito repellents where I discussed the products you spray on your body.  In this war on mosquitoes and other pests, there are repellents safer than Malathion and pyrethroids that you can deploy on your yard.  Here are the best of what we found!  

Similar to the way a “wireless fence” works to keep pets in the yard, what if there was a way to keep insect pests out of the yard?  There is!  For those who dream of Star Wars technology in the home, Photonic Fence is an insect-killing laser device that tracks mosquitoes and other potential pests using cameras and computers, then kills them with a “minimum lethal dose” laser.  The “Photonic Fence is capable of finely discriminating between different species of insects, and so can be relied upon to target only harmful insects, rather than beneficial insects.” (photonicsentry.com)  Unfortunately it is only available by inquiry at the moment…

On the more realistic (and safer) side, the first thing to do is make your backyard inhospitable to mosquitoes through these strategies:

  • Get rid of standing water.  If you have a fish pond, make sure there is not algae growing in it, because this is a favorite food for mosquito larvae.  Be aware that container plants need to have adequate drainage, too, otherwise mosquito larvae can grow in water in the pots.  Also, refill bird baths and dog bowls frequently to discourage mosquitoes.  A frequently overlooked spot is the AC unit, which usually has a pan with drain holes under it.  If the drain holes get clogged with leaves and debris, voila! You have a mosquito incubator. 
  • Install fans around your favorite gathering places.  Mosquitoes are slow, weak fliers that can’t stand up against strong breezes.  It also disperses the carbon dioxide we breathe out, which is a way that mosquitoes target us.
  • Install netting or screen around your favorite hangout: a porch, gazebo, or screened tent.
  • Wear light colored clothing, because mosquitoes “see” dark colors more easily.
  • If fleas are your main problem, be aware that fleas breed in backyards before hitching a ride on pets or us.  So, you can unleash a natural predator like beneficial nematodes on them, that will destroy them and their eggs within about 2 weeks.  Here is an excellent article on how to deploy these microscopic worms to demolish fleas in your backyard. 
  • For the science geeks among us, try making a dry ice trap!  These are actually used by scientists to count and examine species of mosquitoes.  You’ll want to use this at the farthest point from any gathering place, because it is a “bait”: mosquitoes are tricked into thinking that the CO2 is from a prey source, so you don’t want it near you!

Now that you’ve done your best to put up a “NO VACANCY” sign, here are the safer outdoor pesticides which can be sprayed manually or automatically around your yard to discourage or kill mosquitoes and other pests.  These stand out by using natural ingredients for great results: 

  • We touted Wondercide in our post about indoor pesticides (Why You Should Get Rid of Raid!) and they have an excellent outdoor pesticide as well.  Wondercide built their business on being friendly to pets and families.  Their outdoor products come in a formulation that repels fleas and ticks (that also work on mosquitoes), or, if you don’t have pets that attract fleas and ticks, a formulation that primarily kills mosquitoes but also works on ants and ticks. 
  • Nature-cide Outdoor Insect Repellent is a great choice with no toxic ingredients.  The active ingredients are cedarwood oil and cinnamon oil, with carriers lecithin, soap and water.  It deters Ants, Bed Bugs, Caterpillars, Cockroaches, Earwigs, Fleas, Flies, Hornets, Mites, Mosquitoes, Moths, Silverfish, Spiders, Stink Bugs, Ticks, and Wasps.  It is available in a 32 oz spray bottle (perfect for small areas) or larger sizes.  
  • Mosquito Barrier by Garlic Research Labs, Inc.  is 99.3% garlic juice, with the remainder citric acid and potassium sorbate.  When it is diluted in water as per instructions, it kills adult mosquitoes, coats plants to deter mosquitoes, and suffocates mosquito larvae in standing water.  It also repels fleas, ticks and ants, a great combination for pet owners. 

The following two treatments have ingredients that are a lot safer than pyrethroids, but one carrier ingredient that can be questionable (sodium laureth sulfate).  Sodium laureth sulfate is a surfactant which helps the treatment spread out and stick to plants.  Depending on how it is manufactured, sodium laureth sulfate may be contaminated with measurable amounts of ethylene oxide and 1,4-dioxane, a known carcinogen and a possible carcinogen (davidsuzuki.org).

  • Pyranha® Zero-Bite® Natural Insect Repellent by Bug Armour: according to the label, the ingredients are 6% Geraniol (oil derived from geraniums), Clove oil and Peppermint oil, 7% Sodium Laureth Sulfate, 13% water and glycerin.   
  • Naprovit PRO Plus™ by Natural Misting Solutions “controls mosquitoes, spiders, wasps, hornets, midges (No-see-ums), gnats, and many other types of small flying insects when used in residential and commercial misting systems.”  It contains 8% Sodium Laureth Sulfate, 2% soybean oil and 1% corn oil (the rest is water and soap).  It kills insects on contact, including wasps and hornets; however I could find no information on its effect on honeybees.

There you have it–let us know what other outdoor strategies have helped you enjoy your little slice of heaven!

Photo by Randy Fath on Unsplash

Mosquito Repellant: Is DEET the only option? (No, there are safer choices!)

Mosquito Repellant: Is DEET the only option?  (No, there are safer choices!) 

Going on camping trips and just generally living in the woods for most of my life now, I am very familiar with mosquito repellant.  I was told that more DEET = less mosquitoes.  What exactly is DEET ?  

According to pesticides.org, “DEET is a repellent used by almost one-third of the U.S. population every year. It is one of the few pesticides applied directly to skin and clothing.”  It was developed during WWII by the US Army as a repellant and has been in use as a pesticide since 1957.  Just because it’s been used so long, does not mean it’s safe, however!

DEET has scary effects on animals, some children, and the cells and DNA in our bodies.  In lab tests, animals subjected to DEET lost much of their ability to climb, grip, and reproduce in normal ways.  It is debilitating and fatal to fish.  Children may have seizures at even low concentrations (less than 20%), and experiments with our own brain cells show that it kills them.  It’s not something I’ll want to apply again to anyone in my family!  

Permethrin is a different mosquito repellant that is marketed and sold as a fabric treatment for tents, clothing and camping gear like backpacks and used as an outdoor soil treatment for termites; it is a synthetic pyrethroid, which is a class of neurotoxins.  It behaves in insects similarly to the insecticide DDT.  Permethrin does not decay quickly in soil (it is commonly sprayed on the ground and around homes).  Besides being a possible carcinogen, it affects the immune system, hormones, and different organs such as the liver and lungs.  According to laboratory studies on rats, “children may be more sensitive to permethrin than adults,” (pesticide.org).  Why put yourself into close contact with a neurotoxin, just to avoid termites or insects?

I believe there is “kryptonite” for every pest–we just have to discover them.  The following repellent active ingredients work by masking the personal scent that mosquitoes use to target us as prey.  Some are manufactured and some are natural extracts.

  • Picaridin is a synthetic imitation of piperine, an extract from plants used to make black pepper.  It is in the original formulation of Skin So Soft, which was passed around many Girl Scout Troops and made its way onto our family camping and fishing trips too.  According to the National Pesticide Information Center (NPIC), Picaridin has had very few allergic reactions, was not shown to cause cancer, and is generally safe.  
  • Due to the anecdotal (not studied) evidence that Skin So Soft repels mosquitoes, Avon produced a Bug Repellant that contains IR3535 as its active ingredient, which is a chemical that is structurally similar to the naturally occurring amino acid B-alanine (ewg.org). It is similar to or slightly less effective than DEET or Picaridin on mosquitoes, but almost twice the mean protection time of these products against deer ticks (which are carriers of Lyme’s Disease).  It can be very irritating to the eyes, but has no other health risks.
  • Oil of Lemon Eucalyptus is an extract of a species of Australian eucalyptus tree.  This extract is refined in order to concentrate the chemical that repels bugs, para-menthane-3,8-diol, or PMD.  PMD is used by brand names Repel and Cutter at 30% Oil of Lemon Eucalyptus or 20% PMD.  According to beyondpesticides.org, PMD was tested in Africa against mosquitoes that are known to cause malaria, and it “gave complete protection from biting for between 6 and 7.75 hours”, and it was equally effective as lower concentrations of DEET.  PMD has reportedly few allergic skin reactions but it is an eye irritant.  Because it has not been studied on young animals, it’s not advised to use on children under 3. 
  • Essential oils: Clove or Thyme oil at 50% concentrations were the most effective in this study of 5 oils, however they can be irritating to the skin and not pleasant to every user at these high concentrations.  In this study, clove oil was studied along with citronella, patchouli, and makaen (Zanthoxylum limonella), and clove oil performed the best, with undiluted clove oil giving 2-4 hours of complete repellency.  This study also concluded that full-strength oils perform the best, but adding vanillin increased the time of repellency.  VerywellHealth.com gives a list of more oils and their respective benefits and cautions. 

These are the ACTIVE ingredients.  We note that  there is always a “carrier” (whether it’s called inert or inactive, these are the ingredient(s) that dilute and aid in application of the active ingredient) and not every product discloses the full list of ingredients.  It’s always best to check the Material Safety Data Sheet (MSDS) for a product you are considering.  These are usually found at the bottom of the manufacturer’s home page.  

  • Picaridin products tend to have less disclosure about carrier ingredients: 
    • Sawyer Products 20% Picaridin Insect Repellent and Naturapel’s Picaridin Insect Repellent both contain Polyethylene Glycol (PEG).  Despite the wide use of PEG in the cosmetics industry, it can be contaminated with carcinogens and if used on broken skin, a cause for irritation and systemic toxicity (David Suzuki Foundation). 
    • RangerReady Repellents Picaridin 20% contain propylene glycol, which is a penetration enhancer and found to provoke skin irritations in people with eczema and other skin allergies (ewg.org)
    • Earthkind StayAway Mosquitoes is a Picaridin formula made with small parts of ethanol, glycerin (both non-toxic), and mainly water, but 10% undisclosed ingredients (it could be a fragrance or combination of ingredients). 
  • Murphy’s Naturals is a great choice because this company clearly states that the carrier in their Lemon Eucalyptus Oil Insect Repellant Spray is deionized water and corn ethanol (alcohol made from corn). 
  • Wondercide has a range of repellants made with different essential oils (for personal scent preferences, not efficacy).  They are safe for kids and adults, with no artificial dyes or fragrances.
  • Anyone who travels or has young children would appreciate the convenience of Aunt Fannie’s Mosquito Repellent Wipes, the ingredients of which are clearly stated on the front of the package.  The main active ingredients are citronella oils and cedarwood oil, with peppermint, lemongrass and geranium.  While cedarwood oil did not fare well alone as a repellent in this study, the combination in Aunt Fannies seems to work as they are blessed in good reviews and sales. 
  • Kinfield’s Golden Hour spray ($22 for 3 oz) is priced at a premium, but its reviews are too good to ignore.  Made of active ingredients citronella oil, lemongrass oil and clove oil, with inactive ingredients isopropyl alcohol, lauric acid, water and vanillin, the scent is light with citrus and vanilla.

Has anyone found any new or different ingredients or products that safely repel mosquitoes?  Let us know!

Photo by Bima Wahyu on Unsplash

The Hidden Danger of Gas Appliances

The Hidden Danger of Gas Appliances 

Ok, confession: I didn’t learn the meaning of the expression “You’re cooking with gas now!” until I was about 25 because I didn’t grow up in a home with a gas stove!  When I learned it, however, I knew I wanted a gas stove in my own home because I like to try new recipes and of course, restaurants had gas stoves.  Gas was supposedly the best.

Fast forward to today—I have had gas stoves in my other homes, and no doubt it is a different method of cooking!  My current home has an electric stove (because it came with the house) but that renovation priority is declining because of new information about the by-products of burning gas.

Burning natural gas or propane in indoor appliances causes particulate matter (PM), nitrogen dioxide (NO2), carbon monoxide (CO) and formaldehyde to be expelled into the air, which are not adequately vented by exhaust fans. Gas stoves are the largest polluter but gas heaters, water heaters, and clothes dryers all contribute.  A 2013 meta-analysis (analysis of 41 studies) concluded that NO2 indoor air pollution from gas cooking increases the risk of asthma in children by 42% and increased wheeze (breathing difficulty).  Cooking on a gas stove in a small apartment for one hour raises NO2 levels in the air to easily surpass air quality limits set by the EPA and California Air Resource Board, or CARB.  Venting does help lower these levels, but many lower income families use stoves in kitchens that are unvented, though they are illegal.  In another meta-analysis, exposure to NO2 and COPD were positively associated.  

For the benefit of the young to the older members of your household, we hope that you will re-think “cooking with gas”! (and heating with gas, and drying your clothes with gas…)  As for me, my grill outside is working just fine!