Category Archives for "Air Quality"

Do you have a sixth sense? Maybe you need one!

Do you have a sixth sense?  Maybe you need one!

One of the top thermal camera manufacturers, Teledyne FLIR (which stand for “Forward Looking InfraRed”) uses the term “The World’s Sixth Sense” to describe the images they are able to capture with their cameras.  For sure, infrared is a totally different way of viewing the world than what we are used to seeing.  Infrared does not rely on light to capture images, but rather senses heat and generates an image based on relative differences in heat energy.  With an infrared (IR) camera, you could see your cat hiding in the corner of a pitch dark room, which is something “night vision” may or may not pick up, depending on the true ambient light level.   

But beyond avoiding cat attacks, is it useful to the average homeowner?  Oh, very!  There are some gadgets, like a cake pop maker, that have extremely limited use and seem to sit in your junk drawer more than they get used.  A thermal imaging camera doesn’t fall into that category.  Here are some of the varied uses from different industries that might be applied to your own home:

  • Electrical Wiring maintenance: why does that breaker keep tripping?  Are any wall switches or plugs excessively hot?

These are thermal and visual images of a damaged electrical plug (Fluke.com)


  • Security: who or what made that noise outside the window?

  • Animal Health: where is your pet experiencing “hot spots” or possible infection?

  • Lost pets: A pet hamster or lizard can be found much faster with a thermal camera (if it’s still alive).

  • Gas Detection:  when an infrared camera is pointed at a surface having a gas leak, it shows the temperature difference at the point of a leak caused by the pressure variance. (Top Applications of Thermal Imaging Cameras)

  • Water Heater or water line maintenance: a temperature difference can show where corrosion may be progressing on an older tank, just as oil industry professionals can use them to “see” corrosion.

  • Heat loss in common appliances like stoves, refrigerators, dryers and vent lines, etc.

  • Insulation: check for air sealing problems in your attic, walls, basement and crawlspace (check this video on how to “see” duct leaks)

  • Roof inspection: see where water may be leaking through your roof

  • Water leaks: spot the leak inside walls or ceilings without ripping them up. 

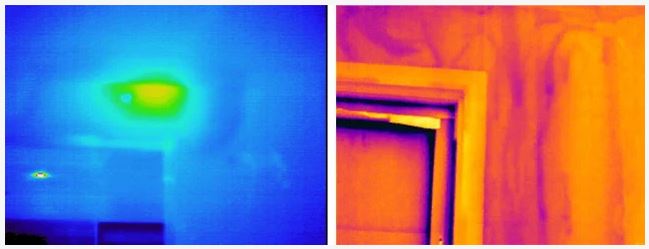
  • Pests:  Locate mice, bats, squirrels, termites, hornets and all sorts of warm-bodied creatures in and around your home.  Snakes, unfortunately, will not show up on an infrared camera because their body temperature is too close to their surroundings. The following images are of a termite’s nest (left) and streaks that indicate termite tunnels (right) (Detecting Pests with Thermal Imaging).  The slightly higher moisture content associated with termite tunnels needs a camera with a higher sensitivity.

  • House hunting: take your thermal camera to reveal hidden insulation and wiring problems. 

  • Car maintenance:  see if any components are overheating, and possibly spot leaks, as in brakes, tires, radiators, coolant lines, and exhaust systems.  

  • Gardening: You can possibly spot sprinkler line leaks, and underground gas leaks in your yard.

This video shows a plethora of ways to use a FLIR camera.  Although you may not need to locate enemy forces in your backyard, finding a lost pet, hidden water leaks and missing insulation could be well worth its price. 

Now that your interest is piqued, it’s best to shop around to find the camera that suits your needs within your budget.  Here are some of the main characteristics you’ll want to check out:

Resolution:  This is the number of pixels per inch, or PPI.  The resolution is usually given in two numbers, which are (Width X Height).  Higher resolution numbers give more information in each image, with less grainy edges.  Don’t try to compare the resolution of a thermal camera to a regular digital camera, however, because the role of the thermal camera is more of a sensor to detect heat differences.  Resolution is not incredibly important if you are mainly using your camera to view large areas like walls and windows, but if you are going to use it to troubleshoot electronic components (much smaller area), you’ll want higher resolution. 

Sensitivity: Thermal sensitivity is the ability of a thermal device to distinguish between temperature differences, measured in milliKelvins (mK).  (Thermal Sensitivity – Understanding Millikelvins)  The lower the number, the higher the sensitivity. For example, 150mK sensitivity means each pixel takes readings to the nearest 0.15˚C. 

Sensitivity Range:  The range of temperatures the device can sense, for example from -4 deg F to 248 deg F. 

Battery Life:  Some thermal cameras have an independent, rechargeable battery, while some run off of the battery of the phone they’re attached to.  Either way, you’ll need to make sure you have enough battery life to get the job done!

Photo by Teledyne FLIR

OH, the detergent of the atmosphere, and OH-, the ion that cleanses our homes’ air

OH, the detergent of the atmosphere, and OH-, the ion that cleanses our homes’ air

Did you know that earth’s atmosphere is self-cleaning, to an extent?  We would be A LOT worse off if it wasn’t.

OH, the hydroxyl radical, is the most important oxidizing species in the atmosphere.  In this article, we’re going to discuss how it’s formed in nature, what it does, and how it’s different from the hydroxide ion OH- that is formed in bipolar ionizers.  

You’ve probably heard that there is ozone in the earth’s atmosphere.  The majority of ozone is found in the stratosphere (about 10-25 miles above the earth), shielding us from the sun’s UV light and cosmic radiation.  This is where ozone can be destroyed by molecules that contain chlorine and bromine, such as chlorofluorocarbons (CFCs). (EPA.gov) About 10% of the ozone is found a bit lower, however, in the troposphere (where clouds are formed and planes fly).  In the troposphere, ozone performs a very important function by being a primary ingredient for the production of OH.  Here, UV energy from the sun (mostly in the UV-B range of 290-310nm)(Treatise on GeoChemistry, ch.5.5.9.1 Chemistry of the Hydroxyl Radical (OH) in the Troposphere), breaks down ozone (O3) into O + O2.  Then, in the presence of water vapor (there’s very little water vapor in the stratosphere, so this has to happen in the troposphere), the lone O molecule reacts with H2O to form 2 molecules of OH (hydroxyl radical).  

In chemistry, a radical, also called free radical, is a molecule that contains at least one unpaired electron.  OH is a radical which is highly reactive because of the configuration of electrons in its outermost shell.  Normally, atoms and molecules prefer to have 8 electrons in their outermost shell, making them most stable (called the Octet Rule), but they will compromise and share electrons if necessary.  OH has 7 electrons in its outer shell: 6 electrons are from the O atom and 1 electron from the H atom.  Each electron has a negative charge, but it is balanced by the same number of protons in the nuclei of the atoms, so that the total “charge” of the molecule remains neutral.  Electrons also like to be “paired”, and although each has a negative charge, they have opposing spin directions which causes them to seek to be “paired” with another electron.  The OH molecule constantly seeks one more electron to “pair” with the 7th electron in its outer shell.  OH only survives for nanoseconds after it is formed–because it can immediately steal that missing electron from most of the chemicals found in the troposphere.  This reaction of the OH with other molecules is called oxidation. 

(Oxidation: Despite the name, the presence of oxygen is not a requirement in an oxidation reaction.  The reaction is part of a transfer of electrons between two substances.  Oxidation occurs simultaneously with reduction in a type of chemical reaction called a reduction-oxidation or “redox” reaction.  The oxidized atom loses electrons, while the reduced atom gains electrons.  On earth, oxidation is usually an undesirable reaction.  Oxidation is another name for rust, corrosion, and breakdown of materials around us and in us.  Our bodies produce “anti-oxidants” to prevent breakdown of our cells. ) 

There are limitless reactions that can happen in the atmosphere, but OH reacts primarily with carbon monoxide (40%) to form carbon dioxide. Around 30% of the OH produced is removed from the atmosphere in reactions with organic compounds and 15% reacts with methane (CH4). The remaining 15% reacts with ozone (O3), hydroperoxy radicals (HO2) and hydrogen gas (H2). (Oxidation and OH Radicals)  With its supreme oxidation potential, hydroxyl radicals can react with molecules and chemicals that are otherwise extremely stubborn and resist oxidation. (Hydrogenlink.com)

Since OH is primarily formed with energy from the sun, OH production mainly happens during daylight hours.  The following map is a snapshot of a model showing how OH is generated as sunlight illuminates a rotating earth.  (The Atmosphere: Earth’s Security Blanket)  Because OH is so short-lived, it’s really hard to detect, so the formation or degradation of other chemicals is used to determine how much OH is in the atmosphere at any one time.  For example, this model is generated from the Tropospheric Emissions Spectrometer (TES) equipment on a NASA satellite.  TES measurements of a number of other chemical elements influenced by OH, such as ozone, carbon monoxide and nitrogen dioxide, have enabled scientists to better represent OH in these models.

Did you know that humans also generate OH indoors? (Science Daily)  Indoor air can have higher (but not dangerous) levels of ozone, which reacts with certain oils on our skin. The reaction releases a host of gas phase chemicals containing double bonds that react further in the air with ozone to generate substantial levels of OH radicals.  It’s a very new discovery (2022), which was aided with extensive computer modeling.  This is important to know, because although they are great to have in the upper level of the troposphere,  we don’t want high levels of hydroxyl radicals indoors.  They can damage tissue and frequently initiate chain reactions with other radicals and VOCs, able to produce harmful chemicals like formaldehyde. 

So far we’ve talked solely about the hydroxyl radical, OH.  This chemical formula looks similar to hydroxide ions, OH-, produced by bipolar devices like the Germ Defender, Air Angel and Whole-Home Ionizer, but they are VERY different.  Even though the hydroxyl radical OH has an unpaired electron, that molecule as a whole is considered to have a neutral charge. The hydroxide ion, on the other hand, OH-, does not have any unpaired electrons, and has a negative charge by gaining an extra electron from a hydrogen atom.   OH- is made in bipolar devices when electricity is passed through water vapor in the air, splitting the water vapor into H+ and OH- ions.  A Japanese microbial study also confirms splitting of water vapor into positive (H+) and negative (O2-) ions.  H+ ions consist essentially of the hydrogen proton, which is very small; this positively charged ion does not last long in the air, as it is quickly attracted to and absorbed by larger molecules.  When the OH- ion encounters a microbe, it behaves as a hydroxyl radical, and tends to steal a hydrogen molecule from the surface of the microbe to balance out its negative charge, which damages the surface of the microbe and renders it unable to infect.  When they encounter a positively charged dust particle, OH- ions increase the total weight of the particle and cause it to drop out of the air.  They can also react with VOCs in the air.  Therefore hydroxide ions (OH-) have many of the air cleaning capabilities of hydroxyl radicals, without the harmful effects.  They are also longer-lived, lasting about a minute in the air, so they have time to permeate a room and create a sanitizing effect.  OH- ions are found naturally in larger concentrations near waterfalls, in the atmosphere after lightning, and in forests, causing the air to have that fresh, clean smell.   By releasing OH- ions indoors, bipolar ionization is all about bringing the best of the outdoors, indoors!

Photo by Daniel Olah on Unsplash

Detecting Gas Leaks in the Home

Detecting Gas Leaks in the Home

As we pointed out in our article on Propane and Natural Gas, gas leaks outside the home are very common, especially in older neighborhoods.  Gas leaks in the home are rare, but they sure can be dangerous!  Even if you have no piped gas coming into your home, there is still the risk of radon (a naturally-occuring, cancer-causing gas in the ground), and carbon monoxide from any combustion engines or appliances operating closeby.  Here are some of the detectors and monitors you will want to consider adding to your home.

Radon: Your home is most at risk for radon accumulation if you have a basement or a crawlspace.  It’s a colorless, odorless gas that is heavier than air, so it can sit undetected in these areas.  Here are two sites you can use to find a professional in your area: NRSB.org, CertifiedRadonPros.org, or you can test your home yourself and send the results to a lab for interpretation using this popular home test kit by First Alert, $16.  If you do live in an area with high radon content, you may opt to get a monitor so that you’re always aware of the radon level in your home.  The following monitors will help you stay on top of Radon:

  • AirThings Corentium Home Radon Detector, $99, is portable so that you can occasionally move it to different locations in your home to check levels.  It has a long-term history (for trends) as well as a short-term weekly view; both be displayed at the same time.  Other devices by AirThings offer Radon plus more points of measurements like PM2.5, CO2, etc. 
  • EcoSense’s RD200 RadonEye is $175 and offers bluetooth and an app so that you can monitor radon levels remotely.

Carbon Monoxide (CO) can be easily confused with Carbon Dioxide, but they are very different and you must know why: CO in your home is deadly,  while CO2 is a sign that people are living there!  CO is a byproduct of combustion (incomplete combustion, actually), and when too much of it lingers in your home, your body will start to replace oxygen in your bloodstream with CO.  This can result in tissue damage or death, in a short amount of time. (Mayo Clinic)  For this reason, it’s imperative that all of your gas appliances are vented correctly, that your attached garage has air barriers between the garage and house, that you use a fireplace correctly, and that any running generators are located a safe distance from the house (6 feet or more).   If you have any of these (gas appliances, attached garage, working fireplace or generator), it’s great to have a CO monitor installed that will alert you to the presence of this dangerous gas.  Check out these options, all of which would get installed high on the wall or on the ceiling (as CO is slightly lighter than air and tends to go up in your home):

  • First Alert Smoke and Carbon Monoxide Detector with 9V Battery, $27:  This is a good, old fashioned wall-mounted detector that gets 1 9V battery (included!)  You don’t have to have wifi to monitor it.  Just change the batteries once a year and try the “test” button to make sure all is in working order.
  • This Combination Smoke and CO alarm by X-Sense, $40, is popular because it has a 10-year battery, allowing you to skip those battery changes for a while (focus on changing your air filters on time instead!)
  • A Plug-in Carbon Monoxide Detector by Kidde makes sense if you are renting and aren’t provided with a detector, or don’t want permanent installation but want the peace of mind of your family’s safety.  It has battery backup and does include 2 AA batteries (nice!).  Since plugs are often within reach of children, it has a “tamper-resist” mode to alert if it is accidentally unplugged.  It’s recommended to have at least one of these on each floor of your home.

You may be under the impression that these monitors may also protect you from all invisible gasses, like natural gas and propane, but that’s not the case!   Each gas has a different chemical makeup, and the detectors that find them use different technology.   So, if you have natural gas or propane piped into your home, it’s a great idea to also have the appropriate detector ready to sound the alarm if there’s a leak inside.  Here’s where you need to know which gas you have, because propane is heavier than air, so it tends to hang around at floor level, which can be a danger for children or pets who spend more time on or near  the floor.  Natural gas, on the other hand, is lighter than air so it will float up near the ceiling.  We definitely recommend reading the installation instructions thoroughly for any of these monitors, to make sure you place them correctly!  You’ll also want to know the term “LEL”.  These gasses are combustible, but only in the right mixture of fuel gas and air.  The range of combustible mixture is called the “explosive limits”, of which the least amount of gas mixed with the atmosphere is called the “Lower Explosive Limit” (LEL, which is the lean ratio) and the most amount of gas mixed with the atmosphere is called “Upper Explosive Limit” or UEL, also called the rich ratio.  Since the air is a home usually just has traces of such gasses when a leak forms, a detector may only use the LEL, and show “percentage of LEL”.  That means the alarm should go off way before the concentration of fuel gas is strong enough to ignite, like at 5 percent of LEL.  

  • Nighthawk Carbon Monoxide & Combustible Gas Detector, $44, by Kidde does double duty, and comes with a 6 foot extension cord so that it can be properly positioned to detect the correct gas.  It’s plug-in and comes with a 9V battery for backup.  The CO levels read in ppm, and the gas detector simply sounds the alarm with visible “GAS” on the LCD readout.
  • EG’s Natural Gas Detector and Propane Detector, $32, has a clear, easily read display that reads in % of LEL, where the alarm sounds at 5% LEL and you can watch the levels go up or down.  

Since I live in the country, I have a propane tank that is periodically refilled by a propane company.  Recently, while thinking about getting the gas tank in my backyard refilled, I had a thought: what if my piping is leaking in the yard?   How would I know?  Of course, I could call the propane company to come out and “sniff” the connections and ground, but if they are not quickly available, or I just want to make sure I connected my grill correctly to a small propane bottle, it’s not an ideal option.  Here are the portable detectors I thought would be especially good to have for this purpose, and while professionals use instruments that cost hundreds, serviceable home use detectors can be significantly less.

  • TOPTES PT199, $17, is suitable for LPG, methane, ethane, propane, butane, natural gas, coal gas, gas fuel, sewer gas, liquefied natural gas, etc.  Since it’s shaped like a pen, it’s easy to move it around in tight spaces to find leaks (like the back of your stove or at a wall valve).  The alarm will go off at 5% LEL and stay on until the gas clears to a lower level, and it also has an LCD readout of PPM (parts per million). 
  • You can get a professional gas detector at a reasonable price now too:  Klein Tools ET120 Gas Leak Detector, Combustible Gas Leak Tester, $102, has an 18” gooseneck that allows you to hold the instrument with one hand and move the “sniffer” around to probe for a leak.  It will detect methane, propane and other combustible gases at concentrations as low as 50 ppm, but could be used at lower sensitivity to detect concentrations as high as 10,000 ppm.
  • For added functionability, the Gas Leak Detector, Protmex HT609 Natural Gas Detector has temperature and humidity and is suitable for detecting LPG, methane, ethane, propane, butane, natural gas, coal gas, gas fuel, sewer gas and liquefied natural gas. The backlit screen aids in low light.   It has low, medium and high sensitivity selection modes.

Photo by Sugarman Joe on Unsplash

All about Propane and Natural Gas

All about Propane and Natural Gas

I’ve lived in the city, and I live (now) in the country.  In both places, there was a gas line coming into the house that could be used for gas appliances like my stove, dryer, water heater, furnace, etc.  I, like most people, don’t give the gas or these pipes a thought beyond paying the monthly bill, until there’s a leak or a catastrophe.   How can you keep from being on the 6 o’clock news?  By being aware of how these fuel gasses are supplied, and what to look out for!  

I first encountered the difference between natural gas and propane when selecting appliances. You need to know what gas comes in to your home in order to select the right appliance!  Here’s a general rule: if your gas comes from a city source (pipe coming out of the ground with a meter on it), it’s usually Natural Gas.  If you have a tank that needs to be refilled periodically, it’s usually Propane.   Chemically, natural gas occurs “naturally” in the earth, but must be cleaned.  During the cleaning process, propane is extracted.  Propane provides more than twice the heating value of natural gas (2,500 BTUs vs. 1,000 BTUs) per cubic foot, so natural gas costs at least a third less than propane.  Although some prefer natural gas to propane for grilling, it’s difficult to tell the difference between these two gasses.  They are both colorless and odorless, so utilities companies add a odorant (a chemical called mercaptan) so that leaks are easily detected.  Mercaptan is toxic and flammable, but at the levels that it is used to odorize gas, it’s no more harmful than the natural gas or propane.  (The nose can detect mercaptan at a 1.6 parts per billion, and the typical range of odorants in natural gas ranges from 0-10 parts per million). (GPL Odorizers)  Here are some facts about these gasses:

Propane:

  • Is also called “bottled gas”, it’s pressurized between 100-200 psi and becomes a liquid at this pressure (called liquified petroleum gas, or LPG, or LP for short).
  • Like natural gas, propane is one of the cleanest burning fossil fuel products, releasing negligible amounts of emissions. When burned, it leaves no ash and produces practically no sulfur oxides, particulate matter, or mercury emissions. On the other hand, burning propane produces carbon dioxide, a cause of global climate change, and it also emits nitrogen oxides which are key ingredients in the formation of urban smog and ozone. (FactsAboutPropane.pdf)
  • Is used for powering trucks and forklifts operating inside warehouses, so that air quality is preserved for workers.

Natural Gas:

  • Is most often compressed or liquified for transport, however the pressure required to do so is much higher than propane, so transportation and storage tanks are heavier.  
  • Is available in some communities and is delivered by pipeline to homes.  Unless an emergency or planned work causes the pipes to be shut down, it’s always available. 
  • Is mainly methane—a strong greenhouse gas.  The U.S. Energy Information Administration (EIA) estimates that in 2021, U.S. CO2 emissions from natural gas combustion for energy accounted for about 34% of total U.S. energy-related CO2 emissions. (eia.gov)

Many appliances can use either natural gas or propane, but the combustion orifices must be changed to accommodate one or the other.  You can purchase the conversion kit yourself, but due to the hazards of incorrectly installed parts, a licensed professional (plumber or appliance repair technician) should do the conversion. (bobvila.com)  For this reason, it’s often better to purchase the right appliance for your gas from the start, even if it is listed at a slightly higher price than appliances configured for the other gas (a lesson I learned the hard way!).  For example, the burners for gas dryers are often deep inside the appliance, requiring the removal of many parts.  

What’s that flying saucer-looking thing?

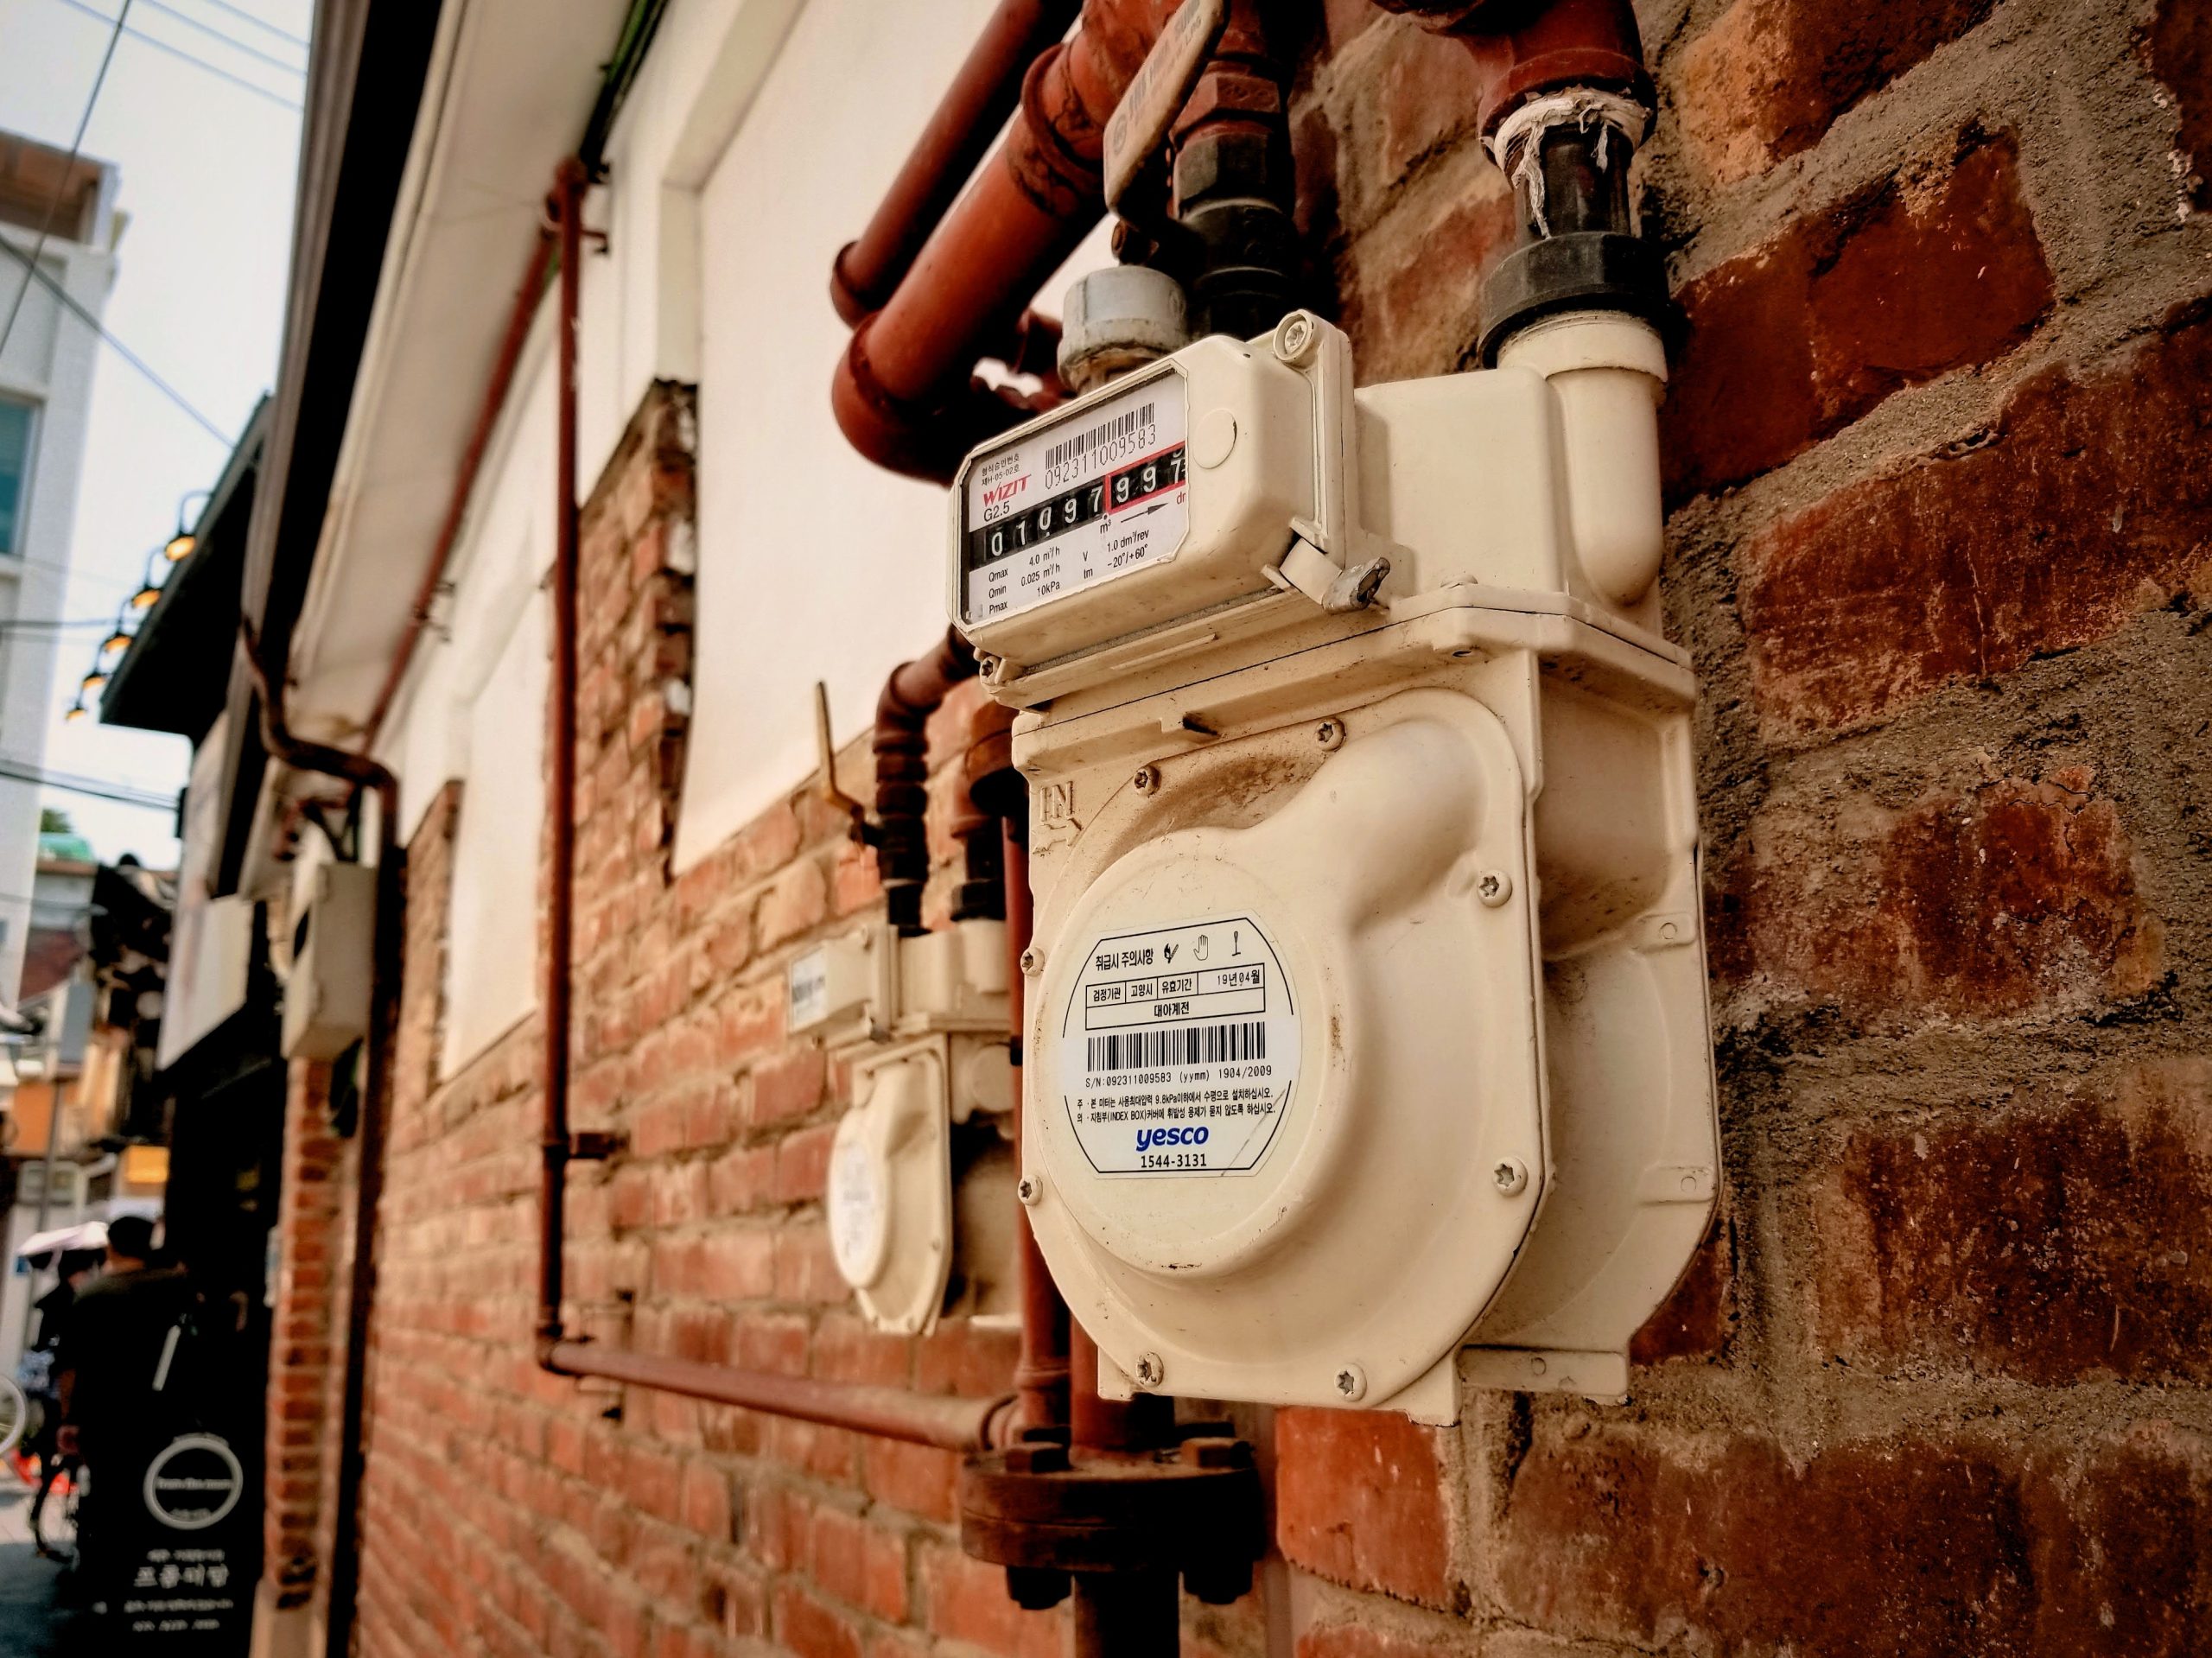
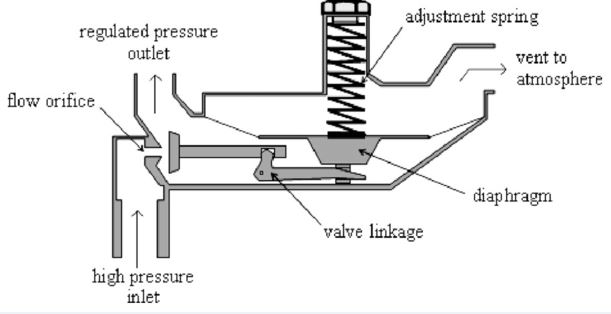
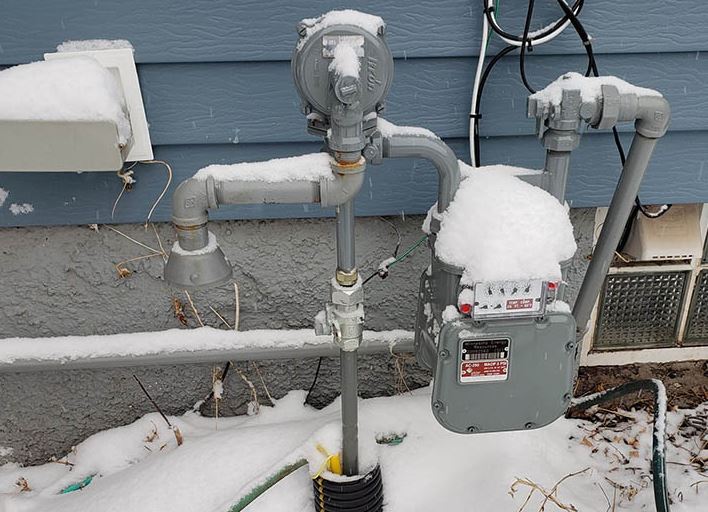
Both natural gas and propane are stored at higher pressures than the appliances use, so the pressure must be reduced before it comes into the appliance, and most often before it comes into your home.  The flying-saucer looking gadget is a “regulator” which reduces the pressure.  High -pressure gas comes into the underside of the circular disk, and is slowly released into the downstream side, governed by a diaphragm inside the disk.  The size of the diaphragm sets the correct pressure for home use.  Because gas can have impurities like rust, condensation, and dirt in it, gas pressure regulators are supposed to be changed out every five years or so.  They are designed to shut the gas flow off if the unit fails, which is good for your home.  Each regulator is typically stamped by the manufacturer with its date of production. (eatingexpired.com) Here’s a really interesting video showing how the regulator works.  Gas pressure regulators are designed to be installed close to the end use of the gas (ie, right outside your home or next to your gas barbeque grill).  Here’s something else I did not know: if you live in an area that gets a lot of snow, make sure to gently clear it off your gas meter/regulator, so that the vent on the regulator does not get blocked.  This is the reason that regulators should not be painted–you don’t want to block that vent. 

Source: The Dallas Morning News

Outside, the gas meter, shutoff valve and regulator are usually located next to the home, but occasionally they are located closer to the street (see above photo of a meter in a parking lot).  If this is the case, be proactive and ask your service provider to install a guard around it!  Collisions and damage by vehicles happens more often than you think.  

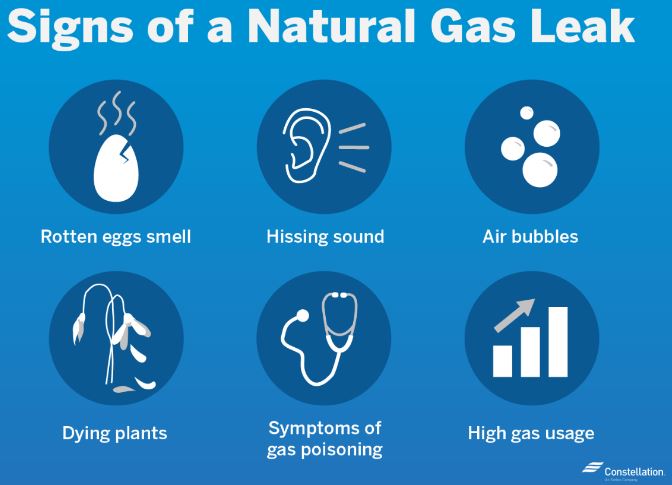
Because they come into the home under pressure, both natural gas and propane have a risk of leaks from piping or appliances.  If a new gas appliance has been installed recently in your home, or any maintenance has been done on your gas pipes, be especially vigilant of the smell of gas or  any of the following signs.  One exception is if you have a propane tank, and the gas gets low in the tank.  In this case, the smell is actually designed to let you know it’s time for a refill:  propane gas contains a few chemicals. One of these chemicals condenses out and collects as a liquid in the bottom. When the tank is low, the reduced pressure causes the odorant to evaporate and makes a strong gas odor.  Normally, gas companies recommend not letting your tank go below 20%.  If it’s refilled at that point, the gas smell should dissipate within about 2 hours.  (Wheat Energy Services)  If the gas is allowed to run out completely, a pressure test is required by the National Fuel Gas code, because joint compound used on the pipes may contract and cause leaks.  

Source: Constellation.com

If any of these are apparent, start investigating immediately. If the smell is strong, leave the area immediately. If the gas smell is faint, you may wish to try to locate the source by smell and a bubble test. Do not attempt a repair. (Five Common Home Gas Leaks You Should Know About)

  • If inside, turn off any stove or oven burners that are on; open windows and doors

  • Leave the area; go to the home of a friend or neighbor a safe distance away (Staying in your home or near the leak to make a cellphone call could spark an explosion)

  • Call a licensed plumber, your gas company, or 911 to report the smell (first responders often arrive before gas company technicians)

  • Do not turn any electrical switches on or off

  • Do not use any kind of telephone, garage door opener, doorbell or even a flashlight

  • Do not smoke, light a match or lighter

  • Do not stop or start a nearby vehicle or piece of machinery

  • Do not attempt to shut off the natural gas valve

Of course, you know the rotten eggs smell.  If there are no rotten eggs around, suspect a leak!  If you’ve just connected a propane tank to your gas grill, make sure to turn off the valve and check hose connections, let air circulate in and around the grill for five to ten minutes, and try again. Hissing sounds are a sure sign of gas escaping, so try to turn off the supply (by hand, without using tools) if possible.  You can also use a mixture of water with a few drops of dish soap in a spray bottle to find the leaky connection: simply spray it on the connection, crack open the gas valve, and look for bubbles. 

I used to think that natural gas leaks were rare.  However, since the supply lines are buried, water eats away at the pipes and shifts in the ground from drought, construction and earthquakes can cause cracks and leaks as well.  Apparently there are gas leaks everywhere, as this article points out, but most gas companies only fix those that are large or close to structures.  A leak can show up as air bubbles coming up through a mud puddle, or it can kill houseplants and outdoor plants.  The presence of natural gas prevents a plant’s roots from absorbing oxygen and can lead to wilting. Natural gas leaks can also cause smaller-than-normal leaves on trees, wilted plants and yellowish patches of grass. (Constellation.com)   One customer in northern California planted successive blueberry bushes that died each time he planted them, without knowing there was a gas leak on the edge of his property. (inewsource.org)

Although they may be signs of other types of illness, headaches, dizziness, fatigue and nausea are all symptoms of natural gas exposure.  If it is a gas leak, it will probably affect most if not all of the people in the home.  It’s very dangerous, because eventually the gas will cause suffocation and death!  If your family is experiencing these symptoms, leave the home and call 911. 

Finally, if your monthly gas bill is unusually high without the presence of very cold weather, suspect a leak and let your service company know as soon as possible.  

Even if your gas meter has not been struck by a vehicle, tool or tree, the meter or associated piping could still be leaking.  Dan Thomsen, whose company Building Doctors focuses on energy efficiency, said on about 25 percent of the homes he surveys, he finds a gas leak somewhere. (inewsource.org)  Here are some of the most common places that natural gas or propane can leak directly outside, or inside the home (Five Common Home Gas Leaks You Should Know About):

  • Gas riser – The gas riser is the pipe that emerges from the ground to connect the gas supply to your gas meter.

  • Gas regulator – the disc-shaped device near your gas meter that controls gas pressure going into your home.

  • Fireplace valve – the valve you turn with a removable key to turn on and off the flow of gas to a gas fireplace.

  • Pilot lights – these ignite the gas to produce a flame when you want to cook, heat your home or get hot water.

  • Joints and fittings – any visible joint or fitting that may not be sufficiently tightened.

Natural gas and propane make living easy and very convenient; after all, many appliances that run on gas will still work when the electricity is out!  However, supply and use of these gasses requires care and vigilance.  To help ensure that no leaks go undetected, you can also purchase and install a natural gas/propane monitor for your home (they are NOT the same as carbon monoxide monitors).  These monitors should be installed near the appliances that use the gas; however, propane is heavier than air so the monitor should be mounted near the floor, while natural gas is lighter than air so the monitor should be mounted at a height above the door and window openings. Change the battery(s) whenever you change your smoke alarm batteries, and you should be good to go!

Photo by Andrea Davis on Unsplash

Some natural methods to avoid getting the Flu

Some natural methods to avoid getting the Flu

Another virus has dominated the headlines this fall and winter 2022, an old nemesis that changes disguises (varieties) every year to trip us up–Influenza.  Of course, you could always take a gamble that the Flu vaccines offered in clinics will match the real cocktail of virus in the air, but there are a lot of other ways to reduce your chances of contracting this illness that don’t involve needles.  Let’s get started!

Yes, masks, social distancing and hand-washing are still part of the solution.  Some health advisory authorities, like the California Department of Public Health, are basing mask recommendations against flu on COVID-19 illness risk in your area, because flu and RSV (Respiratory Syncytial Virus) spread in similar ways to COVID-19.  The CDC has a searchable risk database by county here,  Infants and young children, as well as older adults and those with chronic medical conditions, are most at risk for RSV, which can cause bronchiolitis (an inflammation of the small airways in the lung) and pneumonia. (CDC.gov)  For more on masks, check out our article here.

Avoid air pollution.  It doesn’t seem like crisp winter air should come with air pollution flags, but unfortunately winter sometimes hosts the worst conditions of the year.  There are several different types of a phenomenon called “inversions” (which are well-explained in this video from the University of Illinois Extension), but they all involve a warmer layer of air above a cooler layer of air, restricting air movement and causing pollutants to be trapped near the earth’s surface.  That bad air quality will likely contain elevated levels of fine particulates like PM2.5 and PM10, carbon monoxide (CO) and sulfur dioxide (SO2), which were all shown to increase the risk of influenza-like illness (ILI) in Jinan, China (The short-term effects of air pollutants on influenza-like illness in Jinan, China, 2019).  If your area is known to have moderate to bad air quality days, keep an eye on it and adjust your plans accordingly!  Airnow.gov, breezometer.com and local news stations can all help you stay informed and healthier.

These tips can help you stay healthy against a plethora of diseases (dispatchhealth.com):

  • Stay active: get out and rake leaves, or take a brisk walk around the neighborhood or around your local mall if the weather is inclement.  Routine exercise is a simple and smart way to bolster your immune system and improve your overall health.

  • Rest well; try to get 7-9 hours of sleep every night, because sleep is critical to a well-functioning immune system.  If you have difficulty getting to sleep, reduce your caffeine intake after noon, don’t use digital devices in bed, and try a melatonin supplement.

  • Take your vitamins–in your food!  Foods that are rich in vitamins A, C, D, E, zinc and selenium naturally boost your immune system, while foods that have lots of added sugar, salt, and fried and highly processed foods may do the opposite (avoid them).  (Healthline.com)

  • Consider herbal supplements (7 Natural Remedies for Preventing the Flu):

    • Echinacea.  As shown in a 2015 study in the Czech Republic, Echinaforce Hotdrink is as effective as oseltamivir (Tamiflu Oral) in early treatment of confirmed influenza virus infections.  If this particular drink is not readily available, you can take tablets containing 6.78 milligrams of echinacea extract two to three times a day, having 900 milligrams of Echinacea root tincture daily or five to six cups of echinacea tea on the first day of symptoms, and then 1 cup a day thereafter. 

    • Oregano oil has powerful antiviral effects, too: you can take 500mg twice daily to help reduce the effects of a cold, as well as fight it off.

    • Essential oils used in a diffuser can help with congestion and headaches, as well as preventing airborne viruses from being able to infect you.   Clove,  peppermint and eucalyptus are some of the most popular.  According to a 2021 review, essential oils from Eucalyptus are recognized for their broad spectrum of action, such as antibacterial, antifungal, antiviral, anti-inflammatory, anti-immunomodulatory (against diseases that suppress the immune system), antioxidant, and wound healing properties.  One study that was reviewed showed that when the pure eucalyptus essential oil was actively diffused with a nebulizer for 15 seconds (oil concentration: 125 μg/L of air in the chamber), Influenza Virus-A was completely inactivated in the air.

And of course–keep your bipolar ionizers running!   The Germ Defender, Air Angel and Whole Home Polar Ionizer produce positive and negative ions that can disable viruses and bacteria on surfaces and in the air from across the room.  We have posted links to some of the scientific studies on this technology here.   We’re hoping that this winter you can use these natural tips to make more good memories with family and friends, and less memories of illness, missed work and school from the flu!

Photo by Suhyeon Choi on Unsplash

The unintended consequences of turning down the thermostat this winter

The unintended consequences of turning down the thermostat this winter

According to the Energy Information Administration and their Winter Fuels Outlook report, it will cost 27 percent to 28 percent more than 2021/2022 to heat your home with oil or gas.  If you heat with electricity, prices may rise by as much as 10 percent, because much of our electricity is generated from oil and gas. (Newsweek.com)

When you have a fixed or unstable budget, the decision to lower or turn off heat during the winter is not easy.  The other components of our budgets–food, housing, transportation and medical care–aren’t as flexible as those extra blankets, mittens and hats, so down the thermostat goes.  This is where what you don’t know might hurt you.

It’s not only the air temperature that changes when the heat source turns off.  Air holds a certain amount of water vapor, also called humidity, and warmer air can hold more water vapor than cooler air.  When the air cools, water vapor in the air will tend to condense on any surface that is lower than the dewpoint temperature.  That’s why you see condensation on windows and around door frames in winter: these are the points that tend to conduct cold temperatures from the outside, and moisture from the air is condensing on them.  Persistent moisture is mold-feeding moisture, and before you know it, there is a mold problem.  Even worse is that mold could be forming in places you can’t readily see, like inside walls, attics and basements, because the air temperature has dropped and cooler air just can’t hold the moisture of warmer air.   Cooler air can easily reach humidity levels of 80% or more, giving that “damp” feeling and over time, exposing the home to mold growth.  

There is a myth that when a room is not being used, it’s best to turn off heat (close registers) and close it off from the rest of the house (close the door) to save money.  If this is done without any ventilation or air circulation, it’s also a recipe for mold, because without air circulation, water vapor in stagnant air will be absorbed by furnishings and allow mold to take root.  If you need to limit heating in your home, try to leave doors to unused rooms at least cracked and leave a fan running in the room, because dynamic airflow limits moisture ingress due to evaporation. For more on finding and fixing areas prone to mold in the winter, check out our article.

If high humidity is not a problem, low humidity might be.  Low humidity can damage all kinds of decor in your house by shrinking and drying, from wood flooring, wallpaper, and furniture to fine instruments like pianos and guitars and artwork.

Then, there’s your body.  Stress due to cold is a real problem for the elderly and those with pre-existing medical conditions like asthma or heart disease.  It also makes people more likely to use alternate heating methods that could be unsafe.  Small room heaters are often known to tip over and cause fires, and electric blankets can actually cause burns.   Falling asleep on a bunched-up blanket is a common cause of burns, according to Bell, a plastic surgeon who treats many burn patients. He explains that when a hot blanket rests on the same body part for an extended period, the skin can burn. “These burn accidents usually happen because someone has fallen asleep on a bunched-up area of the blanket,” he says.  Unfortunately, people with diabetes are more vulnerable to burns from electric blankets because their condition makes them less sensitive to heat. “Electric blankets are also not recommended for infants, young children or anyone who is paralyzed or incapable of understanding how to safely operate them,” says Bell.  People with urinary incontinence also should not use electric blankets because wetness and electricity don't mix. (ul.com)  If you do use an electric blanket, follow all the safety guidelines of UL Solutions (previously Underwriters Laboratories) so that you don’t become one of these statistics!

When home heating costs rise, air quality can also worsen due to particulates in the air.  In Europe, the impacts of inflation and fuel scarcity due to the Russian-Ukrainian war is particularly hard on middle and lower income families, and they turn to alternative sources like burning wood, coal and even garbage in indoor stoves.  These stoves impact indoor and outdoor air quality.  Indoors, reloading a stove that is already burning fills the air with particulates, and combustion gasses can leak out of improperly-sealed doors and exhaust pipe fittings, exposing inhabitants to dangerous levels of carbon monoxide and particulates.   Outdoors, European cities that typically have poor air quality during the winter may have even worse this winter. A recent study from Greece showed that wood burning was responsible for almost half of the cancer-causing air pollution in Athens and a new study from New Zealand has showed an increase in serious respiratory infections when wood smoke built up in an area. (TheGuardian.com)  If you live in one of these areas, it doesn’t matter whether you are the one burning wood–you will still be breathing its effects. 

If you feel financial pressure to lower the thermostat this winter, here are some practical ways to keep the air warmer and less humid in your home (Prof Cath Noakes from the University of Leeds):

  • Move seating away from cold windows
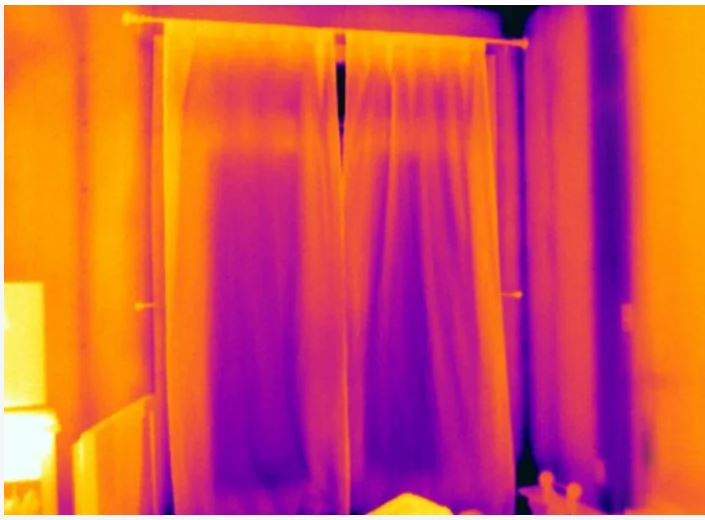
  • Use thick curtains at night, but allow the sun to come in during the day
  • Ensure radiators or ventilation registers are not covered or blocked by furniture
  • Ventilate using high-level windows can reduce cold drafts
  • Ventilating after a shower or when cooking can prevent moisture buildup which can lead to damp and mold.

It’s sometimes harder to detect high humidity in the winter because of the lower temperatures, so don’t take a risk–keep one or more humidity sensors in your home for monitoring it.  Our bipolar ionizers like the Germ Defender, Air Angel or Whole Home Polar Ionizer actually deter mold even if humidity temporarily goes too high, making them great investments for all seasons. 

Finally, if you have a warm home, sharing it with your elderly, disabled or disadvantaged friends for a meal or a few hours could make a huge impact in their lives.  Helping them to purchase safe heating appliances and understand how to keep humidity at manageable levels also will help them to live healthier.  Warmth is not always about containment, but allowing it to radiate to others. 

Photo by Will on Unsplash

The Science of Dust

The Science of Dust

Dust.  It’s not just harmless dirt that builds up on fan blades until we can’t turn the fan on any more for fear of clumps flying everywhere.  It’s a combination of skin cells, pollen, dead bugs, bacteria, soil, dander and various fibers. (iaq.works)  Dust also carries SVOCs, or semivolatile organic compounds, that are emitted from materials and products like plasticizers from plastic products and flame retardants from upholstered furniture. "Unlike VOCs, that you can smell and that warn you of their presence, SVOCs are called stealth chemicals. They are odorless, ride on dust, and are insidious underminers of our health, "  says Marilee Nelson, co-founder of Branch Basics.  (wellandgood.com)  Then, there are the dust mites, which are microscopic organisms that feed on dust.  All in all, dust is even more disgusting than it looks!

My all-time least favorite chore as a kid was dusting.  It didn’t require a load of physical exertion, so it must have been the sheer tediousness of moving the same stuff to dust around it week after week.   We used lemon-scented Endust in the 70’s and 80’s, which actually should have made me a little giddy (it had odorless mineral spirits and 1,1,1-trichloroethane with a propellant blend of butane and isopropane, of which inhaled 1,1,1-trichloroethane acts as a central nervous system depressant and can cause effects similar to those of intoxication)...yikes!  (chemeurope.com)  Why haven’t we invented a way to keep the dust off permanently?    

I guessed the answer had something to do with static electricity.  Apparently, the “mechanism of particle adhesion” works against us in allowing dust to settle on furniture and objects in our homes.  According to Keyence.com, producer of static eliminators and ionizers, “When dust is carried on air currents generated by air conditioning and similar devices, the dust takes on a positive or negative static electric charge due to contact with various objects. Dust that has a positive electric charge will be attracted to objects that have a negative electric charge, and vice versa. The greater the amount of dust in the air, the larger the amount of dust that clings to objects within the room.

Also, if sources of dust (mainly people and clothing) are electrically charged, the dust that is generated from these sources is electrically charged as well. This attractive force generated by static electricity is known as “Coulomb force.” 

The solution to particle adhesion is to eliminate the static electricity from the object’s surface and from the air up to a few millimeters from the object’s surface.  This is easy to do using a static eliminator, which charges the air with ions.  This removes the static charge from the particles and prevents them from reattaching.  There are also lots of “anti-static” polishes on the market, however, their toxic ingredients may or may not be disclosed.

Also, the answer to dusting less also has to do with humidity.  Humidity does not reduce the literal amount of dust in your home; instead, humidity causes dust particles to adhere to one another, making them too heavy to travel through the air. Thus, dust particles are still present in your home, but the ideal humidity level makes dust particles quicker to settle and easier to clean.  

In addition, when the indoor humidity level is between 40 and 60%, dust mites are unable to thrive and spread. Dust mites prefer extremely humid atmospheres because they absorb moisture from the air in order to survive.

So, apparently there are two things that tend to keep dust (and dust mites) down to manageable levels: ionized air and the right humidity.  We fully endorse both!  Most of the HypoAir air purifying products include a bi-polar ionizer, which has the capability to kill germs at a distance by attacking them with the same ions that control the dust.  We also like to talk about keeping your home at the right humidity to fight mold growth and germ dispersion.  It’s a win-win!

With ionization and the right humidity in place, getting rid of the remaining dust should be manageable.  Cleaning experts give these tips to get the most out of your cleaning tools and time:

Get rid of feather dusters and dry cotton cloths, because they are simply flinging the dust into the air.  Also, don’t use damp cotton cloths, because they leave streaks of dust behind.  The best tool is a microfiber cloth (again, microfiber is better at holding a slight “charge” to attract dust) and your favorite all-purpose cleaner, like one of the following: 

  • HypoAir’s TotalClean, a non-toxic multi-purpose cleaner you can use throughout your home

  • Force of Nature, a non-toxic hypochlorous cleaner that can sanitize or disinfect surfaces depending on the concentration

  • Branch Basics, a non-toxic plant and mineral based cleaner

For wood surfaces, you can add some drops of a non-damaging essential oil to the spray bottle, so that wood surfaces don’t dry out and retain a nice shine. Orange oil is great for this purpose.  Since many ingredients are not disclosed on commercial dusting sprays, it may be tempting to make your own DIY dusting spray, and there are lots of recipes on the internet.  However, look at the ingredients closely, because vinegar is a key ingredient in many recipes, and it can damage many surfaces in your home.  

If an area has more dust than usual, or to avoid switching cleaning cloths too often, you can use your HEPA vacuum cleaner with a soft head attachment to “pre-dust”.  Of course, standalone HEPA filters running part-time or full-time will cut down on a lot of dust.  

Keeping the dust down in your home can lead to less allergies, sickness, and over time, better overall health because of the way ultra-fine particles can penetrate our lungs and migrate to different areas in the body.  With the right conditions (ionized air and the right humidity) and tools (microfiber cloths, non-toxic cleaners and a HEPA vacuum), regular dusting can be manageable, kind of like flossing your teeth.  Reveal the beautiful side of your home and get dusting!

Photo by Austin Ban on Unsplash

Cleaning vs. Sanitizing vs. Disinfecting: There is a Difference

Cleaning vs. Sanitizing vs. Disinfecting: There is a Difference

Hold on, we’re going to break some common misconceptions in this post!

Misconception #1: What room do you think is the dirtiest (germiest) part of your house?  

Most people said that it is the bathroom (in a study of 22 families), but in reality, it is THE KITCHEN.  Coliform bacteria –indicating possible fecal contamination—was found on: (from the Association of Home Appliance Manufacturers)

More than 75% of dish sponges and rags

45% of kitchen sinks

32% of countertops

18% of cutting boards

Overall, the 10 germiest items in the household, listed in order, are:

  • Dish sponges/rags

  • Kitchen sink

  • Toothbrush holders

  • Pet bowls

  • Coffee reservoir:  (NSF’s 2011 International Household Germ Study found yeast and mold present in 31% of households studied. In half of those, it was found in the coffee reservoir of the coffeemaker.)

  • Bathroom faucet handle

  • Pet toys

  • Countertops

  • Stove knobs: Staphyloccus aureus (staph), a common and potentially harmful type of bacteria,was found on stove knobs in 5% of the homes where the bacteria was discovered.

  • Cutting boards

Misconception #2: In the US, we tend to use the words cleaning, sanitizing and disinfecting interchangeably, but they really are not the same!  

Many people use vinegar to clean because it is a “natural” non-toxic product, but it does not sanitize.  “It’s a misconception that if you’re using vinegar to clean, you’re sanitizing,” says Mindy Costello, a registered environmental health sanitarian and the National Science Foundation’s (NSF) consumer product certification specialist. “Cleaning is just removing the soil. In sanitizing, you’re killing the microorganisms (bacteria, viruses and fungi).” If you want to reduce your risk of getting sick, sanitizing is the way to go. (Association of Home Appliance Manufacturers)  Sanitization reduces contamination or bacteria to a safe level.

Now, if you really want to go all-out, disinfection kills everything on a particular surface, according to Travers Anderson, R&D Group Manager at Clorox.  

Now that you know what cleaning, sanitizing and disinfecting are, where and when should they be used?

According to Mr. Anderson at Clorox, sanitizing is best for surfaces that don't typically come into contact with hazardous bacteria, or those that shouldn't come into contact with powerful chemicals: Think cooking tools and food prep surfaces or toys that children come into close contact with (or put into their mouths). Disinfecting is for the big messes, particularly those involving bodily fluids, blood, and the like. In household settings, you'd disinfect a toilet or sinks. (realsimple.com)  

Sanitizing can be done with a cleaning product, or with appliances that have this built-in feature, like a dishwasher or washing machine.  These appliances do so with high heat during the cycle.  It’s important to use these cycles to sanitize your laundry and dishes regularly, especially clothes and dishes worn and used by people who are ill. Sanitize high-contact surfaces regularly, and do dishes as soon as possible, as bacteria begins to grow after about two hours on soiled dishes left at room temperature according to Ms. Costello of the NSF.

Dishwashers and washing machines are tested by the NSF to ensure their sanitizing cycles are faultless.  Clothes washers must show that the sanitizing cycle removes 99.9% of microorganisms from laundry and dishwashers must show a reduction of 99.999%. During testing, three common organisms – staphyloccus aureus, klebsiella pneumoniae, and pseudomonas aeruginosa – are added to the loads of dishes or laundry. The level of bacteria is tested afterward. The water in dishwashers that earn the NSF mark for sanitization must reach 150 degrees Fahrenheit during the final rinse and stay at or above that temperature long enough to achieve the 99.999 % reduction.

The sanitizing cycle doesn’t need to be used on every load of clothing, however, because the high heat can cause colors to fade and fibers to wear over time.  It’s a good idea to use it when laundering clothing or bedding from someone who’s sick, or when washing sweaty clothing, or when towels or clothing smell musty–indicating mold growth.  (realsimple.com)

To sanitize sponges and dishrags, heat them in the microwave for two minutes while they’re wet.  

As for cleaning products, we are all for non-toxic ones.  TotalClean is an all-purpose cleaner and deodorizer that is safe to use in all areas of the home, from the kitchen to the bathroom to your childrens’ toys.  It hasn’t been tested according to the EPA’s requirements for sanitizing and disinfection yet, so we recommend it for cleaning purposes and will advise when these tests are completed!  

Bleach is a sanitizer at low concentrations and a disinfectant at higher concentrations.  However, bleach has toxic VOCs and we don’t recommend it.  Instead, try hypochlorous acid.  Even though it sounds toxic and it’s related to bleach (hypochlorite), hypochlorous is much safer as well as being a far superior disinfectant to bleach.  One of the most fundamental reasons for this is its pH. Hypochlorous acid exists at a near-neutral pH (5-7). Bleach resides at a highly-alkaline pH (8-13). The germ-killing properties of bleach are derived from the presence of hypochlorous acid. However, because of its high pH, the majority of the hypochlorous acid present in bleach ends up getting converted to hypochlorite, which is a less effective disinfectant.  (hypsosource.com)

Here’s something else you may not know: the dirtier the surface is, the less effective the disinfectant is. (sfgate.com)  Switching from using bleach to hypochlorous as a sanitizer is not complicated at all, but it may mean you need to adjust some of your cleaning protocols. For example, cleaning the area with regular soap and water first to remove the bulk of organic material present allows your sanitizer (hypochlorous acid) to disinfect much more effectively. Otherwise, the chlorine in the hypochlorous gets used up trying to break down the organic matter, instead of focusing on killing the more resilient pathogens. (hypsosource.com)  

If you aren’t convinced, check out the following table.   It shows that hypochlorous needs less concentration (parts per million or ppm) and less contact time than bleach to do the same or better job at disinfection!

Source: hypsosource.com

Now that you know about hypochlorous acid, check out the following disinfectants::

  • Force of Nature is a multi-purpose cleaner & EPA registered disinfectant that kills 99.9% of germs. It’s even EPA approved for use against Covid-19.  Best of all, you can easily make more cleaner at home with their small countertop appliance plus a capsule of salt, water & vinegar.  No bulky plastic bottles to tote home or try to recycle!  Force of Nature is hypochlorous acid, a powerful disinfectant.

  • Clean Republic’s All Purpose Cleaner is also hypochlorous acid, and it comes pre-mixed in 3 small spray bottles for $15.  The size of the bottles mean that you can carry them in your car or stash them in small spaces to use whenever and wherever you need to!  

  • Cleanwell Botanical Disinfectant Cleaning Wipes are also a great on-the-go disinfector.  They use Thymol, which is a component of botanical thyme oil that was approved in 2020 by the EPA as an effective disinfectant against SARS-CoV2, the virus that causes COVID-19. It also disinfects bacteria and viruses including MRSA, Salmonella, H1N1, Influenza A, Staph, E-Coli, Norovirus, Rhinovirus, and more. The thyme scent is very pleasant.

  • The Honest Company Disinfecting Spray uses hydrogen peroxide to clean, disinfect, and deodorize while meeting EPA’s criteria for products effective against SARS-CoV-2 and a laundry list of other germs. If you’re familiar with hydrogen peroxide, it’s one of our favorite non-toxic cleaners that you can safely use on food surfaces and children’s items.  However, it can be a bit harsh, etching marble and granite, it shouldn’t be mixed with vinegar, and can discolor fabrics.

Disinfecting shouldn’t require heavy gloves, eye protection and a respirator! Knowledge is power, and you CAN disinfect without smelly, toxic chemicals.  It’s just a matter of changing your mindset and your tools (cleaning products), so that it’s easy to do.  Breathe easier knowing that your home is clean AND disinfected, the non-toxic way! 

Photo by Kelly Sikkema on Unsplash

The Consequences of Flushing the Toilet with the Lid Open

The Consequences of Flushing the Toilet with the Lid Open

Spoiler alert: the consequences are not pretty.  This calming (Australian?) voice and wonderful orchestral soundtrack in this December 2022 video belie the serious and gross subject: how much germs and fecal matter shoot out of a toilet when you flush it.  The University of Colorado Boulder researchers who produced the video found that airborne particles ejected from the toilet traveled at speeds of up to 6.6 feet per second (that’s a very fast walk at 4.5 miles per hour) and reached 4.9 feet above the toilet and smaller particles measuring less than 5 microns hung in the air for more than a minute. 

It’s not a new subject (the subject was first revealed in a 1975 study, and another 2013 study warned about the toilet plume) but the video using UV light brings it to the forefront of our minds and hopefully, engages us in healthier bathroom habits such as closing the lid and sanitizing surfaces more frequently in our own private bathrooms. 

So what should we do?

Ever since Febreeze informed us that odor can be caused by bacteria, bathroom odors are particularly noxious, as we know that the substances that cause it definitely have dangerous bacteria.   There are different ways of removing/preventing bathroom odor (and thus bacteria).  In light of the knowledge of toilet plumes, toilet sprays like PooPourri, although emitting a pleasant odor, seem to be one of the least effective because while spraying on the bowl creates a scented vapor, it does not prevent the emission of bacteria and particulates into the atmosphere.  Other products on the market that have been invented to remove toilet odors at the source, using hardware to pull vapors from the bowl area.  These include:

  • Potty Sniffer Toilet Odor Ventilation System ($271 and up): fan directs air from bowl into a nearby vent.  This is the preferred place to direct these gasses.  However, installation is a bit more complicated as connecting to a vent may require to drill into drywall or cabinets, which needs work to conceal. 
  • JonEvac  Toilet Seat Ventilation System ($300): Replaces your toilet seat with a special seat that has ventilation channels on the underside.  Fan needs to be plugged into a regular wall outlet and activated carbon filter ($80) needs to be replaced every 1-2 years.
  • Splashblocker was invented primarily for hospital settings.  It is a portable “shield” to protect healthcare workers from disease and hazardous drugs (like chemotherapy) that are excreted in patients’ waste, which are aerosolized whenever the toilet is flushed. Previous to this invention, caregivers often placed plastic-backed absorbent pads (such as are used in keeping beds dry from incontinence) over the toilet before flushing, but the cost of these adds up and can easily be sucked down the toilet, creating big plumbing issues.
  • According to this 2020 study, a redesigned toilet seat that can spray a “liquid curtain” of water or sanitizing solution over the bowl when you flush can effectively impede upward movement of particulates, and only 1% of (bacteria/virus-laden) aerosols enter the air above the toilet seat.

The forceful flushing of vacuum-assisted flush toilets, which are commonly used in public restrooms (and all airplanes), actually do a great job of eliminating the toilet plume.  This video uses blacklight just like the study at the beginning of the article, and the difference between regular toilets and this vacuum system seem to be huge.  There were no particles coming out of the vacuum-assisted toilet, but many coming out of the regular flush toilet.  Vacuum-assist toilets still use water to help flush, but nowhere near the amount of regular gravity systems.   This fact comes from the AcornVac website (a manufacturer/supplier of vacuum toilet systems): “a 500 person commercial office building that is serviced by a single vacuum center and 1/2 gallon per flush vacuum toilets will save over 265,000 gallons per year, compared to conventional low flush toilets.”  Water savings aside, I think that the absence of a toilet plume when using a vacuum toilet is their greatest benefit, and it makes me feel a whole lot better about using the bathroom on airplanes!

What happens when the lid is lowered?

Since vacuum-assist toilets and shields are not commonly installed in residences, most people have only a lid to guard against the toilet plume.  What happens when you put the lid down and flush?  Obviously, there are particulates and germs landing on the inside of the lid.  (This is an area that gets skipped over when cleaning, I’m sure!)  The rest of the particulates exit through the spaces between the toilet, seat and lid.  Here are the good and bad results of flushing with the lid down, assessed by researchers at University College Cork:

  • Reduced the number of both visible and smaller droplets during and after flushing by 30-60%
  • increased the diameter and concentration of the bacteria in these droplets.
  • airborne microdroplets were detected for 16 minutes after flushing the toilet with the lid down, 11 minutes longer than when the toilet was flushed with the lid up. 
  • Another study concluded that lowering the lid before flushing “reduced 48% of total number concentration, 76% of total surface area concentration, and 66% of total mass concentration, respectively.”

Using the lid when flushing definitely helps, however some aerosols are still shooting out, and hanging around even longer.  What are the other things we can do to protect from THE PLUME?

  1. If you are in a public place and concerned about transmission of disease, put on an appropriate mask before going into the restroom–at least the aerosols should be filtered out of your air, and germs will not land on your nose or mouth.  As always, wash your hands thoroughly, and don’t touch your mask or face!
  2. If you’re at home, it goes without saying to clean regularly.  
    1. Use a non-toxic disinfectant on all surfaces in the bathroom.  Check out our article on the differences and methods of cleaning, sanitizing and disinfecting. 
    2. Change hand towels frequently, at least twice per week.  For towels and clothing that have been exposed to toilet plume, you can add Borax to your laundry, or pre-soak with it, as it turns into hydrogen peroxide when hot water is added to it.  It’s also generally safe for colored clothes.
    3. Use a HypoAir bipolar ionizer like Germ Defender or Upgraded Air Angel Mobile to sanitize the air and surfaces in your bathroom 24/7!
    4. Leaving your toothbrush in an open place on the bathroom counter sounds icky (for obvious reasons), but stashing it away in a plastic container or drawer is not advised either.  According to a meta-study published in 2012,  toothbrushes stored in aerated conditions had a lower number of bacteria than those stored in plastic and bacterial growth on the toothbrush increased 70% in a moist, covered environment.  What should we do with our toothbrushes?  Sanitize your toothbrush regularly by soaking it in hydrogen peroxide, Listerine, or using an approved UV sanitization device (but not in the microwave). (Is your toothbrush covered in poop? Here's how to thoroughly clean it)
    5. It’s best to switch on your bathroom exhaust fan before every flush, and leave it running for at least 15-20 minutes afterwards.  If your exhaust fan does not seem to remove odor very quickly, then you know it’s not removing the “toilet plume” aerosols.  It may be under-sized, or just old and inefficient.  Because the bathroom exhaust fan is also a very important appliance to remove humidity (and thus prevent mold), check out our article on how to check its size and where it should be vented!

Sorry, I know after seeing that first video, I couldn’t “un-see” it, but I’m grateful that non-toxic cleaners and laundry methods have been invented.  We just need to somehow lower the cost of vacuum-assisted toilets, and bathrooms will get a lot cleaner!  

Advances in Phototherapy

Advances in Phototherapy

Phototherapy, or light therapy, is the exposure to direct sunlight or artificial light at controlled wavelengths in order to treat a variety of medical disorders. (Light therapy) Light therapy has been around for a long time.  Natural sunlight is free and abundant in many climates, and doctors have known that it does other things for our bodies like assisting in producing vitamin D, elevating mood and killing dangerous bacteria and mold on our skin.  However, natural sunlight is not always available, and also has ultraviolet wavelengths that can be dangerous in longer doses.  New technology is able to select the wavelengths and with the right exposure, provide the same healing benefits as natural sunlight without additional skin cancer risks. 

Phototherapy is now a standard treatment for skin conditions like psoriasis (raised, red, scaly patches on skin), vitiligo (loss of color on patches of skin), eczema (a condition that makes your skin red and itchy), as well as various forms of skin cancer.  The key to healing is selecting the correct wavelength, intensity and duration of exposure, which are determined by research trials on animals and humans.  Ultraviolet light has been classified into three groups of descending wavelengths: UV-A, UV-B and UV-C (for more in-depth explanation on wavelength, visit our article here).  UV-A and -B are the types used for phototherapy, with UV-B being further broken down into narrow-and broad-bands.  Narrow band UV-B has been found to be most effective for psoriasis, for example, and can be produced by traditional ultraviolet lamps, or LED bulbs.  Excimer lasers have been approved by the Food and Drug Administration (FDA) for treating chronic, localized psoriasis plaques by emitting a high-intensity beam of UVB. (Phototherapy)  These treatments can be applied in doctors offices or at home using approved medical equipment and prescription.

Since we know that sunlight has the power to purify water and disinfect surfaces like sheets, fabric and plastics, we know that it is actually killing microbes as well.  Again, it’s the UV wavelengths in sunlight (including UV-C) that break up DNA and inactivate microbes and mold.  Why not apply this to skin and wounds to kill infections?  Ultraviolet light was first used to sterilize bacteria over 100 years ago, a treatment based on the work of Niels Finsen, who won the Nobel Prize in Physiology in 1903 for using filtered sunlight as a cure for skin tuberculosis.  Now uv light is being used in tandem with antibiotics to enhance their effects and overcome antibiotic resistance, which is a growing problem.  Bacteria can evolve to resist drugs, but bacteria cannot resist the destructive power of UV light.  

Antimicrobial photodynamic therapy (aPDT) is a chemical reaction triggered by visible light for use on antibiotic-resistant bacteria strains.  It involves molecular oxygen, light, and a photosensitizer (something that creates a reaction between oxygen and light). To test it, researchers used an already FDA-approved dye called methylene blue as a photosensitizer, and specially constructed panels of 25 LEDs in reflective cones.  Light and photosensitizer were tested with Methicillin-resistant Staphylococcus aureus to determine the lowest dose and shortest series of antibiotics that could weaken the bacterial membranes and other resistance mechanisms.  The resistant bacteria, weakened by aPDT treatments, were killed with far lower doses of current antibiotics, and it’s a promising method for treating resistant bacteria in wounds and reducing antibiotic use in general.  (Light-Based Therapy Weakens Antibiotic-Resistant Bacteria)

At the other end of the light spectrum (literally), red and infrared lights also promote wound healing, but possibly for different reasons.  Although a Danish physician (Niels Ryberg Finsen) received a Nobel Prize in 1903 for discovering that exposure to concentrated red light accelerated the healing of sores, scientists today are only beginning to learn how and why this happens.  Research funded by NASA in the 1990’s showed that near-infrared laser light speeds healing of wounds, particularly those that are starved for oxygen, by boosting the production of growth-factor proteins, collagen, and blood vessels.One company that spun out of NASA’s programs is Multi Radiance Medical, which produces laser units for physicians, athletic trainers, physical therapists,  chiropractors, and veterinarians.   Although lasers have the possibility of damaging surrounding tissue, and they also use a lot of energy and they’re expensive, LED arrays are a better alternative.  They are cheaper, use less energy, can be designed to emit multiple wavelengths, and cover a larger area than a laser.  (NASA Research Illuminates Medical Uses of Light)  This is where the consumer must be careful, however, as today there are many manufacturers of LED red light therapy devices, and without applying the research of specific wavelengths, intensity and timed sessions, these devices are simply lamps, not healing devices.  When searching for a red light therapy device, you want to look for a device with 600 to 900 nanometers (nm) of light, as well as one that is easy to use or easy to wear. (Red Light Therapy Review)  Therefore, it’s wise to research the manufacturer on their knowledge of the technology, dosage instructions and independent testing of their products for wavelength, flicker rate.  This manufacturer has developed a helpful blog to understand red light therapy and its uses.

Here’s the best part: despite all the technology and expense, the benefits of UV light and infrared light can be free.  We know that sunlight has the “full spectrum” of light–from ultraviolet to infrared–and it can be helpful in moderate doses, not "lying on tinfoil basking like a trout"!  With the right intensity and dosage, it doesn’t have to hurt your skin, but can actually heal it.  Our parents and grandparents might have advised us to “get out in the sun”, and moderate exposure is the key to getting more benefits than downsides.  

Photo by Kent Pilcher on Unsplash

1 8 9 10 11 12 28