Monthly Archives: October 2024

Finish Your Walls with Limewash for Style–and Health!

Finish Your Walls with Limewash for Style–and Health!

Limewashed walls are soothing, calming and pleasing to look upon.  This finish has a texture and lightly variable color that would take a lot of artistry to achieve with any regular latex paint. In addition, lime is an air purifier while it’s wet, and it’s non toxic; it produces no VOCs. (We also discuss the mold-remediation and prevention aspects of using it for a primer here).   It does take a bit of work to apply, but the aesthetics of limewashed walls are amazing!  You can buy limewash pre-mixed, or make your own.

That said, I’d like to introduce or remind you of an old, true rule: the Good, Fast and Cheap Rule.  You can pick only two of the following:

  • Good

  • Fast

  • Cheap

For example Good + Fast is not Cheap.  Fast + Cheap is not Good.  Good + Cheap is not Fast.  Think about it and you’ll realize it applies to many areas of life, not just renovation projects!  In this case, you can make Limewash Cheap.  It’s a Good recipe that turns out well.  However, it takes some time to properly mix and apply it, therefore it’s not Fast.  Making and applying limewash should cost less than $50 and make LOTS of limewash.

As I mentioned, you can also buy limewash pre-mixed; Color Atelier is a highly rated brand for pre-mixed limewash paint.  According to the manufacturer, one gallon ($98) will cover approx 400 sq. feet, and normally two coats are advised (total $196).  It still requires a Primer (same with making your own limewash) and optionally but optimally, a Sealer to protect it.  Therefore, you just need to decide which two aspects of Good, Fast and Cheap appeal the most to you!

“The Sorry Girls” have a really good tutorial and video on making your own limewash.  A quick science lesson is given in the video at minute 3:25 (or read our article).  For best results, be patient and follow the directions and steps as closely as possible!  

Storm Protection for your Windows and Glass Doors

Storm Protection for your Windows and Glass Doors

There are many good ways to protect your windows from storms like hurricanes and tornadoes.  However, the disadvantages to these systems often deter homeowners from making any preparations at all.  These are:

  • Most are expensive

  • They require extensive preparation (ordering and professional installation) that can take months

  • They involve bulky panels for storage

  • While installed, light coming from outside is limited/completely blocked

  • Mounting hardware can be permanent AND unsightly

  • Mounting hardware compromises the watertight integrity of your home’s exterior

  • Some mounting hardware can become misplaced

  • Self-installation is laborious or very time-consuming

Well, ready or not, the storms keep coming, so it’s best to do some research for your home, “bite the bullet”, and protect those expensive windows!  After all, if you do nothing and one or more windows are broken in a storm, first you have the water damage in walls and furniture.  Then, fighting with insurance only gets you so far–maybe not even enough money to restore what you have.  We’ve compiled a list of protection systems that are recommended by experts.  If you want to go the traditional route, here are the best options, and their installation often positively affects your home insurance premium:

  1. Roll-down shutters: these are most often professionally measured and installed, but once they are installed, are simple to roll down and even lock as added theft protection in the aftermath of a major hurricane.  In addition, they can be used for heat protection by blocking sunlight during the hottest months of the year. 

  2. Colonial Shutters: These shutters look like traditional shutters because they hang on the vertical sides of the windows and fold in to protect the windows, with some type of locking system to keep them folded.  These can be made from wood, aluminum or plastic. 

  3. Bermuda Shutters:  Bermuda shutters are hinged at the top of the window, where they may be opened or completely shut to cover the window.  They also may be made of wood, aluminum or plastic, and also serve the dual purpose of being a sun shade on the building’s sunny side. 

  4. Fabric Storm Panels are made of UV-resistant, strong fabric similar to trampoline fabric (it’s not stretchy though).  Permanent mounting hardware in the form of threaded bolts are drilled and inserted into the window frames, and the panels can be (fairly easily) installed during storm preparation.  This system is one of the most DIY friendly, because homeowners can buy, measure, cut and install the panels, and storing them is easy because they can be rolled up and take up very little space.  However, they are not rated for hurricane protection in some of the most hurricane-prone areas of the country, such as Miami/Dade County.  

  5. Polypropylene or Polycarbonate Panels are lightweight and translucent, allowing light to come through if you choose to stay at home during a storm.  They require mounting hardware, but the average DIY homeowner should be able to install the hardware and panels with a minimum of tools.   StormStopper.com is a complete system, and Justpolycarbonate.com has several different types of panel and several types of installation hardware: studs, mounting clips or U-channels. Here is a video on installing with studs or mounting clips. 

  6. Accordion style shutters are permanently mounted on the long side of windows or doors, and are manually extended and locked into place when needed.  They offer good protection for larger openings. 

Of course, there is still plywood, which despite having the innovation of plylox clips, is very heavy to move and bulky to store.  Another option is impact-resistant window films, such as BDF impact-resistant films.  Although these do not have the strength of other systems; they will keep the pieces of glass from shattering all over the floor and minimize water intrusion, but do not stop flying debris from breaking a window.

Considering all of this information: 

  • The fastest, minimal system to install (if you had nothing and see a storm coming in a few days) might be impact-resistant window film, as it only requires cleaning the window and installing the film.  

  • The fastest, maximal system to install (if you had nothing and see a storm coming in a few days) is the traditional route of installing plywood with plylox-type clips.  It is quite labor-intensive, however, because ½” plywood sheets are heavy.  These HurriClips require at least a 2.5 inch inset to grip properly; they work on wood, block, and stucco insets, and 4 clips are required per opening or piece of wood.  They may also damage the exterior as they slide in and out of the opening. 

  • If you plan ahead of time, for wind protection and the option to keep out sun and intruders, Colonial and Bermuda Shutters are a great permanent option.  

  • A lightweight, fast, temporary panel system is StormStoppers, which uses 3M Dual Lock strips to adhere the panels to the window frames.  The 3M hardware is the least damaging of any hardware to the fascia of your home, and can be hidden by their product CAPS (cover and protect strips) for a professional, clean look.  The StormStopper panels are 10 mil (⅜”) polypropylene, which has been missile tested (survived a 2x4 impact, unlike plywood), and also survived a 143mph “wall of wind” test to simulate hurricane conditions.  They are a cloudy white, which obscures your interior to deter theft, but also lets light in if you are staying at home during a storm.. 

  • For a temporary option that also allows sunlight to filter in, polycarbonate panels offer clear, bronze or translucent views with UV protection, and they are lightweight for storing.  The 16mm thickness is approved even in hurricane-prone areas such as Miami/Dade County, but must be properly installed according to local codes in order to be recognized by your insurance company.   Eplast.com had the best price on this product but Duralightplastics.com had more options available. Polycarbonate is not as flexible as polypropylene, however, so in our opinion the previous StormStopper panels are a better choice. 

Since hurricanes happen every year in the southeast of the US and seem to be increasing in intensity, it makes sense to plan ahead and protect the expensive investment of your windows and home.  Do your own research and move ahead with the window protection that fits your home’s style, budget, and your own ability to activate (install) the systems.  It’s just like putting on a raincoat or coveralls when you know things are going to get messy! 

Photo by Evan Wise on Unsplash

The Unique Properties and Uses of Expanded Perlite

The Unique Properties and Uses of Expanded Perlite

Perlite is not a household name…but it’s in a lot of products you might not know about, such as insulation, filters and even cosmetics.  First, let’s look at what perlite is and where it comes from. 

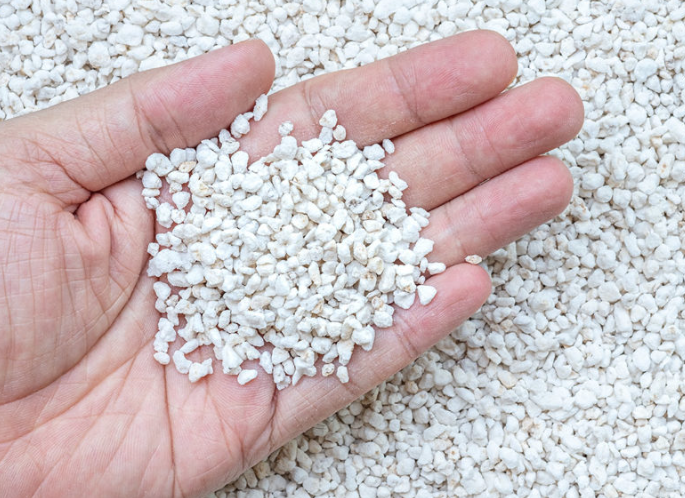
Perlite is a volcanic rock that’s closely related to pumice–that rough one with all the holes, used for scraping calluses off your feet or stains off the toilet.  Perlite ore (raw form) is a pearly white color (“perle” is the french word for pearl) that has a low density (it’s lightweight) and relatively low price on the market (about US$150 per tonne of unexpanded perlite) due to its relative abundance.  “Unexpanded” is its natural state; “expanded” is the manufacturing process that heats perlite until it “pops” like popcorn due to the water content inside the rock.  Natural perlite is first crushed to the desired size granules, then heated.  Because natural perlite has a relatively high water content of 2-5%, when it is heated, the water turns to steam, which explodes and opens up the pores in the rock, also turning the rock into small pebble-like fragments that resemble styrofoam balls. (Perlite)  These are the little white balls you most often see in potting soil.  The “expanded” perlite is now even less dense, very porous, and can hold even more water.  Expanded perlite has 70 times more surface area and pore volume compared to unexpanded perlite (Hydrogen Storage in Expanded Perlite), which is similar to another material you may be more familiar with, activated carbon.   

Perlite enhances plant soil because it provides many small water storage chambers that slowly release water so that plants can endure dry spells.  It can also increase drainage in clay-type soils.  Besides potting soil, though, what are scientists and researchers doing with perlite?

Perlite for insulation

For wall insulation, perlite can be poured or blown into the wall cavities. Make sure the perlite is spread out evenly and fills all spaces to work best at keeping things insulated. Special tools can spread perlite evenly in wall spaces. Make sure there are no empty spaces. Empty spaces can make the insulation less effective.  After adding insulation perlite, be sure to seal the area tightly to prevent it from moving or compacting. You can do this by using a vapor barrier or sealant. Sealing perlite stops it from moving and makes it better at keeping heat and moisture out. This step is very important to keep the insulation working well for a long time.  Perlite can be used in residential, commercial and industrial construction.  The little grains of perlite are filled with air pockets, so it’s essentially doing what other air-filled insulation products do by using air to insulate your walls.  Since it’s naturally fire-resistant, it stops flames from spreading, making the building safer during a fire. It gives everyone more time to get out safely.  (Expert Tips: Using Perlite for Insulation in Construction!)

Spray foam insulation is petroleum based and over time will deteriorate, melt and ultimately end up as petroleum goo in landfills. Wanting no part of that, our eco-friendly clients across industries have been switching to loose-fill perlite insulation, which is all natural and will never deteriorate. It also has better R-Values and is more cost-effective than spray foam. (Success Stories)

Perlite as a mineral adsorbent for heavy metals ions and dye removal from industrial wastewater

Studies have shown that perlite-based adsorbents can achieve high removal efficiencies for pollutants, making it an attractive option for water treatment applications. Its low cost, abundance, and ease of preparation also make it a sustainable and eco-friendly alternative to other adsorbents.

Perlite for Filtration

Perlite can be sprayed onto filters to increase their filter efficiency.  It’s termed a “filter aid” because it effectively increases the “surface area” of the filter and increases its use time and contaminant capture before it clogs.  These functions make it useful in industrial dust filters, for one.  However, since perlite is lightweight, inert, imparts no taste or odor to liquids being filtered, and is virtually insoluble in mineral and organic acids at all temperatures, it’s even used in food-grade filters like juices, beers, wines, sweeteners, vegetable oils.  Here are some other industries that use it:

  • Pharmaceuticals: enzymes, antibiotics, Epsom salt

  • Industrial: water treatment, sizings, oil & solvent recovery, greases

  • Chemicals: inorganic & organic chemicals, resins, polymers, brine, adhesives, fertilizers, waste disposal

  • Paint and Coatings: waxes, oils, varnish, gums, shellac, wastewater treatment

  • Environmental: stormwater filtration, ecology embankments, media filter drains

Perlite as a Cement Additive

When added to cement, perlite helps create a mix that is lighter, stronger, and better at insulating. Whether you’re building walls, floors, or panels, using perlite for cement can make your project more efficient and cost-effective.  Perlite cement can resist changes in temperature and moisture, which makes it last longer. It doesn’t break as easily as regular cement, making it great for places with harsh weather.  Cement mixed with perlite is also fire-resistant. Perlite cement can handle high temperatures, which makes it ideal for projects that need extra fire protection.  Bulk perlite is added slowly to the wet cement mix; a common ratio is about 1 part perlite to 6 parts cement by volume. The amount of perlite can be adjusted based on how lightweight or insulating you want the mix to be.

Perlite as Moisture Control

Perlite is a cheap way to control moisture. It’s effective and cheaper than other drying agents. Perlite can absorb up to four times its weight in water, depending on the grade and particle size.  In order to guard against moisture intrusion and maintain the quality of pharmaceutical products, companies use perlite in the following ways:

  • One popular way to use bulk perlite in the pharma industry is in packaging. Manufacturers keep tablets, capsules, and powders dry and stable by including perlite in desiccant packs or the packaging. This keeps their quality good, even if the environment changes.

  • Bulk perlite is often used in storage places for medicines before they are sent out. Keeping the right amount of moisture in big storage places is crucial to protect items. Perlite helps pharma products stay dry and in good shape while stored.

  • Perlite can even be used in direct contact with bulk products because it’s inert and non-toxic.

Perlite in Animal Husbandry

Because perlite is inert and non-toxic, it has been widely studied in animals and deemed safe for ingestion.  It can be used as a carrier of liquid vitamins or drugs for livestock. Perlite impregnated with medicine is added to animal feed. The perlite medicine is gradually released in the animal’s body, but the perlite itself remains excreted. Perlite is also added to feed as a natural anti-caking agent. Because it adsorbs moisture, it acts to prevent mold in feed.  It has also been used as an odor and moisture absorber in animal bedding. (The Use of Perlite)

Other applications  (The Use of Perlite):

  • Cat litter

  • Acoustic insulation

  • Scent carrier (for scented products)  

  • Cosmetics

  • Abrasive and polishing agents

  • Absorbent bales and booms for oil and chemical spills

So, the next time you see bags of perlite in the garden department, you might think outside the garden and pick up a bag or two for spill cleanup, odor control in the hamster or bird cage, cement additive, or any other project where you can use its unique properties. 

Photo from perlite.org, "Perlite, the Safe and Fully Natural Material"

Lime: an ancient wonder-mineral Copy

Lime: an ancient wonder-mineral

If you read our article on Ancient Homebuilding 101, your interest might be piqued about lime and its use as an anti-fungal coating inside and outside homes.  We gave a number of benefits of limewash that are still used on some farms and buildings today; if you see white walls inside a dairy barn, for example, it’s most likely limewash.  But how does limewash work to kill germs?  The answer lies in its chemical makeup before it’s completely dry, and repeating the application. 

Mold does not grow on limewash when it’s fresh.  Here is advice from Timothy Sly, a Food-borne disease epidemiologist.  To make lime-wash, quick-lime (calcium oxide, CaO) is ‘slaked’ with water to produce calcium hydroxide, Ca(OH)2. A slurry of this is applied to the wall, stone, plaster, etc. It begins as a strong alkali (base), but after a while, atmospheric acids (e.g. carbonic acid, H2CO3) react with the slaked lime to produce a neutral carbonate (CaCO3). At this stage, though still white, the surface can support molds and mildews that use pollen , soil, and other dust as a substrate. The solution is to apply more lime wash at LEAST once a year, often twice.

When lime-wash was applied frequently and regularly to house-roofs in the tropics which were - and still are - used as rainwater catchments, the water collected was partially protected with the bactericidal effect of freshly-slaked lime. But as modern options appeared, house-holders chose to use white latex paint on their roofs, which now required re-painting much less often. The problem was that all the bactericidal effect was now absent, and the water in the collection cistern was of a poorer bacterial quality, grew more algae, and had more mosquito larvae present. Another example of ‘improving’ A only to cause more problems with B. 

Lime render and mortar physically degrade because of chemical removal of the calcium ions by dissolved atmospheric acidic gases and by chemical substitution with sulphates and chlorides. As erosion occurs, spaces form in the lime providing damp niches for chemotrophs (organisms like mushrooms or bacteria which manufacture their food from inorganic substances in the presence of energy derived from inorganic compounds) which produce toxic compounds of ammonia and nitrite salts and as they die, form a nutrient base for other organisms.  (Novel Biodesign enhancements to at-risk traditional building materials

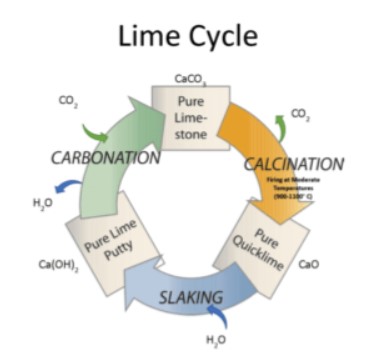
Here is a rendering of the “Lime Cycle” (from LimeWorks.us)

This diagram shows that it’s really a layer of “limestone” or CaCO3, that is formed when you limewash and allow it to dry (top of diagram). 

Let’s take that cycle one step at a time. The following is adapted from Calcium carbonate and the Lime Cycle.  Calcium carbonate is a very common mineral in the Earth's crust. It is the main building block of most animal shells, including the shells of shellfish, snails and birds’ eggs.  There are four main types of rock containing calcium carbonate: limestone, marble, chalk and calcite.

If we heat limestone to a very high temperature (to about 900 degC or 1652 degF), it decomposes - this is an example of thermal decomposition.

Calcium oxide is known as lime, or sometimes quicklime. If we heat a lump of quicklime very strongly it gives out a very bright white light. This is known as limelight. Limelight was used for stage lighting before the introduction of electricity, so famous actors and actresses were said to be in the limelight.

Quicklime reacts very violently with water giving out a lot of heat.

This reaction is called slaking. Calcium hydroxide is also known as lime, or sometimes slaked lime.

Lime mortar hardens as it dries. In addition a chemical reaction takes place between the lime and the carbon dioxide in the air.

This reaction takes place quite quickly at the surface but more slowly in the interior: not all of the lime in the lime mortar used to build the Great Pyramid has yet turned into calcium carbonate - after more than four thousand years!   The carbonation process absorbing atmospheric CO2 occurs at about 5 mm per month from the outer skin working inwards.  (Novel Biodesign enhancements to at-risk traditional building materials)

As you can see, processing limestone is a very energy-intensive process, but when compared to manufacturing Portland Cement, it’s actually more energy efficient.  Although it doesn’t actually sequester carbon (because CO2 is released during the burning process and it’s reabsorbed during the curing process), it does produce less CO2 emissions than Portland Cement.  During manufacture lime produces 20% less carbon dioxide than cement production.  Lime is burnt at a lower temperature than cement in the production process (900°C as opposed to 1300°C), therefore making lime production more economic. (The History of Lime and its Environmental Benefits)  In addition, cement does not “reabsorb” CO2 and is brittle (cracks), while lime used in cement can somewhat “heal” cracks.  If “lime putty” is added to mortar, it makes it more breathable (permeable) than Portland Cement (check out the pore structure here).

Lime’s anti-fungal properties can also be used on living trees, to protect trees from disease, sunburn and frost injury: The National Park Service used it on their historic trees, and it’s also recommended for citrus trees by a knowledgable tree service.  

If you want to use lime inside your home to deter mold or remediate a moldy area, Earth Paint has taken a 10,000 year old technology and engineered it to be safely applied directly over high moisture content, Mold and Mildew stained surfaces.  This product uses the power of lime to penetrate and saturate the porous cell structure of wood, drywall and concrete matrix.  As such, spray coating your building with Lime Prime and Lime Seal renders  a weather and air barrier outside.  Inside, before windows and drywall are hung, spraying the frame and wall cavities with Lime Prime will inhibit mold inside the walls.  (Lime Prime - Mold Abatement / Remediation)

For more benefits of limewash, be sure to visit our article on Ancient Homebuilding 101.  Lime is everywhere…did you also know that calcium carbonate is also the primary ingredient in antacids like TUMS?   You also may be walking on it or showering in it, because travertine is really a type of limestone.  It just goes to show that limestone is not just for caves; it’s a really useful (and beautiful) material in many aspects.

Photo by Anne Nygård on Unsplash