Window AC units need (Deep) Spring Cleaning too!
Window AC units need (Deep) Spring Cleaning too!
We still have cool evenings in the eastern US as I’m writing this (late April), but the days are heating up quickly. My parents and I have central air conditioning in our homes, but their workshop has a window unit. It’s an older unit, still very good at cooling the room, but we turned it on recently and immediately had to turn it off. The mold smell was overwhelming! Even cleaning the air filter did not clear up the smell. I knew what I had to do–a deep cleaning to get the mold out!
My father’s hobby of decoy carving makes a LOT of dust. He has a carving cabinet with dedicated vacuum (the 220v motor pulls the dusty air into a collection unit outside), but even so, there is dust on EVERYTHING. I had a theory that the thin intake filter was not stopping the dust from being trapped in the tiny fins, where condensation provides moisture and voila! The window AC unit became a petri dish for mold. It wasn’t my parents’ fault; these window unit filters are just not designed for dusty workshops (more on that later).
If you have the same experience of turning on your window unit and smelling mold, STOP! Don’t let it run any longer without taking the following steps, or you run the risk of blowing mold spores all over your space. Here’s the deal: you can check, but mold is usually not growing on the intake filter in the front. It’s growing INSIDE the air conditioner, where there’s more moisture from condensation. You can do the following check, but 9 times out of 10, it won’t be enough to eliminate the mold smell.
- Remove the front plastic grille (it usually pulls out from the sides, and lifts out from the top or bottom).
- Remove the intake filter. If it has a light coat of dust, you can vacuum it off, or use dish soap and water, a soft sponge, and rinse clean and let it dry.
- Replace the filter and turn the AC back on. (You don’t have to replace the plastic grille just yet). Do you smell mold?
- No mold smell: you are blessed and can replace the plastic grille and enjoy the cool air.
- Mold smell: STOP! It’s time for deep cleaning.
I didn’t know that deep cleaning the fins of the unit was possible until I saw this video. The unit shown is a GE air conditioner, but many units are very similar. Here is a diagram that shows the major components of every older air conditioner (from howstuffworks.com):
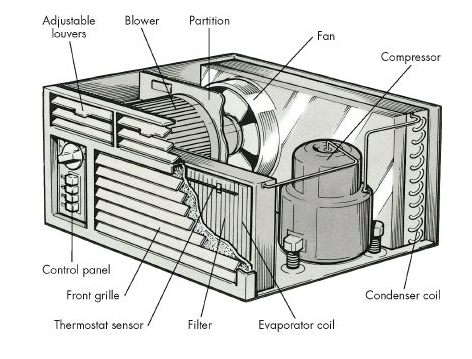
The machine sucks in air through the front grille (lower rectangular part) and pulls it through the evaporator coil by the blower. This is where the warm air from the room is made cooler by the refrigerant that circulates through the evaporator coil. The air, which is now cool and hopefully drier, is expelled through the louvers at the top of the front grille, which you can direct at different angles into the room. Unless there is a “fresh air intake” from the back of the air conditioner (which is hanging outside the room), no outside air is coming into your space, so the mold problem likely lies in the evaporator coil and areas around it, like the blower.
There are “easier” ways of cleaning your air conditioner, like just vacuuming off the coils, or using an ozone method like this one to disinfect all the inner parts without touching them. The only problem is that dead mold is not safe mold, either. “Dead mold is just as bad as live mold. When mold dies, its cell wall dessicates and it gets dry and it will break apart into little fragments. And the fragments have toxins on them. This is a disease of toxins. When you inhale those toxins, they are in you. If you don’t recognize them as being foreign, you have a difficult time getting them out of your body.” (Scott McMahon, M.D., moldymovie.com)
It’s not easy, but removing the parts in order to clean all the way through the coils is the best way to get rid of hidden mold. The unit in the video had a metal cover that lifts off to expose the inner parts of the machine. Mine (and many others) actually pull out of a cover/cage by means of a handle in the front. Get help to do this as they can be very heavy! You’ll also want to wear gloves and long sleeves to avoid cuts on sharp metal (from experience 🙁 …) and avoid gripping or pinching the fins on the evaporator and condenser coils, as they are super thin and fragile. The cooling capacity of the machine actually depends on these being undamaged! There are many videos online to show how various machines come apart.
Obviously you’ll want to be doing this job outside, not only because of the dirt, mold and water involved, but also if you choose to use a stronger coil cleaner. The coil cleaner shown in the video (which she did not use) contains sodium hydroxide, which is also known as lye or caustic soda. She’s right that it can cause severe burns or even damage the coils if it’s left on them too long. Rinsing off these types of cleaners puts them into the environment. Also, most aerosol coil cleaners have a “propellant” that assists with moving the liquid out of the spray can. These propellants are usually hydrocarbons with VOCs. There are safer ingredients. (“No Rinse” on a label means just that; the product actually rinses itself off when condensation on the coils appears during normal use, but it still drains into the environment, so the less toxic, the better).
Remember, vacuum first to get the loose dirt out, then use liquids!
- Our choice of a non-toxic coil cleaner is Viper Evap+ from Refrigeration Technologies. According to the Technical Data Sheet, it is the industry’s only Non-Rinsing Evaporator Coil Cleaner utilizing slow-release enzymes in a synthetic detergent base, which is safe for all metals. If it is not rinsed off, the enzymes remain on the coils for 72 hours, starving any microbes of oxygen. The solution is gradually rinsed off by condensate production, which is drained via the condensate line. It has no VOCs, TAC (toxic air contaminants) or HAP (hazardous air pollutants). It is to be used full-strength via a pump sprayer (the garden sprayer we mentioned above works just fine).
- There are two natural cleaners we can recommend that are non-toxic. The best part about these are the light citrus fragrance Please note that you should check the manufacturer literature on your mini-split unit to find out the recommended maximum acidity or alkalinity of any evaporator coil cleaning solutions, because strong acids or bases can eat metal and damage your unit! Whichever you choose, you can check the acidity with a pH test strip after dilution to make sure it’s in a safe range for your unit.
- For an acidic cleaner: Nutribiotic is a grapefruit seed extract (GSE) which is highly acidic and microbial at full concentration (be very careful mixing and using it!) but can be diluted to use as a coil cleaner. According to the manufacturer, The GSE Liquid Concentrate has a pH of about 2.75 and the Maximum GSE Liquid Concentrate has a pH of about 2.2, which are both very acidic. In the article we found for using it to clean your car’s air conditioning evaporator coil, it’s recommended to use it at 2x manufacturer’s recommended dilution. (Recommended is 10 drops per 5 oz water, so 2x strength is 20 drops per 5 oz water).
- For a basic (alkaline) cleaner: EarthClean by Earthpaint is a citric acid cleaner that is super-effective on greasy countertops, and when used at the manufacturer’s dilution, degreases safely on stone countertops with no damage. Alkaline cleaners can remove greasy dust more easily, so if your mini-split is near your kitchen and your unit can tolerate an alkaline cleaner, this might be the best choice.
- Concrobium Mold Control Spray is a no-rinse product. To use it outside, first vacuum off loose dust, spray it on and work it into the coils with a soft brush in the direction of the fins. Let it sit and rinse it through the coils; repeat as necessary. Finally when the coil is clean, spray on and don’t rinse; let it dry as this will protect against future mold growth.
Homemade Coil Cleaners: You’ll want at least one ingredient in the mix that kills mold. Some websites advise to add cornstarch to the mix, however mold can grow on cornstarch, so I would advise against this!
- One part vinegar, one part rubbing alcohol, and baking soda: This combination will kill mold because of the alcohol. Use a soft brush to work it into the front of the coils, let it sit for a few minutes, then use a garden hose to spray it deeper and through the coils. Repeat as necessary til you can see light through the coils.
- Straight (3-5%) hydrogen peroxide with baking soda: This combination will kill mold because of the hydrogen peroxide. It’s extremely fizzy! Use the same way as the vinegar solution above (do not mix vinegar and hydrogen peroxide!)
Other equipment you need or may find useful:
- Safety goggles or face shield to keep the spray away from your eyes
- Heavy-duty gloves to protect your hands
- A fin comb helps straighten out those dents and dings in the coils.
It’s going to be time worth spending. You’ll breathe easier not only with fresh air, but also knowing that it’s mold-free! If you have a mini-split instead of a window unit, check out our article on how to clean it!

Photo by Salman Hossain Saif on Unsplash