Tag Archives for " HEPA vacuum "

How to safely remove old carpet

How to safely remove old carpet

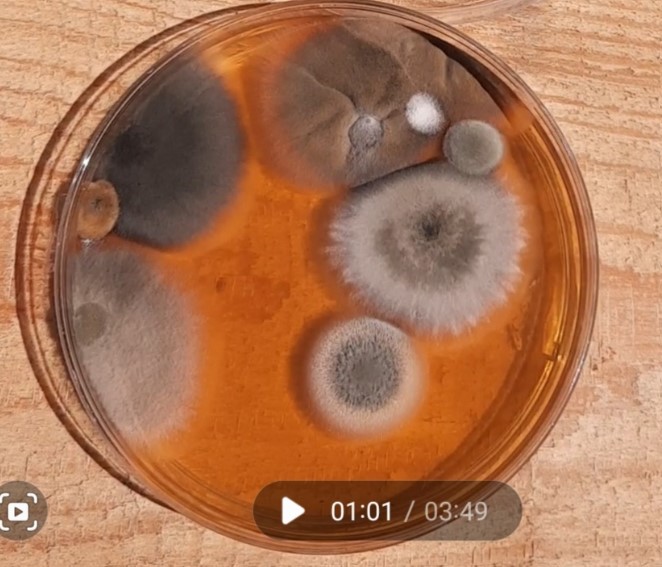
Upon testing my bedroom carpet as part of a series of mold tests in my home, I found this:

I scheduled time to remove the carpet the next week.  Now, how do I do this safely?

Research revealed two extremes:

  1. removing the carpet with no breathing equipment and no dust abatement (although this guy has some great tips, I cringe at the way he’s throwing the carpet around with no dust mask)

  2. removing the carpet with breathing equipment, a zillion garbage bags and gallons of mold eliminator (this method is costly and WET!) 

I had to find a solution in the median.  Here’s what I came up with for my situation (I am moderately sensitive to mold). 

Supply list:

  • Respirator with extra set of filters

  • Heavy gloves

  • Old clothes

  • Knee pads

  • TotalClean concentrate (or several pre-mixed spray bottles)

  • Clean garden sprayer

  • Rags

  • Plastic sheeting and painters tape for taping off vents and covering heavy furniture

  • Old towels to block under door

  • Heavy duty garbage bags (also known as contractor bags)

  • Carpet knife with extra blades or utility knife with extra blades

  • Duct tape

  • Pliers for pulling carpet

  • Nail puller to remove staples in padding

  • Pry bar and hammer to remove tack strips

  • HEPA vacuum with new bag for cleanup

  • Air Angel and/or Germ Defender: helps with dust and mold mitigation

Prep, prep, prep…it’s tedious but so worth it.  

  • Move whatever furniture, clothing and decor you can easily move, into another room. I took the long-overdue opportunity to get a new mattress, so I could escort my old one to the dump!

  • Use dollies on furniture that is too heavy or large to move out of the room.

  • Turn off the HVAC and cover any ceiling, floor or wall registers with plastic sheeting and painter’s tape

  • Measure TotalClean concentrate and water into garden sprayer at 1:7 parts respectively or empty pre-mixed spray bottles into sprayer.

  • Block under door(s) with old towels so that dust doesn’t migrate through the house.

  • Open window and remove screen if you plan to toss the carpet out of the window (also block off the area below)

  • Turn on the Air Angel and/or Germ Defender to help dust particles clump together and fall to the floor; the ions also destroy mold and bacteria on contact

  • Suit up with all protective gear including your respirator!

My strategies for minimizing dust will be to dampen a section of the carpet with the sprayer; cut the carpet into a  manageable section, remove it, and do the same three steps for the carpet pad underneath.  You’ll want to make the least number of cuts, because cutting through the carpet releases a lot of dust and fibers into the air.  I realize that this method will only wet the top of the carpet and not the cut edge or bottom, but short of soaking the carpet and subfloor, I found this is the best solution.  I liked the idea of tossing the carpet out of the window on a good weather day and bagging or binning it outside so that I didn’t drag the bags through the house.  I removed the carpet, padding and staples as I went, because I had a heavy piece of furniture left in the room and did not want to move it around more than necessary.

  1. Starting in one corner, use the sprayer to dampen the carpet in a 2’x8’ section.  Cut just inside that section with the carpet knife.  

  2. Use pliers to grab the carpet in the corner and wrestle it from the tack strips. If you can’t get it out, try cutting the corner out with your knife and pulling out just the corner.

  3. Roll it up gently and dispose of it in a contractor bag (or toss it out a window!)  If bagging it, then you can use the duct tape to keep it rolled tightly.

  4. Spray the carpet pad underneath and cut it.

  5. Dispose of it in the same way.

  6. Remove staples holding the padding to the floor with the nail puller.

  7. Remove tack strips using the pry bar and hammer.  They are super-sharp!  (If you plan on replacing with new carpet and the tack strips are not rusty or damaged, you can leave them in place).  

Repeat steps 1-5 until the whole room is devoid of carpet and padding!  If you can handle more than 2x8’ of damp carpet at a time, you can  Then, use a HEPA vacuum to thoroughly vacuum the floors to remove dust.  You will want to wipe down the walls, window(s) and ceiling fan with TotalClean because dust is now everywhere.  Finally, you can remove the sheeting from your register(s) and change clothes and shower–you earned it!  It’s best to add a bit of EC3 Laundry Additive to your clothing when washing it to avoid spreading mold to any of your clean clothing. 

If you have a new floor already scheduled for installation, good for you! Make sure that the subfloor dries out completely before 48 hours have passed, and definitely before installing new flooring (use of the sprayer makes it unlikely to soak the subfloor).   If you haven’t picked out new flooring yet, you can remove/replace any nails or screws that are sticking out, use a non-toxic floor paint, and/or use an area rug to cover over any rough areas until that day comes.  Try not to wait too long, however, so that excessive wear of the subfloor doesn’t occur.  

Photo by Julie Marsh on Unsplash

The Science of Dust

The Science of Dust

Dust.  It’s not just harmless dirt that builds up on fan blades until we can’t turn the fan on any more for fear of clumps flying everywhere.  It’s a combination of skin cells, pollen, dead bugs, bacteria, soil, dander and various fibers. (iaq.works)  Dust also carries SVOCs, or semivolatile organic compounds, that are emitted from materials and products like plasticizers from plastic products and flame retardants from upholstered furniture. "Unlike VOCs, that you can smell and that warn you of their presence, SVOCs are called stealth chemicals. They are odorless, ride on dust, and are insidious underminers of our health, "  says Marilee Nelson, co-founder of Branch Basics.  (wellandgood.com)  Then, there are the dust mites, which are microscopic organisms that feed on dust.  All in all, dust is even more disgusting than it looks!

My all-time least favorite chore as a kid was dusting.  It didn’t require a load of physical exertion, so it must have been the sheer tediousness of moving the same stuff to dust around it week after week.   We used lemon-scented Endust in the 70’s and 80’s, which actually should have made me a little giddy (it had odorless mineral spirits and 1,1,1-trichloroethane with a propellant blend of butane and isopropane, of which inhaled 1,1,1-trichloroethane acts as a central nervous system depressant and can cause effects similar to those of intoxication)...yikes!  (chemeurope.com)  Why haven’t we invented a way to keep the dust off permanently?    

I guessed the answer had something to do with static electricity.  Apparently, the “mechanism of particle adhesion” works against us in allowing dust to settle on furniture and objects in our homes.  According to Keyence.com, producer of static eliminators and ionizers, “When dust is carried on air currents generated by air conditioning and similar devices, the dust takes on a positive or negative static electric charge due to contact with various objects. Dust that has a positive electric charge will be attracted to objects that have a negative electric charge, and vice versa. The greater the amount of dust in the air, the larger the amount of dust that clings to objects within the room.

Also, if sources of dust (mainly people and clothing) are electrically charged, the dust that is generated from these sources is electrically charged as well. This attractive force generated by static electricity is known as “Coulomb force.” 

The solution to particle adhesion is to eliminate the static electricity from the object’s surface and from the air up to a few millimeters from the object’s surface.  This is easy to do using a static eliminator, which charges the air with ions.  This removes the static charge from the particles and prevents them from reattaching.  There are also lots of “anti-static” polishes on the market, however, their toxic ingredients may or may not be disclosed.

Also, the answer to dusting less also has to do with humidity.  Humidity does not reduce the literal amount of dust in your home; instead, humidity causes dust particles to adhere to one another, making them too heavy to travel through the air. Thus, dust particles are still present in your home, but the ideal humidity level makes dust particles quicker to settle and easier to clean.  

In addition, when the indoor humidity level is between 40 and 60%, dust mites are unable to thrive and spread. Dust mites prefer extremely humid atmospheres because they absorb moisture from the air in order to survive.

So, apparently there are two things that tend to keep dust (and dust mites) down to manageable levels: ionized air and the right humidity.  We fully endorse both!  Most of the HypoAir air purifying products include a bi-polar ionizer, which has the capability to kill germs at a distance by attacking them with the same ions that control the dust.  We also like to talk about keeping your home at the right humidity to fight mold growth and germ dispersion.  It’s a win-win!

With ionization and the right humidity in place, getting rid of the remaining dust should be manageable.  Cleaning experts give these tips to get the most out of your cleaning tools and time:

Get rid of feather dusters and dry cotton cloths, because they are simply flinging the dust into the air.  Also, don’t use damp cotton cloths, because they leave streaks of dust behind.  The best tool is a microfiber cloth (again, microfiber is better at holding a slight “charge” to attract dust) and your favorite all-purpose cleaner, like one of the following: 

  • HypoAir’s TotalClean, a non-toxic multi-purpose cleaner you can use throughout your home

  • Force of Nature, a non-toxic hypochlorous cleaner that can sanitize or disinfect surfaces depending on the concentration

  • Branch Basics, a non-toxic plant and mineral based cleaner

For wood surfaces, you can add some drops of a non-damaging essential oil to the spray bottle, so that wood surfaces don’t dry out and retain a nice shine. Orange oil is great for this purpose.  Since many ingredients are not disclosed on commercial dusting sprays, it may be tempting to make your own DIY dusting spray, and there are lots of recipes on the internet.  However, look at the ingredients closely, because vinegar is a key ingredient in many recipes, and it can damage many surfaces in your home.  

If an area has more dust than usual, or to avoid switching cleaning cloths too often, you can use your HEPA vacuum cleaner with a soft head attachment to “pre-dust”.  Of course, standalone HEPA filters running part-time or full-time will cut down on a lot of dust.  

Keeping the dust down in your home can lead to less allergies, sickness, and over time, better overall health because of the way ultra-fine particles can penetrate our lungs and migrate to different areas in the body.  With the right conditions (ionized air and the right humidity) and tools (microfiber cloths, non-toxic cleaners and a HEPA vacuum), regular dusting can be manageable, kind of like flossing your teeth.  Reveal the beautiful side of your home and get dusting!

Photo by Austin Ban on Unsplash