Tag Archives for " condensation "

The unintended consequences of turning down the thermostat this winter

The unintended consequences of turning down the thermostat this winter

According to the Energy Information Administration and their Winter Fuels Outlook report, it will cost 27 percent to 28 percent more than 2021/2022 to heat your home with oil or gas.  If you heat with electricity, prices may rise by as much as 10 percent, because much of our electricity is generated from oil and gas. (Newsweek.com)

When you have a fixed or unstable budget, the decision to lower or turn off heat during the winter is not easy.  The other components of our budgets–food, housing, transportation and medical care–aren’t as flexible as those extra blankets, mittens and hats, so down the thermostat goes.  This is where what you don’t know might hurt you.

It’s not only the air temperature that changes when the heat source turns off.  Air holds a certain amount of water vapor, also called humidity, and warmer air can hold more water vapor than cooler air.  When the air cools, water vapor in the air will tend to condense on any surface that is lower than the dewpoint temperature.  That’s why you see condensation on windows and around door frames in winter: these are the points that tend to conduct cold temperatures from the outside, and moisture from the air is condensing on them.  Persistent moisture is mold-feeding moisture, and before you know it, there is a mold problem.  Even worse is that mold could be forming in places you can’t readily see, like inside walls, attics and basements, because the air temperature has dropped and cooler air just can’t hold the moisture of warmer air.   Cooler air can easily reach humidity levels of 80% or more, giving that “damp” feeling and over time, exposing the home to mold growth.  

There is a myth that when a room is not being used, it’s best to turn off heat (close registers) and close it off from the rest of the house (close the door) to save money.  If this is done without any ventilation or air circulation, it’s also a recipe for mold, because without air circulation, water vapor in stagnant air will be absorbed by furnishings and allow mold to take root.  If you need to limit heating in your home, try to leave doors to unused rooms at least cracked and leave a fan running in the room, because dynamic airflow limits moisture ingress due to evaporation. For more on finding and fixing areas prone to mold in the winter, check out our article.

If high humidity is not a problem, low humidity might be.  Low humidity can damage all kinds of decor in your house by shrinking and drying, from wood flooring, wallpaper, and furniture to fine instruments like pianos and guitars and artwork.

Then, there’s your body.  Stress due to cold is a real problem for the elderly and those with pre-existing medical conditions like asthma or heart disease.  It also makes people more likely to use alternate heating methods that could be unsafe.  Small room heaters are often known to tip over and cause fires, and electric blankets can actually cause burns.   Falling asleep on a bunched-up blanket is a common cause of burns, according to Bell, a plastic surgeon who treats many burn patients. He explains that when a hot blanket rests on the same body part for an extended period, the skin can burn. “These burn accidents usually happen because someone has fallen asleep on a bunched-up area of the blanket,” he says.  Unfortunately, people with diabetes are more vulnerable to burns from electric blankets because their condition makes them less sensitive to heat. “Electric blankets are also not recommended for infants, young children or anyone who is paralyzed or incapable of understanding how to safely operate them,” says Bell.  People with urinary incontinence also should not use electric blankets because wetness and electricity don't mix. (ul.com)  If you do use an electric blanket, follow all the safety guidelines of UL Solutions (previously Underwriters Laboratories) so that you don’t become one of these statistics!

When home heating costs rise, air quality can also worsen due to particulates in the air.  In Europe, the impacts of inflation and fuel scarcity due to the Russian-Ukrainian war is particularly hard on middle and lower income families, and they turn to alternative sources like burning wood, coal and even garbage in indoor stoves.  These stoves impact indoor and outdoor air quality.  Indoors, reloading a stove that is already burning fills the air with particulates, and combustion gasses can leak out of improperly-sealed doors and exhaust pipe fittings, exposing inhabitants to dangerous levels of carbon monoxide and particulates.   Outdoors, European cities that typically have poor air quality during the winter may have even worse this winter. A recent study from Greece showed that wood burning was responsible for almost half of the cancer-causing air pollution in Athens and a new study from New Zealand has showed an increase in serious respiratory infections when wood smoke built up in an area. (TheGuardian.com)  If you live in one of these areas, it doesn’t matter whether you are the one burning wood–you will still be breathing its effects. 

If you feel financial pressure to lower the thermostat this winter, here are some practical ways to keep the air warmer and less humid in your home (Prof Cath Noakes from the University of Leeds):

  • Move seating away from cold windows
  • Use thick curtains at night, but allow the sun to come in during the day
  • Ensure radiators or ventilation registers are not covered or blocked by furniture
  • Ventilate using high-level windows can reduce cold drafts
  • Ventilating after a shower or when cooking can prevent moisture buildup which can lead to damp and mold.

It’s sometimes harder to detect high humidity in the winter because of the lower temperatures, so don’t take a risk–keep one or more humidity sensors in your home for monitoring it.  Our bipolar ionizers like the Germ Defender, Air Angel or Whole Home Polar Ionizer actually deter mold even if humidity temporarily goes too high, making them great investments for all seasons. 

Finally, if you have a warm home, sharing it with your elderly, disabled or disadvantaged friends for a meal or a few hours could make a huge impact in their lives.  Helping them to purchase safe heating appliances and understand how to keep humidity at manageable levels also will help them to live healthier.  Warmth is not always about containment, but allowing it to radiate to others. 

Photo by Will on Unsplash

Wait–I thought mold was only a problem during the summer!

Wait–I thought mold was only a problem during the summer!

When humidity levels in your home plummet during the winter months due to dry outside air and even more drying heated air inside, it’s easy to think that mold could not possibly be a problem during the winter.  We’re sorry to have to debunk that myth, but sadly mold is a year-round problem!  It flourishes in environments between 60 and 80 degrees and can grow wherever moisture or humidity is present. It’s a problem in the winter because it can grow in your walls and attic, places where it’s hard to detect. (Maryland HVAC company Griffith Energy Services)

Why does mold occur during the winter and where does it get the moisture to grow?  The answers lie in temperature differentials and air leaks.  Warm air that escapes the building envelope can cause condensation when it hits a cold surface (heat energy travels from hot to cold areas).  The worst part is that many of these unregulated “meeting places” of warm air and cold surfaces are deep inside your walls, attic, basement or crawlspace, going undetected for months until it becomes a BIG problem.  Here are some specific problematic places:

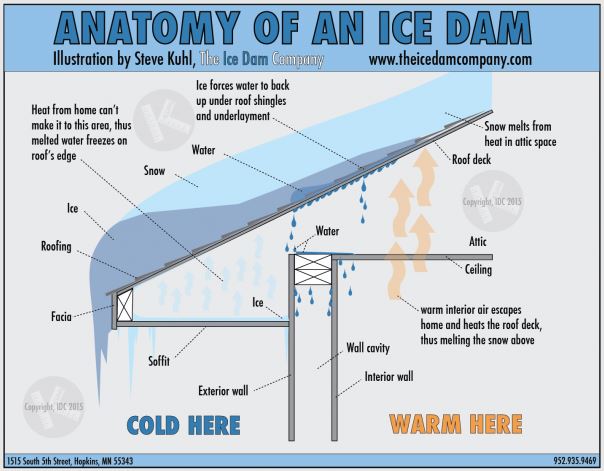
  • Do you have ice dams on your roof?  Ice dams occur near the bottom edge of a roof, and they are formed when snow melts on the roof above your attic (usually due to missing or insufficient insulation), runs down the roof to the edge and refreezes, causing a buildup of ice at the edge of the roof.  The ice can even force its way underneath shingles and sheathing, and when it reaches the attic space, will melt again and “rain” in your attic!  The condensation can drip onto insulation, run down into cavities, and cause a lot of mold.  It’s quite a damaging problem in any climate that can get freezing weather and precipitation; even just a dusting of snow can form an ice dam.  Plugged gutters that fill up and freeze can also form ice dams if they are too close to the roofline.  Here’s the “anatomy” of an ice dam:

Source: icedamcompany.com

  • Plumbing pipes that run through poorly insulated walls can create a cold surface on which warm air from the home can condense. 
  • Glass is not a great insulator; a single-pane window will have an R-value of 1 and the standard double-pane window will have an R-value of 2 (see our article on insulation for an explanation of  R-values).  Warm air inside condenses on that cold glass, and condensation that runs down windows can pool on the wooden jambs and framework, allowing mold to grow. 
  • The basement is another place where there is often high humidity, and windows, steel doors and penetrating pipes can be cold surfaces on which condensation will form, which mold loves.  

How can your dry indoor air hold so much water vapor to make condensation?  It doesn’t seem possible until you consider the dewpoint.  It’s true, air at 50% relative humidity does not have enough moisture to sustain mold growth.  The answer lies in the dewpoint of that air.  Check out this fun dew point calculator (well, I think it’s fun and incredibly useful!)  Make sure that the little blue dot is set to solve “dew point” and the units are set to deg F (or deg C if you are used to Celsius).  Now, use the little sliders to adjust the temperature and humidity to your normal indoor environment (get one of our humidity sensors if you don’t have one!), and watch how the dew point changes.  For example, 75 degF at 50% relative humidity = 55 degF dew point.  That means that any surface below 55 degF can cause water vapor to condense out of your “dry” air!  If you put your hand on a single pane glass window when it’s snowing or freezing outside and warm inside, I’m sure you’ll agree this could be a potential problem.

How can we prevent winter mold?

Look up and pay attention to your ceilings, upper stories and attics.  Since heat rises, it makes sense that the warm air from your home may cause the most problems in your upper parts of your home where warm meets cold.  Humid air will accumulate in the upper areas of your home right along with the heat.   Bring your humidity sensor upstairs (if you have a 2nd story on your home) and note the increase. 

  • Seal around can light fixtures and other openings in the ceiling. 
  • Cathedral ceilings are especially prone to mold, because the heat and humidity rise high in your home and hit the roofline (typically there are no attics above cathedral ceilings) that may be poorly insulated.  (Check out these videos by a mold restoration company in Kansas City).  If you replace your roof, consider increasing insulation in cathedral ceilings either by spray foam, or adding rigid foam boards above the sheathing.  Here’s an article by a building science expert on how to install rigid foam boards in roofing.
  • Make sure ceiling fans are moving counter-clockwise during the heating season, to draw warm air down.  
  • Seal the attic stair hatch (if you have a collapsible attic stairway) with a zippered or velcroed containment like this one, which can also save money on your heating bill.  If you have an attic access that is simply a hole cut in your ceiling with trim and loose-fitting plywood or drywall above it that you lift up to get into the attic, try to find a way to add weight to the piece of drywall or plywood (so it sits down snugly) and seal the edges with foam weatherstripping so that gaps don’t let air through.

Mold sometimes forms in plain sight during the winter.  Often bedrooms that are not used are closed off from the rest of the house, but lack of ventilation can be a recipe for mold.  It’s best to open the door and turn on a fan in the room to prevent mold growth on cold corners and walls.  Be vigilant to check north-facing walls, corners and closets, as these can be the coldest in your home.  If you discover mold in a closet, check out our article (see #6) for tips on keeping it mold-free once it’s been cleaned. 

If you have single-pane windows, you don’t necessarily have to replace them to “up” their insulation or R-value and avoid the condensation that can lead to mold.  Here are a couple of solutions:

  • Insulated drapes can prevent warm air from hitting cold windows–just make sure they go all the way to the windowsill or floor and fit closely along the sides, to make a “seal”. 
  • There is conflicting evidence whether window films (that are cut and fit to “cling” to the glass of your window) and shrink-fit window insulation actually reduce condensation on your windows.  This article by an Australian company brings up two important points: that radiant energy will still flow through the window film, and the air-tight seal required for the shrink-fit system to work will seal moisture into the space between the window and film (not good).  If condensation is a problem on your windows, it’s not clear whether these two solutions will work. 
  • Indows” are inserts that fit inside your windows (how clever is that name!).  They are custom made from measurements you provide and fit snugly against the frame with compression seals and are supposed to increase the R-value of single pane windows to 94% of double-pane windows.  This short video shows a customer measuring and fitting his new Indow.

Even if you don’t plan to replace siding on your home, there are companies that can increase your exterior wall insulation in discreet ways so that mold doesn’t form inside walls.  It may be possible to add insulation between the studs by either removing a layer of siding at the middle or top of the first floor, or drilling through the interior wall.  Then loose fill or spray foam can be blown into the cavity, and the siding replaced or the hole patched.  (attainablehome.com)  Loose fill can be sheeps wool, cellulose, fiberglass, hemp, cork or a mixture of agricultural products, like ClimaCell.

Make sure you check the basement regularly to ensure that everything is dry, so that you won’t be surprised by mold.  We have a lot of tips on preventing mold in the basement in this article

Finally, suit up with some warm layers and take a walk around your house to see where cold air might be seeping in from the outside.  Evidence of animal intrusion, missing siding, fiberglass insulation peeking out, missing shingles, and exterior mold or rot are all areas to address.  Don’t let dry winter air fool you, because unregulated “meeting places” of warm air and cold surfaces can produce moldy consequences!


Are my windows causing my mold allergy?

Are my windows causing my mold allergy?

If you viewed the results of my home’s mold plate testing, you probably saw the high count of mold colonies in my sunroom–which doesn’t even have air conditioning vents in it.   What the heck?  I was scratching my head until I remembered that I had placed the plate on a table only a few feet away from the exterior wall of windows.  There are 12 exterior windows in that room!

Here are some of the ways that windows can increase mold counts in your home:

  • Direct water leaks:  if the seals or caulking fail on your window(s), they could allow water to run into the wall, where mold can grow.

  • Drafty windows allow air to pass from the outside in, or inside to outside, where the temperature and humidity difference can surpass the dewpoint and cause condensation.  Condensation can occur on the windowsill or anywhere around the window that is not properly sealed.

  • Outdoor mold can grow on the screens, because they retain dust and moisture.  When you open windows, air blowing through the screens will blow mold spores right into the room.

  • Heavy window treatments create a micro-climate between the room and the window.  Although they are great at insulating the room from heat or cold, fabric curtains retain humidity/moisture, and also create a cold pocket of air without air circulation.  With drafty windows, air between long curtains and the wall can allow condensation, and offer the ideal darkness for mold to grow.    

In my case, I believe it was the drafty windows that allowed air to blow around the frames and carry mold into the room.

Here are some ways to get that mold count down:

  • Check for leaks in your windows.  Here are some warning signs that a window is leaking and how to determine where it is leaking (video):

    • Peeling paint on an interior window sill 

    • Peeling paint on an interior wall near a window

    • Rotting wood on the exterior window frame or sill

If you have any of these symptoms, it’s best to remove the outer siding materials and find out where the water is getting in, because cosmetic repairs will not fix the leak. 

  • Decide whether to replace or reseal your windows.  It’s rarely an easy decision because replacing your windows is not likely to save you money, considering the cost of the windows and installation.  However, there are some ways to know that it’s time to replace them:

    • Replacement: If your windows are extremely damaged by water infiltration, then it’s a good case for replacement. (ecohome.net)  There are many options for energy-efficient windows, available in wood, vinyl or composite (fiberglass or a combination of materials).  Like many products, the installation of the windows is just as important as the quality of the windows themselves. Quality installation is critical for an airtight fit and a continuous water barrier to prevent drafts, water damage and condensation.(efficientwindows.org)  To select windows, the National Fenestration Rating Council (nfrc.org) is a non-profit organization that gives consumers energy performance ratings and other useful information about windows, doors, and skylights.  You’ll also want to consider that new exterior windows that meet Energy Star standards fall under “qualified energy efficiency improvements” which can generate tax credits.  For windows purchased in 2022, you can claim the Residential Renewable Energy Tax Credit for 30% of the total cost, up to a maximum of $600 for exterior windows and skylights. (filemytaxesonline.org) In addition, check with your local power supplier to see if they have more incentives for replacing windows. If you do decide to replace, remember that higher-cost wood windows (which are clad in aluminum or vinyl for weather protection) are only as good as the seals and techniques of cladding them; if water penetrates the cladding, the windows can rot in just a few years.  In addition, the vinyl or aluminum skins on these windows do not permit passage of vapor from the interior to the exterior, so that condensation forms on the inside of the skin.  Condensation = rot! (video)

    • Reseal:  If the windows and frames are in good shape, but you have airtightness problems, it’s most cost-effective to apply some sealing around them. Caulk, weatherstripping and caulking cord are all products made for these purposes, and this video shows how to apply them.  In order to know where the air is coming in, you can do the following (houselogic.com):

      • Seal the house by locking all doors, windows, and skylights.

      • Close all dampers and vents.

      • Turn on all kitchen and bath exhaust fans.

      • Pass a burning incense stick along all openings -- windows, doors, fireplaces, outlets -- to pinpoint air rushing in from the outside. Smoke Pencil Pro ($44) is non-toxic smoke pencil for this purpose.

    • Clean your windows and screens!  On windows where screens are installed, a bi-annual cleaning will greatly reduce the amount of mold present.  In general it’s not better to wash the outside or the inside first, as long as both are done!  However, since outsides usually get dirtier than the insides, it may be easier to see inside dirt if you wash the outside first. You can use a bucket of warm water with a few drops of dish detergent on the outside with a long-handled brush and squeegee, and TotalClean or a mixture of one part white vinegar to two parts water in a spray bottle for the inside. 

    • Get your drapes in order!  If drapes are causing condensation to form on or around your windows, this is not a good situation and it will lead to mold if left unchecked.  Here are some suggestions:

      • Open the drapes during the warm part of the day so that temperatures between the room and window can equalize and dry out moisture. 

      • Leave the ceiling fan running in the room to promote circulation. 

      • True thermal curtains are made of 3-4 layers of material, including a vapor retarder that allows vapor to escape through the curtain.   Problems can occur if the curtains block vapor.  

If you still have a high mold count near your windows, it’s best to check with a qualified, reputable mold inspector to find out the source and be able to enjoy the sun and scenery through your windows instead of the mold!

Photo by Rob Wingate on Unsplash

Understanding Air Barriers and Vapor Retarders: Why and Where to Place Them

Understanding Air Barriers and Vapor Retarders: Why and Where to Place Them

If you are endeavoring to build your own home or even just renovate part of it, most likely you want to do it right the first time.  Here is some inspiration to plan well from workzone.com:

“By failing to prepare, you are preparing to fail.” ― Benjamin Franklin, Founding Father of the United States

“Every minute you spend in planning saves 10 minutes in execution; this gives you a 1,000 percent return on energy!” ― Brian Tracy, author and motivational speaker

“Give me six hours to chop down a tree and I will spend the first four sharpening the axe.” ― Abraham Lincoln, former U.S. President

It’s so true.  One of my personal skills is the ability to paint walls well and enjoy doing it.   I know that planning works because the best walls I have ever painted were the ones I spent 75% of the time preparing and 25% of the time painting.   Planning ahead just makes the job so much more easy and successful.  

Building something that you want to last is the same way: the investment of time and money is well worth it when the home just works.  Layout and design seem to be the priority today, but function should take first place.  It’s like choosing the color of the living room and buying that paint before any of the structural decisions have been made or executed.  Does the roof work?  Do the walls do their job?  Does the foundation work?  Let’s get those bones built and covered, so that they will protect all the beauty of form and life inside.  (getting off my soapbox now).

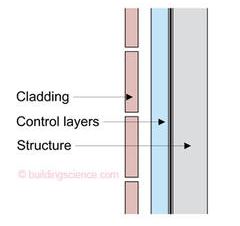
Here is an article that is well worth reading: Building the Perfect Wall by Joe Lstiburek. Mr. Lstiburek argues that there are four barriers that need to be constructed to protect the home from the elements, and here they are in order of importance but not in order of installation.

  1. a rain control layer
  2. an air control layer
  3. a vapor control layer
  4. a thermal control layer

He also argues that all of these layers should be on the exterior of the structure (the bones, whether it’s wood or steel or concrete), because the structure is where the money is!  Other than the rain control layer and maybe a vapor control layer, many builders do not recognize this.  Putting the insulation on the outside of the structure?  It’s just not done enough, but it’s brilliant.  Here is a simplified diagram (buildingscience.com): 

Here are some important points to understanding why these control layers are needed and why they have these priorities.

Rain control: 

  • Water does a lot of damage.
  • UV light also does a lot of damage. 

Air control: 

  • In order to control the interior environment, for the health of the building and its occupants, you must control the air.  Controlling the air means making it air-tight, with controlled penetrations. 
  • Air can carry (transport) a lot of water: see the first point above about water doing a lot of damage.

Vapor control: 

  • Water vapor travels in two methods: air transport (see air control above) and vapor diffusion.  
  • Once again, in order to control the interior environment, you must control the vapor flow into and out of it. 

Thermal control:

  • Thermal control prevents condensation when the temperatures and dewpoints inside and outside of the home are different.
  • One final word: Comfort!

Rain control and thermal control are relatively easy for me to understand; after all, every 4-season home now has siding and insulation.  It took some digging to understand the limits of, and relationship between, air barriers and vapor retarders. It’s helpful to know that air barriers are actually rated in their ability to retard vapor, so that in modern buildings, air barriers are used as vapor retarders as well.  (The term "vapor barrier" used to be in vogue but it's actually more accurate to use "vapor retarder").  There are two terms that relate to a material’s ability to retard vapor: permeability and permeance.  To understand them, it’s helpful to know a little about water vapor.

Water vapor moves in two ways through a building:  diffusion through the building materials themselves, and air transport.  Here is a diagram illustrating the two:

Source: BuildingScience.com

Water vapor has its own pressure, which contributes to the total air pressure.  The difference in vapor pressure between two sides of a building envelope assembly is the driving force behind vapor transmission by diffusion. (buildingenclosureonline.com)

Water vapor absorbs heat differently than the air in which it is mixed.  If you think of sunshine streaming through a window and heating a room, the sun is heating air and water vapor in the room, but at different rates.  Heat applied to the air raises its temperature directly (called sensible heat). Heat applied to the water vapor raises its temperature more slowly (also sensible heat), increases vapor pressure and with the increase in ambient temperature, also increases the ability of the air to hold more water vapor; thus it causes evaporation of any water in the room (from our skin for example) without changing its temperature (called latent heat).   Sensible heat causes an increase in temperature, but latent heat causes a change in state without a change in temperature.  (Latent heat is the heat applied to melt ice or boil water; the ice cube doesn’t change temperature while it’s melting and the water in a boiling pot does not change temperature while it’s boiling.)  Vapor pressure will seek equilibrium, so that an area of high vapor pressure will try to diffuse to an area of lower pressure.  It does this by “diffusing” through the wall itself. This movement is the reason for installing a vapor retarder.

Regarding air transport of water vapor, warm air naturally holds more moisture than cooler air, so you’ll want to prevent warm humid air from moving inward during summer, and warm air from moving outward during winter (causing condensation on the way in/out). The air barrier is responsible for stopping this movement.

Permeance describes the water vapor transmission rate (by diffusion).  It is the rate over the course of one hour through one square foot of a material of a given thickness at a specified vapor pressure, expressed in perms (grams/hour●ft2●inches Mercury). (buildingenclosureonline.com) Since it deals with water vapor, permeance is also a description of how vapor retarders slow the transmission of latent heat.  

Permeability in building materials is permeance per unit of thickness—or perm-inches, which is useful when comparing different thicknesses of insulation.   

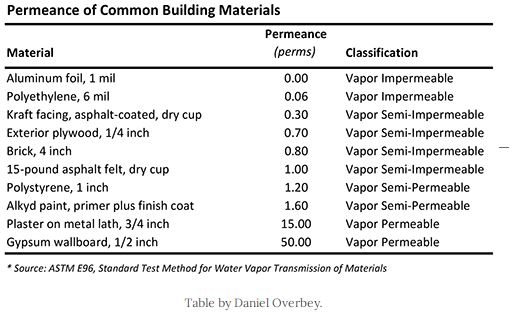
With the standard of Permeance, we are able to compare the vapor transmission qualities of different building materials.  The less permeable a building material is, the greater its resistance to water vapor transmission. A vapor retarder is essentially any building material that exhibits a very low permeance (very high resistance to water vapor transmission). (buildingenclosureonline.com)  Here is a table with some common building materials and their permeances:

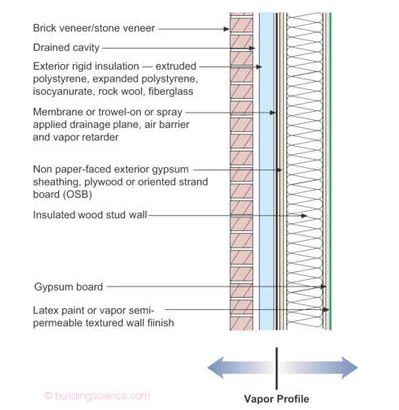
Below is a diagram of The Perfect Residential Wall.  The vapor arrows denote the desired flow of moisture because “we want the assembly to dry inwards from the control layers—and to dry outwards from the control layers.” (Joe Lstiburek, Building Science)  You never, never, want to sandwich material between 2 vapor retarders.  In effect, vapor will definitely be retarded there in that sandwich, causing condensation and mold!

Source: buildingscience.com

Note that this wall has two layers of insulation, which is ok, because the insulation is not trapping moisture (however it’s probably advisable not to insulation without kraft paper inside, more on that below).  The external rigid insulation stops heat transfer to the wooden structure, and the internal insulation provides more comfort.  The Perfect Wall article also describes a “clever wall” which combines all three: air, vapor and thermal control layers with one external layer of closed-cell high-density foam insulation.  

Vapor retarders have evolved a lot over the course of just a few decades.  From the early to the late 1900’s, roofing felt/tar paper was usually the only thing that went over the sheathing and behind the siding.  There was no drainage behind the siding (and in most mid-grade homes, there is still none), and no air barrier.  Sometimes the assembly worked well to protect the structure, and sometimes it did not, but without an air barrier, only moderate thermal control could be achieved inside.  Also, the kraft-paper facing on fiberglass insulation is a permeable vapor barrier (see chart above).

Polyethylene was introduced as a vapor barrier in the 1950s (constructioncanada.net) and it had disastrous effects in many homes, because although it is a Class 1 Vapor Retarder (0.1 perm or less), correct placement of this layer was critical to avoid condensation issues.  This brings us to our final point, where is the best place for the air barrier and vapor retarder?

The construction industry has had much confusion over where to place these layers.  For a long time, installers were instructed to install the kraft paper facing of fiberglass insulation “facing the warm side”.   They were also told (true today) to install it “facing them” meaning toward the interior of the building.  What about southern buildings, which are cooler inside for most of the year, and cooler outside for only a few months?  One can’t rearrange the insulation seasonally after the wall has been sealed up (!).    The good thing is that kraft paper is semi-impermeable and, it turns out, is one of the earliest “smart” vapor retarders, meaning that it has variable permeance: low permeance in cooler, drier weather, and higher permeance in warmer, more humid weather. (greenbuildingadvisor.com) The newest vapor retarders are doing this to give a measure of flexibility to buildings in these swing climates.  Some brand names are Intello Plus, Pro Clima DB+, and MemBrain (haha).  Each of these products are marketed as air barriers AND vapor retarders, so that by installing one of them outside the structure (wood or metal or concrete), you are protecting the structure by slowing vapor diffusion through it and maximizing climatization inside the building by sealing air leakage.  Since air sealing is ranked in priority above vapor retardation, it’s critical that the product be correctly and thoroughly installed to prioritize air sealing.  For example, on a busy jobsite, different trades and change orders can make multiple unauthorized perforations in a properly installed air barrier, so signage protecting it and rules for authorizing penetrations must be given. 

Since Youtube and Pinterest are the inspiration for many renovation projects, if you are taking on a renovation as a DIYer, and even when using a contractor, go back to the beginning of this article for more inspiration on planning.  It does take extra time to read and research products and methods of installing air barriers and vapor retarders, but it’s oh-so-critical to get them right for the long-term health of your family and longevity of your home.  Some recommended sites (in no particular order) are GreenBuildingAdvisor.com, BuildingScience.com, EnergyVanguard.com, Inspectapedia.com, BuildingEnclosureOnline.com, and more.  Planning it well is more than half of building it well!