All Posts by Jennifer Faul

About the Author

What is Salutogenic Design? How can we use it in our homes?

What is Salutogenic Design?  How can we use it in our homes?

Salutogenic design comes from the two Latin words ‘salus’ meaning health and ‘genesis’ meaning origin.  It is the study of the origins of human health.  Aaron Antonovsky was an immigrant to the US in the 1920’s, eventually being drafted into the US Army in World War II and serving in the Pacific.  Much later after obtaining his doctorate in sociology, Aaron studied survivors of concentration camps and wondered, why aren’t more of them in very poor health?  It was his questioning of the means and causes of good health, rather than what causes disease, that set him apart. (The Handbook of Salutogenesis, Chapter 3, Aaron Antonovsky, the Scholar and the Man Behind Salutogenesis

Normally salutogenesis is focused on healthcare settings and providers.  However, we can take the same concepts and apply them to our workspaces and homes. In today’s news, we’re constantly being made aware of environmental and human threats like viruses and toxic spills that threaten our health.  The possible effects,  such as cancer, high blood pressure, and sickness, are always presented to admonish us, avoid this or suffer consequences!  It’s definitely hard to tune out these sources.  However, if we’re able to focus on what makes us feel good, the results could be much greater.  Whether you’re designing a home from the ground up or have some time and budget to make some changes, here are some concepts from salutogenesis to keep your perspective in the right place: your health.

Louisa Grey is a designer living in north London who has embraced salutogenic design.  She prioritizes space, light and air in her projects by identifying the direction of natural light and the optimum layout to encourage airflow.  She admires the design of southern Italy’s trulli (ancient homes made out of limestone with conical roofs) and often incorporates a similar building material–clay–in her modern works, because it is naturally abundant, has acoustic-controlling qualities, is dehumidifying, regulates temperature and can improve air quality.  Clay plaster on walls has a soothing texture and appearance that gives a rustic, hand-crafted look to rooms, which also saves on energy in manufacturing and reduces waste. (Interiors expert Louisa Grey on how to embrace salutogenic design)  

Well-placed windows should allow the right amount of sunlight into your home, such that it doesn’t cause a large cooling load but rather allow a range of filtered or dappled light.  There are a number of companies that also offer faux skylights (thus avoiding any leaks or roof problems!) when natural light is at a premium.  

Open-concept floor plans do have the advantage of seeming more spacious than the same size traditional floor plan, but there is also comfort and peace in having walls and doors define some spaces, like an office or home library.   

Porches, courtyards and the ability to open large windows or doors to the outdoors (in areas with good air quality) are very beneficial because they allow fresh air to fill your home and to warm or cool it.  Plus, they are an ideal place to keep plants that need a little shade or protection and surround your seating areas in green.  Even views of green–from inside the house–lower stress, lower blood pressure, improve cognitive functions (like your ability to learn or focus), increase productivity, reduce anxiety, improve mood … the list is extensive! (How Your Home’s Design Can Improve Your Health)

If you are not building from the ground up, however, there are still ways to apply this type of design in your home.  According to the previous source, one of the most popular methods of salutogenic design is to incorporate biophilic design, which is based on human’s innate connection to nature. To do this, you can incorporate plants into your home, a calming mural, or the actual “architecture” of nature such as a natural stone fireplace, spiral staircase, or live-edge shelving that protrudes at different widths and heights on a wall.  Honeycomb shelving or tiled floors also mimic natural shapes.

Texture and comfort inside the home are very important.  (Although rugs and upholstery can hold dust and dust-mites, the way they “warm up” a room to make it inviting and comforting is important enough to use them when you can.  Also according to Louisa Grey, scents are can also be a healing part of your home: try to use natural oils and purifying mists and flowers that are grown locally. (How to design a healing home – and the power of salutogenic design)

Salutogenic design can even encourage healthy behavior when features like stairs or a swimming pool are included, or workout areas are not tucked away into a back corner or basement (you pass by them on a regular basis).  A beautiful library space, whether it’s an entire room or several bookshelves and a comfortable chair with good light also encourages learning. (Salutogenic Approach to Design is at the Core of Wellbeing)

Salutogenic design follows the principle that “an ounce of prevention is worth a pound of cure”.  Many homeowners make this choice everyday: should we go for small pieces of quality workmanship in our decor, appliances and clothing, or larger but lower-quality items?  It’s true that good design, building and decor may cost more than “builder’s grade” plans and materials, but what you should reap is a lifetime (or at least as long as you can live there) of better air quality, ergonomic ease, increased productivity and creativity, lower stress and overall wellbeing.  Who can put a price on that?

Photo by Andrea Davis on Unsplash

Are you TILTed?

Are you TILTed?

People who have lived with chemical sensitivities for some time become more educated about their bodies and what makes them feel bad.  The upside to knowing your sensitivities is that you can (mostly) avoid products and situations that will worsen your health, but the downside is that these products and situations can become ubiquitous, and dramatically change your social, work and home lives!  For many people, the onset of chemical sensitivities can be related to an over-exposure to one thing, like renovating a moldy bathroom, or staying in a hotel room that was cleaned with overly-noxious chemicals.  However, others do not have a clue about what caused the onset of sensitivities.  For each, navigating their daily life becomes a strategy of finding out and avoiding chemicals that trigger symptoms.  

If you are able to consult a doctor who treats chemical sensitivities, they will likely discuss conditions like “Mast Cell Activation Syndrome” (MCAS), or “Chronic Inflammatory Response Syndrome” (CIRS).  These syndromes present differently in different people and have overlapping symptoms, but there are physical tests and questionnaires that can help the doctor diagnose and treat them.  If you are in the beginning stages of treating sensitivities, it’s certainly helpful to become knowledgeable on your own, and researchers at the University of Texas have made it a little bit easier to zoom in on what makes you feel sick with a couple of free online tools.  In the expensive world of healthcare, we are all for “free”!

In their recent article “5 Types of Household Items to Avoid if You Have a Chemical Intolerance”, researchers introduce the two-stage process called toxicant-induced loss of tolerance, or TILT.  First, there is a major or chronic exposure to environmental agents such as pesticides, solvents or indoor air contaminants. Then, multi-system symptoms are triggered by a series of lower-level exposures to substances you may have previously tolerated like cleaning products, fragrances, foods, drugs or food and drug combinations.   This can explain why, after a major chemical exposure, you may feel sick in the vicinity of things that never affected you before, like certain laundry soaps or refueling your car at the gas station.  (The article above is super-helpful, including several recipes for homemade, non-toxic cleaners that anyone, TILTed or not, should try!)

To broadly test for TILT, they have developed a really quick questionnaire of 3 questions (within the article).  If you answer “yes” to one or more of those questions, they have a more detailed questionnaire of about 10 pages (all online click-through scales, no paper and math involved!) which can help you identify the types of chemicals and the parts of your body they affect the most.  Although I answered “yes” to food allergies, thankfully the more detailed questionnaire suggested I didn’t have TILT.  The organization has a page that describes TILT with a video of a man who grew up on a farm and the over-exposure to various dangerous chemicals that probably contributed to his sensitivities.  You can find more stories of different people with their triggers and symptoms here

This organization is dedicated to educating the public and also traditional healthcare workers like doctors, nurses and hospital staff about TILT.  On their provider resource page is a video describing the current problem: healthcare workers frequently don’t ask questions about chemical exposure when someone presents with symptoms.  

If you do find you have been TILTed, you can share your story or register to help the organization with future studies here.  At the very least, you can take the results of the surveys to your own healthcare provider to make sure they are aware of your sensitivities in planning your treatment.  The complexities of the chemical world we live in are making it more and more difficult to live well, but knowledge goes a long way toward that goal.

Photo by Rex Pickar on Unsplash

Fire and Smoke Recovery

Fire and Smoke Recovery

Wildfires have been very destructive in the western half of the US in the late 2010's and early 2020’s.  As for the future, a 2022 report by the UN Environment Programme (UNEP) and GRID-Arendal projects an increase in extreme fires by 14% by 2030, 30% by the end of 2050, and 50% by 2100, due to climate change and land-use change. (breezometer.com)  

Fire disasters, like natural disasters, do not just destroy what the fire touches.  They can disrupt major infrastructures like highways and railways, power and water, and most important, air quality.  Because fires may smolder for some time, try to prepare to deal with the effects for weeks. 

If you live in an area prone to wildfires or prevailing winds that may carry smoke, here are some ways to prepare:

  • Seal doors and windows with weatherstripping, caulk and door sweeps.  
  • Find out how to adjust your HVAC system accordingly: you’ll want to close the fresh air intake and change over to recirculation, no matter whether you have central AC, a window air conditioner or portable air conditioner.
  • Purchase extra MERV 13 or higher filters for your HVAC system, to be used on poor air quality days.
  • If you live in an apartment building or condo with little control over the HVAC, consider purchasing vent filter material so you can place them in the vents into your space. Carbon vent filter material will neutralize many VOCs as well.
  • Purchase a HEPA air cleaner (non-ozone producing type) and be sure to have an extra filter or two on hand.    
  • Keep a number of N95 respirator masks on hand.    
  • Keep canned food and bottled water on hand.
  • Stock up on essentials for cleaning smoke odor: baking soda, white vinegar, rags, TotalClean

During:

  • Try not to cook during a wildfire emergency, because cooking indoors increases small particulates and vapors in the air, and you won’t want to turn on your stove exhaust, as that will draw polluted outdoor air into the house.  Try to use just the canned food you have on hand.
  • Monitor the filters in your HVAC system and air purifiers and change them when you start to notice a color change on the front of the filter, or when the output air starts to smell like smoke. 
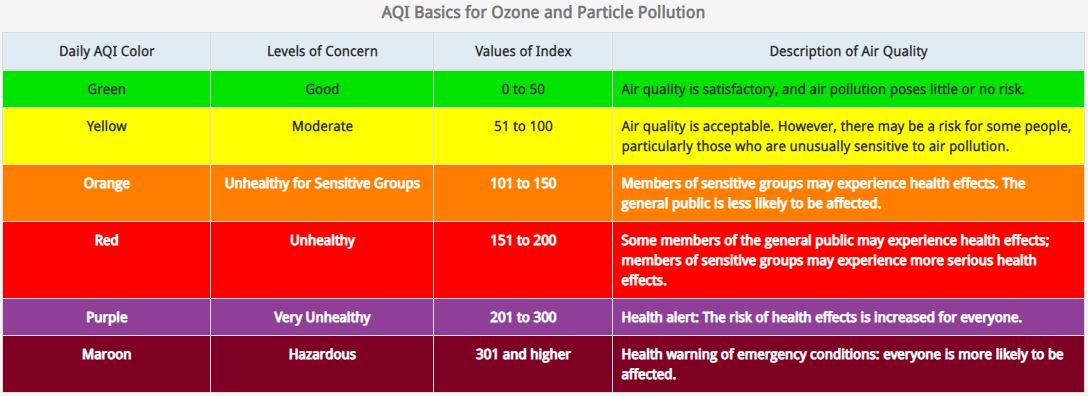
  • Check your local air quality and receive updates from airnow.gov . Fire and smoke maps are available under the heading fire.airnow.gov.  You can also register for a free 14-day trial of Breezometer’s Air Quality app.  Below is a diagram to understand air quality index values (airnow.gov).
  • Use N95 respirators to evacuate to a safer place if necessary.  

Source: airnow.gov

After:  

  • Don’t open windows and doors until the air quality index is less than 100.  When that happens, you can open windows fully to get more fresh air ventilation. 
  • Set up fans near doors and windows to “push” smoke odor and soot outside.

To remove smoke odor that infiltrated from outside, or if you had a fire in your home:

  • Run air purifier(s) continuously with charcoal filters. 
  • Sprinkle baking soda over carpets and rugs and leave it overnight.  Then using a vacuum with HEPA filter, vacuum out the carpets.  
  • Remove drapes, towels, and any hanging fabric exposed to smoke, and either launder it in your washing machine or send it for professional cleaning.  When washing it yourself, you can add a cup of distilled white vinegar to your regular laundry detergent to remove smoke.  Don’t machine dry the item until the odor has been removed; it may need an additional washing cycle.
  • Wipe down all hard surfaces, including walls, ceilings, floors and windows with TotalClean or a 1:1 mixture of warm water and white vinegar (TotalClean is more gentle than vinegar and can be used on stone, wood, etc.)  Dispose of rags or wash them out with mild detergent and water as you go.  

To clean fabric-upholstered items:

  • Try to remove any cushion covers that are washable.  
  • Clean bare foam cushions by using “air replacement”:  Place the cushion into a large vacuum-seal bag and sprinkle baking soda over it.  Seal the bag and use your HEPA vacuum to remove the air from inside the cushion.  Let the air back into the bag to re-inflate the cushion.   Repeat several times if necessary. 
  • Sprinkle baking soda over the piece and let it set overnight before vacuuming it off.
  • You can also move the piece outside to air it out in the sun.  
  • It’s difficult to remove smoke that’s settled into furniture, however, if it does not dissipate following using an ozone generator, you can contact a restoration company for their services if it’s a valuable piece to you.

Try an Ozone Generator to remove smoke odors:

  • Ozone generators should only be used once all surfaces that can be cleaned are thoroughly cleaned (walls, floors and ceilings too!).  
  • Ozone is not as effective in areas of high humidity, so running the air conditioner or a dehumidifier in the space to get the humidity down (60% or less) is advisable.  Central air conditioning and any exhaust fans must be shut down when using the ozone generator, though, because you’ll want the ozone to stay in the space. 
  • Use fan(s) within the space to circulate the ozone.
  • Ozone generators cannot be used in the presence of people, pets or plants, but once these are removed, they can be quite effective in removing smoke.  Follow all instructions to seal up the space and allow it to work for the full time advised before ventilating.  Contact HypoAir regarding rental of our ozone generators, or local restoration companies may rent ozone generators.    

For large areas with open walls and ceilings such as basements, garages or gutted homes, consider having them soda blasted by professionals to remove soot and smoke odor from the structure in hard-to-reach places.  Baking soda’s legendary cleaning and odor-absorption qualities can produce amazing results when combined with commercial equipment and a skilled contractor.

Don’t: 

  • Spray deodorizers or fresheners to “cover up” the smell of smoke, because they do nothing to remove the contaminants, and many have toxic ingredients in them.
  • Attempt to live in spaces with heavy smoke damage until they are cleaned.  “Third-hand smoke” is the term used for the way carbon and chemicals in the smoke react to the materials in your home, and it can make you very ill.
  • Neglect flood remediation if the smoke damage was part of a fire in your home and fire response crews extinguished it using water.  Building materials must be removed or dried thoroughly within 48 hours in order to prevent mold growth. 

Photo by Daniel Tausis on Unsplash

Flood and Leak Preparation/Remediation Guide

Flood and Leak Preparation/ Remediation Guide

Water damage (including damage from freezing) is one of the most common and most costly types of homeowners insurance claims. Every year, about one in 50 homeowners files a water damage or freezing claim, accounting for 29% of all homeowners insurance claims, according to the Insurance Information Institute. (forbes.com) With the right knowledge and preparation, we hope that you can avoid very costly damage even if you experience a flood event.  That’s the purpose of this guide and kit. 

Before: secure lawn furniture, vehicles, and windows and doors

Flash Floods can happen with no notice, but if you have time, try to do as much of the following as possible to keep water and wind out.

  • Park your vehicle in a garage above street level if possible  

  • If high winds are forecasted, install hurricane shutters or plywood over windows and glass doors if possible. Store lawn furniture and bikes in a garage and roll or move heavy decor like pots to sheltered places.

Before the storm/flood: Take photos of your property inside and out for documentation (which hopefully will not be needed!).  Move valuables like photos and jewelry to a high, safe place in the home.

Before: prepare a basic survival kit for weathering the storm at home, as many times floods cause power outages.  

  • Drinking water (one gallon per person per day for several days, for drinking and sanitation)

  • Food (at least a several-day supply of non-perishable food) 

  • Manual can opener (for food)

  • Battery-powered or hand crank radio and a NOAA Weather Radio with tone alert

  • Flashlight

  • First aid kit

  • Extra batteries

  • Whistle (to signal for help)

  • Dust masks (N-95 if possible) (to help filter contaminated air)

  • Plastic sheeting and duct tape to protect furniture from water

  • Hand sanitizer

  • Moist towelettes, garbage bags and plastic ties (for personal sanitation)

  • Wrench or pliers (to turn off utilities)

  • Local maps

  • Cell phone with chargers and a backup battery

  • Various buckets for leaks

Minimum Tools for Clean-Up:

  • Utility knife with extra blades for cutting drywall

  • Pry bar and hammer

  • Heavy duty gloves

  • Heavier plastic tarp(s) for temporary repairs and drywall disposal

  • Heavy duty “contractor” bags for disposing of wet drywall, carpeting and water-damaged items

  • Flat shovel for removing debris from floor

  • Wet-dry HEPA vacuum

During the storm/flood: 

  • Don’t open windows or doors during the storm, as flying debris can cause serious injury!  Contrary to urban legends, you shouldn’t open them to “equalize pressure” during a tornado situation, either.  

  • Keep your weather radio tuned and cell phone on for local updates and take shelter in an interior room or the basement if advised against tornadoes. 

  • Occasionally tour the house and peek at attic space (if you have one) to check for leaks. Use buckets to contain water and if a steady drip of water starts to come from one area, use a utility knife to cut through the ceiling drywall to let the water run out faster and avoid blowout of the ceiling.  

  • Don’t stand in or walk through water to avoid risk of electrocution

After:  

  • Venture outside only when it’s safe to do so (the storm has passed). 

  • Alert authorities if your power is out or there are downed power lines near your property

  • Don’t drink tap water unless it’s deemed safe to do so

  • Take “after” photos inside and out

  • Be aware of displaced wildlife like snakes, alligators and the like!

  • Make repairs as you are safely able to do so.

  • If you have to leave your home for safety, write the date, your name(s), destination and phone number on a prominent wall as information for rescue teams

The Clean-Up:

When flooded by a hurricane or flash flood, the waters invading your home contain a variety of pathogens such as E. coli, Salmonella, and Shigella; Hepatitis A Virus, agents of typhoid, paratyphoid and tetanus, as well as agricultural or industrial chemicals (OSHA.gov).  This means that contents and surfaces that came in contact with floodwater from outside must be sanitized and completely dried within 48 hours or disposed of; do not let them just “dry out”.  Then after cleaning and drying, mold prevention treatment can be applied. 

Tips for salvaging household items (adapted from haywardscore.com):

Papers and clothing 

  • Move outside and spread out in sun

  • May wash clothing in washer

  • Papers and clothing soaked in contaminated water should be disposed (clothing will contaminate washing machine)

Solid wood furniture

  • Move outside to dry thoroughly

  • Remove drawers

  • Tip back to expose underside

  • Wipe down with clean rags

Area rugs

  • Can be professionally cleaned with extraction method

  • Washing them in your machine may contaminate the machine

  • Rugs with foam backings should be disposed

Wall-to-wall carpeting

  • Since it must be cleaned and thoroughly dried within 48 hours, and this is hard to do in the case of large areas of carpet, disposal is most common.

Padding under wall-to-wall carpet

  • Dispose because it is difficult to completely dry.

Upholstered furniture like couches and recliners

  • Must be cleaned and thoroughly dried within 48 hours.  

  • Move them outside if the weather is dry

  • Tip back so that the underside is exposed

  • Remove cushions and covers if possible to dry faster. 

  • Use a wet-dry shop vac to remove as much water as possible, then use fans to circulate air over them continually.

  • Thoroughly soaked furniture is unlikely to be completely cleaned and dried: disposal is recommended.

Drywall:  If any water pooled on the floor near walls, then it likely contacted the bottom of the drywall and insulation and needs immediate attention to get the walls dry.  The following is adapted from PopularMechanics.com:

  1. Wearing a respirator mask, safety glasses and gloves, remove baseboard with a prybar or hammer claw.

  2. Place a tarp under the area you will start to cut to catch drywall debris.

  3. Mark walls 6-12” above the high water line (use a chalkline or laser if possible) and cut using a utility knife, drywall saw or light circular saw set at ½” depth.

  4. Punch out the drywall under the cut with a hammer and remove it from the studs.

  5. Cut away insulation using a utility knife, making sure that you remove all damp insulation.

  6. Haul out debris on the tarp and repeat until all affected walls are open.  

  7. Use a wet-dry HEPA vacuum throughout the process to keep dust down

  8. Remove electrical plates to promote drying within the wall.

  9. Disinfect floors and cavities with a degreaser/cleaner and pressure washing to clean out all the bacteria from floodwater (not necessary if it was clean water) (moldfreeliving.com)

  10. Use drying equipment (see below) to expedite drying.

If entire ceiling areas and walls are soaked (from roof damage), remove all items you wish to salvage in the room before tearing out drywall and insulation (best done by professionals).  Unfortunately, all wood, tile, and vinyl flooring must be removed eventually because incomplete drying in-between and under the floor will cause mold to grow (also best left to professionals).  

How to use Drying Equipment: Drying out a house is actually an art.  Remediation companies use their equipment to get the right humidity, airflow, and temperature (HAT), the elements necessary for evaporation, during different stages of drying. The following advice is from the article Expediting the Drying Cycle:

  • Low relative humidity (RH) is necessary for drying, as moisture in materials and air seek equilibrium. The lower the RH of the air, the quicker the wet materials will give up their moisture to become equal with the moisture in the air.  Use any dehumidifier available from the first day, in order to get the RH as low as possible and keep it there.  It’s important to use the wet-dry HEPA vacuum as much as possible before switching on fans, as dust can plug filters on the dehumidifiers and reduce their drying capabilities. 

  • Airflow measured in feet per minute (FPM) is more important than cubic feet per minute (CFM).  Airflow speed at the beginning must be aggressive, preferably 600 FPM or more.   This is why professional blowers sit low on the floor to move air directly across flooring surfaces.  Alternate the blower between rooms if you only have one blower. 

  • Heat is needed when rates of evaporation begin to slow down, usually on the second day of drying.  At this time, if you have a room heater, turn it on and slow down fan speeds to 150 FPM.

  • Consistently low RH is the most important goal, because RH drives drying. Toward the end of the drying job, it’s possible that only one airmover is needed in each room (where the drying goal has not been met) with all available dehumidifiers running.

Wait until everything completely dries in the walls (consistently low RH can indicate this) before applying any anti-mold products.  Here are some recommended mold preventatives:

  • For a large area, consider having it soda blasted by professionals to remove remaining debris and mold from the structure in hard-to-reach places. 

  • DIY Fogging to prevent mold growth:  EC3 Mold Solution Concentrate and Fogger, $495

  • Laundry: EC3 Laundry Additive, $23

  • Use the Mold Guard and Air Angels after drying to continue elimination of mold in all areas.

  • Use TotalClean to wipe down surfaces like countertops, windows, cabinets, mirrors

Consider using an Ozone Generator to kill mold and remove odors:

  • Ozone generators should only be used once all surfaces that can be cleaned are thoroughly cleaned (walls, floors and ceilings too!).  

  • Ozone is not as effective in areas of high humidity, so running the air conditioner or a dehumidifier in the space to get the humidity down (60% or less) is advisable.  Central air conditioning and any exhaust fans must be shut down when using the ozone generator, though, because you’ll want the ozone to stay in the space. 

  • Use fan(s) within the space to circulate the ozone.

  • Ozone generators cannot be used in the presence of people, pets or plants, but once these are removed, they can be quite effective in removing smoke.  Follow all instructions to seal up the space and allow it to work for the full time advised before ventilating.  Contact HypoAir regarding rental, or local restoration companies may rent ozone generators.  

How to safely remove old carpet

How to safely remove old carpet

Upon testing my bedroom carpet as part of a series of mold tests in my home, I found this:

I scheduled time to remove the carpet the next week.  Now, how do I do this safely?

Research revealed two extremes:

  1. removing the carpet with no breathing equipment and no dust abatement (although this guy has some great tips, I cringe at the way he’s throwing the carpet around with no dust mask)

  2. removing the carpet with breathing equipment, a zillion garbage bags and gallons of mold eliminator (this method is costly and WET!) 

I had to find a solution in the median.  Here’s what I came up with for my situation (I am moderately sensitive to mold). 

Supply list:

  • Respirator with extra set of filters

  • Heavy gloves

  • Old clothes

  • Knee pads

  • TotalClean concentrate (or several pre-mixed spray bottles)

  • Clean garden sprayer

  • Rags

  • Plastic sheeting and painters tape for taping off vents and covering heavy furniture

  • Old towels to block under door

  • Heavy duty garbage bags (also known as contractor bags)

  • Carpet knife with extra blades or utility knife with extra blades

  • Duct tape

  • Pliers for pulling carpet

  • Nail puller to remove staples in padding

  • Pry bar and hammer to remove tack strips

  • HEPA vacuum with new bag for cleanup

  • Air Angel and/or Germ Defender: helps with dust and mold mitigation

Prep, prep, prep…it’s tedious but so worth it.  

  • Move whatever furniture, clothing and decor you can easily move, into another room. I took the long-overdue opportunity to get a new mattress, so I could escort my old one to the dump!

  • Use dollies on furniture that is too heavy or large to move out of the room.

  • Turn off the HVAC and cover any ceiling, floor or wall registers with plastic sheeting and painter’s tape

  • Measure TotalClean concentrate and water into garden sprayer at 1:7 parts respectively or empty pre-mixed spray bottles into sprayer.

  • Block under door(s) with old towels so that dust doesn’t migrate through the house.

  • Open window and remove screen if you plan to toss the carpet out of the window (also block off the area below)

  • Turn on the Air Angel and/or Germ Defender to help dust particles clump together and fall to the floor; the ions also destroy mold and bacteria on contact

  • Suit up with all protective gear including your respirator!

My strategies for minimizing dust will be to dampen a section of the carpet with the sprayer; cut the carpet into a  manageable section, remove it, and do the same three steps for the carpet pad underneath.  You’ll want to make the least number of cuts, because cutting through the carpet releases a lot of dust and fibers into the air.  I realize that this method will only wet the top of the carpet and not the cut edge or bottom, but short of soaking the carpet and subfloor, I found this is the best solution.  I liked the idea of tossing the carpet out of the window on a good weather day and bagging or binning it outside so that I didn’t drag the bags through the house.  I removed the carpet, padding and staples as I went, because I had a heavy piece of furniture left in the room and did not want to move it around more than necessary.

  1. Starting in one corner, use the sprayer to dampen the carpet in a 2’x8’ section.  Cut just inside that section with the carpet knife.  

  2. Use pliers to grab the carpet in the corner and wrestle it from the tack strips. If you can’t get it out, try cutting the corner out with your knife and pulling out just the corner.

  3. Roll it up gently and dispose of it in a contractor bag (or toss it out a window!)  If bagging it, then you can use the duct tape to keep it rolled tightly.

  4. Spray the carpet pad underneath and cut it.

  5. Dispose of it in the same way.

  6. Remove staples holding the padding to the floor with the nail puller.

  7. Remove tack strips using the pry bar and hammer.  They are super-sharp!  (If you plan on replacing with new carpet and the tack strips are not rusty or damaged, you can leave them in place).  

Repeat steps 1-5 until the whole room is devoid of carpet and padding!  If you can handle more than 2x8’ of damp carpet at a time, you can  Then, use a HEPA vacuum to thoroughly vacuum the floors to remove dust.  You will want to wipe down the walls, window(s) and ceiling fan with TotalClean because dust is now everywhere.  Finally, you can remove the sheeting from your register(s) and change clothes and shower–you earned it!  It’s best to add a bit of EC3 Laundry Additive to your clothing when washing it to avoid spreading mold to any of your clean clothing. 

If you have a new floor already scheduled for installation, good for you! Make sure that the subfloor dries out completely before 48 hours have passed, and definitely before installing new flooring (use of the sprayer makes it unlikely to soak the subfloor).   If you haven’t picked out new flooring yet, you can remove/replace any nails or screws that are sticking out, use a non-toxic floor paint, and/or use an area rug to cover over any rough areas until that day comes.  Try not to wait too long, however, so that excessive wear of the subfloor doesn’t occur.  

Photo by Julie Marsh on Unsplash

Safety concerns after the Norfolk Southern train derailment in Ohio

Safety concerns after the Norfolk Southern train derailment in Ohio

On Friday, February 3, 2023, about 50 freight cars derailed in East Palestine, Ohio. Unfortunately, the freight company Norfolk Southern did not release the full manifest of what was in the derailed cars to the public until about two weeks later.  It was first stated that only ten of these cars contained hazardous materials.  Five of those cars started leaking vinyl chloride, a gas which is used to make PVC (polyvinyl chloride), a hard plastic that composes many consumer products such as lawn chairs and water piping.  Vinyl chloride exposure increases risk of certain cancers, including liver cancer. According to the New Jersey Department of Health, some of the acute health effects of inhaling vinyl chloride are irritation of the nose, throat and lungs causing coughing, wheezing and/or shortness of breath.  It can cause headache, nausea, vomiting, dizziness, fatigue, weakness and confusion. Higher levels can cause lightheadedness and passing out.  With chronic exposure, vinyl chloride is a carcinogen in humans. It has been shown to cause liver, brain, lung, and other types of cancer, as well as reproductive harm.


Other chemicals initially reported were:

  • Butyl acrylate, a liquid at normal atmospheric conditions, but it evaporates quickly.  It’s used to make plastics and paints.  Butyl Acrylate is listed as a “serious” health and flammability hazard by the New Jersey Department of Health.  Inhaling Butyl Acrylate can irritate the nose, throat and lungs causing coughing, wheezing and/or shortness of breath.  Exposure to Butyl Acrylate can cause headache, dizziness, nausea and vomiting.
  • A “small amount of non-hazardous lube oil”.

According to news headlines of February 13, additional chemicals contained in the train cars include:

  • Ethylene glycol monobutyl ether (EGBE) is a colorless liquid with a mild odor, is used as a solvent for paints and enamels, as well as in cleaning products.  It’s a carcinogen and can immediately irritate the nose and throat to cause coughing, wheezing, nausea, vomiting, diahhrea, abdominal pain, headaches, dizziness, confusion and passing out (Hazardous Substance Fact Sheet).
  • Ethyhexyl acrylate is a clear colorless liquid with a pleasant odor, whose vapors are heavier than air.  It’s used in the making of paints and plastics.  It can cause severe skin and eye irritation on contact and respiratory irritation if concentrated vapors are inhaled.
  • Isobutylene is usually transported as a colorless liquid under pressure, which becomes a gas when depressurized.  It’s highly flammable and used in the production of aviation gasoline, paints and coatings, packagings and plastics.  It can cause headache, dizziness, lightheadedness and fatigue when breathed in, as well as irritating the eyes, nose and throat. (Hazardous Substance Fact Sheet)

According to a Washington Post article of February 18, other chemicals include:

  • Polyethylene, a common plastic, is considered to be of low toxicity by the Environmental Working Group.
  • Dipropylene glycol, used in some skin care products, has low toxicity. (Environmental Working Group)
  • Propylene glycol, a food additive and skin care ingredient, has moderate allergenic potential.  (Environmental Working Group)
  • Polyvinyl (PVC), a common plastic, may contain phthalates (an endocrine and reproductive toxin), and can produce dioxin and hydrogen chloride if it's burned.
  • Diethylene glycol (DEG) is a clear, colorless, practically odorless, viscous, hygroscopic liquid with a sweet taste. It’s used in a wide range of industrial products but has also been involved in a number of prominent mass poisonings spanning back to 1937. (scientific review), causing renal (kidney) failure, neurological disorders, and/or death.
  • Benzene, a major ingredient in gasoline, is used to make many other industrial products, detergents, drugs and pesticides.  It’s a known carcinogen that can cause death at high levels of inhalation (10,000-20,000 ppm), and headaches, dizziness and drowsiness with only short-term inhalation.  Inhalation over extended periods or in high concentration can cause organ damage, especially to bone marrow and blood (Virginia Department of Health).

In order to mitigate explosion risk, crews drained and ignited the vinyl chloride on Monday February 6, causing a dark plume of smoke.  Unfortunately, the smoke contains phosgene and hydrogen chloride, which are both irritants that can cause adverse effects at very low concentrations.  Here is what we know about these chemicals:

Phosgene, a product of the burning vinyl chloride, can occasionally poison workers in the plastics and chemical industries.  According to an academic review of 10 cases of phosgene exposure, “Phosgene inhalation may cause initially symptoms of respiratory tract irritation, patients feel fine thereafter, and then die of choking a day later because of build up of fluid in the lungs (delayed onset non-cardiogenic pulmonary edema). Phosgene exposure is associated with significant morbidity and mortality.”  The exposure limits are also very low for this chemical: 0.1 ppm (part per million) averaged over a 10-hour workshift and 0.2 ppm, not to be exceeded during any 15 minute work period, according to the National Institute for Occupational Safety and Health (NIOSH).  (Phosgene Hazardous Substance Fact Sheet)

Hydrogen Chloride, another of the products of burning vinyl chloride, is synonymous with Muriatic Acid and Hydrochloric Acid.  It’s a colorless gas with a very pungent odor, used to make other chemicals, or used in making cleaning products.  Very corrosive, it’s an irritant to the respiratory system and can cause severe burns to the skin, eyes and lungs.  Hydrogen Chloride is corrosive to steel and has an explosive reaction to some other substances. (Hydrogen Chloride Hazardous Substance Fact Sheet)

Since vinyl chloride and some other chemicals are heavier than air at ambient temperatures, officials have been testing areas near the ground and the basements of residents, to be sure that they are safe to return to their homes.  However, until all of the chemicals are removed from the site, there is the possibility of further escape of chemical gasses and liquids into the air, ground and water.  It’s been confirmed that some chemicals reached the Ohio River, so that at least one water supply company had to make provisions to obtain a different source of water from another river.  There have been reports of dead animals in the area such as chickens, dogs, foxes, and fish. 

There is a very real concern about soil and water contamination, because the vinyl chloride was first drained from five of the cars to an excavated trench and then burned.  This was not a lined trench, so the vinyl chloride contaminated the soil, where it can permeate and move into waterways with snow and rain.   According to the EPA’s letter to Norfolk Southern, chemicals were also seen entering storm drains.  The soil of the disposal trench was not excavated for disposal following the burning; in fact the repaired train line was quickly built over part of the trench/burn site.  Because vinyl chloride is a carcinogen, there’s likely to be lasting adverse effects from the quick disposal and cover-over.  

In addition, chemicals released from burning the vinyl chloride are potentially toxic.  Among them, dioxins can cause developmental problems in children, lead to reproductive and infertility problems in adults, result in miscarriages, damage the immune system, and interfere with hormones.  Dioxins can bind to an intracellular protein known as the aryl hydrocarbon receptor (AhR). When that happens, the AhR can alter the expression, or function, of certain genes. The resulting cellular imbalance leads to a disruption in normal cell function and ultimately adverse health effects. (National Institute of Environmental Health Sciences)  Unfortunately, dioxins can persist for decades in soil and contaminate plants and animals, where they are stored in the fat reserves of the animals which graze on or contact the soil.  On Thursday, March 2, the EPA ordered Norfolk Southern to begin testing for dioxins in the area surrounding the derailment.

Many residents returning to their homes have requested air and well water testing, which is being conducted by the EPA.  Detection of these gasses and chemicals in many cases requires specialized testing equipment that has been calibrated to sense their presence, such as this meter. According to this fact sheet from the Illinois Department of Public Health, showering, bathing or cooking with water contaminated with vinyl chloride can release it into the air, where you can breathe it. Drinking contaminated water can also expose you to vinyl chloride; people can taste it starting at about 3400 parts per billion (ppb), however, the EPA recommends avoiding cooking or bathing with water that contains over 2 ppb.  The sheet advises that water can be safely filtered using carbon filters, however with the low safety level (2 ppb) and much higher sensory detection level (3400 ppb), there is no way to know if water has been safely filtered unless it’s tested.  Testing by private labs are one way to be sure that water is safe, but testing water continually, and purchasing bottled water, can come at significant cost to the homeowners.

Photo by Craig Marolf on Unsplash

How to enjoy winter

How to enjoy winter

Whether or not you enjoy winter, there are ways you can enjoy it more.  It calls for identifying some potential drawbacks, and transforming them into advantages.  Some potential cons of the winter are less daylight, more clothing, less time outside, colds and flu, and staying at home when inclement weather hits.  These don’t have to be dampers on the season: here’s how.

Less Daylight.  When the sun goes down at 5pm or earlier, our bodies tend to say, “Yay, it’s time to sleep!”  but there’s still plenty of time left in the day.  Apparently, less sunlight really does affect our circadian rhythm and may cause us to feel groggy or fatigued during the day.  Also, because our bodies use sunlight to manufacture vitamin D, and vitamin D is a hormone, less of this vitamin has a tremendous impact on mood, energy level and immune function. Here are some ways to keep your energy levels high even after the sun goes down:

  • Bright light helps to energize us by telling your brain to stop producing melatonin, a sleep hormone.  If you want to get really technical, blue light does that best, while lights that are amber and reddish don’t provide much “wake-up” at all.  In our previous post, we describe how sunlight actually wakes and puts us to bed with different wavelengths as the light is filtered differently through our atmosphere at different times of day.  You can do this inside (artificial light)with programmable light bulbs in your home like the Wyze Color Bulb ($16) or Light Engines ($289-349) which can help your body track the natural sun or reprogram for travel.  In any case, when you want to stay awake, break out those cool blue light bulbs (also called daylight and cool white), and head toward the warm white bulbs when you’re ready to sleep. 

  • Get tested for your vitamin D levels.  Women are especially susceptible to deficiency in this vitamin, which can lead to lower bone density, fatigue and susceptibility to disease (immune problems).  Your doctor can help you select the right vitamin D supplement to recover.

More clothing:  If you prefer to walk around in shorts, winter could put a cramp in your style, but layers can extend many different styles.  When the weather is blah, brighten up your mood with your wardrobe!  Here are some cases in point:

  • Leggings got you covered whether you wear a summer dress or shorts over them.

  • Socks come uber-stylish in patterns and colors, and showing them off is cool.  Unique socks make great gifts too!

  • Sweater vests add warmth to your core.

  • Try a different kind of hat, in a different color, than what you would normally wear–like a bucket hat, turban or tam.

  • Lighter layers even help you to pack less clothing when you travel, because you can mix and match them compared to more bulky items.  

  • Think about it: insulation in the home is about sandwiching air in cavities.  Several light layers usually cause active people to be more comfortable and sweat less.  They also do a better job to allow movement and coverage–a gap here or there is covered by another layer, or adds “ventilation”.  

Less time outside: says who?  If you’re limiting time outside, it’s only because you haven’t found the right sport or way to dress for it.  There are proven benefits to spending more time outside during the winter: it increases the basal metabolic rate, which helps the body burn more calories. (insidehook.com)  Here are some suggestions:

  • Firepits and outdoor heaters

  • Hot tubs

  • String lights

  • Backyard gatherings with friendly competitions and hot chocolate

  • If you live in snow: snowshoeing, cross-country-skiing

  • Biking

  • Birdwatching

  • Polar bear dips

Repeat after me: colds and flu do not have to be part of my winter!  Contrary to advice during our upbringing, people experiencing cold temperatures are no more likely to get sick than those who are in a warm environment.  The increase in colds and flu at this time of year is most likely because cold, dry conditions are ideal for transmitting these viruses.  The virus is more stable and is able to stay in the air for longer when it’s cold and dry. (signaturemd.com)  

If the indoor air is dry, you can add humidity to it in your own home by using a humidifier.  Dr. Jeffrey Banyas is an ear, nose and throat surgeon in Pennsylvania.  He advises that about 40% relative humidity is ideal to prevent infections, because it reduces the chances of virus remaining airborne, and it helps the body’s natural defenses.  “The nose and sinuses are lined with a mucous membrane that has within it small hairs called cilia,” Banyas explained. “These cilia beat rhythmically to sweep the sinuses clean.” Banyas said when the mucus is thin, the cilia work much more efficiently. However, dryness impedes them.

“When the membranes dry out, not only do the cilia not work as well, but any trapped infectious mucus, pus, or debris is thicker and harder for the cilia to remove.” (Pennsylvania newspaper)

Especially if you are out and about, be sure to drink plenty of water and use a saline nasal spray or gel to keep nasal passages moist.

Cold air is a problem for asthma sufferers because it causes air passageways to constrict when breathing it in.  In this case, it’s best to dress warmly and place a scarf or covering over your mouth to help warm the air before it enters your body.  In the case of those with heart disease, cold temperatures stress the cardiovascular system and cause your blood vessels to constrict, shallow breathing, and a slight thickening of the blood.  (signaturemd.com) Yes, strenuous outdoor activities like shoveling snow can cause heart attacks, so if heart disease is a concern, it’s best to get help with chores outside! 

There is moderate evidence to suggest that vitamin C, D and zinc help with colds.  Vitamin C helps in the formation and function of immune cells, but here’s the thing: they don’t do much if you only start taking them after you get sick.  According to a 2013 Cochrane meta-analysis of human studies, people who take vitamin C regularly can expect shorter colds (by 8% in adults and 14% in children) with slightly less severe symptoms.  Also, athletes who take vitamin C regularly are about half as likely to catch a cold as those who don’t.  The recommended daily dose of vitamin C is 75 milligrams (mg) a day for women and 90 mg a day for men. (mayoclinic.org)

Vitamin D is involved in many cellular processes, including the regulation of immune cells during infections. Deficiences of vitamin D are associated with increased upper respiratory tract (URT) infections. (signaturemd.com).  Because one way of getting vitamin D, through exposure to sunlight on your skin, is limited during the winter months, supplements can help.  You don’t need to take a large dose of vitamin D daily to get its benefits. The recommended daily amount of vitamin D is 400 international units (IU) for children up to age 12 months, 600 IU for people ages 1 to 70 years, and 800 IU for people over 70 years.  (webmd.com)

Zinc keeps the immune system strong, helps heal wounds, and supports normal growth.  Some studies have found that zinc lozenges may reduce the duration of cold, perhaps by a day or so, and may reduce the number of upper respiratory infections.  The recommended dosage of zinc is 8 mg/day for women and 11 mg/day for men (webmd.com)

Knowing that your body reacts differently to cold air and it can harbor harmful viruses, taking care of your body needs to be an everyday routine.  Make sure to get the rest you need, hydrate your body and the air, and take supplements that will support your immune system before you encounter germs, to have your best winter yet!

Photo by freestocks on Unsplash

How to choose the right ceiling fan (other than the color)

How to choose the right ceiling fan (other than the color)

Everyone has a “style” in their home, and glancing at the number of pages of ceiling fan choices in any online hardware or home decor store, there is a ceiling fan for every style!   You’ve got modern, traditional, glam, rustic, minimalist, and everything in-between.  Knowing the characteristics of the best-performing ceiling fans will make your choices easier within the style and color you like, so take a minute to check out these tips.

The object of a ceiling fan is to circulate air, so air flow should be near the top of your list.  Airflow is measured in cubic feet per minute, and although some manufacturers like to give measurements of velocity (feet per second or meters per second), they are not the same.  Airflow is what “mixes up” the air in a room and breaks up stratified air (thermal layers) so that your air conditioning system becomes more efficient.    The most efficient ceiling fans are High Velocity Low Speed (HVLS) types; these are the ginormous fans that you may see in a warehouse store or sports arena.  They typically measure 6 feet in diameter and larger, many topping 20 feet or more.  Surprisingly, they move the most air with the least amount of energy, but you do need a high ceiling so that each fan is between 20-25 feet above the floor.  If you aren’t looking for such an industrial size fan, Aeratron makes the most efficient ceiling fan in normal sizes.  Their fans incorporate several designs that help them to achieve this efficiency:

  • Blade shape: Blades can get super-fancy, but the most efficient are oar-shaped, or in Aeratron’s case, with a “winglet” to reduce drag.

  • Motors: the more powerful the motor, the more efficient the fan.  The most recent developments are “DC” or direct current motors, which can be adjusted to an infinite number of speeds.  These are electronically controlled and are typically quieter, smaller and lighter than AC (alternating current) motors.  

  • Number of blades (Less is More): Did you know that the lower the number of blades, the better the efficiency?  More than two blades just cause more turbulence and do not move more air.  

  • Slower is better:  Operating a ceiling fan at a slow speed continuously is better than higher speeds.

  • Having a downrod (an extension that lowers the body and blades of a fan away from the ceiling) is critical to a fan’s ability to move air.  Even a 3” to 4” downrod increases efficiency by approximately 40% over a flush-mount fan (one that hugs the ceiling).  Check out downrod specifications below. 

So, after giving all this information, there is one number that could guide you to the most efficient fan in your style preference.  It’s called cubic feet per minute per watt (CFM/W).  Basically, it’s analogous to gas mileage for fans–how much air it can move per watt of energy expended.  Although 75 is the minimum to make a fan efficient, the higher the better, and the most efficient fans have a CFM/W over 400.   Here’s a list of the most efficient as compiled by EnergyStar.gov.

So, now that you think you have found the most efficient, stylish fan in your budget, we just wanted to make sure you know the following interesting information:

Ceiling fans don’t actually cool a room.  Say whaaat?  That’s right, ceiling fans don’t cool a room because they can’t remove heat, the way an air conditioner can.  In fact, because ceiling fans expend energy and a portion of that energy produces heat, they actually add heat to a room.  The cooling effect you feel is the wind chill effect, which is the temperature which a person feels with respect to the wind.  (cielowigle.com)  According to Consumer Reports, using a ceiling fan, can make you feel up to 4° F cooler, and you can save 3 to 5 percent on air-conditioning costs for each degree you raise the thermostat, so using ceiling fans and raising the thermostat setpoint can theoretically save you 12-20% in air conditioning costs.  Pretty cool!

Remember the rule above about the less blades, the better?  Well, an improvement on a two-bladed ceiling fan might just be a ceiling fan without blades.  There are actually quite a few products that advertise to be “bladeless”, but in reality, the blades are enclosed in a casing (enclosed fans, by the way, are great choices for kids’ rooms and near bunkbeds, to avoid the chance of getting fingers or toys caught in them).  One of the true “bladeless” fans is the Exhale Fan, which features a stack of spinning discs modeled after Nikola Tesla’s bladeless turbine.  Instead of shooting the air straight downwards like traditional fans, Exhale fans move air at a 45 degree angle, which accomplishes a lot: it creates a vortex and de-stratifies the temperature layers of the room, more effectively mixing the air.  The fans themselves move over 5,000 cfm of air, which is pretty amazing since they have no “blades”!  No blades also means very little noise.  In addition, they are preferably mounted directly to the ceiling, eliminating the use of downrods.

Sizing your fan is very important.  The larger your room, the greater the diameter of the ceiling fan you need to circulate air effectively.  This sizing guide is very simple to use, and when in doubt, it’s best to go one size larger!   The reason for this is that it’s more efficient to operate a large fan on lower speed, than to operate a smaller fan on its highest setting.    

Choosing the correct downrod length is very important.  It’s not common knowledge, but if you have a standard 8’ ceiling, you should have a short downrod on your fan (3”).  When I purchased my home, even though all of the ceilings are 8’ or more, 6 out of 7 ceiling fans were flush-mounted (mounted directly to the ceiling).  Flush-mounting is only recommended for ceilings lower than 8’, and a flush-mounted fan moves approximately 40% less air!   So, before purchasing a ceiling fan, measure your ceiling height and check this handy guide.  If a fan accommodates a downrod, you can always adjust the length by purchasing the right downrod separately.  Basically, you’ll want the fan to be at least 7’ from the floor and 8-9’ for optimal airflow.

LED lights continue the savings.  If you are going for efficiency, it makes sense not to squander savings from the fan by using incandescent light bulbs.  Many high-end fans now have permanent LED bulbs and LEDs that can be adjusted for color in cooler or warmer tones. 

Photo by Sidekix Media on Unsplash

You can’t have too much air circulation!

You can’t have too much air circulation!

When clients ask advice on choosing air purifiers, some of the first questions we ask are about the layout of their home and how air circulation is accomplished.  This topic is covered in our article “Which air purifier should I choose for my home?  Part 1: Airflow”.  Airflow is super-important, and if outdoor conditions like heat, cold, humidity or pollution restrict your ability to open windows for good cross-ventilation, fans are necessary to get air moving.  Moving air helps any kind of air purifier and also your home’s heating and cooling systems to work more efficiently.  We’ve put together a few visuals on how common (and not so common) fans work. 

What about Radiator Fans?  

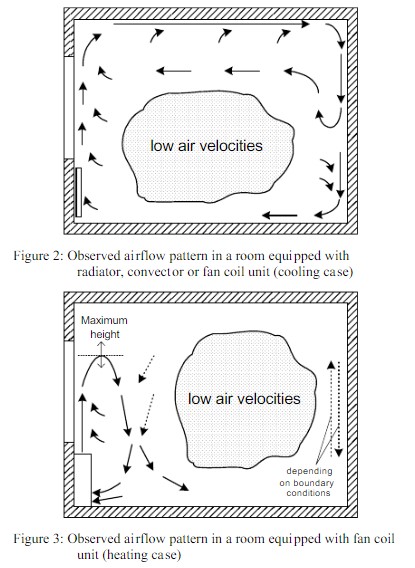
Radiators with fans are common installations in older buildings and to be sure, they are better than not having a fan at all.  However as shown in the below diagrams, there tends to be an area in the middle of the room that doesn’t get much mixing action.

Source: Study “Influence of Sensor Position in Building Thermal Control: Development and Validation of and Adapted Zone Model

“Basket Fans”

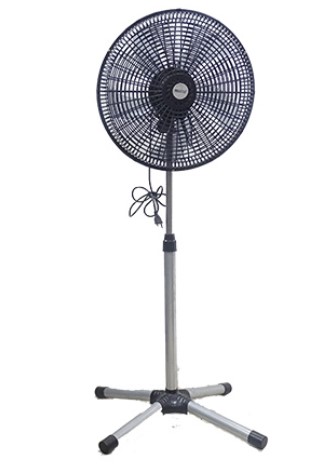
Although you may not have heard of this description before, when seeing a basket fan you can easily understand why it’s called that:

Whether sitting on a desk, standing on a floor or hung from the ceiling, these types are generally economical and when placed near where you are sitting, seem to be efficient in moving air.  However, scientific study about their circulation effects show otherwise.  There can be large “void spaces” where virtually no air is moving.

Source: Read this before investing in basket fans for air circulation

Regular Ceiling Fans

Ceiling fans are great tools for getting more air circulation.  Traditional ceiling fans tend to create better air circulation in a room than regular floor-or tabletop- fans (excluding “air circulators”, which we will visit separately in this article).  The image below shows that the fan shoots air with greatest velocity down near its center, and airflow moves along floors until it reaches walls and moves upwards again.  There are entrainment zones around the fan that do not get optimal mixing, however, if the fan is sized correctly for the room (check our article on choosing a ceiling fan), it’s definitely an improvement over not having a fan at all.

Image: Study: Measurement of airflow pattern induced by ceiling fan with quad-view colour sequence particle streak velocimetry

HVLS Fans

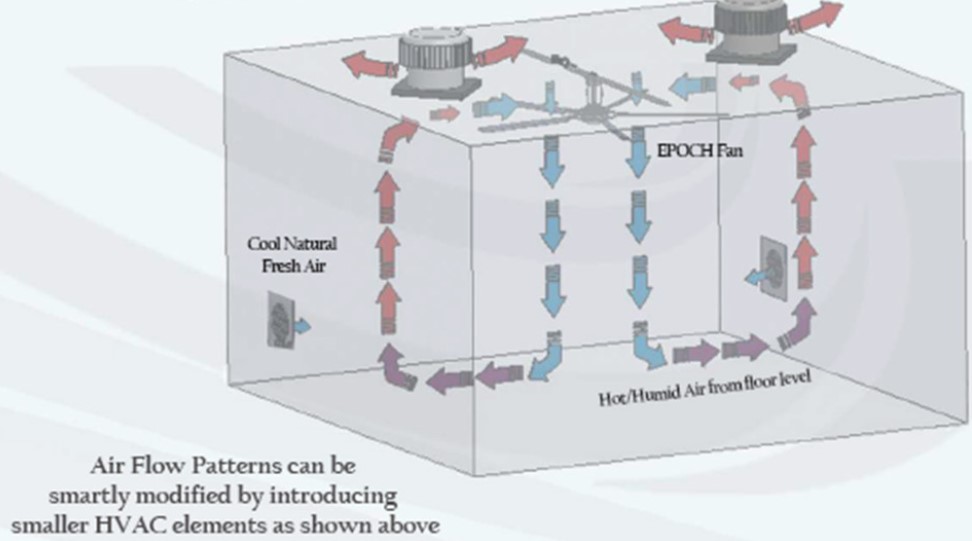
Some big rooms can be serviced by one or more High Volume Low Speed (HVLS) fans, which turn more slowly but generate much bigger cubic foot per minute (cfm) airflows in a space (read more about HVLS fans here).  Because the airflow along the floor is much deeper with HVLS fans than with normal ceiling fans, these currents on the floor are called floor jets.  The image below also shows how such a fan can cool even more effectively when fresh air vents at the bottom of the room, and exhaust vents at the top, are opened.

Source: “Need for Ventilation

Air Circulators/Destratification Fans

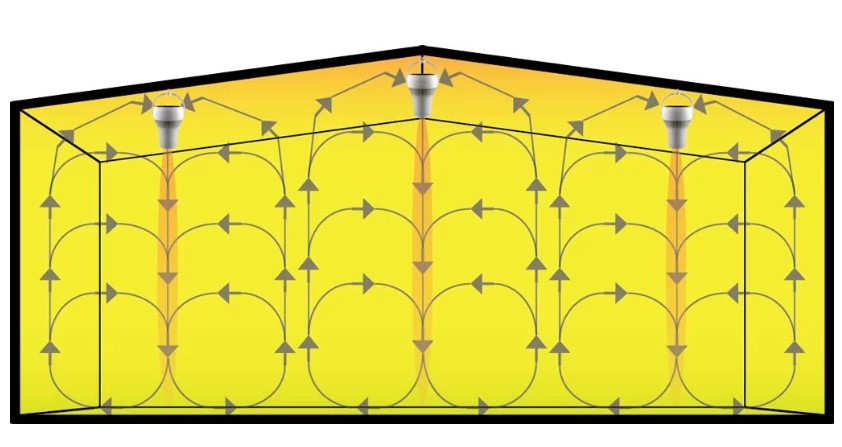
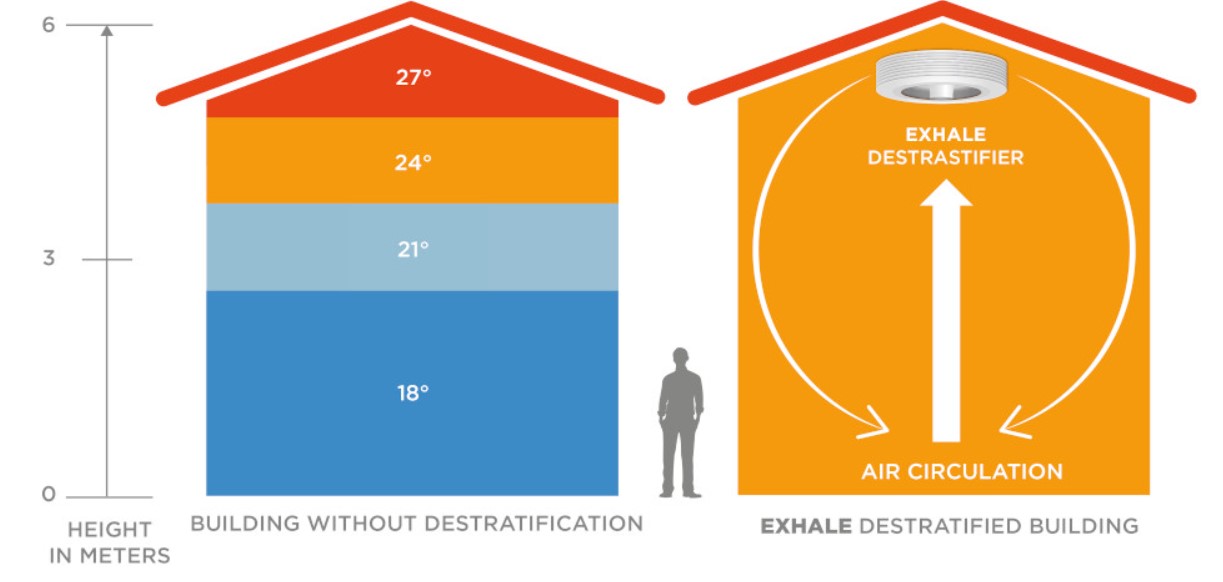
“Destratification” is the gold standard of air circulation in a room, because temperatures in the top, bottom and sides of the room can show that the air is being thoroughly mixed!  Without destratification, thermal “layers” can develop, and air conditioning (including heating) as well as purifiers cannot effectively service the entire volume of air.  There are several different types of fans that can break up these thermal layers.  Airius, an Australian company, makes a different type of high volume fan that is termed “bladeless” because the blades are hidden in the body of the fan but still generate significant airflow.  Their systems are termed “airflow circulation cooling fan and destratification system” and are designed to be mounted close to the ceiling; many applications are found in convention centers, dealerships and indoor stadiums. 

Source: Airius Fans Vs. HVLS Fans

Real “bladeless” fans

For residential or commercial use, true “bladeless” ceiling fans (modeled after Nicola Tesla’s bladeless turbine) offer similar destratification to circulator fans, with less noise.  According to Exhale Fans’ fact page, “The airflow is a vortex: The airflow profile makes the real difference in how you feel while in your space. Air exits the Exhale Fan in all directions 360° horizontally and at a 45° angle. This unique airflow starts a gentle rotation of the air much like a vortex. The vortex airflow profile generated by the Exhale Fan is unmatched in the ceiling fan industry. Air is not simply directed straight down but moves around the room in a pleasant cyclonic flow. What we have created is a destratified environment where floor to ceiling, wall to wall, you have a temperature balanced and comfortable space.”  The video of an Exhale Fan working in water to lift and circulate particles off the floor of the water tank is impressive!

Source: How does it work?

An “air circulator” like the Vornado ($92) is purported to have a similar pattern to ceiling and HVLS fans, however it shoots air across a room.  Here is a video comparing Vornado, Dyson and generic tabletop fan.  The reviewer (Filipino) and commenters mostly prefer the Vornado for power and value.  Another great air circulator option is the Dreo ($99); this video comparing Vornado and Dreo declares Dreo the winner, although it's virtually the same price as the Vornado.  The Dreo uses a brushless DC motor so it has more range of speeds, and uses less power than the Vornado, which uses an AC induction motor.  Dreo is also quieter across the range, even at the highest setting.  There are more economical versions of each brand that incorporate less technology but move the same amount of air.

Source: Vornado 293HD literature

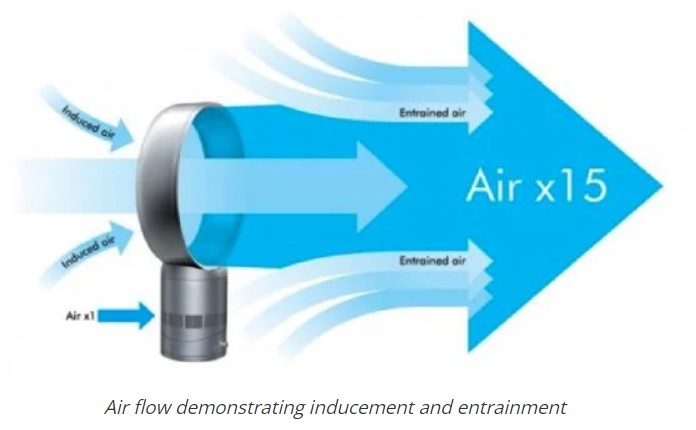
Although the Dyson bladeless fans claim to be “air multipliers” because more air is entrained than is taken in through the pedestal of the fan, they lack the power to destratify and circulate air in a whole room.

Source: How does the Dyson Air Multiplier Work?

Now that you know which types of fans help to truly get all of the air in the room moving, you can decide how and where to use/place them.  Perhaps you’ve never turned on your ceiling fans…now is the time to clean them and get them running!  Considering that the purpose of an air purifier with HEPA is to filter all the air within a room, the fan used in the purifier or a separate fan paired with it is very important to the purification function. It should either have a high Clean Air Delivery Rate (CADR), or be used with a separate fan that is able to destratify the room.  

In this test, a 705 cubic foot space (approximately 9x10 foot room with 8 foot ceiling) was filled with incense smoke and different purifiers were operated to clear all traces of PM1.0ug/m3, PM2.5ug/m3 and PM10.0 ug/m3 particulate matter.  Although the location of the particulate measurement devices were not disclosed (how close to the purifier they were), the purifier with the highest CADR proved to be the fastest to clear the air (BlueAir Pure Fan Auto, in only 27 minutes); the other two purifiers tested took 1 hour 24 minutes and 2 hours 11 minutes!   However, it’s possible to pair a purifier with lower CADR with a ceiling fan or circulator or destratifier fan to improve performance..

In conclusion, the best way to purify air with a HEPA filter is to use a purifier with a high CADR, or to use the purifier in conjunction with a fan that improves whole-room circulation (and thus destratification).  In addition, we’ve always stated that the Germ Defender/Mold Guard and Air Angel units work differently from HEPA, because they send out ions into the room instead of pulling all the air through the device to filter it.  However, their function also improves when coupled with an air circulator, in order to deliver the ions more widely and evenly throughout the space.

Photo by Sidekix Media on Unsplash

Is there KDF in your water filter?

Is there KDF in your water filter?

If you’ve ever shopped for a water filtration system for your home, you’ll know that there are a lot of different systems out there!  Starting with the size, you can go from pitcher (1-2 liters) to countertop, to under-counter, to whole-home systems.  Then, there are the different methods used to remove different pollutants.  Do you want a passive system that just uses gravity, or a system that uses the water pressure to filter, and/or a system that back-flushes contaminants to “clear” the filter?

Many filtration systems use granule-type media, which can be made from activated carbon, catalytic carbon, copper and zinc particles, mixed media like gravel and resin, activated aluminum or manganese dioxide.   Copper and zinc particles are what is used in kinetic degradation fluxion (KDF) filters, and depending on the ratio and granule size, KDF media can reduce the levels of water-soluble heavy metals, chlorine, iron, and hydrogen sulfide. It also manages scale, bacteria, and algae in the water. (aquasana.com)

Kinetic degradation fluxion describes how this type of media purifies water.  It works in a reduction/oxidation process (also known as “redox”) in which, as the water travels through the media, some molecules gain electrons (reduction) and some molecules lose electrons (oxidation).  Although this sounds counter-intuitive, reduction and oxidation refer to the oxidation states of the atoms, where gaining an electron reduces its oxidation state, and losing an electron increases its oxidation state.  The oxidation state is the total number of electrons that an atom either gains or loses in order to form a chemical bond with another atom. (Britannica.com)  For example, as lead, hydrogen sulfide and chlorine (found in many water supplies) flow through KDF media, some of the harmful contaminants are changed into harmless components, while others are electrochemically bound to the KDF media: (waterfilterguru.com)

  • Soluble lead cations (positively charged ions) are reduced to insoluble lead atoms, which are electroplated onto the surface of the media (they stay in the filter and can only be removed by recycling it) . (KDF Reticulated Foam)

  • Dissolved chlorine gas is reduced to water-soluble chloride ions, which pass through with the water as harmless ions that no longer have oxidation properties.  The KDF media donates two negatively charged electrons to each molecule of chlorine to reduce it to the lower oxidation state of chloride. (What are KDF Process Media and How Do They Work?)  (You can check out an animated visual of the transformation of chlorine gas into chloride ions on the same page!)

  • Hydrogen sulfide: the copper in the KDF media loses an electron and the sulfur gains an electron, so that copper sulfide and water are formed. The copper sulfide is insoluble in water and can be backwashed off the KDF filter media.

As you can see, this type of filter works on a lot of different contaminants, and even microbes.  Copper and zinc are anti-microbial metals.  They kill bacteria by direct electrochemical contact and by the flash formation of hydroxyl radicals and hydrogen peroxide, both of which interfere with a microorganism's ability to function. (LennTech.com)  Because other filters can be more prone to microbial growth (like activated carbon), using a KDF filter before the carbon filter prolongs the life of the carbon filter.   

KDF was invented in 1984 by American Don Heskett “accidentally”.  He used a brass ballpoint pen to stir some chemicals and discovered that it removed chlorine from water.  He worked on the formulation for several years and patented it, also forming the KDF Fluid Treatment (KDFFT) company.  Raw KDF media are produced by KDFFT and sold to many filter manufacturers, to be used alone or layered with other media in their water filtration systems.  There are 4 types of media produced: KDF 55 (55% copper and 45% zinc, removes chlorine, heavy metals and bacteria), KDF 85 (85% copper, 15% zinc, best for iron and hydrogen sulfide), KDF Fines (best for chlorine and bacteria removal when incorporated with other media) and KDF Coarse Mesh (for reduction of heavy metals and chlorines).  (KDF Products)

The benefits of KDF media are many:

  • It removes a wide range of contaminants

  • It is cost effective.  KDF media can be replaced every 9-12 months, or if the system allows and you have the means, can be backwashed and reused for over 6 years!

  • It can be recycled. 

  • It can be used in warmer water than other media (for example in showerheads or dishwasher feed water, whereas activated carbon cannot be used in warm-water applications)

  • It releases no toxins into the water, so is completely safe. (KDF doesn’t require registration by the EPA as other “pesticides” do, like silver-impregnated carbon.)

Disadvantages include:

  • Periodic backwashing is required unless you prefer to just replace and recycle the filter. Unfortunately, backwashing must be done at 30 gallons per minute, or the media will not be adequately flushed.  In places where water is expensive or scarce, this would be difficult to maintain.

  • KDF media doesn’t remove organic chemicals such as VOCs, pesticides and herbicides, organic cysts, nitrates, fluoride, viruses, arsenic, and pharmaceuticals, so you’ll have to add another type of filter if these are present.  (waterfilterguru.com)  It also doesn’t remove chloramines (some water suppliers disinfect with chloramines instead of chlorine, which are very difficult to remove).

Based on the benefits of safety, longevity and recyclability, KDF media can be a great asset for water purification.  It uses natural sanitization and filtration methods to make water more pure and tasty.  Whatever media your filter uses, make a habit of recycling your filters with the manufacturer: it could get you money back on your next purchase!
1 7 8 9 10 11 30