Tag Archives for " negative pressure "

Why is my house so DUSTY? Assessing the air currents gives a clue

Why is my house so DUSTY? Assessing the air currents gives a clue

This article was written in response to an actual problem.  My elderly parents moved into a “barndominium” which was converted from a 35x35’ metal workshop, in 2020.  The walls were insulated with fiberglass batts, and the attic above their 10’ ceilings was insulated with blown-in insulation.  I listened to my mom’s complaints about dust in the house. This is a real problem because the dust seemed to settle very quickly after cleaning, and my father has COPD.  Since the dust seemed to be a whitish colored dust, together we decided it must be coming from the attic, which had extra (white) insulation blown in after renovations were complete. We increased the HEPA filtration of the HVAC, with no results.  I checked for openings in the flexible ducts of the HVAC which could entrain insulation, with no results.  I tried several different times to seal the attic penetrations, which in actuality should have been done by a conscientious insulation company BEFORE the extra insulation was blown in.  I sprayed foam:

  • Around the HVAC vents
  • Around the bathroom exhaust fans
  • Around the LED puck lights (must check with the lighting manufacturer before doing this as some lighting is incompatible with direct-contact insulation.  The light needs to be “IC rated” in order to safely come into contact with the insulation.)
  • Around ceiling fan boxes
  • Around hanging shelf penetrations through the drywall of a floor-to-ceiling closet

It took multiple trips to the attic (with a good dust mask, of course) and quite a few cans of spray foam to get the job done, but sealing these areas, and one other (big) thing really helped cut the dust down.  It wasn’t until I really analyzed what was propelling the dust from the attic into the living space, that I figured out what was going on.

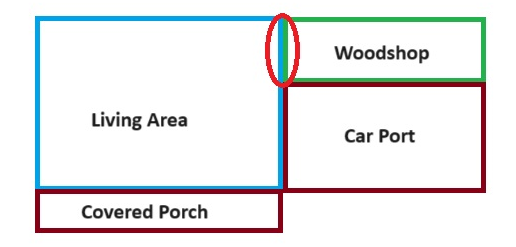
We’ve written several articles about negative pressure in your home and its negative effects. (This one has an eye-opening video linked).  I suspected that the dust was coming from the attic because negative pressure was somehow being generated in the house by the HVAC system.  However, I didn’t look at the big picture.  The living space is adjacent to a woodshop where my father carves (his hobby) and he uses a powerful dust collector to whisk the dust out of the workshop to a drum container.  The motor on this dust collector is rated for 240V so you can imagine that it’s a heavy-duty machine and being situated in the carport, can be heard from some distance from the house.  This thing SUCKS, and most of the time he’s using it with the door and window closed, so where is the makeup air coming from?  The workshop shares a common wall with a small bedroom in the living area (see red circle in diagram below).  It’s not too big of a leap to think that the dust collector may be pulling air from the house, as well, which in turn draws air from the attic when the ceiling penetrations were not sealed. 

To seal the wall between the woodshop and living area, I caulked the baseboard to the floor, as well as sealed the electrical boxes by taking off the switchplate and sprayfoaming around them as much as the little foam straw would allow (extra large switch plates help if you have to cut out the drywall a little).  The drywall took care of the rest of the wall.

Sometimes it takes a bit of thought to figure out the air currents in your home, but they are well-worth investigating!  Recently I found (by accident) that some carpenters had terminated a whole-house vacuum system in the ceiling of their house instead of routing it outside.  Even though the system used a filter, the space above the tiled ceiling was thick with a fine dust. We only discovered it when a  leak forced replacement of part of the roof above it.  We extended the PVC vacuum exhaust pipe just a few more feet and ran it out through the soffit.  It just goes to show that a little investigation (and a lot of spray foam) can go a long way to maintaining less dust in the house! 

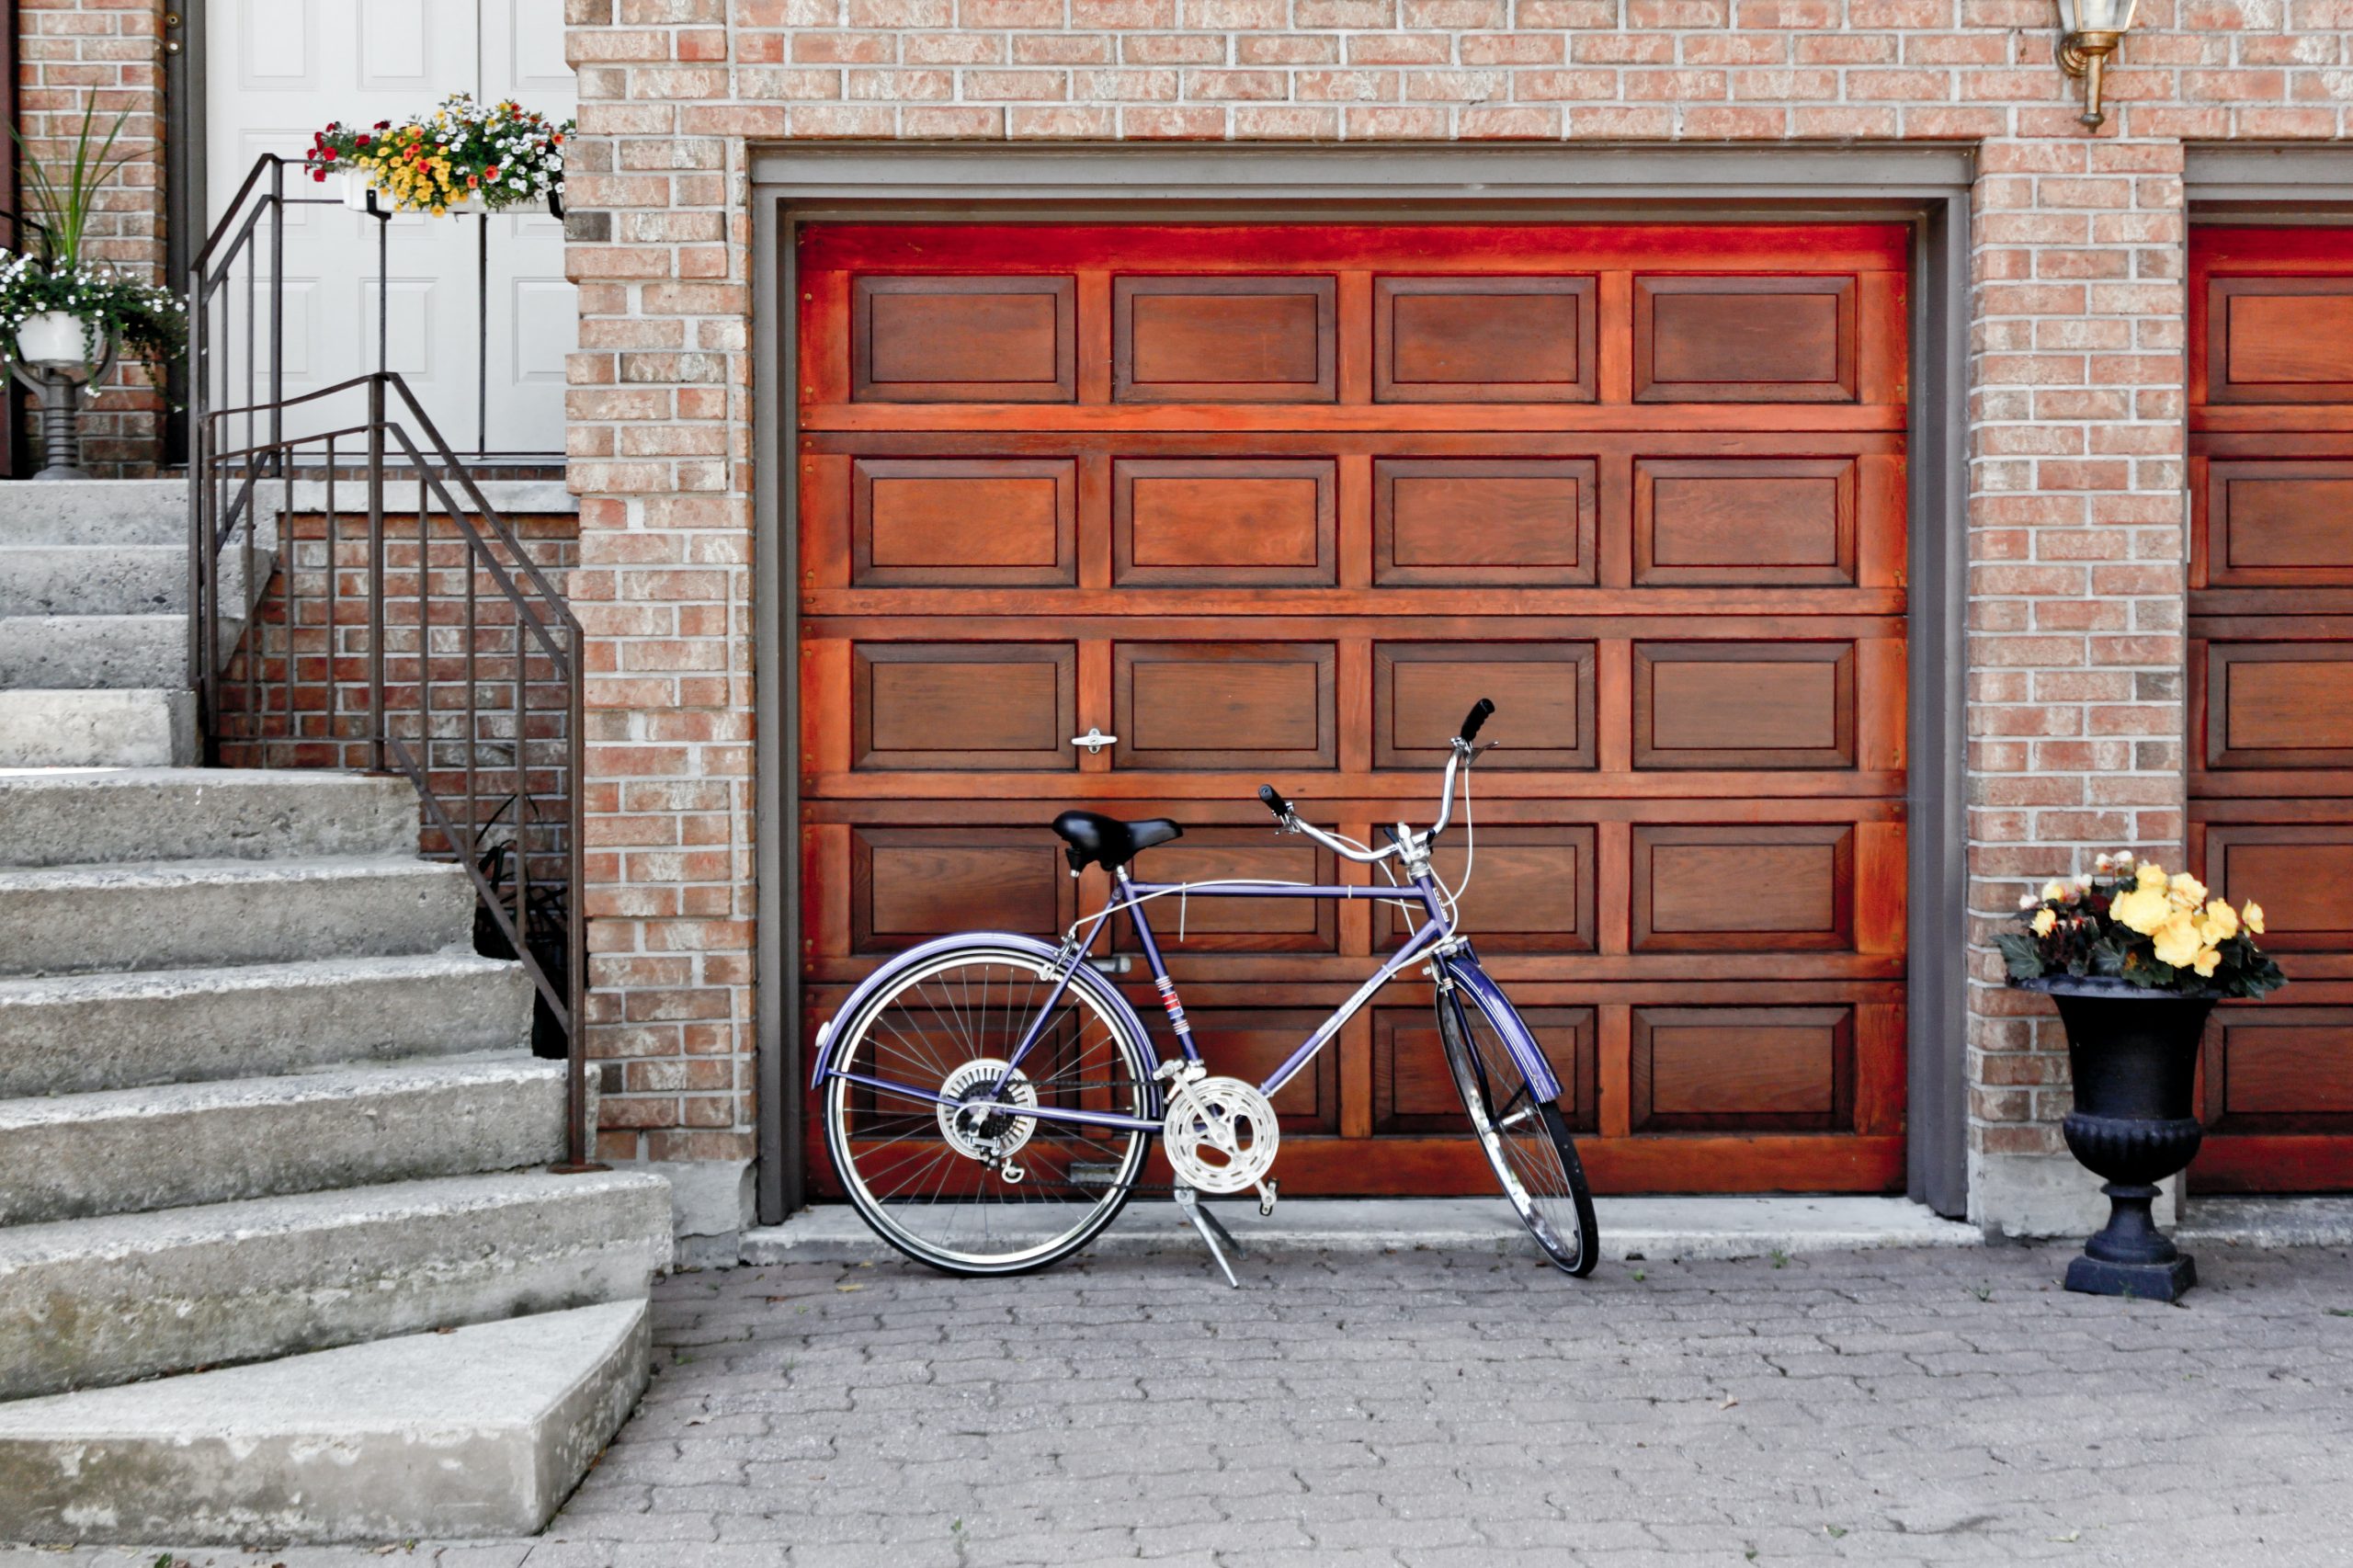
Photo by Kent Pilcher on Unsplash

Sealing your Attached Garage

Sealing your Attached Garage

For many people an “attached garage” is an asset in a home: the convenience of parking and walking inside under cover is very attractive when there’s extreme weather outside!  However, from an air quality perspective, attached garages are actually a liability, unless the garage has been air-sealed from your house!

In our articles about negative air pressure here and here, we talked about how contaminants can enter your home from the garage.  The garage not only has car exhaust fumes, it can also have paint or chemical fumes from your hobby, VOCs from pesticides and insecticides stored there, and possibly even exhaust gases from your gas water heater, furnace or clothes dryer.  Need we  mention the mold and mildew spores when humidity and cardboard boxes create the perfect environment for mold?  It’s almost like having an unsanitary neighbor in the apartment next to you…now, does an attached garage still seem like an “asset” to your clean, healthy home?

If you are coming around to a healthier way of thinking about your garage, it’s essential to consider installing some boundaries with this unsanitary neighbor!  “Air sealing” is more than just a tight-closing door.  It goes from the ground (foundation), through walls and insulation and even into the attic.  That’s right–if the attic over your garage is not sealed from the attic over your home, you got it–there is shared airspace and the possibility of contaminants crossing over from the air that circulates there due to changing temperatures. 

As with most air-sealing projects, creating this boundary is easiest if it’s done during the building phase.  The easiest way is to build your attached garage as a “separate” building…as in this article.  Jake Bruton of Airow Building in Missouri does it this way: do all the framing for the house, install your air barrier, and only then, frame the garage on the other side of the air barrier.  Finally, any penetrations like electrical and ventilation must be properly sealed. 

Another way to airseal during construction is to hang drywall on the shared wall inside the garage, foam the penetrations like light switches and outlets on that wall, and also run plywood sheathing above it to the roofdeck, using sprayfoam to seal the entire barrier in the attic as in this video.  Sprayfoam really is the only way to effectively seal around ceiling joists, which often run straight over the wall from the home into the garage.     

This is all great...for new construction.  What if you are buying an existing home, or just now want to upgrade your home?  First of all, examine that shared wall from the garage side, from floor to ceiling. 

  • If the drywall is finished, that’s good.  Finished drywall can be an air barrier.  However, you’ll want to remove any trim like baseboards or trim around doors, faceplates like electrical plates, and uncover any penetrations.  Get some spray foam in a can and seal all of these cracks with spray foam.   You’ll want to cover the space from the sill plate to the drywall, the spaces around electrical boxes, and around any pipes sticking through the wall like gas pipes or hot water pipes if you have a hot water heater in the garage.  Make sure to seal around the door frame if there’s dead space there. 

  • If the drywall is not finished (no tape and mud or just insulation), that’s even better!  Consider removing the existing drywall on the garage side (you can install it again later if screws were used), as well as any fiberglass or rolled insulation, and sprayfoaming the entire wall.  Spray foam can be an excellent air barrier if it’s done by a pro.  Before you schedule the job, however, go to the next point and prep the attic space so that they can foam there as well.

  • If the attic space between the garage and home are shared, you’ll need to build a partition wall between them.  Of course this is not a fun job, because attics are typically low, cramped and have extreme temperatures, but it’s critical if you’re going to do a thorough job.  Then, the wall can be sprayfoamed on the attic or house side, or at least foamed around the roof, rafters and joists and taped where plywood sheets come together.  

  • Ventilation (air conditioning and heating) is something that should never be shared between a house and garage, because that is a sure way to pull those contaminants right in and distribute them around your home!  If you do have a shared system, consult with an HVAC company about terminating the vents to the garage and installing a dedicated mini-split.  For small garages, a window air conditioner and portable heater will do the trick!  

  • If flexible ventilation ducts go over the garage with no vents, it’s really hard to get an air seal around flex ducts.  If you can’t/don’t want to switch to metal ductwork, install a collar in the attic wall that separates the garage and house (the one you build as in bullet #3 above), and attach the ends of the flex duct to it, so the wall can still be adequately airsealed.  

  • The door between the house and garage, of course, is an area that needs to seal tightly.  Adjust the door so that no daylight shows around the perimeter (I know, this is easier said than done!) and use weatherstripping around the sides so that it seals when closed.  If necessary, install a “sweep” on the bottom or replace the rubber seal in the threshold so the bottom seals as well. 

Here are some product recommendations for air sealing the garage:  

  • Air-sealing tapes can be expensive, but don’t scrimp: don’t use duct-tape, vapor-barrier tape or anything less than a product that is for air-sealing.  ZIP System is a great brand and be sure to buy more than you think you will need, because there always seems to be another seam to seal!  Use this tape to seal plywood edges together, seal the door frame to the drywall (if you can’t foam it), etc. 

  • Spray foam cans come in lots of formulations: small cracks (less than ¼”), larger gaps and cracks ( ), pest block formula (who knows what kind of chemicals are in there), but just be sure to buy a good number of the small and large gap formulations before you start the job.  Wear gloves, safety goggles and old clothing (long hair safely tucked away) because this stuff is super sticky!  Also, if you use a can quickly, you can reuse the same straw on the next can, and save the extra straw in case one gets plugged or lost.  Unless you buy the “smart dispenser” version, the straws and remainder in the can cannot be reused after about 30-40 minutes, so be sure to have several spray areas ready when you start spraying!  After it hardens, you can use a utility knife or hacksaw blade to cut away excess foam.  Consider these different products:

    • Great Stuff Window and Door gently expands so that frames will not warp under pressure.

    • Great Stuff Gap and Cracks (use in gaps up to 1”)

    • Loctite Tite Foam, pack of 2 for $19

    • Great Stuff Pro (large cans, $14 each–a great tool for a large job because it’s easier to dispense and can be reused for up to 30 days); however it requires a special gun.  Users report that a can goes a LONG way (3-6 cans on a large home) but if you have more air-sealing to do, it’s worth having several more on hand.

    • And more…

Not only will your house smell better and stay cleaner after these airsealing improvements, you’ll probably notice less cold drafts in winter and hot air in summer, since most attached garages are not conditioned.  Finally, complete your sealed garage upgrade with a funny sign reminding everyone to “close the door”...after all, airsealing can only go so far when the door is open!!

Photo by Kevin Wolf on Unsplash

What happens behind closed doors…

What happens behind closed doors…

What happens behind closed doors…is STAGNATION!  When you close the door to a room in your home, air is trapped in the room, resulting in the following:

  • If there is no fan operating, air will not circulate, and any humidity present in the air will saturate soft furnishings, increasing the likelihood that mold will grow (see our article on ventilation and one of our favorite tools, dpcalc.org).

  • If central air conditioning or heating is pushing air into the room, the closed door prevents proper cycling of air out of the room, causing the system to a create a negative pressure zone near the return grille and placing stress on the system’s mechanical parts like blower motors.

  • Again, central air conditioning or heating with closed doors causes imbalances in the temperature of the home, because conditioned air is prevented from mixing, which in turn affects the thermostat and causes the system to run longer to reach the temperature set point.

Keeping doors closed, in other words, is just not good for proper ventilation in your home!  This makes sense to us…until the question of privacy is brought up.  Of course, not everyone wants their door to be open at all times, even if it’s just cracked open.  Don’t worry, there are ways to get good ventilation even with closed doors!

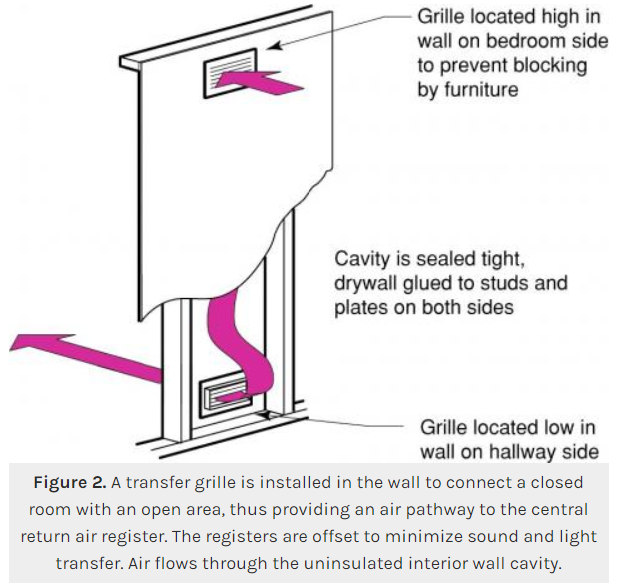
The best solutions are brought in during the design phase of the home, before construction begins.  This is where our first idea is best incorporated.  Transfer grilles offset high/low in a wall cavity use the cavity to muffle sound, so that this design affords  the maximum privacy.  However, in order to avoid entraining dust and other building toxins from surrounding spaces, the cavity needs to be sealed by gluing the drywall to the studs and plates…meaning that this solution needs to be built in during construction.

Source: Building America Solution Center

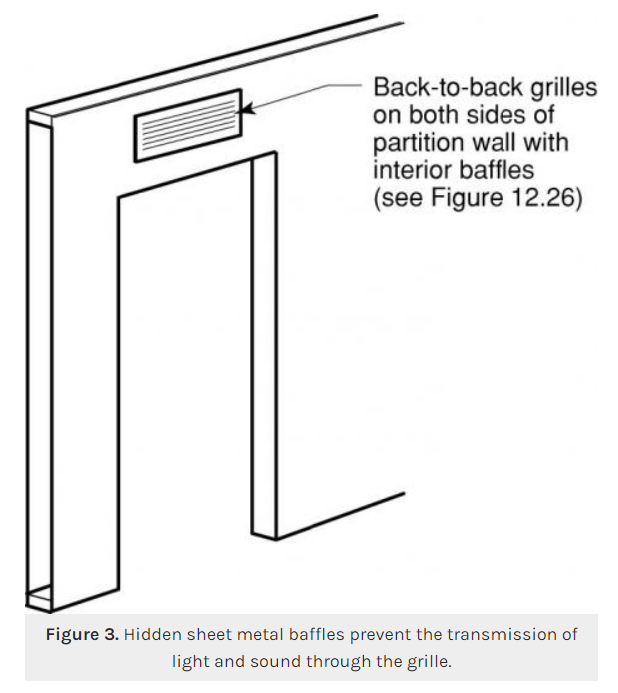
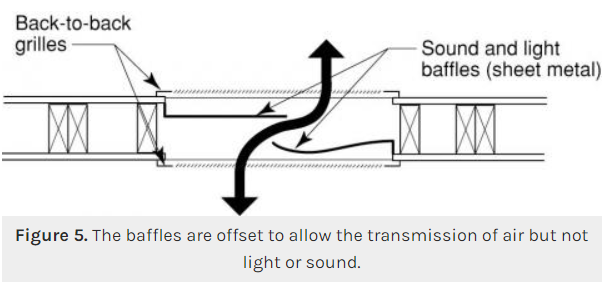
If you’re realizing you need better air circulation after construction, then there are still more solutions to consider.  You can use a back-to-back grille over a door (or any high space on a shared wall), which have sheet metal baffles to block sound and light while still allowing the passage of air through the wall.  Here are some diagrams to show back-to-back grilles:

Source: Building America Solution Center

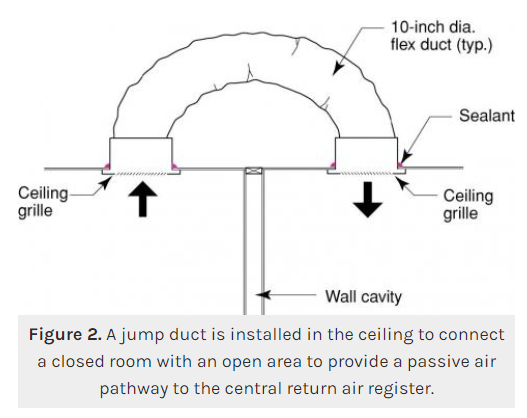
Thirdly, if wall space is an issue and you have attic space above the rooms, you could install a jump duct using flexible duct, two ceiling grilles, and foam sealant (to make sure air from the attic does not leak into your home).  Theoretically, a jump duct could also be placed through/under the floor to bridge two spaces, but in either place, take care to make sure the flexible duct is not crimped, and do not cut any structural beams like rafters or joists to install it.

Source: Building America Solution Center

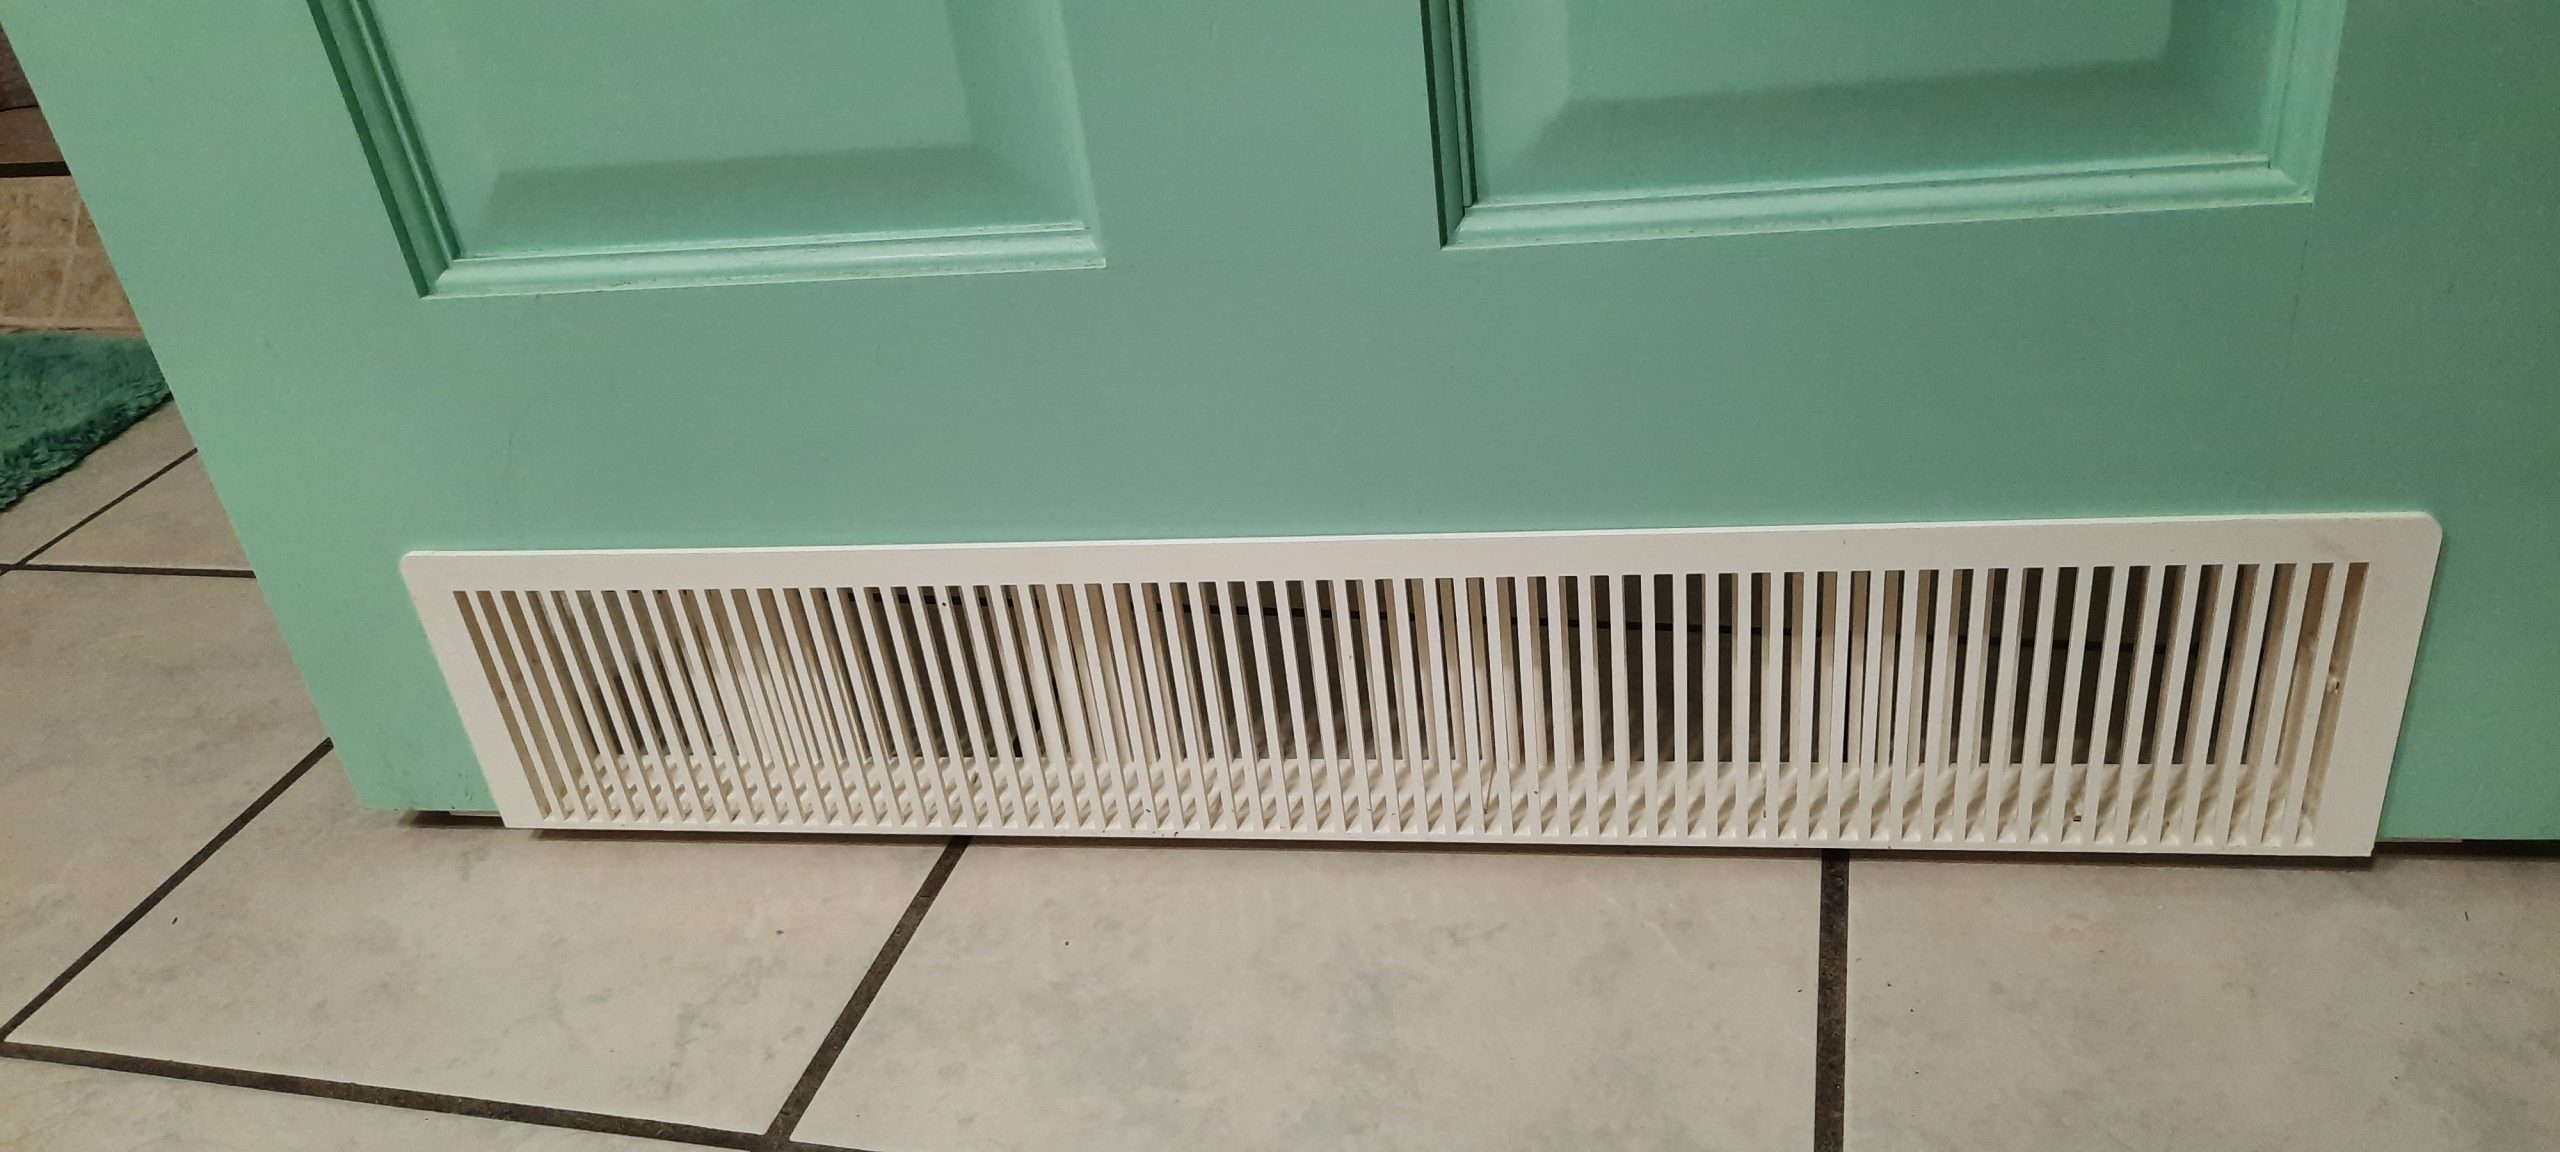
Lastly, there’s a solution which I consider to be the easiest of all of these.  In-Door Return Air Pathways by Tamarack Technology are easily installed in the bottom of your hollow-core or solid wood interior doors (door must be 1-3/8” thick to fit).  Simply remove the door from the frame (I find that tapping the hinge pins out is easiest), lay it down, trace the provided template on the bottom of the door, cut it with a jigsaw, install the grille with two screws (provided) and re-install the door.  They do provide less privacy than the previous two options, but are quick to install (less than 30 minutes in my experience) and can be left white or spray painted to match any door color with paint suitable for plastic. 

In-Door Return Air Pathway installed in a solid wood door.

When you have the door closed with any of these three solutions, air is free to mix with the rest of the home, rooms do not become positively or negatively pressured, and you definitely have an advantage in keeping mold from forming in that room.  Additionally, the continuous use of the following in the closed room costs very little energy, but boosts your mold protection even more: 

Sure, we get it…everyone needs their privacy, but for health’s sake, make sure the air is flowing freely!  

Photo by Storiès on Unsplash