Tag Archives for " leaks "

PSA: How to quickly shut off water to your home, and systems that can do it automatically

PSA: How to quickly shut off water to your home, and systems that can do it automatically

Think quick: do you know where your home’s water shut-off valve(s) are?   Imagine for a moment that you hear the sound of water gushing in the kitchen, and walk in to find it pouring out from under the kitchen sink.  If it’s not the dishwasher or kitchen faucet, then the leak may be in the wall–what do you do?  

Emergency water leaks are a realistic scenario, and every year, 1 in 12 homes experience a leak.  That’s more often than burglary or fires!  (Plumbing Leak Facts)  Therefore, it should be top priority to find your home’s water shut-off valve right away, and show it to other family members/housemates so that they know what to do, too.  It’s a good idea to practice gently closing and opening these valves every so often so that you know they work.  We use the term “gently” because old plastic valves and old plastic lines can break if they are manipulated with too much force!  If they are in bad repair, it’s time to replace them (or call a plumber to replace them) asap.

There could be multiple main water shut-off valves.  They are typically: (Two methods to turn off your homes water supply)

  1. In the main riser– this is where the water pipe comes out of the ground outside, and enters the home through the side.  If you live in a cold climate, there may not be an exposed valve outside to avoid freezing!
  2. In the garage or basement.  Normally it’s in the wall next to the garage door. 
  3. At the water meter box, you can use a meter key (special long-handled wrench) to shut off the water to the whole home.
  4. If you live in an apartment, there is one valve that serves the whole apartment.  It’s usually near your hot water heater or in a utility closet.

If you know where the water is coming from and you can shut it off at a specific appliance, go for it!  Here are the locations of specific water supply valves throughout a home: (How to shut off water supply in an apartment)

  • Toilets: Below and behind the toilet at the wall.  These can be ¼ turn valves or fully opening and closing valves.
  • Refrigerator: You’ll need to pull out the refrigerator to access the valve that supplies the icemaker; it’s usually recessed in the wall.  These are usually ¼ turn valves.
  • Dishwasher: look underneath the sink for a supply line that goes toward the dishwasher. 
  • Kitchen and bathroom sinks: under the sink, there are usually two for hot and cold. 
  • Washing machine: the valves should be about 2-3 feet off the floor behind or next to the machine in the wall. 
  • Water heater:  first, shut off the gas or electricity to the water heater.  Then, shut off the water supply by closing the valve(s) on the lines coming into the water heater at the top.  Then, relieve pressure to the lines by opening a sink faucet.  You can also help the water heater to drain to an appropriate place (like outside) by connecting a garden hose to the drain valve on the side, and opening the valve.  (How To Turn Off a Leaking Water Heater)
  • Showers and baths: if there is not an access panel in the opposite side of the wall where the shower/bath valves are located, go and shut off water at one of the main supply valves mentioned above.

Here’s a trick if the main shut-off valve(s) is not closing all the way, and water is continuing to come in at a reduced rate.  You can open the other faucets with drains in the home, like bathtub, sinks, etc., to relieve pressure at the leak until the plumber can get there.

Now that you know where your water supply valves are, you might want to consider automatic water shut-off options.  There are many systems that can shut off your whole home’s water supply, but they fall into 2 categories: moisture detection and flow sensing.  Basically, the water valve is shut off if the system senses water on the floor (via water detectors scattered around the home) or if the water flow in the main supply exceeds a pre-set user amount (water runs for too long).  Here are some pros and cons for these systems:

System

Leak Detector System

Flow-Sensing System

Pros

  • May detect smaller leaks if water falls on/near sensors
  • Will determine exact location of leak
  • May shut off water faster than a flow-sensing system if leak detector is placed in right location
  • Some qualify for home insurance discount
  • If wi-fi goes out, it can still shut off water in case of leaks 
  • Can catch very small leaks if loss of pressure is detected

Cons

  • Detector could get kicked out of place
  • If moisture sensors require batteries, they could fail if not changed regularly
  • If wi-fi goes out, individual leak detector may not communicate with shutoff valve
  • Doesn’t detect leaks behind walls, floors, etc. 
  • Most systems require wi-fi
  • No way to tell where leak is located
  • Water flow must exceed pre-set limits to shut off water, so small leaks could go undetected in some systems

Here are some systems for each:

Leak Detection: We spoke about individual leak detectors in this article, but the systems below can also shut off water:

  • Phyn ($50-579) offers leak detection via moisture-detecting “pucks” you can place around your home under sinks and other water appliances, but it also has a “smart water assistant” that can notify you of leaks via pressure waves in the system in both your hot and cold water lines.  It also has a “plumbing check” function to detect pinhole-size leaks.  The Phyn Plus will shut off your water in case leak parameters are exceeded. 
  • YoLink has a variety of water leak sensors that connect to their hub and thus can be programmed to activate an automatic water shutoff valve that is connected to the same app.

Flow-sensing: 

  • Water Hero ($900-1250): This is a whole-home system that is installed on the main water line just inside or outside (only in non-freezing climates) your home.  The motorized valve is installed by your plumber, and then it can be activated when you connect the unit to wi-fi and set up the water usage parameters for your home online.  If the water usage exceeds the parameters you set (for example, for 20 minutes continuously), the valve shuts, limiting water leakage in the home.
  • FloLogic ($2000-2900): This is also a whole-home system that is installed on the water main line, indoors or outdoors (outdoors with precipitation protection).  It has a more sophisticated flow sensor; FloLogic’s EverWatch™ leak sensing technology can see leaks in real time starting a ½ ounces per-minute (about a tablespoon).  Normal water use happens in intervals. Leaks are constant. Once flow begins, FloLogic measures the time duration. If the flow time exceeds the allowance, a leak is suspected and the water is shut off automatically.   The system can have a local control panel or app-based control.
  • Moen Flo Smart Water Monitor and Automatic Shutoff Sensor ($500) is an app-based product that “learns” your home appliances’ water usages and can shut off flow when leaks are detected through their FloSense technology.  The app is free with the product and the system is compatible with Amazon Alexa, Google Assistant, and Control4. 
  • YoLink FlowSmart Control: Meter & Valve Controller, $40-1180, is an AC or battery-powered device (4 AA batteries) that monitors water usage and will shut-off water if flow exceeds pre-determined limits you set on the app.  This device requires a YoLink “hub” as it doesn’t connect directly to the app or your wi-fi.  

There are additional considerations as well.  Most of these valves are recommended to be installed by a licensed plumber.  You’ll also need to check what kind of battery backup they have so that in case of a power outage, you’re still protected from leaks.  If you don’t want wi-fi control, only one system (FloLogic) seems to have a local panel option instead of the app.  Despite these details, the time and money you spend on selecting such a system could be “a drop in the bucket” compared to costly renovations from water damage if you didn’t have this protection.  Busy lives and unattended homes need help to keep the water where it should be–in the pipes and drains!

Photo by Jimmy Chang on Unsplash

Are Tiny Homes built from Sheds a Good Idea?

Are Tiny Homes built from Sheds a Good Idea?

At least every other day, I see an ad for a tiny home or office that companies or individuals built from what used to be backyard “sheds”.  Now, don’t get me wrong, I am all for repurposing buildings and materials, when they are done the right way!  (In fact, I even repurposed a large metal workshop building into a 2 bed/1.5 bath “condo” for my parents.  This one is on a concrete slab and for all intents and purposes, could have been built that way as a home). What are the advantages, and what are the cautions, of making a home from a shed?  (Many great points adapted from Living in a Shed: 9 Things (2023) You Must Know):

The advantages to living in a tiny home are many, for example:

  • Up-front cost is cheaper than a house
  • Smaller utility bill
  • Less square footage to clean
  • Less impact on the environment
  • Privacy
  • Portability
  • Customization
  • Ability to live in nature or “off-grid” more easily

However, “sheds” are only a subset of tiny homes, specifically, tiny homes that started out as prefab backyard buildings.  Let’s take a look at what could go wrong from making one of these into a habitation.

First of all, when considering whether to build out a shed as a home, you should check into local building codes.  If you live within city limits, there are likely laws about what type of buildings can be built or placed on your property to become “habitations”.  Plopping a shed down and running electricity to it for your teenager to live in could be a big problem whenever it’s noticed by the building inspectors!  Moving it to the middle of a few acres in the country doesn’t normally pose these legal issues, but again, it’s best to check with your local building inspector!   If it’s illegal to live in a shed, it may be legal to live in an ADU-an Accessory Dwelling Unit.  For example, ADU’s in California are required to be at least the size of an efficiency unit (at least 150 sq. ft. livable space plus a bathroom), they must contain a kitchen, a bathroom, they must be built on a permanent foundation, and must be able to turn on/off the ADU utilities without entering the primary unit.  (ADU vs Finished Shed Comparison)

Construction: This is the largest area of caution we see.  Within this topic, we need to highlight: 

  • Off-gassing of toxic compounds from interior building materials.  If the building was never meant for habitation (even as a chicken coop!), then it may contain building materials that are rated for “outdoor use only” which may give off dangerous pesticides/weatherization chemicals.
  • Inferior flooring and framing techniques:  We’ve seen them: sheds built to hold push lawnmowers and Christmas decorations may not hold up to daily living over a number of years.  Holes or loose joints that develop inevitably allow pests to come in (they want to be cool/warm/fed too!).  
  • Inferior foundation: Setting a shed on a few cinder blocks is typically not sufficient for daily living and if the floor begins to sag, all kinds of structural issues (including leaks and mold) can ensue. 
  • Poor insulation:  Typically, storage sheds only need to keep the paint from freezing, not keep a person comfortable, so insulation may not be optimal.  This includes roof and floor insulation–yes, if your shed is not mounted to a slab foundation, it needs to be insulated!
  • Improper sealing (which can cause moisture infiltration and mold growth): If siding is applied over the frame without an air or vapor barrier, it’s easy for moisture to condense inside the walls if they are heated for a living space, or similarly cooled during a hot summer.  These steps in normal construction are what inspectors look for, for the safety of the homeowner and longevity of the building.
  • Addition of water and sewage facilities warrants several considerations:
    • Where is your water source and how will you deal with sewage?  Sewage service is probably the biggest hurdle to overcome, as there are 3 options which may or may not be permitted in your locale: connection to the city’s sewer system, installing a septic tank, or installing a composting toilet. 
    • Plumbing in sinks, toilets, showers and drains also is done by code for a reason–leaks can cause serious mold and hygiene issues.  It’s not a good idea to buy that shed if these appliances are added without proper spacing and materials by someone who knows plumbing code.
  • Addition of power to the shed:  Sometimes power service to a shed (50-100 amp service) is not what you would get for a normal home (200 amp service).  Like the plumbing, wiring the shed for power should be done by someone who knows electrical code, so that it’s wired safely!
  • Addition of HVAC to the shed: Sticking a “window unit” AC or space heater in the side of the shed may keep you cool or warm if it’s the right size, but without proper ventilation, you could build up CO2 and mold very quickly.  CO2 is the product of insufficient ventilation, and face it, a shed is just a small, closed room unless proper ventilation is planned and built-in!  The mold can result from simply living in that closed room, because along with CO2, every human exudes water vapor through their lungs and skin.  If there are 2 people living there, the air quality will be even worse.

So far, it may sound like a major “NO” to use sheds as homes, but that’s just not true.  If you’re allowed to use one in your locale, you can safely do so by starting from scratch (buying a bare-bones model) or buying one from a builder that knows good home construction.  Then you can make sure that the construction, outfitting and customization will work for years to come without causing health issues.  Let’s face it, home ownership is expensive, but saving on a tiny home just to live uncomfortably from lack of weatherization or get sick from mold is definitely not worth the savings.  Therefore, planning is essential!

Photo by Andrea Davis on Unsplash

Do you have a sixth sense? Maybe you need one!

Do you have a sixth sense?  Maybe you need one!

One of the top thermal camera manufacturers, Teledyne FLIR (which stand for “Forward Looking InfraRed”) uses the term “The World’s Sixth Sense” to describe the images they are able to capture with their cameras.  For sure, infrared is a totally different way of viewing the world than what we are used to seeing.  Infrared does not rely on light to capture images, but rather senses heat and generates an image based on relative differences in heat energy.  With an infrared (IR) camera, you could see your cat hiding in the corner of a pitch dark room, which is something “night vision” may or may not pick up, depending on the true ambient light level.   

But beyond avoiding cat attacks, is it useful to the average homeowner?  Oh, very!  There are some gadgets, like a cake pop maker, that have extremely limited use and seem to sit in your junk drawer more than they get used.  A thermal imaging camera doesn’t fall into that category.  Here are some of the varied uses from different industries that might be applied to your own home:

  • Electrical Wiring maintenance: why does that breaker keep tripping?  Are any wall switches or plugs excessively hot?

These are thermal and visual images of a damaged electrical plug (Fluke.com)


  • Security: who or what made that noise outside the window?

  • Animal Health: where is your pet experiencing “hot spots” or possible infection?

  • Lost pets: A pet hamster or lizard can be found much faster with a thermal camera (if it’s still alive).

  • Gas Detection:  when an infrared camera is pointed at a surface having a gas leak, it shows the temperature difference at the point of a leak caused by the pressure variance. (Top Applications of Thermal Imaging Cameras)

  • Water Heater or water line maintenance: a temperature difference can show where corrosion may be progressing on an older tank, just as oil industry professionals can use them to “see” corrosion.

  • Heat loss in common appliances like stoves, refrigerators, dryers and vent lines, etc.

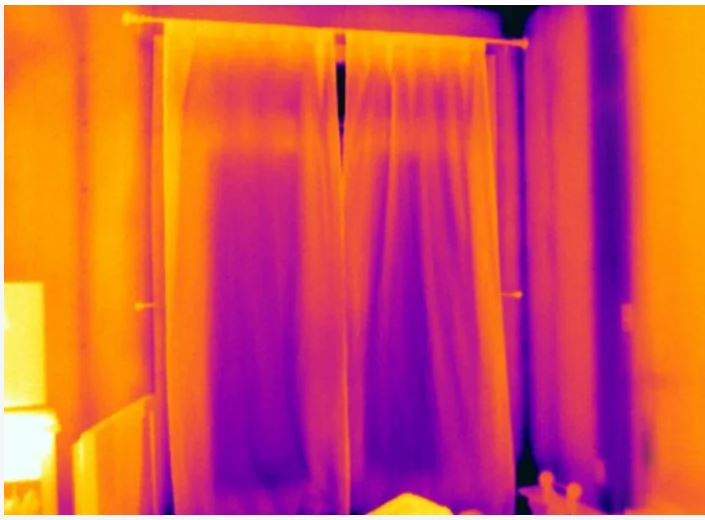
  • Insulation: check for air sealing problems in your attic, walls, basement and crawlspace (check this video on how to “see” duct leaks)

  • Roof inspection: see where water may be leaking through your roof

  • Water leaks: spot the leak inside walls or ceilings without ripping them up. 

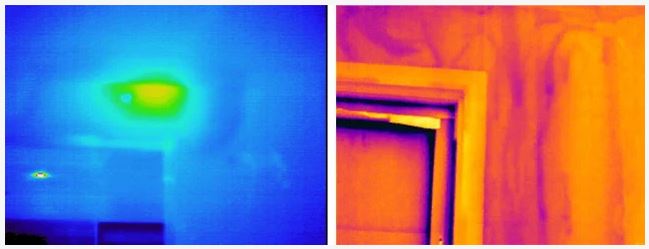
  • Pests:  Locate mice, bats, squirrels, termites, hornets and all sorts of warm-bodied creatures in and around your home.  Snakes, unfortunately, will not show up on an infrared camera because their body temperature is too close to their surroundings. The following images are of a termite’s nest (left) and streaks that indicate termite tunnels (right) (Detecting Pests with Thermal Imaging).  The slightly higher moisture content associated with termite tunnels needs a camera with a higher sensitivity.

  • House hunting: take your thermal camera to reveal hidden insulation and wiring problems. 

  • Car maintenance:  see if any components are overheating, and possibly spot leaks, as in brakes, tires, radiators, coolant lines, and exhaust systems.  

  • Gardening: You can possibly spot sprinkler line leaks, and underground gas leaks in your yard.

This video shows a plethora of ways to use a FLIR camera.  Although you may not need to locate enemy forces in your backyard, finding a lost pet, hidden water leaks and missing insulation could be well worth its price. 

Now that your interest is piqued, it’s best to shop around to find the camera that suits your needs within your budget.  Here are some of the main characteristics you’ll want to check out:

Resolution:  This is the number of pixels per inch, or PPI.  The resolution is usually given in two numbers, which are (Width X Height).  Higher resolution numbers give more information in each image, with less grainy edges.  Don’t try to compare the resolution of a thermal camera to a regular digital camera, however, because the role of the thermal camera is more of a sensor to detect heat differences.  Resolution is not incredibly important if you are mainly using your camera to view large areas like walls and windows, but if you are going to use it to troubleshoot electronic components (much smaller area), you’ll want higher resolution. 

Sensitivity: Thermal sensitivity is the ability of a thermal device to distinguish between temperature differences, measured in milliKelvins (mK).  (Thermal Sensitivity – Understanding Millikelvins)  The lower the number, the higher the sensitivity. For example, 150mK sensitivity means each pixel takes readings to the nearest 0.15˚C. 

Sensitivity Range:  The range of temperatures the device can sense, for example from -4 deg F to 248 deg F. 

Battery Life:  Some thermal cameras have an independent, rechargeable battery, while some run off of the battery of the phone they’re attached to.  Either way, you’ll need to make sure you have enough battery life to get the job done!

Photo by Teledyne FLIR

Detecting Gas Leaks in the Home

Detecting Gas Leaks in the Home

As we pointed out in our article on Propane and Natural Gas, gas leaks outside the home are very common, especially in older neighborhoods.  Gas leaks in the home are rare, but they sure can be dangerous!  Even if you have no piped gas coming into your home, there is still the risk of radon (a naturally-occuring, cancer-causing gas in the ground), and carbon monoxide from any combustion engines or appliances operating closeby.  Here are some of the detectors and monitors you will want to consider adding to your home.

Radon: Your home is most at risk for radon accumulation if you have a basement or a crawlspace.  It’s a colorless, odorless gas that is heavier than air, so it can sit undetected in these areas.  Here are two sites you can use to find a professional in your area: NRSB.org, CertifiedRadonPros.org, or you can test your home yourself and send the results to a lab for interpretation using this popular home test kit by First Alert, $16.  If you do live in an area with high radon content, you may opt to get a monitor so that you’re always aware of the radon level in your home.  The following monitors will help you stay on top of Radon:

  • AirThings Corentium Home Radon Detector, $99, is portable so that you can occasionally move it to different locations in your home to check levels.  It has a long-term history (for trends) as well as a short-term weekly view; both be displayed at the same time.  Other devices by AirThings offer Radon plus more points of measurements like PM2.5, CO2, etc. 
  • EcoSense’s RD200 RadonEye is $175 and offers bluetooth and an app so that you can monitor radon levels remotely.

Carbon Monoxide (CO) can be easily confused with Carbon Dioxide, but they are very different and you must know why: CO in your home is deadly,  while CO2 is a sign that people are living there!  CO is a byproduct of combustion (incomplete combustion, actually), and when too much of it lingers in your home, your body will start to replace oxygen in your bloodstream with CO.  This can result in tissue damage or death, in a short amount of time. (Mayo Clinic)  For this reason, it’s imperative that all of your gas appliances are vented correctly, that your attached garage has air barriers between the garage and house, that you use a fireplace correctly, and that any running generators are located a safe distance from the house (6 feet or more).   If you have any of these (gas appliances, attached garage, working fireplace or generator), it’s great to have a CO monitor installed that will alert you to the presence of this dangerous gas.  Check out these options, all of which would get installed high on the wall or on the ceiling (as CO is slightly lighter than air and tends to go up in your home):

  • First Alert Smoke and Carbon Monoxide Detector with 9V Battery, $27:  This is a good, old fashioned wall-mounted detector that gets 1 9V battery (included!)  You don’t have to have wifi to monitor it.  Just change the batteries once a year and try the “test” button to make sure all is in working order.
  • This Combination Smoke and CO alarm by X-Sense, $40, is popular because it has a 10-year battery, allowing you to skip those battery changes for a while (focus on changing your air filters on time instead!)
  • A Plug-in Carbon Monoxide Detector by Kidde makes sense if you are renting and aren’t provided with a detector, or don’t want permanent installation but want the peace of mind of your family’s safety.  It has battery backup and does include 2 AA batteries (nice!).  Since plugs are often within reach of children, it has a “tamper-resist” mode to alert if it is accidentally unplugged.  It’s recommended to have at least one of these on each floor of your home.

You may be under the impression that these monitors may also protect you from all invisible gasses, like natural gas and propane, but that’s not the case!   Each gas has a different chemical makeup, and the detectors that find them use different technology.   So, if you have natural gas or propane piped into your home, it’s a great idea to also have the appropriate detector ready to sound the alarm if there’s a leak inside.  Here’s where you need to know which gas you have, because propane is heavier than air, so it tends to hang around at floor level, which can be a danger for children or pets who spend more time on or near  the floor.  Natural gas, on the other hand, is lighter than air so it will float up near the ceiling.  We definitely recommend reading the installation instructions thoroughly for any of these monitors, to make sure you place them correctly!  You’ll also want to know the term “LEL”.  These gasses are combustible, but only in the right mixture of fuel gas and air.  The range of combustible mixture is called the “explosive limits”, of which the least amount of gas mixed with the atmosphere is called the “Lower Explosive Limit” (LEL, which is the lean ratio) and the most amount of gas mixed with the atmosphere is called “Upper Explosive Limit” or UEL, also called the rich ratio.  Since the air is a home usually just has traces of such gasses when a leak forms, a detector may only use the LEL, and show “percentage of LEL”.  That means the alarm should go off way before the concentration of fuel gas is strong enough to ignite, like at 5 percent of LEL.  

  • Nighthawk Carbon Monoxide & Combustible Gas Detector, $44, by Kidde does double duty, and comes with a 6 foot extension cord so that it can be properly positioned to detect the correct gas.  It’s plug-in and comes with a 9V battery for backup.  The CO levels read in ppm, and the gas detector simply sounds the alarm with visible “GAS” on the LCD readout.
  • EG’s Natural Gas Detector and Propane Detector, $32, has a clear, easily read display that reads in % of LEL, where the alarm sounds at 5% LEL and you can watch the levels go up or down.  

Since I live in the country, I have a propane tank that is periodically refilled by a propane company.  Recently, while thinking about getting the gas tank in my backyard refilled, I had a thought: what if my piping is leaking in the yard?   How would I know?  Of course, I could call the propane company to come out and “sniff” the connections and ground, but if they are not quickly available, or I just want to make sure I connected my grill correctly to a small propane bottle, it’s not an ideal option.  Here are the portable detectors I thought would be especially good to have for this purpose, and while professionals use instruments that cost hundreds, serviceable home use detectors can be significantly less.

  • TOPTES PT199, $17, is suitable for LPG, methane, ethane, propane, butane, natural gas, coal gas, gas fuel, sewer gas, liquefied natural gas, etc.  Since it’s shaped like a pen, it’s easy to move it around in tight spaces to find leaks (like the back of your stove or at a wall valve).  The alarm will go off at 5% LEL and stay on until the gas clears to a lower level, and it also has an LCD readout of PPM (parts per million). 
  • You can get a professional gas detector at a reasonable price now too:  Klein Tools ET120 Gas Leak Detector, Combustible Gas Leak Tester, $102, has an 18” gooseneck that allows you to hold the instrument with one hand and move the “sniffer” around to probe for a leak.  It will detect methane, propane and other combustible gases at concentrations as low as 50 ppm, but could be used at lower sensitivity to detect concentrations as high as 10,000 ppm.
  • For added functionability, the Gas Leak Detector, Protmex HT609 Natural Gas Detector has temperature and humidity and is suitable for detecting LPG, methane, ethane, propane, butane, natural gas, coal gas, gas fuel, sewer gas and liquefied natural gas. The backlit screen aids in low light.   It has low, medium and high sensitivity selection modes.

Photo by Sugarman Joe on Unsplash

All about Propane and Natural Gas

All about Propane and Natural Gas

I’ve lived in the city, and I live (now) in the country.  In both places, there was a gas line coming into the house that could be used for gas appliances like my stove, dryer, water heater, furnace, etc.  I, like most people, don’t give the gas or these pipes a thought beyond paying the monthly bill, until there’s a leak or a catastrophe.   How can you keep from being on the 6 o’clock news?  By being aware of how these fuel gasses are supplied, and what to look out for!  

I first encountered the difference between natural gas and propane when selecting appliances. You need to know what gas comes in to your home in order to select the right appliance!  Here’s a general rule: if your gas comes from a city source (pipe coming out of the ground with a meter on it), it’s usually Natural Gas.  If you have a tank that needs to be refilled periodically, it’s usually Propane.   Chemically, natural gas occurs “naturally” in the earth, but must be cleaned.  During the cleaning process, propane is extracted.  Propane provides more than twice the heating value of natural gas (2,500 BTUs vs. 1,000 BTUs) per cubic foot, so natural gas costs at least a third less than propane.  Although some prefer natural gas to propane for grilling, it’s difficult to tell the difference between these two gasses.  They are both colorless and odorless, so utilities companies add a odorant (a chemical called mercaptan) so that leaks are easily detected.  Mercaptan is toxic and flammable, but at the levels that it is used to odorize gas, it’s no more harmful than the natural gas or propane.  (The nose can detect mercaptan at a 1.6 parts per billion, and the typical range of odorants in natural gas ranges from 0-10 parts per million). (GPL Odorizers)  Here are some facts about these gasses:

Propane:

  • Is also called “bottled gas”, it’s pressurized between 100-200 psi and becomes a liquid at this pressure (called liquified petroleum gas, or LPG, or LP for short).
  • Like natural gas, propane is one of the cleanest burning fossil fuel products, releasing negligible amounts of emissions. When burned, it leaves no ash and produces practically no sulfur oxides, particulate matter, or mercury emissions. On the other hand, burning propane produces carbon dioxide, a cause of global climate change, and it also emits nitrogen oxides which are key ingredients in the formation of urban smog and ozone. (FactsAboutPropane.pdf)
  • Is used for powering trucks and forklifts operating inside warehouses, so that air quality is preserved for workers.

Natural Gas:

  • Is most often compressed or liquified for transport, however the pressure required to do so is much higher than propane, so transportation and storage tanks are heavier.  
  • Is available in some communities and is delivered by pipeline to homes.  Unless an emergency or planned work causes the pipes to be shut down, it’s always available. 
  • Is mainly methane—a strong greenhouse gas.  The U.S. Energy Information Administration (EIA) estimates that in 2021, U.S. CO2 emissions from natural gas combustion for energy accounted for about 34% of total U.S. energy-related CO2 emissions. (eia.gov)

Many appliances can use either natural gas or propane, but the combustion orifices must be changed to accommodate one or the other.  You can purchase the conversion kit yourself, but due to the hazards of incorrectly installed parts, a licensed professional (plumber or appliance repair technician) should do the conversion. (bobvila.com)  For this reason, it’s often better to purchase the right appliance for your gas from the start, even if it is listed at a slightly higher price than appliances configured for the other gas (a lesson I learned the hard way!).  For example, the burners for gas dryers are often deep inside the appliance, requiring the removal of many parts.  

What’s that flying saucer-looking thing?

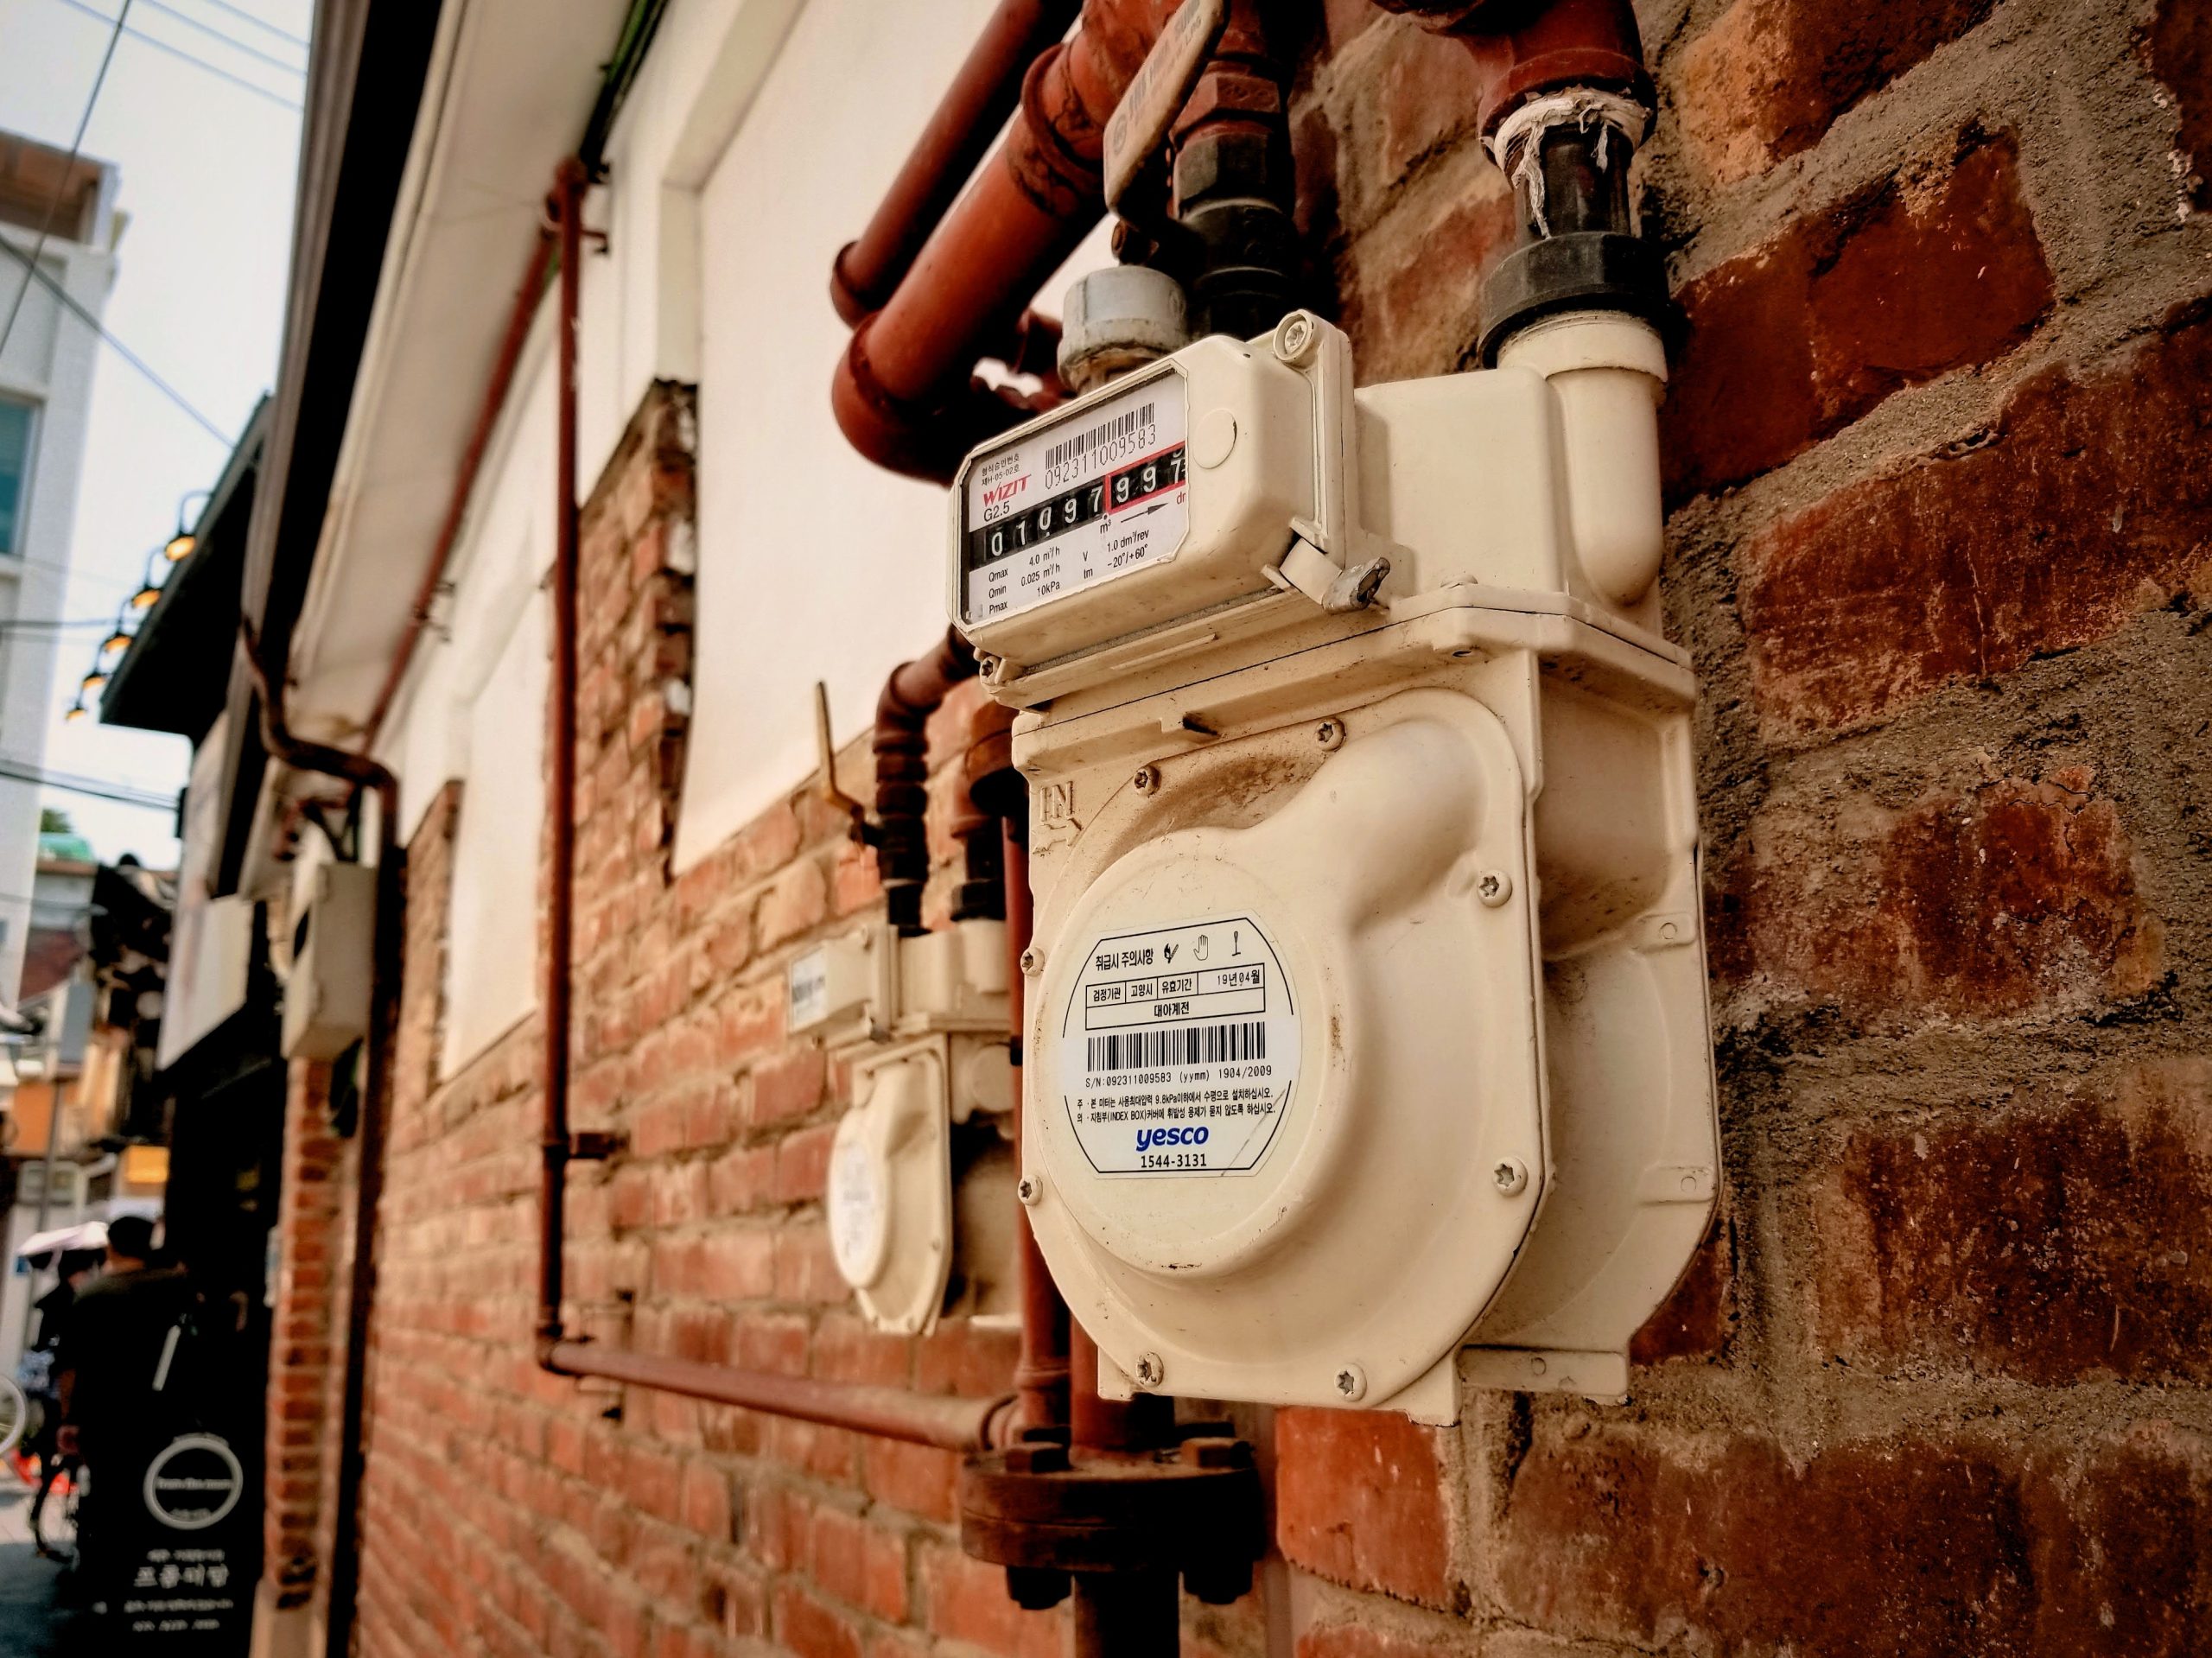
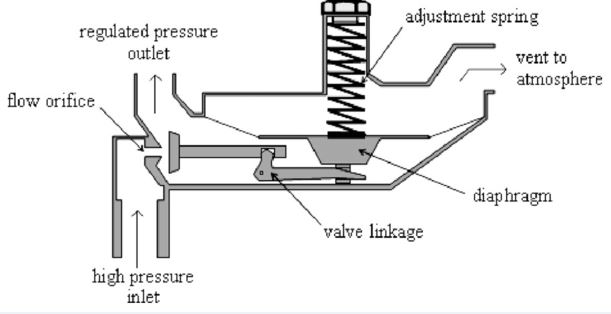
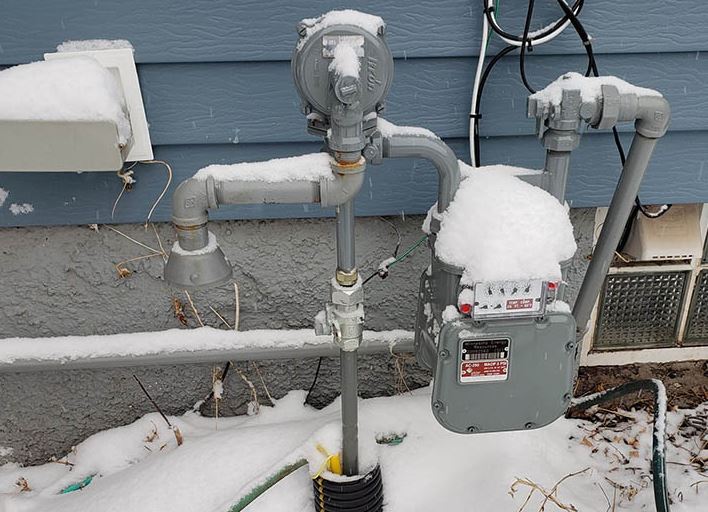
Both natural gas and propane are stored at higher pressures than the appliances use, so the pressure must be reduced before it comes into the appliance, and most often before it comes into your home.  The flying-saucer looking gadget is a “regulator” which reduces the pressure.  High -pressure gas comes into the underside of the circular disk, and is slowly released into the downstream side, governed by a diaphragm inside the disk.  The size of the diaphragm sets the correct pressure for home use.  Because gas can have impurities like rust, condensation, and dirt in it, gas pressure regulators are supposed to be changed out every five years or so.  They are designed to shut the gas flow off if the unit fails, which is good for your home.  Each regulator is typically stamped by the manufacturer with its date of production. (eatingexpired.com) Here’s a really interesting video showing how the regulator works.  Gas pressure regulators are designed to be installed close to the end use of the gas (ie, right outside your home or next to your gas barbeque grill).  Here’s something else I did not know: if you live in an area that gets a lot of snow, make sure to gently clear it off your gas meter/regulator, so that the vent on the regulator does not get blocked.  This is the reason that regulators should not be painted–you don’t want to block that vent. 

Source: The Dallas Morning News

Outside, the gas meter, shutoff valve and regulator are usually located next to the home, but occasionally they are located closer to the street (see above photo of a meter in a parking lot).  If this is the case, be proactive and ask your service provider to install a guard around it!  Collisions and damage by vehicles happens more often than you think.  

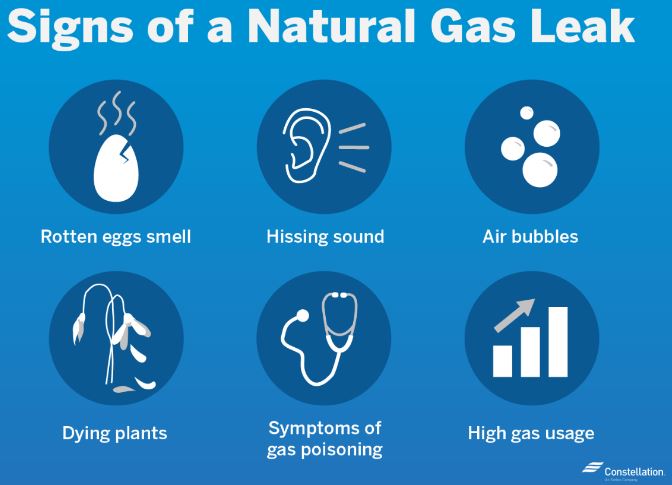
Because they come into the home under pressure, both natural gas and propane have a risk of leaks from piping or appliances.  If a new gas appliance has been installed recently in your home, or any maintenance has been done on your gas pipes, be especially vigilant of the smell of gas or  any of the following signs.  One exception is if you have a propane tank, and the gas gets low in the tank.  In this case, the smell is actually designed to let you know it’s time for a refill:  propane gas contains a few chemicals. One of these chemicals condenses out and collects as a liquid in the bottom. When the tank is low, the reduced pressure causes the odorant to evaporate and makes a strong gas odor.  Normally, gas companies recommend not letting your tank go below 20%.  If it’s refilled at that point, the gas smell should dissipate within about 2 hours.  (Wheat Energy Services)  If the gas is allowed to run out completely, a pressure test is required by the National Fuel Gas code, because joint compound used on the pipes may contract and cause leaks.  

Source: Constellation.com

If any of these are apparent, start investigating immediately. If the smell is strong, leave the area immediately. If the gas smell is faint, you may wish to try to locate the source by smell and a bubble test. Do not attempt a repair. (Five Common Home Gas Leaks You Should Know About)

  • If inside, turn off any stove or oven burners that are on; open windows and doors

  • Leave the area; go to the home of a friend or neighbor a safe distance away (Staying in your home or near the leak to make a cellphone call could spark an explosion)

  • Call a licensed plumber, your gas company, or 911 to report the smell (first responders often arrive before gas company technicians)

  • Do not turn any electrical switches on or off

  • Do not use any kind of telephone, garage door opener, doorbell or even a flashlight

  • Do not smoke, light a match or lighter

  • Do not stop or start a nearby vehicle or piece of machinery

  • Do not attempt to shut off the natural gas valve

Of course, you know the rotten eggs smell.  If there are no rotten eggs around, suspect a leak!  If you’ve just connected a propane tank to your gas grill, make sure to turn off the valve and check hose connections, let air circulate in and around the grill for five to ten minutes, and try again. Hissing sounds are a sure sign of gas escaping, so try to turn off the supply (by hand, without using tools) if possible.  You can also use a mixture of water with a few drops of dish soap in a spray bottle to find the leaky connection: simply spray it on the connection, crack open the gas valve, and look for bubbles. 

I used to think that natural gas leaks were rare.  However, since the supply lines are buried, water eats away at the pipes and shifts in the ground from drought, construction and earthquakes can cause cracks and leaks as well.  Apparently there are gas leaks everywhere, as this article points out, but most gas companies only fix those that are large or close to structures.  A leak can show up as air bubbles coming up through a mud puddle, or it can kill houseplants and outdoor plants.  The presence of natural gas prevents a plant’s roots from absorbing oxygen and can lead to wilting. Natural gas leaks can also cause smaller-than-normal leaves on trees, wilted plants and yellowish patches of grass. (Constellation.com)   One customer in northern California planted successive blueberry bushes that died each time he planted them, without knowing there was a gas leak on the edge of his property. (inewsource.org)

Although they may be signs of other types of illness, headaches, dizziness, fatigue and nausea are all symptoms of natural gas exposure.  If it is a gas leak, it will probably affect most if not all of the people in the home.  It’s very dangerous, because eventually the gas will cause suffocation and death!  If your family is experiencing these symptoms, leave the home and call 911. 

Finally, if your monthly gas bill is unusually high without the presence of very cold weather, suspect a leak and let your service company know as soon as possible.  

Even if your gas meter has not been struck by a vehicle, tool or tree, the meter or associated piping could still be leaking.  Dan Thomsen, whose company Building Doctors focuses on energy efficiency, said on about 25 percent of the homes he surveys, he finds a gas leak somewhere. (inewsource.org)  Here are some of the most common places that natural gas or propane can leak directly outside, or inside the home (Five Common Home Gas Leaks You Should Know About):

  • Gas riser – The gas riser is the pipe that emerges from the ground to connect the gas supply to your gas meter.

  • Gas regulator – the disc-shaped device near your gas meter that controls gas pressure going into your home.

  • Fireplace valve – the valve you turn with a removable key to turn on and off the flow of gas to a gas fireplace.

  • Pilot lights – these ignite the gas to produce a flame when you want to cook, heat your home or get hot water.

  • Joints and fittings – any visible joint or fitting that may not be sufficiently tightened.

Natural gas and propane make living easy and very convenient; after all, many appliances that run on gas will still work when the electricity is out!  However, supply and use of these gasses requires care and vigilance.  To help ensure that no leaks go undetected, you can also purchase and install a natural gas/propane monitor for your home (they are NOT the same as carbon monoxide monitors).  These monitors should be installed near the appliances that use the gas; however, propane is heavier than air so the monitor should be mounted near the floor, while natural gas is lighter than air so the monitor should be mounted at a height above the door and window openings. Change the battery(s) whenever you change your smoke alarm batteries, and you should be good to go!

Photo by Andrea Davis on Unsplash

Start Thinking Like a Home Inspector

Start Thinking Like a Home Inspector

If you own a home, you need to learn to think like a home inspector.  A home is a great investment, but if the outside elements start to penetrate the building envelope, your great investment can start to deteriorate and become toxic!

Sometimes, after an especially hard rain, there is a different smell in my house.  This tells me that rain is probably going where it shouldn't. According to commonsensehome.com, a natural home website, the first spots to check are the roof and attic, especially around any roof penetrations like chimneys and vent lines.  

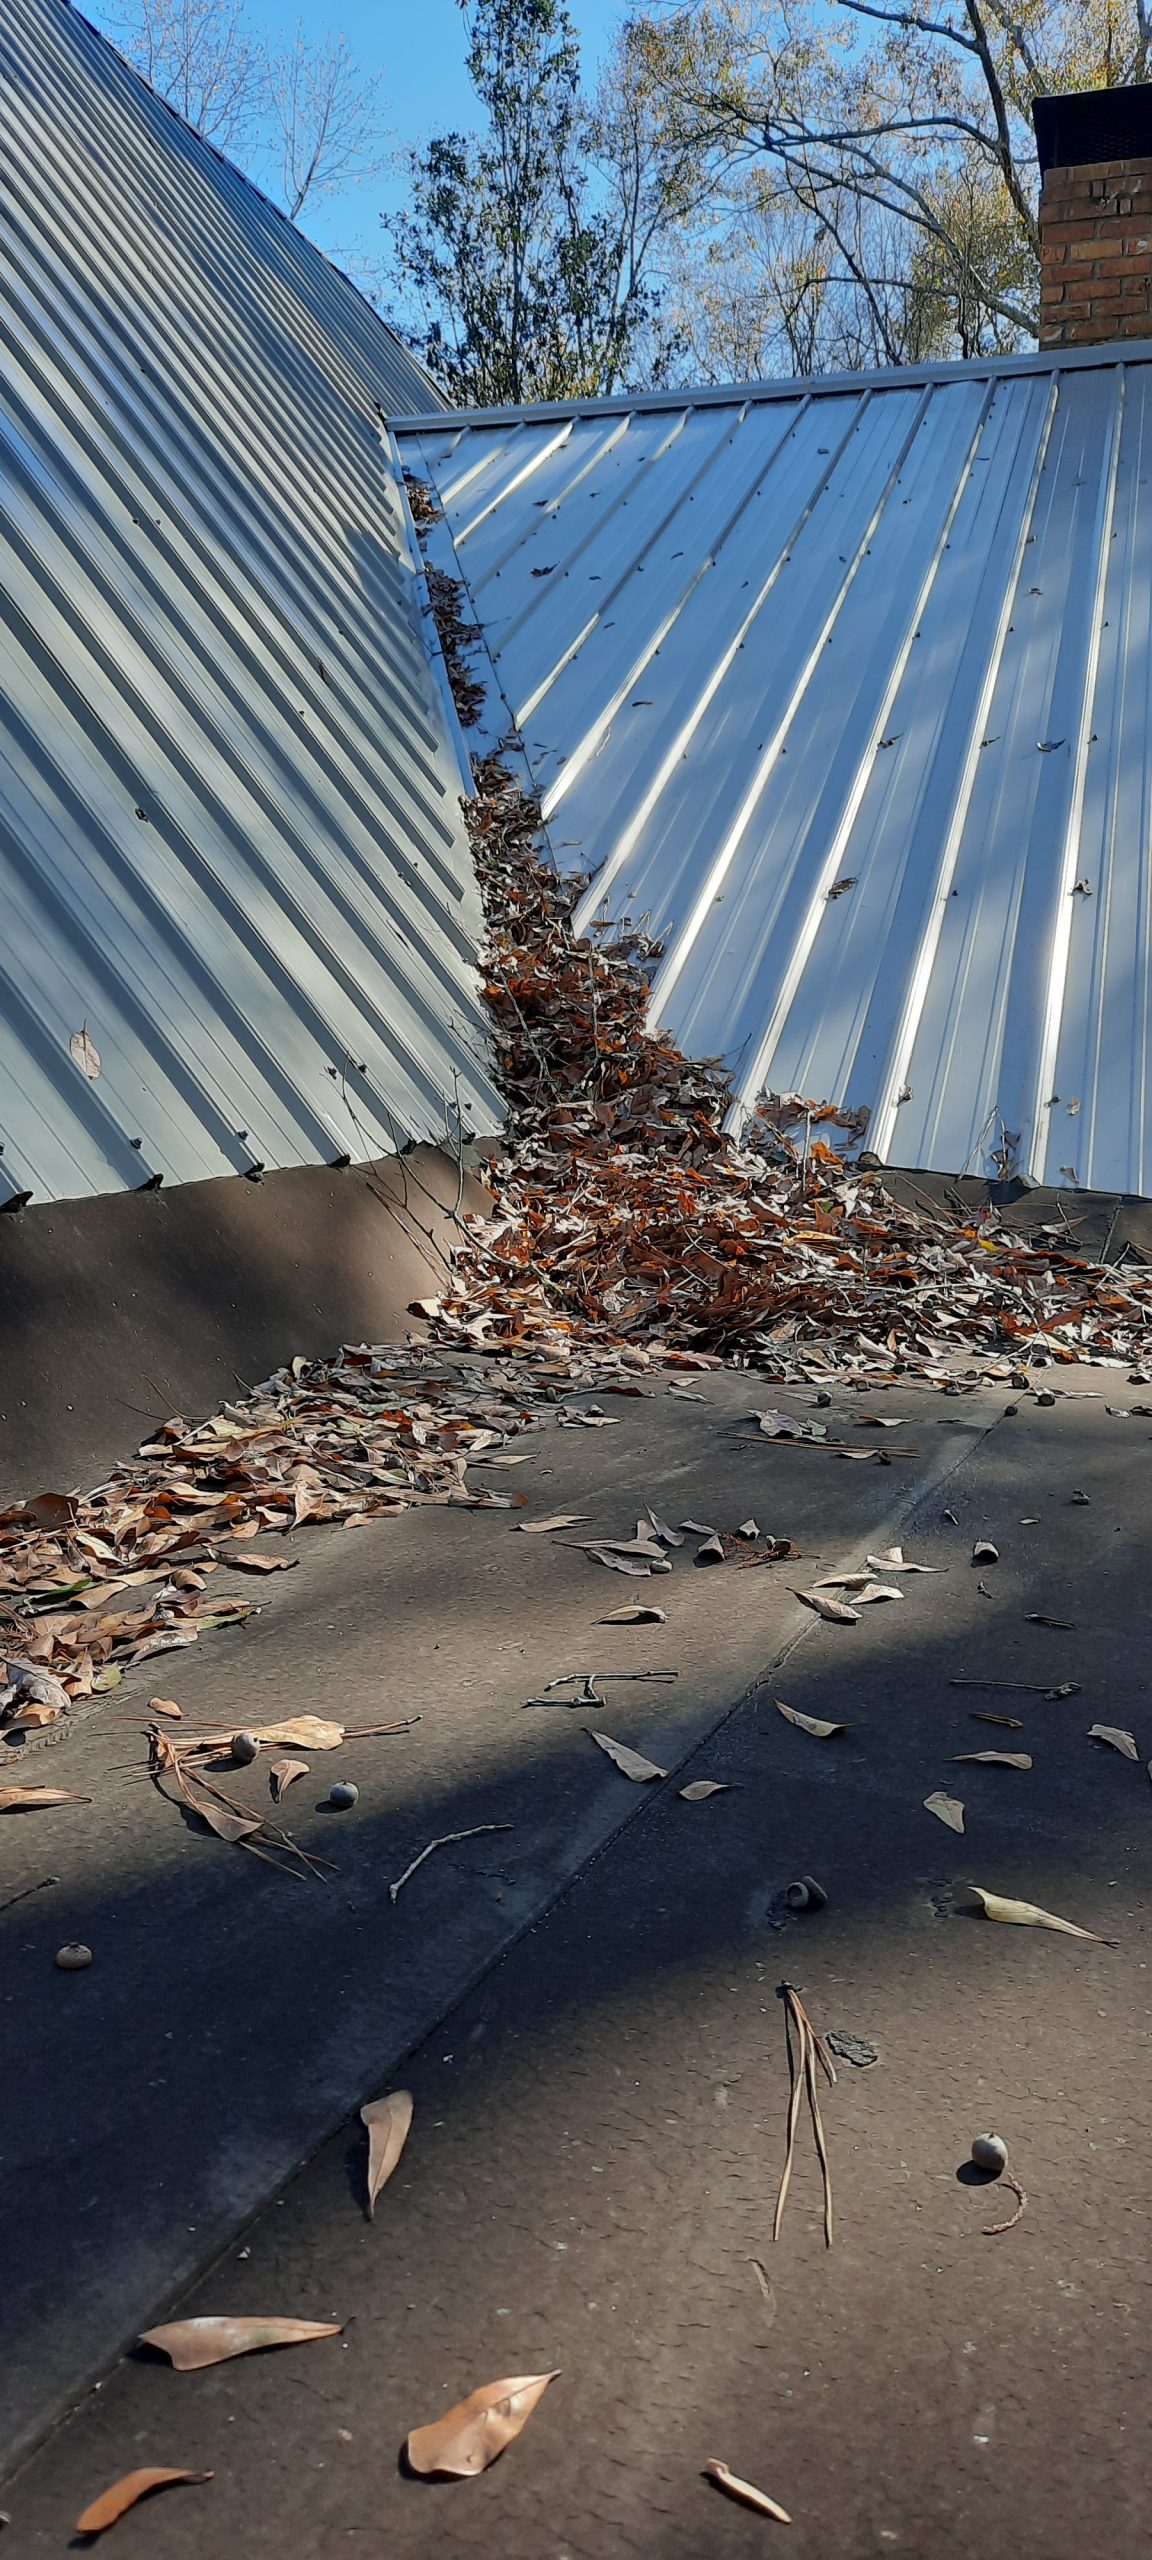
Recently one morning after such a rain, I went in earnest search of leaks inside to find the source of the musty smell.  Not finding anything in the attic, I went to the room where the smell was the strongest, the laundry room.  I checked areas around the windows because there were shelves in front of them, hiding any potential damp spots.  Uh-oh– a couple of the windowsills were wet, indicating that more of the not-so-old (10 years) windows were leaking.  I checked the corner above which there was a valley in the roof (roof valleys can be a source of leaks in a hard rain if they are improperly installed/sealed).  Thankfully all the walls were dry.

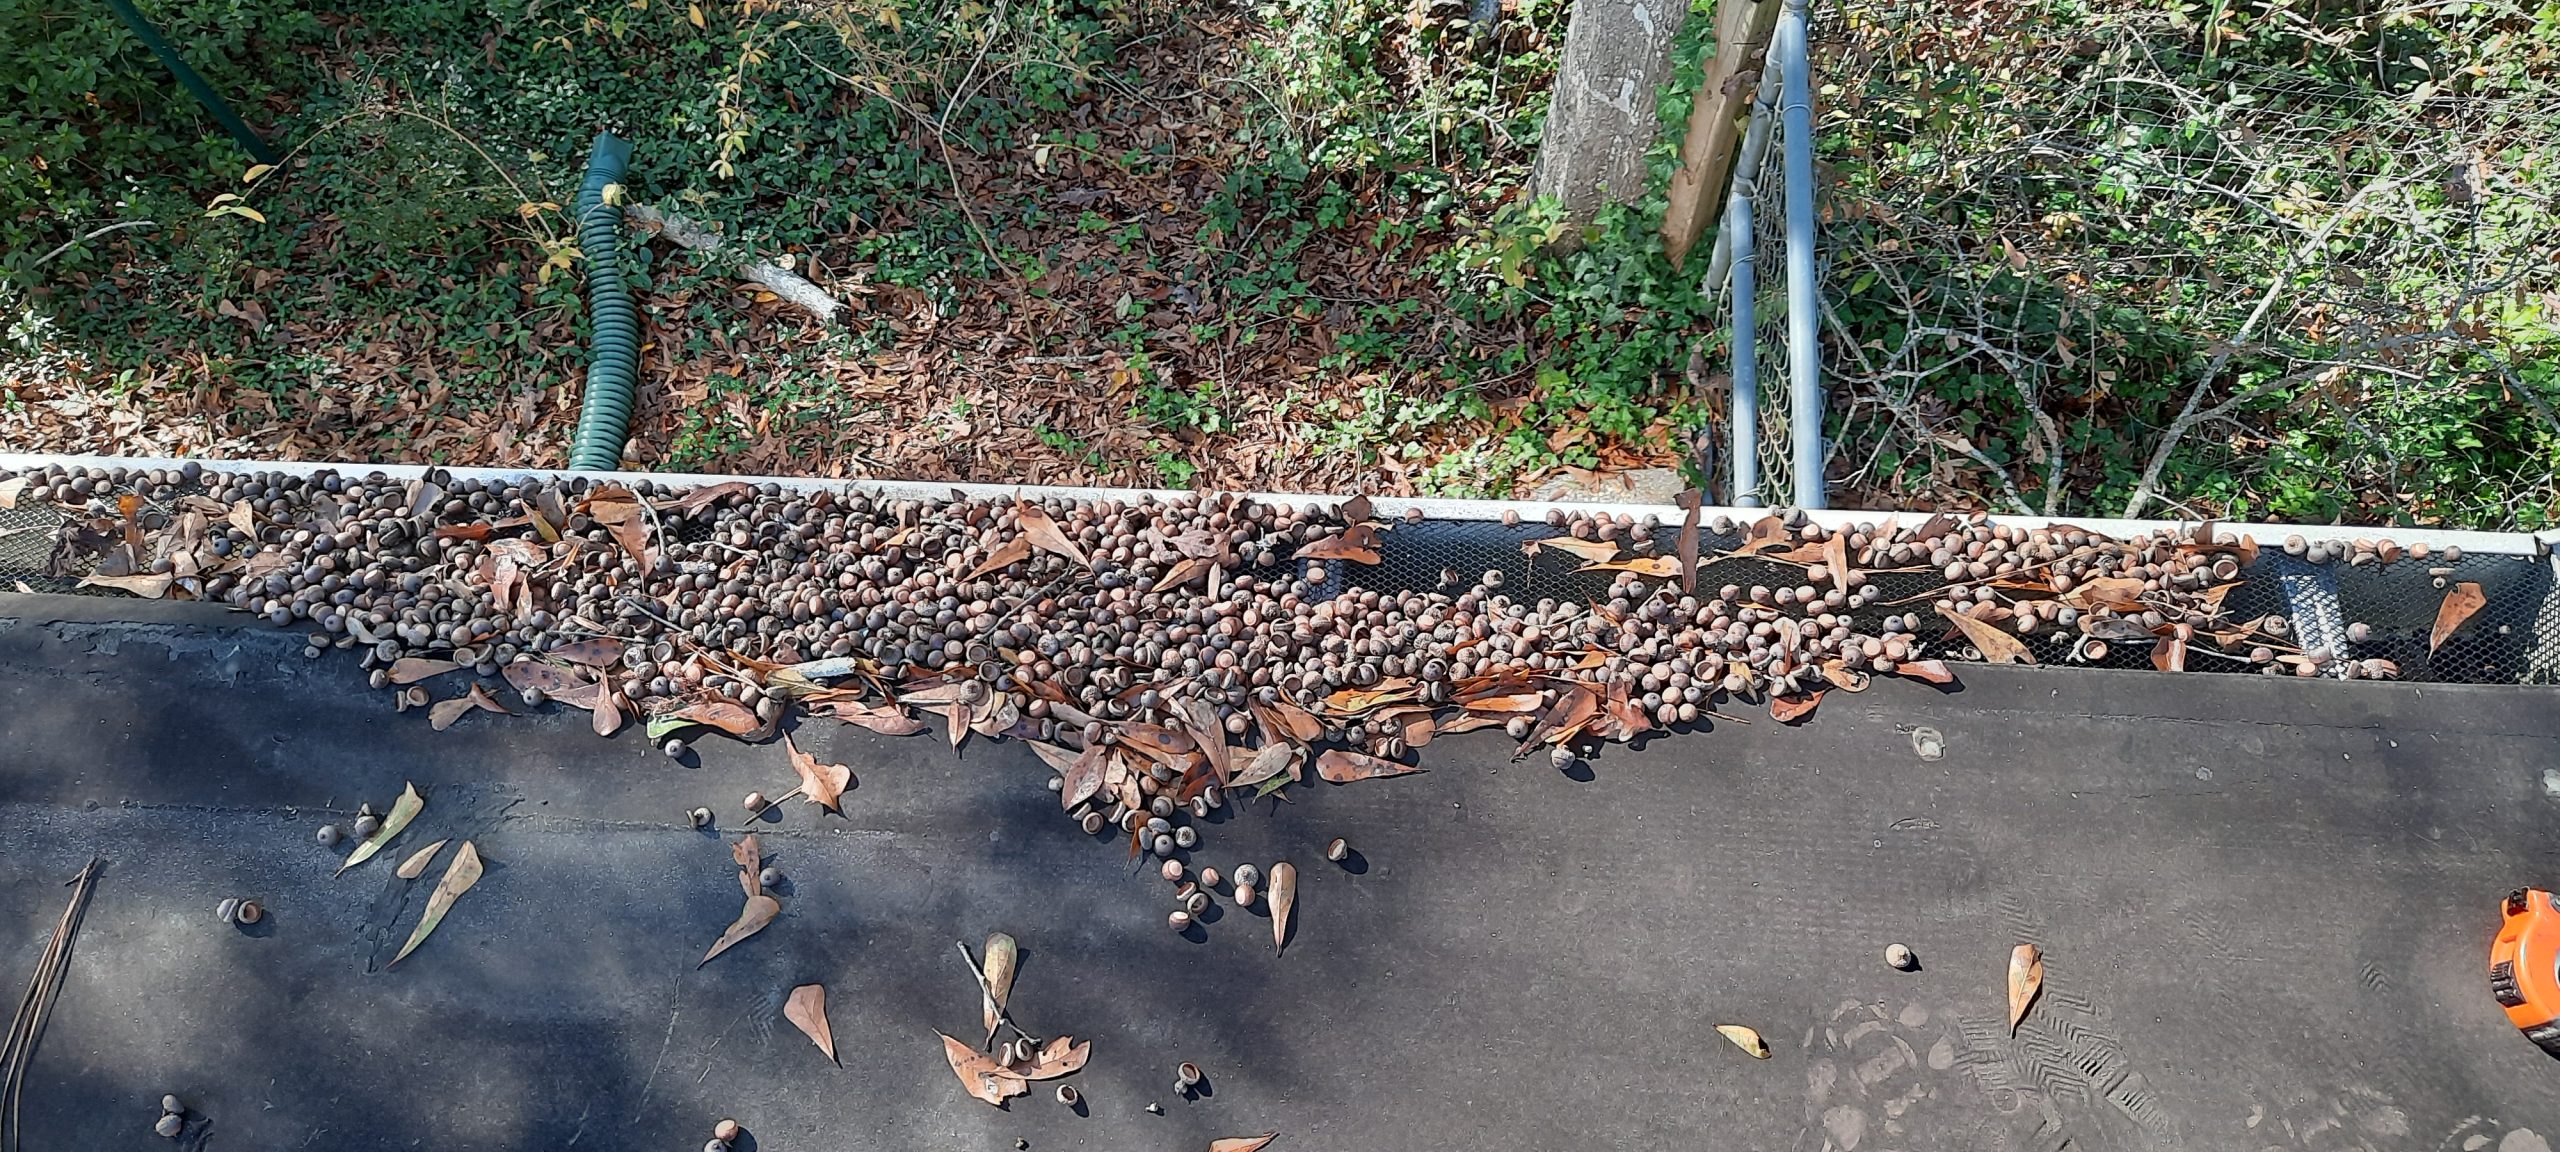
There was a gutter outside this room, and I knew from past experience (rain during the daytime), that the volume of water flowing off the roof seemed to be too fast or too much for this particular gutter, because it would shoot right over the side and pour down next to the wall.  Thinking about it, I went up onto the flat portion of the roof over the laundry room.  There were no big branches or breaks in the flat roof, but a lot of leaves and acorns were up there!  Time to get to work with the broom or leafblower, and I removed a section of the leaf guard over the gutter to clean out the gutter.  I checked to see that the downspouts were clean.

Next, I looked up to see if there were any wet spots behind or below the gutters (this only works after the sun has been out for a bit).  Thankfully, that was not the case.  Looking down the walls, I saw that there were a lot of wet leaves piled up around the foundation.  Wet leaves around the foundation do not just cause a musty smell in the house.  They can allow insects like carpenter ants and termites to come in, using the leaves as a shield to keep their tunnels moist.  I got to work with the leafblower.  

Rain can seep into basements and crawlspaces, so if I had a  basement, I would check the walls for seepage.  Bring a bright light, gloves, and if necessary a respirator (basements can be dusty!) to make sure that you don’t leave any corners/spots hidden from view; try to move any stored boxes to get a peek at every square foot of wall.  It was only after moving some storage shelves in front of the laundry room windows that I discovered the leaking windows. (Crazy, I know, my goal is to build some cabinets so that the windows will not be covered up!)

If you can't find the source of the problem, reach out to a well-reviewed professional home inspector in your area.  Remember, professional home inspection is a service dedicated to helping you find and live in healthy homes--not selling you other products or services.  You can find accredited home inspectors in your state at The International Association of Certified Home Inspectors (nachi.org).

There are a lot of good sites to help you get thinking like a home inspector.  Here are some that we’ve discovered and reference frequently.  Don't be shy about contacting them with questions!  

  • Inspectapedia.com: This website must have THOUSANDS of pages, but the “search” function is great, the website hosts answer questions very promptly (within 48 hours), and there is feedback from many homeowners and experts alike.  Highly recommended!
  • Homeinspectorsecrets.com: Created by a home inspector, this site has a lot of guides about a variety of subjects.
  • Familyhandyman.com: This website contains step by step instructions to correct any problems you may find around your home, and reviews products as well.   
  • Thespruce.com: Although not technically about home inspection, this website contains a wealth of information on a variety of home improvement topics and often contains non-toxic, safer alternatives. Their Home Improvement Review Board is made up of licensed general and specialty contractors, journeyman electricians, and journeyman plumbers, so you know that you’re getting good advice.
  • Energyvanguard.com: This website is written by a building scientist and has an extensive blog, so you can understand the “why’s” of the best building practices.  He also frequently incorporates how he investigates and solves problems at his own home.