Tag Archives for " air leaks "

How to choose a Whole-Home Dehumidifier

How to choose a Whole-Home Dehumidifier

If you have problems keeping the humidity below 60% in your home, we’ve written a lot on ways to lower it.  The first and foremost one should be to check for hidden air leaks in your building envelope.  Look for and correct the biggest ones first, to reap the most benefits.  To the untrained eye, these might not leap out at you, so a short visit by an energy inspector can discover big-ticket savings. Just recently, I found a big one that I should have recognized years ago: a shaft made for ventilation ducts going from my attic to my first floor was open and uninsulated!  No wonder my 2nd-story bedroom can be very cold or very warm–and I’m sure this wasn’t helping my humidity problem.  

If you have sealed up obvious air leaks, insulated appropriately, and are not considering upgrading your central air conditioner, then you can consider adding a whole-home dehumidifier.  We wrote a little about them here, but I found out a lot more recently when I had to select one for my own home!  

Sizing the dehumidifier depends on several things:

  • Square footage of your home: if you have 8-foot ceilings, this directly correlates with rated square footage for dehumidifiers.  If you have higher ceilings, this additional volume will reduce the rated coverage of the dehumidifier.

  • Where you are located geographically (exterior temperature and humidity) and/or how well sealed your home is:  Homes located in more humid climates and those that are only  loosely sealed will need more capacity in dehumidification, because humid air from outside can rapidly infiltrate the air inside a leaky home.  Infiltration rates also vary throughout the year. Infiltration can be greater in winter if the temperature difference between inside and outside is greater. For example, 75 degF inside and 0 degF outside in winter, versus 75 degF inside and 95 degF outside in summer. Infiltration rates depend on wind velocity and direction and also on the building envelope construction. (energy-models.com)

The following chart gives capacity in the number of liters of water a machine can remove from the air in one day.

Source: Sylvane.com

A few years ago the dehumidifier capacity ratings changed. The new 2019 standard considers the Integrated Energy Factor, which is more accurate in representing the capacity of a dehumidifier. The new 2019 testing procedure also tests dehumidifiers at a lower temperature (65°F) while the older standard test temperature was 80°F. (learnmetrics.com)  The sizes above are under the new 2019 standards.  Generally, the sizes required for a given square footage were reduced.  

So, you’ve determined the capacity you will need.  Here are some features to consider when shopping for a new unit:

  • Circulation: The current consensus on the best way to install a whole-house dehumidifier is to have a dedicated return, and to use the HVAC supply or a dedicated supply.  If you exhaust the dehumidifier into the HVAC supply, you can use the blower on the HVAC to always circulate air throughout the house.  Otherwise, if you choose a model with a “circulation” mode, you can set the dehumidifier to always circulate air in the house.  Since dehumidifier blowers are generally smaller than air handler blowers, you may realize a cost savings by using this function.

  • Portability: Some whole home dehumidifiers come with the option of casters so they can be rolled from room to room.  While portability can be an advantage, there are several problems with this.  First of all, they tend to be heavy, cumbersome units. Second, in the space in which you’ll use it, you’ll need to find a drain that is lower than the unit, or set it up higher to drain into a sink or shower.  This requirement alone may cause you to have it permanently installed!

  • Noise and heat:  because these larger machines than smaller room dehumidifiers, they tend to produce more noise and heat.  Therefore, amount of noise, heat, and the installation location are key characteristics to consider.  

  • If you have an open-concept living space where doors are rarely closed, you may consider an “in-wall” unit.  This can be a very unobtrusive way to get dehumidification if you don’t have a duct system (such as when window or ductless AC units are installed), and additionally it can be a super-easy installation for your HVAC technician if a power supply and drain are closeby. 

  • Power requirements: check with your electrician or HVAC technician before purchasing to make sure that the circuit on which you plan to install the dehumidifier has sufficient amperage. 

  • Filters: some dehumidifiers come with a removable, washable filter (like MERV 8).  This is nice, but if the dehumidifier has its own return, then you will want a higher MERV filter in this return so that smaller particles are not sucked into the distribution system. See our article on HVAC filter ratings here

  • Remote reading and wifi capability: at the minimum, whole house dehumidifiers should have the ability to be controlled remotely, either from a central control panel or a wireless control.  Who wants to go into the attic or crawlspace to check humidity and turn it on or off?  Your HVAC technician should be able to route the controls to a suitable place.

  • Why not add some fresh-air ventilation while you’re at it?  A whole house dehumidifier can be configured with a fresh air intake, to pull in fresh air from the outside at a timed interval so that your whole home has less CO2 and indoor pollutants, without raising the humidity level or increasing dehumidification load on your AC unit. 

If a musty smell has been taking over your home lately, don’t delay in measuring the humidity and getting it under control!  Whole-house dehumidifiers can supplement an existing air conditioning system and make your home more comfortable and healthy for everyone. 

Photo by Anne Nygård on Unsplash

Getting the Basement Dried Out

Getting the Basement Dried Out

In our post on how the basement affects our whole home’s air quality, we discussed how mold and mildew form and are sustained in the basement.  Active water leaks (flowing down the walls and pooled on the floor) are not required to make the basement a musty place.  Here are some sources of moisture coming into the basement:

  • Concrete is not a moisture barrier on its own!  Water will permeate concrete walls and floors and simply evaporate, increasing humidity.  
  • Open or broken windows allow moist air from the outside to come in and upon encountering cool walls and surfaces in the basement, condensation will form or just increase relative humidity in the air.  
  • Air leaks around windows, entry doors, unsealed wall penetrations and penetrations into the first floor above allow air to come in, in an uncontrolled way. 

Ideally the basement is inside your building envelope, whether you decide to finish it or not.  This is because it can be a suitable place for mechanical systems like HVAC air handlers and furnaces, hot water heaters, and also for storage.  To house these systems, however, the basement needs to be dry, with good air quality.  We argue that the basement air quality needs to be as good as any other floor in the home, because it will mingle with the atmosphere of the rest of your home!  There will be small leaks in the basement ceiling that make it permeable to the rest of your home.

The way to control humidity is to control:

  • Water flow into the space,
  • Airflow into the space, and
  • Air circulation within the space.

Let’s tackle each problem individually.

Water flow into the basement

Water flowing down walls in streams and puddling on the floor is a major problem– in this case, it is like living above a lake!  It will be difficult to “dehumidify” the air when open water is present, because the water will be continually vaporizing into the air as fast as a dehumidifier can take it out.  Although many basements exist like this, walls and storage of home goods in such environments can accumulate mildew rapidly.  Painting on a “waterproofing coating” will usually just act as a band-aid, because the pressure behind the wall, forcing it into your basement (called hydrostatic pressure) will eventually break through the paint and even degrade the foundation if it’s not drained away properly using interior and/or exterior drains. (basement waterproofing)  It’s best to contract several reputable basement remediation contractors in order to get their recommendations and quotes on stopping the inflow of water.  

If the water is only causing dampness on the walls but not visible condensation, then it’s possible to allow the walls to continually “dry” to the inside by doing the following:

  • Cracks and damage to the walls need to be repaired first.
  • Install rigid foam board with a “perm” rating of 1 or greater.  This allows the moisture to move through the foam and dry out, but still insulate the basement for greater thermal comfort and avoid condensation on the cold wall. Keep the foam insulation up about an inch from the floor to allow any condensation to drain.  If desired, the walls can be framed with treated wood to hang drywall inside.  An excellent cutaway diagram of the installation can be found here (page 24). Below is a picture of rigid foam board insulation from the same document (page 32).
  • An alternative to applying rigid foam board is to paint concrete walls with a waterproofer such as UGL’s Extreme Latex Masonry Waterproofer.  This product has a perm rating of less than 1 (according to this manufacturer’s video), so it is vapor semi-impermeable, but it does not have any insulating properties, like the foam board, so the walls will still be cold to the touch and allow condensation if the air inside is too warm and humid.  
  • Use dehumidification to dry things out.  
  • Decrease relative humidity by increasing the temperature slightly (the dehumidifier may raise the temperature a few degrees, but if not, you can add a small heater).
  • Increase circulation with fans so that air is evenly dehumidified.

Some notes on Vapor Permeability: A material’s permeability is measured in units called perms, which assess how much moisture can pass through a barrier in a 24-hour period according to standardized industry tests. Materials are separated into four general classes based on their permeance:

  • Vapor impermeable: 0.1 perms or less

  • Vapor semi-impermeable: 1.0 perms or less and greater than 0.1 perm

  • Vapor semi-permeable: 10 perms or less and greater than 1.0 perm

  • Vapor permeable: greater than 10 perms

Materials with lower perm ratings are better at stopping the movement of water vapor. If the perm rating is low enough, the material is a vapor retarder. If it’s really low, it is a vapor barrier. (Barricade Building Products)


Air flow into the basement

Sometimes it’s difficult to know what to do: open the windows or not?  Many reputable websites advocate “airing out the basement” (such as thisoldhouse.com), and we at HypoAir always advocate for ventilation to dilute stale air, but here’s the problem: when you don’t know the dewpoint of the air coming in or leaking in, it can cause major mold problems in the basement!  Dewpoint is the controlling factor of whether fresh-air ventilation alone can prevent mold.  As we wrote in another post

The best way to explain this (per this great article) is to find out the dewpoints of the indoor and outdoor conditions.  If the outdoor dewpoint is lower, you can ventilate with fresh air and still dry out your house!  For example on July 26, 2002, here are the conditions inside and outside my house (a relatively “dry” hot day outside!):

Inside: 76 deg F, 67% humidity = 63 deg F dewpoint (check out this easy calculator on dpcalc.org)

Outside: 91 deg F, 54% humidity = 72 deg F dewpoint (dpcalc.org)

See, in this case even though the relative humidity outdoors is lower, if I open my windows, that hot air coming inside would be cooled and relative humidity would increase, working against my humidity goals.

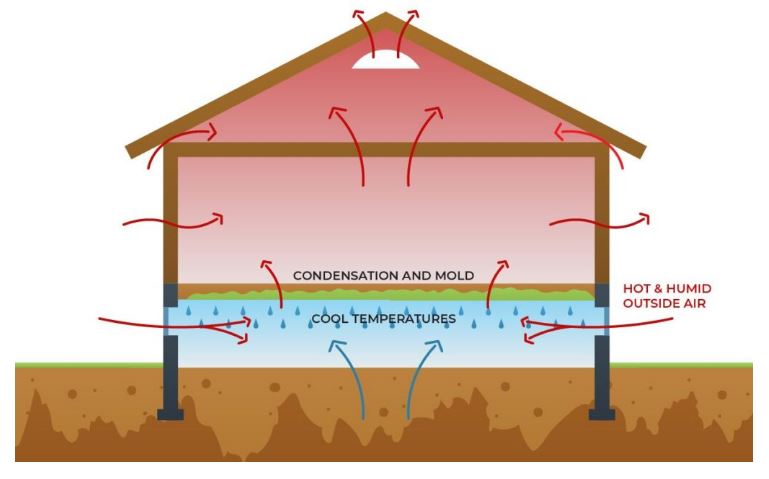
In the case of the basement, the air temperature could easily be lower, like 68 deg F.  If you cool 91 deg air with 54% relative humidity down to 68 degrees, water vapor in the air is going to condense, making your humidity problem worse!   Therefore we want to control all sources of air inflow and only let in drier air for ventilation.  Here is a diagram showing the problem of leaving windows open, and how to solve it:

source: bayareaunderpinning.com

  1. Close windows, block off vents, and seal the window frames with caulk, spray foam or adhesive tape made for the purpose.  Make sure exterior doors have weatherstripping. 

  2. Check for unsealed penetrations in the walls.  If you have to use a flashlight and look behind appliances such as water heaters or furnaces, be prepared with gloves and pest spray to get it done!  The best sealant for wall penetrations in the basement would be sprayfoam, because it conforms to the shape of the hole.  You may want to shove in a wad of steel wool first, because it deters animals from chewing through the foam and re-opening the hole.

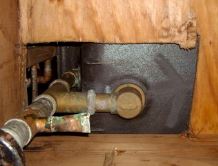
  3. Look up–check the ceiling.  If there is a false ceiling in the basement, you may need to remove ceiling tiles and/or insulation in order to see the underside of the subfloor, but this is where big problems can hide!  The photo below shows the underside of a tub.  Plumbers often cut BIG holes to make their jobs easier, but this can really hurt air quality when these holes let lots of moldy air up (if there’s a negative pressure generated in the space above, this is easily done with a bathroom vent fan), or warm air down (if you are using any type of air extractor in the basement).  It’s best to seal big holes like this one by framing in a box to the surrounding joists, and using spray foam to seal the resulting cracks and holes.  It’s not recommended to insulate the ceiling of the basement (see this definitive guide, page 25) to try to separate it from the rest of the building, as this will only cause more mold problems in the basement.

Source: energyvanguard.com

Where does fresh-air ventilation come from if you’ve sealed outside access off?  According to energyvanguard.com, there are 6 ways to supply fresh air to your home in a humid climate, and for the purpose of a basement that is outside the building envelope, only one makes sense since you’re probably already using a dehumidifier: a fresh air fan that purposely pulls in outside air.  Here are some options to make it happen: 

  • Air King’s QUFresh, 120 cfm, $413 at ecomfort.com
  • Broan’s FreshIn, 180 cfm, $239 at sylvane.com
  • ACInfinity’s AIRTITAN T3 6-In Ventilation Fan, 120 cfm, $69.99, sylvane.com

The AirTitan is a good option where windows are available, because it can be retrofitted to fit in an open window more easily than the other ducted models.  Each of these models have temperature and humidity settings you can adjust so that the fan will only operate when it meets those specifications.  These may need to be set higher in hot and humid climates, but the dehumidifier should be able to handle moderate inflows of fresh air.  When you control the airflow into the basement, you can control the humidity.

And finally, Air Circulation Within the Space

Your basement may be one wide-open area, or several rooms separated by walls and doors, but in each case, good air quality requires that air is moving constantly.  Here are some tips to get the best circulation:

  • Leave doors within the basement open as much as possible
  • Leave dedicated fans running all the time.  Floor fans work great for this purpose, as you can move them around/adjust direction and speeds until you find the optimum circulation.
  • Move boxes and furnishings away from walls and up from floors so that air will circulate to dry them.  Don’t stack boxes to the ceiling.  Separate boxes by several inches to get air moving between them. 
  • Remember, the less absorbent material stored in a non-conditioned space, the better (less cardboard, less fabric, and less wood).

I hope these suggestions help you to dry out your basement so that your whole-house air quality improves, from the ground up!