Category Archives for "Air Quality"

How is my Crawl Space affecting my Indoor Air Quality?

How is my Crawl Space affecting my Indoor Air Quality?

According to the National Association of Home Builders, 65% of new homes in 2020 were built on slab foundations, 22% had a full or partial basement, and 12% had a crawl space.  From their statistics since 2000, it’s clear that slab foundations are increasing, while basements and crawl spaces are decreasing.  From an indoor air quality perspective, we have to admit that’s a good thing!  We found a lot of other pros and cons about slab foundations, and if you are building or buying a home and have a choice, you should investigate the differences.

Slab foundations became popular in the 1950’s; before that, most homes were “raised” with a crawlspace or set over a basement.  Crawl spaces did their job to keep the main living area “off the ground”, ie. not in direct contact with the earth, and they accommodate floor plan renovations more easily than slabs because of easier access to plumbing.  However, crawl spaces typically are partially sealed off, and very contaminated with dust, mold, bacteria and stale air.  What you did not know about crawl spaces may be the most harmful of all: “Approximately 50% of air on the first floor of your home comes from your crawl space.” (goTerraFirma.com)  How can this happen?  Due to the stack effect which affects virtually every building on the planet, warm air rises through the house and is replaced by cooler air from outside, through leaks in the lowest parts of the home.  If you have a crawl space that is partially open to the outside, you may even place a pinwheel or light tissue in the crawlspace opening on a still (non-windy) day, and see if the air currents are blowing into the crawlspace of your raised home.  Fresh air from outside will be drawn into the crawlspace, pick up dust, mold and bacteria (not to mention musty or animal smells), and infiltrate your home through leaks in the flooring.  Gross!

If you can’t or won’t investigate the condition of your crawl space first hand, find a foundation expert and ask them to conduct a thorough inspection (with photos).  Knowledge is the first step to preventing or remediating the problem!  Here’s what they may find:

  • Flooding.  Just like any other ground that floods, if water enters your crawlspace, it can pool and remain for weeks or months, depending on the environment and soil composition.  How about living over a stagnant puddle?
  • Moisture damage.  Moldy and rotten timbers are a consequence of constant water contact and high humidity.
  • Insect damage.  Termites can thrive in even lower moisture zones, and without proper termite prevention like physical barriers, they can do a lot of damage.  The shredded wood creates even more dust under the house.
  • Animals and animal damage.  There are several harmful aspects of animals living in the crawl space under the house.  For one, their feces can carry virulent diseases like hantavirus (from rodents).  Then, unfortunately they may die under the house, with accompanying death smells and a bacteria-laden carcass… Third, they may actually undermine the foundation with burrows.  Did you know that groundhogs can seriously impact your home’s foundation, causing sagging floors and major structural problems?
  • Damaged and missing insulation.  Exposure to water, insects and animals all results in deterioration of insulation on pipes, ducts and subfloor, so that the essential systems and floor itself are exposed.  

If you have a crawl space and want to improve indoor air quality, don’t miss this opportunity to take a step in the right direction by hiring a trusted professional to do an inspection, and then get several bids for remediation.  Most foundation companies will recommend a combination of the following to resolve these issues (from GroundWorks.com):

  • Encapsulation is a method of sealing off the crawl space from the surrounding elements.  It involves closing crawl space vents, installing a vapor barrier so that moisture from the ground does not intrude, and installing a dehumidifier.
  • Insulation is important to prevent condensation and resulting mold issues.  Damaged insulation should be replaced and missing insulation should be installed.
  • Sump pumps are necessary if standing water has been a problem in the past, and to remove condensate from the dehumidifier.  
  • Repair of sagging and damaged joists and supports.

It may seem like a daunting task, and these tend to get postponed until things get really bad.  If you don’t know the condition of your crawl space, we want to encourage you to take a first step of inspection, which many companies do for free.  If remediation is required, call several more companies for inspections and quotes, and research their work.  When the work is completed, you will have the comfort of protecting your largest investment (your home) and increasing your air quality at the same time.  It’s hard to overestimate the cost of a less humid, healthier, fresher home! 

How can I make sure my basement has good air quality?

How can I make sure my basement has good air quality?

If you glanced at our post on crawl spaces, you would know that more new homes have basements than crawl spaces, but they are both declining in popularity.  Here’s what the National Association of Home Builders found:

Still, many existing homes have basements, finished and unfinished.  They can add value to your home value by boosting its square footage and livable space, or they can be a detriment to your home value as a source of mold and poor air quality!   Let’s hope that your basement falls into the former category…but read on to make sure!

The basement shares several characteristics with the attic: many times they are not planned to be living space, and thus often lack the proper ventilation and fresh air flow.(ecolivingexpert.com)  Also, they are often made to be storage spaces containing boxes (cardboard is food for mold and many types of insects and pests), and then home heating systems are often installed there, which if they are gas- or oil-powered, have the potential to leak fumes.  

Whether you use your basement as living space or not, the basement has to be maintained with proper ventilation and dehumidification so that it doesn’t contaminate the rest of the house with poor, even dangerous air quality.  Let’s take a look at these problem areas and sort them out one by one!

Radon is a concern in many areas of the country.  It’s a colorless, odorless gas that that seeps naturally from certain underground rocks and can permeate basement walls and foundations, as well as contaminate ground or well water.  Because radon is radioactive, it can cause cancer (it’s estimated by the EPA to be the #1 cause of lung cancer among non-smokers).  Radon tends to accumulate in basements because it’s heavier than air, so it’s best to have the basement checked for radon levels, and if present, investigate mitigation systems (you can find local qualified contractors through the link on this page, and information on water testing labs here). 

Moisture and mold: If you smell an earthy, musty smell in the basement, it’s most likely mold that is starting to form or has already formed.  The smell is characteristic of the Microbial Volatile Organic Compounds (mVOCs) that the mold releases.  Some MVOCs have been identified as irritants and can contribute to sick building syndrome (easlab.com).  The key is to identify the area (possibly many areas and the whole basement) and remediate in order to stop the growth and get rid of the mold, as soon as possible.  Here are ways to do it:

  • Ventilate: Although opening the windows of the basement, if you have them, will help dilute the smell, it will not stop the mold from growing and continuing to produce mVOCs.  Ventilation has to be done with dehumidification (next point), eliminating excess moisture, in order to stop the growth of mold.  Ventilation can be accomplished by a dedicated basement ventilation system (check out EZBreathe), or by installing air vents from your existing HVAC system to ventilate the basement, creating a positive pressure in the basement.  Although installing a return air vent in the basement could utilize the coolness of the basement to lower AC energy costs, if you have a mold problem in the basement, this is not a good idea as it can distribute the mold spores through the rest of the home. 

  • Dry it out: Check that any water pipes running through the basement area or behind its walls or ceiling are not leaking or even causing condensation.  Cold water pipes from a well or underground can easily cause condensation to form, leading to…you guessed it– mold!  Drying them off and adding insulation can solve this problem.  If there are no leaking pipes, condensation, or flooding issues, then moisture from the surrounding earth can be permeating the block walls of a basement, because concrete is porous.  (For all of my childhood, I lived in a neighborhood called “Spring Hill Estates” because it had springs, one of which was a constant source of moisture for our basement.)  It’s possible that the humidity can be lowered by running a portable dehumidifier, which should be run to a permanent drain (sink, shower or other drain) in order to avoid shut-off or accidental flooding issues.  Alternatively, there are numerous foundation and basement repair companies which can inspect and suggest drying solutions to keep the basement at a proper humidity (30-60%)--the drier the better!  Don’t wait on calling several firms for inspections and quotes, as these are normally free of charge.  

  • Add some active air purification like Air Angel, a purifier that zaps mold spores using 3 technologies for more breathable air.  A standalone HEPA filter is also recommended to filter out mold spores (alive or dead) with an activated carbon element to remove mVOCs and smells.

  • Get rid of “consumables” like cardboard: Side story: I was sorely disappointed to walk into my storage building at the beginning of summer and find an antique portable sewing machine case (which was covered in a clothlike material) streaked with mildew.  Similarly, if you have to use the basement for storage, plastic tote containers or vacuum bags are way better at resisting mold and protecting the items inside from moisture and insect damage than cardboard. Try to store containers on shelving with plenty of ventilation under and between them (like wire shelving) instead of stacking them on the floor or against each other or a wall.  If antiques are valuable to you, try to make room for them in your normal living area, where the humidity is more controllable.  Also, furniture that is made of “pressboard” can absorb more moisture than real wood, with less options for cleaning and disinfecting it.  The use of scatter rugs rather than wall-to-wall carpeting allows for easier washing and cleaning of the floor if it has moisture issues, too.  Consider using hardwood or plastic blinds or shutters for windows instead of draperies, which can absorb moisture. 

Combustion fumes: If you are intentionally or unknowingly using a “negative pressure” ventilation system in your home, exhaust from a gas, oil, coal or biofuel (like wood) furnace can be extracted out of the appliance’s exhaust system if it’s not well-designed or sealed.  As we reviewed in the post “How is my crawl space affecting my indoor air quality?”, the stack effect causes warm air to rise through a home and exit through the roof or attic, drawing cool air into lower levels of the house.  The rise of the hot air creates a slight negative pressure on the lowest levels, like a crawl space or basement, drawing in outside air and even extracting combustion fumes from a furnace into the air.  This can create an extremely dangerous mixture of VOCs that spreads through the rest of the home with the air flow. 

Chemicals, paints, batteries and cleaning products: We get it, these are the substances you don’t want anywhere near your pets or children, so the basement seems like the perfect space to seal them up and store them away!  It is okay to store them there, but only if they are truly sealed (hammer to the lid of the paint can or transferred to a more sealable container with a screw top) AND humidity/moisture is under control AND they are not overly old, so that metal containers do not rust.  Due to external or internal moisture, I’ve seen metal paint cans rust completely through the bottom, and then I’m left with a gooey, toxic mess!   The best scenario is to dispose of old paints and chemicals safely; most communities have a toxic material disposal site or a designated day to bring them to the regular garbage site.  It’s just safer to have these things out of the house!  If you use the basement as a hobby space, make sure to have the proper exhaust ventilation.  The stack effect can drive fumes from glue and paint and dust like sawdust particles, right up into the house.  

Install an air monitor to help take the guesswork–or legwork–out of knowing if the dehumidification and purification is working.  Thanks to wireless technology, you don’t even have to open the basement door to know if pollutants are elevated.  AirThings’ View Plus monitors all the important conditions of a basement: radon, PM2.5, CO2, humidity, temperature, VOCs and pressure (if they had to add anything, CO would be helpful for spaces with combustion appliances like gas furnaces or dryers).  Their connectivity to the app on your phone makes it easy to check!  Kaiterra’s Laser Egg + Chemical is a close runner-up that monitors Total VOCs, PM2.5, temperature and humidity (it doesn’t do radon or CO).  Either of these monitors will help you “see the unseen” air quality of your basement.

Your basement doesn’t have to be scary because of mold and poor air quality.  Shed some light on the subject by doing your own inspection, and if it seems overwhelming or the solutions you try are not working, get professional help.   The health of your family and home depend on it!

How to lower humidity in your home by choosing the right dehumidifier

How to lower humidity in your home by choosing the right dehumidifier

If you have incorporated a humidity sensor or two into your home and monitoring routine, bravo for you!  We at HypoAir believe that these are among the most important tools you can have in your air quality toolbelt.  Now, what you do with that information–home or room humidity–-is equally important!  If the monitor tells you that a space is consistently above 60% relative humidity, after you’ve checked and mitigated the sources of moisture (see our post “Humidity and an Indoor Moisture Inventory”), then a dehumidifier can bring it down into the 40-60% range.

The great thing about dehumidification is that by reducing the humidity, you are also increasing comfort.  In hot climates, excess humidity in the air prevents our bodies from cooling effectively by evaporation, because the air is already loaded with moisture.  In cold climates, excess humidity in the air (such as in coastal regions) causes us to feel colder than in dry air at the same temperature.

You are also saving on energy usage for 3 reasons:

  • Air conditioners use less energy to cool dry air than more humid air at the same temperature, and heaters use less energy to heat dry air than more humid air at the same temperature.
  • In the summer you will feel cooler at any given temperature, when the air is drier versus more humid.  Therefore, you may be able to set your thermostat higher during the summer!
  • In the winter you will feel warmer at  any given temperature, when the air is drier versus more humid.  Therefore, you may be able to set your thermostat lower during the winter!

Dehumidifiers come in all sizes for all applications.  When choosing a portable one for a room, it’s important to know the following things:

  • Square footage determines capacity:  Just like air purifiers, dehumidifiers are limited by air flow, so standalone units can’t effectively dehumidify through walls and doors.  If you are choosing a standalone unit, measure the floor space.  The square footage measurement incorporates standard 8-foot ceilings, because it really translates to air space, which is ft3.  For 500 ft2, start with a small dehumidifier (10 pints for a moderately humid space and 12 pints for a more humid space) and add 4 pints capacity for every additional 500 ft2 (bobvila.com).  The capacity is usually measured in pints or liters per day, which is the amount of moisture the unit can draw from the space in 24 hours.  The Department of Energy changed capacity testing and ratings for models released in 2020, so newer models are not comparable to older ones.  This page shows a table comparing older and newer capacity ratings.
  • Additional/ongoing moisture sources:   Human occupancy = moisture!  We sweat, breathe, and generally exude H20, and rooms with higher activity or temperature levels (like a home gym or sauna) will need more dehumidification capacity.  Also, leaks in the building envelope like doors and windows can allow moisture from outdoor air to come in.  Then, there are those inherently humid spaces that incorporate running water like bathrooms and laundry rooms.  
  • Energy Efficiency:  Dehumidifiers are very much like air conditioners, with similar parts and operation.  A coolant is pumped in a closed loop system from the hot side (condenser) to the cool side (evaporator) to draw moisture from the air, collecting it in a reservoir or allowing it to drain to a permanent drain.  The compressors in these dehumidifiers used to draw significant energy (amps) to do their work of changing the fluid from gas to liquid, but newer models are much more energy-efficient.  Inverter technology decreases the energy draw most of all, because the compressor will have a variable speed motor, allowing it to run continuously at a lower speed to keep a constant humidity, or ramp up when the humidity increases.  
  • Method of dehumidification:  There are two main types of dehumidifier: refrigerant and desiccant.  Refrigerant is by far the most applicable to residential needs because it can remove large amounts of water from rooms above 50 degrees F.  These work when humid air is drawn across the cold evaporator coil containing refrigerant; the refrigerant removes moisture from the air and produces condensate, and the dry air is blown into the room.  Desiccant dehumidifiers work in lower, less humid spaces by absorbing water directly into a material (desiccant), which is dried out to be used again.  There are some desiccant humidifiers on the market for small spaces like closets or cars; these require that the desiccant be regenerated in an oven or replaced with new desiccant. 

Installing a portable refrigerant dehumidifier is pretty simple; you will need to: 

  • Place the unit in the room you want to dehumidify (not inside of a closet), at least 1 foot away from walls or other obstacles so that air is free to circulate around it
  • Make sure it’s placed on a flat and stable surface. Sometimes carpet can be too plush for this purpose, so try to find a board or other flat surface
  • Choose your drainage method (ideally you should have this in mind before selecting the unit).  If using the bucket, make sure it’s properly installed (most new units will not start working if it’s not).  If using continuous drainage, make sure that the hose is attached securely, the drain end is placed into a sink or drain, and check for leaks once it starts to operate.  Unless the dehumidifier has a condensate pump included, the drain hose end will need to be lower than the unit so that water doesn’t back up in the unit.
  • Plug in and set the desired humidity level.

If you have a humidity problem in several rooms or the whole house (this is common situation in hot, humid regions), it’s wise to choose a whole-home dehumidifier. This is a permanent installation that uses your home’s HVAC ducts to distribute dry air throughout the home.  Whole house dehumidifiers are a bit complicated (not generally a DIY installation) essentially involving hanging the unit, running the ductwork, running the condensate line, connecting the unit to an electrical supply and installing the controller.   In addition, you need to make sure that the ductwork is connected to the right places: having a dedicated “return” vent for the dehumidifier, and sending the dry air to the distribution plenum for your AC, are critical for getting the most out of this unit. (pvhvac.com, bobvila.com)

One slight drawback of dehumidifiers is the heat that they produce.  Unlike air conditioners, the hot and cold sides of the heat transfer system are not separated by a wall, so the heat generated by the unit goes into the air surrounding it.  Unless the unit is placed in a small room, this usually doesn’t make a noticable difference in the temperature of the space, but it’s something to take into consideration.

Dehumidifiers need maintenance, just like HVAC units.  With standing water inside, mold can grow fast.  Some manufacturers require that the maintenance on whole house units is performed by a qualified HVAC technician, for warranty purposes.  Here is in essence what they do:

  • Turn off the power
  • Clean or change the air intake filter
  • Clean the condensate drain line and/or add anti-microbial agents to the line
  • If there is a condensate pump (typical in crawl space units), make sure it is clean and operating properly
  • Make sure that the house humidity is staying in range of its setpoint

For portable dehumidifiers, you can do the following (cnet.com):

  • Unplug the unit
  • Wipe down the outside
  • Empty and clean the bucket thoroughly with dish detergent.  If your unit is plumbed to empty the condensate into a garden hose or other hose line instead of the bucket, then unscrew the connection at the unit and use a towel to wipe any slime from inside the fitting.  Also at this time, you can dump a cup of vinegar or hydrogen peroxide (not both!) into the hose so that any algae forming in the line will die and be flushed out.
  • Remove and check the bucket filter (if your unit has one) and clean it out.
  • Rinse off the air filter
  • Replace the bucket and air filter, and you’re good to go!

Dehumidifiers work best with air circulation!  With portable units, that means that using a ceiling or portable fan to move the air around the room, so pockets of drier or more humid air don’t form.  With a whole house dehumidifier, the fan inside the unit (if operating independently) or the HVAC fan will provide the circulation.

If you decide to invest in a dehumidifier, be sure to check the Department of Energy’s Buying Guide for additional tips, and to find Energy Star Products and rebates ($!)

Photo by Manos Gkikas on Unsplash

To Vent or not to Vent the Attic? It’s all about air-sealing and insulation

To Vent or not to Vent the Attic?  It’s all about air-sealing and insulation

In the early 2000’s, this was not a relevant question for most homebuilders.  Attics were virtually always vented, in line with the thinking that ventilation was the best way to mitigate condensation and moisture issues, ice dams and other damage.  Like many elements of home design, however, practices have evolved to seal homes more tightly against energy loss and pollution.  Sealing the attic is one such evolution. 

In our article “On a home hunt?  Make sure Air Quality is on your home inspection list!”, sealing the attic was mentioned.   If you are building a new home, you will basically need to decide where the thermal boundary will fall–will it exclude the attic, or include it?  Here is a diagram to show what we mean (source: basc.pnnl.gov)

The pink lines indicate where insulation and air barriers will be.  In diagram a), the upper thermal boundary is located at the attic floor.  Notice that the roofline is broken at the eaves (small hooked part on lower ends) and there is also a “vent” in the ridge of the roof.  In diagram b), the upper thermal boundary is located at the attic ceiling (underside of roof), and there are no breaks in the roof line for vents.  Diagram a) will require that the attic is vented, but diagram b) will require that it is unvented.  Why?

Sealing up uninsulated spaces (like diagram a) will cause the air in the space to become the same temperature as the outside, but without ventilation, moisture cannot escape and mold and rot can form.  The alternative is to make sure the uninsulated attic receives plenty of outdoor air ventilation, OR include the attic within the thermal boundary, making it part of the “conditioned space” of the rest of the home (diagram B).  

Factors to consider when determining where to locate the thermal barrier in new construction include climate, desire for additional living and storage space, building design and configuration, and location of HVAC. 

Consideration

Vented

Unvented

Climate

Acceptable for all climates, providing sealing, insulation and ventilation methods work

Best for: 

  • Coastal climates

  • Hurricane, tornado-prone areas

  • Wildfire-prone areas

  • Hot, humid climates

Additional living space

Not acceptable

Necessary

Building design

Good for truss framing (can’t be used for interior living space anyway)

Good for complex interior ceiling/attic design, 

Best for low-slope roofs where it is difficult to seal, ventilate, insulate and provide ventilation space above soffit eaves.

HVAC in attic

Acceptable with good duct sealing and insulation

Best 

Other pros

Less-costly insulation

More resistance against:

  • Wind-driven rain

  • High wind damage

  • Wildfire embers

Let’s explore the types of ventilation that are common in attics today (source: roofingcalc.com): 

Passive roof ventilation using:

  • Ridge vents

  • Soffit vents

  • Roof vents including box vents and turtle vents

  • Gable vents

Active roof ventilation using:

  • Turbine-style (whirlybird) vents

  • Motorized roof vents

  • Gable fans

Many people are convinced that “if it’s not broke, don’t fix it”, and this applies to the traditional design of vented attics.  In truth, many attics have been able to ward off condensation, rot and mold for decades because they are well-ventilated and properly roofed.  If you decide to stay with a vented attic design and still keep the HVAC ducts in the attic, there are two developments that can help save money on heating and cooling.  

  • Laying the ducts on the attic floor and burying them in fibrous insulation can achieve energy savings and can be done at any point, before or after building (although it’s easier whenever new ducts are installed) (basc.pnnl.gov) The key to success with buried ducts is making sure that the ducts are airtight, encapsulating them with foam (ccSPF=closed cell spray foam) if necessary, and deeply burying them in loose insulation.  Here is a diagram:

  • If the ducts are hanging in your attic and you decide to keep the attic vented and ducts where they are, you can have them encapsulated in closed-cell spray foam in order to minimize heat transfer. 

Source: basc.pnnl.gov

Vented attics are not a good place for storage because of extreme heat, cold, and sometimes insect and pest issues.  Without the above measures, vented attics are also not the best place for HVAC systems, for the same reasons.  HVAC equipment will last longer and perform more efficiently when it’s operating in a temperate, dry climate.  Ducts passing through a vented attic must be sealed tightly in order to avoid pulling unconditioned air and dust into your home.  

The key to creating an unvented roof assembly is to keep the roof deck – the principle condensing surface in roof assemblies – sufficiently warm throughout the year such that condensation will not occur, or to prevent moisture-laden air from the interior of the home from accessing the underside of the roof deck. (basc.pnnl.gov)  This can be accomplished by installing rigid foam insulation over the sheathing, or (more commonly) using spray foam insulation under the sheathing.  Both require a high degree of air-tightness to avoid condensation.  In an existing home, changing the thermal boundary from the floor to roof or vice-versa can be quite a bit of work, and often it’s best to do/combine this task when reroofing or other modifications, like HVAC system replacement. 

For many people, it’s hard to imagine an attic that is not unbearably hot in the summer and frigid in the winter.  However, when the roofline is properly insulated and sealed to the walls, you have a space that is less dusty, easier to work in when renovations are made, and a better space for HVAC equipment.  It also provides a “buffer space” for all that conditioned air in your home, which tends to rise and escape through the ceiling area.  Without excess temperatures bearing down on your ceiling in the summer or trying to vent warm air in the winter, energy costs can be moderated.  If you do choose to convert to an unvented attic, be sure that the company you choose to seal and insulate it will do a thorough job of sealing, then apply sufficient spray foam insulation according to local code for your climate. 

Whether you decide to go with a vented or unvented attic space, the best choice for air quality and energy efficiency will depend on how well you can seal and insulate.  For vented attics, the living space below and any ductwork within need to be sealed and insulated from the attic space, which is an extension of the outside via ventilation.  For an unvented attic, the whole attic is an extension of your home and therefore must be sealed and insulated from the outside at the roofline.

Photo by Rosemary on Unsplash

On a home hunt? Make sure Air Quality is on your home inspection list!

On a home hunt?  Make sure Air Quality is on your home inspection list!

At HypoAir, we want to give you information that will help you make healthy choices about your existing home or any home you intend to live in (purchase or rent).  Real estate sites have a lot of pretty pictures, but until you step inside a home with critical eyes (and nose), you will not know the impact it could have on your life, because indoor air quality is even more crucial than the school district or neighborhood.  We hope that this checklist helps you make sure that all areas impacting air quality are assessed and addressed.

  • Button it up.  It’s 2022, nearly 50 years after the energy crisis that stimulated a myriad of home insulation and building design changes.  If we’ve learned anything, it’s that insulation and sealant against air leakages is good.  The tighter the building envelope, the better air filtering and climate condition systems can do their jobs.  We list some of the points you can check, but for top energy savings, it’s best to hire a professional home energy consultant.  Certification varies by state, and here are two national pages that may help find a consultant: hersindex.com and US Department of Energy.  However, the best place to start looking for a Home Energy Auditer is with your local power company–some even conduct energy audits for free and install energy-saving equipment like lightbulbs for free.  If you need to hire an energy consultant, here are some helpful questions to ask: how do you discover the main air flow patterns in my home?  where will you target your time?  Can you address the discomfort during (winter/summer) in (name room).  What are the average savings homeowners realize with your services?  Energy consultants can perform a blower door test, and use infrared scanners and smoke tools to see the larger leaks that most inexperienced homeowners will miss.  According to energy expert Ken Gadsby, “doors and windows only account for 20-30% of air leakage in most cases”, while it is more cost and time effective to go after the other 70-80% that is coming from elsewhere. (from Solar Age article referenced here).   If you decide to do your own checks with equipment, you may want to buy a smoke pencil to find hidden leaks, you’ll want to find one that is not toxic. This brand uses glycerine, propylene glycol and distilled water to generate a non-toxic white smoke.  There are two main types of air leaks in buildings - direct leaks through the exterior walls or ceiling to the outdoors, and indirect air leaks through interior partition walls, ceilings, or stairwells and plumbing chases. (inspectapedia.com)  
    • Indirect leaks may be part of a larger convective air loop, where void spaces in walls and ceilings can pump warm air out of a house during the winter, or into a house during the summer.  You or the energy consultant may need to investigate penetrations such as ceiling lights and bathroom exhaust fans and uninsulated void spaces like ductwork, soffits (commonly above kitchen cabinets) and firewalls.  It may be that simply installing a physical barrier will interrupt the air loop and stop energy loss.  This can be done retroactively by drilling holes and using spray foam to seal cavities at the ceiling/floor level, sealing plates and void wall tops, etc.  
    • Direct leaks may occur around baseboard heaters, wall sockets and light switches (check out these easy gaskets), around window and door frames/molding, and around penetrations through exterior walls such as cable/telephone wires and gas lines.  These can be resolved with some low VOC caulk.  For larger penetrations like plumbing and drain lines, the only spray foam sealant that is UL GreenGuard Gold Certified is made by FOMO Products Inc., called Handifoam Window & Door.  Some penetrations, like electrical wires, may need a fireblock sealant by code, and Handifoam Fireblock is also GreenGuard Gold Certified.
    • Seal the attic: to vent or not to vent?  Attics are typically very hot or very cold, because the builder chose not to include this space in the conditioned space.  If an attic is insulated on the floor and interior wall boundaries, it will need to be vented so that it acclimatizes to exterior conditions and doesn’t hold excess moisture.  In the case of vented attics, according to the US Department of Energy, just a ¼” gap around the hatch (for a pull down ladder) is equivalent to a ceiling register removing heat from a room.  There are manufacturers of attic stair covers that can seal this difficult opening well.  Secondly, any air conditioning ducts in the attic must be sealed at all joints, which is something you may be able to do yourself.  As for the rest of the attic, this guide has details of all the places to check for undesirable ventilation.  On the other hand, if you live in a hot, humid climate, or want to reserve the attic for extra living space, then it’s wise to move the envelope to the roof line, and make the attic part of your entire’s home conditioned space.  Here is a page that will help you decide between venting and sealing the attic.
    • Seal the fireplace.   In general, it is the fireplace damper that opens or closes the chimney space to your firebox.  It needs to be closed when not in use, but if there is no damper, or it doesn’t seal properly, you can check out this page to decide how to seal it.  Just as importantly, the fireplace surround should be sealed to the stone or brickwork, and vents can be sealed off with magnetic covers.
    • Crawlspaces can be a source of home energy loss or increased heating bills, as well as mold and rot issues (inspectipedia.com)  The old recommendation was to thoroughly ventilate crawlspaces in order to prevent these issues, but now the recommendation is convert the crawl area to a conditioned space with vapor barriers and insulation.  Recognizing air leaks, humidity and mold issues in crawlspaces (and unconditioned basements) needs to be addressed!
  • Not location, location, location: Ventilation, ventilation, ventilation!   Tight building envelopes without fresh air ventilation are unhealthy, and leaky building envelopes with the wrong types of ventilation also create problems.  Unfortunately, the average American home has no dedicated fresh air ventilation system. (buildinggreen.com) According to ASHRAE standards (formerly called the American Society of Heating, Refrigerating and Air-Conditioning Engineers), homes should receive 0.35 air changes per hour, but not less than 15 cfm (cubic feet per minute) fresh air per person (EPA.gov).  There are 4 types of dedicated mechanical ventilation; we discuss these in our post “How does indoor air pressure affect ventilation and air quality?”  Most home energy consultants recommend a balanced ventilation system that includes an HRV or ERV, however in hot and humid climates additional dehumidification will be necessary, because ERV’s actually raise the humidity level in your home.  
  • Humidity.  If the interior stays above 60% relative humidity for long periods of time, it’s not a question of if, but a question of when, mold will become a problem.  Arming yourself with a simple humidity sensor on a home tour can confirm what your senses may already be telling you–does it seem too humid?  Or too dry?  Dry air can cause germs to live longer in the air, posing increased risk of respiratory infection.  You can do an inventory in your own home with our post “Humidity and an Indoor Moisture Inventory”, and HVAC experts in your area can help rectify under or over humidification with the right equipment.  The following graph shows the benefits of keeping it between 30-60%:

  • Radon.  According to the EPA, radon is the #1 cause of lung cancer among non-smokers.  A colorless, odorless gas that seeps naturally from certain underground rocks, radon can permeate basement walls and foundations, as well as contaminate ground or well water.  It’s best to have the home’s air and water checked for radon levels, and if present, investigate mitigation systems (you can find local qualified contractors through the link on this page, and information on water testing labs here).  
  • Mold.  As mentioned in our post “Taking our homes back from mold”, using a home inspector who is equipped with forward-looking infrared radar (FLIR) gives you “x-ray views” of hidden sources of mold.  FLIR is a type of thermographic camera that detects infrared radiation, and while it is used in military and spy applications(!), it is also extremely useful in locating areas behind walls where water intrusion may be present, making a hospitable area for mold.  Such a home inspector will also be intimately familiar with construction methods that can be causing moisture issues now or may cause them in the future. 
  • Active Air Filtration and Purification.   Buttoning up the envelope and ventilating properly are non-negotiable basics; filtration and purification step up the breathability and comfort of your air.   Is the only air filtration in your existing or potential home done through the furnace filter?  If so, additional filtration and/or purification in the HVAC or standalone will help with dust, seasonal allergies, viruses, mold spores and mycotoxins, and pet dander. 
  • Old House Materials.  Asbestos and lead paint are still out there in older buildings (pre-1978 for lead paint and pre-1989 for asbestos), and disturbing them will bring these hazardous materials into the air.  It’s best to make sure that your home inspector identifies any sources of these materials in case you get the (common) urge to renovate!
  • Gas appliances.  Heartbreaking but vital information for foodies: gas stoves can throw quite a bit of VOCs and fine particulates (PM2.5) into the air, in addition to whatever you are cooking and what you are cooking it in.  If you plan on keeping or installing a gas stove, make sure that the ventilator hood is powerful enough for the space (check out our post ‘Humidity and an Indoor Moisture Inventory’) and it works quietly, so that you will be inclined to use it to whisk away harmful chemicals and particles.  In addition, inquire about any other gas appliances such as water heaters, clothes dryers and space heaters.  The inspector should note their age and condition (gas orifices can wear or rust over time, causing poor combustion) and if they are vented properly.  Here’s a good article for those who like to see what I’m talking about! 
  • Outdoor sources of pollution.  Does it make sense to include the outdoors in an indoor air quality survey?  Yes–and here’s why.  No matter how tight your home’s envelope, we hope that there will be ample times of the year when the weather outside is just so gorgeous that it’s impossible to keep the windows closed.  At that moment, do you want to be worrying about what kind of air pollution could enter your home?  Although there’s little you can do about these sources, it’s good to know what they are and how often they may affect your ability to open windows, depending on the wind and weather conditions.  Here are just some of examples of outdoor air pollution: living near 
    • a busy thoroughfare or bus station
    • oil wells or refineries
    • trash dump
    • Stagnant farm pond or standing water (like used tire recycling center)
    • neighbors who burn trash or wood consistently
    • farms that crop dust or use aerosolized fertilizers
    • Areas that employ insecticide spray trucks
    • Golf courses and other public areas that use copious lawn treatments
    • Businesses that perform outdoor renovation work like sanding or spray painting
    • Seasonal issues like wildfires, tree pollen, ragweed, etc.
  • New house smell.  New homes, just like new cars, can have many sources of VOCs, most dangerous and common among them being formaldehyde.  If you consider a newly finished or furnished home, find out if it has the following:

Those were the biggest offenders, but new vinyl windows, insulation, drywall, caulks and adhesives can also off-gas VOCs.  This site gives detailed reviews on building products that “cure” quickly or are more tolerable for chemically-sensitive people.

  • Attached Garage.  What?  Why is my attached garage a liability?  Attached garages are used for activities that people normally wouldn’t do in the home, AND they usually have air leaks that can infiltrate the home, since they are attached.  That’s why generators, motor vehicles and combustion-driven lawn equipment should never be allowed to “idle” or run continuously in the garage, even with the door open!  Also, although it may be the only sheltered place available to do home projects and hobbies, do realize that the fumes from paints and glues may work their way into the home through a leaky door, vents, and other unseen air passageways.  
  • EMFs.  Although their effects are very controversial, electromagnetic fields (such as wi-fi, high-voltage power lines and stations outside and communications towers) can actually contribute to lower air quality in a home that is predisposed to mold issues.  If you have researched this topic and are concerned, you will want to know EMF sources in the neighborhood, as well the types of the wi-fi router and smart appliances, and where they are located.  Studies have found that mold growing in homes or buildings can actually be amplified by EMFs – causing mold to grow more rapidly and spread further. EMFs may also trigger the mold spores floating around in your house or body to release more mycotoxins. (jillcarnahan.com).  See our post ‘Taking our homes back from mold’ for more information.
  • Wildlife.  Crazy as it sounds, if you live in an area with certain protected species, you may not be able to evict them without a special permit, or during certain times of the year.  For example, the Florida bonneted bat is a Federally endangered species that cannot be evicted from a home or building without a permit (floridabonnetedbat.org). Bat guano is extremely fragile and can become airborne if it is disturbed. Inhaling bat guano can spread Histoplasmosis, a major respiratory illness, and rabies to you and your family. (skedaddlewildlife.com ; this page also shows a short video of how bats can enter the home through the smallest of spaces!)  We at HypoAir were contacted by a homeowner who was not allowed to evict a family of bats during breeding season, and so sought air purification methods.  

Research on home air quality can help you avoid or mitigate unhealthy living spaces, make your home more comfortable, and even save money in many cases!  Make sure to check the date of any published materials on- or offline, because building codes and theories about air quality change (for example, some of the Building America recommendations made in 2005 have been superceded by newer technology).  Thoroughly inspecting and researching where you and your family will spend most of their time is worth it!

Photo by Allen Taylor on Unsplash

How does indoor air pressure affect ventilation and air quality?

How does indoor air pressure affect ventilation and air quality?

If you’ve read some of our posts, you’ve probably heard how passionate we are about ventilation for indoor spaces.  Most old and new buildings just do not have sufficient fresh air flowing in, resulting in ill health for the building and its occupants!  This post is about the role indoor air pressure plays in ventilation and air quality. 

The air pressure we’re talking about inside your home is relative, meaning, it is higher or lower relative to the outdoors pressure.  Normal outdoor air pressure at sea level is 101,325 pascals, which is also equal to 14.7 pounds per square inch, or 29.92 inches of mercury, and it can go up or down slightly according to the weather.  Now, if the air inside your home has a pressure lower than the outside, then it would be slightly lower than 101,325 pascals, and the relative pressure would be the difference between the two pressures (like 20 pascals).  

If your home is very tightly sealed, it would be able to maintain a pressure differential like this for some time.  However, this is very rare.  Most homes are not tightly sealed, so air will flow from the area of higher pressure to the the area of lower pressure (in this case, from outside to inside).  Air pressure, like water and other sources of energy, tend to flow from high to low pressure: this is the second law of thermodynamics, which is explained well here

Air pressure differential has been used to control air movement for a long time.  Negative pressure has been a principle in design of multi-family homes and apartment buildings in order to get fresh air to ventilate the building.  In this case, constant negative air pressure inside the building is needed to continually draw fresh air in from the outside through passive vents or windows.  To generate negative air pressure, architects place exhaust vents in strategic places, like bathrooms and kitchens, where it’s desirable to draw out humid, odorous air anyway, and feed them into ventilation shafts.  This part of the design is not the problem, however; the problem is that the apartments or homes are not tightly sealed, so that replacement air (flowing into the negative pressure space) does not always come from dedicated passive vents or open windows.  If it’s too cold or too hot and windows are closed, air may be drawn in from the neighbor’s (smoky) apartment, or through leaks on the side of the building beside a busy street, or through the corridor and door leading from the parking garage.  

The only way to get negative pressure ventilation to work in a controlled way is to (very) tightly seal the home. During a research project for for the Building America program under the National Renewable Energy Laboratory, Steven Winter Associates sealed several apartments manually (using weatherstripping, caulk, etc.–see below “apartment sealed to 0.27 CM50/SF”), and UC Davis sealed several other apartments using an aerosol sealing technology (see below “apartment sealed to 0.08 CM50/SF”).  This is where a fog of sealant is applied while pressurizing the apartment, so that air flowing out of the apartment carries the sealant and “plugs” any leaks along the way.  Of course, this method can only be applied before the apartment is finished, however, the “tightness” of the building envelope achieved by this technology is dramatic, as shown in the graphs of the ventilation tests. 

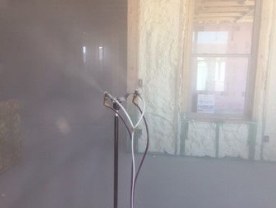
Photo of aerosol sealing during installation (energy.gov)

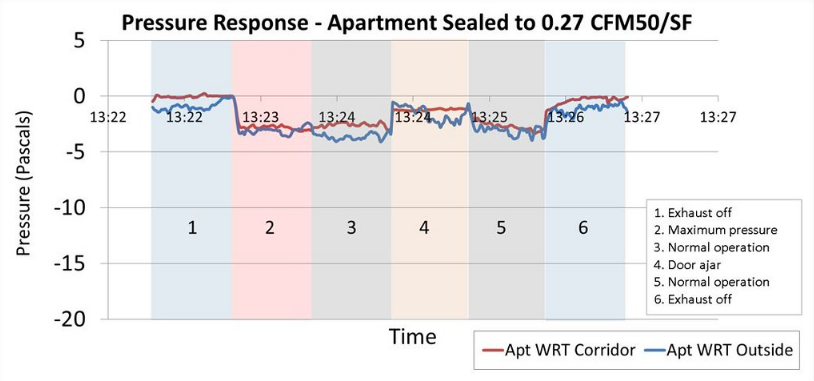
It can be inferred from the graphs that getting sufficient fresh air from dedicated vents is only possible when the apartment or home is tightly sealed–otherwise air is just as likely to come from undesirably-located leaks and other apartments.  Sealing a home to 0.1 CM50/SF or less, as in the second graph, is uncommon even in the best “green” buildings.  Therefore, relying solely on negative pressure ventilation is not an effective strategy–especially if you’re interested in good indoor air quality while looking at buying an existing home.  

Let’s switch over to positive pressure ventilation.  This strategy is used in “clean rooms”, CPAP machines (continuous positive airway pressure), and wherever you want to supplement a space with fresh air in a controlled way, not just allowing outside air to flow in by chance.  The air supplied will come from the outside, but in order to make sure it’s clean and at the right temperature and humidity, it will need to be filtered and “conditioned” if necessary, by the HVAC system.  As an example, the AirCycler g1 (www.aircycler.com) comes with a programmable damper system.  It will open the fresh air intake damper as required and run the air handler fan on a user-specified schedule (typically, for 10 minutes every ½ hour to 1 hour).  This works fine in normal homes, which are leaky enough that the house is not really pressurized to any great extent- air will just flow out of the available cracks and crevices of the home.

Third, with modern technology, we can even get ventilation with no pressure differential, which is called a “balanced” system.  The simplest concept is to utilize a system such as the Aircycler g2 and your bathroom exhaust fan.  The g2 will tell the bathroom exhaust fan to turn on at the same time it opens and turns on the air handler unit, causing your HVAC unit to pull fresh air in through a damper, filter and condition it, distribute it throughout your home, and exhaust stale air through the bathroom exhaust vent.  In this manner, there is no appreciable pressure differential, just 2 fans working to add fresh air and exhaust stale air from your home on a predetermined schedule/volume.

For a practical demonstration of the differences among these 3 systems and how to measure air flow, I suggest this video

The next “upgrade” to the balanced system is using an HRV or ERV (heat recovery ventilator or energy recovery ventilator), which works with your HVAC to reduce energy costs of pulling in that fresh but unconditioned air.  When there is a large temperature or humidity differential between the outdoors and indoors, simply dumping outside air into your HVAC inlet causes it to use a lot of energy to bring that air up or down in temperature and humidity.  A heat recovery ventilator will use the temperature of the exhaust air to close the gap in temperature, and an energy recovery ventilator will use the temperature and humidity of the exhaust air to close the gap in temperature and humidity.  UltimateAir, AprilAire, Panasonic, Broan, Honeywell and FanTech are some of the manufacturers of whole-house ERV’s, which have a larger up-front cost than negative, positive, or balanced systems alone, but have payback periods of 3 years or less when you factor in the energy cost savings.  

There is one more consideration when deciding on what type of ventilation to pursue: condensation.  Both negative and positive air pressure will cause condensation in undesirable places if there is an extreme difference in air temperature between inside and outside.  This is most notable in the following situations: 

  • With negatively-pressured rooms in the summer, unintended leaks can draw in humid air and cause condensation and mold problems.  This happened on Texas A&M campus in several buildings due to poor design or building change orders during construction (study)
  • With positively-pressured homes in the winter, at some point in the air passageway to the outside, the warm moist air from inside encounters a cold surface and condensation and mold can form (ecohome.net).

Here are some pros and cons to these different systems:

Type of System

What it is

Pros

Cons

Negative Pressure

Uses bathroom or kitchen exhaust fan to create negative pressure inside house and pull fresh air in through passive vents or leaks

  • Least expensive
  • Can be controlled via timer
  • In normal homes leaks cause “fresh” air to come through random and undesirable places
  • Fresh Air flow is not evenly distributed in home
  • Can cause condensation and mold deep in structure when temperature and humidity differentials occur (usually in the summer)

Positive Pressure

Uses a damper to pass fresh air into the HVAC intake for distribution in the house

  • Keeps humid air out of the house in humid climates
  • Uses a large fan (air handler) to move and condition a small amount of air, when the system is not actively heating or cooling
  • Loss of heated or cool air when venting
  • Can cause condensation and mold deep in structure when extreme temp differentials occur (usually in the winter)

Balanced

ventilation

Combination of intake damper and bathroom exhaust fan

  • Utilizes systems that are already present in home, with addition of damper and scheduling electronics
  • Evenly distributes fresh air in home
  • Uses a large fan (air handler) to move and condition a small amount of air, when the system is not actively heating or cooling
  • Loss of heated or cool air when venting

Balanced ventilation with HRV or ERV

Two fans (one for intake and one for exhaust) combined with a heat exchanger to recover energy from vented air

  • Value of vented, conditioned air is not wasted because some energy is recovered
  • Does not actively pull in air through leaks
  • Evenly distributes fresh air in home
  • Most costly upfront but realizes energy savings for a 1-3 year payback


There you have it–the 3-½ ways of ventilating your home!  If you want to measure the pressure in your home or a home you are thinking of purchasing, manometers are used to measure air pressure and other gas pressures.  It’s possible to make a simple manometer with some plastic tubing, colored water and a few other supplies, but if you want to measure the pressure of a room, you’ll probably want to use a digital manometer.  This is because very slight air pressure differentials are generated for ventilation purposes within homes, and it would be hard to distinguish them with the homemade manometer.  For example, only 20 Paschals of negative pressure, or 0.08 inches of water, should cause the required 7.5 CFM of air to flow through a trickle vent for dilution ventilation, but this would be difficult to measure on a homemade manometer.  Digital manometers are best suited for this purpose, and ventilation supply companies sell them, or you can rent them in select states from some companies (such as JMTest).

In order to measure the pressure of a room (for example, a negative pressure room like a bathroom) with reference to another room (the hallway outside) with a digital manometer, you will need to: 

  • Turn on the manometer and make sure it reads zero differential pressure.  If not, use the owner’s manual to “zero” the instrument.
  • Prepare the manometer tubing–make sure it has no kinks in it.  Connect the tubing to the negative port. 
  • Turn off the exhaust fan of the bathroom.
  • Close all the doors and windows to the room you are measuring.  You will be standing outside in the hallway, which is the “with reference to” room. 
  • The positive port will remain open/unconnected to any tubing.
  • Place the other end of the tubing under the door of the bathroom and allow pressure to stabilize, then record reading.  There should be very little to zero pressure differential. 
  • Open the door and turn on the exhaust fan, then close the door again (remain outside).
  • After a few minutes of running the exhaust fan, take a reading and record it.  This should be a reading similar to ‘0.2” w.c.’ which is a slight pressure differential in inches of water column, a standard unit of measurement for ventilation pressures in the US.
For more details and helpful hints on using a manometer, check out this article on contractingbusiness.com.  Soon to come, we will have a guide on how to check ventilation and air quality in your home or any home you may potentially purchase.  It’s a new mindset, but we want you to change from location, location, location to ventilation, ventilation, ventilation! 

Photo by Mufid Majnun on Unsplash

Do Trickle Vents Really Work?

Do Trickle Vents Really Work?

In our post “How does indoor air pressure affect Ventilation and Air Quality?” we discussed the pros and cons of negative, positive, balanced and balanced with HRV/ERV ventilation. We really do think that balanced ventilation is the way to go, but not everyone is convinced.  In the UK and Europe, negative pressure ventilation is common through the combined use of trickle vents and kitchen and bath exhaust fans.  Trickle vents are offered on new window frames and there are options for retrofitting them into existing frames.  

It may sound like a drippy register, but “trickle vents” are designed to provide “background ventilation” and remove condensation from a house. They supposedly have several advantages:

  • You can ventilate your home during most types of weather, no matter if it’s rainy or not.  The design of most trickle vents does not allow water to be forced in even during windy rainstorms.

  • You can ventilate your home more safely than opening the window.  Homes and apartments with first-floor access have considerably more risk of break-ins than higher stories, so opening windows, even with nightlatches, is often a safety risk.  Trickle vents allow safe ventilation, whether you’re at home or away.

  • You can control the ventilation with adjustable trickle vents.  Too much draft on a cold day is not nice, so you can open the vent partially or close it altogether on some windows.

  • Trickle vents supposedly provide minimal ventilation where homes are built tightly and windows are rarely opened.  This allows toxic chemicals that build up from off-gassing and normal daily activities like cooking and cleaning, to be diluted and vented.

  • Trickle vent options include ones that automatically open at preset humidity or temperature levels.

Of course, there are cons to trickle vents.  Complaints most often center on noise and wind.  If the home is located on a busy street which has a lot of car and truck traffic, or is in a windy area, trickle vents break the insulative qualities of the window to let in traffic and wind noise.  Some designs are better than others at attenuating noise, so design of the vent is important to consider when installing new windows. 

Now, do they work?  Since they were mandated in the UK for some time (2006-2021 from what I’ve read), it seems to me that they were proven to do the job, but in reality, they probably were not.  According to a research project funded by the National Renewable Energy Laboratory as part of the Building America program (here is a summary by one of the authors), fresh-air ventilation like trickle vents usually does not work the way it is intended.  In order for it to do so, the home must be sealed very tightly except for the vent, and rooms must be in constant negative pressure.  In most cases (which are normal or poorly sealed homes) cracks around the main entrance door overwhelmed the amount of ventilation coming through dedicated vents like trickle vents.  Ventilation in multi-family homes in particular is unpredictable, because pressure in the corridors and apartments fluctuate depending on weather, wind, and occupation of the buildings.  The end result is that the theory of exhaust-only ventilation was not working in real life.  According to the theory, “consistent negative pressures of up to 20 Pa are needed to draw air from the vents at the rates desired”.  No wonder there are so many moisture, mold and air quality problems in modern homes!  The air exchange is not working as exhaust-only ventilation plans have been designed.

In the end, the author of the aforementioned research project still advocated for tighter buildings and controlled ventilation via balanced ventilation and energy recovery units and whole-home dehumidifiers (if necessary).  These do have higher up-front costs, but they deliver consistently healthier air, and the paybacks are short (under 5 years).  

Obviously, if I lived in the UK and was required to have trickle vents in windows, I might not be inclined to “do the research” because they seem to be a reasonable source of ventilation.  Living in 2022, even better ways of getting fresh-air ventilation are constantly being designed and with many sources of information at our fingertips, we can choose more wisely.

Photo by JamesKingdom on Wikimedia

Why selecting and sizing your HVAC system is critical for healthy air (and what to do when it’s not sized or balanced correctly)

Why selecting and sizing your HVAC system is critical for healthy air (and what to do when it’s not sized or balanced correctly)

A home’s HVAC system may seem like a commodity when building a new home, but it’s one of the most important selections you can make for your health.  When purchasing an existing home, it becomes apparent very quickly if the HVAC system “fits” the needs of the home!  An HVAC system needs to be (health effects are prioritized first!):

  • Sized correctly:  This means that the main equipment (compressor, evaporator and air handler) are not too large or too small for the cooling and heating needs of the home.  Having excess capacity in an HVAC system is just as bad, or worse, than having equipment that is undersized, because the units may cool, but not adequately dehumidify the space.  HVAC contractors should be able to calculate the thermal needs of your home in order to specify this equipment.
  • Balanced correctly:  Even if you are living in a large studio apartment, there can be hot or cool spots if the system is not balanced well.  This means that ducts take into account the distance and routing from the unit, and some dampers may be needed in order to direct the air flow more evenly.  In addition, more twists and turns in the ducts cause pressure drop, restricting air flow.  
  • Ventilated correctly:  Although this is not a requirement in the lists of Forbes and Consumer Reports, we at HypoAir argue that fresh air ventilation needs to be incorporated into any new or older system for healthy air quality.  Period.
  • Be efficient: Electric costs are increasing, just like costs for everything else.  With new inverter technology, it’s possible to get the same cooling and heating capacity at less cost. 
  • Maintained easily:  Will your system require custom filters that are hard to find (especially in this age of shortages) and does the installation company also offer maintenance plans?  
  • Not be the center of attention:  I’m talking about noise!  With older units, you can sometimes hear a distinguishable knock when the compressor kicks on. Maybe the “whistle” of air through vents is distracting for our ever-increasing home time. 

If you are building a home from the ground up, these are reasonable requirements for any HVAC contractor to fulfill.  You can see a range of HVAC solutions here.  What’s more difficult is transforming an older system into a healthy system!  Here are some ways to do just that, sourced from our own customers’ problems.

  • I live in a hot, humid area, and have a 2-story house that stays too hot upstairs.  In this case, pulling in humid air from the outdoors is not an option. What can I do?  

We found a really helpful video that explained it well:  how to get the right temperatures in the right parts of the house!  https://www.youtube.com/watch?v=ufLOd4eIjsc  Basically this is a problem when you have 1 zone cooling/heating.  The part of the home where the thermostat is installed (usually downstairs, if that is where the main living space is) gets cooled to the correct temperature, but since the upstairs shares the same thermostat and heat rises, it ends up being 5 degrees or more warmer.  Here’s what you can do while keeping the existing equipment: 

  1. Insulate the attic really well, if this has not already been done.  In existing homes, blown-in insulation is an easy way to increase the insulation.
  2. Check for other leaks in your building envelope, such as windows, doors and other penetrations on exterior walls.
  3. Have an HVAC technician install a manual damper (or series of dampers) in the duct to adjust airflow.  This will route more cold air to the “zone” that is warmer, and in general is better than shutting off registers manually, which can cause too much static pressure for the air handler.   
  4. To get more fresh air into the house, we advise adding an Energy Recovery Ventilator (ERV).  See our post on Adding fresh air through the HVAC system.

If you have the option to replace equipment, variable-speed equipment can give you the opportunity to add a second zone while providing for better cooling and constant dehumidification, as well as energy savings (inverter technology uses variable speed compressors).

  • I live in the southwest, where it can get scorching hot during the daytime and cool(er) at night. How can I reduce my electricity bill?  

Whole-house fans are useful to cool down the house at night, but if you don’t have one, you can still use the principle of “stack ventilation”, or the way heat rises through your home, to your advantage.  If you have a basement, use it as the “ground floor” of your stack–that is where the coolest air is.  Close all exterior windows and doors except for a window in the top floor, and place a box fan in it facing out.  This will be the “exhaust”.  Next go down to the basement, and open a window or door–this is the “intake”.  Open interior doors between these two windows so that air can flow upward through the house.  Even if the air outside is warmer than the basement, it will be cooler by the time it exits the basement and makes its way through the house.  You can also turn on ceiling fans near stairwells to help move air.

Here are some other ideas for extremely warm climates (some from SFGate.com)

  • If your basement does not have a cold air return vent, you can have one installed. This will enable your central AC to suck cool air from the basement and circulate it throughout your home.  If your basement smells musty, you’ll want to dehumidify and tackle mold issues first.  Similarly, make sure that you don’t have high radon levels coming in through the basement, so that you’re not circulating unhealthy air.
  • If your community water laws allow it, plant bushes and bushy trees around your home (but not too close to the foundation) to provide insulation all year round.
  • Install heat reflecting film on south and/or west-facing windows (check out our post on Low-E window films).
  • Make sure your attic has working ventilation.  Heat that is trapped in the attic is like wearing a wool hat in the summer–your body heat cannot be expelled through it!  It puts a strain on your HVAC system.  Ventilation can be accomplished via a passive soffit and ridge-vent system (outside air floats up through the soffit vents and pulls hot air from the attic through the ridge vent), or an active roof vent (a fan pulls out air through the roof) or through gable vents (active with a fan or passive).    
  • Lighten up the exterior:  There are a lot of white paints on the market, even ones that claim to reject more heat than others (like InsulAdd and Rainguard Cool Coat), but according to a cnet test, they perform similarly to plain white paint, which stays close to ambient temperature.  On the other hand, a brown stucco can be 25 degrees warmer than white paint, so although dark and black exteriors are trendy right now, you will pay for them if the summer heats up!    A new paint developed at Purdue University reflects 98% of sunlight (average white paint reflects 80-90%), cooling down buildings by 19 deg F (at night).  This means that the paint and building lose more heat than they absorb!  Traditional white paints are made with titanium dioxide, which heats up by absorbing UV rays of the sun.  The new paint uses barium sulfate and reflects the heat out of the earth’s atmosphere, to deep space. (Greekreporter.com)

Photo by Moja Msanii on Unsplash

Adding fresh-air ventilation through your HVAC system

Adding fresh-air ventilation through your HVAC system

How can you get that "fresh air" feeling in your home if bringing in outside air means bringing in the cold or humidity?

In order to improve IAQ, the EPA recommends that homes receive “0.35 air changes per hour but not less than 15 cubic feet of air per minute (cfm) per person.”  These air changes can occur through natural ventilation such as open doors or windows, infiltration such as cracks and joints around doors and windows, or mechanical means such as fresh air intake of HVAC units.  This third option is what we’re aiming at in this post: consider this option like the “fresh air” vs. “recirc” buttons on your car’s climate control.  

“Dilution Ventilation” is critical for improving IAQ because it adds fresh air to the soup we are breathing when staying indoors.  Doing it through the HVAC system is best because on those days when it’s too muggy or too cold to open the windows, your IAQ should not suffer.  

  • The simplest way of bringing in fresh air through the HVAC involves a motorized damper and controller.  When the damper is open, it delivers fresh air from the outside to the “return” side of the furnace so that the incoming air can be properly filtered and conditioned before being distributed with the recirculated air.  Here are several makes of simple damper/control systems: AirCycler and Honeywell.  These do not exhaust air outside, however, so they result in a net positive pressure in your home as compared to outside. 

  • When the fresh air coming in is very cold, warm or humid compared to the air inside your home, it’s most efficient to use the air that’s already in your home to change the temperature and humidity of the fresh air.  An Energy Recovery Ventilator (ERV) is a heat exchange system to: 1) exhaust stale air from your home and 2) bring in and exchange energy with fresh air from outside.  By doing a volume and energy exchange, you are getting net neutral air pressure in your home and less lost energy by using the stale air to heat or cool and dehumidify the fresh air.   Here are several options to:

    • Exchange heat and humidity in equal volumes with each other.  It only requires energy for the fan and controls.

    • Bring in fresh air and heat or cool it with a heat pump.  This requires a little more energy but for small spaces, can even be the sole heat/cooling source.

    • Bring in fresh air and dehumidify it with a dehumidifier.  This is best for hotter, more humid climates where cooling and dehumidification is needed more often than heating.

If you don’t know how or when to “let the fresh air in”, let your HVAC system do it for you!

Which air purifier should I choose for my home? Part 2: Air Cleaning

Which air purifier should I choose for my home?  Part 2: Air Cleaning

If you read the post on Part 1: Airflow, you can see that unless you live in a studio apartment with one Big Ass Fan (not joking, they really do exist!) to get airflow moving, it’s sometimes difficult to get good dilution ventilation.  Many homes are broken up into little boxes that aren’t planned well for air circulation.  Without that mixing action going on, the air quality is not going to be homogenous and a single purifier will not be able to effectively clean the air in corners and behind closed or even partially closed doors. 

HypoAir purifiers do not have large fans to pull air through them; they have a single small fan that distributes polarized ions and catalytic molecules into the air.  Therefore, they rely heavily on the airflow already established in the space.  Better airflow = better purification.  We make specific recommendations based on a review of the layout of your home and specific needs.  Let’s hit one more topic of Specific Needs before making the recommendation. 

The Air Angel, Germ Defender and Whole-Home Polar Ionizer have overlapping technologies, each of which are suited to different air contaminants.  

  • All three have Polar Ionization, which is great against bacteria, viruses, mold, and particulate control (pet dander, pollen, smoke particles from wildfires, dust, etc.).  
  • The Air Angel has the added benefit of an AHPCO cell with UV light, which make it a better choice in areas with VOCs/smells like the kitchen, cat litter box or pet bed area, areas around new furniture, and also bedrooms for easier breathing at night. 
  • We suggest adding a “removal” unit like HEPA filter to your arsenal as these three HypoAir units do not include HEPA filters. 

If you would like to protect your whole home and have central HVAC, then the Whole-Home Polar Ionizer delivers the best value for protection.  There are no filters to change, and is designed to run continuously with the AC fan set to “on”.   Everywhere that HVAC is delivered, polar ions will flow with the air to deactivate pollutants and germs.  One unit will be required for each air handler in your home; for example if you have two air handlers for different zones, you would need two Whole-Home Polar Ionizer units. 

Consider strategic placement of Germ Defenders and Air Angels if the following applies:

  • You don’t have central AC, or
  • Your central AC does not cover the whole home, or
  • You have a smaller budget
We highly recommend a Germ Defender in bathrooms (it’s so easy to plug in and forget about it) because it helps to keep mold at bay.  I have personal experience with this: in the spring of 2020 my shower faucet began to leak and the constant dripping caused mold to spread in the shower within days.  Until I could get the valve fixed, moving a Germ Defender into my bathroom stopped the mold growth.  Another great space for the Germ Defender is a front entryway or hallway, where bigger purifiers would be a tripping hazard or seem unsightly.  Neutralize germs at the front door!


Air Angels are great for bedrooms and any space up to 300 ft2, and they have three fan settings to adjust the airflow/noise to your liking.  When possible, the fan should be kept on the highest setting to afford maximum distribution of polar ions in the space.  This unit is more portable because of the cord and horizontal mounting surface.  You can move one from your main living space to a bedroom in the evening, if necessary,  for better sleeping.  

Both Germ Defenders and Air Angels are made for zone purification like medium to small rooms and spaces.  When your home is more than one story, staircases are an added complexity.  In general, we recommend placing one purifier at the top of the stairway rather than the bottom, as air tends to move down and will carry the polar ions with it. 

As mentioned earlier, we recommend a separate HEPA filter to pick up deactivated toxins from the air.  If you are using your homes HVAC with the Whole-Home Polar Ionizer, then make sure the AC filter is a HEPA one.  Otherwise we have some great picks for standalone HEPA filters.  If the square footage given is slightly smaller than your space, don’t count the HEPA filter out; rather, just be aware that it will take a little longer than designed to purify all the air in the space.  

  • The BlueAir Pure Fan Auto, $240, has a large Clean Air Delivery Rate and cleaned a 702 ft3 room (about the size of an 8’x9’x8’ tall room) full of incense smoke in only 27 minutes!  (see the test results here).  It has washable pre-filters that come in different colors.

  • The CoWay AirMega Mighty, $230, has been highly rated for a number of years by the NY Times Wirecutter review for dusty rooms up to 250 square feet.  Their testing has used the same filter for up to a year with good performance (however of course you’ll want to have new filters on hand just in case you are caught in an exceptionally-poor air quality day). 

  • Lenoit has several models that fit comfortably into bedrooms and small to medium size living spaces. This one can purify spaces up to 129 ft2 in as little as 15 minutes.  
  • For DIY’ers / very low budget:  check out this DIY Box fan air cleaner which at the highest setting, can clean over 1600ft2 every 15 minutes (assuming you have 8 foot ceilings).  Since it only has HEPA, there is no carbon filtration of smells or VOCs, but 4 HEPA filters in one unit are certainly going to impact your life in terms of better air quality!