Tag Archives for " mildew "

The purifying power of sunlight

The purifying power of sunlight

“Letting the sunshine in” has several purifying benefits–and sunshine is free!  Ultraviolet (UV) radiation has a higher frequency than visible light (you can’t see it), but it kills microbes.  UV radiation has three wavelength zones: UV-A, UV-B, and UV-C, and it is this last region, the shortwave UV-C, that has germicidal properties for disinfection.  the optimum range for UV energy absorption by nucleic acids is about 240-280 nanometers (nm); at this wavelength the UV breaks bonds in the nucleic acids of microorganisms, killing them.  Artificial UV lamps for germicidal use tend to emit energy around the middle of this range, at 260 nm.  (UV Disinfection)  If you want to know more about the sanitizing power of UV light, check out our first article here.  Here are some ways to put it to good use:

Purify water with sunlight (salt and lime juice optional):  UV radiation is sometimes used in municipal water purification systems (more often in Europe).  It doesn’t affect the taste or smell of the water (unlike chlorine), so this is an advantage over that chemical.  However, turbidity of the water (amount of particles present) will decrease the effectiveness of UV radiation, so it should be pre-filtered first.  Here’s where the salt comes in:  if you have a plastic or glass bottle of water that is slightly turbid, add a pinch of salt, which will help the particles settle to the bottom of the container, allowing the UV radiation to penetrate farther into the bottle.   Leave it out in the sun for 6 hours, and the microbes will be dead!  If you want to speed up the process, add some lime juice.  Lime juice cuts down the amount of time necessary to disinfect a two liter bottle of water from six hours to just half an hour!  Limes contain chemical compounds called psoralens, which have been shown to kill pathogens in blood and, now, also in water.  (To Disinfect Water Cheaply, Just Add Sunlight (and Salt or Lime Juice))  Psoralens are also used together with UV light to treat psoriasis, vitiligo, and skin nodules of cutaneous T-cell lymphoma. (National Cancer Institute Dictionary)  Many fruits and vegetables like parsnips, carrots and celery are high in psoralens too, so they would work, but the juice of a lime is probably the most tasty. Of course, the sunlight doesn’t remove pathogens, so if you have the opportunity, you can run the disinfected water through a post-filter. 

Sanitize sheets, bedding and any upholstered item by laying them out in the sun and flipping over after 1-2 hours to expose the reverse side.  UV light kills dust mites and mold!  The key is cleaning off any dirt first (ie, wash anything that can be washed first), and making sure that it dries COMPLETELY in the sun.  Therefore, obviously sheets, quilts and comforters can go in the washer, but bulky items like rugs, mattresses and upholstered chairs should get a vacuuming and surface cleaning using a non-toxic fabric cleaner.  Be aware that sunlight can fade colors, so avoid leaving colorful or fragile items out for more than several hours in direct sunlight. 

“Bleach” plastic containers by leaving them in the sun:  UV light can also take stains out of plastic.  Spaghetti sauce stains be gone!  (Things You Can Clean With Sunlight)

Mildewed things:  Once again, surface cleaning is the important first step in order to get wooden furniture, books, leather, and anything else looking and smelling better.  Then, let the sun do its work!  

You don’t have to tell me (I can see/feel the humidity!)

You don’t have to tell me (I can see/feel the humidity!)

Although we like to measure to be sure and humidity sensors are easy, cheap ways to verify, there are signs all around us when the humidity is too high.   

Here are a few examples with the explanation why: 

  • That musty smell, of course:  Unfortunately, that smell is the telltale sign of mold, and is actually the microbial Volatile Organic Compounds (mVOCs) that molds produce.  To find out more about mVOCs, check out our detailed article

  • Doors and wooden windows that “stick” in their frames: Wood absorbs water from the air, causing it to swell, so closely-fitted wooden furniture like doors, window frames and even cabinets and drawers can “stick”.  When the interior and exterior “weather” dries out, they can work just fine again!

  • Condensation on the inside of windows:  To understand why condensation happens, it’s best to start at the concept of dew points.  You can read more about it in our article here, but the basic concept is that every temperature and pressure of air can hold a certain amount of water vapor.  Warmer air holds more water vapor than colder air.  When warm air hits a cold surface, the water vapor will condense or “drop out” of the air onto the surface–just like a glass of iced tea sweats on a warm day.  The occurrence of windows sweating on the inside will happen when warm, humid air hits a cold window frame (this happens most often with aluminum windows), and if it persists, can be a habitat for mold.

  • Salt or seasonings that clump and stick together:  This may not happen as much nowadays with the proliferation of “preservatives” used in our foods.  However back in 1911 (before air conditioning was widespread), table salt tended to cake in the container when it was rainy or muggy, because salt is hygroscopic.  This means that it has a tendency to absorb moisture, even from the air, and clump together.   Morton started to advertise using the slogan “When it rains, it pours” because they added magnesium carbonate (an anti-caking agent) to their salt, which allowed it to pour freely even in humid weather. (Today, the company uses calcium silicate.) (What’s The Weather Lore Behind The Morton Salt Slogan?)  Here’s a tip: if you are having a bit of a humid spell in your home, or even going camping, you can add a pinch of rice to the salt shaker to get it flowing.  Just like immersing a wet cell phone in a bag of rice, the rice will absorb the moisture out of the salt and allow it to flow through the holes of the shaker again.

  • Household electronics having issues--especially battery ones:  Electronics and water rarely go together, and they can get finicky when the humidity starts to creep up. Battery-operated appliances have contacts that can easily corrode.  If that happens, of course try to dry out the air, and you can use fine sandpaper on the contacts to remove corrosion.

  • Proliferation of insects and pests: Pests like fleas, ants and cockroaches love high humidity: it’s the perfect environment for them to lay eggs and develop into adults. Warm temperatures combined with high humidity is ideal for fleas, and they can rapidly multiply in these conditions. (Do Fleas Thrive in the Rain?)

  • Mildew on wooden furniture: If you have wooden furniture on a humid porch, you may have already figured out that it needs regular wipedowns and maintenance to keep it from growing “fur”!  The same thing can happen inside when it becomes too humid, because the surface of wood is very hospitable to catching dust that can feed mold.  

If you notice any of these signs, it’s time to take action before mold sets in!  The first thing we can recommend is air circulation and ventilation (outside weather permitting), which can change the indoor climate from room to room.  Air conditioners are not automatically “dehumidifiers”, so if your air conditioner does not have a dehumidification mode, you may need to add a standalone dehumidifier.  Sealing the boundaries of the home is really important to prevent intrusion of exterior humidity.  Finally, our Germ Defender, Upgraded Air Angel Mobile and Whole Home Polar Ionizer can help by sending out millions of ions to kill mold spores in the air and on surfaces. The takeaway is that after a while, you can learn to read the signs of high humidity without even glancing at an air quality monitor, and make adjustments accordingly!

Getting the Basement Dried Out

Getting the Basement Dried Out

In our post on how the basement affects our whole home’s air quality, we discussed how mold and mildew form and are sustained in the basement.  Active water leaks (flowing down the walls and pooled on the floor) are not required to make the basement a musty place.  Here are some sources of moisture coming into the basement:

  • Concrete is not a moisture barrier on its own!  Water will permeate concrete walls and floors and simply evaporate, increasing humidity.  
  • Open or broken windows allow moist air from the outside to come in and upon encountering cool walls and surfaces in the basement, condensation will form or just increase relative humidity in the air.  
  • Air leaks around windows, entry doors, unsealed wall penetrations and penetrations into the first floor above allow air to come in, in an uncontrolled way. 

Ideally the basement is inside your building envelope, whether you decide to finish it or not.  This is because it can be a suitable place for mechanical systems like HVAC air handlers and furnaces, hot water heaters, and also for storage.  To house these systems, however, the basement needs to be dry, with good air quality.  We argue that the basement air quality needs to be as good as any other floor in the home, because it will mingle with the atmosphere of the rest of your home!  There will be small leaks in the basement ceiling that make it permeable to the rest of your home.

The way to control humidity is to control:

  • Water flow into the space,
  • Airflow into the space, and
  • Air circulation within the space.

Let’s tackle each problem individually.

Water flow into the basement

Water flowing down walls in streams and puddling on the floor is a major problem– in this case, it is like living above a lake!  It will be difficult to “dehumidify” the air when open water is present, because the water will be continually vaporizing into the air as fast as a dehumidifier can take it out.  Although many basements exist like this, walls and storage of home goods in such environments can accumulate mildew rapidly.  Painting on a “waterproofing coating” will usually just act as a band-aid, because the pressure behind the wall, forcing it into your basement (called hydrostatic pressure) will eventually break through the paint and even degrade the foundation if it’s not drained away properly using interior and/or exterior drains. (basement waterproofing)  It’s best to contract several reputable basement remediation contractors in order to get their recommendations and quotes on stopping the inflow of water.  

If the water is only causing dampness on the walls but not visible condensation, then it’s possible to allow the walls to continually “dry” to the inside by doing the following:

  • Cracks and damage to the walls need to be repaired first.
  • Install rigid foam board with a “perm” rating of 1 or greater.  This allows the moisture to move through the foam and dry out, but still insulate the basement for greater thermal comfort and avoid condensation on the cold wall. Keep the foam insulation up about an inch from the floor to allow any condensation to drain.  If desired, the walls can be framed with treated wood to hang drywall inside.  An excellent cutaway diagram of the installation can be found here (page 24). Below is a picture of rigid foam board insulation from the same document (page 32).
  • An alternative to applying rigid foam board is to paint concrete walls with a waterproofer such as UGL’s Extreme Latex Masonry Waterproofer.  This product has a perm rating of less than 1 (according to this manufacturer’s video), so it is vapor semi-impermeable, but it does not have any insulating properties, like the foam board, so the walls will still be cold to the touch and allow condensation if the air inside is too warm and humid.  
  • Use dehumidification to dry things out.  
  • Decrease relative humidity by increasing the temperature slightly (the dehumidifier may raise the temperature a few degrees, but if not, you can add a small heater).
  • Increase circulation with fans so that air is evenly dehumidified.

Some notes on Vapor Permeability: A material’s permeability is measured in units called perms, which assess how much moisture can pass through a barrier in a 24-hour period according to standardized industry tests. Materials are separated into four general classes based on their permeance:

  • Vapor impermeable: 0.1 perms or less

  • Vapor semi-impermeable: 1.0 perms or less and greater than 0.1 perm

  • Vapor semi-permeable: 10 perms or less and greater than 1.0 perm

  • Vapor permeable: greater than 10 perms

Materials with lower perm ratings are better at stopping the movement of water vapor. If the perm rating is low enough, the material is a vapor retarder. If it’s really low, it is a vapor barrier. (Barricade Building Products)


Air flow into the basement

Sometimes it’s difficult to know what to do: open the windows or not?  Many reputable websites advocate “airing out the basement” (such as thisoldhouse.com), and we at HypoAir always advocate for ventilation to dilute stale air, but here’s the problem: when you don’t know the dewpoint of the air coming in or leaking in, it can cause major mold problems in the basement!  Dewpoint is the controlling factor of whether fresh-air ventilation alone can prevent mold.  As we wrote in another post

The best way to explain this (per this great article) is to find out the dewpoints of the indoor and outdoor conditions.  If the outdoor dewpoint is lower, you can ventilate with fresh air and still dry out your house!  For example on July 26, 2002, here are the conditions inside and outside my house (a relatively “dry” hot day outside!):

Inside: 76 deg F, 67% humidity = 63 deg F dewpoint (check out this easy calculator on dpcalc.org)

Outside: 91 deg F, 54% humidity = 72 deg F dewpoint (dpcalc.org)

See, in this case even though the relative humidity outdoors is lower, if I open my windows, that hot air coming inside would be cooled and relative humidity would increase, working against my humidity goals.

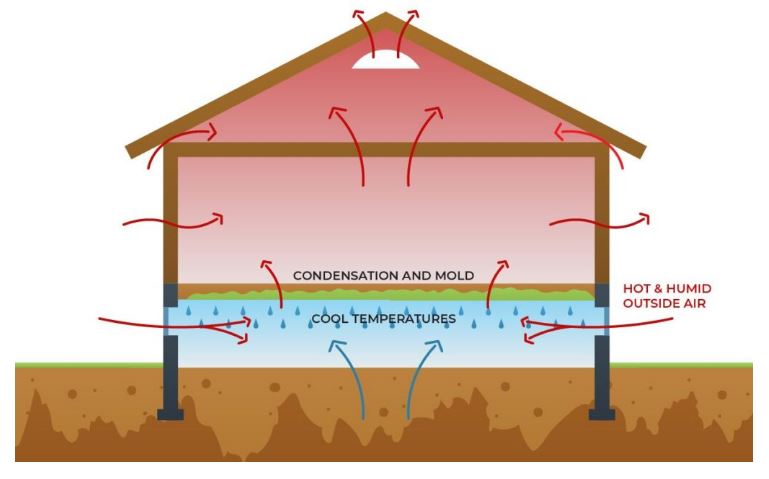
In the case of the basement, the air temperature could easily be lower, like 68 deg F.  If you cool 91 deg air with 54% relative humidity down to 68 degrees, water vapor in the air is going to condense, making your humidity problem worse!   Therefore we want to control all sources of air inflow and only let in drier air for ventilation.  Here is a diagram showing the problem of leaving windows open, and how to solve it:

source: bayareaunderpinning.com

  1. Close windows, block off vents, and seal the window frames with caulk, spray foam or adhesive tape made for the purpose.  Make sure exterior doors have weatherstripping. 

  2. Check for unsealed penetrations in the walls.  If you have to use a flashlight and look behind appliances such as water heaters or furnaces, be prepared with gloves and pest spray to get it done!  The best sealant for wall penetrations in the basement would be sprayfoam, because it conforms to the shape of the hole.  You may want to shove in a wad of steel wool first, because it deters animals from chewing through the foam and re-opening the hole.

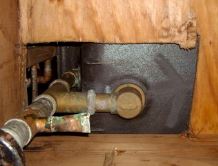
  3. Look up–check the ceiling.  If there is a false ceiling in the basement, you may need to remove ceiling tiles and/or insulation in order to see the underside of the subfloor, but this is where big problems can hide!  The photo below shows the underside of a tub.  Plumbers often cut BIG holes to make their jobs easier, but this can really hurt air quality when these holes let lots of moldy air up (if there’s a negative pressure generated in the space above, this is easily done with a bathroom vent fan), or warm air down (if you are using any type of air extractor in the basement).  It’s best to seal big holes like this one by framing in a box to the surrounding joists, and using spray foam to seal the resulting cracks and holes.  It’s not recommended to insulate the ceiling of the basement (see this definitive guide, page 25) to try to separate it from the rest of the building, as this will only cause more mold problems in the basement.

Source: energyvanguard.com

Where does fresh-air ventilation come from if you’ve sealed outside access off?  According to energyvanguard.com, there are 6 ways to supply fresh air to your home in a humid climate, and for the purpose of a basement that is outside the building envelope, only one makes sense since you’re probably already using a dehumidifier: a fresh air fan that purposely pulls in outside air.  Here are some options to make it happen: 

  • Air King’s QUFresh, 120 cfm, $413 at ecomfort.com
  • Broan’s FreshIn, 180 cfm, $239 at sylvane.com
  • ACInfinity’s AIRTITAN T3 6-In Ventilation Fan, 120 cfm, $69.99, sylvane.com

The AirTitan is a good option where windows are available, because it can be retrofitted to fit in an open window more easily than the other ducted models.  Each of these models have temperature and humidity settings you can adjust so that the fan will only operate when it meets those specifications.  These may need to be set higher in hot and humid climates, but the dehumidifier should be able to handle moderate inflows of fresh air.  When you control the airflow into the basement, you can control the humidity.

And finally, Air Circulation Within the Space

Your basement may be one wide-open area, or several rooms separated by walls and doors, but in each case, good air quality requires that air is moving constantly.  Here are some tips to get the best circulation:

  • Leave doors within the basement open as much as possible
  • Leave dedicated fans running all the time.  Floor fans work great for this purpose, as you can move them around/adjust direction and speeds until you find the optimum circulation.
  • Move boxes and furnishings away from walls and up from floors so that air will circulate to dry them.  Don’t stack boxes to the ceiling.  Separate boxes by several inches to get air moving between them. 
  • Remember, the less absorbent material stored in a non-conditioned space, the better (less cardboard, less fabric, and less wood).

I hope these suggestions help you to dry out your basement so that your whole-house air quality improves, from the ground up!

How to keep MILDEW out of your CLOSET

How to keep MILDEW out of your CLOSET

Closet doors are meant to keep closed, right?  Unless you are Martha Stewart, it’s likely your closet doors don’t stay open very long–if they close to begin with!  The problem comes when humidity and closed doors combine for a stinky problem: mildew and mold.

We sometimes think that mildew is a less toxic form of mold, but it is still mold nonetheless.  Mildew is a subclass of mold that exhibits a white or gray, flat, powdery growth, while the rest of the molds can get more fuzzy and colorful.  Both release spores, but unlike other molds, mildew doesn’t penetrate surfaces and grow into the materials it lands on (though it can still cause cosmetic damage). Instead, it grows on top of flat surfaces and often collects in places like cardboard boxes or your vintage leather jacket in the closet.  Not good!  (What is Mildew, Really? The Difference Between Mold and Mildew)

Since we know that mildew is a form of mold, we know that it needs several things to grow: a food source (ie. leather, clothing, and dust in general), moisture (even excess humidity) and air (although stagnant air is best because lack of circulation keeps humidity at surfaces high).  So, the best ways to keep mildew at bay in closets is to:

  • Clean out the dust and seal off any sources of dust

  • Keep the humidity down and ventilate

  • Store items for longevity and air circulation 

How the heck does dust get in the closet when the door’s closed?

Incredibly, some closets are like dust magnets.  If your closet is part of a tiled or vinyl floor area, dust bunnies can usually slide right under the door due to the slick surface.  If you have any penetrations in the ceiling (like a light bulb), then your closet may be part of a hidden circulation system where the framing in your walls conducts air currents throughout your home.  For example, closets near bathrooms may unknowingly supply air to the bathroom exhaust fan, if the fan’s ductwork is not sealed well in the attic or the lightbulb box is not sealed to the ceiling.  Then there are the closets that double as storage areas and HVAC equipment rooms.  If the HVAC unit is not sealed well, it just pulls air from the surrounding home into your closet.

  1. Seal

The way to keep out the dust is to seal these small air passages: at the ceiling, remove the light fixture and either use a caulk gun (less messy) or a spray foam can with a straw (very messy, be sure to cover everything!)  to seal the electrical box to the drywall.  If the closet is an upper story, you may be able to do it from above in the attic with less mess, and sealing all the ceiling penetrations may help with dust house-wide.  If you notice a lot of dust forming on the floor, it may be worth caulking the baseboards to the floor (if it’s tile or solid-surface) to seal that up as well.

  1. Clean 

Next, removing the dust should be part of a larger goal to store items properly so that cleaning will be easier and mildew will be less likely to form.  You’ll need a HEPA vacuum with brush attachments, and various storage containers.  If possible, empty the closet.  This will allow you to see all the walls and floor to see if there are any water leaks coming in that could be causing the mildew.  If not, use the vacuum to clean ALL the surfaces so you can get a fresh clean start!

It’s a great time to wash clothing and purge any items that you don’t use anymore by donating them.  Clean clothing is less likely to smell and deteriorate from body sweat and dust mites as well.

Stop right there!  If you had mildew in your closet before, you need to make ventilation changes to stop it from recurring.

  1. Ventilate/dehumidify

Mildew sometimes forms in closets because of lack of ventilation.  The great thing about moving air is that it lowers the moisture content of surfaces that come in contact with it.  If the air is not moving, the moisture content of surfaces tends to equalize with the stagnant air, and over time, mold is able to grow.  Also, if your closet is located on the corner or north side of a building, the insulation in the wall may not be sufficient to prevent warm house air from causing condensation on the cold wall.   Here are some tips:

  1. Refill the closet

Ok, you can start restocking the closet but remember this important point: maintain space between items so that air can freely circulate!  Don’t overstuff or compact items against the wall, either.  Wire shelving is great for maintaining circulation from top to bottom, too.

Storage containers matter, too–if possible, don’t use cardboard boxes because cardboard holds moisture, and it’s a favorite food for all kinds of pests: mold, roaches and silverfish like to eat it, and mice like to use it for bedding!  If you’ve cleaned and dried your clothing and excess bedding, packing them in clear storage bins is ideal so that you can easily see what’s in each.  For wool and moth-prone items, you can add cedar blocks to the bin to keep pests out.  These garment bags are great to keep dust off hanging clothes.

After mildew remediation, it’s important to check on your closet at least every few weeks until you’re sure that the changes are producing their intended effect: the ability to close the closet door without mildew taking root!

Photo by Annie Spratt on Unsplash