Monthly Archives: November 2022

What’s the difference between dangerous mold and good fermentation?

What’s the difference between dangerous mold and good fermentation?

Maybe you’ve heard about fermented foods as one of the latest health fads, and are wondering (like I was), what’s the difference between green cheese discovered in the back of the fridge, and “good” stinky cheese, kombucha or sauerkraut?  They all seem to use microbes to change the flavor, so how can we tell the difference?  

Fermented foods are defined as “foods or beverages produced through controlled microbial growth, and the conversion of food components through enzymatic action” (my emphasis, from 2016 study).   The main difference, it turns out, is the intention and methods (control) of allowing food to ferment.   Fermented foods have been around for a loooong time.  When you have foods that are notoriously difficult to preserve (dairy) in a hot climate (the middle east and Africa), fermentation happens naturally and quickly.  As long ago as 10,000 BCE, people figured out how to control the natural bacteria present in cow, sheep, goat and camel milk to produce yogurt.  This is called “thermophilic lactic acid fermentation”. (Living History Farms)  This continued for centuries and in 1910, a Russian bacteriologist, Elie Metchnikoff, attributed the longer average lifespan of Bulgarians (87 years) to increased fermented milk consumption, and a particular strain of bacteria used in their fermented milk products.  Certain strains of “Lactobacillus bulgaricus” were shown to be able to survive and flourish in the human stomach and intestines, making them the first “probiotics” discovered.   Probiotics simply are live bacteria and yeasts that are good for you, especially your digestive system. (webmd.com)  The “cultures” of live bacteria and yeasts in fermented foods make them full of natural probiotics.  However, ancient peoples (through the 1900s) were likely not eating them for their health benefits.  Fermenting was simply a form of food preservation.  Cheese, bread, vinegar and beer are all products of fermentation.  Food can be fermented naturally using the microbes that are present in the food itself, or by adding a “starter culture” that has the desirable microbes included. (2019 paper)

Many studies have been conducted on the health benefits of fermented foods.  Some have been proven, and others are disputed.  For example, compounds known as biologically active peptides, which are produced by the bacteria responsible for fermentation, are also well known for their health benefits. Among these peptides, conjugated linoleic acids (CLA) have a blood pressure lowering effect, exopolysaccharides exhibit prebiotic properties, bacteriocins show anti-microbial effects, sphingolipids have anti-carcinogenic and anti-microbial properties, and bioactive peptides exhibit anti-oxidant, anti-microbial, opioid antagonist, anti-allergenic, and blood pressure lowering effects. (paper investigating the health effects of fermented foods). As a current health hot topic, it’s best for you to do your own research on any fermented food you want to start including in your diet. 

There are many types of fermentation that are culture-specific, having such a strong smell and/or taste that to the uninitiated, may be called “rotten”!  In fact, “one person’s delicious fermentation is another person’s disgusting rot, and according to fermentation guru Sandor Ellix Katz, “Learning a sense of boundaries around what it is appropriate to eat is necessary for survival. But precisely where we lay those boundaries is highly subjective, and largely culturally determined.” (americastestkitchen.com) This is the case for hákarl, an Icelandic delicacy often referred to as “rotten shark”, Surströmming, a Swedish fermented herring product, natto, a slimy fermented Japanese soybean dish, and century eggs, which are fermented for 3 years in some Southeast Asian cultures.  (18 stinky foods around the world).

Okay…we know that heat and microbes will break down food whether or not we initiate it, so just what kinds of “control” can we exert over fermentation?

One key is just as invisible to the naked eye as the microbes themselves: air.  Fermentation is generally an anaerobic process, which occurs in an airless environment. Most desirable bacteria thrive in this oxygen-free environment digesting sugars, starches, and carbohydrates and releasing alcohols, carbon dioxide, and organic acids (which are what preserve the food). Most undesirable bacteria that cause spoilage, rotting, and decay of food can’t survive in this anaerobic environment. (Living History Farms)  Unfortunately, this reference does not point out at least one major exception: Clostridium botulinum, which produces botulism.  In order to keep vegetables from developing undesirable mold, for example, they are “weighed down” under the fermenting liquid so the food does not contact the air. 

According to Paul Adams, a researcher for America’s Test Kitchen,  we have a few other tools to keep the fermented product safer and less smelly:  salt, temperature and acidity.  For example, allowing cucumbers to sit in room temperature water will usually produce a scummy pink slime in short order, but changing the water for brine (saltwater) will produce some nice tangy pickles.  Brewing beer has its best results when controlling the temperature, so brewers have developed methods to decrease or increase the temperature of their kegs depending on the ambient air temperature.  Finally, acidity is a tool for controlling fermentation.  pH is the measure of acidity or alkalinity in a solution and pH changes due to changing chemical composition produced during fermentation.  pH also can control the species of microbes in fermentation.  For example, the low pH (acidity) of kombucha, owing mainly to the production of high concentration of acetic acid, has been shown to prevent the growth of pathogenic bacteria such as Helicobacter pylori, Escherichia coli, Salmonella typhimurium and Campylobacter jejuni. (2019 paper) According to Utah State University Extension Service, for fermentation to be successful at eliminating all potential pathogens, the pH level must drop below an acidity of 4.6 verified by using a pH meter or test strip.  Foods that “appear” to be safe can still contain harmful pathogens.

What’s the difference between yeast and mold?

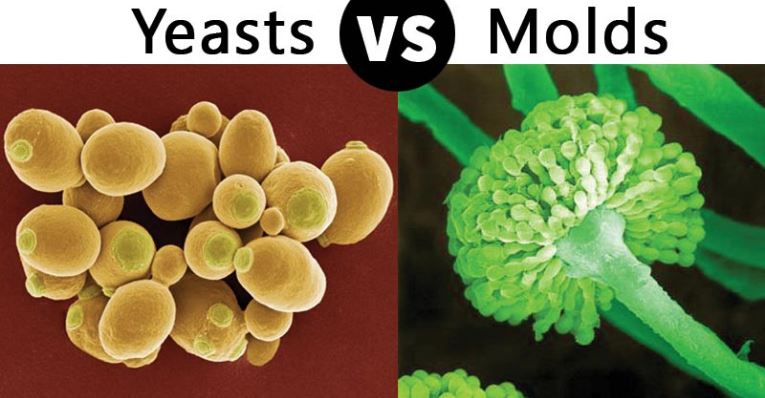
Yeasts and mold are both considered fungi.  Yeasts are microscopic fungi consisting of solitary cells that reproduce by budding. Molds, in contrast, are multi-cellular and occur in long filaments known as hyphae, which grow by apical extension (extending into fresh substrate). Yeasts do not produce spores; molds do.  Yeasts can grow in aerobic (with air) or anaerobic (airless) conditions; molds only grow in aerobic conditions.  Regardless of their shape or size, fungi are all heterotrophic (cannot produce their own food) and digest their food externally by releasing hydrolytic enzymes into their immediate surroundings (absorptive nutrition). (Introduction to Mycology textbook) Here is a highly magnified photo of the two:

Photo source: microbenotes.com

As a company concerned about air quality, HypoAir is typically anti-mold except where it’s cultured and processed carefully for medical and gastronomical reasons (like penicillin and cheese)!   Penicillium (P.) roqueforti, P. glaucum, and P. candidum are some common types of mold that are used in cheesemaking.  (thecheesemaker.com)  I’ve found out through researching this article that there are other types of mold that give fermented food its characteristic flavor and possible health benefits.  For example tempeh, an Indonesian fermented soybean cake, and Miso, a traditional Japanese paste of fermented soybean used to make miso soup, both contain molds that have no detrimental effects to humans.  Likewise, yeasts are familiar to those who make bread, but Kombucha, a fermented tea beverage reported to have originated in northern China, is also made with yeast.  The critical aspect of making each of these foods is providing the correct environment, including temperature, pH, humidity and salinity, to encourage the good fungus and discourage bad fungus!

Of course, there is a lot of information on the internet about making fermented foods at home.  Not all of them advise the safeguards that are necessary to prevent harmful bacteria from giving you life-threatening food poisoning, so it’s best to compare them to a source such as the USDA.  For example, this guide on safely fermenting food at home recommends starting fermentation only on fresh, clean vegetables and using non-iodized salt.  In addition, the National Center for Home Food Preservation has tips and tested recipes.

If you have any doubts about the safety of fermented food, throw it out!  The website fermentools.com gives the following advice on when to do so:

  • Visible fuzz, or white, pink, green, or black mold.
  • Extremely pungent and unpleasant stink.
  • Slimy, discolored vegetables.
  • A bad taste.  If your taste buds are offended, be safe and spit it out!

If you follow the safety guidelines, you can explore the world of fermented foods and maybe even make your own food combinations to surprise family and friends! (Who wouldn't like a delicious jar of well-preserved food?)

Photo by Brooke Lark on Unsplash

Hosting Responsibly

Hosting Responsibly

‘Tis the season for gathering together for celebrations!  More than a few years ago, “hosting responsibly” might be taken to mean monitoring alcohol consumption and driving.  Now, it also means providing good air quality where participants don’t need to worry about breathing in germs.  What a difference a few years (and a pandemic) makes!

In November 2022, in grocery stores, malls, airports and airplanes, masks and distancing are no longer mandatory.  There are also no mandatory distinctions between vaccinated and unvaccinated people.  I realize that although most places present as pre-pandemic, these norms can change at any time, and many people are still concerned about virus transmission and their health.  This elephant has been dressed up well, but he’s not going away, so it’s best to acknowledge him!

Letting your guests know about your preparations means letting them know you care, and make them even more eager to attend!  How can we get started?  Here are some questions for the host:

Is your home or gathering place well-ventilated? 

Here are a couple ways to tell:

  1. Do odors persist for hours if you don’t do anything to abate them?  This might be a little tricky to answer, because it’s definitely a good idea to use your kitchen exhaust fan while cooking, but if you clean up the food bits, wake up and can still smell last night’s dinner, there is likely a problem.
  2. Is the carbon dioxide level in your home below 1000ppm?  It’s really helpful (and surprising) to use a portable CO2 meter in your home and elsewhere.  It let me know that my house (built 1982 with building paper as the air barrier) is quite leaky at about 520-550 ppm CO2, but on the other hand, my parents’ house (renovated 2020) seems to be quite tight and in need of more ventilation (1500ppm)!  The American Society of Heating, Refrigerating and Air-Conditioning Engineers (ASHRAE), which is the dominant organization in establishing proper building ventilation rates in the US,  is hesitant to use CO2 levels as an indication of proper ventilation in homes and businesses because of lack of research and a number of variables.  However it does state in a white paper on indoor CO2 levels
  • Indoor CO2 concentrations do not provide an overall indication of IAQ, but they can be a useful tool in IAQ assessments if users understand the limitations in these applications.
  • All else being equal, higher CO2 concentrations correspond to lower outdoor air ventilation rates and the potential for an increased risk of airborne transmission.
  • Rather than using indoor CO2 concentration as an indicator of desired ventilation rates, several analyses of airborne infection risk have used CO2 as an indicator of the “rebreathed fraction” of indoor air (the fraction of inhaled air that was exhaled by someone else in the space). (Yuck!)

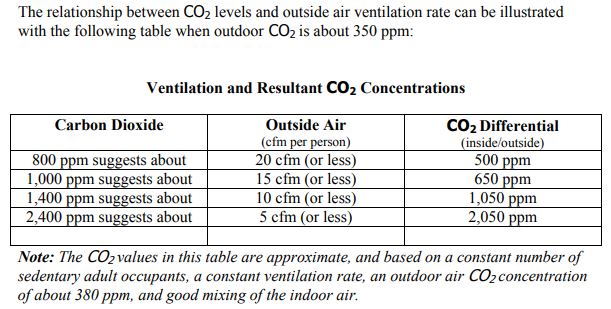
So, although ASHRAE did not set these values (contrary to misquotes), the generally accepted values are consistent with these:

Source: Washington State University Extension Energy Program

So, if you take a reading on your CO2 meter and find that the difference between the indoors and outdoors is less than 650 ppm (which is normally about 1000 ppm indoors), your ventilation is “acceptable”.  Above that level, your guests will have complaints of fatigue, loss of focus and concentration, and an uncomfortable ‘stuffy’ feeling in the air, all of which indicates you are not getting enough fresh air. (Kaiterra.com)  Keep in mind that with more guests, more ventilation is necessary to keep the CO2 level down!  You can crack windows to add more ventilation.

Do you have active air purification?  If so, let them know!  Just as businesses are proud to advertise that they use HypoAir products to keep their clientele safe, don’t hesitate to let your guests know if you are using active air sanitation like the Whole Home Polar Ionizer, Air Angel or Germ Defenders.  In addition, a fresh furnace filter in a higher MERV rating and/or use of a standalone HEPA filter also increase the air quality. 

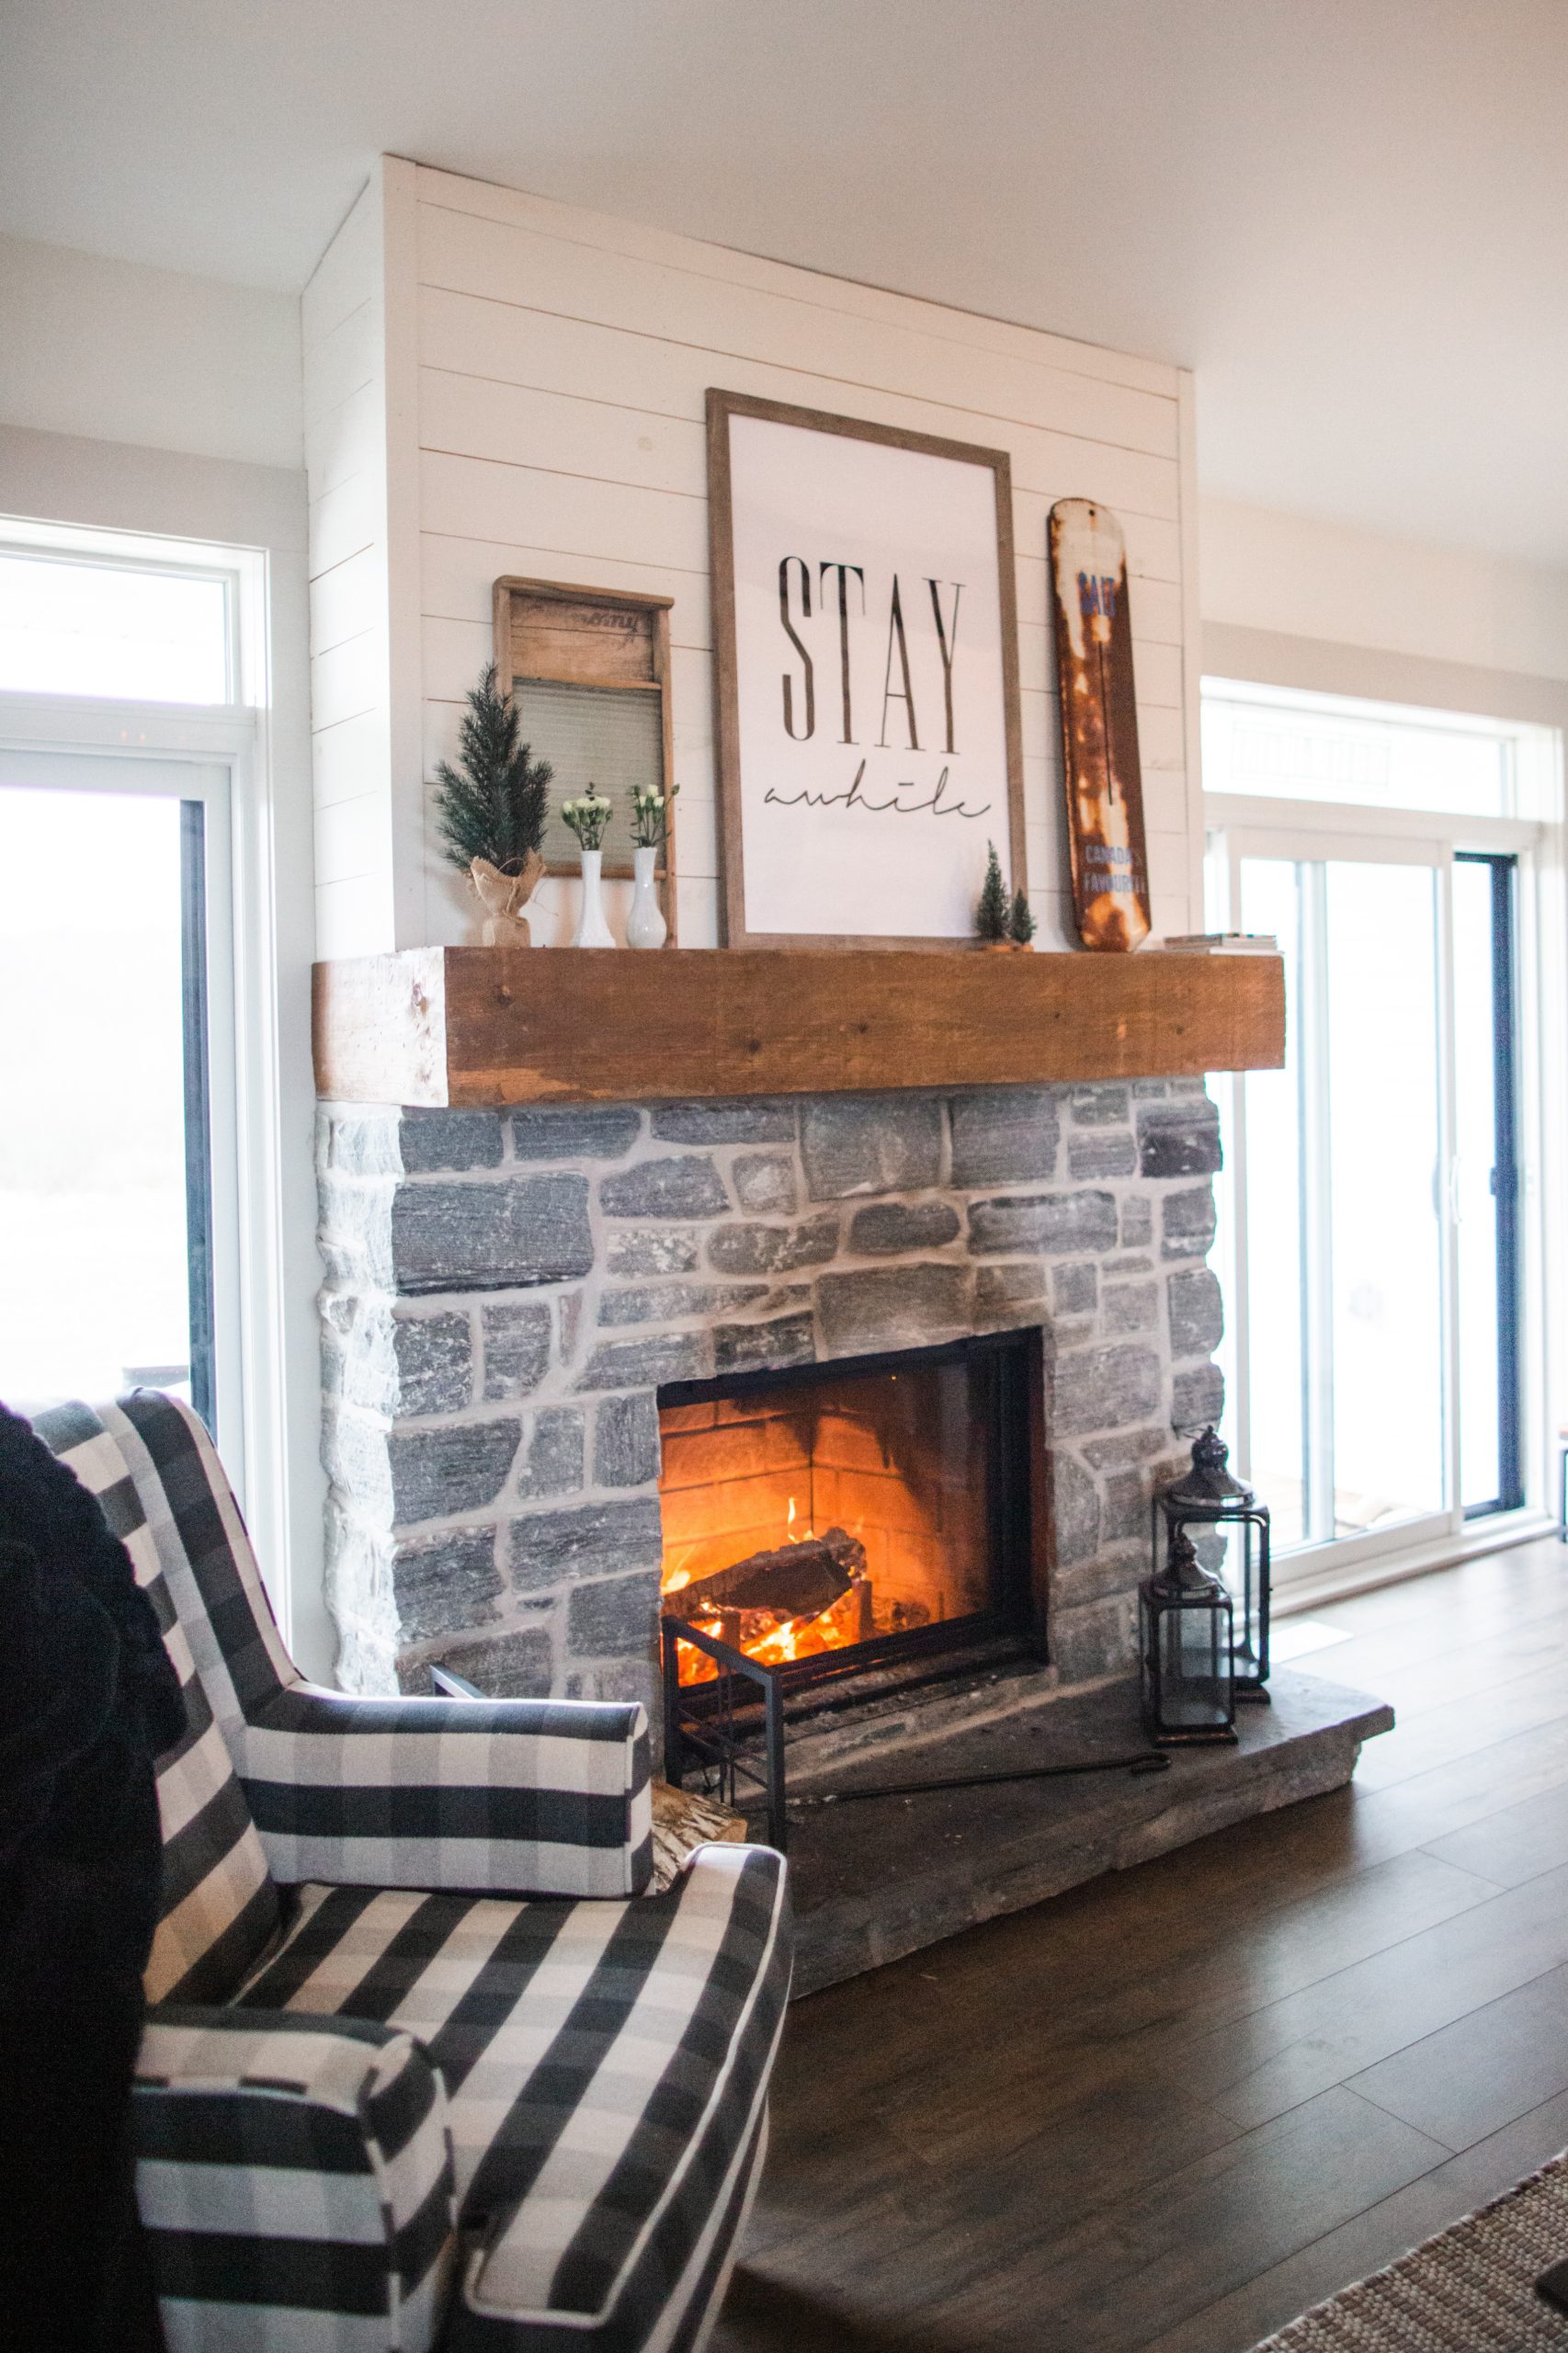
How about making your gathering indoor-outdoor?  If you have a patio or yard, string lights and a firepit or chiminea make for a cozy, festive ambiance!  In addition, the opening of doors when guests enter or exit adds fresh-air ventilation to your indoor space. If you decide to light a fire in the fireplace, cracking a window will help the fire burn better with less chance of backdrafting smoke into the room.

Have you thought about food and beverage service?

If we had a throw-away mentality before COVID-19, unfortunately the pandemic has only made it worse.  Restaurants have embraced using disposable food trays, utensils and drinking glasses for sanitation, however I suspect it is now more for convenience.  According to this 2020 study, the SARS-CoV-2 virus can remain viable on inert surfaces, with varying lengths of time depending on the surface: four hours on copper, 24 hours on cardboard, 48 hours on stainless steel and up to 72 hours on plastic.  With this evidence showing that cardboard and plastic are not anti-viral, you don’t have to follow suit with everyone else regarding what you serve on.  Instead of having a large trashbin in the center of the party (although some garbage is inevitable for sure), why not fill one side of the sink with soapy water, or leave a basin with soapy water, in which to submerge dishes?  I’ve always enjoyed using real dishes over plastic or paper, so if your gathering is smaller than your collection of plates, it’s not taboo to use china and stainless steel. Marking drinking glasses with a marker or tag ensures that everyone keeps their own!  You could even DIY inexpensive beverage glasses with your guests’ names as favors.  If you decide to go with single serve drinks, cans or bottles are still best marked to avoid confusion.

What’s more important, though, is how you serve.  It’s wise to designate 1 or 2 people as “servers” who can add helpings to individual plates in order to reduce handling of the serving utensils.  If “seconds” are available, it’s best to use additional clean plates to avoid contamination.  Wrap utensils in individual napkins pre-party so that no one has to dig through a bin to get their own.  

Set containers of hand sanitizer throughout your space, and most importantly at the food and drink service area.  

Have you made sure the bathroom is clean and inviting?

  • Provide antibacterial soap and individual paper hand towels
  • If you have a bathroom vent, consider installing a switch protector or sign so that it stays on throughout the party to keep the bathroom air fresh(er!)
  • Instead of buying deodorizers that can add toxic chemicals and VOCs to the air, re-package some TotalClean in a pretty glass bottle and label “air freshener”--it really deodorizes well!

Will you have chemically sensitive guests?

Ask guests to notify you if they have chemical allergies, so you can keep it scent-free if necessary.   If you've ever had a smell irritate your nose or even cause a headache, you have a inkling of what Multiple Chemical Sensitivity (MCS) sufferers go through.

  • It’s hard to pass up candles and sprays in holiday scents, but try to do it for the sake of your friends!
  • It’s also wise to use unscented, natural products like TotalClean to get a thorough clean on all surfaces without any scent.
  • Ask other guests to abstain from using scented personal items like perfume and deodorants.

Spread the warmth from your fireplace…not the air pollution!y

Spread the warmth from your fireplace…not the air pollution!

With temps turning colder and guests coming over for the holidays, I thought to myself, wouldn’t it be nice to start a fire in the fireplace soon?  With Thanksgiving a week away, I decided to make sure that it would be a joyful experience and not a regret!  Here’s some tips for getting your fireplace and wood ready.

The fireplace:

  • If you haven’t had the chimney cleaned in several years after using it, call a professional for this job and make sure they use HEPA filters in the vacuum.  
  • If you are not having your chimney cleaned (if so the cleaner can do this check), check that the damper is working properly:  Get some safety glasses on and a flashlight for this one.  Moving your head underneath the fireplace opening, use the lever handle to open the damper and make sure it stays open when you release it.  Hopefully you do not have the surprise of wildlife or a lot of debris being released when you open it!  Close it again until you get ready to start the fire, making sure that it closes fully and seals (see next point).
  • Sealing the fireplace damper when the fireplace is not in use is really important.  Inadequately sealed fireplaces are noted as being one of the worst air leakage sources in the home. According to the D.O.E.3, by weatherstripping the fireplace, the typical U.S. home can reduce air leaks by 14% or more. (hearth.com)  Here some ways of sealing your chimney, some of which would be better avoided:
    • Top mounted chimney dampers don’t seal the chimney space off from your home, meaning that the combustion products and cold (or warm) brick is still exposed to your air.  These aren’t highly recommended.
    • Plugs are inflatable devices that seal off the chimney when it’s not in use.  The problem is that they can deflate with colder temps, allowing air to leak through, causing it to need to be reinflated sometimes.  Sometimes the product itself leaks. 
    • Glass doors don’t adequately seal off the chimney, even though they look nice.  The solution: a magnetic, insulated cover will stop the drafts if your fireplace doors are sealed to the masonry.
  • A grate is really helpful to help your fire burn cleanly and not smoke too much.  Why?  A grate gets the wood up off the floor and allows air to circulate under and through the logs.  (This is the key to those new smokeless fire pits–air holes along the bottom of the fire pit get adequate combustion air to the wood!)  Check that your grate is sturdy.  If it is corroded or broken, take it to a welding shop for repairs.  You don’t want a pile of logs shifting and rolling or throwing a cascade of sparks when you’ve already started your fire!

The wood:

  • Only burn wood that is completely dry, which usually means it was cut and stored over 6 months ago.  Only burn hardwood,
  • Don’t buy firewood a long distance from your home.  Although it may look clean and dry, wood that is harvested over 50 miles from your home may have species of pests (eggs and insects) that are new to your area and by transporting them, you could unleash an invasive pest to the trees in your county. (Forestry Commission
  • Be selective about what kind of wood you burn indoors.  Stay away from wood with a lot of resin, such as pine and spruce, because burning it forms creosote that can cause a chimney fire.  Never burn treated wood or particleboard, as these release toxic fumes. (Family Handyman)
  • It's important to store all firewood outdoors until you're ready to use it, because firewood will naturally have some mold on it.  Storing it outdoors not only keeps the mold spores from entering your home but it also reduces the risk of spiders, ants and other unwanted insects from coming inside as well.  (firewood-for-life.com)
  • If you encounter wood with a lot of visible mold, it’s best not to bring it inside at all!  If the mold is on the bark, you can try to knock the bark off with a hatchet or hammer.  Remember, mold spores spread easily through the air and disturbing a mold colony just by moving the firewood (and stacking and then tossing it into a hot fireplace) will release millions of spores into your home!

What about firestarters?

  • Firestarters are easy to buy at the hardware or grocery store, but it may be harder to determine if their ingredients are safe and non-toxic.   In a 2014 study, burning synthetic firewood logs increased breast cancer risk in women by 42%.  Wood and synthetic logs are sources of polycyclic aromatic hydrocarbons (PAHs), which cause mammary cancer in animal experiments. Both contribute to residential air pollution, but researchers found that only the synthetic logs were found to be associated with an increased risk of breast cancer.
  • If you have any concern, take the safe route and make these firestarters easily from cardboard egg cartons, wax and sawdust (great project with your kids!)  The only caveat I would add is not to use just any candles for wax; paraffin candles are made from petroleum products, and soy candles are from hydrogenated oils that usually contain some paraffins.  If you can find it, unscented beeswax is the best!

Test it out! 

  • Keep a fire extinguisher nearby.
  • First and foremost, make sure the damper is open and any plugs or stops are removed before starting a fire.  Use your safety glasses when looking up into the chimney!
  • Always clean out cold ashes from a previous fire before starting a new one.  If you use your fireplace frequently, an ash vacuum is really helpful and speeds up the job.  Don’t use just any vacuum to suck up ashes, as vacuums without a HEPA filter will blow them all over the room!
  • Prime the flue: this means getting a flow of air going up the chimney.  The cleanest, simplest way is use a hair dryer on the hot setting, or a blow torch: just hold and point it up the flue for a few minutes. 
  • Place a few firestarters or balled up newspaper under the grate and some kindling (small pieces of wood) on the grate.  Start the fire with a long-handled igniter. 
  • When the kindling is burning well, place a few logs on the grate.
  • Does your fireplace smoke? (does smoke roll out of the top of the opening into the room?)  If so, the opening may be too large in relation to the flue, causing air to stall at the top of the firebox and allow smoke to come out into the room.  Here is a great video explaining the concept and how to fix it (or buy the right smoke guard and screen if you’re not a welder).  A smoke guard is a strip of metal that extends from the top of the opening down into the fireplace 4-8” to make the opening smaller and improe draft.  This article tells about an aluminum foil trick on how to size the smoke guard before you buy one, plus other reasons the fireplace may be smoking.
  • If there’s no smoke coming into the room, add more logs slowly, making sure to place them with good air flow from below. 
Fireplaces are not the cleanest or most efficient ways to heat your home, but the fireplace is here to stay in American homes because of its tradition and ambience.  For more tips on upgrading its efficiency, check out our other post on fireplaces here.  We wish you warm and cozy memories snuggled in front of your (safe, clean-burning) fireplace!

Do you need more INSULATION?

Do you need more INSULATION?

When seasons change it’s easier to get a fresh perspective on how well your home is performing against the elements, or we would say how well the building envelope is “sealed”.  Because it’s very difficult and expensive to build a home that is perfectly sealed, everything else is relative to the best-case scenario.  It’s best to have a good idea of what kinds of insulation are out there, before even requesting estimates to improve your insulation, so you know what the experts are talking about!  We can start by discussing what insulation does, how it is rated, and then move on to what types of insulation exist and what they do for our building envelope. 

Heat is a source of energy, and here on the surface of the earth on Monday through Sunday, energy naturally obeys certain laws (we won’t go into any sub-atomic or supersonic cases here). According to the 2nd law of thermodynamics, heat flows from hot bodies to cold bodies.  If the sun has heated up your roof and it’s cool inside because your air conditioning is running, the heat of the roof will try to flow into your cool house.  It’s just doing what is natural, like water running downhill!

Insulation is what we use to stop or retard the flow of heat, whether it’s trying to come in like the above example,  or go out on a cold winter’s day.  It’s like putting on a fluffy down jacket over your warm body, to keep the heat where you want it.  Some heat will undoubtedly escape through the openings and seams, but if you had to spend all day, every day outside, you will want the best insulation, tightest seams and the smallest openings you could get in that coat!  That’s the picture.

To rate the possible types of insulation you can stuff in the floor, walls and ceiling, we have “R-values”.  R-values measure an insulation’s resistance to heat flow; lower R-values allow more heat flow (not good) than high R-values (better).  Typically R-values can range from R-10 for some flooring materials to R-60 for some dense attic insulation materials. (Forbes Home)  These are all based on 1” of thickness, though, so one inch of R-30 is roughly equivalent to two inches of R-15. 

According to the Department of Energy, nine out of ten homes in the US are underinsulated.  (energystar.gov)  Therefore, chances are good that your home could use more insulation.  This map of the US shows 7 zones, which are basically increasing “delta T” or temperature difference between the interior and exterior of the home.  For example, the northernmost extremes in Zone 7 have the greatest temperature difference during the winter, so will need the most insulation.  It also gives guidelines on where and how to add insulation.

Because heat rises (an important part of the “stack effect” in your home), the most effective place to add insulation is in the attic.  Keep that expensive heat inside where it belongs!  This chart shows by the number of stars what value is obtained by adding insulation in the attic vs. floor (lots).  

Everything has an R-value–even carpet and glass.  Here’s a chart that shows the R-values of many common building materials.  Manufacturers generally price the insulation according to its R-value–meaning that the highest R-values are most expensive!   Because heat transfers in three different ways (convection, conduction, and radiation), some materials are better at retarding the transfer in one or more ways.  Here are the differences:

  • Convection is heat transfer from fluid to fluid.  Because air is a fluid for these purposes, air barriers (air sealing) is important to stop air from outside your home stealing heat from air inside your home.  Fiberglass batts with a paper facing are not great for protection against convection, but they are better than loose fiberfill.  Air can move through fiberglass batting, and it can actually move loose fiberfill out of the way.  Spray foam, when correctly applied, is one of the best convective thermal barriers. 

  • Conduction is heat transfer from solid to solid.  Most homes are built with 2x4 or 2x6 studs of wood that are joined directly to sheathing, then roofing or siding.  Without a conductive thermal barrier, cold from outside conducts directly through the siding, to the sheathing, to the wood stud, to the interior drywall.  Brrr!  This is why you can usually “see” the framing of a home on a thermal image on a cold day.  Conduction of heat in this manner is also called thermal “bridging”.  Newer building techniques suggest that a layer of rigid foam board between the siding and framing isolates the framing and prevents it from conducting heat into or out of the home.

  • When there is no direct contact or fluids between two bodies, heat transfer can still occur through thermal radiation.   Waves of electromagnetic radiation from the sun reach our planet and roofs everyday, and on cloudless nights, the warmth is reflected back into space.   Radiant barriers, either as part of a rigid foam board or on their own, have become popular additions in attics to retard heat radiation.  In order for radiant barriers to be effective, though, they can’t be sandwiched between other layers of insulation.  I won’t discuss radiant barriers in this article, but you can read more about them here

Here are some other pieces of information about insulation that it’s important to know:

  • Many types of insulation, like fiberglass and sheep’s wool, are “fluffy” because they are using the insulative properties tiny pockets of air within them.  Therefore when installing fluffy types of insulation, you want to “fluff” them out (wearing a respirator of course), not compress them, as compressing them actually decreases their R-value. 

  • Although the Department of Energy says that fiberglass batt insulation is fine for new construction or even laying over old insulation in attics, the building industry does not agree.  According to Family Handyman, batt insulation simply does not cover well in the attic because of its shape and inability to fill odd crevices and voids.  Of cellulose and loose fiberglass, cellulose has slightly higher R-value but fiberglass is more widely used in attics.  

  • Every insulation type must be correctly installed in order to achieve its rated R-value!

  • Loose fill insulations are very popular for ease of application and decent R-values, but in terms of air quality, most have the ability to generate dust and PM2.5.  If you are looking to use loose fill, make sure your HVAC ducts are sealed well and the area using the loose fill (for example the attic) is air-sealed from the rest of the home.

Here are the types of insulation grouped by where they are generally used:

Attic: Make sure that you have done the best air-sealing possible before adding insulation to your attic.  

Cellulose is recycled, ground-up paper with boric acid added for insect control and fire resistance (Family Handyman).  It comes in dense sacks and is installed with a blower.  Installation creates a lot of dust, but professionals can do a “wet-spray cellulose” that adds a small amount of water to keep the dust down and slightly increase the R-value, which is 3.5 per inch.  

Loose Fiberglass:  Fiberglass is small strands of glass that clump to form fluffy insulation.  It is also densely packed in bags that must be blown in.  It is very itchy to the skin and irritating to the eyes and lungs, so be careful to use full-body protection or hire a professional to install it.  It also can get entrained into your HVAC system if any ducts in the attic have leaks in them.  Fiberglass is lighter than cellulose so that if wind-washing occurs (where air/wind enters the attic through cracks), it is not a good choice for protection against heat convection. R-value: 2.5 per inch

Spray-Foam Insulation:  Spray foam generally comes in two varieties, open cell and closed cell.   To get anywhere near the R-49 recommended in attics of zones 5-8 on this chart, you’ll need to think about using closed-cell spray foam or adding rigid foam board when you replace the roof (see next point).  Open cell foam deforms easily when you poke a finger in it, and has an R-value of approximately 3.6 per inch.  Closed cell foam is typically used in extreme temperatures and under homes, because it has a higher R-value of 6 per inch, and it’s very hard, making it almost impervious to critters that tend to chew through insulation.   Besides being used as an air barrier, it’s also a total vapor barrier, and it adds a lot of structural rigidity to the cavity it’s sprayed in.  The downsides of spray foam insulation include the use of toxic blowing agents that, if improperly installed, can cause long-term off-gas issues (see our post here).  It is also difficult to detect leaks and insect damage behind the spray foam, so that major damage can be done before the problem is evident.  Spray foam must be installed by experienced professionals, and the cost is accordingly higher than other types of insulation!

Rigid foam board insulation:  Installation of foam board in attics is not as easy as blowing in loose insulation, but it adds a lot of  R-value as well as protects against conductive heat transfer.  It gives some of the closed-cell properties of spray-foam, without the offgassing (most of the off-gassing is accomplished at the factory) and installation cost (it can be installed DIY).  The most popular types of foam board are EPS (expanded polystyrene) and XPS (extruded polystyrene).  Polyisocyanurate is made of urethane and is a newer, popular choice with an R-value of 6 to 8.   The easiest way to install these boards is during roof replacement, but they can also be used to create a conditioned attic by screwing them to rafters with special fasteners like drywall (video).  Seams and penetrations can then be sealed using foil tape. 

Walls: Of course, the best time to insulate well is during construction.  However, insulation can be added to walls during siding replacement.  Here are typical wall insulations and their values: 

Fiberglass batts:  Fiberglass has been the standard for many decades now, but its R-values are limited to R-13 for a 2x4 wall, and R-20 for a 2x6 wall (since fiberglass has an R-value of 3.7 per inch,  and a 2x4 stud is 3.5” wide, it gives a value of 12.95). (learnmetrics.com)  This is not very much for northern climates, and it doesn’t address conduction transfer, so you may choose to add rigid foam board to the exterior before the siding. 

Mineral Wool batts: Mineral wool is a fiber insulation, similar to fiberglass, but is made from natural materials and not glass. There are two kinds of mineral wool available for home insulation – rock wool, which is made from fibers of stone and slag wool, are fibers made from iron ore waste.  Additional benefits of mineral wool is that it is an excellent acoustic insulator and it’s very fire-resistant. (What is mineral wool insulation?)  The R-value is about 3-3.3 per inch for a brand-name mineral wool called RockWool.  (bobvila.com)  Mineral wool is also made into boards, with an R-value of about 4.0 per inch.

Sheeps Wool batts:  For those who are sensitive to other types of insulation, or want to use some of the most natural building products available, sheeps wool fits the bill.  What you will need to ascertain, however, is if synthetic adhesives are used, and how sustainably and humanely the sheep are raised and sheared, because the industry has the potential to generate abuse.  Sheep’s wool can also regulate the humidity in your home: it can absorb around 33 percent of its weight in moisture without ever losing its insulating ability.  (buildwithrise.com)  The R-value of sheep's wool insulation ranges between 3.5 and 3.8 per inch, due to millions of tiny air pockets in the folded wool.  Sheeps wool can also come loose in bags for blowing in behind netting (see “loose fill” section below). 

Hemp batts: Hemp has an R-value of approx. 3.7 per inch, making it a very good insulation.  It is sustainable because the hemp plant grows fairly quickly (only 90-120) days, and the product uses only about a pound of raw material per square foot of R-13 HempWool, one brand name for this product.  According to BuildwithRise.com, hemp insulation is non-toxic. It is a plant-based product that contains no VOCs, no chemical binders, and does not off-gas. Hemp insulation is hypoallergenic, repellent to mold, pests, and insects.  One drawback to hemp insulation is that it is not naturally fire-resistant, so fire retardants must be added to it, potentially adding chemicals with sensitivities or toxicities. 

Recycled Denim Batts: It’s unlikely that you have enough old jeans to insulate one 2x4 cavity, but the recycled clothing industry has more than enough!  Denim insulation is actually a combination of recycled jeans and post-industrial denim and cotton, not just denim alone. The fabric is shredded and treated with boric acid to make it flame retardant, and insect, pest, and mildew resistant. (builddirect.com)  It also comes in loose fill for attics and walls, and has approximately the same R-value as fiberglass: 3.5 per inch.  It doesn’t require special protective equipment to install, but it is more difficult to cut and can take a long time to dry if it gets wet. 

Cork:  Cork is a remarkable material.  It’s harvested by hand from trees that live from 150-250 years.  Only the bark is removed every 9 years, without harming the tree.  Most of the world’s cork comes from Portugal.  ThermaCork is a product that is made from the bark and water in a superheated steam process.  It has an R-value of 4 per inch, which is on the high end.  It can be used on the interior for soundproofing, flooring and partitioning, as well as exterior walls and roofing.  It’s non-toxic and sustainably produced. 

ClimaCell: ClimaCell was developed out of an effort to find a scalable alternative to EPS, which is more commonly known as Styrofoam®. (businessinsider.com)  It’s made with paper and corn starch so that it’s fully recyclable and is a preferred packing material for cold shipments.  In residential use, it’s made in loose fill, batts and rigid boards, but only mainly available in European markets at the moment  (start saving all your cold-pack boxes!).

Rigid Foam Boards: EPS and XPS are great choices to protect the structure because of their “closed cell” insulative properties and vapor barrier properties.  Polyiso can absorb moisture, though, so it cannot be in contact with the ground or wet surfaces.  They can be installed during siding renovations or additions.  Check out this article where rigid foam insulation was used to create a continuous air barrier between the garage and the home (genius!)

Spray foam: As stated above, spray foam has good insulative, air barrier and in the case of closed cell foam, vapor barrier properties that make it an excellent choice for walls during construction.  It can also be retrofitted into existing home walls by removing a layer of siding, removing the old insulation and filling the stud cavities from the exterior.  (Removing old insulation before installing new)

Loose fill:  If you live in an older home that was poorly insulated, it may be possible to add insulation between the studs by either removing a layer of siding at the middle or top of the first floor, or drilling through the interior wall.  Then loose fill can be blown into the cavity, and the siding replaced or the hole patched.  (attainablehome.com)  Loose fill can be sheeps wool, cellulose, fiberglass, hemp, cork or a mixture of agricultural products, like ClimaCell.

Loose fill is also a popular choice for new construction, when it is used with netting to contain it.   Netting or fabric is stapled to the studs and insulation is blown into each cavity until it is full. The only problem with this is that it may settle over time, leaving gaps at the top.  

Floors:  If your home is built above the ground, it’s important to consider where your building envelope lies: at the floor, or at the ground?  If you have a crawlspace, consider closing it off and conditioning it, so that humidity and mold from the ground are not sucked into your home.  If you decide to keep the crawlspace open and ventilated, however, additional insulation can be added to the underside to keep cold air from leaking out in summer or penetrating in winter.  Any insulation should have good water-resistant properties to avoid absorbing moisture and breeding mold.

Rigid foam board is great for insulating the walls of conditioned crawlspaces.  This type of insulation may be faced with silver foil, with the foil facing inward toward the crawl space. Though the rigid foam is the chief insulator, the foil adds a bit more energy savings by reflecting heat into the crawl space. The foil, too, acts as a vapor barrier. (thespruce.com)

Closed-cell sprayfoam could be used on walls of conditioned crawlspaces, but they would need to be clean and dry first.  More often, it is used under the floors of ventilated crawlspaces to provide the thermal insulation, moisture and air barriers needed to keep the home more comfortable. 

“New” Insulations

Residential insulation is evolving all the time, and one thing we are watching is Vacuum Insulated Panels (VIPs). With the absence of air in their core, they resist all types of heat except radiation, and often they are covered with a radiant barrier that closes that gap.  They are quite expensive at the moment and shapes/sizes cannot be cut on the job, but they are very promising for roofing especially because of the need to reject heat at this high-access point.  Like other emerging technologies, we expect these to become more widely and cheaply available in the next decade. 

Aerogel is a gel is most commonly made from silica (silicon dioxide), where the liquid portion of the gel has been replaced with air or another gas.  It’s very low density but with high-crush strength, and has an R-value of 10 or more per inch.  It’s used in thin strips and sheets to eliminate thermal bridging, and also available in blanket form.   Aerogel is supposedly “low-dust” compared to loose fiberglass and batts, but silica is dangerous to breathe in so respiratory protection is still required when installing and cutting it. (A Look at Aerogel as Insulation) In addition, it repels water so it can protect your structure from water damage.  Alas, its cost is prohibitive for most residential projects at the moment.

There’s only a few year-round climates that don’t need insulation (Hawaii, anyone?), so it’s always good to stay on top of potential thermal leaks and new developments in insulation.  It’s a case of sowing some money and effort to reap comfort and energy savings down the road! 

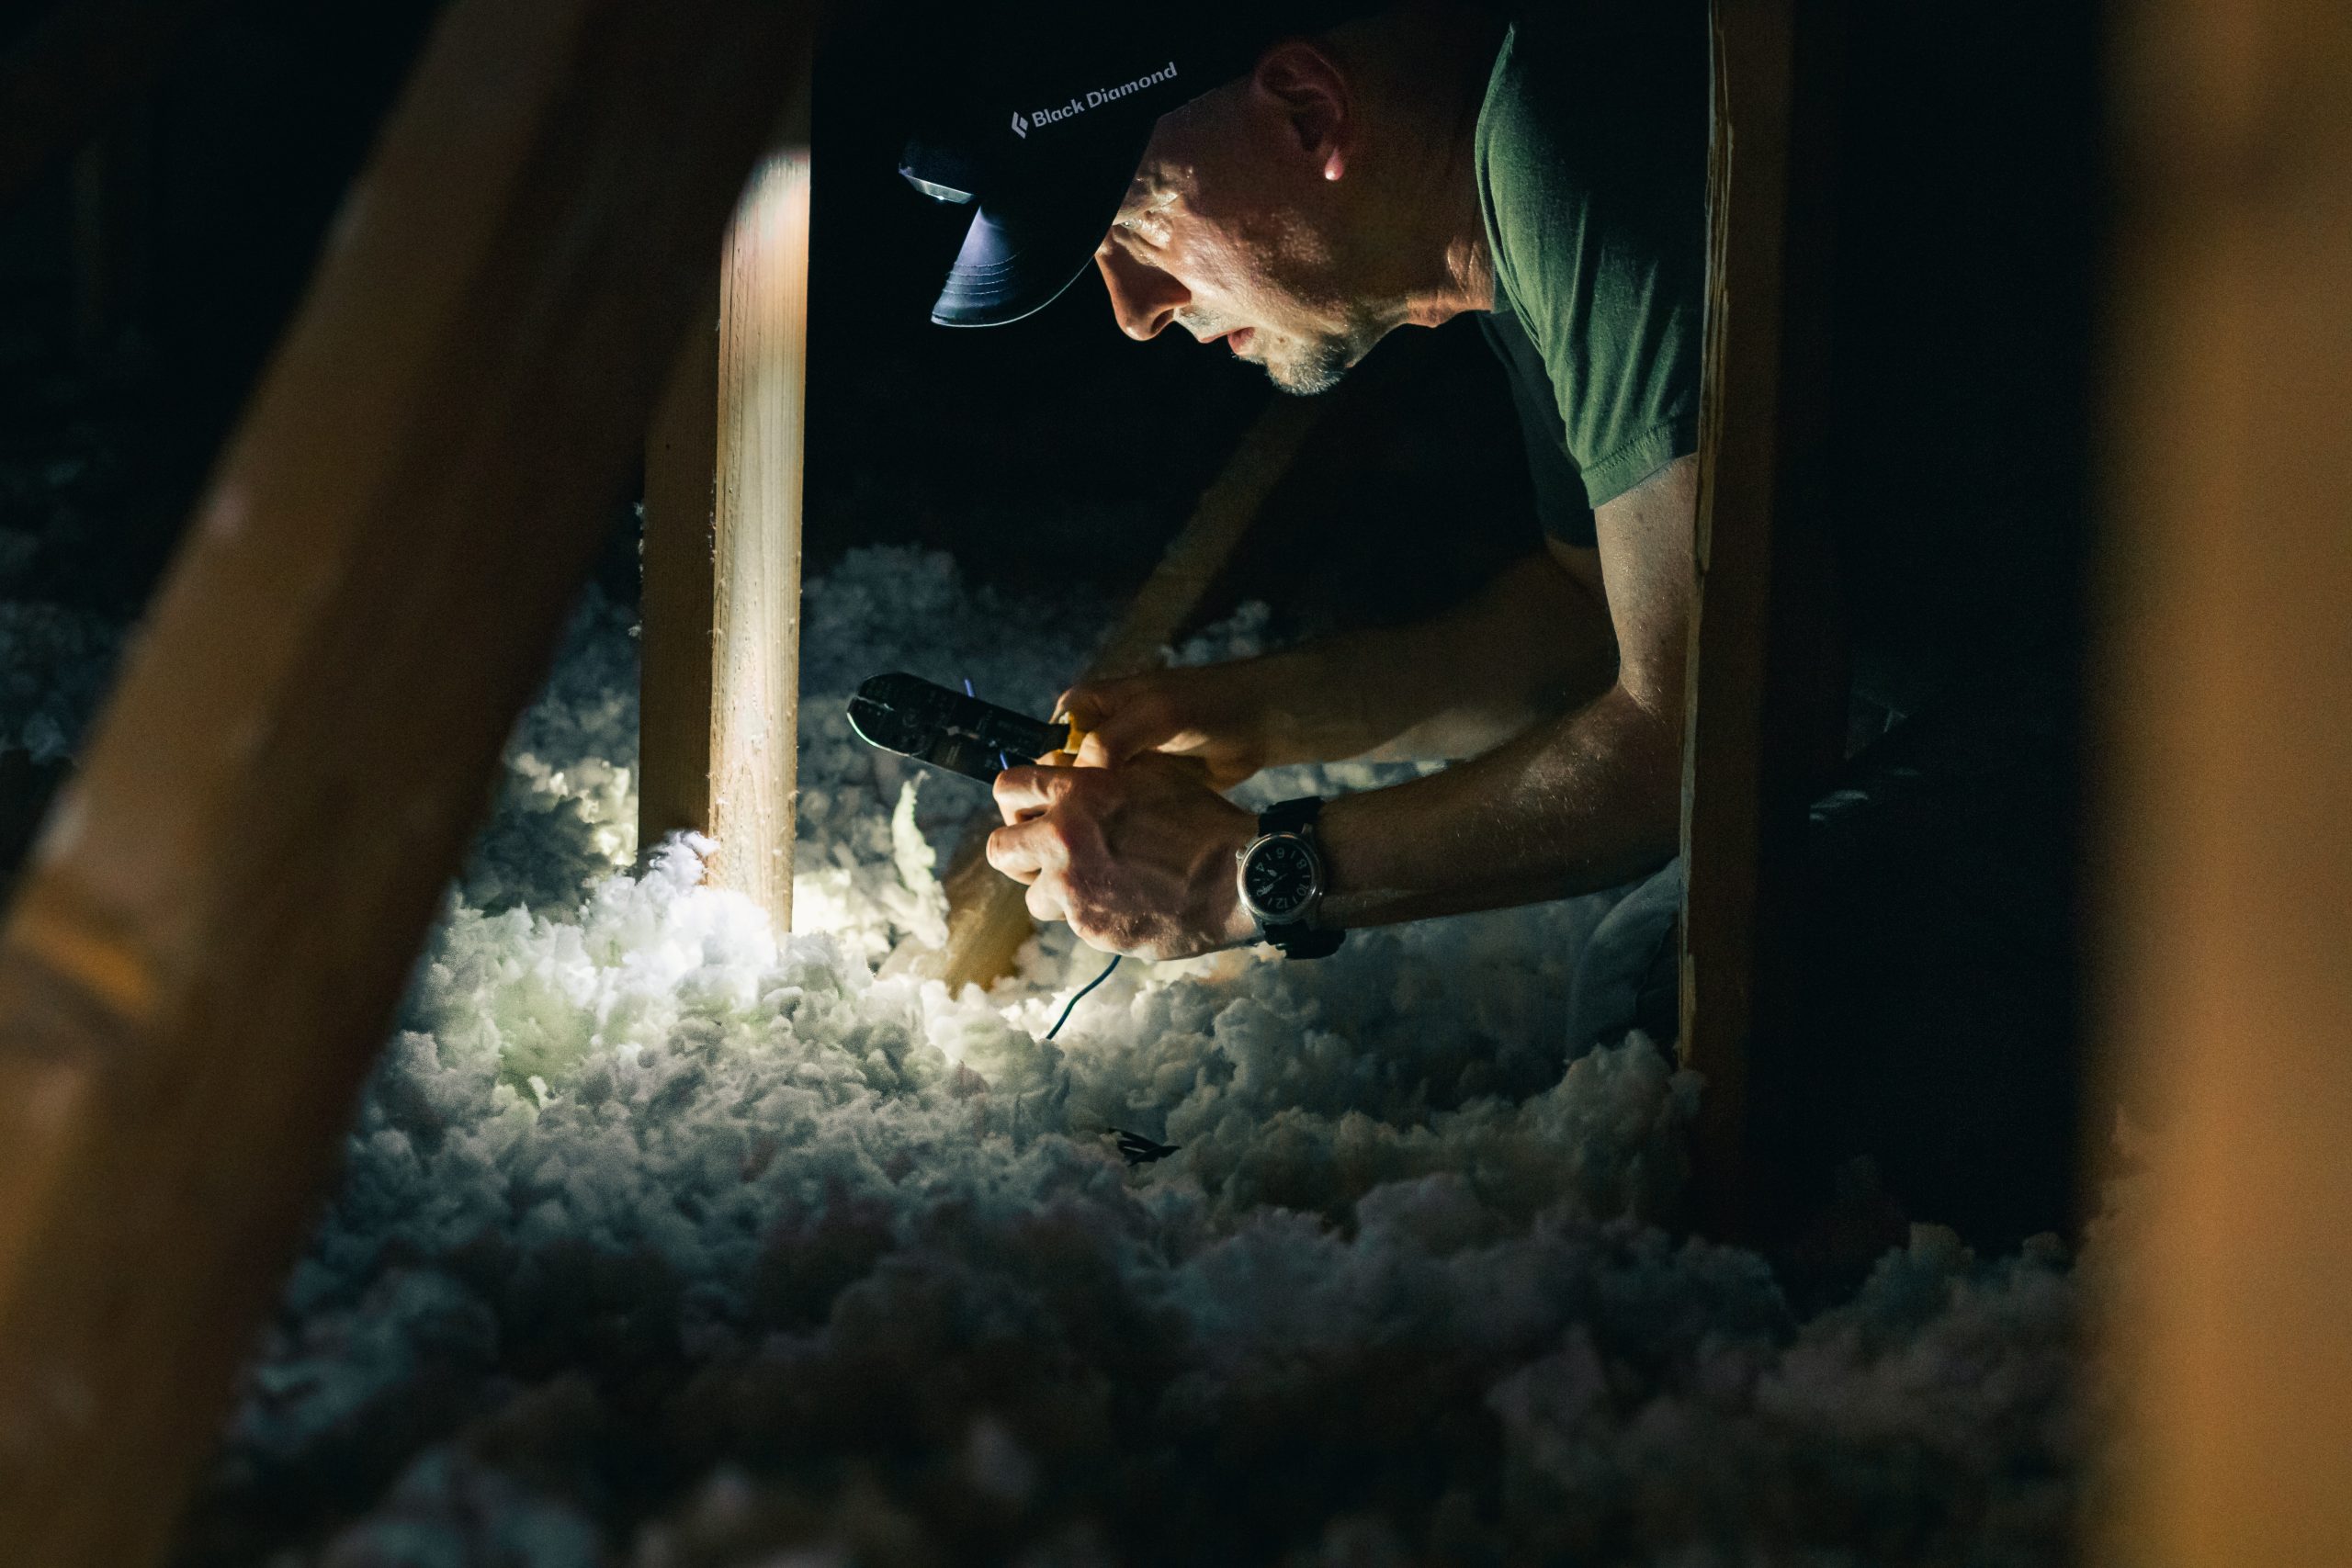
Photo by Greg Rosenke on Unsplash

What size heating/cooling unit does my home need?

What size heating/cooling unit does my home need?

If you find yourself shivering or sweating and madly mashing thermostat buttons without success, it might be time for a new heating or cooling unit.  If your HVAC tech confirms that’s the case, it’s easy to just have it replaced with the same capacity unit.  But what if you were never comfortable with the capacity of the unit you had?  If it ran constantly, or started and stopped frequently, then those are signs that it may not have been sized correctly in the first place.  We briefly touched on this subject in another article, but in the process of considering a new unit for my own home, I thought you would like to know about the factors to consider when sizing a new unit, and how you can do some calculations yourself (with free online programs). 

Just as a car’s engine has to be sized correctly to provide the right horsepower for driving the car and its auxiliary functions like hauling heavy things and/or towing, a home’s heating and cooling unit must be sized correctly.  Too small, and it will run constantly and struggle to keep the setpoint temperature.  Too large, and it will start, quickly reach the set temperature, and shut down, sometimes “cycling” through the startup and shutdown frequently.  Right-sizing the unit keeps the unit running for an optimal time without wasted power.  It also allows the unit to remove more humidity from the air during the cooling season.  

Your home is a complex environment!  If you have an HVAC contractor that you trust to get you the right equipment, that’s a great resource to have.  If you aren’t sure that he’s listening or will do his “homework” as well as he should, then it’s a good idea to do your own research.  Normally when sizing a heating and cooling unit for a new construction home, architects or builders will perform what is known as a “Manual J” calculation.  Manual J is the national ANSI-recognized (American National Standards Institute) standard for producing HVAC equipment sizing loads for single-family detached homes, small multi-unit structures, condominiums, town houses, and manufactured homes. A proper load calculation, performed in accordance with the Manual J 8th Edition procedure, is required by national building codes and most state and local jurisdictions.  (Air Conditioning Contractors of America)  Engineers usually use a specialized computer program and have training to input the right numbers, so performing a complete Manual J is usually not done by homeowners.  However, not unlike the thousands of “hacks” you find online everyday, there are ways to approximate a Manual J yourself!  Even though the computer or app is doing a lot of work for you, it’s only as good as the information you put into it.  Let’s look at some of the factors that you will need to know about your home to get a moderately accurate answer. 

Climate: Heating and cooling loads depend on what is going on outside, and decades of temperature highs, lows and averages can all be derived from your address or climate zone. You can get an idea of what climate zone you live in by checking out the map on this page

Construction: Your home is unique, and the following features have impacts on your heating and cooling load by their different “R-values”, or the resistance to the flow of heat.  The most convenient online estimators supply average R-values for each factor from the date of construction of the home and the standards that were in place at that time.  For example, a home constructed in 2003 will have higher average R-values than one constructed in 1963.  (For more about R-values, check out our article here!)

  • Type of foundation: crawlspace, basement, or slab, and the insulation level of each. 

  • Floors: How many floors above grade (earth) do you have? What is the ceiling height of each floor?

  • Space above ceiling of uppermost floor: do you have a vented attic, no attic (ceiling is just below the roofline), or an unvented (conditioned) attic?

  • Walls: how are they constructed?  Are they cinder blocks, wood frame, metal frame, etc.?  What is the siding: brick, vinyl, wood, cement board, etc.?

  • Windows and doors: A full manual J will require the number and size of all windows and doors, but the estimators may only require a relative number of windows in a wall (none/low/med/high) and the type of window (single pane, double pane, etc.).  Also, there should be a spot to include any skylights. 

  • Exposure: the length of the sides facing each direction (north, south, east and west) are important.

  • Air-tightness:  if you haven’t had a “blower-door test” performed on your house, an estimator program will allow you to guesstimate whether the air-sealing of your home is tight, average, or leaky.  

  • Type of roof: Asphalt shingle, tile, and metal are popular inputs for this parameter.  

HVAC:  Now, it’s time to input what type of system you want to have.  Most of these are geared toward central heating and cooling, so the following questions reflect that:

  • Ductwork: is it a ducted or ductless system?  Is ductwork above, below, or in the conditioned space?

  • Design considerations: for example, the summer and winter indoor temperatures, and summer humidity (normally 50-55%).  

  • How many occupants normally live in the home?  If it’s only 2, Manual J will still call for 1 occupant per bedroom plus one in the living room (for example, a 3 bedroom home will have an input of 4 people).

  • Daily activity load: there may be opportunity to input the number of appliances or select an extra-large kitchen or extra refrigerator.

Now that you see all of the ways your home’s configuration and construction affects its heating and cooling load, it’s time to find free “apps” that can estimate that load with moderate effort and a good interface.  I tried several programs to check my skills and the programs’ accuracy.  For reference, my old system was rated at 3 tons, but because of high humidity it struggled to keep up on the hottest days.   Here are some of the best programs:

  • CoolCalc.com: It’s free to create an account and input your “project”.  You can also look at the loads that are calculated for free, however, you will need to pay to download the report that’s generated.  The lowest payment is $20 for 5 downloads (which I found are needed as you can go back and “tweak” any inputs).  This program had a neat feature of allowing you to look at a satellite image of your home and “trace” the first and second floor plans to estimate the square footage, but if your home is covered by too many trees or has a complex footprint, you can also input floors and rooms individually.  By simply entering the date of construction, the program suggested average R-values, which really   simplified input.  With this calculator I received the report of 29,565 Btu cooling load and  48,043 Btu heating load (Btu’s are British Thermal Units; 12,000 Btu’s = 1 “ton” of capacity): this can be rounded to 3 tons of cooling and 4 tons of heating.  This eight-minute video gives a quick tutorial on entering the necessary information to get a good result.

  • Loadcalc.net: This program did not have a fancy tab interface like CoolCalc, however it was more similar to a manual J in that square footage of the walls and windows were required (the most time-consuming element).  Don’t try to do this one on your phone; you’ll need a spreadsheet if you have any number of windows in your home!  Because of the input of wall and window exposure on the various walls, I do think this program produced the most accurate result, rendering 33,568 Btu’s cooling and 39,593 Btu’s heating load.   It has decent instruction pages that explain a lot, and is completely free and savable so that you can go back and make changes easily.  After you calculate your load, there is also a page to check that the size of the system you plan to purchase is within the specs of what you need for the load.  

  • ServiceTitan.com: This is a super-simplified web page with only a few inputs, which turned out to wildly over-size the load: it generated 60,000 Btu (5 tons) recommended capacity and would not let me recalculate unless I entered my email address.

  • Remodelingcalculator.org: This calculator promised “NOT to over-specify the unit capacity…(because) most online tools give you a higher heat load estimate than you actually need for your home to sell you more expensive equipment.“ However, it was too simplified and definitely did oversize at 53,000 cooling Btu’s and 61,000 heating Btu’s. It also advised to verify the load with loadcalc.net before purchasing any equipment. 

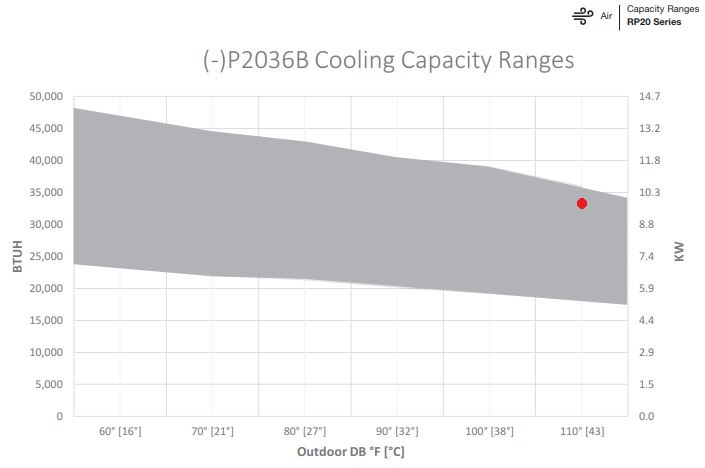
There is another factor that may influence sizing of your heating and cooling system: inverter heat pumps.   Because my old system did not have inverter motors in it, it was limited to the speed settings of the motors it had.  Inverter motors are a type of variable speed motor with infinite speeds, that will run at high speeds at the beginning to heat or cool quickly, then slow down to maintain the temperature, instead of constantly starting and stopping.  This actually saves energy and keeps the temperature spot-on, instead of letting it wander a couple degrees up or down until the thermostat is triggered again.   In humid climates, this type of system also removes moisture from the air more effectively because the blower runs longer at a lower speed, which is what is needed to remove more moisture from the air.  If you check the performance curves for such a unit, like the Rheem RP20 Series, the rated capacity should fall well within the range of what the unit can do.  In the case of their 3 ton unit, it should provide the calculated 34,000 Btus cooling right on up to 110 degF outside (see red dot on the chart).  That’s a good thing. 

Source: Rheem Heat Pump Specs

Because I plan on purchasing an inverter heat pump system with high SEER, am adding insulation in the attic, sealing an uninsulated duct chase and adding more weatherstripping and caulk around the house, I am going to opt for the 3 ton size again.  It will definitely handle the cooling, which is the majority of the year here in the southeast, and is a bit undersized for the heating, but I’m not worried because we only have a few really cold days per year (30 degF and below).  Before performing the calculations with these online programs, I wasn’t sure.  But now, I can purchase with confidence that my new equipment will be up for the task.  There’s so much technology online, it would be a shame not to take advantage of it.  I hope this article helps you check out the real heating and cooling loads of your home, because even if you are not replacing equipment, it’s good to know if your equipment is performing well, or if there is a big hole in your building envelope somewhere (hope not!). 

Photo by Pixasquare on Unsplash

Air-Purifying Paint? Yes Please!

Air-Purifying Paint?  Yes Please!

Every little bit helps.  Even if you haven’t changed your furniture or decor in years, most of us are constantly bringing chemicals and VOCs into our homes that come with food packaging and toiletries, new clothing and shoes, electronics and consumables like filters, printer ink and cat litter.  It’s a revolving door–even the garbage bags we use to take the garbage out (ie. scented or unscented “odor control” garbage bags) unleash a lot of VOCs into the air when we shake them out and every time we open the garbage can. (cleanlivingpodcast.com)

These are the reasons I was elated to find that something as simple as paint can purify the air in your home.  It’s brilliant, really, after all the years that paint added VOCs to the air, that now it can take them out of the rest of our homes.  And, it can deal not just with VOCs but microbes like germs and mold.  These really are super-paints, and although their cost is premium, if you can afford it, why not?  Here are some of the ones that stand out.

ECOS Paints (ecospaints.net) are marketed as “paints that you can feel good about”.  I feel that way about most no-VOC paints, but these are special.  They have categories like “Air-Purifying”, “Anti-formaldehyde”, “EMF-Shielding”, “Pet Dwelling”, and “Lullaby” (for nurseries and nursery furniture).   All formulas are water-based, are non-toxic and emit zero VOCs.  Primers, stains, varnishes, concrete and stone coatings are included.   My main fascination, however, was with the Air Purifying Paint.  At $120 per gallon, it’s quite pricey, but you can justify the price over the lifetime of the paint.  It “absorbs and neutralizes chemicals, pollutants and VOCs for improved indoor air quality.”  Their Air Purifying Paints contain a molecular sieve which is designed to both stop harmful volatile organic compounds (VOCs) from being released into the air and to trap them as they float through a room.  (What is Air-Purifying Paint)  This sieve is zeolite, which is used in water purification, similar to activated carbon.  Over time, the pores in the zeolite will become less active (the website does not say how long this takes), but considering that most people repaint every 3-5 years, renewing the paint is like changing a filter on your air purifier. 

Gush Paints contain a proprietary catalyst that constantly breaks down VOCs in the room.   Their research indicates that the gush proprietary catalyst (GPC) is proven to be effective for at least 5 - 8 years under real-life conditions, which is a considerable length of time to enjoy cleaner air.  The literature is quite technical; GPC uses the principle of lattice doping and electron hole positioning, to interact with oxygen and water vapour in the air to form radical agents on the surface of the paint.  (This is not unlike the way bipolar ions attack VOCs through hydroxl radicals.)  It claims that VOCs are broken down at the rate of 99% in 21 hours.  They also stop mold and 99.9% of infection-causing bacteria.  At $70-75 per gallon, it has air-purifying and washable versions, which the air-purifying capability also somewhat regulate humidity.   Gush paints are GreenGuard Gold certified.  The colors are very hip with names like “boogie board” and “coffee beam”... perfectly named for the area they are manufactured, southern California. 

Smog Armor is made in Florida and uses zeolite (similar to ECOS Paints), which adsorbs VOCs and carbon dioxide, too.  It does not release them back into the environment and remains active for about 5 years.  It’s currently only available for commercial projects, but we can see the market for these types of paints expanding. 

Even Sherwin-Williams has picked up on this market.  Its SuperPaint with Air Purifying Technology ($75 per gallon) is mold and mildew inhibiting, zero VOCs, and helps reduce V.O.C. levels from potential sources like carpet, cabinets and fabrics and works to reduce unwanted household odors.  It’s also GreenGuard Gold Certified, but it is a latex paint, so those with latex allergies should be advised. 

Paints that incorporate Corning Guardiant, a finely milled glass-copper powder, harness the power of copper as an antimicrobial shield for their walls.  These include PPG Copper Armor (starting at $47/gallon) and Behr Copper Force (starting at $35/gallon), both available at Home Depot in a wide selection of colors.  Copper Force is Greenguard Certified, works to continuously kill 99.9% of viruses (SARS CoV-2 and Feline calicivirus) and bacteria (Staphylococcus aureus and Pseudomonas aeruginosa) on your painted surfaces within 2 hours of exposure, for up to 6 years as long as the paint film integrity is maintained.   Copper Armor “kills 99.9% of S. aureus (staph), P. aeruginosa, K. aerogenes as well as MRSA, Enterococcus faecium, E. coli O157: H7, Salmonella enterica and viruses norovirus (feline calicivirus) and SARS CoV-2 within 2-hours of exposure when used as part of a comprehensive infection control program for up to 5-years.”

Although Airlite is an Italian company and mostly available overseas, I thought I would tell you a little about their technology, because it seems different than the other paints presented.  “Airlite uses the energy of light to generate a small concentration of electrons on the surface on which it is applied. These electrons interact with water and oxygen present in the air to generate negative ions. When the air comes into contact with the wall on which Airlite is applied, the ions present near the surface interact with the polluting molecules and transform them into water-soluble, invisible and harmless mineral salts.”  The company has partnered with a number of artists and organizations to refresh and create outdoor murals, in order to reduce outdoor pollution as well.  The efficiency of the Airlite properties are guaranteed for 10 years; as long as there is light and humidity in the air, the benefits of Airlite will be active.  With its negative ions, Airlite also destroys viruses, bacteria, and mold at its surface, and repels dust and dirt. It’s a radiant reflector, with a saving of electricity for air conditioning between 15 and 30%.  Brilliant!

A fresh coat of paint has long been uplifting to our eyes and moods, but with these added technologies, these benefits are going beyond aesthetics to better health…making it easier to live in a polluted world.  Every little bit helps!

Unseen Toxins Really Do Affect Us: 3 Disturbing Headlines

Unseen Toxins Really Do Affect Us: 3 Disturbing Headlines

While scanning the “Indoor Air Pollution” headlines, I recently came across three that caught my eye.  In the US, consumers have access to an amazing number of products manufactured everywhere in the world.  In stores and online, we can purchase virtually everything from nutritional supplements and cosmetics to home decor to automotive parts.  What are all these products made of?  Unless its a food–and even some food ingredients are kept secret–most components are undisclosed.  This wonderful banquet of products is coming back to bite us, the consumer.  Here is what I found.

  1. Uterine fibroid growth activated by phthalates, chemicals found in everyday products

I’ve written about phthalates before, and in today’s society, it’s very difficult to avoid them.  According to the National Institute of Health, Phthalates are a family of man-made chemical compounds developed in the last century to be used in the manufacture of plastics, solvents, and personal care products. They are colorless, odorless, oily liquids that do not evaporate easily and do not chemically bind to the material they are added to. The everpresent use of phthalates as an additive to PVC (polyvinyl chloride) products to make them flexible and to personal care products to make fragrances last longer in the past 50 years has resulted in widespread general population exposure.

Some examples of phthalate use is in vinyl shower curtains, plastic toothbrushes, plastic food storage containers, plastic wrap, nail polish, perfume, shampoo, lotions, scented cleaning products, vinyl gloves…(toxicfreefuture.org) The list is long and chances are that unless you work very diligently to exclude them, your home has many sources of phthalates in it.  This chemical is not banned in the US. 

Although there have been many studies on what phthalates do to animals, human data is less common.  For the first time, scientists at Northwestern Medicine have demonstrated a causal link between environmental phthalates (toxic chemicals found in everyday consumer products) and the increased growth of uterine fibroids, the most common tumors among women. Up to 80% of all women may develop a fibroid tumor during their lifetime, Bulun said. One-quarter of these women become symptomatic with excessive and uncontrolled uterine bleeding, anemia, miscarriages, infertility and large abdominal tumors necessitating technically difficult surgeries.  The new study found women with a high exposure to certain phthalates such as DEHP (used as a plasticizer to increase the durability of products such as shower curtains, car upholstery, lunchboxes, shoes and more) and its metabolites have a high risk for having a symptomatic fibroid. (sciencedaily.com)  To put it in perspective, one quarter of 80% is equal 20% of women (1 out of 5 women) will have a symptomatic fibroid, causing a lot of pain and/or health problems.  This is significant–and all because phthalates are used as an ingredient in many, many products.  Women in reproductive age seem to be more exposed to phthalates than men, probably due to the use of cosmetic and personal care products.  (National Institute of Health)

  1. In utero exposure to flame retardants increases anxiety symptoms in adolescents

Let’s start with what these flame retardant chemicals are.  Polybrominated diphenyl ethers (PBDEs) were used as flame retardants for products like furniture foam padding, wire insulation, rugs, upholstery, computers and appliances. Exposure to PBDEs during early brain development has been associated with cognitive deficits, reduced language skills and attention-deficit/hyperactivity disorder, and the chemicals were banned in the United States in 2004, but realistically, they were probably not completely eliminated from products until several years later.   

The article describes a study which enrolled 468 pregnant women in the Greater Cincinnati region from 2003-2006 and continued to follow up with their children up to 12 years later.  Blood samples from their pregnancies were correlated with test results of the adolescents.  The tragedy of the results is that each time the PBDE levels doubled in a pregnant mother's blood sample was associated with increased anxiety scores in the adolescents, suggesting PBDE exposure during pregnancy may be a risk factor for developing anxiety symptoms in early adolescence.

The children who were affected by PBDEs are now in their teenage years and older.  They are entering highschool, college or starting a career, and may have no idea why they suffer from these problems, now including depression and anxiety.  It’s tough enough to be a young person nowadays without hidden chemicals that affect your brain and hormones!  

  1. Neurotoxicity of Ortho-Phthalates: Recommendations for Critical Policy Reforms to Protect Brain Development in Children

Although the PBDE class of chemicals has been banned, phthalates are still around and also have negative effects on children.  The strongest associations have been found with hyperactivity, aggression, defiance, emotional reactivity, delinquent behaviors and other signs of attention deficit hyperactivity disorder, or ADHD, after exposure to phthalates, according to Project TENDR, a unique collaboration of leading scientists, health professionals and children’s and environmental advocates. (CNN.com)  

Phthalates are readily transferred from mother to fetus during pregnancy (study published by the National Institute of Health), and soon after birth, babies continue their exposure through plastics all around them.  Plastic food containers and packaging, medical supplies and medication, personal care products and household cleaners, as well as building materials for homes all continue the barrage of phthalates on childrens’ neurological and other developing systems. Unfortunately, economically disadvantaged children and communities of color have been shown to have the highest exposures to these chemicals. 

Although the headlines seem depressing, there is some good news.  Because of the phthlates’ health risks, Congress overwhelmingly approved legislation that outlawed three of the most hazardous phthalates in children’s toys and products in 2008. (National Resources Defense Council)

Toxicfreefuture.org tested many samples of vinyl flooring in 2015, finding high levels of phthalates in them.  Armed with test data, this organization was able to convince many of the top retailers of vinyl flooring to exclude phthalates from these products, and within 3 years (2018), tests of the same types of flooring showed no detectable levels of phthalates.  There’s hope!

If you are concerned about phthalates for yourself or your family, this article is an excellent place to start.  Written by an environmental scientist who takes her own advice, you can avoid some of the negative health outcomes from phthalates just by knowing what to look for in the products we use.  It’s worth a shot to protect yourself and your children!

What’s hiding in that pallet wall?

What’s hiding in that pallet wall?

Another embarrassing but true story:  

Once upon a time in New Orleans, I rehabbed a house that was gutted post-Katrina.  In a neighborhood built in the 1950’s, I took down a few walls and set about making this little 1500 square foot home into my Pinterest dream.  No matter that the sloping floors would make a soup can roll from front door to back with no effort and amazing speed; all of the reclaimed furniture and materials available at that time were more than sufficient to supply the ideas that came into my head.  Some of my favorite places to go were the local “Green Project” or Habitat for Humanity stores.  Green Project had a small lumber yard of reclaimed wood and salvaged architectural pieces.  I don’t know whether I found this particular piece of wood there, or from the side of the road, but it looked perfect. 

My carpenter had framed in split-level bar countertops on either side of the newly opened-up kitchen, and to keep the cost of countertops low, I decided that the top of the bar would be reclaimed wood.  The chunk of wood I found was long enough for both tops, and the color of dark chocolate, a perfect contrast to the cream-colored kitchen.  I cut the pieces, sanded the edges, coated them with a few layers of varnish and set them outside to dry for a week or so.  Time to install!  They looked beautiful.

Throughout processing this wood, I did notice a “smell”.  It didn’t seem too strong, probably because I was doing the cutting, sanding and painting outside.  But soon after I installed it inside, the headaches started.  I had a constant strong headache most days for a week, until I made the connection and removed the wood.  Bingo!  Problem solved.  This was probably a decade before home VOC-testing equipment was available, but my brain and respiratory system was telling me that this wood was poisonous. Looking back, it was probably treated with creosote, which gave it the (beautiful!) dark brown color.  Creosote is derived from the distillation of tar from wood or coal and is used as a wood preservative. Pesticide products containing creosote as the active ingredient are used to protect wood used outdoors (such as railroad ties and utility poles) against termites, fungi, mites and other pests. (epa.gov) The EPA has also determined that coal tar creosote is a probable human carcinogen (over longer exposure periods).  Thankfully, I was the only one in the household who seemed to be affected.  

I’m still a fan of reclaiming wood and other materials, but I’m a little more cautious nowadays.  That’s the major drawback to most reclaimed wood: you just don’t know its history.  Whether it’s been soaked in smelly chemicals like creosote, or sprayed with non-odorous pesticides, or just sitting outside accumulating mold and insect droppings, it has a mysterious history that you may or may not be able to neutralize when you “reclaim” it.  Following are the main dangers of using some (not all) reclaimed wood (cdawood.com) indoors.  

  • Like my experience above, reclaimed wood that has been treated with harsh chemicals, like paints or stains, or contains VOCs (volatile organic compounds), can release toxins into the air.  Unlike my experience, you may not always smell these VOCs or toxins, which is a “silent” risk.

  • Wood is quite a porous material.  Mold and mildew can be hiding in the crevices of the wood, especially reclaimed wood that has a lot of “character” (read: cracks, knots and grains).  Mold and its toxic byproducts, mycotoxins and MVOCs, can make you quite sick and even spread to other parts of your home via dust and spores.  

  • You could bring pests inside.  Anyone who’s lived in the southeastern US would be familiar with termites, possibly carpenter bees, and maybe carpenter ants.  These are all wood-loving pests that can hitch a ride into your home inside of the lovely reclaimed wood.  They generally exit or die when the wood is agitated or dried out.  But have you heard of powder-post beetles?  These tiny pests can spread to other wood furniture and even the framing of your home, reducing the wood to “powder”.  Imagine losing your grandma’s precious antique dresser, or your kitchen floor joists, to these destructive pests because you decided to “reclaim” some wood for a table top: not a good trade-off!

If part of the reason to use reclaimed wood is “saving money” (one of my original reasons for creating those bar tops), are you really saving if one or more of these problems surfaces because of using it?  Here are a few ways to be more cautious with reclaimed wood: (Brunsell.com)

  • Consider the source: Grocery store palettes are likely to have been in close contact with food, so they run a higher risk of having bacteria (from spills), so don’t use them indoors.

  • Check for signs of how the wood has been treated: Know if and how the wood’s been treated. Heat-treated wood, also known as kiln-dried wood, is generally marked with an “HT.” In terms of your health, HT wood is preferable to chemically treated wood. You forgo the chemicals, and the heating kills off bugs. 

  • Consider the end-use of the wood:  If it will be in close contact with children, pets or food, it’s best to use new, untreated wood and opt for non-toxic finishes (like the paints and stains we mention in this article). 

If your gut says, I don’t know about this piece of wood, it might be best to listen to your gut!   Manufacturers have honed in on the reclaimed trend and created vintage looking wood and furniture from new materials.  

  • CdA Wood in Coeur d’Alene, Idaho is one such company that has the slogan “Barn wood but better”.  They take new untreated wood and make it look like old barn wood without paints or stains, using a patented “Xcelerated” process.  In the words of the VP, they “age wood indoors without using paints or stains”.  

  • Another company that values indoor air quality is EarthPaint.net.   All of their coatings are non-toxic, so you can start with new wood and get a fabulous aged finish without VOCs, mold, toxins or pests.   

  • Here’s a slew of ways you can add “character” to new wood with tools and a little elbow grease; just substitute non-toxic finishes for the stains used in the last few slides.

  • Did you know that charred wood naturally resists water, pests and further aging?  Developed by the  Japanese, Shou sugi ban is the art of preserving and finishing wood using fire.  Cedar wood works best for shou sugi ban because of its natural chemical properties, but you can also use shou sugi ban on pine, hemlock, maple, or oak.  This article tells you a little about the history and how to DIY your own burnt wood!  EarthPaint.net also has “Special Linseed Oil” similar to what is used in the article.  I’ve personally used shou sugi ban on some wood supports for my shower curtain, as well as an outdoor table. 

At HypoAir, we aim to bring the best of the outdoors inside.  We’re very selective, though, to make sure that hidden pollutants or pests don’t slip in with the good stuff…and with vigilance you can be too.  It’s time to raise the bar on reclaimed wood, to make it as healthy as it is beautiful!

Start Thinking Like a Home Inspector

Start Thinking Like a Home Inspector

If you own a home, you need to learn to think like a home inspector.  A home is a great investment, but if the outside elements start to penetrate the building envelope, your great investment can start to deteriorate and become toxic!

Sometimes, after an especially hard rain, there is a different smell in my house.  This tells me that rain is probably going where it shouldn't. According to commonsensehome.com, a natural home website, the first spots to check are the roof and attic, especially around any roof penetrations like chimneys and vent lines.  

Recently one morning after such a rain, I went in earnest search of leaks inside to find the source of the musty smell.  Not finding anything in the attic, I went to the room where the smell was the strongest, the laundry room.  I checked areas around the windows because there were shelves in front of them, hiding any potential damp spots.  Uh-oh– a couple of the windowsills were wet, indicating that more of the not-so-old (10 years) windows were leaking.  I checked the corner above which there was a valley in the roof (roof valleys can be a source of leaks in a hard rain if they are improperly installed/sealed).  Thankfully all the walls were dry.

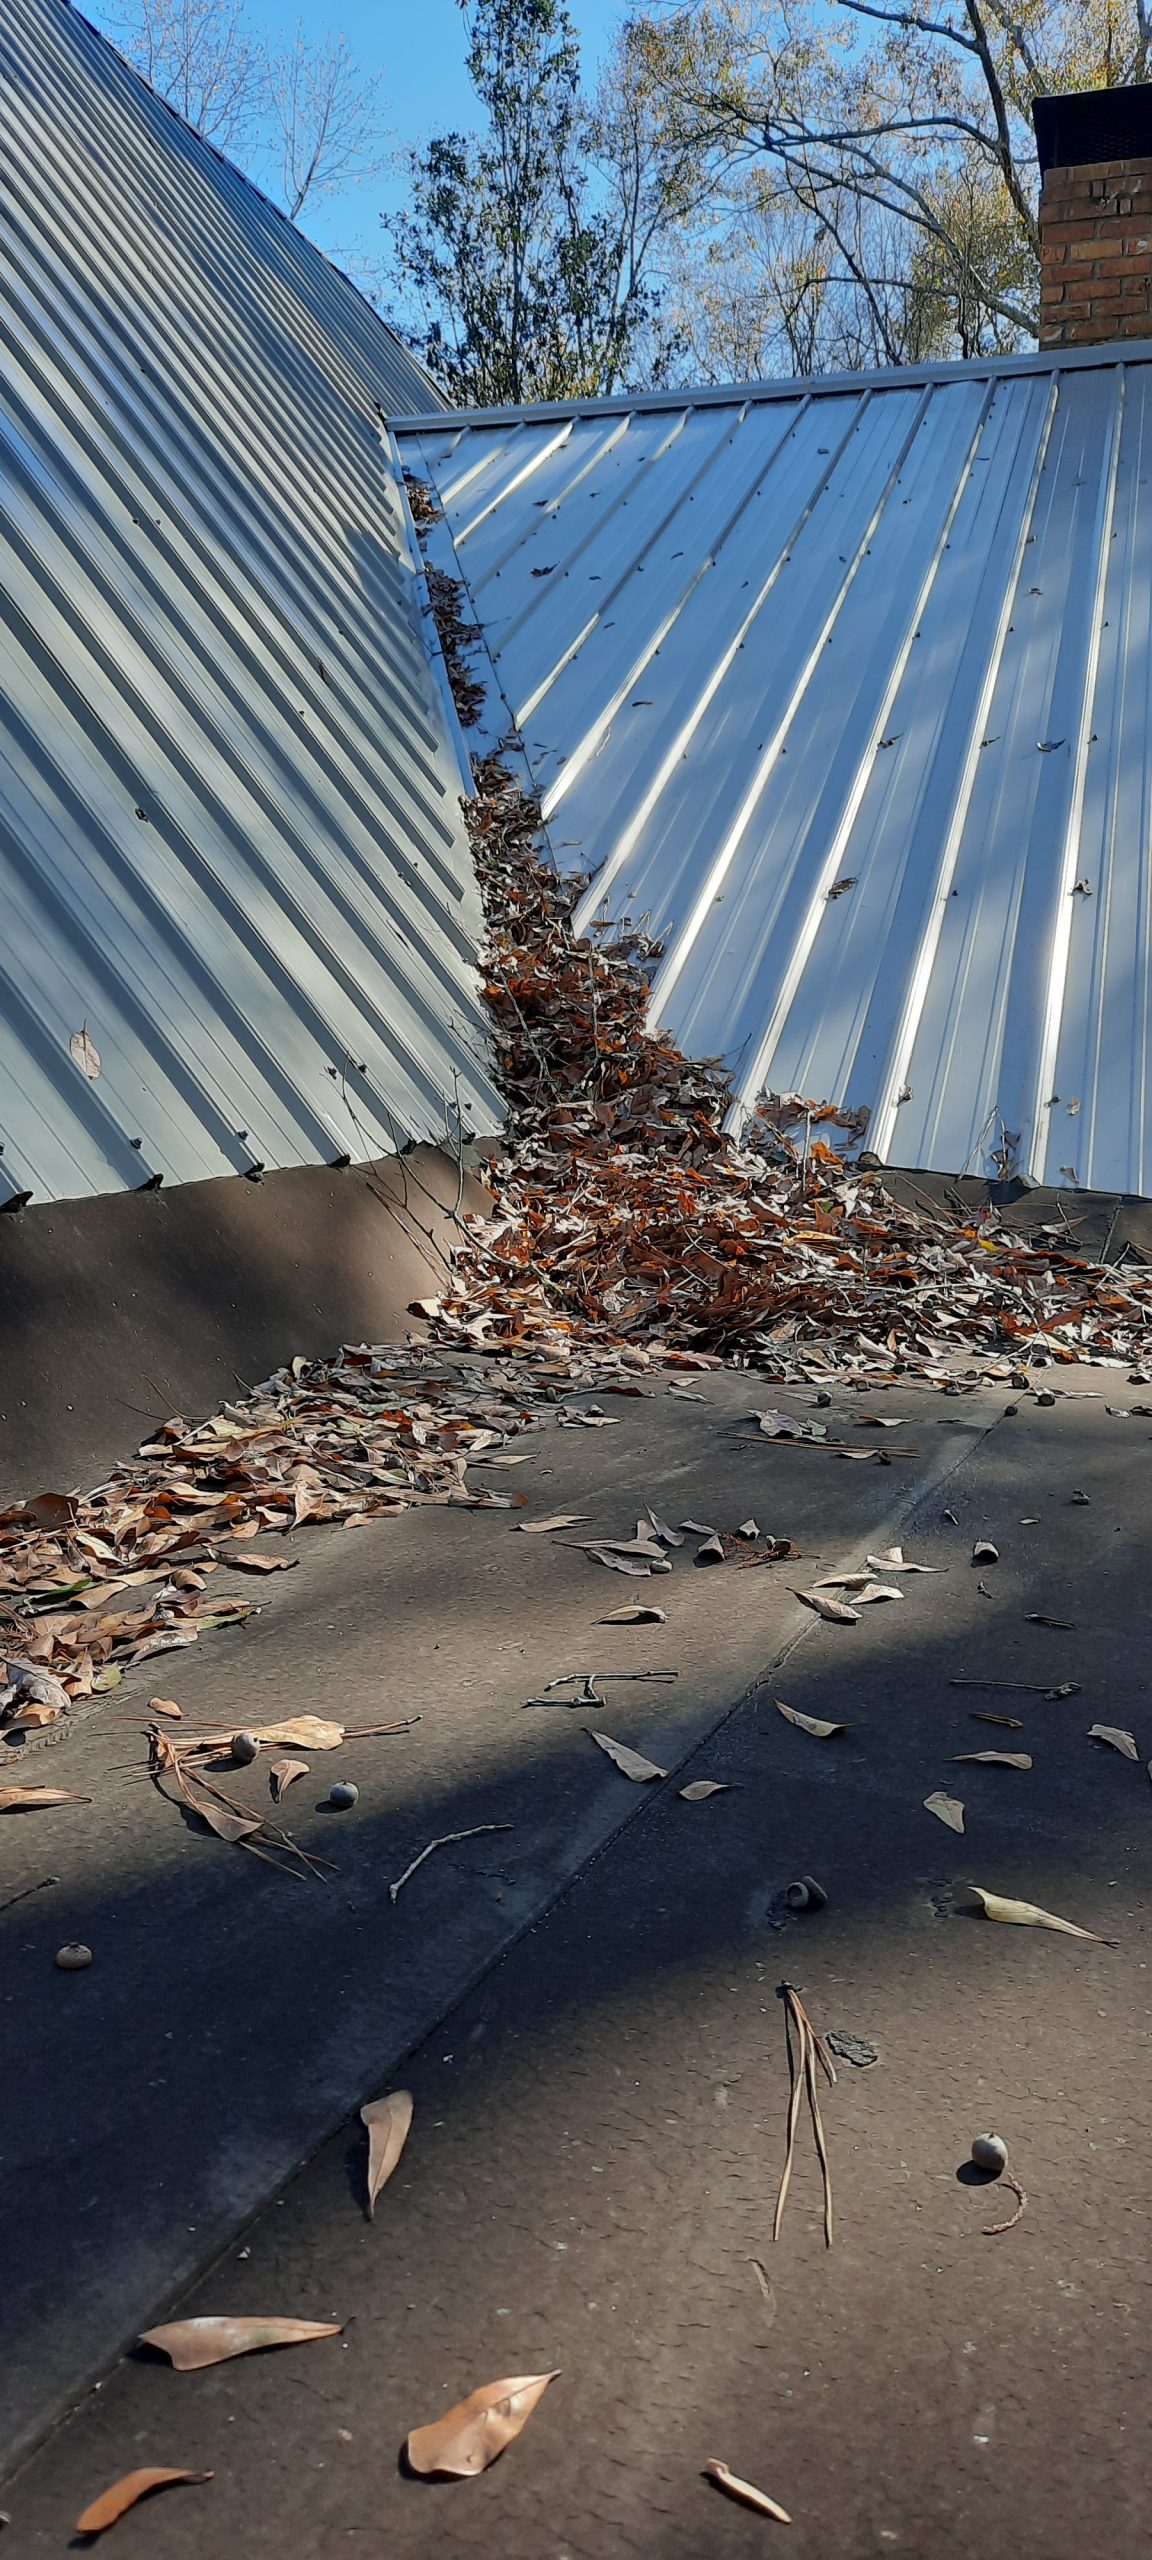
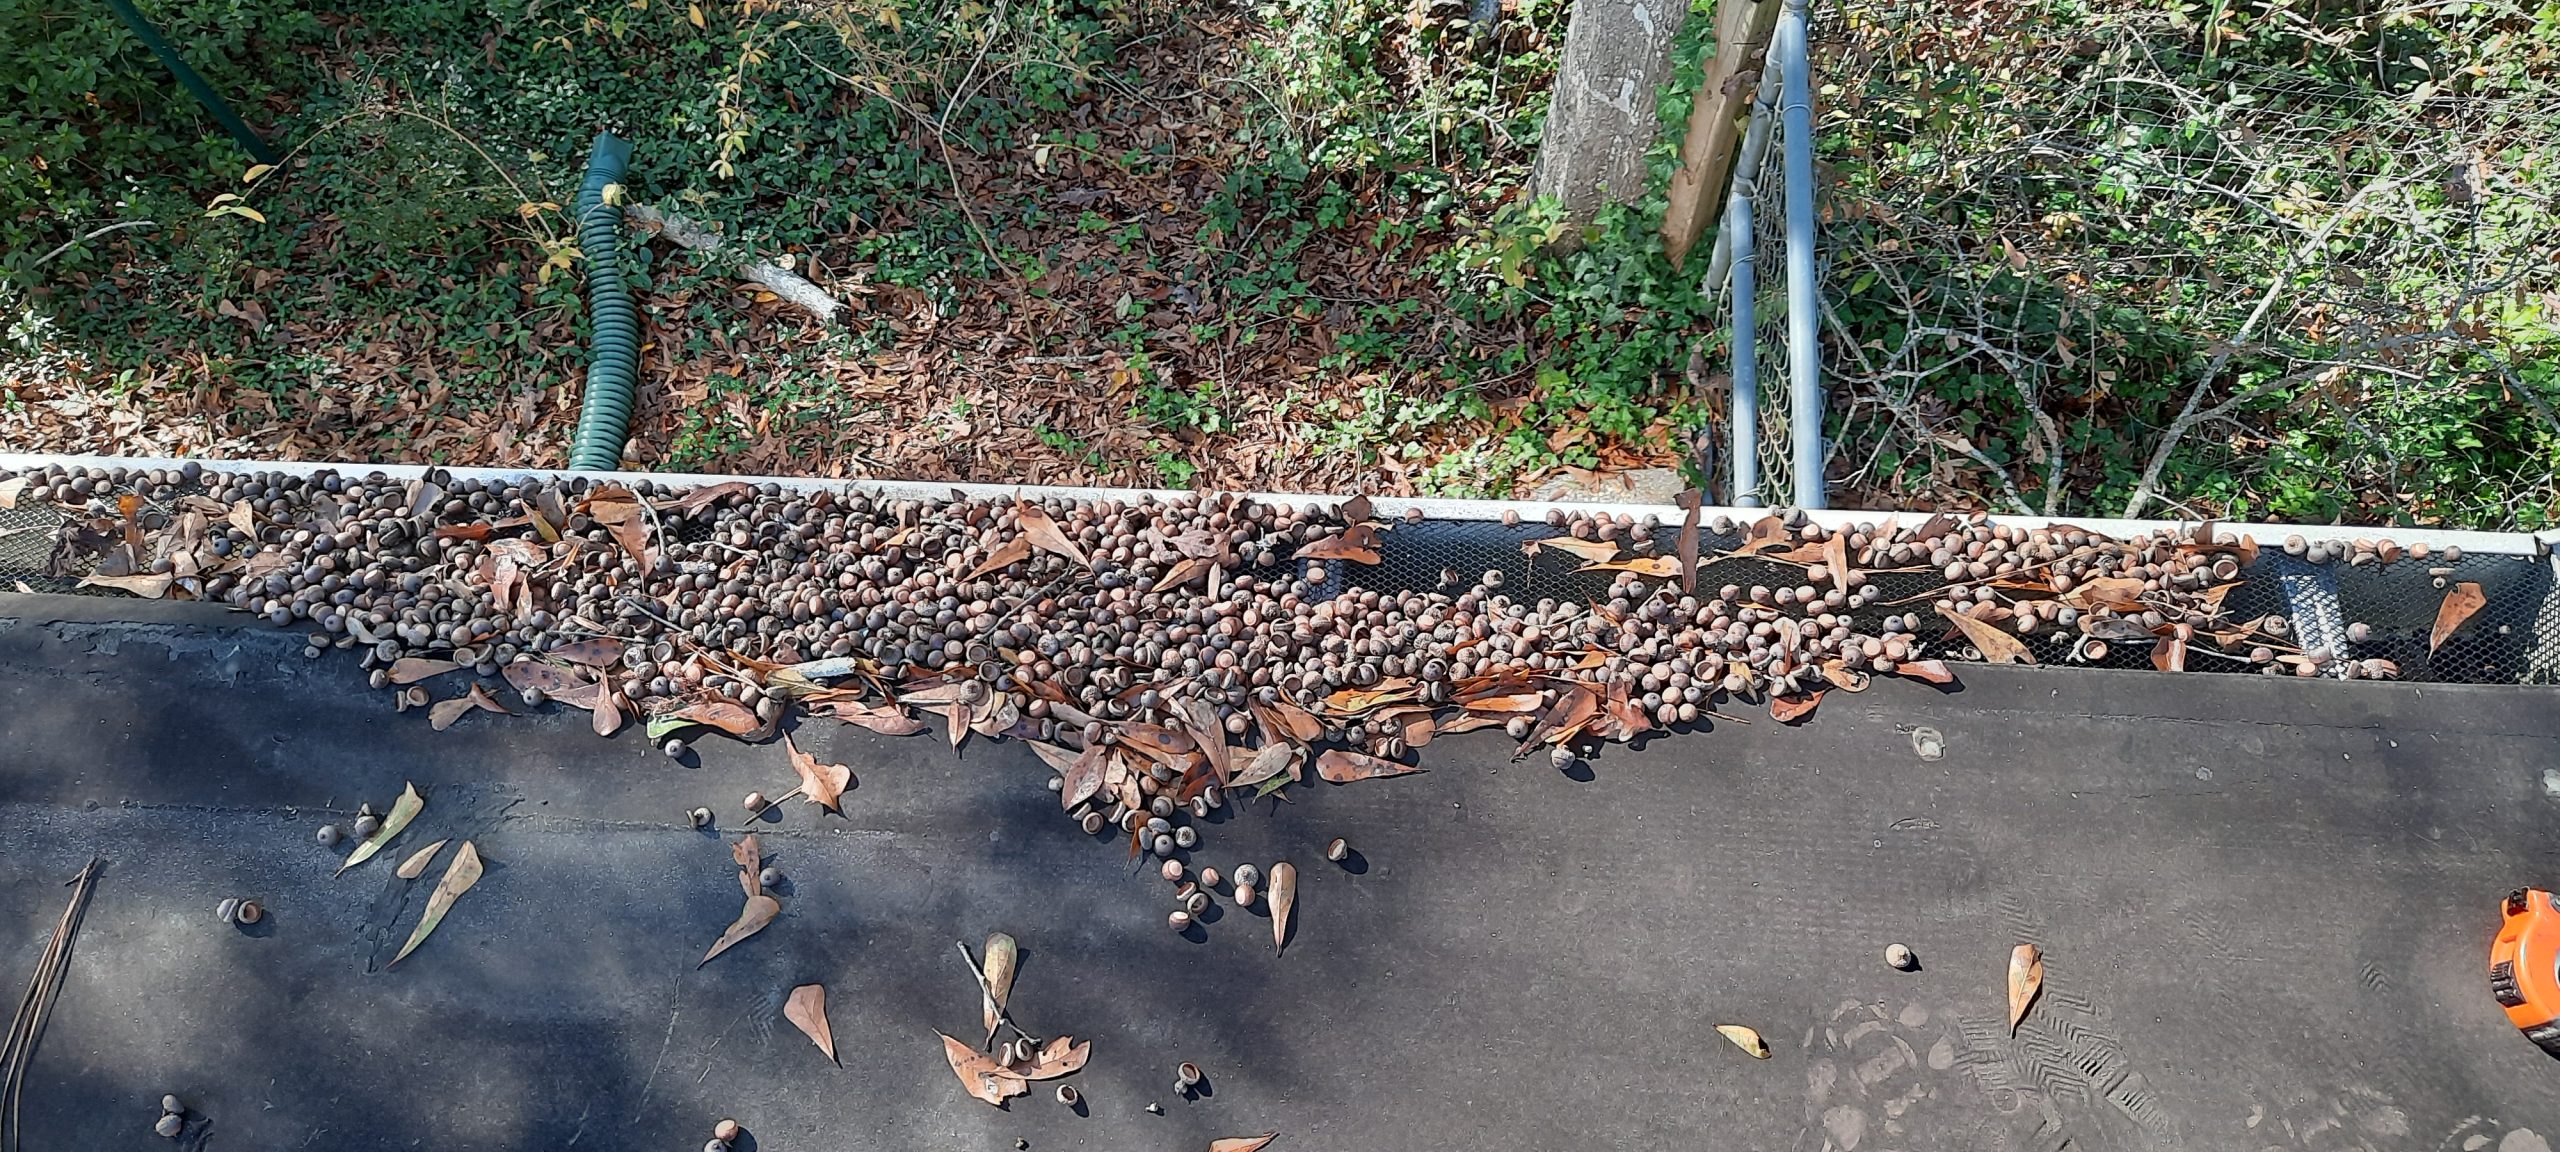
There was a gutter outside this room, and I knew from past experience (rain during the daytime), that the volume of water flowing off the roof seemed to be too fast or too much for this particular gutter, because it would shoot right over the side and pour down next to the wall.  Thinking about it, I went up onto the flat portion of the roof over the laundry room.  There were no big branches or breaks in the flat roof, but a lot of leaves and acorns were up there!  Time to get to work with the broom or leafblower, and I removed a section of the leaf guard over the gutter to clean out the gutter.  I checked to see that the downspouts were clean.

Next, I looked up to see if there were any wet spots behind or below the gutters (this only works after the sun has been out for a bit).  Thankfully, that was not the case.  Looking down the walls, I saw that there were a lot of wet leaves piled up around the foundation.  Wet leaves around the foundation do not just cause a musty smell in the house.  They can allow insects like carpenter ants and termites to come in, using the leaves as a shield to keep their tunnels moist.  I got to work with the leafblower.  

Rain can seep into basements and crawlspaces, so if I had a  basement, I would check the walls for seepage.  Bring a bright light, gloves, and if necessary a respirator (basements can be dusty!) to make sure that you don’t leave any corners/spots hidden from view; try to move any stored boxes to get a peek at every square foot of wall.  It was only after moving some storage shelves in front of the laundry room windows that I discovered the leaking windows. (Crazy, I know, my goal is to build some cabinets so that the windows will not be covered up!)

If you can't find the source of the problem, reach out to a well-reviewed professional home inspector in your area.  Remember, professional home inspection is a service dedicated to helping you find and live in healthy homes--not selling you other products or services.  You can find accredited home inspectors in your state at The International Association of Certified Home Inspectors (nachi.org).

There are a lot of good sites to help you get thinking like a home inspector.  Here are some that we’ve discovered and reference frequently.  Don't be shy about contacting them with questions!  

  • Inspectapedia.com: This website must have THOUSANDS of pages, but the “search” function is great, the website hosts answer questions very promptly (within 48 hours), and there is feedback from many homeowners and experts alike.  Highly recommended!
  • Homeinspectorsecrets.com: Created by a home inspector, this site has a lot of guides about a variety of subjects.
  • Familyhandyman.com: This website contains step by step instructions to correct any problems you may find around your home, and reviews products as well.   
  • Thespruce.com: Although not technically about home inspection, this website contains a wealth of information on a variety of home improvement topics and often contains non-toxic, safer alternatives. Their Home Improvement Review Board is made up of licensed general and specialty contractors, journeyman electricians, and journeyman plumbers, so you know that you’re getting good advice.
  • Energyvanguard.com: This website is written by a building scientist and has an extensive blog, so you can understand the “why’s” of the best building practices.  He also frequently incorporates how he investigates and solves problems at his own home.